

Page 1
READ AND SAVE THESE INSTRUCTION
II
BREADMAKER
]
MODEL: ABM 2900
Page 2

IMPORTANT SAFEGUARDS
.~.
WHEN USING ELECTRICAL APPLIANCES, BASIC SAFETY PRECAUTIONS SHOULD
ALWAYS BE FOLLOWED, INCLUDING THE FOLLOWINGS:
1. Read all instructions carefully.
2. Do not touch hot surfaces. Use handles or knobs and a potholder.
Do not close or clog the steam vent openings under any circumstances.
3. To protect against electrical shock, do not immerse cord, plug, or any other part of this Breadmaker, in water
or other liquid.
4. Close supervision is necessary when any appliance is used by or near children.
5. Unplug the power supply cord when the appliance is not in use, or before cleaning.
Allow to cool before putting on or taking off any parts, and before cleaning the appliance.
6. Do not use or operate the appliance with a damaged cord or plug, or after the appliance malfunctions or has
been damaged in any manner.
7. The use of accessory attachments not recommended or sold by Welbilt may cause injuries.
8. Do not use outdoors.
9. Do not let the power supply cord hang over the edge of table or counter, or touch hot surfaces.
10. Do not place the appliance on or near heat sources such as gas or electric stove ovens, or burners.
11. Extreme caution must be given when moving an appliances containing hot contents or liquids.
12. To disconnect, press STOP, then remove plug from wall outlet. Grip plug and pull from wall outlet.
Never pull on the cord.
13. Do not use the Breadmaker for other than intended use.
14. Avoid contact with moving parts.
15. Do not pour any ingredients directly into the Breadmaker- only into the baking pan.
The baking pan must be in place to avoid electric shock.
16. Do not operate this appliance in the presence of explosive and / or flammable fumes.
17. This appliance is intended for household use only and not for commercial or industrial use.
18. To avoid damaging the machine, do not place the Baking Pan or any object on top of the unit.
19. Do not clean with scouring pads. The baking pan and kneading blade have a non-stick coating.
Refer to "Cleaning" section of this book.
20. Do not use Breadmaker for storage purposes nor insert any utensils, as they may create a fire or electric
shock.
SAVE THESE INSTRUCTIONS
1
I
i
1
j
,
1
i
j
Page 3
Your bread maker makes REGULAR Loaves of 1 lb. breads.
There are 11 settings, including one for dough.
A "Keep Warm" function prevents the bread from getting soggy by keeping finished bread
warm up to an hour after the baking is completed. This function stops when the unit is
turned OFF / STOP or unplugged.
An "add-ingredient" function signals with an audible tone when it is time to add ingredients
such as fruits or nuts to reCipes used with the Basic Breads (2-3) and Sweet (8) settings.
The signal tone comes on 32 minutes into the cycle (after initial kneading) so that your fruit
or nuts will remain whole rather than be chopped up by the Kneading Blade. If you use the
TIMER to delay baking, you may add all ingredients at once and bypass this function;
however, your fruit or nuts may get somewhat "chopped."
Do not cover the bread maker with towels or other material that may prevent steam from
escaping. Some steaming from vents is normal.
Do not place any objects on top of the bread maker.
Unplug the unit and wait until it cools, then remove any food substances from inside the
inner case of the Breadmaker by wiping with a damp sponge or cloth. See "Care and
Cleaning", page 13 for full cleaning details.
IMPORTANT: Always add ingredients in the order they are specified in the recipe. For best
results, accurate measuring of ingredients is very important.
Do not put larger quantities than recommended into the Baking Pan as it may produce poor
results and may damage the bread maker.
2------------------
Page 4
BEFORE FIRST USE
Enjoy using your Welbilt Automatic Breadmaker. Before first use, please take a few minutes to read this Operating
Instruction / Cookbook and to find a place to keep it handy for reference. Pay particular attention to the safety
instructions we have provided for your protection. Carefully unpack the Breadmaker and removeall'packaging
materials. To remove any dust that may have accumulated during packing, wipe the Baking Pan, Kneading Blade
and outside surface of the Breadmaker with a clean, damp cloth. Do not use scouring pads or any abrasives on
any part of the Breadmaker ..
GENERAL INFORMATION
Plug the cord into a 120 volt AC outlet. The cord length of this Breadmaker was selected to reduce the possibility
of tangling or tripping over a longer cord. If more cord length is needed use a UL certified extension cord rated no
less than 15 amperes and 120 volts. The longer cord should be arranged so that it will not drape over the countertop
where it can be pulled on by children or tripped over.
TABLE OF CONTENTS
OPERATING INSTRUCTION SECTION
Important Safeguards
Things You Should Know About Your
Breadmaker
Before First Use
Names Of Parts
Control Panel Settings And Functions
Setting Descriptions
How To Use Your Automatic Breadmaker
Bread and Dough Settings
Using the Timer for Delayed Completion
Slicing And Storing Bread
Care and Cleaning
COOKBOOK SECTION
Tips On Using Your Automatic Breadmaker
Knowing Your Ingredients
Measuring Your Ingredients
Ingredient Temperatures
Creating Your Own Yeast Breads
Other Tips
Special Glazes For Yeast Breads
RECIPE SECTION
Yeast Breads
Basic White Bread
100% Whole Wheat Bread
Pumpernickel Bread
Potato Bread
Caraway Rye Bread
Cracked Wheat Bread
Seven Grain Bread
Italian Herb Bread
Corn Bread
Cheese 'N' Onion Bread
Sour Cream Bread
Pesto Bread
Beer Bread
Dark Rye Bread
Sauerkraut Rye Bread
Irish Soda Bread
- -
2
3
4
5
6
7-10
7-9
10
10
11-12
13-17
13-16
16
17
17
17
17
18
18
18
18
18
19
19
19
19
19
19
20
20
20
20
20
French Bread
Cottage Dill Bread
Yogurt Bread
Honey Granola Bread
Chunky Nut Bread
Sunny Orange Bread
Raisin Bread
Mixed Fruit Bread
Peanut Butter Bread
Cranberry Nut Bread
Chocolate Bread
Banana Nut Bread
Russian Kulich
Dough Ilecipes
Sour Dough Starter
Sour Dough French
Bagels
Croissants
Pizza Dough
Layered Pizza Loaf
White Rolls
Wheat Rolls
Pumpernickel RQlls
Pretzels
Raspberry Braid
Hot Cross Buns
Jewish Challah Loaf
English Muffins
Doughnuts
Raisin Kolacky
Quick Bread
Jam
Baking Cycling Time
Need Help? (Questions and Answers)
Baking Tips Guide Introduction
Baking Tips Guide For Yeast Breads
Troubleshooting
Notes Call Time
20
21
21
21
21
21
21
22
22
22
22
22
22
23
23
23
27
24
24
25
25
25
25
26
26
26
26
27
27
27-28
28
29
30-32
32
33-34
35
36
3-----------------
Page 5
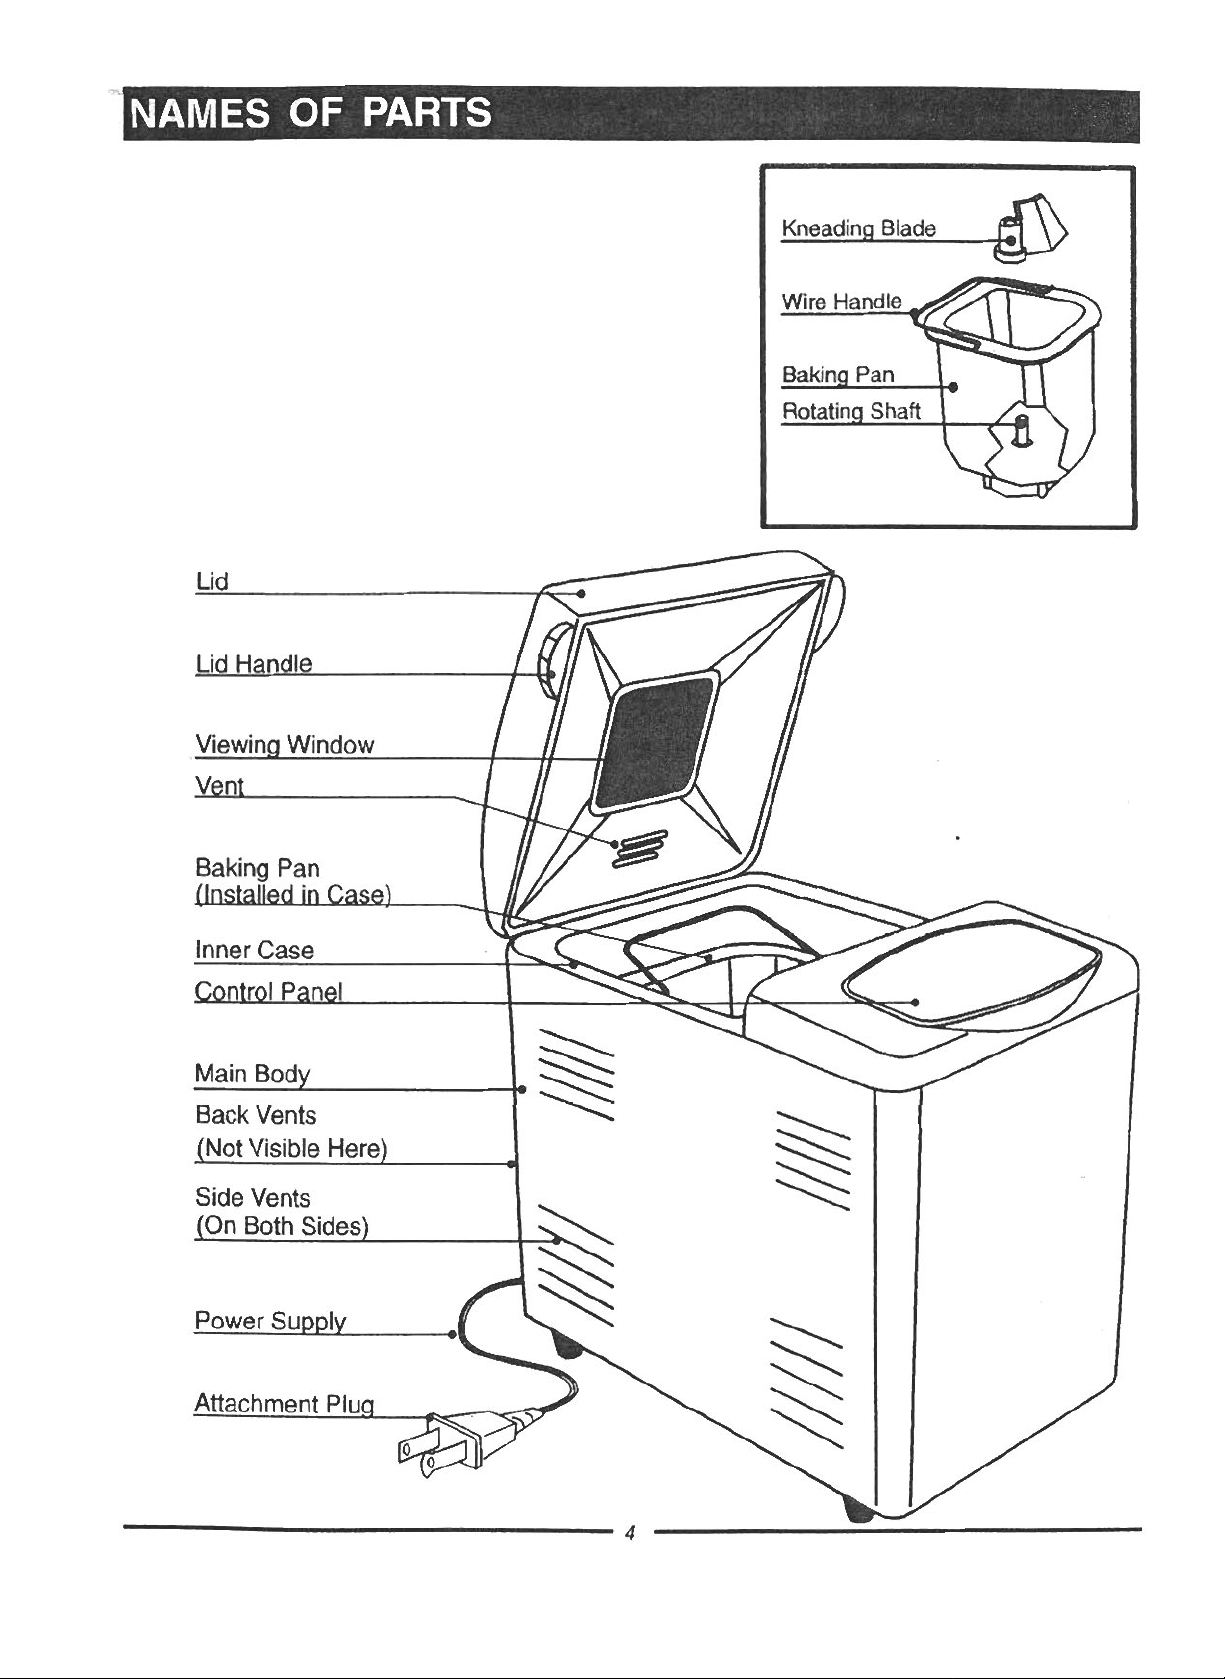
NAMES OF PARTS
Lid
Lid Handle
Kneading Blade
Wire Handle
Viewing Window
Ven
Baking Pan
Inner Case
Main Bod
Back Vents
Not Visible Here
,
Side Vents
On Both Sides
PowerSuQ.Q!y
Attachment Plu
4
Page 6

CONTROL PANEL SETTINGS & FUNCTIONS
WHOLE WHEAT
o liGHT
() REGULAR'
o RAPID
BASIC BREADS
o LIGHT
e REGULAR
o DARK
SPECIALTY
& FRENCH
o SWEET
o OOUGH
TIMER SET
~ CAKE
IQUICK BREADa. JAM
o
4) (3
NOTE: When using the touchpad controls, be sure to press the pad until you hear a beep .
-
-
Shows .• and T Arrows.
Arrows will move time up or down in 30-minute increment.
Shows one digit for the Setting Number (One of the numbers 1 to 11, depending on
Press to select the setting of your choice (number 1 thru 11- "1" for LIGHT, "2" for
Shows minute-by-minute baking time countdown.
Press to start operation or begin Timer countdown for delayed completion.
Press and hold until you hear a beep to stop operation or cancel a Timer setting.
STOP
TIMER
DISPLAY
SELECT
START
-
REGULAR, "3" for DARK, "4" for LIGHT Whole Wheat Bread, "5" for REGULAR Whole
Wheat Bread, etc. The selected setting automatically assigns the time needed tocomplete the process.
the setting you choose for a particular recipe).
..
-
-
Use when setting the TIMER to delay baking.
-
-
(Note: Do not press "STOP" when you are just checking the progress of our bread.)
.'
5-----------------
1
I
Page 7
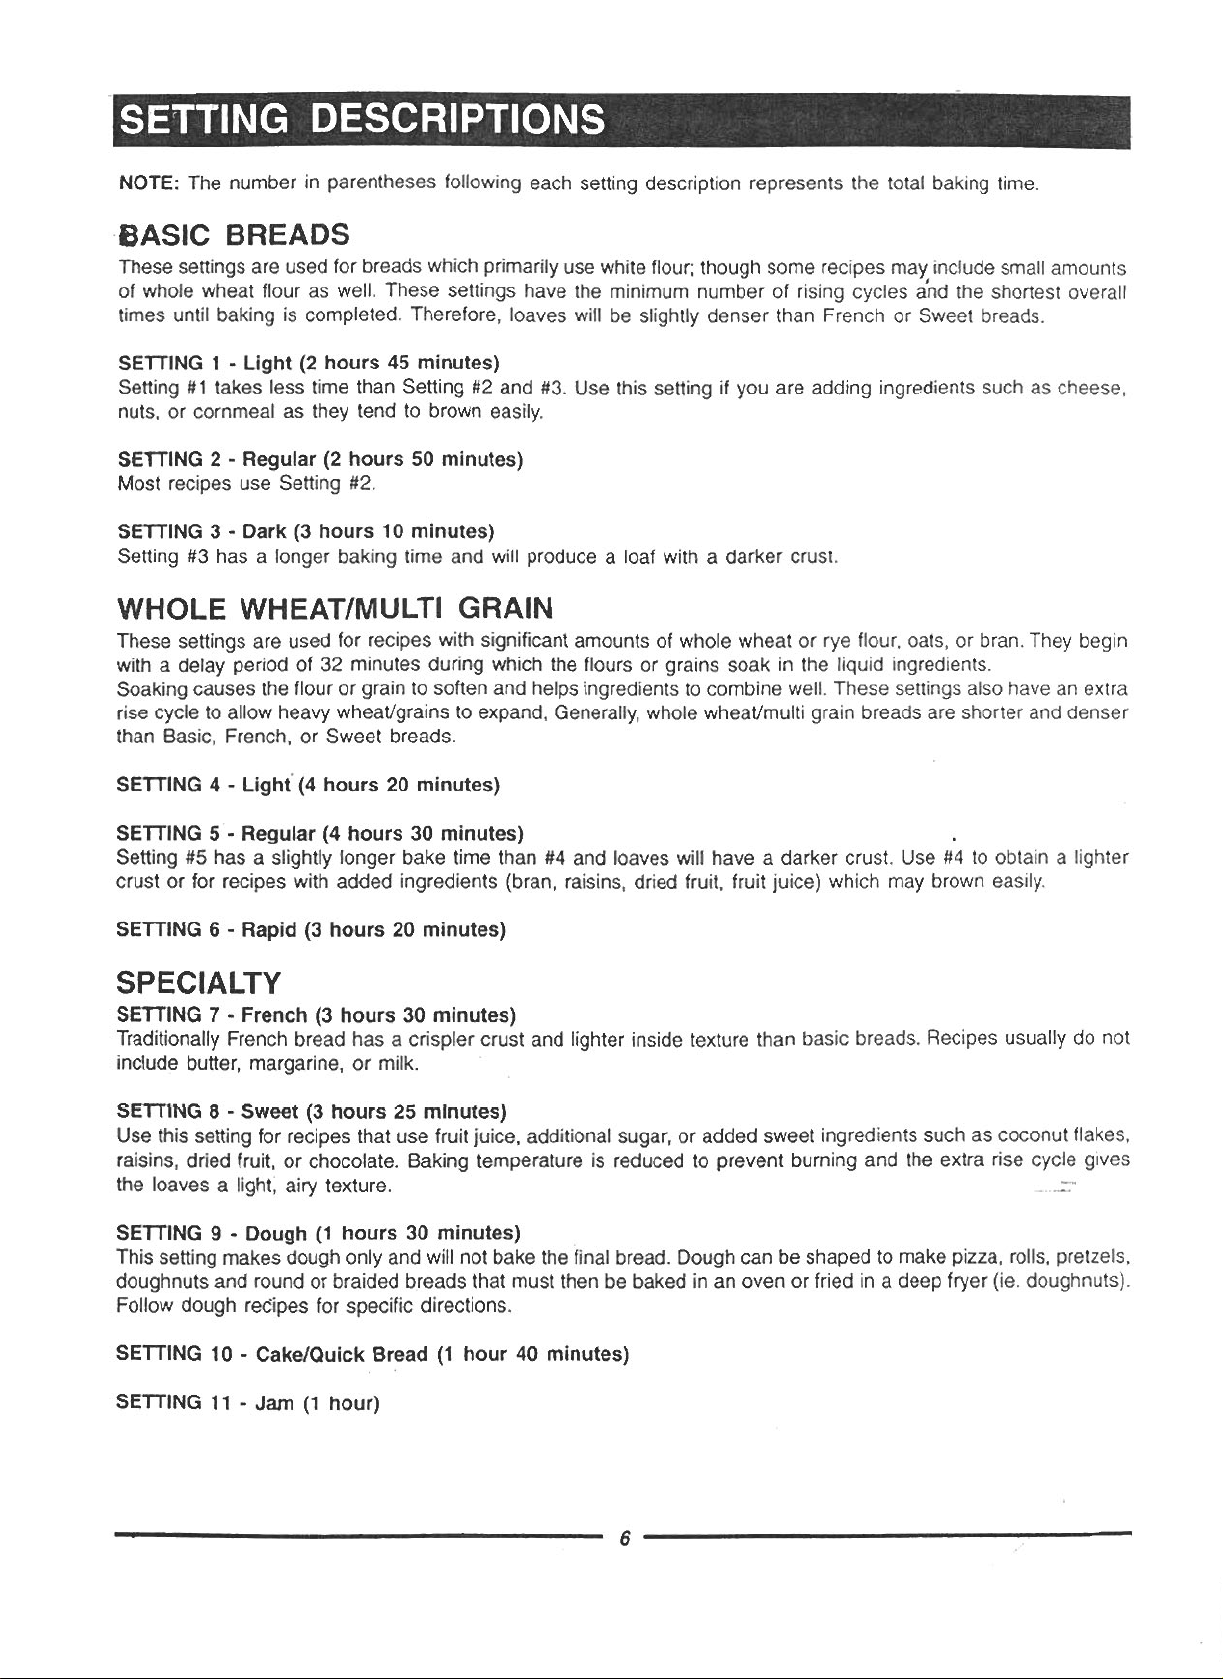
SETTING DESCRIPTIONS
NOTE: The number in parentheses following each setting description represents the total baking time.
SASIC BREADS
These settings are used for breads which primarily use white flour; though some recipes may include small amounts
of whole wheat flour as well. These settings have the minimum number of rising cycles a'nd the shortest overall
times until baking is completed. Therefore, loaves will be slightly denser than French or Sweet breads.
SETTING 1 - Light (2 hours 45 minutes)
Setting #1 takes less time than Setting #2 and #3. Use this setting if you are adding ingredients such as cheese,
nuts, or cornmeal as they tend to brown easily.
SETTING 2 - Regular (2 hours 50 minutes)
Most recipes use Setting #2.
SETTING 3 - Dark (3 hours 10 minutes)
Setting #3 has a longer baking time and will produce a loaf with a darker crust.
WHOLE WHEAT/MULTI GRAIN
These settings are used for recipes with significant amounts of whole wheat or rye flour, oats, or bran. They begin
with a delay period of 32 minutes during which the flours or grains soak in the liquid ingredients.
Soaking causes the flour or grain to soften and helps ingredients to combine well. These settings also have an extra
rise cycle to allow heavy wheat/grains to expand, Generally, whole wheat/multi grain breads are shorter and denser
than Basic, French, or Sweet breads.
SETTING 4 - Light"(4 hours 20 minutes)
SETTING 5 - Regular (4 hours 30 minutes)
Setting #5 has a slightly longer bake time than #4 and loaves will have a darker crust. Use #4 to obtain a lighter
crust or for recipes with added ingredients (bran, raisins, dried fruit, fruit juice) which may brown easily.
SETTING 6 - Rapid (3 hours 20 minutes)
SPECIALTY
SETTING 7 - French (3 hours 30 minutes)
Traditionally French bread has a crispier crust and lighter inside texture than basic breads. Recipes usually do not
include butter, margarine, or milk.
SETTING 8 - Sweet (3 hours 25 minutes)
Use this setting for recipes that use fruit juice, additional sugar, or added sweet ingredients such as coconut flakes,
raisins, dried fruit, or chocolate. Baking temperature is reduced to prevent burning and the extra rise cycle gives
the loaves a light, airy texture.
SETTING 9 - Dough (1 hours 30 minutes)
This setting makes dough only and will not bake the final bread. Dough can be shaped to make pizza, rolls, pretzels,
doughnuts and round or braided breads that must then be baked in an oven or fried in a deep fryer (ie. doughnuts).
Follow dough recipes for specific directions.
SETTING 10 - Cake/Quick Bread (1 hour 40 minutes)
SETTING 11 - Jam (1 hour)
6 /
Page 8
HOW TO USE YOUR BREADMAKER
The 8 bread settings in this unit will combine ingredients, knead, and make bread from start to finish automatically.
The DOUGH setting makes dough for a variety of recipes but you must shape and bake the dough yourself in an
oven. To delay completion, the automatic TIMER may be programmed to make bread ordough while you are at work
or asleep. (See "Using The Timer For Delayed Completion" pg. 10)
The Cookbook Section of this book includes recipes that have been thoroughly tested in WelbilfIDown test kitchens
to ensure best results. Recipes have been created by our staff home economists specifically for this Automatic
Breadmaker and may not produce acceptable results in other similar Breadmaker.
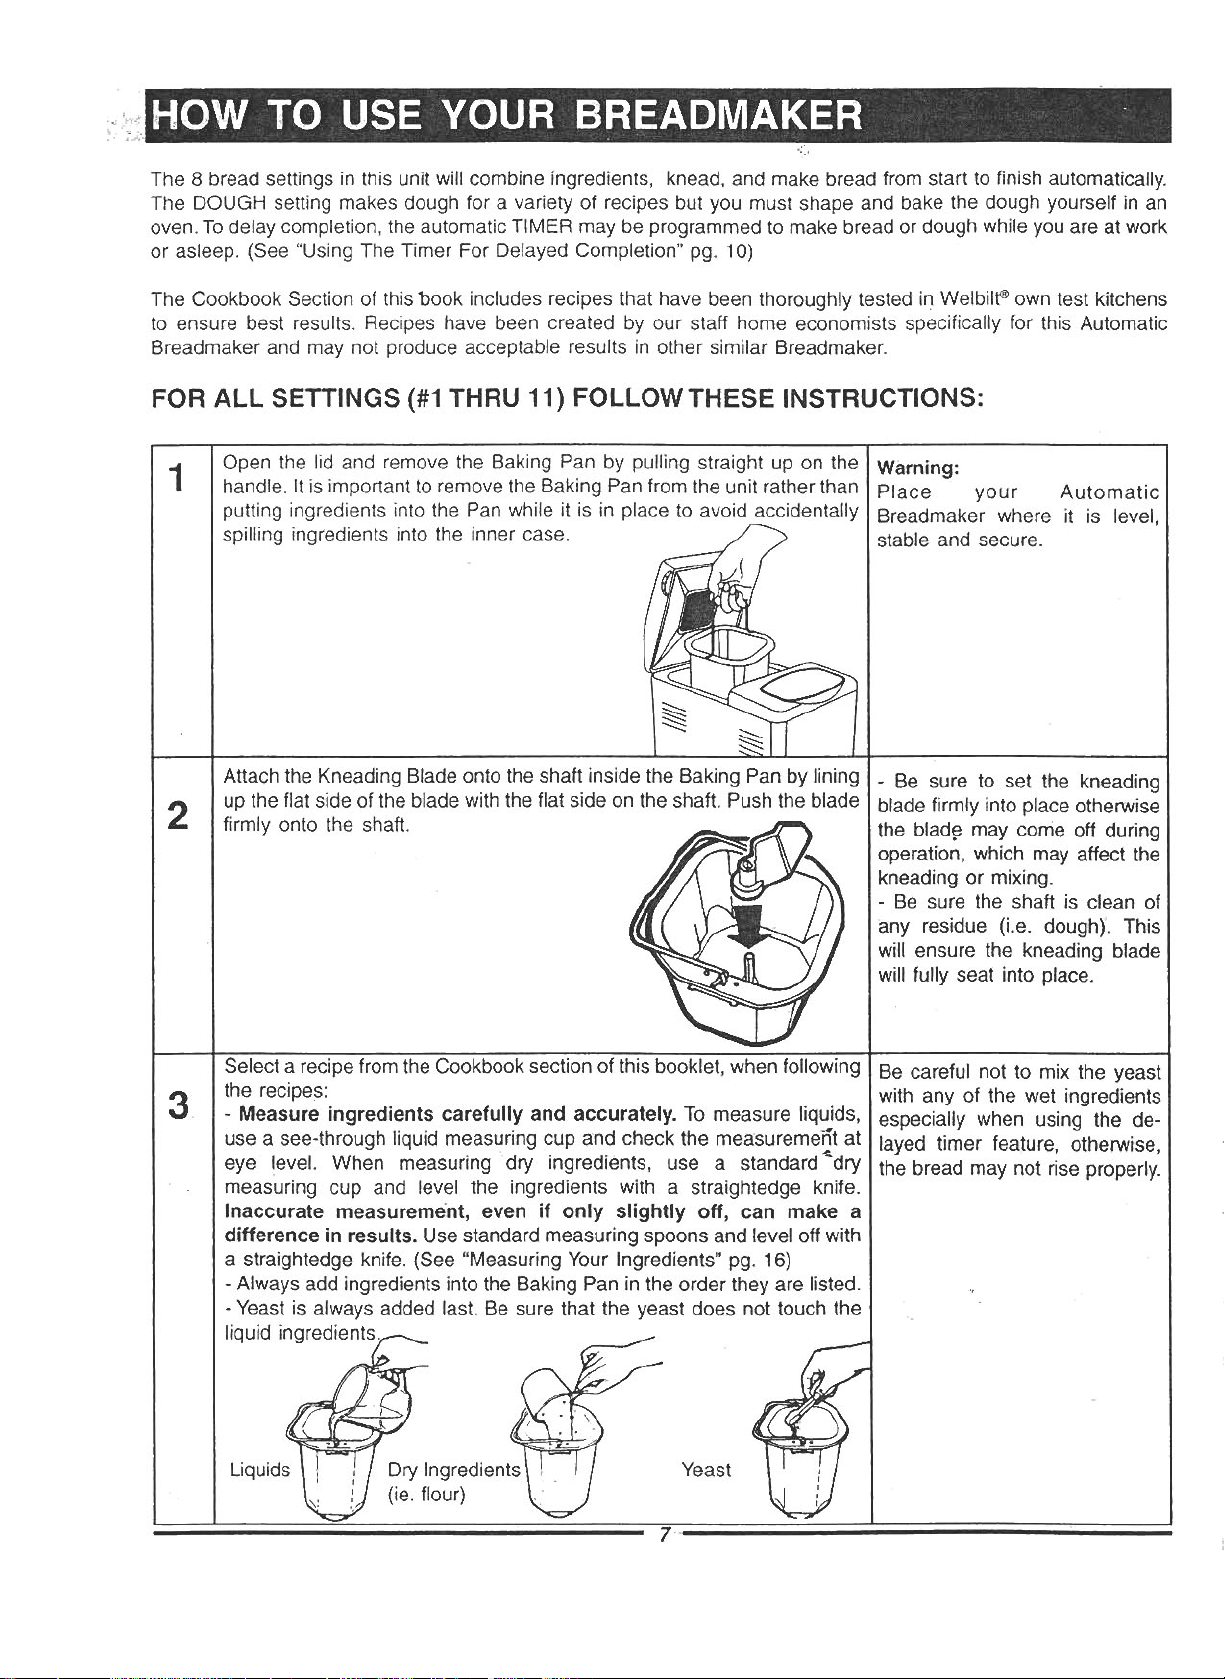
FOR ALL SETTINGS (#1 THRU 11) FOLLOWTHESE INSTRUCTIONS:
Open the lid and remove the Baking Pan by pulling straight up on the
1
handle. It is important to remove the Baking Pan from the unit rather than
putting ingredients into the Pan while it is in place to avoid accidentally
spilling ingredients into the inner case.
Attach the Kneading Blade onto the shaft inside the Baking Pan by lining
up the flat side of the blade with the flat side on the shaft. Push the blade
2
firmly onto the shaft.
Warning:
Place your Automatic
Breadmaker where it is level,
stable and secure.
- Be sure to set the kneading
blade firmly into place otherwise
the blad~ may come off during
operation, which may affect the
kneading or mixing.
- Be sure the shaft is clean of
any residue (i.e. dough). This
will ensure the kneading blade
will fully seat into place.
Select a recipe from the Cookbook section of this booklet, when following
the recipes:
3
- Measure ingredients carefully and accurately. To measure liquids,
use a see-through liquid measuring cup and check the measurement at
eye level. When measuring dry ingredients, use a standard~dry
measuring cup and level the ingredients with a straightedge knife.
Inaccurate measurement, even if only slightly off, can make a
difference in results. Use standard measuring spoons and level off with
a straightedge knife. (See "Measuring Your Ingredients" pg. 16)
- Always add ingredients into the Baking Pan in the order they are listed.
- Yeast is always added last. Be sure that the yeast does not touch the
liquid ingredients.
Yeast
7'-----------------
Be careful not to mix the yeast
with any of the wet ingredients
especially when using the de-
layed timer feature, otherwise,
the bread may not rise properly.
Page 9
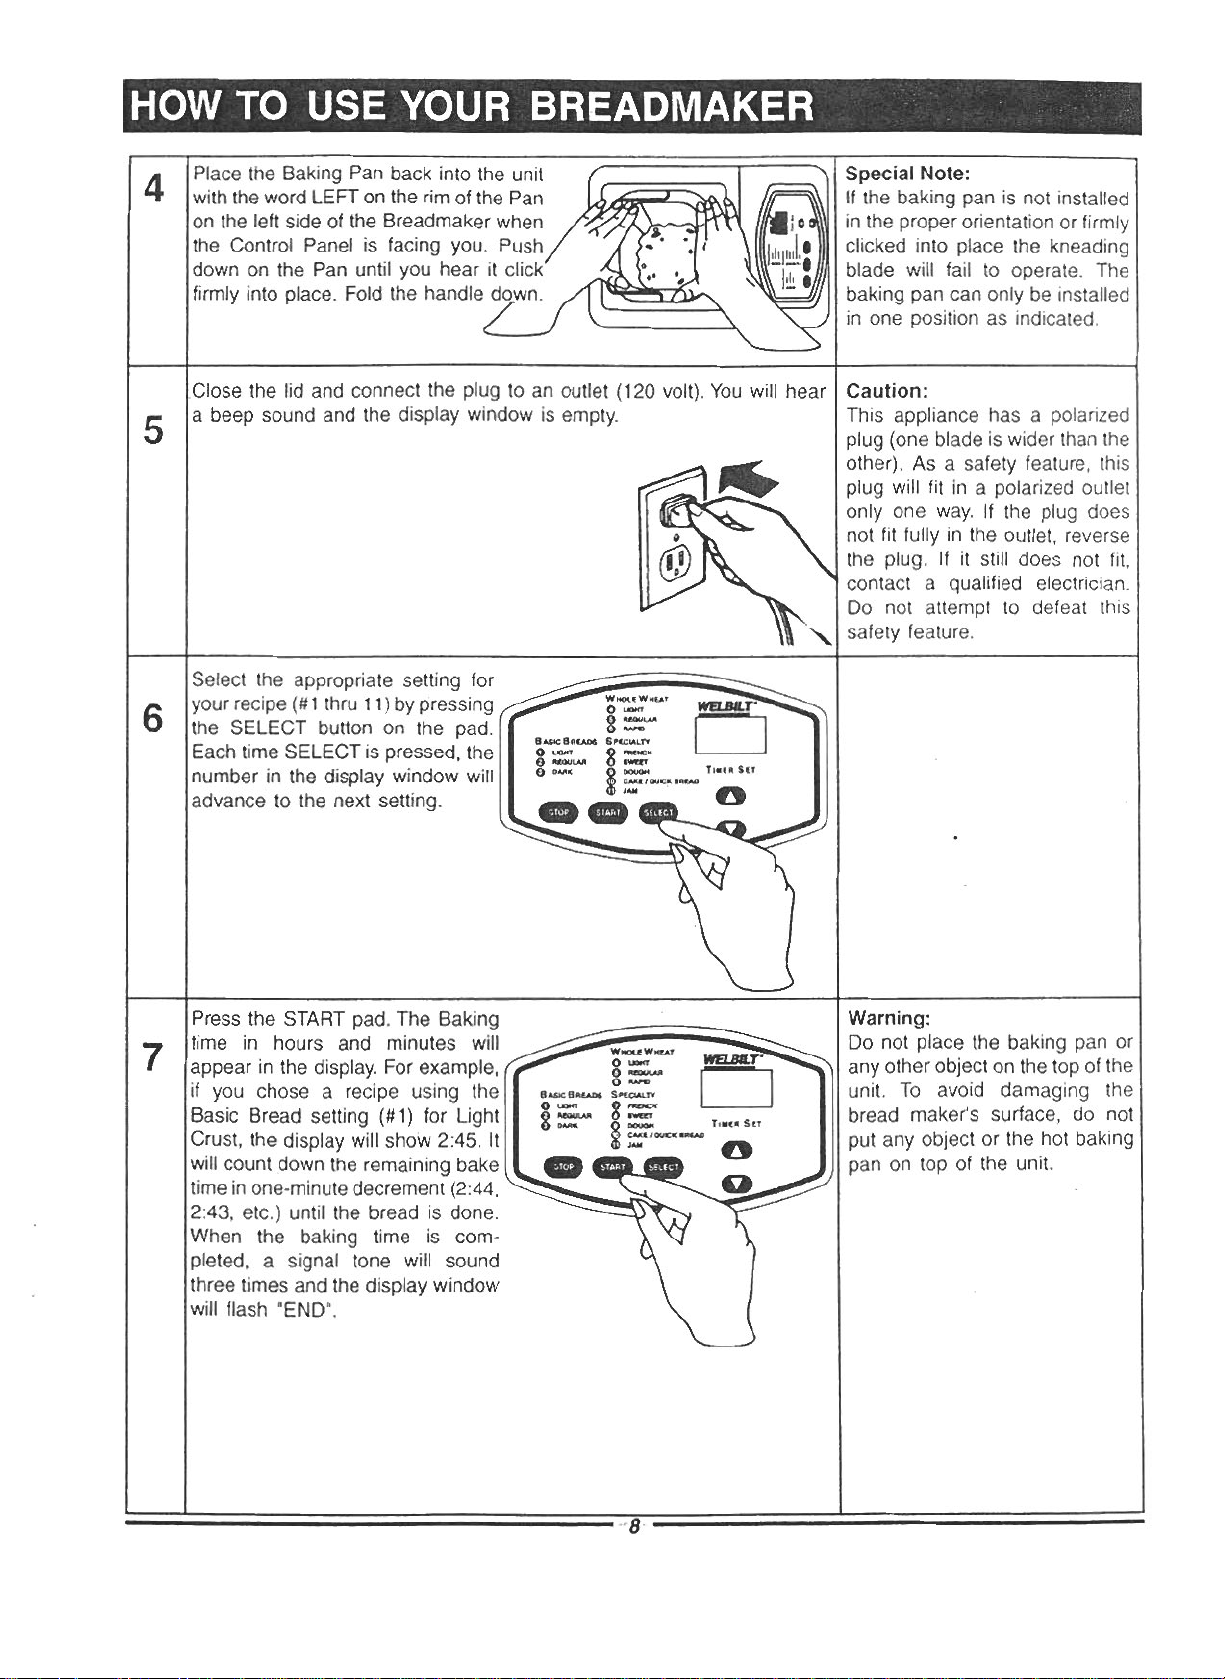
HOW TO USE YOUR BREADMAKER
Place the Baking Pan back into the unit
4
with the word LEFT on the rim of the Pan
on the left side of the Breadmaker when
the Control Panel is facing you. Push
down on the Pan until you hear it click
firmly into place. Fold the handle down.
Close the lid and connect the plug to an outlet (120 volt). You will hear
a beep sound and the display window is empty.
5
Select the appropriate setting for
your recipe (#1thru 11) by pressing
6
the SELECT button on the pad.
Each time SELECT is pressed, the
number in the display window will
advance to the next setting.
Special Note:
If the baking pan is not installed
in the proper orientation or firmly
clicked into place the kneading
blade will fail to operate. The
baking pan
in one position as indicated.
Caution:
This appliance has a polarized
plug (one blade is wider than the
other). As a safety feature, this
plug will fit in a polarized outlet
only one way. If the plug does
not fit fully in the outlet, reverse
the plug. If it still does not fit,
contact a qualified electrician.
Do not attempt to defeat this
safety feature.
can only be installed
Press the START pad. The Baking
time in hours and minutes will
7
appear in the display. For example,
if you chose a recipe using the
Basic Bread setting (#1) for Light
Crust, the display will show 2:45. It
will count down the remaining bake
time in one-minute decrement (2:44,
2:43, etc.) until the bread is done.
When the baking time is com-
pleted, a signal tone will sound
three times and the display window
will flash "END".
Warning:
Do not place the baking pan or
any other object on the top of the
unit. To avoid damaging the
bread maker's surface, do not
put any object or the hot baking
pan on top of the unit.
-----------------··8 -----------------
Page 10
HOW TO USE YOUR BREADMAKER
This Bread maker is designed with a "Keep Warm" function that
8
automatically begins when the BAKE time is completed. At the end of the
BAKE cycle "END" will appear (in the display window) up to 60 minutes
after baking is complete and will keep the bread warm during that time.
You may remove the Baking Pan at any time during the "Keep Warm"
cycle. To turn off the "Keep Warm" feature before the 60 minutes are up,
simply press the STOP button and hold it for 3 seconds until you hear
a "beep". END will disappear and the display window will now be empty.
UNPLUG THE UNIT WHEN FINISHED. Never leave the unit plugged
in when not in use. The "Keep warm" feature is not provided for in the
DOUGH setting. If you leave finished dough in the Bread maker over a
period of time, it may over-rise and produce poor results. For best results,
remove dough at the end of the cycle and follow the recipe directions for
shaping, resting and baking.
This Breadmaker has a convenient Viewing Window so that you may
watch the progress of the bread as it is mixed, kneaded, and baked.
9
Occasionally, some moisture may be formed in the window during
processing. If moisture forms, you may lift the lid to look inside during
the mixing and kneading stages, however, DO NOT OPEN THE LID
DURING THE BAKING CYCLE (approximately the last hour or so) as this
may cause the bread to collapse.
Note:
There is no "Keep Warm" feature
on dough setting #9.
Do not open the lid during the
baking cycle (approximately the
last hour or so in each
breadmaking program) as this
may cause the bread to col-
lapse.
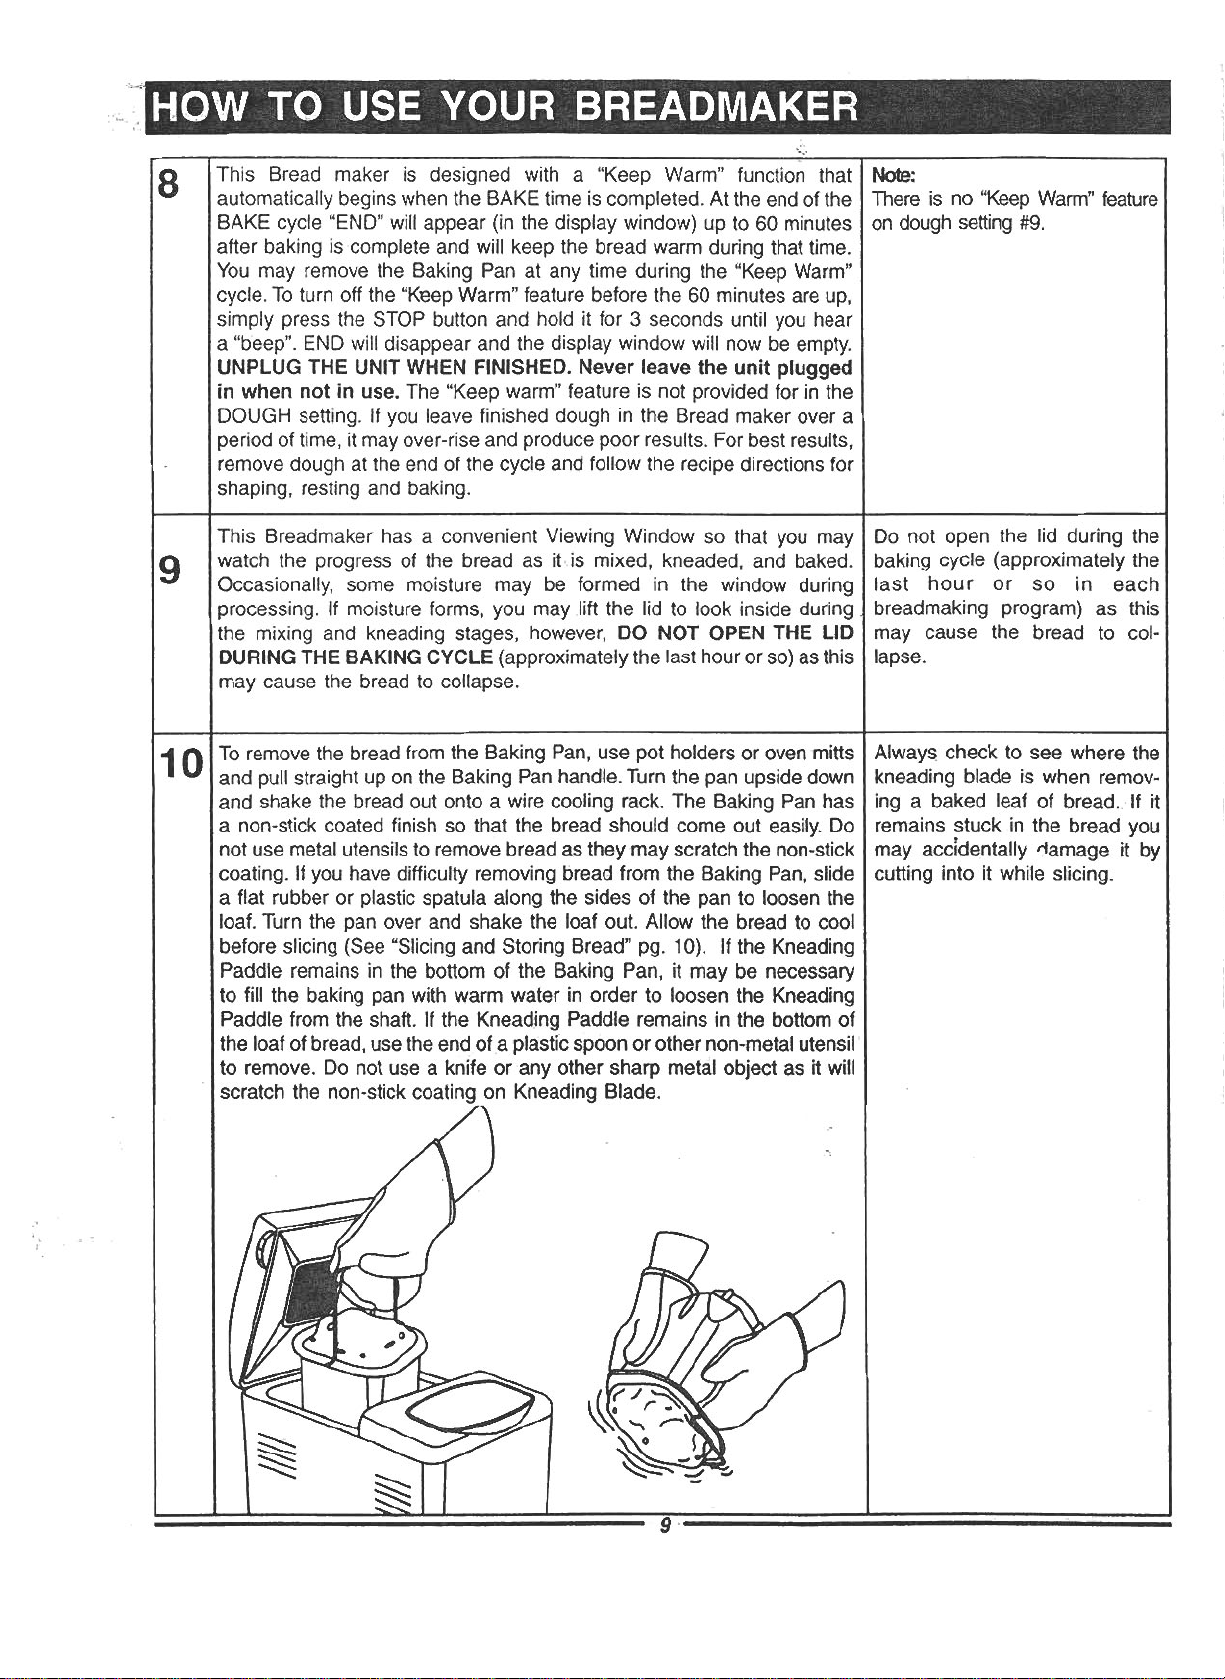
To remove the bread from the Baking Pan, use pot holders aroven mitts
10
and pull straight up on the Baking Pan handle. Turn the pan upside down
and shake the bread out onto a wire cooling rack. The Baking Pan has
a non-stick coated finish so that the bread should come out easily. Do
not use metal utensils to remove bread as they may scratch the non-stick
coating. If you have difficulty removing bread from the Baking Pan, slide
a flat rubber or plastic spatula along the sides of the pan to loosen the
loaf. Turn the pan over and shake the loaf out. Allow the bread to cool
before slicing (See "Slicing and Storing Bread" pg. 10). If the Kneading
Paddle remains in the bottom of the Baking Pan, it may be necessary
to fill the baking pan with warm water in order to loosen the Kneading
Paddle from the shaft. If the Kneading Paddle remains in the bottom of
the loaf of bread, use the endofa plastic spoon or other non-metal utensil
to remove. Do not use a knife or any other sharp metcHobject as it will
scratch the non-stick coating on Kneading Blade.
".\
Always check to see where the
kneading blade is when remov-
ing a baked leaf of bread., If it
remains stuck in the bread you
may accidentally riamage it by
cutting into it while slicing.
9------------------
Page 11
HOW TO USE YOUR BREADMAKER
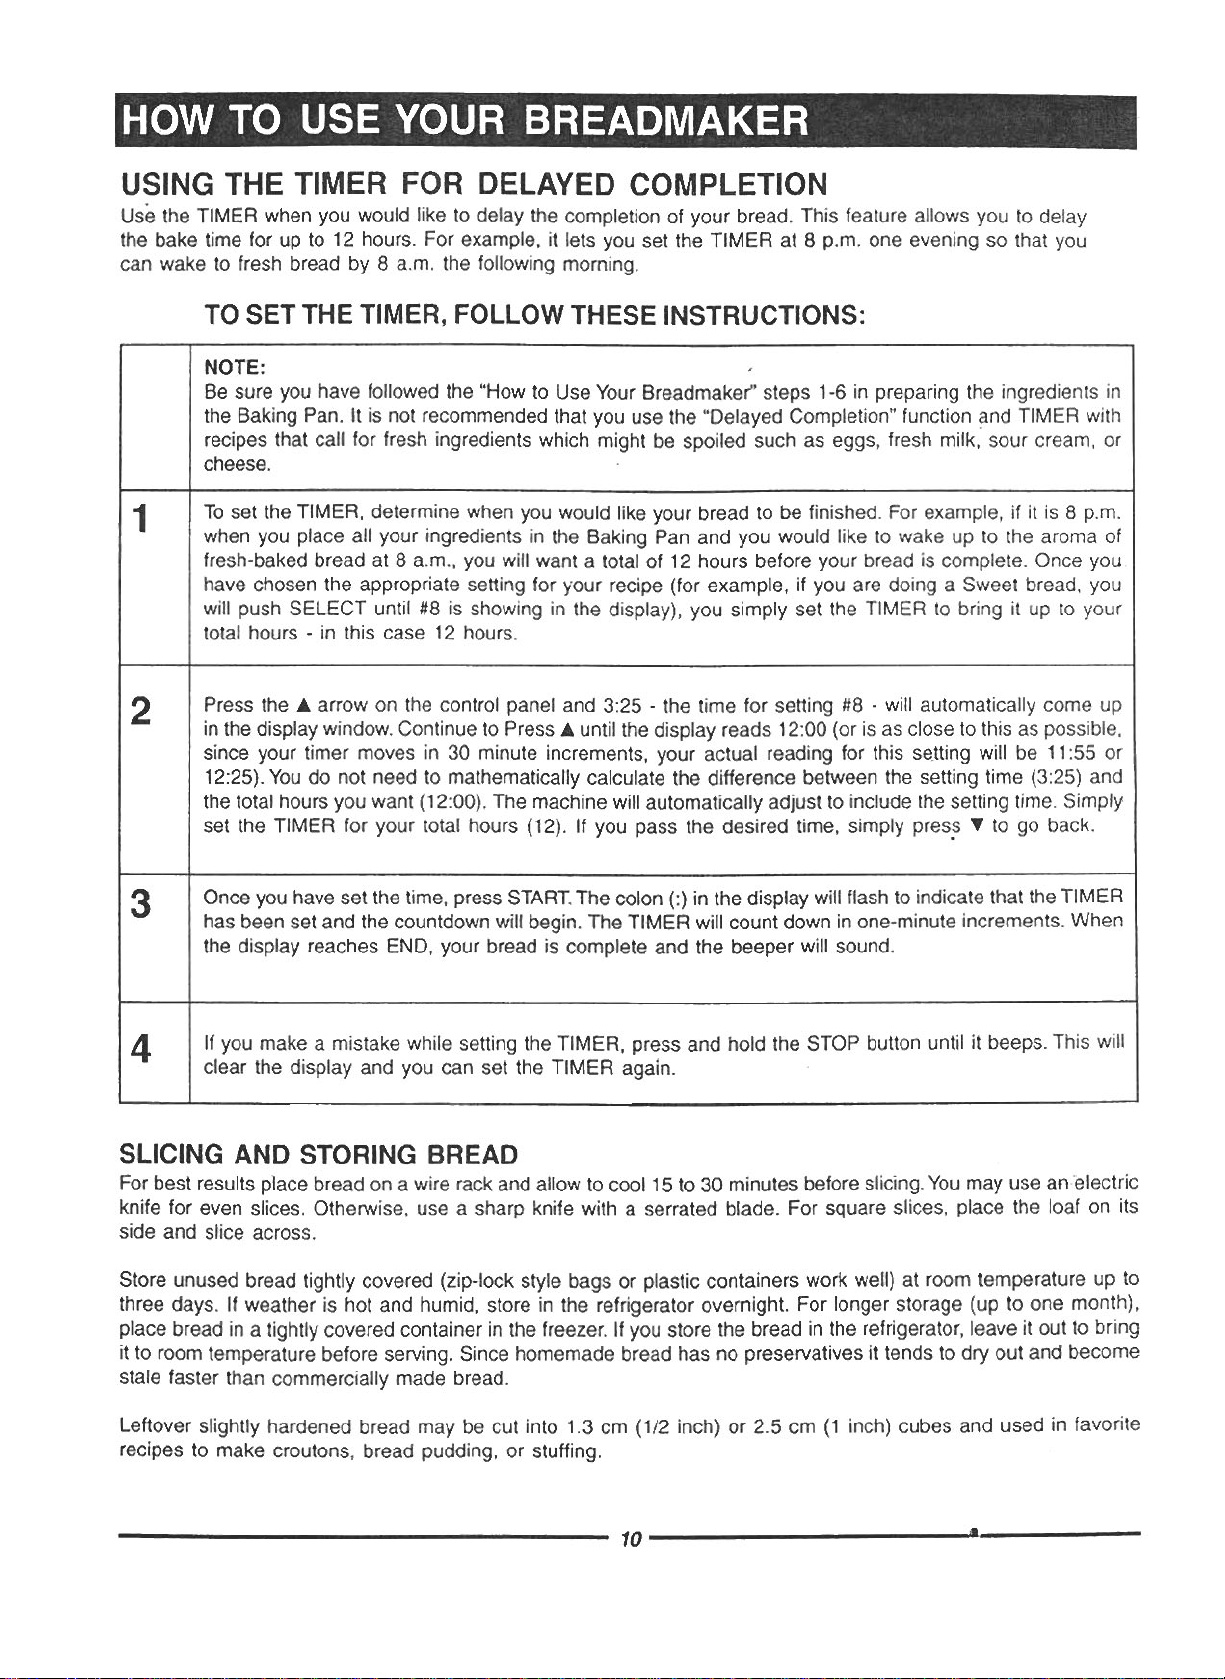
USING THE TIMER FOR DELAYED COMPLETION
Use the TIMER when you would like to delay the completion of your bread. This feature allows you to delay
the bake time for up to 12 hours. For example, it lets you set the TIMER at 8 p.m. one evening so that you
can wake to fresh bread by 8 a.m. the following morning.
TO SET THE TIMER, FOllOW THESE INSTRUCTIONS:
NOTE:
Be sure you have followed the "How to Use Your Breadmaker" steps 1-6 in preparing the ingredients in
the Baking Pan. It is not recommended that you use the "Delayed Completion" function and TIMER with
recipes that call for fresh ingredients which might be spoiled such as eggs, fresh milk, sour cream, or
cheese.
1
2
3
4
To set the TIMER, determine when you would like your bread to be finished. For example, if it is 8 p.m.
when you place all your ingredients in the Baking Pan and you would like to wake up to the aroma of
fresh-baked bread at 8 a.m., you will want a total of 12 hours before your bread is complete. Once you.
have chosen the appropriate setting for your recipe (for example, if you are doing a Sweet bread, you
will push SELECT until #8 is showing in the display), you simply set the TIMER to bring it up to your
total hours - in this case 12 hours.
Press the .•. arrow on the control panel and 3:25 - the time for setting #8 - will automatically come up
in the display window. Continue to Press .•.until the display reads 12:00 (or is as close to this as possible,
since your timer moves in 30 minute increments, your actual reading for this setting will be 11:55 or
12:25). You do not need to mathematically calculate the difference between the setting time (3:25) and
the total hours you want (12:00). The machine will automatically adjust to include the setting time. Simply
setthe TIMER for your total hours (12). If you pass the desired time, simply pres~ T to go back.
Once you have set the time, press START.The colon (:) in the display will flash to indicate that the TIMER
has been set and the countdown will begin. The TIMER will count down in one-minute increments. When
the display reaches END, your bread is complete and the beeper will sound.
If you make a mistake while setting the TIMER, press and hold the STOP button until it beeps. This will
clear the display and you can set the TIMER again.
SLICING AND STORING BREAD
For best results place bread on a wire rack and allow to cool 15 to 30 minutes before slicing. You may use an electric
knife for even slices. Otherwise, use a sharp knife with a serrated blade. For square slices, place the loaf on its
side and slice across.
Store unused bread tightly covered (zip-lock style bags or plastic containers work well) at room temperature up to
three days. If weather is hot and humid, store in the refrigerator overnight. For longer storage (up to one month),
place bread in a tightly covered container in the freezer. If you store the bread in the refrigerator, leave it out to bring
it to room temperature before serving. Since homemade bread has no preservatives it tends to dry out and become
stale faster than commercially made bread.
Leftover slightly hardened bread may be cut into 1.3 cm
recipes to make croutons, bread pudding, or stuffing.
(1/2 inch) or 2.5 cm (1 inch) cubes and used in favorite
10
Page 12

CARE AND CLEANING
CAUTION
To prevent electrical shock, unplug the unit before cleaning. Wait until the Breadmaker has cooled prior to cleaning.
Do not immerse or splash either the body or lid in any liquid as this may cause damage and/or electric shock.
For best performance and (Tlaintenance, it is recommended to clean the Breadmaker after each use as
follows:
Outer Body, Lid, and Inner Case:
Wipe the lid and outer body of the unit with a damp cloth or slightly
dampened sponge. Use a damp sponge or cloth to wipe out any flour,
crumbs, or other materials from the inner case.
Baking Pan and Kneading Blade
Both the Baking Pan and Kneading Blade have a non-stick coated surface. Do not use any harsh cleansers, abrasive
materials or utensils on these parts that may scratch their surfaces. Over time, the non-stick surface may change
in appearance due to moisture and steam. This is normal and has no effect on its use or quality.
Remove the Baking Pan and Kneading Blade from the inner case before cleaning. Wipe the outside of the Baking
Pan with a damp cloth. NEVER SUBMERGE THE BAKING PAN in water, You may hand wash the inside of the
Baking Pan with soapy water. If the Kneading Blade gets stuck on its shaft, fill the Baking Pan with hot water and
soak it for about 30 minutes or until it loosens and can be removed easily. If the hole in the Kneading Blade becomes
clogged, carefully clean it out with a wooden or plastic toothpick ..
Paint Thinner
Benzine
Steel Wool
Pads
Polishing
Powder
Chemical
Dustcloth
CAUTION:
None of the Breadmaker parts are dishwasher safe. DO NOT place the Baking Pan or Kneading Blade in the
dishwasher.
Special care for the non-stick finish.
Avoid damaging the coating. Do not use metal utensils such as spatulas, knives or forks. The
coating may change color after long use; this is only caused by moisture and steam and will
not affect the performance of the unit or quality of your bread.
11-----------------
Page 13

CARE AND CLEANING
STORING THE UNIT
Be sure to dry all parts before storing including wiping any moisture from the Viewing Window. Close the Lid and
do not store anything on top of the Lid.
POLARIZED PLUG
This appliance has a polarized plug (one blade is wider than the other). As a safety feature, this plug will fit into
a polarized outlet only one way. If the plug does not fit fully into the outlet, reverse the plug. If it still does not fit,
contact a qualified electrician. Do not attempt to defeat this safety feature.
To reduce the risk of fire or electric shock, do not attempt to remove the outer cover. There are no user serviceable
parts inside. Repair should be done only by authorized service personnel.
TIPS ABOUT THE ELECTRICAL CORD
The cord length of this appliance has been selected to reduce the possibility of tangling or tripping over a longer
cord. If additional cord length is needed, an extension cord rated not less than 15 amperes, 120 volts and UL
certified, may be used. If using an extension, be sure to arrange it so that it cannot be pulled or tripped on.
TROUBLESHOOTING
Specific questions about the Breadmaker functions and problems with ingredients or recipes are addressed in the
"Need Help?" section on pages 30-32. For better performance, if you want to continue a second loaves of bread after
the first one, allow the unit to cool sufficiently. It can be done by open the lid, remove the Baking Pan and allow
the inside of the unit to cool.
----------------- 12------------------
Page 14

TIPS ON USING YOUR BREADMAKER _
INTRODUCTION
Waking to the smell of homemade bread baking in the kitchen is one of the most comforting memories of childhood.
Can you remember rushing downstairs to taste the bread, hot out of the oven, with butter melting on top? What
a great way to start the morning! The Automatic Breadmaker by Welbilt0 can create that same experience every
morning.
There's very little effort on the part of the baker, because this Automatic Breadmaker is a sophisticated counter-
top appliance with a computer memory that does all the work for you. Just follow the recipe instructions, and wake
up to the old-fashioned smell of fresh bread baking in your Automatic Breadmaker. But don't stop at baking bread
in this appliance. Besides being able to do all kinds of specialty breads, including 100% whole wheat, you can also
prepare doughs for croissants, bagels, doughnuts, pizzas and more. Everything is easy and tastes homemade,
because it is.
Bake some bread and make some memories, for yourself, and the people you love.
KNOWING YOUR INGREDIENTS
It is often said that cooking is an art relying on the creativity of the chef while baking bread is much more of a
science. This means that the process of combining flour, water and yeast results in a chemical reaction that
produces bread. You have to remember that when the ingredients combine with each other they produce a specific
result. Read the following information carefully to gain a better understanding of the importance each ingredient plays
in the breadmaking process.
1 ALL PURPOSE FLOUR
All-Purpose Flour is a blend of refined hard and soft wheat flours especially suitable for making breads and cakes.
Most popular brands have been tested in the Bread maker with excellent results.
2 BREAD FLOUR
Bread Flour is a high gluten/protein flour that has been treated with conditioners that give dough a greater tolerance
during kneading. Bread Flour typically has a higher gluten concentration than All Purpose Flour; however, depending
on different milling practices this may vary. It is not necessary to use Bread Flour with your Breadmaker, as most
All Purpose Flours will produce loaves with good volume and structure.
3 WHOLE WHEAT FLOUR
Whole Wheat Flour is milled from the entire wheat kernel which contains the bran and germ and makes it heavier
and richer in nutrients than All Purpose Flour. Breads made with this flour are. usually smaller and heavier than white
loaves. To overcome this Whole Wheat Flour is usually mixed with All Purpose Flour, Bread Flour, or Gluten Flour
to produce a high light textured bread.
4 RYE FLOUR
Rye Flour is a high fibre flour similar to Whole Wheat Flour, also called Graham Flour. Rye Flour must always be
mixed with a high proportion of All Purpose Flour, Bread Flour, or Gluten Flour, as it does not contain enough gluten
to develop the structure for a high even grained loaf.
13 ----------~------
Page 15

TIPS ON USING YOUR BREADMAKER
5 GLUTEN FLOUR
Gluten Flour is Wheat Flour that has been treated to remove nearly all the starch, which leaves a very high gluten
content. (Gluten is the protein in the wheat that makes the dough elastic). This flour is usually available at most
health food stores and is sometimes used in small portions with dense low gluten flours such as whole wheat to
increase volume and lighten texture.
6 CAKE FLOUR
Cake Flour is made from softer or lower protein wheats and is specially designed for use in cake recipes.
7 SELF-RISING FLOUR
Self Rising Flours contain unnecessary leavening ingredients that will interfere with bread and cake making. It is not
recommended for use.
IMPORTANT SPECIAL NOTE ON FLOURS
Flours, while visibly similar, can be very different by virtue of how they were grown, milled, stored, etc. You may
find that you will have to experiment with different brands of flour to help you make that perfect loaf. A Baking Tips
Guide has been provided on pages 33 and 34 of this book to assist you with these experiments.
Storage is also very important, as all flours should be kept in a secure, airtight container. Rye and Whole Wheat
Flours should be maintained in a refrigerator, or a cool area to prevent them from becoming rancid.
8 BRAN
Bran (unprocessed) & Wheat Germ are the coarse outer portions of the wheat or rye grains separated from flour
by sifting or bolting. They are often added in small quantities to bread for nutritional enrichment, heartiness and flavor.
They are also used to enhance the texture of bread.
9 CORNMEAL & OATMEAL
Cornmeal & Oatmeal come from coarsely ground white or yellow corn and from rolled or steel-cut oats. They are
used primarily to enhance the favor and texture.
10 CRACKED WHEAT
Cracked Wheat is very coarse in texture. It comes from wheat kernels cut into angular fragments. It gives Whole
Grain Breads a nutty flavor and crunchy texture.
11 SEVEN GRAIN CEREAL BLEND
Seven-Grain Cereal Blend is a blend of cracked wheat, oats, bran, rye, corn meal, flax seeds, and hulled millet.
-----------------····14 ---------
Page 16

TIPS ON USING YOUR BREADMAKER
12 YEASTS
ACTIVE DRY YEAST
Yeast through a fermentation process produces gas (carbon dioxide) necessary to make the bread rise. Yeast must
be able to feed on sugar and flour carbohydrates in order to produce this gas. Active dry granular yeast is used
in all recipes that call for yeast. There are basically three different types of yeast available, fresh, dry and instant
quick rising. It is recommended that traditional dry yeast be used, however, instant quick rising can also be used
in lesser amounts. (Note: The recipes in this cookbook were developed using traditional dry yeast), Fresh or
compressed cake yeast is not recommended as they will produce poor results. Yeast must always be stored in a
refrigerator to keep it fresh. Too much heat will kill it. Ensure your yeast is fresh by checking its expiration date.
Once a package or can of yeast is opened it is important that the remaining contents be immediately resealed and
refrigerated as soon as possible for future use. Often bread or dough, which fails to rise, is due to stale yeast being
used. The following test can be used to determine whether your yeast is stale and inactive:
A) Place 1/2 cup of lukewarm water into a small bowl or cup.
B) Stir 1 tsp. of sugar into the water then sprinkle 2 tsp. of yeast over the surface.
C) Place bowl or cup in a warm area and allow to sit for 10 minutes undisturbed.
D) The mixture should foam and produce a strong yeast aroma. If this does not occur, fresh .yeast should be
purchased.
CONVERSION CHART FOR FAST-RISING YEAST
1 1/2 teaspoons active dry yeast = 1 teaspoon fast-rising yeast
2 1/2 teaspoons active dry yeast = 1 1/2 teaspoons fast-rising yeast
1 1/2 teaspoons active dry yeast = 2 1/4 teaspoons fast-rising yeast
13 SUGAR
Sugar is important for the color and flavour of breads. It is also food for the yeast as it supports the fermentation
process. Recipes in this cook book that call for sugar require granulated sugar. Do not substitute powdered sugar
or brown sugar unless indicated. Artificial sweeteners cannot be used asa substitute for sugar as the yeast will
not react properly with them.
14 SALT
Salt is necessary to balance the flavour of breads and cakes, as well as for the crust colour that develops during
baking. Salt also limits the growth of yeast so the amounts shown in the recipes should not be increased. For dietary
reasons it may even be eliminated entirely, however, your bread may over-proof and rise higher than normal.
15 LIQUIDS
Liquids such as milk (1%,2%, whole & skim) or a combination of powdered rrftlk and water, can be used when making
bread. Milk will improve flavour, provide a velvety texture and soften the crust, while water alone will produce a
crispier crust, Some liquids call for juice (orange, apple, etc.) to be added as a flavour enhancer.
16 EGGS
Eggs add richness and a velvety texture to bread doughs and cakes. Use large-size eggs in these recipes.
17 SHORTENING, BUTTER & MARGARINE
Shortening, Butter and Margarine "shortens" or tenderizes the texture of yeast breads. French Bread gets its unique
crust and texture' from the lack of butter added. However, breads that call for butter stay fresh longer. If butter or
margarine is used direct from the refrigerator, it should be cut into small pieces for easier blending during the
kneading cycle. Oil should not be used as a substitute for butter, margarine or shortening.
15
Page 17

TIPS ON USING YOUR BREADMAKER .
18 BAKING POWDER
Baking Powder is a leavening agent used in quick breads and cakes. This type of leavening agent does not require
rising time before baking as the chemical reaction works when liquid ingredients are added.
19 BAKING SODA
Baking Soda is another leavening agent not to be confused or substituted for baking powder. It also does not require
rising time before baking as the chemical reaction works during baking process.
MEASURING YOUR INGREDIENTS
The key and most important step when using your Breadmaker is measuring your ingredients precisely and
accurately. It is extremely important to measure each liquid and dry ingredient properly or it could result in a poor
or unacceptable baking result. The ingredients must also be added into the baking pan in the order in which they
are given in each recipe. Liquid and dry measurements are done somewhat differently and are as follows:
Liquid Measurements
Either plastic or glass transparent liquid measuring cups must be used
to measure all liquids such as water or milk. When reading amounts, the
measuring cup must be placed on a horizontal flat surface and viewed
at eye level (not on an angle). The liquid level line must be aligned to
the mark of measurement. A "guesstimate" is not good enough as it
could throw out the critical balance of the recipe.
Dry Measurements
Dry measurements (especially flours) must be done using standard size dry measuring cups. These cups are
available in various size graduations. Dry measuring must be done by gently spooning ingredients into the measuring
cup and then once filled, levelling off with a knife (See Fig. 1 and 2 below). Scooping or tapping a measuring cup
will pack the ingredients and you will end up with more than is required. This extra amount could affect the balance
of the recipe. Do not sift the flour.·
When measuring small amounts of dry or liquid ingredients (ie. Yeast, Sugar, Salt, Powdered Milk, Honey, Molasses)
a standard measuring spoon must be used. Measurements must be level, not heaping as this small difference could
throw out the critical balance of the recipe.
Your Bread maker produces delicious baked goods with ease. This marvelous machine asks only that you carefully
follow the recipe instructions. In basic cooking, normally "a pinch of this and a dash of that" is fine, but not for
automatic Bread makers. Using an automatic Bread maker requires you accurately measure eactr ingredient
(especially yeast and water) for best results. For best results, have your ingredients at room temperature unless
otherwise specified.
Fig. 1
Fig. 2
16
Page 18

TIPS ON USING YOUR BREADMAKER
INGREDIENT TEMPERATURES
All ingredients, especially liquids (water or milk), should be warmed to room temperature 21°C (70°F). If ingredients
are too cold, below 1QoC (50°F), they will not activate the yeast. Extremely hot liquids, above 40°C (104°F), may
kill the yeast.
CREATING YOUR OWN YEAST BREADS
With the Automatic Breadmaker, even the most inexperienced baker can achieve the satisfying experience of baking
a loaf of bread. All of the mystery and hard work is gone. Inside this talented machine with a computer brain, the
dough is mixed, kneaded, proofed, and baked without you being present. The Automatic Breadmaker can also just
prepare the dough, and when it's ready, you shape and bake in a conventional
pages are "tailored" for this Welbilt® Breadmaker. Each recipe features ingredients that best compliment a particular
loaf of bread, and each was tested in our machines. It is extremely important not to exceed the amounts of flour
specified in each of the recipes or else it could result in unsatisfactory baking performance. When creating your
own yeast bread recipes or baking an old favorite, use the recipes in this cookbook as a guide for converting portions
from your recipe to your Breadmaker.
OTHER TIPS
Place all recipe ingredients into the baking pan so that yeast is not touching any liquid.
Use Bread Flour when a recipe calls for white flour, because our testing has shown that it
consistently provides the best quality bread.
After completing the process of making Dough in your Bread maker, typically when letting dough rise outside
the Bread machine, allow 30 minutes or until dough doubles in size. Dough should be lightly greased and
covered with waxed paper and a dry towel. It should be placed in a warm area free from drafts,
Humidity makes dough more moist, therefore humidity and high altitudes require adjustments.
For humidity, add an extra tablespoon of flour if consistency isn't right. For high altitudes, decrease yeast
amount approximately 1/4 teaspoon, and decrease sugar and/or water or milk slightly.
(See Baking Tips Guide pages 33 & 34)
The DOUGH setting is great for mixing, kneading, and proofing (allowing dough tb rise) richor dough like
croissa"nt doughs. Use the Automatic Breadmaker to prepare this dough so all you need to do is shape and
bake it according to your recipe.
When recipes call for a "lightly floured surface," use about 1 to 2 tablespoons of flour on the surface.
You may want to lightly flour your fingers or rolling pin for easy dough manipulation.
When you let dough "rest" and "rise" according to a recipe, place it in a warm, draft-free area. If the dough
doesn't double in size, it may not produce a tender product. Dough is ready when an indentation remains when
it is touched.
If the dough you are rolling shrinks back, let it rest covered for a few minutes before rolling again.
Dough may be wrapped in plastic and stored in a freezer for later use. Bring the dough to room temperature
before using.
oven. The recipes on the following
SPECIAL GLAZES FOR YEAST BREADS
Give your just baked bread a professional finish. Select one of the following special glazes to enhance your bread.
Egg Glaze:
Beat 1 large egg and 1tablespoon of water together, brush generously (Note: apply only to doughs before baking).
Melted Butter Crust:
BrLish melted butter over just baked bread for a softer, tender crust.
Milk Glaze:
For a softer, shiny crust, brush just baked bread with milk or cream.
Sweet Icing Glaze:
Mix 1 cup sifted icing sugar with 1 to 2 tablespoons of milk to make a consistent glaze, drizzle over Raisin Bread
or Sweet Breads.
Poppy/Sesame/Caraway Seed/Cornmeal/Oatmeal: Sprinkle your choice of these seeds generously over just
glazed bread.
----------------- 17 -----------------
Page 19

RECIPES
BASIC WHITE BREAD
1
Ingredient
METHOD
1 Measure ingredients into baking pan.
2 Insert baking pan securely into unit, close lid.
3 Select appropriate bread selling.
4 Push start bullon.
5 The Breadmaker will beep 3 times and the
display will flash "END" when bread is done.
6 Using oven mills, remove pan from unit.
7 Remove bread from baking pan.
(and kneading blade from bread if required)
8 Allow to cool before slicing.
Yield: Makes 1 loaf
2 tbsp.
1cup
ltbsp.
2,3
1tsp.
1150.11/4tso.
LightRegular/Dark
5/8 cup
ltbsp.
21/2tbsp.21/2tbsp.
22/3cups31/3 cups
2tbsp.
ltsp.
Whole Wheat Flour
Molasses
Water
Skim Milk Powder
(j) Yeast
~hortening
Honey
Salt
Use Selling
100% WHOLE WHEAT BREAD
Ingredient
METHOD
1 Measure ingredients into baking pan.
2 Insert baking pan securely into unit, close lid.
3 Select appropriate bread selling.
4 Push start bullon.
5 The Bread maker will beep 3 times and the display
will flash "END" when bread is done.
6 Using oven mills, remove pan from unit.
7 Remove bread from baking pan.
(and kneading blade from bread if required).
8 Allow to cool before slicing.
Yield: Makes 1 loaf
5,6
11/2 tsp.
2 tbsp.
2tbsp.
4
11/4tso.1 1/2 tSo:
21/2cups31/4cups
1tbsp.2tbsp.
ltbsp.1tbsp.
1tsp.
LightRegular/Rapid
3/8 cup1cup
1tbsp.
1tbsp.
Water
Molasses
White Flour
Whole Wheat Flour
Instant coffee
mYeast
Use Selling
Locoa
ISkim Milk Powder
Shortening
Salt
Rye Flour
Sugar
PUMPERNICKEL BREAD
Ingredient
METHOD
1 Measure ingredients into baking pan.
2 Insert baking pan securely into unit, close lid.
3 Select appropriate bread selling.
4 Push start bullon.
5 The Breadmaker will beep 3 times and the display
6 Using oven mitts, remove pan from unit.
7 Remove bread from baking pan.
8 Allow to cool before slicing.
Yield: Makes 1 loaf
11/2150.
2,3
1 tbsp.
11/2tsp.
11/2tsp.
11/4cups
2 tbsp.
will flash "END" when bread is done.
(and kneading blade from bread if required)
1
1tbsp.
1cup
11/2tso.
1tbsp.2tbsp.
1tbsp.2 tbsp.
3/4 cup1 cup
LightRegular/Dark
1tbsp.
1tbsp.2 tbsp.
11/3cups13/4cups
1/4 cup1/2cup
t tap.
1tsp.
POTATO BREAD
Ingredient
METHOD
1 Measure ingredients into baking pan.
2 Insert baking pan securely into unit, close lid.
3 Select appropriate bread setting.
4 Push start button.
5 The Breadmaker will beep 3 times and the display
will flash "END" when bread is done.
6 Using oven mitts, remove pan from unit.
7 Remove bread from baking pan.
(and kneading blade from bread if required)
8 Allow to cool before slicing.
Yield: Makes 1 loaf
2,3
Light
Regular/Dark
1
II/2lso.11/2lsD.
1cup1113cups
1 tbsp.2tbsp.
1tbsp.2tbsp.
1tbsp.2 tbsp.
11/2.tsp.II/2tsp.
1/3 cup1/3 cup
21/2 cups31/2 cups
CARAWAY RYE BREAD
METHOD
1 Measure ingredients into baking pan.
2 Insert baking pan securely into unit, close lid.
3 Select appropriate bread setting.
4 Push start button.
5 The Breadmaker will beep 3 times and the display
will flash "END" when bread Is done.::~~~
6 Using oven mitts, remove pan from unit.
7 Remove bread from baking pan.
(and kneading blade from bread if required)
8 Allow to cool before slicing.
Yield: Makes 1 loaf
CD See page 15 for additional Dry Yeast Information.
" All of the recipes in this book have been tested with
your Breadmaker. If the result is not satisfied, ingredi-
ents adjustment may be needed (particularly yeast &
water). For details, please refer to the "Baking Tips
for Yeast Bread" on page 33-34.
18 ----------------
Page 20

-
6 U~
--: . :' ~,-
ITAL
-
White
11/2ts . 1 Yeast
Salt
Hone
Water
Wate
11/4ts ':'
11/215
1
1tbsp.
1cup
RegularIngredientLightRegularIngn
1 tsp.
Light
Light
2tbsp.$our
1113cups
2/3 cups-
2/3 cup
1 tbsp.
1tbsp.
11/4tsp.
1/2 cup
1tbsp.
8 AllYield: Makes 1 loaf
, All of the recipes in this book have been tested with
(and kneading blade from bread if required)8 Allow to cool before slicing.
your Breadmaker. If the result is not satisfied, ingredi-ents adjustment may be needed (particularly yeast &
6 Using oven mitts, remove pan from unit.
for Yeast Bread' on page 33-34.
water). For details, please refer to the "Baking Tips
Yield: Makes 1 loaf
RECIPES
Water
1
Dried Onion
White Flour
Skim Milk Powder
Salt
1
' Old cheddar
Salt
White Flour
Whole Wheat Flour
2tbsp.
1cup
1tbsp.
1tbsp.
1cup11/4cups
11/4tsp.
1 tsp.
2tsp.1tbsp.
2tbsp.
2 cupscheese (grated)
1/3 cup
1 tbsp.Sugar1tbsp.2tbsp.
1cup11/3cups
12/3cups
Light
3/4Isp.
1tbsp.
Yeast
Ingredient
Use Setting
Shortening
Honey
Use Setting
'.
METI
4 Push start button.
1 ME
2 Ins
4 Pu
will flash "END" when bread is done.
wil
Yield: Makes 1 loaf
'NOTE:
1 Me
3 Se
METHOD
METI
METHOD
6 Us
7 Re
Use ~
3 Se
4 PL
7 RE
5 Th
Skim Milk Powder
SH
8 All
4 Push start button.
Yield
will flash "END" when bread is done.
3 Select appropriate bread setting.
Ye
2 Insert baking pan securely into unit, close lid.
Seven Grain Cereal
7 Remove bread from baking pan.
(and kneading blade from bread if required)
5 The Breadmaker will beep 3 times and the display
6 Using oven mitts, remove pan from unit.
8 Allow 10 cool before slicing.(ar
1 Measure ingredients into baking pan.
2 Insert baking pan securely into unit, close lid.. .::.
result in a slightly collapsed loaf.
3 Select appropriate bread setting.
1 Measure ingredients into baking pan.
7 Remove bread from baking pan.
Using cheese with a high lat high moisture content may
5 The Bread maker will beep 3 times and the display
,
CHEESE
(al
--I
SEVEN GRAIN BREAD
Yield:
'N' ONION BREADSOU
2 1m
19
wi
IAN HERB BREAD
edient
Milk Powder
ening
Ma~oram
Basil
Thyme
Flour
ast
etting
Light
1cup
1tbsp.
1tbsp.
2tbsp.
1 tsp.
1/2tsp.
1/2 tsp.
1/2tsp.
21/3 cups
1ts
'7
Regular
1 1/3 cups
2tbsp.
2tbsp.
1 tbsp.
ltsp.
1 tsp.
1tsp.
1tsp.
31/4 cups
11/2ts
7
00
asure ingredients into baking pan.
ert baking pan securely into unit, close lid.
ect appropriate bread setting.
h start button.
Breadmaker will beep 3 times and the display
flash "END" when bread is done.
ng oven mitts, remove pan from unit
move bread from baking pan.
d kneading blade from bread
w to cool before slicing.
Makes 1 loaf
if required)
UR CREAM BREAD
edient
r
Cream
y
e Flour
east
Settin
00
asure ingredients into baking pan.
ert baking pan securely into unit, close lid.
ect appropriate bread setting.
sh start button.
e Breadmaker will beep 3 times and the display
flash "END" when bread is done.
ng oven mitts, remove pan from unit.
move bread from baking pan,
d kneading blade from bread if required)
ow to cool before slicing.
Makes 1 loaf
Page 21

RECIPES
PESTO BREAD
Regular
1 cup
1 tbsp.
1tsp.
1/3cup
f273Cups
12/3 cups
1 ts
2"
METHOD
1 Measure ingredients into baking pan.
2 Insert baking pan securely into unit, close lid.
3 Select appropriate bread setting.
4 Push start button.
S The Breadmaker will beep 3 times and the display
will flash "END" when bread is done.
6 Using oven mitts, remove pan from unit.
7 Refl10ve bread from baking pan.
(and kneading blade from bread if required)
B Allow to cool before slicing.
Yield: Makes 1 loaf
BEER BREAD
Light
11/4cups
1tbsp.
2tbsp.
1 tsp.
11/4cups
3/4 cup
1/4 cup
1/4cup
2 ts
2
METHOD
1 Measure ingredients into baking pan.
2 Insert baking pan securely into unit, close lid.
3 Select appropriafe bread setting.
4 Push start button.
5 The Breadmaker will beep 3 times and the display
will flash "END" when bread is done.
6 Using oven mitts, remove pan from unit.
7 Remove bread from baking pan.
(and kneading blade from bread if required)
8 Allow to cool before slicing.
Yield: Makes 1 loaf
DARK RYE BREAD
Ingredient
old Black Colfee
Shortening
Molasses
Brown Sugar
~
Wi1It8Fiou r
Dark Rye Flour
Yeast
Use Setting
METHOD
1 Measure ingredients into baking pan.
2 Insert baking pan securely into unit, close lid.
3 Select appropriate bread setting.
4 Push start button.
5 The Breadmaker will beep 3 times and the display
will flash "END" when bread is done.
6 Using oven mitts, remove pan from unit.
7 Remove bread from baking pan.
(and kneading blade from bread if required)
8 Allow to cool before slicing.
Yield: Makes 1 loaf
Light
1cup
1tbsp.
1tbsp.
1 tbsp.
1tsp.
13I4Cups
3/4 cup
lIs
1
Regular/Dark
11/4cups
2 tbsp.
2 tbsp.
2 tbsp.
11/2tsp.
21/2 cups
1cup
11/4ts
2.3
SAUERKRAUT RYE BREAD
Large
1 cup
1tbsp.
1tbsp.
1 tbsp.
1 tsp.
1 cup
1 tbsp.
22/3 cups
1cup
11/2ts
-1-
• NOTE:
Sauerkraut must be well drained and have the
moisture squeezed out.
METHOD
1 Measure ingredients into baking pan.
2 Insert baking pan securely into unit, close lid.
3 Select appropriate bread setting.
4 Push start button.
S The Breadmaker will beep 3 times and the display
will flash "END" when bread is done.
6 Using oven mitts, remove pan from unit.
7 Remove bread from baking pan.
(and kneading blade from bread if required)
8 Allow to cool before slicing.
Yield: Makes 1 loaf
IRISH SODA BREAD
Regular
11/3cups
2tbsp.
2tbsp.
1/2tsp.
1/4 cup
~
METHOD
1 Measure ingredients into baking pan.
2 Insert baking pan securely into unit, close lid.
3 Select appropriate bread setting.
4 Push start button.
5 The Breadmaker will beep 3 times and the display
will flash "END" when bread is done.
6 Using oven mitts, remove pan from unit.
7 Remove bread from baking pan.
(and kneading blade from bread if required)
B Allow to cool before slicing.
Yield: Makes 1 loaf
FRENCH BREAD
METHOD
1 Measure ingredients into baking pan.
2 Insert baking pan securely into unit, close lid.
3 Select appropriate bread setting.
4 Push start button.
S The Breadmaker will beep 3 times and the display
will flash "END· when bread is done.
6 Using oven mitts, remove pan from unit.
7 Remove bread from baking pan.
(and kneading blade from bread if required)
B Allow to cool before slicing.
Yield: Makes 1 loaf
<D See page 15 for additional Dry Yeast Information .
• All of the recipes in this book have been tested with
your Breadmaker. If the result is not satisfied. ingredi-
ents adjustment may be needed (particularly yeast &
water). For details, please refer to the "Baking Tips
for Yeast Bread" on page 33-34.
20-----------------
Page 22

'. - -
.
'
.-
4 Push start button.
• All of the recipes in this book have been tested with
your Breadmaker. If the result is not satisfied, ingredi·ents adjustment maybe needed (particularly yeast &
for Yeast Bread" on page 33-34.
water). For details, please refer to the "Baking Tips
·'oi
J.; .-- .
7 Granola
1
11/2ts
11/2ts
11/2ts
3
~.~.'
8
3
Regular
1 tbsp.
1cup
2 tbsp.
1 tbsp.
ltsp.11/2tsp.
1cup
1 tsp. Shortening
31/4 cups Honey
1 tsp.
1 tsp. Honey.2 tbsp. Sugar
3/4 cup
1/4 cup White Flour
etting
etting
Measure ingredients into baking pan.
3 cups
2 tbsp.
Regular
11/3cups
HONEY GRANOLA BREAD
RECIPES
COTTAGE DILL BREAD
1/3cup1/2 cup
21/4 cups3 cups
ltbsp.2 tbsp.
ltbsp.2tbsp.
2 tbsp.1/4 cup
Light
Regular
1/4 cup
2 tbsp.
3 1/4 cups
2 tbsp.
~.
Sa~
Use
Skim Milk Powder
Water
Salt
White Flour
METHOD Raisins
Water
Water
Skim Milk Powder
Raisins
2 Insert baking pan securely into baking unit, clos(llid.
Salt
Sunflower Seeds
Cinnamon
Yeast
Yeast
Use Setting
Ingredient
IngredientLight
Yogurt1 1/3cups
Brown sugar
3 Select appropriate bread setting.
Ingredient
Ingredient
Orange Juice1/2 cup
11/4cups
Shortening1 tbsp. Shortening
Orange Rind
(grated)1tsp.
1 Measure ingredients into baking pan.
Regular/Dark
Salt11/2tsp.
2 tbsp.
1tbsp.
2 tbsp.
1/4 cup
METHOD
1
4 Push start button.
Yield: Makes 1 loaf
YeastIts11/2
will flash "END' when bread is done.
White Flour
4 Push start button.
METHOD
will flash "END" when bread is done.
4 Push start button.
will flash "END" when bread is done.
Use Setting
5 The Breadmaker will beep 3 times and the display
6 Using oven mitts, remove pan from unit.
7 Remove bread from baking pan.
8 Allow to cool before slicing.
(and kneading blade from bread if required)
7 Remove bread from baking pan.
7 Remove bread from baking pan.
8 Allow to cool before slicing.
1 Measure ingredients into baking pan.
2 Insert baking pan securely into baking unit, close lid.
3 Select appropriate bread setting.
2 Insert baking pan securely into baking unit, close lid.
2 Insert baking pan securely into baking unit, close lid.3 Select appropriate bread setting.
Use Setting'
5 The Breadmaker will beep 3 times and the display
5 The Breadmaker will beep 3 times and the dis~ay
6 Using oven mitts, remove pan from unit.7 Remove bread from baking pan.
(and kneading blade from bread if required)
8 Allow to cool before slicing.
YOGURT BREAD
SUNNY ORANGE BREADRAISIN BREAD
3 Select appropriate bread setting.
5 The ffreadmaker will beep 3 times and the display
1 Measure ingredients into baking pan.
will flash "END' when bread is done.
6 Using oven mitts, remove pan from unit.
Yield: Makes 1 loaf
21
While Flour
METHOD
6 Using oven mitts, remove pan from unit.
8 Allow to cool before slicing.
(and kneading blade from bread if required)
Yield: Makes 1 loafYield: Makes 1 loaf
CHUNKY NUT BREAD
Page 23

RECIPES
MIXED FRUIT BREAD
Water
.Salt
Peanut Butter
(j) DIY Yeast
White Flour
I
Brown Sugar
Use Setting
METHOD
1 Measure ingredients into baking pan.
2 Insert baking pan securely into baking unit, close lid.
3 Select appropriate bread setting.
4 Push start button.
5 The Breadmaker will beep 3 times and the display
will flash "END" when bread is done.
6 Using oven mitts, remove pan from unit.
7 Remove bread from baking pan.
(and kneading blade from bread if required)
8 Allow to cool before slicing.
Yield: Makes 1 loaf
PEANUT BUTTER BREAD
Ingredient
METHOD
1 Measure ingredients into baking pan.
2 Insert baking pan securely into unit, close lid.
3 Select appropriate bread setting.
4 Push start button.
5 The Breadmaker will beep 3 times and the display
will flash "END" when bread is done.
6 Using oven mitts, remove pan from unit.
7 Remove bread from baking pan.
(and kneading blade from bread if required)
8 Allow to cool before slicing.
Yield: Makes 1 loaf
1
Regular
11l2tso.
1 1/3 cup
1/4 cup
1/2 cup
31/4 cups
1 tsp.
White Flour
Lemon Juice
Water
Shortening
Salt
c;ranberries
Honey
(f) Yeast
Walnuts (chopped)
Use Setting
l;ranberry JUIce
CRANBERRY NUT BREAD
Ingredient
METHOD
1 Measure ingredients into baking pan.
2 Insert baking pan securely into unit, close lid.
3 Select appropriate bread setting.
4 Push start button.
5 The Breadmaker will beep 3 times and the display
will flash "END" when bread is done.
6 Using oven mitts, remove pan from unit.
7 Remove bread from baking pan.
(and kneading blade from bread if required)
8 Allow to cool before slicing.
Yield: Makes 1 loaf
3
Reaular
11l2tsn.
1tsp.
1/2 cup
31/4cups
1tsp.
1/2 cup
2tbsp.
2tbsp.
1/4cup
1/2 cup
CHOCOLATE BREAD
Regular
Water
emon
Skim Milk Powder
alt
1cup
-s!lortening
Honey
v'hite Flour
1) DIY Yeast
UseSetting
anana (mashed)
Valnuts (chopped)
METHOD
1 Measure Ingredients Into baking pan.
2 Insert baking pan securely into unit, close lid.
3 Select appropriate bread setting.· .
4 Push start button.
5 The Breadmaker will beep 3 times and the display
will flash "END" when bread is done.
6 Using' oven mitts, remove pan from unit.
7 Remove bread from baking pan.
(and kneading blade from bread if required)
8 Allow to cool before slicing.
Yield: Makes 1 loaf
BANANA NUT BREAD
Ingredient
METHOD
1 Measure ingredients into baking pan.
2 Insert baking pan securely into unit, close lid.
3 Select appropriate bread setting.
4 Push start button.
5 The Breadmaker will beep 3 times and the display
will flash "END" when bread is done.
1tsp.
1112tso.
2 tbsp.
Regular/Dark
1 cup
2 tbsp.
1 1/2 tsp.
3 1/2 cups
1/2 cup
1/4 cup
2,3
2 tbsp.
e Using oven mitts, remove pan from unit.
7 Remove bread from baking pan.
(and kneading blade from bread if required)
8 Allow to cool before slicing.
Yield: Makes 1 loaf
RUSSIAN KULICH
METHOD
1 Measure ingredients into baking pan.
2 Insert baking pan securely into unit, close lid.
3 Select appropriate bread setting.
4 Push start button.
5 The Breadmaker will beep 3 times and the display
will flash "END" when bread is done. __
6 Using oven mitts, remove pan from unit.
7 Remove bread from baking.pan.
(and kneading blade from bread'i!-required)
8 Allow to cool before slicing.
Yield: Makes 1 loaf
<D See page 15 for additional Dry Yeast Information .
• All of the recipes in this book have been tested with
your Breadmaker. If the result is not satlsfled. Ingredi-
ents adjustment may be needed (particularly yeest &
water). For details, please refer to the "Baking Tips
for Yeast Bread" on page 33-34.
-----------------22-----------------
Page 24

RECIPES
SOUR DOUGH STARTER
Skim Milk
White Flour
Plain Yogurt
(1) 1-1/2 qt. Ceramic or glass container
Ingredient
(with tight-fitting lid)
To Prepare:
1 Heat skim milk to gOoF (32°C) to 100°F (38°C)
2 Remove from heat and stir in yogurt.
3 Let mixture stand at room. temperature 18-24 hours
or until a curd forms. Stir once or twice with a
wooden spoon, to keep liquid mixed in.
4 Stir in flour gradually, mixing well.
5 Let stand 2-5 days untit bubbly and spongy-looking
with a good sour aroma.
6 Refrigerate.
To use:
1 Bring to room temperature and allow to bubble.
2 Use amount recommended in recipe.
3 After each use replenish starter.
To replenish:
1 If 1 1/2 cups starter was used. add 3/4 cup flour
and 3/4 cup skim milk to remaining starter.
Note: total volume must remain same.
2 Allow mixture to stand at room temperature for 18-
24 hours.
3 Refrigerate until needed.
BAGELS
White Ftour
Water
Salt
Use :;etting
Sugar
1 Dry Yeast
Ingredient
Regular
1 cup
3 tbsp.
1 cup
9
1 1/2 tsp.
Regular
1 cup
1 tsp.
3 cups
1 tsp.
Water
White Flour
Water
Salt
Cornstarch
Sour Dough Starter
\..,ornmeal
Use Setting
Sugar
1 Dry Yeast
SOUR DOUGH FRENCH
Ingredient
METHOD
1 Measure sour dough starter, water, sugar, salt, flour,
and yeast into pan.
2 Insert baking pan securely into unit, close lid.
3 Select appropriate bread setting.
4 Push start button.
5 When dough is ready remove from pan, and divide
dough in half. Roll dough back and forth, elongating
it into a 14-inch log.
6 Place each loaf on a stift piece of cardboard.
Sprinkle with 1/4 cup cornmeal. Cover lightly with
plastic wrap or damp cloth. Allow to rise in a warm
place free from drafts until putty or double in size
(about 45 minutes to 1 hour).
7 Adjust oven rack to the lowest position.
Place a 12 x ls-inch baking pan without sides on
top rack as oven is preheating to 400°F (200°C).
Then place a baking pan with sides on the bottom
rack: Add 1/4-inch boiling water.
8 Combine cornstarch and water.
Heat to boiling while stirring, allow to cool.
9 With very sharp knife, cut four, 1I2-inch deep
diagonal slashes on top of loaves. Brush the entire
surface of each loaf with cornstarch mixture.
10 Slide each loaf oft cardboard onto top baking sheet
in oven.
11 Bake at 400°F (2000c) for 25 minutes or until bread
sounds hollow when tapped. Brush every 5 to 7
minutes with cornstarch mixture.
Yield: Makes 2 loaves
9
1/2 cup
1/2 cup
1 1/2 tsp.
3 tsp.
1 tsp_
Regular
1 1/2 cups
1 1/2 tsp.
3 1/2 cups
1/4 cup
METHOD
1 Measure water, sugar, salt, ftour, and yeast into
baking pan.
2 Insert baking pan securely into unit, close lid.
3 Select appropriate bread setting & push start button.
4 When dough is ready, remove from pan and turn
dough out onto a lightly'f1oured surface.
5 Divide into 10 equal portions. Roll into smooth
balls. Use thumbs to make a 1-1/2 inch hole in the
center of each ball.
6 Place on a greased baking sheet.
7 Grease top of each bagel with soft shortening.
Cover with wax paper and dry towel.
Place in a warm area free of drafts and allow to rise
for 30-minutes.
8 Meanwhile,-bring 3 quarts of water and 1tablespoon
sugar to boil.
9 Simmer 3 to 4 bagels at a time in water for 5 to 6
minutes per side.
10Turn once or twice. Remove with slotted spoon.
Drain on paper towels. Place on greased baking
sheet dusted with cornmeal.
11 Brush lightly with egg yolk and water mixture.
Q Sprinkle with poppy or sesame seeds. diced onion,
garlic chips, or shredded chaddar cheese,
if desired.
13 Bake at 400°F (200°C) 25 to 30 minutes.
Yield: Makes 10 bagels
CD See page 15 for additional Dry Yeast Information.
• All of the recipes in this book have been tested with
your Breadmaker. If the result is not satisfied, ingredi-
ents adjustment may be needed (particularly yeast &
water). For details, please refer to the ·Baking Tips
for Yeast Bread" on page 33-34.
23----------------------
1. Divide dough into 10 equal place.
2. Hold ball with both hands, use thumbs to make a hole
in the center of each ball. Continue to work with dough
until hole is about 1 1/2 inches and ball is shaped like a
doughnut.
3. With a metal spatula, place bagels into boiling water
and cook 5 to 6 minutes per side, tuming once or twice.
(This helps to develop a chewy crust.) Remove from
water and drain on paper towels.
4. Place bagels on greased baking sheet dusted with
commeal. Brush lightly with mixture of water and egg
yolk. Sprinkle with your choice of seeds or salt.
Page 25

RECIPES
CROISSANTS
Butter
Butter Chilled and Sliced
Water
Skim Milk Powder
White Flour
mDrv Yeast
Egg
Sugar
Salt
Ingredients
with 1 tbsp. of cold water)Use ~etting
METHOD
1 Measure water, dry milk, sugar, salt, butter, flour,
into baking pan. Sprinkle yeast into center of flour.
2 Insert baking pan securely into unit, close lid.
3 Select dough setting and push start button.
4 Meanwhile, roll
between two sheets of waxed paper into a
lOx 7-inch rectangle. Chill at least 1 hour.
5 The Breadmaker will beep 3 times and the display
will flash "END" when dough is ready.
6 Remove dough from pan and roll dough out to 1/4
inch thickness on a lightly-floured surface into a
12-inch square.
7 Place chilled butter on center third of dough.
Fold each side over the buttered side.
Roll dough to 20 x 14-inch rectangle.
S Fold dough into thirds, seal edges. Roll into a 20 x
14-inch rectangle. Fold and roll twice more. Cover
securely with plastic wrap. Chill in freezer for 20
minutes. Repeal folding and rolling 3 times.
9 Roll dough to liS" thickness into a 10"x15-inch
rectangle. Cut into 6 squares.
Cut ~ach square in half to form 12 triangles.
1) Roll each triangle loosely, starting from the wide
end. Place seam side down on greased baking pan.
11Curve ends, Sprinkle water on top, Cover lightly with
damp cloth and allow to rise in a warm area free
from drafts 45 to 50 minutes or until doubled in size.
12 Brush lightly with beaten egg and water.
13Bake at 375°F (190°C), 10 to 15 minutes, or until
golden brown and flaky.
Yield: Makes 12 croissants
3 tSD.
9
1/2 cup
1 large (whisked together
Regular
3/4 cup
1 tbsp.
1 tsp.
1 tbsp.
2 cups
2 tbsp.
1/2 cup of chilled butter slices
White Flour
• Beer
Butter
1m Drv Yeast
Use Setting
Sugar
iSall
1. For flaky croissants, place chilled dough on a cool
surface such as marble. Place chilled butter in center
third of dough square: Fold each side over buttered
side.
2. Roll dough out again into a 3IB-inch-thick or 20 x 14-
inch rectangle. Turn over, occasionally flouring sur-
face lightly to prevent sticking.
3. Fold dough in thirds to make a rectangle again. Roll
and fold dough this way twice.
PIZZA DOUGH
Ingredients
" NOTE: Water can be substituted for beer in this
recipe resulting in a crispier crust.
METHOD
1 Place beer, butter, sugar and salt into baking pan.
2 Add flour. Sprinkle yeast into center of flour.
3 Insert pan securely into baking unit, close lid.
4 Select dough setting and push start button.
5 The Breadmaker will beep 3 times and the display
will flash "END" when dough is ready.
6 Preheat your oven to 4000F (2000c)
7 Remove dough from pan and press dough into a
lightly greased 12" pizza pan. Brush lightly with
vegetable oil. Cover dough and allow to stand 15
minutes in a warm draft free area.
8 Spoon tomato or pizza sauce over dough, top with
your favorite ingredients & grated mozzarella cheese.
9 Bake at 4000F (200°C) 25-30 minutes or until crust
is golden brown and cheese is bubbly.
NOTE:
For a thinner crust pizza, divide dough in half and
press into 2-12" pans.
Yield: Makes one thkk pizza crust.
1tbSD.
9
1 cup
1 tbsp.
1 tsp.
2314 cups
Regular
2 tbsp.
<D See page 15 for additional Dry Yeast Information.
" All of the recipes in this book have been tested with
your Breadmaker. If the result is not satisfied, ingredi-
ents adjustment may be needed (particularly yeast &
water). For details, please refer to the "Baking Tips
for Yeast Bread" on page 33-34.
4. Roll dough into a rectangle about
to x 15-inch rectangle. Cut into 6 squares, Cut each
square in half to from a total of 12 triangles.
5. Roll up each triangle, starting from the wide end.
Place seam-side down on greased baking pan.
liB-inch thick or
24 -----------------
Page 26

RECIPES
LAYERED PIZZA LOAF WHITE ROLLS WHEAT ROLLS
Regular
1 cup
1 tbsp.
2 tbsp.
1 tsp.
23/4 cups
1 ts
'9
"NOTE: Water can be substituted for beer in this
recipe resulting in a crispier crust.
METHOD
1 Place beer, butter, sugar and salt into baking pan.
2 Add four, Sprinkle yeast into center of flour
3 Insert pan securely into baking unit, close lid.
4 Select dough setting and push start button.
5 The Breadmaker will beep 3 times and the display
will flash "END" when dough is ready.
6 Prepare filling ingredients during final half hour
dough is rising. All ingredients should be at room
temperature.
7 Thaw spinach and squeeze dry. Add egg, parmesan
cheese and basil. Set aside.
8 Cook, crumble and drain Italian sausage, set aside.
9 Slice mushrooms, onion and green pepper
t) Shred mozzarella cheese.
11 Set aside 1/4 dough.
12 Roll remaining dough into a 18" x 12" rectangle.
Lightly press into a greased 10" x 5" loaf pan,
allowing dough to hang 1/2" over on all sides.
13 Sprinkle one half of cheese onto bottom of dough.
14Layer in remaining ingredients in the order listed in
the filling recipe.
15Top with remaining cheese.
1) Roll remaining dough into a 10" x 5" rectangle.
17 Fold over and seal edges.
11 Cut 3 steam slits in dough.
19Bake at 375°F (190°C) for 30-40 minutes until allow
sounding
20 Allow to cool in pan for 15 minutes before removing.
Filling Ingredients:
Frozen spinach (300 g) 10 oz.
Grated parmesan 1/3 cup
Egg 1
Basil 1 tsp.
Mozzarella (300 g) 10 oz.
Italian sausage (300 g) 10 oz.
Pizza sauce 1 1/4 cups
Green peppers 1/3 cup
Mushrooms 1/3 cup
Chopped onion 1/3 cup
Yield: Makes 1 loaf.
CD See page 15 for additional Dry Yeast Information.
" All of the recipes in this book have been tested with
your Breadmaker If the result is not satisfied, ingredi-
ents adjustment may be needed (particularly yeast &
water). For details, please refer to the "Baking Tips
for Yeast Bread" on page 33-34.
Regular
1 1/4 cups
1 tbsp.
2 tbsp.
2 tbsp.
1 1/2 tsp.
31/4 cups
111215
'9
METHOD
1 Measure ingredients into baking pan.
2 Insert baking pan securely into unit, close lid.
3 Select dough setting.
4 Push slart button.
5 The Breadmaker will beep 3 times and the display
will flash "END" when dough is ready.
6 Remove dough from pan and turn dough out onto
a lightly floured surface.
7 Divide into 12 equal pieces.
8 Shape each into a ball.
9 Place in greased muHin tins.
10Brush lightly with melted butter.
11 Let stand, covered for 20-25 minutes.
12 Bake at 375°F (190°C) for 15-20 minutes.
Yield: Makes 12 rolls
PUMPERNICKEL ROLLS
Ingredient
Water
Skim Milk Powder
Shortening
Sugar
Molasses
~
WhiieFiour
Whole Wheat Flour
Rye Flour
Cocoa
Instant CoHee
) Yeast
Use Setting
METHOD
1 Measure ingredients into baking pan.
2 Insert baking pan securely into unit, close lid.
3 Select dough setting.
4 Push start button.
5 The Breadmaker will beep 3 times and the display
will flash "END" when dough is ready.
6 Remove dough from pan and turn dough out onto
a lightly floured surface.
7 Divide into 12 equal pieces.
8 Shape each into a ball.
9 Piace jn greased muHin tins.
10 Brush lightly with melted butter.
11 Let stand, covered for 20-25 minutes.
12Bake at 375°F (190'C) for 15-20 minutes.
Yield: Makes 12 rolls
Regular
1 1/4 cups
2 tbsp.
1 tbsp.
2 tbsp.
2 tbsp.
1 1/2 tsp.
1 3/4 c.tJps
1 cup
1/2 cup
2 tbsp.
11l2tsp.
1112ts
'9
Regular
1 1/4 cups
2 tbsp.
2 tbsp.
2 tbsp.
1tbsp.
11/2tsp.
31/4 cups
11/2ts
'9
METHOD
1 Measure ingredients into baking pan.
2 Insert baking pan securely into unit, close lid.
3 Select dough setting.
4 Push start button.
5 The Breadmaker will beep 3 times and the display
will flash "END" when dough is ready.
6 Remove dough from pan and turn dough out onto
a lightly floured surface.
7 Divide into 12 equal pieces.
8 Shape each i.oto a ball.
9 Place in greased muHin tins.
10Brush lightly with melted butter
11 Let stand, covered for 20-25 minutes.
12 Bake at 37S'F (190"C) for 15-20 minutes.
Yield: Makes 12 rolls
PRETZELS
" NOTE: Water can be substituted for beer in this
recipes resulting in a crispier crust.
METHOD
1 Place beer, butter, sugar and salt into baking pan.
2 Add flour. Sprinkle yeast into center of flour.
3 Insert pan securely into baking unit, close lid.
4 Select dough setting.
5 The Breadmaker will beep 3 times and the display
-<:,
will flash "END" when dough is ready.
6 Remove dough from pan and turn dough onto lightly
floured board divide into 4 equal portions.
7 Cut each quarter into 4 equal portions. Roll each
piece of dough into a thin rope about 12 inches
long.
B To shape into pretzel, pick up ends of rope in each
hand and curve into a circle, crossing ends at top.
9 Twist ends once and lay down over bottom of circle.
t) Invert pretzels so ends are underneath, place about
1 inch a part on well-greased baking sheets. Then
brush with beaten egg and sprinkle lightly with
coarse salt, poppy seeds, or sesame seeds.
1 Bake at 400°F (200'C), 10 to 12 minutes.
Q For crispy, dry crunchy pretzels, place cooked
pretzels in cool oven, on an ungreased baking
sheet. Allow to stand 3 hours or ovemight. This
process allows pretzels to become dry & crunchy.
13 For soft and chewy pretzels, serve warm with
mustard.
Yield: Makes 16 pretzels
Page 27

RECIPES
Butter
Water
White Flour
Egg (beaten)
(i) Orv Yeast
Use Setting
Sugar
Sa~
RASPBERRY BRAID
Ingredient
METHOD
1 Measure ingredients into baking pan.
2 Insert baking pan securely into baking unit, close lid.
3 Select dough setting.
4 Push start button.
5 The Breadmaker will beep 3 times and the display
will flash "END" when dough is ready.
6 Remove dough from pan and on a lightly floured
surface, divide dough in half.
7 Roll each half into a 14" x 8" rectangle.
8 Spread 1/4 cup raspberry jam down (lengthwise)
centre third of each rectangle.
9 Make diagonal cuts from the outer edges one inch
apart and three inches long. (See fig. 1)
1) Fold alternate strips of dough over filling.
(See fig. 2)
11 Place on greased baking sheets.
12 Brush with me~ed and cooled butter.
13Let rise 30 minutes.
14 Brush with an egg yolk and 1tbsp. water mixture.
15Combine until crumbly:
2 tbsp. soft butter
2 tbsp. brown sugar
1/3 cup flour
1/4 tsp. nutmeg
16Sprinkle half over each dough.
17Sake at 350"F 175°C), for 30-35 minutes
Yield: Makes 2 braids.
1
9
2 tso.
Regular
1 1/4 cups
32/3 cups
2 tbsp.
1/4 cup
3/4 tsp.
White Flour
Milk
ISa~
Raisins
IButter
I<:;illOamon
IGround Cloves
I
(i) Orv Yeast
I Sugar
Egg (Beaten)
Nutmeg
Use Setting
HOT CROSS BUNS
Ingredient
METHOD
1 Measure ingredients into baking pan.
2 Insert baking pan securely into baking unit, close lid.
3 Select dough setting.
4 Push start button.
5 The Breadmaker will beep 3 times and the display
will flash "END" when dough is ready.
6 Remove dough from pan and divide into 12 pieces.
7 Shape into round, slightly flattened buns.
8 Place 2" apart on greased baking sheets.
9 Cover and let rise 30 minutes or until double.
10Combine (and brush on buns) 1slightly beaten egg
with 1 tbsp, water.
11 Slash top of bun to form a cross.
12Bake at 375°F (190"C) for 16-18 minutes.
13 Drizzle "cross", while hot, with icing sugar glaze
consisting of:
3/4 cup sifted icing sugar.
1 tbsp. milk
2 drops almond flavouring.
Yield: Makes 12 buns.
9
1/4 tsp.
3 tso.
3 1/2 cups
Regular
1cup
1 1/4 cups
1/4 cup
1/3 cup
1 large
1 tsp.
1 tsp.
1/2 tsp.
Water
White Flour
Butter
Skim Milk Powder
Use Setting
(i) Orv Yeast
Sugar
Salt
Eggs (beaten)
ilk
Use Setting
White Flour
(I) Orv Yeast
gg (beaten)
hortening
Salt
ugar
JEWISH CHALLAH LOAF
Ingredient
METHOD
1 Measure ingredients into baking pan.
2 Insert baking pan securely into baking unit, close lid.
3 Select dough setting.
4 Push start button.
5 The Breadmaker will beep 3 times and the display
will flash "END" when dough is ready.
6 Remove dough from pan and divide dough into 6
equal portions.
7 Roll, with palm of hands into long smooth strips.
Thll pieces should be thick in the middle and
gradually tapered towards the ends.
8 Braid the 6 dough strips.
9 Place on a lightly greased baking sheet.
10Cover and let rise 30 minutes.
11 Brush with egg yolk.
12Bake at 375°F (190°C) for 30-35 minutes
Yield: Makes 1 loaf.
2
11/2tso.
9
1 cup
3 tbsp.
1/4 cup
1/4 cup
1 1/2 tsp.
31/2 cups
Regular
ENGLISH MUFFINS
Ingredient
9
2
2 tbsp.
2 tso.
1 cup
2 tbsp.
Regular
1 tsp.
3 cups
<D See page 15 for additional Dry Yeast Information.
" All of the recipes in this book have been tested with
your Breadmaker. If the result is not satisfied, ingredi-
ents adjustment may be needed (particularly yeast &
water). For details, please refer to the "Baking Tips
for Yeast Bread" on page 33-34.
26
METHOD
1 Measure ingredients into baking pan.
2 Insert baking pan sacurelyinto baking unit, close lid.
3 Select dough setting.
4 Push start button.
5 The Breadmaker will beep 3 times and the display
will flash "END" when dough is ready.
6 Remove dough from pan and roll to 1/4" thick.
7 Cut into 3" circles.
8 Place on cornmeal sprinkled baking sheets.
9 Brush with water and sprinkle with com' meal.
10Cover and let rise 30 minutes.
11 Preheat an ungreased grill to 35O"F(175OC).
12 Grill 6-7 minutes on each side or until golden
brown.
Yield: Makes 20 muffins.
Page 28

RECIPES
RAISIN KOlACKY
Ingredient
Water
Skim Milk Powder
Sugar
Butter
Egg
Salt
White Flour
UJ Dry Yeast
Use·Setting
METHOD
1 Measure ingredients into baking pan.
2 Insert baking pan securely i"to baking unit. close lid.
3 Select dough setting.
4 Push start button.
5 The Breadmaker will beep 3 times and the display
will flash "END" when dough is ready.
6 Remove dough from pan.
7 Roll dough out to 1/2" thick
8 Cut with a 2 1/2" biscuit cutter
9 Place 2" apart on greased baking sheets.
10Cover and let rise 30 minutes or until double in size.
11 Press an indent In the centre of each bun.
leaVing a 1/4" rim around the edge.
12 Fill with raiSin filling.
13Bake at 400°F (200°C) for 10 minutes.
Raisin fillin9 Combine:
2 cups seedless raisins
1 cup brown sugar
1 tsp. cinnamon
1/2 tsp allspice
1 1/3 cup water
Bring to a boll stirring constantly.
Cook 1 minute longer.
Remove from heat and cool.
Yield: Makes 18-20 buns
Regular
1 cup
Milk
White Flour
Salt
Egg (beaten)
Use Setting
Shortening
Sugar
I CD Dry Yeast
ltbsp
1/4cup
2 tbsp.
TTarge(i)eaten)
3/41sp
3-1/2 cups
1tbs
9'
DOUGHNUTS
Ingredient
METHOD'
1 Measure ingredients into baking pan.
2 Insert baking pan securely into baking unit, close lid.
3 Select dough setting
4 Push start button.
5 The Breadmaker will beep 3 times and the display
will flash "END" when dough is ready
6 Roll dough to 1/2" thick.
7 Cut with a 2 1/2" doughnut cutter.
8 Let rise, covered. 30 minutes or until double in size.
9 Deep fat fry at 375°F (190°C).
10Turn doughnuts as they rise to the surface.
Fry until brown on both sides.
11 Drain on absorbent paper.
Yield: Makes 2 dozen doughnuts.
1
9
11/2tsD.
1 1/4 cups
1/4 cup
1 tsp.
31/2 cups
1/4 cup
Regular
Water
Vegetable Oil
Egg Whites
'Super Moist Cake Mix
Use Setting
Milk
Vanilla
Eggs
Shortening
CAKE
Pre-measure ingredient groups (sift together ingredi-
ent Group 2). Place in bowls near Bread Machine. All
ingredients must be at room temperature.
Ingredient
'Super Moist is a registered Trade Mark of General
Mills, Inc.
METHOD
1 Measure water. oil & egg whites & place in baking
pan.
2 Add Contents from box Cake Mix to baking pan.
3 Select #10
4 Push Start Button.
5 The Bread Make will beep 3 times and the display
will flash "END" when cake is done.
6 Push and hold down stop button until buzzer sounds.
7 Unplug Bread Maker.
8 Using oven mitts. remove pan from unit & allow to
cool.
9 Carefully remove cake from pan.
3
10
3/4 cup
Regular
1/4cup
1 Box (S17g)
BEST 2 EGG CAKE
Pre-measure ingredient groups (sift together ingredi-
ent Group 2). Place in bowls near Bread Machine. All
ingredients must be at room temperature.
(1) Ingredient
.
1/3cup
2
3/4 cup
1 tsp.
Regular
CD See page 15 for additional Dry Yeast Information .
• All of the recipes in this book have been tested with
your Breadmaker. If the result is not satisfied. ingredi-
ents adjustment may be needed (particularly yeast &
water). For details. please refer to the "Baking Tips
for Yeast Bread" on page 33-34.
Salt
Sifted Cake Flour
Baking Powder
27 ------------------
(2)
Ingredient
METHOD
1 Measure and place ingredients from group 1in bread
machine bucket
2 Measure and sift together ingredients in group 2.
Then place in bread machine pan.
3 Select #10 setting.
4 Push Start Button.
5 The Bread Make will beep 3 times and the display
will fresh "END" when cake is done.
6 Push and hold down stop button until buzzer sounds.
7 Unplug Bread Maker.
8 Using oven mitts, remove pan from unit and allow to
cool.
9 Carefully remove cake from pan.
Regular
1tsp.
21/4 cups
21/2tsp.
Page 29

RECIPES I QUICK BREADS
BANANA NUT BREAD
We've seen many an eye light up at the mention of
Banana Nut Bread. It has to be one of the most popular
quick breads around.
Pre-measure ingredient groups (sift together ingredi-
ents Group 2). Place in bowls near Bread Machine. All
ingredients must be at room temperature.
(1) Ingredient
(2)
Ingredient
Packed
All-Purpose Flour
METHOD
1 Measure and place ingredients from group 1 in bread
machine baking pan.
2 Measure and sift together ingredients in group 2.
Then place in bread machine baking pan.
3 Press select to #10 for quick bread.
4 Press start. Bread Machine will mix and bake bread
automatically.
5 When display reads "END" the baking is complete.
6 Press and hold stop button until buzzer sounds.
Display is Blank.
7 Unplug bread maker.
8 Using oven mitts, Take pan out of bread machine and
let cool before removing Banana Nut Loaf.
21/2 tbsp.
1/2 cup
1cup
2 Large Eggs
1/2 cups
Regular
Butter 1 Oil
Milk
Eggs
Unbleached
I Cornmeal
Baking Powder
fGranulated Sugar
1/4 cup
1/4cup
11/2cups
1tsp.
1tsp.
Regular
CORNBREAD
Have you ever noticed how most quick breads re-
semble cake? Well, com bread is one quick bread that
can be described as savory rather than sweet.
Pre-measure ingredient groups (sift together ingredi-
ents Group 2). Place in bowls near Bread Machine. All
ingredients must be at room temperature.
1 Oil
(1) Ingredient
(2)
Ingredient
All-Purpose Flour
METHOD
1 Measure and place ingredients from group 1 in bread
machine baking pan.
2 Measure and sift together ingredients in group 2.
Then place in bread machine baking pan.
3 Press select to #10 for quick bread.
4 Press start. Bread Machine will mix and bake bread
automatically.
5 When display reads "END" the baking is complete.
6 Press and hold stop button until buzzer sounds.
Display is Blank.
7 Unplug bread maker.
8 Using oven mitts, Take pan out of bread machine and
let cool before removing Com Bread.
Milk
Butter
Unbleached
Egg
Chopped Walnuts
Baking Soda
Baking Powder
,Salt
'Ground Cinnamon
Granulated Sugar
,Ground Nutmeg
Grated Peeled,
1/2 cup
2 Large Eggs
3 tbsp.
Regular
(2)
Regular
11/3cups
21/2 tsp.
1/2cup
2 tbsp.
APPLE WALNUT LOAF
The glorious aroma of baking apples, cinnamon and
nutmeg is this recipe's hallmark.
Pre-measure ingredient groups (sift together ingredi-
ents Group 2). Place in bowls near Bread Machine. All
ingredients must be at room temperature.
(1) Ingredient
Ingredient Regular
Granny Smith Apple
All-Purpose Flour
METHOD
1 Measure and place ingredients from group 1 in bread
machine baking pan.
2 Measure and sift together ingredients in group 2.
Then place in bread machine baking pan.
3 Press select to #10 for quick bread.
4 Press start. Bread Machine will mix and bake bread
automatically. _
5 When display reads "END" the baking is complete.
6 Press and hold stop button until buzzer sounds.
Display is Blank.
7 Unplug bread maker.
8 Using oven mitts, Take pan out of bread machine and
let cool before removing Apple Walnut Loaf.
1tbsp.
1cup
1 Large Eggs
1/2 cup
11/2Ccps
1l2tsp.
1/4tsp.
1/2cup
- 1/4tsp.
1/4 tsp.
1/4tsp.
Regular
2 tbsp.
IRIS SODA BREAD
You won't want to wait for St. Paddy's Day to enjoy this
raisin-studded, buttery bread.
Pre-measure ingredient groups (sift together ingredi-
ents Group 2). Place in bowls near Bread Machine. All
ingredients must be at room temperature.
(1) Ingredient
(2)
Ingredient Regular
All-Purpose Flour
METHOD
1 Measure and place ingredients from group 1in bread
machine baking pan.
2 Measure and sift together ingredients in group 2.
Then place in bread machine baking pan.
3 Press select to #10 for quick bread.
4 Press start. Bread Machine will mix and bake bread
automatically.
5 When display reads "END" the baking is complete.
6 Press and hold stop button until buzzer sounds.
Display is Blank .
7 Unplug bread maker.
8 Using oven mitts, Take pan out
let cool before removing Irish Soda Bread.
Lemon Juice
Powdered Pectin
Sugar
Use setting
vrushed Fresh ::;trawberries
1/2 cup
Regular
3/4 cup
1Large Egg
2 cups
11/2tsp.
1/4tsp.
1/4 cfup
01 bread machine and
JAMS
Ingredient
or Other Types of Fruit
FOR OTHER JAMS, FOLLOW THE SAME BASIC
RECIPE, ONLY SUBSTITUTE THE DESIRED FRESH
FRUIT INGREDIENT.
METHOD
1 Measure the ingredients into baking pan.
2 Insert the baking pan securely into baking unit,
close lid.
3 Select#11
4 Push start button.
5 The Breadmaker will beep 3 times and the display
will flash "END" when the jam is done.
6 Using oven mitts, remove pan from unit.
CD See page 15 for additional Dry Yeast Information.
• All of the recipes in this book have been tested with
your Breadmaker. If the result is not satisfied, ingredi-
ents adjustment may be needed (particularly yeast &
water). For details, please refer to the "Baking Tips
for Yeast Bread" on page 3;3-34.
11
1cup
1 pack (50g or 3 H. oz.)
Regular
3 cups
2 tbsp.
28----------------------
Page 30

BAKING CYCLE TIME ABM 2900
1 LB. BREADMAKER - BAKING CYCLE'TIME ABM 2900
SELECTIONS
·
·
··
··-
-
.
.··
··
··
··
··
·
·
·-
·
.·
-
·
··
·
·
·
--
--
·
30 min.
10 sec.
30 min.
10 sec.
10 sec.
5 sec.
5 sec.
90min.
1:30
60 min..
-
·
.
·
·
·
·
·
·
·
·
·
·
·
·
COURSE
Rise 2
Time
---
·
·
BASIC'
WHOLE
FRENCHSWEETDOUGH
WHEATWHEAT
5 sec.3 sec.3 sec.
5 sec.
31 min.
22 min.31 min.24 min.
76 min.
40 min.
2:50
4:20
10 sec.
5 sec.
5 sec.
3
89
10 sec.
55 min.
54 min.
30 min.
5 sec.
30 min.
29 min.
10 sec.
6 min.6 min.
BASIC
WHOLEWHOLE
REGULAR
WHEAT
REGULARRAPID
5 sec.
3 sec.5 sec.
31 min.
18 min.25 min.25 min.
79 min.39 min.34 min.
60 min.
3:10
4:303:203:303:25
1:401:00
45 min.45 min.
49 min.
15 min.
15 sec.15 sec.5 sec.
15 min.29 min.
6 min.
6 min.6 min.6 min.6 min.6 min.
4567
CAKE!JAM
60 min.60 min.60 min.60 min.60 min.60 min.60 min.
DARK
4 min.45 min.
10
6 min.
11
.
*15 min.
·
·
27 min.
6 min.
60 min.
23 min.29 min.29 min.
45 min..50 min.70 min.45 min.55 min.56 min.65 min.50 min.
2:45
10 sec.10 sec.
64 min.54 min.54 min.
12
BASIC
5 sec.5 sec.5 sec.
5 sec.
QUICK
BREAD
* Knead and Warm Cycle
29----------------
Page 31

NEED HELP?
QUESTIONS ABOUT GENERAL PERFORMANCE AND OPERATION
inserted properly. Make sure the pan is facing the
slicing the bread. Since the blade can be discon-
corners of the baking pan. When this happens, it
discarded and the process started from the
before the bread will be ready. These sounds are
lb..)
baking. Running warm or hot water over the blade
beginning.
ingredients in the most efficient manner possible.
long. Fresh ingredients such as eggs and mil~
Q1 How do I make doughnuts with my Breadmaker? A 1 The Breadmaker only makes the dough for the
minutes.
the bottom of the Breadmaker.
feature.
in a conventional deep fryer.
stuck, soak in lukewarm water for about 30
should never be used with the delayed timer
of the outer crust with a sharp knife.
nected from the pan, it is not a malfunction if it
should loosen it enough to be removed. If still
comes out in your bread.
right way and that it has "clicked" and seated into
made by the motor when kneading the dough. It isa normal operation, not a malfunction.
usually can be eaten or simply trim off that portion
It also serves to keep the yeast from combiningwith the liquid before the dough is mixed.
--
doughnuts. You must form and fry the doughnuts
A3 In some cases, the flour mix may remain on the
A4 The Kneading Blade or baking pan may not be
A6 The milk will spoil if left sitting in the machine too
A 10 Your Bread maker makes REGULAR (1
A11 The kneading blade may "stick" in place after
A2 Remove it with a pair of plastic tongs before
A 7 No. The unfinished bread or dough should be
AS Timing for each setting is outlined on page 6.
AS This allows for the Breadmaker to mix the
A9 The machine must start operation several hours
-----------------30-----------------
Page 32

NEED HELP?
QUESTIONS ABOUT GENERAL PERFORMANCE ANl)"OPERATION
012 How many watts is my Breadmaker?
013 Can I wash the baking pan in the dishwasher?
014 What will happen if I leave the finished bread in
the baking pan?
015 Why did the dough only partially mix? Why didn't
it mix completely?
016 Why didn't the bread rise?
A 12 430 watts during the baking cycle. Very little power
is consumed during the kneading and rising
cycles.
A 13 No. The baking pan and kneading blade must be
washed by hand.
A14 It may result in a "soggy" loaf of bread as excess
steam (moisture) would not be able to escape.
Allow to coolon a wire rack after baking to prevent
this.
A15 The batter may be too heavy or dry. Also, the
kneading blade or baking pan may not be inserted
properly. Ingredients may have been added in the
wrong order. (See Baking Tips Guide on page 33
and 34).
A16 The yeast could be bad, expired or possibly no
yeast was added at all. Also, if the mixing was not
complete, rising problems could develop. Gluten-
free flour will also affect the amount of rising.
There are numerous reasons for this problem and
are outlined in the Baking Tips Guide on page 33
and 34.
017 Why can't the delayed finish be set for more than
12 hour? What is the minimum time a cycle may
be delayed?
QUESTIONS ABOUT INGREDIENTS/RECIPES
018How do I know when to add raisins, nuts, etc. to
the bread?
019How come my bread comes out too moist? What
can I do?
A17 The maximum length of delay is 12 hours
including the particular cycle time. For example,
setting 8 has a cycle that takes 3:25 hours, so it
may be delayed up to 8 1/2 hours. The delay
cannot exceed 12 hours since the yeast and
ingredients may not work well. The minimum
length of delay for each setting is 30 minutes, as
the delay clock increase in 30 minute increments.
On setting 'Z thru 3 and 8, there is beeper tone to
A18 signal that vou may add raisins, nuts, etc. after
the initial kneading cycle is complete. (NOTE: The
beeper sounds after 32 minutes.)
However, in most cases, the added ingredients are
broken apart during the initial kneading cycle. So,
if it is more convenient for you to add them at the
start, results will be fine.
Humidity may affect the dough. Add an extra
A 19 tablespoon of flour. Also, high altitude may have
the same effect. Decrease the amount of yeast by
1/4 teaspoon and decrease the sugar and/or water/
milk slightly. (See Baking Tips Guide on page 33
& 34).
31 ------.....;,;;;;;;;;;;;;;:;.:;;;;;;;;:;.:;;;;;;;;:;.:===========
Page 33

NEED HELP?
QUESTIONS ABOUT INGREDIENTS I RECIPES
020 Why do I get air bubbles at the top of the bread? I A20 This can be caused by using too much yeast.
021 When using raisins, the Breadmaker crushes IA21
them. How can I avoid this?
022Why does my bread rise and then collapse or
crater?
023 Can I use my favorite bread recipes (traditional
yeast bread) in my bread machine?
024 Is it important for ingredients to be at room
temperature before adding them to the Baking
Pan?
A22 The bread may be rising too fast. To reduce the
A23 Yes, but you will need to experiment to get the
A24 No, as long as ingredients an~ not extremely cold
Ingredients such as raisins, nuts etc. should be
added when the signal time comes on approxi-
mately 32 minutes into the cycle (after initial
kneading) to prevent this from occurring (See page
2).
rate of rising, reduce the amount of water and/ or
increase the amount of salt and/ or decrease the
amount of yeast. (See Baking Tips Guide on page
33 & 34).
right proportion of ingredients. Become familiar
with the unit and make several loaves of bread
before you begin experimenting. Never exceed a
total amount of 4 2/3 cups dry ingredients (that
includes flours, oats, cornmeal, bran, cereal,
cracked wheat, etc.). Use the recipes in this bock
to help determine the ratio of dry ingredients to
liquid and amounts of yeast, sugar, salt, and
butter/margarine to use.
or hot, Milk, eggs, butter/margarine, and yeast can
be added directly from the refrigerator with good
results.
025 Why do the loaves vary in height and weight? The
. whole wheat and multi-grain breads are always
shorter. Am I doing some thing wrong?
A25 No, it is normal for Whole Wheat and Multi-Grain
breads to be shorter and denser than Basic or
French breads. Whole Wheat and Rye flours are
heavier than while bread flour, therefore they don't
rise as much during the bread making process.
They also typically have added ingredients, such
as oats, bran, nuts and raisins, which contribute to
the shorter height and denser texture.
BAKING TIPS GUIDE INTRODUCTION
When the Welbilf® Cookbook was developed, hundreds of loaves of bread were baked using popular brands of flours
and yeasts available. Adjustments were made to the recipes based on ingredients from popular brands. For example,
if you use flour processed by a local mill it may have different characteristics and produce different results than some
of the more popular national brands. If you followed the recipe in the cookbook exactly and feel the results should
be better than what you are currently achieving, use the BAKING TIPS GUIDE on following pages 33
you produce a loaf of bread to suit you personal tastes. There are usually several possible solutions to improve each
result. You can make adjustments one at a time, or you can try a combination of them all at once. We suggest
you keep track of your "baking experiments" so you can determine what adjustments were made to create your
perfect loaf.
& 34 to help
-----------------32----------------
Page 34

ex:
."
W
or Milk
BAKING TIPS FOR YEAST BREADS
- -'''. " -
orJXlW8f intenuption
W
J:
W
«
:J
CJ)
:J
W
CJ)
~
«
0
rnaIfi.n:1Xrrg
1 OJ!
outofdate
bJ
l£:m ingluten
cniEnl
Fagim
Uquidtoohot
seated insidebread maker
ofbread pan, crust burned
Flour
maker mor 00heatirI;,)element
Baking pan notproperty
was used
IBread not
oreao :CNerI ed;Je
or Honey
Flour
Sugar
IIncorrectbreadsetting
pan soon afterbaking
Salt
installedcorrectfy
Yeast
Nctera.xjl
~
SeeP.16·
Dark
spmeal
Caved In
Increase
Increase +
SeeP.15SeeP.15
Short
SeeP.16
SeeP.16SeeP.16
Decrease-
Increase
•
Loaf Rises
Flat Loaf
Increase
Increase
Decrease-
-sooP.16
Not Rise
SeeP'13,14
Loaf Does
SeeP'13,14
CrustToo
•
SeeP.16
1 Tbsp.
1/4 tsp.1/4 tsp.
CrustToo
No Rising
1 Tbsp.
1/4 tsp.
•
Uncooked
1/8-1/4 tsp,
Light
Too High
1 Tbsp.
•
••
•
•
1/8-1/4 tsp.1/8-1/4 tsp.
Enough
•
•
.~
Or Partially
not
0
Q
0
0
ctJ
SeeP.16
axe
Loaf RisesLoaf Sides
+
Decrease-
Loaf
"Mushroom
&
+
+
+
Used wrong type (fresh)
•
'IY
a:fu:j
Ire
Nooewas
Heavy
Decrease-
Loaf'
~.
SeeP.15
•
SeeP'13,14
Cooked
1/2 Tbsp.
1 Tbsp.
1/2 Tbsp.
1/2 Tbsp.
•
•
•
SeeP'13,14
•
1 Tbsp.
2 Tbsp .
1/4 tsp.
1/2 Tbsp.
1/8-1/4 tsp.
•
•
•
•
•
SeeP.17
SeeP.15
'.
.
33 -----------------
Page 35

BAKING TIPS FOR YEAST BREADS
•
•
Overcooked
•
• soIutKx1scoIt.rnn
•
1/8-1/4 tsp.1/8-1/4 tsp .
•
Breadmaker
See'M.Ishroon Loof'
::ieePolo
Dense
Loaf Core
Knotted
TextureOdorAltitudeCannot be
""""'.'v
Not MixedLoaf is
Loaf Burned
Texture
Loaf Core
AdjustmentProgrammed
High
During
•
Operation
Burning
&
•
Gnarly
Soggy
Completely
Heavy
Open, CoarsE
•
1/2 Tbsp.
•
or Started
Vtlt::r. IV
•
Top
1 Tbsp.
•
1/8-1/4tsp.
2 Tbsp.
SeeP.15
•
..
•
1/2 Tbsp.
---------------- 34 -----------------
. ,I
Page 36

TROUBLESHOOTING
CRATERED BREAD
If the top cave in, it is probably too much moisture inside the bread. This could be caused by using canned fruit
or vegetables. You are better to drain well and blow them dry first or to reduce your water by 1 tablespoon. Crater
Bread also happen with cheese bread because of each cheese has its own moisture content. A soggy sides and
silly shapes could be happened from leaving a loaf in the bucket after baking is completed.
MUSHROOM BREAD
There is too much yeast, so that it's blown its top. Yeast is almost always measured in teaspoons and is active
dry type. Please do not mix your active dry yeast with fast rise yeast in same bread. There is also too much sugar,
or ingredients with sugar like dried fruit. Decrease the sugar or honey accordingly. Another possibility is too much
of water used. Try decreasing it by 1/8 cup at a time. If a recipe still explodes to the top, try to replace 1/4 of the
total flour with whole wheat flour.
GNARLY LOAVES
Your dough probably needs more moisture. It is suggested to reduce flour 1 tablespoon at a time or to increase
liquids 1 tablespoon at a time until you reach the right balance for your machine.
HIGHER ALTITUDE
The low air pressure in higher altitudes means that less resistance is exerted on yeast, so your bread may rise faster.
Try to decrease the amount of yeast by 1/4 teaspoon at a time to slow the rising. Also try to decrease water by
no more than 1/8 cup. You can also see that climate can change the results of your bread due to different
temperature, and humidity of different locations in the world.
CAKE STICKING AT THE BOTTOM OF BUCKET
This is happened due to the amount of liquids is too much. We did an experiment to reduce the amount of water
to 3/4 cup from 1 1/4 cup and to reduce the amount of vegetable oil to 1/4 cup from 1/3 cup' as what Betty Crocker
SuperMoist Cake Mix said. We found out that the cake came out excellent. You can see that the magic of baking
is under your control through the bread machine.
JAM
If you find that your jam is not thicken enough, you may restart this particular Jam cycle again.
Most recipes contain sugar in some form for sweetness but to start the yeast and to promote browning. Salt, on
the other hand, inhibits the yeast, but is needed for flavor. Thus you can control the balance of the chemical reaction
between flour, yeast, water, sugar and salt to make a good loaf of bread according to your desired fluffiness, weight,
and browning.
Please not to believe a recipe that can work until you have already made it Otherwise, please follow suggestions
from this guide.
35-----------------
 Loading...