

Page 1
OWNER'S MANUAL
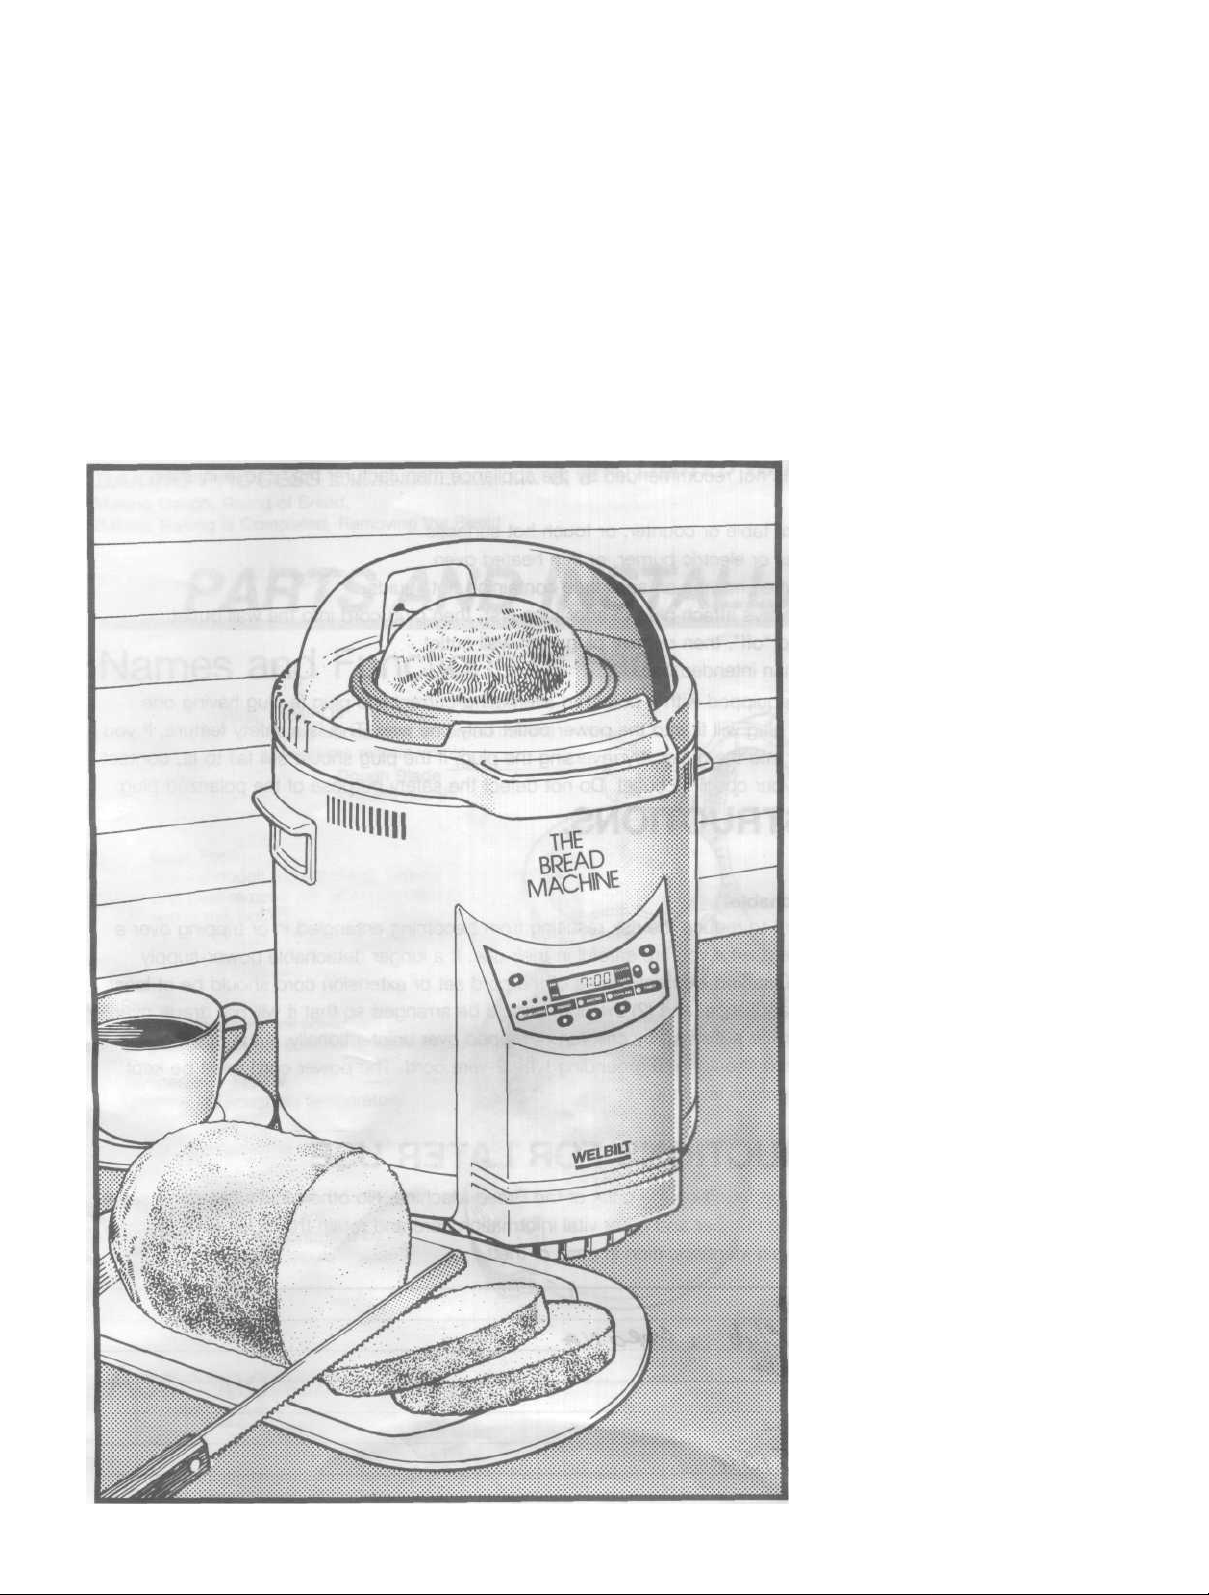
THE BREAD MACHINE
From Sandwich Breads to Specialty Breads
Easy and Delicious — Right at Your Table
ABM-1OO-4
MODEL
Please take a few minutes to read
these instructions before use. By
carefully following the instructions,
your
Home
Baker
will
serve
you
long
and well.
WELBILT
®
Page 2

IMPORTANT SAFEGUARDS
HOUSEHOLD USE ONLY
When using electrical appliances, basic safety precautions should always be followed, including the following:
1. Read all instructions before using the appliance.
2. Do not touch hot surface. Use handles or knobs.
3. To protect against electrical shock do not immerse cord, plugs, or unit in water or other liquid.
4. To prevent injuries or burns, do not insert your hand into appliance when appliance is operating.
5. Close supervision is necessary when any appliance is used by or near children.
6. Unplug from outlet when not in use and before cleaning. Allow to cool before putting on or taking off parts.
7. Do not operate any appliance with a damaged cord or plug or after the appliance malfunctions, or has been
damaged in any manner. Return appliance to the nearest authorized service facility for examination, repair, or
adjustment.
8. The use of accessory attachments not recommended by the appliance manufacturer may cause injuries.
9. Do not use outdoors,
10. Do not let cord hang over edge of table or counter, or touch hot surfaces.
11. Do not place on or near a hot gas or electric burner, or in a heated oven.
12. Extreme caution must be used when moving an appliance containing hot liquids.
13. When using an extension cord always attach plug to appliance first, then plug cord into the wall outlet.
To disconnect, turn any control to "off", then remove plug from wall outlet.
14. Do not use appliance for other than intended use.
15. Polarization — This appliance is equipped with a polarized alternating-current line plug (a plug having one
blade wider than the other). This plug will fit into the power outlet only one way. This is a safety feature, if you
are unable to insert the plug fully into the outlet, try reversing the plug, if the plug should still fail to fit, contact
a qualified electrician to replace your obsolete outlet. Do not defect the safety purpose of the polarized plug.
SAVE THESE INSTRUCTIONS.
A short power-supply cord for detachable
This unit has a short power supply cord to reduce the risk resulting from becoming entangled in or tripping over a
longer cord. An extension cord may be used if you are careful in their use. If a longer detachable power-supply
cord or extension cord is used, (1) the marked electrical rating of the cord set or extension cord should be at least
as great as the electrical ration of the appliance, and (2) the cord should be arranged so that it will not drape over
the countertop or tabletop where it can be pulled on by children or tripped over unintentionally. If the appliance is
of the grounded type, the extension cord should be a grounding type 2-wire cord. The power cord must be kept
dry and must not be bent or anything put on top of it.
SAVE THESE INSTRUCTIONS FOR LATER USE
The serial number of this product may be found on the back of the Bread Machine. No others have the same serial
number as yours. You should record the number and other vital information here and retain this book as a
permanent record of your purchase to aid identificication in case of theft.
Date of Purchase
Dealer Purchase from
Dealer Address
Dealer Phone No.
Model No.
Serial No.
ABM-100-4
2
Page 3
CONTENTS
PARTS AND INSTALLATION 3
Names and Functions of Parts, Accessories
CONTROL PANEL 4, 5
THE TIMER
Setting the Present Time,
Using the Timer to Make Bread
MAKING VARIOUS TYPES OF BREAD .. 6
Menu Selection, Mounting the Inner Pot
SAFETY INSTRUCTIONS 10, 11
Baking Process, Power Supply, Suitable Locations,
Main Unit, Oven, Handling of the Unit,
If Power Goes off During Use,
Consult Qualified Service Personnel if the Following
Occurs
CARE OF YOUR AUTO BAKERY 12
Inner Pot, Dough Blade, Shaft, Packing,
Oven, Air Intake, Main Unit
BEFORE ASKING FOR SERVICE 13
BREAD MAKING 7
Full Auto cycle. Making Special Kinds of Bread,
Manual cycle for Homemade Bread,
BAKING PROCESS 8, 9
Making Dough, Rising of Bread,
Baking, Baking is Completed, Removing the Bread
FEATURES, SPECIFICATIONS 14
LIMITED WARRANTY.. .15
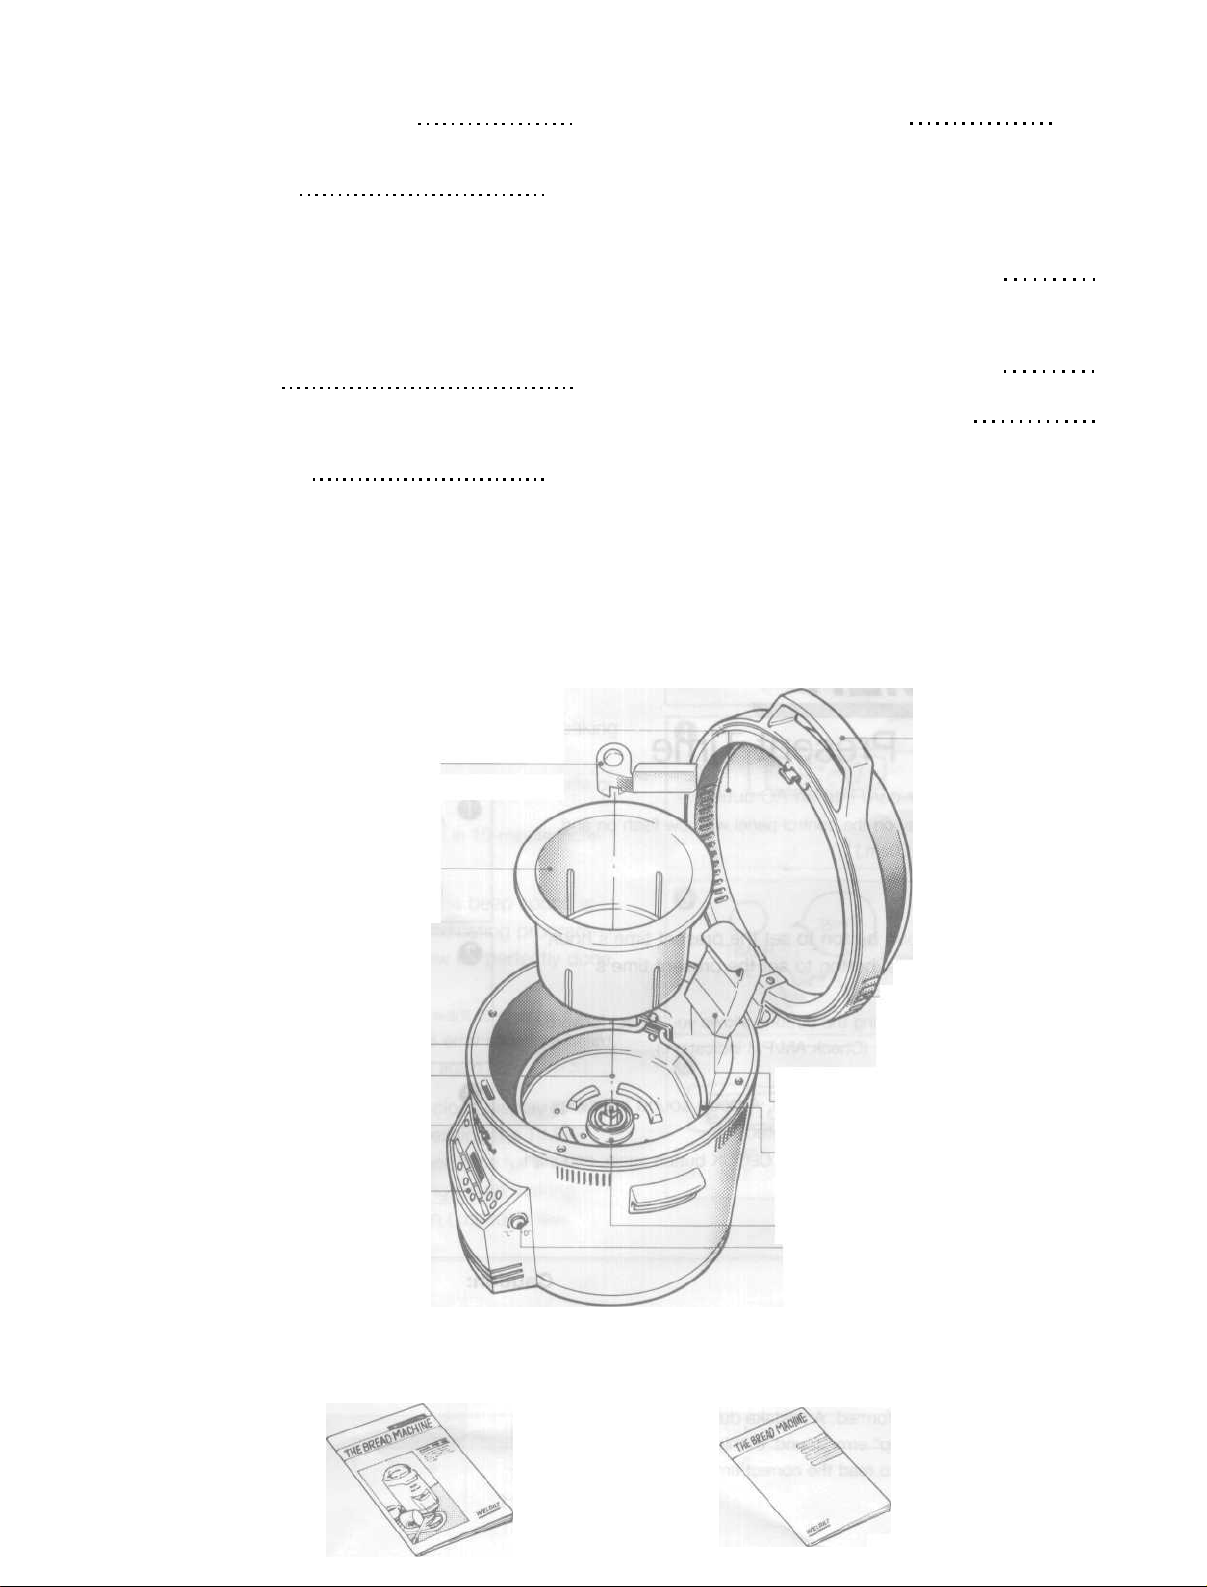
PARTS AND INSTALLATION
Names and Functions of Parts
Glass Lid
Being transparent, all bread making
processes remain visible.
Dough Blade
Kneads dough.
Inner Pot
Making dough, dough rising, baking
and heat removal are all performed
within this pot.
Oven Sensor
The baking temperature will adjust
depending on the type of bread to be baked,
Temperature Sensor
Controls the kneading temperature.
Shaft
Rotates the dough blade.
Control Panel
Operations are
centrally controlled by
a microcomputer.
Handle
Air Exhaust
— Air is vented
through these
outlets.
Ventilator
Air intake for cooling controls the
temperature and removes heat.
Heater
Bakes bread.
Packing
Temperature Sensor Adjuster
Used to fine-adjust the temperature
sensor to change the degree of
baking. Set it to "D" for wellbaked bread; turn it toward
"L" for lighter color bread.
Accessories
Owner's Manual
Baking Guide
3
Page 4
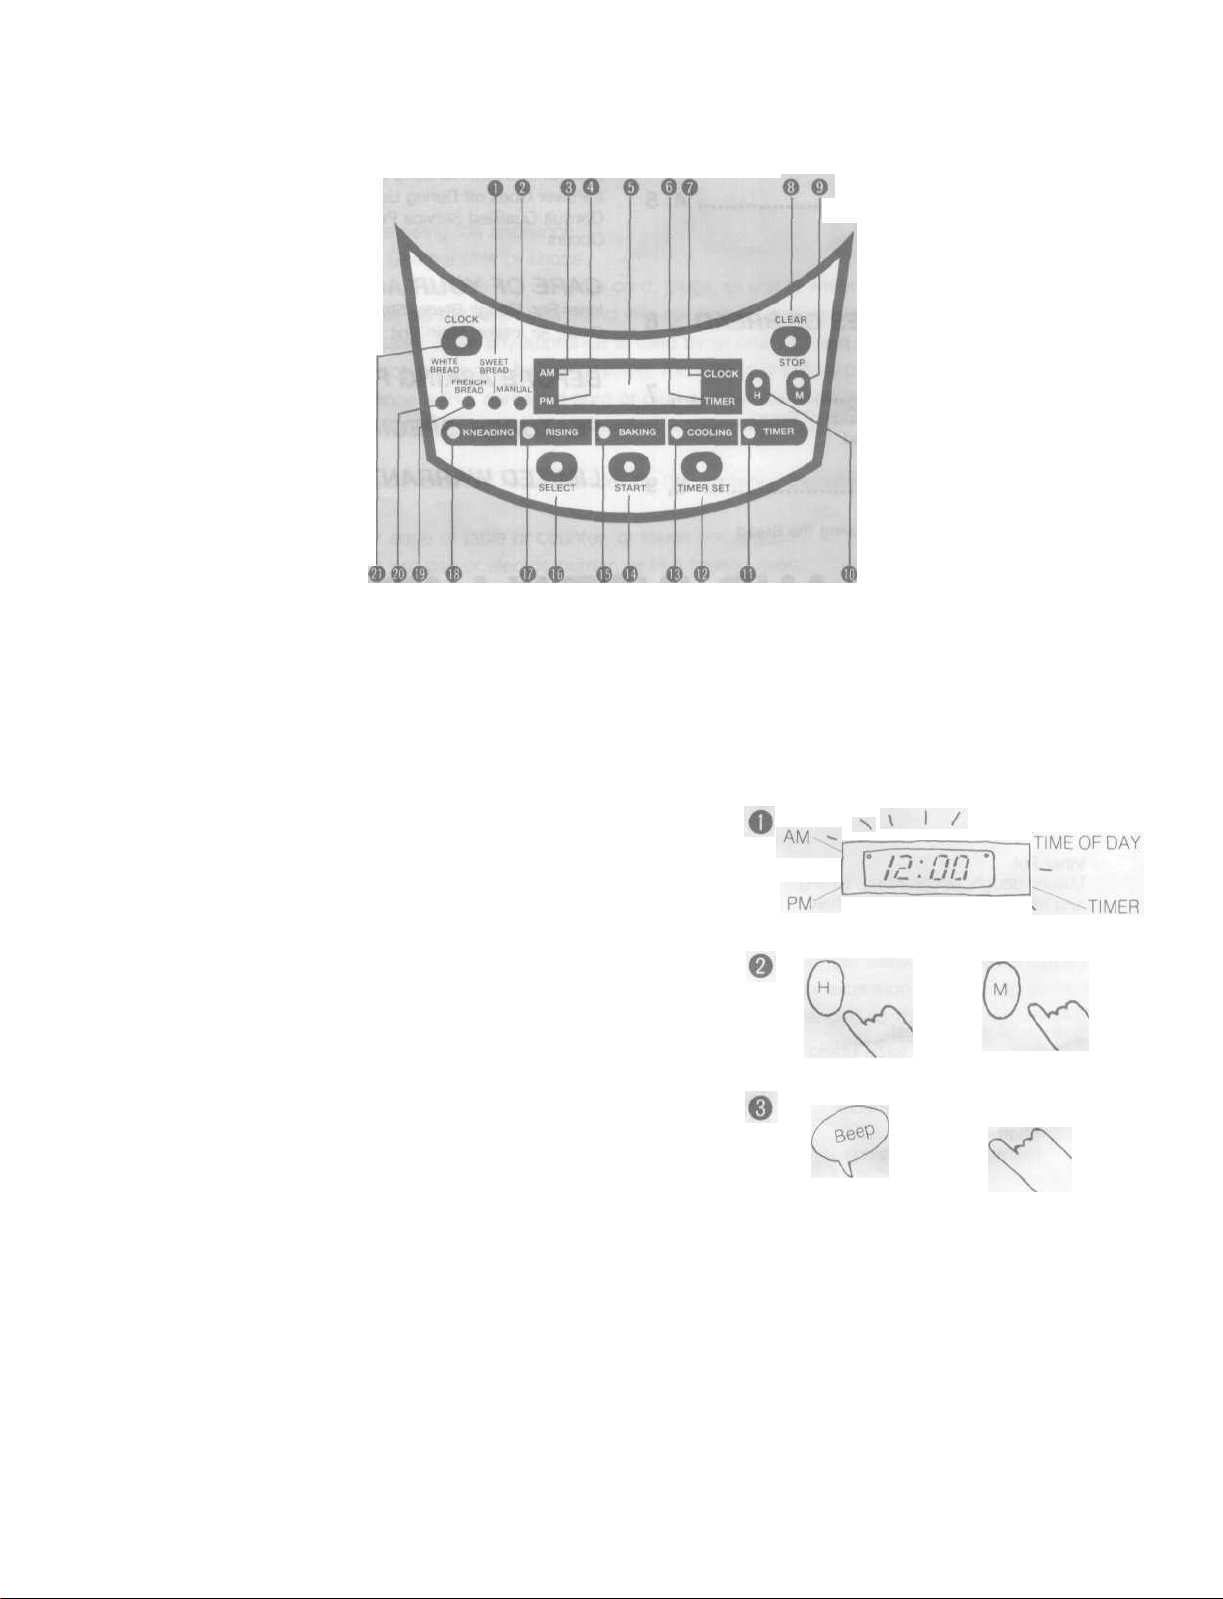
CONTROL PANEL
O SWEET BREAD IND. LIGHT
© MANUAL MODE IND. LIGHT
© AM IND. LIGHT
O PM IND. LIGHT
O DISPLAY WINDOW
© TIMER STANDBY MODE
IND. LIGHT
O CLOCK MODE IND. LIGHT
© CLEAR/STOP BUTTON
© MINUTE BUTTON
© HOUR BUTTON
THE TIMER
Setting the Present Time
1 Plug the power cord into an AC outlet.
(The clock display on the control panel will now flash on and
off indicating 12:00am.)
© TIMER SET IND. LIGHT
© TIMER MEMORY SET BUTTON
© COOLING IND. LIGHT
® START BUTTON
© BAKING IND. LIGHT
© MENU SELECT BUTTON
© RISING IND. LIGHT
© KNEADING IND. LIGHT
© FRENCH BREAD IND. LIGHT
© WHITE BREAD IND. LIGHT
® CLOCK SETTING
BUTTON
2 Press the H(Hour) button to set the present time's hour,
and the M(Minute) button to set the present time's
minutes.
• Continuously pressing the buttons allows you to fast forward
to the time desired. (Check AM/PM indication.)
3 Now press the CLOCK button. A beep sound indicates
present time setting is completed.
• In case of a mistake, press the CLOCK button again, and start
again from step 2.
Note: Time Setting
To prevent the quality of ingredients from deteriorating,
the timer cannot be programmed for periods over 12
hours. As process usually requires approx. 4 hours and
20 minutes, a time setting of less than 4 hours and 20
minutes cannot be performed. A mistake during setting
will generate "long beep" error sound. In this case,
reset the time display to read the correct time.
CLOCK
o
Caution:
Do not operate the unit immediately after baking is
completed or when temperature inside of oven is
higher than 122°F (50°C). Otherwise the microprocessor
will not activate the Bread Machine.
4
Page 5
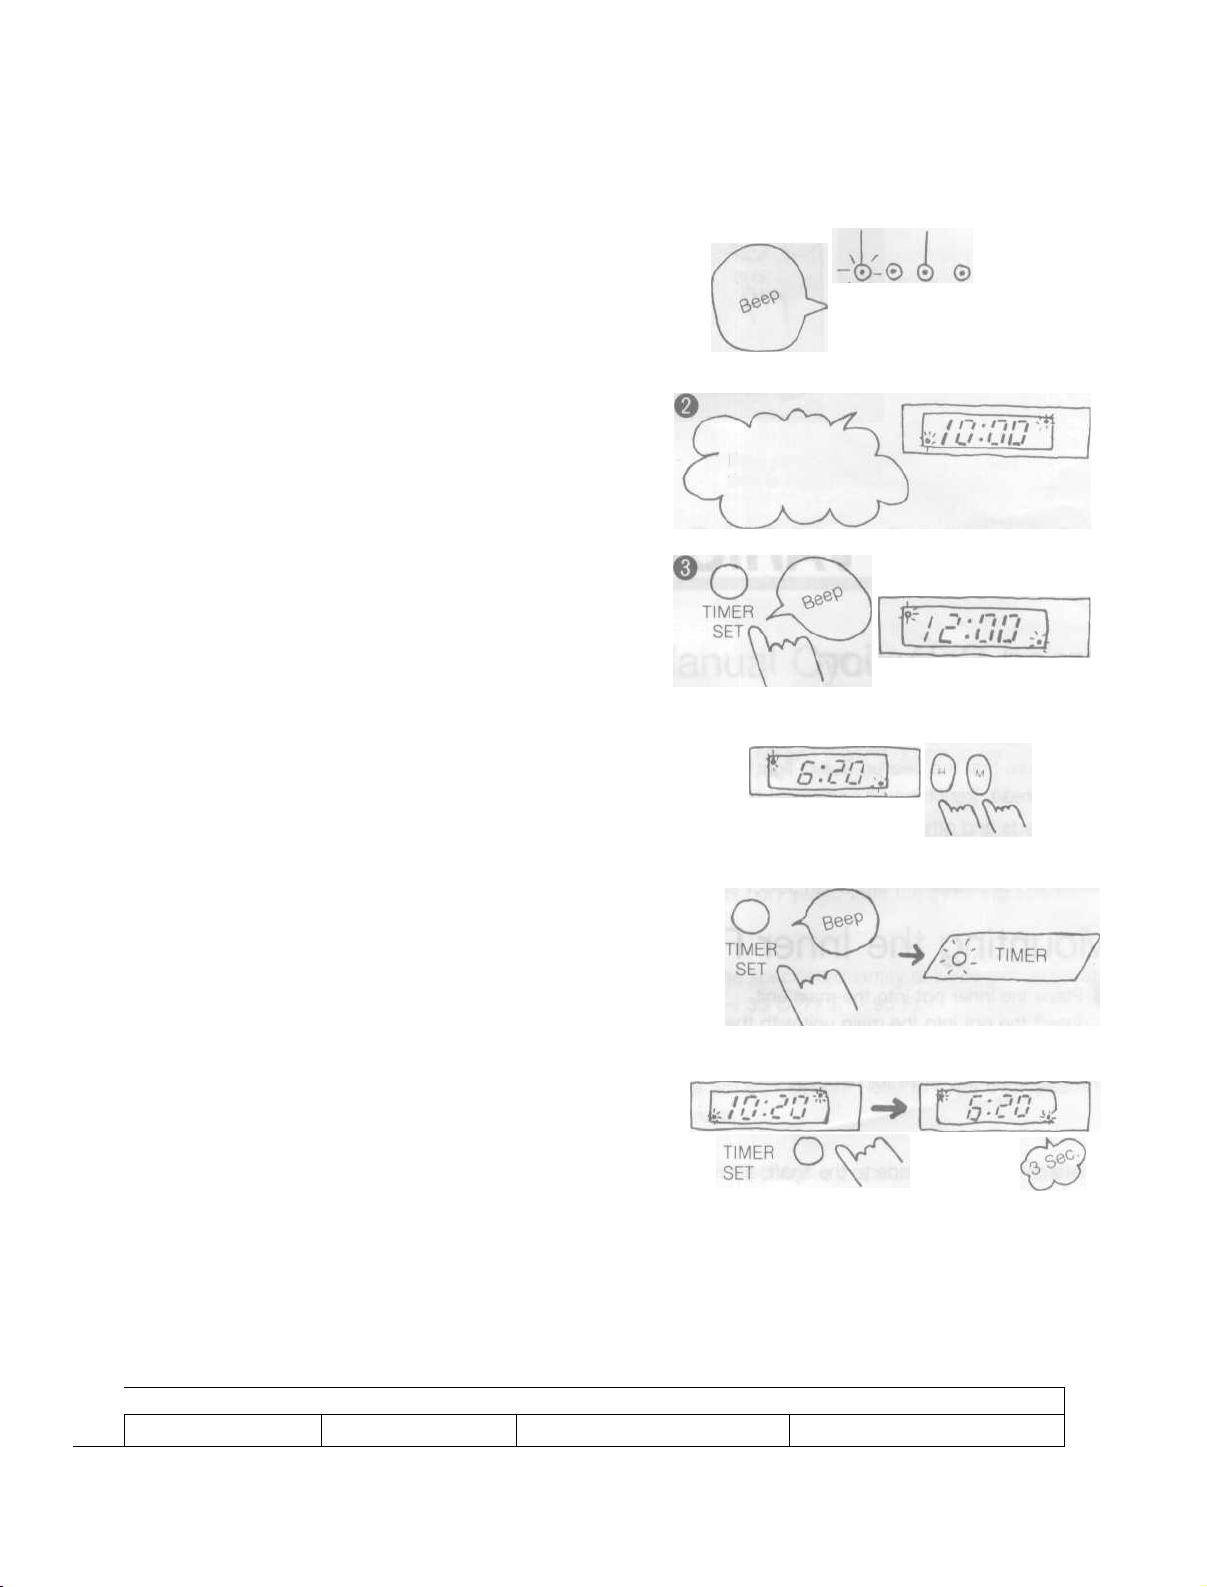
Using the Timer to Make Bread
1 Select the type of bread to be baked with the SELECT
button.
Note: Do not use the program timer when making bread containing
ingredients that can easily spoil, such as egg, milk, vegetables
and grains such as oatmeal etc.
2 Check the present time on the display.
3 Press the TIMER SET button.
(Check to make sure the timer display lights up.)
MENU
If the present
time is 10:00pm ..
4 Set the hour and minute for the time you want the baking
to be finished.
(Follow the same procedure as that used for setting the time of
day.)
Note: The program timer can only be adjusted in 10-minute incre-
ments.
5 Press the TIMER SET button again. The beep sound is
heard and the timer lamp lights up, indicating programming is completed. The bread will now be perfectly done
at the programmed time.
(If you made a mistake during setting or want to change the
programmed time, or should a long beep error sound be heard,
press the CLEAR/STOP button and start again from step 3.)
6 After programming is completed, the clock display returns
to indicate the current time of day. Pressing the TIMER
SET button will display the programmed time for 3 seconds. Pressing the 'start' button during bread making
process will display baking completion time for a few
seconds.
For example...
4
Program timer cannot be set for
(4 hours, 20 minutes)
Time of Day 11 12
10
00pm
Time for which the program timer may be set
123456
2:20am
789 Next morning
9:50am
5
Page 6
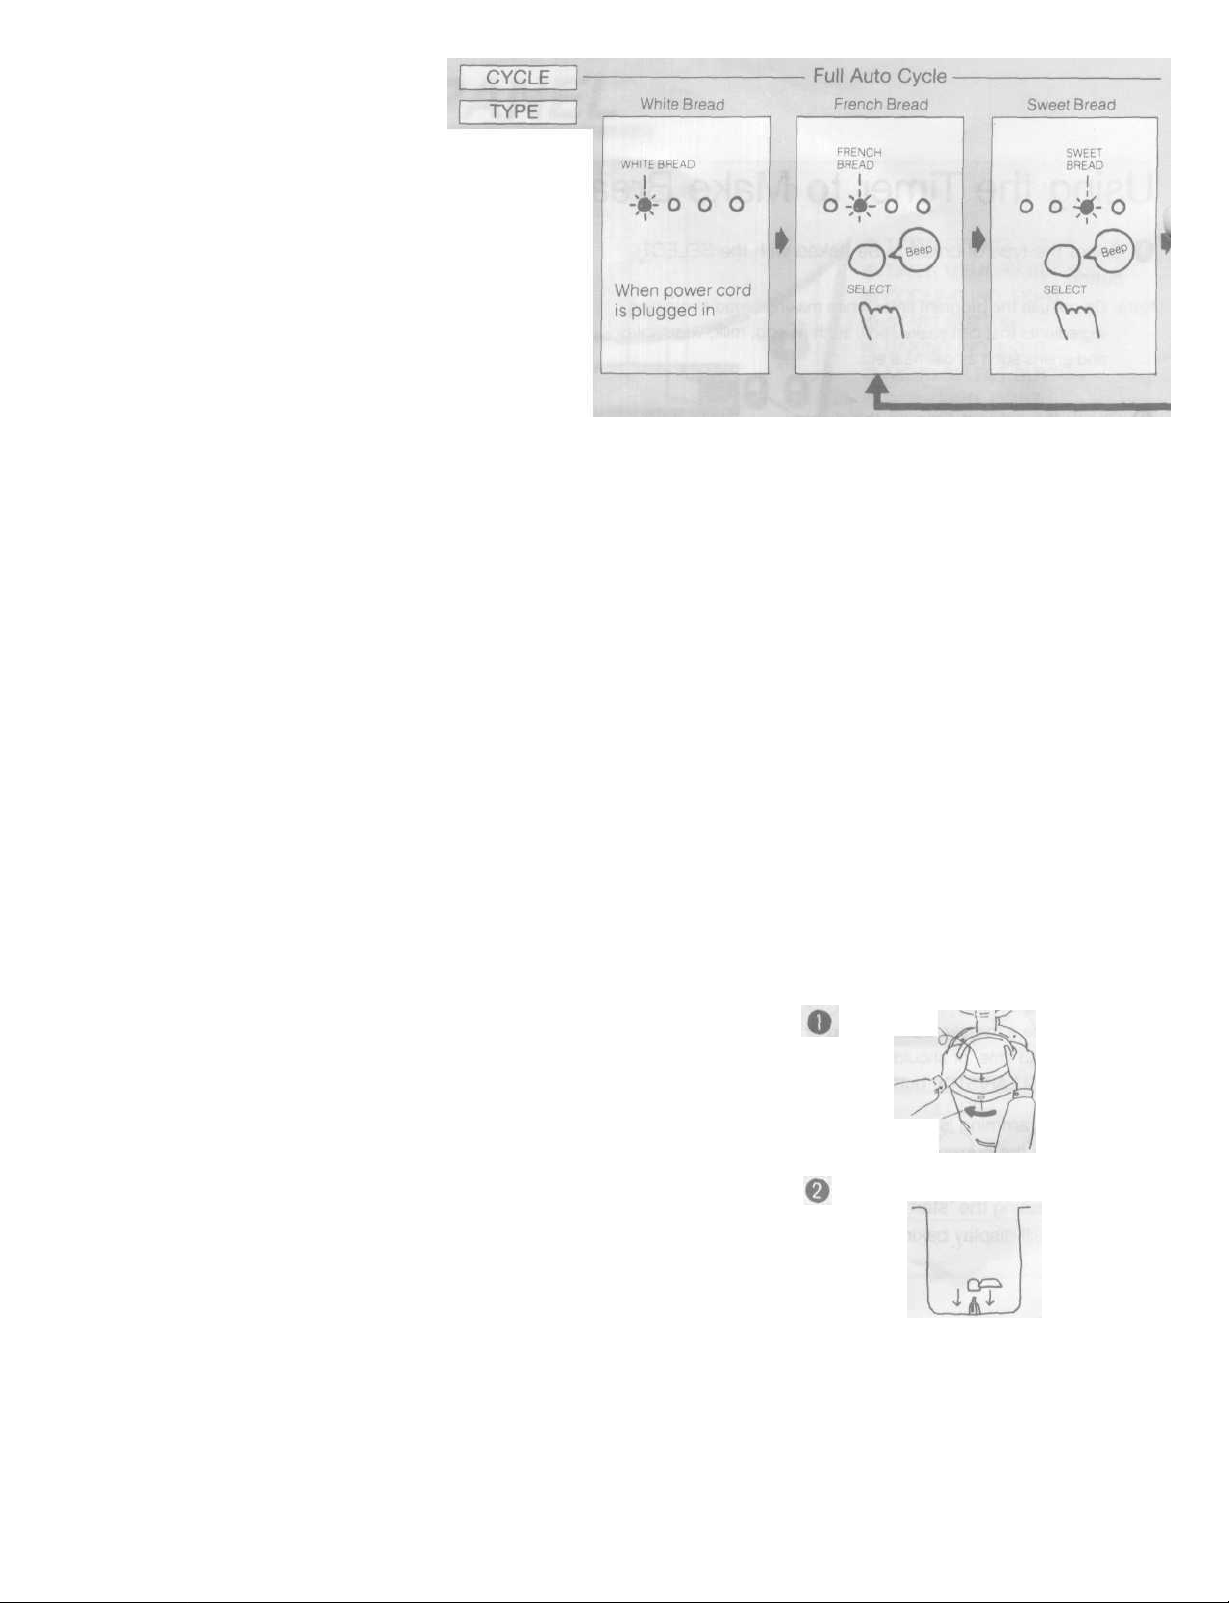
MAKING VARIOUS TYPES OF BREAD
Bread Selection
• When the SELECT button is pressed, the Select light shifts as shown above, so that your desired
type of bread will be selected.
Make sure that the desired Select light is lit before pressing the START button.
• White bread, french bread and sweet bread are automatically baked.
• For breads and other yeast dough items to be baked in a conventional oven, SELECT button is
pressed until MANUAL light is lit. Press button again until light for desired bread dough is simultaneously lit. For example: For Danish select sweet bread, For bagels select white bread, etc.
Mounting the Inner Pot
1 Place the inner pot into the main unit.
Insert the pot into the main unit with the arrow facing front,
and turn clockwise to lock into place securely. Turn the inner
pot counterclockwise for removal.
2 Attach the dough blade to the shaft.
Make sure all bread crumbs are removed after each use and
firmly attach to the shaft.
• Wash the dough blade and the inner pot before use
with a soft sponge. Be sure to rinse well with water after
each use.
6
Arrow
Locked
Page 7

BREAD MAKING
Full Auto Cycle
1 Check to make sure the inner pot is correctly
positioned.
Prepare and add the ingredients for the bread.
Note:
Adding
2 First add the dry yeast, then the other ingredients
into the inner pot.
3 Add the specified quantity of lukewarm water at
25°C ~ 35°C (77°F ~ 95°F).
4 Press the SELECT button to select your desired
bread.
5 Press the START button for immediate baking.
Your bread will be ready in about 4 hours.
When using the program timer, set the timer following
the procedure on page 5.
Yeast
For better baking results, add yeast near the edge of
the inner pot. (See page 8, step ©.)
Making Special Kinds of Bread
Manual Cycle for
Homemade Bread
The process for just making dough is performed with
this cycle.
1 Mix the ingredients for the desired type of bread.
2 First add dry yeast, then the other ingredients.
3 Add the specified quantity of lukewarm water at
25°C ~ 35°C (77°F ~ 95°F).
4 Select your desired Manual bread by pressing
the SELECT button. Refer to page 6 for selecting
breads.
5 When the dough is prepared, remove it from the inner
pot and let it rise in the shape you desire.
6 After the bread rises, bake it in your oven.
Note: Pressing the Start button during the bread making
process will display the baking completion time.
Raisin bread, rye bread and other types of bread can
also be baked.
Hint:
If the dough rises upto the glass lid, or colapses when the
baking process begins, adjust the recipe as explained in the
"Suggestions and Hints" section of the recipe booklet.
7
Page 8

BAKING PROCESS
Making Dough
1 Always put the dry yeast first, then the flour,
other ingredients, and lastly lukewarm water
into the inner pot in order to keep the dry yeast
active.
Lukewarm Water
Dry Yeast
Flour
Caution:
Always use soft, lukewarm water. If hard water is used,
dough may not rise enough.
2 Press the START button to begin the primary
kneading of dough.
4 Secondary kneading (re-kneading) begins. 5
minutes before kneading is completed, the beeper
will sound 10 times, indicating the best time to
add optional ingredients like raisins for raisin bread
etc.
Rising of Dough
5 The rising of the dough begins again.
3 Kneading stops, and dough begins to rise.
Note:
Water Temperature and Yeast
Yeast is a delicate organism that is easily influenced by
temperature changes. For bread to be delicious, it is
important that the yeast should function as effectively as
possible. The optimum water temperature for yeast is
25°C ~ 35°C (77°F ~ 95°F).
6 The dough blade rotates, gathering all the dough.
7 The final rising of the dough is carried out.
Baking
8 The heater is turned on.
8
Page 9

9 The beep sound will indicate baking is completed.
When serving bread that is just baked, take the bread out
from the inner pot first. (Make sure you use oven mitts,
towels etc., because the temperature is so high.) Dissipate
heat by placing a towel or other cloth under the bread
before cutting.
Baking is Completed
10 Air is taken in through the air duct for approx.
20 - 30 minutes to remove heat.
Removing the Bread
12 Turn the inner pot counterclockwise to remove it
from the main unit.
13 Place the inner pot upside down to carefully
remove the baked bread.
14 Gently remove dough blade which is stuck to
the bread.
11 The beep sound indicates baking is completed.
Take the bread out.
Note:
Removal of Heat
The key to baking flavorful bread is efficient heat removal
(cooling). Steam can cause the bread to crumble and rob
the bread of its aromatic flavor.
15 Cut the bread as desired and serve.
9
Page 10

SAFETY INSTRUCTIONS
Baking Process
• Do not touch the glass lid as the temperature
becomes extremely high when the unit starts the
baking process, or immediately after baking is
done. Take special care if infants and children are
nearby. Always use hot-pad mitts when taking out
fresh-baked bread. Be especially careful that
flammable objects are never placed on top of the
unit as fire may be caused.
Power Supply
• Only use correctly wired outlets.
• Never share the same outlet with other appliances.
• Remove the plug if the unit is not to be used for an
extended period of time.
• Your product is equipped with a polarized alternating
current line plug (a plug having one blade wider than
the other). This plug will fit into the power outlet only
one way. This is a safety feature. If you are unable to
insert the plug fully into the outlet, try reversing the
plug. If the plug should still fail to fit, contact your
electrician to replace your obsolete outlet. Do not
defeat the safety purpose of the polarized plug.
Suitable Locations
• Do not obstruct the air intake opening which is
located on the bottom of the unit.
• Do not use the unit near any fire-causing objects,
in places exposed to rain or direct sunlight, or
other inappropriate places, as it may cause the
unit to malfunction or be damaged.
Main Unit
• Do not wash the main unit with water, as this
could lead to electrical shock, electrical leakage or
other malfunctions.
10
Page 11

Oven
Handling of the Unit
• Flour, bread crumbs or any foreign matter
accumulated in the oven may make it impossible
to insert the inner pot.
• Flour and other substances scattered on the
heater may cause some smoke to be generated
during baking.
• Do not drop or transmit strong shocks to the
unit as malfunctions could result.
• This unit is exclusively designed for bread making. Do not place any other ingredients than
used for bread making in the unit.
I
If Power Goes off During Use
• If the power is cut off while making bread due to
power failure, unplugging, etc., the bread making
process will be discontinued. In this case, remove
the ingredients from the inner pot, replace with new
ingredients, and start again from the beginning.
• Please note that if the power is cut off during the
programmed time, the clock display will flash 12:00
on and off, making it impossible to continue bread
making.
Consult Qualified Service Personnel if the Following
Occurs;
• When damage or an abnormality is found in the power cord.
• When the unit operates improperly.
• When the plug's temperature increases alarmingly during use.
• When unusual conditions occur.
11
Page 12

CARE OF YOUR AUTO BAKERY
Inner Pot and Dough
Blade_
• Clean these parts thoroughly using a sponge or
soft cloth dampened in lukewarm water. After
cleaning, dry completely and store inside the main
unit.
Note: The inner pot and dough blade are fluorine
resin-coated. To keep the coating from getting
scratched and damaged, only use plastic utensils.
Main Unit
Shaft
• Remove all crumbs after each use. Use a sponge
or cloth dampened in lukewarm water and
squeezed out.
Packing
• If crumbs accumulate on the bottom of the main
unit, remove the packing and clean thoroughly
with a sponge or soft cloth.
• Be sure to reinstall the packing properly or water
may leak.
• Unplug the power cord from the AC outlet before
cleaning.
• Gently wipe dirt off with a sponge or soft cloth
dampened with detergent. Next wipe with a dry
cloth.
• Never use harsh cleansers, chemicals or abrasive
cleaners. Nylon and metal brushes cannot be used.
• Non-kitchen detergents or bleach should not be
used.
12
Oven
Remove flour and bread crumbs and all foreign
matter, etc. from the inside of the oven, using a
vacuum cleaner first. Next wipe off with a cloth
dampened in water and tightly squeezed.
Air Intake
Occasionally clean the air intake filter situated on
the unit's bottom to prevent it from clogging.
Use vacuum cleaner crevice tool or soft brush to do
this.
Page 13

BEFORE ASKING FOR SERVICE
Problem
The unit
does not start.
Water leaks
from the inner
pot.
Dough kneading
cannot be
performed.
Smoke is
generated during
baking.
Cause
Is the power cord plugged in?
Does the clock display indicate OEO2?
Does the clock display indicate OEO1?
Is the inner pot mounted correctly?
Is the packing of the shaft normal?
Is the
dough
blade attached
Have flour or other ingredients spattered over the
heater in the oven burned?
Is the amount of water used correct?
Is the temperature of the water correct?
correctly?
Solution
If not, plug the power cord in securely.
The unit will not operate if the oven's interior
temperature is above 122°F — such as immediately
after baking is done. Open the lid and let the inside
cool off.
If so, contact qualified personnel.
If not, mount the inner pot correctly.
If not, contact service personnel and replace the
packing.
If not, remove the inner pot, take out ingredients,
and attach the dough blade correctly.
If so, clean the inside of oven. If smoke results from
any other cause than the above, unplug the power
cord and contact service personnel.
Use the correct temperature and correct amount
of lukewarm water.
(25°C ~ 35°C/77°F ~ 95°F)
Dough does
not stretch
enough.
Bread rises too
much or collapses.
Bread cannot
be baked.
Bread cannot
be baked with
the program
timer.
The program timer
cannot be set.
Does the clock display read HE02?
Are the ingredients used and their composition
correct?
Is the yeast you are using old or has it been left for a
long time with the package opened?
Has it been stored incorrectly?
Is the bread being baked where the temperature is
excessively high or low?-
High humidity and or high temperatures.
Is the Manual cycle being used?
Is the dough blade properly attached?
Does the clock display read HEO1 or HEO2?
Was glass cover opened during baking?
Does the clock display indicate the present time?
Is the program timer set correctly?
Does the clock display flash on and off reading
12:00?
Did you check to see that the timer lamp lights up?
Is the program timer set correctly?
Contact qualified service personnel.
Check to make sure that the ingredients and their
compositions are correct.
Use fresh yeast from an unopened package.
Use the unit in locations where the temperature is
normal.
Reduce yeast to 1 '/> tsp and water to one cup
plus up to 4 tbsp.
The Manual course is designed just for dough
making and the unit will not enter the baking
process. Remove the ingredients, replace with new
ingredients, and start the unit in the correct cycle.
If not, attach the dough blade correctly.
Contact qualified service personnel.
Keep the glass cover closed during baking.
Correctly set to read the current time of day.
Carefully read instructions for setting the program
timer on page 4.
A power failure may have occured. Remove
ingredients and start all over.
Carefully read the instructions for setting the
program timer on page 4.
13
Page 14

Features
• Micro computer control panel does not require user supervision once set.
• Programable timer allows operator to prepare bread mix twelve hours before bread is desired.
• Transparent glass lid allows viewing of entire bread making process,
• High tech design; Euro-White finish.
• Oven and temperature sensors that adjust automatically to the type of bread being made.
• Non-stick inner pan enables user to mix, knead, raise and bake bread in one pan.
• Unique dough blade that lift and fold dough under as if being kneaded by hand to product a high quality finished
product.
• Cool air ventilator cools temperature of bakery and finished product eliminating possibility of a soggy loaf of
bread.
• Temperature sensor allows user to adjust for well baked, darker or lighter bread.
• Cookbook included.
Specifications
• Power Source: AC 120V/60Hz
• Power Consumption (Heater): 750W
Dimensions
• 105/s" W x 12"D x 14%"H
Net Weight
• 181/2lb3.
SPECIFICATIONS SUBJECT TO CHANGE WITHOUT NOTICE
FCC Information
This equipment has been tested and found to comply with the limits for a Class B digital device, pursuant to Part 15
of the FCC Rules. These limits are designed to provide reasonable protection against harmful interference in a
residential installation. This equipment generates, uses, and can radiate radio frequency energy and, if not installed
and used in accordance with the instructions, may cause harmful interference to radio communications. However,
there is no guarantee that interference will not occur in a particular installation. If this equipment does cause harmful
interference to radio or television reception, which can be determined by turning the equipment off and on, the user
is encouraged to try to correct the interference by one or more of the following measures:
- Reorient or relocate the receiving antenna.
- Increase the separation between the equipment and receiver,
- Connect the equipment into an outlet on a circuit different from that to which the receiver is connected.
- Consult the dealer or an experienced radio/TV technician for help.
FCC Warning — This equipment may generate or use radio frequency energy. Changes or modifications to this
equipment may cause harmful interference unless the modifications are expressly approved in the instruction
manual. The user could lose the authority to operate this equipment if an unauthorized changes or modification is
made.
14
Page 15

The Bread Machine
LIMITED WARRANTY
What Is Covered and For How Long?
This warranty covers all defects in workmanship or materials in the mechanical and electrical parts contained
in this Welbilt® product for a period of 12 months from the date of purchase. There will be no charge to the purchaser
for parts and labor on items covered under the warranty during this period.
YOU MUST KEEP YOUR ORIGINAL SALES SLIP
OR OTHER PROOF-OF-PURCHASE AS PROOF OF
THE DATE OF PURCHASE
Who Is Covered?
The original retail purchaser of this Welbilt® product.
What Will Be Done?
We will repair or replace, at our discretion, any mechanical or electrical part which proves defective in normal
household use during the applicable warranty period.
How Can You Get Service?
(1) Contact your nearest Welbilt® authorized Service Depot. For the name of your nearest authorized Service
Depot, call Welbilt Appliance's Parts Department at (516)747-9595.
(2) If you have any difficulty in obtaining warranty service, contact the Director of Customer Relations, Welbilt
Appliance, Inc., Parts & Service Dept. 25 Rose Place Garden City, NY 11040 (telephone number (516) 747-9595).
DO NOT RETURN THE PRODUCT TO WELBILT APPLIANCE, INC.
(3) All service must be performed by a Welbilt® authorized Service Depot or by Welbilt's Appliance Parts
Department.
THIS WARRANTY COVERS UNITS WITHIN THE
CONTINENTAL UNITED STATES AND
DOES NOT COVER
- Damages from improper installation
- Damages in shipping
- Defects other than manufacturing
- Damages from misuse, abuse, accident, alteration, lack of proper care and maintenance or incorrect current or
voltage
- Damages from other than household use
- Damage from service by other than an authorized dealer or service center
- Glass, trim or light bulbs
- Transportation and shipping
THIS LIMITED WARRANTY IS GIVEN
IN LIEU OF ALL OTHER WARRANTIES,
EXPRESS OR IMPLIED,
INCLUDING THE WARRANTIES OF
MERCHANTABILITY AND FITNESS
FOR A PARTICULAR
PURPOSE.
The remedy provided in this warranty is exclusive and is granted in lieu of all other remedies. This warranty does not
cover incidental or consequential damages. Some states do not allow the exclusion of incidental or consequential
damages, so the above limitation may not apply to you. Some states do not allow limitations on how long an implied
warranty lasts, so the above limitation may not apply to you.
This warranty gives you specific legal rights, and you may also have other rights which vary from state to state.
15
Page 16

More Tips for Easy Baking
Congratulations on owning a Welbilt automatic bread machine. For best
results, carefully read the owner's manual and recipe booklet. We have also
prepared the following hints and suggestions to assist you in making delicious
loaves of homemade bread for your family and friends.
Yeast
Yeast is the leavening agent that causes the dough to expand or "rise". It is
a living organism that is purchased in a dehydrated, dormant state. When mixed
with warm liquids, yeast is brought back to life. It reacts with the sugar and
starch in the recipe and subsequently develops gases which is what creates the
small air pockets found in baked bread. Since making bread in a bread machine
is different from the traditional handmade method, you should never dissolve
the yeast in liquid. Just carefully follow the instructions given in the Welbilt
recipe booklet for best results.
Bread Flour
Flour is an organic food product that contains many of the natural
properties found in the wheat. Gluten, a natural protein found in wheat, is what
makes bread dough elastic when efficiently kneaded. The higher gluten content
of bread flour, which is available in most local supermarkets, is what produces
high volume loaves of bread. As an organic food product, the gluten or protein
level of flour can vary form harvest to harvest. In order to stabilize the protein
levels of the flour, the mills add dough conditioners such as potassium bromate
or ascorbic acid (a form of vitamin C).
continued
Page 17

In
Welbilt baking
consistently found that the flours that contain ascorbic acid provide the best
results. You can determine whether or not the flour you are using contains
ascorbic acid as a dough conditioner by reading the ingredient list on the flour
bag. If you are unable to purchase flour with ascorbic acid, you can try adding
1 teaspoon of freshly squeezed lemon juice to the ingredients in the bread
machine prior to pressing START. In fact, you may want to consider adding
1 teaspoon of lemon juice to all of your bread recipes to assure consistent baking
results every time.
tests,
using
flour
milled
from
the
1992
harvest,
we
Yeast and Flour
Curiously enough, we have seen that certain brands and types of yeast and
flour react differently when used together. The following are some of our
suggestions to consider when making bread in a bread machine.
Yeast Flour
Red Star Quick Rise Gold Medal Best For Bread
Use only 1 1/2 teaspoons 0 r
in 3-cup-flour bread machines Pillsbury Bread Flour
and 1 teaspoon in 2-cup units.
Red Star Active Dry Gold Medal Best For Bread
Fleischman Active Dry Gold Medal Best For Bread
Or
Pillsbury Bread Flour
For additional baking assistance, please refer to your Owner's Manual or contact
Welbilt at 516-365-5040 between 9 a.m. and 5p.m. Eastern time.
 Loading...