

Page 1
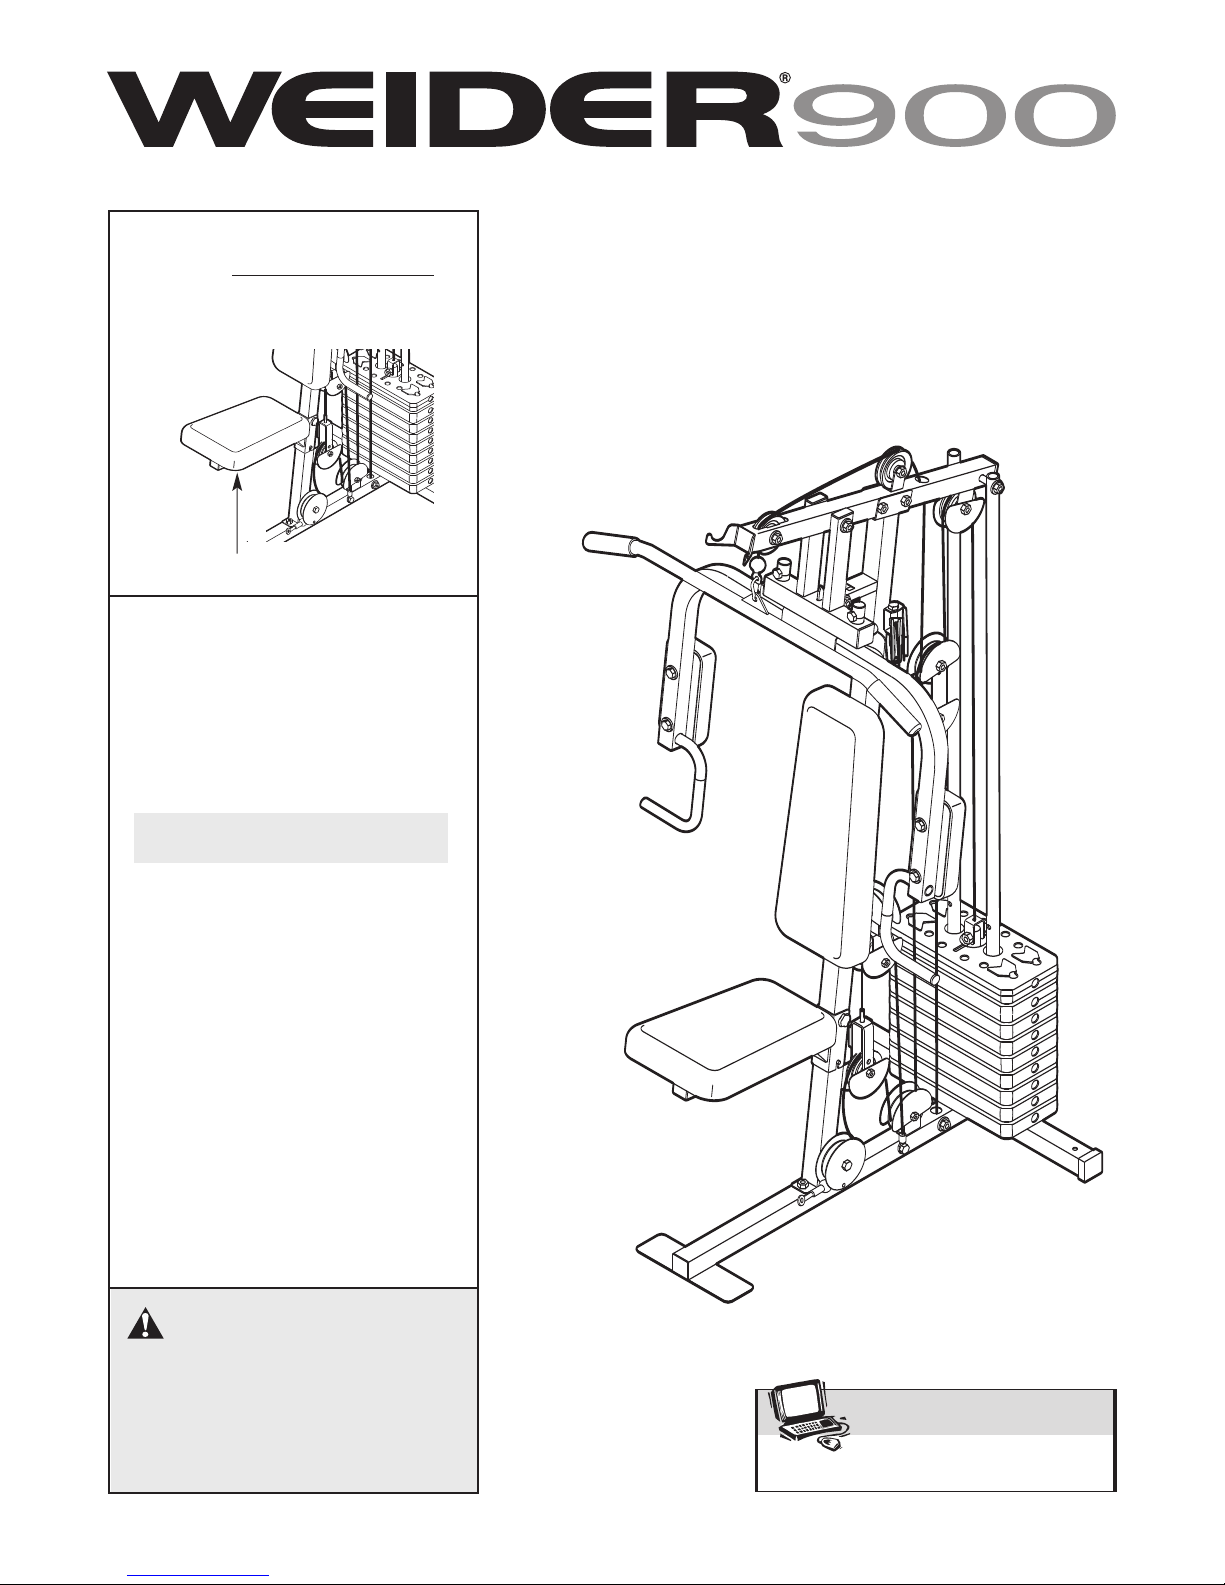
Model No. WEEVSY1326.0
www.iconeurope.com
Visit our website at
Serial No.
rite the serial number in the
W
space above for future reference.
Serial Number Decal (Under Seat)
QUESTIONS?
As a manufacturer, we are committed to providing complete
customer satisfaction. If you
have questions, or if there are
missing parts, please call:
USER'S MANUAL
08457 089 009
Or write:
ICON Health & Fitness, Ltd.
Unit 4
Revie Road Industrial Estate
Revie Road
Beeston
Leeds, LS118JG
UK
email: [email protected]
CAUTION
Read all precautions and instructions in this manual before using
this equipment. Save this manual
for future reference.
Page 2
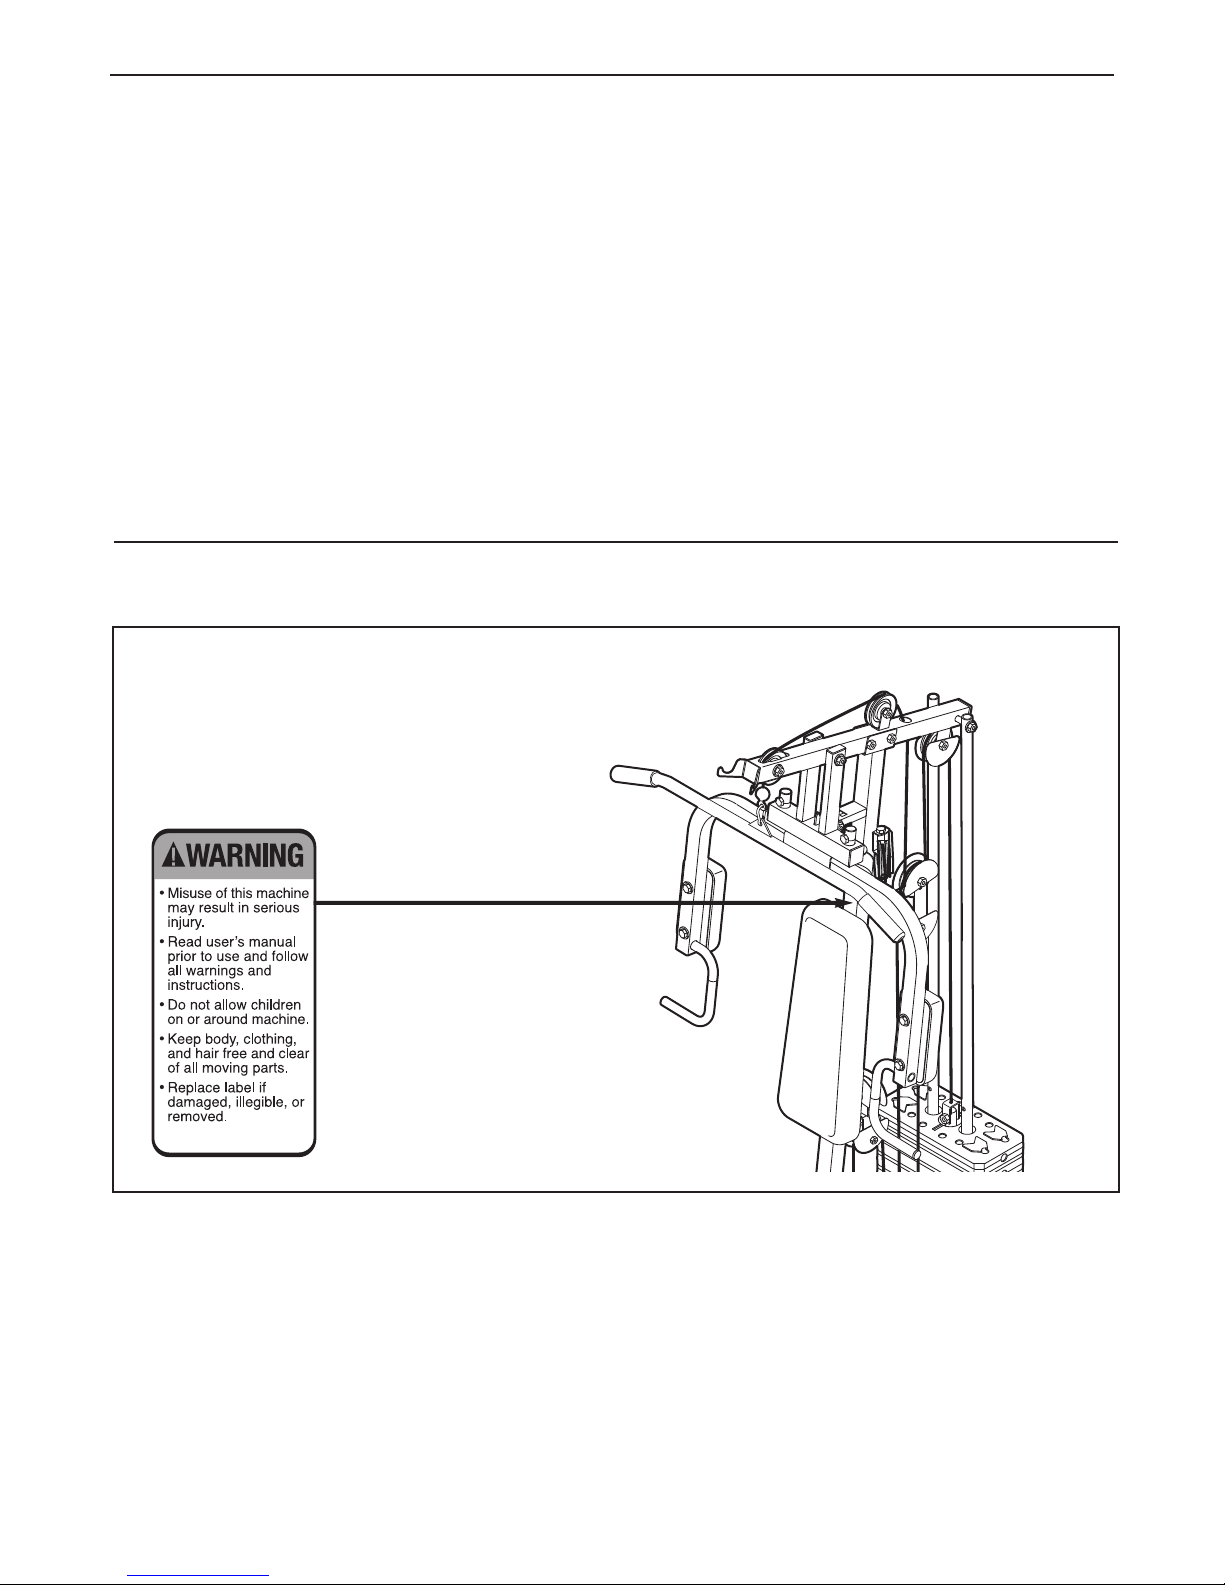
TABLE OF CONTENTS
WARNING DECAL PLACEMENT . . . . . . . . . . . . . . . . . . . . . . . . . . . . . . . . . . . . . . . . . . . . . . . . . . . . . . . . . . . . . 2
IMPORTANT PRECAUTIONS . . . . . . . . . . . . . . . . . . . . . . . . . . . . . . . . . . . . . . . . . . . . . . . . . . . . . . . . . . . . . . . . 3
BEFORE YOU BEGIN . . . . . . . . . . . . . . . . . . . . . . . . . . . . . . . . . . . . . . . . . . . . . . . . . . . . . . . . . . . . . . . . . . . . . . 4
PART IDENTIFICATION CHART . . . . . . . . . . . . . . . . . . . . . . . . . . . . . . . . . . . . . . . . . . . . . . . . . . . . . . . . . . . . . .5
ASSEMBLY . . . . . . . . . . . . . . . . . . . . . . . . . . . . . . . . . . . . . . . . . . . . . . . . . . . . . . . . . . . . . . . . . . . . . . . . . . . . . . 6
ADJUSTMENT . . . . . . . . . . . . . . . . . . . . . . . . . . . . . . . . . . . . . . . . . . . . . . . . . . . . . . . . . . . . . . . . . . . . . . . . . . . 16
WEIGHT RESISTANCE CHART . . . . . . . . . . . . . . . . . . . . . . . . . . . . . . . . . . . . . . . . . . . . . . . . . . . . . . . . . . . . . .17
CABLE DIAGRAM . . . . . . . . . . . . . . . . . . . . . . . . . . . . . . . . . . . . . . . . . . . . . . . . . . . . . . . . . . . . . . . . . . . . . . . . .18
TROUBLESHOOTING AND MAINTENANCE . . . . . . . . . . . . . . . . . . . . . . . . . . . . . . . . . . . . . . . . . . . . . . . . . . .19
PART LIST . . . . . . . . . . . . . . . . . . . . . . . . . . . . . . . . . . . . . . . . . . . . . . . . . . . . . . . . . . . . . . . . . . . . . . . . . . . . . .21
EXPLODED DRAWING . . . . . . . . . . . . . . . . . . . . . . . . . . . . . . . . . . . . . . . . . . . . . . . . . . . . . . . . . . . . . . . . . . . .22
ORDERING REPLACEMENT PARTS . . . . . . . . . . . . . . . . . . . . . . . . . . . . . . . . . . . . . . . . . . . . . . . . . .Back Cover
WARNING DECAL PLACEMENT
The decal shown here has been placed on
the weight system. If the decal is missing or
illegible, call the telephone number on the
front cover of this manual and order a free
replacement decal. Apply the decal in the
location shown.
WEIDER is a registered trademark of ICON IP
, Inc.
2
Page 3
IMPORTANT PRECAUTIONS
WARNING: To reduce the risk of serious injury, read the following important precau-
tions before using the weight system.
. Read all instructions in this manual and in
1
the accompanying literature and all warnings
on the weight system before using the
weight system. Use the weight system only
as described in this manual.
. Inspect and properly tighten all parts regular-
6
ly. Replace any worn parts immediately.
7. Keep children under the age of 12 and pets
away from the weight system at all times.
2. It is the responsibility of the owner to ensure
that all users of the weight system are adequately informed of all precautions.
3. The weight system is intended for home use
only. Do not use the weight system in a commercial, rental, or institutional setting.
4. Keep the weight system indoors, away from
moisture and dust. Place the weight system
on a level surface, with a mat beneath it to
protect the floor or carpet. Make sure that
there is enough clearance around the weight
system to mount, dismount, and use the
weight system.
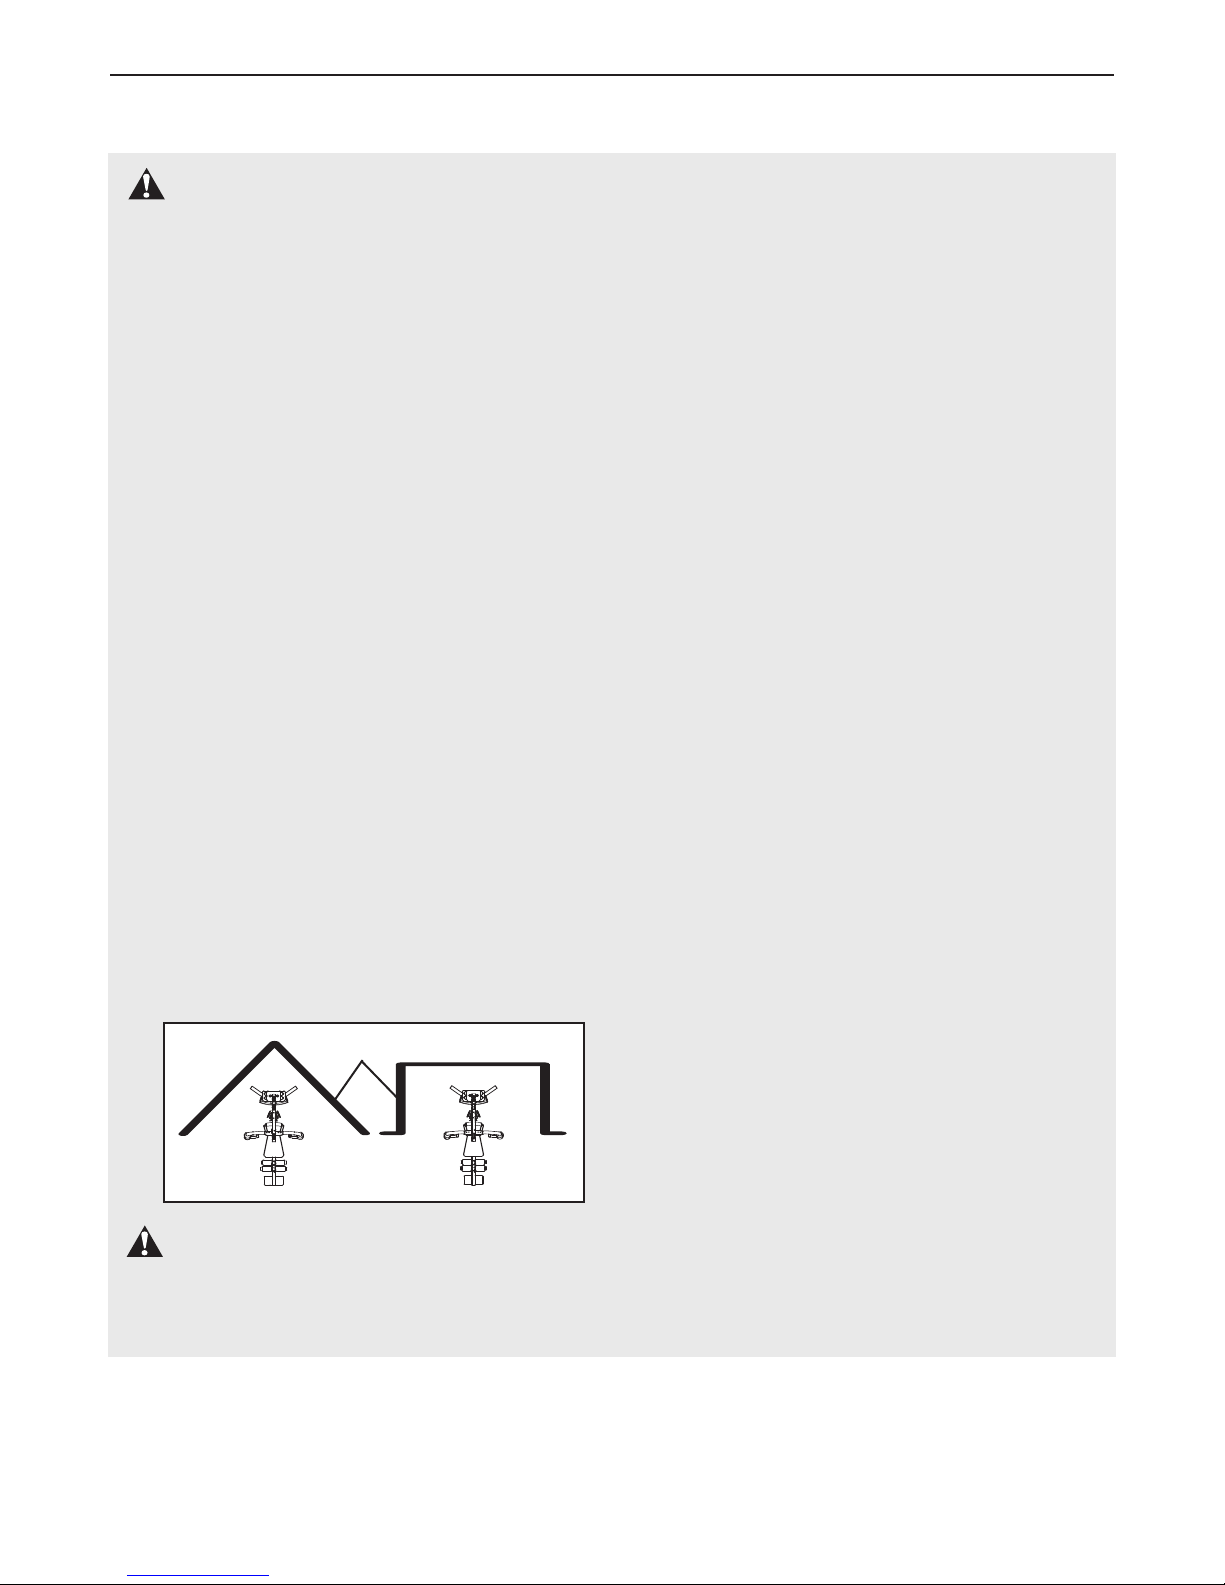
5. This weight system has an open weight
stack; the weight stack must not be accessible from any point outside of the user’s field
of view. To prevent access to the weight
stack, place the weight system in a corner or
bay of a room, as shown in the drawing
below. There must be no more than 3 ft. (1m)
of clearance between the weight system and
the adjacent walls.
Wall
8. Always wear athletic shoes for foot protection when using the weight system.
9. Keep hands and feet away from moving parts.
10. The weight system is designed to support a
maximum user weight of 300 lbs (135 kg).
11. Always stand on the foot plate when performing an exercise that could cause the
weight system to tip.
12. Never release the arms, leg lever, or lat bar
while weights are raised; the weights will fall
with great force.
13. Always disconnect the lat bar from the
weight system when performing an exercise
that does not use the lat bar.
14. The weight system is designed to be used
only with the included weight. Do not use the
weight system with dumbbells or any other
type of weight to increase the resistance.
15. Make sure that the cables remain on the pulleys at all times. If the cables bind while you
are exercising, stop immediately and make
sure that the cables are on all of the pulleys.
WARNING: Before beginning this or any exercise program, consult your physician. This
is especially important for persons over the age of 35 or persons with pre-existing health problems.
Read all instructions before using. ICON assumes no responsibility for personal injury or property
damage sustained by or through the use of this product.
16. If you feel pain or dizziness at any time while
exercising, stop immediately and begin cooling down.
3
Page 4
BEFORE YOU BEGIN
Thank you for selecting the versatile WEIDER®900
weight system. The weight system offers a selection of
weight stations designed to develop every major mus-
le group of the body. Whether your goal is to tone
c
your body, build dramatic muscle size and strength, or
improve your cardiovascular system, the weight system will help you to achieve the results you want.
For your benefit, read this manual carefully before
using the weight system. If you have questions after
reading this manual, see the front cover of this manu-
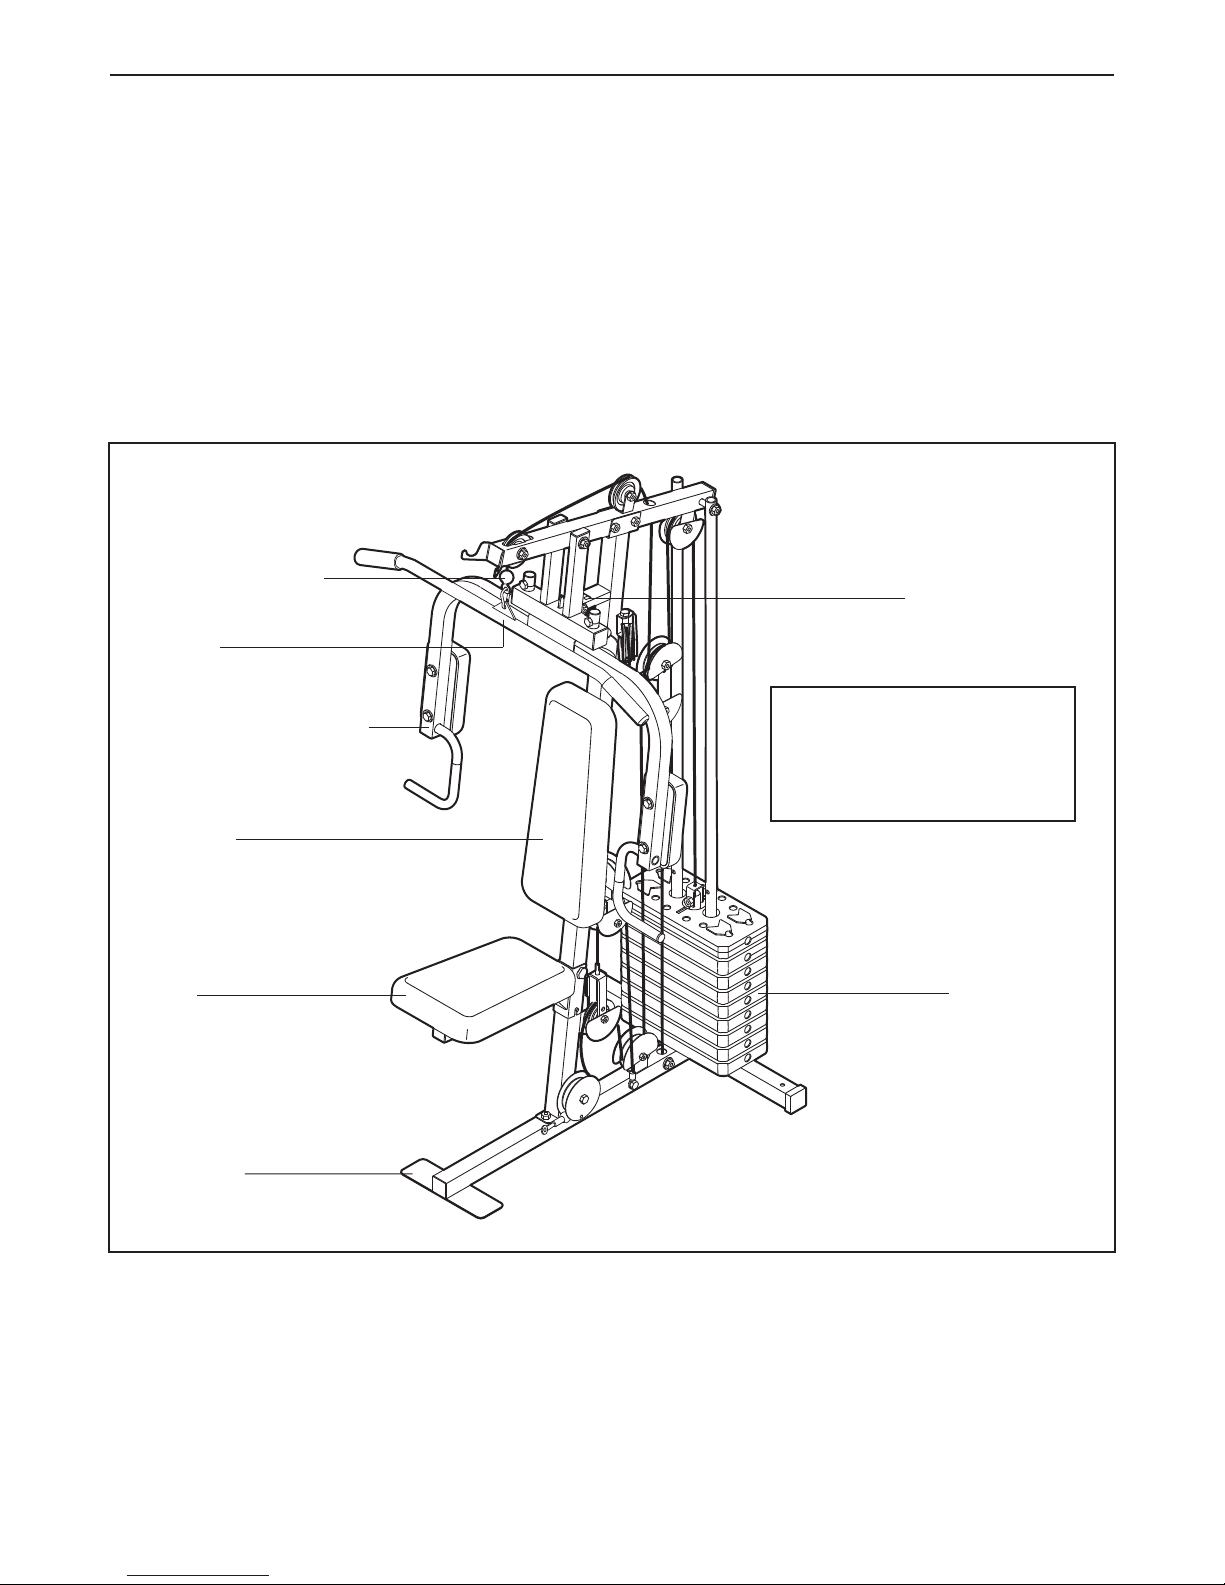
High Pulley Station
Lat Bar
Butterfly Arm/Press Arm
al. To help us assist you, please note the product
model number and serial number before contacting us.
The model number is WEEVSY1326.0. The serial
umber can be found on a decal attached to the
n
weight system (see the front cover of this manual for
the location of the decal).
Before reading further, please review the drawing
below and familiarize yourself with the parts that are
labeled.
Press Frame Lock
ASSEMBLED DIMENSIONS:
Height: 79 in. (200 cm)
Width: 37 in. (94 cm)
Depth: 41 in. (104 cm)
Backrest
Seat
Foot Plate
Weight Stack
4
Page 5
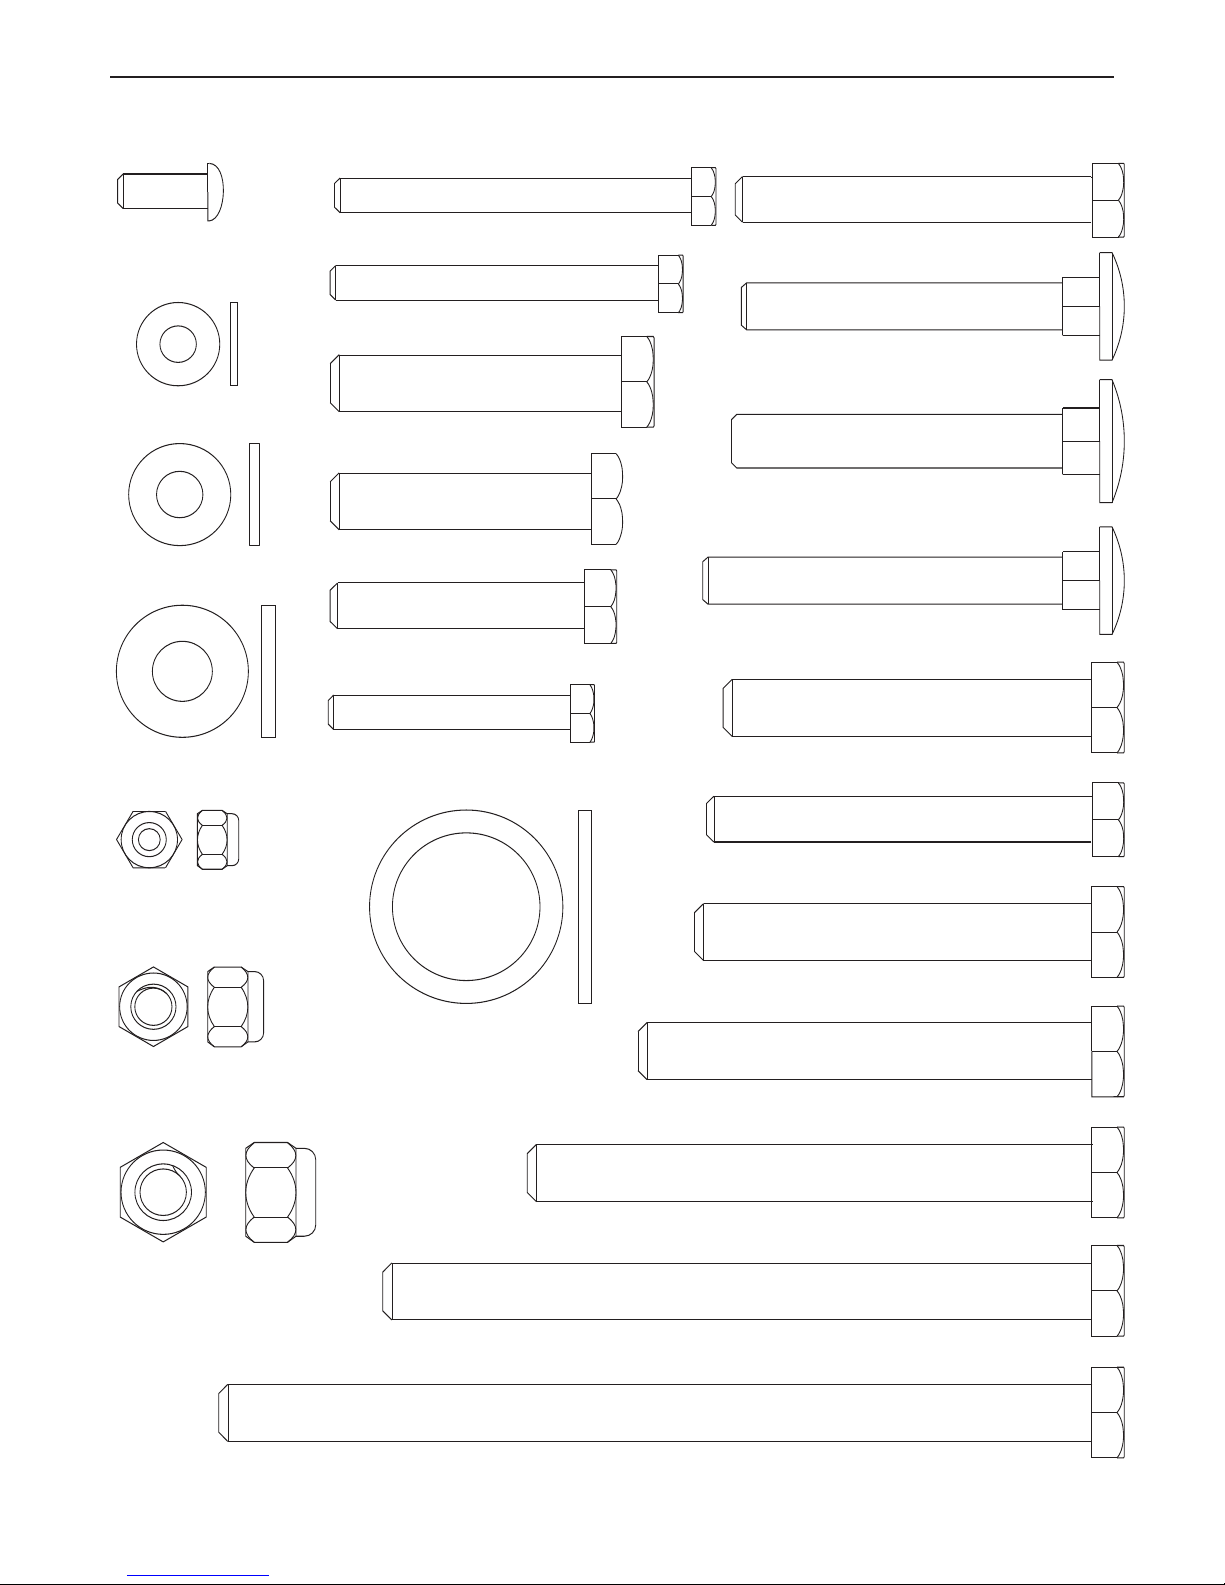
M6 Washer (73)
M8 Nylon Locknut (69)
M10 Washer (70)
M10 Nylon Locknut (68)
M6 Nylon Locknut (72)
M10 x 125mm Bolt (64)
M10 x 155mm Bolt (62)
M10 x 65mm Carriage Bolt (59)
M8 x 63mm Carriage Bolt (58)
M8 x 68mm Bolt (63)
M8 x 63mm Bolt (66)
M8 x 45mm Bolt (60)
M6 x 43mm Bolt (61)
M8 x 70mm Carriage Bolt (56)
M8 Washer (71)
M10 x 100mm Bolt (46)
M10 x 46mm Bolt (53)
M10 x 78mm Bolt (54)
M10 x 65mm Bolt (55)
M10 x 70mm Bolt (57)
M6 x 58mm Screw (65)
M6 x 63mm Screw (67)
M6 x 16mm
Screw (40)
M10 x 52mm Bolt (52)
25mm Washer (29)
PART IDENTIFICATION CHART
5
Page 6
ASSEMBLY
Make Things Easier for Yourself
s you assemble the weight system, make sure
• A
all parts are oriented as shown in the drawings.
Everything in this manual is designed to ensure
that the weight system can be assembled successfully by anyone. However, it is important to
realize that the versatile weight system has
many parts and that the assembly process will
take time. Most people find that by setting aside
plenty of time, assembly will go smoothly.
Before beginning assembly, carefully read the
following information and instructions:
• Assembly requires two persons.
• Place all parts in a cleared area and remove the
packing materials. Do not dispose of the packing
materials until assembly is completed.
• Tighten all parts as you assemble them, unless
instructed to do otherwise.
FRAME ASSEMBLY
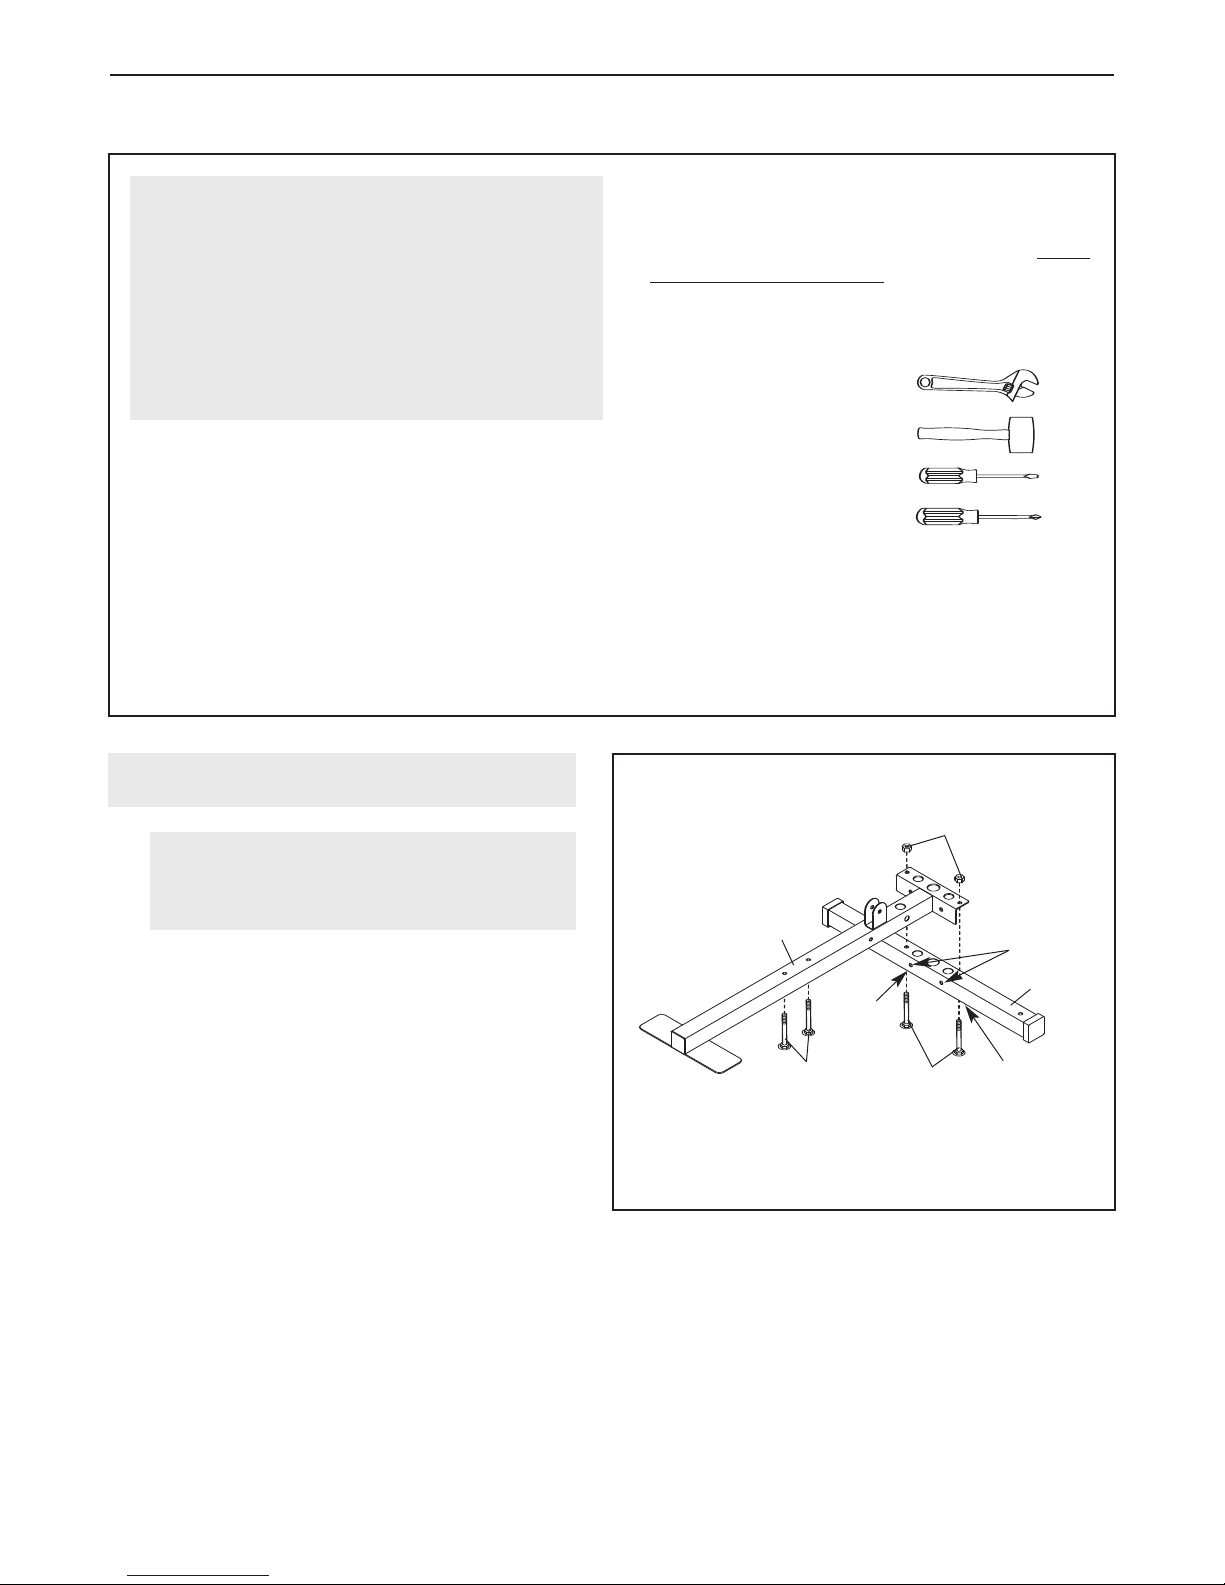
1.
Before beginning assembly, make sure
that you have read and understand the
information in the box above.
Orient the Stabilizer (2) as shown, with the
indented holes facing downward. Attach the
Base (1) to the Stabilizer with two M10 x 65mm
Carriage Bolts (59) and two M10 Nylon
Locknuts (68).
Locknuts yet.
Do not tighten the Nylon
•
For help identifying small parts, use the PART
IDENTIFICATION CHART.
The following tools (not included) are required
for assembly:
• two adjustable spanners
• one rubber mallet
• one standard screwdriver
• one Phillips screwdriver
• lubricant, such as grease or petroleum jelly,
and soapy water.
Assembly will be more convenient if you have a
socket set, a set of open-end or closed-end spanners, or a set of ratchet spanners.
1
68
1
Indent
58
59
These
holes are
smaller
than those
on the
opposite
side.
2
Indent
Insert two M8 x 63mm Carriage Bolts (58) into
the bottom of the Base (1). Note: It may be
helpful to place tape over the bolt heads to
hold them in place.
6
Page 7
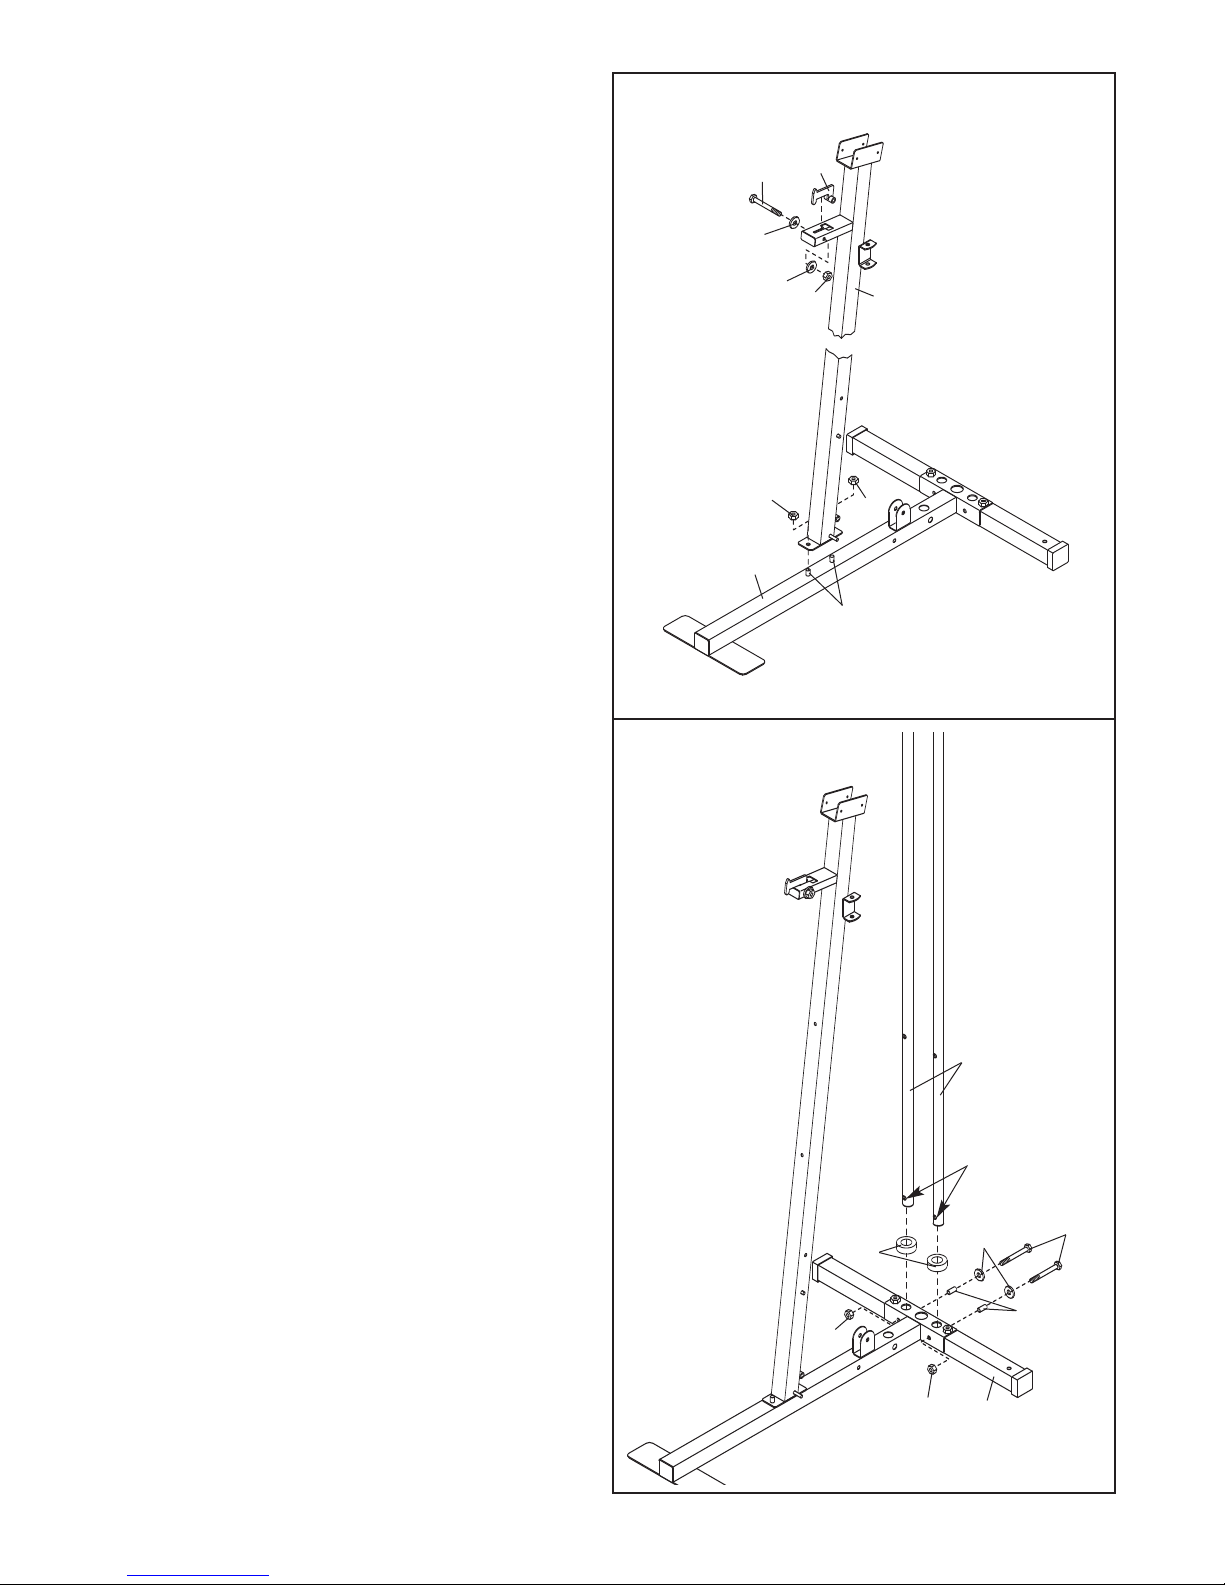
2. Attach the Upright (3) to the Base (1) with the
two M8 x 63mm Carriage Bolts (58) and two
8 Nylon Locknuts (69). D
M
Nylon Locknuts yet.
Attach the Press Frame Lock (39) to the
Upright (3) with an M8 x 63mm Bolt (66), two
M8 Washers (71), and an M8 Nylon Locknut
(69). Do not overtighten the Nylon Locknut;
the Press Frame Lock must pivot easily.
o not tighten the
2
39
66
71
1
7
69
3
3. Set the two Weight Bumpers (17) over the indicated holes in the Stabilizer (2).
Orient the two Weight Guides (10) so that the
indicated holes are near the lower ends. Insert
the Weight Guides into the Weight Bumpers
(17) and the holes in the Stabilizer (2). Attach
the Weight Guides with two M10 x 70mm Bolts
(57), two M10 Washers (70), two Small Spacers
(37), and two M10 Nylon Locknuts (68).
Tighten the M10 Nylon Locknuts (68) used in
steps 1 and 3.
69
1
3
69
58
10
Holes
57
37
68
17
68
70
2
7
Page 8
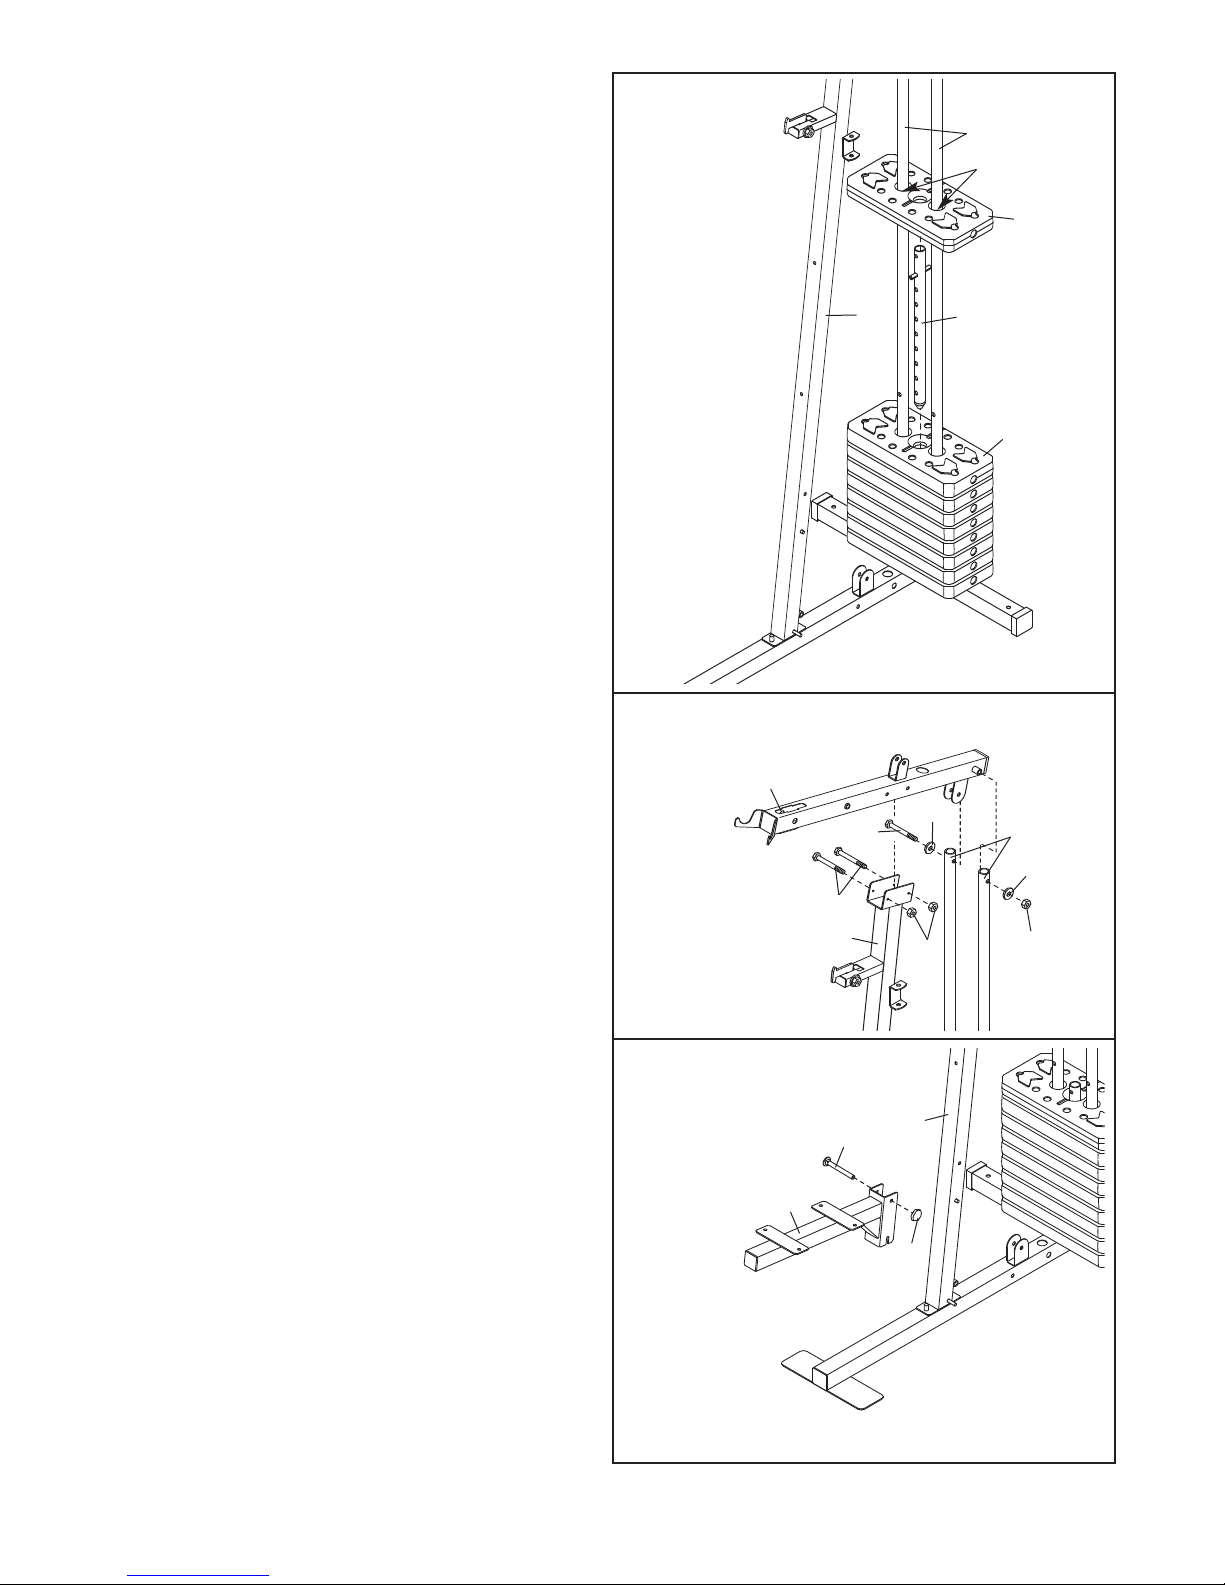
4. Slide eight Weights (15) onto the Weight
Guides (10), with the slot for the Weight Pin
not shown) on the bottom and on the side fac-
(
ing away from the Upright (3).
4
10
Lubricate
Insert the Weight Tube (12) into the Weights
(15).
Lubricate the indicated holes in a Weight (15)
with grease. Slide the Weight onto the Weight
Guides (10).
5. Attach the Top Frame (4) to the Upright (3) with
two M8 x 68mm Bolts (63) and two M8 Nylon
Locknuts (69). Do not tighten the Nylon
Locknuts yet.
Attach the Top Frame (4) between the Weight
Guides (10) with an M10 x 155mm Bolt (62),
two M10 Washers (70), and an M10 Nylon
Locknut (68).
Tighten the Nylon Locknuts (68, 69) used in
steps 2 and 5.
15
3
5
4
62
63
3
70
69
12
15
10
70
68
6. Attach the Seat Frame (8) to the Upright (3)
with an M8 x 70mm Carriage Bolt (56) and an
M8 Knob (30).
6
56
8
3
30
8
Page 9
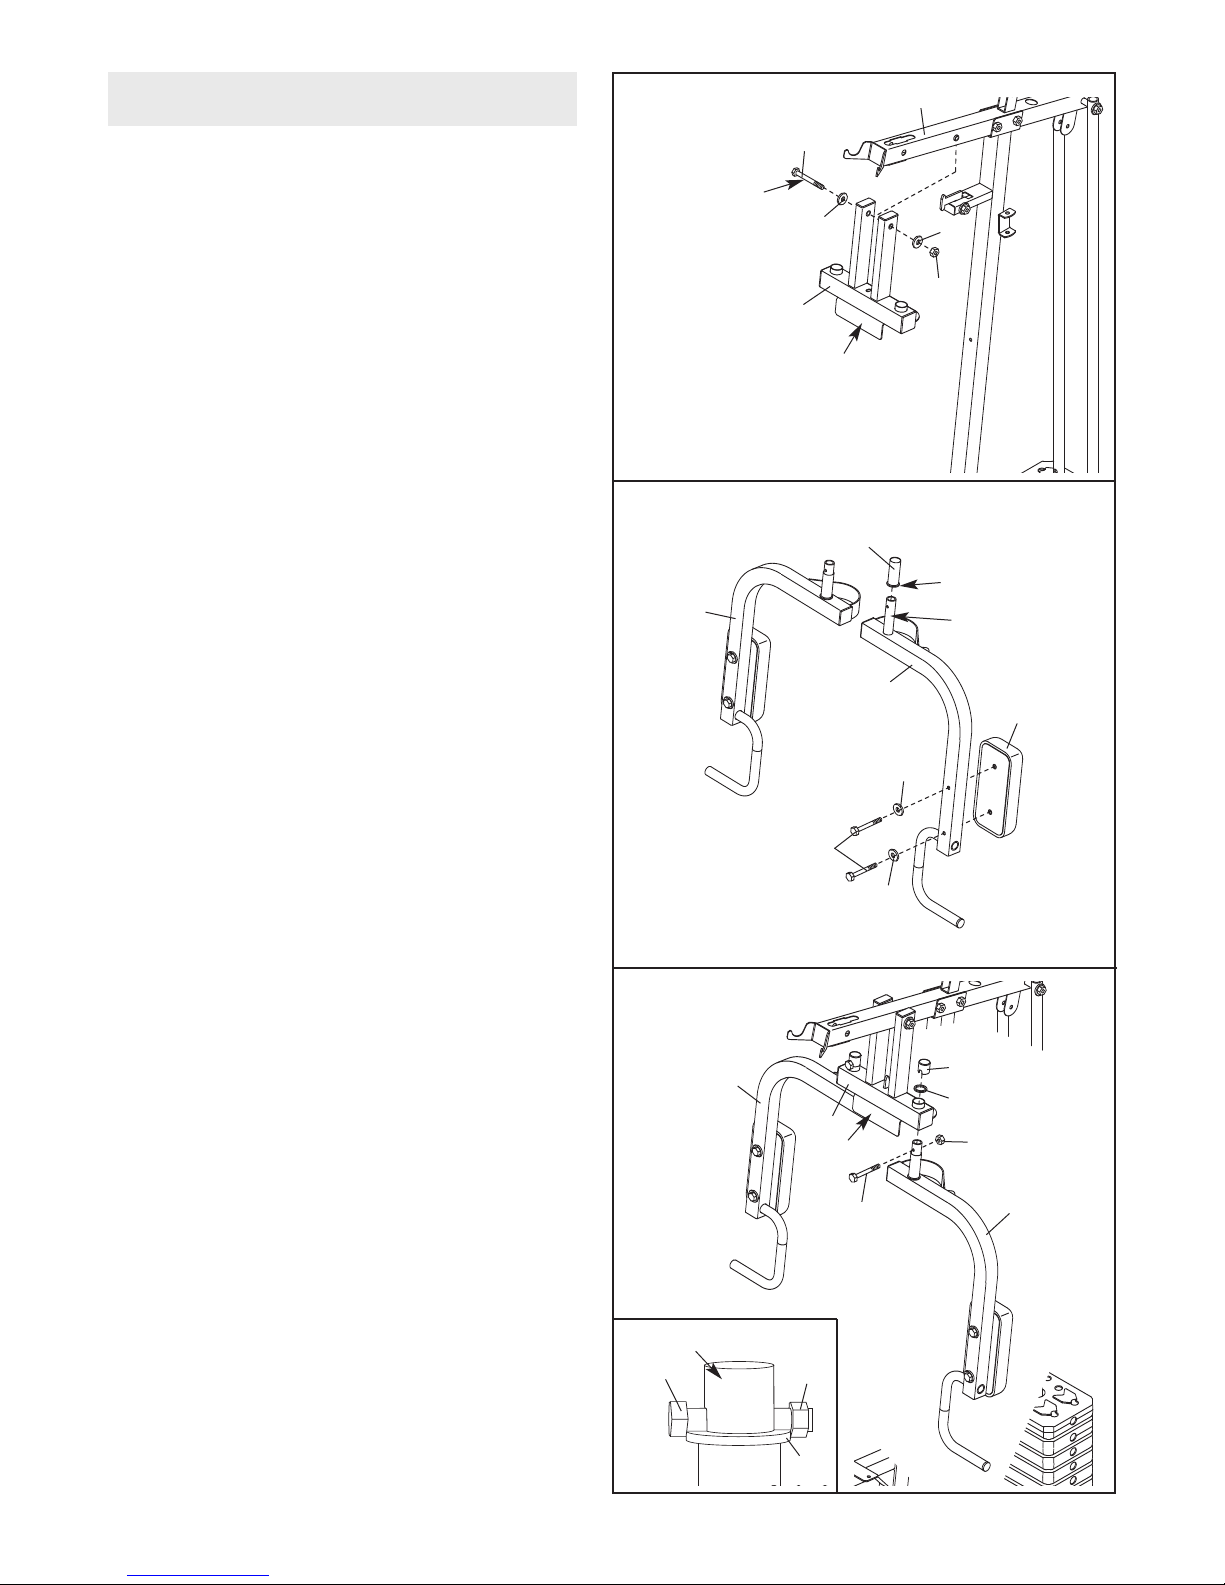
ARM ASSEMBLY
7. Apply grease to an M10 x 125mm Bolt (64).
Orient the Press Frame (5) with the bracket on
the side shown. Attach the Press Frame to the
Top Frame (4) with the Bolt, two M10 Washers
70), and an M10 Nylon Locknut (68). D
(
overtighten the Nylon Locknut; the Press
Frame must pivot easily.
o not
7
64
rease
G
70
5
Bracket
4
70
68
8. Attach an Arm Pad (20) to the Left Butterly Arm
(7) with two M6 x 58mm Screws (65) and two
M6 Washers (73).
Apply grease to the post on top of the Left Arm
(7). Orient a 25mm x 68mm Bushing (28) with
the lip in the position shown, and slide the
Bushing onto the post.
Repeat this step with the Right Butterfly Arm
(6).
9. Insert the post on the Left Butterfly Arm (7) into
the left hole in the Press Frame (5). Make sure
that the Left
bracket on the Press Frame.
Slide a 25mm Washer (29) onto the post on the
Left Arm (7). Attach an M6 x 43mm Bolt (61) to
the post with an M6 Nylon Locknut (72). Make
sure that the Nylon Locknut and the head of
the Bolt are overlapping the edge of the
asher
W
Arm is behind the indicated
, as shown in the inset drawing.
8
28
Lip
6
7
73
65
73
9
6
5
Bracket
61
Grease
20
27
29
72
7
Press a 25mm Round Outer Cap (27) onto the
post on the Left Arm (7).
Repeat this step with the Right
Arm (6).
Post
61
72
29
9
Page 10
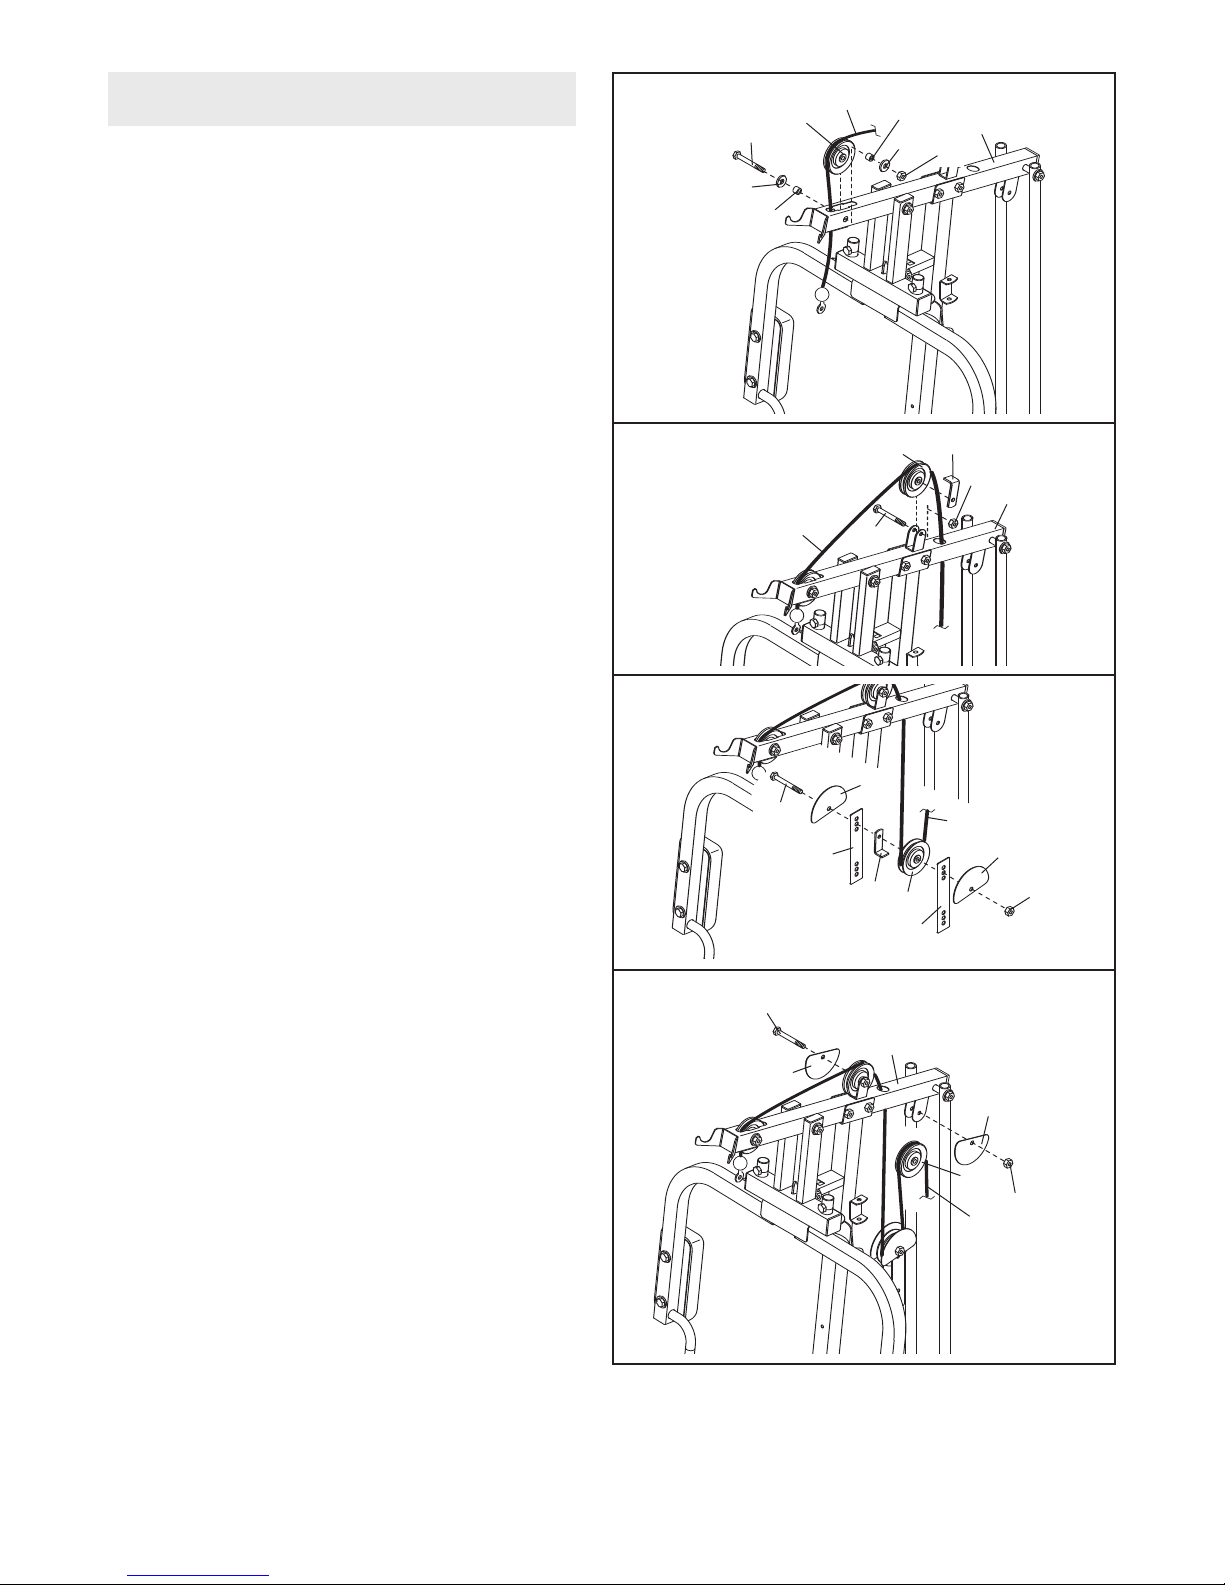
CABLE ASSEMBLY
10. See the CABLE DIAGRAM on page 18 for
proper cable routing.
dentify the High Cable (50). R
I
threaded shaft end of the Cable up through the
Top Frame (4) and over a 90mm Pulley (34).
Attach the Pulley inside the Top Frame with an
M10 x 65mm Bolt (55), two M10 Washers (70),
two Small Spacers (37), and an M10 Nylon
Locknut (68).
oute the
10
70
55
50
34
7
3
3
70
7
4
68
11. Route the High Cable (50) over a 90mm Pulley
(34) and down through the Top Frame (4).
Attach the Pulley and a Cable Trap (36) to the
bracket on the Top Frame with an M10 x 52mm
Bolt (52) and an M10 Nylon Locknut (68). Make
sure the Cable Trap is oriented to hold the
Cable in the groove of the Pulley.
12. Route the High Cable (50) under a 90mm
Pulley (34). Attach the Pulley, a Cable Trap
(36), and two Finger Guards (35) to the second
set of holes from the top of the two Pulley
Plates (44) with an M10 x 52mm Bolt (52) and
an M10 Nylon Locknut (68). Make sure that
the Cable Trap is oriented to hold the Cable
in the groove of the Pulley.
13. Route the High Cable (50) over a 90mm Pulley
(34). Attach the Pulley and two Finger Guards
(35) to the Top Frame (4) with an M10 x 46mm
Bolt (53) and an M10 Nylon Locknut (68).
11
12
13
53
52
35
50
44
52
35
36
34
4
34
44
36
68
4
50
35
68
35
34
68
50
10
Page 11
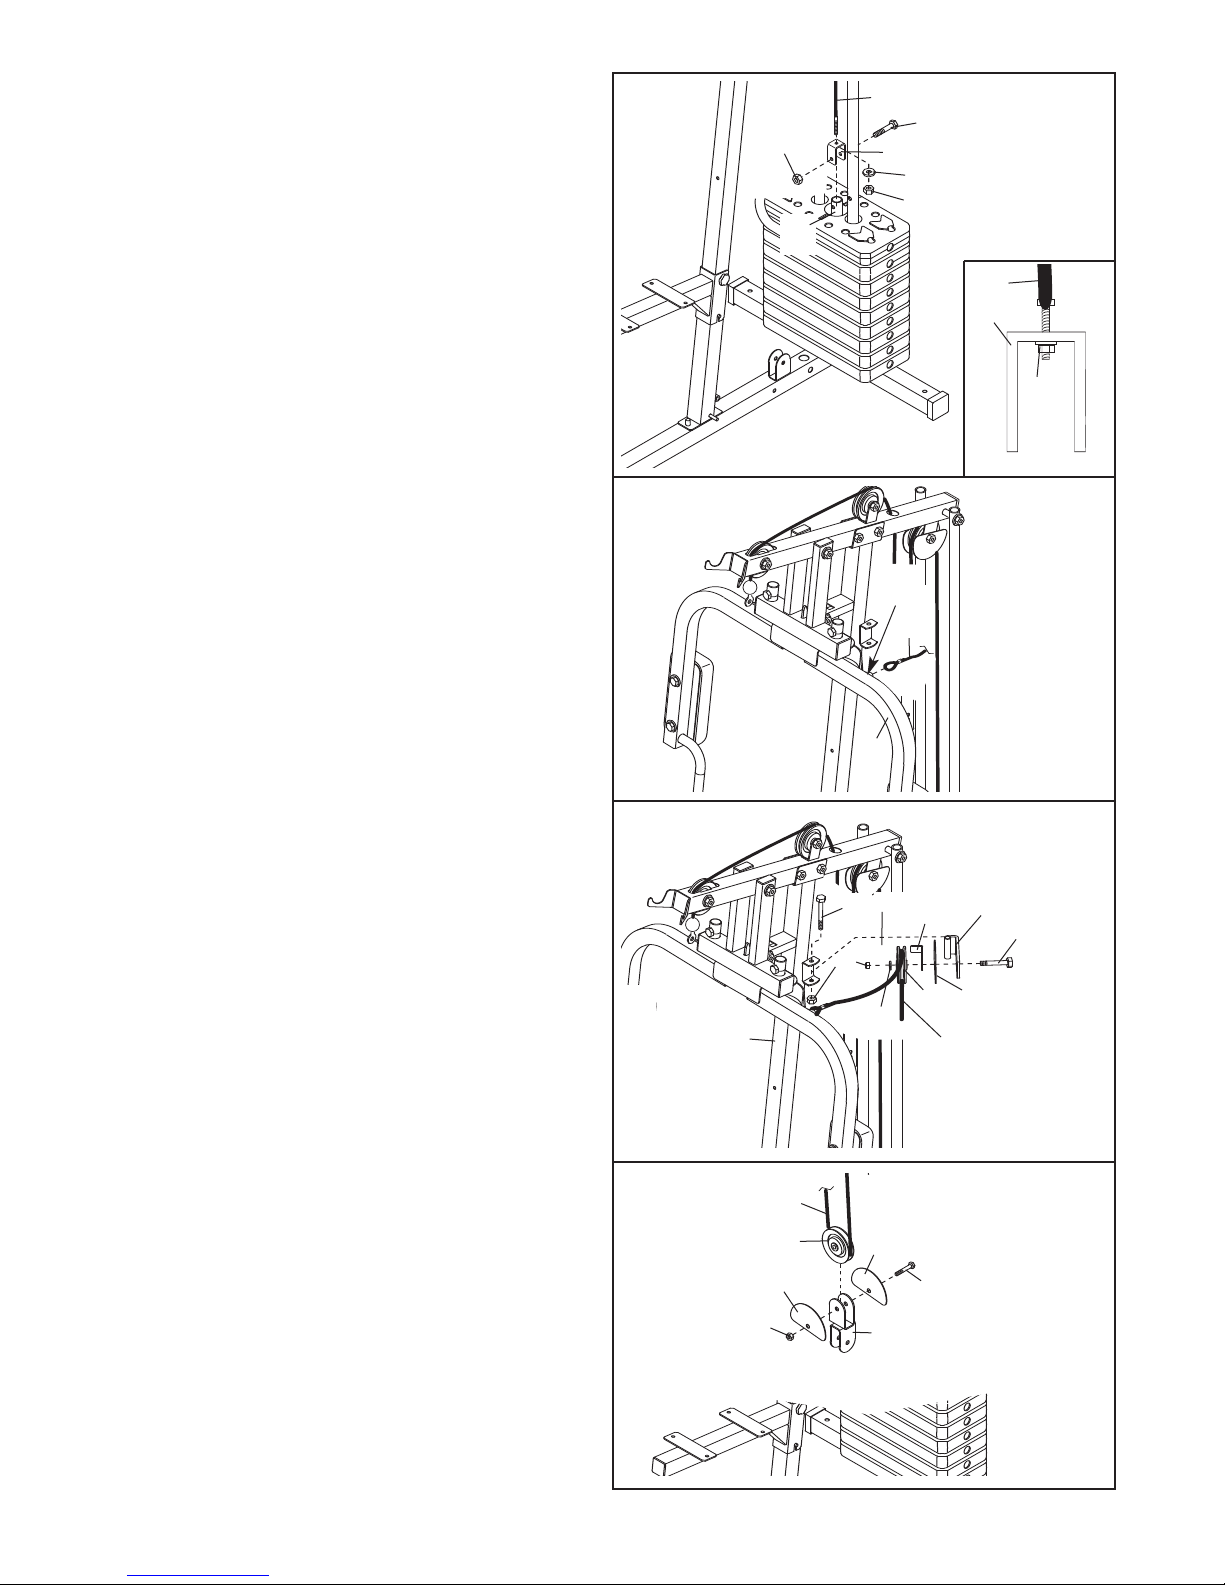
14. Attach the end of the High Cable (50) to the
Small “U”-bracket (11) with an M8 Washer (71)
nd an M8 Nylon Locknut (69). N
a
completely tighten the Nylon Locknut; it
hould be threaded onto the Cable so that
s
two threads show past the Nylon Locknut,
as shown in the inset drawing.
ote: Do not
4
1
9
6
2
1
50
60
11
71
69
Attach the Small “U”-bracket (11) to the Weight
Tube (12) with an M8 x 45mm Bolt (60) and an
M8 Nylon Locknut (69). Do not overtighten
the Nylon Locknut; the Weight Tube must
pivot easily in the Small “U”-bracket.
15. Identify the Press Cable (49). Slide the Cable
onto the hook on the Left Arm (7).
16. Apply grease to an M10 x 78mm Bolt (54).
Attach a Pulley Arm (38) to the Upright (3) with
the Bolt and an M10 Nylon Locknut (68). Do
not overtighten the Nylon Locknut; the
Pulley Arm must pivot easily.
Route the Press Cable (49) over a 90mm
Pulley (34). Attach the Pulley, a Cable Trap
(36), an M10 Washer (70), and two Finger
Guards (35) to the indicated side of the Pulley
Arm (38) with an M10 x 52mm Bolt (52) and an
M10 Nylon Locknut (68). Make sure that the
Cable Trap is oriented to hold the Cable in
the groove of the Pulley.
15
16
50
11
69
Hook
49
7
35
54
68
3
36
70
34
38
52
35
49
17.
Route the Press Cable (49) under a 90mm
Pulley (34). Attach the Pulley and two Finger
Guards (35) to the Double “U”-bracket (42) with
an M10 x 46mm Bolt (53) and an M10 Nylon
Locknut (68).
11
17
68
35
49
34
35
53
42
Page 12
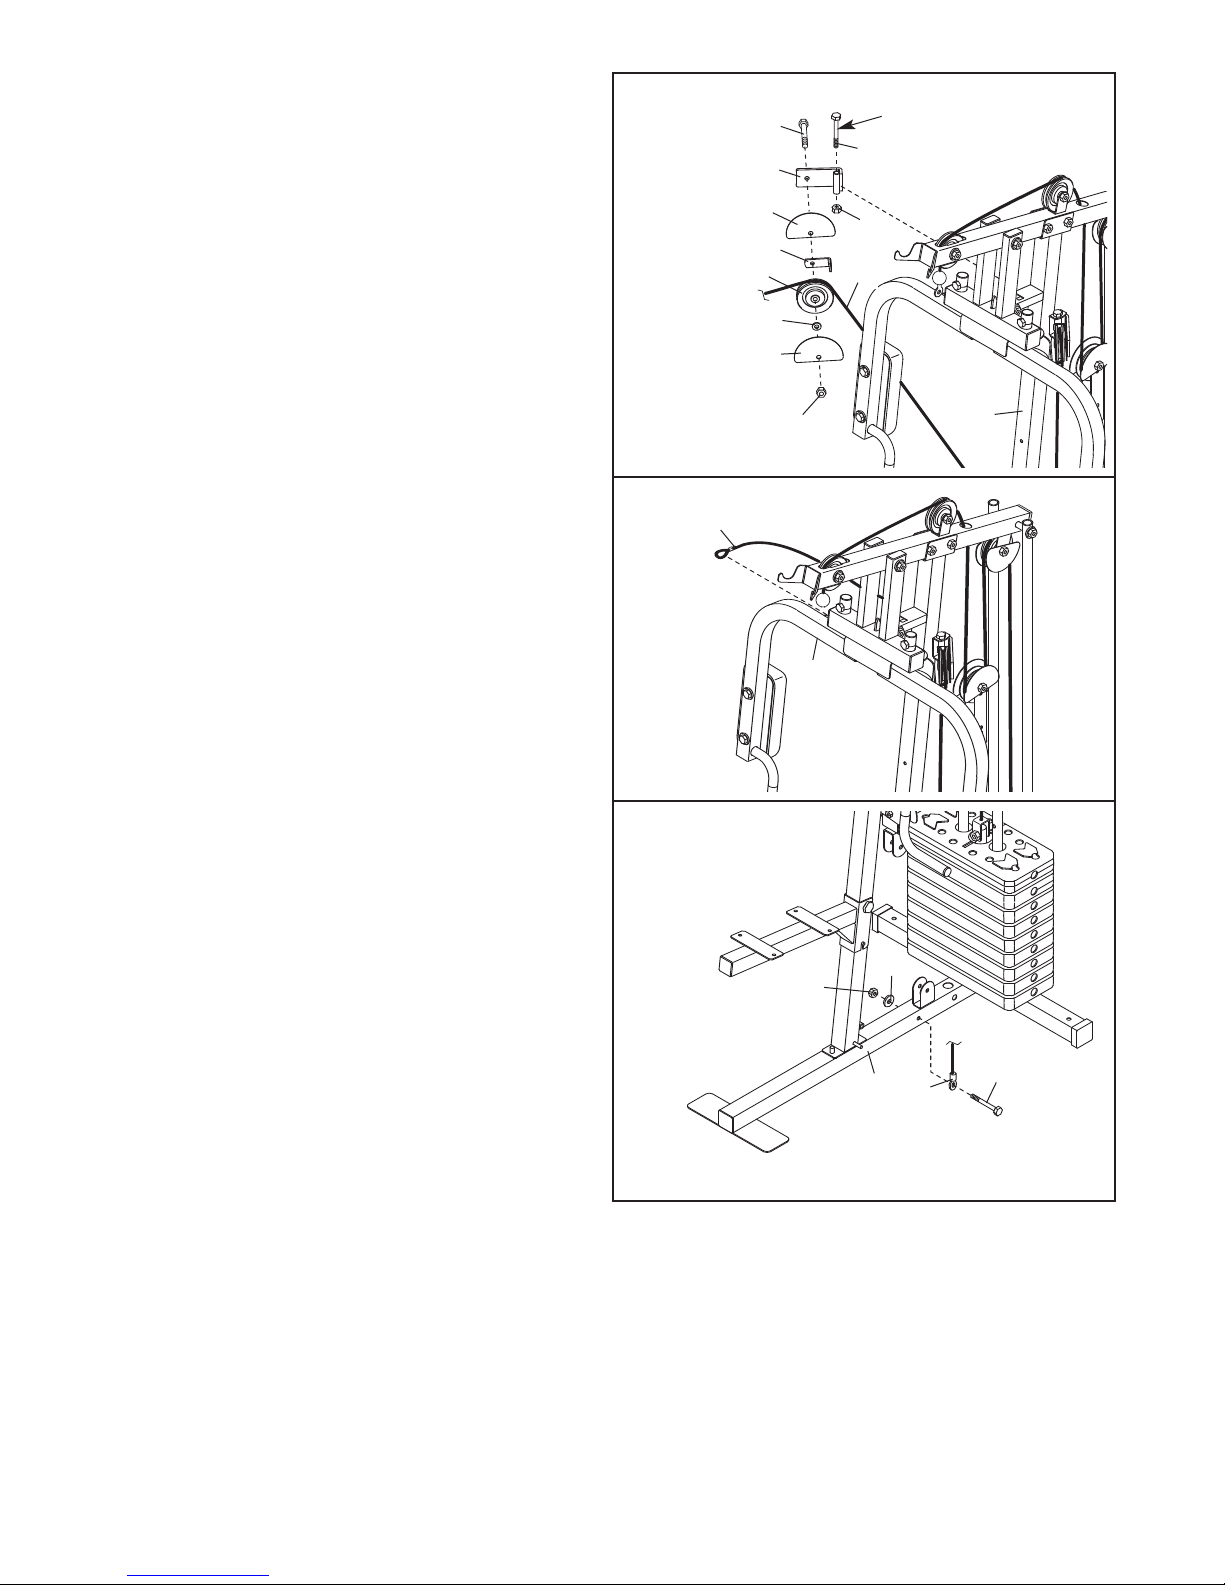
18. Apply grease to an M10 x 78mm Bolt (54).
Attach a Pulley Arm (38) to the Upright (3) with
he Bolt and an M10 Nylon Locknut (68). D
t
not overtighten the Nylon Locknut; the
ulley Arm must pivot easily.
P
Route the Press Cable (49) over a 90mm Pulley
(34). Attach the Pulley, a Cable Trap (36), an
M10 Washer (70), and two Finger Guards (35)
to the indicated side of the Pulley Arm (38) with
an M10 x 52mm Bolt (52) and an M10 Nylon
Locknut (68).
is oriented to hold the Cable in the groove
of the Pulley.
Make sure that the Cable Trap
18
rease
G
54
8
6
9
4
3
35
34
52
3
36
70
35
8
68
o
19. Slide the end of the Press Cable (49) onto the
hook on the Right Arm (6).
20. Identify the Short Cable (47). Attach the eye-
let on the Cable to the Base (1) with an M10 x
70mm Bolt (57), an M10 Washer (70), and an
M10 Nylon Locknut (68). Do not overtighten
the Nylon Locknut.
19
49
6
20
70
68
12
1
47
57
Page 13
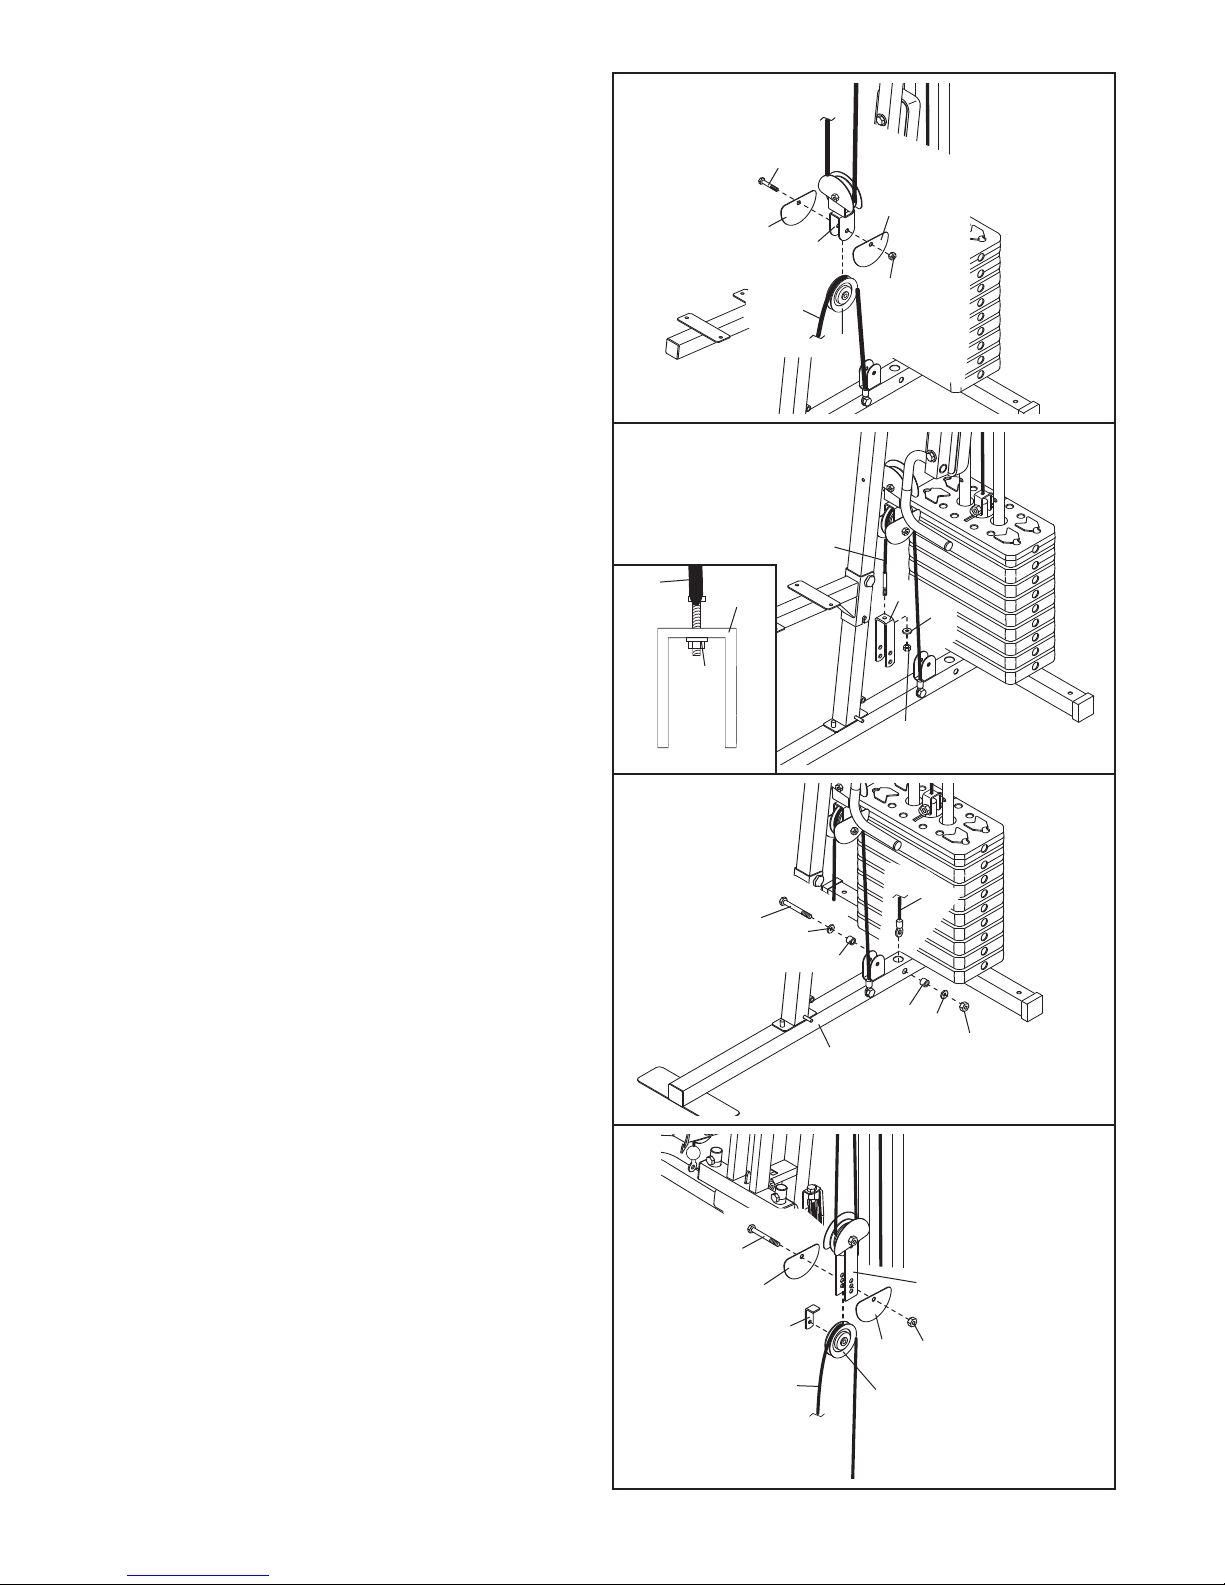
21. Route the Short Cable (47) over a 90mm Pulley
(34). Attach the Pulley and two Finger Guards
35) to the Double “U”-bracket (42) with an M10
(
x 46mm Bolt (53) and an M10 Nylon Locknut
68).
(
21
53
5
3
5
3
42
8
47
6
34
22. Attach the end of the Short Cable (47) to the
“U”-bracket (43) with an M8 Washer (71) and
an M8 Nylon Locknut (69).
pletely tighten the Nylon Locknut; it should
be threaded onto the Cable so that two
threads show past the Nylon Locknut, as
shown in the inset drawing.
23. Identify the Low Cable (48). Attach the Cable
inside the Base (1) with an M10 x 65mm Bolt
(55), two M10 Washers (70), two Large
Spacers (51), and an M10 Nylon Locknut (68).
Note: Do not com-
22
23
47
69
43
55
47
43
71
69
48
70
51
24. Route the Low Cable (48) over a 90mm Pulley
Attach the Pulley
(34).
two Finger Guards (35) to the second hole from
the bottom of each Pulley Plate (44) with an
M10 x 52mm Bolt (52) and an M10 Nylon
Locknut (68).
is oriented to hold the Cable in the groove
of the Pulley.
Make sure that the Cable T
, a Cable
rap (36), and
T
rap
13
24
52
35
36
48
51
70
1
35
34
68
44
68
Page 14
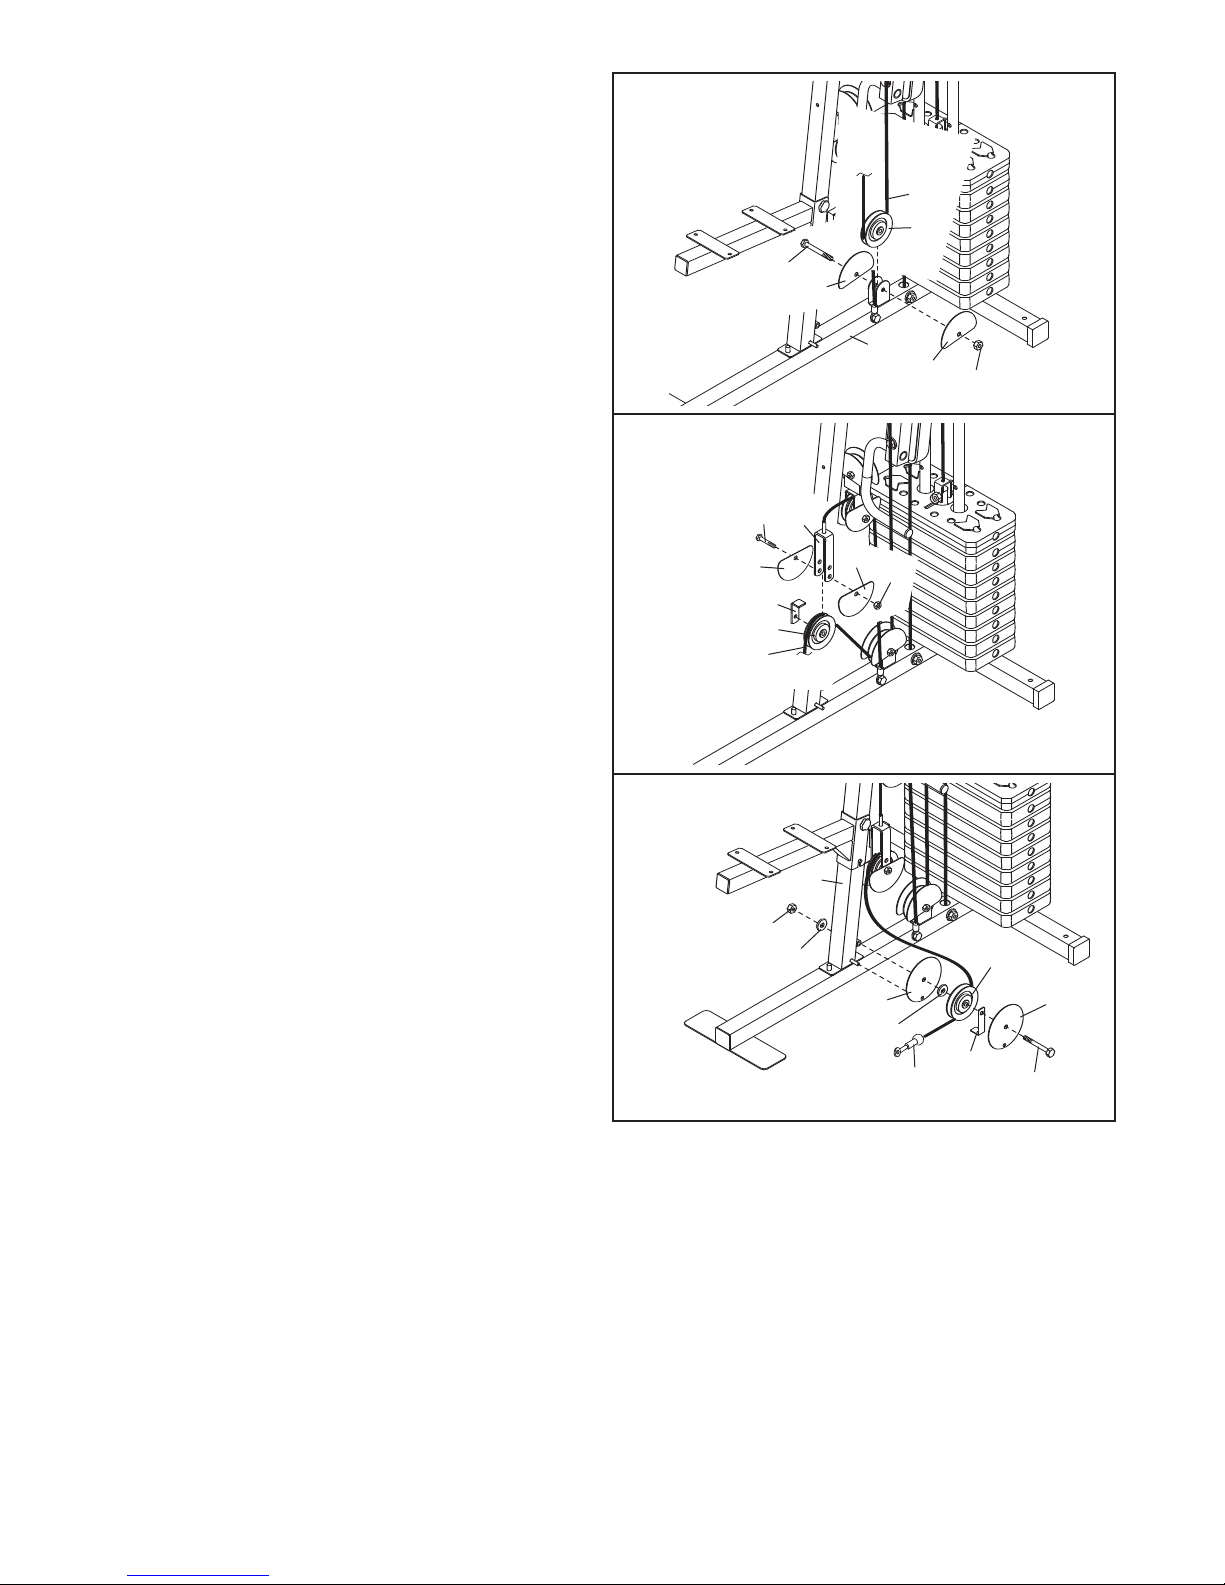
25. Route the Low Cable (48) under a 90mm Pulley
(34). Attach the Pulley and two Finger Guards
35) to the bracket on the Base (1) with an M10
(
x 46mm Bolt (53) and an M10 Nylon Locknut
68).
(
25
48
34
3
5
35
1
35
68
26. Route the Low Cable (48) over a 90mm Pulley
(34). Attach the Pulley, a Cable Trap (36), and
two Finger Guards (35) to the lower set of holes
in the “U”-bracket (43) with an M10 x 52mm
Bolt (52) and an M10 Nylon Locknut (68).
sure that the Cable Trap is oriented to hold
the Cable in the groove of the Pulley.
27. Route the Low Cable (48) under a 90mm Pulley
(34). Attach the Pulley, a Cable Trap (36), and
two Guards (14) to the Upright (3) with an M10
x 100mm Bolt (46), two M10 Washers (70), and
an M10 Nylon Locknut (68). Make sure that
the Cable Trap is oriented to hold the Cable
in the groove of the Pulley.
Make
26
27
35
52
48
68
36
34
43
70
35
68
3
34
14
70
36
48
14
46
14
Page 15
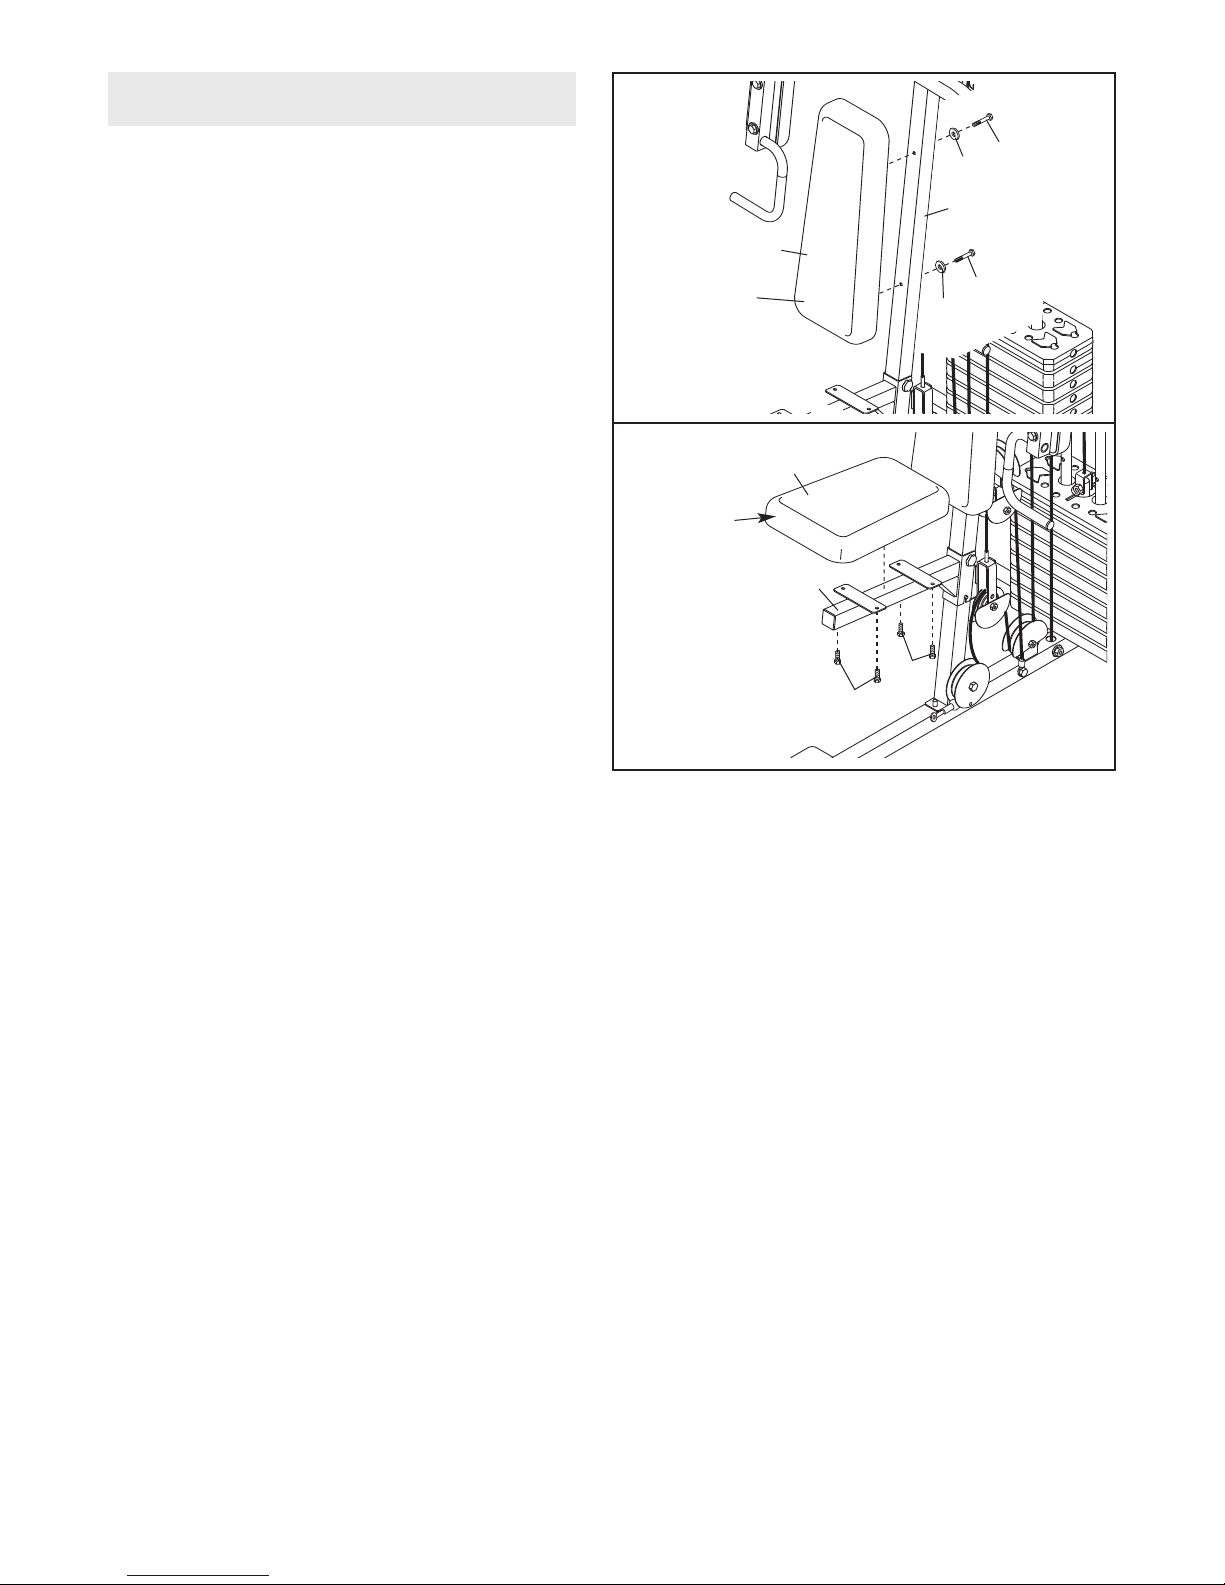
SEAT ASSEMBLY
28
28. Attach the Backrest (18) to the Upright (3) with
two M6 x 63mm Screws (67) and two M6
Washers (73).
29. Orient the Seat (19) as shown, and attach it to
the Seat Frame (8) with four M6 x 16mm
Screws (40).
29
Wide End
Wide
End
67
73
3
8
1
67
73
19
8
40
40
30. Make sure that all parts have been properly tightened. The use of all remaining parts will be explained in
ADJUSTMENTS, beginning on the next page. Before using the weight system, pull each cable a few times to
make sure that the cables move smoothly over the pulleys. If one of the cables does not move smoothly, find
and correct the problem. IMPORTANT: If the cables are not properly routed, they may be damaged when
heavy weight is used. See the CABLE DIAGRAM on page 18 for proper cable routing. If there is any
slack in the cables, you will need to remove it by tightening the cables; see TROUBLESHOOTING AND
MAINTENANCE on page 19.
15
Page 16
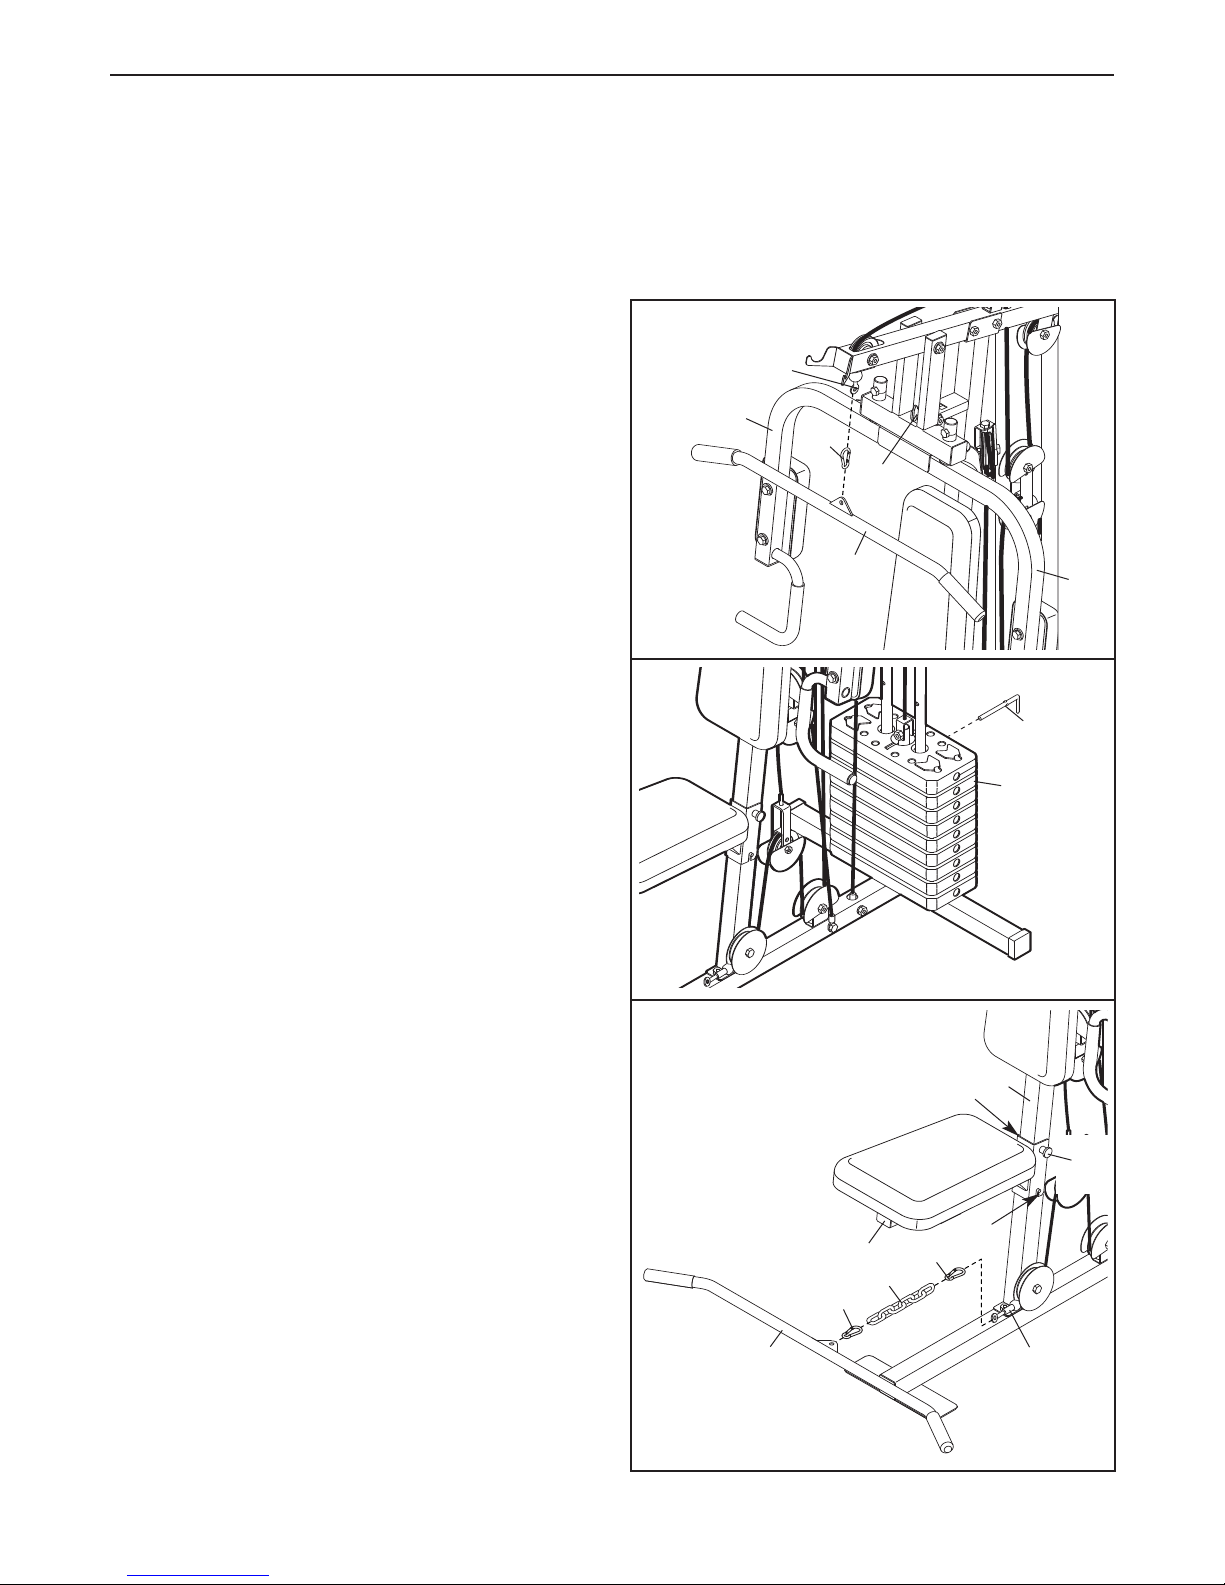
ADJUSTMENT
This section explains how to adjust the weight system. Refer to the accompanying exercise guide to see the correct form for each exercise.
ake sure all parts are properly tightened each time you use the weight system. Replace any worn parts immediate-
M
ly. The weight system can be cleaned with a damp cloth and a mild, non-abrasive detergent. Do not use solvents.
ATTACHING THE LAT BAR
Attach the Lat Bar (31) to the High Cable (50) with a
Cable Clip (33). Note: The Lat Bar can be attached to
the Low Cable (not shown). Remove the Lat Bar
when performing exercises that do not require it.
USING THE BUTTERFLY ARMS
To do butterfly exercises, push the Press Frame Lock
(39) to the position shown to lock the Right and Left
Butterfly
the Press Frame Lock until the Right and Left
Butterfly Arms are free.
CHANGING THE WEIGHT SETTING
To change the weight setting, insert a Weight Pin (16)
under the desired Weight (15) until the bent end of
the Weight Pin touches the Weights. Turn the bent
end downward. Note: Due to the cables and pul-
leys, the amount of resistance at each exercise
station may vary from the weight setting. Use the
WEIGHT RESISTANCE CHART on page 17 to find
the approximate amount of resistance at each
weight station.
Arms (6, 7). To do press arm exercises, lift
50
6
33
39
31
7
16
15
REMOVING THE SEAT
Remove the M8 Knob (30) and the M8 x 70mm
Carriage Bolt (56). Lift the Seat Frame (8) off the pin
on the Upright (3).
USING THE LOW
To perform exercises that require the Low Pulley
Station, attach a Cable Clip (33) to the Low Cable
(48) and to one end of the Chain (9). Next, attach the
Chain to another Cable Clip (33) and attach the Cable
Clip to the Lat Bar (31).
PULLEY STATION
16
31
33
3
56
30
Pin
8
33
9
48
Page 17
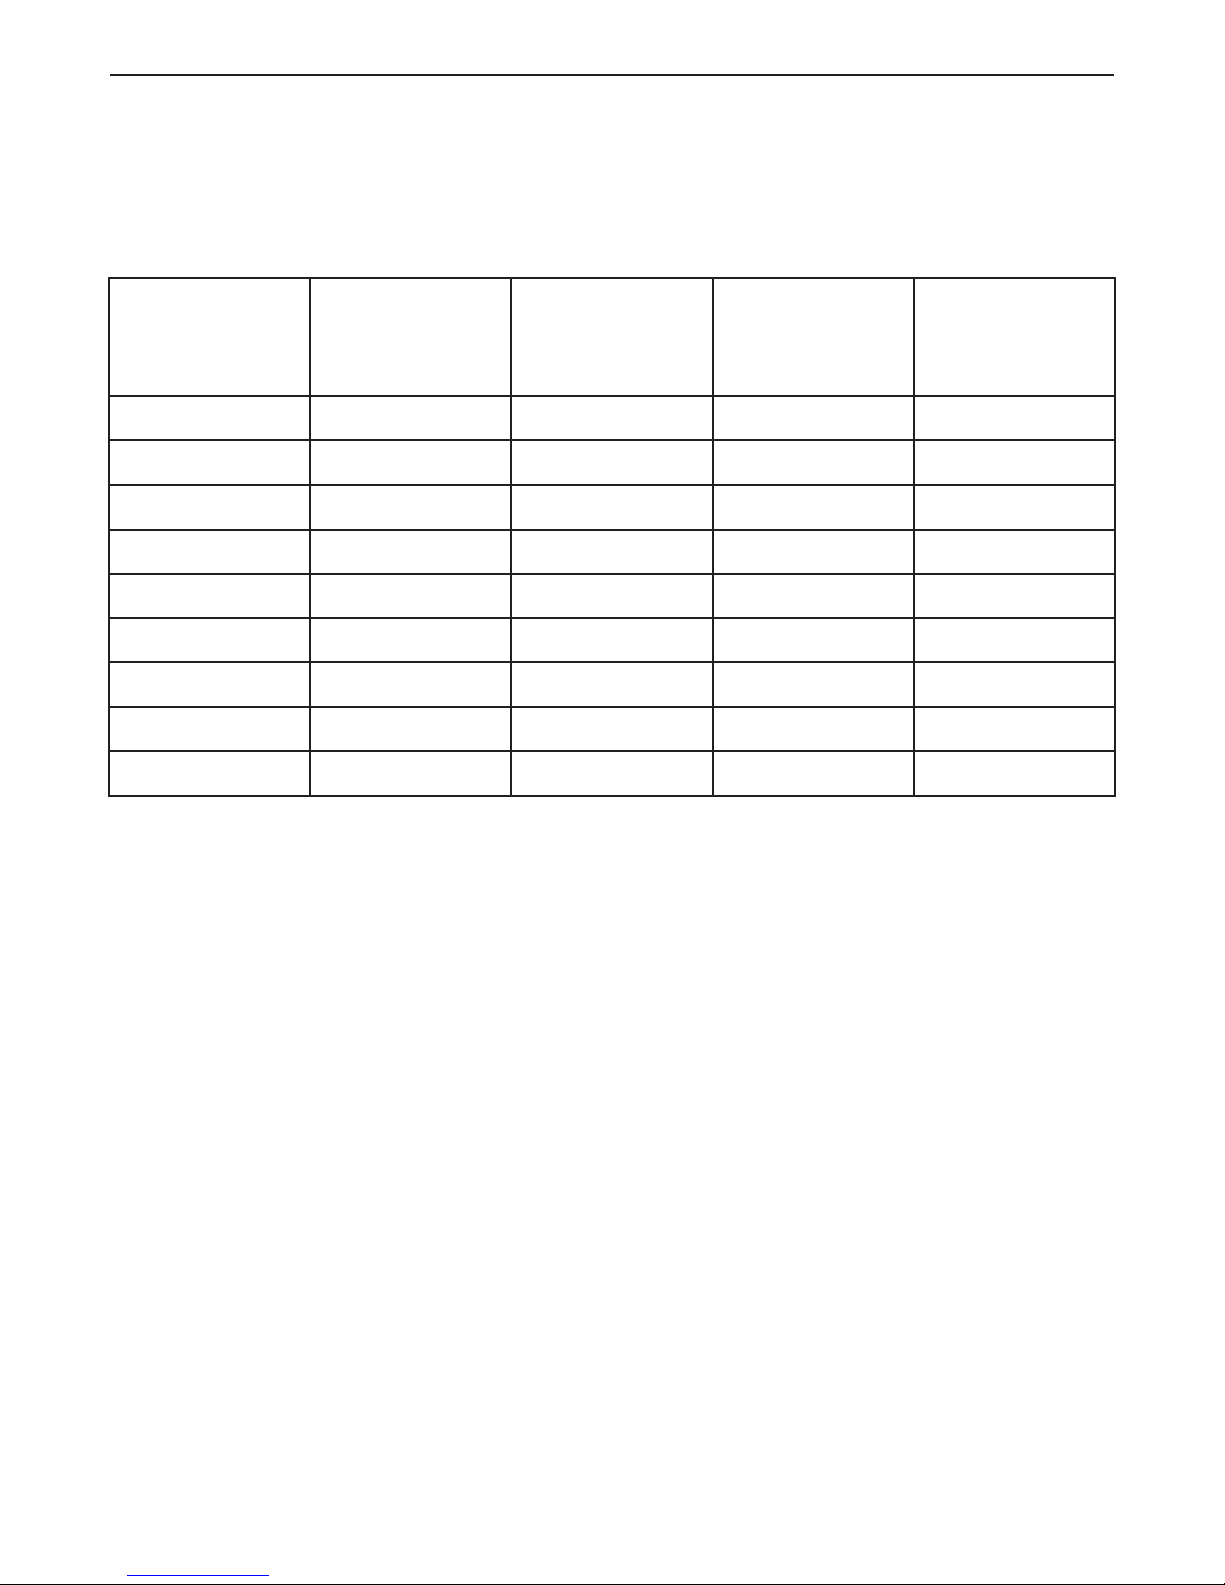
WEIGHT RESISTANCE CHART
The chart below shows the approximate weight resistance at each exercise station. Weight resistance shown for
the butterfly arm station is for each butterfly arm. Note: The actual resistance at each station may vary due
to differences in individual weight plates as well as friction between the cables, pulleys, and weight
guides.
WEIGHT
1 35 19 26 29
2 50 28 38 43
3 66 36 53 55
4 81 45 68 69
5 94 55 80 84
6 111 69 98 96
7 132 75 116 119
8 155 84 127 139
9 170 94 139 160
Note: 1 lb. = 0.454 kg
PRESS
ARM
(lbs.)
BUTTERFLY ARM
(lbs.)
HIGH
PULLEY
(lbs.)
LOW
PULLEY
(lbs.)
17
Page 18
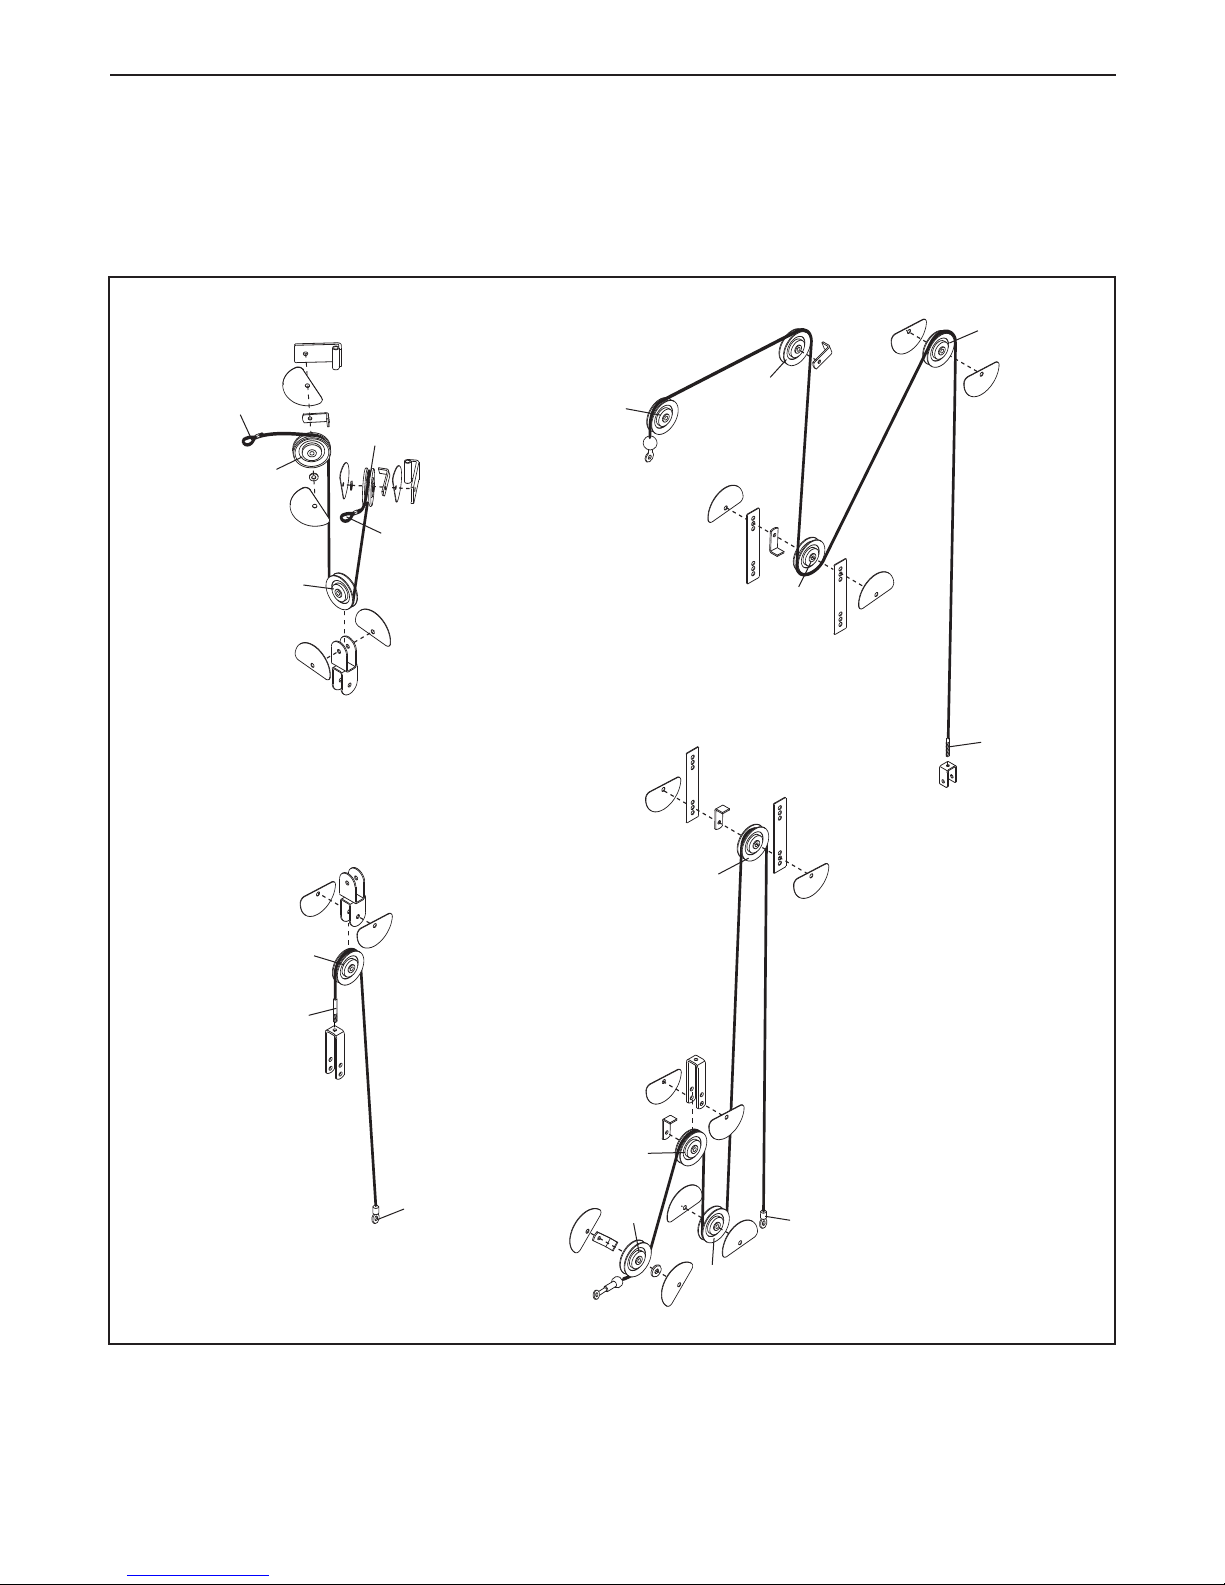
CABLE DIAGRAM
The cable diagram below shows the proper routing of the Short Cable (47), the Low Cable (48), the Press
Cable (49), and the High Cable (50). Use the diagrams to make sure that the cables have been assembled correctly. If the cables have not been correctly routed, the weight system will not function properly and damage may
occur. The numbers show the correct route for each cable.
4
Press Cable (49)
5
2
4
1
2
3
Short Cable (47)
2
3
1
High Cable (50)
3
5
2
Low Cable (48)
1
18
4
5
3
1
Page 19
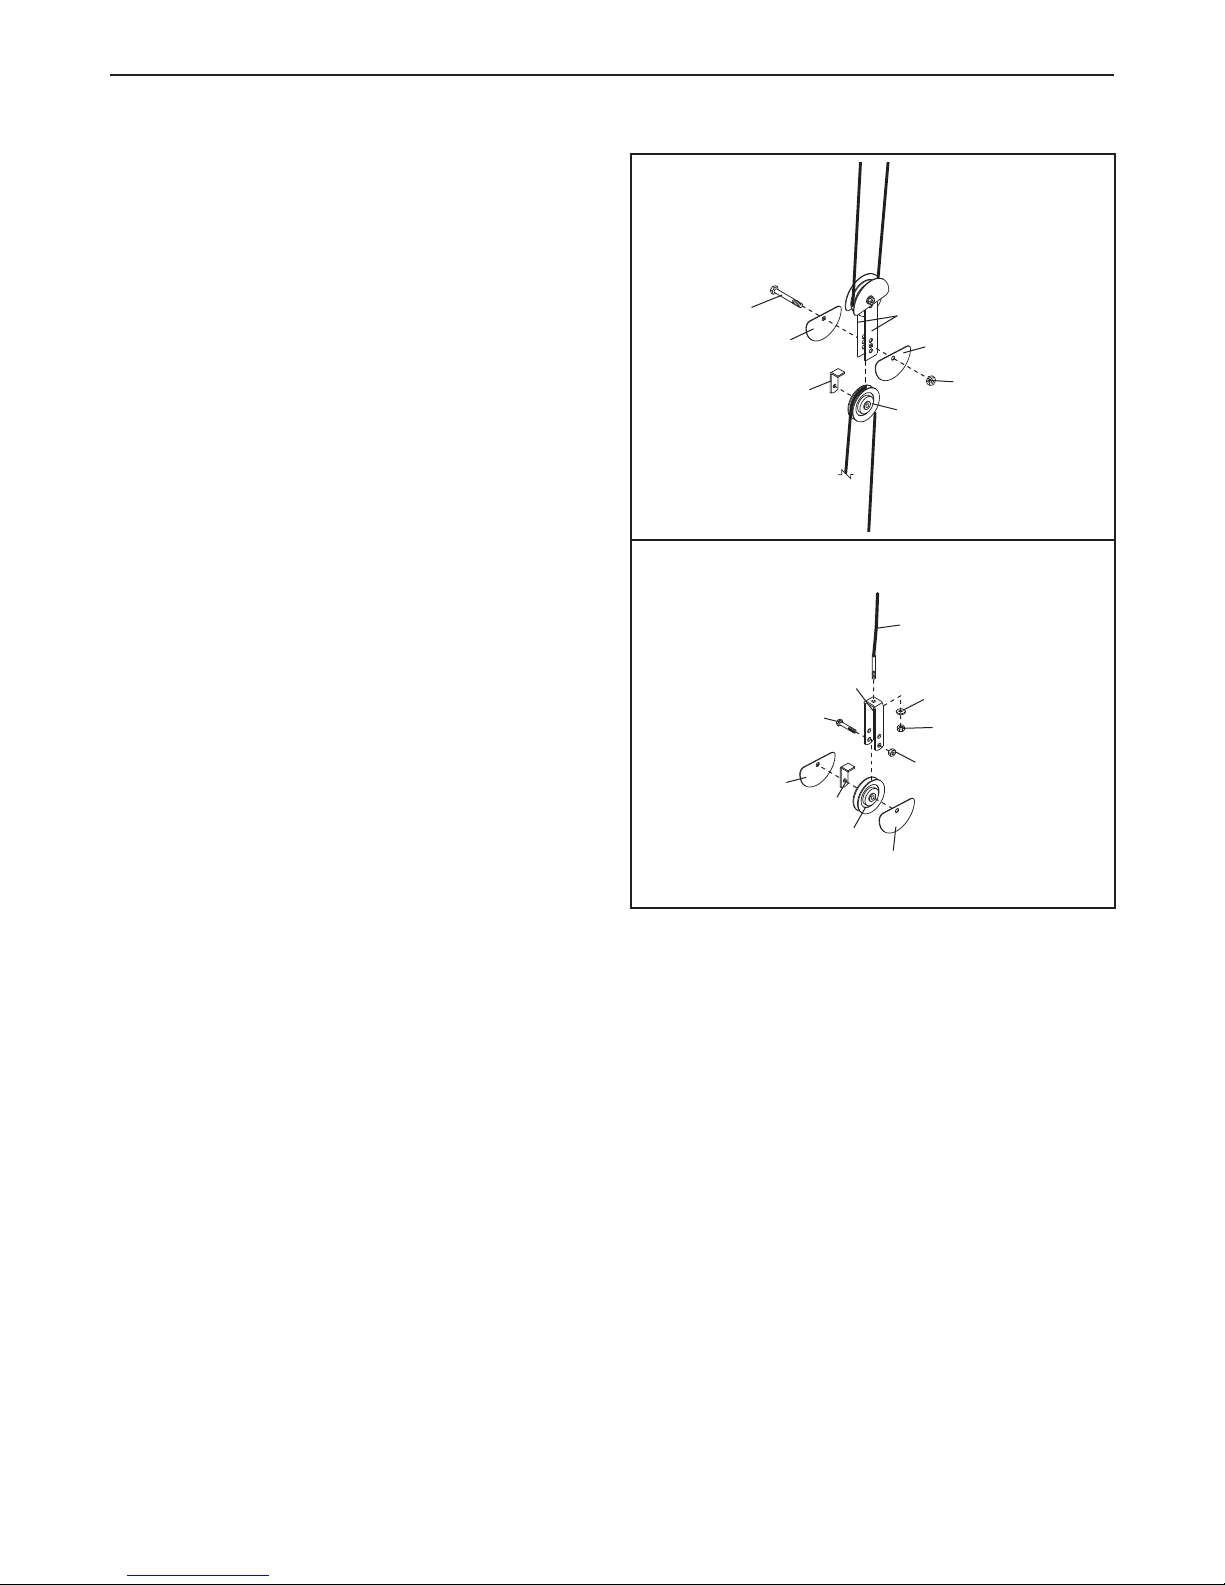
TROUBLESHOOTING AND MAINTENANCE
TIGHTENING THE CABLES
Woven cable, the type of cable used on the weight
system, can stretch slightly when it is first used. If
there is slack in the cables before resistance is felt,
the cables should be tightened.
Slack can be removed by moving a 90mm Pulley
(34), a Cable Trap (36), and two Finger Guards (35)
to a set of holes closer to the center of the two Pulley
Plates (44). Remove the M10 Nylon Locknut (68) and
the M10 x 52mm Bolt (52), and reattach the Pulley,
Cable Trap, and Finger Guards to the different set of
holes in the Pulley Plates.
Slack can also be removed by moving the 90mm
Pulley (34), the Cable Trap (36), and the two Finger
Guards (35) to the higher set of holes in the “U”-bracket (43). Remove the M10 Nylon Locknut (68) and the
M10 x 52mm Bolt (52), and reattach the Pulley, the
Cable Trap, and two Finger Guards to the higher set
of holes in the “U”-bracket.
Finally, slack can be removed from the cables by tightening the M8 Nylon Locknut (69) attaching the Short
Cable (47) to the “U”-bracket (43). The High Cable (not
shown) and the Small “U”-bracket (not shown) can be
adjusted in the same manner.
Make sure that the cables are not too tight, or the
Top Weight (not shown) will be lifted off the weight
stack.
52
35
36
52
35
36
43
34
44
35
68
34
47
71
69
68
35
19
Page 20

NOTES
20
Page 21

PART LIST—Model No. WEEVSY1326.0 R0906A
Key No. Qty. Description Key No. Qty. Description
1 1 Base
2
3 1 Upright
4 1 Top Frame
5 1 Press Frame
6 1 Right Arm
7 1 Left Arm
8 1 Seat Frame
9 1 Chain
10 2 Weight Guide
11 1 Small “U”-bracket
12 1 Weight Tube
13 1 Weight Tube Bumper
14 2 Guard
15 9 Weight
16 1 Weight Pin
17 2 Weight Bumper
18 1 Backrest
19 1 Seat
20 2 Arm Pad
21 1 Lock Pin
22 1 Lock
23 2 25mm Round Inner Cap
24 5 45mm Square Inner Cap
25 3 25mm x 50mm Inner Cap
26 4 50mm Square Inner Cap
27 2 25mm Round Outer Cap
28 2 25mm x 68mm Bushing
29 2 25mm Washer
30 1 M8 Knob
31 1 Lat Bar
32 2 Handgrip
33 3 Cable Clip
34 12 90mm Pulley
35 18 Finger Guard
36 7 Cable Trap
37 4 Small Spacer
38 2 Pulley Arm
39 1 Press Frame Lock
1 Stabilizer
40 4 M6 x 16mm Screw
1 2 50mm Square Outer Cap
4
42 1 Double “U”-bracket
43 1 “U”-bracket
44 2 Pulley Plate
45 2 Butterfly Grip
46 1 M10 x 100mm Bolt
47 1 Short Cable
48 1 Low Cable
49 1 Press Cable
50 1 High Cable
51 2 Large Spacer
52 6 M10 x 52mm Bolt
53 4 M10 x 46mm Bolt
54 2 M10 x 78mm Bolt
55 2 M10 x 65mm Bolt
56 1 M8 x 70mm Carriage Bolt
57 3 M10 x 70mm Bolt
58 2 M8 x 63mm Carriage Bolt
59 2 M10 x 65mm Carriage Bolt
60 1 M8 x 45mm Bolt
61 2 M6 x 43mm Bolt
62 1 M10 x 155mm Bolt
63 2 M8 x 68mm Bolt
64 1 M10 x 125mm Bolt
65 4 M6 x 58mm Screw
66 1 M8 x 63mm Bolt
67 2 M6 x 63mm Screw
68 22 M10 Nylon Locknut
69 8 M8 Nylon Locknut
70 15 M10 Washer
71 4 M8 Washer
72 2 M6 Nylon Locknut
73 6 M6 Washer
74 2 25mm Round Thin Cap
# – User’s Manual
# – Exercise Guide
# – Grease Packet
Note: “#” indicates a non-illustrated part. Specifications are subject to change without notice. See the back cover
of the user’s manual for information about ordering replacement parts.
21
Page 22
8
19
40
40
30
56
5
6
7
20
20
74
74
24
24
26
2
6
2
5
24
2
7
2
7
28
29
2
9
49
49
6
4
70
70
68
72
72
61
61
65
73
73
73
73
65
23
44
44
35
34
35
35
34
35
68
52
36
36
43
35
34
35
47
52
69
68
71
36
45
45
28
4
26
34
3
4
34
35
3
6
37
37
35
50
70
55
68
70
53
6
8
68
53
24
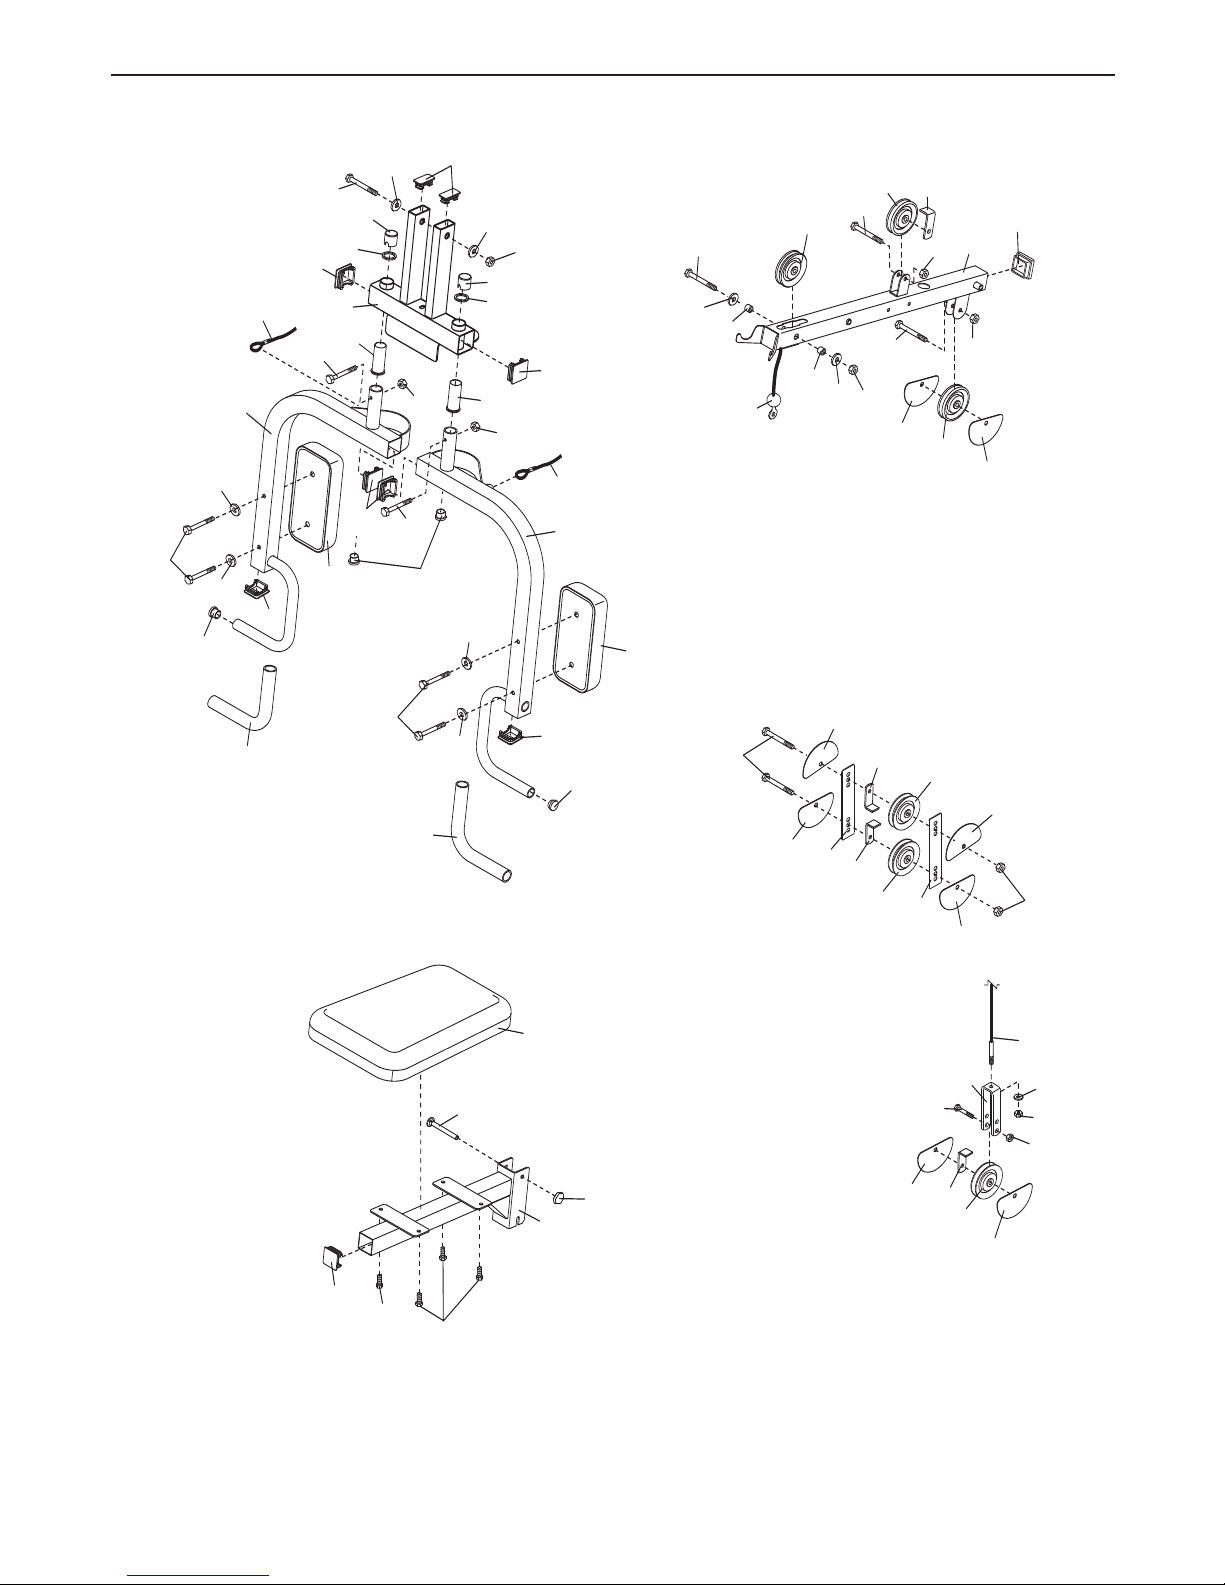
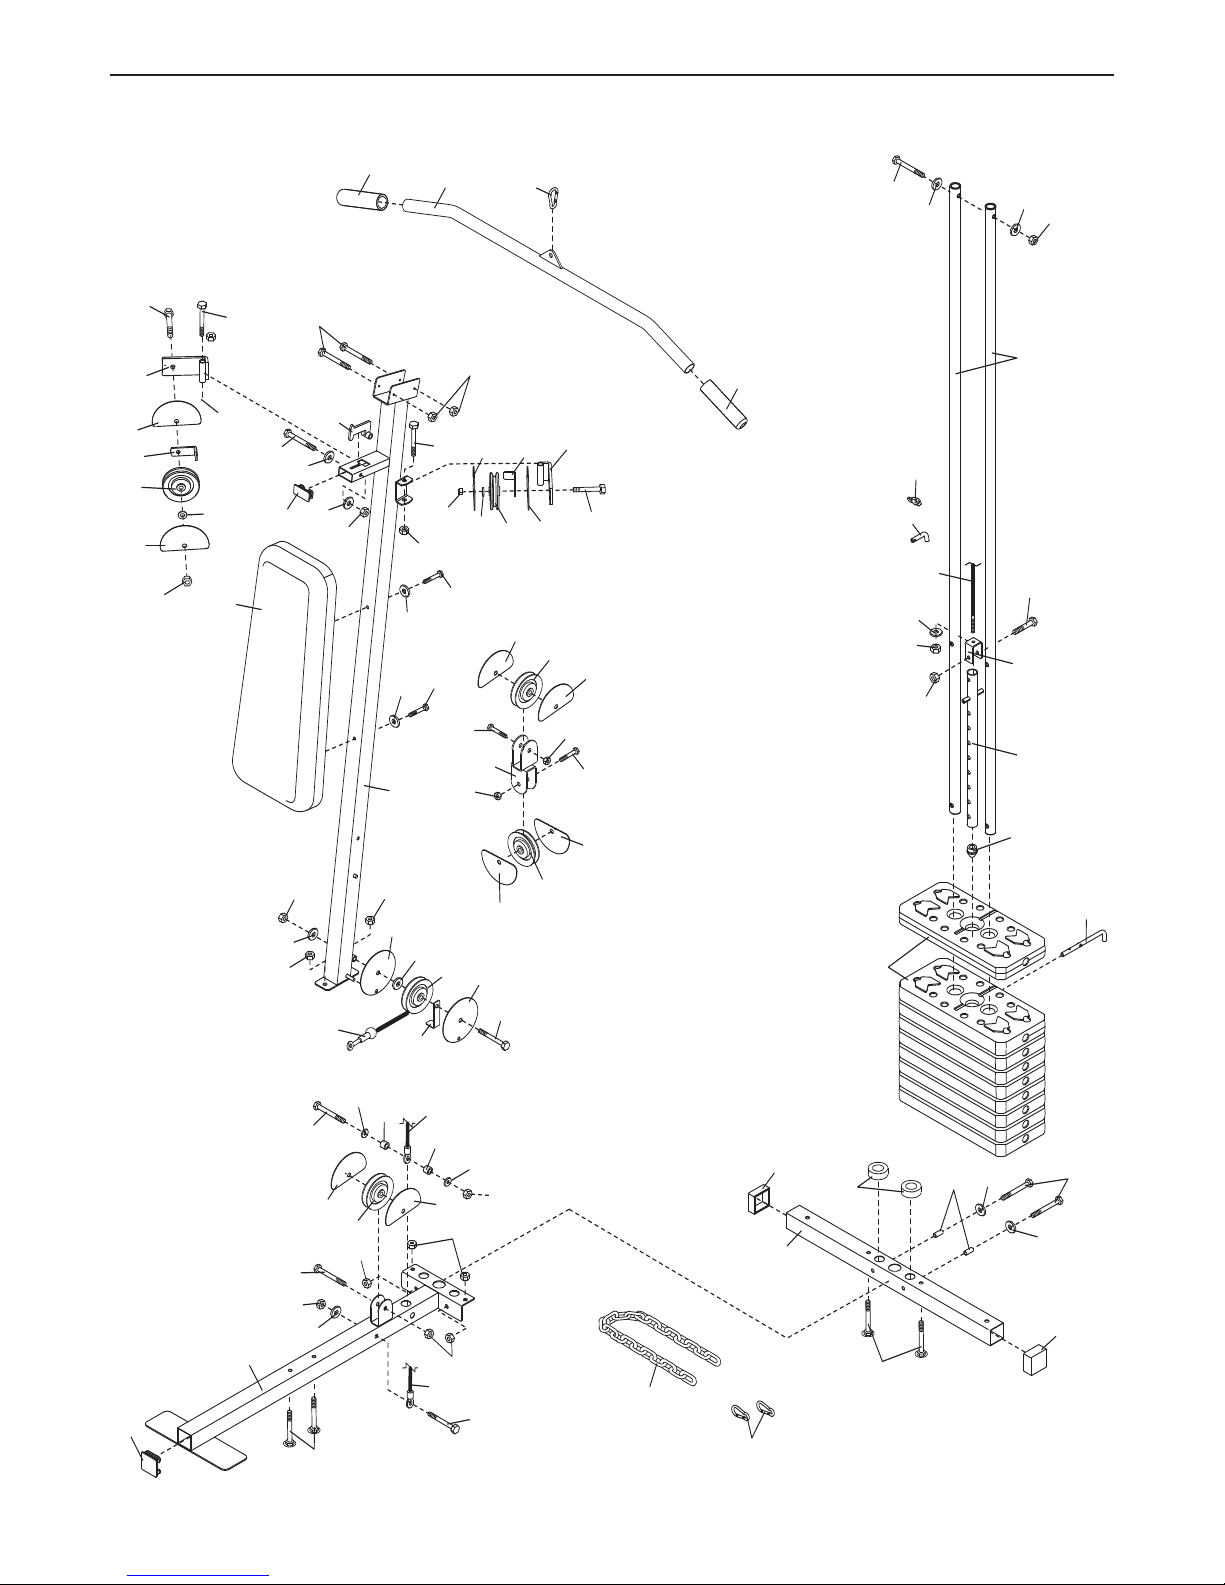
EXPLODED DRAWING A—Model No. WEEVSY1326.0 R0906A
22
Page 23
3
2
31
33
32
35
42
35
34
34
35
35
68
68
53
53
2
17
41
41
70
70
57
59
37
10
11
12
13
15
16
50
62
7
0
68
70
60
71
69
69
3
18
35
34
35
35
34
38
38
39
25
34
52
54
68
68
66
71
63
69
54
68
68
52
73
67
73
67
46
70
69
68
69
70
71
69
35
34
35
47
48
51
51
58
57
70
68
53
68
68
68
70
70
55
1
26
14
36
70
36
70
22
21
68
36
35
9
33
14
48
EXPLODED DRAWING B—Model No. WEEVSY1326.0 R0906A
23
Page 24

ORDERING REPLACEMENT PARTS
To order replacement parts, contact the ICON Health & Fitness, Ltd. office, or write:
CON Health & Fitness, Ltd.
I
Unit 4
Revie Road Industrial Estate
Revie Road
Beeston
Leeds, LS118JG
UK
Tel:
08457 089 009
Outside the UK: 0 (044) 113 387 7133
Fax: 0 (044) 113 387 7125
Please provide the following information when ordering replacement parts:
• the MODEL NUMBER of the product (WEEVSY1326.0)
• the NAME of the product (WEIDER 900 weight system)
• the SERIAL NUMBER of the product (see the front cover of this manual)
• the KEY NUMBER and DESCRIPTION of the part(s) (see the PART LIST and the EXPLODED DRAWING on
pages 21 to 23)
Part No. 242331 R0906A Printed in China © 2006 ICON IP, Inc.
 Loading...