

Page 1
Motors I Automation I Energy I Transmission & Distribution I Coatings
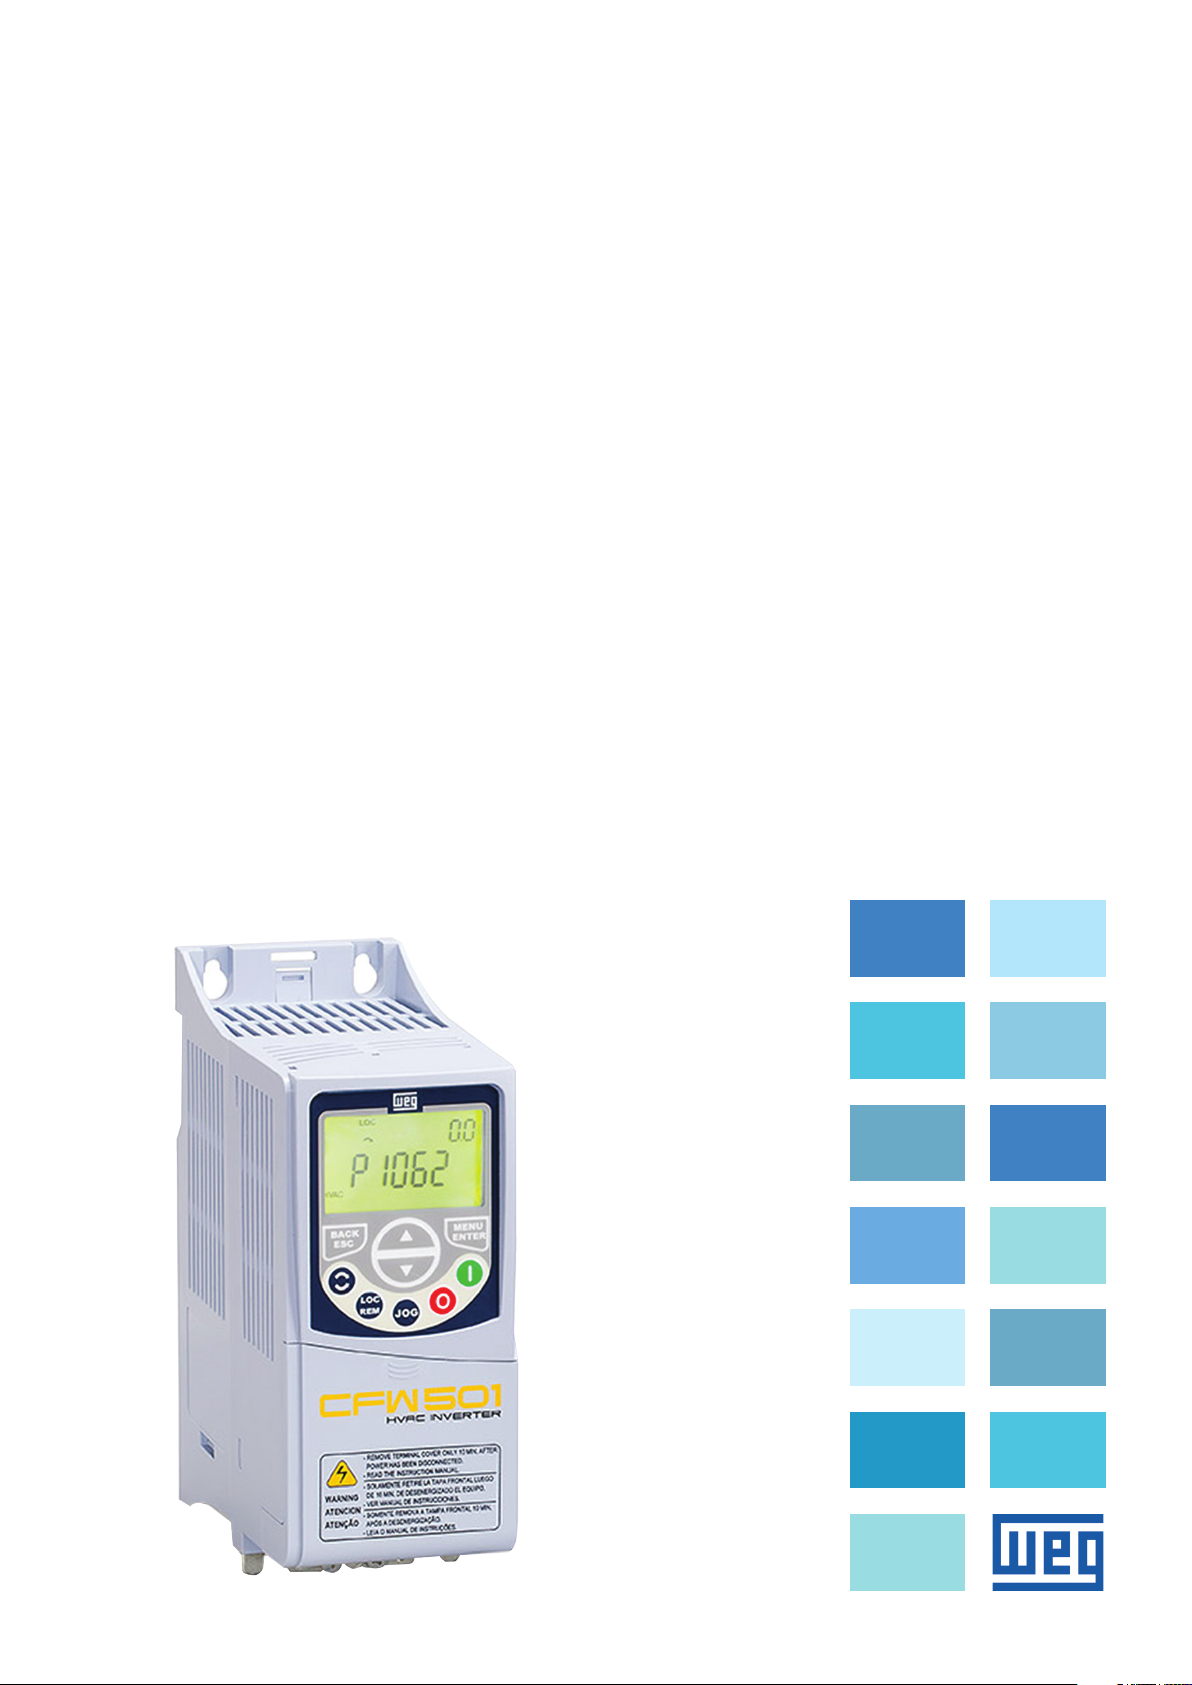
Frequency Inverter
CFW501 V1.8X
Programming Manual
Page 2

Page 3

Programming Manual
Series: CFW501
Language: English
Document Number: 10002391560 / 01
Software Version: 1.8X
Publication Date: 04/2015
Page 4

Summary of Reviews
The information below describes the reviews made in this manual.
Version Review Description
V1.5X R00 First edition
V1.8X R01 New options of the V/f and VV W Control Type included and modified
Page 5

Summary
QUICK REFERENCE OF PARAMETERS, ALARMS AND FAULTS .........0-1
1 SAFETY INSTRUCTIONS ...................................................................... 1-1
1.1 SAFETY WARNINGS IN THIS MANUAL .......................................................................................1-1
1.2 SAFETY WARNINGS IN THE PRODUCT .......................................................................................1-1
1.3 PRELIMINARY RECOMMENDATIONS .........................................................................................1-2
2 GENERAL INFORMATION .....................................................................2-1
2.1 ABOUT THE MANUAL ...................................................................................................................2-1
2.2 TERMINOLOGY AND DEFINITIONS .............................................................................................2-1
2.2.1 Terms and Definitions Used .................................................................................................2-1
2.2.2 Numerical Representation ................................................................................................. 2-3
2.2.3 Symbols to Describe Parameter Properties .................................................................... 2-3
3 ABOUT THE CFW501 ............................................................................3-1
4 HMI AND BASIC PROGRAMMING ....................................................... 4-1
4.1 USE OF THE HMI TO OPERATE THE INVERTER ....................................................................... 4 -1
4.2 INDICATIONS ON THE HMI DISPLAY .......................................................................................... 4-2
4.3 OPERATING MODES OF THE HMI ............................................................................................... 4-3
5 BASIC INSTRUCTIONS FOR PROGRAMMING AND SETTINGS ........5 -1
5.1 PARAMETER STRUCTURE ........................................................................................................... 5 -1
5.2 PARAMETERS SELECTED BY THE HMI MENU ......................................................................... 5-1
5.3 HMI .................................................................................................................................................. 5-2
5.4 INDIRECT ENGINEERING UNITS ................................................................................................. 5-6
5.5 BACKUP PARAMETERS ..............................................................................................................5 -11
5.6 SETTING OF DISPLAY INDICATIONS IN THE MONITORING MODE .......................................5-12
5.7 SITUATIONS FOR CONFIG STATUS ............................................................................................5 -12
6 IDENTIFICATION OF THE INVERTER MODEL AND ACCESSORIES ..6-1
6.1 INVERTER DATA ............................................................................................................................ 6-1
7 LOGICAL COMMAND AND SPEED REFERENCE ............................... 7-1
7.1 SELECTION FOR LOGICAL COMMAND AND SPEED REFERENCE ......................................... 7-1
7.2 SPEED REFERENCE .....................................................................................................................7-7
7.2.1 Speed Reference Limits .................................................................................................... 7- 8
7.2.2 Speed Reference Backup .................................................................................................... 7-8
7.2.3 Speed Reference Parameters .............................................................................................7-9
7.2.4 Analog Input AIx and Frequency Input FI .........................................................................7-9
7.2.5 13-Bit Speed Reference ......................................................................................................7- 9
7.3 CONTROL WORD AND INVERTER STATUS ............................................................................... 7-10
7.3.1 Control via HMI Inputs ......................................................................................................7-13
7.3.2 Control via Digital Inputs ................................................................................................. 7-13
8 AVAILABLE MOTOR CONTROL TYPES ...............................................8 -1
Page 6

Summary
9 V/f SCALAR CONTROL ..........................................................................9-1
9.1 PARAMETERIZATION OF THE V/f SCALAR CONTROL ............................................................. 9-3
9.2 START-UP IN V/f MODE ............................................................................................................... 9-8
10 V V W VECTOR CONTROL .................................................................10 -1
10.1 VVW VECTOR CONTROL PARAMETERIZATION .................................................................... 10-3
10.2 START-UP IN VV W MODE ........................................................................................................ 10-8
11 FUNCTIONS COMMON TO ALL THE CONTROL MODES ............... 11-1
11.1 RAMPS ........................................................................................................................................ 11-1
11.2 DC LINK VOLTAGE AND OUTPUT CURRENT LIMITATION ....................................................11-3
11.2.1 DC Link Voltage Limitation by “Ramp Hold” P0150 = 0 or 2 .........................................11- 4
11.2.2 DC Link Voltage Limitation by “Accelerate Ramp” P0150 = 1 or 3 ..............................11- 4
11.2.3 Output Current Limitation by “Ramp Hold” P0150 = 2 or 3 .......................................... 11-7
11.2.4 Current Limitation Type “Decelerate Ramp” P0150 = 0 or 1 ........................................ 11-7
11.3 FLYING-START / RIDE-THROUGH ............................................................................................11- 9
11.3.1 Flying Start Function ........................................................................................................11-9
11.3.2 Ride-Through Function .................................................................................................. 11-10
11.4 DC BRAKING ............................................................................................................................ 11-10
11.5 AVOIDED SPEED ....................................................................................................................... 11-13
12 DIGITAL AND ANALOG INPUTS AND OUTPUTS ............................ 12-1
12.1 ANALOG INPUTS .......................................................................................................................12-1
12.2 ANALOG OUTPUTS ...................................................................................................................12-7
12.3 FREQUENCY INPUT ................................................................................................................12-10
12.4 FREQUENCY OUTPUT ............................................................................................................12 -13
12.5 DIGITAL INPUTS ......................................................................................................................12-15
12.6 DIGITAL OUTPUT .................................................................................................................... 12-2 2
13 RHEOSTATIC BRAKING .................................................................... 13 -1
14 FAULTS AND ALARMS ....................................................................... 14 -1
14.1 MOTOR OVERLOAD PROTECTION (F0072 AND A0046) .........................................................14-1
14.2 IGBTS OVERLOAD PROTECTION (F0048 AND A0047) .......................................................... 14- 4
14.3 MOTOR OVERTEMPERATURE PROTECTION (F0078) .......................................................... 14-5
14.4 IGBTS OVERTEMPERATURE PROTECTION (F0051 AND A0050) ......................................... 14- 6
14.5 OVERCURRENT PROTECTION (F0070 AND F0074) ............................................................... 14-6
14.6 LINK VOLTAGE SUPERVISION (F0021 AND F0022) ................................................................14-7
14.7 PLUG-IN MODULE COMMUNICATION FAULT (F0031) ...........................................................14-7
14.8 V VW CONTROL MODE SELF-TUNING FAULT (F0033) .........................................................14-7
14.9 REMOTE HMI COMMUNICATION FAULT ALARM (A0700) .....................................................14-7
14.10 REMOTE HMI COMMUNICATION ERROR ALARM (F0700) ..................................................14-7
14.11 AUTO-DIAGNOSIS FAULT (F0084) ...........................................................................................14 -7
14.12 FAULT IN THE CPU (F0080) ......................................................................................................14 -7
14.13 INCOMPATIBLE MAIN SOFTWARE VERSION (F0151) .......................................................... 14 - 8
14.14 PULSE FEEDBACK FAULT (F0182) ........................................................................................ 14 -8
14.15 FAULT HISTORY ...................................................................................................................... 14 - 8
14.16 FAULT AUTO-RESET .............................................................................................................. 14 -11
Page 7

Summary
15 READING PARAMETERS ................................................................... 15 -1
16 COMMUNICATION ............................................................................. 16-1
16.1 SERIAL RS-485 INTERFACE ......................................................................................................16-1
16.2 BACNET COMMUNICATION ..................................................................................................... 16-2
16.3 METASYS N2 COMMUNICATION ............................................................................................ 16-2
16.4 COMMUNICATION COMMANDS AND STATUS ...................................................................... 16-2
17 SOFTPLC ............................................................................................ 17-1
18 HVAC FUNCTIONS ..............................................................................18 -1
18.1 ENERGY SAVING .........................................................................................................................18 -1
18.2 PROTECTION AGAINST SHORT CYCLES ............................................................................... 18-3
18.3 DRY PUMP .................................................................................................................................. 18 -4
18.4 BROKEN BELT ........................................................................................................................... 18-6
18.5 FILTER MAINTENANCE ALARM ...............................................................................................18-7
18.6 MAIN PID CONTROLLER .......................................................................................................... 18-8
18.7 EXTERNAL PID CONTROLLER .............................................................................................. 18-20
18.8 HVAC FUNCTIONS LOGICAL STATUS ................................................................................... 18 -28
18.9 FIRE MODE ............................................................................................................................... 18-29
18.10 BYPASS MODE ....................................................................................................................... 18-31
Page 8

Summary
Page 9
Quick Reference of Parameters, Alarms and Faults
QUICK REFERENCE OF PARAMETERS, ALARMS AND FAULTS
Param. Function Adjustable Range Factory Setting
P0000 Access to Parameters 0 to 9999 0 5-2
P0001 Speed Reference 0 to 65535 rpm ro READ 15-1
P0002 Motor Speed 0 to 65535 rpm ro READ 15-1
P0003 Motor Current 0.0 to 200.0 A ro READ 15-1
P0004 DC Link Voltage (Ud) 0 to 2000 V ro READ 15-1
P0005 Motor Frequency 0.0 to 500.0 Hz ro READ 15-2
P0006 VFD Status 0 = Ready
1 = Run
2 = Undervoltage
3 = Fault
4 = Self-Tuning
5 = Configuration
6 = DC-Braking
7 = Reserved
8 = Reserved
9 = Reserved
P0007 Output Voltage 0 to 2000 V ro READ 15-3
P0009 Motor Torque -1000.0 to 1000.0 % ro READ 15-3
P0 010 Output Power 0.0 to 6553.5 kW ro READ 15-3
P0 0 11 Power Factor -1.00 to 1.00 ro READ 15-3
P0 012 DI8 to DI1 Status Bit 0 = DI1
Bit 1 = DI2
Bit 2 = DI3
Bit 3 = DI4
Bit 4 = DI5
Bit 5 = DI6
Bit 6 = DI7
Bit 7 = DI8
P0 013 DO5 to DO1 Status Bit 0 = DO1
Bit 1 = DO2
Bit 2 = DO3
Bit 3 = DO4
Bit 4 = DO5
P0 014 AO1 Value 0.0 to 100.0 % ro READ, I/O 12-7
P0 015 AO2 Value 0.0 to 100.0 % ro READ, I/O 12-7
P0 016 FO % Value 0.0 to 100.0 % ro READ, I/O 12-13
P0017 FO Hz Value 0 to 20000 Hz ro READ, I/O 12-13
P0 018 AI1 Value -100.0 to 100.0 % ro READ, I/O 12-1
P0 019 AI2 Value -100.0 to 100.0 % ro READ, I/O 12-1
P0020 AI3 Value -100.0 to 100.0 % ro READ, I/O 12-1
P0021 FI % Value -100.0 to 100.0 % ro READ, I/O 12-11
P0022 FI Hz Value 0 to 20000 Hz ro READ, I/O 12 -11
P0023 Main SW Version 0.00 to 655.35 ro READ 6-1
P0024 Sec. SW Version 0.00 to 655.35 ro READ 6-1
P0027 Plug-In Mod. Config. 0 = No Plug-in
1 to 8 = Reserved
9 = CFW500-CRS485
User
Setting
Propr. Groups Pag.
ro READ 15-2
ro READ, I/O 12-16
ro READ, I/O 12-22
ro READ 6-1
0
0
CFW501 | 0-1
Page 10
Quick Reference of Parameters, Alarms and Faults
0
Param. Function Adjustable Range Factory Setting
P0029 Power HW Config.
0 = Not Identified
User
Setting
Propr. Groups Pag.
ro READ 6-2
1 = 200-240 V / 1.6 A
2 = 200-240 V / 2.6 A
3 = 200-240 V / 4.3 A
4 = 200-240 V / 7.0 A
5 = 200-240 V / 9.6 A
6 = 380-480 V / 1.0 A
7 = 380-480 V / 1.6 A
8 = 380-480 V / 2.6 A
9 = 380-480 V / 4.3 A
10 = 380-480 V / 6.1 A
11 = 200-240 V / 7.3 A
12 = 200-240 V / 10.0 A
13 = 200-240 V / 16.0 A
14 = 380-480 V / 2.6 A
15 = 380-480 V / 4.3 A
16 = 380-480 V / 6.5 A
17 = 380-480 V / 10.0 A
18 = 200-240 V / 24.0 A
19 = 380-480 V / 14.0 A
20 = 380-480 V / 16.0 A
21 = 500-600 V / 1.7 A
22 = 500-600 V / 3.0 A
23 = 500-600 V / 4.3 A
24 = 500-600 V / 7.0 A
25 = 500-600 V / 10.0 A
26 = 500-600 V / 12.0 A
27 = 200-240 V / 28.0 A
28 = 200-240 V / 33.0 A
29 = 380-480 V / 24.0 A
30 = 380-480 V / 31.0 A
31 = 500-600 V / 17.0 A
32 = 500-600 V / 22.0 A
33 = 200-240 V / 47.0 A
34 = 200-240 V / 56.0 A
35 = 380-480 V / 39.0 A
36 = 380-480 V / 49.0 A
37 = 500-600 V / 27.0 A
38 = 500-600 V / 32.0 A
P0030 Heatsink Temperature -20 to 150 ºC ro READ 15-5
P0037 Motor Overload Ixt 0 to 100 % ro READ 14-3
P0042 Powered Time 0 to 65535 h ro READ 15-5
P0043 Enabled Time 0.0 to 6553.5 h ro READ 15-5
P0044 kWh Output Energy 0 to 65535 kWh ro READ 15-6
P0 047 CONF State 0 to 999 ro READ 15-6
P0048 Present Alarm 0 to 999 ro READ 14-8
P0049 Present Fault 0 to 999 ro READ 14-8
P0050 Last Fault 0 to 999 ro READ 14-8
P0 0 51 Current At Last Fault 0.0 to 200.0 A ro READ 14-9
P0052 DC Link At Last Fault 0 to 2000 V ro READ 14-9
P0053 Frequency At Last Fault 0.0 to 500.0 Hz ro READ 14-9
P0054 Temp. At Last Fault -20 to 150 ºC ro READ 14-10
P0055 Log. State Last Fault 0000h to FFFFh ro READ 14 -10
P0060 Second Fault 0 to 999 ro READ 14- 8
P0061 Current at 2
P0062 DC Link at 2
P0063 Frequency 2
P0064 Te m p. 2
P0065 Log. State 2
nd
Fault 0.0 to 200.0 A ro READ 14 - 9
nd
Fault 0 to 2000 V ro READ 14-9
nd
Fault 0.0 to 500.0 Hz ro READ 14- 9
nd
Fault -20 to 150 ºC ro READ 14-10
nd
Fault 0000h to FFFFh ro READ 14 -10
P0070 Third Fault 0 to 999 ro READ 14- 8
P0 071 Current at 3
P0072 DC Link 3
P0073 Frequency 3
P0 0 74 Te m p. 3
rd
Fault 0.0 to 200.0 A ro READ 14-9
rd
Fault 0 to 2000 V ro READ 14 - 9
rd
Fault 0.0 to 500.0 Hz ro READ 14 - 9
rd
Fault -20 to 150 ºC ro READ 14-10
0-2 | CFW501
Page 11
Quick Reference of Parameters, Alarms and Faults
Param. Function Adjustable Range Factory Setting
P0075 Log. State 3rd Fault 0000h to FFFFh ro READ 14 -10
P0080 Last Fault in “Fire Mode” 0 to 999 0 ro READ 14-10
P0081 Second Fault in “Fire Mode” 0 to 999 0 ro READ 14 -10
P0082 Third Fault in “Fire Mode” 0 to 999 0 ro READ 14 -10
P010 0 Acceleration Time 0.1 to 999.0 s 10.0 s BASIC 11-1
P0101 Deceleration Time 0.1 to 999.0 s 10.0 s BASIC 11-1
P010 2 2nd Ramp Accel. Time 0.1 to 999.0 s 10.0 s 11-2
P010 3 2nd Ramp Decel. Time 0.1 to 999.0 s 10.0 s 11- 2
P010 4 S Ramp 0 = Inactive
P010 5 1st/2nd Ramp Sel. 0 = 1st Ramp
P010 6 3rd Ramp Time 0.1 to 999.0 s 5.0 s 11- 3
P0120 Speed Ref. Backup 0 = Inactive
P0121 Keypad Reference 0 to 18000 rpm 90 rpm 7-9
P0122 JOG Reference 0 to 18000 rpm 150 (125) rpm 7-9
P0133 Minimum Speed 0 to 18000 rpm 90 (75) rpm BASIC 7-8
P0134 Maximum Speed 0 to 18000 rpm 1800 (1500) rpm BASIC 7-8
P0135 Max. Output Current 0.0 to 200.0 A 1.5xI
P0136 Manual Torque Boost 0.0 to 30.0 % According to
P0137 Autom. Torque Boost 0.0 to 30.0 % 0.0 % V/f MOTOR 9-6
P0138 Slip Compensation -10.0 to 10.0 % 0.0 % V/f MOTOR 9-7
P0139 Output Current Filter 0 to 9999 ms 50 ms 8-1
P0140 Sleep Compensation Filter 0 to 9999 ms 500 ms VVW 8-2
P0142 Max. Output Voltage 0.0 to 100.0 % 100.0 % cfg, V/f 9-5
P0143 Interm.Output Voltage 0.0 to 100.0 % 66.7 % c fg, V/ f 9-5
P0144 Low Output Voltage 0.0 to 100.0 % 33.3 % cfg, V/f 9-5
P0145 Field Weakening Speed 0 to 18000 rpm 1800 (1500) rpm cfg, V/f 9-5
P0146 Intermediate Speed 0 to 18000 rpm 1200 (1000) rpm c fg, V/f 9-5
P0147 Low Speed point 0 to 18000 rpm 600 (500) rpm cfg, V/f 9-5
P0150 Ud Regul. Type V/f and Current
Limitation
P0151 DC Regul. Level V/f 339 to 1200 V 400 V (P0296 = 0)
P0152 DC Link Regul. P Gain 0.00 to 9.99 1.50 V/f, V VW MOTOR 11-5
P0153 Dyn. Braking Level 339 to 1200 V 375 V (P0296 = 0)
P0156 Overl.Curr. 100 % Speed 0.0 to 200.0 A 1.1x I
P0157 Overl.Curr. 50 % Speed 0.0 to 200.0 A 1.0xI
P0158 Overl.Curr. 20 % Speed 0.0 to 200.0 A 0.8xI
P0178 Rated Flux 0.0 to 150.0 % 100.0 % MOTOR 10- 4
P0200 Password 0 = Inactive
P0202 Type of Control 0 to 2 = V/f
1 = Active
1 = 2nd Ramp
2 = DIx
3 = Serial/USB
4 = SoftPLC
1 = Active
2 = Backup by P0121
0 = hold_Ud and desac_LC
1 = acel_Ud and desac_LC
2 = hold_Ud and hold_LC
3 = acel_Ud and hold_LC
1000 V (P0296 = 2)
1 = Active
1 to 19999 = New password
3 = V V W
0 cfg 11-2
2 I/O 11- 3
1 7-8
nom
inverter model
0 cfg, V/f,
800 V (P0296 = 1)
750 V (P0296 = 1)
950 V (P0296 = 2)
nom
nom
nom
0 HMI 5-3
0 cfg STARTUP 8-1
User
Setting
Propr. Groups Pag.
V/f, V V W BASIC,
MOTOR
V/f BASIC,
MOTOR
MOTOR 11-4
VVW
V/f, V V W MOTOR 11- 5
V/f, V V W MOTOR 13 -1
MOTOR 14-2
MOTOR 14-2
MOTOR 14-2
11- 8
9-4
0
0
CFW501 | 0-3
Page 12

Quick Reference of Parameters, Alarms and Faults
0
Param. Function Adjustable Range Factory Setting
P0204 Load/Save Parameters 0 to 2 = Not Used
P0205 Main Parameter Display 0 to 1079 2 HMI 5-3
P0206 Secondary Parameter Display 0 to 1079 1 HMI 5-3
P0208 Main Display Scale Factor 0.1 to 1000.0 % 100.0 % HMI 5-4
P0209 Main Display Eng. Unit 0 = None
3 = Reset P0043
4 = Reset P0044
5 = Load 60 Hz
6 = Load 50 Hz
7 = Load User 1
8 = Load User 2
9 = Save User 1
10 = Save User 2
11 = Load SoftPLC
12 to 15 = Reserved
1 = V
2 = A
3 = rpm
4 = s
5 = ms
6 = None
7 = m
8 = None
9 = None
10 = %
11 = ºC
12 = None
13 = Hz
14 = None
15 = h
16 = W
17 = kW
18 = None
19 = None
20 = min
21 = °F
22 = bar
23 = mbar
24 = psi
25 = Pa
26 = kPa
27 = MPa
28 = mwc
29 = mca
30 = gal
31 = l
32 = in
33 = ft
3
34 = m
3
35 = ft
36 = gal/s
37 = gal/min
38 = gal/h
39 = l/s
40 = l/min
41 = l/h
42 = m/s
43 = m/min
44 = m/h
45 = ft/s
46 = ft/min
47 = ft/h
48 = m3/s
49 = m3/min
50 = m3/h
51 = ft3/s
52 = ft3/min
53 = ft3/h
54 = According to P0510
55 = According to P0512
56 = None
57 = According to P0516
0 cfg 5 -11
3 HMI 5-5
User
Setting
Propr. Groups Pag.
0-4 | CFW501
Page 13
Quick Reference of Parameters, Alarms and Faults
Param. Function Adjustable Range Factory Setting
P0210 Main Display Decimal Point 0 = wxyz
1 = wxy.z
2 = wx.yz
3 = w.xyz
4 = According to P0511
5 = According to P0511
6 = Reserved
7 = According to P0511
P0 211 Secondary Display Scale Factor 0.1 to 1000.0 % 100.0 % HMI 5-4
P0 212 Secondary Display Decimal Point See options in P0210 0 HMI 5-4
P0216 HMI Display Ilumination 0 = Inactive
1 = Active
P0220 LOC/REM Selection Src 0 = Always LOC
1 = Always REM
2 = HMI Key (LOC)
3 = HMI Key (REM)
4 = DIx
5 = Serial/USB (LOC)
6 = Serial/USB (REM)
7 = SoftPLC LOC
P0221 LOC Reference Sel. 0 = Keypad
1 = AI1
2 = AI2
3 = AI3
4 = AI1 + AI2 > 0
5 = AI1 + AI2
6 = Serial/USB
7 = SoftPLC
8 = FI
9 = AI1 > 0
10 = AI2 > 0
11 = AI3 > 0
12 = FI > 0
P0222 REM Reference Sel. See options in P0221 1 cfg I/O 7- 5
P0223 LOC FWD/REV Selection 0 = Always FWD
1 = Always REV
2 = HMI Key (FWD)
3 = HMI Key (REV)
4 = DIx
5 = Serial/USB (FWD)
6 = Serial/USB (REV)
7 = SoftPLC
P0224 LOC Run/Stop Sel. 0 = HMI Keys
1 = DIx
2 = Serial/USB
3 = SoftPLC
P0225 LOC JOG Selection 0 = Disable
1 = HMI Key
2 = DIx
3 = Serial/USB
4 = SoftPLC
P0226 REM FWD/REV Selection See options in P0223 0 cfg I/O 7- 6
P0227 REM Run/Stop Sel. See options in P0224 1 cfg I/O 7- 6
P0228 REM JOG Selection See options in P0225 2 cfg I/O 7-7
P0229 Stop Mode Selection 0 = Ramp to Stop
1 = Coast to Stop
2 = Quick Stop
P0230 Dead Zone (AIs) 0 = Inactive
1 = Active
0 HMI 5-4
1 HMI 5-6
2 cfg I/O 7-5
0 cfg I/O 7-5
2 cfg I/O 7- 6
0 cfg I/O 7- 6
1 cfg I/O 7-7
0 cfg I/O 7-13
0 cfg I/O 12-2
User
Setting
Propr. Groups Pag.
0
0
CFW501 | 0-5
Page 14
Quick Reference of Parameters, Alarms and Faults
0
Param. Function Adjustable Range Factory Setting
P0231 AI1 Signal Function 0 = Speed Ref.
1 = Not Used
2 = Not Used
3 = SoftPLC
4 = PTC
5 = Main PID Feedback 1
6 = Main PID Feedback 2
7 = Not Used
8 = External PID 1 Feedback
9 = Not Used
P0232 AI1 G ain 0.000 to 9.999 1.000 I/O 12-4
P0233 AI1 Signal Type 0 = 0 to 10 V / 20 mA
1 = 4 to 20 mA
2 = 10 V / 20 mA to 0
3 = 20 to 4 mA
P0234 AI1 Of fset -100.0 to 100.0 % 0.0 % I/O 12-4
P0235 AI1 Filter 0.00 to 16.00 s 0.15 s I/O 12-5
P0236 AI2 Signal Function See options in P0231 8 cfg I/O 12-3
P0237 AI2 Gain 0.000 to 9.999 1.000 I/O 12- 4
P0238 AI2 Signal Type 0 = 0 to 10 V / 20 mA
1 = 4 to 20 mA
2 = 10 V / 20 mA to 0
3 = 20 to 4 mA
P0239 AI2 Offset -100.0 to 100.0 % 0.0 % I/O 12-4
P0240 AI2 Filter 0.00 to 16.00 s 0.15 s I/O 12-5
P0 241 AI3 Signal Function See options in P0231 0 cfg I/O 12-3
P0242 AI3 Gain 0.000 to 9.999 1.000 I/O 12- 4
P0243 AI3 Signal Type 0 = 0 to 10 V / 20 mA
1 = 4 to 20 mA
2 = 10 V / 20 mA to 0
3 = 20 to 4 mA
4 = -10 to +10 V
P0244 AI3 Offset -100.0 to 100.0 % 0.0 % I/O 12- 4
P0245 AI3 Filter 0.00 to 16.00 s 0 .15 s I/O 12-5
P0246 Freq. Input FI 0 = Inactive
1 = Active
P0247 FI Gain 0.000 to 9.999 1.000 I/O 12-12
P0248 Min. FI 10 to 20000 Hz 10 Hz I/O 12-12
P0249 FI Offset -100.0 to 100.0 % 0.0 % I/O 12-12
P0250 Max. FI 10 to 20000 Hz 10000 Hz I/O 12-12
P0 251 AO1 Function 0 = Speed Ref.
1 = Not Used
2 = Real Speed
3 = Not Used
4 = Not Used
5 = Output Current
6 = Active Current
7 = Output Power
8 = Not Used
9 = Motor Torque
10 = SoftPLC
11 = Not Used
12 = Motor Ixt
13 = P0696 Value
14 = P0697 Value
15 = Not Used
16 = External PID Output
17 = Not Used
18 = P0698 Value
P0252 AO1 Gain 0.000 to 9.999 1.000 I/O 12-9
5 cfg I/O 12-3
0 cfg I/O 12- 5
0 cfg I/O 12- 5
0 cfg I/O 12- 6
0 I/O 12-11
16 I/O 12-8
User
Setting
Propr. Groups Pag.
0-6 | CFW501
Page 15
Quick Reference of Parameters, Alarms and Faults
Param. Function Adjustable Range Factory Setting
P0253 AO1 Signal Type 0 = 0 to 10 V
1 = 0 to 20 mA
2 = 4 to 20 mA
3 = 10 V to 0
4 = 20 mA to 0
5 = 20 to 4 mA
P0254 AO2 Function See options in P0251 5 I/O 12-8
P0255 AO2 Gain 0.000 to 9.999 1.000 I/O 12-9
P0256 AO2 Signal Type See options in P0253 0 I/O 12-9
P0257 FO Function 0 = Speed Ref.
1 = Not Used
2 = Real Speed
3 = Not Used
4 = Not Used
5 = Output Current
6 = Active Current
7 = Output Power
8 = Not Used
9 = Motor Torque
10 = SoftPLC
11 = Not Used
12 = Motor Ixt
13 = P0696 Value
14 = P0697 Value
15 = Disable F.O.
16 = External PID Output
17 = Not Used
18 = P0698 Value
P0258 FO Gain 0.000 to 9.999 1.000 I/O 12-15
P0259 Min. FO 10 to 20000 Hz 10 Hz I/O 12-15
P0260 Max. FO 10 to 20000 Hz 10000 Hz I/O 12-15
P0263 DI1 Function 0 = Not Used
1 = Run/Stop
2 = General Enable
3 = Quick Stop
4 = FWD/REV
5 = LOC/REM
6 = JOG
7 = SoftPLC
8 = 2nd Ramp
9 = Not Used
10 = Not Used
11 = Not Used
12 = No Ext. Alarm
13 = No Ext. Fault
14 = Reset
15 = Disab.FlyStart
16 = Not Used
17 = Progr. Off
18 = Load User 1
19 = Load User 2
20 = Auto/Manual Main PID
21 = Auto/Manual External PID
22 = Not Used
23 = Bypass Mode
24 = Activate Fire Mode
25 = PTC
P0264 DI2 Function See options in P0263 0 cfg I/O 12-17
P0265 DI3 Function See options in P0263 20 cfg I/O 12-17
P0266 DI4 Function See options in P0263 21 cfg I/O 12-17
P0267 DI5 Function See options in P0263 0 cfg I/O 12-17
P0268 DI6 Function See options in P0263 0 cfg I/O 12-17
0 I/O 12-9
15 I/O 12-14
1 cfg I/O 12-17
User
Setting
Propr. Groups Pag.
0
0
CFW501 | 0-7
Page 16
Quick Reference of Parameters, Alarms and Faults
0
Param. Function Adjustable Range Factory Setting
P0269 DI7 Function See options in P0263 0 cfg I/O 12-17
P0270 DI8 Function See options in P0263 0 cfg I/O 12-17
P0271 DI1 Function 0 = (DI1..DI8)NPN
1 = DI1 PNP
2 = (DI1..DI2)PNP
3 = (DI1..DI3)PNP
4 = (DI1..DI4)PNP
5 = (DI1..DI5)PNP
6 = (DI1..DI6)PNP
7 = (DI1..DI7)PNP
8 = (DI1..DI8)PNP
P0275 DO1 Function 0 = Not Used
1 = N* > Nx
2 = N > Nx
3 = N < Nx
4 = N = N*
5 = Zero Speed
6 = Is > Ix
7 = Is < Ix
8 = Torque > Tx
9 = Torque < Tx
10 = Remote
11 = Run
12 = Ready
13 = No Fault
14 = No F070
15 = Not Used
16 = No F0021/22
17 = No F0051
18 = No F072
19 = 4-20 mA OK
20 = P0695 Value
21 = Forward
22 = Ride-Through
23 = Pre-Charge OK
24 = Fault
25 = Time Enable > Hx
26 = SoftPLC
27 = Not Used
28 = F > Fx(1)
29 = F > Fx(2)
30 = Not Used
31 = Not Used
32 = No Alarm
33 = No Fault/Alarm
34 = Dry Pump Alarm/Fault
35 = Broken Belt Alarm/Fault
36 = Filter Mainten. Alarm/Fault
37 = Sleep Mode
38 = Not Used
39 = Drive Bypass Contactor
40 = Mains Bypass Contactor
41 = Fire Mode
42 = Self-tunning
P0276 DO2 Function See options in P0275 0 I/O 12-22
P0277 DO3 Function See options in P0275 24 I/O 12-22
P0278 DO4 Function See options in P0275 0 I/O 12-2 2
P0279 DO5 Function See options in P0275 0 I/O 12-2 2
P0281 Fx Frequency 0.0 to 500.0 Hz 4.0 Hz I/O 12-24
P0282 Fx Hysteresis 0.0 to 15.0 Hz 2.0 Hz I/O 12-24
P0287 Nx/Ny Hysteresis 0 to 900 rpm 18 (15) rpm I/O 12-24
P0288 Nx Speed 0 to 18000 rpm 120 (100) rpm I/O 12-24
0 cfg I/O 12-15
11 I/O 12-2 2
User
Setting
Propr. Groups Pag.
0-8 | CFW501
Page 17
Quick Reference of Parameters, Alarms and Faults
Param. Function Adjustable Range Factory Setting
P0289 Ny Speed 0 to 18000 rpm 1800 (1500) rpm I/O 12-24
P0290 Ix Current 0.0 to 200.0 A 1.0xI
P0291 Zero Speed 0 to 18000 rpm 18 (15) rpm I/O 12-25
P0292 N = N* Band 0 to 18000 rpm 18 (15) rpm I/O 12-25
P0293 Tx To rque 0 to 200 % 100 % I/O 12-25
P0294 Hx Time 0 to 6553.5 h 432.0 h I/O 12-25
P0295 Inverter Rated Current 0.0 to 200.0 A According to
P0296 Line Rated Voltage 0 = 200 - 240 V
1 = 380 - 480 V
2 = 500 - 600 V
P0297 Switching Frequency 2500 to 15000 Hz 5000 Hz MOTOR 6-3
P0299 DC-Braking Start Time 0.0 to 15.0 s 0.0 s MOTOR 11-10
P0300 DC-Braking Stop Time 0.0 to 15.0 s 0.0 s MOTOR 11-11
P0301 DC-Braking Speed 0 to 18000 rpm 30 rpm MOTOR 11 -12
P0302 DC-Braking Voltage 0.0 to 100.0 % 20.0 % MOTOR 11-12
P0303 Skip Speed 1 0 to 18000 rpm 600 rpm 11-13
P0304 Skip Speed 2 0 to 18000 rpm 900 rpm 11-13
P0306 Skip Band 0 to 18000 rpm 0 rpm 11-13
P0308 Serial Address 0 to 255 1 NET 16 -1
P0310 Serial Baud Rate 0 = 9600 bits/s
1 = 19200 bits/s
2 = 38400 bits/s
P0 311 Serial Bytes Config. 0 = 8 bits, no, 1
1 = 8 bits, even,1
2 = 8 bits, odd, 1
3 = 8 bits, no, 2
4 = 8 bits, even,2
5 = 8 bits, odd, 2
P0 312 Serial Protocol(1)(2) 0 = HMI(1)
1 = Reserved
2 = Modbus RTU(1)
3 = BACnet(1)
4 = N2(1)
5 = Reserved
6 = HMI(1)/Modbus RTU(2)
7 = Modbus RTU(2)
8 = HMI(1)/BACnet(2)
9 = BACnet(2)
10 = HMI(1)/N2(2)
11 = N2(2)
P0 313 Comm. Error Action 0 = Inactive
1 = Ramp Stop
2 = General Disab.
3 = Go to LOC
4 = LOC Keep Enab.
5 = Cause Fault
P0 314 Serial Watchdog 0.0 to 999.0 s 0.0 s NET 16 -1
P0316 Serial Interf. Status 0 = Inactive
1 = Active
2 = Watchdog Error
P0320 FlyStart/Ride-Through 0 = Inactive
1 = Flying Start
2 = FS / RT
3 = Ride-Through
P0331 Voltage Ramp 0.2 to 60.0 s 2.0 s 11- 9
P0340 Auto-Reset Time 0 to 255 s 0 s 14 -11
nom
inverter model
According to
inverter model
1 NET 16 -1
1 NET 16 -1
2 cfg NET 16-1
1 NET 16 -2
0 cfg 11- 9
User
Setting
Propr. Groups Pag.
I/O 12-24
ro READ 6-3
ro READ 6-3
ro NET 16 -1
0
0
CFW501 | 0-9
Page 18

Quick Reference of Parameters, Alarms and Faults
0
Param. Function Adjustable Range Factory Setting
P0343 Mask for Faults and Alarms 0000 to FFFFh
Bit 0 = F0074
Bit 1 = F0048
Bit 2...3 = Reserved
Bit 4 = F0076
Bit 5....15 = Reserved
P0349 Ixt Alarm Level 70 to 100 % 85 % cfg 14-3
P0397 Control Config 0000 to FFFFh
Bit 0 = Slip Compens. Regen.
Bit 1 = Dead Time Compens.
Bit 2 = Io Stabilization
Bit 3 = P0297 Reduction
Temperature
P0398 Motor Service Factor 1.00 to 1.50 1.00 cfg MOTOR,
P0399 Motor Rated Eff. 50.0 to 99.9 % 75.0 % cfg,
P0400 Motor Rated Voltage 200 to 600 V 220(230) V
P0401 Motor Rated Current 0 to 200.0 A 1.0xI
P0402 Motor Rated Speed 0 to 30000 rpm 1710 (1425) rpm cfg MOTOR,
P0403 Motor Rated Frequency 0 to 500 Hz 60 (50) Hz cfg MOTOR,
P0404 Motor Rated Power 0 = 0.16 hp 0.12 kW
1 = 0.25 hp 0.19 kW
2 = 0.33 hp 0.25 kW
3 = 0.5 hp 0.37 kW
4 = 0.75 hp 0.55 kW
5 = 1 hp 0.75 kW
6 = 1.5 hp 1.1 kW
7 = 2 hp 1.5 kW
8 = 3 hp 2.2 kW
9 = 4 hp 3 kW
10 = 5 hp 3.7 kW
11 = 5.5 hp 4 kW
12 = 6 hp 4.5 kW
13 = 7.5 hp 5.5 kW
14 = 10 hp 7.5 kW
15 = 12.5 hp 9 kW
16 = 15 hp 11 kW
17 = 20 hp 15 kW
18 = 25 hp 18.5 kW
19 = 30 hp 22 kW
P0407 Motor Rated Power Fac 0.50 to 0.99 0.80 cfg MOTOR,
P0408 Run Self-Tuning 0 = Inactive
1 = No Rotation
P0409 Stator Resistance 0.01 to 99.99 According to
0003h cfg 14 - 4
000Bh cfg 8-2
(P0296 = 0)
380(400) V
(P0296 = 1)
575(525) V
(P0296 = 2)
nom
According to
inverter model
0 cfg,
inverter model
User
Setting
Propr. Groups Pag.
STA R T U P
VVW
VVW
VVW
MOTOR,
STA R T U P
cfg MOTOR,
STA R T U P
cfg MOTOR,
STA R T U P
STA R T U P
STA R T U P
cfg MOTOR,
STA R T U P
STA R T U P
STA R T U P 10 -7
cfg,
MOTOR,
STA R T U P
10- 4
10- 5
10- 5
10- 6
10- 6
10- 6
10- 6
10-7
18-2
10-7
0-10 | CFW501
Page 19

Quick Reference of Parameters, Alarms and Faults
Param. Function Adjustable Range Factory Setting
P0 510 Ref. Eng. Unit 1 0 = None
P0 511 Indirect Indication Form 1 0 = wxyz
P0 512 Ref. Eng. Unit 2 See options in P0510 11 HMI 5 -7
1 = V
2 = A
3 = rpm
4 = s
5 = ms
6 = None
7 = m
8 = None
9 = None
10 = %
11 = ºC
12 = None
13 = Hz
14 = None
15 = h
16 = W
17 = kW
18 = None
19 = None
20 = min
21 = °F
22 = bar
23 = mbar
24 = psi
25 = Pa
26 = kPa
27 = MPa
28 = mwc
29 = mca
30 = gal
31 = l
32 = in
33 = ft
3
34 = m
3
35 = ft
36 = gal/s
37 = gal/min
38 = gal/h
39 = l/s
40 = l/min
41 = l/h
42 = m/s
43 = m/min
44 = m/h
45 = ft/s
46 = ft/min
47 = ft/h
48 = m3/s
49 = m3/min
50 = m3/h
51 = ft3/s
52 = ft3/min
53 = ft3/h
1 = wxy.z
2 = wx.yz
3 = w.xyz
22 HMI 5-6
1 HMI 5-7
User
Setting
Propr. Groups Pag.
0
0
CFW501 | 0-11
Page 20
Quick Reference of Parameters, Alarms and Faults
0
Param. Function Adjustable Range Factory Setting
P0 513 Indirect Indication Form 2 0 = wxyz
1 = wxy.z
2 = wx.yz
3 = w.xyz
P0 516 Ref. Eng. Unit 4 See options in P0510 13 HMI 5-9
P0517 Indirect Indication Form 4 0 = wxyz
1 = wxy.z
2 = wx.yz
3 = w.xyz
P0580 Fire Mode Configuration 0 = Inactive
1 = Active
2 = Active / P0134
3 = Active / P0581
4 = Active / Gen. Disable
P0581 Setpoint PID fire Mode -32768 to 32767 0 HVAC 18-30
P0582 Auto-reset configuration 0 = Limited
1 = Unlimited
P0583 Bypass Mode Configuration 0 = Inactive
1 = Active/DIx
2 = Active/DIx+Failure
P0584 Bypass Contactor time 0.00 to 300.00 s 0.30 s cfg HVAC 18-3 4
P0585 Short Cycle Protection Config. 0 = Inactive
1 = Active
P0586 Minimum RUN Time 0 to 650.00 s 5.00 s cfg HVAC 18 -4
P0587 Minimum STOP Time 0.00 to 650.00 s 5.00 s cfg HVAC 18-4
P0588 Energy Saving Max. Torque 0 to 85 % 60 % cfg, V/f HVAC 18-2
P0589 Energy Saving Min. Mag. 40 to 80 % 40 % cfg, V/f HVAC 18-2
P0590 Energy Saving Min. Speed 360 to 18000 rpm 600 (525) rpm cfg, V/f HVAC 18-3
P0591 Energy Saving Hysteresis 0 to 30 % 10 % cfg, V/f HVAC 18-3
P0680 Logical Status Bit 0 = Not Used
Bit 1 = Run Command
Bit 2 = Fire mode
Bit 3 = Bypass
Bit 4 = Quick Stop
Bit 5 = 2nd Ramp
Bit 6 = Config. Mode
Bit 7 = Alarm
Bit 8 = Running
Bit 9 = Enabled
Bit 10 = Forward
Bit 11 = JOG
Bit 12 = Remote
Bit 13 = Subvoltage
Bit 14 = Reserved
Bit 15 = Fault
P0681 Speed in 13 bits -32768 to 32767 ro NET 16 -2
P0682 Serial/USB Control Bit 0 = Ramp Enable
Bit 1 = General Enable
Bit 2 = Run Forward
Bit 3 = JOG Enable
Bit 4 = Remote
Bit 5 = 2nd Ramp
Bit 6 = Quick Stop
Bit 7 = Fault Reset
Bit 8....12 = Not Used
Bit 13 = Intern PID
Bit 14 = Extern PID
Bit 15 = Reserved
P0683 Serial/USB Speed Ref. -32768 to 32767 ro NET 16-2
1 HMI 5-9
1 HMI 5-10
0 cfg HVAC 18-30
0 cfg HVAC 18- 31
0 cfg HVAC 18-34
0 cfg HVAC 18- 3
User
Setting
Propr. Groups Pag.
ro READ,
NET
ro NET 7-12
16-2
16-2
0-12 | CFW501
Page 21
Quick Reference of Parameters, Alarms and Faults
Param. Function Adjustable Range Factory Setting
P0690 Logical Status 2 Bit 0....3 = Not Used
P0695 DOx Value Bit 0 = DO1
P0696 AOx Value 1 -32768 to 32767 ro NET 16 -2
P0697 AOx Value 2 -32768 to 32767 ro NET 16 -2
P0698 AOx Value 3 -32768 to 32767 ro NET 16 -2
P0760 BACnet Dev Inst Hi 0 to 419 0 NET 16-2
P0761 BACnet Dev Inst Lo 0 to 9999 0 NET 16 -2
P0762 Max Number of Master 0 to 127 127 NET 16 -2
P0763 MS/TP Max info Frame 1 to 65535 1 NET 16 -2
P0764 I-AM Msg transmition 0 = Power Up
P0765 Token RX Qtde 0 to 65535 ro NET 16-2
P1000 SoftPLC Status 0 = No Applicative
P1001 SoftPLC Command 0 = Stop Application
P1002 Scan Cycle Time 0 to 65535 ms ro HVAC 17-1
P1003 SoftPLC Application 0 = User
P1010 HVAC Function Version 0.00 to 100.00 ro H VAC 17- 2
P10 11 Main PID Aut. Setpoint -32768 to 32767 0 HVAC 17- 2
P1012 SoftPLC Parameter 3 -32768 to 32767 0 HVAC 17- 2
P1013 SoftPLC Parameter 4 -32768 to 32767 0 HVAC 17-2
P1014 Main PID Man. Setpoint 0.0 to 100.0 % 0.0 % H VAC 17- 2
P1015 Main PID Feedback -32768 to 32767 ro HVAC 17-2
P1016 Main PID Output 0.0 to 100.0 % ro HVAC 17-2
P1017 Main PID Action Control 0 = Disable PID
P1018 Main PID Operation Mode 0 = Always Automatic
P1019 Main PID Sampling Time 0.10 to 60.00 s 0.1 0 s HVAC 17- 2
Bit 4 = Force Low Fs
Bit 5 = Sleep State
Bit 6 = Deceleration Ramp
Bit 7 = Acceleration Ramp
Bit 8 = Freeze Ramp
Bit 9 = Setpoint Ok
Bit 10 = DC Link Regulation
Bit 11 = 50Hz Config
Bit 12 = Ride Through
Bit 13 = Flying Start
Bit 14 = DC-Braking
Bit 15 = PWM
Bit 1 = DO2
Bit 2 = DO3
Bit 3 = DO4
Bit 4 = DO5
0 NET 16-2
1 = Continuos
1 = Installing App.
2 = Incompatible App.
3 = Stopped App.
4 = App. Running
1 cfg HVAC 17-1
1 = Run Application
2 = Delete Application
1 cfg HVAC 17-2
1 = HVAC
0 cfg HVAC 17-2
1 = Direct Mode
2 = Reverse Mode
0 HVAC 17-2
1 = Always Manual
2 = A/M DI w/o bumpless
3 = A/M Net w/o bumpless
4 = A/M DI w/ bumpless
5 = A/M Net w/ bumpless
User
Setting
Propr. Groups Pag.
ro READ,
NET
ro NET 16-2
ro HVAC 17-1
7-11
18- 9
18- 9
18- 9
18- 9
18 -10
18 -11
18 -12
0
0
CFW501 | 0-13
Page 22
Quick Reference of Parameters, Alarms and Faults
0
Param. Function Adjustable Range Factory Setting
P1020 Main PID P. Gain 0.000 to 32.767 1.000 HVAC 17- 2
P1021 Main PID I. Gain 0.000 to 32.767 0.430 H VAC 17- 2
P102 2 Main PID D. Gain 0.000 to 32.767 0.000 HVAC 17-2
P1023 Main PID Output Min. Value 0.0 to 100.0 % 0.0 % HVAC 17- 2
P1024 Main PID Output Max. Value 0.0 to 100.0 % 10 0.0 % HVAC 17- 2
P1025 Sof tPLC Parameter 16 -32768 to 32767 0 HVAC 17-2
P1026 Main PID Feedback Conf. 0 = Sum Feed. 1 and 2
1 = Difference Feed. 1 and 2
2 = Average Feed. 1 and 2
P1027 Main PID Minimum Feedback -32768 to 32767 0 HVAC 17-2
P1028 Main PID Maximum Feedback -32768 to 32767 1000 HVAC 17-2
P102 9 SoftPLC Parameter 20 -32768 to 32767 0 HVAC 17-2
P1030 Main PID Feedback Alarm Conf. 0 = Disable
1 = Enable Alarm
2 = Enable Fault
P1031 Main PID Feedback Alarm Low V. -32768 to 32767 50 HVAC 17-2
P1032 Main PID Feedback Alarm Low T. 0.00 to 650.00 s 5.00 s H VAC 17- 2
P1033 Main PID Feedback Alarm High V. -32768 to 32767 900 HVAC 17-2
P1034 Main PID Feedback Alarm High T. 0.00 to 650.00 s 5.00 s H VAC 17-2
P1035 SoftPLC Parameter 26 -32768 to 32767 0 HVAC 17-2
P1036 Sleep Mode Speed 0 to 18000 350 HVAC 17- 2
P1037 Sleep Mode Time 0.00 to 650.00 s 5.00 s HVAC 17-2
P1038 Wake up Mode Deviation 0.0 to 100.0 % 5.0 % H VAC 17- 2
P1039 Wake up Mode Time 0.00 to 650.00 s 10.00 s HVAC 17-2
P1040 HVAC Func. Logical Status 0 to 65535 ro HVAC 17- 2
P10 41 SoftPLC Parameter 32 -32768 to 32767 0 HVAC 17-2
P1042 Dry Pump Config. 0 = Disable
1 = Enable Alarm
2 = Enable Fault
P1043 Dry Pump Speed 0 to 18000 400 HVAC 17-2
P1044 Dry Pump Torque 0.0 to 350.0 % 20.0 % HVAC 17-2
P1045 Dry Pump Time 0.00 to 650.00 s 20.00 s HVAC 17- 2
P1046 Broken Belt Conf. 0 = Disable
1 = Enable Alarm
2 = Enable Fault
P1047 Broken Belt Speed 0 to 18000 400 HVAC 17-2
0 cfg HVAC 17-2
0 cfg HVAC 17-2
0 cfg HVAC 17-2
0 cfg HVAC 17-2
User
Setting
Propr. Groups Pag.
18 -12
18 -12
18 -12
18 -13
18 -13
18 -13
18 -14
18 -14
18 -15
18 -15
18 -16
18 -16
18 -17
18 -17
18-18
18-18
18-18
18-28
18- 4
18-5
18-5
18-5
18- 6
18- 6
0-14 | CFW501
Page 23
Quick Reference of Parameters, Alarms and Faults
Param. Function Adjustable Range Factory Setting
P1048 Broken Belt Torque 0.0 to 350.0 % 20.0 % HVAC 17-2
P1049 Broken Belt Time 0.00 to 650.00 s 20.00 s HVAC 17- 2
P1050 Filter Mainten. Alarm Conf. 0 = Disable
1 = Enable Alarm
2 = Enable Fault
P10 51 Filter Mainten. Alarm Time 0 to 32000 h 5000 h HVAC 17-2
P1052 Filter Mainten. Alarm Counter 0 to 32000 h HVAC 17-2
P1053 SoftPLC Parameter 44 -32768 to 32767 0 HVAC 17-2
P1054 SoftPLC Parameter 45 -32768 to 32767 0 HVAC 17-2
P1055 SoftPLC Parameter 46 -32768 to 32767 0 HVAC 17-2
P1056 SoftPLC Parameter 47 -32768 to 32767 0 HVAC 17-2
P1057 SoftPLC Parameter 48 -32768 to 32767 0 HVAC 17-2
P1058 SoftPLC Parameter 49 -32768 to 32767 0 HVAC 17-2
P1059 SoftPLC Parameter 50 -32768 to 32767 0 HVAC 17-2
P1060 External PID Auto Setpoint -32768 to 32767 0 HVAC 17- 2
P1061 External PID Man. Setpoint 0.0 to 100.0 % 0.0 % HVAC 17- 2
P1062 External PID Feedback -32768 to 32767 ro HVAC 17-2
P1063 External PID Output 0.0 to 100.0 % ro H VAC 17-2
P1064 External PID Action Control 0 = Disable PID
1 = Direct Mode
2 = Reverse Mode
P1065 External PID Operation Mode 0 = Always Automatic
1 = Always Manual
2 = A/M DI w/o bumpless
3 = A/M Net w/o bumpless
4 = A/M DI w/ bumpless
5 = A/M Net w/ bumpless
P1066 External PID Sampling Time 0.10 to 60.00 s 0 .10 s HVAC 17-2
P1067 External PID P. Gain 0.000 to 32.767 1.000 HVAC 17-2
P1068 External PID I. Gain 0.000 to 32.767 0.430 HVAC 17- 2
P1069 External PID D. Gain 0.000 to 32.767 0.000 HVAC 17-2
P1070 External PID Output Min. Value 0.0 to 100.0 % 0.0 % HVAC 17-2
P1071 External PID Output Max. Value 0.0 to 100.0 % 100.0 % H VAC 17-2
P1072 SoftPLC Parameter 63 -32768 to 32767 0 HVAC 17- 2
P1073 External PID Minimum Feedback -32768 to 32767 0 HVAC 17-2
P1074 External PID Maximum Feedback -32768 to 32767 1000 HVAC 17-2
P1075 External PID Feedback Alarm Conf. 0 = Disable
1 = Enable Alarm
2 = Enable Fault
0 cfg HVAC 17-2
0 cfg HVAC 17-2
0 HVAC 17-2
0 HVAC 17-2
User
Setting
Propr. Groups Pag.
18-7
18-7
18-7
18-8
18-8
18-20
18-20
18-21
18-21
18-21
18-22
18-23
18-23
18-23
18-23
18-24
18-24
18-24
18-25
18-25
0
0
CFW501 | 0-15
Page 24

Quick Reference of Parameters, Alarms and Faults
0
Param. Function Adjustable Range Factory Setting
P1076 External PID Feedback Alarm Low V. -32768 to 32767 2 HVAC 17- 2
P1077 External PID Feedback Alarm Low T. 0.00 to 650.00 s 5.00 s H VAC 17- 2
P1078 External PID Feedback Alarm High V. -32768 to 32767 900 HVAC 17- 2
P1079 External PID Feedback Alarm High T. 0.00 to 650.00 s 5.00 s HVAC 17- 2
User
Setting
Propr. Groups Pag.
18-26
18-26
18-27
18-27
Notes:
ro = Read only parameter.
V/f = Available when V/f control mode is chosen.
cfg = Configuration parameter, value can be programmed only with motor stopped.
VV W = Available when V VW control mode is chosen.
0-16 | CFW501
Page 25

Quick Reference of Parameters, Alarms and Faults
Fault / Alarm Description Possible Causes
A0046
Motor overload
A00 47
IGBT overload
A0050
Power module
overtemperature
A0090
External alarm
A0128
Telegram reception
timeout
A0213
Protection Against Short
Cycles
A0700
Communication fault with
remote HMI
A0702
Inverter disabled
A0704
Two movem. enabled
A0706
Refer. Not Progr. SPLC
A0710
SPLC Progr. Bigger than
8 KB
A0750
Program AIx for Process
Variable of
Main PID Controller
A0752
Program DIx for Automatic
/ Manual Selection of the
Main PID Controller
Motor overload alarm. Settings of P0156, P0157, and P0158 are too low for the
Overload alarm on the power pack with
IG B Ts .
Overtemperature alarm from the power
module temperature sensor (NTC).
External alarm via DIx (option “Without
External Alarm” in P0263 to P0270).
Alarm that indicates serial communication
fault. It indicates the equipment stopped
receiving valid serial telegrams for a
period longer than the setting in P0314.
Alarm that indicates the short cycle
protection occurred.
No communication with remote HMI, but
there is no speed command or reference
for this source.
This failure occurs when there is a
SoftPLC movement block (REF block)
active and the “General Enable”
command is disabled.
It occurs when 2 or more SoftPLC
movement blocks (REF Block) are
enabled at the same time.
This failure occurs when a SoftPLC
movement block is enabled and the
speed reference is not programmed for
the SoftPLC.
It occurs when you try to download to
the inverter a SoftPLC Program that is
too large (larger than 8 KB).
Alarm that indicates an analog input was
not programmed for the process variable
of the main PID controller.
Alarm that indicates a digital input was
not programmed for automatic / manual
selection of the main PID controller.
used motor.
Overload on the motor shaft.
Inverter output overcurrent.
High ambient temperature around the inverter (>50 °C (> 122 °F))
and high output current.
Blocked or defective fan.
Heatsink is too dirty, preventing the air flow.
Wiring on DI1 to DI8 inputs are open or have poor contact.
Check network installation, broken cable or fault/poor contact
on the connections with the network, grounding.
Ensure the master always sends telegrams to the equipment
in a time shorter than the setting in P0314.
Disable this function in P0314.
The STAR command occurred during the time count defined
by P 05 87.
The STOP command occurred during the time count defined
by P0586.
Check if the communication interface with the HMI is properly
configured in parameter P0312.
HMI cable disconnected.
Check if the drive general enable command is active.
Check the user’s program logic.
Check the programming of the references in the local and/or
remote mode (P0221 and P0222).
Extension of the SoftPLC Prog. exceeded 8 KBytes.
Parameter P0231 or P0236 was not programmed for 5 or 6.
Parameter P0263 or P0264 or P0265 or P0266 was not
programmed for 20.
0
0
A0754
Program LOCAL
Reference (P0221) for
SoftPLC
A0756
Program REMOTE
Reference (P0222) for
SoftPLC
A0758
Program Indirect
Engineering Unit 4 (P0516)
for Hz or rpm
Alarm that indicates the origin of the
speed reference in LOCAL mode was not
programmed for SoftPLC.
Alarm that indicates the origin of the speed
reference in REMOTE mode was not
programmed for SoftPLC.
Alarm that indicates the parameter for
engineering unit of the motor speed was
not programmed for Hz or rpm.
Main PID controller is enabled (P1017 in 1 or 2) and the
CFW501 frequency inverter is running the motor in LOCAL
mode and parameter P0221 is not programmed for 7.
Main PID controller is enabled (P1017 in 1 or 2) and the
CFW501 frequency inverter is running the motor in REMOTE
mode and parameter P0222 is not programmed for 7.
Parameter P0516 was not programmed for 13 (Hz) or 3 (rpm).
CFW501 | 0-17
Page 26

Quick Reference of Parameters, Alarms and Faults
0
Fault / Alarm Description Possible Causes
A0760
Low Level of the Process
Variable of the Main PID
Controller
A0762
High Level in the Process
Variable of the Main PID
Controller
A0764
Frequency Inverter in
Sleep Mode
A0766
Dry Pump Detected
A0768
Broken Belt Detected
A0770
Filter Maintenance
A0780
Program AIx for Process
Variable of the External
PID Controller
A0782
Program DIx for Automatic
/ Manual Selection of the
External PID Controller
A0784
Program AOx for Output
of the External PID
Controller
A0786
Low Level of the Process
Variable of the External
PID Controller
A0788
High Level of the Process
Variable of the External
PID Controller
F0021
Undervoltage on the DC
Link
F0022
Overvoltage on the DC
Link
Alarm that indicates the process variable
of the main PID controller has a low
value.
Alarm that indicates the process variable
of the main PID controller has a high
value.
Alarm that indicates the CFW501
frequency inverter is in the sleep mode.
Alarm that indicates the dry pump
condition was detected for the pump
driven by the CFW501 frequency
inverter.
Alarm that indicates the broken belt
condition was detected for the motor
driven by the CFW501 frequency inverter.
Alarm that indicates the need of
replacing the system filter.
Alarm that indicates an analog input was
not programmed for the process variable
of the external PID controller.
Alarm that indicates a digital input was
not programmed for automatic / manual
selection of the external PID controller.
Alarm that indicates an analog output was
not programmed for output of the external
PID controller.
Alarm that indicates the process variable
of the external PID controller has a low
value.
Alarm that indicates the process variable
of the external PID controller has a high
value.
Undervoltage fault on the intermediate
circuit.
Overvoltage fault on the intermediate
circuit.
Parameter P1030 is programmed for 1 and the value of the
process variable of the main PID controller remained below
the value programmed in P1031 for the time programmed
in P1032.
Parameter P1030 is programmed for 1 and the value of the
process variable of the main PID controller remained above
the value programmed in P1033 for the time programmed
in P1034.
Main PID controller is enabled and in automatic mode, and
the motor speed remained below the speed programmed in
P1036 for the time programmed in P1037.
Parameter P1042 is programmed for 1 and the pump driven
by the CFW501 frequency inverter is running with speed
above the speed programmed in P1043 and the motor torque
remained below the value programmed in P1044 for the time
programmed in P1045.
Parameter P1046 is programmed for 1 and the motor driven
by the CFW501 frequency inverter is running with speed
above the speed programmed in P1047 and the motor torque
remained below the value programmed in P1048 for the time
programmed in P1049.
Parameter P1050 is programmed for 1 and the operation time
of the motor driven by the CFW501 frequency inverter shown
in P1052 is above the value programmed in P1051.
Parameter P0231 or P0236 was not programmed for 8.
Parameter P0263 or P0264 or P0265 or P0266 was not
programmed for 21.
Parameter P0251 or P0254 was not programmed for 16.
Parameter P1075 is programmed for 1 and the value of the
process variable of the external PID controller remained below
the value programmed in P1076 for the time programmed
in P1077.
Parameter P1075 is programmed for 1 and the value of the
process variable of the external PID controller remained above
the value programmed in P1078 for the time programmed
in P1079.
Wrong voltage supply; check if the data on the inver ter label
comply with the power supply and parameter P0296.
Supply voltage too low, producing voltage on the DC link
below the minimum value (in P0004):
Ud < 200 Vdc in 200-240 Vac (P0296 = 0).
Ud < 360 Vdc in 380-480 Vac (P0296 = 1).
Ud < 500 Vdc in 500-600 Vac (P0296 = 2).
Phase fault in the input.
Fault in the pre-charge circuit.
Wrong voltage supply; check if the data on the inver ter label
comply with the power supply and parameter P0296.
Supply voltage is too high, producing voltage on the DC link
above the maximum value (in P0004):
Ud > 410 Vdc in 200-240 Vac (P0296 = 0).
Ud > 810 Vdc in 380-480 Vac (P0296 = 1).
Ud > 1000 Vdc in 500-600 Vac (P0296 = 2).
Load inertia is too high or deceleration ramp is too fast.
P0151 or P0153 setting is too high.
0-18 | CFW501
Page 27

Quick Reference of Parameters, Alarms and Faults
Fault / Alarm Description Possible Causes
F0031
Communication fault with
Plug-In module
Main control cannot set a communication
link with the Plug-In module.
Plug-In module is damaged.
Plug-In module is not properly connected.
Problem in the identification of the Plug-In module; refer to
P0027 for further information.
F0033
VV W self-tuning fault
Stator resistance setting fault P0409. Stator resistance value in P0409 does not comply with the
inverter power.
Motor connection error; turn off the power supply and check the
motor terminal box and the connections with the motor terminals.
Motor power too low or too high in relation to the inverter.
F0048
Overload on the IGBTs
Overload fault on the power pack with
IGBTs (3 s in 1.5xInom).
Inverter output overcurrent (>2xInom).
Note:
This failure may be disabled, by setting
P0343 = 0 or 1.
F0051
IGBTs overtemperature
F0070
Overcurrent/Short- circuit
Overtemperature fault measured on the
temperature sensor of the power pack.
Overcurrent or short- circuit on the
output, DC link or braking resistor.
High ambient temperature around the inver ter (>50 °C (>122 °F ))
and high output current.
Blocked or defective fan.
Heatsink is too dirty, preventing the air flow.
Shor t- circuit between two motor phases.
Short- circuit of the rheostatic braking resistor connecting
cables.
IGBTs module in short- circuit or damaged.
Star t with too short acceleration ramp.
Star t with motor spinning without the flying-start function.
F0072
Motor overload
F0 0 74
Ground fault
Motor overload fault (60 s in 1.5xInom) P0156, P0157 and P0158 setting is too low in relation to the
motor operating current.
Overload on the motor shaft.
Ground overcurrent fault.
Note:
This failure may be disabled, by setting
Short-circuit to the ground in one or more output phases.
Motor cable capacitance too high, causing current peaks in
the output.
P0343 = 0 or 2.
F0076
Output Phase Current
Fault
F0078
Motor overtemperature
F0080
CPU fault (Watchdog)
F0084
Auto-diagnosis fault
F0091
External fault
F0182
Pulse feedback fault
F0228
Telegram reception
timeout
F0700
Remote HMI
communication fault
This fault indicates the motor presents
phase loss, imbalanced phase current or
is disconnected.
Overtemperature fault measured on the
motor temperature sensor (Triple PTC)
via analog input AIx or digital input DIx.
Fault related to the supervision algorithm
of the inverter main CPU.
Fault related to the automatic identification
algorithm of the inverter hardware and
Plug-In module.
External fault via DIx (“No External Fault”
option in P0263 to P0270).
Pulse feedback circuit fault of the output
voltage.
Note: it may be turned off in P0397.
Serial communication timeout.
It indicates the equipment stopped
receiving valid serial telegrams for a
period longer than the setting in P0314.
No communication with remote HMI, but
there is speed command or reference for
this source.
Motor wiring or connection error.
Loss of motor connection with the drive or broken wire.
Overload on the motor shaft.
Load cycle is too high (high number of starts and stops per
minute).
High ambient temperature around the motor.
Poor contact or short circuit (3.9 kΩ < R
Motor thermistor not installed.
Motor shaft is stuck.
Electric noise.
Inverter firmware fault.
Poor contact in the connection between the main control and
the power pack.
Hardware not compatible with the firmware version.
Defect on the internal circuits of the inverter.
Wiring on DI1 to DI8 inputs are open or have poor contact.
Hardware identification fault; compare P0295 and P0296 to
the inverter identification label.
Inverter internal circuits fault.
Check network installation, broken cable or fault/poor contact
on the connections with the network, grounding.
Ensure the master always sends telegrams to the equipment
in a time shorter than the setting in P0314.
Disable this function in P0314.
Check if the communication interface with the HMI is properly
configured in parameter P0312.
HMI cable disconnected.
< (100 Ω).
PTC
0
0
CFW501 | 0-19
Page 28

Quick Reference of Parameters, Alarms and Faults
0
Fault / Alarm Description Possible Causes
F0 7 11
The upload of the SoftPLC
application failed
F0761
Low Level of the Process
Variable of the Main PID
Controller
F0763
High Level in the Process
Variable of the Main PID
Controller
F0767
Dry Pump Detected
F0769
Broken Belt Detected
F0771
Filter maintenance
F0773
HVAC Plug-in Module not
Detected
F0787
Low Level of the Process
Variable of the External
PID Controller
F0789
High Level of the Process
Variable of the External
PID Controller
The upload or the SoftPLC application
failed.
Fault that indicates the process variation
of the main PID controller has a low
value.
Fault that indicates the process variation
of the main PID controller has a high
value.
Fault that indicates the dry pump
condition was detected for the pump
driven by the CFW501 frequency
inverter.
Fault that indicates the broken belt
condition was detected for the motor
driven by the CFW501 frequency
inverter.
Fault that indicates the need of replacing
the system filter.
“Installed plug-in module does not
correspond to the plug-in module
specific for the HVAC function
(CFW500-CRS485).”
Fault that indicates the feedback of the
external PID controller has a low value.
Fault that indicates the feedback of the
external PID controller has a high value.
Fault in the HVAC plug-in connection.
Fault in the communication between the HVAC plug-in board
and the main control board.
Fault in the SoftPLC boot by the CPU.
Parameter P1030 is programmed for 2 and the value of the
process variation of the main PID controller remained below
the value programmed in P1031 for the time programmed
in P1032.
Parameter P1030 is programmed for 2 and the value of the
process variation of the main PID controller remained above
the value programmed in P1033 for the time programmed
in P1034.
Parameter P1042 is programmed for 2 and the pump driven
by the CFW501 frequency inverter is running with speed
above the speed programmed in P1043 and the motor torque
remained below the value programmed in P1044 for the time
programmed in P1045.
Parameter P1046 is programmed for 2 and the motor driven
by the CFW501 frequency inverter is running with speed
above the speed programmed in P1047 and the motor torque
remained below the value programmed in P1048 for the time
programmed in P1049.
Parameter P1050 is programmed for 2 and the operation time
of the motor driven by the CFW501 frequency inverter shown
in P1052 is above the value programmed in P1051.
HVAC application active (P1003 = 1) without the standard
plug-in CFW500-CRS485.
Parameter P1075 is programmed for 2 and the value of the
process variation of the external PID controller remained below
the value programmed in P1076 for the time programmed
in P1077.
Parameter P1075 is programmed for 2 and the value of the
process variation of the external PID controller remained above
the value programmed in P1078 for the time programmed
in P1079.
0-20 | CFW501
Page 29
Safety Instructions
1 SAFETY INSTRUCTIONS
This manual contains the information necessary for the correct setting of the frequency inverter CFW501.
It was developed to be used by people with proper technical training or qualification to operate this kind of
equipment. These people must follow the safety instructions defined by local standards. The noncompliance with
the safety instructions may result in death risk and/or equipment damage.
1.1 SAFETY WARNINGS IN THIS MANUAL
DANGER!
The procedures recommended in this warning have the purpose of protecting the user against death,
serious injuries and considerable material damage.
ATTENTION!
The procedures recommended in this warning have the purpose of avoiding material damage.
NOTE!
The information mentioned in this warning is important for the proper understanding and good
operation of the product.
1.2 SAFETY WARNINGS IN THE PRODUCT
1
The following symbols are fixed to the product, as a safety warning:
High voltages present.
Components sensitive to electrostatic discharges.
Do not touch them.
Mandatory connection to the protection grounding (PE).
Connection of the shield to the grounding.
Hot surface.
CFW501 | 1-1
Page 30
Safety Instructions
1.3 PRELIMINARY RECOMMENDATIONS
DANGER!
1
Only qualified personnel, familiar with the CFW501 inverter and related equipment must plan or
perform the installation, commissioning, operation and maintenance of this equipment.
The personnel must follow the safety instructions described in this manual and/or defined by local
standards.
The noncompliance with the safety instructions may result in death risk and/or equipment damage.
NOTE!
For the purposes of this manual, qualified personnel are those trained in order to be able to:
1. Install, ground, power up and operate the CFW501 in accordance with this manual and the safety
legal procedures in force.
2. Use the protective equipment in accordance with the relevant standards.
3. Give first aid.
DANGER!
Always disconnect the general power supply before touching any electric component associated
to the inverter.
Many components may remain loaded with high voltages and/or moving (fans), even after the AC
power supply input is disconnected or turned off. Wait for at least ten minutes in order to guarantee
the full discharge of the capacitors. Always connect the frame of the equipment to the protective
earth (PE) at the proper point for that.
ATTENTION!
Electronic boards have components sensitive to electrostatic discharge. Do not touch directly the
component parts or connectors. If necessary, first touch the grounded metallic frame or use proper
grounding strap.
Do not execute any applied potential test on the inverter!
If necessary, contact WEG.
NOTE!
Frequency inverters may interfere in other electronic equipments. Observe the recommendations of
chapter 3 - Installation and Connection of the user’s manual in order to minimize these effects.
Read the user’s manual completely before installing or operating this inverter.
NOTE!
The operations to copy the inverter parameters by means of the CFW500-MMF accessory must be
preceded by a power-up cycle. That is, after the modification of one or more parameters, it will be
available for copy on the plug-in module after the next power-up of the CFW501.
1-2 | CFW501
Page 31

General Information
2 GENERAL INFORMATION
2.1 ABOUT THE MANUAL
This manual presents information necessary for the configuration of all the functions and parameters of the frequency
inverter CFW501. This manual must be used together with the user’s manual of the CFW501.
The text provides additional information so as to make the use and programming of the CFW501 easier in certain
applications.
The standard value for the parameters related to speed described in this manual assumes a standard 4-pole
motor, that is, with synchronous speed of 1500 rpm (50 Hz) or 1800 rpm (60 Hz). Table 2.1: Setting of the speed
parameters on page 2-1 shows the setting suggested of those parameters for other number of poles. Furthermore,
parameter P0402 must be set with the data on the motor nameplate; if not available, use the rated speed.
Table 2.1: Setting of the speed parameters
Number of
Poles
2 180 rpm 3000 rpm 3600 rpm 2000 rpm 2400 r pm 1000 rpm 120 0 rpm
4 90 rpm 1500 r pm 18 00 rp m 1000 rpm 1200 rpm 50 0rpm 600 rpm
6 60 rpm 1000 rpm 120 0 r pm 667 rpm 800 rpm 333 rpm 400 rpm
8 45 rpm 750 rpm 900 rpm 500 rpm 600 rpm 250 rpm 300 rpm
P013 3 P0134 and P0145 P014 6 P0147
50 Hz 60 Hz 50 Hz 60 Hz 50 Hz 60 Hz
NOTE!
“The specific HVAC functions present on the CFW501 can only be activated with the connection of
the HVAC plug-in module (CFW500-CRS485). Other plug-in modules can be used, but in this case
the HVAC application must be turned off by means of parameter P1001.”
2.2 TERMINOLOGY AND DEFINITIONS
2
2.2.1 Terms and Definitions Used
I
: inverter rated current by P0295.
nom
Overload Duty: in the CFW501 there is no difference in the operating duty between “Light - Normal Duty” (ND)
and “Heavy - Heavy Duty” (HD). Thus, the overload duty adopted for the CFW501 is equivalent to the HD standard,
that is, the maximum overload current is 1.5 x I
for one minute of continuous operation.
nom
Rectifier: input circuit of the inverters that transforms the input AC voltage into DC. It is formed by high-power
diodes.
IGBT: insulated Gate Bipolar Transistor - basic component part of the output inverter bridge. It works as an
electronic switch in the saturated (closed switch) and cut-off (open switch) modes.
DC Link: intermediary circuit of the inverter; voltage in direct current obtained by rectifying the power supply
alternate voltage or external supply; it supplies the output inverter bridge with IGBTs.
Pre-Charge Circuit: charges the capacitors of the DC link with limited current, avoiding current peaks in the
inverter power-up.
Braking IGBT: it works as a switch to turn on the braking resistor. It is controlled by the DC link level.
CFW501 | 2-1
Page 32

General Information
PTC: resistor whose resistance value in ohms increases proportionally to the temperature; it is used as a temperature
sensor in motors.
NTC: resistor whose resistance value in ohms decreases proportionally to the increase of the temperature; it is
used as a temperature sensor in power packs.
HMI: "Human-Machine Interface"; device which allows controlling the motor, viewing and changing the inverter
2
parameters. It features keys to control the motor, navigation keys and graphic LCD display.
PE: protective earth.
PWM: pulse Width Modulation - modulation by pulse width; pulsed voltage that supplies the motor.
Switching frequency: commutating frequency of the inverter bridge IGBTs, normally expressed in kHz.
General Enable: when activated, it accelerates the motor by acceleration ramp and Run/Stop=Run. When disabled,
the PWM pulses will be immediately blocked. It may be controlled by digital input set for this function or via serial.
Run/Stop: inverter function which, when activated (run), accelerates the motor by acceleration ramp up to the
reference speed and, when deactivated (stop), decelerates the motor by deceleration ramp. It may be controlled
by digital input set for this function or via serial.
Heatsink: metal part designed to dissipate the heat produced by power semiconductors.
Amp, A: ampere.
°C: celsius degrees.
°F: fahrenheit degree.
CA: alternate current.
DC: direct current.
CV: cavalo-vapor = 736 Watts (Brazilian unit of measurement of power, normally used to indicate mechanical
power of electric motors).
hp: horse power = 746 Watts (unit of measurement of power, normally used to indicate mechanical power of
electric motors).
Fmin: minimum frequency or speed (P0133).
Fmáx: maximum frequency or speed (P0134).
DIx: digital input “x”.
AIx: analog input "x".
AOx: analog output "x".
DOx: digital output "x".
Io: output current.
Iu: current on phase u (RMS).
Iv: current on phase v (RMS).
2-2 | CFW501
Page 33

Iw: current on phase w (RMS).
Ia: output active current (RMS).
Hz: hertz.
kHz: kilohertz = 1000 hertz.
mA: milliampere = 0.001 ampere.
min: minute.
ms: millisecond = 0.001 seconds.
Nm: newton meter; unit of torque.
rms: root mean square; effective value.
rpm: revolutions per minute; unit of measurement of rotation.
s: second.
General Information
2
V: volts.
Ω: ohms.
2.2.2 Numerical Representation
The decimal numbers are represented by means of digits without suffix. Hexadecimal numbers are represented
with the letter “h” after the number.
2.2.3 Symbols to Describe Parameter Properties
ro Read only parameter.
cfg Parameter that can be changed only with a stopped motor.
V/f Parameter visible on the HMI only in the V/f mode: P0202 = 0, 1 or 2.
VVW Parameter visible on the HMI only in the V VW mode: P0202 = 3.
CFW501 | 2-3
Page 34

General Information
2
2-4 | CFW501
Page 35

About the CFW501
3 ABOUT THE CFW501
The frequency inverter CFW501 is a high performance product which enables speed and torque control of threephase induction motors. This product provides the user with the options of vector (VV W) or scalar (V/f) control,
both programmable according to the application.
In the vector mode, the operation is optimized for the used motor, providing a better performance in terms of speed
control torque. The “Self-Tuning” function, available for the vector control, allows the automatic setting of control
parameters and controllers based on the identification (also automatic) of the motor parameters.
The scalar mode (V/f) is recommended for simpler applications, such as the activation of most pumps and fans. In
those cases, it is possible to reduce the motor and inverter losses by adjusting the V/f curve using the parameters
based on quadratic curve approximation of the V/f relationship, which results in energy saving. The V/f mode is
used when more than a motor is activated by an inverter simultaneously (multimotor applications).
The main components of the CFW501 can be viewed in the block diagram of Figure 3.1: CFW501 block diagram
on page 3-2 and Figure 3.2: Main components of the CFW501 on page 3-3. The mechanical project was
designed to simplify the connection and maintenance, as well as to ensure the safety of the product.
Developed to meet the main technological requirements of the market, the CFW501 has a plug-in modular interface
which adapts to the application. As shown in item 4 of Figure 3.2: Main components of the CFW501 on page
3-3, the plug-in allows the CFW501 to meet the requirements of different applications.
All CFW501 interface models feature communication in physical media RS485 with Modbus RTU and resources
for data transfer via memory card.
3
CFW501 | 3-1
Page 36

About the CFW501
= DC link connection
= Braking resistor connection
DC+ DC-BR
Power
supply
S/L2/N
T/L 3
Internal
RFI filter
Single-phase
/ thre e -p h as e
R/L1/L
3
PE
rectifier
Pré-
carga
DC-Inverter
with IGBT
transistors
and current
feedback
Voltage
feedback
DC link capacitor bank
Inver ters CFW501...DB...)
Braking IGBT (available in
U/T1
V/T2
Motor
W/T3
PE
(**)
POWER
CONTROL
Power supplies for electronics and interfaces
between power and control
HMI
(remote)
CPU
32 bits
"RISC"
EEPROM
(memory)
HMI
CONTROL
PLUG-IN RS-485
Supply 10 V
PC
Software WLP
SUPERDRIVE
MODBUS
Digital inputs
(DI1 to DI4)
Analog input
(AI1 and AI2)
(*)
(*)
(*)
RS-485
Interface
RS-485
User’s
plug-in
card
Memory card (MMF)
Supply 24 V
Analog output
(AO1)
(*)
Digital output
DO1 (RL1) and
DO3 (RL2)
Digital output
DO2 (TR)
(*)
Accessory
= Human-machine interface
(*) The number of inputs and outputs (analog and digital) may vary according to the used plug-in module. For further information,
refer to the installation, configuration and operation guide of the accessory with plug-in module used.
(**) Not available in mechanics A.
Figure 3.1: CFW501 block diagram
3-2 | CFW501
Page 37

About the CFW501
1
2
3
1 – Fixing support (for surface mounting)
2 – Fixing support (for Din-rail mount)
3 – Fan with fixing support
4 – Plug-in module
5 – HMI
6 – Front cover
Figure 3.2: Main components of the CFW501
5
6
4
3
CFW501 | 3-3
Page 38

About the CFW501
3
3-4 | CFW501
Page 39

HMI and Basic Programming
4 HMI AND BASIC PROGRAMMING
4.1 USE OF THE HMI TO OPERATE THE INVERTER
Through the HMI, it is possible to view and set all the parameters. The HMI features two operating modes: monitoring
and parameterization. The functions of the keys and the active fields on the HMI display vary according to the
operating mode. The setting mode is composed of three levels.
- When in the setting mode, level 1:
press this key to return to the
monitoring mode.
- When in the setting mode, level 2:
press this key to return to level 1 of
the setting mode.
- When in the setting mode, level 3:
press this key to cancel the new value
(new value is not saved) and return to
level 2 of the setting mode.
- When in the monitoring mode: press
this key to increase the speed.
- When in the setting mode, level 1:
press this key to go to the previous
group.
- When in the setting mode, level 2:
press this key to go to the next
parameter.
- When in the setting mode, level 3:
press this key to increase the content
of the parameter.
Press this key to define the motor
rotation direction.
Active when:
P0223 = 2 or 3 in LOC and/or
P0226 = 2 or 3 in REM.
- When in the monitoring mode: press this key to
enter the setting mode.
- When in the setting mode, level 1: press this key
to select the desired parameter group – it shows
the parameter group selected.
- When in the setting mode, level 2: press this key
to show the parameter- It shows the content of
the parameter to change the content.
- When in the setting mode, level 3: press this
key to save the new content of the parameter – it
returns to level 2 of the setting mode.
- When in the monitoring mode: press this key to
decrease the speed.
- When in the setting mode, level 1: press this key
to go to the next group.
- When in the setting mode, level 2: press this key
to show the previous parameter.
- When in the setting mode, level 3: press this key
to decrease the content of the parameter.
Press this key to accelerate the motor within the
time determined by the acceleration ramp.
Active when:
P0224 = 0 in LOC or
P0227 = 0 in REM.
4
Press this key to commute between
LOCAL and REMOTE mode.
Active when:
P0220 = 2 or 3.
Press this key to accelerate the motor up to the speed set in P0122 within the time determined
by the acceleration ramp. The motor speed is kept while the key is pressed. When the key is
released, the motor decelerates within the time determined by the deceleration ramp, until it
stops. This function is active when all the conditions below are met:
1. Run/stop = Stop;
2. General enable = Active;
3. P0225 = 1 in LOC and/or P0228 = 1 in REM.
Press this key to decelerate the motor within the
time determined by the deceleration ramp.
Active when:
P0224 = 0 in LOC or
P0227 = 0 in REM.
Figure 4.1: HMI Keys
CFW501 | 4-1
Page 40

HMI and Basic Programming
4.2 INDICATIONS ON THE HMI DISPLAY
The information shown on the HMI LCD display is divided into five fields: menu, status, secondary display, unit,
and main display. Those fields are defined in Figure 4.2: Display areas on page 4-2. The main and secondary
display set allows alternating the focus to scroll the parameter number or parameter value according to levels 2
and 3 of the parameterization mode, respectively.
Local/Remote
(command
and reference
Forward/Reverse
source)
Inverter status
Menu (to select the
4
parameter groups) –
only one parameter
group is shown at a
time.
Main display
Figure 4.2: Display areas
Secondary display
Unit of measurement
(it refers to the value
of the main display)
Parameter groups available in the field Menu:
PARAM: all parameters.
READ: read only parameters.
MODIF: parameters modified in relation to the factory default.
BASIC: parameters for basic application.
MOTOR: parameters related to the motor control.
I/O: parameters related to digital and analog inputs and outputs.
N E T: parameters related to the communication networks.
HMI: parameters to configure the HMI.
HVAC: parameters related to HVAC applications.
S TA R TUP: parameters for oriented Start-up.
Status of the inverter:
LOC: command source or local references.
REM: command source or remote references.
: direction of rotation by means of arrows.
CONF: CONFIG status active.
SUB: undervoltage.
RUN: execution.
4-2 | CFW501
Page 41

HMI and Basic Programming
4.3 OPERATING MODES OF THE HMI
The monitoring mode allows the user to view up to two variables of interest, one on the main display, and another
on the secondary display. Such fields of the display are defined in Figure 4.2: Display areas on page 4-2.
Level 1 allows the user to select the menu items to direct the browsing of the parameters.
Level 2 allows browsing the parameters of the group selected by level 1.
Level 3, in turn, allows the modification of the parameter selected in level 2. At the end of this level, the modified
value is saved or not if the key ENTER or ESC is pressed, respectively.
The Figure 4.3: HMI operating modes on page 4-3 illustrates the basic browsing of the operating modes of the HMI.
Monitoring Mode
It is the initial status of the HMI af ter the powering up and of the initialization
screen, with factory default values.
The field menu is not active in this mode.
The main display and secondary display of the HMI indicate the values of
the two parameters preset by P0205 and P0206.
From the monitoring mode, when you press the ENTER/MENU key, you
commute to the setting mode.
Setting Mode
Level 1:
This is the first level of the setting mode. It is possible to choose the
parameter group using the keys and .
The fields: main display, secondary display, bar graph for monitoring of
variable and measurement units are not shown in this level.
Press the ENTER/MENU key to go to level 2 of the setting mode – parameter
selection.
Press the BACK /ESC key to return to the monitoring mode.
Level 2:
The number of the parameter is shown on the main display and its content
on the secondary display.
Use the and keys to find the desired parameter.
Press the ENTER/MENU key to go to level 3 of the set ting mode- modification
of the parameter content.
Press the BACK /ESC key to return to level 1 of the setting mode.
Level 3:
The content of the parameter is shown on the main display and the number
of the parameter is shown on the secondary display.
Use the and keys to configure the new value for the selected
parameter.
Press the ENTER/MENU key to confirm the modification (save the new
value) or BACK/ESC to cancel the modification (not save the new value).
In both cases, the HMI returns to level 2 of the setting mode.
Figure 4.3: HMI operating modes
BACK
BACK
BACK
Monitoring
ESC
Parameterization
Level 1
ESC
Parameterization
Level 2
ESC
Parameterization
Level 3
ENTER
MENU
ENTER
MENU
ENTER
MENU
4
NOTE!
When the inverter is in the fault state, the main display indicates the number of the fault in the format
Fxxxx. The browsing is allowed after pressing the ESC key, and the indication Fxxxx goes to the
secondary display until the fault is reset.
NOTE!
When the inverter is in the alarm state, the main display indicates the number of the alarm in the
format Axxxx. The browsing is allowed after pressing any key, and the indication Axxxx goes to
the secondary display until the situation causing the alarm is solved.
CFW501 | 4-3
Page 42

HMI and Basic Programming
4
4-4 | CFW501
Page 43

Basic Instructions for Programming and Settings
5 BASIC INSTRUCTIONS FOR PROGRAMMING AND SETTINGS
5.1 PARAMETER STRUCTURE
Aiming at simplifying the parameterization process, the CFW501 parameters were classified into ten groups which
can be individually selected in the Menu area of the HMI display. When the enter/menu key of the HMI is pressed in
the monitoring mode, you enter the setting mode level 1. In this mode, it is possible to select the desired parameter
group by browsing with the " " and " " keys. For further details on the use of the HMI, refer to chapter 4 HMI
AND BASIC PROGRAMMING on page 4-1.
NOTE!
The inverter comes from the factory with the frequency (V/f 50/60 Hz mode) and voltage adjusted
according to the market.
The reset to factory default may change the content of the parameters related to frequency as per
P0204. In the detailed description, some parameters have values between brackets, which represents
the default value for operation in 50 Hz; thus the value without brackets is the default for operation
in 60 Hz.
5.2 PARAMETERS SELECTED BY THE HMI MENU
5
In the first level of the setting mode, select the group to browse the next levels according to the table below.
Table 5.1: Parameter group accessed by the HMI MENU
Group Contained Parameters
PARAM All parameters.
Read only parameters:
READ
MODIF Only parameters whose contents are different from the factor y settings.
BASIC
MOTOR
I/O
NET
HMI
HVAC
STARTUP
P0001, P0002, P0003, P0004, P0005, P0006, P0007, P0009, P0010, P0011, P0012, P0013, P0014, P0015, P0016,
P0017, P0018, P0019, P0020, P0021, P0022, P0023, P0024, P0027, P0029, P0030, P0037, P0042, P0043, P0044,
P0047, P0048, P0049, P0050, P0051, P0052, P0053, P0054, P0055, P0060, P0061, P0062, P0063, P0064, P0065,
P0070, P0071, P0072, P0073, P0074, P0075, P0080, P0081, P0082, P0295, P0296, P0680, P0690.
Parameters for simple application: ramps, minimum and maximum speed, maximum current and torque boost:
P0100, P0101, P0133, P0134, P0135, P0136.
Parameter related to the motor data control:
P0135, P0136, P0137, P0138, P0150, P0151, P0152, P0153, P0156, P0157, P0158, P0178, P0297, P0299, P0300,
P0301, P0302, P0398, P0399, P0400, P0401, P0402, P0403, P0404, P0407, P0409.
Groups related to digital and analog inputs and outputs:
P0012, P0013, P0014, P0015, P0016, P0017, P0018, P0019, P0020, P0021, P0022, P0105, P0220, P0221, P0222,
P0223, P0224, P0225, P0226, P0227, P0228, P0229, P0230, P0231, P0232, P0233, P0234, P0235, P0236, P0237,
P0238, P0239, P0240, P0241, P0242, P0243, P0244, P0245, P0246, P0247, P0248, P0249, P0250, P0251, P0252,
P0253, P0254, P0255, P0256, P0257, P0258, P0259, P0260, P0263, P0264, P0265, P0266, P0267, P0268, P0269,
P0270, P0271, P0275, P0276, P0277, P0278, P0279, P0281, P0282, P0287, P0288, P0289, P0290, P0291, P0292,
P0293, P0294.
Parameter related to the communication networks:
P0308, P0310, P0311, P0312, P0313, P0314, P0316, P0680, P0681, P0682, P0683, P0690, P0695, P0696, P0697,
P0698, P0760, P0761, P0762, P0763, P0764, P0765.
Parameter to configure the HMI:
P0200, P0205, P0206, P0208, P0209, P0210, P0211, P0212, P0216, P0510, P0511, P0512, P0513, P0516, P0517.
Parameter related to the HVAC function:
P0580, P0581, P0582, P0583, P0584 P0585, P0586, P0587, P0588, P0589, P0590, P0591, P1000, P1001, P1002,
P1003, P1010, P1011, P1012, P1013, P1014, P1015, P1016, P1017, P1018, P1019, P1020, P1021, P1022, P1023,
P1024, P1025, P1026, P1027, P1028, P1029, P1030, P1031, P1032, P1033, P1034, P1035, P1036, P1037, P1038,
P1039, P1040, P1041, P1042, P1043, P1044, P1045, P1046, P1047, P1048, P1049, P1050, P1051, P1052, P1053,
P1054, P1055, P1056, P1057, P1058, P105 9, P10 60, P10 61, P1062, P10 63, P10 64, P10 65, P1066, P1067, P10 68,
P1069, P1070, P1071, P1072, P1073, P1074, P1075, P1076, P1077, P1078, P1079.
Parameter to enter the VVW - oriented Start-up mode:
P0202, P0398, P0399, P0400, P0401, P0402, P0403, P0404, P0407, P0408, P0409.
CFW501 | 5-1
Page 44

Basic Instructions for Programming and Settings
NOTE!
Besides the selected group in the menu field of the HMI, the view of the parameters on the HMI
depends on the hardware installed and on the operating mode of the CFW501. Therefore, observe
the connected plug-In module, as well as the motor control mode: V VW or V/f. For example, if the
plug-in module only features the analog input AI1, the parameters related to the other analog inputs
are not shown. The same occurs with the parameters exclusively related to the V VW and V/f modes.
5.3 HMI
In the HMI group, you find parameters related to the showing of information on the display, backlight and password
of the HMI. See detailed description below of the possible settings of the parameters.
P0000 – Access to the Parameters
5
Adjustable
Range:
Description:
Password input to release the access to the parameters. Once a password is saved in P0200, the access to
the parameters is only allowed if this password is set in P0000.
After setting P0000 with a password value, P0000 will show “1” or “0”, keeping the set password value hidden.
Where “1” releases the access to parameters and “0” locks the access to the parameters.
NOTE!
The access to the parameters and P0000 is cleared together with the powering down of the inverter.
0 to 9999 Factory
Setting:
0
5-2 | CFW501
Page 45

P0200 – Password
Basic Instructions for Programming and Settings
Adjustable
Range:
0 = Inactive
1 = Active
Factory
Setting:
0 = Inactive
1 to 9999 = New Password
Properties:
Access groups
HMI
via HMI:
Description:
It allows activating the password (by inserting a new value) or disabling it. For further details regarding the use
of this parameter, refer to Table 5.2: Required procedure for each kind of action on page 5-3.
Table 5.2: Required procedure for each kind of action
Action Procedure
Activate password
Change password
Disable password
Disable password
Notes:
(1) It only allows changing the content of the parameters when P0000 is equal to the value of the password.
(2) It is allowed to change the content of the parameters and P0000 is inaccessible.
1. Set P0200 with the desired value for the password (P0200 = password);
2. After this procedure, the new password is active and P0200 is automatically adjusted for 1 (password
1. Set the current value of the password (P0000 = password);
2. Set the desired value for the new password in P0200 (P0200 = new password);
3. After this procedure, the new password is active and P0200 is automatically adjusted for 1 (password
1. Set the current value of the password (P0000 = password);
2. Set inactive password (P0200 = 0);
3. After this procedure, the password is disabled
1. Activate a factory default by means of P0204;
2. After this procedure, the password is disabled
active)
active)
(1)
.
(1)
.
(2)
.
(2)
.
5
P0205 – Main Display Parameter Selection
P0206 – Secondary Display Parameter Selection
Adjustable
Range:
Properties:
Access groups
via HMI:
Description:
These parameters define which parameters are shown on the HMI display in the monitoring mode.
More details of this programming can be found in section 5.6 SETTING OF DISPLAY INDICATIONS IN THE
MONITORING MODE on page 5-12.
0 to 1079 Factory
Setting:
HMI
P0205 = 2
P0206 = 1
CFW501 | 5-3
Page 46

Basic Instructions for Programming and Settings
P0208 – Main Display Scale Factor
P0211 – Secondary Display Scale Factor
Adjustable
Range:
Properties:
Access groups
via HMI:
0.1 to 1000.0 % Factory
Setting:
HMI
100.0 %
P0210 – Indication Form of the Main Display
P0212 – Indication Form of the Second Display
5
Adjustable
Range:
Properties:
Access groups
via HMI:
0 = wxyz
1 = wxy.z
2 = wx.yz
3 = w.xyz
4 = According to P0511
5 = According to P0513
6 = Reserved
7 = According to P0517
HMI
Factory
Setting:
0
Description:
These parameters allow setting the main and secondary display scale so as to convert motor variables, such as
speed (rpm) into HVAC application unit, such as meters/min or cubic feet/min, for instance.
5-4 | CFW501
Page 47

Basic Instructions for Programming and Settings
P0209 – Main Display Engineering Unit
Adjustable
Range:
Properties:
Access groups
via HMI:
0 = none
1 = V
2 = A
3 = rpm
4 = s
5 = ms
6 = none
7 = m
8 = none
9 = none
10 = %
11 = °C
12 = none
13 = Hz
14 = none
15 = h
16 = W
17 = kW
18 = none
19 = none
20 = min
21 = °F
22 = bar
23 = mbar
24 = psi
25 = Pa
26 = kPa
27 = MPa
28 = mwc
29 = mca
30 = gal
31 = l
32 = in
33 = ft
34 = m³
35 = ft³
36 = gal/s
37 = gal/min
38 = gal/h
39 = l/s
40 = l/min
41 = l/h
42 = m/s
43 = m/min
44 = m/h
45 = ft/s
46 = ft/min
47 = ft/h
48 = m³/s
49 = m³/min
50 = m³/h
51 = ft³/s
52 = ft³/min
53 = ft³/h
54 = According to P0510
55 = According to P0512
56 = none
57 = According to P0516
HMI
Factory
Setting:
3
5
Description:
This parameter selects the engineering unit to be presented in the main display. The content of this parameter
is automatically adjusted to match the unit of the parameter selected by P0205 when its value is changed by
the HMI.
CFW501 | 5-5
Page 48

Basic Instructions for Programming and Settings
P0216 – HMI Display Light
Adjustable
Range:
Properties:
Access groups
via HMI:
Description:
The function of this parameter is to turn on or off the backlight of the HMI display.
NOTE!
When the remote HMI is connected and activated by P0312, the light of the CFW501 local HMI is
cut off and parameter P0216 starts to control the remote HMI.
0 = Inactive
1 = Active
HMI
Factory
Setting:
1
5
5.4 INDIRECT ENGINEERING UNITS
This parameter group allows the user to configure the engineering units for the user's parameters of the SoftPLC
function.
P0510 – Indirect Engineering Unit 1
Adjustable
Range:
5-6 | CFW501
0 = none
1 = V
2 = A
3 = rpm
4 = s
5 = ms
6 = none
7 = m
8 = none
9 = none
10 = %
11 = °C
12 = none
13 = Hz
14 = none
15 = h
16 = W
17 = kW
18 = none
19 = none
20 = min
21 = °F
22 = bar
23 = mbar
24 = psi
25 = Pa
26 = kPa
27 = MPa
28 = mwc (meter of water column)
29 = mca (metro de coluna d'água)
30 = gal
31 = l (litro)
32 = in
33 = ft
34 = m³
35 = ft³
36 = gal/s
37 = gal/min (= GPM)
Factory
Setting:
22
Page 49

Basic Instructions for Programming and Settings
38 = gal/h
39 = l/s
40 = l/min
41 = l/h
42 = m/s
43 = m/min
44 = m/h
45 = ft/s
46 = ft/min
47 = ft/h
48 = m³/s
49 = m³/min
50 = m³/h
51 = ft³/s
52 = ft³/min
53 = ft³/h
Properties:
Access groups
via HMI:
Description:
This parameter selects the engineering unit that will be viewed in the user’s parameter of the SoftPLC which is
associated to it, that is, any user’s parameter of the SoftPLC that is associated to the indirect engineering unit
1 will be viewed in this format on the CFW501 HMI.
HMI
5
NOTE!
Parameters P1011, P1015, P1027, P1028, P1031 and P1033 of the main PID controller (HVAC functions)
are associated to the indirect engineering unit 1.
P0511– Indirect Indication Form 1
Adjustable
Range:
Properties:
Access groups
via HMI:
Description:
This parameter selects the decimal point that will be viewed in the user’s parameter of the SoftPLC which is
associated to it, that is, any user’s parameter of the SoftPLC that is associated to the indirect indication form 1
will be viewed in this format on the CFW501 HMI.
NOTE!
Parameters P1011, P1015, P1027, P1028, P1031 and P1033 of the main PID controller (HVAC functions)
are associated to the indirect indication form 1.
0 = wxyz
1 = wxy.z
2 = wx.yz
3 = w.xyz
HMI
Factory
Setting:
1
P0512 – Indirect Engineering Unit 2
Adjustable
Range:
0 = none
1 = V
2 = A
3 = rpm
4 = s
Factory
Setting:
11
CFW501 | 5-7
Page 50

Basic Instructions for Programming and Settings
5 = ms
6 = none
7 = m
8 = none
9 = none
10 = %
11 = °C
12 = none
13 = Hz
14 = none
15 = h
16 = W
17 = kW
18 = none
19 = none
20 = min
21 = °F
5
Properties:
Access groups
via HMI:
22 = bar
23 = mbar
24 = psi
25 = Pa
26 = kPa
27 = MPa
28 = mwc (meter of water column)
29 = mca (metro de coluna d'água)
30 = gal
31 = l (litro)
32 = in
33 = ft
34 = m³
35 = ft³
36 = gal/s
37 = gal/min (= GPM)
38 = gal/h
39 = l/s
40 = l/min
41 = l/h
42 = m/s
43 = m/min
44 = m/h
45 = ft/s
46 = ft/min
47 = ft/h
48 = m³/s
49 = m³/min
50 = m³/h
51 = ft³/s
52 = ft³/min
53 = ft³/h
HMI
Description:
This parameter selects the engineering unit that will be viewed in the user’s parameter of the SoftPLC which is
associated to it, that is, any user’s parameter of the SoftPLC that is associated to the indirect engineering unit
2 will be viewed in this format on the CFW501 HMI.
NOTE!
Parameters P1060, P1062, P1073, P1074, P1076 and P1078 of the external PID controller (HVAC
functions) are associated to the indirect engineering unit 2.
5-8 | CFW501
Page 51

P0513 – Indirect Indication Form 2
Basic Instructions for Programming and Settings
Adjustable
Range:
Properties:
Access groups
via HMI:
Description:
This parameter selects the decimal point that will be viewed in the user’s parameter of the SoftPLC which is
associated to it, that is, any user’s parameter of the SoftPLC that is associated to the indirect indication form 2
will be viewed in this format on the CFW501 HMI.
NOTE!
Parameters P1011, P1015, P1027, P1028, P1031 and P1033 of the main PID controller (HVAC
functions) are associated to the indirect indication form 2.
0 = wxyz
1 = wxy.z
2 = wx.yz
3 = w.xyz
HMI
Factory
Setting:
1
P0516 – Indirect Engineering Unit 4
Adjustable
Range:
0 = none
1 = V
2 = A
3 = rpm
4 = s
5 = ms
6 = none
7 = m
8 = none
9 = none
10 = %
11 = °C
12 = none
13 = Hz
14 = none
15 = h
16 = W
17 = kW
18 = none
19 = none
20 = min
21 = °F
22 = bar
23 = mbar
24 = psi
25 = Pa
26 = kPa
27 = MPa
28 = mwc (meter of water column)
29 = mca (metro de coluna d’água)
30 = gal
31 = l (litro)
32 = in
33 = ft
Factory
Setting:
13
5
CFW501 | 5-9
Page 52

Basic Instructions for Programming and Settings
34 = m³
35 = ft³
36 = gal/s
37 = gal/min (= GPM)
38 = gal/h
39 = l/s
40 = l/min
41 = l/h
42 = m/s
43 = m/min
44 = m/h
45 = ft/s
46 = ft/min
47 = ft/h
48 = m³/s
49 = m³/min
5
Properties:
Access groups
via HMI:
50 = m³/h
51 = ft³/s
52 = ft³/min
53 = ft³/h
HMI
Description:
This parameter selects the engineering unit that will be viewed in the user’s parameter of the SoftPLC which is
associated to it, that is, any user’s parameter of the SoftPLC that is associated to the indirect engineering unit
4 will be viewed in this format on the CFW501 HMI.
NOTE!
Parameters P1036, P1043 and P1047 are related to speed limits (Hz or rpm) in the HVAC functions
and are associated to the indirect engineering unit 4.
P0517 – Indirect Indication Form 4
Adjustable
Range:
Properties:
Access groups
via HMI:
Description:
This parameter selects the decimal point that will be viewed in the user’s parameter of the SoftPLC which is
associated to it, that is, any user’s parameter of the SoftPLC that is associated to the indirect indication form 4
will be viewed in this format on the CFW501 HMI.
0 = wxyz
1 = wxy.z
2 = wx.yz
3 = w.xyz
HMI
Factory
Setting:
1
5-10 | CFW501
NOTE!
Parameters P1036, P1043 and P1047 are related to speed limits (Hz or rpm) in the HVAC functions
and are associated to the indirect indication form 4.
Page 53

Basic Instructions for Programming and Settings
5.5 BACKUP PARAMETERS
The CFW501 BACKUP functions allow saving the inverter current parameter contents in a specific memory
(EEPROM), or vice-versa overwrite the current parameters with the content of the specified memory.
P0204 – Load / Save Parameters
Adjustable
Range:
0...2 = Not Used
3 = Reset P0043
Factory
Setting:
0
4 = Reset P0044
5 = Load WEG 60 Hz
6 = Load WEG 50 Hz
7 = Load user 1
8 = Load user 2
9 = Save user 1
10 = Save user 2
11 = Load Standard SoftPLC
12...15 = Reserved
Properties: cfg
Description:
It allows saving the inverter present parameters in a non-volatile memory (EEPROM) of the control module or
the opposite, loading the parameters with the content of this area. Table 5.3: Option of parameter P0204 on
page 5-11 describes the actions performed
by each option.
Table 5.3: Option of parameter P0204
P0204 Action
0...2 Not Used: No action.
3 Reset P0043: resets the enabled hours counter.
4 Reset P0044: resets the kWh counter.
5 Load WEG 6 0 Hz: It loads the default parameters on the inverter with the factory default for 60 Hz.
6 Load WEG 50 Hz: It loads the default parameters on the inverter with the factory default for 50 Hz.
7 Load user 1: It transfers the content of the memory of parameters 1 to the inverter current parameters.
8 Load user 2: It transfers the content of the memory of parameters 2 to the inverter current parameters.
9 Saver user 1: It transfers the current content of the parameters to the memory of parameters 1.
10 Saver user 2: It transfers the current content of the parameters to the memory of parameters 2.
11 Load Standard Sof tPLC: It loads the default values of the parameters SoftPLC applicative parameters.
12...15 Reserved: No Action
5
In order to load the parameters of user 1 and/or user 2 to the CFW501 operating area (P0204 = 7 or 8), it is
necessary that those areas be previously saved.
The operation of loading one of those memories (P0204 = 7 or 8) can also be done via digital inputs (DIx). For
further details referring to this programming, refer to section 12.5 DIGITAL INPUTS on page 12-15.
NOTE!
When P0204 = 5 or 6, parameters P0296 (Rated voltage), P0297 (Switching frequency) P0312 (Serial
Protocol) and P0308 (Serial address) are not changed to the factory default.
CFW501 | 5-11
Page 54

Basic Instructions for Programming and Settings
5.6 SETTING OF DISPLAY INDICATIONS IN THE MONITORING MODE
Whenever the inverter is powered up, the HMI display goes to the monitoring mode. In order to simplify the reading
of the inverter parameters, the display was designed to indicate two parameters simultaneously, at the user’s
discretion. The selection of those parameters is done via P0205and P0206 as indicated in Figure 5.1: Screen on
initialization and display fields on page 5-12.
Inverter operating status
Menu
Parameter group selection
5
Figure 5.1: Screen on initialization and display fields
Secondary display (selected by P0206)
presents the content of parameter (xxxxx),
number of the parameter (Pxxxx), fault (Fxxx)
or alarm (Axxx) indication
Engineering unit for the main display
(selected by P0209)
Main display (selected by P0205) presents
the content of parameter (xxxxx), number
of the parameter (Pxxxx), fault (Fxxx) or
alarm (Axxx) indication
5.7 SITUATIONS FOR CONFIG STATUS
The CONFIG status is indicated by the HMI “CONF” status, as well as in parameters P0006 and P0680. Such
status indicates that the CFW501 cannot enable the output PWM pulses because the inverter configuration is
incorrect or incomplete.
The table below shows the situations of CONFIG status, where the user can identify the origin condition through
parameter P0047.
Table 5.4: Situations for CONFIG status
P0047 Origin Situation of CONFIG Status
0 Out of CONFIG status, HMI, P0006 and P0680 must not indicate CONF.
5 Two or more DIx (P0263...P0270) programmed for direction of rotation (4).
6 Two or more DIx (P0263...P0270) programmed for LOC/REM selection (5).
9 Two or more DIx (P0263...P0270) programmed for 2nd ramp (8).
11 Two or more DIx (P0263...P0270) programmed for disable Flying-Start (15).
12 Two or more DIx (P0263...P0270) programmed for lock programming (17).
13 Two or more DIx (P0263...P0270) programmed for load user 1 (18).
14 Two or more DIx (P0263...P0270) programmed for load user 2 (19).
Run-Stop command (P0224 or P0227) programmed for Dix (1) without DIx (P0263...P0270) programmed for (1 = Run/Stop) and
19
without DIx (P0263...P0270) programmed for general enable (2) and without DIx (P0263...P0270) programmed for quick stop (3)
and without DIx (P0263...P0270) programmed for advance(4) and without DIx (P0263...P0270) programmed for star t (6).
20 Digital input DI2 (P0265) programmed for PTC (29) or analog input AI3 (P0241) programmed for PTC (4).
25 Reference (P0221 or P0222) programmed for AI2 (2) or AI3 (3) and the plug-In module has no AI2 and AI3.
26 P0312 programmed for REMOTE HMI (0 or 6) without HMI connected.
27 Poor configuration of the V/f curve (P0142 to P0147) causes voltage step in the output).
Bypass mode configured (P0583) without any digital input configured for “Activate bypass”;
Bypass mode configured with more than one digital input configured for “Activate bypass”;
28
Bypass mode configured without a digital output configured for “Contactor bypass drive” and a digital output configure to
“Mains bypass contactor”;
Bypass mode configured and either of the two bypass digital outputs with duplicated configuration.
“Fire Mode” configured without a digital input configured for “Activate Fire Mode”;
More than one digital input configured for “Activate Fire Mode”;
29
More than one digital output configured for “Fire Mode active”;
Digital input configured for “Fire Mode” with the “Fire Mode” function disabled;
Digital output configured for “Fire Mode” with the “Fire Mode” function disabled.
5-12 | CFW501
Page 55

Identification of the Inverter Model and Accessories
6 IDENTIFICATION OF THE INVERTER MODEL AND ACCESSORIES
To verify the inverter model, check the code on the product identification labels: the complete one, on the side of
the inverter, or the summarized one, under the HMI.
Once the inverter model identification code is checked, it is necessary to interpret it in order to understand its
meaning. Refer to chapter 2 - General Information of the CFW501 user’s manual.
Below are the parameters related to the inverter model which change according to the inverter model and version.
Those parameters must comply with the data read on the product identification label.
6.1 INVERTER DATA
P0023 – Main Software Version
P0024 – Secondary Software Version
Adjustable
Range:
0.00 to 655.35 Factory
Setting:
Properties: ro
Access groups
READ
via HMI:
Description:
These parameters indicate the software versions of the microprocessor: main one, on the control board of the
CFW501 and secondary one, on the plug-in module. Those data are on the EEPROM memory located on the
control board.
P0027 – Plug-in Module Configuration
Adjustable
Range:
Properties: ro
Access groups
via HMI:
Description:
This parameter identifies the plug-in which is connected to the control module. Table 6.1: Identification of
the plug-in modules of the CFW501 on page 6-1 presents all plug-in modules recognized by the inverter
firmware, but only the CFW500-CRS485 is avaliable for the CFW501.
0 to 9 Factory
Setting:
READ
6
Table 6 .1: Identification of the plug-in modules of the CFW501
Name Description P0027
No plug-in module connected. 0
CFW500-IOS Standard plug-in module (I/O Standard). 1
CFW500-IOD Plug-in module with addition of digital inputs and outputs (Digital I/O). 2
CFW500-IOAD
CFW500-IOR Plug-in module with addition of relay digital outputs (I/O Relay). 4
CFW500-CUSB Plug-in module with addition of a USB communication port. 5
CFW500-CRS232 Plug-in module with addition of a RS232 communication port. 7
CFW500-CRS485 Plug-in module with addition of a RS485 communication port. 9
Note: *CFW501 does not support CAN and Profibus communication.
Plug-in module with addition of analog and digital inputs and analog and digital outputs
(Analog and Digital I/O).
CFW501 | 6-1
3
Page 56

Identification of the Inverter Model and Accessories
P0029 – Power Hardware Configuration
Adjustable
Range:
0 to 38 Factory
Setting:
Properties: ro
Access groups
READ
via HMI:
Description:
This parameter identifies the inverter model, distinguishing frame, supply voltage and rated current as per Tab l e 6.2:
Identification of the CFW501 models for frames A, B, C, D and E on page 6-2.
From P0029, the CFW501 determines the current and voltage parameters which depend on the identification of the
model. On the other hand, this action is only executed at the moment the factory default is loaded (P0204 = 5 or 6).
Tabl e 6 . 2 : Identification of the CFW501 models for frames A, B, C, D and E
Volt ag e Power Supply Current Frame P0029
6
- - - - 0
200-240 V Single-Phase or Mono/Tri 1.6 A A 1
200-240 V Single-Phase or Mono/Tri 2.6 A A 2
200-240 V Single-Phase or Mono/Tri 4.3 A A 3
200-240 V Single-Phase or Three-Phase 7.0 A A 4
200-240 V Three-Phase 9.6 A A 5
380-480 V Three-Phase 1.0 A A 6
380-480 V Three-Phase 1.6 A A 7
380-480 V Three-Phase 2.6 A A 8
380-480 V Three-Phase 4.3 A A 9
380-480 V Three-Phase 6 .1 A A 10
200-240 V Single-Phase or Three-Phase 7.3 A B 11
200-240 V Single-Phase or Three-Phase 10.0 A B 12
200-240 V Three-Phase 16.0 A B 13
380-480 V Three-Phase 2.6 A B 14
380-480 V Three-Phase 4.3 A B 15
380-480 V Three-Phase 6.5 A B 16
380-480 V Three-Phase 10.0 A B 17
200-240 V Three-Phase 24.0 A C 18
380-480 V Three-Phase 14.0 A C 19
380-480 V Three-Phase 16.0 A C 20
500-600 V Three-Phase 1.7 A C 21
500-600 V Three-Phase 3.0 A C 22
500-600 V Three-Phase 4.3 A C 23
500-600 V Three-Phase 7. 0 A C 24
500-600 V Three-Phase 10.0 A C
500-600 V Three-Phase 12.0 A C 26
200-240 V Three-Phase 28.0 A D 27
200-240 V Three-Phase 33.0 A D 28
380-480 V Three-Phase 24.0 A D 29
380-480 V Three-Phase
500-600 V Three-Phase 17. 0 A D 31
500-600 V Three-Phase 22.0 A D 32
200-240 V Three-Phase
200-240 V Three-Phase
380-480 V Three-Phase
380-480 V Three-Phase
500-600 V Three-Phase 27.0 A E 37
500-600 V Three-Phase 32.0 A E 38
31.0 A D 30
47.0 A E 33
56.0 A E 34
39.0 A E 35
49.0 A E 36
25
6-2 | CFW501
Page 57

P0295 – Inverter Rated Current
Identification of the Inverter Model and Accessories
Adjustable
Range:
Properties: ro
Access groups
via HMI:
Description:
This parameter presents the inverter rated current as per Table 6.2: Identification of the CFW501 models for
frames A, B, C, D and E on page 6-2.
0.0 to 200.0 A Factory
Setting:
READ
According
to inverter
model
P0296 – Power Supply Rated Voltage
Adjustable
Range:
Properties: ro
Access groups
via HMI:
Description:
This parameter presents the inverter rated power supply as shown in Table 6.2: Identification of the CFW501
models for frames A, B, C, D and E on page 6-2.
0 = 200 - 240 V
1 = 380 - 480 V
2 = 500 - 600 V
READ
Factory
Setting:
According
to inverter
model
6
P0297 – Switching Frequency
Adjustable
Range:
Properties:
Access groups
via HMI:
Description:
You can use this parameter to define the inverter IGBT switching frequency.
The inverter switching frequency may be adjusted according to the appliction needs. Higher switching frequencies
imply less acoustic noise in the motor. However, the switching frequency choice results in a compromise among
the acoustic noise in the motor, the inverter IGBT losses and the maximum permitted currents.
The reduction of the switching frequency reduces the effects related to the motor instability, which occurs in
certain application conditions. Besides, it reduces the earth leakage current, preventing the actuation of the
faults F0074 (earth fault) or F0070 (output overcurrent or short-circuit).
ATTENTION!
Check the output current data considering the switching frequency when it is different from the
default in table B.4 available in annex B - Technical Specifications of the CFW501 user's manual.
2500 to 15000 Hz Factory
Setting:
MOTOR
5000 Hz
CFW501 | 6-3
Page 58

Identification of the Inverter Model and Accessories
6
6-4 | CFW501
Page 59

Logical Command and Speed Reference
7 LOGICAL COMMAND AND SPEED REFERENCE
The drive of the electric motor connected to the inverter depends on the logical command and on the reference
defined by one of the several possible sources, such as: HMI keys, digital inputs (DIx), analog inputs (AIx),
serial/ USB interface, SoftPLC, etc.
The command via HMI is limited to a set of functions pre-defined for the keys according to chapter 4 HMI AND
BASIC PROGRAMMING on page 4-1, similarly to the digital inputs (DIx), with the functions implemented
in parameter P0263 to P0270.
On the other hand, the command via digital interfaces, such as communication network and SoftPLC, act
directly on the inverter control word by means of control parameters and system markers of the SoftPLC,
respectively.
The speed reference, in turn, is processed inside the CFW501 in 16 bits with signal (-32768 to +32767) for
a range from -18000 rpm to 18000 rpm and, therefore, minimum resolution of 0.55 rpm. On the other hand,
the unit factor, range and resolution of the reference depend on the used source, as described in section 7.2
SPEED REFERENCE on page 7-7.
7.1 SELECTION FOR LOGICAL COMMAND AND SPEED REFERENCE
The inverter command and reference source is defined by the inverter parameters for two different situations: local
and remote, which can be switched dynamically during the inverter operation. Thus, for a certain parameterization,
the inverter has two sets for command and reference, according to block diagram of Figure 7.1: General block
diagram for commands and references on page 7-2.
7
Parameter P0220 determines the source of commands between the Local and Remote situations.
Parameters P0223, P0224 and P0225 define the commands in the Local situation; parameters P0226, P0227 and
P0228 define the commands in the Remote situation, and parameter P0105 determines the source for selection
between 1st and 2nd ramp. This structure for the selection of the command source is shown in Figure 7.2: Command
selection structure on page 7-3, where parameter P0312 directs the serial communication source for the plug-in
modules with two ports.
Parameters P0221 and P0222 define the speed reference in the Local and Remote situations, respectively. This
structure for the selection of the reference source is shown in Figure 7.3: Structure to select the speed reference on
page 7-4, where parameter P0312 directs the serial communication source to the plug-in modules with two ports.
CFW501 | 7-1
Page 60
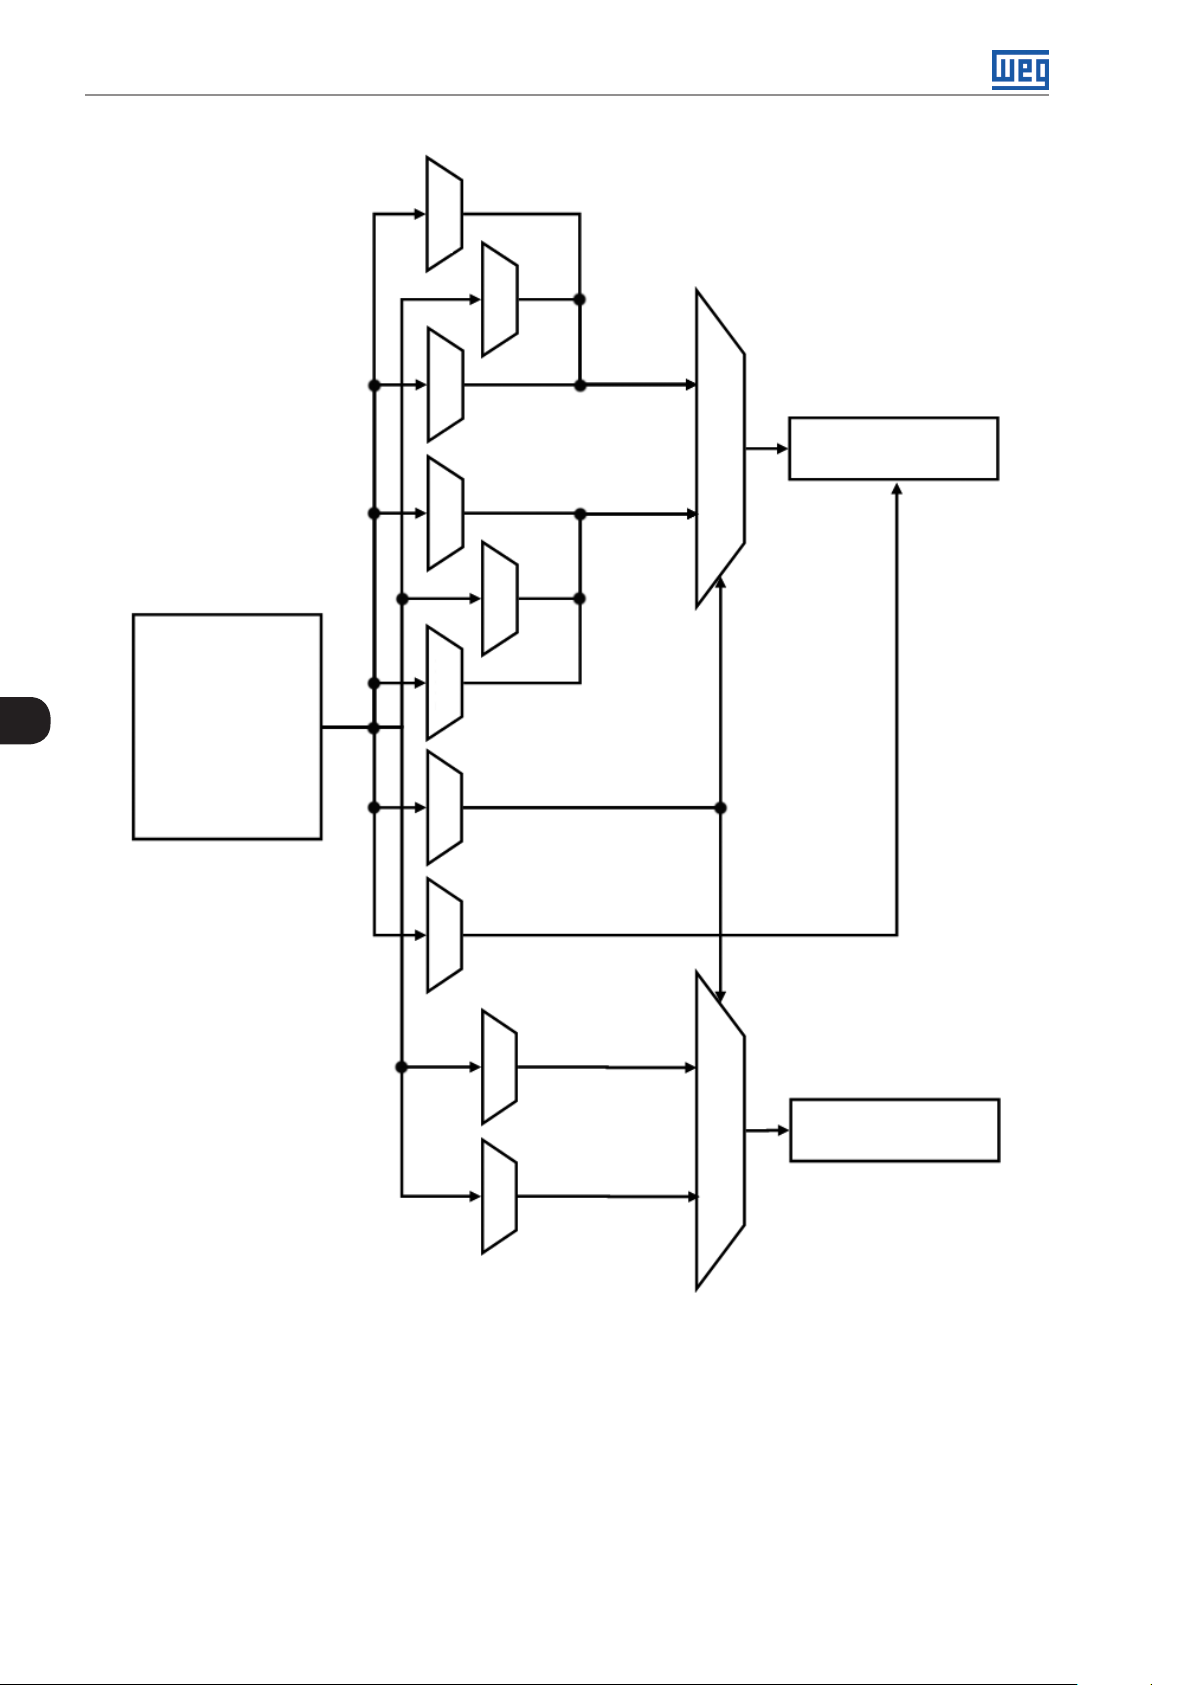
Logical Command and Speed Reference
Direction
of rotation
Run /
Stop
JOG
Direction
of rotation
P0226 P0223P0225P010 5
Run /
Stop
P0227 P0224
JOG
All of the inverter
7
command and reference
sources (HMI, terminals,
networks and SoftPLC)
P0220 P0228
LOC/REM
nd
Ramp
2
Control
word
Control
word
LOC
Control word
REM
7-2 | CFW501
Speed
reference
P0221P0222
Speed
reference
Figure 7.1: General block diagram for commands and references
LOC
REM
Speed reference
Page 61

HMI
Logical Command and Speed Reference
Command selection
P0105 and P0223 to P0228
HMI Keys
CRS485
Dlx
P0 312
Serial/USB
Inverter control
word
SoftPLC
Figure 7.2: Command selection structure
7
SoftPLC
CFW501 | 7-3
Page 62

Logical Command and Speed Reference
HMI
Reference key
(P 0121)
P0247
FI
Frequency
input
AI1
CRS485
AI2
P0249
P0232
P0234
P0237
(*)
7
P0239
Speed reference selection
P0221 or P0222
0 - HMI Keys
8 - FI
12 - FI > 0
1 - AI1
9 - AI1 > 0
4 - AI1 + AI2 > 0
5 - AI1 + AI2
2 - AI2
10 - AI2 > 0
Inverter speed
reference
RS-485
P0 312
SoftPLC
(**)
7 - SoftPLC
Figure 7.3: Structure to select the speed reference
6 - Serial
or USB
7-4 | CFW501
Page 63

P0220 – Local/Remote Selection
Logical Command and Speed Reference
Adjustable
Range:
0 = Always Local
1 = Always Remote
Factory
Setting:
2
2 = Local / Remote HMI Key (LOC)
3 = Local / Remote HMI Key (REM)
4 = Digital Input (DIx)
5 = Serial / USB (LOC)
6 = Serial / USB (REM)
7 = SoftPLC
Properties: cfg
Access groups
I/O
via HMI:
Description:
It defines the command origin source which will select between Local situation and Remote situation, where:
LOC: means Local situation default.
REM: means Remote situation default.
DIx: according to function programmed for digital input in P0263 to P0270.
P0221 – Speed Reference Selection – LOCAL Situation
P0222 – Speed Reference Selection – REMOTE Situation
7
Adjustable
Range:
0 = HMI Keys
1 = AI1
Factory
Setting:
P0221 = 0
P0222 = 1
2 = AI2
3 = AI3
4 = AI1 + AI2 > 0 (Sum AIs > 0)
5 = AI1 + AI2 (Sum AIs)
6 = Serial / USB
7 = SoftPLC
8 = Frequency input (FI)
9 = AI1 > 0
10 = AI2 > 0
11 = AI3 > 0
12 = FI > 0
Properties: cfg
Access groups
I/O
via HMI:
Description:
These parameters define the origin source for the speed reference in the Local situation and Remote situation.
Some comments on the options of this parameter:
AIx: it refers to the analog input signal according to section 12.1 ANALOG INPUTS on page 12-1.
HMI: the reference value set by the keys and contained in parameter P0121.
AIx > 0: the negative values of the AIx reference are zeroed.
CFW501 | 7-5
Page 64

Logical Command and Speed Reference
P0223 – Direction of Rotation Selection – LOCAL Situation
P0226 – Direction of Rotation Selection – REMOTE Situation
Adjustable
Range:
Properties: cfg
Access groups
via HMI:
Description:
These parameters define the origin source for the “Direction of Rotation" command in the Local and Remote
situation, where:
H: it means clockwise default at the inverter power-up.
7
AH: means counterclockwise default at the inverter power-up.
DIx: refer to section 12.5 DIGITAL INPUTS on page 12-15.
0 = Clockwise
1 = Counterclockwise
2 = HMI Key (H)
3 = HMI Keys (AH)
4 = DIx
5 = Serial / USB (H)
6 = Serial / USB (AH)
7 = SoftPLC
I/O
Factory
Setting:
P0223 = 2
P0226 = 0
P0224 – Run / Stop Selection – LOCAL Situation
P0227 – Run / Stop Selection – REMOTE Situation
Adjustable
Range:
Properties: cfg
Access groups
via HMI:
Description:
These parameters define the origin source for the “Run/Stop" command in the Local and Remote situation. This
command corresponds to the functions implemented in any of the command sources able to enable the motor
movement, that is, general enable, ramp enable, turn on, turn off, JOG, etc.
0 = HMI Keys
1 = DIx
2 = Serial / USB
3 = SoftPLC
I/O
Factory
Setting:
P0224 = 0
P0227 = 1
7-6 | CFW501
Page 65

P0225 – JOG Selection – LOCAL Situation
P0228 – JOG Selection – REMOTE Situation
Logical Command and Speed Reference
Adjustable
Range:
Properties: cfg
Access groups
via HMI:
Description:
These parameters define the origin source for the JOG function in the Local and Remote situation. The JOG
function means a run/stop command added to the reference defined by P0122 – see item 7.2.3 Speed Reference
Parameters on page 7-9.
0 = Inactive
1 = HMI Keys
2 = DIx
3 = Serial / USB
4 = SoftPLC
I/O
Factory
Setting:
P0225 = 1
P0228 = 2
7.2 SPEED REFERENCE
The speed reference is the value applied to the input of the acceleration ramp module (P0001) to control the
frequency control applied to the inverter output (P0002) and consequently the motor shaft speed.
Internally, the inverter CPU uses 16-bit variables with signal to treat the speed references. Besides, the full scale
of the reference, output frequency and related variables is defined in 1800 rpm. On the other hand, depending
on the source, this scale is conveniently modified considering the interface with the user by standardization or
application requirements.
7
In general, the digital references defined by parameters such as: HMI keys (P0121), and JOG have a scale from 0
to 18000 rpm with resolution of 1 rpm. On the other hand, the reference via analog input uses the 16-bit internal
scale with signal with a full scale in 18000 rpm and resolution of 0.55 rpm.
The speed reference via HMI can be the JOG key of the keys " " and " " on parameter P0121.
In digital inputs (DIx), on the other hand, the reference is defined according to the function predefined for P0263
to P0270.
The speed reference via analog inputs and frequency input is according to the signal, gain and offset parameters
P0230 to P0250. The full scale of the reference is always by P0134, that is, maximum value in AIx is equivalent to
the speed reference equal to P0134.
The digital references Serial/USB and SoftPLC act on a standardized scale called “13-bit Speed”, where the
value 8192 (213) is equivalent to the motor rated frequency given by P0403. Those references are accessed by
parameter P0683 and system marker of the SoftPLC, respectively.
Although the digital references have a different scale and speed reference parameters with their range from 0 to
18000 rpm, as previously informed, the speed value on the ramp input (P0001) is always limited by P0133 and
P0134. For example, the JOG reference is given by P0122; this parameter may be set to up to 18000 rpm, but
the value applied to the ramp input as reference will be limited by P0134 when the function is executed.
Tabl e 7.1: Summary of the scales and resolutions of the speed references
Reference Full Scale Resolution
Analog inputs (AIx) - P0134 to P0134 10 bits or (P0134 / 1024)
Communication networks and SoftPLC -18000 rpm to 18000 rpm Speed 13 Bits (P0403 / 8192)
HMI Parameters -18000 rpm to 18000 rpm 1 rpm
CFW501 | 7-7
Page 66

Logical Command and Speed Reference
7.2 .1 Speed Reference Limits
Although the parameters to adjust the reference have a wide range of values (0 to 18000), the value applied to
the ramp is limited by P0133 and P0134. Therefore, the values in module out of this range will have no effect on
the reference.
P0133 – Minimum Speed Reference
Adjustable
Range:
Properties:
Access groups
via HMI:
0 to 18000 rpm Factor y
Setting:
BASIC
90 (75) rpm
P0134 – Maximum Speed Reference
Adjustable
Range:
Properties:
7
Access groups
via HMI:
Description:
Limits for the inverter speed reference. Those limits are applied to any reference source, even in the case of
13-bit speed reference.
7.2.2 Speed Reference Backup
0 to 18000 rpm Factory
Setting:
BASIC
1800
(1500) rpm
P0120 – Speed Reference Backup
Adjustable
Range:
Description:
This parameter defines the operation of the speed reference backup function between the options active
(P0120 = 1), inactive (P0120 = 0) and by P0121 (P0120 = 2). This function determines the form of backup of
digital references and sources: HMI (P0121), Serial/USB (P0683) and SoftPLC according to Table 7.2: Options
of parameter P0120 on page 7-8.
P012 0 Reference Initial Values at the Enabling or Power-Up
0 Value of P0133
1 Last adjusted value
2 Value of P0121
If P0120 = Inactive, the inverter will not save the speed reference value when it is disabled. Thus, when the
inverter is enabled again, the speed reference value will become the speed minimum limit value (P0133).
If P0120 = Active, the value set in the reference is not lost when the inverter is disabled or powered down.
If P0120 = Backup by P0121, the reference Initial value is fixed by P0121 at the enabling or power-up of the
inverter.
0 = Inactive
1 = Active
2 = Backup by P0121
Tabl e 7. 2: Options of parameter P0120
Factory
Setting:
1
7-8 | CFW501
Page 67

7.2 .3 Speed Reference Parameters
P0121 – Speed Reference via HMI
Logical Command and Speed Reference
Adjustable
Range:
Description:
Parameter P0121 stores the speed reference via HMI (P0221 = 0 or P0222 = 0). When the keys " " and " " are
active and the HMI in the view mode of the HMI, the value of P0121 is increased and shown on the HMI main
display. Besides, the P0121 is used as input for the reference backup function.
The direction of rotation is defined by parameters P0223 (LOCAL) or P0226 (REMOTE).
NOTE!
The maximum setting value of parameter P0121 via HMI is limited by P0134.
0 to 18000 rpm Factory
Setting:
90 rpm
P0122 – Speed Reference for JOG
Adjustable
Range:
Description:
During the JOG command, the motor accelerates up to the value defined in P0122, following the acceleration ramp
set according to P0105. This command may be activated by any of the sources, as per section 7.1 SELECTION
FOR LOGICAL COMMAND AND SPEED REFERENCE on page 7-1.
0 to 18000 rpm Factory
Setting:
150 (125) rpm
7
The direction of rotation is defined by parameters P0223 (LOCAL) or P0226 (REMOTE).
The JOG command is only effective with the motor stopped.
7.2 .4 Analog Input AIx and Frequency Input FI
The behaviors of the analog and frequency inputs are described in details in section 12.1 ANALOG INPUTS on
page 12-1. Thus, after the proper signal treatment, it is applied to the ramp input according to the section 7.1
SELECTION FOR LOGICAL COMMAND AND SPEED REFERENCE on page 7-1.
7.2 .5 13-Bit Speed Reference
The 13-bit speed reference is a scale based on the motor rated speed (P0403). In the CFW501, parameter
P0403 is taken as the base to determine the speed reference. Thus, the 13-bit speed value has a range of 16
bits with signal, that is, -32768 to 32767; however, the rated frequency in P0403 is equivalent to the value 8192.
Therefore, the maximum value in the range 32767 is equivalent to four times P0403.
The 13-bit speed reference is used in parameters P0681 or P0685 and system marker for the SoftPLC, which
are related to the interfaces with communication networks and SoftPLC function of the product.
CFW501 | 7-9
Page 68

Logical Command and Speed Reference
7.3 CONTROL WORD AND INVERTER STATUS
The inverter control word is the grouping of a set of bits to determine the commands received by the inverter from
an external source. On the other hand, the status word is another set of bits that define the inverter status. This
way, the control and status words establish an interface for the exchanging of information between the inverter
and an external module, such as a communication network or a controller.
P0680 – Logical Status
Adjustable
Range:
0000h to FFFFh Factory
Setting:
Properties: ro
Access groups
NE T, R EA D
via HMI:
Description:
The inverter status word is unique for all the sources and can only be accessed for reading. It indicates all the
relevant operating status and modes of the inverter. The function of each bit of P0680 is described in Table 7.3:
Status word (P0680) on page 7-10.
Tabl e 7.3: Status word (P0680)
7
BIT Function Description
0 Not Used
1 CMD Status Run/Stop
2 Fire mode
3 Bypass
4 Quick Stop
5 2nd Ramp
6 Config. status
7 Alarm
8 Running
9 Enabled
10 Clockwise
11 JOG
12 Remote
13 Undervoltage
14 Reserved
15 Fault
0: There was no Run command.
1: There was Run command.
0: Fire mode Inactive.
1: Fire mode Active.
0: Bypass Inactive.
1: Bypass Active.
0: Quick stop inactive.
1: Quick stop active.
0: 1st Acceleration and deceleration ramp by P0100 and P0101.
1: 2nd Acceleration and deceleration ramp by P0102 and P0103.
0: Inverter operating in normal conditions.
1: Inverter in configuration state. It indicates a special condition in which the inverter cannot be
enabled, because it has parameterization incompatibility.
0: Inverter is not in alarm state.
1: Inverter is in alarm state.
0: Motor is stopped.
1: Inverter is running according to reference and command.
0: Inverter is general disable.
1: Inverter is general enable and ready to run motor.
0: Motor spinning counter clockwise.
1: Motor spinning clockwise.
0: JOG function inactive.
1: JOG function active.
0: Inverter in local mode.
1: Inverter in remote mode.
0: No undervoltage.
1: With undervoltage.
0: Inverter is not in fault state.
1: Some fault registered by the inverter.
7-10 | CFW501
Page 69

P0690 – Logical Status 2
Logical Command and Speed Reference
Adjustable
Range:
0000h to FFFFh Factory
Setting:
Properties: ro
Access groups
NE T, R EA D
via HMI:
Description:
Parameter P0690 presents other signaling bits for functions exclusively implemented in the CFW501. The
function of each bit of P0690 is described in Table 7.4: Status word (P0680) on page 7-11.
Tabl e 7.4: Status word (P0680)
BIT Function Description
0 to 3 Reserved
4 Fs reduction
5 Sleep State
6 Deceleration Ramp
7 Acceleration Ramp
8 Freeze Ramp
9 Setpoint Ok
10 DC link regulation
11
12 Ride-Through
13 Flying-Start
14 DC Braking
15 PWM Pulses
Configuration in
50 Hz
0: Output frequency reduction inactive.
1: Output frequency reduction active.
0: No deceleration.
1: Inverter decelerating.
0: No acceleration.
1: Inverter accelerating.
0: Ramp operating in normal conditions.
1: The path of the ramp is frozen by some command source or internal function..
0: Output frequency has not reached reference yet.
1: Output frequency reached reference.
0: DC link regulation or current limitation inactive.
1: DC link regulation or current limitation active (P0150).
0: Factory default loaded in 1800 rpm / 60 Hz (P0204 = 5).
1: Factory default loaded in 1500 rpm / 50 Hz (P0204 = 6).
0: No execution of Ride-Through.
1: Executing Ride-Through.
0: No execution of Flying Start.
1: Executing Flying Start.
0: DC breaking inactive.
1: DC breaking active.
0: PWM voltage pulses in the output disabled.
1: PWM voltage pulses in the output enabled.
7
CFW501 | 7-11
Page 70

Logical Command and Speed Reference
P0682 – Serial / USB Control
Adjustable
Range:
0000h to FFFFh Factory
Setting:
Properties: ro
Access groups
NET
via HMI:
Description:
The inverter control word for a certain source is accessible for reading and writing, but read only access is
permitted for the other sources. The inverter has a common word for interface, which is defined by the function
of its bits separately as per Table 7.5: Control word (P0682) on page 7-12.
Table 7.5: Control word (P0682)
BIT Function Description
0 Enable Ramp
1 Enable General
2 Run Clockwise
3 JOG Enable
7
4 Remote
5 2nd Ramp
6 Quick Stop
7 Fault Reset
8 to 12 Reserved
13
14
15 Reserved
Internal PID
Controller
External PID
Controller
0: Stops the motor by deceleration ramp.
1: Turn the motor according to the acceleration ramp until reaching the speed reference value.
0: Disable the inverter completely, interrupting the power supply to the motor.
1: Enable completely the inverter, allowing the operation of the motor.
0: Run the motor in the opposite direction of the reference signal (counter clockwise).
1: Run the motor in direction of the reference signal (clockwise).
0: Disable JOG function.
1: Enable JOG function.
0: Inverter goes into local mode.
1: Inverter goes into remote mode.
0: Acceleration and deceleration ramp by P0100 and P0101.
1: Acceleration and deceleration ramp by P0102 and P0103.
0: It does not execute the fast stop command.
1: It executes the fast stop command.
0: No function.
1: If in fault state, reset the fault.
0: Automatic.
1: Manual.
0: Automatic.
1: Manual.
7-12 | CFW501
Page 71

P0229 – Stop Mode
Logical Command and Speed Reference
Adjustable
Range:
0 = Ramp to Stop
1 = Coast to Stop
Factory
Setting:
0
2 = Quick Stop
Properties: cfg
Access groups
I/O
via HMI:
Description:
This parameter defines the motor stop mode when the inverter receives the “Stop” command. Table 7.6:
Selection of stop mode on page 7-13 describes the options of this parameter.
Table 7.6: Selection of stop mode
P0229 Description
0 The inverter will apply the stop ramp programmed in P0101 and/or P0103.
1 The motor will run free until it stops.
2 The inverter will apply the stop ramp programmed in P0106.
NOTE!
When the stop by inertia mode is programmed and the Flying-Start function is disabled, only activate
the motor if it is stopped.
7
NOTE!
This parameter is applied to all the inverter command sources, but it was created aiming at allowing
the command P0229 via HMI to be able to disable the motor by inertia instead of deceleration ramp.
In this way, when P0229 = 1, bit 0 of the control word (Ramp Enable) has a function similar to bit 1
(General Enable). The same way, the digital input functions such as: Run-Stop, forward/reverse run
and command with three wires turn off the motor by inertia in this condition of P0229.
7.3 .1 Control via HMI Inputs
Contrary to the network interfaces and SoftPLC, the HMI commands do not access the inverter control word
directly, because of limitations of key functions and HMI behavior. The HMI behavior is described in chapter 4
HMI AND BASIC PROGRAMMING on page 4-1.
7.3 . 2 Control via Digital Inputs
Contrary to the network interfaces and SoftPLC, the digital inputs do not access the inverter control word directly,
because there are several functions for the DIx that make the envelopment according to the application. Such
digital input functions are described in details in chapter 12 DIGITAL AND ANALOG INPUTS AND OUTPUTS on
page 12-1.
CFW501 | 7-13
Page 72

Logical Command and Speed Reference
7
7-14 | CFW501
Page 73

Available Motor Control Types
8 AVAILABLE MOTOR CONTROL TYPES
The inverter feeds the motor with variable voltage, current and frequency, providing control of the motor speed.
The values applied to the motor follow a control strategy, which depends on the selected type of motor control
and on the inverter parameter settings.
The selection of the proper control type for the application depends on the static and dynamic requirements of
torque and speed of the driven load, that is, the control type is directly connected to the required performance.
Besides, the setting of the parameters involved is essential to reach such performance.
The CFW501 is equipped with two control modes for the three-phase induction motor, that are:
V/f Scalar Control: for basic applications without output speed control.
VV W Sensorless Vector Control: for applications that need high performance in the control of the output
speed.
In chapter 9 V/f SCALAR CONTROL on page 9-1 and chapter 10 VVW VECTOR CONTROL on page 10-1,
each of these kinds of control, related parameters and directions regarding the use of each of these modes are
described in details.
P0202 – Control Type
Adjustable
Range:
Properties: cfg
Access groups
via HMI:
Description:
This parameter selects the kind of three-phase induction motor control used.
NOTE!
When the V VW mode is programmed via HMI (P0202 = 3), the STARTUP menu is activated
automatically, forcing an oriented start-up for vector mode setting. See chapter 10.2 START-UP IN
VV W MODE on page 10-8.
0 to 2 = V/f
3 = VV W
STA RT UP
Factory
Setting:
0
P0139 – Output Current Filter
Adjustable
Range:
Properties: V/f, V V W
Description:
Time constant of the filter for the total and active output current. You must consider a filter response time equal
to three times the time constant set in P0139 (50 ms).
0 to 9999 ms Factory
Setting:
50 ms
8
CFW501 | 8-1
Page 74

Available Motor Control Types
P0140 – Sleep Compensation Filter
Adjustable
Range:
0 to 9999 ms Factory
Setting:
500 ms
Properties: VVW
Description:
Time constant of the filter for slip compensation in the output frequency. You must consider a filter response
time equal to three times the time constant set in P0140 (500 ms).
P0397 – Control Configuration
Adjustable
Range:
Properties: cfg
Description:
The bits of parameter P0397, as shown in Table 8.1: Options available to configure the control (P0397) on page
8-3, enable a series of internal options to configure the control of the induction motor, such as:
Slip Compensation during the Regeneration (Bit 0)
The regeneration is an operating mode of the inverter which occurs when the power flux goes from the motor to
the inverter. The bit 0 of P0397 (set in 0) allows the slip compensation to be turned off in this situation. This option is
8
particularly useful when the compensation during the motor deceleration is necessary.
0000h to 000Fh Factory
Setting:
000Bh
Dead Time Compensation (Bit 1)
The dead time is a time interval introduced in the PWM necessary for the commutation of the power inverter
bridge. On the other hand, the dead time generates distortions applied to the motor, which can cause torque
reduction at low speeds and current oscillation in motors above 5 HP running with no load. Thus, the dead time
compensation measures the voltage pulse width in the output and compensates this distortion introduced by
the dead time.
Bit 1 of P0397 (set in 0) allows deactivating this compensation. This feature is useful when there is a problem
related to the inverter internal circuit for pulse feedback causing fault F0182. Thus, the compensation, and
consequently the fault, can be disabled.
Output Current Stabilization (Bit 2)
High-performance motors with power above 5 HP are marginally stable when driven by frequency inverters and
at operation with no load. Therefore, in this situation a resonance may occur in the output current which may
reach the overcurrent level F0070. Bit 2 of P0397 (set to 1) activates an algorithm for regulation of the output
current in closed loop which neutralizes the oscillations of resonant output current.
Reduction of P0297 at high temperature (Bit 3)
Bit 3 of P0397 controls the overtemperature protection action according to section 14.4 IGBTS
OVERTEMPERATURE PROTECTION (F0051 AND A0050) on page 14-6.
ATTENTION!
The default setting of P0397 meets most application needs of the inverter.
Therefore, avoid modifying its content without knowing the related consequences. If you are not
sure, contact WEG Technical Assistance before changing P0397.
8-2 | CFW501
Page 75

Available Motor Control Types
Table 8 .1: Options available to configure the control (P0397)
Bit 3 Bit 2 Bit 1 Bit 0
P0397
0000h Disabled Disabled Disabled Disabled
0001h Disabled Disabled Disabled Enabled
0002h Disabled Disabled Enabled Disabled
0003h Disabled Disabled Enabled Enabled
0004h Disabled Enabled Disabled Disabled
0005h Disabled Enabled Disabled Enabled
0006h Disabled Enabled Enabled Disabled
0007h Disabled Enabled Enabled Enabled
0008h Enabled Disabled Disabled Disabled
0009h Enabled Disabled Disabled Enabled
000Ah Enabled Disabled Enabled Disabled
000Bh Enabled Disabled Enabled Enabled
000Ch Enabled Enabled Disabled Disabled
000Dh Enabled Enabled Disabled Enabled
000Eh Enabled Enabled Enabled Disabled
000Fh Enabled Enabled Enabled Enabled
Reduction of P0297 in
A0050
Output Current
Stabilization
Compensation of
Dead Time
Slip Compensation
During Regeneration
8
CFW501 | 8-3
Page 76

Available Motor Control Types
8
8-4 | CFW501
Page 77

V/f Scalar Control
9 V/f SCALAR CONTROL
This is the classical control method for three-phase induction motors, based on a curve that relates output
frequency and voltage. The inverter works as a variable frequency voltage source, generating a combination of
voltage and frequency according to the configured curve. It is possible to adjust this curve for standard 50 HZ or
60 HZ or special motors.
According to the block diagram of Figure 9.1: Block diagram of V/f scale control on page 9-2, the speed reference
f* is limited by P0133 and P0134 and applied to the input of “V/f CURVE” block input, where the output voltage
amplitude and frequency imposed to the motor are obtained. For further details on the speed reference, refer to
chapter 7 LOGICAL COMMAND AND SPEED REFERENCE on page 7-1.
By monitoring the total and active output current, and the DC link voltage, compensators and controllers which
help protect the V/f control performance are implemented. The operation and parameterization of those blocks
are detailed in section 11.2 - DC Link Voltage and Output Current Limitation.
The advantage of the V/f control is its simplicity and the need of few settings. The start-up is quick and simple
and the factory default, and the factory default normally requires little or no modification. Besides, in cases where
the application allows the proper adjustments of the V/f curve, you save energy.
The V/f or scalar Control is recommended for the following cases:
Drive of several motors with the same inverter (multi-motor drive).
Energy saving in the drive of loads with quadratic torque/speed relationship.
Motor rated current lower than 1/3 of the inverter rated current.
For test purposes, the inverter is turned on without motor or with a small motor with no load.
Applications where the load connected to the inverter is not a three-phase induction motor.
9
CFW501 | 9-1
Page 78

V/f Scalar Control
Power
supply
o
I
MI
W
, i
V
i
3φ
P0004
d
U
W
, i
Direction
of rotation
PWM
Modulation
Space Vector
m
V
i
a
P0 0 11
a
I
Calculation of I
P0007
P0002
o
f
m
lxR
m
P0137
+
slip
f
+
+
+
P0138
W
, i
V
i
o
Calculation of I
P0003
o
I
P0202 = 0 (V/f control)
PWM
9
V/f curve
f
P0147
P0146
P0145
V
P0142
P0143
P0144
Acelerate ramp
P0150 = 1 OR P0150 = 3
d
U
Ud
f
P0151
P0152
Ud
f
P013 6
f
+
+
r
f
9-2 | CFW501
DC link regulation
d
OR P0150 = 2
Ramp hold P0150 = 0
d
U
U
Hold
P0151
P013 3
P013 4
t
o
I
Zero
P0135
P0100-P0104
limitation
P0151
f*
Output current
Figure 9.1: Block diagram of V/f scale control
Page 79

V/f Scalar Control
9.1 PARAMETERIZATION OF THE V/f SCALAR CONTROL
The scalar control is the inverter factory default control mode for its popularity and because it meets most
applications of the market. However, parameter P0202 allows the selection of other options for the control mode,
as per chapter 8 AVAILABLE MOTOR CONTROL TYPES on page 8-1.
The V/f curve is completely adjustable in five different points as shown in Figure 9.2: Curve V/f on page 9-3,
although the factory default
defines a preset curve for motors (1500 rpm / 50 Hz) ou (1800 rpm / 60 Hz), as per options of P0204. In this
format, point P0 defines the amplitude applied at 0 rpm, while P3 defines the rated amplitude and frequency
and beginning of field weakening. Intermediate points P1 and P2 allow the setting of the curve for a non-linear
relationship between torque and speed, for instance, in fans where the load torque is quadratic in relation to the
speed. The field weakening region is determined between P3 and P4, where the amplitude is maintained in 100 %.
Output
voltage (%)
P0142
P
3
P
4
P0143
P0144
P0136
P
1
P
0
P
2
Figure 9.2: Curve V/f
P0134P0145P0146P0147
Output
frequency (Hz)
The CFW501 factory default settings define a linear relationship of the torque with the speed, overlapping points
P1, P2 and P3 at 1500 rpm (50 Hz) or 1800 rpm (60 Hz); refer to the description of P0204. In this way, V/f curve is a
straight line defined by just two points, P0136 which is the constant term or voltage in 0 Hz and the rated frequency
and voltage operation point 1500 rpm (50 Hz) or 1800 rpm (60 Hz) and 100 % of maximum output voltage).
The points P0[P0136, 0 Hz], P1[P0144, P0147], P2[P0143, P0146], P3[P0142, P0145] and P4[100 %, P0134] can be
adjusted so that the voltage and frequency relationship imposed to the output approximates the ideal curve for the
load. Therefore, for loads in which the torque behavior is quadratic in relation to the speed, such as in centrifugal
pumps and fans, the points of the curve can be adjusted so energy saving is obtained.
NOTE!
A V/f quadratic curve can be approximated by: P0136 = 0; P0144 = 11.1 % and P0143 = 44.4 %.
9
NOTE!
If P0147 ≥ P0146 or P0146 ≥ P0145 or the V/f curve results in a segment with slope (rate) above
10 % / Hz, CONFIG (CONF) status is activated.
NOTE!
In frequencies below 0.1 Hz, the output PWM pulses are cut, except when the inverter is in DC braking.
CFW501 | 9-3
Page 80
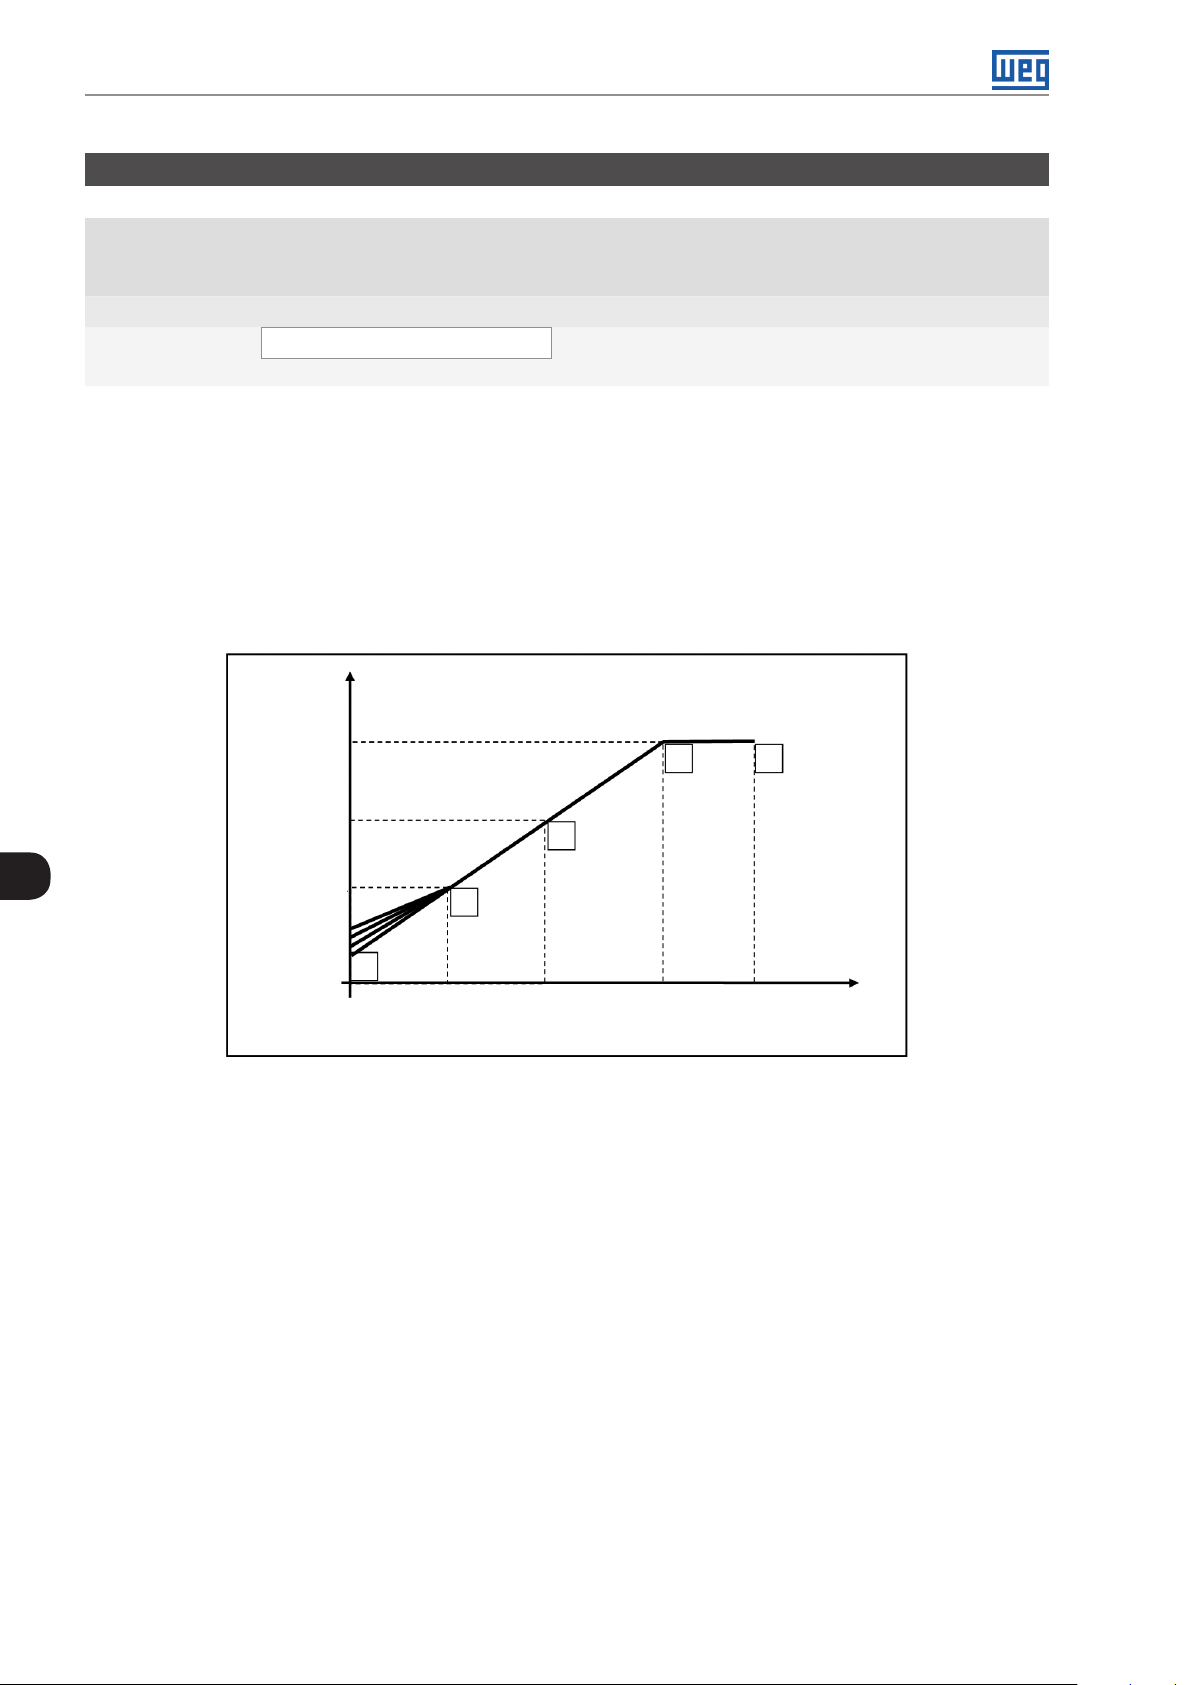
V/f Scalar Control
P0136 – Manual Torque Boost
Adjustable
Range:
0.0 to 30.0 % Factory
Setting:
According
to inverter
model
Properties: V/f
Access groups
BASIC, MOTOR
via HMI:
Description:
This parameter actuates in low speeds, that is, in the range from 0 to P0147, increasing the inverter output
voltage to compensate the voltage drop in the motor stator resistance so as to keep the torque constant.
The optimum setting is the smallest value of P0136 which allows the motor satisfactory start. A value greater
than necessary will excessively increase the motor current at low speeds, which may lead the inverter to a fault
condition (F0048, F0051 or F0070) or alarm condition (A0046, A0047 or A0050), as well as motor overheating.
Figure 9.3: Torque boost region on page 9-4 shows the region of actuation of the Torque Boost between
points P0 and P1.
Output
voltage (%)
P0142
P
3
P
4
P0143
9
P0144
P0136
P
1
P
0
Figure 9.3: Torque boost region
P
2
P0134P0145P0146P0147
Output
speed (rpm)
9-4 | CFW501
Page 81

P0142 – Maximum Output Voltage
P0143 – Intermediate Output Voltage
P0144 – Minimum Output Voltage
V/f Scalar Control
Adjustable
Range:
Properties: cfg, V/f
Description:
These parameters allow adjusting the inverter V/f curve together with its orderly pairs P0145, P0146 and P0147.
0.0 to 100.0 % Factory
Setting:
P0142 = 100.0 %
P0143 = 66.7 %
P0144 = 33.3 %
P0145 – Field Weakening Start Speed
P0146 – Intermediate Output Speed
P0147 – Minimum Output Speed
Adjustable
Range:
Properties: cfg, V/f
0.0 to 18000 Factory
Setting:
P0145 = 1800
(1500) rpm
P0146 = 1200
(1000) rpm
P0147 = 600
(500) rpm
9
Description:
These parameters allow adjusting the inverter V/f curve together with its orderly pairs P0142, P0143 and P0144.
The V/f curve can be adjusted in applications where the motor rated voltage is smaller than the power supply
voltage, for instance, in a 440 V power supply with 380 V motor.
The adjustment of the V/f curve is necessary when a quadratic approximation is desired for energy saving in
centrifugal pumps and fans, or in special applications: when a transformer is used between the inverter and the
motor or the inverter is used as a power supply.
CFW501 | 9-5
Page 82

V/f Scalar Control
P0137 – Automatic Torque Boost
Adjustable
Range:
0.0 to 30.0 % Factory
Setting:
0.0 %
Properties: V/f
Access groups
MOTOR
via HMI:
Description:
The automatic torque boost compensates the voltage drop in the stator resistance because of active current.
Look at Figure 9.1: Block diagram of V/f scale control on page 9-2, where variable m
corresponds to the
IxR
automatic torque boost action on the modulation index defined by V/f curve.
P0137 actuates similarly to P0136, but the value set is applied proportionally to the output active current in
relation to the maximum current (2xP0295).
The setting criteria of P0137 are the same as those of P0136, that is, set the value as low as possible for the
motor start and operation at low frequencies, because values above those increase the losses, heating and
overload of the motor and inverter.
The block diagram of Figure 9.4: Block diagram of the automatic torque boost on page 9-6 shows the
automatic compensation action IxR responsible for the increment of the voltage in the ramp output according
to the increase of the active current.
P0007
Speed reference
9
I x R
P0136
Voltage
applied on
motor
Output
active
current
I x R
Automatic
P0137
P0139
Figure 9.4: Block diagram of the automatic torque boost
9-6 | CFW501
Page 83

P0138 – Slip Compensation
V/f Scalar Control
Adjustable
Range:
-10.0 % to 10.0 % Factor y
Setting:
0.0 %
Properties: V/f
Access groups
MOTOR
via HMI:
Description:
Parameter P0138 is used in the motor slip compensation function, when set for positive values. In this case, it
compensates the speed drop due to application of the load on the shaft and, consequently, the slip. In this way,
it increments the output frequency (Δv) considering the increase of the motor active current as shown in Figure
9.5: Slip compensation in an operation point of the standar V/f curve on page 9-7. In Figure 9.1: Block diagram
of V/f scale control on page 9-2 this compensation is represented in the variable f
Slip
.
The setting in P0138 allows regulating with good accuracy the slip compensation by moving the operation point
on the V/f curve, as shown in Figure 9.5: Slip compensation in an operation point of the standar V/f curve on
page 9-7. Once P0138 is set, the inverter is able to keep the speed constant even with load variations.
Negative values are used in special applications where you wish to reduce the output speed considering the
increase of the motor current.
E.g.: load distribution in motors driven in parallel.
Output
voltage (%)
P0142
P0143
P0144
P
4
9
P0136
Figure 9.5: Slip compensation in an operation point of the standar V/f curve
Δv
P0146
P0147
P0134P0145
Output speed
(rpm)
CFW501 | 9-7
Page 84

V/f Scalar Control
9.2 START-UP IN V/f MODE
NOTE!
Read chapter 3 - Installation and Connection of the user’s manual before installing, powering up or
operating the inverter.
Sequence for installation, verification, power up and start-up.
1. Install the inverter: according to chapter 3 - Installation and Connection of the user’s manual, making all the
power and control connections.
2. Prepare and power up the inverter according to section 3.2 - Electric Installation of the user’s manual of the
CFW5 01.
3. Load the factory default with P0204 = 5 (1800 rpm / 60 Hz) or P0204 = 6 (1500 rpm /50 Hz), according to the
input rated frequency (power supply) of the inverter used.
4. In order to set a V/f curve different from the default, set the V/f curve using parameters P0136 to P0147.
5. Setting of specific parameters and functions for the application: program the digital and analog inputs and
outputs, HMI keys, etc., according to the application requirements.
For applications:
Simple applications that can use the factory default programming of the analog and digital inputs and outputs,
use the HMI “BASIC” menu.
Applications that require just the analog and digital inputs and outputs with programming different from the
factory default, use the HMI “I/O” menu.
Applications that require functions such as flying start, ride-through, DC braking, rheostatic braking, etc.,
access and modify the parameter of those functions in the HMI “PARAM” menu.
9
9-8 | CFW501
Page 85

V VW Vector Control
10 V V W VECTOR CONTROL
The V VW vector control mode (Voltage Vector WEG) uses a control method with a much higher performance than
the V/f control because of the load torque estimation and of the control of the magnetic flux in the air gap, as per
scheme of Figure 10.1: VVW control flow on page 10-2. In this control strategy, losses, efficiency, rated slip and
power factor of the motor are considered in order to improve the control performance.
The main advantage compared to the V/f control is the best speed regulation with greater torque capacity at
low speeds (frequencies below 5 Hz), allowing a relevant improvement in the drive performance in permanent
duty. Besides, the VVW control has a quick and simple setting and it is suitable for most medium-performance
applications in the control of three-phase induction motor.
By just measuring the output current, the VV W control instantly obtains the motor torque and slip. Thus, the
VV W actuates in the output voltage compensation and slip compensation. Therefore, the VV W controller action
replaces the classical V/f functions in P0137 and P0138, but with a calculation model much more sophisticated
and accurate, meeting several load conditions or operation points of the application.
In order to achieve a good speed regulation in permanent duty, the parameter setting in the range from P0399
to P0407 and the stator resistance in P0409 are essential for the good operation of the VVW control. Those
parameters can easily be obtained on the motor nameplate and in the self-tuning routine activated by P0408.
10
CFW501 | 10-1
Page 86

V VW Vector Control
Power
supply
P0004
d
U
o
I
MI
3φ
W
, i
V
PWM
PMW
Direction
of rotation
d
U
compensation
Output voltage
modulation
space vector
o
f
P0007
m
i
W
, i
V
i
a
P295
P0 0 11
a
I
P0295
Calculation of I
W
, i
V
i
o
P0003
o
I
Calculation of I
m
10
m*
o
I
a
I
P0202 = 3 (Control V VW )
P0409, P0178
P0400, P0403, P0401, P0407,
Accelerate ramp
P0150 = 1 OR P0150 = 3
Ud
f
Flux control
o
f
d
+
fU
d
U
slip
f
+
+
r
f
t
Filter
P0140
P0151
o
f
slip
of f
Calculation
P0403
P0152
P013 4
P013 3
R
, S
R
/T
L
T
a
o
o
I
I
f
P0404,P0399,
m
Torq u e
estimation
d
U
P0402,P0403
P0401,P0409,
controler
Ramp hold
DC link regulation
P0150 = 0 OR P0150 = 2
d
U
d
U
Hold
t
Zero
P0151
P0151
Current limitation
o
I
P0135
P0100-P0104
10-2 | CFW501
f*
Figure 10.1: VV W control flow
Page 87

V VW Vector Control
10 .1 VVW VECTOR CONTROL PARAMETERIZATION
The V VW control mode is selected by parameter P0202, control mode selection, as described in chapter 8
AVAILABLE MOTOR CONTROL TYPES on page 8-1.
Opposite to the V/f scalar control, the VV W control requires a series of data from the motor nameplate and a
self-tuning for its proper operation. Besides, it is recommended that the driven motor match the inverter, that is,
the motor and inverter power be as close as possible.
The V VW control setting process is simplified by the HMI “STARTUP” menu, where the relevant parameters for
the configuration of the V V W are selected for browsing the HMI.
Below are described the parameters to configure the V VW vector control setting. Those data are easily obtained
on the nameplate of WEG motors; however, in old motors or motor of other manufacturers, this information may
not be available. In those cases, it is recommended first contact the motor manufacturer, measure or calculate the
desired parameter, or, still, make a relationship with Table 10.1: Characteristics of IV pole WEG standard motors
on page 10-3 and use the equivalent or approximate WEG standard motor parameter.
NOTE!
The correct setting of the parameters directly contributes to the V VW control performance.
Table 10 .1: Characteristics of IV pole WEG standard motors
Power [P0404]
Frame
(CV) (kW)
0.16 0.12 63
0.25 0 .18 63 1.12 17 2 0 64.0 0.66 14.87
0.33 0.25 63 1.42 1720 67.0 0.69 10.63
0.50 0.37 71 2.07 172 0 68.0 0.69 7.37
0.75 0.55 71 2.90 1720 71.0 0.70 3.97
1.0 0 0.75 80 3.08 1730 78.0 0.82 4 .13
1.5 0 1.1 0 80 4.78 170 0 72.7 0.83 2.78
2.00 1.50 90S 6.47 172 0 80.0 0.76 1.5 5
3.00 2.20 90L 8.57 1710 79.3 0.85 0.99
4.00 3.00 100L 11.6 173 0 82.7 0.82 0.65
5.00 3.70 10 0L 13.8 173 0 84.6 0.83 0.49
6.00 4.50 112M 16. 3 1730 84.2 0.86 0.38
7.5 0 5.50 112M 20.0 1740 88.5 0.82 0.27
10.0 7.5 0 13 2S 26.6 1760 89.0 0.84 0.23
12.5 9.20 132M 33.0 175 5 87.7 0.86 0.16
0.16 0.12 63
0.25 0 .18 63 0.65 172 0 64.0 0.66 44.60
0.33 0.25 63 0.82 1720 6 7.0 0.69 31.9 0
0.50 0.37 71 1. 2 0 1720 68.0 0.69 2 2 .10
0.75 0.55 71 1.67 1720 71.0 0.70 11.9 0
1.0 0 0.75 80 1.78 173 0 78.0 0.82 12.40
1.5 0 1.1 0 80 2.76 1700 72.7 0.83 8.35
2.00 1.50 90S 3 .74 1720 80.0 0.76 4.65
3.00 2.20 90L 4.95 1710 79.3 0.85 2.97
4.00 3.00 100L 6.70 1730 82.7 0.82 1.96
5.00 3.70 10 0L 7.97 1730 84.6 0.83 1.47
6.00 4.50 112M 9.41 173 0 84.2 0.86 1.15
7.5 0 5.50 112M 11. 4 9 1740 88.5 0.82 0.82
10.0 7.5 0 13 2S 15.18 1760 89.0 0.84 0.68
12.5 9.20 132M 18.48 1755 87.7 0.86 0.47
15.0 11.0 132M 22.7 1755 88.5 0.83 0.43
20.0 15.0 160M 30.0 176 0 90.2 0.83 0.23
Volt ag e
[P0400]
(V)
220
380
Current
[P0401]
(A)
0.85
0.49
Frequency
[P0403]
(Hz)
60
60
Speed
[P0402]
(rpm)
172 0 56.0 0.66 21.77
172 0 56.0 0.66 65.30
Efficiency
[P0399]
(%)
Power
Factor
[P0407]
Stator
Resistance
[P0409] (Ω)
10
CFW501 | 10-3
Page 88

V VW Vector Control
Power [P0404]
Frame
(CV) (kW)
0.16 0.12 63
0.25 0 .18 63 1.05 1360 58.0 0.74 20.31
0.33 0.25 71 1.4 1310 59.0 0.76 14.32
0.50 0.37 71 1.97 1320 62.0 0.76 7. 27
0.75 0.55 80 2.48 1410 68.0 0.82 5.78
1.0 0 0.75 80 3.23 1395 72.0 0.81 4.28
1.5 0 1.1 0 90S 4.54 1420 7 7. 0 0.79 2.58
2.00 1.50 90L 5.81 1410 79.0 0.82 1.69
3.00 2.20 100 L 8.26 1410 81.5 0.82 0.98
4.00 3.00 100L 11. 3 140 0 82.6 0.81 0.58
5.00 3.70 112M 14.2 1440 85.0 0.83 0.43
7.5 0 5.50 132S 1 9 .1 145 0 86.0 0.84 0.25
10.0 7.5 0 13 2M 25.7 14 55 8 7.0 0.84 0.20
0.16 0.12 63
0.25 0 .18 63 0.60 13 6 0 58.0 0.74 60.94
0.33 0.25 71 0.80 1310 59.0 0.76 42.96
0.50 0.37 71 1.13 1320 62.0 0.76 21.81
0.75 0.55 80 1.42 1410 68.0 0.82 17.3 3
1.0 0 0.75 80 1.86 1395 72.0 0.81 12. 85
1.5 0 1.1 0 90S 2.61 142 0 77. 0 0.79 7.7 3
2.00 1.50 90L 3.34 1410 79.0 0.82 5.06
3.00 2.20 100 L 4.75 1410 81.5 0.82 2.95
4.00 3.00 100L 6.47 1400 82.6 0.81 1.75
5.00 3.70 112M 8.18 1440 85.0 0.83 1. 29
7.5 0 5.50 132S 11.0 145 0 86.0 0.84 0.76
10.0 7.5 0 13 2M 14.8 14 5 5 87. 0 0.84 0.61
15.0 11.0 160M 22 .1 1455 88.5 0.81 0.35
20.0 15.0 160 L 29.1 146 0 89.7 0.83 0.24
Volt ag e
[P0400]
(V)
230
400
Current
[P0401]
(A)
0.73
0.42
Frequency
[P0403]
(Hz)
50
50
Speed
[P0402]
(rpm)
1375 57. 0 0.72 30.62
1375 57. 0 0.72 91.8 5
Efficiency
[P0399]
(%)
Power
Factor
[P0407]
Stator
Resistance
[P0409] (Ω)
10
P0178 – Rated Flux
Adjustable
Range:
Properties:
Access groups
via HMI:
Description:
It defines the desired flux in the motor air gap in percentage (%) of the rated flux. In general, it is not necessary
to modify the value of P0178 of the standard value of 100 %. However, some specific situations may use values
slightly above to increase the torque, or below to reduce the energy consumption.
0.0 to 150.0 % Factory
Setting:
MOTOR
100.0 %
P0398 – Motor Service Factor
Adjustable
Range:
Properties: cfg
Access groups
via HMI:
1.00 to 1.50 Factory
Setting:
MOTO R , STA R TU P
1.0 0
Description:
It is the continuous overload capability, i.e., a reserve of power that gives the motor the capability to withstand
working in adverse conditions.
10-4 | CFW501
Page 89

Set it according to the value informed on the motor nameplate.
It affects the motor overload protection.
P0399 – Motor Rated Efficiency
V VW Vector Control
Adjustable
Range:
50.0 to 99.9 % Factor y
Setting:
75.0 %
Properties: cfg, V V W
Access groups
MOTO R , STA R TU P
via HMI:
Description:
This parameter is important for the precise operation of the VVW control. The imprecise setting will cause the
incorrect calculation of the slip compensation and consequent speed control imprecision.
P0400 – Motor Rated Voltage
Adjustable
Range:
Properties: cfg
Access groups
via HMI:
200 to 600 V Factory
Setting:
MOTO R , STA R TU P
According to Tabl e
10.2: Default setting
of P0400 according
to the identified
inverter model on
page 10-5
Description:
Set according to the data on the motor nameplate and the wire connection on the motor terminal box. This
value cannot be above the rated voltage value set in P0296 (power supply rated voltage).
NOTE!
In order to validate a new setting of P0400 out of the HMI “STARTUP” menu, it's necessary to power
cycle the inverter.
Tabl e 10. 2 : Default setting of P0400 according to the identified inverter model
P0296 P014 5 ( Hz) P0400 (V)
0
1
2
50.0 230
60.0 220
50.0 400
60.0 380
50.0 525
60.0 575
For further information on model identification, refer to Table 6.2: Identification of the CFW501 models for
frames A, B, C, D and E on page 6-2.
10
CFW501 | 10-5
Page 90

V VW Vector Control
P0401 – Motor Rated Current
Adjustable
Range:
Properties: cfg
Access groups
via HMI:
0 to 200.0 A Factory
MOTO R , STA R TU P
P0402 – Motor Rated Speed
Adjustable
Range:
Properties: cfg
Access groups
via HMI:
0 to 30000 rpm Factory
MOTO R , STA R TU P
P0403 – Motor Rated Frequency
Adjustable
Range:
Properties: cfg
Access groups
via HMI:
0 to 500 Hz Factory
MOTO R , STA R TU P
Setting:
Setting:
Setting:
1.0 x I
nom
1710 rpm
(1425 rpm)
60 Hz (50 Hz)
10
P0404 – Motor Rated Power
Adjustable
Range:
Properties: cfg
Access groups
via HMI:
0 = 0.16 hp (0.12 kW)
1 = 0.25 hp (0.19 kW)
2 = 0.33 hp (0.25 kW)
3 = 0.50 hp (0.37 kW)
4 = 0.75 hp (0.55 kW)
5 = 1.00 hp (0.75 kW)
6 = 1.50 hp (1.10 kW)
7 = 2.00 hp (1.50 kW)
8 = 3.00 hp (2.20 kW)
9 = 4.00 hp (3.00 kW)
10 = 5.00 hp (3.70 kW)
11 = 5.50 hp (4.00 kW)
12 = 6.00 hp (4.50 kW)
13 = 7.50 hp (5.50 kW)
14 = 10.00 hp (7.50 kW)
15 = 12.50 hp (9.00 kW)
16 = 15.00 hp (11.00 kW)
17 = 20.00 hp (15.00 kW)
18 = 25.00 hp (18.50 kW)
19 = 30.00 hp (22.00 kW)
MOTO R , STA R TU P
Factory
Setting:
According
to inverter
model
10-6 | CFW501
Page 91

P0407 – Motor Rated Power Factor
V VW Vector Control
Adjustable
Range:
Properties: cfg
Access groups
via HMI:
Description:
The setting of parameters P0398, P0399, P0401, P0402, P0403, P0404 and P0407 must be according to the
nameplate data of the used motor, taking into account the motor voltage.
0.50 to 0.99 Factory
Setting:
MOTO R , STA R TU P
0.80
P0408 – Self-tuning
Adjustable
Range:
Properties: cfg, V V W
Access groups
via HMI:
Description:
Parameter P0408 in 1 activates the self-tuning of the VV W mode, where the motor stator resistance is
measured. The self-tuning can only be activated via HMI, and it can be interrupted at any time with the key.
0 = Inactive
1 = No Rotation
STA RT UP
Factory
Setting:
0
During the self-tuning, the motor remains still, because a direct current signal is sent to measure the stator
resistance.
If the estimated value of the motor stator resistance is too high for the inverter used (for example: motor not
connected or motor too small for the inverter) the inverter indicates fault F0033.
At the end of the self-tuning process, the measured motor stator resistance is saved in P0409.
P0409 – Stator Resistance
Adjustable
Range:
Properties: cfg, V V W
Access groups
via HMI:
Description:
Motor phase stator resistance in ohms (Ω), assuming a star (Y) motor connection.
If the value adjusted in P0409 is too high or too low for the inverter used, the inverter indicates fault F0033. In
order to exit this condition, just perform a reset by using the key. In this case, P0409 will be loaded with the
factory default value which is equivalent to WEG IV pole standard motor stator resistance with power matched
to the inverter, as per Table 10.1: Characteristics of IV pole WEG standard motors on page 10-3.
0.01 to 99.99 Ω Factory
Setting:
MOTO R , STA R TU P
According
to inverter
model
10
CFW501 | 10-7
Page 92

V VW Vector Control
10.2 START-UP IN V VW MODE
NOTE!
Read chapter 3 - Installation and Connection of the user’s manual before installing, powering up or
operating the inverter.
Sequence for installation, verification, power up and start-up.
1. Install the inverter according to chapter 3 - Installation and Connection of the user’s manual, making all the
power and control connections.
2. Prepare and power up the inverter according to section 3.2 - Electric Installation of the user’s manual.
3. Load the correct factory default in P0204 based on the motor rated frequency (set P0204 = 5 for 1800 rpm
(60 Hz) or P0204 = 6 to 1500 rpm (50 Hz).
4. Parameter and function setting specific for the application: program the digital and analog inputs and outputs,
HMI keys, etc., according to the application requirements;
5. Activation of the VVW control: using the HMI “STARTUP” menu, the browsing is limited to the relevant parameters
to set the control mode. Set P0202 = 3; then the “STARTUP” menu will browse the relevant parameters to set
the V VW;
10
6. Parameterization of the V VW control: browsing the “STARTUP” menu, set parameters P0398, P0399, P0400,
P0401, P0402, P0403, P0404 and P0407 according to the data on the motor nameplate. If some of those data
are not available, insert the approximate value by calculation or similarity to WEG standard motor – see Ta b le
10.1: Characteristics of IV pole WEG standard motors on page 10-3.
7. Self-Tuning of the V VW control: The self-tuning is activated by setting P0408 = 1. In this process, the inverter
applies DC to the motor to measure the stator resistance, while the HMI bar graph shows the progress of the
self-tuning. The self-tuning process can be interrupted at any time by pressing the key.
8. End of the Self-Tuning: at end of the self-tuning, the HMI returns to the browsing menu, the bar displays the
parameter programmed by P0207 again and the stator resistance measured is stored in P0409. On the other
hand, if the self-tuning fails, the inverter will indicate a fault. The most common fault in this case is F0033, which
indicates error in the estimated stator resistance. Refer to chapter 14 - Faults and Alarms.
For applications:
That can use the factory default programming of the analog and digital inputs and outputs, use the HMI
“BASIC” menu.
That require just the analog and digital inputs and outputs with programming different from the factory default,
use the HMI “I/O” menu.
That require functions such as flying start, ride-through, DC braking, rheostatic braking, etc., access and modify
the parameter of those functions in the HMI “PARAM” menu. For further information on the HMI menus, refer
to chapter 5 - Basic Instructions for Programming and Settings.
10-8 | CFW501
Page 93

V VW Vector Control
For better visualization of the start-up in the V VW mode, check Figure 10.2: Start-up of the VVW mode on page
10-10, below.
Seq Action/Indication on the Display Seq Action/Indication on the Display
1
Monitoring mode.
Press the ENTER/MENU key to enter the 1
st
level of the
programming mode.
2 7
The PARAM group is selected; press the or key
until selecting the STARTUP group.
3 8
When the STARTUP group is selected, press the
ENTER/MENU key.
4 9
Press ENTER/MENU and with the and keys
set the value 3, which activates V VW control mode.
6
Press the key to proceed with the Startup of the V VW.
If necessary, modify the content of P0399 – Motor rated
efficiency, or press the key for the next parameter.
If necessary, modify the content of P0400 – Motor rated voltage
or press the key for the next parameter.
If necessary, modify the content of P0401 – Motor rated
current, or press the key for the next parameter.
5 10
Press ENTER/MENU to save the modification of P0202.
11 16
If necessary, modify the content of P0403 – Motor rated
frequency, or press the key for the next parameter.
12 17
If necessary, modify the content of P0404 – Motor rated
power, or press the key for the next parameter.
10
If necessary, modify the content of P0402 – Motor rated
speed, or press the key for the next parameter.
At the end of the Self-Tuning. The values of P0408
automatically return to “0”, as well as the “RUN” and
“CONF” status are erased.
Press the key for the next parameter.
The result of the Self-Tuning is the value in ohms of the stator
resistance shown in P0409. This is the last parameter of
the Self-Tuning of the VVW control mode. Pressing the
key returns to the initial parameter P0202.
CFW501 | 10-9
Page 94

V VW Vector Control
Seq Action/Indication on the Display Seq Action/Indication on the Display
13
If necessary, modify the content of P0407 – Motor rated
power factor, or press the key for the next parameter.
14 19
At this point, the HMI shows the option to do the S e lf-Tu n i n g.
Whenever possible, execute the self-tuning. To activate the
self-tuning, change the value of P0408 to 1.
15
During the self-tuning, the HMI will simultaneously indicate
the “RUN” and “CONF” status. And the bar indicates the
operation progress.
Figure 10.2: Start-up of the V VW mode
18
To exit the STARTUP menu, just press BACK /ESC.
By means of the and keys, select the desired
menu or press BACK /ESC again to return directly to the
HMI monitoring mode.
10
10-10 | CF W501
Page 95

Functions Common to all the Control Modes
11 FUNCTIONS COMMON TO ALL THE CONTROL MODES
This chapter describes the functions common to all the inverter control modes V/f and VVW, but which interferes
in the drive performance.
11.1 RAMPS
The inverter ramp functions allow the motor to accelerate or decelerate faster or slower. They are adjusted by
parameters that define the linear acceleration time between zero and the maximum speed (P0134) and the time
for a linear deceleration from the maximum speed to zero.
In the CFW501, three ramps with different functions were implemented:
st
1
Ramp – standard for most functions.
nd
2
Ramp – it may be activated by the user, according to the drive requirement, by means of the inverter
command word or by a digital input.
rd
3
Ramp – it is used for the inverter protection functions, such as: current limitation, DC link control, quick
stop, etc. The 3rd Ramp has priority over the other ramps.
NOTE!
The setting with too short ramp time may cause overcurrent in the output (F0070), undervoltage
(F0021) or overvoltage (F0022) of the DC link.
P0100 – Acceleration Time
Adjustable
Range:
Properties:
Access groups
via HMI:
Description:
Acceleration time from zero to maximum speed (P0134).
0.1 to 999.0 s Factory
BASIC
P0101 – Deceleration Time
Adjustable
Range:
Properties:
Access groups
via HMI:
0.1 to 999.0 s Factory
BASIC
10.0 s
Setting:
11
10.0 s
Setting:
Description:
Deceleration time from maximum speed (P0134) to zero.
CFW501 | 11-1
Page 96

Functions Common to all the Control Modes
P0102 – Acceleration Time 2nd Ramp
Adjustable
Range:
0.1 to 999.0 s Factory
Setting:
10.0 s
Description:
Acceleration time from zero to maximum speed (P0134) when the 2nd ramp is active.
P0103 – Deceleration Time 2nd Ramp
Adjustable
Range:
Description:
Deceleration time from maximum speed (P0134) to zero when the 2nd ramp is active.
0.1 to 999.0 s Factory
Setting:
10.0 s
P0104 – S Ramp
Adjustable
Range:
Properties: cfg
Description:
This parameter allows the inverter acceleration and deceleration ramps to have a non-linear profile, similar to an
“S”, aiming at reducing the mechanical shocks on the load, as shown in Figure 11.1: S or linear ramp on page
11- 2 .
0 = Inactive
1 = Active
Factory
Setting:
0
11
Speed
Aceleration time
(P0100/ P0102)
Linear
ramp
S ramp
Deceleration time
Figure 11.1: S or linear ramp
t(s)
(P0101/P0103)
11-2 | CFW501
Page 97

P0105 – 1st / 2nd Ramp Selection
Functions Common to all the Control Modes
Adjustable
Range:
Properties:
Access groups
via HMI:
Description:
It defines the command origin source to activate the 2nd Ramp.
Note: Parameter P0680 (Logical Status) indicates if the 2nd Ramp is active or not. For further information on this
parameter, refer to section 7.3 CONTROL WORD AND INVERTER STATUS on page 7-10.
NOTE!
The inactive status of any of the active sources activates the 1st ramp. The same occurs in option 2
(DIx) and there is no digital input for the 2nd ramp.
0 = 1st Ramp
1 = 2nd Ramp
2 = DIx
3 = Serial/ USB
4 = SoftPLC
I/O
Factory
Setting:
2
P0106 – Time of the 3rd Ramp
Adjustable
Range:
0.1 to 999.0 s Factory
Setting:
5.0 s
Description:
Acceleration time from zero to maximum speed (P0134) or deceleration from maximum speed (P0134) to zero
when the 3rd Ramp is active.
11. 2 DC LINK VOLTAGE AND OUTPUT CURRENT LIMITATION
The DC Link voltage and output current limitation are protection functions of the inverter which act on the ramp
control according to the P0150 options, aiming at containing the voltage increase in the DC link and output current.
In this way, the following of the reference by the ramp is blocked and the output speed follows the 3rd ramp for
P0133 or P0134.
When the DC link voltage is too high, the inverter may freeze the deceleration ramp or increase the output speed
in order to contain this voltage. On the other hand, when the output current is too high, the inverter may decelerate
or hold the acceleration ramp in order to reduce this current. Those actions prevent the occurrence of faults F0022
and F0070, respectively.
Both protections normally occur at different moments of the inverter operation, but in case of occurrence at the
same time, by definition, the DC link limitation has higher priority than the output current limitation.
There are two modes to limit the DC link voltage during the motor braking: “Ramp Holding” (P0150 = 0 or 2) and
“Accelerate Ramp” (P0150 = 1 or 3). Both actuate limiting the braking torque and power, so as to prevent the
shutting down of the inverter by overvoltage (F0022). This situation often occurs when a load with high moment
of inertia is decelerated or when short deceleration time is programmed.
11
NOTE!
The inverter protection functions use the 3rd ramp defined by P0106 for both acceleration and
deceleration.
CFW501 | 11-3
Page 98

Functions Common to all the Control Modes
11. 2.1 DC Link Voltage Limitation by “Ramp Hold” P0150 = 0 or 2
It has effect during deceleration only.
Actuation: when the DC link voltage reaches the level set in P0151, a command is set to the “ramp” block,
which inhibits the motor speed variation according to Figure 9.1: Block diagram of V/f scale control on page
9-2 of chapter 9 V/f SCALAR CONTROL on page 9-1 and Figure 10.1: VVW control flow on page 10-2 of
chapter 10 VVW VECTOR CONTROL on page 10-1.
Use recommended in the drive of loads with high moment of inertia referred to the motor shaft or loads that
require short deceleration ramps.
11.2.2 DC Link Voltage Limitation by “Accelerate Ramp” P0150 = 1 or 3
It has effect in any situation, regardless the motor speed condition: accelerating, decelerating or constant speed.
Actuation: the DC link voltage is measured (P0004) and compared to the value set in P0151; the difference
between those signals (error) is multiplied by the proportional gain (P0152); the result is then added to the
ramp output, as per Figure 11.4: Block diagram of DC link voltage limitation – Accelerate Ramp (P0152 = 1
or P0152 = 3) on page 11-6 and Figure 11.5: Example graph of the DC ling voltage limitation – Accelerate
Ramp (P0152 = 1 or P0152 = 3) on page 11-7.
11
Use recommended in the drive of loads that require braking torques at constant speed situation in the inverter
output. For example, drive of loads with eccentric shaft as in sucker rod pumps; another application is the load
handling with balance like in the translation in overhead cranes.
NOTE!
When using rheostatic braking, the function “Ramp Hold” or “Accelerate Ramp” must be disabled.
Refer to description of P0151.
P0150 – Ud Controller Type and Current Limitation
Adjustable
Range:
Properties: cfg, V/f, V V W
Access groups
via HMI:
Description:
P0150 configures the behavior of the ramp for the limitation functions of the DC link voltage and current limitation.
In those cases, the ramp ignores the reference and takes an action of accelerating (accel), decelerating (decel)
or freezing (freeze) the normal path of the ramp. That occurs because of the limit pre-defined in P0151 and
P0135 for the DC link (Ud) limitation and for current (LC) limitation, respectively.
0 = hold_Ud and decel_LC
1 = acel_Ud and decel_LC
2 = hold_Ud and hold_LC
3 = acel_Ud and hold_LC
MOTOR
Factory
Setting:
0
11-4 | CFW501
Page 99

Functions Common to all the Control Modes
P0151 – Actuation Level of the DC Link Voltage Regulation
Adjustable
339 to 1200 V Factor y
Range:
Properties: V/f, V V W
Access groups
MOTOR
via HMI:
Description:
Voltage level to activate the DC Link Voltage regulation.
P0152 – Gain Proportional to the DC Link Voltage Controller
Adjustable
Range:
Properties: V/f, V VW
Access groups
via HMI:
Description:
Gain proportional to the DC link voltage controller.
0.00 to 9.99 Factory
MOTOR
Setting:
Setting:
400 V
(P0296 = 0)
800 V
(P0296 = 1)
1000 V
(P0296 = 2)
1.50
When the option of P0150 is 1 or 3, the value of P0152 is multiplied by the “error” of the DC link voltage, seeing
that the error results from the difference between the actual DC link voltage (P0004) and the actuation level
of the DC link voltage regulation (P0151). The result is added directly to the inverter output speed in rpm. This
resource is normally used to prevent overvoltage in applications with eccentric loads.
Figure 11.2: Block diagram DC link voltage limitation – Ramp Hold (P0152 = 0 or P0152 = 2) on page 11-5 to
Figure 11.5: Example graph of the DC ling voltage limitation – Accelerate Ramp (P0152 = 1 or P0152 = 3) on
page 11-7 show the block diagrams and example graphs.
Ramp
P0100-P0104
P0001
P0004
Figure 11.2: Block diagram DC link voltage limitation – Ramp Hold (P0152 = 0 or P0152 = 2)
Reference
+
-
P0151
Error
Hold
≥ 0
Output speed
P0002
11
CFW501 | 11-5
Page 100

Functions Common to all the Control Modes
U
DC link voltage (P0004)
d
P0151
Ud rated
Output
speed
Figure 11.3: Example graph of DC link voltage limitation – Ramp Hold (P0152 = 0 or P0152 = 2)
Ramp
P0100-P0104
P0001
Reference
F0022Overvoltage
DC link
regulation
Time
Time
+
+
Output speed
P0002
11
P0004
Figure 11.4: Block diagram of DC link voltage limitation – Accelerate Ramp (P0152 = 1 or P0152 = 3)
+
-
P0151
Error
P0152
P0152 x error
11-6 | CFW501
 Loading...