

Page 1

Webtuner Corp.
User manual for A6
-1-
Page 2

Content
1 General Information ................................................................................................................................................. 6
1.1 Profile .............................................................................................................................................................. 6
1.2 Safety warning and Attentions ........................................................................................................................ 6
2 Your Tablet ................................................................................................................................................................ 9
2.1 Tablet overview ............................................................................................................................................... 9
2.2 Functions of Keys ......................................................................................................................................... 10
2.3 Functions of icons ......................................................................................................................................... 10
2.4 Status bar ....................................................................................................................................................... 10
3 Getting started ......................................................................................................................................................... 11
3.1 Installing the SIM Card and the Battery ........................................................................................................ 11
3.2 Charging the Battery ..................................................................................................................................... 12
3.3 Linking to the Networks and devices ............................................................................................................ 13
3.4 Using the touch screen .................................................................................................................................. 15
3.5 Using the onscreen keypad ........................................................................................................................... 16
3.6 Dialing Calls ................................................................................................................................................. 16
-2-
Page 3

4 Using the Menus ...................................................................................................................................................... 17
4.1 Browser ......................................................................................................................................................... 17
4.2 Calculator ...................................................................................................................................................... 20
4.3 Calendar ........................................................................................................................................................ 20
4.4 Camcorder ..................................................................................................................................................... 21
4.5 Camera .......................................................................................................................................................... 22
4.6 Clock ............................................................................................................................................................. 22
4.7 Currents ......................................................................................................................................................... 22
4.8 Downloads .................................................................................................................................................... 22
4.9 Email ............................................................................................................................................................. 23
4.10 File Explorer ................................................................................................................................................. 24
4.11 FM Radio ...................................................................................................................................................... 24
4.12 Gallery .......................................................................................................................................................... 25
4.13 Gmail ............................................................................................................................................................ 25
4.14 Latitude ......................................................................................................................................................... 25
4.15 Local ............................................................................................................................................................. 25
4.16 Maps .............................................................................................................................................................. 25
4.17 Messaging ..................................................................................................................................................... 25
-3-
Page 4

4.18 Video studio .................................................................................................................................................. 26
4.19 Music ............................................................................................................................................................ 26
4.20 Navigation ..................................................................................................................................................... 27
4.21 News & W eat her ........................................................................................................................................... 27
4.22 People ............................................................................................................................................................ 28
4.23 Tablet............................................................................................................................................................. 28
4.24 Play store ....................................................................................................................................................... 28
4.25 Portable hotspot ............................................................................................................................................ 28
4.26 Profile manager ............................................................................................................................................. 29
4.27 Search ............................................................................................................................................................ 29
4.28 Settings .......................................................................................................................................................... 29
4.29 SIM T o olkit ................................................................................................................................................... 33
4.30 Sound Recorder ............................................................................................................................................. 33
4.31 Stopwatch ...................................................................................................................................................... 33
4.32 Talk ............................................................................................................................................................... 34
4.33 Videos ........................................................................................................................................................... 34
4.34 Voice dialer ................................................................................................................................................... 34
4.35 Whether ......................................................................................................................................................... 34
-4-
Page 5

4.36 World Clock .................................................................................................................................................. 34
5 Appendix .................................................................................................................................................................. 35
6 FCC Statement ........................................................................................................................................................ 39
7 SAR Statement ........................................................................................................................................................ 40
-5-
Page 6

1 General Information
1.1 Profile
Please read this pamphlet carefully in order to make your Tablet in perfect condition.
Our company may change this Tablet without prior written notice and reserves the final right to interpret
the performance of this Tablet.
Due to different software and network operators, display on your Tablet may be different, refer to your
Tablet for details.
1.2 Safety warning and Attentions
Safety warning
ROAD SAFETY COMES FIRST
Do not use a hand-held Tablet while driving. Use hands-free fittings when calls are unavoidable while
driving. In some countries, dialing or receiving calls while driving is illegal!
SWITCH OFF IN AIRCRAFT
Wireless devices can cause interference in aircraft. Using a Tablet in flight is illegal and risky.
Please make sure that your Tablet is powered off in flight.
SWITCH OFF BEFORE ENTERING RISKY AREAS
Strictly observe the relevant laws, codes, and regulations on the use of Tablets in risky areas. Turn off
your Tablet before entering a place susceptible to explosion, such as an oil station, oil tank, chemical plant or
a place where a blasting process is under way.
-6-
Page 7

OBSERVE ALL SPECIAL REGULATIONS
Follow any special regulations in force in any area such as hospitals and always switch off your Tablet
whenever it is forbidden to use it or, when it may cause interference or danger. Properly use your Tablet near
medical apparatuses, such as pacemakers, hearing aids and some other electronic medical devices, as it may
cause interference to such apparatuses.
INTERFERENCE
The conversation quality of any Tablet may be affected by radio interference. An antenna is built inside
the Tablet and located below the microTabl et. Do not touch the antenna area during a conversation, lest that
the conversation quality deteriorate.
QUALIFIED SERVICE
Only qualified personnel may install or repair Tablet equipment. Installing or repairing the Tablet on
your own may bring great danger and violates the warranty rules.
ACCESSORIES AND BATTERIES
Use only approved accessories and batteries.
USE SENSIBLY
Use only in a normal and proper manner.
EMERGENCY CALLS
Ensure the Tablet is switched on and in service, enter the emergency number, e.g. 112, then press the
Dial key. Give your location and state your situation briefly. Do not end the call until told to do so.
Note: Just like all other Tablets, this Tablet does not necessarily support all the features described in this
manual due to network or radio transmission problems. Some networks even do not support the emergency
call service. Therefore, do not rely solely on the Tablet for critical communications such as first aid. Please
-7-
Page 8

consult the local network operator.
Precautions
This Tablet is well designed with fine art. Please exercise special care when using it. The following
suggestions will help your Tablet survive the warranty period and extend its service life:
Keep the Tablet and all its fittings beyond children's reach.
Keep the Tablet dry. Keep away from rain, moisture, liquid or other substances that may corrode electronic
circuits.
Do not use or store the Tablet in dusty places, lest that active parts of the Tablet be damaged.
Do not store the Tablet in a high-temperature place. High temperature will shorten the life of electronic
circuits and damage the battery and some plastic parts.
Do not store the Tablet in a chilly place. Otherwise, moistures will be formed inside the Tablet to damage
electronic circuits when the Tablet is moved to a constant temperature place.
Do not throw, knock or shock the Tablet, as that will destroy the internal circuits and high-precision
components of the Tablet.
-8-
Page 9
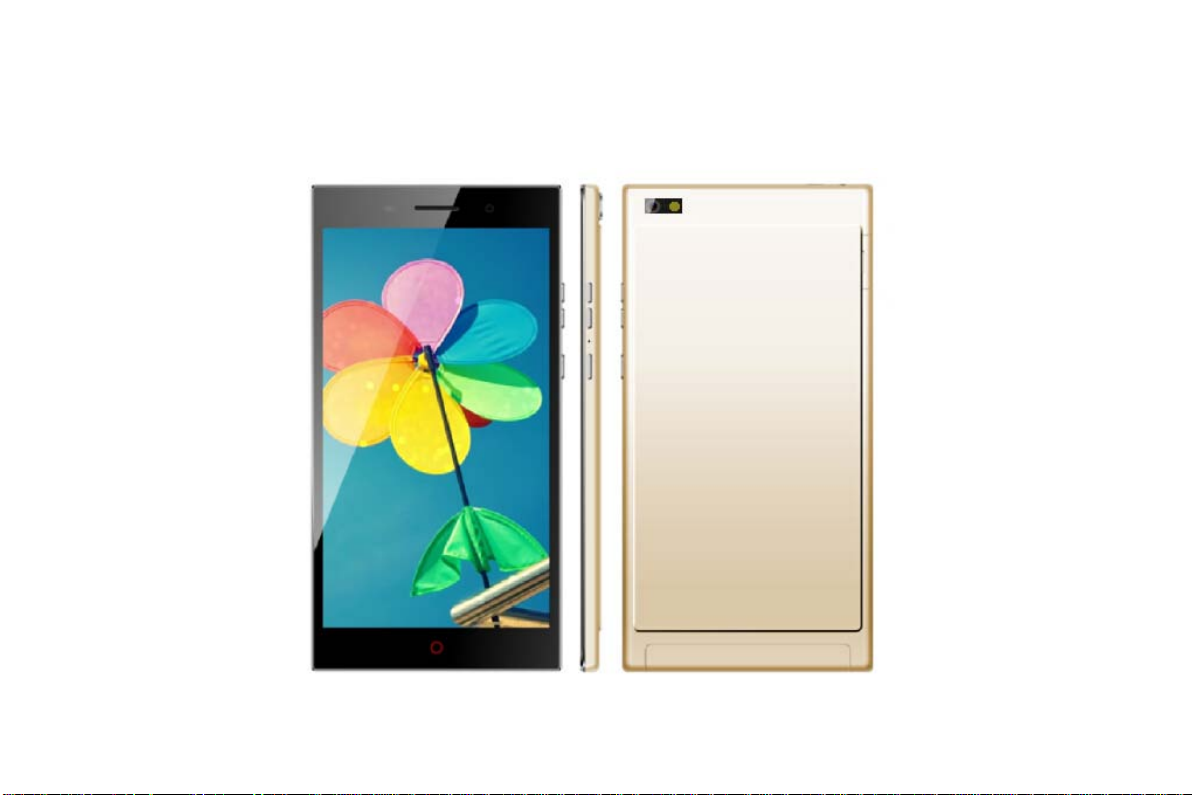
2.1 Tablet overview
2 Your Tablet
-9-
Page 10

2.2 Functions of Keys
The Tablet provides the following keys:
Power key
Power key situates at the top of the Tablet. While using the Tablet, you can press this key to lock screen;
if you press and hold this key, a Tablet-options dialog would pop out. Here, you can select to adjust the
profile mode or power off.
Volume key
Volume key situates at the right side of the Tablet. You can press it to adjust ringer volume.
2.3 Functions of icons
Menu icon
Touch this icon to access options of a selected function;
Home icon
Touch it to open home screen. If you’re viewing the left or right extended Home screen, Touch it can
enter the central screen.
Back icon
Touch this icon to return to the previous screen;
2.4 Status bar
Various indicators are provided in status bar to show ongoing activities. Tap the status bar and scroll
down to view notifications or view system information.
-10-
Page 11

3 Getting started
3.1 Installing the SIM Card and the Battery
An SIM card carries useful information, including your Tablet number, PIN (Personal Identification
Number), PIN2, PUK (PIN Unlocking Key), PUK2 (PIN2 Unlocking Key), IMSI (International Mobile
Subscriber Identity), network information, contacts data, and short messages data.
Note:
After powering off your Tablet, wait for a few seconds before removing or inserting an SIM card.
Exercise caution when operating an SIM card, as friction or bending will damage the SIM card.
Properly keep the Tablet and its fittings such as the SIM cards beyond children's reach.
Installation
Hold the power key for a while and select power off to power off the Tablet
Take the back cover away.
Insert the SIM Card into the SIM Card slot lightly with the corner cutting of the card aligning to the
notch of the slot and the gold plate of the card facing download, till the SIM Card cannot be further
pushed in.
With the metallic contacts of the battery facing the metallic contacts in the battery slot, install the
battery.
Note:
The SD card is a miniature object. Keep it out of the reach of children for fear that children swallow it!
-11-
Page 12

3.2 Charging the Battery
Your Tablet can monitor and display the battery state.
Normally the remaining energy of the battery is indicated by the battery level icon at the upper right
corner of the display screen.
When the battery energy is insufficient, the Tablet prompts "Battery low".
Using a travel adapter:
Install the battery into the Tablet before charging the battery.
Connect the adapter of the travel charger with the charging slot in the Tablet. Ensure that the adapter is
fully inserted.
Insert the plug of the travel charger to an appropriate power outlet.
During the charging, the battery level grids in the battery icon keep flickering till the battery is fully
charged.
The battery icon does no longer flicker when the charging process ends.
Note:
Ensure that the plug of the charger, the plug of the earTab let, and the plug of the USB cable are inserted
in the right direction. Inserting them in a wrong direction may cause charging failure or other problems.
Before the charging, ensure that the standard voltage and frequency of the local mains supply match the
rated voltage and power of the travel charger.
Optimizing battery life
You can extend your battery’s life between charges by turning off features that you don’t need. You can
also monitor how applications and system resources consume battery power.
-12-
Page 13

To guarantee the optimal performance of your battery, please stick to the following rules:
Turn off radios that you aren’t using. If you aren’t using Wi-Fi, Bluetooth, or GPRS, use the Setting
application to turn them off.
Turn down screen brightness and set a shorter screen timeout.
If you don’t need them, turn off automatic syncing for Gmail, Calendar, Contacts, and other
applications.
Note: On the Home screen, press Menu icon and touch Settings > About Tablet > Battery use. The
Battery Use screen lists the applications that have been using the battery, from greatest to least battery use.
The top of the screen displays the time since you were last connected to a charger or, if you’re currently
connected to one, how long you were running on battery power before you connected to a charger. Then each
application or service that used battery power during that time is displayed, in order of the amount of power
they used. Touch an application in the Battery Use screen to learn details about its power consumption.
Different applications offer different kinds of information.
3.3 Linking to the Networks and devices
Your Tablet can connect to a variety of networks and devices, including mobile ne tworks for voice and
data transmission, Wi-Fi data networks, and Bluet ooth devices, such as headsets. You can also connect your
Tablet to a computer, to transfer files from your Tablet’s SD card and share your Tablet’s mobile data
connection via USB.
Connecting to mobile networks
When you assemble your Tablet with a SIM card, your Tablet is configured to use your provider’s
mobile networks for voice calls and for transmitting data.
-13-
Page 14

Connecting to Wi-Fi networks
Wi-Fi is a wireless networking technology that can provide Internet access at distances of up to 100
meters, depending on the Wi-Fi router and your surroundings.
Touch Settings>Wireless & networks > WLAN settings. Check Wi-Fi to turn it on. The Tablet scans for
available Wi-Fi networks and displays the names of those it finds. Secured networks are indicated with a
Lock icon.
Note: If the Tablet finds a network that you connected to previously, it connects to it.
Touch a network to connect to it. If the network is open, you are prompted to confirm that you want to
connect to that network by touching Connect. If the network is secured, you’re prompted to enter a password
or other credentials.
Connecting to Bluetooth devices
Bluetooth is a short-range wireless communications technology that devices can use to exchange
information over a distance of about 8 meters. The most common Bluetooth devices are headTablets for
making calls or listening to music, hands-free kits for cars, and other portable devices, including laptops and
cell Tablets.
Touch Settings>Wireless & networks > Bluetooth. Check Bluetooth to turn it on.
You must pair your Tablet with a device before you can connect to it. Once you pair your Tablet with a
device, they stay paired unless you unpair them.
Your Tablet scans for and displays the IDs of all available Bluetooth devices in range. If the device you
want to pair with isn’t in the list, make it discoverable.
-14-
Page 15

Connecting to a computer via USB
You can connect your Tablet to a computer with a USB cable, to transfer music, pictures, and other files
between your Tablet’s SD card and the computer.
3.4 Using the touch screen
Touch-screen tips
Touch
To act on i tems on the screen, such as application and settings icons, to type l etters and symbols using
the onscreen keyboard, or to press onscreen buttons, you simply touch them with your finger.
Touch & hold
Touch & hold an item on the screen by touching it and not lifting your finger until an action occurs. For
example, to open a menu for customizing the Home screen, you touch an empty area on the Home screen
until the menu opens.
Drag
Touch & hold an item for a moment and then, without lifting your finger, move your finger on the
screen until you reach the target position.
Swipe or slide
To swipe or sl ide, you quickly move your finger across the surface of the sc reen, without pausing when
you first touch it (so you don’t drag an item instead). For example, you slide the screen up or down to scroll a
list.
Lock screen
When Screen lock in Security setting is enabled, press Power key to lock the handset. This helps to
-15-
Page 16

prevent accidental touching of keys and as well as power saving. When Sleep function in Display setting is
enabled, after the handset device has been idle for preset period, the screen will be locked automatically to
save power.
Unlock screen
Press Power key to switch on the handset device. The lock screen appears. Touch and slide left to open
camera application. Touch and slide right to unlock screen, and the screen being locked last time will show.
3.5 Using the onscreen keypad
You enter text using the onscreen keyboard. Some applications open the keyboard automatically. In others,
you touch a text field where you want to enter text to open the keyboard. You can also enter text by speaking
instead of by typing.
To enter text
Touch a text field, and the onscreen keyboard opens. Some applications open the keyboard automatically.
In others, you touch a text field where you want to enter text to open the keyboard.
Touch the keys on the keyboard to type.
The characters you’ve entered appear in the text field, with suggestions for the word you are typing
below.
Use the Delete icon to erase characters to the left of the cursor.
After finishing typing, touch Back icon to close the keyboard.
3.6 Dialing Calls
Dialing a call to a number in the contacts
Touch the Tablet icon or the Tablet application icon on the Home screen, then select the Contacts tab.
-16-
Page 17

Swipe or slide upward/downward to pick out the target contact. Then you can touch the dial icon to originate
a call.
Dialing a call to a number in call log
Touch the Tablet icon or the Tablet application icon on the Home screen, then select the call log tab.
Swipe or slide upward/downward to pick out and touch the target contact. Then you can originate a call.
Answering incoming calls
Drag the Answer icon towards right to answer an incoming call.
Touch the End icon to end the current conversation.
To reject an incoming call, drag the End icon towards left.
Managing multiple calls
If you accept a new call when you’re already on a call, you can drag the Answer icon towards right to
answer the current calls.
4 Using the Menus
4.1 Browser
You can use Browser to view web pages and search for information on the web.
When you open Browser, your home page opens. The web address (URL) of the current page is
displayed at the top of the window.
To go to a webpage or search the web
Touch the URL box at the top of the Browser screen. Enter the address (URL) of a webpage. Or enter
-17-
Page 18

terms you want to search for. As you enter text, your web search engine makes suggestions of web pages and
queries.
To refresh the current page
Touch Menu icon and an option interface appears, then you can touch Refresh to update the current web
page.
To zoom in or out on a webpage
Slide your finger slightly on the screen to reveal the Zoom control. Touch the plus or minus side of the
Zoom control to zoom in or out.
To find text on a webpage
Touch Menu icon and touch More > Find on page. Enter the text you’re l ooking for. As you type, the
first word with matching characters is highlighted on the screen, and subsequent matches are boxed. Touch
the left or right arrow to scroll to and highlight the previous or next matching word.
Copy text from webpage
Use your finger to long press the text you want to copy. It will pop up some options, select the Select
text option to select the text you want, and then touch the icon at the right top corner of the screen to copy or
share the text.
Navigate among webpage
You can open links on a webpage, navigate back and forward, and review your browsing history, just as
in any web browser.
To open a link: Touch a link to open it. Links that you touch are highlighted in orange until the webpage
they refer to opens in the window.
-18-
Page 19

To go back and forward among the pages you’ve opened: Press back key or touch menu icon> forward.
To view your Browser history: As you browse the web, Browser keeps track of the pages you visit, to
help you find your way back later. Touch the icon which situates at the right of the URL box, then touch
History tab, and then you can view your browser history. Select Most visited tab and you can view a list of
most visited webpage.
Working with multiple browser windows
You can open up to several Browser windows at once and switch among them.
To open a new Browser window, touch menu icon >new window; New windows open with your home
page.
To switch Browser windows, touch the icon at the top right corner of the screen. Here, all your open
windows are listed. You can select one of them as per your need.
To close a Browser window, touch the icon at the top right corner of the screen. Here, all your open
windows are listed. You can touch the close icon at the right side of each open window to close it.
Downloading files
You can download files and even applications from webpage. The files that you download are stored on
your SD card.
To download a file, Different webpage offer different mechanisms for downloading pictures, documents,
applications, and other files. Touch & hold an image or a link to a file or to another webpage. In the menu
that opens, touch Save. If the file is in a format supported by an application on the Tablet, it is downloaded to
your SD card. Touch menu icon and then touch More>downloads, here, you can find a list of downloaded
files. If you want to delete a file, just touch the indication box which situates at the left of the downloaded file,
-19-
Page 20

and an option box will pop out, here, you can select delete to delete an unnecessary file.
Working with bookmarks
Open a web page to bookmark, touch menu icon> Bookmarks, here, you can view bookmarks displayed
in thumbnail style.
Touch & hold a bookmark, an option box will pop out. There, you can perform the following operations
on bookmarks: Open, open in new window, Edit bookmark, Add shortcut to Home, Share link, copy link
URL, Delete bookmark and set the current bookmark as homepage.
4.2 Calculator
You can use this Calculator to solve simple arithmetic problems or use its advanced operators to solve
more complex equations.
Enter numbers and arithmetic operators on the basic screen; Drag the basic screen to the left to open the
advanced screen; Touch Clear to delete the last number or operator you entered. Touch & hold Clear to
delete everything in the display.
In the calculator screen, you can touch menu icon to clear history or access advanced panel.
4.3 Calendar
You can open Calendar to view events you’ve created.
Touch the Cale ndar icon in the main menu interface. Events from each account you’ve added to your
Tablet and configured to synchronize calendars are displayed in Calendar.
Creating an event
You can use Calendar on your Tablet to create events. In any calendar view, touch menu icon and then
touch more> new event to open a event details screen for a new event.
-20-
Page 21

Enter a name, time, and optional additional details about the event. You can touch plus icon to add more
reminders. In the Guests field, you can enter the email addresses of everyone you want to invite to the event.
Separate multiple addresses with commas ( , ). If the people to whom you send invitations use Google
Calendar, they’ll receive an invitation in Calendar and by email. You can touch menu icon and touch Show
extra options to add details about the event. Scroll to the bottom of the Event details screen and touch Done.
The event is added to your calendar.
Synchronizing and displaying calendars
When you add a Google Account or Microsoft Exchange ActiveSync account to your Tablet that
includes a calendar service, and you configure that account to synchronize calendar events to the Tablet, the
events from that calendar are added and kept up to date in Calendar on the Tablet.
In calendar screen, touch menu icon and touch Calendars to display > Calendars, here, you can set
whether calendars are stored on the Tablet or visible. The Calendars screen displays all the calendars you’ve
added or subscribed to for each account that is configured to synchronize events to your Tablet, organized by
account. Touch the name of an account to show or hide its calendars on your Tablet. An icon to t he right of
each calendar indicates whether its events are synchronized in the Tablet and whether they are visible in
Calendar.
Change Calendar settings
You can change the following settings for how Calendar displays event and how it notifies you of
upcoming events. Open a Calendar view, touch menu icon and touch settings.
4.4 Camcorder
Touch the Camcorder icon in the main menu interface or on the home screen, camcorder opens in
-21-
Page 22

Landscape mode, ready to record a video. In this mode, you can t ouch the bottom icon start recording, touch
the icon beside start icon to switch between camera and video mode.
Note: you can also touch menu icon to pop out an option box. There, you can switch to camera mode .
4.5 Camera
Touch the Camera icon in the main menu interface or on the home screen, camera opens in Landscape
mode, ready to take a picture. In this mode, you can touch the bottom icon to take a photo, touch the icon
beside start icon to switch between camera and video mode.
Note: you can also touch menu icon to pop out an option box. There, you can switch to camcorder mode.
4.6 Clock
Touch the C lock icon on the Home screen or in the main menu interface. Clock opens with the date and
time displayed on your Home screen wallpaper.
You can set an alarm by modifying an existing alarm or by adding a new one.
Note: Alarms that are set are underlined in green.
4.7 Currents
You can access Currents through this function.
4.8 Downloads
Through this function, you can view a list of files and applications which you downloaded from the
webpage.
-22-
Page 23

4.9 Email
You use the Email application to read and send email.
Touch email icon to access it. If the Email account has not been set up, you can set up an Email account
in a few steps.
Account setup
Enter an Email address and the account’s password.
Account settings
Set inbox checking frequency.
Set Send email from this account by default.
Set Notify me when email arrives.
Set Synchronize contacts, calendar or Email from this account.
Set Automatically download attachments when connected to Wi-Fi.
Compose and sending Email
To compose and send an Email:
1. Touch the create icon to compose a new Email.
2. Enter Email address(es) for intended recipient(s).
3. Touch Menu → Attach file to attach a file.
4. Touch Menu → Add Cc/Bcc to add copy or blind copy this Email to other contacts.
5. After completing the Email, Touch send icon to send the Email. Touch folder icon to check the
account status. For each Email account there are five default folders, i.e., Inbox, Drafts, Outbox, Send and
Trash folders. To view sent Emails, open Sent folder and tap refresh icon.
-23-
Page 24

Adding and editing Email accounts
Add an Email account
1. Open Email application.
2. Touch Menu to enter Settings interface.
3. Touch ADD ACCOUNT on top-right of the display.
Change account settings
1. Enter Settings interface and touch General to view general settings for all accounts.
2. Enter Settings interface and touch the account to view the account settings.
Delete an Email account
1. Enter Settings interface.
2. Touch the account to delete.
3. In account settings interface, touch Remove account to delete this account.
4.10 File Explorer
The Tablet supports the SD card. You can use the File Explorer to conveniently manage various
directories and files on the SD card.
4.11 FM Radio
Please plug in the compatible earTablet to the device and then turn on the radio. The earTablet cable can
be used as FM Antenna. Please adjust appropriate volume when listening to the radio. Continue to use higher
volume is harmful for your ear.
-24-
Page 25

4.12 Gallery
Both pictures and videos taken by camera or stored in SD card can be scanned through this function.
4.13 Gmail
You can access to Gmail application through this function.
4.14 Latitude
You can access to Google application through this function.
4.15 Local
You can fix your location and search the spot you want to know through this function.
4.16 Maps
You can access to Google map through this application.
4.17 Messaging
You can use Messaging to exchange text messages (SMS) and multimedia messages (MMS) with your
friends on their Tablets.
Sending a message
1. Touch message icon on the home screen and touch New message icon to edit a new message.
2. Enter a contact’s name or call number in the To field. As the information is entered, all matching
contacts appear. Touch a suggested contact or multiple contacts as message recipient(s).
3. Touch Enter message to compose your message. Touch to select a message template.
4. After completing the message, touch Send icon which beside template icon to send your message.
-25-
Page 26

Message template
Message templates can save your time in editing message with similar format. To create a message
template:
1. Touch message icon on the home screen and touch application item to enter message settings.
2. Touch Message template to create or edit a message template.
4.18 Video studio
You can editing and rearrange your photos and videos through this function.
4.19 Music
Music plays audio files that are stored on your Tablet’s SD card, so before you open Music, you must
copy audio files from your computer onto the SD card. Music supports a wide variety of audio file formats,
so it can play music that you purchase from online stores, music that you copy from your CD collection, and
so on.
To open Music and view your music library
Touch the Music icon in the main menu interface or on the Home screen.
When you copy music to your SD card, Music searches the card for music files and bui lds a catalog of
your music, based on information about each file that is stored in the file itself. This can take from a few
seconds to several minutes, depending on how many files you have copied onto the SD card. When the
catalog is complete, the Music library screen opens, with tabs that you can touch to view your music library
organized by Artists, Albums, Songs or Playlists.
Note: If the Tablet power off owing to low battery while you were downloading music via USB cable, the
Tablet would prompt ‘ SD card error’ when you power on the Tablet. Repower on the Tablet for about 5 times,
-26-
Page 27

the same prompt would occur. Under this circumstance, you should repower on the Tablet until it prompts
‘SD card error. Format?’. Please select format to format your SD card to ensure the Tablet runs properly.
Any sudden suspend during downloading music via USB cable may result in great damage to your SD
card.
Play music
You can listen to music by using the Tablet’s built-in speaker, through a wired headset, or through a
wireless Bluetooth stereo headset.
Touch a song in your library to listen to it. The Playback screen opens and the song you touched starts to
play. The Playback screen contains several icons that you can touch to control the playback of songs. On the
right-top of playback screen, you can find three function icons. You can touch them to open the current
playlist, shuffle the current playlist or repeat the current playlist / repeat the current track (touch twice). Three
function icons which situates just above the process bar can be used to control the playing process of the
music application. Their functions can be defined as the following: switch to last song (touch) /rewind (touch
& hold), play/pause and switch to next song (touch)/ fast forward (touch & hold)
To delete a song from the SD card
You can delete music from the storage card. Touch & hold a song in a library list. In the menu that opens,
touch Delete.
4.20 Navigation
You can use this function as navigation.
4.21 News & Weather
You can view the weather predicted and the latest news through this function, but it required network
-27-
Page 28

connected.
4.22 People
In the contacts screen, touch menu icon and you can perform the following operations:
Delete: Select this function, then you can mark the target contacts. To delete all contacts, you just need
to touch all at the top of contacts screen. Last, touch OK and confirm to delete contacts.
Contacts to display: you can select the contacts on different group to display.
Import/export: you can import/export the contacts form SIM card or storage; you can also share the
visible contacts.
Settings: you can set the display options in this interface.
4.23 Tablet
Touch the Contacts icon on the Home screen or in main menu interface. Three tabs are listed at the
top of the screen. Select the Tablet tab and you can find a dialpad screen where you can input Tablet
number to originate a call.
Note: During a conversation, you can’t originate a new call by open the dialpad, enter number and
press dial key. If you press dial key, the current conversation would hold.
4.24 Play store
When you first open Play store, a guide will display to guide you to use this function.
4.25 Portable hotspot
Use this function to share your Tabl et’s mobile data connection via USB or as a portable WLAN
hotspot.
-28-
Page 29

4.26 Profile manager
The Tablet provides multiple profiles, so that you can customize some settings to adapt to the specific
events and environments.
4.27 Search
The Search function enables you to open a search box for searching your Tablet and the web.
4.28 Settings
The Settings application contains most of the tools for customizing and configuring your Tablet.
【WIRELESS & NETWORK】
You can use Wireless & Network settings to configure and manage connections to networks and
devices by using Wi-Fi. You also can use Wireless & Network settings to configure connections between
your Tablet and virtual private networks (VPNs), to connect your Tablet to the Internet using your
Tablet , and to turn off all radios with Airplane mode, etc.
【DEVICE】
Dual-SIM settings
When a SIM card is enabled, the user can:
Set SIM card name, turn on or turn off the SIM card.
Set preferred SIM slot for voice call, data call and SMS.
Set count down time.
Enable or disable preferred callback.
Theme settings
-29-
Page 30

You can select the theme you like in this interface.
Sound
You can set volumes, the sounds of notification and system in this interface.
Display
Brightness
Adjust brightness of screen.
Wallpaper
Choose wallpaper from Gallery, Live Wallpapers or Wallpapers.
Auto-rotate screen
Adapt screen orientation automatically per movement and direction of the mobile handset.
Sleep
Set the period of time for the screen to turn off screen before being in idle.
Font size
Set font size for user interface.
Storage
Use the Storage settings to monitor the used and available space on your Tablet and on your SD card and
to manage your SD card.
Battery
You can view your battery status, battery level and battery use in this interface.
Apps
You can use the Applications settings to view details about the applications installed on your Tablet, to
manage their data and force them to stop, to view and control currently running services, and to view the
-30-
Page 31

storage used by applications, etc.
【PERSONAL】
Accounts & sync
You should add account first before using this function.
Location services
Google’s location service
Use Google location service to locate your position via Wi-Fi or mobile network connection.
GPS satellites
Use GPS to pinpoint user’s location.
Location & Google search
Google uses your location to improve search results and other services.
Security
Screen lock
Select screen lock mode from one of the following options:
None Slide Face unlock Pattern PIN Password
For example, with the Pattern option, a user can protect the handset from unauthorized use by creating a
personal screen unlock pattern. Slide your finger to connect at least four dots together on the next screen.
Owner information
Show owner information on lock screen (make sure to have SIM/USIM card inserted).
Encrypt Tablet
Require the user to input a numeric PIN or password to decrypt the handset device upon powering on.
Set up SIM card lock
-31-
Page 32

Lock SIM card and change PIN for SIM card.
Make passwords visible
Show password as you type.
Device administrators
View or deactivate device administrators.
Unknown sources
Allow installation of applications with unknown sources.
Trusted credentials
Display trusted CA certificates from system and user applications. Allow applications to access secure
certificates/other credentials.
Install from SD card
Install encrypted certificates from SD card.
Clear credentials
Remove all certificates.
Language & input
Use the Language & Keyboard settings to select the language for the text on your Tablet and for
configuring the input method.
Backup & reset
You can backup your data and reset your Tablet in this interface.
【SYSTEM】
Date & time
You can use Date & Time settings to set your preferences for how dates are displayed. You can also use
-32-
Page 33

these settings to set your own time and time zone, rather than obtaining the current time from the network,
etc.
Accessibility
You use the Accessibility settings to configure any accessibility plug-ins you have installed on your
Tablet.
Developer options
You can manage your develop tools through this function.
About Tablet
This function enables you to view some Tablet related information.
4.29 SIM Toolkit
STK service is the tool kit of SIM card. This Tablet supports the service function .The specific items are
depended by SIM card and network. Service menu will be auto added to the Tablet menu when supported by
network and SIM card.
4.30 Sound Recorder
Use this function to record audio files. Three function icons at the bottom of the Recorder screen are
corresponding to start recording, review record file and stop recording.
4.31 Stopwatch
Stopwatch is simple application for measuring time with possibility to register several results and
suspend/resume measurement.
-33-
Page 34

4.32 Talk
You can log on Google talk through this application.
4.33 Videos
With Videos, you can play video clips in your device (for example, the video you captured by the
camera) or video files stored in compatible SD card (if inserted).
<Tips>
If there are available video files in the device, for example, you captured some video files by camera, the
amount of these video files will be displayed in bracket at right of Movie.
4.34 Voice dialer
You can originate a call by voice through this function.
4.35 Whether
You can view the weather information through this function.
4.36 World Clock
Access this menu to view time of main cities in various time zones.
-34-
Page 35
5 Appendix
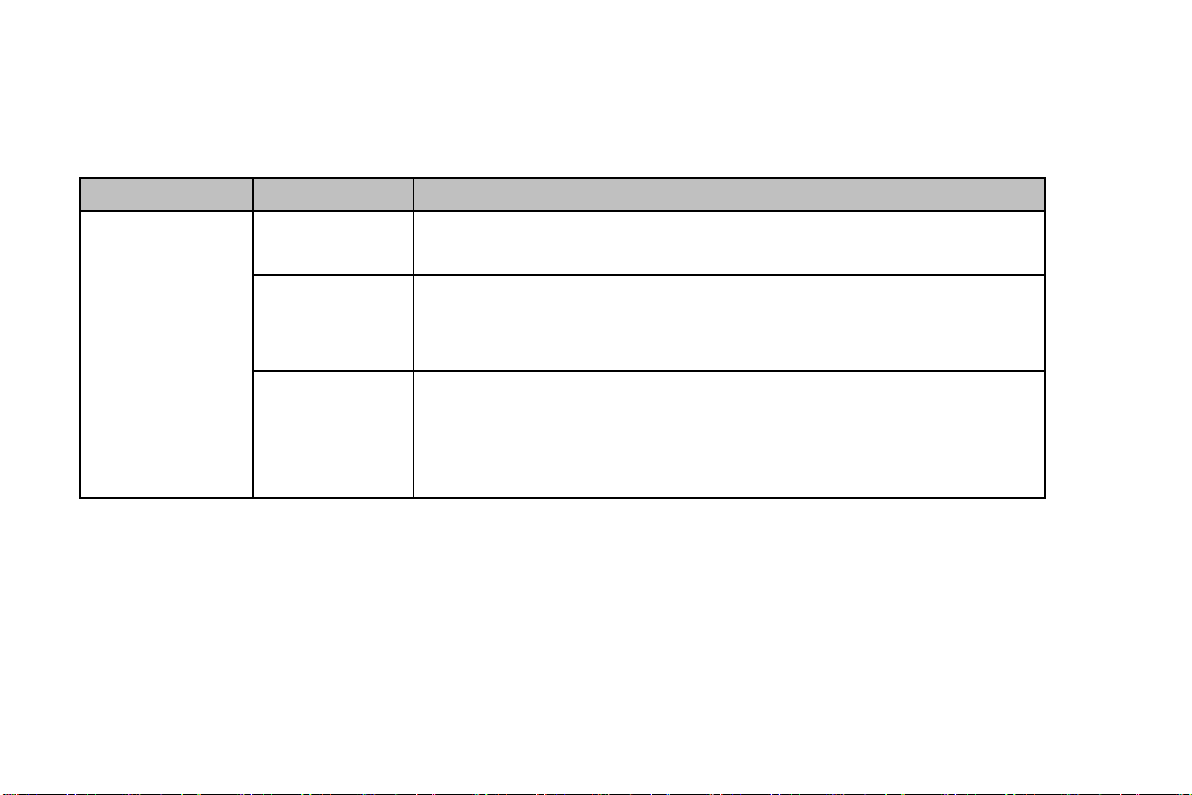
Appendix 1:Troubleshooting
If you find exceptions when operating the Tablet, restore the factory settings and then refer to the following
table to solve the problem. If the problem persists, contact the distributor or service provider.
Fault Cause Solution
SIM
card
error
The SIM card
is damaged.
The SIM card
is not in
position.
The metal
face of the
SIM card is
polluted.
Contact your network service provider
Check the SIM card
Clean the SIM card with a clean cloth
-35-
Page 36
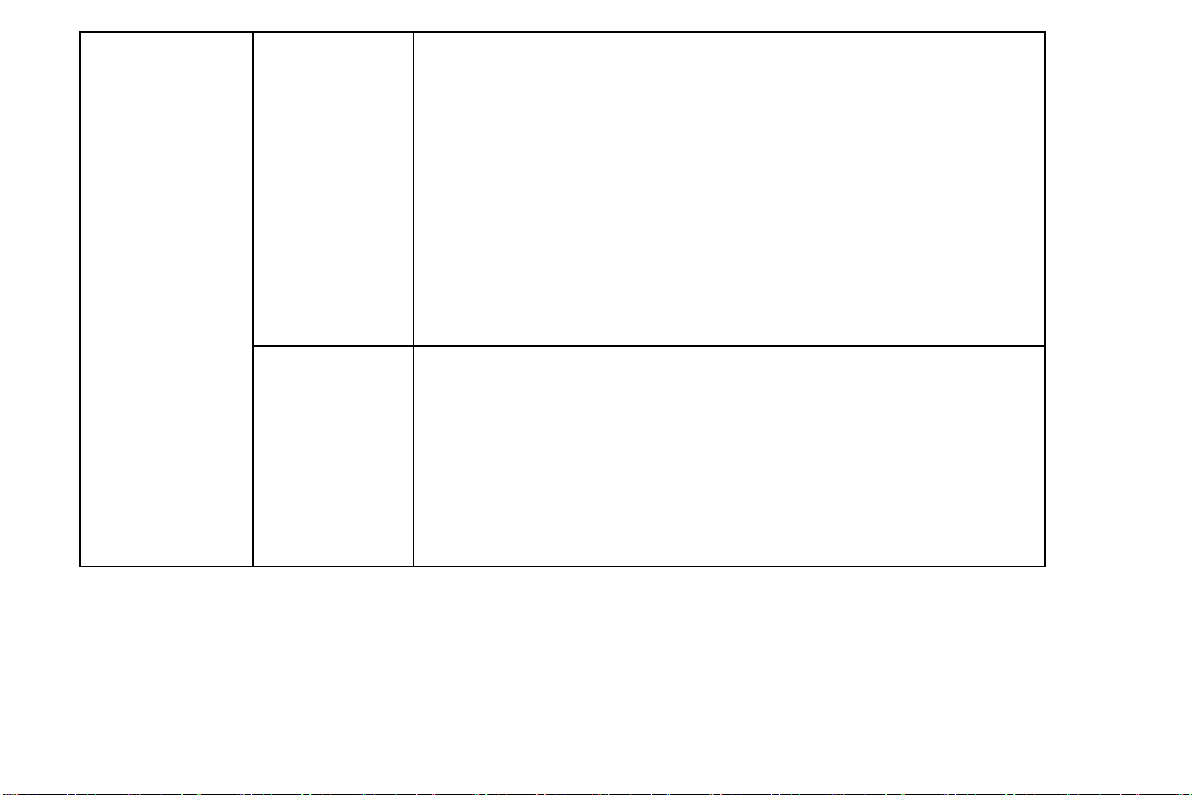
Poor received
hours
signal quality
Signals are
obstructed.
For instance,
radio waves
cannot be
effectively
transmitted
nearby a high
building or in
a basement.
Line
congestions
occur when
you use the
Tablet in
high-traffic
Move to a place where signals can be effectively transmitted
Avoid using the Tablet in high-traffic hours
-36-
Page 37
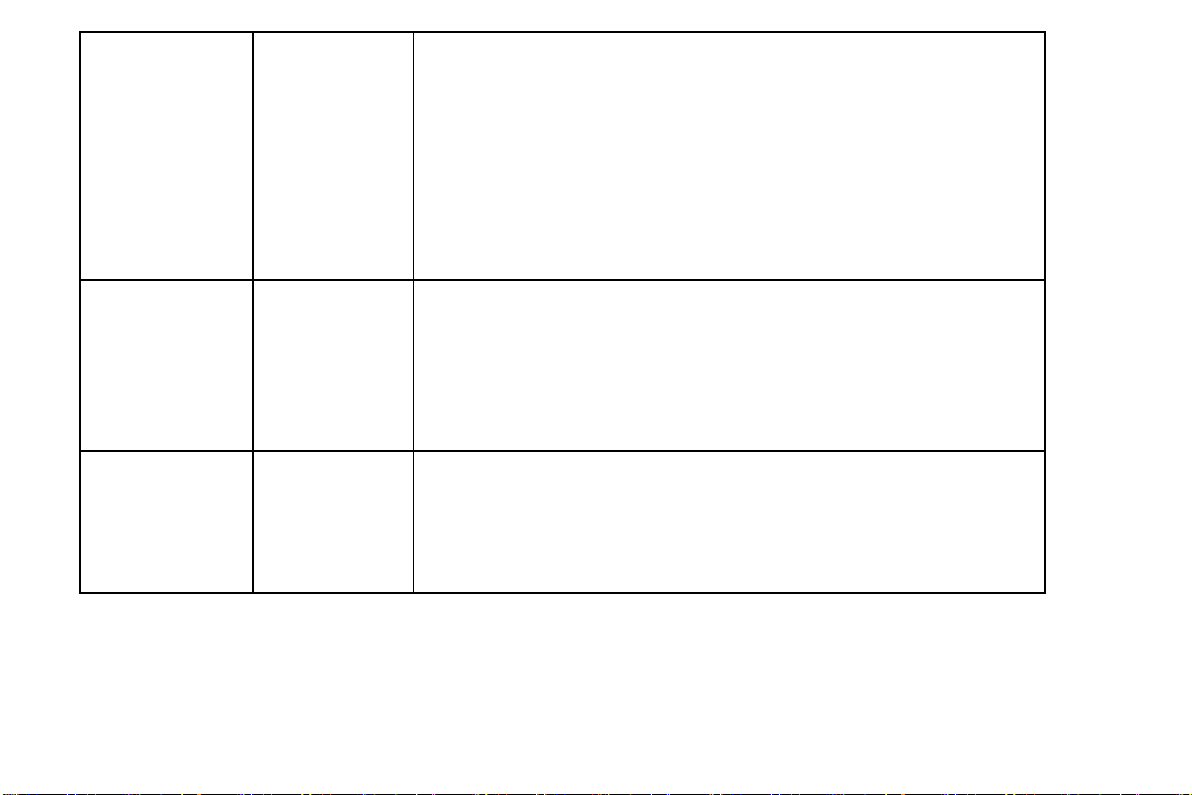
The Tablet
cannot be
powered on
The battery
energy is
exhausted.
Charge the battery
Calls cannot be
dialed
The Tablet
cannot connect
the network
Call barring is
activated
The SIM card
is invalid
Cancel call barring
Contact your network service provider
-37-
Page 38
The Tablet is
not in a
service area
of the GSM
network
Move to the network operator's service area
The battery
cannot be
charged
The signal is
weak
Move to a place where the signal quality is high
The charging
voltage does
not match the
voltage range
Ensure the charging voltage matches the voltage range
indicated on the charger
indicated on
the charger
An improper
charger is
Use the charger specially designed for the Tabl et
used
Poor contact Ensure the charger plug is in good contact with the Tablet
-38-
Page 39

6 FCC Statement
This equipment has been tested and found to comply with the limits for a Class B digital device, pursuant to p
art 15 of FCC Rules. These limits are designed to provide reasonable protection against harmful interference
in a residential installation. This equipment generates and can radiate radio frequency energy and, if not instal
led and used in accordance with the instructions, may cause harmful interference to radio communications. H
owever, there is no guarantee that interference will not occur in a particular installation. If this equipment doe
s cause harmful interference to radio or television reception, which can be determined by turning the equipme
nt off and on, the user is encouraged to try to correct theinterference by one or more of the following measure
s:
--Reorient or relocate the receiving antenna.
--Increase the separation between the equipment and receiver.
--Connect the equipment into an outlet on a circuit different from that to which the receiver is connected.
--Consult the dealer or an experienced radio/TV technician for help.
This device complies with Part 15 of FCC Rules. Operation is subject to the following two conditions: (1)Thi
s device may not cause harmful interference, and (2)This device must accept any interference received, inclu
ding interference that may cause undesired operation.
Note: The manufacturer is not responsible for any radio or TV interference caused by unauthorized modificat
ions to this equipment. such modifications could void the user’s authority to operate this equipment.
Any Changes or modifications not expressly approved by the party responsible for compliance could void the
user's authority to operate the equipment.
-39-
Page 40

7 SAR Statement
This Tablet meets the government's requirements for exposure to radio waves. The guidelines are based on standards that
were developed by independent scientific organizations through periodic and thorough evaluation of scientific studies. The
standards include a substantial safety margin designed to assure the safety of all persons regardless of age or health.
FCC RF Exposure Information and Statement The SAR limit of USA (FCC) is 1.6 W/kg averaged over one gram of tissue.
Device types: A6 (FCC ID: 2AFW8-A6) has also been tested against this SAR limit. SAR information on this and other pad
can be viewed on-line at http://www.fcc.gov/oet/ea/fccid/. Please use the device FCC ID number for search. This device was
tested for typical operations with handset Tablet 0mm from the body. The use of belt clips, holsters and similar accessories
should not contain metallic components in its assembly. The use of accessories that do not satisfy these requirements may not
comply with FCC RF exposure requirements, and should be avoided.
-40-
 Loading...