

Weber Q300 LP Owner's Manual
LP Gas Grill Owner’s Guide
Guía del propietario del asador de gas licuado de propano - Pg 25
Guide de l’utilisateur du grill à gaz PL - Pg 40
Assembly, Ensamblaje, Assemblage - Pg 7
PLACE STICKER HERE
Register your grill online at www.weber.com
You must read this Owner’s Guide before
operating your gas grill
DANGER
If you smell gas:
1. Shut off gas to the appliance.
2. Extinguish any open fl ames.
3. Open lid.
4. If odor continues, keep away from the
appliance and immediately call your gas
supplier or your fi re department.
Leaking gas may cause a fi re or explosion
which can cause serious bodily injury or
death, or damage to property.
#77576
WARNING: Follow all leak-check procedures
carefully in this manual prior to barbecue
operation. Do this even if the barbecue was
dealer-assembled.
NOTICE TO INSTALLER: These instructions must be
left with the owner and the owner should keep them
for future use.
THIS GAS APPLIANCE IS DESIGNED FOR OUTDOOR
USE ONLY.
WARNING: Do not try to light this appliance
without reading the “Lighting Instructions”
section of this manual.
WARNING
1. Do not store spare liquid propane
cylinder within 10 feet (3m) of this
appliance.
2. Do not store or use gasoline or other
fl ammable liquids or vapors within 25
feet (8m) of this appliance.
77576 US 05/09/06 LP
US ENGLISH

Dangers and Warnings
2
DANGER
Failure to follow the Dangers, Warnings and Cautions contained in this Owner’s Manual may result in serious bodily
injury or death, or in a fi re or an explosion causing damage to property.
WARNINGS
Do not store a spare or disconnected liquid propane cylinder under or near this barbecue.
Improper assembly may be dangerous. Please follow the assembly instructions carefully.
After a period of storage, and/or nonuse, the Weber® gas barbecue should be checked for gas leaks and burner
obstructions before use. See instructions in this manual for correct procedures.
Do not operate the Weber® gas barbecue if there is a gas leak present.
Do not use a fl ame to check for gas leaks.
Combustible materials should never be within 24 inches of the back or sides of your Weber® gas barbecue.
Do not put a barbecue cover or anything fl ammable on, or in the storage area under the barbecue.
Your Weber® gas barbecue should never be used by children. Accessible parts of the barbecue may be very hot.
Keep young children away while it is in use.
You should exercise reasonable care when operating your Weber® gas barbecue. It will be hot during cooking or
cleaning and should never be left unattended, or moved while in operation.
Should the burners go out while in operation, turn all gas valves off. Open the lid and wait fi ve minutes before
attempting to relight, using the lighting instructions.
Do not use charcoal or lava rock in your Weber® gas barbecue.
Never lean over open grill or place hands or fi ngers on the front edge of the cooking box.
Should a grease fi re occur, turn off all burners and leave lid closed until fi re is out.
Do not enlarge valve orifi ces or burner ports when cleaning the valves or burners.
The Weber® gas barbecue should be thoroughly cleaned on a regular basis.
Liquid propane gas is not natural gas. The conversion or attempted use of natural gas in a liquid propane unit or
liquid propane gas in a natural gas unit is dangerous and will void your warranty.
Do not attempt to disconnect any gas fi tting while your barbecue is in operation.
Use heat-resistant barbecue mitts or gloves when operating barbecue.
Keep any electrical supply cord and the fuel supply hose away from any heated surfaces.
Combustion byproducts produced when using this product contain chemicals known to the state of California to
cause cancer, birth defects, or other reproductive harm.
Do not use this barbecue unless all parts are in place. The unit must be properly assembled according to the
instructions outlined in the “Assembly Instructions”.
LIQUID PROPANE GAS UNITS ONLY:
Use the pressure regulator and hose assembly that is supplied with your Weber® gas barbecue.
Do not attempt to disconnect the gas regulator and hose assembly or any gas fi tting while your barbecue is in
operation.
A dented or rusty liquid propane cylinder may be hazardous and should be checked by your liquid propane
supplier. Do not use a liquid propane cylinder with a damaged valve.
Although your liquid propane cylinder may appear to be empty, gas may still be present, and the cylinder should
be transported and stored accordingly.
If you see, smell or hear the hiss of escaping gas from the liquid propane cylinder:
1. Move away from liquid propane cylinder.
2. Do not attempt to correct the problem yourself.
3. Call your fi re department.

Warranty
3
In order to validate your warranty please register your grill online at www.weber.com
Weber-Stephen Products Co. (Weber) hereby warrants to the ORIGINAL
PURCHASER of this Weber® gas grill that it will be free of defects in material
and workmanship from the date of purchase as follows:
Aluminium Castings, 5 years
Thermoplastic/Thermoset Parts, 5 years Excluding
fading
All Remaining Parts, 2 years
when assembled and
operated in accordance
with the printed
instructions that
accompany it.
when assembled and operated in accordance with the printed instructions
accompanying it.
Weber may require reasonable proof of your date of purchase.
THEREFORE, YOU SHOULD RETAIN YOUR SALES SLIP OR INVOICE.
This Limited Warranty shall be limited to the repair or replacement of parts
that prove defective under normal use and service and which on examination
shall indicate, to Weber’s satisfaction, they are defective. Before returning
any parts, contact the Customer Service Representative in your area using
the contact information on our website. If Weber confi rms the defect and
approves the claim, Weber will elect to replace such parts without charge.
If you are required to return defective parts, transportation charges must be
prepaid. Weber will return parts to the purchaser, freight or postage prepaid.
This Limited Warranty does not cover any failures or operating diffi culties due
to accident, abuse, misuse, alteration, misapplication, vandalism, improper
installation or improper maintenance or service, or failure to perform normal
and routine maintenance, including but not limited to damage caused by
insects within the burner tubes, as set out in this owner’s manual.
Deterioration or damage due to severe weather conditions such as hail,
hurricanes, earthquakes or tornadoes, discoloration due to exposure to
chemicals either directly or in the atmosphere, is not covered by this Limited
Warranty.
There are no other express warrants except as set forth herein and any
applicable implied warranties of merchantability and fi tness are limited in
duration to the period of coverage of this express written Limited Warranty.
Some regions do not allow limitation on how long an implied warranty lasts,
so this limitation may not apply to you.
Weber is not liable for any special, indirect or consequential damages. Some
regions do not allow the exclusion or limitation of incidental or consequential
damages, so this limitation or exclusion may not apply to you.
Weber does not authorize any person or company to assume for it any other
obligation or liability in connection with the sale, installation, use, removal,
return, or replacement of its equipment; and no such representations are
binding on Weber.
This Warranty applies only to products sold at retail.
WEBER-STEPHEN PRODUCTS CO.
Customer Service Center
1890 Roselle Road, Suite 308
Schaumburg, IL 60195
USA
For replacement parts call:
1-800-446-1071
www.weber.com
®
ATTENTION: This product has been safety tested
and is only certifi ed for use in a specifi c country.
Refer to country designation located on outer
carton.
These parts may be gas carrying or gas burning components.
Please contact Weber-Stephen Products Co., Customer
Service Department for genuine Weber-Stephen Products Co.
replacement part(s) information.
WARNING: Do not attempt to make any repair to
gas carrying or gas burning components without
contacting Weber-Stephen Products Co., Customer
Service Department. Your actions, if you fail to
follow this product Warning, may cause a fi re or an
explosion resulting in serious personal injury or
death and damage to property.
FOR PURCHASES MADE IN THE US: Customer Service: 1-800-446-1071
PARA COMPRAS HECHAS EN E.U.: Atención al cliente: 1-800-446-1071
4
Exploded View
Diagrama de despiece
Vision éclatée
1
21
22
2
3
4
23
5
6
7
8
9
10
11
12
13
14
15
16
24
25
26
27
28
29
30
31
32
17
18
19
20
33
34
35
36

Exploded View List
Lista del diagrama de despiece
Liste de la vision éclatée
5
1. Swing-Up Work Surface
Superfi cie de trabajo basculante
Surface de travail rabattable
2. Thermometer Assembly
Ensamble del termómetro
Ensemble du thermomètre
3. Handle Assembly
Ensamble del asa
Ensemble de la poignée
4. Cooking Grate
Rejilla de cocción
Grille de cuisson
5. Wire Brace
Atadura para el alambre
Renfort en fi l de fer
6. Outside Burner Tube
Tubo quemador externo
Tube du brûleur externe
7. Inside Burner Tube
Tubo quemador interno
Tube du brûleur interne
14. Disposable Drip Pan
Bandeja de goteo desechable
Egouttoir jetable
15. ¼ x 20 x 1˝ Truss Head Screw
¼ x 20 x 1˝ Tornillo de cabeza segmentada
Vis à tête bombée large de ¼ x 20 x 1˝
16. Left Leg
Pata izquierda
Pied gauche
17. Tank Skirt
Falda del tanque
Jupe du réservoir
18. Front Bridge Piece
Pieza del puente delantero
Pièce du pont avant
19. Tank Base
Base del tanque
Base du réservoir
20. Bottom Rack
Gradilla inferior
Grille inférieure
27. Valve & Manifold - Regulator Assembly
Válvula y múltiple - Ensamble del regulador
Ensemble valve & collecteur - régulateur
28. Manifold-Hardware
Accesorios del múltiple
Collecteur - matériel
29. Catch Pan
Plato recolector
Egouttoir
30. Rear Bridge Piece
Pieza del puente trasero
Pièce du pont arrière
31. Right Leg
Pata derecha
Pied droit
32. Tank Bracket Assembly
Ensamblaje del soporte del tanque
Ensemble du support du réservoir
33. Wheel Cover
Cubierta de la rueda
Enjoliveur
8. Electrode Assembly
Ensamble del electrodo
Ensemble de l’électrode
9. Front Cradle
Jaula delantera
Berceau avant
10. Igniter
Encendedor
Allumeur
11. Burner Tube Hardware
Accesorios del tubo quemador
Matériel du tube du brûleur
12. Large Control Knob
Perilla de control grande
Grand bouton de commande
13. Small Control Knob
Perilla de control pequeña
Petit bouton de commande
21. Hair Pin Cotter
Clavija hendida
Anneau de retenue
22. Hinge Pin
Pasador de bisagra
Axe de charnière
23. Lid
Tapa
Couvercle
24. Rear Cradle
Jaula trasera
Berceau arrière
25. Fire box
Caja de fuego
Boîtier de feu
26. Fire Box Mounting Hardware
Accesorios de montaje para la caja de fuego
Matériel de montage du boîtier de feu
34. Hubcap
Tapa del cubo
Cache-moyeu
35. Wheel
Rueda
Roue
36. Axle
Eje
Axe
6
Parts List
Lista de Piezas
Liste des pièces
TOOLS NEEDED: HERRAMIENTAS REQUERIDAS: OUTILS NECESSAIRES:
WOOD BLOCK
WOOD BLOCK
BLOC DE BOIS
212
K50 X 19MM
PHILLIPS SCREW (BLACK)
k50 X 19MM
TORNILLO PHILLIPS (NEGRO)
k50 X 19MM
VIS PHILLIPS (NOIRE)
1/4 - 2 0 X 1"
TRUSS HEAD SCREW
1/4 - 2 0 X 3/4”
TORNILLO DE CABEZA
SEGMEN TADA (NEGRO)
1/4 - 2 0 X 3/4”
VIS DE TETE DE SUPPORT (NOIRE)
2 -
1/4 - 2 0 X 1 1/2"
2
STAINLESS STEEL PAN HEAD
PHILLIPS SCREW
pTORNILLO PHILLIPS DE CABEZA
ARMADA DE ACERO INOXIDABLE
1/4 - 20 X 1 1/2 PULGADAS
VIS PHILLIPS À TÊTE CYLINDRIQUE
LARGE EN ACIER INOXYDABLE DE 0,6
À 50 X 2,5 CM (1/4 - 20 X 1 PO)
1 -
Assembly
Ensamblaje
Assemblage
7
1
2 -
2
3 4
2 -
5
Le cadre des roues se place à droite. L’autocollant
pour les instructions d’allumage est orienté vers l’avant.
El bastidor de la rueda va a la derecha. La etiqueta de
instrucciones de encendido ve hacia adelante.
Wheel frame goes on the right. Lighting
instruction sticker faces forward.
6
4 -
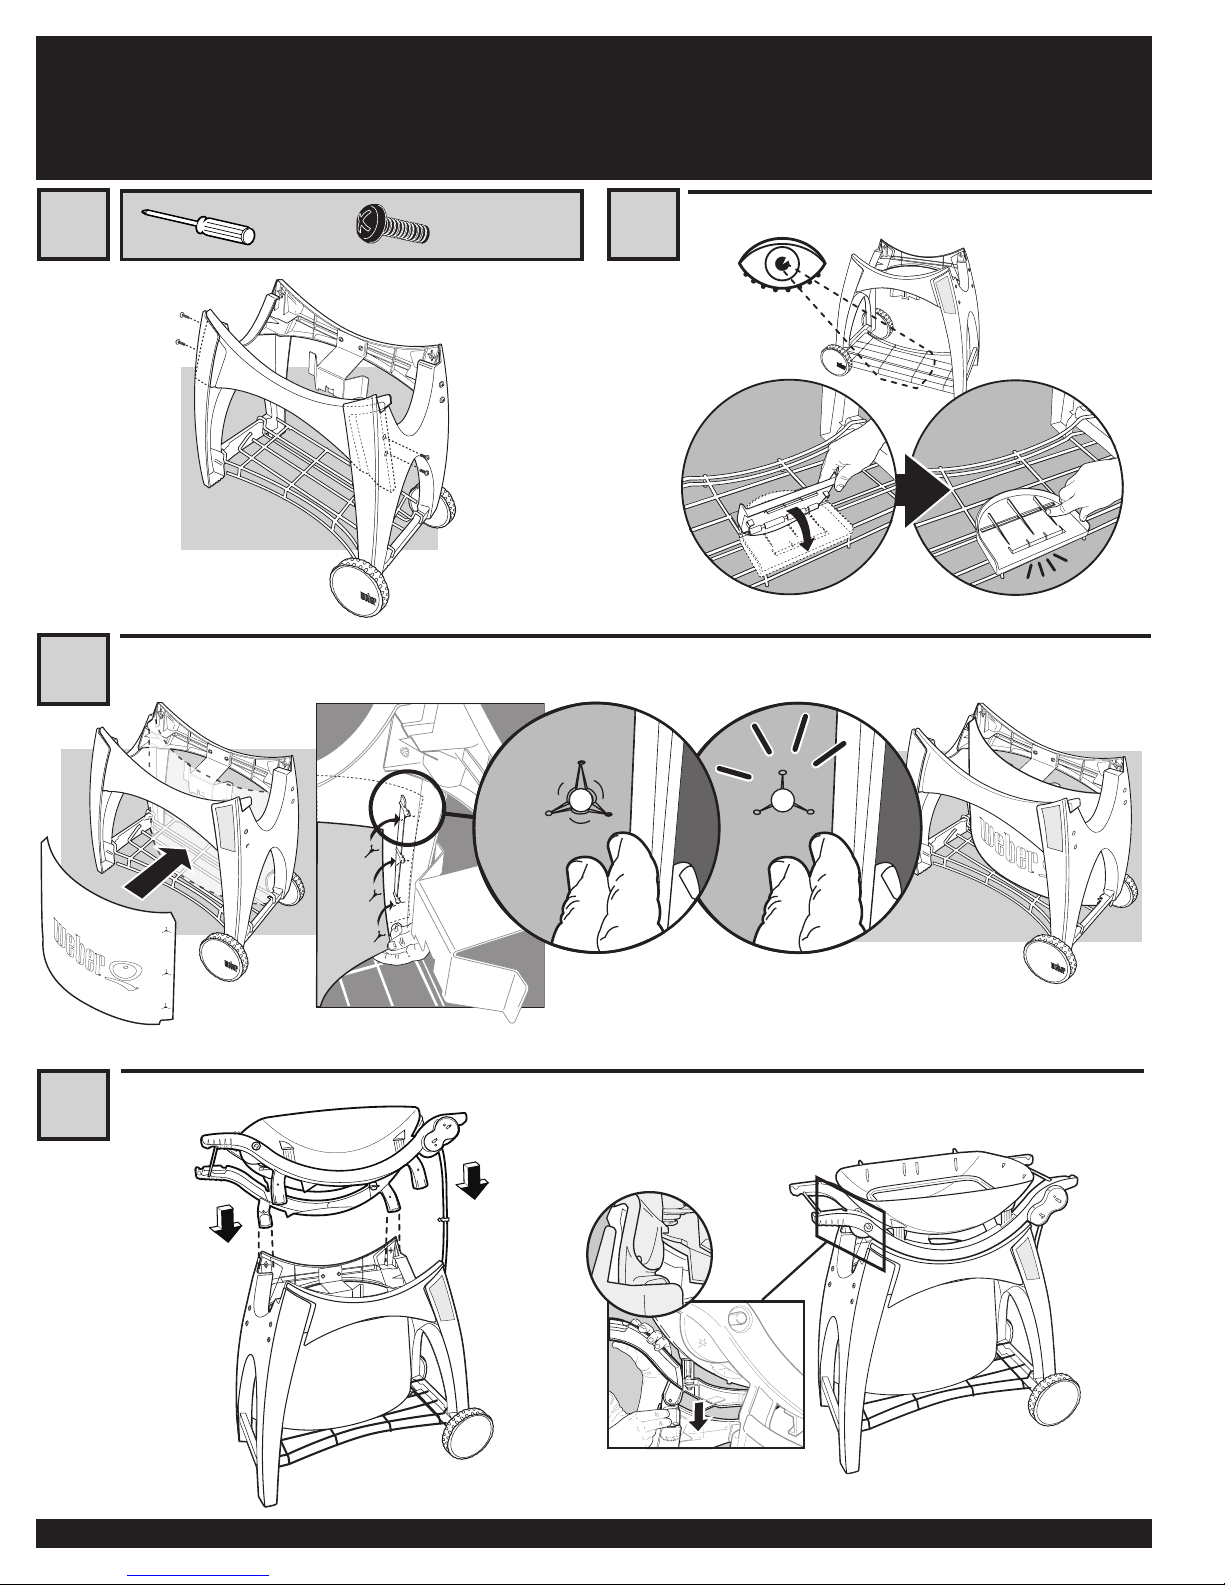
8
Assembly
Ensamblaje
Assemblage
7 8
4 -
9
10

Assembly
Ensamblaje
Assemblage
9
11 12
4 -
4-
13 14
2 -
2
1
2 -
10
15
Assembly
Ensamblaje
Assemblage
16
(1)
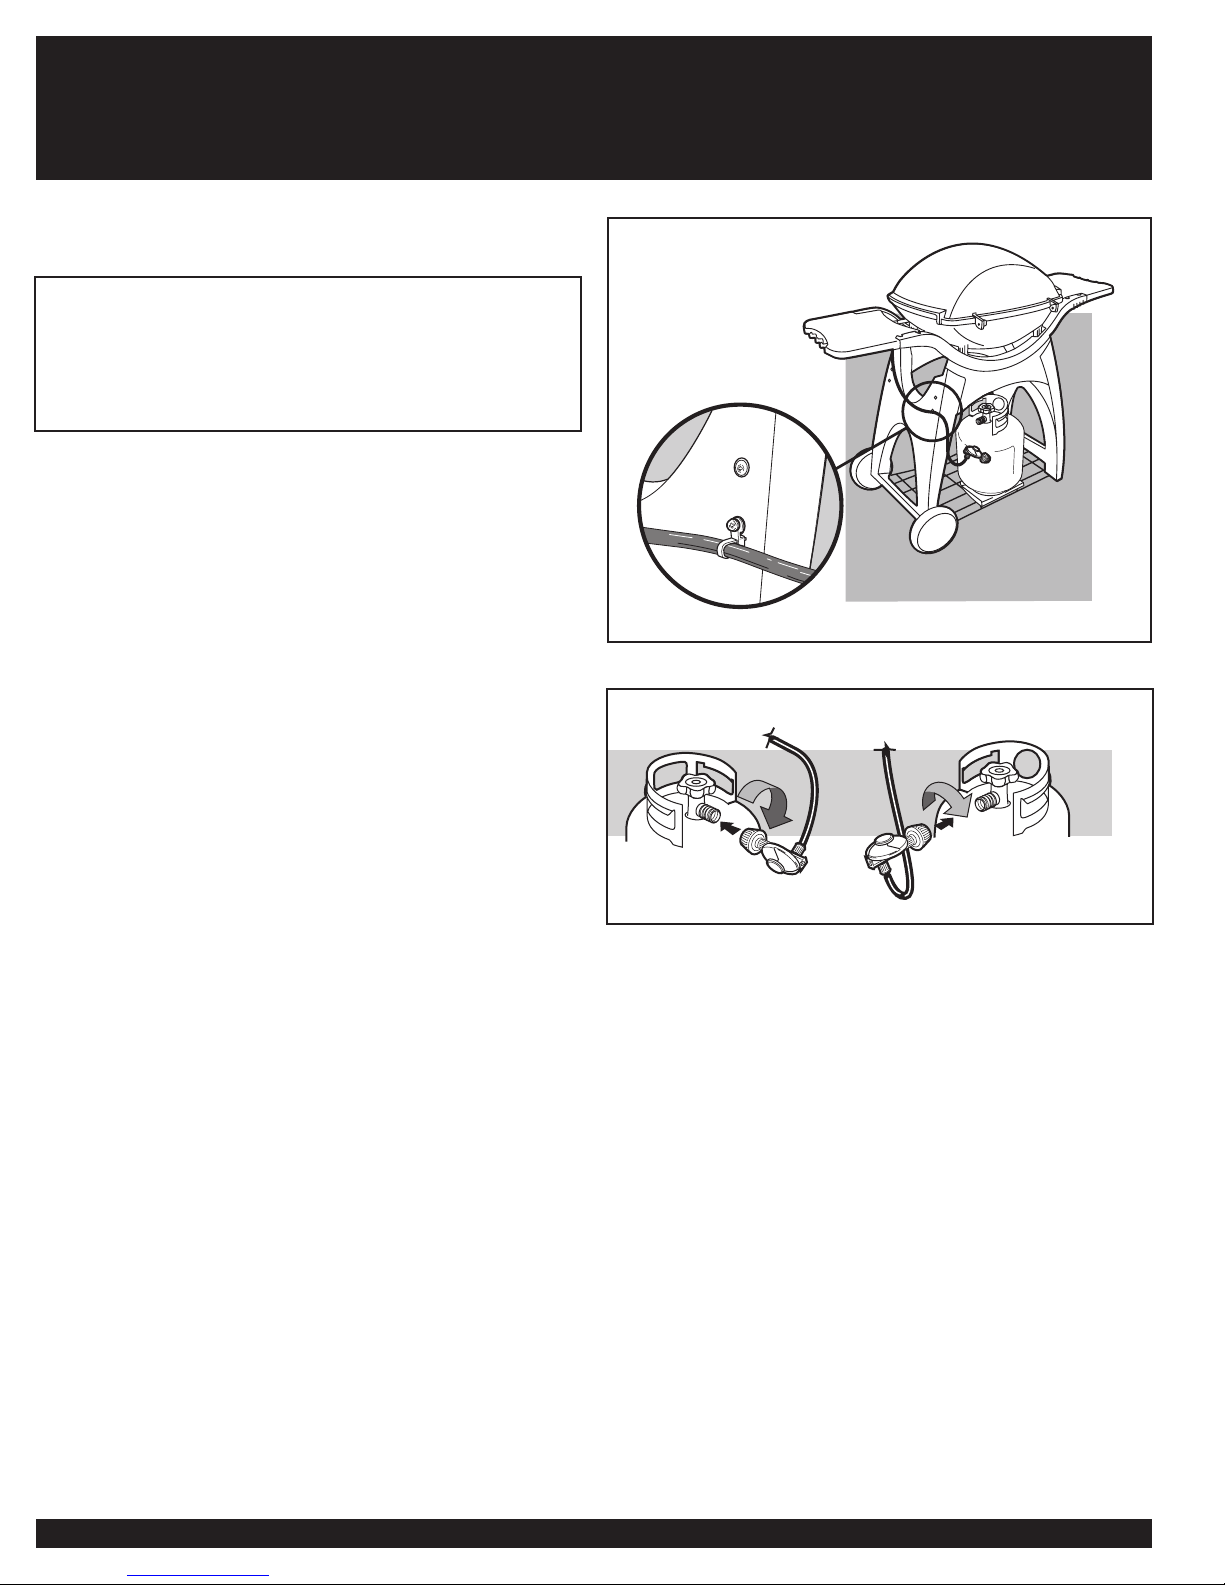
1) Uncoil the hose and regulator of the Weber® Q™ 300.
2) Remove leg screw and secure hose and retention clip(1) to cart leg.
WARNING: The hose must be secured to the cart leg
by the hose retention clip. Failure to do so could cause
damage to hose resulting in a fi re or explosion, which
can cause serious bodily injury or death and damage to
property.
1) Desenrolle la manguera y el regulador del asador Weber® Q™ 300.
2) Retire el tornillo de la pata y asegure la manguera y el clip de retención(1)
a la pata del carro.
NOTA IMPORTANTE: La manguera debe sujetarse a
la pata del carro usando el clip de retención. El no
hacerlo pudiera causar un fuego o explosión, resultando
en lesiones corporales o la muerte y en daños a la
propiedad.
1) Déroulez le tuyau et le régulateur du Weber® Q™ 300.
2) Retirez la vis du pied et fi xez le tuyau et la pince(1) de rétention au pied du
chariot.
MISE EN GARDE : Le tuyau doit être fi xé solidement
au pied du chariot par la pince de rétention du tuyau.
Le non respect de cette consigne risque de provoquer
une détérioration du tuyau entraînant un incendie ou
une explosion, susceptible de provoquer une blessure
physique grave voire un décès ainsi que des dégâts
matériels.
17
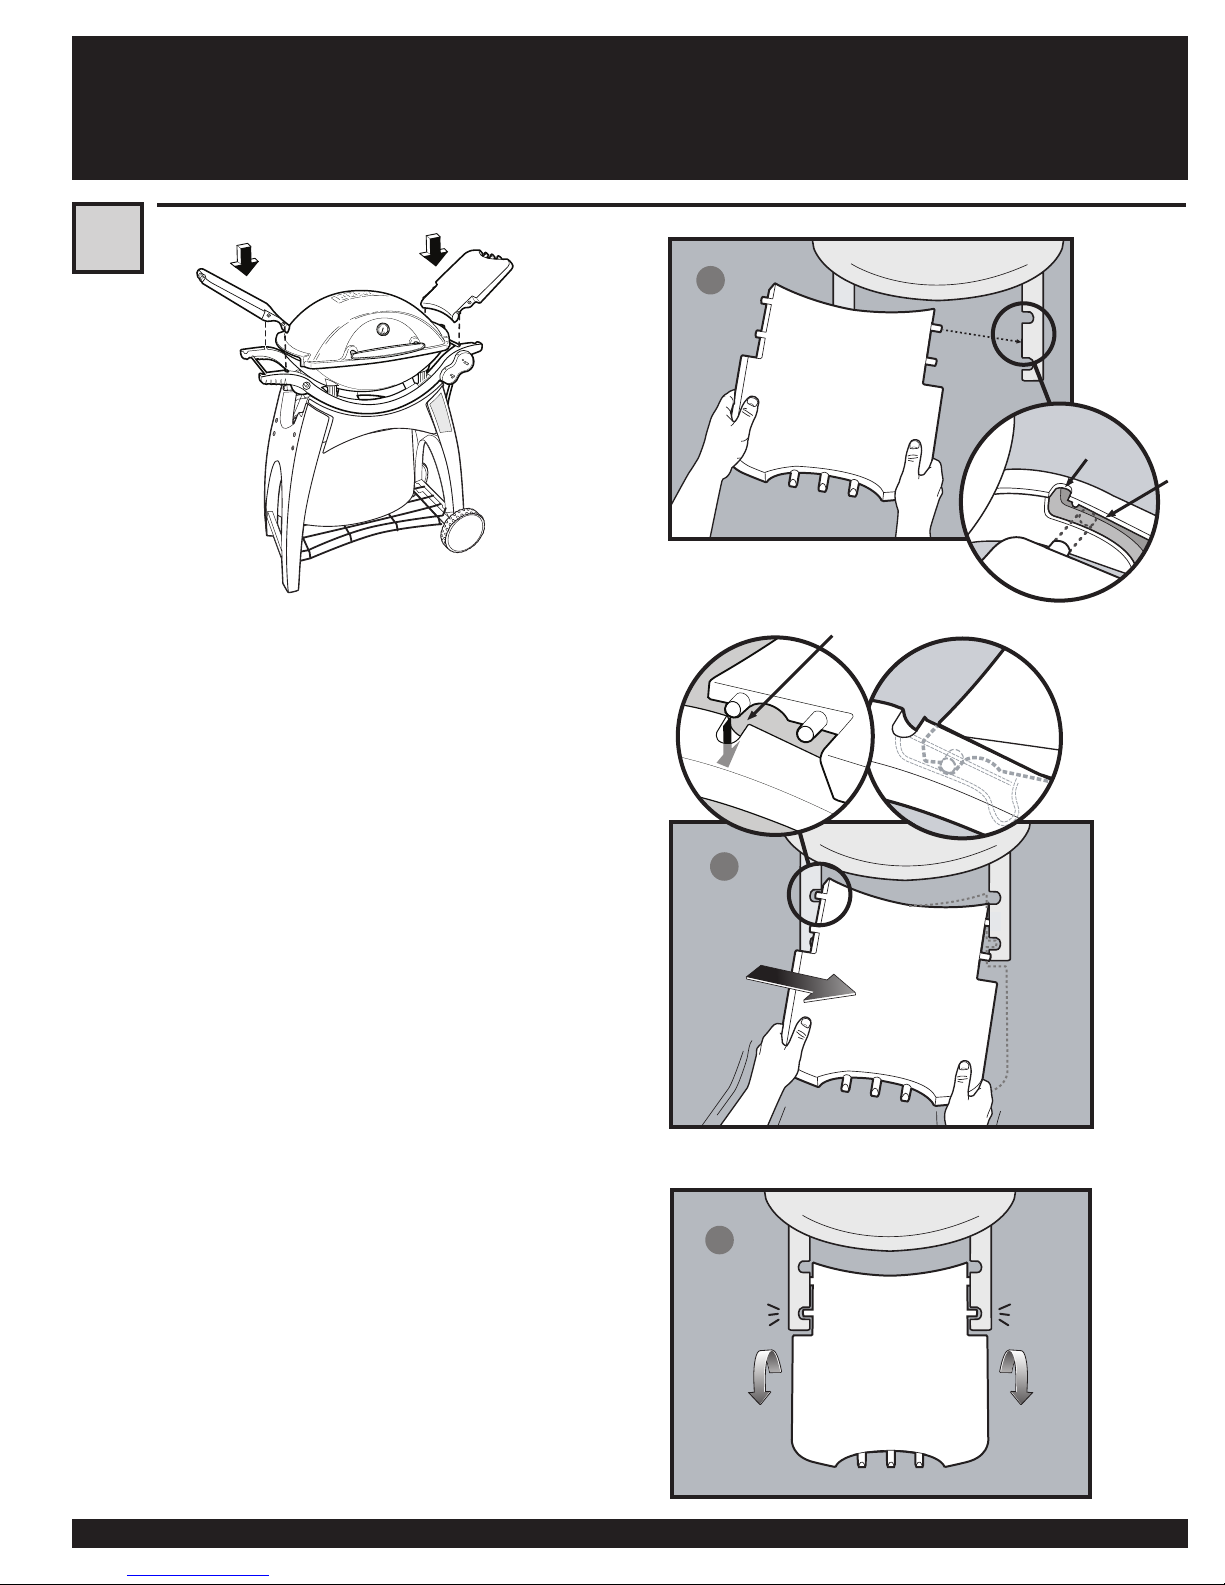
Assembly
Ensamblaje
Assemblage
11
1
(B)
(A)
CAUTION: Read this step carefully before installing
tables.
1) Place top right post of side table into right side cradle slot(A)
approximately one inch behind cradle slot opening(B).
2) Place opposite (top left) post into the opposite cradle slot(C). Using both
hands, apply pressure towards the right until the top left post pivots into
cradle slot.
3) Line up both lower table posts and snap into lower cradle slots.
NOTA IMPORTANTE: Lea este paso cuidadosamente
antes de instalar las mesas.
1) Inserte el poste superior derecho de la mesa lateral dentro de la ranura
en el lado derecho del soporte(A) en un punto aproximadamente una
pulgada detrás de la abertura de la ranura del soporte(B).
2) Coloque el poste opuesto (superior izquierdo) en la ranura del soporte
opuesto(C). Usando ambas manos, aplique presión hacia la derecha hasta
que el poste superior izquierdo gire hacia dentro de la ranura del soporte.
3) Alinee ambos postes inferiores de la mesa y encájelos a presión dentro
de las aberturas inferiores del soporte.
(C)
2
ATTENTION : Veuillez lire cette étape avec attention
avant l’installation des tables.
1) Placez le piquet supérieur droit de la table latérale dans la fente du côté
droit de la cuve(A) à environ un pouce derrière l’ouverture de la fente de la
cuve(B).
2) Placez le piquet opposé (supérieur gauche) dans la fente de la cuve
opposée(C). A l’aide des deux mains, appliquez une pression vers la droite
jusqu’à ce que le piquet supérieur gauche pivote vers la fente de la cuve.
3) Alignez les deux piquets inférieurs de la table puis enfoncez-les dans les
fentes inférieures de la cuve.
3
12
18
Assembly
Ensamblaje
Assemblage
19
1 2
3 4

General Instructions
13
Your Weber® gas barbecue is a portable outdoor cooking appliance. With the
Weber® gas barbecue you can grill, barbecue, roast and bake with results
that are diffi cult to duplicate with indoor kitchen appliances.
The Weber® gas barbecue is portable so you can easily change its location
in your yard or on your patio. Portability means you can take your Weber®
gas barbecue with, if you move.
Liquid Propane (LP) gas supply is easy to use and gives you more cooking
control than charcoal fuel.
• These instructions will give you the minimum requirements for
assembling your Weber® gas barbecue. Please read the instructions
carefully before using your Weber® gas barbecue. Improper assembly
can be dangerous.
• Not for use by children.
• If there are local codes that apply to portable gas grills, you will have to
conform to them. If there are no local codes, you must conform to the
latest edition of the National Fuel Gas Code: ANSI Z 223.1/NFPA 54, or
Natural Gas and Propane Installation Code, CSA B149.1, or Propane
Storage and Handling Code, B149.2
• Use the pressure regulator and hose assembly that is supplied with
the Weber® gas barbecue. This regulator is set for 11 inches of water
column (pressure).
• This Weber® gas barbecue is designed for use with liquid propane
(LP) gas only. Do not use with natural (piped in city) gas. The valves,
orifi ces, hose and regulator are for LP gas only.
• Do not use with charcoal fuel.
• The areas around the LP cylinder must be free and clear from debris.
• Replacement pressure regulators and hose assemblies must be those
specifi ed by the outdoor cooking gas appliance manufacturer.
FOR INSTALLATION IN CANADA
These instructions, while generally acceptable, do not necessarily comply
with the Canadian Installation codes, particularly with piping above and
below ground. In Canada the installation of this appliance must comply with
local codes and/or Standard CSA-B149.2 (Propane Storage and Handling
Code).
STORAGE AND/OR NONUSE
• The gas must be turned off at the liquid propane cylinder when the
Weber® gas barbecue is not in use.
• When the Weber® gas barbecue is stored indoors, the gas supply must be
DISCONNECTED and the LP cylinder stored outdoors in a well-ventilated
space.
• LP cylinder must be stored outdoors in a well -ventilated area out of reach
of children. Disconnected LP cylinder must not be stored in a building,
garage or any other enclosed area.
• When the LP cylinder is not disconnected from the Weber® gas barbecue,
the appliance and LP tank must be kept outdoors in a well-ventilated
space.
• The Weber® gas barbecue should be checked for gas leaks and any
obstructions in the burner tubes before using. (See Sections: “General
Maintenance and Annual Maintenance.”)
• Check that area under the barbecue and the bottom tray are free from
debris that might obstruct the fl ow of combustion or ventilation air.
• The Spider /Insect Screens should also be checked for any obstructions.
(See Section: "Annual Maintenance.")
OPERATING
WARNING: Only use this barbecue outdoors in a
well-ventilated area. Do not use in a garage, building,
breezeway or any other enclosed area.
WARNING: Your Weber® gas barbecue shall not be
used under overhead combustible construction.
WARNING: Your Weber® gas barbecue is not intended
to be installed in or on recreational vehicles and/or
boats.
WARNING: Do not use the barbecue within 24 inches
of combustible materials to the back or sides of the
grill.
WARNING: The entire cooking box gets hot when in
use. Do not leave unattended.
WARNING: Keep any electrical supply cord and the
fuel supply hose away from any heated surface.
WARNING: Keep the cooking area clear of fl ammable
vapors and liquids such as gasoline, alcohol, etc., and
combustible materials.
WARNING: Never store an extra (spare) LP cylinder
under or near the Weber® gas barbecue.
WARNING: The LP cylinder used with your barbecue
must be with a listed OPD (Overfi lling Prevention
Device) and a QCC1 or Type 1 (CGA810) cylinder
connection. The cylinder connection must be
compatible with the barbecue connection.

14
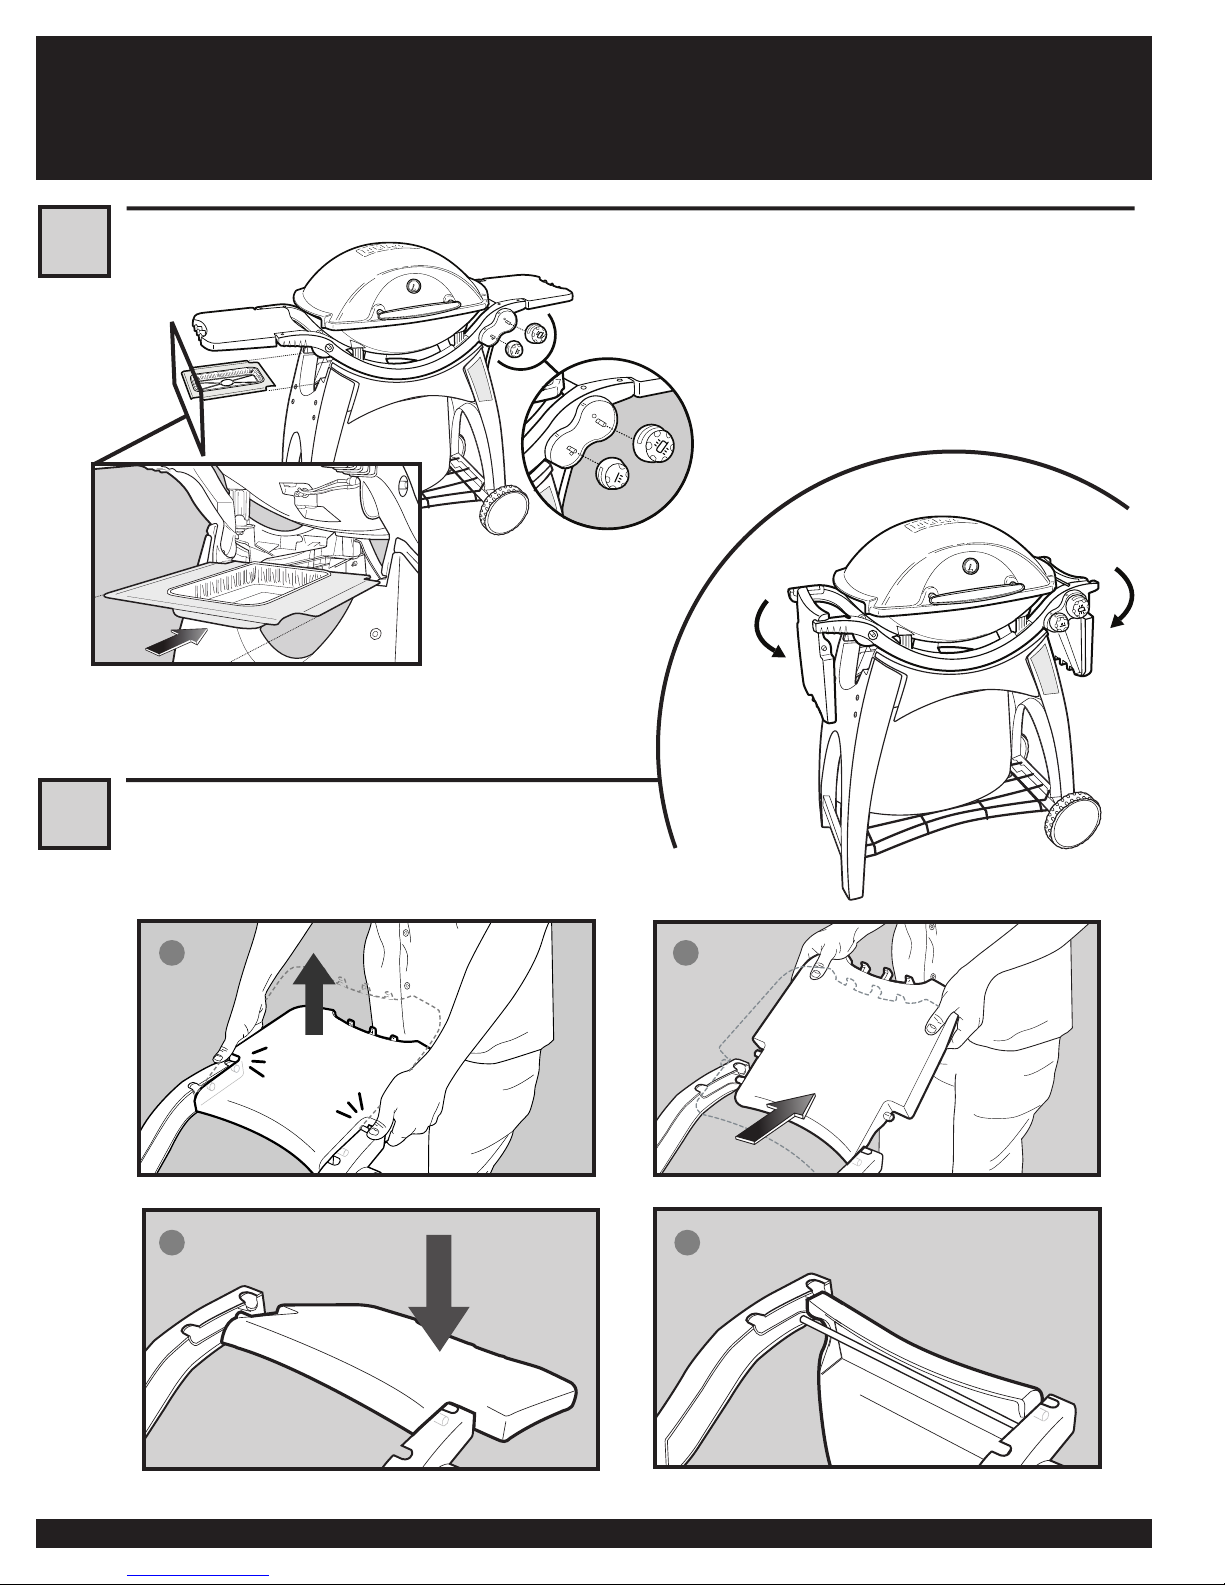
General Instructions
COOKING
WARNING: Do not move the Weber® gas barbecue
when operating or while barbecue is hot.
You can adjust the burners as desired. The control settings: High (H),
Medium (M), Low (L), or Off (O) are described in your Weber
cookbook uses these notations to describe the settings of the INSIDE and
OUTSIDE burners. For example, to sear steaks, you would set both burners
at H (high). Then to complete cooking, you would set OUTSIDE burner at M
(medium). Refer to your Weber
log onto our website at www.weber.com®.
®
cookbook for detailed cooking instructions or
Inside Outside
Inside Outside
®
cookbook. The
Low Direct
Chicken Pieces,
Low Direct
Sausages
Chicken Pieces,
Sausages
High Direct
High Direct
Steak and items
Steak and items
that need searing
that need searing
Low Low
Low Low
Preheating - Your Weber
It operates at an economical low BTU rate. To preheat: after lighting, close
lid and turn both burners to high (H). Preheating to between 500° and 550°
F (260° and 290° C) will take 10 to 15 minutes depending on conditions
such as air temperature and wind. After preheating, adjust control knobs to
Medium or Low, or to between 350 and 450º F (177 and 232º C)
Drippings and grease - Excess drippings and grease will accumulate in the
catch pan under the cookbox. Disposable foil drip pans are available that fi t
the catch pan.
®
gas barbecue is an energy-effi cient appliance.
WARNING: Check the drip pan for grease build-up
before each use. Remove excess grease to avoid a
grease fi re in the catch pan.
Cleaning
WARNING: Turn your Weber® gas barbecue OFF and wait for it to
cool before cleaning.
For availability of replacement cooking grate contact the Customer Service
Representative in your region using the contact information on our web site.
Log onto www.weber.com®.
Outside surfaces - Use a warm soapy water solution to clean, then rinse
with water.
CAUTION: Do not use oven cleaner, abrasive cleansers (kitchen
cleansers) cleaners that contain citrus products, or abrasive
cleaning pads on barbecue or cart surfaces.
Medium Medium
Medium Medium
Indirect
Indirect
Small chickens
Small chickens
Off Medium
Off Medium
Preheat
Preheat
High High
High High
Note: The temperature inside your cooking box for the fi rst few uses, while
surfaces are still very refl ective, may be hotter than those shown in your
cookbook. Cooking conditions. Such as wind and weather, may require the
adjustment of the burner controls to obtain the correct cooking temperatures.
Slide out Bottom tray - Remove excess grease, then wash with warm
soapy water, then rinse
Cooking grate - Clean with a suitable brass bristle brush. As needed,
remove from grill and wash with warm soapy water, then rinse with water.
Catch pan - Disposable foil trays are available, or you can line the catch pan
with aluminum foil. To clean the catch pan, wash with warm soapy water,
then rinse.
Inside cooking Box - Brush any debris off of burner tubes. DO NOT
ENLARGE BURNER PORTS (OPENINGS). Wash inside of cooking box with
warm soapy water and a water rinse.
Inside Lid - While lid is warm, wipe inside with paper towel to prevent grease
build-up. Flaking built-up grease resembles paint fl akes.
Swing-up work tables - Wash with a soft cloth and a soap and water
solution.
Do not use cleaners that contain acid, mineral spirits or xylene. Rinse
well after cleaning.
Swing-up work tables are not to be used as cutting boards.
Gas Instructions
IMPORTANT LP CYLINDER INFORMATION
Failure to follow these DANGER statements exactly may result in a fi re
causing death or serious injury.
DANGER
NEVER store a spare LP Cylinder under or near this
barbecue.
NEVER fi ll the tank beyond 80% full.
If this is not followed exactly, a fi re causing death or
serious injury may occur.
Your Weber® gas grill is equipped for a cylinder supply
system designed for vapor withdrawal.
WARNING: Only use this grill outdoors in a wellventilated area. Do not use in a garage, building,
breezeway or any other enclosed area.
The proper fi lling methods for the fi lling of your cylinder are by weight or
volume, as described in NFPA 58. Please make sure your fi lling station fi lls
your LP cylinder by weight or volume. Ask your fi lling station to read purging
and fi lling instructions on the LP cylinder before attempting to fi ll.
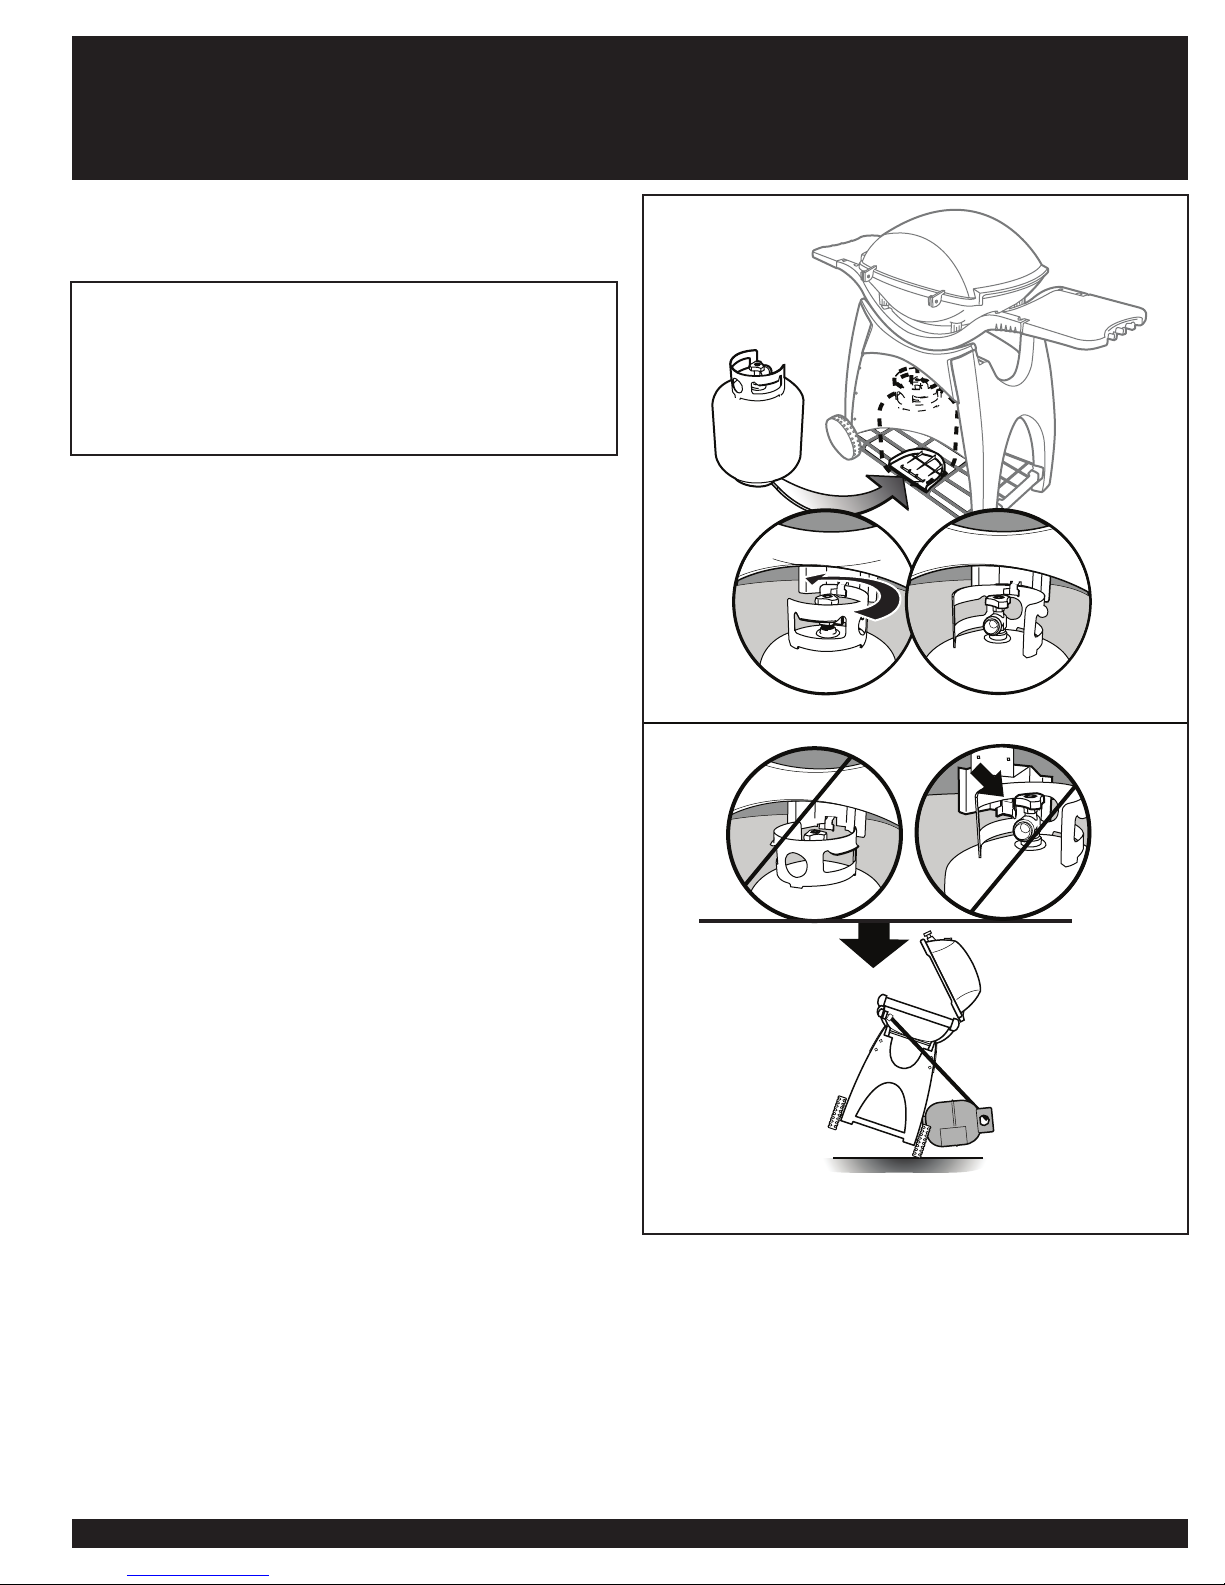
MOUNT THE CYLINDER
See illustration:
15
Gas Instructions
16
CONNECTING THE LIQUID PROPANE CYLINDER
WARNING: Make sure that the LP cylinder valve is
closed. Close by turning valve clockwise.
DANGER
Do not use an open fl ame to check for gas leaks. Be
sure there are no sparks or open fl ames in the area
while you check for leaks. Sparks or fl ames will result
in a fi re or explosion which can cause serious bodily
injury or death, and damage to property.
To Connect the hose to the cylinder:
WARNING: The hose must be secured to the cart
leg by the hose retention clip. Failure to do so could
cause damage to hose resulting in a fi re or explosion,
which can cause serious bodily injury or death and
damage to property.
1) Remove the plastic dust cover from the tank valve.
2) Screw the hose coupling onto the tank valve, clockwise, or to the right.
Hand-tighten only.
Note: This is a new type of connection. It tightens clockwise and will not
allow gas to fl ow unless the connection is tight. The connection requires
tightening by hand only.
WARNING: Do not use a wrench to tighten the
connection. Using a wrench could damage the
regulator coupling and could cause a leak.
CHECK FOR GAS LEAKS
CHECK THAT THE BURNER VALVES ARE OFF
Check by pushing the control knob in and turning clockwise. Confi rm that the
knob is set in the “OFF” indicator position. Proceed to the next step. If the
control knob does turn, continue turning clockwise until it stops. It is now in
the OFF position. Proceed to the next step
WARNING: You should check for gas leaks every time
you disconnect and reconnect a gas fi tting.
WARNING: Perform these leak checks even if your
barbecue was dealer or store assembled.
WARNING: Do not ignite burners when leak checking.

Gas Instructions
DANGER
Do not use an open fl ame to check for gas leaks. Be
sure there are no sparks or open fl ames in the area
while you check for leaks. Sparks or open fl ames will
result in a fi re or explosion, which can cause serious
bodily injury or death and damage to property.
1) Mix soap and water.
2) Turn on the cylinder valve by turning cylinder valve handwheel counterclockwise.
3) Check for leaks by wetting the fi tting with the soap and water solution
and watching for bubbles. If bubbles form, or if a bubble grows, there is
a leak.
If there is a leak, turn off the gas and tighten the fi tting. Turn the gas back on
and recheck with the soap and water solution.
If leak does not stop, Contact the Customer Service Representative in your
area using the contact information on our web site. Log onto www.weber.com®.
Do not use the barbecue.
4) When leak checking is complete, turn gas supply OFF at the source
and rinse connections with water.
WARNING: Do not ignite burners when leak checking.
Check:
A.) Valve to-regulator hose connection.
B.) Valve to Outside burner gas line connection.
C.) Valve to Inside burner gas line connection.
WARNING: If there is a leak at connection (A, B, or C)
turn OFF the gas. DO NOT OPERATE THE GRILL. Contact
the Customer Service Representative in your area using
the contact information on our web site. Log onto www.
weber.com®.
17
(B)
(A)
(C)
Check:
D.) Hose to regulator connection.
E.) Regulator to propane cylinder connection.
WARNING: If there is a leak at connection (E),
remove propane cylinder. Do not operate grill. Use
a different propane cylinder and recheck for leaks
with soap and water solution. If a leak persists after
retightening the propane cylinder, turn OFF the gas.
DO NOT OPERATE THE GRILL. Contact the Customer
Service Representative in your area using the contact
information on our web site. Log onto www.weber.com
®
.
(D)
(E)
 Loading...