

Page 1
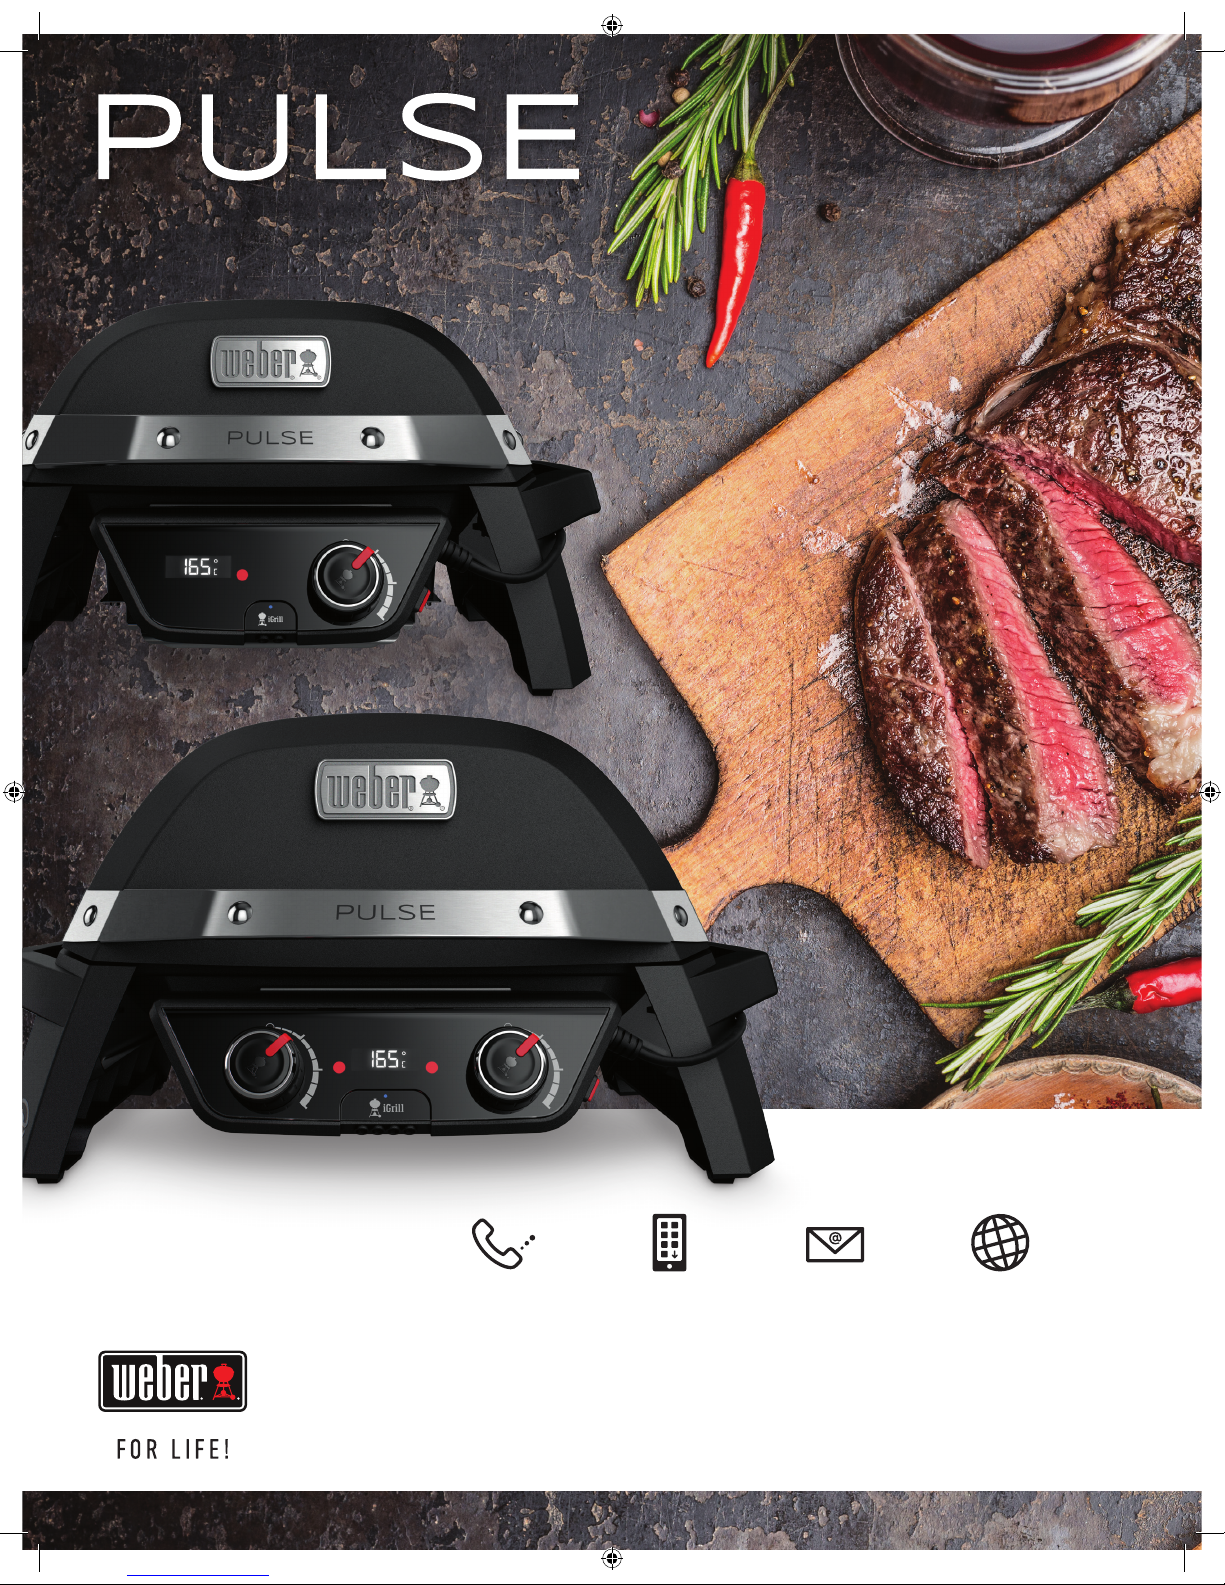
PULSE 1000 with Stand • PULSE 1000
PULSE 2000 with Cart • PULSE 2000
REGISTER TODAY. We are so glad that you have joined us on the journey to
barbecuing greatness. Download the free Weber iGrill App, register your barbecue and
gain access to fun and engaging Weber information, including tips, tricks and how to get
the most out of your barbecuing experience. Add that to a list of mouthwatering recipes
and important service information and you will be proud to say “Weber for life!”
OWNER’S MANUAL
PHONE iGRILL APP EMAIL WEBER.COM
59587_Pulse_enGB_working.indd 1 11/27/17 9:31 AM
Page 2
2
1
2
3
4
Important
SafetyInformation
DANGER, WARNING, and CAUTION
statements are used throughout this
Owner's Manual to emphasise critical and
important information. Read and follow
these statements to help ensure safety and
prevent property damage. Thestatements
are defined below.
m DANGER: Indicates a hazardous
situation which, if not avoided,
will result in death or seriousinjury.
m WARNING: Indicates a hazardous
situation which, if not avoided,
could result in death or seriousinjury.
m CAUTION: Indicates a hazardous
situation which, if not avoided,
could result in minor or moderateinjury.
Hello!
We are so glad that you have joined us
on the journey to barbecuing happiness.
Pleasetake some time to read through
this Owner’s Manual to ensure that
you are up and barbecuing quickly and
easily. We want to be with you for the
life of your grill, so please take just a
couple of minutes to register yourgrill.
Wepromise that we will never sell
your information or spam you with
unnecessary emails. What we do promise
is to be by your side, every step of the
way. When you sign up for a Weber-ID as
part of your registration, wewill deliver
special barbecue-related content just for
you to enjoy.
So, come along and join us online, on
your smartphone or however else you'd
like to stay in touch.
Thank you for choosing Weber.
We are happy you are here.
PERFECTLY
BARBECUED
FOOD
EVERY TIME
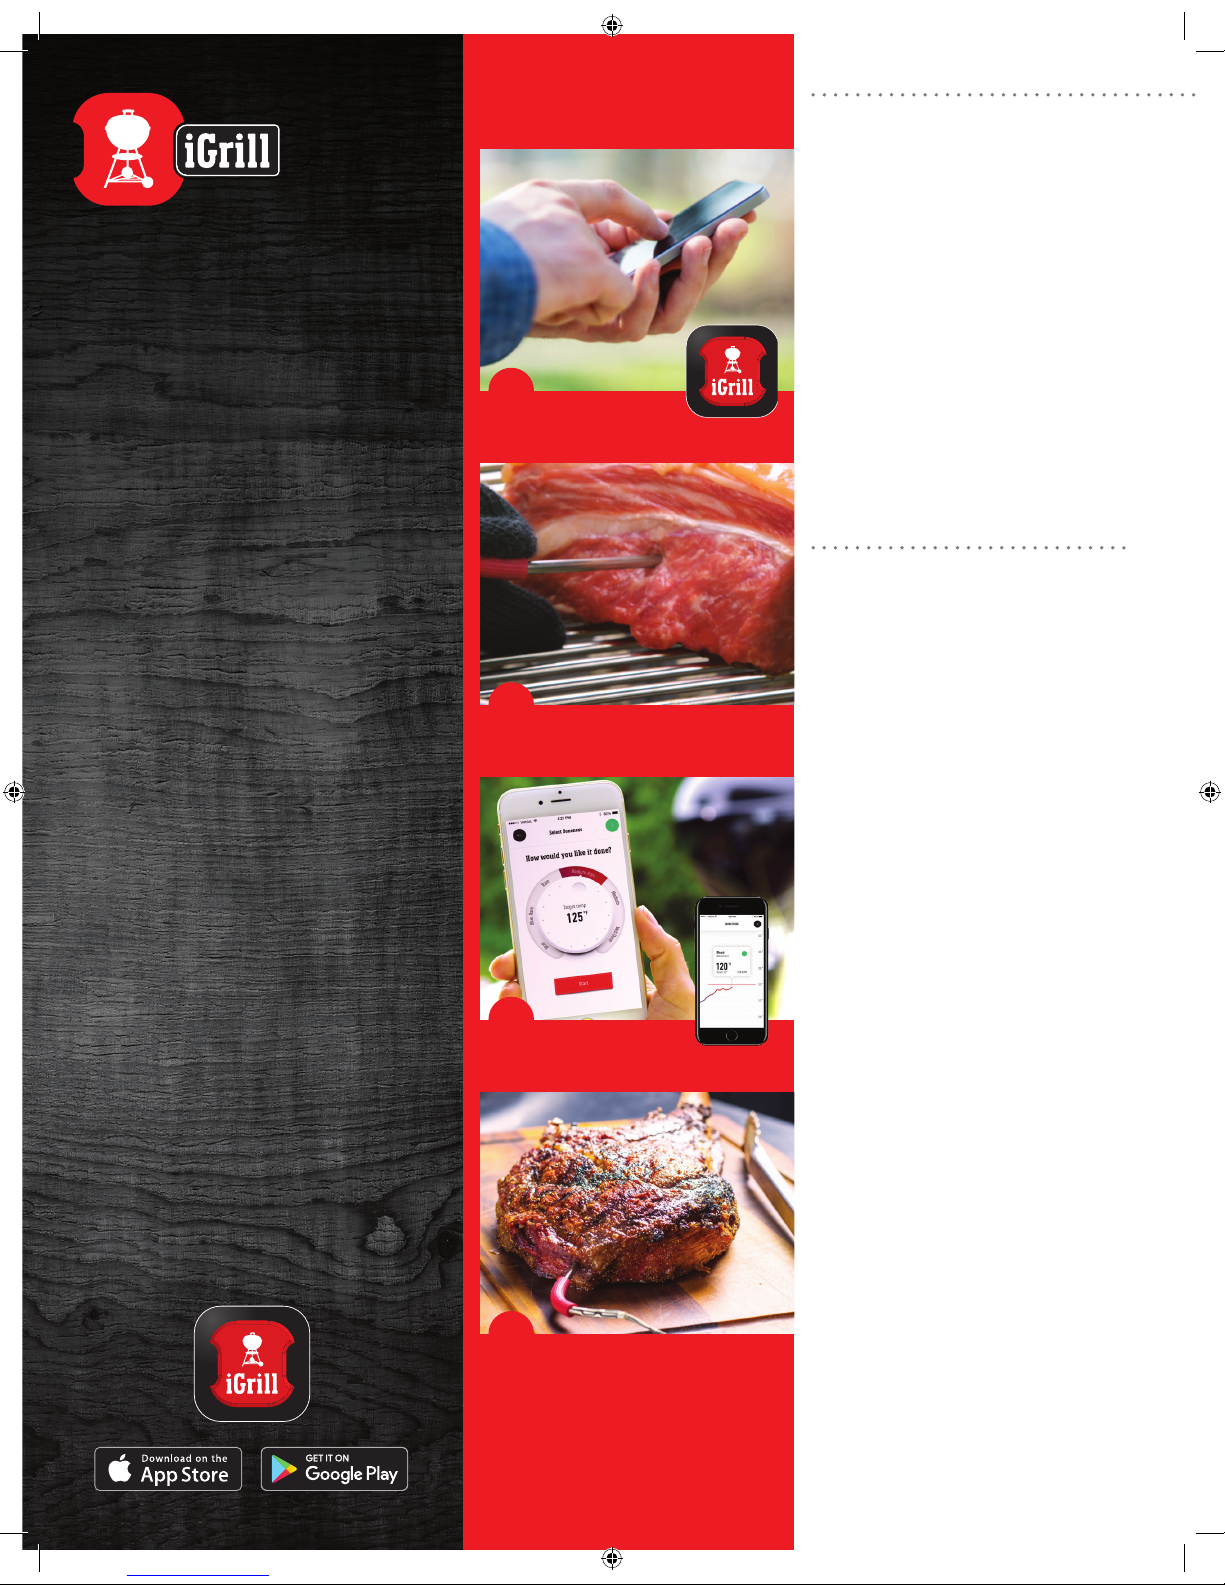
• The built-in iGrill App-connected
thermometer lets you monitor your
food and the inside temperature of your
barbecue right from your smart device.
• Instant LED readout of your barbecues
temperature displays on the digital
temperature screen.
• Track multiple meat probes at once,
setyour own barbecuing guide or select
one of the presets in your iGrill App for a
perfect barbecuing experience.
DOWNLOAD
THE FREE APP
INSERT PROBE
SET UP AND
MONITOR
PERFECT RESULTS
59587_Pulse_enGB_working.indd 2 11/27/17 9:31 AM
Page 3

3
This appliance is rated for
220V-240V - 50/60Hz
Output Power (Watts):
PULSE 1000 = 1800 W
PULSE 2000 = 2200 W
iGrill Frequency Range (MHz):
2402.0 - 2480.0 MHz
Welcome to Weber
ALWAYS
HAVE THE
LATEST AND
GREATEST
The most recent version of this
Owner’s Manual can be
found online.
Installation and Assembly
m WARNING: This barbecue is not intended to be
installed in or on mobile homes, caravans or boats.
m WARNING: This model of barbecue is only intended
for freestanding use.
m WARNING: Do not use this barbecue unless all of the
parts are in place and the barbecue was assembled
according to the assembly instructions.
m CAUTION: To minimise the risk of property damage
and/or personal injury, do not use an extension
power-supply cable unless it conforms to the
specifications listed in this manual.
• If it is necessary to use an extension lead it must be
connected to an earthed socket. Use only a 14-gauge
cable with an earthed plug, suitable for use with
outdoor appliances. The maximum length for the
extension lead is 4 meters (13 feet). Keep the extension
lead as short as possible. Examine the extension lead
before use and replace if damaged.
• Make sure that the lead does not represent a trip hazard.
• Keep the connections dry.
• Observe all local laws and regulations when using this
appliance.
Operation
m DANGER: Only use the barbecue outdoors in a well-
ventilated area. Do not use in a garage, building,
covered walkway, tent or any other enclosed area or
beneath overhead combustibleconstruction.
m DANGER: Do not use charcoal, briquettes, liquid fuel
or lava rock in the barbecue.
m WARNING: Use this barbecue only as described in
this manual. Misuse may cause fire, electric shock
or injury.
m WARNING: This appliance should only be connected
to an earthed socket. Do not use plug adaptors.
m WARNING: The appliance should be supplied through
a residual current device (RCD) having a rated
residual operating current not exceeding 30 mA.
m WARNING: Do not operate the unit if the electrical
socket is damaged.
m WARNING: Always unplug by pulling the plug. Do not
pull on the cable.
m WARNING: Do not use barbecue within 3.05 m (10
feet) of any body of water, such as a pool or pond.
m WARNING: Do not use the barbecue within 61 cm
(24inches) of combustible materials. This includes
the top, bottom, back and sides of the barbecue.
m WARNING: Keep the cooking area clear of flammable
vapours and liquids, such as petrol, alcohol, etc., and
flammable/combustible materials.
m WARNING: Should a grease fire occur, close the lid,
turn the power button o, unplug the barbecue from
the socket and leave the lid closed until the fire is
extinguished. Do not use liquid to extinguish flames.
m WARNING: Accessible parts may be very hot.
Keepyoung children and pets away.
m WARNING: Children should be supervised to ensure
that they do not play with the appliance.
m WARNING: The use of alcohol, prescription drugs,
non-prescription drugs or illegal drugs may impair
the consumer’s ability to properly and safely
assemble, move, store or operate the barbecue.
m WARNING: Do not leave the barbecue unattended
during preheating or use. Exercise caution when
using this barbecue. The entire cookbox gets hot
when in use.
m WARNING: Do not move the appliance during use.
m WARNING: Keep any electrical supply cable
away from any heated surfaces. Follow cable
management instructions.
m WARNING: Locate power cable away from trac
areas. Arrange the cable so that it will not be pulled
or tripped over.
TABLE OF CONTENTS
2 Welcome to Weber
Important SafetyInformation
4 The Weber Promise
Weber’s Voluntary Warranty
5 Assembly
Parts List
6 Product Features
Pulse 1000 Features
Pulse 2000 Features
Feature Descriptions
8 Operation
Getting Started
iGrill Care
Meal-to-Meal Maintenance
11 Tips and Hints
Direct Barbecuing Setup
Indirect Barbecuing Setup
Dual Zone Barbecuing
Barbecuing Do’s and Don’ts
EC Declaration of Conformity
13 Product Care
Deep Cleaning and Maintenance
14 Troubleshooting
m WARNING: Do not drop the temperature controller or
subject it to severe impact as it could compromise
the functionality and/or safety of the unit. Do not use
the appliance if it is dropped or malfunctions in any
manner.
m WARNING: Inspect the power cable and plug
regularly for any signs of damage. Do not operate
appliance with damaged cable or plug.
m WARNING: To protect against electric shock, do not
immerse the temperature controller, cable, plugs,
probes or barbecue in water or other liquids.
m WARNING: To prevent electric shock, do not spray
liquid inside of barbecue.
m WARNING: Operate barbecue only on a level, heat-
resistant surface.
m CAUTION: Always plug the temperature controller
into the barbecue before plugging power cable into
the socket.
m CAUTION: When connecting this appliance to a power
supply, ensure that the supply voltage corresponds
with the voltage rating marked on the appliance label.
m CAUTION: Do not exceed the wattage of the electrical
socket.
m CAUTION: This barbecue is intended for outdoor
household use only. Do not use indoors or for
commercial cooking. Do not use as a heater.
m CAUTION: Do not use the barbecue in any vehicle
or in any storage or cargo area of any vehicle. This
includes, but is not limited to, cars, lorries, estate
cars, mini-vans, sports utility vehicles, mobile
homes, caravans and boats.
Storage and/or Non-use
m CAUTION: Allow the appliance to cool before moving,
cleaning or storing it.
m CAUTION: Temperature controller should be
removed from barbecue and stored indoors when
barbecue is not in use.
m CAUTION: Cover the barbecue only when it is cool.
iGrill Technology
m WARNING: Risk of injury! The probes are very sharp.
Please be careful when handling probes.
m WARNING: Risk of burns! Handling the temperature
probes without hand protection will result in severe
burns. The coloured probe indicators are not
intended to be touched with bare hands while using
the barbecue as they are not heat-insulated. Please
wear heat-resistant gloves at all times while using
this product in order to avoid being burned.
• Visit weber.com/igrillsupport to learn more about
device compatibility and the languages supported
by the Weber iGrill App. Please read this manual
– especially the safety information – before using
the iGrill for the first time, and be sure follow the
instructions while using the device.
• Intended use: This appliance is for outdoor barbecuing
use only and users must follow all safety and use
guidelines as outlined in this Owner’s Guide. Any
other use may cause damage. The manufacturer or
retailer are not liable for injuries/damage arising from
improper use.
• Note: The device is not to be used by children or
persons with reduced physical, sensory or mental
capabilities.
Keep this Owner’s Manual for future
reference. Thoroughly read through it and if
you have any questions please contact us
today using the contact information that can
be found at the back of this manual.
59587_Pulse_enGB_working.indd 3 11/27/17 9:31 AM
Page 4

4
The Weber Promise
Thank you for purchasing a Weber product.
Weber-Stephen Products LLC, 1415 S. Roselle Road,
Palatine, Illinois 60067 and its International Business
Units (listed at the end of this manual) (“Weber”) pride
ourselves on deliver ing a safe, durable, and reliable
product.
This is Weber’s Voluntary War ranty prov ided to you at
no extra charge. It contains the information you will
need to hav e your Weber product repaire d or replaced
in the unlikely event of a failure or defect.
Pursuant to applicable laws, the Owner has several
rights in case the product is defective. Those
rights may include supplementar y performance or
replacement, abatement of the purchasing price, and
compensation. In some countries in the European
Union, for example, this would be a two -year
statutory right starting on the date of the handover of
the product. These and other statutory rights remain
unaec ted by this Voluntary Warranty provision.
Infact, this Voluntar y Warranty grants additional
rights to the Owner that are independent from
statutory provisions.
Weber’s Voluntary Warranty
Weber warrants, to the P urchaser of the Weber
produc t (or in case of a gif t or promotional situation,
the pers on for whom it was purchased as a gift or
promotional item) (“Owner”) that the Weber product
is free from defects in material and workmanship
for five (5) years from the date of purchase when
assembled and operated in accordan ce with the
accompanying Owner ’s Manual. (Note: If you lose or
misplace your Weber Own er’s Manual, a replacement
is available online at ww w.weber.com) The Warranty
is applic able in Europe, t he Middle East and Africa
(EMEA ). Weber agrees to repair or repl ace the part
that is defective in mater ial or workmanship subject
to the limitations, disclaimers, and exclusions listed
below. TO THE EXTEN T ALLOWABLE BY APPLICABLE
LAW, THIS WARRANTY IS EXTENDED ONLY TO THE
ORGINA L PURCHASE R AND IS NOT TRANSFERABLE
TO SUBSEQUENT OWNERS, EXCEPT IN THE CASE OF
GIFTS A ND PROMOTIONAL ITEMS AS NOTED AB OVE.
Weber stands by its products and is hap py to provide
you with this Voluntary War ranty described for
material defects in the barbecue or i ts relevant
components, normal wear and tear excepted.
• ‘Normal wear and tear’ includes cosmetic and
other immaterial deterioration that may come with
ownership of your barbecue over time, such as surface
rust, dents / scratches, etc.
However, Weber w ill honour this Voluntary Warr anty
for the bar becue or its relevant comp onents wher e
damage or dysfunction results from a material defe ct.
• ‘Material defect’ includes rust through or burn through
of certain parts, or other damage or failure inhibiting
your ability to safely / properly use your barbecue.
Owner’s Responsibilities Under this
Voluntary Warranty / Exclusion of
Warranty
To ensure trouble-free War ranty cover age, it is
impor tant (but not required) that you r egister your
Weber pro duct online at www.weber.com. Please also
retain your original sale s receipt and/or invoice as
Proof of Purchase is required for Warranty coverage.
Weber will also require photographs of any alleged
defect, and the serial number of your barbecue, prior
to processing a Warrant y claim. Registering your
Weber pro duct confirms your Warrant y coverage and
provides a direct link b etween you and Weber in case
we need to contact you.
The above Voluntary Warranty only applies if the
Owner takes reasonable care of the Weber product
by following all assembly instructions, usage
instructions, and preventative maintenance as
outline d in the accompanying Owner ’s Manual, unless
the Owner can prove that the material defect or failure
is independent of non-compliance with the above
mentioned obligations. If you live in a c oastal area, or
have your pr oduct located near a pool , maintenance
includes regular washing and rinsing of the exterior
surfaces as outlined in the accompanying Owner’s
Manual.
This Voluntary Warrant y lapses if th ere are damages,
deteriorations, discolourations, and/or rust for which
Weber is not responsible c aused by:
• Abuse, misuse, alteration, modification, misapplication,
vandalism, neglect, improper assembly or installation,
and failure to properly perform normal and routine
maintenance;
• Insects (such as spiders) and rodents (such as
squirrels), including but not limited to damage to gas
hoses;
• Exposure to salt air and/or chlorine sources such as
swimming pools and hot tubs/spas;
• Severe weather conditions such as hail, hurricanes,
earthquakes, tsunamis or surges, tornadoes or severe
storms.
• Acid rain and other environmental factors.
The use an d/or installation of parts on your Weber
produc t that are not genuine Weber parts will void
this Voluntary Warrant y, and any damages that result
hereby ar e not covered by this Voluntary Warranty.
Any conversion of a gas barbecue not auth orised by
Weber and performe d by a Weber authorised ser vice
technician will void this Voluntary Warranty.
Warranty Processing
If you believe that you have a part which is covered
by this Voluntary Warrant y, please conta ct your
purchase dealer. If needed, you may also contact
Weber Customer Service using the contact information
on our website (www.weber.com). Weber will,
upon investigation, repair or replace (at its option)
a defective part that is covered by this Voluntary
Warrant y. In the event that re pair or replac ement
are not possible, Weber may choose (at its option) to
replace the barbecue in question with a new barbe cue
of equal or gr eater value. Web er may ask you to ret urn
part s for inspection, shipping charges to be pre -paid
by the Owner. The shipping char ges will be reimbursed
to the Own er if the defec t is covered by the Warranty.
When you contact your purchase dealer, please have
the following information available:
• Proof of Purchase
• Photographs of the alleged defect
• Product serial number
Disclaimers
APART FR OM THE WARRANTY AN D DISCLAIMERS
AS DES CRIBED IN THIS VOLUNTARY WARRANT Y
STATEMENT, THERE ARE EXPLICITLY NO FURTHER
WARRANTY OR VOLUNTARY DECLARATIONS OF
LIABILITY GI VEN HERE WHICH GO BEYOND THE
STATUTORY LIABILITY APPLYIN G TO WEBER. T HE
PRESENT VOLUNTARY WARRANTY STATEMENT
ALSO DOES NOT LIMIT OR EXCLUDE SITUATIONS OR
CLAIMS WHERE WEBER HAS MANDATORY LIA BILIT Y
AS PRE SCRIBED BY STATUTE.
NO WARRANTIES SHALL APPLY AFTER THE
FIVE (5) Y EAR PERI OD OF THIS VOLUNTARY
WARRA NTY. NO OTHER WARRANTIES GIVEN BY
ANY PERSON, INCLUDING A DEALER OR RETAILER,
WITH RESPECT TO A NY PRODUCT (SUCH AS A NY
“EXTENDED WARRANTIES”), SHALL BIND WEBER.
THE EXC LUSIVE REMEDY OF THIS VO LUNTARY
WARRA NTY IS REPAIR OR REPLACEMENT OF T HE
PART OR PRODUCT.
IN NO EV ENT UNDER T HIS VOLUNTARY WARRANT Y
SHALL RECOVERY OF ANY KIND BE G REATER THA N
THE AMOUNT OF THE PURCHASE P RICE OF THE
WEBER PRODUCT SOLD.
PARTS AND ACCESSORIES REPLACED UNDER THIS
VOLUNTARY WARRANTY ARE WARR ANTED ON LY FOR
THE REMAINING PERIOD OF THE ABOVE MENTIONED
ORIGINAL FIVE (5) YEAR VOLUNTARY WARRANTY
PERIOD.
THIS LI MITATION DOES NOT APPLY IN CASES OF
INTEN T AND GROSS NEGLIGENC E AND CASE S OF
INJURY TO HUMAN LI FE OR HEALTH OR PERSONA L
INJURY WHETHER THE INJURY WAS THE FAULT
OF WEBE R OR ITS LEGAL REPRESENTATIVES OR
AGENTS.
THIS VOLUNTARY WARRANTY AP PLIES TO PRIVATE
USE ONLY AND D OES NOT APPLY TO WEBER®
BARBECUES USED IN COMMERCIAL, COMMUNAL OR
MULTI-UNIT SETTINGS SUCH AS RESTAURANTS,
HOTELS, RESORTS, OR RENTAL PROPERTIES.
WEBER M AY FROM TIME TO T IME CHANG E THE
DESIGN OF ITS PRODUCTS. NOTHING CONTAINED IN
THIS VOLUNTARY WARRANTY SHALL BE CONSTRUED
AS OBLIGATING WEBER TO INCORPORATE
SUCH DE SIGN CHANGES INTO PREVIOUSLY
MANUFACTURED PRODUCTS, NOR SHALL SUCH
CHANGES BE CONS TRUED AS AN ADMISSION THAT
PREVIOUS DESIGNS WERE DEFECTIVE.
Refer to the International Business Unit s list at the
end of this O wner’s Manual for a dditional contact
information.
The Weber Promise 5 year EMEA voluntary warranty)
At Weber, we pride ourselves on two things: making barbecues that last
and providing a lifetime of excellent customer service.
REGISTRATION = WARRANTY
59587_Pulse_enGB_working.indd 4 11/27/17 9:31 AM
Page 5
5
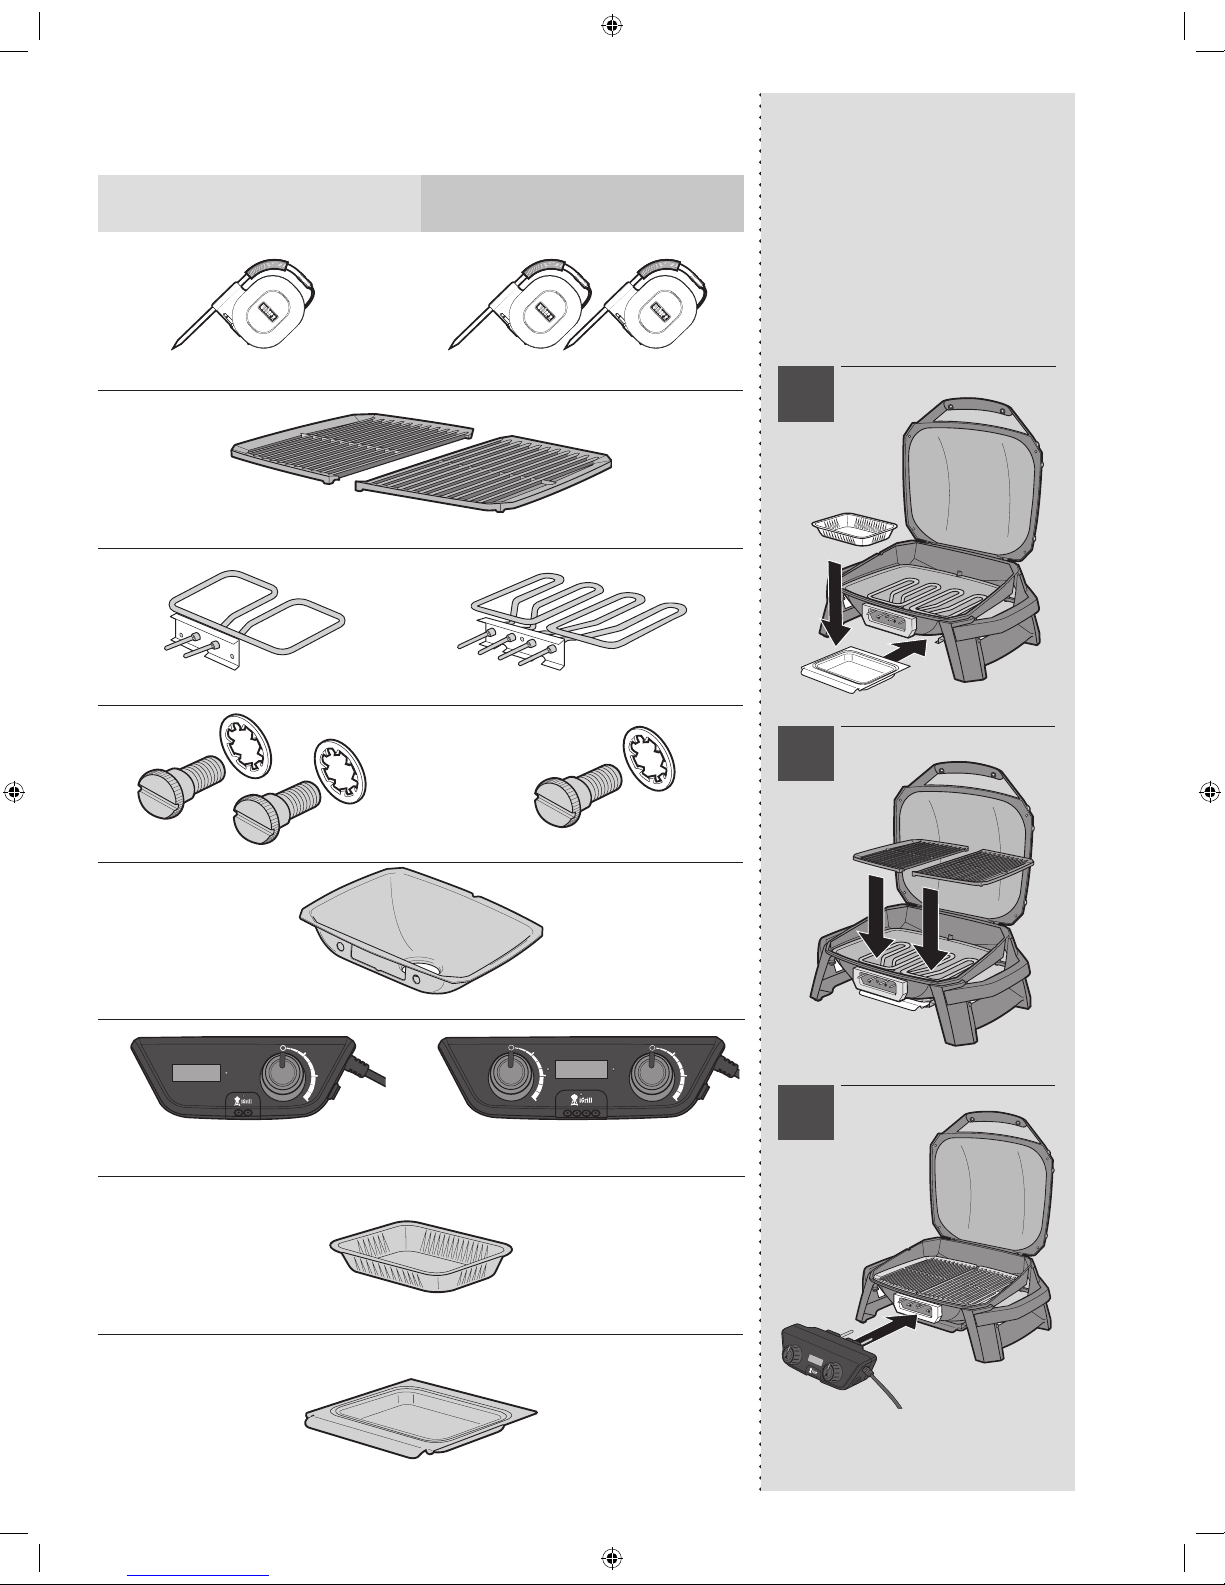
PULSE 1000 PULSE 2000
iGrill Food Probe and Cable Wrap
Porcelain-Enamelled Cast Iron Cooking Grates
Heating Element Assembly
Heating Element Thumb Screws
Removable Bowl Liner
Pulse 1000
Temperature Controller
Pulse 2000
Temperature Controller
Disposable Drip Tray
Slide-Out Catch Pan
Assembly
Assembly
These instructions will give you the minimum
requirements for assembling your Weber
electr ic barbecue. Improper as sembly can be
dangerous.
m WARNING: Do not modify the appliance.
Modifications are unsafe and will void your
warranty.
• Any parts sealed by the manufacturer must not
be opened or altered by the user.
• Do not cover any parts of the barbecue with
aluminium foil. It may negatively impact the
performance of your barbecue.
Parts List
The barbecues that ar e illustrate d in this
Owner’s Manual may vary slightly from the
model purchased.
3
2
1
59587_Pulse_enGB_working.indd 5 11/27/17 9:31 AM
Page 6
6
A
B
C
G
F
E
H
D
I
A
B
G
F
E
H
I
C
D
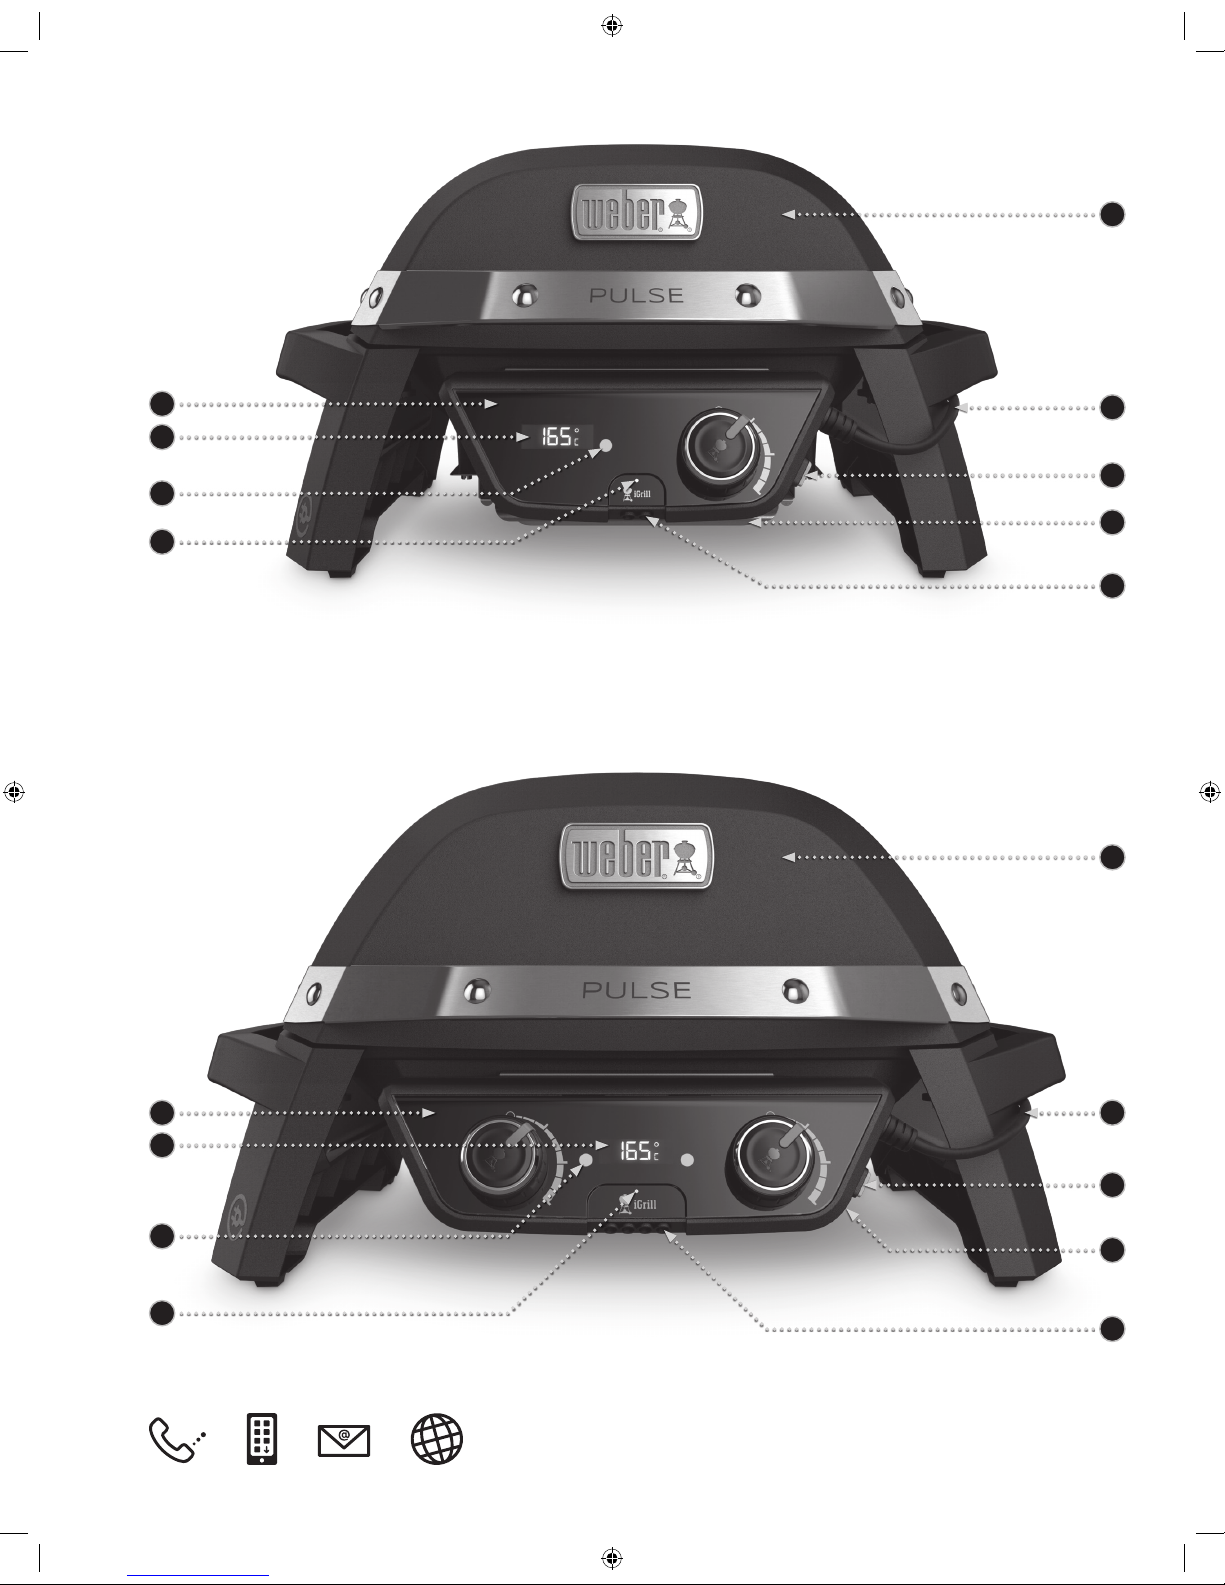
Product Features
TAKES LESS THAN TWO MINUTES
Pulse 1000 Features
Pulse 2000 Features
59587_Pulse_enGB_working.indd 6 11/27/17 9:31 AM
Page 7

7
Product Features
Feature Descriptions
Removable Temperature Controller
The Temperature Controller is designed to be easily removed in order to make storage
and cleaning easy. The controller should be stored indoors in the box provided.
Digital Thermometer
An LED screen serves as a digital thermometer displaying the barbecue temperature.
Thisensures a precise and accurate temperature reading of your barbecue.
Status Indicator Lights
The Pulse has red status indicator lights on the Temperature Controller to let you
know that your barbecue is heating up and when it is ready to barbecue.
The blue light flashes when the controller is ready to pair with your Bluetooth®
enabled smart device and remains lit when the barbecue has successfully paired
with your smart device.
Tall Lid
The lid of the barbecue is tall enough to provide ample room for barbecuing whole
chickens and roasts.
Cable Routing
An integrated clip on the right leg of the barbecue allows for easy routing of the
cable from the Temperature Controller to the back of the barbecue.
Power On/Off Button
The push-button on/o switch is easy to use. When the Temperature Controller is on,
the button is recessed and when it is o, the button protrudes.
Grease Management System
The grease management system helps with the removal of grease and is designed to
help prevent flare-ups. Drippings that are not vapourized are funneled into the drip
tray, which is located within the catch pan under the cookbox.
Integrated iGrill Technology
Confidently tend to the barbecue and your guests while using the integrated iGrill
feature which employs a meat probe allowing you to monitor the temperature of your
food and your barbecue from across the garden or inside your kitchen via your smart
device’s Bluetooth® connection.
The App allows you to view, on your mobile device, the real-time core temperature
of the food and the temperature of your barbecue. Once you’ve downloaded the
Weber iGrill App, connect the meat probes from your barbecue to the food. From
the App youhave the ability to change the display on the Temperature Controller to
Fahrenheit or Celsius.
Removable Components for Easy Cleaning
Cooking grates, bowl liner and grease tray are removable for easy cleaning. The bowl
liner is dishwasher safe.
Porcelain-Enamelled Cast Iron Cooking Grates
Porcelain-enamelled cast iron cooking grates evenly retain heat to create those
beautiful sear marks that we all strive for. The heat retention quality of the cast
ironcreates a faster recovery time after the lid has been lifted.
Dual Zone Barbecuing 2000 Series)
Simultaneously barbecue dierent foods in two temperature zones. Sear a steak over
high heat on one side of the barbecue while your side dish cooks slowly over low
heat on the other side of the barbecue.
A
Removable Temperature Controller
B
Digital Thermometer
C
Temperature Status Indicator Light(s)
D
Bluetooth® Status Indicator Light
E
Tall Lid
F
Cable Routing
G
Power On/Off Button
H
Grease Management System
I
Integrated iGrill Technology
59587_Pulse_enGB_working.indd 7 11/27/17 9:31 AM
Page 8

8
E
D
C
B
A
Operation
Getting Started
Attach Temperature Controller
1) Plug the temperature controller into the barbecue
by pushing i t straight onto the mounting bracket (A).
Do not force the Temperature Controller into the
mounting bracket. Ensure that the heating element
pins are aligned with Temperature Controller for
proper attachment (B).
2) Route the power cable under the right handle and
secure it in the cable clip. (C).
3) Make sure that r ed power but ton located on the
right side of the temperature controller is in the
OFF position.
4) Plug the power cable into an earthed socket.
Preheat the Barbecue
Preheating the barbe cue is critical to successful
barbecuing. Preheating helps to prevent food from
stickin g to the cooking grate and gets the cooking
grate hot enough to sear properly. It also b urns o
residue of a previously -cooked meal.
1) Push the red power button located on right side of
Temperature Controller to t urn ON the barbecue (D).
2) Turn the temperature control k nob(s) to the high
positio n by turning them clockwise. The digital
LED screen will display the temperature of the
barbecue.
3) Preheat the barbecue w ith the contro l knob(s) in
the high position (E). The red status indicator lights
will flash to indicate that th e barbecue is preheating
and the temperature disp lay will increase as the
barbecue heats up. When the selec ted temperature
setting is reached, the temperature controller will
beep mom entarily. The status indicator lights will
stop flashing and remain lit. When the temperature
registers 260°C (500°F) the barbecu e is preheated .
This will t ake approximately 15 to 20 minutes
depending on ambient conditions.
4) To barbecue at a lower temperature: Preheat as
outline d above. Turn the knob anticlockwise to the
desired setting. Start barbecuing.
Reference the barbec uing guides in the iGrill App for
approximate barbecuing times and settings for the
cuts of me ats listed (adjust for condi tions).
Ambient Conditions
Barbecuing in a colder climate or at a higher altitude
will extend your cooking time. Sustained wind will
lower the barbecue’s inter nal temperature. Place
barbecue so wind blows against the front of the
barbecue.
Perform an Initial Burn-Off
Heat the barbecue on the highest setting, with
the lid closed, for at least twenty minutes prior
tobarbecuing for the very first time.
UNLOCK BARBECUING HAPPINESS
m WARNING: Use heat-resistant barbecue mitts
or gloves when operating barbecue.
59587_Pulse_enGB_working.indd 8 11/27/17 9:31 AM
Page 9

9
H
I
G
F
m WARNING: Risk of injury! The probes are
very sharp. Please be careful when handling
probes.
m WARNING: Risk of burns! Handling the
temperature probes without hand protection
will result in severe burns. The coloured
probe indicators are not intended to be
touched with bare hands while using the
barbecue as they are not heat-insulated.
Please wear heat-resistant gloves at all times
while using this product in order to avoid
being burned.
m CAUTION: Temperature controller should be
removed from barbecue and stored indoors
when barbecue is not in use.
Operation
Using the iGrill
Your barbecue is equipped with iGrill te chnology
which enables you to see the barbecue and food probe
temperatures on your App-connected device. Follow
the instr uctions below to use the integrated iGrill.
1) Download the Weber iGrill App.
2) Enable Bluetooth® on your smart device under
‘Settings’.
3) Locate th e input ports on the front of t he
temperature controller. Plug the food probe into any
of the por ts (F).
4) When the barbecue is powered ON a blue light on
the front of the Temperature C ontroller will flash,
indicating that the iGrill feature is on an d ready to
pair (G).
5) Launch the Weber iGrill App on your smart device.
Follow the pairing instr uctions within the App.
6) You are now read y to use your iGrill.
Note: Visit web er.com/igrillsuppor t to learn more about
device compatibility and the lan guages supported by the
Weber iGrill App.
Probe Usage
The colo ured probe indicators are for visual
identification of the probe(s) within the App.
• To ensure an accurate reading, please insert the probe
a minimum depth of 0.4 inches (10 mm) into the centre
of the meat(H). For poultry, it’s best to place the probe
in the thickest part of the thigh or breast, avoiding the
bone. For thick cuts of flat meat, insert the probe into
the middle of the meat from the top or the sides .
To ensure safe us age of the meat probe and to prevent
damage to the probe:
• Do not expose the probe or its wiring to direct contact
with the barbecue grate.
• Route iGrill probe cables through the side channel on
the barbecue to ensure that the barbecue lid closes(I).
• Do not submerge the probe or its wiring in liquid.
• Probe is not dishwasher safe.
Important Note: When using probe, be sure to route wire
where it will not be exposed to flames o r temperatures
exceeding 380°C. Avoid exposing probe to temperatures
below -30°C . Temperatures below -30 °C or above
300°C will not display in the app and will cause the probe
to disappear f rom connection .
Cool Down
When finished barbecuing, turn control knob(s) o,
unplug the power cable and allow the Temperature
Controller to cool. Remove the Temperature Controller
and store indoors in the s torage box when not in use.
iGrill Care
iGrill Probe Care
Clean probe before first use. The probes should
be cleane d by wiping them down with a damp
cloth.
The probes are not dishwasher safe. The probes
are not waterproof and damage may result from
water exposure. Never submerge the probes
in water. Take care not to expose the wiring of
the probes or the area where the probes’ wiring
meets the probe to liquid.
Probe Wrap
Neatly wr ap the probe wh en it is not in use.
Store the probe in the stor age box with the
Temperature Controller.
59587_Pulse_enGB_working.indd 9 11/27/17 9:31 AM
Page 10

10
A C
B
D
Operation
Meal-to-Meal Maintenance
Keep it Clean
Accumulated dirt and grease may reduce barbecue
performance. Factors such as altitude, wind and
outsid e temperatur e can aect co oking times.
Check for Grease
Your barbecue was built with a grease management
system that funnels gr ease away from food and into a
disposable container. As you cook, greas e is channeled
down to the slide-out catch pan and into a disposable
drip tray that lines the catch pan. This system should
be cleane d each and ever y time you barbecue in order
to prevent fires.
1) Confirm that the barbecue is o and cool.
2) Unplug and remove temperature control ler by
pulling it side-to-side slightly until it releases from
the mounting bracket (A).
3) Remove the sl ide-out c atch pan by pulling it
forward (B).
4) Check for grease in the disposable drip tray that
lines the slide-out catch pan. Discard disposable drip
tray when necessar y and replac e with a newone.
5) Reinstall all components.
Clean the Cooking Grate
After preheating, any bits of food or debris left over
from previous use will b e easier to remove. Clean
cooking grates will al so prevent your next meal from
sticking.
1) Brush the cooking grate s with a stainle ss
steel br istle barbecue brush immediately after
preheating(C).
Cleaning the Temperature Controller
Wipe down Temperature Controller with a microfibre
cloth dampened with water. Do not use cleaners o r
brushe s as they will scr atch the surf ace. Never use
glass cleaners on plas tic. It will damage the surface.
Storing the Temperature Controller
Allow the Temperature Controller and probes to cool
before wiping them clean. Store the Temperature
Controller and iGrill probes indoors in the stora ge box
provided (D).
GET SPECIAL CONTENT FREE OF CHARGE
m WARNING: The barbecue should be thoroughly
cleaned on a regular basis.
m WARNING: Do not line the slide-out catch pan
or any part of the barbecue with aluminium
foil.
m WARNING: Use caution when removing catch
pan and disposing of hot grease.
m WARNING: Check the slide-out catch pan for
grease build-up before each use. Remove
excess grease to avoid a grease fire.
m WARNING: Barbecue brushes should be
checked for loose bristles and excessive
wear on a regular basis. Replace brush if any
loose bristles are found on cooking grates or
brush. Weber recommends purchasing a new
stainless steel bristle barbecue brush at the
beginning of every Spring.
m WARNING: Should a grease fire occur, close
the lid, turn the power button o, unplug the
barbecue from the socket and leave the lid
closed until the fire is extinguished. Do not use
liquid to extinguish flames.
m CAUTION: Temperature controller should be
removed from barbecue and stored indoors
when barbecue is not in use.
59587_Pulse_enGB_working.indd 10 11/27/17 9:31 AM
Page 11

11
Tips and Hints
Pulse Barbecue Temperature Range:
LOW (between 93° and 149°C)
MEDIUM (between 176° and 232°C)
HIGH (between 260° and 316°C)
Direct Barbecuing Setup
Pulse 1000 and 2000
Turn the control knob(s) to the high setting and
preheat the barbecue to 260°C (500°F). Brush the
cooking grates clean with a stainless steel bristle
barbecue brush.
Adjust setting to the temperature noted in the
recipe. Place food on cooking grates and close the
lid of the barbecue. Turn your food only once during
the barbecuing time. Lift the lid only to turn the
food or check for the doneness at the end of the
recommended barbecuingtime.
Using your iGrill
Connect the probe plug into the iGrill port on the front
of the barbecue and insert food probe into food. Route
the food probe wire through the channels on the sides
of the barbecue. Ensure that the food probe does not
touch a bone or the cooking grates when inserted
into the food. Launch the Weber iGrill App on your
Bluetooth® enabled smart device in order to set up
alerts and view the remote temperature monitoring
through the App. Refer to ‘Using the iGrill’ instructions
in the ‘Operation’ section of this manual.
Dual Zone Barbecuing
Pulse 2000
Turn the control knobs to the high setting and preheat
the barbecue to 260°C (500°F).
Adjust the temperature of each control knob to the
preferred setting for each zone. Brush the cooking grates
clean with a stainless steel bristle barbecue brush.
If you are barbecuing one item for longer than the
other, it is recommended that you adjust both control
knobs to the preferred temperature of the first item
to be barbecued and place the item on the left side of
the barbecue. Ten minutes prior to adding the second
item, adjust the temperature of the right control knob
to the preferred cooking temperature and allow the
temperature in the area to adjust. Please note that
the temperature controller will display the average
temperature inside of the barbecue and not the
individual zones.
Turn your food only once during the barbecuing time.
Lift the lid only to turn the food or check for the doneness
at the end of the recommended barbecuing time.
Indirect Barbecuing Setup
Pulse 1000 and 2000
Turn the control knob(s) to the high setting and preheat
the barbecue to 260°C (500°F). Brush the cooking grates
clean with a stainless steel bristle barbecue brush.
Reduce heat by turning control knob(s) to medium.
Place large foods, such as whole chickens or roasts,
horizontally in the centre of the barbecue.
Turn your food only once during the barbecuing time.
Lift the lid only to turn the food or check for the doneness
at the end of the recommended barbecuing time.
OFF
LOW
MEDIUM
HIGH
59587_Pulse_enGB_working.indd 11 11/27/17 9:31 AM
Page 12

12
EC Declaration of Conformity
Brand Name: Weber
Model Name: Pulse 1000, Pulse 1000 w/Stand, Pulse 2000, Pulse 2000 w/Cart
Model Number: 81010053, 81010069, 81010074, 81010093, 81010094, 82010053,
82010069, 82010074, 82010093, 84010053, 84010069, 84010093, 85010053,
85010069, 85010074, 82010094, 84010074, 84010094, 85010093, 85010094,
81010079, 82010079, 84010079, 85010079
Product Description: Outdoor Electric Barbecue with iGrill 3.
We, company Weber-Stephen Products LLC, located at 1415 S Roselle Road, Palatine IL,
60067, USA, issue this declaration of conformity under our sole responsiblity.
Object of the Declaration: Weber Pulse 1000 & Pulse 2000 barbecues, which also
contain a transmitter and one probe for the Pulse 1000 or two probes for the
Pulse2000
The object of the declaration described above is in conformity with the relevant Union
harmonization legislation:
Pulse 1000 & Pulse 2000 are manufactured in compliance with the:
LVD Directive:2014/35/EU
EMC Directive:2014/30/EU
Food Contact Directive:1935/2004/EC
Directive 2012/19/EU Waste Electrical and Electronic Equipment (WEEE)
Directive 2011/65/EU Restriction of Hazardous Substances in EEE (RoHS 2)
Regulation No 1907/2006 Registration, Evaluation, Authorisation and Restriction of
Chemicals (REACH)
Council of Europe Resolution CM/Res (2013)9 on Metals and Alloys Used in Food
Contact Materials and Articles
and the following:
Safety/Health:
EN 60335-2-78:2003 + A1:2008
EN 60335-1:2012 + A11:2014
EN 62233: 2008
EMC:
EN 55014-1:2006 + A1:2009 + A2:2011
EN 55014-2:1997 + A1:2001 + A2:2008
EN 61000-3-2: 2014
EN 61000-3-3: 2013
and also the following:
Directive 2014/53/EU Radio Equipment Directive (RED):
Safety/Health:
EN 60950-1:2006+A11:2009+A1:2010+A12:2011+A2:2013
EN 62479:2010
EMC:
EN 301 489-17 V2.2.1:2012-09
EN 301 489-1 V1.9.2:2011-09
EN 55014-1:2006+A1:2009+A2:2011
EN 55014-2:1997+A1:2001+A2:2008
Radio:
EN 300 328 V1.8.1:2012-06
Notified Body: Eurofins Product Service GmbH, Storkower Strasse 38c, D-15526
Reichenwalde b. Berlin, Germany; Phone: +49-33631-888 000;
EU Identification Number: 0681; applied the standards listed above corresponding to
RED, and issued the EU-type examination certificate.
The object of this declaration functions using software and a smart device-enabled App
to which the software connects.
The product carries the CE mark which was first axed in 2017 and is EC typeexamination certified by: Notified 02830, UL International Demko A/S, Borupvang 5A,
DK-2750 Balleruo, DENMARK
Manufacturer’s Address:
Factory Name: Weber-Stephen Products LLC.
Factory address: 1415 S. Roselle Road, Palatine IL, 60067, USA
We, Weber-Stephen Products LLC 1415 S. Roselle Road, Palatine IL, 60067, USA, hereby
confirm that the following addresses are our branch addresses:
Weber-Stephen Deutschland GmbH, Rheinstrasse 194, DE-55218 Ingelheim, Germany
The establishment of quality assurance system is, UL International Demko A/S,
Borupvang 5A, DK-2750 Balleruo, DENMARK
Signed for and on behalf of Weber-Stephen Products LLC,
Palatine, IL USA on 10 July 2017
Ralph N. Ten Bruin
Global Director of Regulatory Aairs
Tips and Hints
REGISTRATION IS IMPORTANT
BarbecuingDo’s andDon’ts
Preheat barbecue each and every time.
If the cooking grates are not hot enough, the food will stick and you will
likely never have a chance of searing your food properly or developing those
handsome sear marks. Even if a recipe calls for medium or low heat, always
preheat the barbecue on highest setting first.
Don’t barbecue on dirty grates.
Placing food onto the cooking grates before they have been cleaned is never
a good idea. Left over residue on the grates acts like glue, binding it to the
grates and to your food. To avoid tasting last night’s dinner on today’s lunch,
make sure that you are barbecuing on a clean cooking grate. Once the grates
are preheated, use a stainless steel bristle barbecue brush to make a clean,
smooth surface.
Be present in the process.
Before starting your barbecue, make sure that everything you need is within
arm’s reach. Don’t forget your essential barbecuing tools, such as oiled and
seasoned food, glazes or sauces and clean cooking platters for the cooked
food. Having to run back to your kitchen not only means missing out on the
fun, but it could also result in burning your food. French chefs call this ‘mise
en place’ (meaning, ‘put in place’). We call it ‘being present’.
Create a little elbow room.
Packing too much food onto the cooking grates restricts your flexibility. Leave
at least one-quarter of the cooking grates clear with plenty of space between
each food item in order to get your tongs in there and easily move the food
around. Sometimes barbecuing involves split-second decisions and the need
to move food from one area of the barbecue to another. So give yourself
enough room to barbecue.
Try not to peek.
The lid on your barbecue is for more than just keeping the rain out. Most
importantly, it’s for preventing too much air from getting in and too much
heat and smoke from getting out. When the lid is closed, the cooking grates
are hotter, the cooking times are faster and the smoky tastes are stronger.
Usethe iGrill App to quickly monitor the heat of your barbecue and the core
temperatures of your food so that you don’t need to open the barbecue until
it’s time for dinner. So put a lid on your barbecue!
Only flip once.
What’s better than a juicy steak with a deep sear and plenty of beautifullycaramelised bits? The key to accomplishing these results is to keep your food
in place. Sometimes we have the tendency to flip our food before it reaches
the desired level of colour and flavour. In nearly all cases, you should turn
food just once. If you are moving it more than that, you are probably also
opening the lid too often which causes its own set of problems. So step back
and trust the barbecue.
59587_Pulse_enGB_working.indd 12 11/27/17 9:31 AM
Page 13

13
D
C
B
A
Product Care
m WARNING: Turn your barbecue o and wait for
it to cool before thoroughly cleaning it.
m CAUTION: Disconnect the appliance from the
supply circuit and remove the temperature
controller before performing cleaning and
maintenance.
m CAUTION: Do not use any of the following
to clean your barbecue: abrasive stainless
steel polishes or paints, cleaners that contain
acid, mineral spirits or xylene, oven cleaner,
abrasive cleaners (kitchen cleaners) or
abrasive cleaning pads.
m CAUTION: Do not use metal brushes to clean
heating elements. Allow food to burn o
during preheating.
Deep Cleaning and Maintenance
CLEANING THE INSIDE OF THE BARBECUE
Over time, the performance of your b arbecue can
diminish if it has not been maintained properly.
Low temperatures, un even heat and fo od sticking
to cookin g grates are all signs that cleaning and
maintenance are overdue. When your barb ecue is o
and cool , start by cleaning the inside from the top down.
A thorough cleaning is rec ommended af ter every fi ve
cooks. Consistent use may require mo re frequent
cleanings.
Cleaning the Lid
From time to time you may notice ‘p aint-like’ flakes
on the inside of the lid. During use, greas e and smoke
vapours slowly change into carbon and deposit on
the inside of your barbecue’s lid. These deposits will
eventually peel and look very similar to paint. These
deposits are non-tox ic, but the flakes could fall onto
your food if you do not clean the lid regularly.
1) Use a plast ic scraper to remove carbonised grease
from inside the lid(A).
Cleaning the Bowl Liner and Cookbox
Look inside the cookbox for any grease accumulation
or leftover food par ticles. Excessive accumulation can
cause a fire.
It is recommended to use gloves when rem oving
heating elements as they will be dirt y.
1) Remove the temperature controller.
2) Remove cooking grates (B).
Do not use metal brushe s to clean heatin g elements.
3) Remove the heating elements by turning the thumb
screw(s) on the front of the barbecue anticlockwise
until the screw releases(C).
4) Slide the heating element s towards the back of
the barb ecue. Taking care not to bend the heating
element, tilt it upwards and remove it (D).
5) Use a plast ic scraper to scrape debris o of the
sides and b ottom of the bowl liner into the opening
in the bot tom of the cookbox(E). This opening
funnel s debris into the slide-out catch pan.
6) Remove and clean the slide-out catch pan. Refer to
‘Meal-to-Meal Maintenance’.
The bot tom liner of the barbecue can be removed
and washe d with warm soapy water. The bowl lin er is
dishwasher safe. Take care not to bend the bowl lin er.
After cleaning, reins tall the bowl l iner. Do not operate
the barb ecue withou t the bowl liner.
To reinstall the heating elements, insert the heating
element s into the corre sponding holes inside the fr ont
of the barbecue. Reattach by turning thumb screws to
the right. Do not over-tighten.
Clean heating elements by allowing foo d to burn o.
CLEANING THE OUTSIDE OF THE BARBECUE
The out side of your barbecue may include aluminium,
stainless steel and pl astic surf aces.
Weber recommends the fo llowing methods based on
the surface type:
Cleaning Stainless Steel Surfaces
Clean stainless steel using a grease-cutting s oap. Use
a microfibre cloth to clean in th e direction of the grain
of the stainless steel . Rinse with clear water and dry
thoroughly. Do not use paper towels. Do not use bleach
or chlorinated cleaning products on s tainless steel.
Note: Do not risk scratching your stainless steel with
abrasive pastes. Pastes do not clean or polish. They
will chang e the colour of the metal by removing the top
chromium oxide film coating.
Cleaning Painted Surfaces and
PlasticComponents
Clean painted and plastic component s with grease cuttin g soap. Rinse with clear water and dry thoroughly.
Cleaning the Outside of Barbecues that
are in Unique Environments
If your bar becue is subject to a particularly harsh
environment, you will want to clean the out side more
often. Acid rain, pool chemicals and salt water
can cause surface rusting to appear. Wipe down
the outside of your barb ecue with war m soapy
water. Follow up with a rinse and thorough drying.
Additionally, for stainle ss steel par ts only, you may
want to apply a stainless steel polish cleaner weekly to
prevent surface rust.
Pulse 1000
Pulse 2000
E
59587_Pulse_enGB_working.indd 13 11/27/17 9:31 AM
Page 14

14
Troubleshooting
ELECTRIC BARBECUE DOES NOT TURN ON
SYMPTOM
• Heating element does not heat when following the instructions in the ‘Operation’ section
of this Owner's Manual.
CAUSE SOLUTION
The temperature controller may not be properly
inserted into the housing.
Remove and reinstall temperature controller.
Always plu g the temperature controller into the
barbecue before plugging power cable into the socke t.
There is a problem with th e power flowing f rom the
socket.
Check the electrical power supply.
The RCD safety device that is built-in to the
temperature controller may have interrupted the
power to the barbecue.
If the digital thermometer display and the temperature
status in dicator light (s) are not on, move the red power
button on the temperature controller to the OFF position
in order to ‘reset’ the RCD s afety device. Wait 30 seconds,
then move the red power bu tton to the ON position.
ERROR CODE APPEARS ON DISPLAY
SYMPTOM
• During start-up or barbecuing, an error code appears on the digital display.
CAUSE SOLUTION
The temperature controller is a device that is sensitive
to certain external factors. Variations in power s upply
or radio frequency may aect operation.
First, turn the temperature controller o using the
red power button. Unp lug the power cable from
the mains power and remove the temperature
controller from the barbecue.
Wait 30 seconds, then at tach the temperature
controller fully onto the barbecue before plugging
the power cable into the socket. Move the red power
button to the ON position.
BLUETOOTH® IS EXPERIENCING CONNECTIVITY ISSUES
SYMPTOM
• Bluetooth® is having trouble maintaining connectivity or pairing with a smart device.
CAUSE SOLUTION
Bluetooth® is a short range signal only. If the Bluetooth® indicator on the barbecue
is flashing, it is ready to pair. Make sure that
Bluetooth® on the smart device is turned on and
that the device is near the barbecue.
Bluetooth® has already paired to another smart device. If the Blu etooth® indic ator light is on but is not
flashing, it means that it is already paire d to a smart
device. Turn o Bluetooth® on any smart device that
you do not wish to have paired to the barbecue.
The RCD safety device that is built-in to the
temperature controller may have interrupted the
power to the barbecue.
If the Bluetooth® indicator light is not on, move the red
power button on the temp erature cont roller to the OFF
positio n in order to ‘reset’ the RCD safety device. Wait
30 secon ds, then move the red power button to the ON
position.
m WARNING: Do not attempt to make
any repair to electric components or
structural components without contacting
Weber-Stephen Products LLC, Customer
Services Department.
m WARNING: Failure to use genuine Weber-
Stephen parts for any repair or replacement
will void all warranty protection.
DON'T FORGET TO REGISTER
REPLACEMENT
PARTS
To obtain replacement parts,
contact the local retailer in your
area or log onto weber.com.
CALL
CUSTOMER
SERVICE
If you are still experiencing any
problems, contact the CustomerService
Representative in your area using the
contact information that can be
found on weber.com.
59587_Pulse_enGB_working.indd 14 11/27/17 9:31 AM
Page 15

15
Essential tools and cookware
to get the most out of your
barbecuing experience.
Accessories
WEBER.COM
59587_Pulse_enGB_working.indd 15 11/27/17 9:32 AM
Page 16

SERIAL NUMBER
59587
111517
enGB - English (United Kingdom)
AUSTRIA
+431 253 0502
info-at@weberstephen.com
BELGIUM
+32 15 28 30 90
infobelux@weberstephen.com
CROATIA
+386 2 749 38 62
info@rosler.si
CZECH REPUBLIC
+420 267 312 973
info-cz@weberstephen.com
DENMARK
+45 99 36 30 10
info@weberstephen.dk
FINLAND
+358 9 7515 4974
info@weberstephen.fi
GERMANY
+49 6132 8999 0
info-de@weberstephen.com
GREECE
+30 210 80 22 200
info@weber-grill-bbq.gr
FRANCE
+33 139 09 90 00
infofrance@weberstephen.com
HUNGARY
+36 23 769 037
merenyi.csaba@merfam.hu
ICELAND
+354 58 58 900
jarngler@jarngler.is
IRELAND
+353 1437 2530
customerserviceuk@weberstephen.com
ISRAEL
+972 392 41119
info@weber.co.il
ITALY
+39 444 367911
servizio.clienti@weberstephen.com
LUXEMBOURG
+32 15 28 30 90
infobelux@weberstephen.com
NETHERLANDS
+31 20 2623978
service-nl@weber.com
NORWAY
+47 21 99 97 99
info@weberstephen.no
POLAND
+48 22 392 04 69
info-pl@weberstephen.com
PORTUGAL
+34 935 844 055
infoiberica@weberstephen.com
ROMANIA
+49 6132 8999 0
info-de@weberstephen.com
RUSSIA
+7 495 956 63 21
info.ru@weberstephen.com
SLOVAKIA
+420 267 31 29 73
info-cz@weberstephen.com
SLOVENIA
+386 2 749 38 62
info@rosler.si
SPAIN
+34 935 844 055
infoiberica@weberstephen.com
SWEDEN
+46 852502424
info@weberstephen.se
SWITZERLAND
+41 52 244025 0
info-ch@weberstephen.com
TURKEY
+90 212 659 64 80
UNITED ARAB EMIRATES
+971 4 454 1626
info@weberstephen.ae
UNITED KINGDOM
+44 203 630 1500
customerserviceuk@weberstephen.com
Write your barbecue's serial number in the above box for
future reference. The serial number appears on the data
label that is located on the right leg of the barbecue frame.
Apple and the Apple logo are trademarks of Apple Inc., registered in the U.S. and other countries.
AppStore is a service mark of Apple Inc. Android and Google Play are trademarks of Google Inc.
The Bluetooth® word mark and logos are registered trademarks owned by Bluetooth SIG, Inc. and
any use of such marks by Weber-Stephen Products LLC is under license. Other trademarks and trade
names are those of their respective owners.
© 2017 Designed and engineered by Weber-Stephen Products LLC,
1415 S. Roselle Road, Palatine, Illinois 60067 USA.
WEBER.COM
Manufacturer:
Weber-Stephen Products LLC
1415 S. Roselle Road
Palatine, IL 60067-6266
USA
Importer:
Weber-Stephen Products (EMEA) GmbH
Leipziger Straße 124
10117 Berlin
Tel: (+49) 307554184-0
59587_Pulse_enGB_working.indd 16 11/27/17 9:32 AM
Page 17

 Loading...