

Page 1
Introduction
Servicing and Safety Instructions
Operating Instructions
Air Top Series Heaters
Dear Webasto Customer,
Thank you for choosing a Webasto Air Top Series Heater.
Air Top Series Heaters are used
– to heat cabins, boats, trucks, minibuses, vans and motor-homes and
– to defrost vehicle windows.
We presume that the principle and mode of operation of your new heater has
been explained to your complete satisfaction by the workshop or service
center which installed the heater. In these operating instructions we would
like to once again provide you with an overview of the safe use of your new
heater.
Repair work should only be carried out by an authorized Webasto dealer.
1. When the heater is in use, the surface of the hot air outlet
Contact with skin may cause burns.
2. Webasto heaters must be switched “off” when re-fueling at gas stations and/or
while loading or unloading flammable materials for transport, to prevent the
risk of explosion.
3. The year in which the heater was used for the first time must be permanently displayed
on the factory plate by deleting the inapplicable years from the plate.
4. The heaters are not designed for heating hazardous substance transport
compartments.
5. Claims can only be made if it can be verified that the claimant has complied with the
servicing and safety instructions.
6. The heater may not be operated in enclosed spaces (such as garages) as a result
of the risk of poisoning and asphyxiation, even if a timer is used.
7. In the event of long-lasting heavy smoke development, unusual combustion noises or a
smell of fuel or if the heater suffers continuous fault cut-outs with error messages
(flashing code), it must be shut down by removing the fuse and must not be used until it
has been inspected by Webasto-trained personnel.
8. Wherever flammable vapors or dust may form, the heater must be switched off
as a result of the risk of explosion.
9. The heat transfer unit on air heaters is exposed to very high thermal stress and
must be replaced by a genuine Webasto spare part after a ten year life cycle.
will become hot to the touch.
Page 2

10. The fuel specified by the vehicle manufacturer is suitable for use in an Air Top Series
Heater B (gasoline).
The diesel fuel specified by the vehicle manufacturer is suitable for use in an Air Top Series
Heater D (diesel).
There are no known negative influences due to fuel additives when used appropriately.
If fuel is extracted from the vehicle’s tank, follow the additive instructions issued by the
vehicle manufacturer.
If you change to low-temperature fuel, the heater must be operated for approx. 15
minutes so that the fuel system is filled with the new fuel.
11. The temperature in the area around the heater must not exceed 85 °C / 185° F (storage
temperature). If the temperature exceeds this level there is a risk of permanent damage
to the electronics systems.
12. Non-compliance with the installation instructions and the warnings contained therein will
lead to the exclusion of all liability by Webasto. The same applies if repairs are carried out
incorrectly or by untrained technicians or with the use of parts other than genuine spare
parts. This will result in the invalidation of the type approval for the heater unit.
13. Keep the hot air inlet and hot air outlet free of dirt and foreign bodies. Soiled or blocked
hot air lines may cause overheating.
14. To prevent mechanical parts seizing, the heater should be operated for approx. 20
minutes once a month.
15. Do not stand on the heater, do not place any items of clothing, textiles or similar materials
over the heater or in front of the hot air inlet and the hot air outlet.
16. The flow of hot air through the heater must not be restricted or blocked by highly
flammable substances or materials such as rags, cleaning wool, etc.
17. The heater must not be cleaned with a high pressure cleaner.
2
Page 3
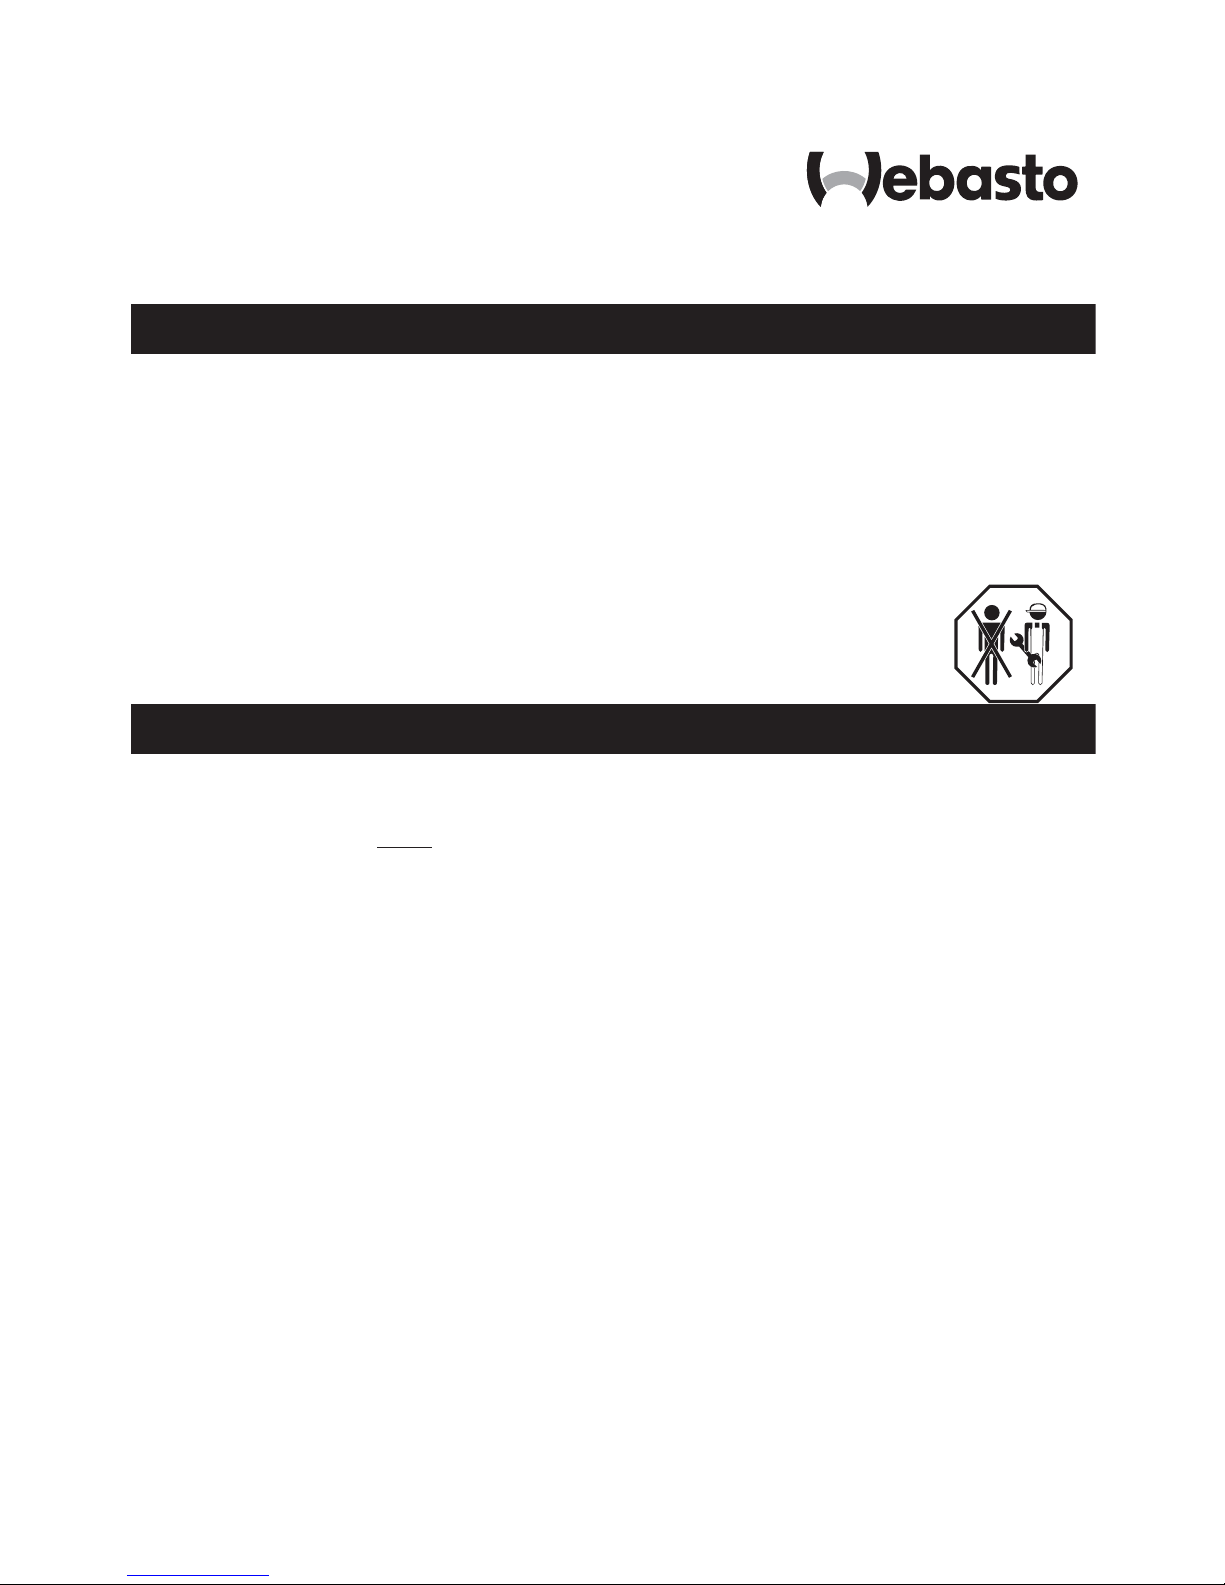
Control Element
Switch On
Ventilation Option
SmarTemp Control
Rotary knob for:
- Switching on and off
- Setting the room temperature
- Resetting after a fault cut-out
Indicator / error code display
Set the rotary knob on the control element to the desired temperature.
NOTE:
To prevent the combustion air fan from scraping, ensure that there are no objects on
or against the heater before you turn it on.
Changes to the settings
on the control element
will be carried out with
a short time delay
A separate switch (optional) allows the user to choose between heating and ventilation
mode. In ventilation mode the fan speed depends on the position of the control element
knob.
3
Page 4
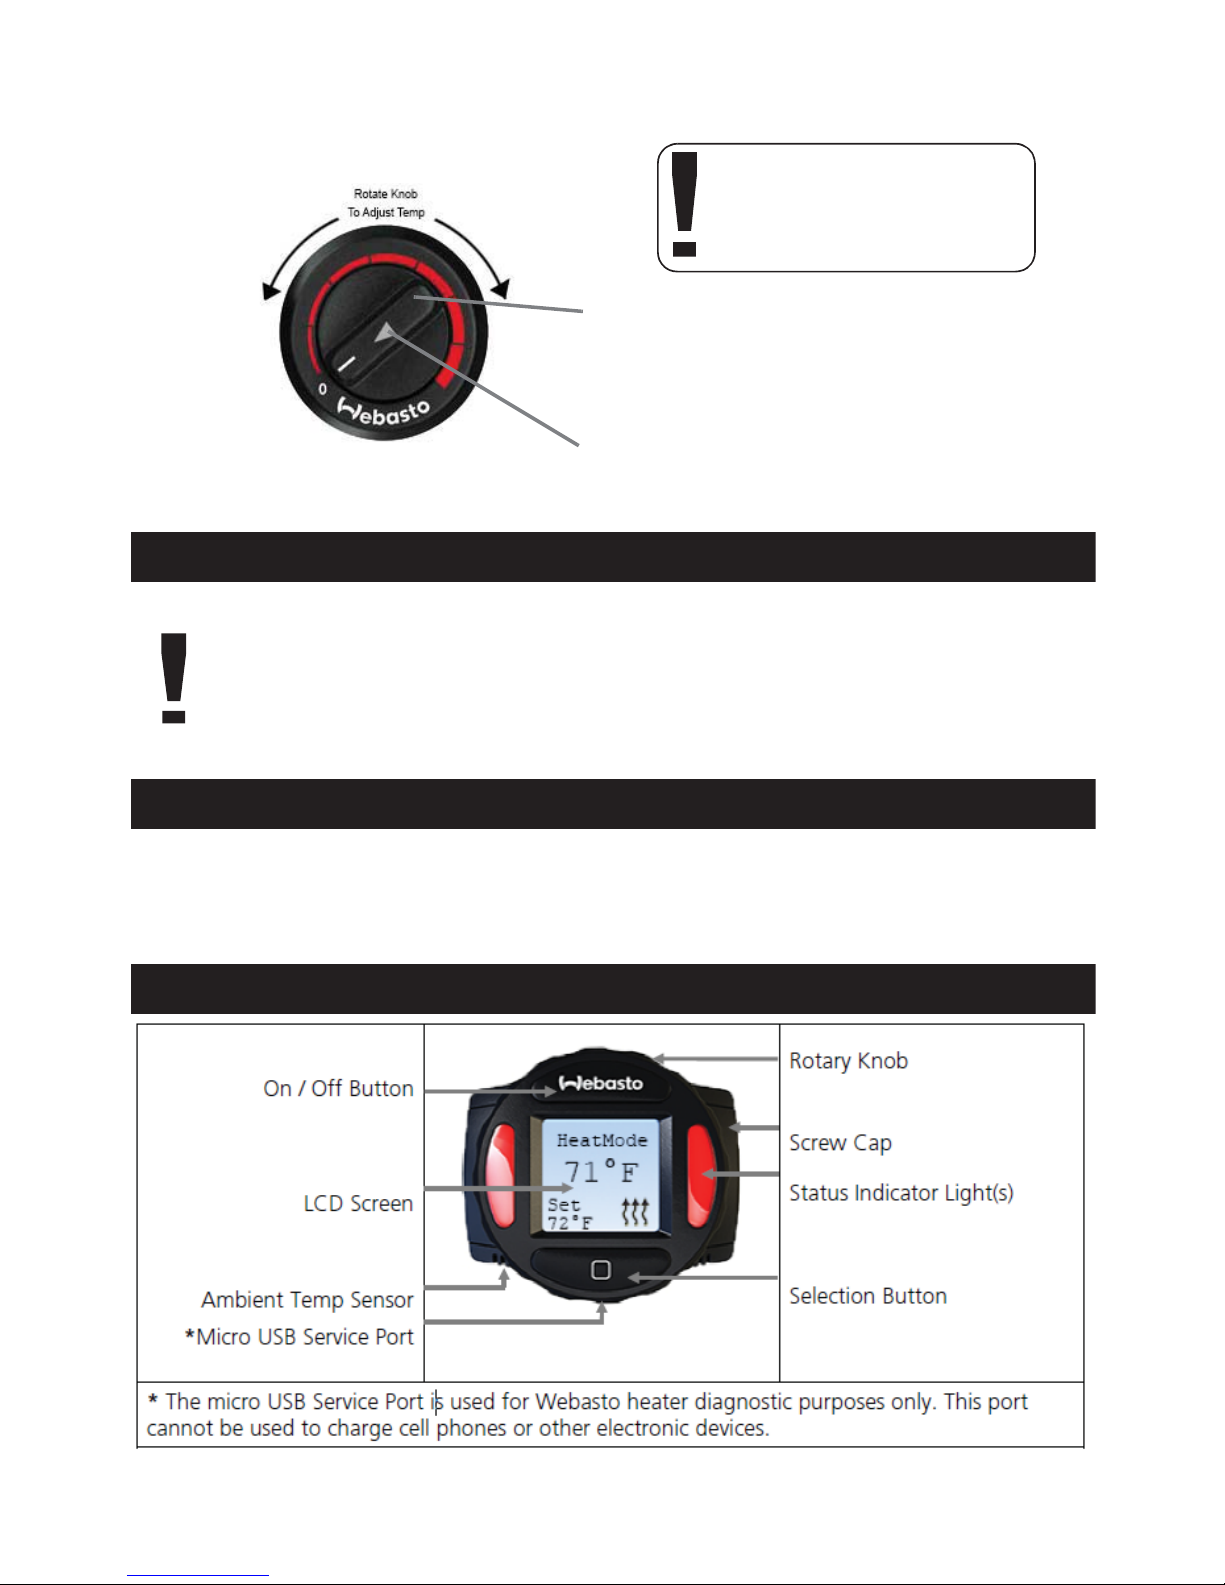
Heater ON Example
Press the Webasto button to turn heater on.
Set Temperature Output & Heater Runtime Example
Using the rotary dial and the selection button, follow these steps to set your cab
temperature to 70°F with a runtime of 4 hours.
1. Press the Selection button. Using the rotary dial, select: Options > Duration >
Timed > Adjust runtime to 4 hours. Confirm the adjustment by pushing the
selection button.
2. From the main screen use the rotary dial to adjust the set temperature to 70°F;
confirm the adjustment by pushing the selection button.
NOTE: The set temperature can be adjusted quickly even when the heater is running using
the same method as above.
Set Timer Example
Set timer to turn on Friday at 6:30AM with a runtime of 60 minutes.
1. Press the Selection button. Using the rotary dial, select Timer.
2. Highlight the timer feature, press the Selection button. Select “edit” from the
sub-menu.
3. Adjust and select day for Friday.
4. Adjust and select time for 6:30AM.
5. Adjust and select runtime for 60 minutes.
6. Settings are saved each time the selection button is pressed.
Menu Description
Refer to Menu Descriptions Table for a detailed description of each menu item and its default
setting.
Depending on the SmarTemp version, menu order may vary from order below.
Definitions Default
Mode
Mode changes the operation of the heater between
Heat Mode
heat mode and ventilation mode. Status indicator lights
will illuminate red for heat mode and blue for
ventilation mode when the selected mode is active.
Note: Refer to Status Indicator Light description on
page 6 for additional Status Indicator explanation.
Language
Language changes between English, Spanish, and
English
French.
Temp Unit
Temp Unit changes between Fahrenheit and Celsius
Fahrenheit
units of measure.
Options
Advanced level adjustments; see below.
4
Page 5

Duration
Duration allows for the selection of continuous
operation or timed
operation (30 minutes – 14 hours in
30 minute increments).
heater
Continuous
LVD
Password
IMPORTANT: Timed
duration is not to be mistaken for
Timer functionality. The duration times above are used
when turning the heater on manually. I.e. set the heater
duration for 8 hours before heading to bed.
Note: If timed
operation is selected 10 hours is default.
LVD “Low Voltage Disconnect” allows the user to set
the battery voltage level at which the Webasto
SmarTemp Control 2.0 will shut down the heater.
If battery voltage is equal to or less than the threshold
selected +0.1v, the heater will not start. I.e. if an 11.5v
threshold is selected the heater cannot be started until
B+ has reached 11.7v.
12 volt - Range between 11v – 12.5v
24 volt - Range between 21v – 25.5v
A password can be set to prevent access to the
advanced “Options” menu. Enter a 4 digit code
passcode to begin securing the “Options” menu.
11.4v
24.2v
OFF
PM Reminder
Time & Date
Note: This is typically used in fleet vehicle applications.
If the heater has not run 30 days, the preventive
maintenance (PM) reminder will alert the operator with
a message to run the heater for 20 minutes. The
indicator lights will flash red as a visual reminder.
The operator will have the ability to Start the 20 minute
maintenance cycle or delay it via a “Snooze” option.
When Snooze is selected the PM reminder will postpone
until 12:00PM the following day.
Set time and date using the rotary knob and selection
button. 12 (AM / PM) or 24 hour available.
The Webasto button can be used to go back to the
previous field if additional changes are needed.
ON
12 hour
5
Page 6

Offset
Depending on the installation location, the temperature
reading may vary slightly. The Offset feature allows a
temperature adjustment of +/- 9°F (+/- 5°C). Adjust this
as necessary to obtain the most accurate ambient
temperature reading.
0°
Default
Default allows the user to perform a factory reset of the
control settings.
Note: Heater information will NOT be affected.
Use the following link to obtain version specific controller operation instructions.
http://www.techwebasto.com/documentation/heater/recreational.html
N/A
6
Page 7

If an error occurs, first check the fuse and plug connections to ensure that they are in proper
Actions in event of faults
Heater unit cuts out automatically
Heater unit emits black smoke
condition and connected correctly.
If the actions described below do not rectify the error, have the heater checked by Webastotrained personnel.
Cause Remedy
No combustion after
start and repeat start
Switch heater unit off (for at least 2 seconds) and then
on again
Flame extinguishes during
operation
Heater unit overheats and indicator flashes
Vehicle voltage too low Charge battery
Switch heater unit off (for at least 2 seconds) and then
on again
Make sure that hot air can flow freely, allow heater unit
to cool down, Switch heater unit off (for at least 2 seconds) and then turn on again
Switch heater unit off (for at least 2 seconds) and then
turn on again
Cause Remedy
Combustion air and/or exhaust
system blocked
Check combustion air and exhaust system for blockage
7
Page 8

If the system is fitted with a combination timer, when an error occurs an error code is dis-
Error code output on combination timer or control element
played on the timer's screen until the heater has been properly repaired.
The error code is output if the heater is fitted with a control element after an error has occurred by the switch-on indicator/error code indicator flashing. After a burst of fast flashes
the error code will be displayed by a sequence of long flashes, the number of which is shown
in the table below.
Error code Meaning
F 00 Control unit error
F 01 No start (after 2 starting attempts)
F 02 Flame failure (at least > 3)
F 03 Undervoltage or overvoltage
F 04 Premature flame recognition
F 05 Flame monitor (petrol heater) interrupt or short circuit
F 06 Temperature sensor interrupt or temperature sensor short circuit
F 07 Metering pump interrupt or metering pump short circuit
F 08 Fan motor interrupt or fan motor short circuit or
fan motor overload or blocked
F 09 Glow plug interrupt or glow plug short circuit
F 10 Overheating
F 11 Overheating sensor interrupt or overheating sensor short circuit
F 12 Heater unit lock-out
F 14 Overheating sensor installed incorrectly
F 15 Defective controller / open or short circuit
F 16 Exhaust temperature exceeded
F 17 Exhaust gas temperature sensor defective
F 18 Low Voltage (SmarTemp error code display only) See proceeding row
for heater error code F 18.
F 18 Defective controller / open or short circuit
F 19 Plausibility of sensors incorrect (exhaust / overheat sensor)
If serious malfunctions such as overheating or failure occur, the heater will go into a locked
state (F 12). This state can be reset by using the following heater lockout reset procedure.
8
Page 9

1. Using switch or standard timer control, turn heater on
Heater Lock-out Reset Procedure
2. Remove the main power connection to heater from battery or pull fuse for a minimum of
20 seconds.
3. Using switch or standard timer control, turn the heater off.
4. Reinstall main heater power connection where previously disconnected.
5. Rectify the cause of the fault.
IMPORTANT: Heater fault codes can be read using PC Diagnostics, however, the heater lockout reset must be manually performed using the procedure stated above.
9
Page 10

Webasto Thermo & Comfort North America, Inc. (hereinafter referred to as Webasto) war-
Limited Non-Transferable Warranty
rants their heaters and heater kits against defects in material and workmanship for two (2)
years effective at the time of installation or vehicle registration date for original equipment
installation (OEM). This warranty period may not exceed three (3) years from the original date
of sale by Webasto. This warranty period may be superseded by written contractual agreements.
All models are limited to 2,000 maximum operating hours.
Replacement parts are covered for six (6) months or the remainder of the original warranty
period, whichever is longer.
The intent of the Webasto warranty is to protect the original end-user of the heater from defects and provide free repair and replacement of defective parts in the manner provided herein. During the warranty period, the exclusive remedy will be for Webasto, at their discretion,
to repair or replace those parts which are demonstrated to be defective in material or workmanship.
While warranty is provided to the “original end-user”, it is to be administered and serviced
through an authorized Webasto dealer in accordance with the Webasto warranty policy or
contractual agreement between Webasto and a second party.
To locate the nearest Webasto authorized dealer for warranty service:
visit http://www.techwebasto.com or call (800) 860-7866 in USA, (800) 667-8900 in Canada.
1
Page 11

Notes
Page 12

Org. 3/2017 P/N: 5012526A
Webasto Thermo & Comfort N.A., Inc
15083 North Road
Fenton, MI 48430
Technical Assistance Hotline
USA: (800) 860-7866
Canada: (800) 667-8900
www.webasto.us
www.techwebasto.com
 Loading...