

Page 1

PRODUCT MANUAL
Ultrastar® DC ME200 Memory Extension Drive
Page 2

Revision History
Revision Date Description Reference
1.0 January 10, 2019 Initial release
2.0 March 22, 2019 Added best practices for benchmarking and
3.0 May 07, 2019 Update to links within Sections 2.3, 2.4, and 8.1.
enhanced troubleshooting.
- 2 -
Page 3

Western Digital Technologies, Inc. or its affiliates' (collectively “Western Digital”) general policy does
not recommend the use of its products in life support applications where in a failure or malfunction of
the product may directly threaten life or injury. Without limitation to the foregoing, Western Digital
shall not be liable for any loss, injury, or damage caused by use in such conditions.
This document is for information use only and is subject to change without prior notice. Western
Digital assumes no responsibility for any errors that may appear in this document, nor for incidental or
consequential damages resulting from the furnishing, performance or use of this material.
Absent a written agreement signed by Western Digital or its authorized representative to the
contrary, Western Digital explicitly disclaims any express and implied warranties and indemnities of
any kind that may, or could, be associated with this document and related material, and any user of
this document or related material agrees to such disclaimer as a precondition to receipt and usage
hereof.
Each user of this document or any product referred to herein expressly waives all guaranties and
warranties of any kind associated with this document any related materials or such product, whether
expressed or implied, including without limitation, any implied warranty of merchantability or fitness
for a particular purpose or non-infringement. Each user of this document or any product referred to
herein also expressly agrees Western Digital shall not be liable for any incidental, punitive, indirect,
special, or consequential damages, including without limitation physical injury or death, property
damage, lost data, loss of profits or costs of procurement of substitute goods, technology, or
services, arising out of or related to this document, any related materials or any product referred to
herein, regardless of whether such damages are based on tort, warranty, contract, or any other legal
theory, even if advised of the possibility of such damages.
This document and its contents, including diagrams, schematics, methodology, work product, and
intellectual property rights described in, associated with, or implied by this document, are the sole
and exclusive property of Western Digital. No intellectual property license, express or implied, is
granted by Western Digital associated with the document recipient's receipt, access and/or use of
this document or the products referred to herein; Western Digital retains all rights hereto.
Western Digital, the Western Digital logo, and Ultrastar are registered trademarks or trademarks of
Western Digital Corporation or its affiliates in the US and/or other countries. Apache, Apache Ignite,
and Apache Spark are either registered trademarks or trademarks of the Apache Software Foundation
in the United States and/or other countries. Docker is a trademark or registered trademark of Docker,
Inc. in the United States and/or other countries. Intel and Xeon are trademarks of Intel Corporation or
its subsidiaries in the U.S. and/or other countries. Linux® is the registered trademark of Linus Torvalds
in the U.S. and other countries. Oracle and MySQL are registered trademarks of Oracle and/or its
affiliates. Red Hat and Red Hat Enterprise Linux are registered trademarks of Red Hat, Inc. in the U.S.
and other countries. Redis is a trademark of Redis Labs Ltd. Any rights therein are reserved to Redis
Labs Ltd. Any use by Western Digital is for referential purposes only and does not indicate any
sponsorship, endorsement or affiliation between Redis and Western Digital. SAP and HANA are the
trademark(s) or registered trademark(s) of SAP SE in Germany and in several other countries. ScaleMP
and the ScaleMP logo are trademarks of ScaleMP, Inc. All other marks are the property of their
respective owners. Product specifications subject to change without notice. Pictures shown may
vary from actual products. Not all products are available in all regions of the world.
© 2019 Western Digital Corporation or its affiliates. All rights reserved.
- 3 -
Page 4

Table of Contents
TABLE OF CONTENTS
1. INTRODUCTION ................................................................................................................. 7
NSTALLING ULTRASTAR MEMORY DRIVE ............................................................................. 8
2. I
2.1 Operating System Prerequisites .................................................................................................... 8
2.2 Preloaded Software ........................................................................................................................ 8
2.3 Installing Ultrastar Memory Tools .................................................................................................. 9
2.4 Update Ultrastar Memory Software..............................................................................................10
2.5 BIOS Configuration..........................................................................................................................11
2.5.1 Configure Boot Device............................................................................................................11
2.5.2 Configuring BIOS to Support Intel® Virtualization Technology......................................... 12
3. ULTRASTAR MEMORY DRIVE BOOT, SETTINGS AND DIAGNOSTICS MENU ..............................14
3.1 Boot Process ................................................................................................................................... 14
3.2 Guest OS ......................................................................................................................................... 16
3.3 System Settings and Diagnostics ................................................................................................. 18
4. HARDWARE CONFIGURATION ........................................................................................... 27
4.1 Recommended Configuration.......................................................................................................27
4.2 DRAM to Ultrastar Memory Drive Ratio ........................................................................................27
5. WORKLOADS PERFORMANCE & OPTIMIZATIONS ................................................................30
5.1 Target Workloads for Ultrastar Memory ..................................................................................... 30
5.1.1 Workloads That Do Not Benefit From Ultrastar Memory Drive........................................... 31
5.2 Optimized Workload Settings....................................................................................................... 31
5.2.1 Operating System................................................................................................................... 31
5.2.2 Memory Settings and Memory Allocators........................................................................... 32
5.2.3 Application Settings.............................................................................................................. 32
6. BENCHMARKING METHODOLOGY AND PERFORMANCE COLLECTION .................................... 33
6.1 Benchmarking Methodology .........................................................................................................33
6.2 Expected Results and Demonstrated Value ............................................................................... 34
6.3 Performance Data Collection ....................................................................................................... 34
6.4 Out-of-the-Box Large Memory Benchmark ................................................................................. 36
7. TROUBLESHOOTING ......................................................................................................... 37
7.1 Ultrastar Memory Drive Fails to Start............................................................................................37
7.1.1 Common Installation Error Codes..........................................................................................37
7.2 Collecting Information for Escalating to Support ...................................................................... 38
8. RELOAD THE ULTRASTAR MEMORY DRIVE SOFTWARE ........................................................ 39
8.1 Reload to Ultrastar Memory Device............................................................................................. 39
8.2 Installing Ultrastar Memory Drive Software to a Different Bootable Media.............................. 41
9. SPECIFICATIONS .............................................................................................................. 43
- 4 -
Page 5

List of Figures
LIST OF FIGURES
Figure 1-1 Block Diagram of the Ultrastar Memory Drive.............................................................................7
Figure 2-1 Preloaded Software ..................................................................................................................... 8
Figure 2-2 Installing Ultrastar Memory Tools ............................................................................................. 9
Figure 2-3 Change Boot Order / Priorities..................................................................................................11
Figure 2-4 Intel Virtualization Technology Configuration ......................................................................... 12
Figure 2-5 Intel Virtualization Technology for Direct I/O Configuration................................................. 13
Figure 3-1 First Screen ................................................................................................................................. 14
Figure 3-2 Ultrastar Memory Drive Boot.................................................................................................... 14
Figure 3-3 Configuration Display................................................................................................................ 15
Figure 3-4 Guest OS Loads ......................................................................................................................... 15
Figure 3-5 Performance Data Collection ....................................................................................................16
Figure 3-6 Software Installer........................................................................................................................ 16
Figure 3-7 Software Installer ........................................................................................................................ 17
Figure 3-8 Systems Settings and Diagnostics (1) ......................................................................................18
Figure 3-9 Systems Settings and Diagnostics (2) ...................................................................................... 19
Figure 3-10 Systems Settings and Diagnostics (3).................................................................................... 20
Figure 3-11 Unify Remote Memory Domains ............................................................................................... 21
Figure 3-12 Expand Local Memory Domains............................................................................................... 21
Figure 3-13 Hardware Tab ........................................................................................................................... 22
Figure 3-14 Boot Tab.................................................................................................................................... 23
Figure 3-15 Diagnostics Tab........................................................................................................................ 24
Figure 3-16 Review Diagnostic Test ........................................................................................................... 25
Figure 3-17 Diagnostics Results .................................................................................................................. 25
Figure 3-18 TFTP Option.............................................................................................................................. 26
Figure 5-1 Performance Data Collection .................................................................................................... 32
Figure 5-2 Performance Data Collection ................................................................................................... 32
Figure 6-1 Figure 1 Type .............................................................................................................................. 34
Figure 6-2 Performance Data Collection ................................................................................................... 35
Figure 6-3 Performance Data Collection ................................................................................................... 35
Figure 6-4 Figure 1 Type.............................................................................................................................. 36
Figure 8-1 Software Installer ...................................................................................................................... 40
Figure 8-2 Software Installer ...................................................................................................................... 42
- 5 -
Page 6

List of Tables
LIST OF TABLES
Table 4-1 Performance-optimized Software-defined Memory (SDM) Capacity ..................................... 28
Table 4-2 Maximum Software-defined Memory (SDM) capacity for Ultrastar Memory ......................... 29
Table 5-1 Workloads and Applications ...................................................................................................... 30
Table 7-1 Common Installation Error Codes...............................................................................................37
Table 7-2 Workloads and Applications...................................................................................................... 38
Table 9-1 Specifications............................................................................................................................... 43
- 6 -
Page 7

1.0 INTRODUCTION
The Ultrastar® DC ME200 Memory Extension Drive can be used to immediately scale existing
system memory, promote server consolidation, and reduce the complexity of splitting large
multi-TB data sets across multiple servers. The Ultrastar memory drive drives applications
with large amounts of system memory at a fraction of the cost of DRAM by combining
Ultrastar NVMe™ SSDs with Western Digital memory extension technology. Advanced
software algorithms work to maintain DRAM-like performance across a variety of applications,
especially targeting highly parallel workloads with high numbers of transactions. Once
installed, the solution is transparent, requiring no changes to the existing OS and applications.
This document provides details for users and administrators on the design, installation,
features, and specifications of Ultrastar memory drives.
As shown in Figure 1-1, the Ultrastar memory drive executes directly on the hardware, below
the operating system, and creates a hybrid system memory from DRAM and NVM. This hybrid
system memory operates transparently as volatile system memory, as if it were all DRAM.
Figure 1-1. Block Diagram of the Ultrastar Memory Drive
Introduction
- 7 -
Page 8

Installing Ultrastar Memory Drive
2.0 INSTALLING ULTRASTAR MEMORY DRIVE
2.1 Operating System Prerequisites
Linux
See Release Notes for supported Linux distributions.
Ultrastar memory drives also supports Open Source hypervisors such as KVM, as
2.2 Preloaded Software
The Ultrastar memory drive is a bootable device, shipped with preloaded software to
create software-defined memory. Booting a system directly from the Ultrastar
memory drive requires the system to support a UEFI boot.
To setup the system from a different local bootable flash media, or if the system does
not support UEFI boot, refer to Chapter 8 - Reload the Ultrastar memory Software.
If the preloaded software on the Ultrastar memory drive is accidentally deleted or
corrupted, refer to Chapter 8 - Reload the Ultrastar Memory Software.
®
x86 64 bit, kernel versions 2.6.32 or higher.
shipped with the major Linux distributions.
Figure 2-1. Preloaded Software
Installing the Ultrastar memory drive is as simple as physically connecting the
Ultrastar memory device to the right slot within the system (refer to the system’s
manual for information on connecting NVMe devices to it).
For optimal performance, it is highly recommended to install at least one
Ultrastar memory drive per processor.
Configure the system’s BIOS to boot from one of the Ultrastar memory
devices installed. Once setup is complete and changes, reboot the system.
NOTE: It is recommended to install a supported Linux OS; if Linux OS is preinstalled, continue with the boot process. Once prompted, select the device onto
which the OS is installed as the boot device.
While it is recommended to have Linux OS pre-installed before installation, users
may opt to install Linux OS before or after installing the Ultrastar memory drive.
- 8 -
Page 9

Installing Ultrastar Memory Drive
2.3 Installing Ultrastar Memory Tools
If installing a system for purposes other than production use, such as software
development, performance tuning, or quality assurance, it is recommended for users
to also install the Ultrastar memory tools as it can provide valuable system
information.
The software installer can be obtained from the download section of the product
support page:
https://www.westerndigital.com/support/wdc/data-center-drives/ssd/ultrastar-dc-me200
NOTE: The Ultrastar memory tools are installed by default within /usr/local/
{bin,etc}.
Figure 2-2. Installing Ultrastar Memory Tools
#./wmem_installer-8.6.2535.77.sh in -t
Preparing installer...
Please take a moment to read the below
================================================================================
Welcome to WDC Ultrastar DC ME200 memory version 8.6.2535.77 !
-------------------------------------------------------------------------------* By installing and/or using this software you acknowledge that you have read and
agreed to the agreement published at
https://www.get-wmen.com/EULA
* Parts if this program, as provided in binary form, include open source code under
one or more open source licenses. For further details and notices please see
https://www.scalemp.com/opensource.
================================================================================
Type “accept” to accept the terms and conditions above: accept
Terms and conditions accepted.
Installing WDC Ultrastar DC ME200 memory tools...
DC Ultrastar DC ME200 memory tools requires SUID permission to run as
non-root user.
Allow WDC Ultrastar DC ME200 memory tools to be run by all users (recommended)?
[N/Y] Y
WDC Ultrastar DC ME200 memory tools installation is complete.
- 9 -
Page 10

Installing Ultrastar Memory Drive
2.4 Update Ultrastar Memory Software
A new software version of the Ultrastar memory drive is released periodically, which
can include bug fixes, new features, and performance enhancements.
The latest software revision is available at:
https://www.westerndigital.com/support/wdc/data-center-drives/ssd/ultrastar-dc-me200
To update to the latest software version, proceed with the following:
1. Before starting the update, verify the Ultrastar memory drive is operating and
supporting the installed OS.
2. Log into the system as root.
3. Download the latest software version to a directory on the target Linux
server.
4. Make the installer file executable:
# chmod +x wmem_installer-x.x.x.x.sh
5. Launch the installer with the update flag, and follow on-screen instructions.
# ./wmem_installer-x.x.x.x.sh up
Please take a moment to read the following:
================================================================================
...
6. Press the U key to start the update process.
Writing part 1 out of 7: 100%
Writing part 2 out of 7: 100%
Writing part 3 out of 7: 100%
Writing part 4 out of 7: 100%
Writing part 5 out of 7: 100%
Writing part 6 out of 7: 100%
Writing part 7 out of 7: 100%
WDC Ultrastar DC ME200 memory installation is complete.
Installing WDC Ultrastar DC ME200 memory tools...
WDC Ultrastar DC ME200 memory tools requires SUID permission to run as non-root
user.
Allow Ultrastar DC ME200 memory tools to be run by all users (recommended)
[N/Y]? Y
7. Reboot the system.
The new version of the Ultrastar memory software will load and made available upon
reboot of the system.
See Section 2.3 - Installing Ultrastar Memory Tools, for more information.
- 10 -
Page 11

Installing Ultrastar Memory Drive
2.5 BIOS Configuration
The BIOS menus of the servers onto which they are installed may differ from the ones
found below. Please verify the configuration of boot options in your systems’ BIOS
manual.
2.5.1 Configure Boot Device
1. Boot the machine and access the BIOS Setup Utility during system load.
2. Navigate via the Menu to (Advanced) Boot Options:
If the system is capable of booting directly from the NVMe (using UEFI), set
the Boot mode to UEFI.(See section 8.2 - Installing Ultrastar Memory Drive
Software to a Different Bootable Media).
In case the option of booting from the NVMe is not available, refer to the
Chapter 8 - Reload the Ultrastar Memory Software of this publication.
3. Save changes in BIOS configuration and reboot the system.
NOTE: To enable boot device selection, save the BIOS
configuration and reboot the system.
4. Re-enter the BIOS setup utility.
5. Navigate via the menu to Boot Options, then select Change Boot Order/
Priorities.
If the system is capable of booting directly from the NVMe (using UEFI), assign
to the UEFI Device and assign as the first/highest boot sequence priority.
In case the option of booting from the NVMe is not available, assign to the
USB Flash Drive highest boot sequence priority by moving it to the first
position on the list.
6. Select menu option Save & Exit and press Enter.
Figure 2-3. Change Boot Order / Priorities
- 11 -
Page 12

Installing Ultrastar Memory Drive
2.5.2 Configuring BIOS to Support Intel® Virtualization Technology
Note, in most systems this feature is a default setting.
To enable Intel Virtualization Technology (VT), navigate via the menu and
proceed with the following steps:
1. Select Advanced, then select Socket Configuration.
2. Click on Processor Configuration, and set Intel Virtualization Technology
to Enabled.
Figure 2-4. Intel Virtualization Technology Configuration
- 12 -
Page 13

Installing Ultrastar Memory Drive
To enable VT-D, navigate via the menu and proceed with the following steps:
1. Select Advanced, then select Socket Configuration.
2. Click on Integrated IO Configuration, and set Intel Virtualization Technology
for Direct I/O to Enabled.
Figure 2-5. Intel Virtualization Technology for Direct I/O Configuration
- 13 -
Page 14

Ultrastar Memory Drive Boot, Settings and Diagnostics Menu
3.0 ULTRASTAR MEMORY DRIVE BOOT, SETTINGS AND DIAGNOSTICS MENU
This chapter outlines the boot process of Ultrastar memory drives, as well as the
interactive user setting and diagnostics options available during the boot process.
It is important to note that for data centers in which KVM console access is not
available, the Ultrastar memory drive can be configured for those outputs and
controls to be available via Serial over LAN (SOL).
3.1 Boot Process
The following screens are displayed during the loading process, directly after the
Ultrastar memory drive system boot.
First visual the end-user sees after BIOS POST.
Figure 3-1. First Screen
Ultrastar memory drive boot start.
Figure 3-2. Ultrastar Memory Drive Boot
- 14 -
Page 15
Ultrastar Memory Drive Boot, Settings and Diagnostics Menu
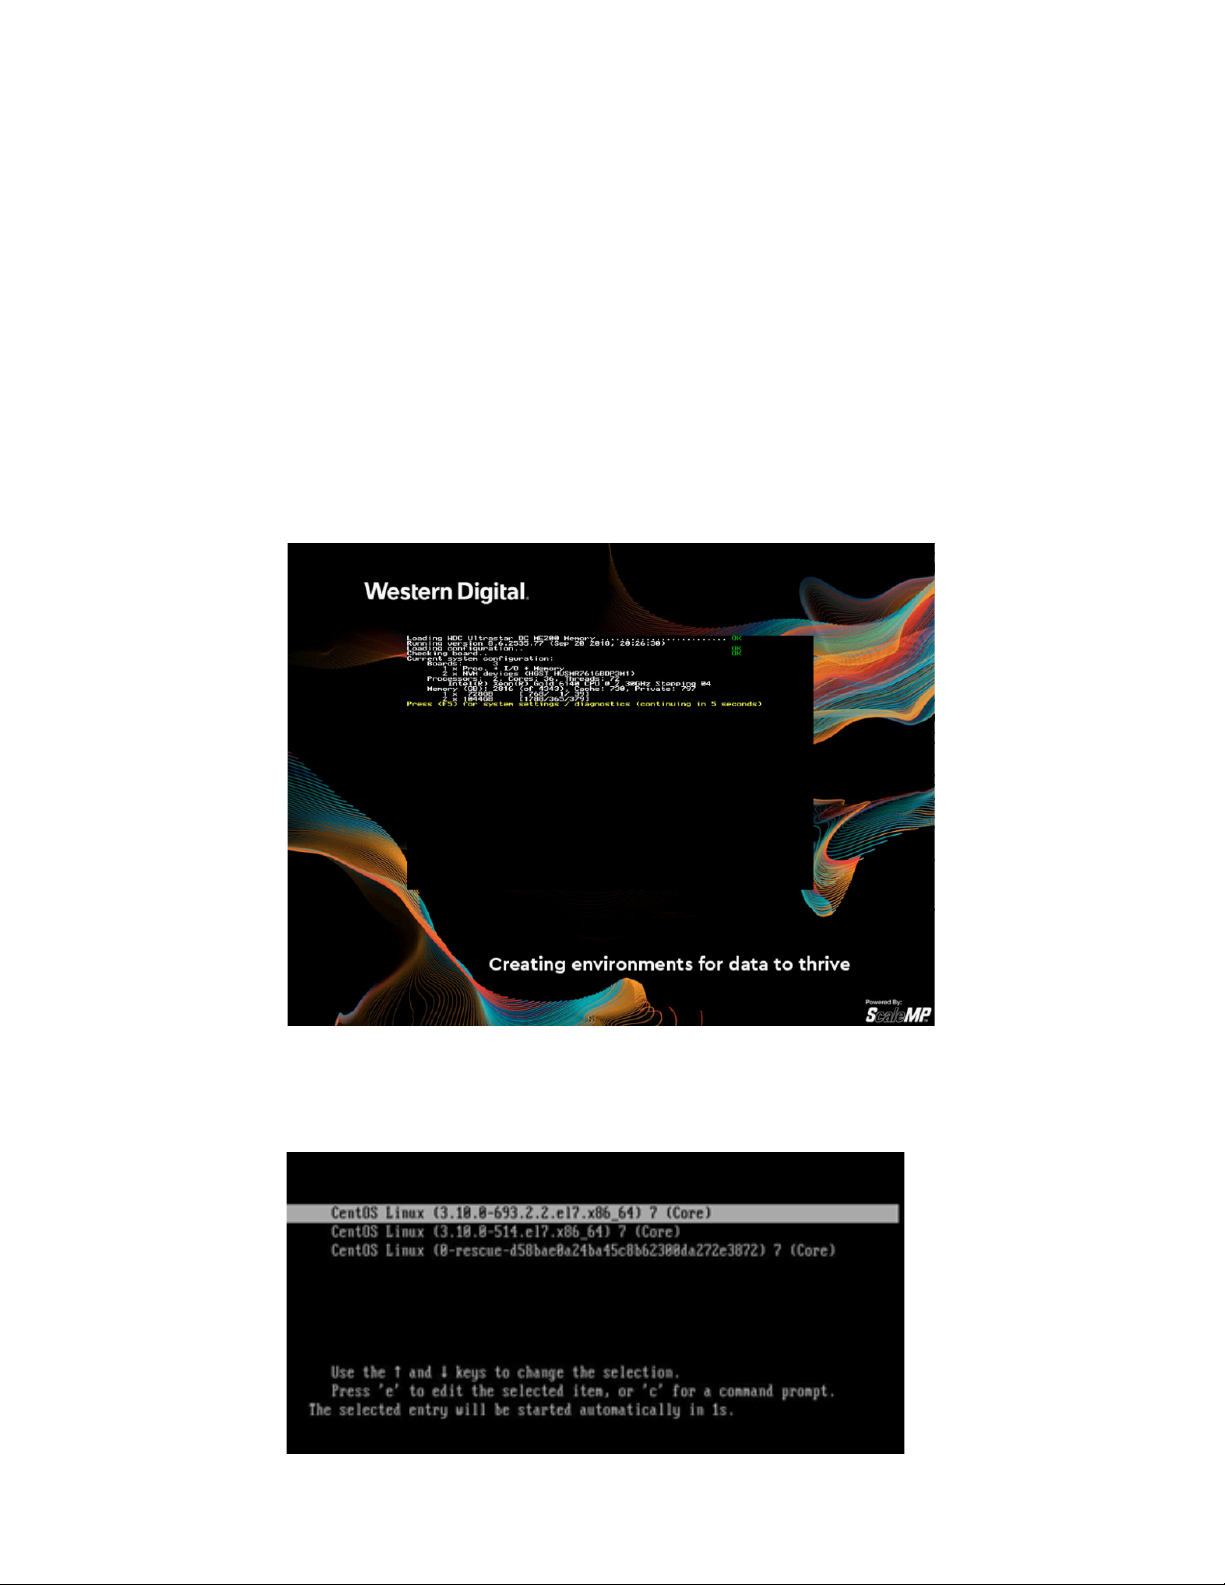
At this stage, the system displays configuration information. This specific example
shows:
1 x 2 Processor System (“Board”) with 768GiB RAM (of which 728GiB are
available for use).
2 x NVMe SSDs (“Boards”) with 1,788GiB each (of which 1,044GiB each are
available for use).
The system reports a total of 2,816GiB available for use.
Warning messages, if any (displayed in yellow font), notify the user about
deviations from best practices and recommendations.
A prompt is displayed to optionally enter the Ultrastar memory drive
settings and diagnostics menu (displayed in yellow font) by pressing <F5>
key. If no action is taken, after timeout, the Linux OS will be booted from
the device defined in the Ultrastar memory drive configuration.
Figure 3-3. Configuration Display
Guest OS Loads
Figure 3-4. Guest OS Loads
- 15 -
Page 16

Ultrastar Memory Drive Boot, Settings and Diagnostics Menu
3.2 Guest OS
Once the guest operating system loads, it is possible to see all available system
memory using standard free command:
Figure 3-5. Performance Data Collection
# free -g
total used free shared buff/cache available
Mem: 2771 21 2749 0 0 2746
Additionally, to check the Ultrastar memory drive version and configuration, users
may see the wmemversion command (Note: this requires installation of Ultrastar
memory tools; see Chapter 2 - Installing Ultrastar Memory Drive Tools):
Figure 3-6. Software Installer
# wmemversion --long
WDC Ultrastar DC ME200 memory: 8.6.2535.77 (Sep 20 2018 20:26:30)
System configuration:
Boards: 3
1 x Proc. + I/O + memory
2 x NVM devices (HGST HUSMR7616BDP3M1)
Processors: 2, Cores: 36, Threads: 72
Intel(R) Xeon(R) Gold 6140 CPU @ 2.30GHz Stepping 04
Memory (GB): 2816 (of 4343), Cache: 730, Private: 797
1 x 728GB [ 768/ 1/ 39]
1 x 1044GB [1788/365/379] 86:00.0#1
1 x 1044GB [1788/365/379] 87:00.0#1
Boot device: [HDD0] ATA VK000240GWCFD
Supported until: Unlimited this specific example shows the resources available for
use:
1 x 2 Processor System (“Board”) with 768GB RAM
(of which 728GB are available for use)
2 x NVMe SSDs (“Boards”) with 1,788GiB each
(of which 1,044GiB each are available for use).
The system reports total 2,816GB available for use.
NVMe® SMART attributes are accessible in-band using the command below. SMART
attributes are also accessible out-of-band using IPMI.
- 16 -
Page 17

Ultrastar Memory Drive Boot, Settings and Diagnostics Menu
Figure 3-7. Software Installer
# wmemctl --pinfo
Device info:
Board number: 0
Device number: 0
Device type: 0
Device address: 0087:00.0#1
PCI VID:DID: 1c58:0023
PCI SVID:SDID: 1c58:0023
Controller ID:
Serial number (SN): CJH002000869
Model number (MN): HUSMR7632BHP301
Firmware number (FN): KNGNP090
Number of namespaces (NN): 128
Namespace ID:
Namespace size (NSZE): 543076758
Namespace capacity (NCAP): 543076758
Namespace utilization (NUSE): 543076758
SMART / HEALTH Information Log:
Critical Warning: 0x0
Composite Temperature: 48 C
Available Spare: 191%
Available Spare Threshold: 10%
Percentage Used: 3%
Data Units Read: 4021317382
Data Units Written: 2177033579
Host Read Commands: 452665252284
Host Write Commands: 272541820061
Controller Busy Time: 44577
Power Cycles: 751
Power On Hours: 2
Unsafe Shutdowns: 140
Media and Data
Integrity Errors: 0
Number of Error
Information Log Entries: 2
License Info:
Provisioned License
- 17 -
Page 18
Ultrastar Memory Drive Boot, Settings and Diagnostics Menu
3.3 System Settings and Diagnostics
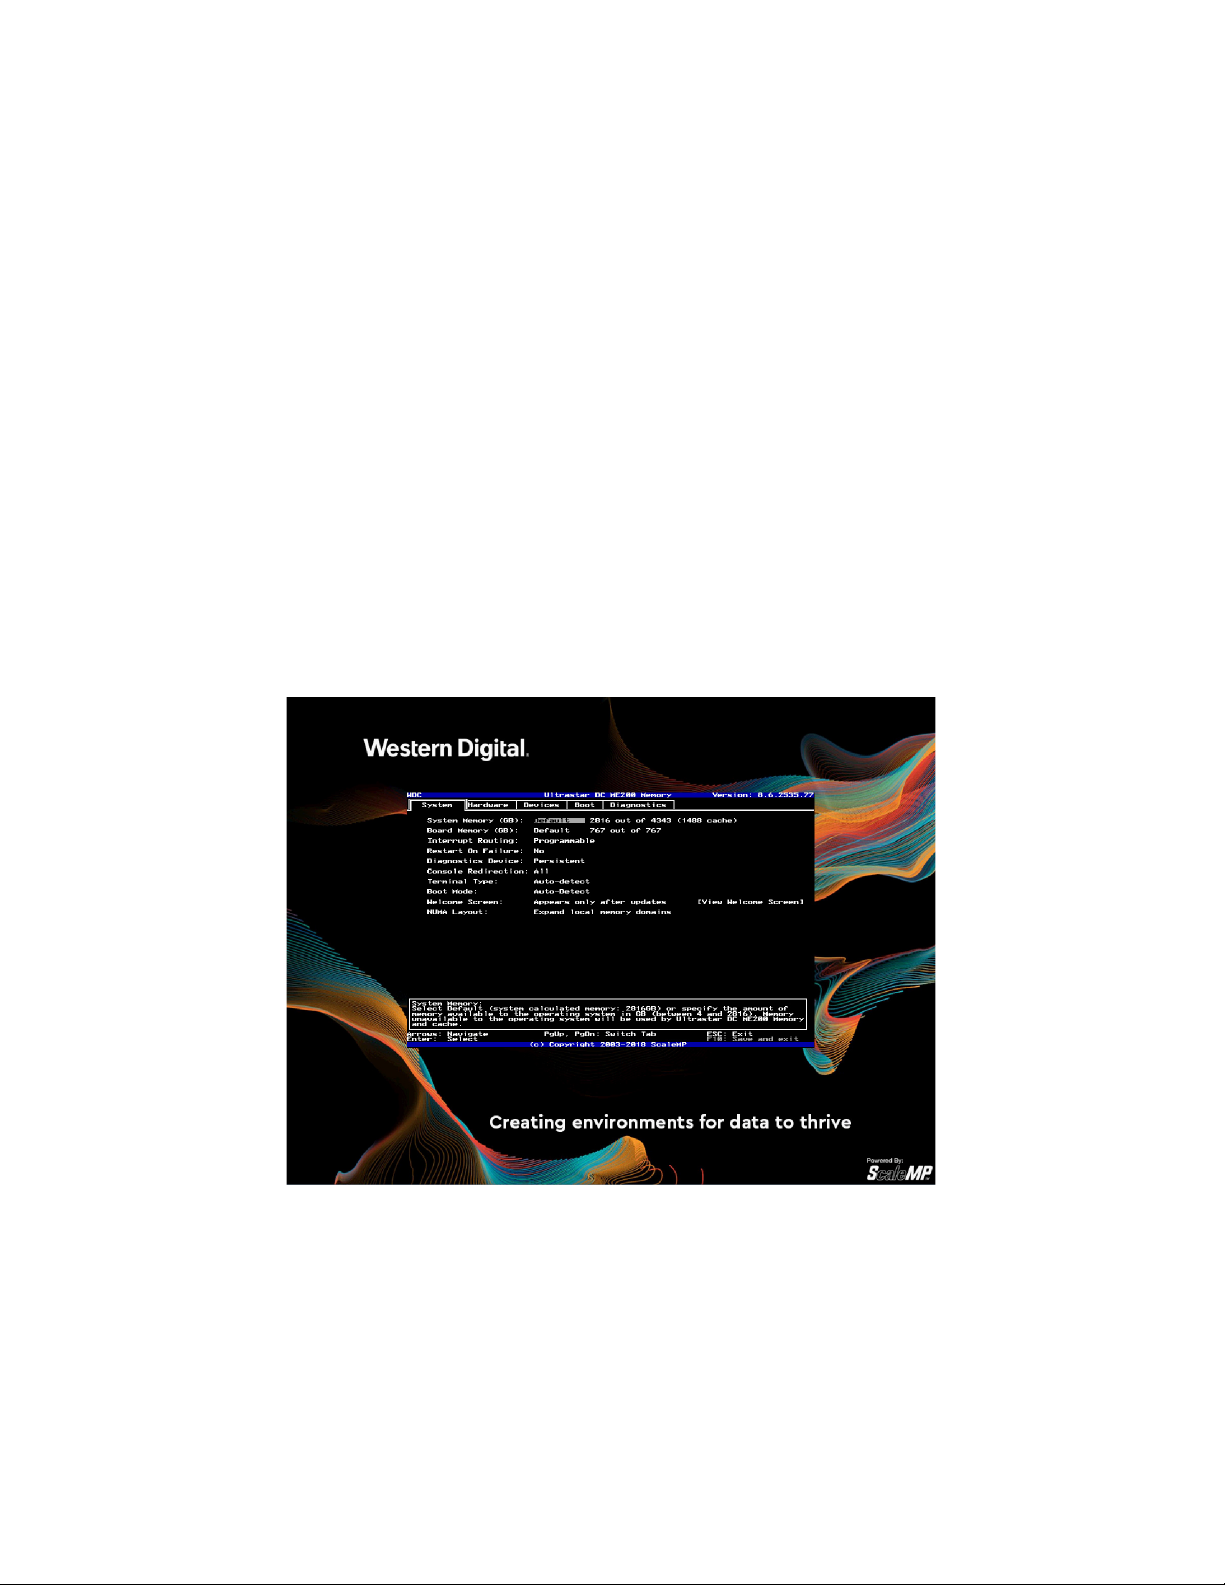
During the Ultrastar memory drive loading process, the user may go into the Settings
and Diagnostics menu by pressing <F5> when prompted.
In the System tab, the following can be configured:
The total system memory available to the operating system
(use the default or set it manually).
The physical board memory used (typically used in benchmarking,
otherwise keep as Default).
Set the system to auto-restart in case of critical failure of a system
component (restarting without that component or stay frozen with the
error message).
Define the console redirection and terminal type.
Toggle the display of the welcome screen between Always and Only After
Updates options.
Select the NUMA layout that Ultrastar memory drive will present to the
operating system.
Figure 3-8. Systems Settings and Diagnostics (1)
- 18 -
Page 19
Ultrastar Memory Drive Boot, Settings and Diagnostics Menu
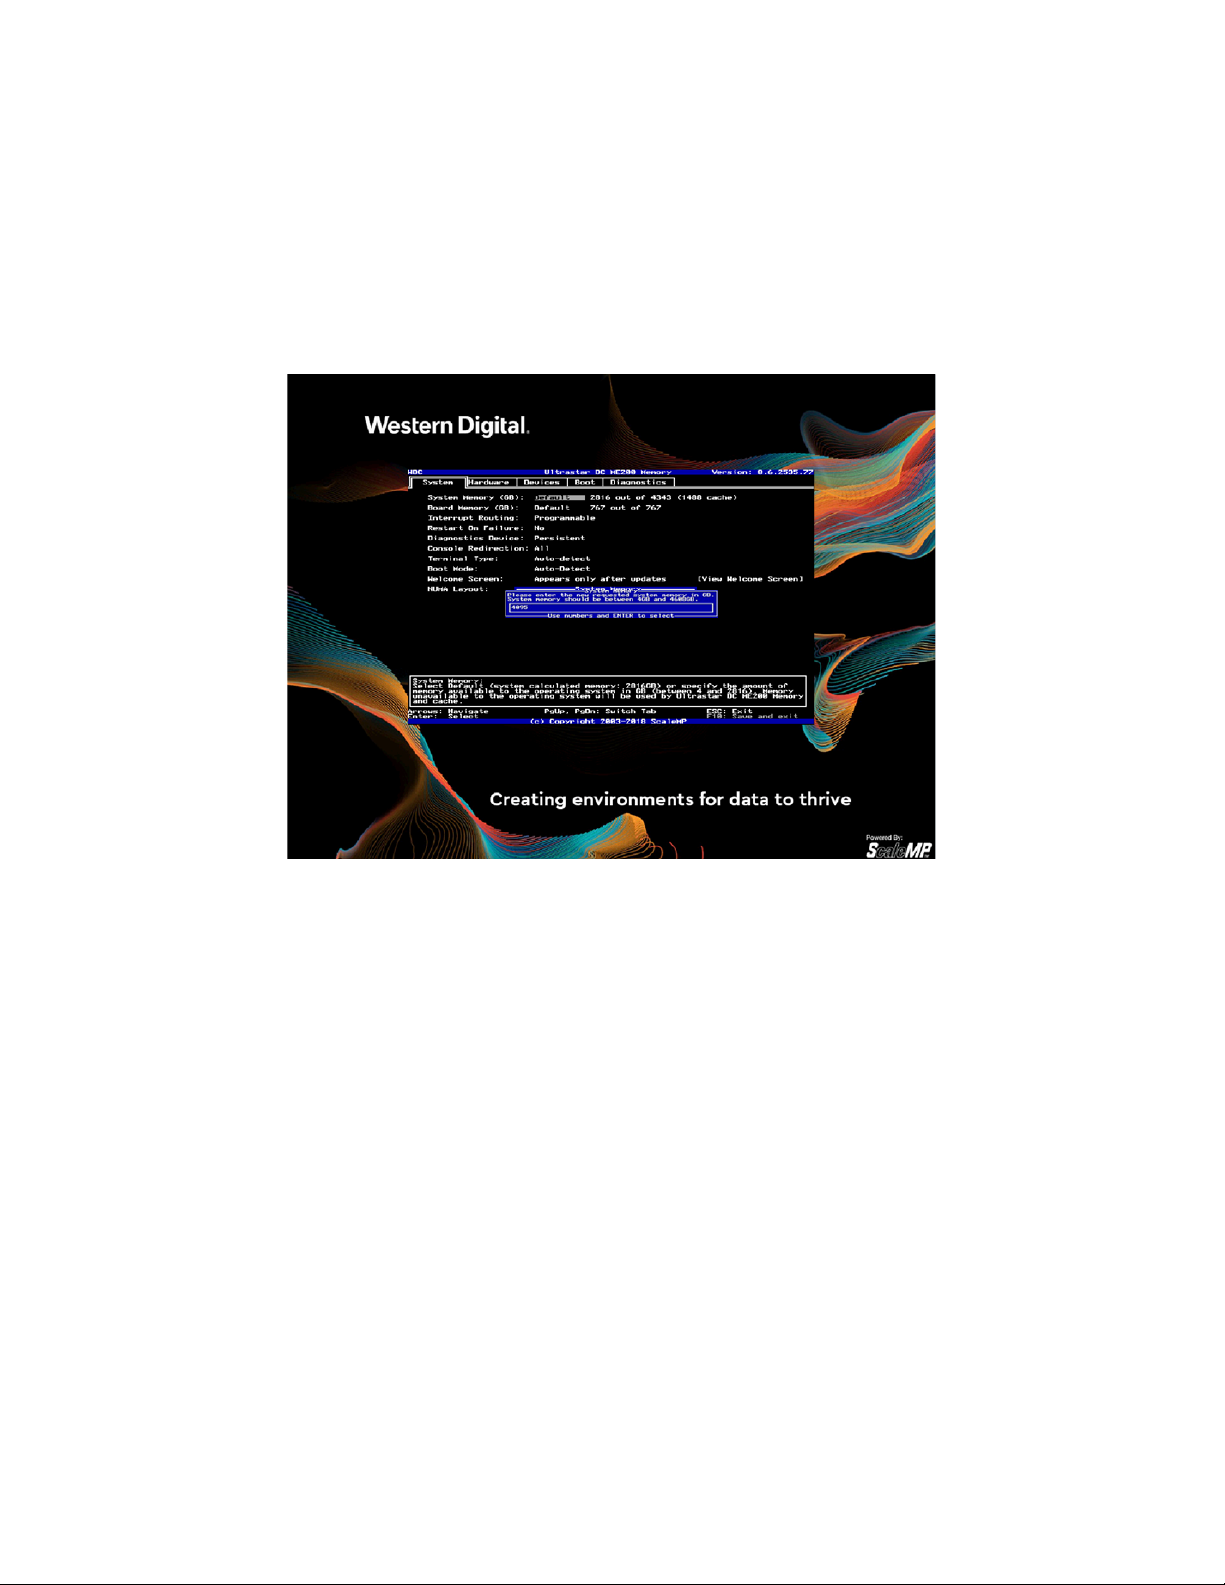
When setting the System Memory, the Default allows the Ultrastar memory drive to
set the number to the optimal value for performance.
Switch this setting to Manual and set any other value from the range allowed by the
system, if desired.
Setting a higher number than the default value would allow for larger system memory
capacity at the expense of performance.
Figure 3-9. Systems Settings and Diagnostics (2)
- 19 -
Page 20
Ultrastar Memory Drive Boot, Settings and Diagnostics Menu
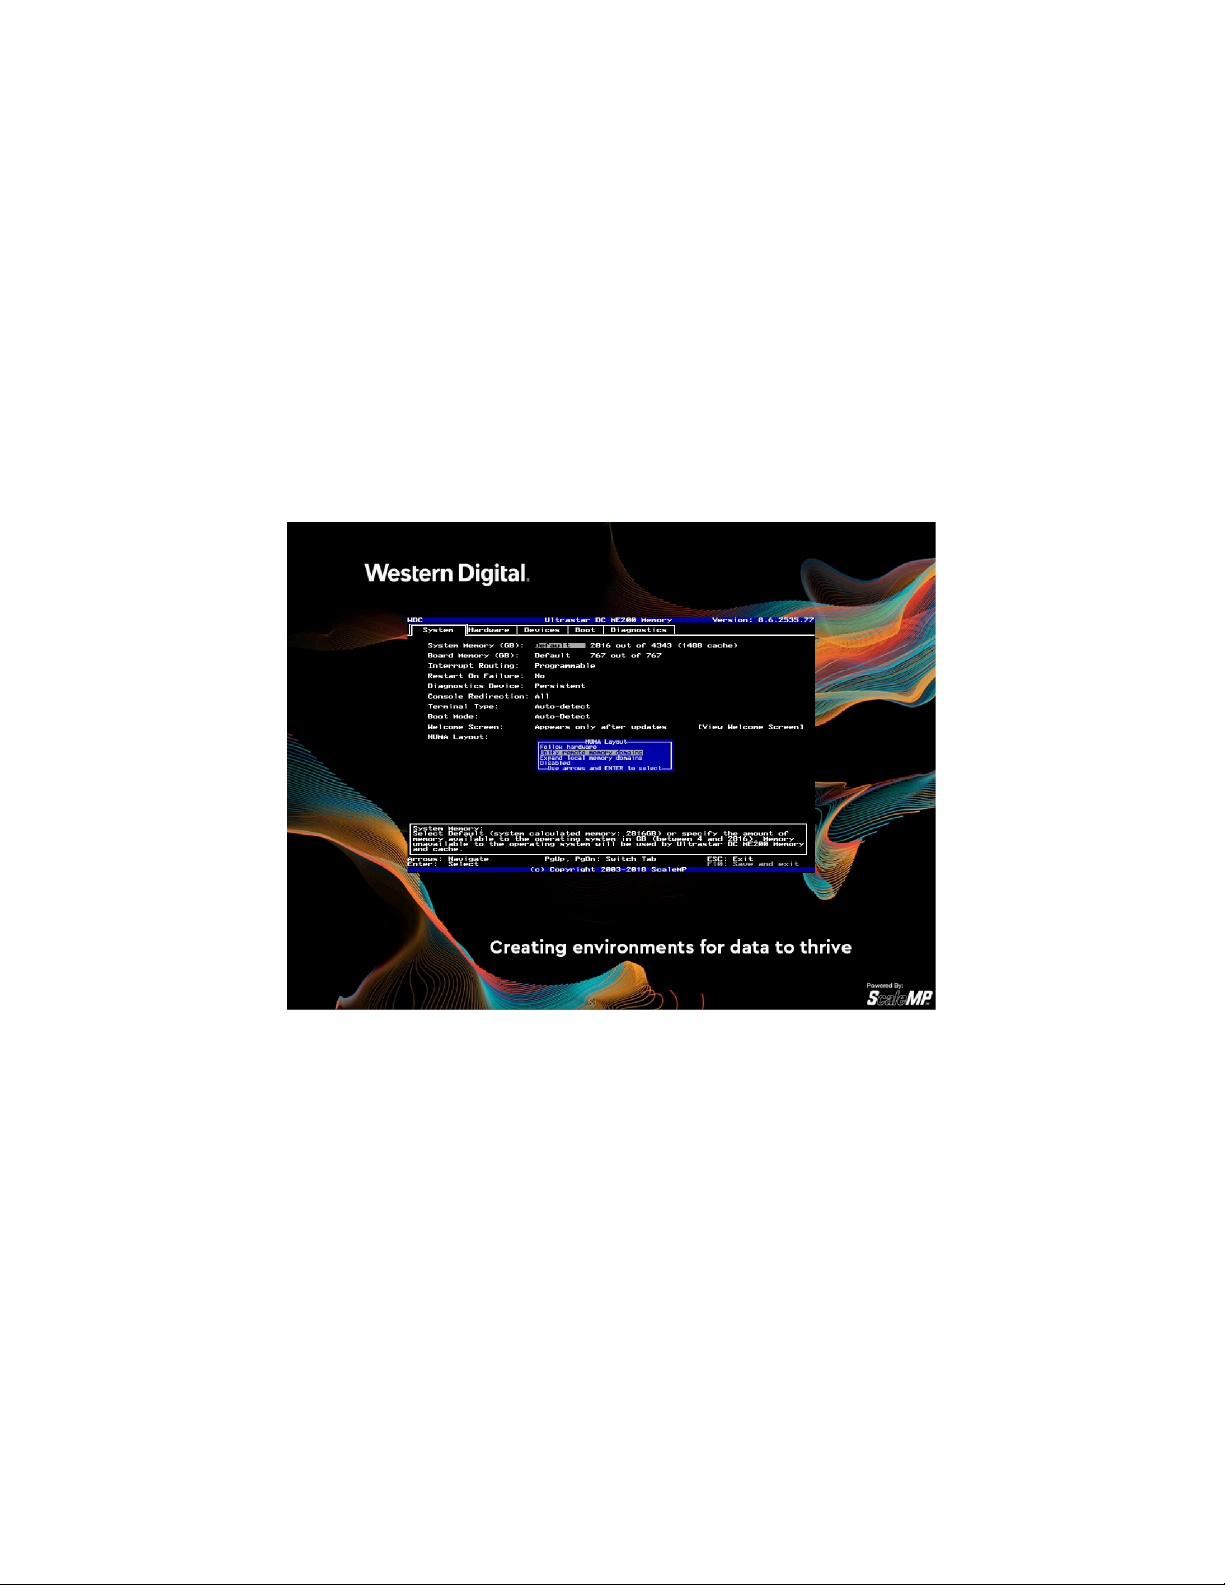
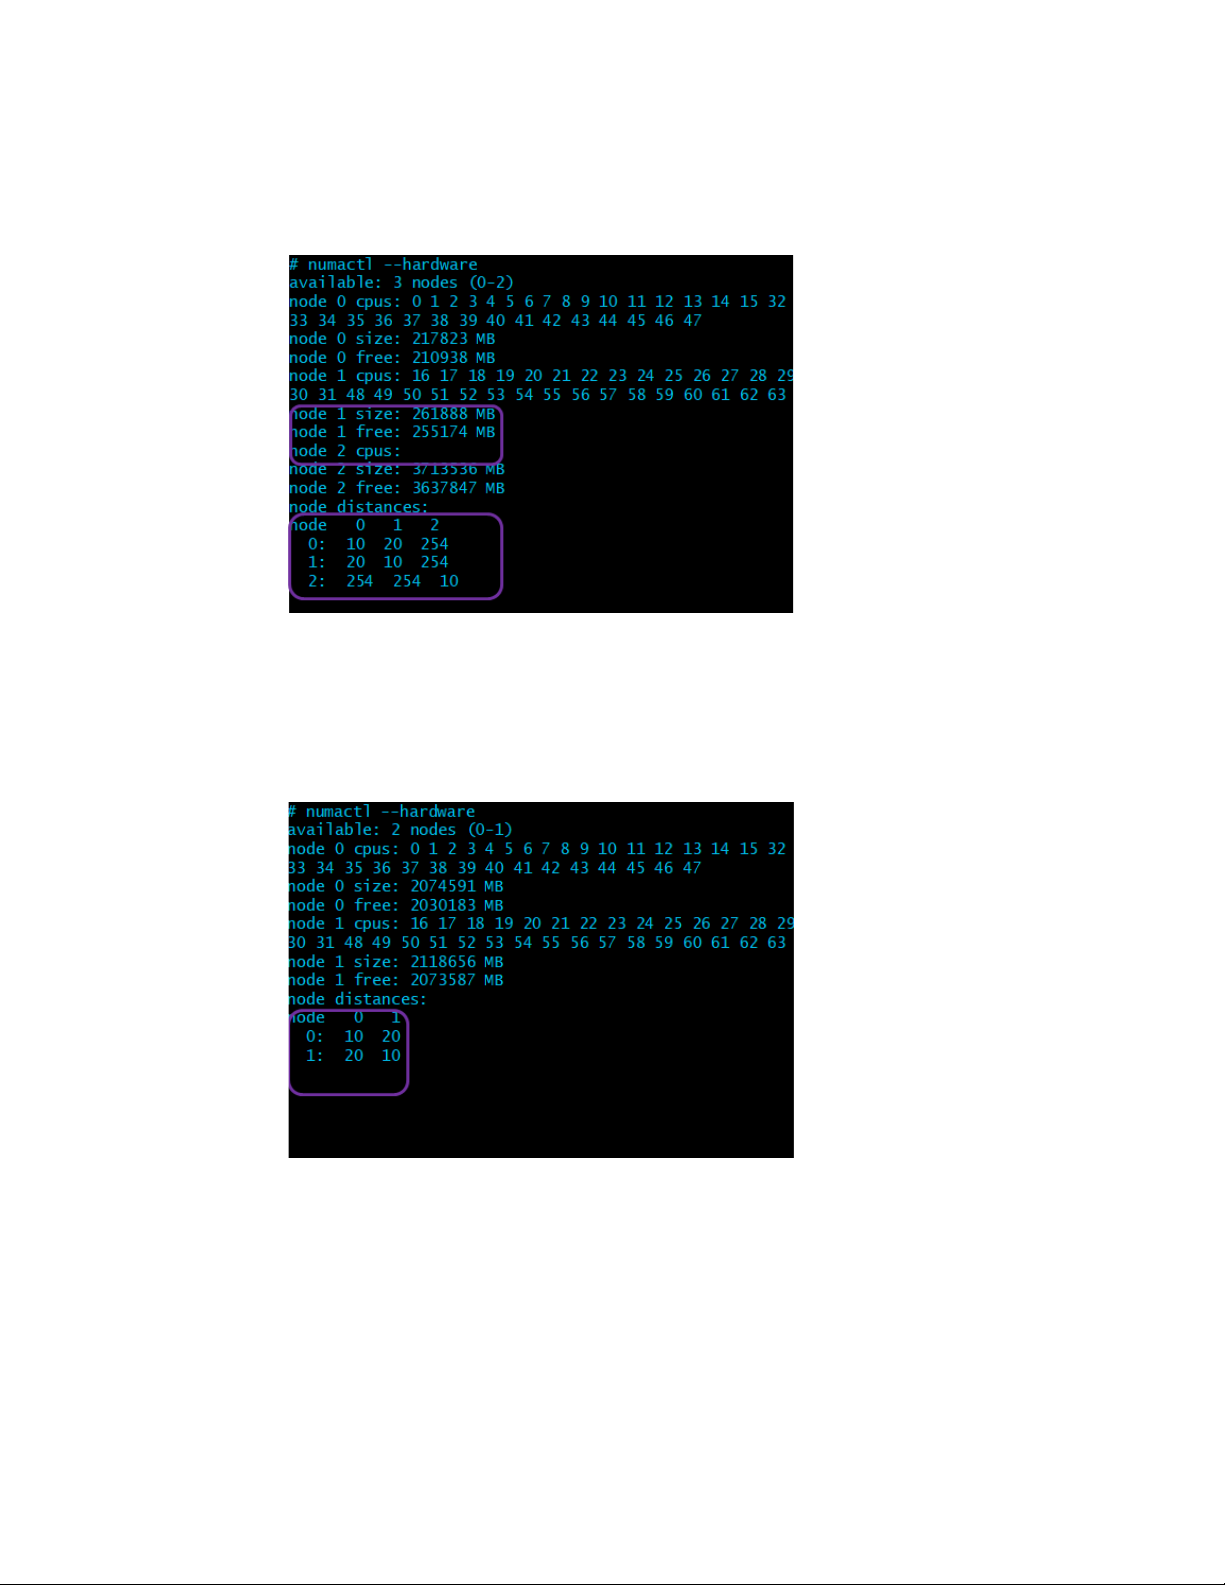
Ultrastar memory drives may present the added memory gain from the NVMe SSDs, as
per the following:
Unifying Remote Memory Domains - present a processor-less (memory-
only) NUMA domain, which is the default setting.
Expand Local Memory Domains - to expand each processor’s memory
domain with a portion of the memory made available by Ultrastar memory
drive.
The Expand Local Memory Domains option is recommended for applications like the
SAP HANA in-memory database.
Consult application-specific documentation for the right choice to a desired
application.
Figure 3-10. Systems Settings and Diagnostics (3)
- 20 -
Page 21
Ultrastar Memory Drive Boot, Settings and Diagnostics Menu
Unify Remote Memory Domains
Memory from Ultrastar memory drive is a single additional numa-node without CPUs.
Figure 3-11. Unify Remote Memory Domains
Expand Local Memory Domains
Memory from Ultrastar memory drive is divided between the processor-oriented
numa-nodes.
Figure 3-12. Expand Local Memory Domains
- 21 -
Page 22
Ultrastar Memory Drive Boot, Settings and Diagnostics Menu
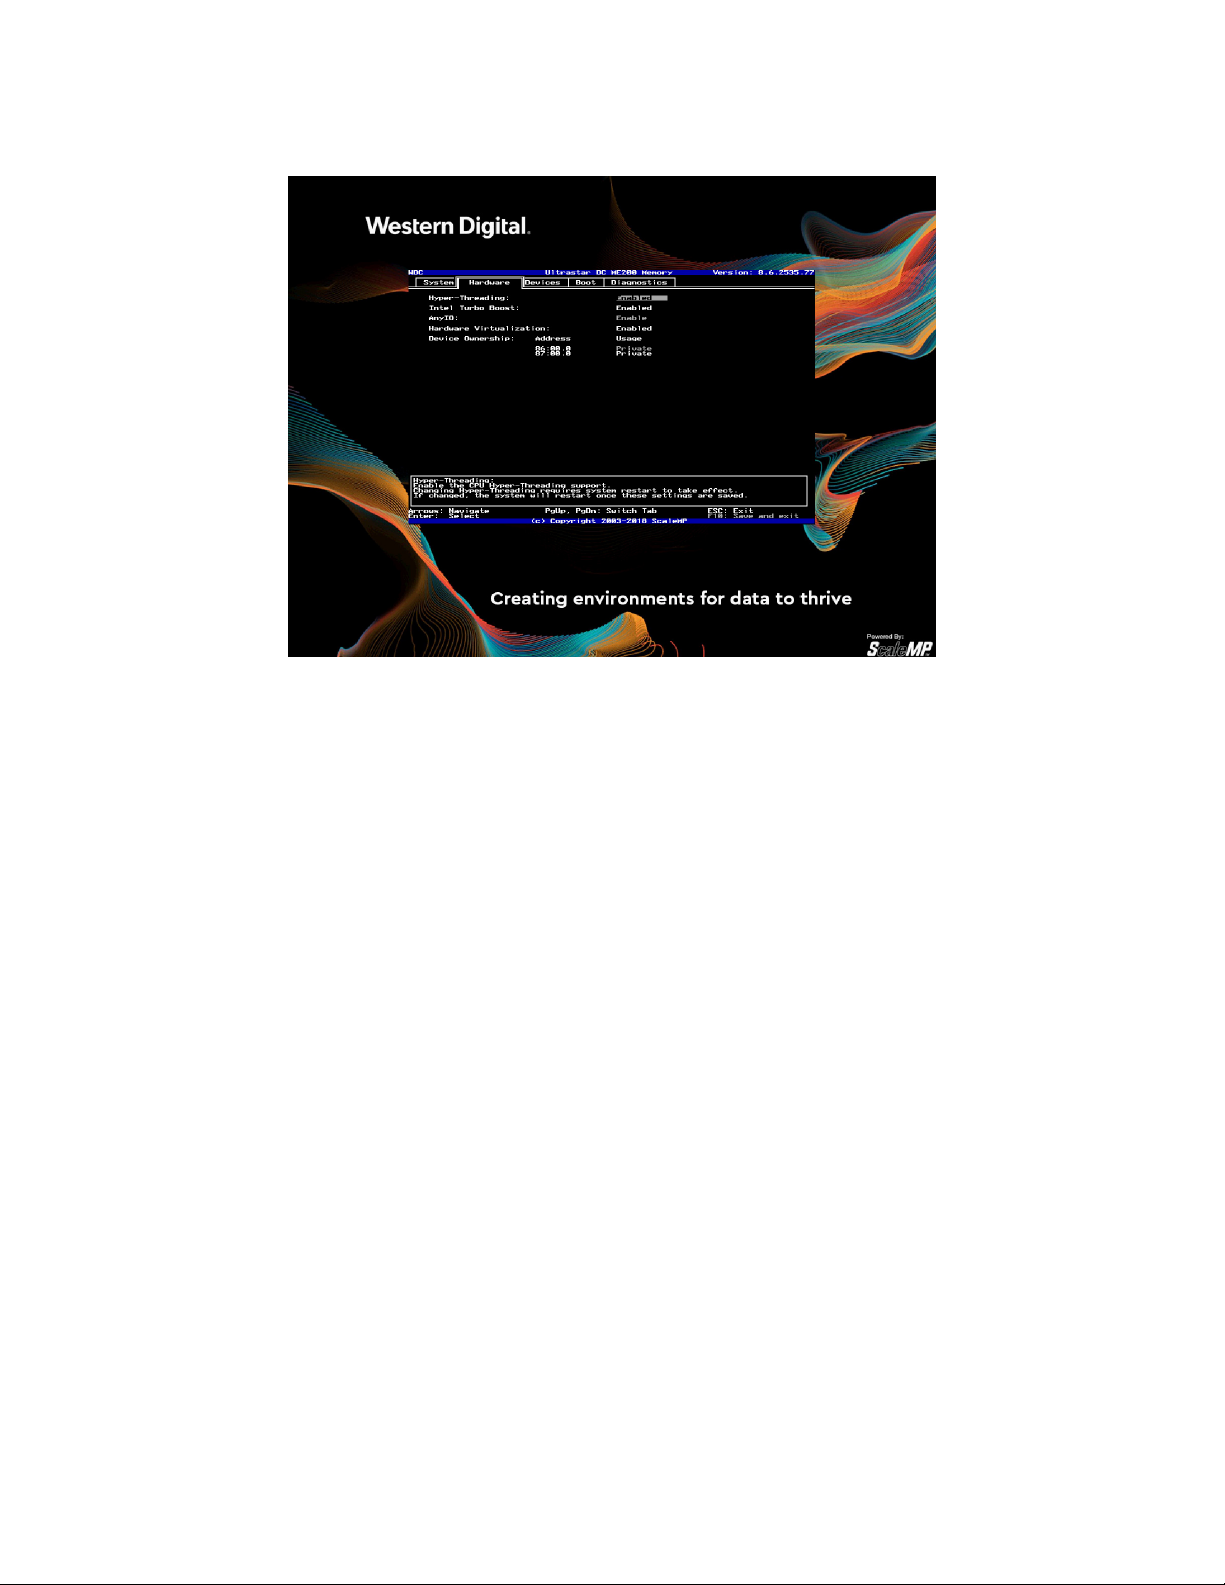
Figure 3-13. Hardware Tab
In the Hardware tab, the following can be set:
1. Intel processor: Hyper-threading
2. Turbo-boost
3. Hardware virtualization support.
4. Enable or disable the use of Ultrastar memory devices as storage devices.
To enable the use of untested PCI-Express cards as I/O and compute devices, use the
Devices tab.
- 22 -
Page 23
Ultrastar Memory Drive Boot, Settings and Diagnostics Menu
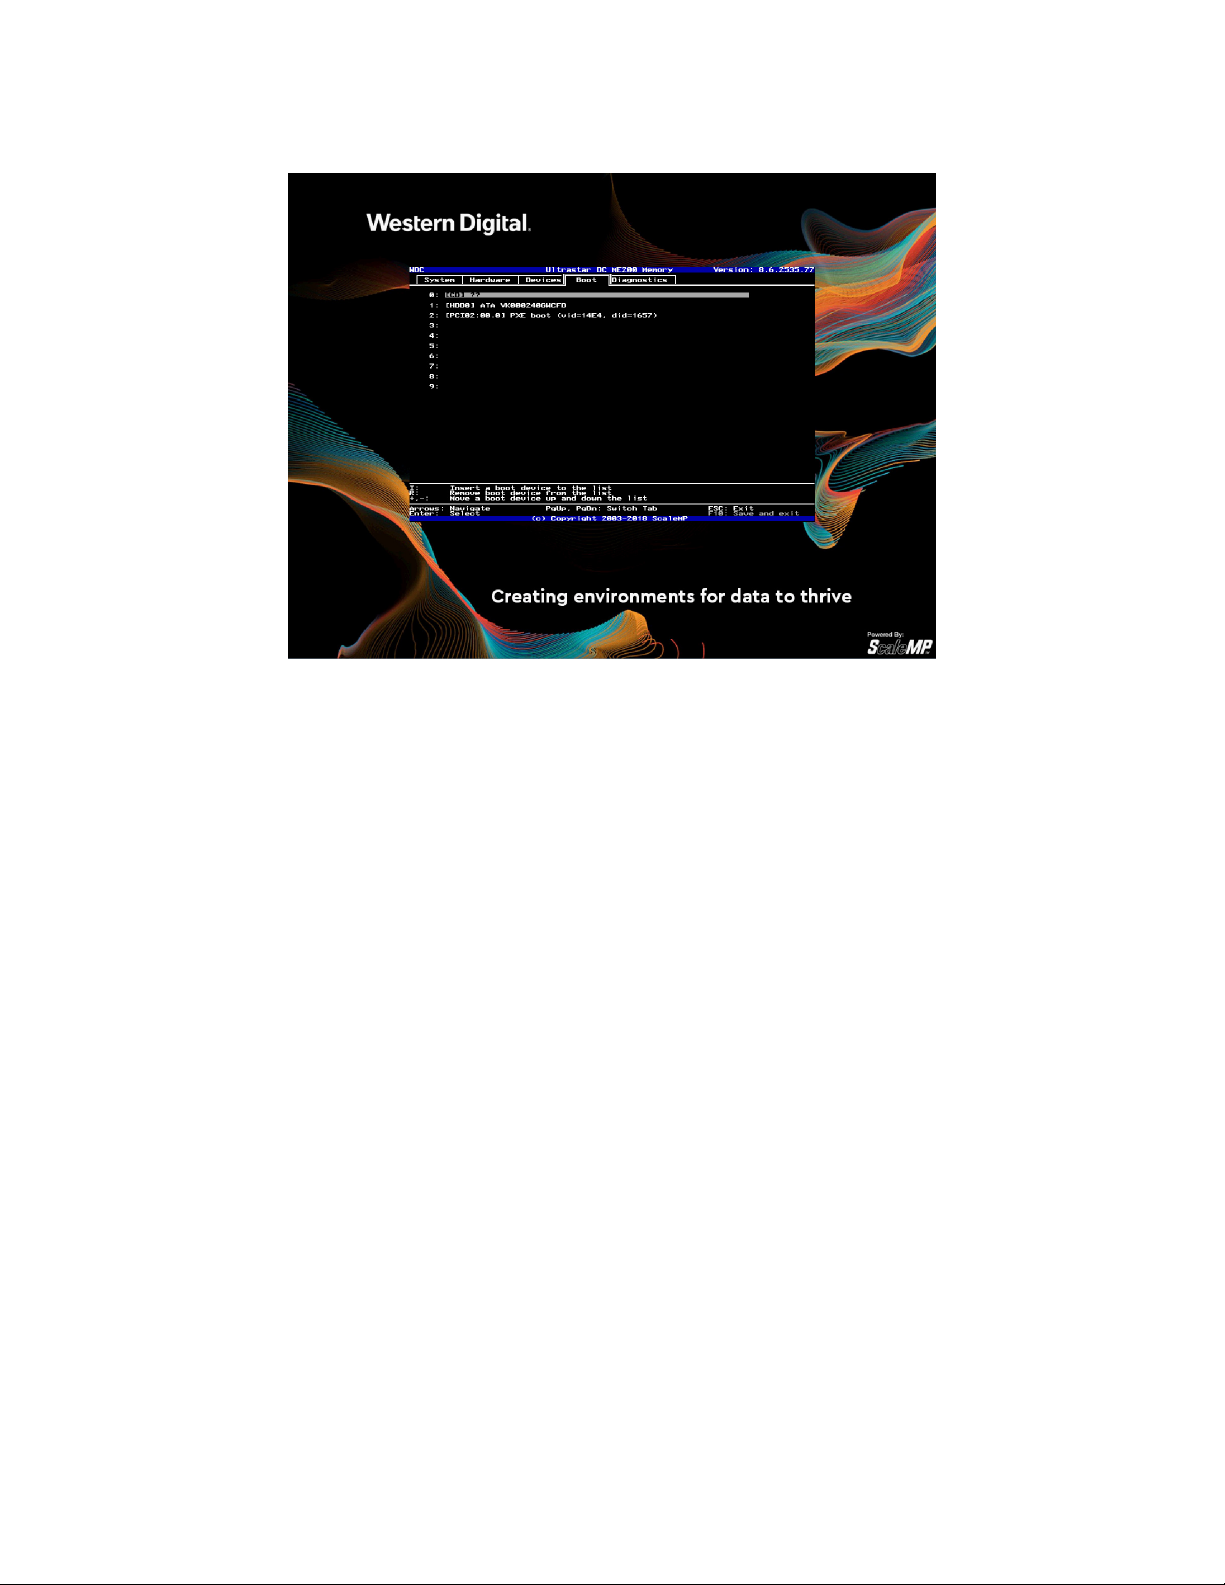
Figure 3-14. Boot Tab
In the Boot tab, select the device containing the desired operating system.
The boot device can be an optical device or a disk connected directly to the system,
a SAN-connected device, a NIC if booting the OS over PXE, etc.
- 23 -
Page 24
Ultrastar Memory Drive Boot, Settings and Diagnostics Menu
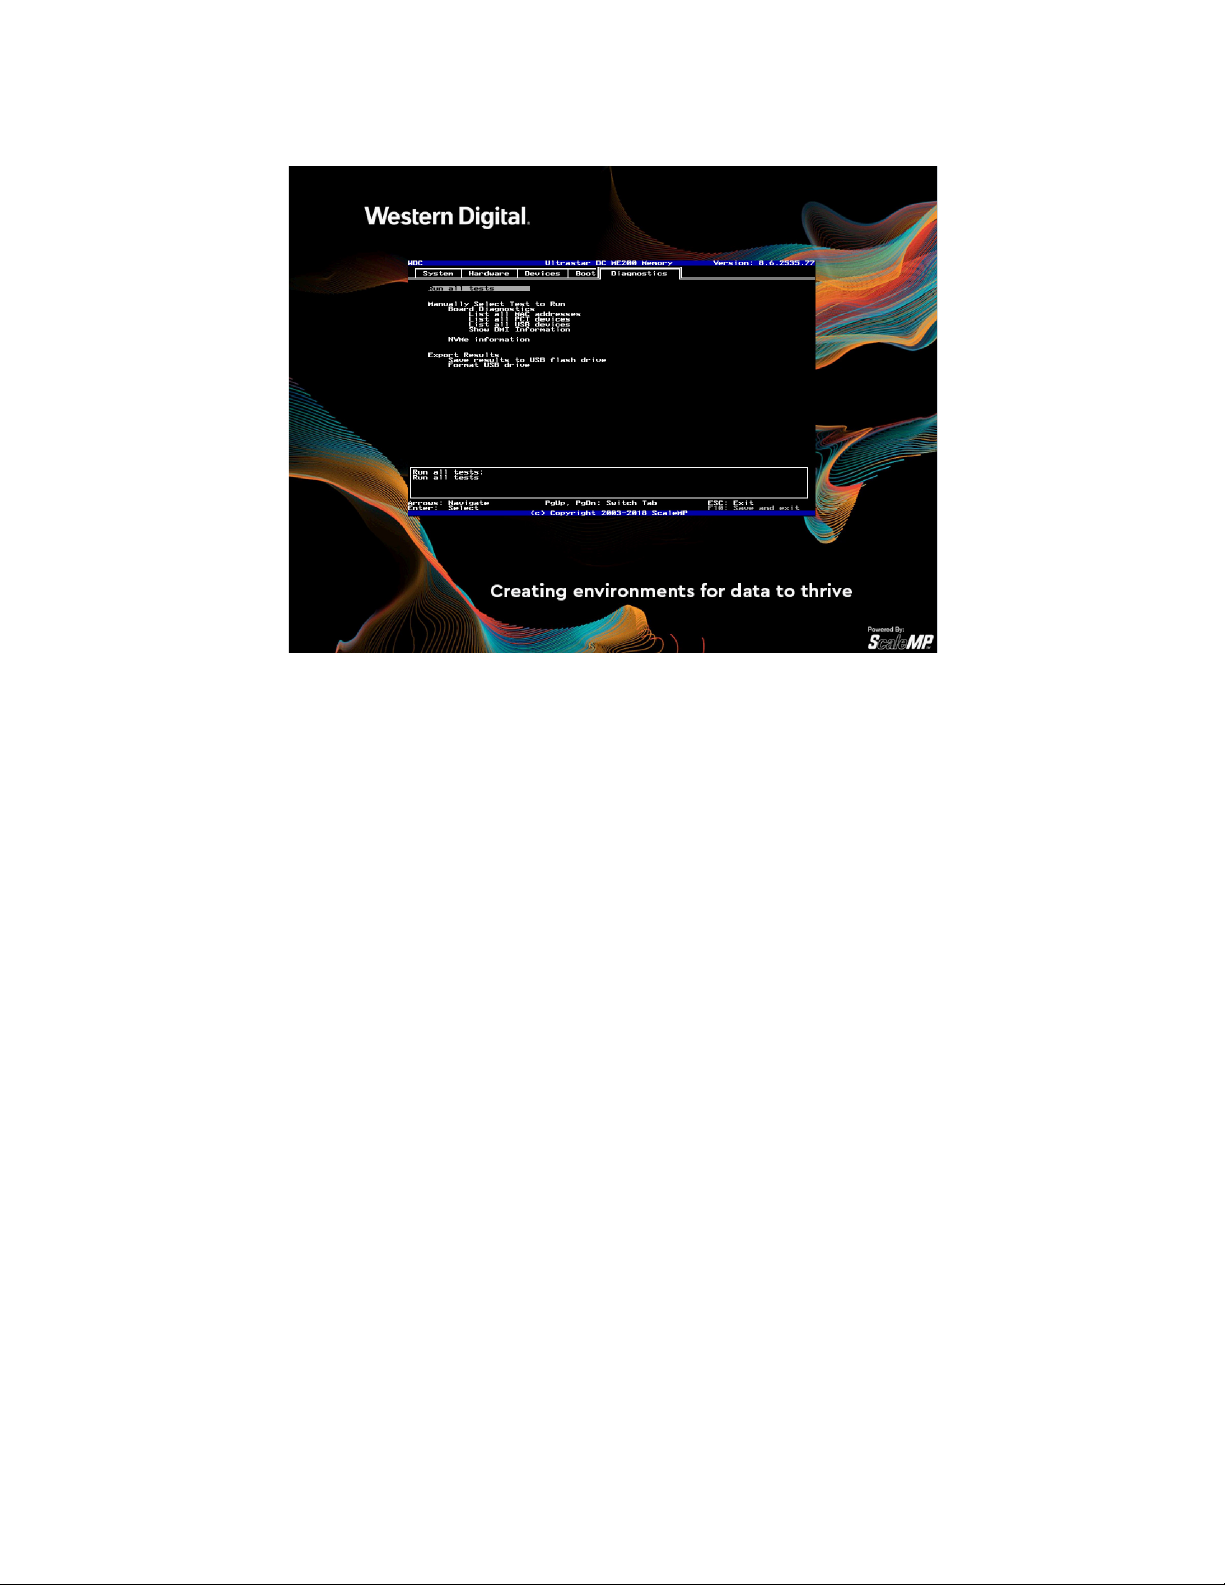
Figure 3-15. Diagnostics Tab
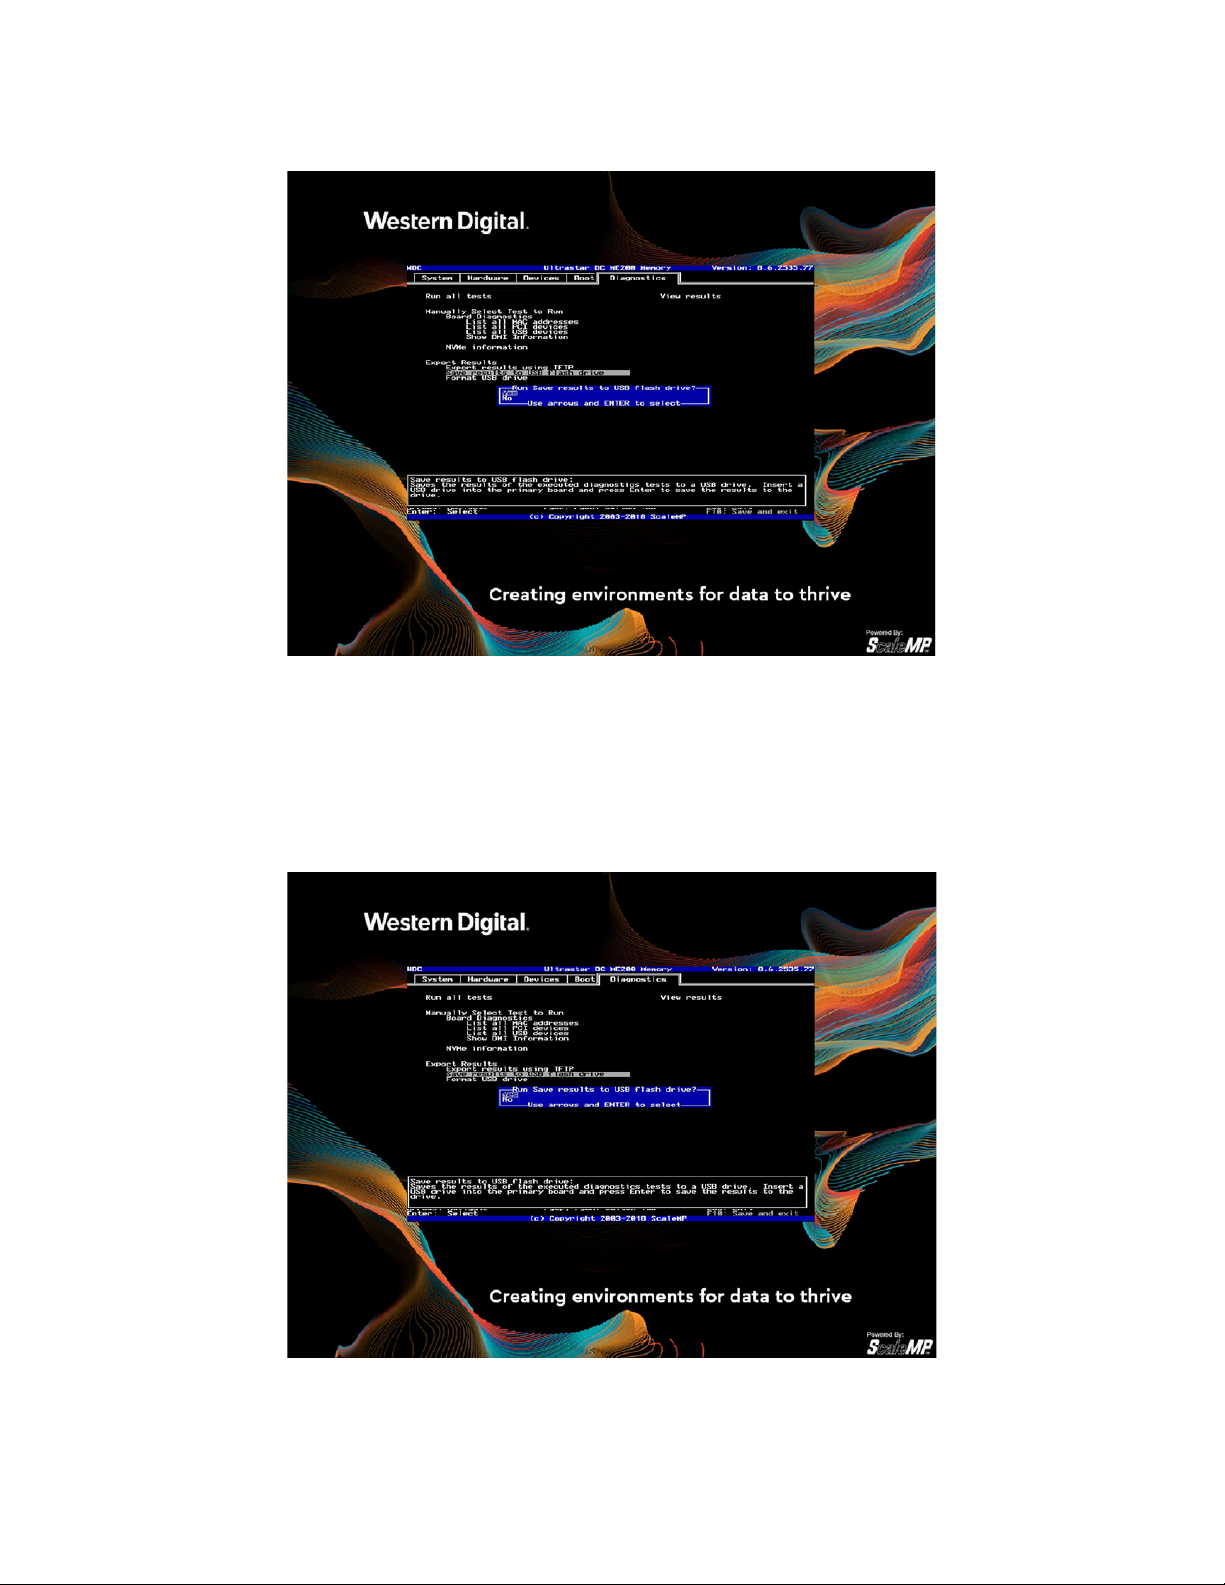
In the Diagnostic tab, select which diagnostics tests to run (or run All Tests).
The test results will be presented on-screen (see next screen-shot). Go back to the
Diagnostics tab and select to save the test results to a USB Flash Drive or make them
available for download using TFTP (this option requires a DHCP server on your
network to assign an IP address to the diagnostics utility).
- 24 -
Page 25
Ultrastar Memory Drive Boot, Settings and Diagnostics Menu
Figure 3-16. Review Diagnostic Test
Review the diagnostic test results on-screen and navigate using the keyboard arrows
and page-up/page-down keys.
To save the diagnostics results, press <ESC> to go back to the Diagnostics tab and
choose the option desired under Export Results tab.
Figure 3-17. Diagnostics Results
Diagnostics results can be saved to a USB Flash Drive.
- 25 -
Page 26
Ultrastar Memory Drive Boot, Settings and Diagnostics Menu
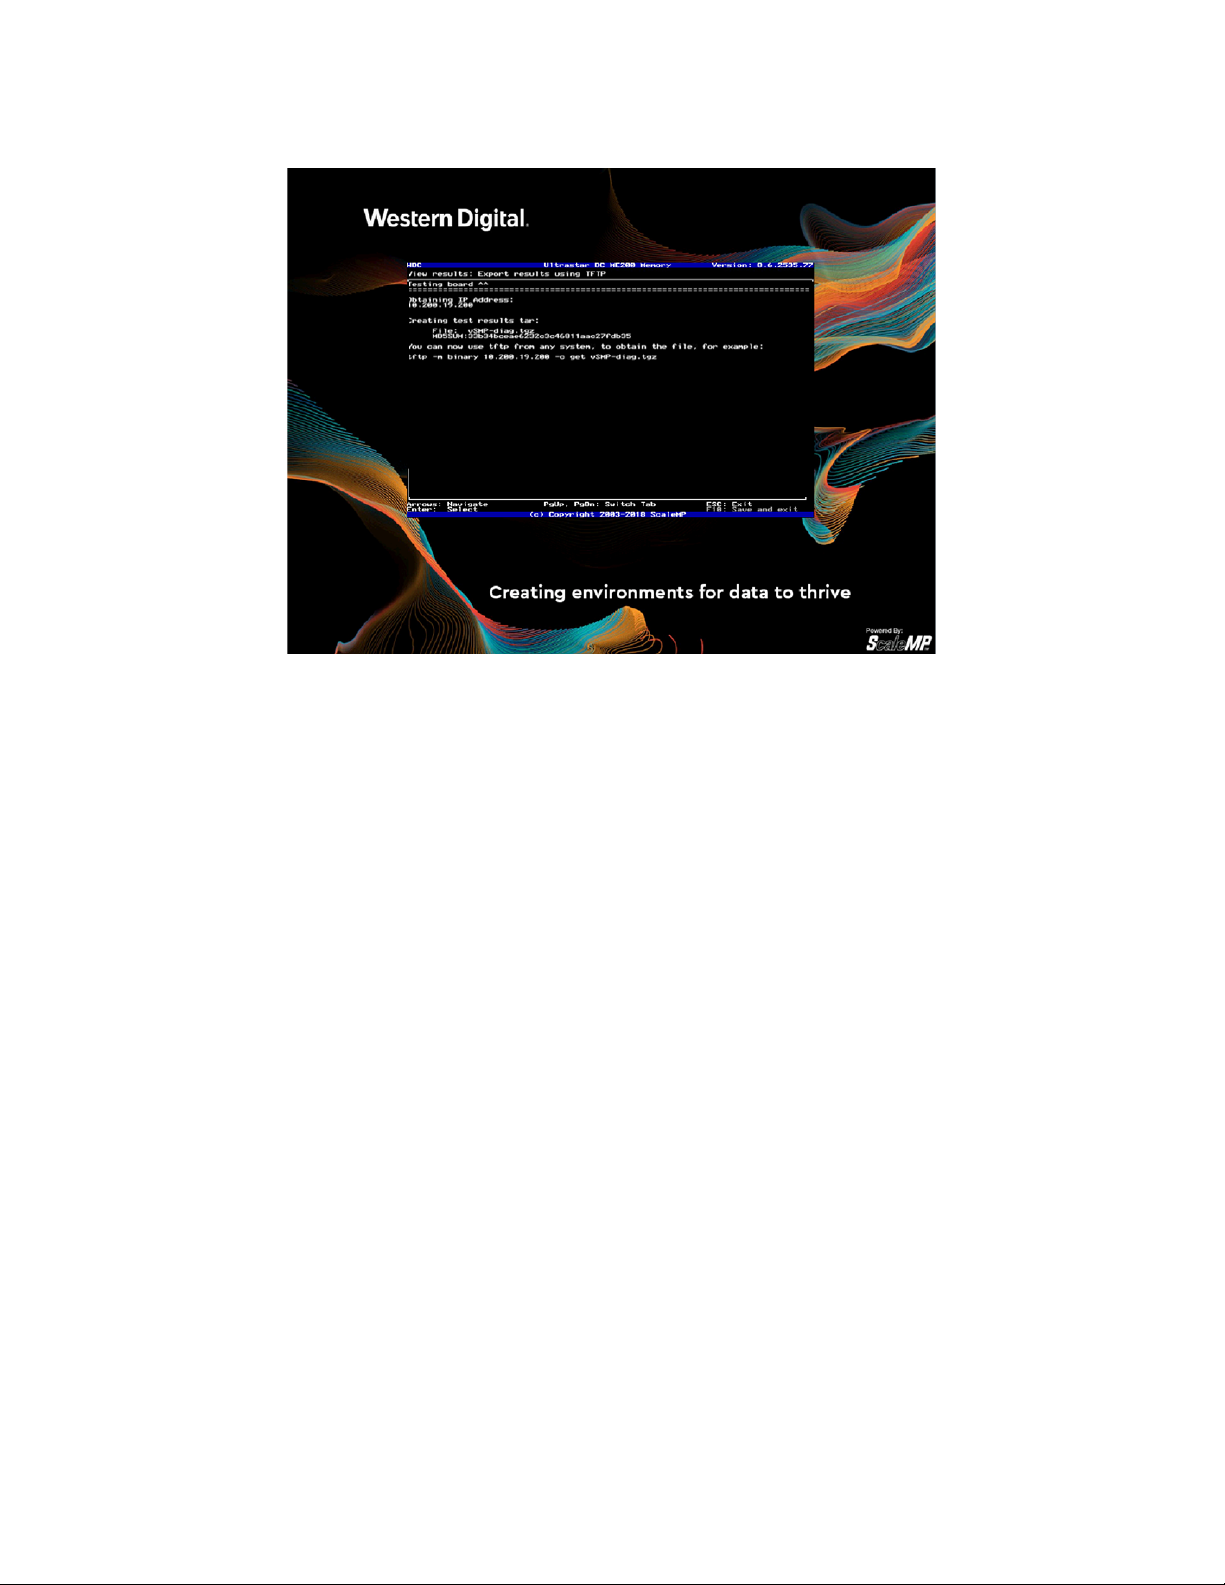
Figure 3-18. TFTP Option
Alternatively, Diagnostics results can also be obtained via TFTP (this option requires a
DHCP server on your network to assign an IP address to the diagnostics utility).
- 26 -
Page 27

Hardware Configuration
4.0 HARDWARE CONFIGURATION
4.1 Recommended Configuration
1. Strongly recommended: Attach equal number of Ultrastar memory devices
between the sockets (consult your system manual for PCIe-to-socket mapping).
Less than one Ultrastar memory device per socket will result in inferior
performance.
2. Multiple Ultrastar memory devices can be installed and are aggregated to
improve performance; optimize for the highest aggregated 4K IOPS across all
Ultrastar memory devices.
3. A smaller capacity Ultrastar memory drive for each processor/socket will yield
better performance than a single larger capacity device attached to only one of
multiple sockets. For example, in a dual socket system, two Ultrastar memory
devices with capacity of 1TiB, attached one to each socket, would perform better
than a single 2TiB Ultrastar memory device attached to only one of the sockets.
The same holds true for multiple devices per socket: Two smaller capacity
Ultrastar memory devices per each processor/socket will yield better
performance than a single larger capacity device attached to each socket. For
example, in a dual socket system, four Ultrastar memory devices with capacity of
1TiB attached two to each socket, would perform better than a two 2TiB Ultrastar
memory device attached one to each socket.
4.2 DRAM to Ultrastar Memory Drive Ratio
Ultrastar memory drive uses part of the overall capacity (DRAM + NVM) for caching,
prefetching, and endurance protection. Thus, adding capacity in either DRAM or
Ultrastar memory drives may result in lower increase or no increase at all in the
system memory available for the OS. This can be overridden by changing Ultrastar
memory drive system memory settings at boot time (<F5>, system settings) from
Automatic to Manual.
For example, when set to Automatic, with 512GiB of DRAM on a system with four
1024GiB Ultrastar memory devices, an increase in number of drives to six will result in
improved performance. However, the system memory available for the OS will not be
increased (it will remain 4TiB).
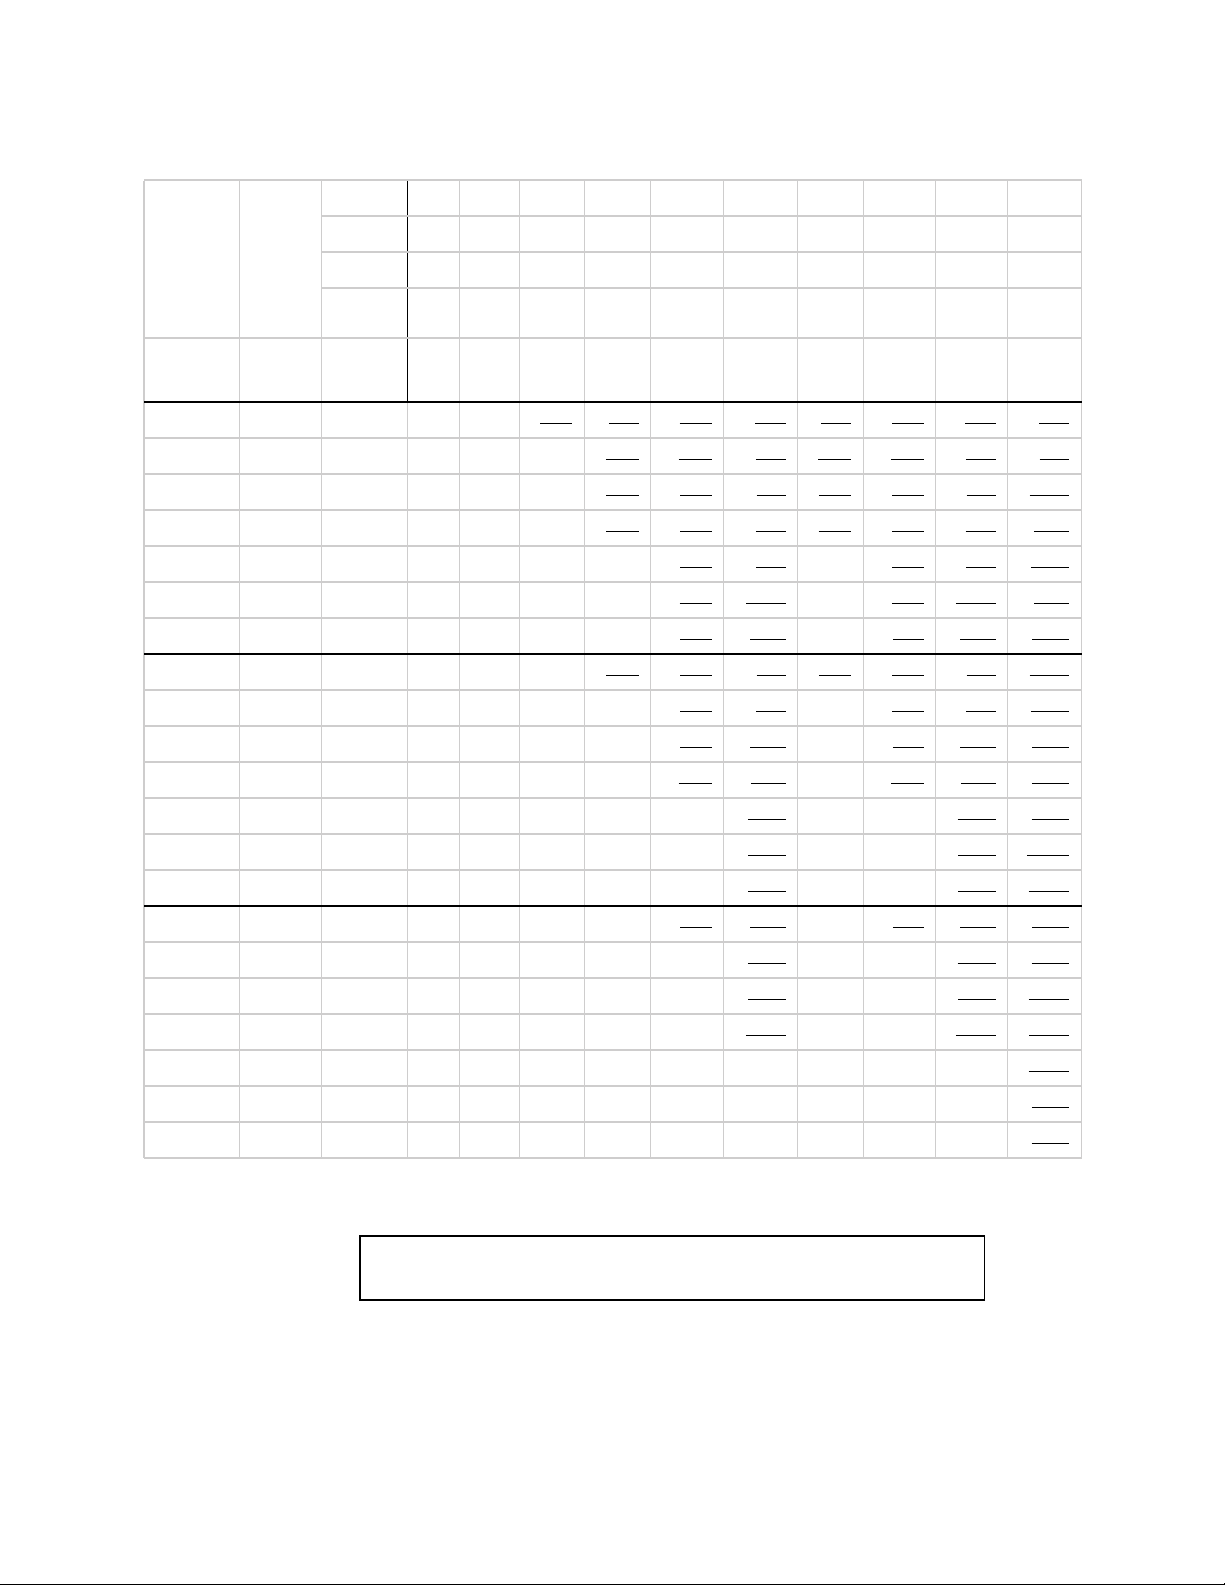
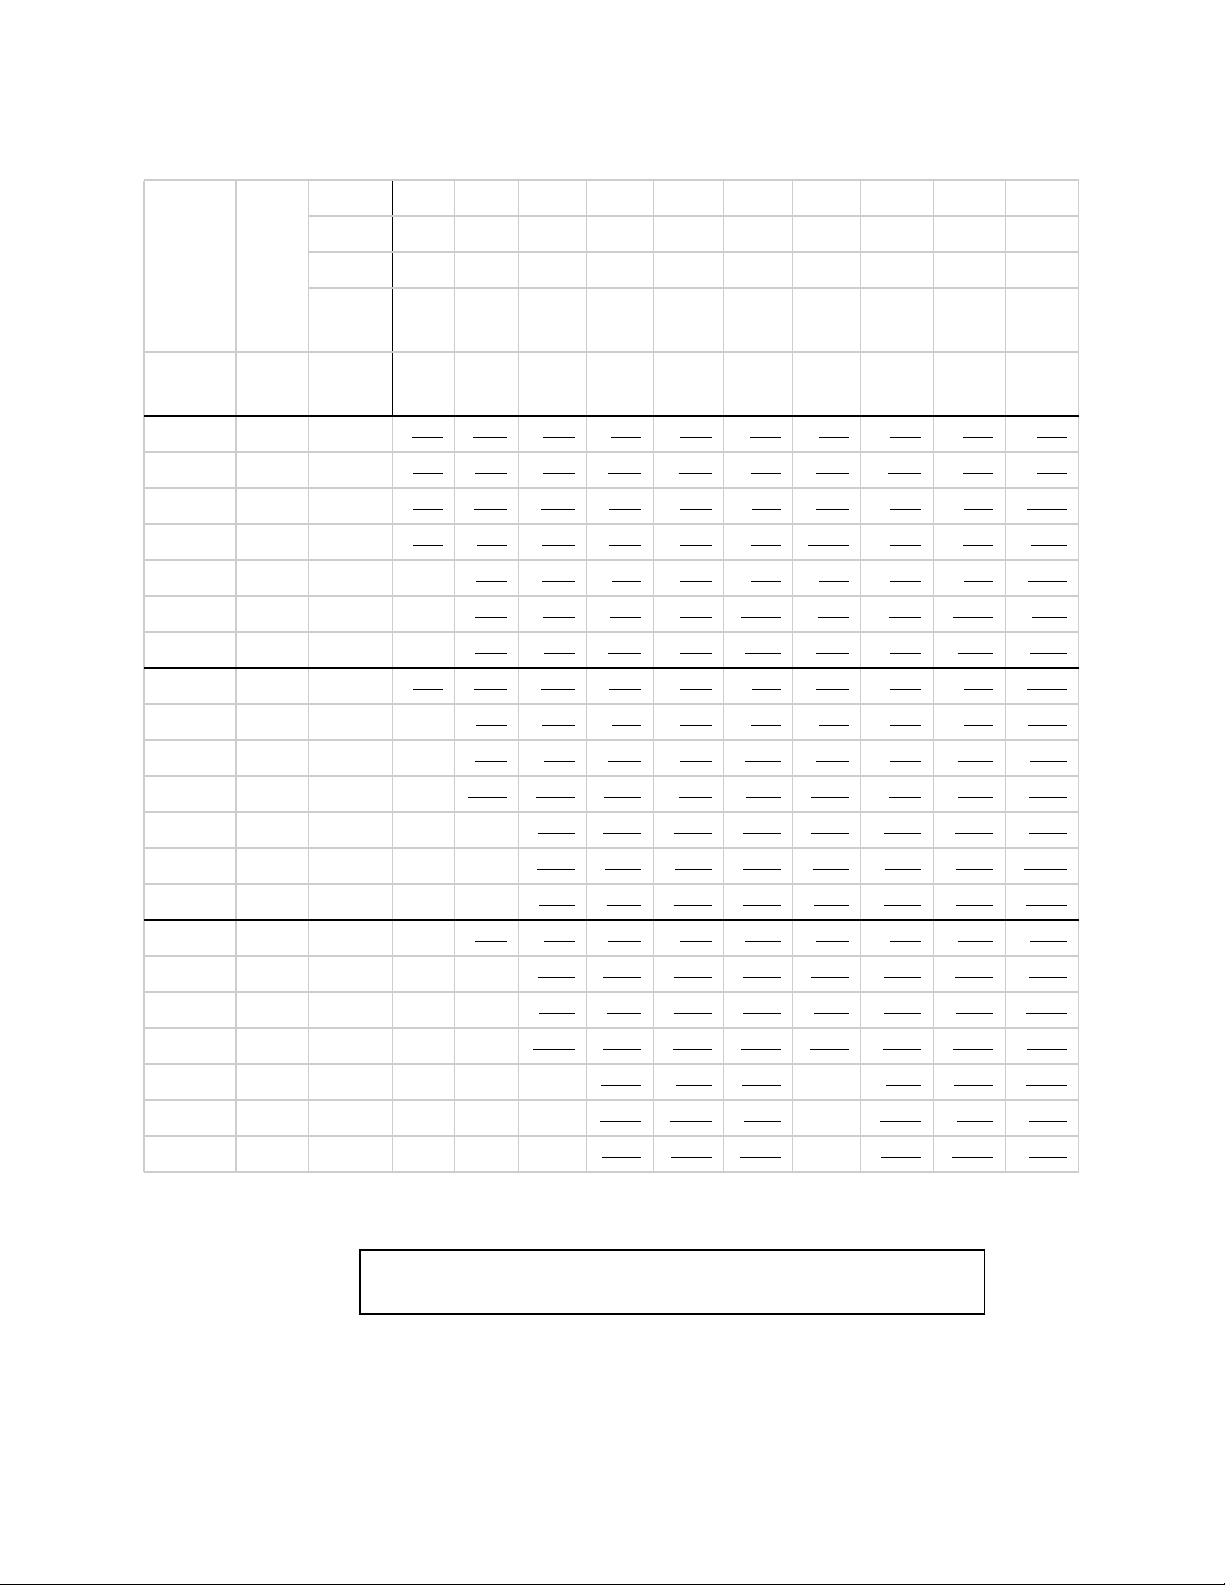
Tables 4-1 and 4-2 indicate the total SDM capacity for a specific DRAM and Ultrastar
memory drive configurations, optimized for performance. Using a higher number of
devices for the same total capacity increases performance. Actual system memory
capacity may vary by ±3% compared to the tables below. Some valid, but less
frequent, configurations are not listed. For example, it is allowed to have a quadsocket system with less than 2TiB system memory, or an octa-socket system with less
than 8TiB system memory.
- 27 -
Page 28
Hardware Configuration
Table 4-1. Performance-optimized Software-defined Memory (SDM) Capacity
Sockets 2 2 2 2 2 2 4 4 4 4
Channels 6 6 6 6 6 6 6 6 6 6
Optimized DRAM
DPC 1 2 2 2 2 2 1 2 2 2
DIMM
Size (GiB)
NAND
Devices
Device
Size
(GiB)
2 1024 2048 768 1536
3 1024 3072 768 1536 3072
4 1024 4096 768 1536 3072
5 1024 5120 768 1536 3072
6 1024 6144 768 1536 3072 6144
7 1024 7168 768 1536 3072 6144
8 1024 8192 768 1536 3072 6144
2 2048 4096 768 1536 3072
3 2048 6144 768 1536 3072 6144
4 2048 8192 768 1536 3072 6144
5 2048 10240 768 1536 3072 6144
6 2048 12288 768 1536 3072 6144 12288
7 2048 14336 768 1536 3072 6144 12288
Total Size
(GiB)
8 8 16 32 64 128 32 32 64 128
96 192 384 768 1536 3072 768 1536 3072 6144
2432 2816 3584 5120 2816 3584 5120 8192
3840 4608 6144 3840 4608 6144 9216
4864 5632 7168 4864 5632 7168 10240
5888 6656 8192 5888 6656 8192 11264
7680 9216 6144 7680 9216 12288
8704 10240 6144 8704 10240 13312
9728 11264 6144 9728 11264 14336
4864 5632 7168 4864 5632 7168 10240
7680 9216 6144 7680 9216 12288
9728 11264 6144 9728 11264 14336
11776 13312 6144 11776 13312 16384
15360 6144 12288 15360 18432
17408 6144 12288 17408 20480
8 2048 16384 768 1536 3072 6144 12288
2 4096 8192 768 1536 3072 6144
3 4096 12288 768 1536 3072 6144 12288
4 4096 16384 768 1536 3072 6144 12288
5 4096 20480 768 1536 3072 6144 12288
6 4096 24576 768 1536 3072 6144 12288 24576 6144 12288 24576
7 4096 28672 768 1536 3072 6144 12288 24576 6144 12288 24576
8 4096 32768 768 1536 3072 6144 12288 24576 6144 12288 24576
9728 11264 6144 9728 11264 14336
19456 6144 12288 19456 22528
15360 6144 12288 15360 18432
19456 6144 12288 19456 22528
23552 6144 12288 23552 26624
NOTE: Figures in bold and underlined indicate that the full
capacity of DRAM and NAND can be used.
30720
34816
38912
- 28 -
Page 29
Hardware Configuration
Table 4-2. Maximum Software-defined Memory (SDM) capacity for Ultrastar Memory
Sockets 2 2 2 2 2 2 4 4 4 4
Channels 6 6 6 6 6 6 6 6 6 6
Optimized DRAM
DPC 1 2 2 2 2 2 1 2 2 2
DIMM
Size
(GiB)
8 8 16 32 64 128 32 32 64 128
NAND
Devices
Device
Size
(GiB)
2 1024 2048
3 1024 3072
4 1024 4096
5 1024 5120
6 1024 6144 6048
7 1024 7168 6048
8 1024 8192 6048
2 2048 4096
3 2048 6144 6048
4 2048 8192 6048
5 2048 10240 6048
6 2048 12288 6048 1296
7 2048 14336 6048 12096
8 2048 16384 6048 12096
2 4096 8192 6048
Total
Size
(GiB)
96 192 384 768 1536 3072 768 1536 3072 6144
2144 2240 2432 2816 3584 5120 2816 3584 5120 8192
3168 3264 3456 3840 4608 6144 3840 4608 6144 9216
4192 4288 4480 4864 5632 7168 4864 5632 7168 10240
5216 5312 5504 5888 6656 8192 58888 6656 8192 11264
6336 6528 6912 7680 9216 6912 7680 9216 12288
7360 7552 7936 8704 10240 7936 8704 10240 13312
8384 8576 8960 9728 11264 8960 9728 11264 14336
4192 4288 4480 4864 5632 7168 4864 5632 7168 10240
6336 6528 6912 7680 9216 6912 7680 9216 12288
8384 8576 8960 9728 11264 8960 9728 11264 14336
10432 10624 11008 11776 13312 11008 11776 13312 16384
12672 13056 13824 15360 13056 13824 15360 18432
14720 15104 15872 17408 15104 15872 17408 20480
16768 17152 17920 19456 17152 17920 19456 22528
8384 8576 8960 9728 11264 8960 9728 11264 14336
3 4096 12288 6048 12096
4 4096 16384 6048 12096
5 4096 20480 6048 12096
6 4096 24576 6048 12096 24192
7 4096 28672 6048 12096 24192
8 4096 32768 6048 12096 24192
12672 13056 13824 15360 13056 13824 15360 18432
16768 17152 17920 19456 17152 17920 19456 22528
20864 21248 22016 23552 21248 22016 23552 26624
NOTE: Figures in bold and underlined indicate that the full
capacity of DRAM and NAND can be used.
25344 26112 27648 24576 26112 27648 30720
29440 30208 31744 24576 30208 31744 34816
33536 34304 35840 24576 34304 35840 38912
- 29 -
Page 30

Workloads Performance & Optimizations
5.0 WORKLOADS PERFORMANCE & OPTIMIZATIONS
5.1 Target Workloads for Ultrastar Memory
The Ultrastar memory drive can take advantage of one or more of the following
workload characteristics to achieve DRAM-like performance, which can be associated
with the sample relevant applications:
Table 5-1. Workloads and Applications
Probability-based memory
access pattern
[pre-fetch]
Predictable workloads:
Analytics, DBMS, etc.
Memory access can be
predicted by:
Frequently similar access
pattern (sequential,
structured, etc.)
Application code analysis
Memory block associativity
Examples can be:
Databases tuples
In-memory columnar
database
Reading database indexes
Large in-core matrices
Block of memory stored from
a disk through DMA.
While relevant application
workloads can be row- or
column-store in-memory
databases used in analytics
workloads, such as SAP
®
, Oracle®, 12c, or
HANA
TM
MySQL
®
High concurrency access
pattern [asynchronous
memory load]
Many processes, or highly
multi-threaded.
Concurrency can be due to:
Many threads
Throughput
(many independent jobs)
Multi-tenants
Relevant application
workloads can be:
Multi-tenant workloads
like container-based
virtual-shared webhosting server with
TM
Docker
, or
Virtualization-based
partitioning for example
with KVM.
Multi-threaded key-value
cache such as
memcached.
Distributed/shared data
grids and frameworks
such as Apache Spark
Apache Ignite
®
Aerospike, or Redis
®
,
TM
.
CPU intensive
[placement]
CAE, HPC
Those are workloads
which are heavy on
compute vs. memory
access. Relevant
applications and
workloads can be:
Multi-threaded linear
algebra workloads
with large matrices.
Parallel statistics
calculations on large
data.
,
- 30 -
Page 31

Workloads Performance & Optimizations
5.1.1 Workloads That Do Not Benefit From Ultrastar Memory Drive
As with any architecture, there are certain workloads that are not an ideal fit
and would not benefit from running with Ultrastar memory drive.
Examples:
1. Workloads with low-concurrency workloads (e.g. serial workloads):
As there is only one execution thread, even though Ultrastar memory drives
can prefetch the memory, the wait-time for memory will reduce the compute
efficiency of the workload.
2. Workloads bound by memory bandwidth
As we rely on Ultrastar memory devices with bandwidth of approximately
2.2GB/s (70%R/30%W), even if four Ultrastar memory drives are installed, the
total aggregate bandwidth would be approx. 8.8GB/s. This would be much
lower than two Xeon processors memory bandwidth of >100GB/s total on
their memory controllers’ link to DRAM.
An example for that is a program constantly accessing memory and doing
little compute on the fetched memory before moving over to consume new
memory.
3. Workloads with a high frequency of system calls may suffer from virtualization
overhead (Ultrastar memory drives uses Intel Virtualization Technology).
5.2 Optimized Workload Settings
This section lists generic recommendations for software stack setup in an
environment using Ultrastar memory drive. Western Digital may publish applicationspecific execution and configuration guidelines; consult the support library for the
same.
5.2.1 Operating System
1. Western Digital recommends using recent builds of supported popular Linux
distributions (or clones) such as Red Hat® Enterprise Linux® 7.x/CentOS 7.x or
SLES 12.x, at the time of writing this manual.
2. Ultrastar memory drives also support Open Source hypervisors such as KVM,
as shipped with the major Linux distributions.
- 31 -
Page 32

Workloads Performance & Optimizations
5.2.2 Memory Settings and Memory Allocators
It is recommended that memory allocators be configured to use large pages
(as example THP - the Linux Transparent Huge Pages), while correctly
configuring them to (1) save on memory use, and (2) avoid memory
fragmentation. For example, if the application was pre-compiled with the
default libc allocator or with jemalloc, or links to one of them using the OS
dynamic linker, please use the following guidelines:
1. For jemalloc, ensure THP operation is maintained by running the command:
Figure 5-1. Performance Data Collection
# ln -sf ‘lg_dirty_mult:-1’ /etc/malloc.conf
2. For libc, the following environment variables may be useful to increase
memory allocation size by the application, and to reduce virtualization
overheads:
Figure 5-2. Performance Data Collection
# export MALLOC_TOP_PAD_=$((16777216))
# export MALLOC_TRIM_THRESHOLD_=$((16777216))
5.2.3 Application Settings
Application parallelism or concurrency yields great benefits with Ultrastar
memory drive. Make sure your application is configured to use many threads
in order to process data, where available. CPU over-subscription increases the
throughput of Ultrastar memory drive.
- 32 -
Page 33

Benchmarking Methodology and Performance Collection
6.0 BENCHMARKING METHODOLOGY AND PERFORMANCE COLLECTION
The Ultrastar memory drive is designed to provide DRAM-like functionality and performance.
As such, the following benefits and use cases are aimed for, which derive the benchmarks and
comparisons to be performed:
Memory Expansion: The goal of benchmarking such cases is to make sure that a
workload with more memory than DRAM available in a server can successfully
execute (along with some performance measurement, e.g. complete execution
within a required amount of time, or enable a required transaction throughput per
second, etc.).
Memory Replacement: The goal of benchmarking such cases is to perform
apples-to-apples comparison of the desired workload on identical environments,
where the Native system would have a certain amount of DRAM. While the system
with Ultrastar memory drive would be using a lower amount of DRAM,
aggregated with Ultrastar memory drive to create the same memory foot-print. In
many cases, due to the limitation of obtaining a comparable system with
sufficient amount of DRAM, a scaled-down version of the workload may be used
(as described below).
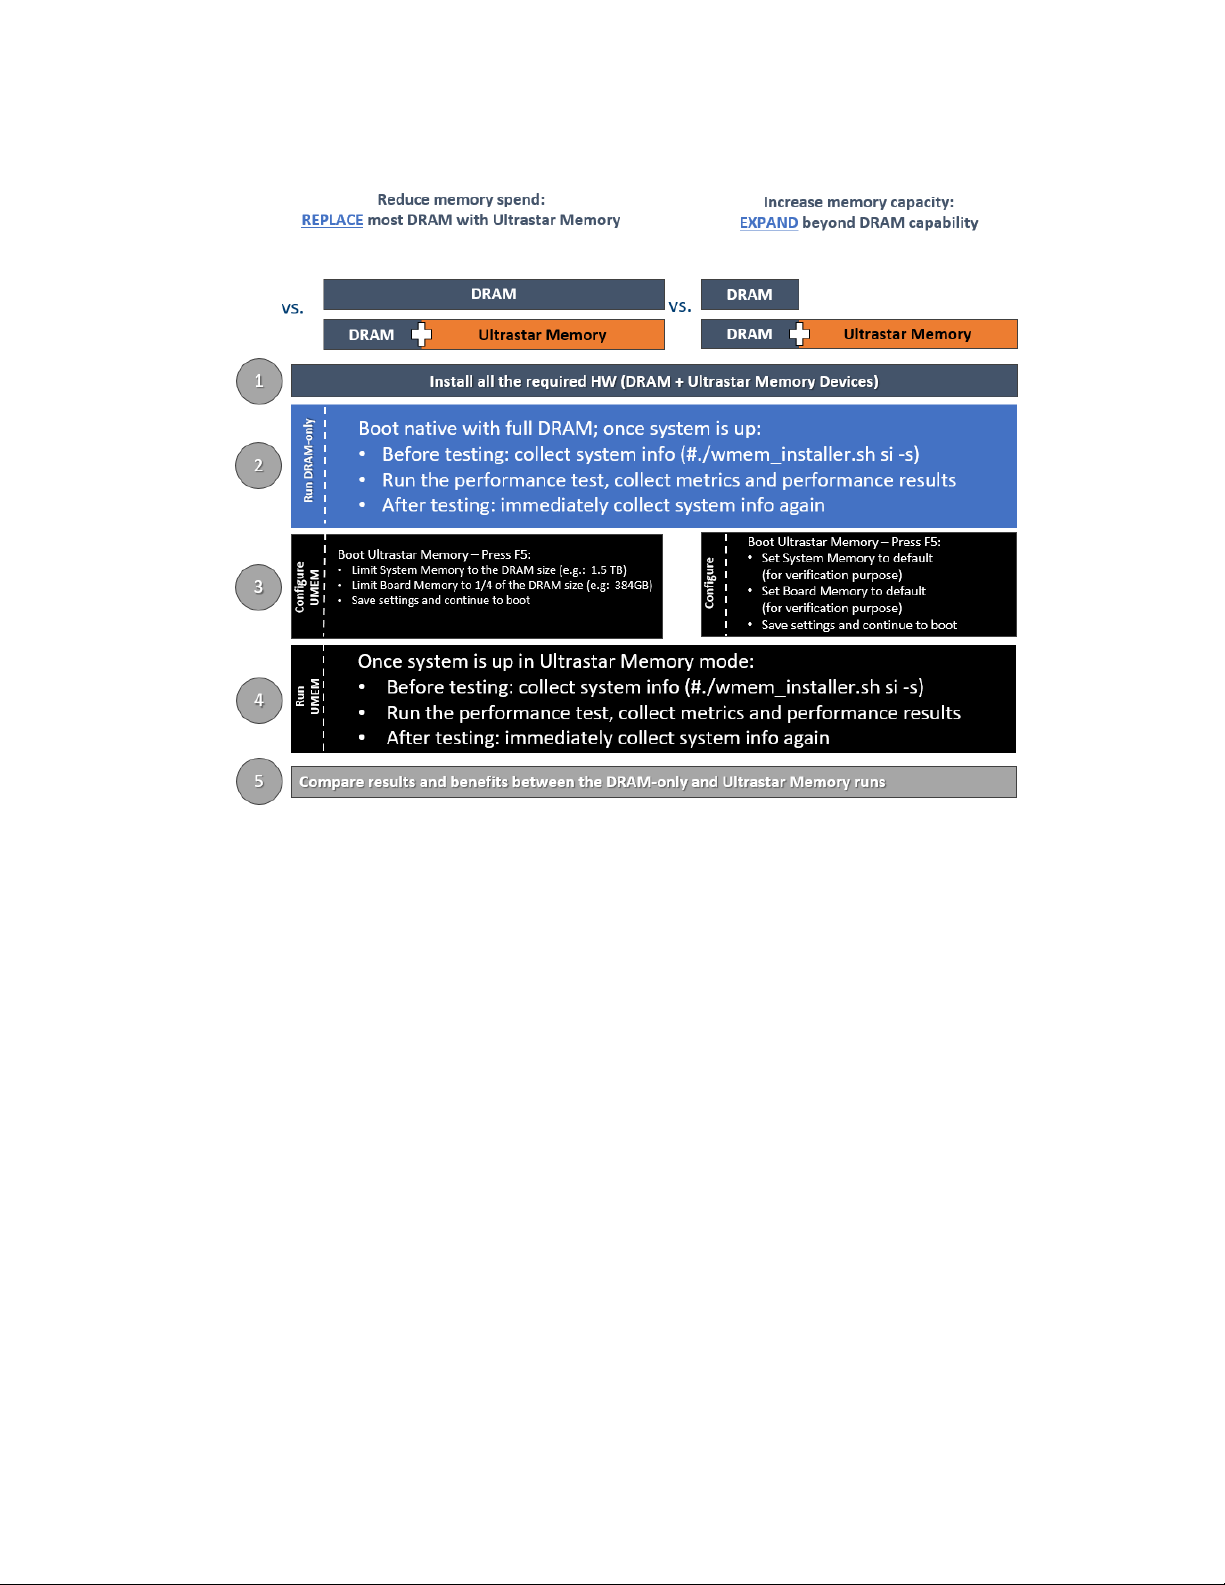
6.1 Benchmarking Methodology
Start with apples-to-apples comparison: Use the same machine for Native and
Ultrastar memory drive comparison:
Native: Use maximum available memory (in optimal configuration).
Ultrastar memory drive:
• Keep same number of DIMMs, with reduced capacity.
• Use Ultrastar memory drive configuration switch to reduce the used
DRAM capacity (See section System Settings and Diagnostics, under
Board Memory settings).
Tune workload configuration for execution environment: Native vs. Ultrastar
memory drive.
• Example: Optimal thread count may be different between Ultrastar
memory drive and Native; use the optimal configuration of the
workload for each machine setup to represent “the best possible” for
that setup.
Scale for larger memory foot-print (especially for memory expansion use case).
For applicable workloads, expand memory beyond DRAM capacity:
- 33 -
Page 34
Benchmarking Methodology and Performance Collection
Figure 6-1. Figure 1 Type
6.2 Expected Results and Demonstrated Value
The Ultrastar memory drive is designed to provide DRAM-like performance.
The Native system (with “all-DRAM” used and no software-defined memory) results
serve as a reference point and Ultrastar memory drive is expected to deliver at least
75% of that performance for fitting workloads (as described in Ultrastar memory drive
documentation).
In addition, it is common to review the overall demonstrated value-based price/
performance, enhanced capabilities and overall cost reduction/savings:
DRAM expansion by up to 8x.
DRAM-like performance (not more than 25% difference).
Memory cost reduction by 30-60%.
6.3 Performance Data Collection
Ultrastar memory drives provide tools for collecting performance-related statistics.
The tools are installed by default into /usr/local/{etc,bin}.
To activate periodic statistics data collection, use the following command in
Figure 6-1, which records the counters every 60 seconds into /tmp/stats. Note, it is
strongly recommended to ensure that this directory is neither network-based nor
ramfs/tmpfs, but rather a directory located on a direct-attached storage device.
- 34 -
Page 35

Benchmarking Methodology and Performance Collection
Figure 6-2. Performance Data Collection
# cd /tmp/stats; /usr/local/bin/wmemstat --outfile 60
To start the performance collection at boot, add the following to your crontab file
(with crontab -e):
Figure 6-3. Performance Data Collection
@reboot (cd /tmp/stats && /usr/local/bin/wmemstat --outfile 60)
After the workload execution is complete, if you wish to have the statistics reviewed,
create a zipped/tar archive of the files collected, or the complete target directory
(/tmp/stats in the example above), and share it with the Ultrastar memory drive
support team to receive expert advice about the execution of your workload.
- 35 -
Page 36
Benchmarking Methodology and Performance Collection
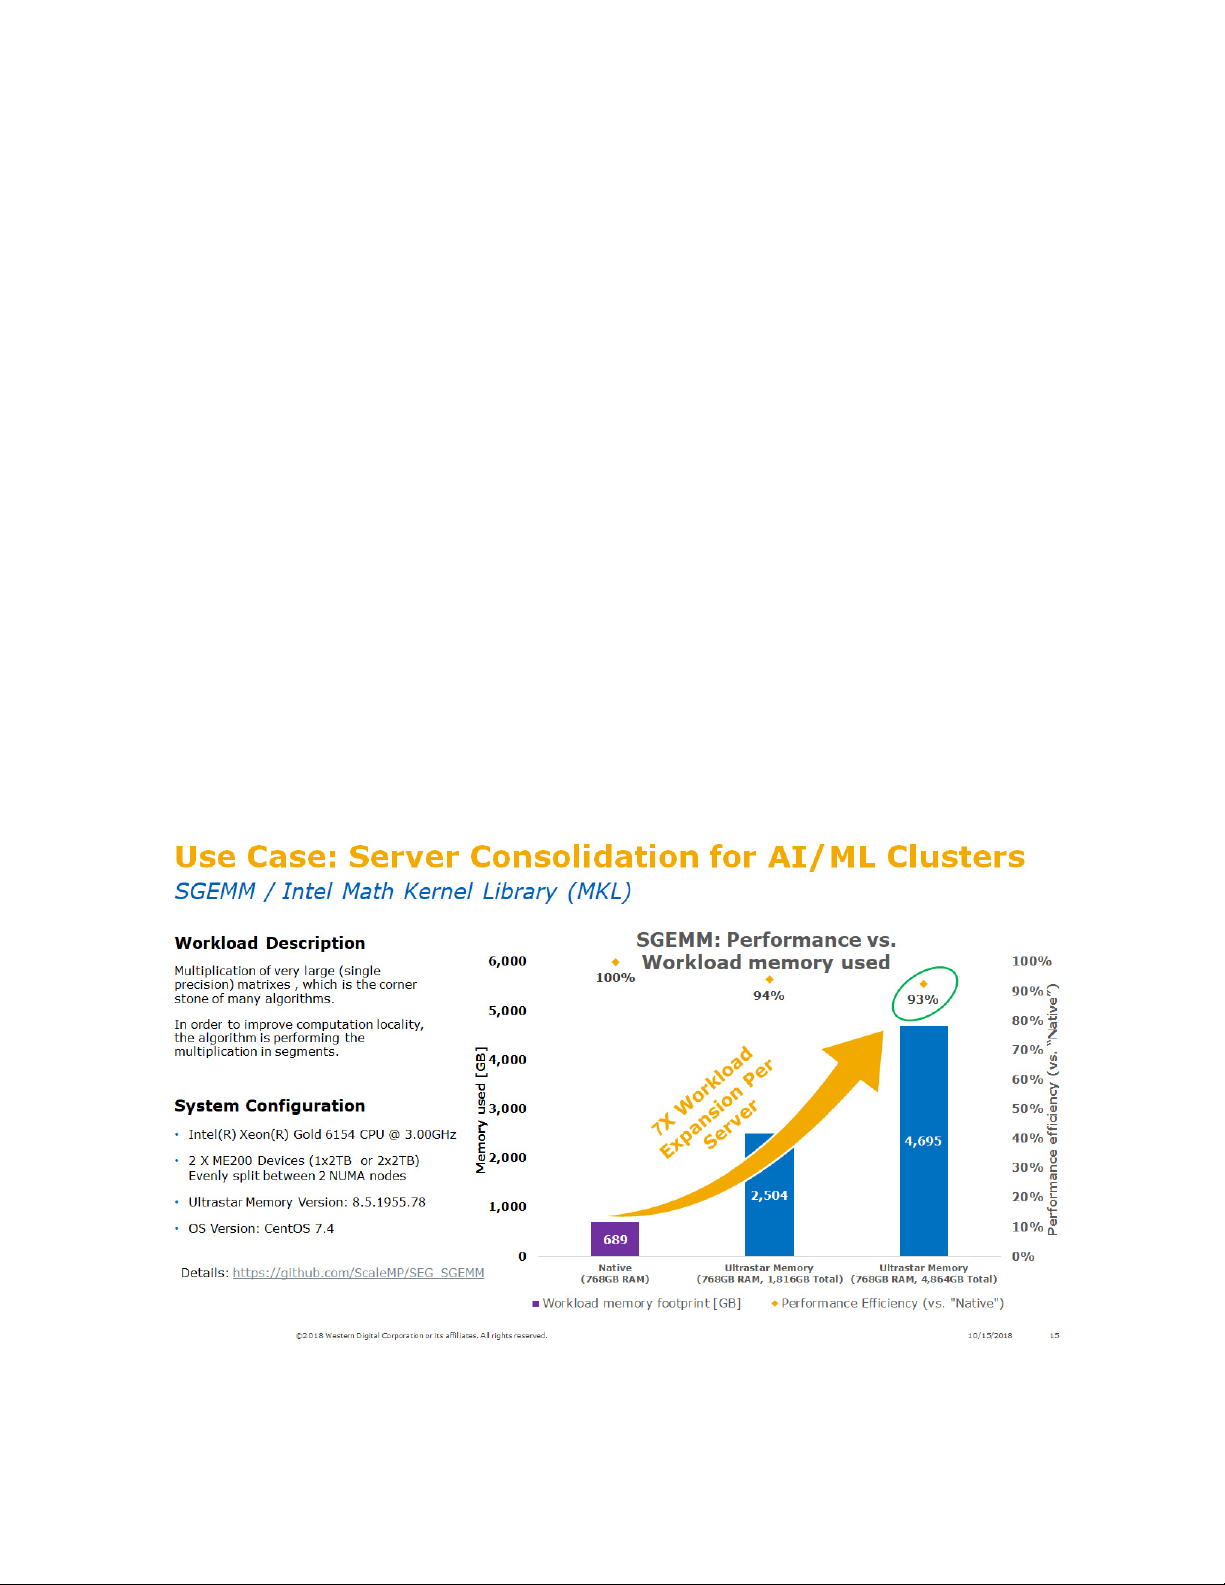
6.4 Out-of-the-Box Large Memory Benchmark
To easily test the performance of the system, a large memory workload,
demonstrating multiplication of very large matrices, which is the corner stone of
many algorithms, leveraging Intel® Math Kernel Library (MKL) is provided.
The workload can be used to test system performance for:
Memory Replacement: Performing an apples-to-apples comparison of (1) a
Native (i.e. DRAM only) system, with (2) a system using lower DRAM
augmented with Ultrastar memory, where (2) would be a cost-effective
alternative to DRAM.
Memory Expansion: Validate that a workload with a memory footprint
higher than DRAM capacity can successfully execute with near-DRAM
performance by expanding the system memory with Ultrastar memory.
To perform the test:
1. If using version 9.0 or newer, run the test embedded in the installer:
# ./wmem_installer-9.0.3365.2.sh si -p s
2. Otherwise, a publicly available workload can be obtained and configured per
the following: github.com/ScaleMP/SEG_SGEMM
3. Run the workload on a Native (i.e. DRAM only) system, and collect the results.
4. Run the workload on a system with Ultrastar memory drive configured, and
collect the results.
Figure 6-4. Figure 1 Type
- 36 -
Page 37

7.0 T ROUBLESHOOTING
7.1 Ultrastar Memory Drive Fails to Start
Ensure use of supported OS distribution and correctly configured BIOS to boot from
Ultrastar memory drive (see specifications in Chapter 5).
7.1.1 Common Installation Error Codes
During the boot process, the Ultrastar memory drive may issue warnings and errors to
the console, in many cases using error codes.
Table 7-1 (see below) lists the most common error codes, their explanations, and
suggested path to resolution.
Table 7-1. Common Installation Error Codes
Error Code or Symptom System State / Diagnosis Proposed Resolution
Troubleshooting
System does not load
Ultrastar memory software
Ultrastar memory loads,
but OS fails to boot
Ultrastar memory drive
reports error 279 or 700
Ultrastar memory reports
error 70x
Ultrastar memory hangs
during boot
Ultrastar memory drive
crashed
BIOS is not set to boot form
the Ultrastar memory device.
Ultrastar memory drive
software erased or misconfigured.
OS installation is erroneous.
The boot device is not
detected.
Ultrastar memory drive
software installed to other
bootable device.
(e.g. USB drive).
Ultrastar memory drive
software error.
A Blue Screen on the console
title Ultrastar memory drive
error with details in white
text.
Configure the BIOS to boot
form Ultrastar memory drive.
Follow manual steps to
recover erased Ultrastar
memory drive software (see
User Manual).
Make sure a supported
Linux OS is installed
Collect information; report
to L2
Collect information; report to
L2.
Remove bootable media that
contains Ultrastar memory
software - except for
Ultrastar memory devices.
Have user take a
screenshot of the error
Collect error code
Report to L2
Have user take a
screenshot of the error
Collect information
including screenshot
Report to L2
Ultrastar memory is
exhibiting low
performance
Workload mis-configured or
unfit for use with Ultrastar
memory drives.
- 37 -
Make sure user followed
performance guidelines
from the manual
Collect information
Collect periodic statistics
while workload is running
Report to L2
Page 38

Troubleshooting
7.2 Collecting Information for Escalating to Support
Table 7-2. Workloads and Applications
Error Type Proposed Resolution
Ultrastar memory
drive fails to boot.
Take a console screenshot depicting the point when the
Ultrastar memory drive boot stops.
Boot to native and run the installer per the following:
./wmem_installer-x.x.x.x.sh si -s
Ultrastar memory
drive successfully
boots; but OS fails to
boot.
In addition to the above instructions, boot the Ultrastar
memory drive.
Press F5 to access the Ultrastar memory drive menu
settings and run diagnostic tests.
Ultrastar memory
drive and OS
successfully boots;
problems arise after
booting process
In addition to the above instructions and after the
successful boot of the Ultrastar memory drive and
operating system, execute the following:
./wmem_installer-x.x.x.x.sh si -s
NOTE: The collection of the above information should be filed when escalating the
case to Level2 Support, including but not limited to:
Description of user actions leading to the error,
Output .tgz file generated by # ./wmem_installer-x.x.x.x.sh si -s,
Related screenshots,
Diagnostic results, etc.
- 38 -
Page 39

Reload the Ultrastar Memory Drive Software
8.0 RELOAD THE ULTRASTAR MEMORY DRIVE SOFTWARE
The Ultrastar memory drives were shipped pre-installed with software. If the software
was removed, deleted, or became corrupted, or if it is required to install the software
on a different bootable device, follow the steps listed in the below sections.
8.1 Reload to Ultrastar Memory Device
NOTE: Back up all data before beginning the software setup. Ultrastar memory
drive software configures the PCIe-based devices as a part of main (volatile)
memory pool.
The software installer can be obtained from the download section of the product
support page:
https://www.westerndigital.com/support/wdc/data-center-drives/ssd/ultrastar-dc-me200
Install the Ultrastar memory drive software to the Ultrastar memory device.
1. If the system is capable of booting directly from the Ultrastar memory device
(using UEFI), set the system BIOS to boot from one of the Ultrastar memory
devices (if not, skip to the next section).
2. Software reload is complete. Reboot the system to expand system DRAM with
Ultrastar memory drive.
3. If your system fails to boot, you may try booting from a different bootable
media as is described in the following section.
- 39 -
Page 40

Reload the Ultrastar Memory Drive Software
Figure 8-1. Software Installer
chmod +x wmen_installer-8.6.2535.77.sh
#./wmem_installer-8.6.2535.77.sh in -n
Preparing installer ............
Please take a moment to read the below
=======================================================================
Welcome to WDC Ultrastar DC ME200 memory version 8.6.2535.77 !
----------------------------------------------------------------------* By installing and/or using this software you acknowledge that you have read and
agreed to the agreement published at
https://www.get-wmem.com/EULA.
* Parts of this program, as provided in binary form, include open source
code under one or more open source licenses. For further details and
notices please see https://www.scalemp.com/opensource.
================================================================================
Type “accept” to accept the terms and conditions above:
Accept terms and conditions accepted.
WDC Ultrastar DC ME200 NVMe SSD licensing status:
## Block Device Vendor and Model Number Serial Number Size (GB/GiB)
01 /dev/nvme0n1 HGST HUSMR7616BDP3M1 SDM0000237D8 1920 / 1788 Available
02 /dev/nvme1n1 HGST HUSMR7616BDP3M1 SDM00001BC43 1920 / 1788 Available
Install WDC Ultrastar DC ME200 memory and its licenses on devices #01, #02? Y/N
Starting license and software installation...
---------------------- Installation Status -------------------------------------
---------------------- Installation Status -------------------------------------
/dev/nvme0n1 [===================================================](100%) DONE
/dev/nvme1n1 [===================================================](100%) DONE
Installing WDC Ultrastar DC ME200 memory tools...
WDC Ultrastar DC ME200 memory tools requires SUID permission to run as non-root
user.
Allow WDC Ultrastar DC ME200 memory tools to be run by all users (recommended)?
[N/Y]
WDC Ultrastar DC ME200 memory tools installation is complete.
- 40 -
Page 41

Reload the Ultrastar Memory Drive Software
8.2 Installing Ultrastar Memory Drive Software to a Different Bootable Media
After following the steps mentioned above to load the Ultrastar memory drive
software on the NVMe device, proceed with the following steps:
1. Insert a bootable flash media to the system (such as USB flash drive).
2. Ensure the bootable flash media is unmounted.
3. Install the Ultrastar memory drive software to the bootable flash media (See
Figure 8.2, found below).
4. Set the system BIOS to boot from the bootable flash media.
5. Software reload is complete. Reboot the system to expand system DRAM
with Ultrastar memory drives.
- 41 -
Page 42

Reload the Ultrastar Memory Drive Software
Figure 8-2. Software Installer
# ./wmem_installer-8.6.2535.77.sh in -b
Preparing installer ............
Please take a moment to read the below
================================================================================
Welcome to WDC Ultrastar DC ME200 memory version 8.6.2535.77 !
-------------------------------------------------------------------------------* By installing and/or using this software you acknowledge that you have
read and agreed to the agreement published at
https://www.get-wmem.com/EULA.
* Parts of this program, as provided in binary form, include open source
code under one or more open source licenses. For further details and
notices please see https://www.scalemp.com/opensource.
================================================================================
Type “accept” to accept the terms and conditions above: accept
Terms and conditions accepted.
WDC Ultrastar DC ME200 memory version 8.6.2535.77 found the following bootable
media:
## Block Device Vendor and Model Number Serial Number Size (GB/GiB)
01 /dev/sdb USB DISK 2.0 07A70E13754EFEA4 1.003 / 0.979
Please select devices to install WDC Ultrastar DC ME200 memory:
- device list (1, 3, 4 or 1-3 or combination of both e.g. 1, 2-4, 5)
- all devices (a)
Devices (q or <ENTER> to quit): 01
/dev/sdb (USB DISK 2.0 07A70E13754EFEA4): installing...
/dev/sdb (USB DISK 2.0 07A70E13754EFEA4): done.
Installing WDC Ultrastar DC ME200 memory tools...
WDC Ultrastar DC ME200 memory tools to be run by all users (recommended)? [N/Y]Y
Please enter absolute install path for Ultrastar DC ME200 memory wmem tools [/usr/
local]:
WDC Ultrastar DC ME200 memory tools installation is complete.
- 42 -
Page 43

9.0 SPECIFICATIONS
Table 9-1. Specifications
Specifications
Capacity
Form Factors
Operating Systems
Supported Processors
Maximum Processor Sockets 8
Maximum Software-defined
Recommended DRAM Expansion Up to 8x
Case Temperature Specification Operating: 0-70C (U.2), 0-55C (HHHL)
Certifications and Declarations UL*, CE*, C-Tick*, BSMI*, KCC*, VCCI*, CAN/CSA*
Product Ecological Compliance RoHS*, WEEE*
1,2,3
Memory
Hot-plug Hot-plug is not supported
U.2: 1TiB, 2TiB, 4TiB
AIC: 1TiB, 2TiB, 4TiB
U.2: 2.5” 15mm dual-port NVMe
AIC: HH-HL NVMe
For an updated list of operating systems, please refer
to the latest release notes.
Ultrastar memory extension software supports UEFI
boot, or alternatively requires a bootable media.
Supported protocols: IDE, UHCI, and EHCI
Intel Xeon
Intel Xeon Bronze, Silver, Gold, or Platinum
64 TiB
®
E5-x6xx v3 or later, E7-x8xx v3 or later
1
4
1. GiB = 1,073,741,824 bytes, TiB = 1,099,511,627,776 bytes
2. Total usable capacity towards memory is lower than total physical capacity of the
media in the Ultrastar DC ME200 Memory Extension Drive.
3. Ultrastar memory drives may be offered with higher capacities at a later date.
4. For example: 1024GiB DRAM can be expanded up to 8096GiB based on the
capacity of memory extension drives installed. Higher expansion ratios may be
supported, with possibly suboptimal performance.
- 43 -
Page 44

Specifications
- 44 -
Page 45

Western Digital
5601 Great Oaks Parkway
San Jose, CA 95119
U.S.A.
For service and literature:
support.wdc.com
www.westerndigital.com
800.ASK.4WDC North America
+800.6008.6008 Asia Pacific
00800.ASK.4WDEU Europe (toll free where available)
+31.88.0062100 Europe/Middle East/Africa
80-11-80165
May 2019
 Loading...