

Page 1

User Instructions For PDTP
Programming software for
Paging Data Terminals (PDTs)
Paging Data Receivers (PDRs)
Paging Serial Receivers (PSRs)
Installing the software
PDTP requires a PC running Windows 2000/NT/XP and at least 32MB RAM.
1. Unzip the installer PDTP.zip to a temporary file or open the installer files in
Winzip.
2. Run the installer by double clicking on Setup.exe.
3. Follow the instructions in the installer wizard.
4. Once installed run PDTP by clicking on the shortcut or selecting esp.exe from
the folder in which it is installed.
5. You will be prompted to Enter Set ID . The ke y will have been provided to
you or may be contained on the CD in a notepad file called PDTP Key.txt.
6. Hit OK.
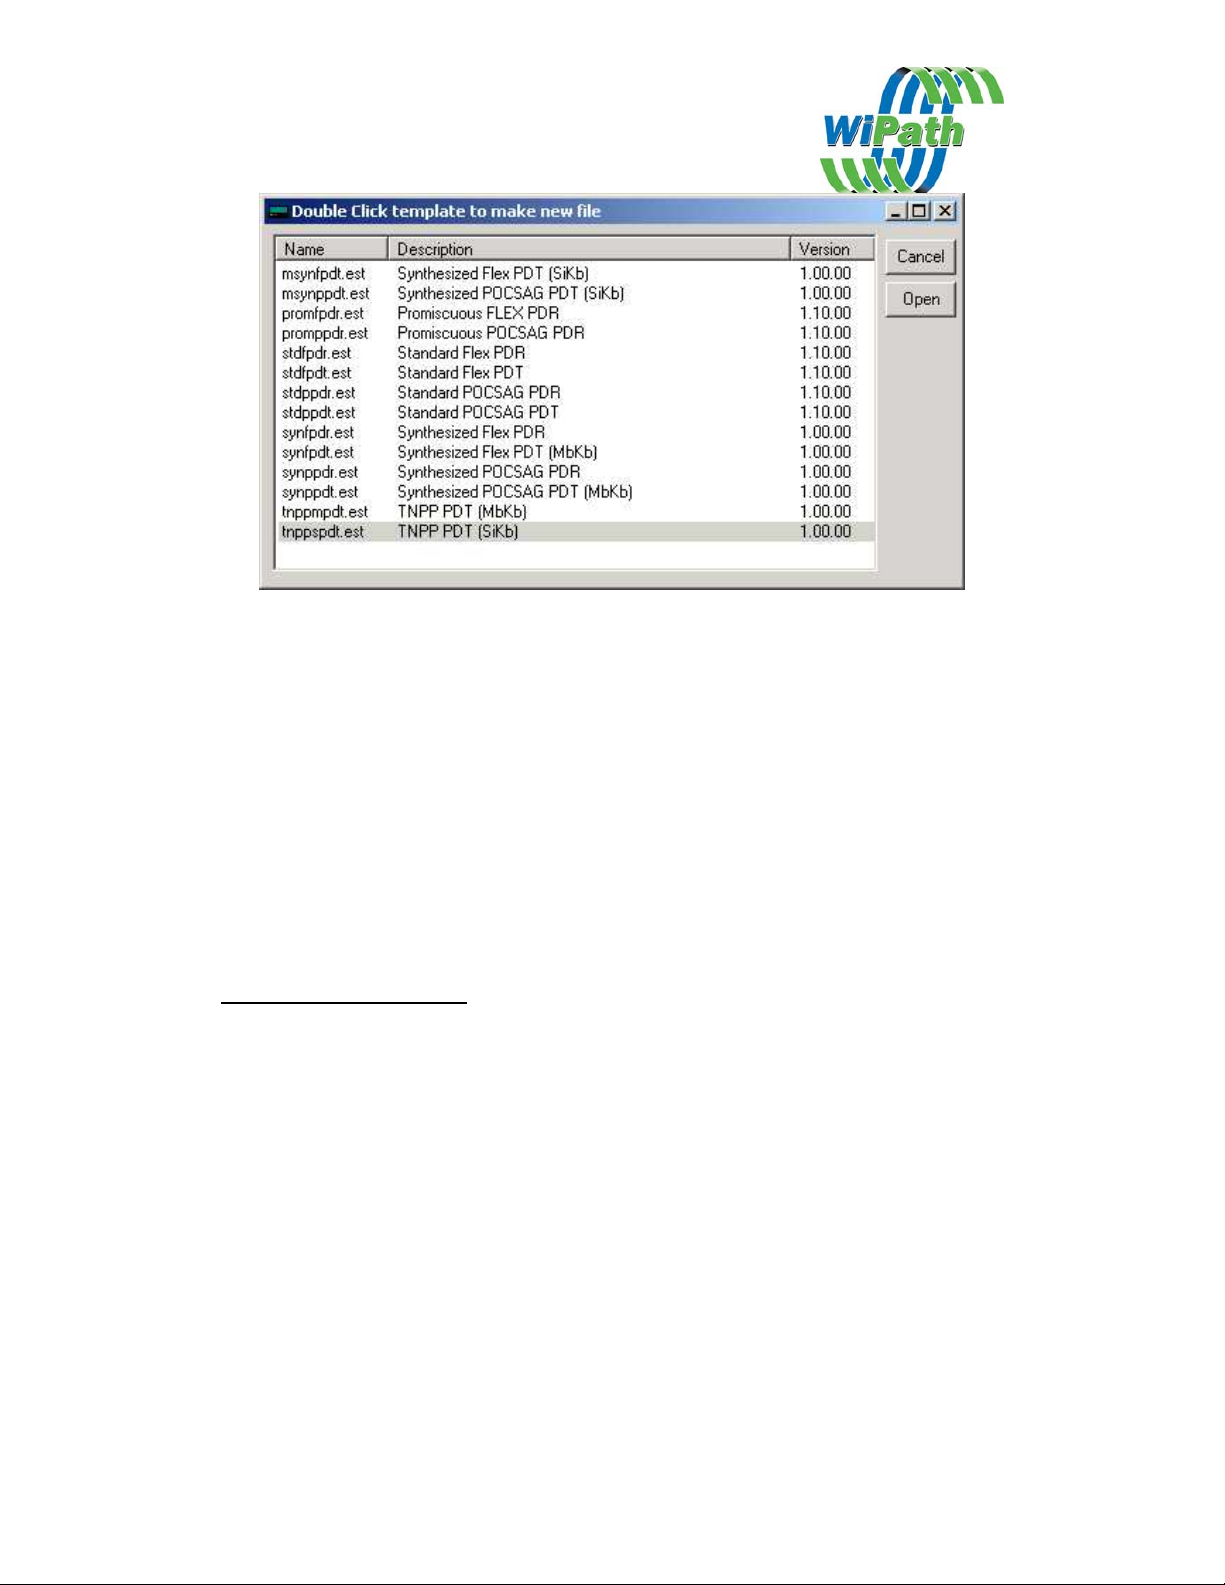
7. If your key permits access to more than one Template then a selection of
templates will appear in a new window. If your key only allows access to one
template then PDTP will start automatically in that template.
{Note: templates determine the function of the PDT/PDR e.g. Flex or pocsag, PDT or
PDR etc.}
Connecting the PDT/PDR
Required Items: *1 x Serial Null Modem DB9 female-to-female cable.
*1 x 12v DC Power supply rated at 0.5 amps (or greater) with
1. Plug the serial cable into the PC (COM1 is the default port)
2. Open PDTP
3. Select the template appropriate to the PDT/PDR/PSR that you are
programming. Note if you only have a key for one template then PDTP will
open automatically with that template active.
2.5mm center positive plug attached.
Page 2
4. Plug the PDT/PDR into a 12-volt supply and plug in the DB9 plug into the
back of the PDT/PDR.
{PDTP does not read or write to the PDT/PDR unless instructed to do so. It is
recommended that unless you need to change the basic template of the PDT/PDR then
you download the settings from the unit first. Click on the “Download From Pager”
button. This will download the current settings from the PDT/PDR. It will also
ensure that the template was selected correctly. The template will change to that
contained in the PDT/PDR if it was not selected correctly when you opened PDTP.
If you need to change the basic template of the PDT/PDR do not do a download. Just
select your template, change the settings and press “Upload To Pager” (Please
consult }
The Main PDTP Window
Note the main window will look slightly different for different templates e.g the PDR
templates include a button for alert settings and setting the time.
Page 3
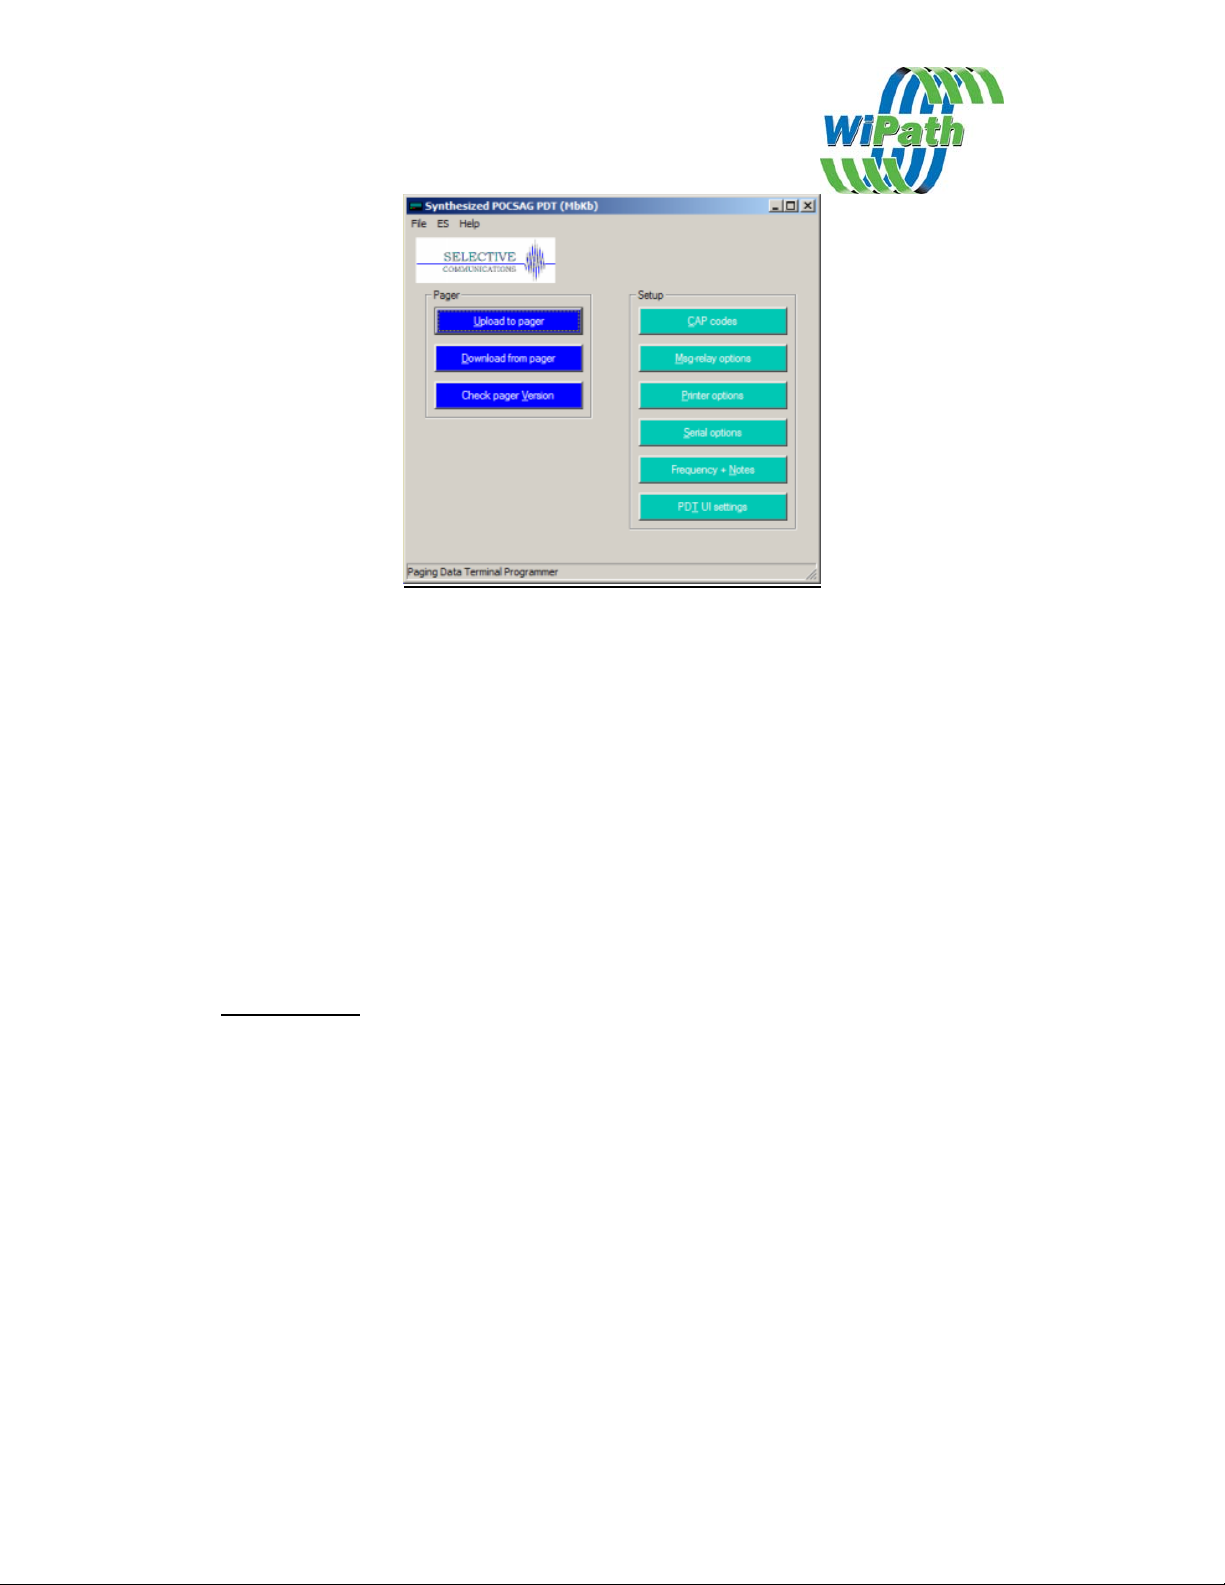
Title Bar
The blue Title Bar at the top shows the current Template selected.
Upload To Pager Button
This button is used to upload new settings to the PDT/PDR. This will overwrite any
settings currently in the PDT/PDR.
Download From Pager Button
This button is used to download the current settings from the PDT/PDR. This will
overwrite any settings currently in PDTP and will change the template in PDTP to
that programmed in the PDT/PDR if different from that showing.
The Set Time & Upload Button (PDR & PSR Templates Only)
This button is used to set the time and upload the new settings to the PDR2000. Time
is set on the PDT in the PDT User Interface.
Menu Options
File – New Open, Save, Save As
Open, save or create new configuration files which are saved as .ses files.
File – Set Template
Change the current template. (This option is only available if you are authorized for
more than 1 template option.)
File – Set Template Set ID
Change the key that authorizes the templates available. (This option is only available
if you are authorized for more than 1 template option.)
File - Comport
Change the comport to which the PDT/PDR is connected.
ES – Read, Write
Page 4
Read and write configuration settings to and from the PDT/PDR. These are the same
as the Upload and Download Buttons on the mainscreen (see below)
ES- Upgrade
Use this option to upgrade the Flash ROM in the PDT/PDR. Only use this option if
instructed to do so by a service representative.
ES – Set Time & Write
Set the time and write configuration settings to and from the PDT/PDR. This is the
same as the Set Time and Upload button on the mainscreen (see below)
Import Capcodes
Provides the capability to load a large number of capcodes from a .csv file. Note
currently this only permits the loading of the capcodes and names and does not set the
output settings which must be done manually.
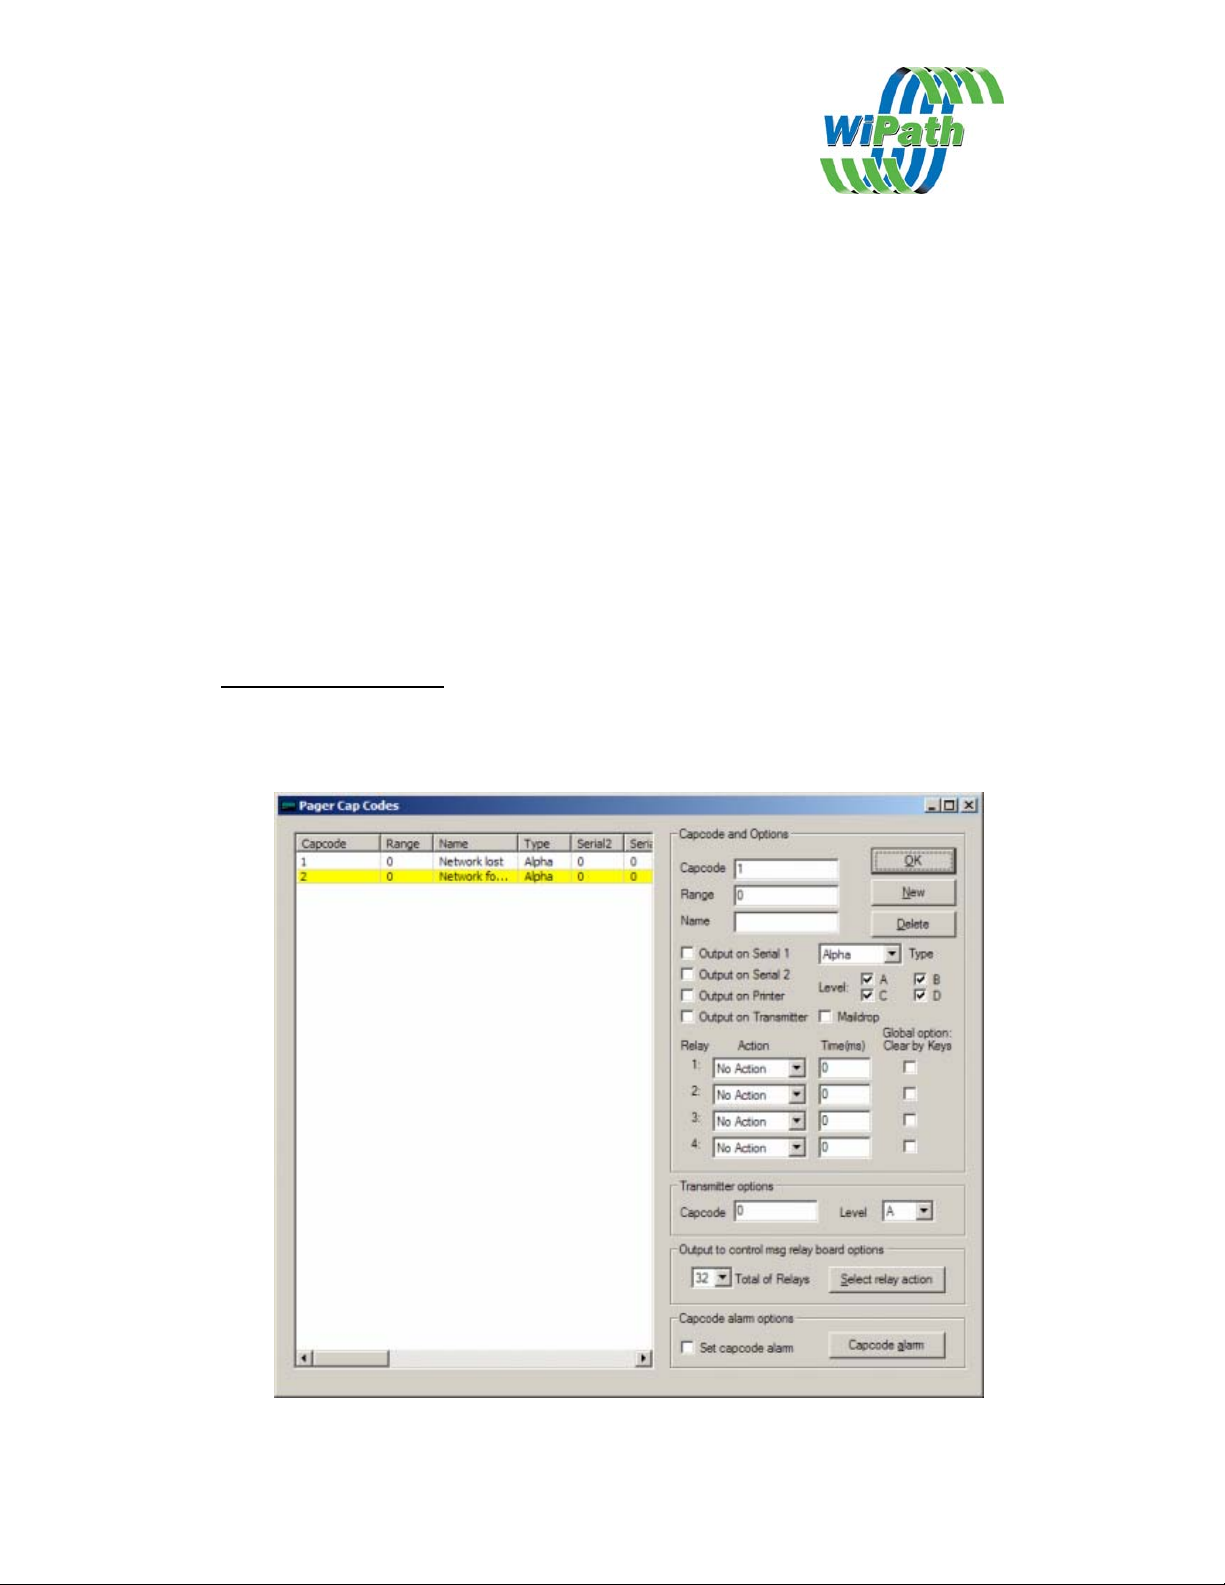
The Capcodes Window
This window is used to set the capcodes (addresses) and the output settings for each
capcode.
Page 5

Adding Capco d es (Addresse s )
1. Enter a new CAP code by clicking on the “New” Button.
2. Enter the new CAP code in the “Capcode” box and the name in the name box
below. i.e., 1234567 TEST CAP. The name is just an identifier and is not
compulsory.
3. If a range of capcodes is required then select the first capcode and the range
that you wish to monitor e.g entering capcode 1000000 and a range of 50 will
monitor capcodes 1000000 to 1000050.
4. Set each of the desired outputs individually
the capcode in the Left hand window and then selecting the outputs on the
Right.
Output Options
Serial 1 The message received on this address will output
on serial 1 – Set serial options (global) in the
Serial Options window.
Serial 2 The message received on this address will output
on serial 2 – Set serial options (global) in the
Serial Options window.
for each capcode by highlighting
Print The message received on this capcode will be
output on the Printer port (parallel printer) or
Serial 1 (serial printers). Global print options are
set in the Printer Options window.
Maildrop Sets this address as a maildrop capcode.
Messages will be stored and overwritten
automatically in the Maildrop area of the display
and will not be stored in the normal messages
area.
Type This option allows the type of message received
to be set. In Flex Templates the options are
Alpha, , Alpha Warning and Alpha Watch. In
pocsag the tone and numeric options are added.
Note: Alpha Warning and Alpha Watch are
special settings that allow different initial alerts
to be set for messages received on that capcode.
Level Sets the pocsag levels for the capcode
Relays 1-4 Sets the action that will occur on each of the 4
on board relays on receipt of any message on
that capcode. Relays are Normally Open.
Options are
i. Close Relay
Page 6

ii. Open Relay
iii. Momentary Close Relay for a period (in
msecs)
Global Option Clear By Keys If selected any relay action initiated on the
selected relay, by any
(reset to normal condition) by hitting any key
(PDT2000 only).
Output to Control Relay Board This sets the actions of any one or more of the
relays contained on the RCM2000 module.
Each RCM2000 adds 32 additional relays and
may be daisy chained.
Output to Transmitter When a transmitter is connected this sets the
output capcode and pocsag level to which the
message received on this address will be
transmitted in pocsag.
Capcode alarm Triggers an output event if no transmissions are
received on the selected capcode in the selected
period of time (alarm interval - in msecs.
capcode, will be cancelled
Page 7

The Msg Relay Options Window
This window is used to set global relay control actions according to the text contained
in a message received on the selected capcodes. Up to 128 actions may be set for the
PDR and PSR and 80 for the PDT.
Setting up a Msg Relay action:
1. Select New
2. Enter the text that you wish a relay or relays to activate on.
3. Select the capcodes to which this action will apply i.e. All or one from the
drop down list. Note any capcodes entered in the main screen with a range
attached will apply that action across the whole range.
4. Select the relay actions to apply when that text is received by the capcodes
selected.
Options:
Global Option Clear By Keys If selected any
Message Text will be cancelled (reset to normal
condition) by hitting any key (PDT2000 only).
Only Match At Beginning Only text at the beginning of the message will be
matched with the target text.
Output to Control Relay Board Extends the capability of this function to the
relays on the optional relay control modules
(RCM2000).
relay action initiated by any
Page 8

The Printer Options Window
Output Options
Output to Printer Turns printing on (global option). (Note
printing still needs to be set for each individual
capcode in the Capcodes window.
Output Time & Date Outputs Time & Date to Printer.
Output Capcode Outputs Capcode to Printer.
Output Form Feed Outputs a Form Feed to Printer.
Put Header on Separate Line Puts the Header (Date/Time, Capcode) on the
first line followed by the message after a line
feed.
Printer Page Width Set the width of the paper
Output Lines Between Messages Outputs a selectable number of line feeds
following each message.
Number of copies to print Sets the number of times the same message is
printed.
Printer Type Set printer type as parallel or serial (See PDTP
Serial Printer Setup document).
Page 9

Printer Contains a number of common printer drivers.
Page 10
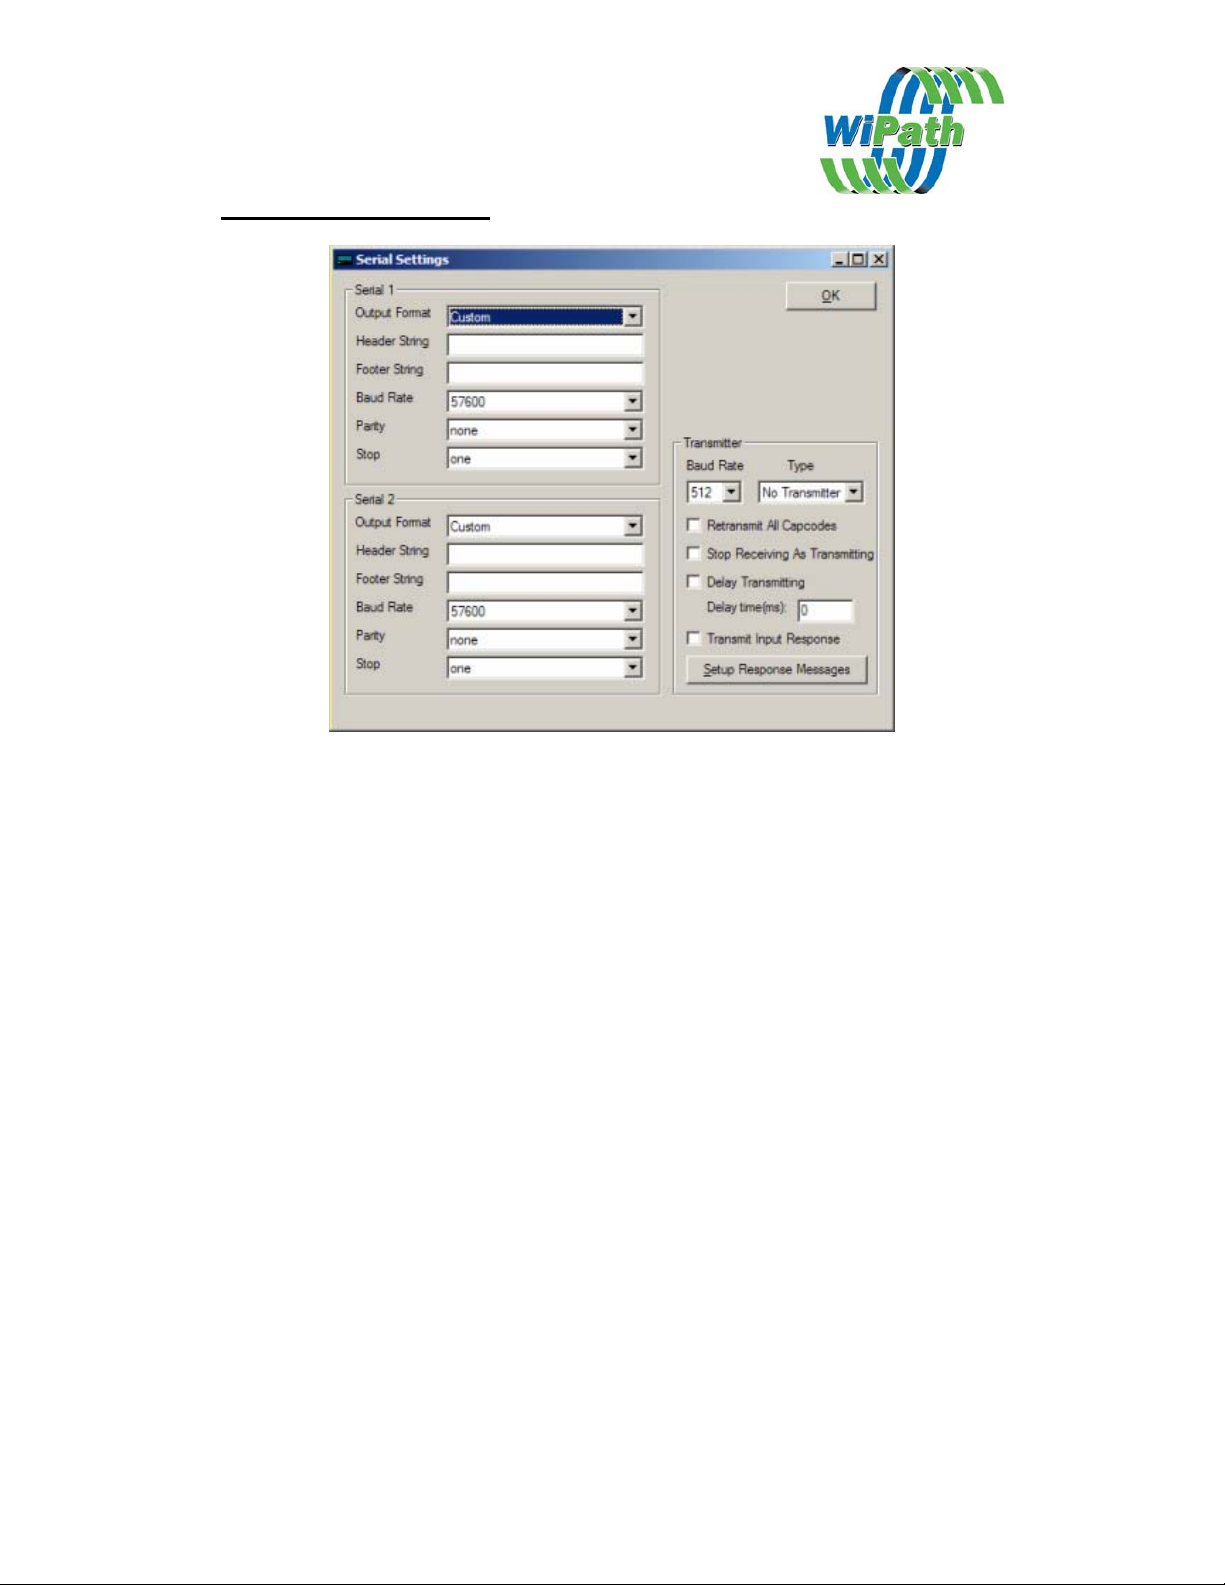
The Serial Options Window
Output Format Contains a number of standard settings for serial
output options to commonly used equipment and
software applications.
Header String Sets the header string at the beginning of the
serial output.
Footer String Sets the footer string at the beginning of the
serial output.
Some standard settings for header and footer strings are:
\r CR, Carriage Return
\n LF, Line Feed
\r\n new line
%n name of address
%a address in decimal
%p protocol
%m message type
%b baud rate in decimal
%L alpha level
%T 24 hour time
%y day, month
%Y day, month, year
For example: \r\n Name:%n Capcode:%a Protocol:%p Time:%T Date:%y\r\n
Page 11

Transmitter Output
Contact Selective for instructions on the set up of transmitter output from this
window.
The Alert Options Window (PDR2000 Only)
This window appears only in PDR templates. (Alerts are set in the PDT via the PDT
user interface).
It is used to turn audible alerting on and off and set the type and length of the audible
beep.
The Frequency & Notes Window
Frequency Set the synthesized frequency. Note: the frequency
must be within the frequency band of the receiver
Page 12

supplied. This will normally be noted in the Notes
section.
Invert Decoder Bit Steam Use this if your pager is set to data inverted. Consult
your carrier before using this option.
Set Decoder Baud Rate Use to set the baud rate (pocsag only). This may be set
to auto although better performance may be
experienced if all pagers are on one baud rate and the
unit is set to that baud rate.
Use New Receiver Please consult with Selective before changing this
option. A new receiver is being progressively
introduced from Q3 2005. On the PDT2000 an RSSI
(Received Signal Strength Indicator) will appear on the
display when the new receiver is in use.
Allow decoding errors Selects the number of character errors that the receiver
will accept before it discards (ignores) the message.
Remove leading characters Removes the selected number of leading characters in
a message before it outputs the message or applies any
message filters. This is used to ignore special
characters used by some systems for special decoding
options.
Notes An area to make general notes on this unit. This
information is stored on the PDT/PDR so that it can be
read wherever the unit is programmed.
Page 13

The PDT UI Settings Window
This window will appear in the PDT2000 templates only. It is used to set standard
User Interface settings that are normally set by the user via the PDT2000 display.
Use the following settings If this box is checked the settings will be settable only
from PDTP and not from the PDT2000 user interface.
(Except Backlight and contrast levels and the date and
time).
Settings
Display Options
Function Description Settings
Backlight Level Sets the initial display backlight level 1-20
Contrast Level Sets the initial display contrast level 1-20
Backlight Time Set how long backlight is to remain
Display Period Set the amount of time the message
5s/10s/30s/1m/5m/Permanent
on after key press
5s/10s/30s/1m/5m/Permanent
will display for before reverting to
main screen.
Page 14

Font Size Sets the size of the message font on
Scroll Lines Sets the number of lines to scroll
Date Format Display dates mm/dd/yy or dd/mm/yy US or International
Time Format 12 or 24 hour 12 or 24
Initial Alert Time How long beeper sounds on initial
Warning Initial Alert
Time
Watch Initial Alert
Time
Reminder Interval How often the reminder beep sounds -
Reminder Period How long reminder beep continues
Lockout period The period during which no additional
Audible Alert Beeper sounds on receipt of message On or Off
Beep Continuously Beeper sounds until message is
Reminder Beep Reminder beep sounds until message
Display Messages on
Arrival
Backlight On When
Messages Arrive
Show [Name] Before
Message
Show [Capcode]
Before Message
Show [Number]
Before Message
Combine Duplicate
Messages
Display Lines Set no of lines of text on display -
Relay Lockout Turns the relay lockout function on or
Show Timestamp Place the date and time of receipt at
Allow to delete all
messages
Allow to delete all
Read messages
Allow to lock
messages
Allow to set time Allows user to set time On or Off
the display.
when the down button is pushed when
a message is displayed.
receipt of message
How long beeper sounds on initial
receipt of a message on a Warning
capcode.
How long beeper sounds on initial
receipt of a message on a Watch
capcode.
every
for
activations of relays shall occur given
the same activation instruction.
acknowledged by pressing any key
is read
Display message automatically when
received
Turn the backlight on on receipt of a
message
Display the name assigned to the cap
code/address at the beginning of the
message (set via PDTP)
Display Capcode at the beginning of
the message.
Display the slot number of the
message at the beginning of the
message (1-40)
If set to on & a message identical to a
previous message is received it will
not be displayed as a separate
message
Changes Text size
off - See Lockout period above
end of message
Turns the delete all function on On or Off
Turns the delete all read messages
function on.
Allows user to lock messages On or Off
Small, medium, large
1,3
1s/5s/10s/30s/1m/ 5m
0,1s,2s,3s,4s,5s,10s,30s,60s,300s
(See capcode settings for an explanation of the
Warning type)
0,1s,2s,3s,4s,5s,10s,30s,60s,300 s (See capcode
settings for an explanation of the Watch type)
30s/1m/2m/3m/4m/5m
5m/10m/15m/30m/Forever
0,1s,2s,3s,5s,10s,20s,30s,1m,2m,3m,5m,10m,20m,30
m
On or Off
On or Off
On or Off
On or Off
On or Off
On or Off
On or Off
On or Off
On or Off
On or Off
On or Off
On or Off
Page 15

Display maildrop
instantly
P key to delete all
messages
Displays maildrop messages instantly On or Off
Changes P key from print to purge all
- same as Delete All
On or Off
 Loading...