

Page 1
INSTALLATION & OPERATING INSTRUCTIONS
WWW.WAVESTREAM.CO.UK
Page 2

04.rev08
Contents Wavestream™ Installation and XOil™
Cartridge Replacement Instructions
Section Page
1. Introduction 2
1.1 Important 2
1.2 What It Does 2
1.3 About these instructions 3
1.4 Before you begin 3
2. Tools and Fasteners 4
3. Basic Components 4
4. Wavestream™ Filter System Specifications 5
5. Fitting the Wavestream™ (flexi bilge pump hose installation) 6
6. Cartridge Replacement 7
7. Functional Checks 7
7.1 Installation check 7
7.2 With bilge pump running, check 7
7.3 Operational / Maintenance check 7
8. Code of Practice 8
8.1 Some points to remember 8
8.2 When refueling 8
Section 1. Introduction
1.1 Important
It is important to us that this product works as advertised and that you enjoy the extra peace of
mind that Wavestream™ offers by protecting the environment. If you have any queries that can
not be answered by your supplier or engineer, please contact us direct on +44 (0) 870 730 2000
or e-mail [email protected]
1.2 What it does
• The Wavestream™ oil from bilge water filter system removes trace oils from the bilge water
CAUTION
This filter system is
designed to remove
trace oils. Heavy oil
contamination in the
bilge should be
removed first using
absorbent pads or
2
when being pumped overboard. Water collects in the bilge and can mix with fuel, grease and
any oils that drip from the engine, gearbox, fuel lines, fuel tanks and greasing points in your
boat.
• Wavestream™ is designed for use in all sizes of boat and can be used as a secondary filter
after oil water separators on larger boats and Superyachts. The filters can be installed in
multiples in series if the oil contamination is high. Although very low differential pressures are
caused by installing a Wavestream™, bilge pumps can be very low pressure output and must
be installed correctly, see Section 1.4
doubt.
• If you pump oily bilge water overboard and there is a visible sheen left on the water at the point
of discharge then you most likely are pumping water over the legal limit for discharge and
polluting the environment. A Wavestream™ system was rigorously tested to achieve Lloyds
register of Shipping Type Approval so when properly maintained you can prevent this occurring,
preserving marine and aquatic life and avoid attracting costly fines.
Check with Wave International technical department if in
Page 3

04.rev08
pump
DANGER
WARNING
CAUTION
NOTE
CAUTION
If you have any
doubts at any time
about installing this
equipment, please
consult a qualified
person or call Wave
International for
WARNING
Particulate material,
sand and paint chips
could block the filter
and stop the
discharge of bilge
water. Take care
when leaving the
boat on an
automatic
WARNING
If the bilge water
system is to be left
unattended during
periods where water
in the filter housing
could freeze the
system should be
drained.
1.3 About these instructions
The panels on the left of the pages draw attention to SAFETY CONSIDERATIONS of the
adjacent text in accordance with the conventions of the EU Recreational Craft Directive.
• DANGER. Indicates a hazard that could easily
result in death or serious injury if proper
precautions are not taken. If you have any doubts about what precautions to take, you should
seek expert advice.
• WARNING. Indicates a hazard that could result in death or serious injury if proper precautions
are not taken. If you have any doubts about what precautions to take, you should seek expert
advice.
• CAUTION. Indicates a hazard that could result in personal injury or damage to your boat or its
equipment if suitable care is not taken.
• NOTE. Contains additional information that may be of help.
1.4 Before you begin
• Before you start, please read through these instructions carefully. Fitting the Wavestream™
involves:
• Cutting in to a section of flexible hose or bilge water discharge pipe after the bilge pump.
• Installing the Wavestream™ filter in to the flexible hose or bilge water discharge pipe after the
bilge pump with hose tails and clamps, screwing in to a threaded section of pipe or using a
flanged and bolted fitting.
• Mounting the Wavestream™ filter by bolting or screwing the mounting bracket to a solid fixing
point.
• The position you mount the Wavestream™ in must allow for the bowl to be removed for
cartridge replacement. Do not mount in direct sunlight.
• If your bilge contains particulate contamination such as sand, mud, paint chips and rust then
there should be a strainer fitted at the bilge pump to stop the debris coming through to the
Wavestream™ filter where it could cause blockage.
• Some consideration must be given at this time to the bilge pump installation, the
following all affect pump performance:
• Hose length, too long causes high friction losses.
• Hose diameter, too small for pump.
• Hose construction, should be smoothbore.
• Outlet and or filter too high, giving too much head from the pump should be < 1000 mm
• Angles and fittings in hose, all cause a reduction in pump efficiency.
• A non-return valve in the system can reduce pump performance drastically.
• State of the battery and length and diameter of the electrical cable and incorrect cable all affect
the voltage to the pump and therefore its speed.
• Check for airlocks in the line and the filter, the filters all have a bleed valve to release trapped air
• The closer the pump to the filter and outlet with smoothbore correctly sized hose with no extra
fittings, such as elbows and right angle bends, in the hose the better. Always check with the
Wave International Technical Department if in doubt.
3
Page 4
04.rev08
Section 2. Tools and Fasteners
The Wavestream™ can be installed in to a flexible discharge hose with the average DIY toolkit. You
NOTE
Take care if using a
sharp knife to cut
flexible hose.
will also need:
• A sharp knife or hacksaw to cut existing flexible bilge water discharge hose.
• The correct hose tails to fit the bilge pump flexible discharge hose.
• Spanners to fit the hose tail connections to the Wavestream™ head unit.
• A flat blade screwdriver for the hose clamps and Phillips head screwdriver for the bracket
screws.
• Thread tape or thread sealing compound.
Section 3. Basic Components
NOTE
Hose tails and hose
clamps are not
supplied and will
need to be obtained
prior to fitting. See
Section 4. for
thread size.
• Before you start, please check that your system kit contains the following components. If you
think you are short of any items, please call us immediately.
Wavestream™ Micro System
• 1 x Wavestream™ Micro System filter housing bowl and head unit.
• 1 x XOil™ oil removing cartridge already installed in the filter unit.
• 1 x Wavestream™ Micro System stainless steel mounting bracket.
• 1 x window sticker.
• 1 x set of instructions.
Wavestream™ System 1
• 1 x Wavestream™ System 1 filter housing bowl and head unit.
• 1 x XOil™ oil removing cartridge already installed in the filter unit.
• 1 x Wavestream™ System 1 stainless steel mounting bracket.
• 1 x plastic bag containing 4 head to bracket fixing stainless screws.
• 1 x window sticker.
• 1 x set of instructions.
Wavestream™ System’s 2 & 3
• 1 x Wavestream™ System 2 or 3 filter housing bowl and head unit.
• 1 x XOil™ oil removing cartridge already installed in the filter unit.
• 1 x Wavestream™ System 2 or 3 stainless steel mounting bracket.
• 1 x plastic bag containing 4 head to bracket fixing stainless screws.
• 1 x plastic filter bowl removing spanner.
• 1 x window sticker.
• 1 x set of instructions.
4
Page 5
04.rev08
Section 4. Wavestream™ Filter System Specifications
Wavestream™ Micro System – WMS
FLOW RATE: 1- 40 Liters per min.
MAX. PRESSURE: 10 bar.
MAX. TEMP: 40 deg. C.
MIN. TEMP: 1 deg. C.
CONNECTIONS: ¾” BSP
CARTRIDGE: WS-CM XOil™
DIMENSIONS: 165 X 120 mm
Leave a minimum of 25 mm below the filter
Housing to allow cartridge removal.
Wavestream™ System 2 – WSS2
FLOW RATE: 1- 265 Liters per min.
MAX. PRESSURE: 6.8 bar.
MAX. TEMP: 37 deg. C.
MIN. TEMP: 1 deg. C.
CONNECTIONS: 1 ½” BSP
CARTRIDGE: WS-C2 XOil™
DIMENSIONS: 350 X 180 mm
Leave a minimum of 50 mm below the filter
Housing to allow cartridge removal.
Wavestream™ System 1 – WSS1
FLOW RATE: 1- 40 Liters per min.
MAX. PRESSURE: 8 bar.
MAX. TEMP: 40 deg. C.
MIN. TEMP: 1 deg. C.
CONNECTIONS: ¾” BSP
CARTRIDGE: WS-C1 XOil™
DIMENSIONS: 315 X 130 mm
Leave a minimum of 25 mm below the filter
Housing to allow cartridge removal.
Wavestream™ System 3 – WSS3
FLOW RATE: 1- 265 Liters per min.
MAX. PRESSURE: 6.2 bar.
MAX. TEMP: 37 deg. C.
MIN. TEMP: 1 deg. C.
CONNECTIONS: 1 ½” BSP
CARTRIDGE: WS-C3 XOil™
DIMENSIONS: 606 X 180 mm
Leave a minimum of 50 mm below the filter
Housing to allow cartridge removal.
WARNING
Wavestream
System’s 2 & 3
require to be used
with minimum 4
meter head pumps
5
• It is recommended that the Wavestream System’s 2 & 3 be used with bilge pumps rated at
not less than 4 meter head (0.5 bar).
.
Page 6
04.rev08
Section 5. Installing the Components
5.1 Fitting the Wavestream™ (flexible bilge pump hose
WARNING
Before fitting the
filter ensure the
bilge pump is not
.
running
WARNING
It is advisable to use
two hose clamps on
each hose tail, so
each connection is
double clamped
NOTE
If installing in a hard
piped system refer
to the BSP thread
data in Section 4
installation).
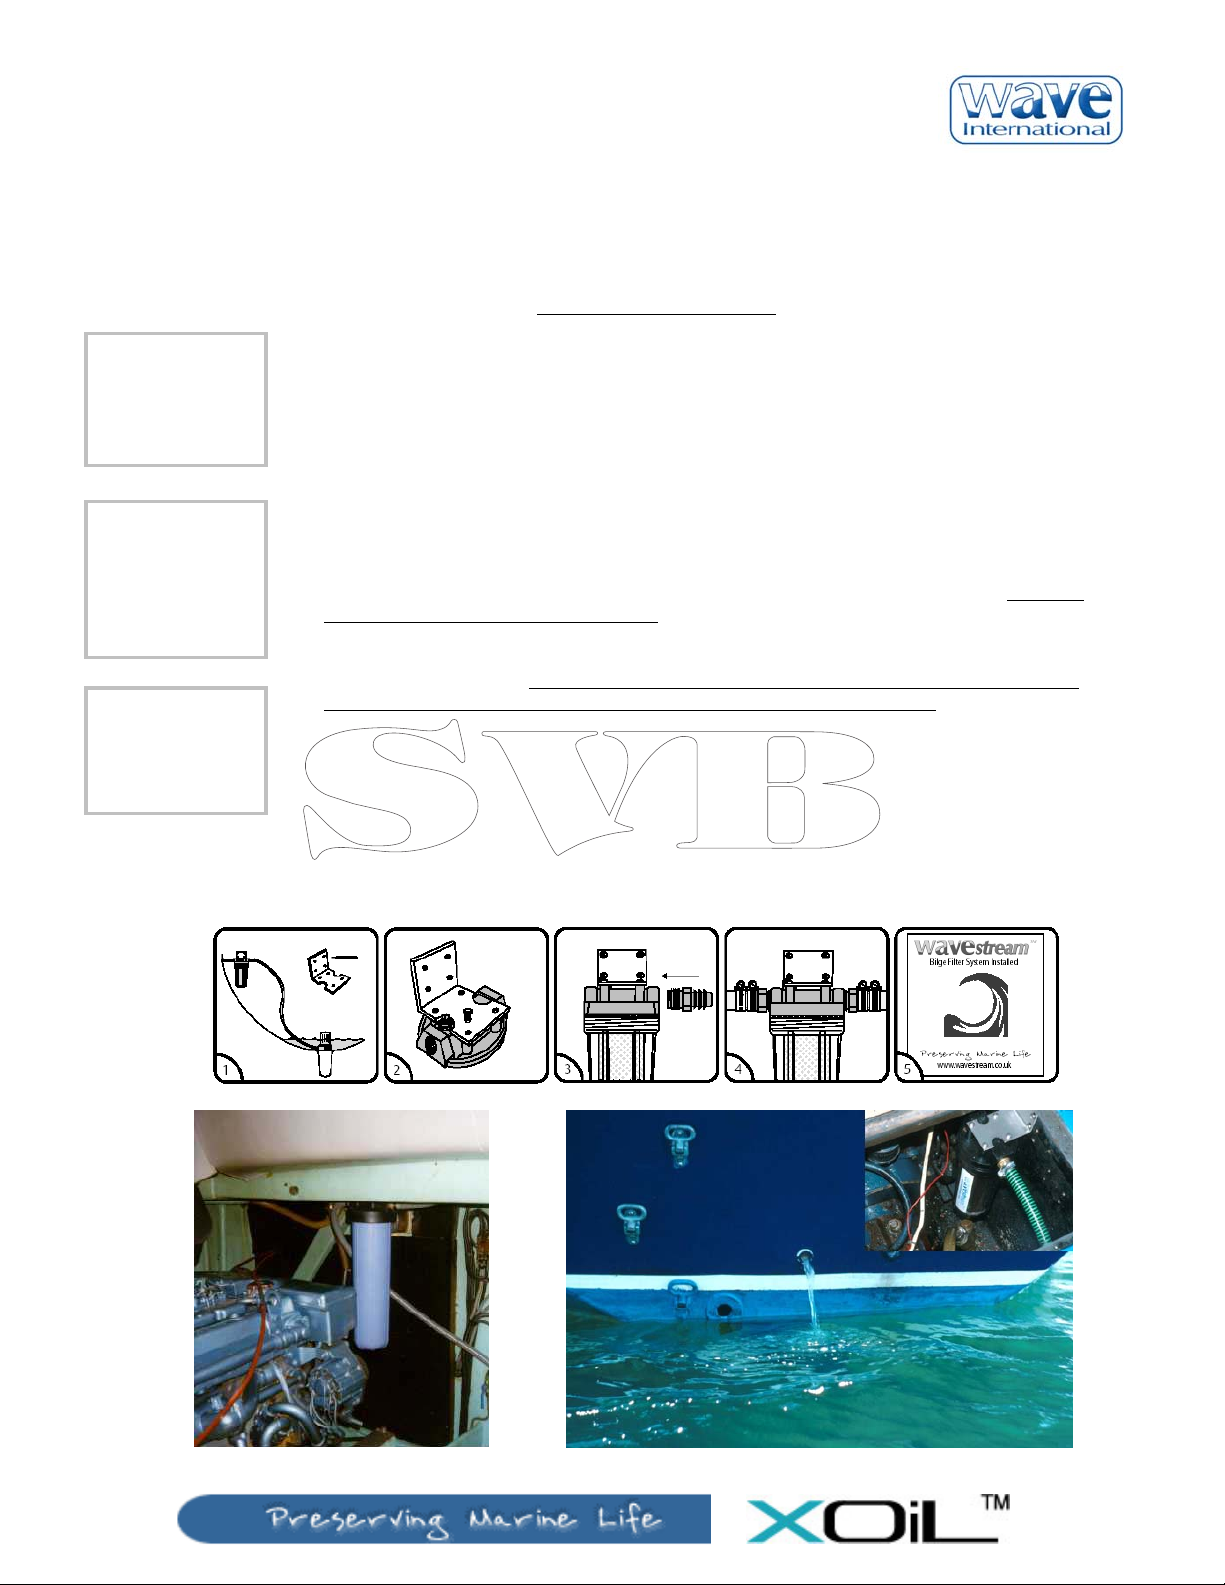
• Locate a suitable position, refer to Section 1.4 and Fig.1
bracket is different with the Micro System compared with all the other units but the same tools
and installation guidelines apply.
• Attach the filter housing to the mounting bracket using the screws provided, ensuring the flow
direction is correct; there is an arrow on the top of the unit. The arrow must point in the direction
of flow from the bilge pump towards the through hull fitting.
• Screw two hose tails in to the filter head using thread tape or compound to ensure a watertight
seal. The hose tails are to be the corresponding size to match the flexible bilge water discharge
hose
• Cut the flexible bilge water discharge hose immediately before and after the filter.
• Slide the two ends of the flexible supply hose over the hose tails on the filter head, check again
the direction of flow and fit the hose clamps.
• It is preferential the Wavestream™ filter is vertical and it is required to have enough space
below the filter unit to remove the filter bowl when changing the XOil™ filter cartridge, check the
.
system specifications at Section 4 above.
• Tighten the hose clamps, using two on each hose connection.
• Remove the filter bowl and check the ‘O’ ring is in position and the filter cartridge in place,
tighten the bowl by hand. A plastic wrench is supplied for removing the bowl on the System 2 &
3 models, the wrench must only be used to remove the bowl not to tighten it.
• Run the bilge pump and bleed any air out of the filter housing using the bleed screw or button on
the top of the unit.
• If the bilge pump overboard outlet is close to the waterline ensure water cannot flow back in to
the bilge through the filter and bilge pump.
• Display the window sticker informing everyone no waterborne oil pollution is coming from your
boat.
Fig 1.
See Fig 1.
, and fix the mounting bracket. The
6
Page 7
04.rev08
Section 6. Cartridge Replacement
WARNING
Before replacing the
cartridge ensure the
bilge pump is
switched off.
WARNING
Only use the plastic
spanner provided
with system’s 2 & 3
to remove the bowl,
do not use to
tighten. Hand tighten
only
• Make the cartridge replacement part of a regular maintenance programme, making sure to
replace the XOil™ cartridge before it allows oily bilge water to pass. The period between
cartridge replacements will depend on the condition of the bilge.
• Ensure you have the correct cartridge for your system.
• Ensure the bilge pump is switched off.
• Unscrew the filter bowl and pour the excess bilge water remaining in the bowl back in to the
bilge. For the Wavestream System 2 & 3 there is a plastic spanner supplied
• Remove the saturated cartridge placing it in a suitable receptacle for onward responsible
disposal.
• Check the ‘O’ ring is in the top of the bowl and it is in good condition and the seals on top and
bottom of the new cartridge are in also in place.
• Locate the new cartridge in the centre of the bowl and then tighten the bowl firmly by hand.
• Turn on the bilge pump and bleed any air from the housing using the bleed screw on the top of
the Micro and System 1 and the bleed button on top of the System 2 & 3, and check for any
leaks.
Section 7.
DANGER
If the bilge pump
overboard outlet is
close to the
waterline ensure
water cannot flow
back in to the bilge
through the filter and
lge pump. bi
WARNING
Check the XOil™
cartridge condition
regularly and
change at least once
a year.
Functional Checks
7.1 Installation Check
• Go over all your work one last time, ensuring that:.
• Ensure the clamps securing the flexible bilge water discharge hose are fully tightened.
• Make sure any other components you disturbed or removed during the fitting process have
been refitted correctly.
7.2 With Bilge Pump Running Check
• If fitted check the bilge pump discharge valve is OPEN.
• Check the entire discharge system for leaks.
7.3 Operational / Maintenance Check
• Make cartridge replacement part of a regular maintenance programme and change at least
once a year.
• Replace the cartridge after there has been a heavy spill of oil in the bilge.
• Do not pump your bilge if you suspect the cartridge needs changing.
7
Page 8

04.rev08
A
Section 8. Code of Practice
8.1 Some points to remember
WARNING
Discharging oily
bilge water damages
the environment and
wild life.
NOTE
Remember it is an
offence to discharge
contaminated bilge
water into any
watercourse. On no
account should
detergents or
emulsifiers be used
in bilge water.
Wave International Limited Your Local Agent Is:
xholme
Newton Way
Colsterworth
Grantham NG33 5NP
UK
tel.: +44 870 730 2000
fax: +44 870 730 2020
email: [email protected]
web: www.wavestream.co.uk
All the Wavestream™ products in this brochure meet the requirements of the Recreational Craft Directive at 1
Wavestream™ and XOil™ are Wave International Limited Trade Marks
Wave International limited makes no representations or warranties with respect to the contents or use of this manual and specifically disclaims
any express or implied warranties of merchantability or fitness for any particular purpose. Further, Wave International Limited reserves the right
to revise this publication and make changes to its content, at any time and to make changes to any and all parts of Wave International products
without obligation to notify any person or entity of such revisions or changes.
• Make sure engines, fuel lines, connections and other systems that could be a source of oil
or fuel contamination have seals and gaskets in good order and are not leaking.
• Use drip trays under engines and separate engine room bilges from the main bilge to
reduce the chance of contaminating bilge water with oil.
• Carry absorbent pads or pillows in case of excessive spillage in to bilge due to fuelling,
maintenance or other accidental dumping. The Wavestream System is a polisher only to
remove the trace amounts from the overboard discharge.
• Prior to pumping inspect bilge to ensure no excessive amounts of oil or fuel are present, if
there are use the pads to remove prior to pumping through Wavestream.
• Take ashore in proper containers any Wavestream cartridges, absorbents and sump oils
which are to be disposed of at approved facilities at marinas, lock stations or local authority
waste disposal sites.
• As far as possible, use biodegradable oils and unleaded fuel.
• Never use detergents or emulsifiers, as these will increase the risk of harming the
environment when discharged overboard.
8.2 When refuelling
• Take care not to spill fuel in to water
• Do not fill to very top, know the volume in your tanks and their total capacity.
• Place an absorbent pad over fuel inlet and under vent to prevent any spillage should there
be any blow back or overfilling
• Listen to the filler pipe carefully to anticipate the fill level and prevent splash back
• If a spill occurs stop fuelling immediately.
• If after having taken all reasonable care when fuelling there is still spillage then notify the
marina or fuelling point immediately so they can initiate their spill response procedures.
• When filling portable containers do so away from the waters edge and take care not to
overfill. Loose containers should be secured safely when on board the vessel.
st
January 2000
8
 Loading...