

SIM7600E-H 4G HAT User Manual
share awesome hardware
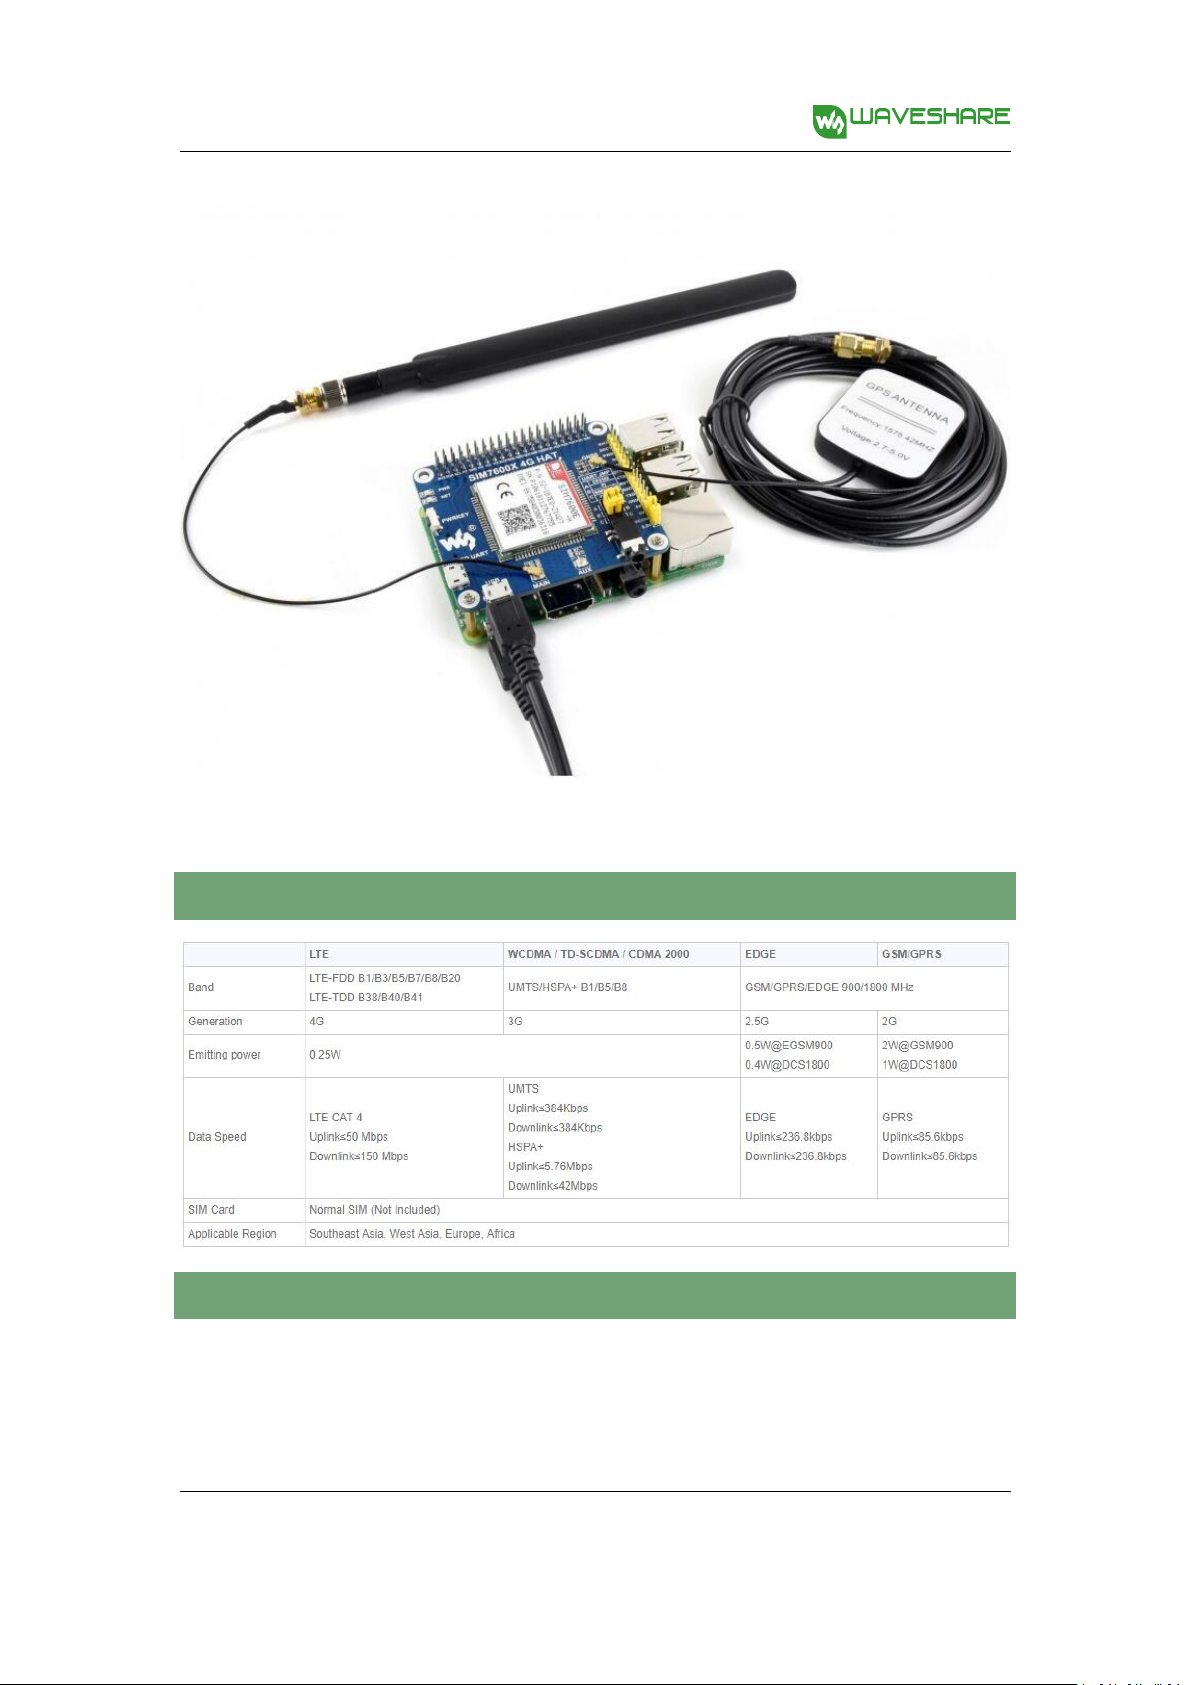
SIM7600E-H 4G HAT
Overview
The SIM7600E-H 4G HAT is a 4G/3G/2G communication and GNSS positioning module, which supports
LTE CAT4 up to 150Mbps for downlink data transfer. it is pretty low power consumption.
You can connect this 4G module with computer to surf the Internet, or attach it onto Raspberry Pi to
enable functions like 4G high speed connection, wireless communication, making telephone call,
sending SMS, global positioning, etc.
Note: this is a region-specific module, please check the supported bands before placing order.
Fe atures
Raspberry Pi connectivity, compatible with Raspberry Pi Zero/Zero W/Zero WH/2B/3B/3B+
Supports dial-up, telephone call, SMS, MMS, mail, TCP, UDP, DTMF, HTTP, FTP, etc.
Supports GPS, BeiDou, Glonass, LBS base station positioning
Onboard USB interface, to test AT Commands, get GPS positioning data, and so on
Onboard CP2102 USB to UART converter, for serial debugging
Breakout UART control pins, to connect with host boards like Arduino/STM32
SIM card slot, supports 1.8V/3V SIM card
TF card slot for storing data like files, messages, etc.
Onboard audio jack and audio decoder for making telephone call
2x LED indicators, easy to monitor the working status
Onboard voltage translator, operating voltage can be configured to 3.3V or 5V via jumper
Baudrate: 300bps ~ 4Mbps (default: 115200bps)
Autobauding baudrate: 9600bps ~ 115200bps
Control via AT commands (3GPP TS 27.007, 27.005, and V.25TER command set)
Supports SIM application toolkit: SAT Class 3, GSM 11.14 Release 99, USAT
Comes with development resources and manual (examples for Raspberry
Pi/Arduino/STM32)
1
Rev1.0 June 8, 2018
SIM7600E-H 4G HAT User Manual
share awesome hardware
Note: Does not contain Raspberry Pi
Co mmunicat i ons Sp ecificat i o ns
GN SS Sp e cificati o ns
Receiver type
16-channel
C/A code
2
Rev1.0 June 8, 2018
SIM7600E-H 4G HAT User Manual
share awesome hardware
Sensitivity
Tracking: -159 dBm (GPS) / -158 dBm (GLONASS) / TBD (BD)
Cold starts: -148 dBm
Time-To-First-Fix (open air)
Cold starts: <35s
Hot starts: <1s
Accuracy
Position: <2.5m CEP
SMS and Audio Specif ications
SMS
Supported types: MT, MO, CB, Text, PDU
Storage: USIM card and ME (default)
Audio feature
Supports echo cancellation
Supports noise reduction
Ot her Sp ecificati ons
Power supply: 5V
Operating voltage: 5V/3.3V (configured via jumper)
Operating temperature: -30°C ~ 80°C
Storage temperature: -45°C ~ 90°C
Dimension: 56.21mm x 65.15mm
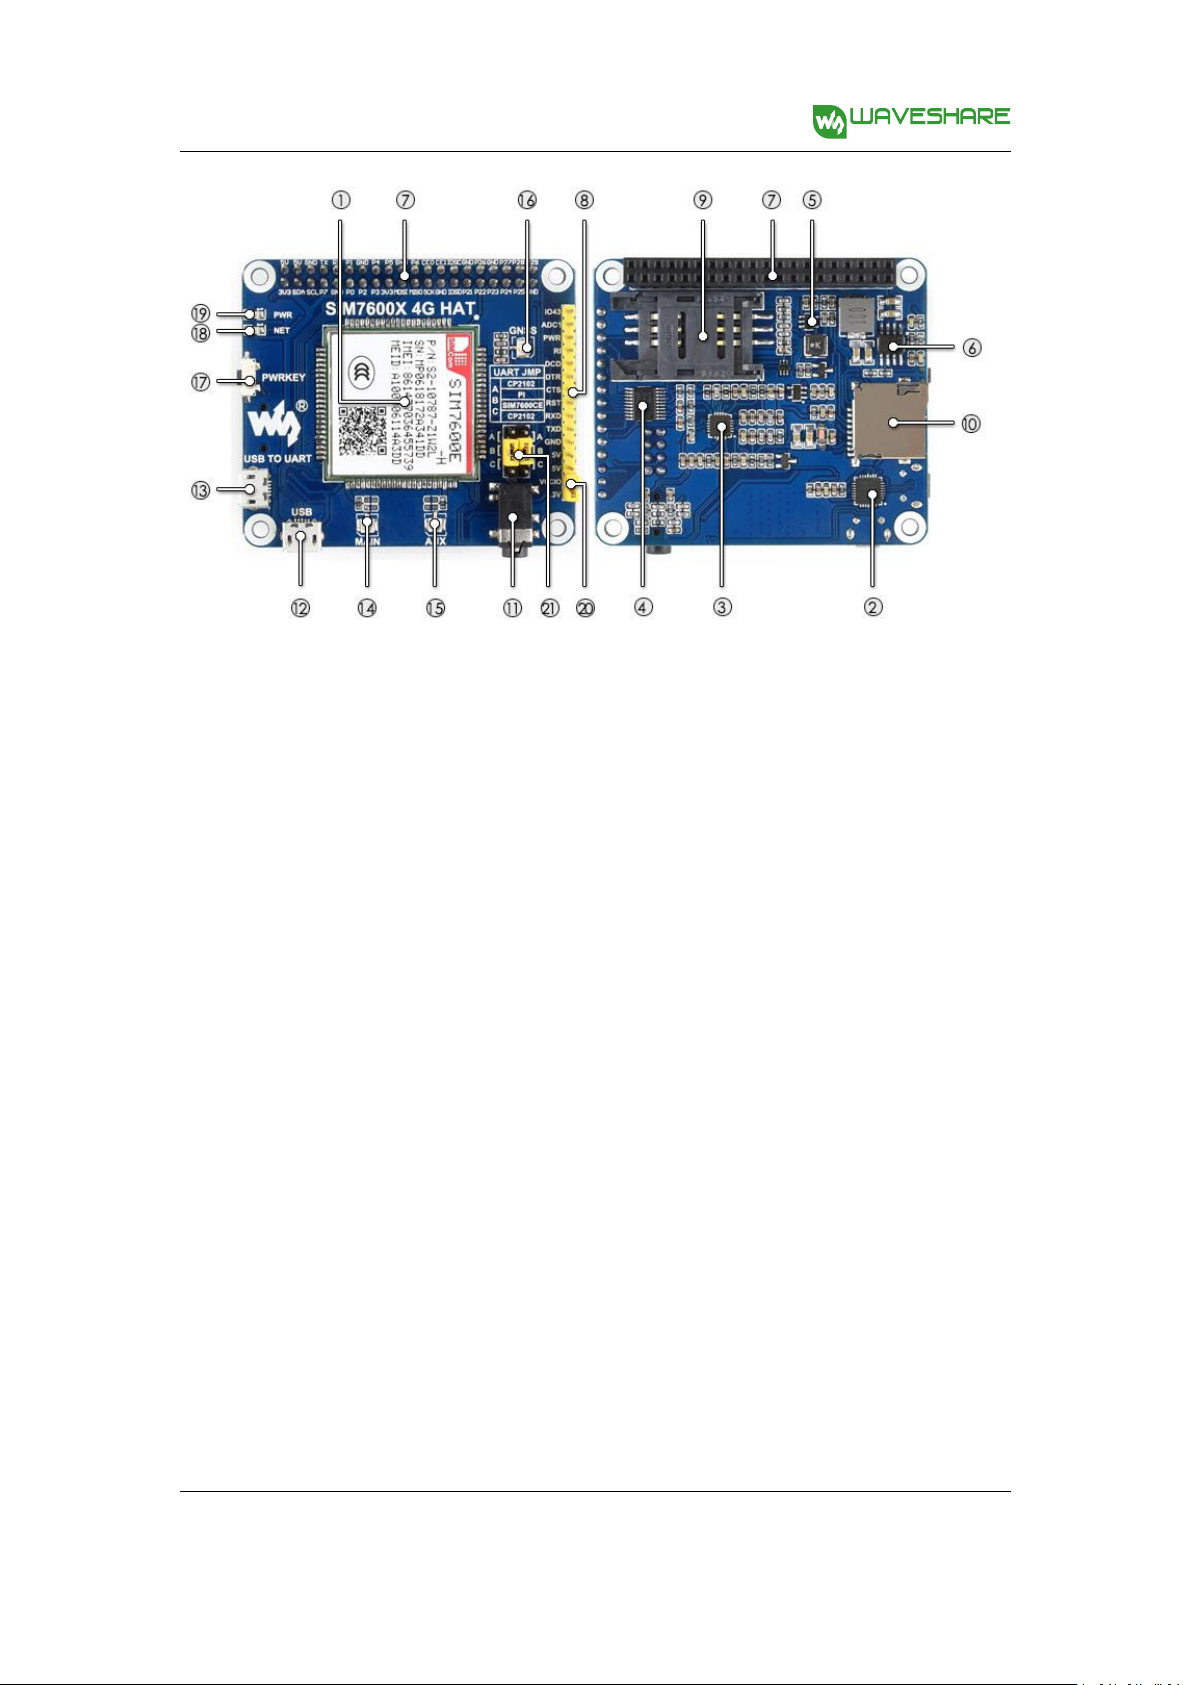
What's on Boar d
3
Rev1.0 June 8, 2018
SIM7600E-H 4G HAT User Manual
share awesome hardware
1. SIM7600E-H
2. CP2102 USB to UART converter
3. NAU8810 audio decoder
4. TXS0108EPWR voltage translator: translates 3.3V/5V into 1.8V
5. MP2128DT power chip
6. MP1482 power chip
7. Raspberry Pi GPIO header: for connecting with Raspberry Pi
8. SIM7600 control interface: for connecting with host boards like Arduino/STM32
9. SIM card slot: supports 1.8V/3V SIM card
10. TF card slot: allows file/SMS/... storage
11. 3.5mm earphone/mic jack
12. USB interface: for testing AT Commands, getting GPS positioning data, etc.
13. USB to UART interface: for serial debugging, or login to Raspberry Pi
14. MAIN antenna connector
15. AUX antenna connector
16. GNSS antenna connector
17. Power switch
18. Network status indicator
19. Power indicator
20. Operating voltage selection jumper:
VCCIO - 3.3V: set operating voltage as 3.3V
VCCIO - 5V: set operating voltage as 5V
4
Rev1.0 June 8, 2018

SIM7600E-H 4G HAT User Manual
share awesome hardware
21. UART selection jumper:
A: access Raspberry Pi via USB to UART
B: control the SIM7600 by Raspberry Pi
C: control the SIM7600 via USB to UART
5
Rev1.0 June 8, 2018

SIM7600E-H 4G HAT User Manual
share awesome hardware
Co ntents
Overview
Features
....................................................................................................................................................
.....................................................................................................................................................
Communications Specifications
GNSS Specifications
...................................................................................................................................
SMS and Audio Specifications
Other Specifications
What's on Board
1. Hardware configuration
...................................................................................................................................
........................................................................................................................................
....................................................................................................................
1.1. Hardware configuration
2. At Test Instructions
...........................................................................................................................
2.1. General AT commands
.................................................................................................................
....................................................................................................................
........................................................................................................
..........................................................................................................
1
1
2
2
3
3
3
8
8
9
9
2.2. Make calls and answer calls
2.3. Send and receive messages
2.4. GPS Debugging
2.5. TF Card Test
2.6. GPRS Debugging
....................................................................................................................
........................................................................................................................
..................................................................................................................
Local virtual severs settings
GPRS Test
3. Using with Raspberry Pi
3.1. Interface overview
.................................................................................................................................
...................................................................................................................
..............................................................................................................
3.2. UART configuration of Raspberry Pi
3.3. Init the Raspberry Pi
...........................................................................................................
................................................................................................
................................................................................................
.....................................................................................................
...................................................................................
11
12
13
15
16
16
17
18
18
18
19
6
Rev1.0 June 8, 2018

SIM7600E-H 4G HAT User Manual
share awesome hardware
3.4. Minicom for UART debugging on Raspberry Pi
3.5. Examples
3.5.1. PhoneCall
3.5.2. SMS
3.5.3. GPS
3.5.4. TCP
3.5.5. FTP
4. Using with Arduino
4.1. Interface overview
4.2. Install Arduino Library
4.2.1. Phonecall
.............................................................................................................................
................................................................................................................
.........................................................................................................................
.........................................................................................................................
..........................................................................................................................
..........................................................................................................................
..........................................................................................................................
..............................................................................................................
.........................................................................................................
................................................................................................................
..................................................................
20
21
21
22
22
23
23
24
24
24
25
4.2.2. SMS
4.2.3. GPS
4.2.4. TCP
4.2.5. FTP
.........................................................................................................................
.........................................................................................................................
..........................................................................................................................
..........................................................................................................................
25
26
27
27
7
Rev1.0 June 8, 2018
SIM7600E-H 4G HAT User Manual
share awesome hardware
1. Ha rdware configur ation
1. 1. Hard ware co n figurat i on
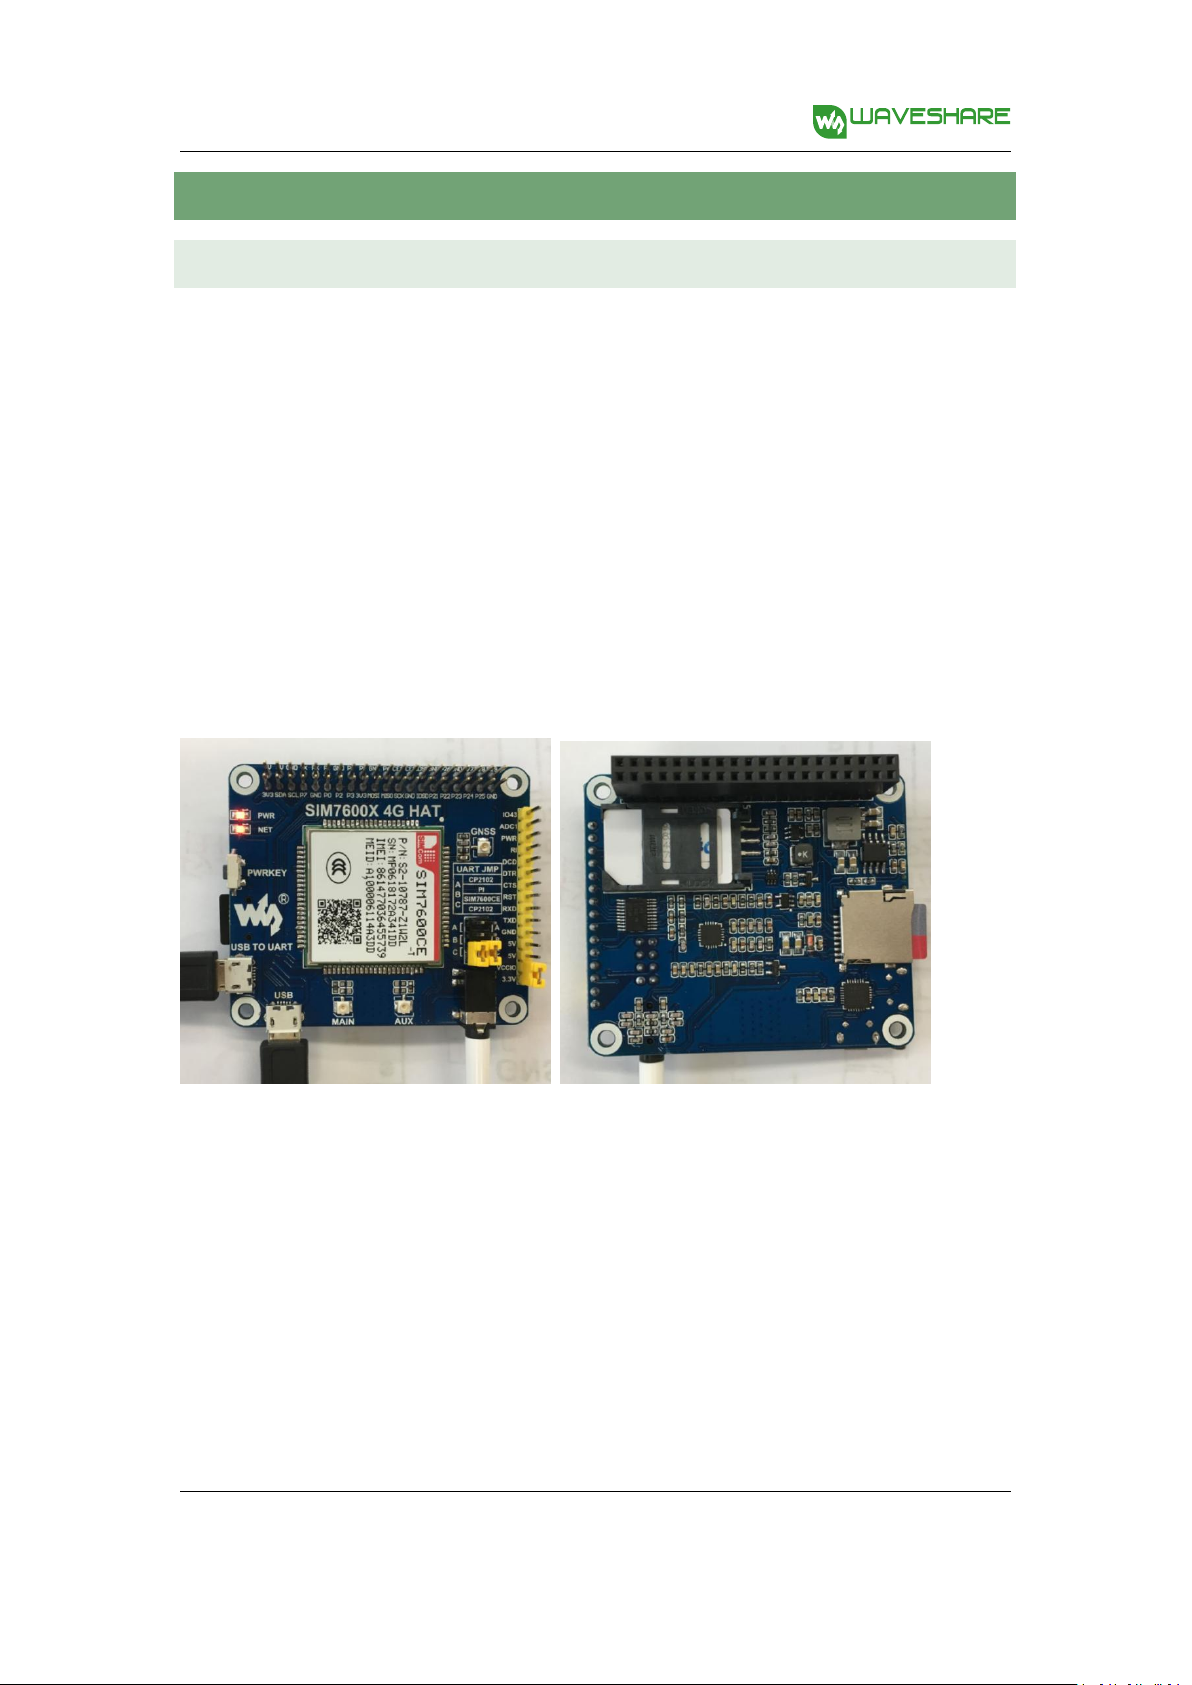
This module comes with GSM antenna, LTE antenna and micro USB cable. Besides these you should
prepare a 4G sim card and a microphone cable with microphone:
1) Insert the SIM card to the card slot, Insert the headphone cable and connect the LTE antenna.
2) Connect the USB interface of SIM7600E-H 4G HAT to PC with a micro USB cable. Then the PWR
indicator will keep bright.
3) Press the PWRKEY button and hold for 1s, the NET indicator will blink as below. Generally, the
NET indicator will fast flash firstly (1 time per second), which means that the module has not
logged in the Network. After logging in, the indicator become to flash slowly (1 time every three
seconds). Up to the local LTE network, this process that logging in will last several seconds to
dozens of seconds.
\
If you take too much time to log in and failed, please check that whether the LTE antenna is
connected correctly, and whether the SIM card is usable and insert correctly.
4) Install SIM7600 driver (windows driver: www.waveshare.com/wiki/File:SIM7X00-Driver.7z)
Open Device Manager to get the corresponding COM port number of SIM7600. For example, the
AT Port is COM19 as below. Users need to choose the correct port according to the Manager.
Figure: Devices Manager
Rev1.0 June 8, 2018
8

SIM7600E-H 4G HAT User Manual
share awesome hardware
Commands
Description
Return
AT
AT test command
OK
NOTE:
The default hardware of SIM7600CE 4G HAT needs to be turned on by button. If the hardware needs
to be turned on automatically, you can use a connection line to connect the PWR and GND pins on
the module pin, so that it can automatically turn on, as shown in the figure below.
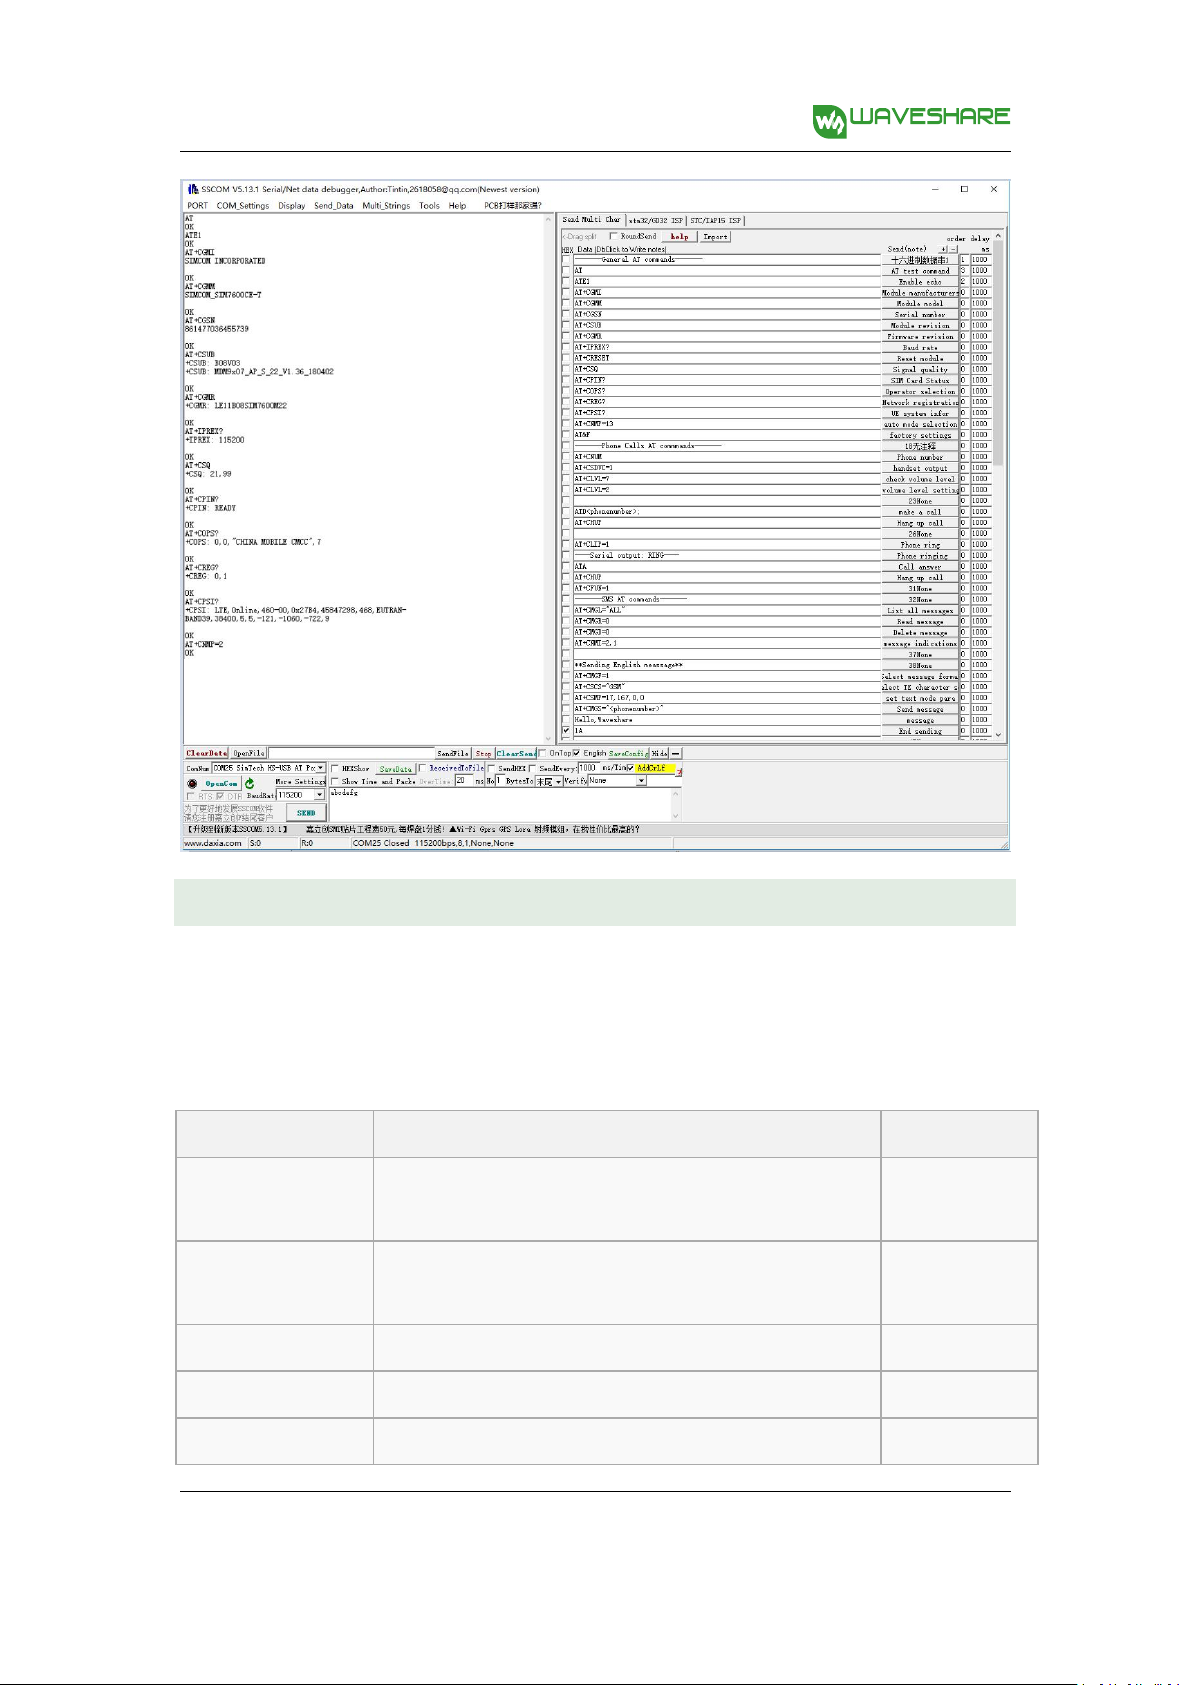
2. At Test Instr u ctions
2. 1. Gene r al AT comman ds
9
Rev1.0 June 8, 2018

SIM7600E-H 4G HAT User Manual
share awesome hardware
ATE
ATE1: Enable echo
ATE0: Disable echo
OK
AT+CGMI
Module manufacturers
OK
AT+CGMM
Module model
OK
AT+CGSN
Serial number
OK
AT+CSUB
Module revision
OK
AT+CGMR
Firmware revision
OK
AT+IPREX
Set baud rate
+IPREX:
OK
AT+CRESET
Reset module
OK
AT+CSQ
Check signal quality
+CSQ: 17,99
OK
AT+CPIN?
SIM Card Status
+CPIN: READY
AT+COPS?
Operator selection
+COPS:
OK
AT+CREG?
Network registration
+CREG:
OK
AT+CPSI?
UE system infor
AT+CNMP
Mode selection:
2:Automatic
13:GSM only
38:LTE only
48
:
Any modes but LTE
... ....
OK
For more details, please refer to the documentation:Series_AT Command Manual_V1.07
10
Rev1.0 June 8, 2018
SIM7600E-H 4G HAT User Manual
share awesome hardware
Commands
Description
Return
AT+CNUM
Phone number (Not all SIM cards Support)
+CNUM
OK
AT+CSDVC
AT+CSDVC=1:Handset output
AT+CSDVC=3:Speaker output
OK
AT+CLVL=?
check volume level
OK
AT+CLVL=2
volume level set to 2
OK
ATD<phone_number>;
Make calls
OK
2. 2. Make calls and answer calls
1) Insert the SIM card, connect the LTE antenna and connect the USB interface of
SIM7600E-H 4G HAT to PC. Then press the PWRKEY to power on the board;
2) Check whether the indicators blink correctly (PWR’s and NET’s flashes).
3) Send AT commands as bellow:
Rev1.0 June 8, 2018
11

SIM7600E-H 4G HAT User Manual
share awesome hardware
AT+CHUP
Hang up call
OK
AT+CLIP=1
Phone ring
OK
ATA
Call answer
OK
Commands
Description
Return
AT+CMGF=1
select message format
OK
AT+CSCS="GSM"
Select TE character set: GSM
OK
AT+CSMP
set text mode para
OK
AT+CMGS="<phonenu
mber>"
Send message
OK
2. 3. Send and receiv e mess a ges
1. Plug the SIM card, connect the LTE antenna and and connect the USB interface of
SIM7600E-H 4G HAT to PC. Then press the PWRKEY to power on the board;
2. Check whether the indicators blink correctly (PWR’s and NET’s flashes).
3. Send AT commands as bellow:
12
Rev1.0 June 8, 2018

SIM7600E-H 4G HAT User Manual
share awesome hardware
AT+CNMI=2,1
message indications
OK
AT+CMGR=1
Read message 1
OK
Commands
Description
Return
AT+CGPS
GNSS Power Control:
OK
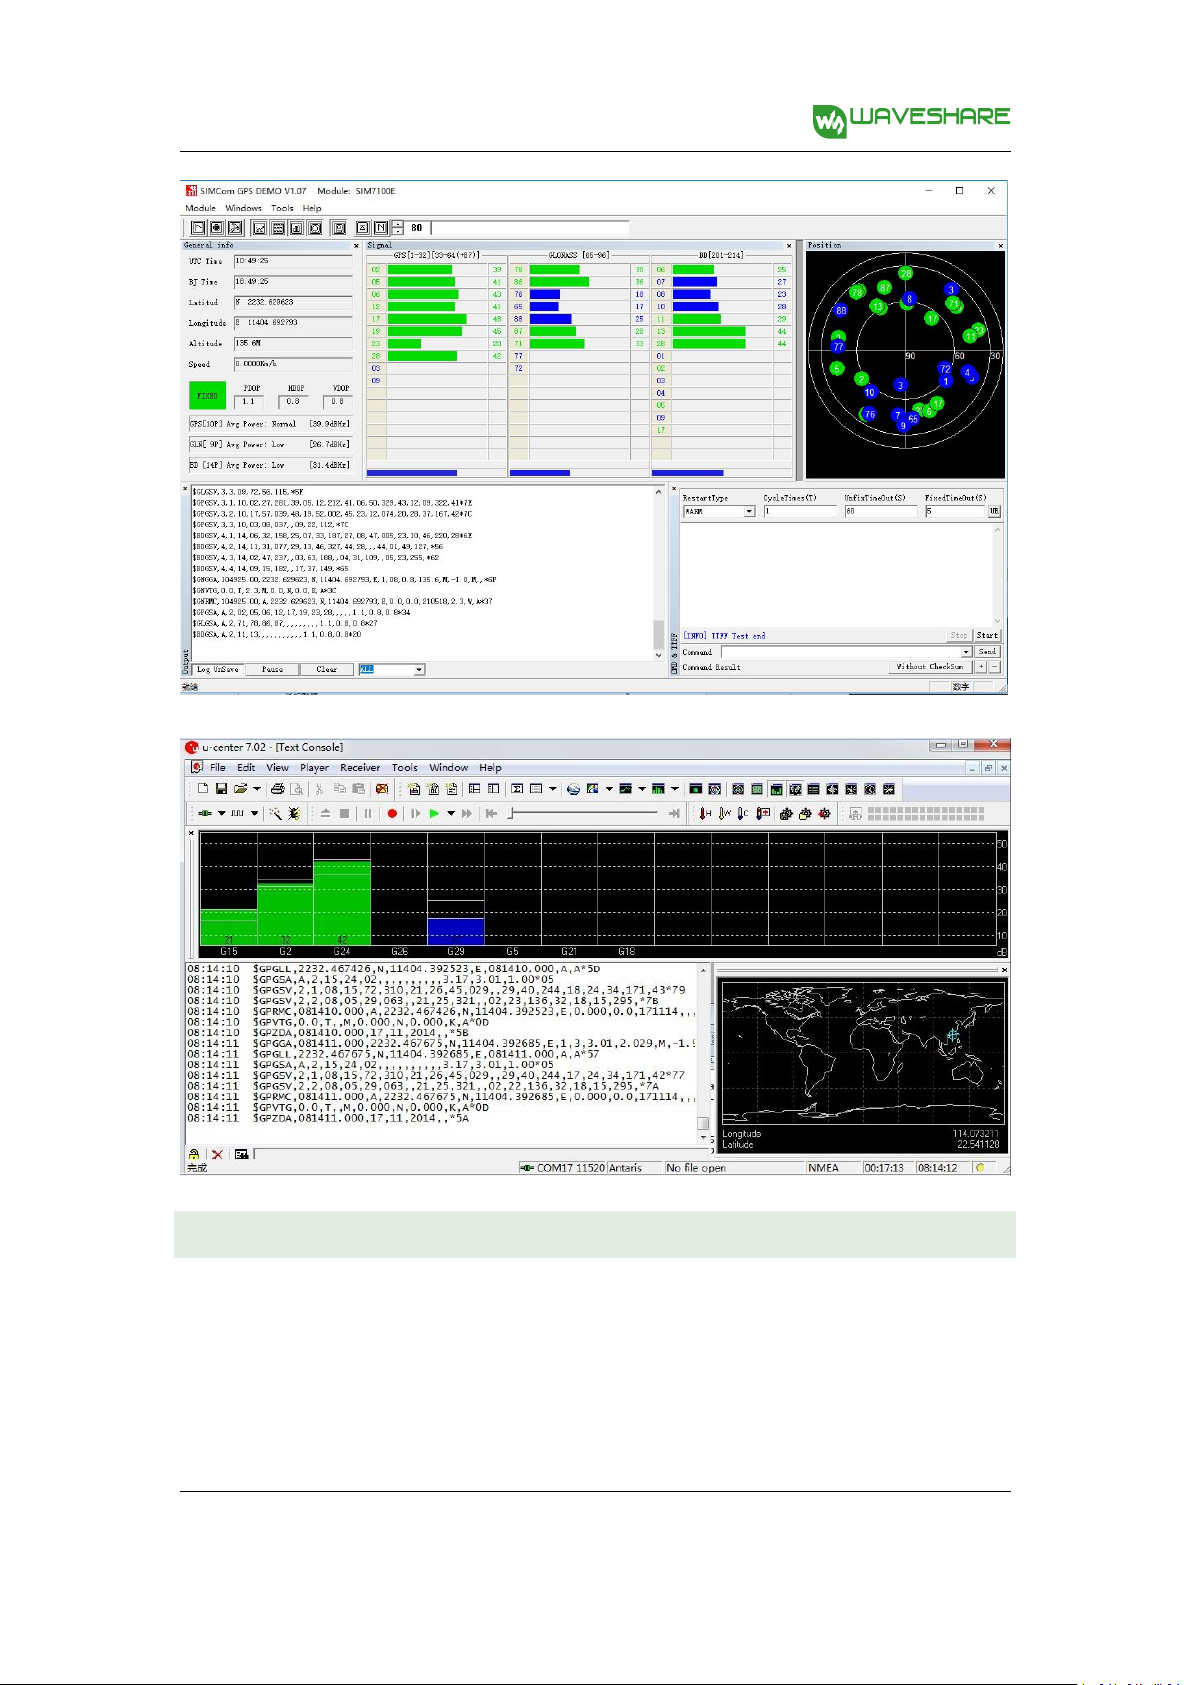
2. 4. GPS Debu g g ing
Rev1.0 June 8, 2018
13

SIM7600E-H 4G HAT User Manual
share awesome hardware
AT+CGPS =1:Turn on
AT+CGPS =0:Turn off
AT+CGPSINFO
GNSS navigation information parsed from NMEA sentences
+CGNSINF:
OK
1) Connecting the GPS antenna, and place the receiver on open area outdoor
AT+CGPS =1 //Turn on power of GPS
2)
3) Open u-center and set the Port and Baudrate (NMEA Port,COM27)
4) AT+CGNSINF // Print the GPS information
AT+CGPS =0 //Turn off power of GPS
5)
Rev1.0 June 8, 2018
14
SIM7600E-H 4G HAT User Manual
share awesome hardware
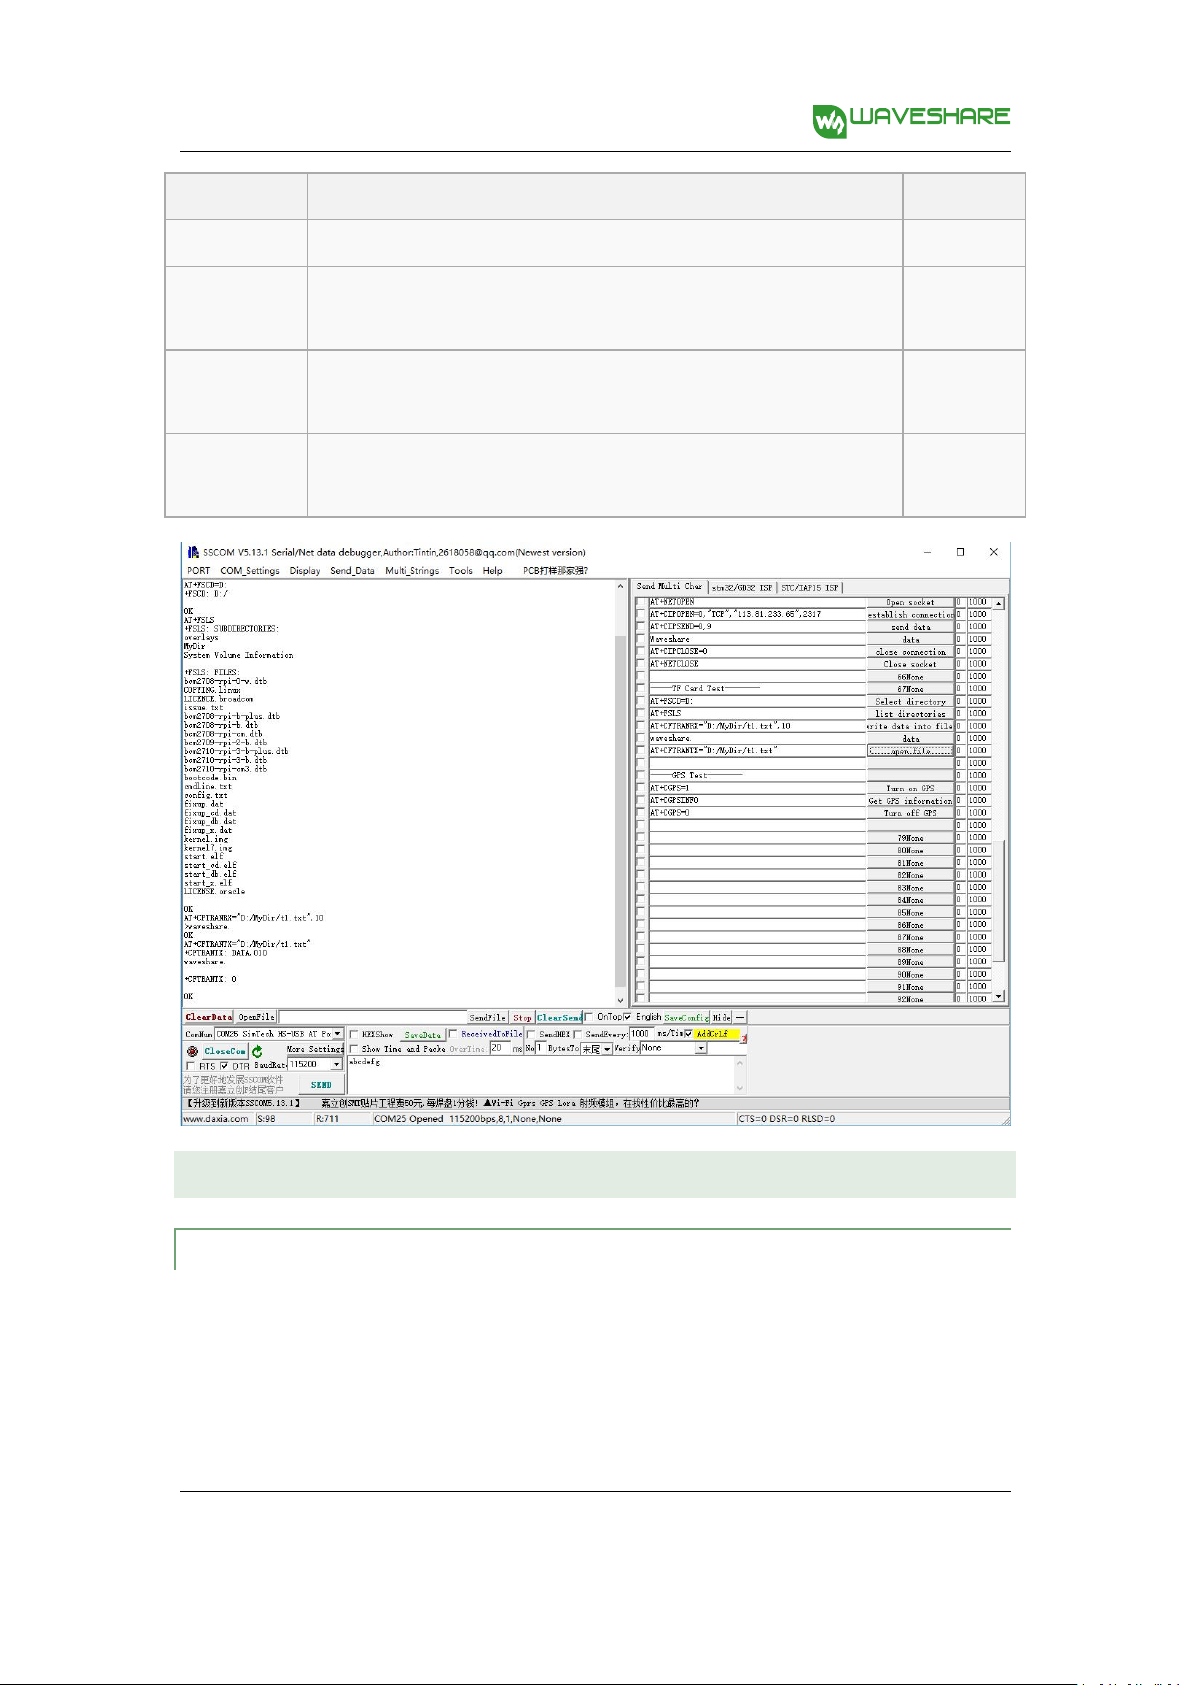
2. 5. TF Card Test
1. Plug the SIM card, connect the LTE antenna and and connect the USB interface of
SIM7600E-H 4G HAT to PC. Then press the PWRKEY to power on the board;
2. Check whether the indicators blink correctly (PWR’s and NET’s flashes).
3. Send AT commands as bellow:
15
Rev1.0 June 8, 2018
SIM7600E-H 4G HAT User Manual
share awesome hardware
Commands
Description
Return
AT+FSCD=D:
Select directory
OK
AT+FSLS
list directories
+FSLS:
OK
AT+CFTRANRX
write data into files
>
OK
AT+CFTRANTX
open file
+CFTRANTX:
OK
2. 6. GPRS Debuggi ng
LO CAL VIRTUAL SEVERS SETTIN G S
Virtual servers define the mapping between service ports of WAN and web servers of LAN.
All requests from Internet to service ports of WAN will be redirected to the computer (web
servers of LAN) specified by the server IP. (see your router’s guide manual)
16
Rev1.0 June 8, 2018
SIM7600E-H 4G HAT User Manual
share awesome hardware
命令
说明
返回值
AT+CGDCONT=1,"IP","
CMNET"
PDP context
OK
AT+CGREG?
GPRS network status
+ CGREG:
OK
AT+CIPMODE=1
TCP/IP mode
OK
AT+CSOCKSETPN=1
PDP profile number
OK
AT+NETOPEN
Open socket
+NETOPEN:
AT+CIPOPEN=0,"TCP","
113.81.233.65",2317
establish connection
+CIPOPEN:
AT+CIPSEND=0,9
Send data of a specific size
>
AT+CIPSEND=0,
Send data of a fixed size
>
1A
(HEX format) Tell module to send data
+CIPSEND:
AT+CIPCLOSE
close connection
+CIPCLOSE:
AT+NETCLOSE
Close socket
+NETCLOSE:
4) Log in Management Console of your router with browser (read your router’s guide manual for
specific address)
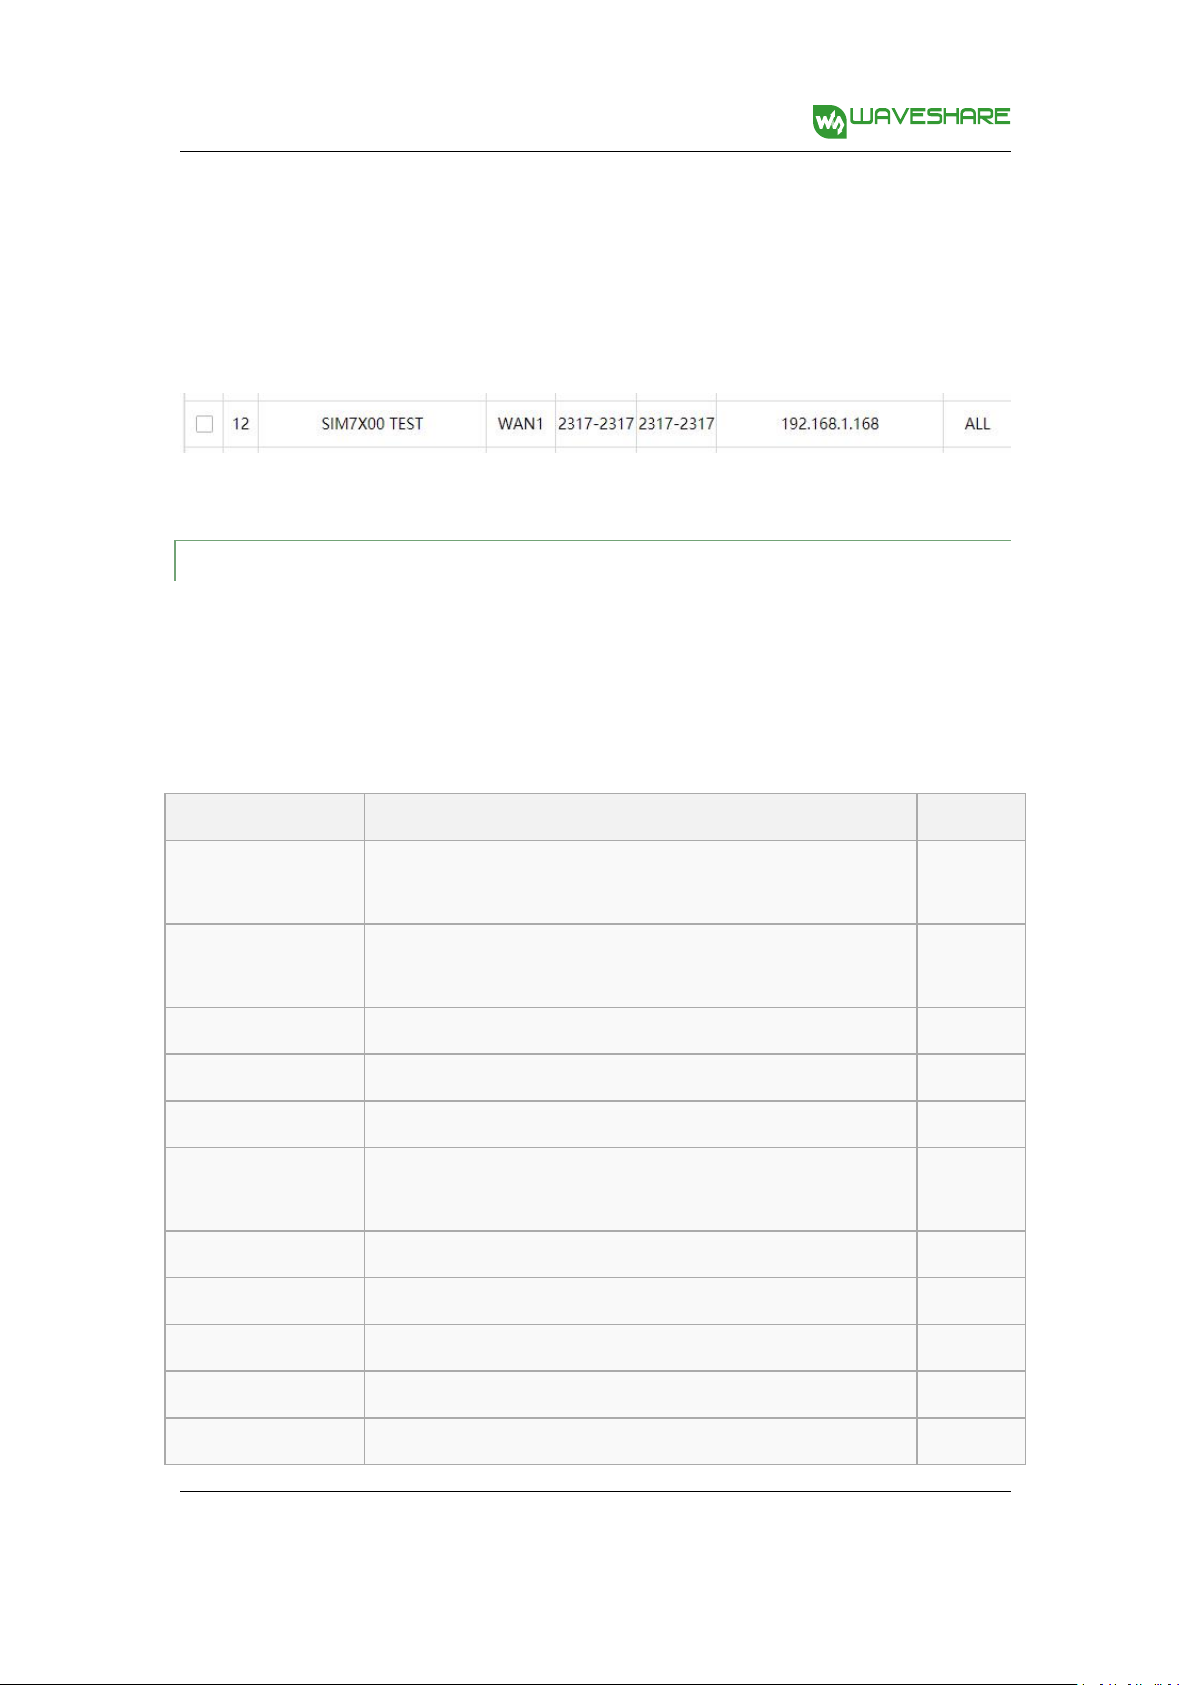
5) Set Port:1822 (The Port can’t be conflict to other’s. Here we set 1822)
Set LAN IP address of your computer (you can run CMD on your computer, and execute command
ipconfig to enquiry the address of IPv4), 192.168.6.168 as examples
6) You can search “IP” on browser to get your WAN IP address.
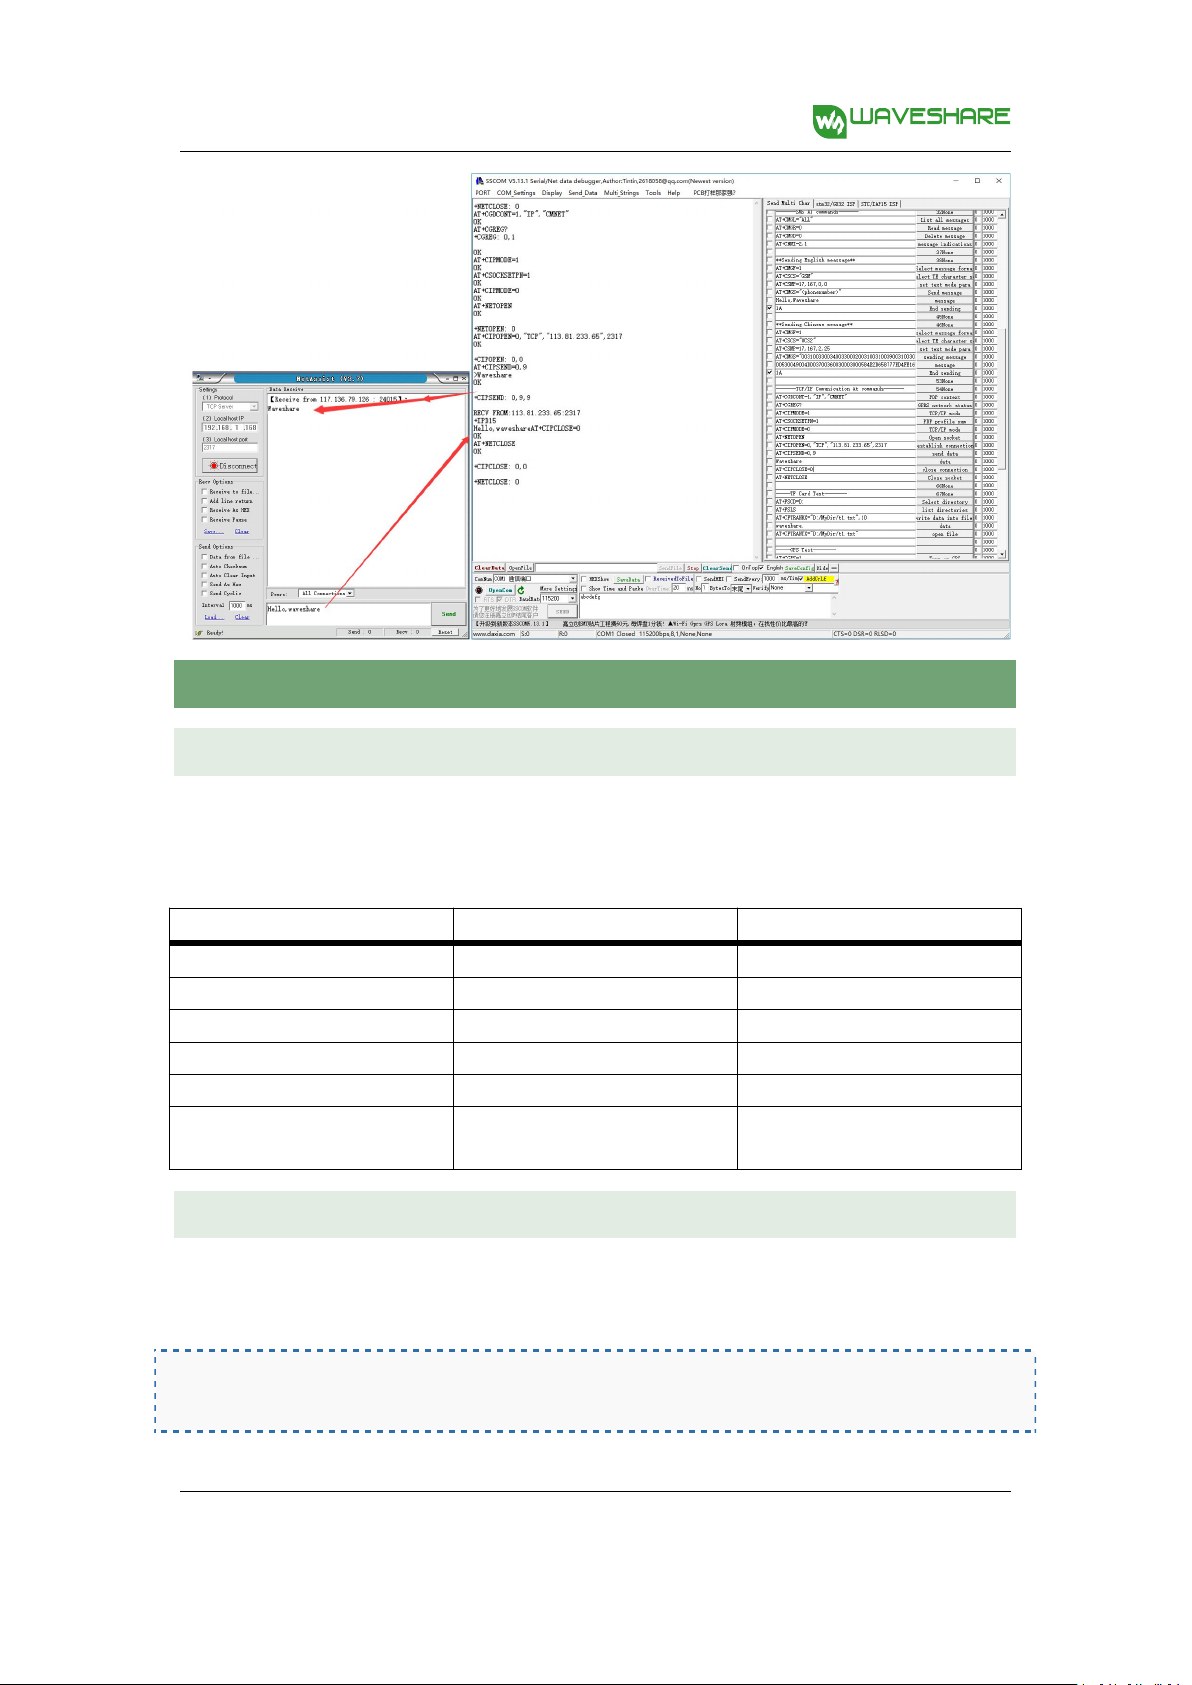
GP RS TE S T
1. Plug the SIM card, connect the LTE antenna and and connect the USB interface of
SIM7600E-H 4G HAT to PC. Then press the PWRKEY to power on the board;
2. Check whether the indicators blink correctly (PWR’s and NET’s flashes).
3. Send AT commands as bellow:
Rev1.0 June 8, 2018
17
SIM7600E-H 4G HAT User Manual
share awesome hardware
SIM7600
IO of Raspberry Pi B+
Description
5V5VPower supply (5V)
GND
GND
Ground
TXD
RXD (BCM P15)
UART pin
RXD
TXD (BCM P14)
UART pin
PWR
P22 (BCM P6)
Power up the module
FLIGHTMODE
P7 (BCM P4), Pull high enable
flight mode
Flight mode
3. Using wi th Ra s pberry Pi
3. 1. Inte r face overview
The default relationship between SIM7600 control pins and Raspberry Pi IOs is shown in Table 1.
Table 1: The relationship between SIM7600 control pins and Raspberry Pi IOs
3. 2. UART config uration of Raspber r y Pi
Because UART of Raspberry Pi is used for Linux console output by default, if we want to use the UART,
we need to change the settings. Executing this command to enter the configuration page :
sudo raspi-config
Rev1.0 June 8, 2018
18

SIM7600E-H 4G HAT User Manual
share awesome hardware
Choose Advanced Options -> Serial -> no , to disable Linux’s use of console UART
Open /boot/config.txt file, find the below statement and uncomment it to enable the UART. You can
directly append it at the end of file as well.
enable_uart=1
Then reboot.
3. 3. Init the Raspb erry Pi
1、Download the raspberry pi demo code to /home/pi/ directory.
wget https://www.waveshare.com/w/upload/2/29/SIM7600X-4G-HAT-Demo.7z
sudo apt-get install p7zip-full
7z x SIM7600X-4G-HAT-Demo.7z -r -o/home/pi
sudo chmod 777 -R /home/pi/SIM7600X-4G-HAT-Demo
2、 Open the /etc/rc.local file, then add the context below:
sh /home/pi/SIM7600X-4G-HAT-Demo/Raspberry/c/sim7600_4G_hat_init
19
Rev1.0 June 8, 2018

SIM7600E-H 4G HAT User Manual
share awesome hardware
3. 4. Minic o m fo r UART debuggi ng on Rasp b erry Pi
Inserting the module to Raspberry Pi and plug the jumper B,
Install minicom,minicom is a text-based modem control and terminal emulation program for Linux
sudo apt-get install minicom
Execute command:
minicom -D /dev/ttyS0 (
ttyS0 is the UART of Raspberry Pi 3B
)
Baud rate is 115200 by default. If you need to change the baud rate, for example 9600, you can add
the parameter -b 9600.
The user UART device of Raspberry Pi 2B/Zero is ttyAMA0, and ttyS0 of Raspberry Pi 3B
Testing Bluetooth function as examples:
:
20
Rev1.0 June 8, 2018

SIM7600E-H 4G HAT User Manual
share awesome hardware
3. 5. Examp les
1、Download the demo code from wiki and copy to the Raspberry Pi (/home/pi/SIM7600X)
2、Enter the bcm2835 directory, compile and install the BCM2835 library:
chmod +x configure && ./configure && sudo make && sudo make install
3、 Compile and run the demo (for example:PhoneCall):
Clean up: sudo make clean
Recompile: sudo make
Run the program: sudo ./PhoneCall
Combination command: sudo make clean && sudo make && sudo ./PhoneCall
3. 5.1. PHONECALL
21
Rev1.0 June 8, 2018

SIM7600E-H 4G HAT User Manual
share awesome hardware
3. 5.2. SMS
3. 5.3. GP S
22
Rev1.0 June 8, 2018

SIM7600E-H 4G HAT User Manual
share awesome hardware
3. 5.4. TC P
3. 5.5. FT P
23
Rev1.0 June 8, 2018

SIM7600E-H 4G HAT User Manual
share awesome hardware
SIM7600
Arduino UNO /UNO PLUS
Description
5V5VPower supply (5V)
GND
GND
Ground
TXD
0 (RX)
UART pin
RXD
1 (TX)
UART pin
PWR2Power up the module
4. Using wi th Ar d uino
4. 1. Inte r face overview
The default relationship between SIM7600 control pins and Arduino is shown in Table 1.
Table 2: The relationship between SIM7600 control pins and Arduino
4. 2. Inst a l l Ard uino Li brary
1. Download the Arduino demo code and copy the Waveshare_SIM7600X_Arduino_Library folder
to {the Arduino software installation path}/Library/ .
2. Run the Arduino IDE, then select the example code as below:
Rev1.0 June 8, 2018
24

SIM7600E-H 4G HAT User Manual
share awesome hardware
4. 2.1. PHONECALL
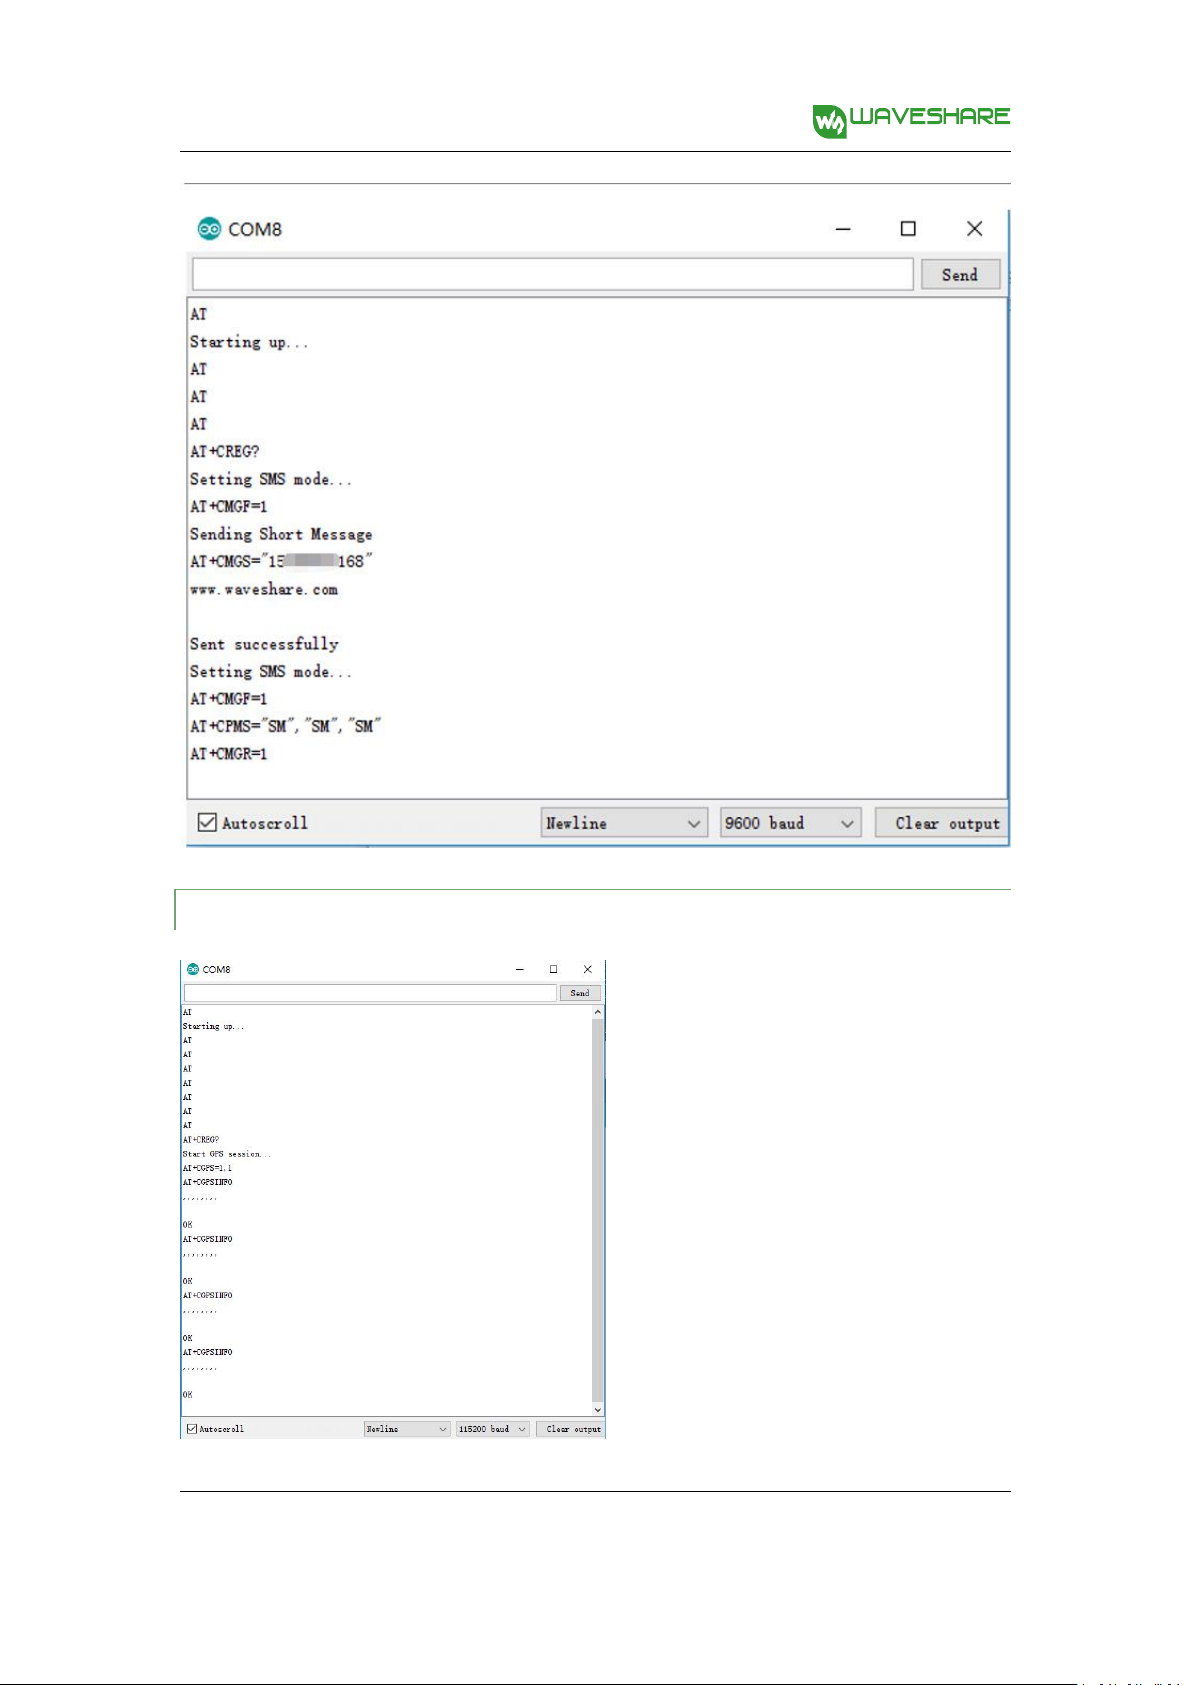
4. 2.2. SMS
25
Rev1.0 June 8, 2018
SIM7600E-H 4G HAT User Manual
share awesome hardware
4. 2.3. GP S
26
Rev1.0 June 8, 2018
SIM7600E-H 4G HAT User Manual
share awesome hardware
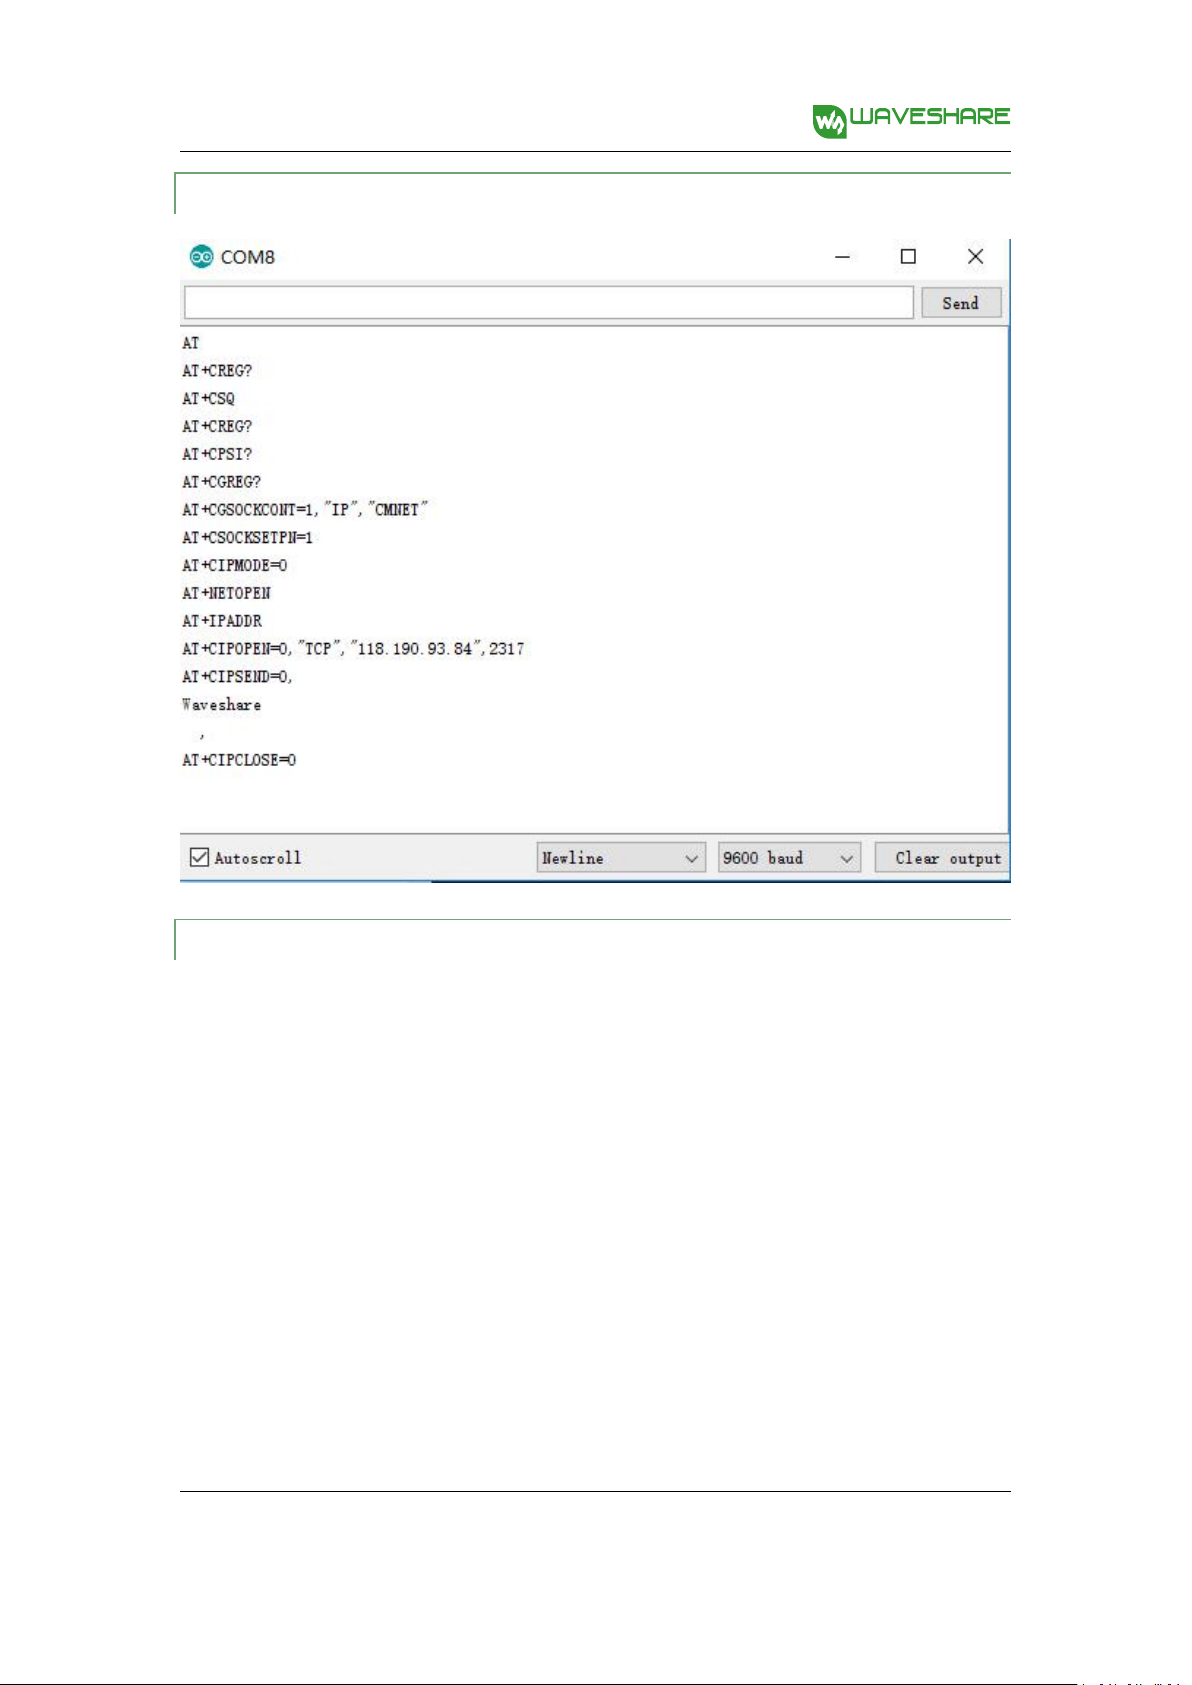
4. 2.4. TC P
4. 2.5. FT P
27
Rev1.0 June 8, 2018

SIM7600E-H 4G HAT User Manual
share awesome hardware
28
Rev1.0 June 8, 2018
 Loading...