


Pan-Tilt HAT User Manual
Version: V1.0.0; Date: 2019.03.16 1 / 17
Pan-Tilt HAT
User Manual
OVERVIEW
This is a 2-DOF pan-tilt kit designed for Raspberry Pi. With onboard PCA9685 PWM
chip and TSL2581 ambient light sensor, it allows the Pi to control camera movement
and sense light intensity through I2C interface.
SPECIFICATION
Operating voltage:
3.3V/5V
PWM driver:
PCA9685
Working voltage:
3.3V
Interface:
I2C
Dimension:
56.6X65(mm)

Pan-Tilt HAT User Manual
Version: V1.0.0; Date: 2019.03.16 2 / 17
CONTENT
Overview ........................................................................................................................................................1
Specification ........................................................................................................................................1
Hardware .......................................................................................................................................................3
Controller ..............................................................................................................................................3
Communication protocol ................................................................................................................3
I2C Write data .............................................................................................................................3
I2C read data ...............................................................................................................................4
I2C adress .....................................................................................................................................4
How to use ...................................................................................................................................................5
Download examples .........................................................................................................................5
Examples ...............................................................................................................................................6
Download examples to Raspberry Pi .................................................................................6
Install libraries .............................................................................................................................6
Assembly ......................................................................................................................................8
Servo and Light sensor ......................................................................................................... 10
Camera ....................................................................................................................................... 10
Web_Control ............................................................................................................................ 12
Expected result ........................................................................................................................ 16
FAQ ............................................................................................................................................................... 17
Pan-Tilt HAT User Manual
Version: V1.0.0; Date: 2019.03.16 3 / 17
HARDWARE
CONTROLLER
The PWN driver is PCA9685, an I2C-bus controlled 26-channel LED controller, 12-bit
resolution PWM output. Pan-Tilt HAT integrate TSL2581 on board. TSL2581 is a light
sensor, can be used to detect light and work with camera. TSL2581 use I2C interface as
well.
COMMUNICATION PROTOCOL
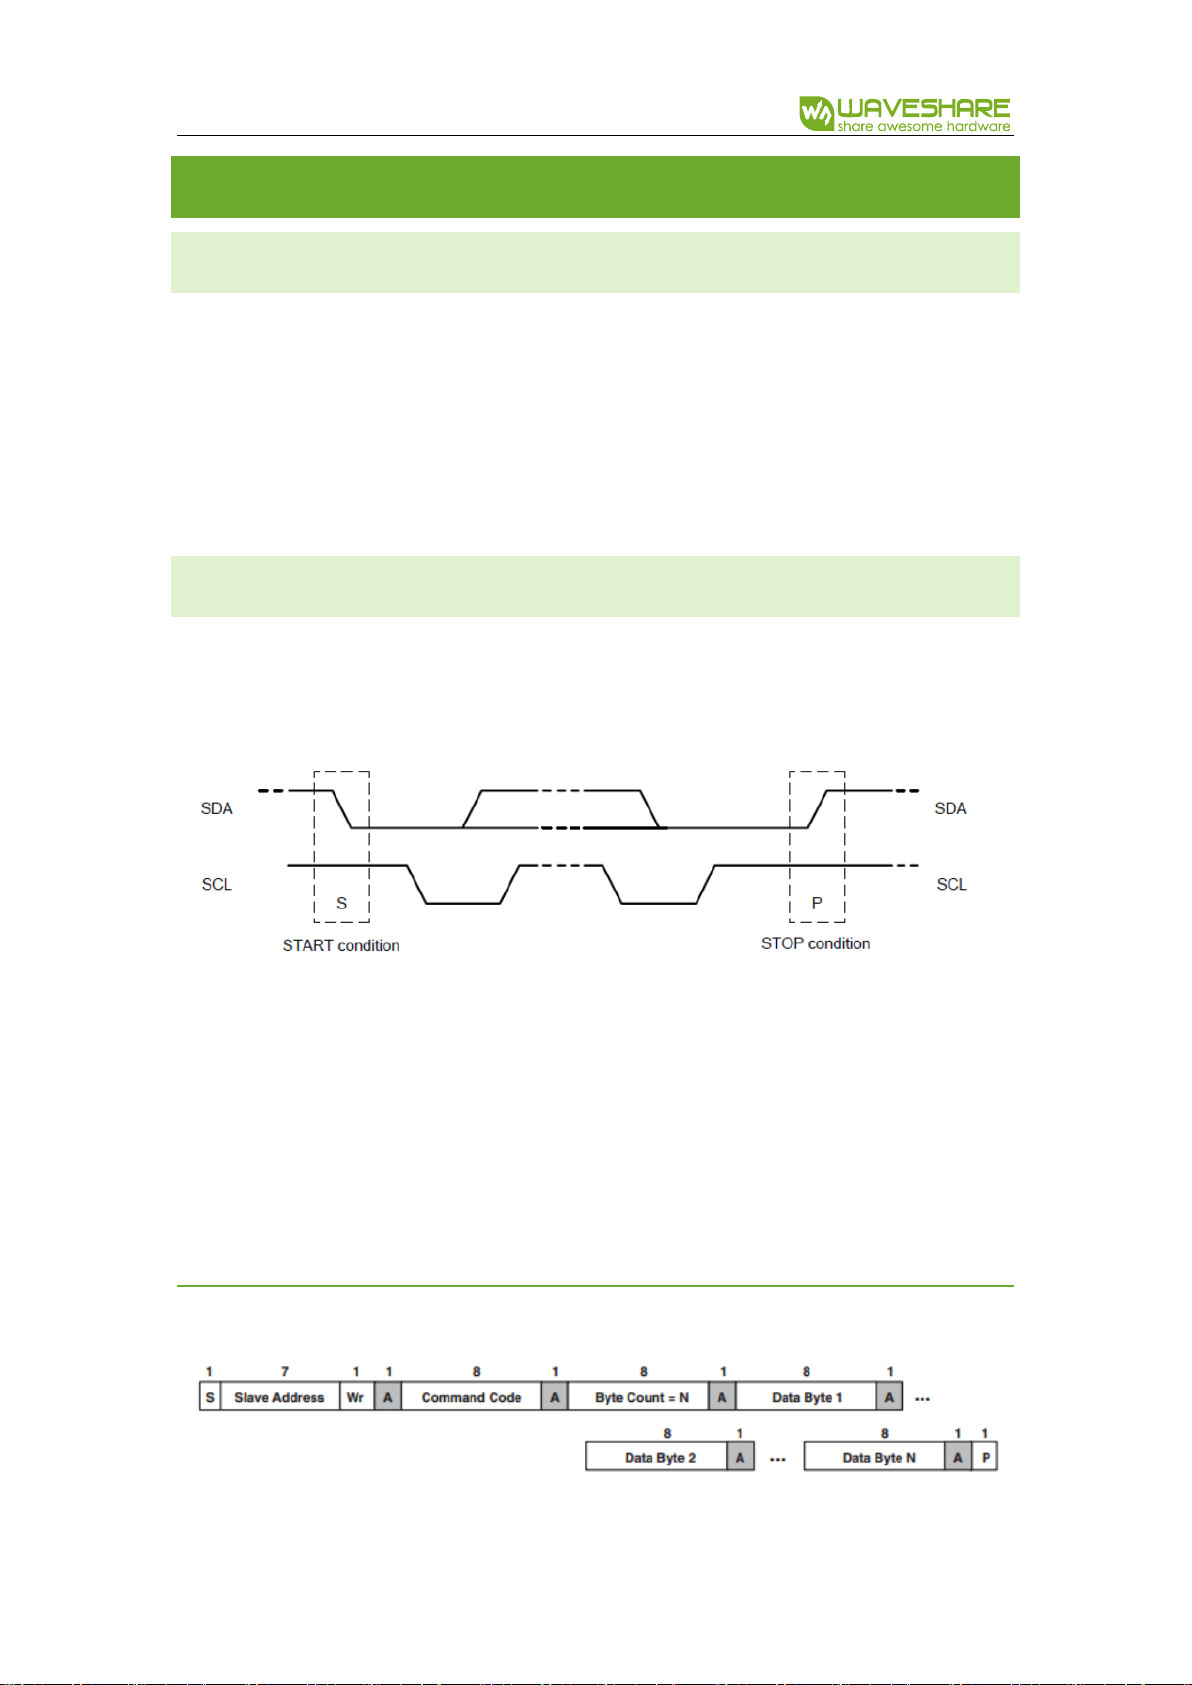
I2C-bus has one data line(SDA) and one clock line(SCL). When communicating, three
kinds of signals are product: Start signal, Stop signal and Answer signal.
Start signal: SCL is High, SDA changes from High to Low, start to transmit data
Stop signal: SCL is High, SDA changes from Low to High, stop transmitting
Answer signal: The receiver will answer a Low plus to sender after receiving 8-Bit data
as ACK.
I2C WRITE DATA
Pan-Tilt HAT User Manual
Version: V1.0.0; Date: 2019.03.16 4 / 17
When working, Raspberry Pi (hereafter named as Master) will first send a Start signal,
then send a byte to TSL2581 (hereafter named as Slaver), whose first 7bits are address
of Slaver and 1 bit write bit. Slave response with Answer signal every time it receives
any data. Master send command register address to Slaver, then data of command
register. Stop signals is sent to slave to stop communicating.
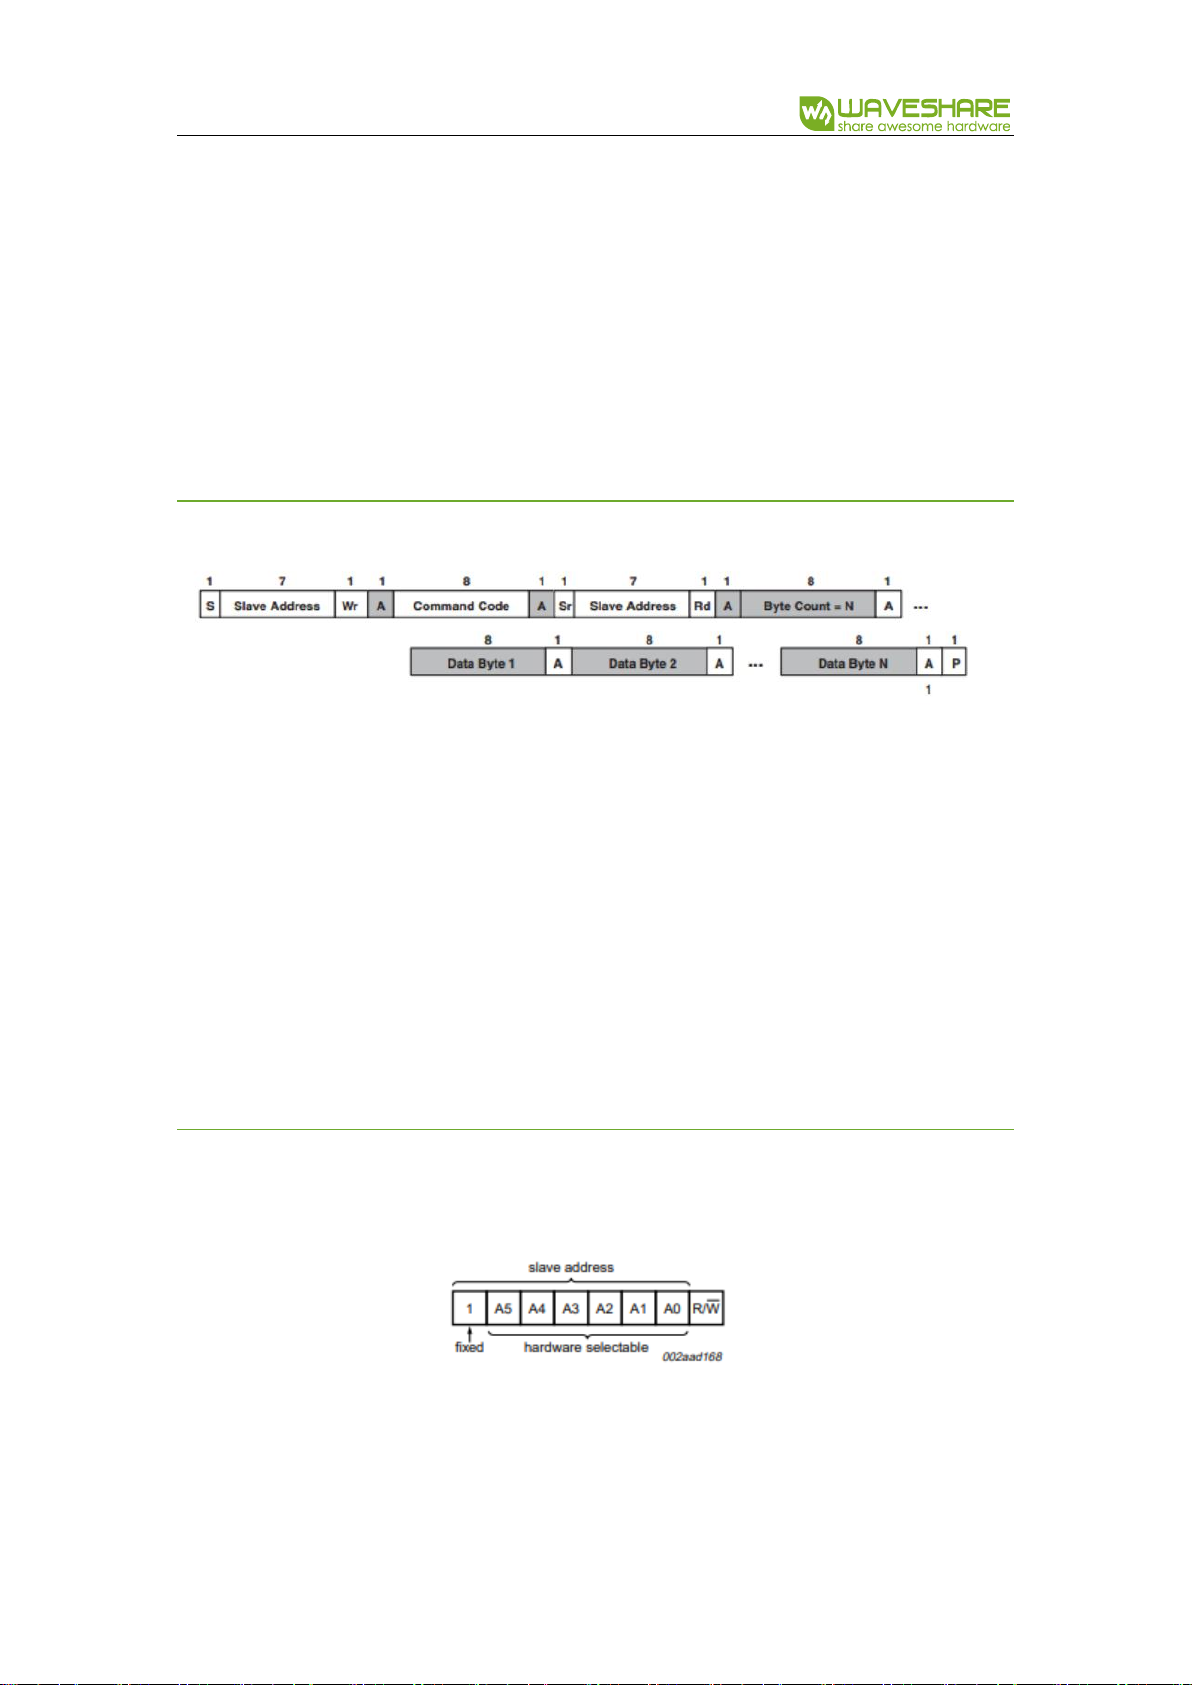
I2C READ DATA
When working, Master will first send a Start signal, then send a byte to Slaver, whose
first 7bits are address of Slaver and 1 bit write bit. Slave response with Answer signal
every time it receives any data. Master send command register address to Slave. After
that, Mater will send a Start signal again, and then send a byte (7bits address and 1bit
read bit) to Slaver. Slaver response and send data of the register to Master, master
answer as well. Stop signals will be sent to stop communicating.
I2C ADRESS
I2C address of PCA9685:
I2C address of TSL2581:
PCA9685 Datasheet Page 7
Pan-Tilt HAT User Manual
Version: V1.0.0; Date: 2019.03.16 5 / 17
Note: The default I2C address pins are set as A5=A4=A3=A2=A1=0, address is 0x40.
I2C address pins are set as Float and its I2C address is 0x39 by default. If you use the
module with other development board, please add R/W bit to Low bit
HOW TO USE
This part shows you how to use the module based on demo codes provided on wiki
DOWNLOAD EXAMPLES
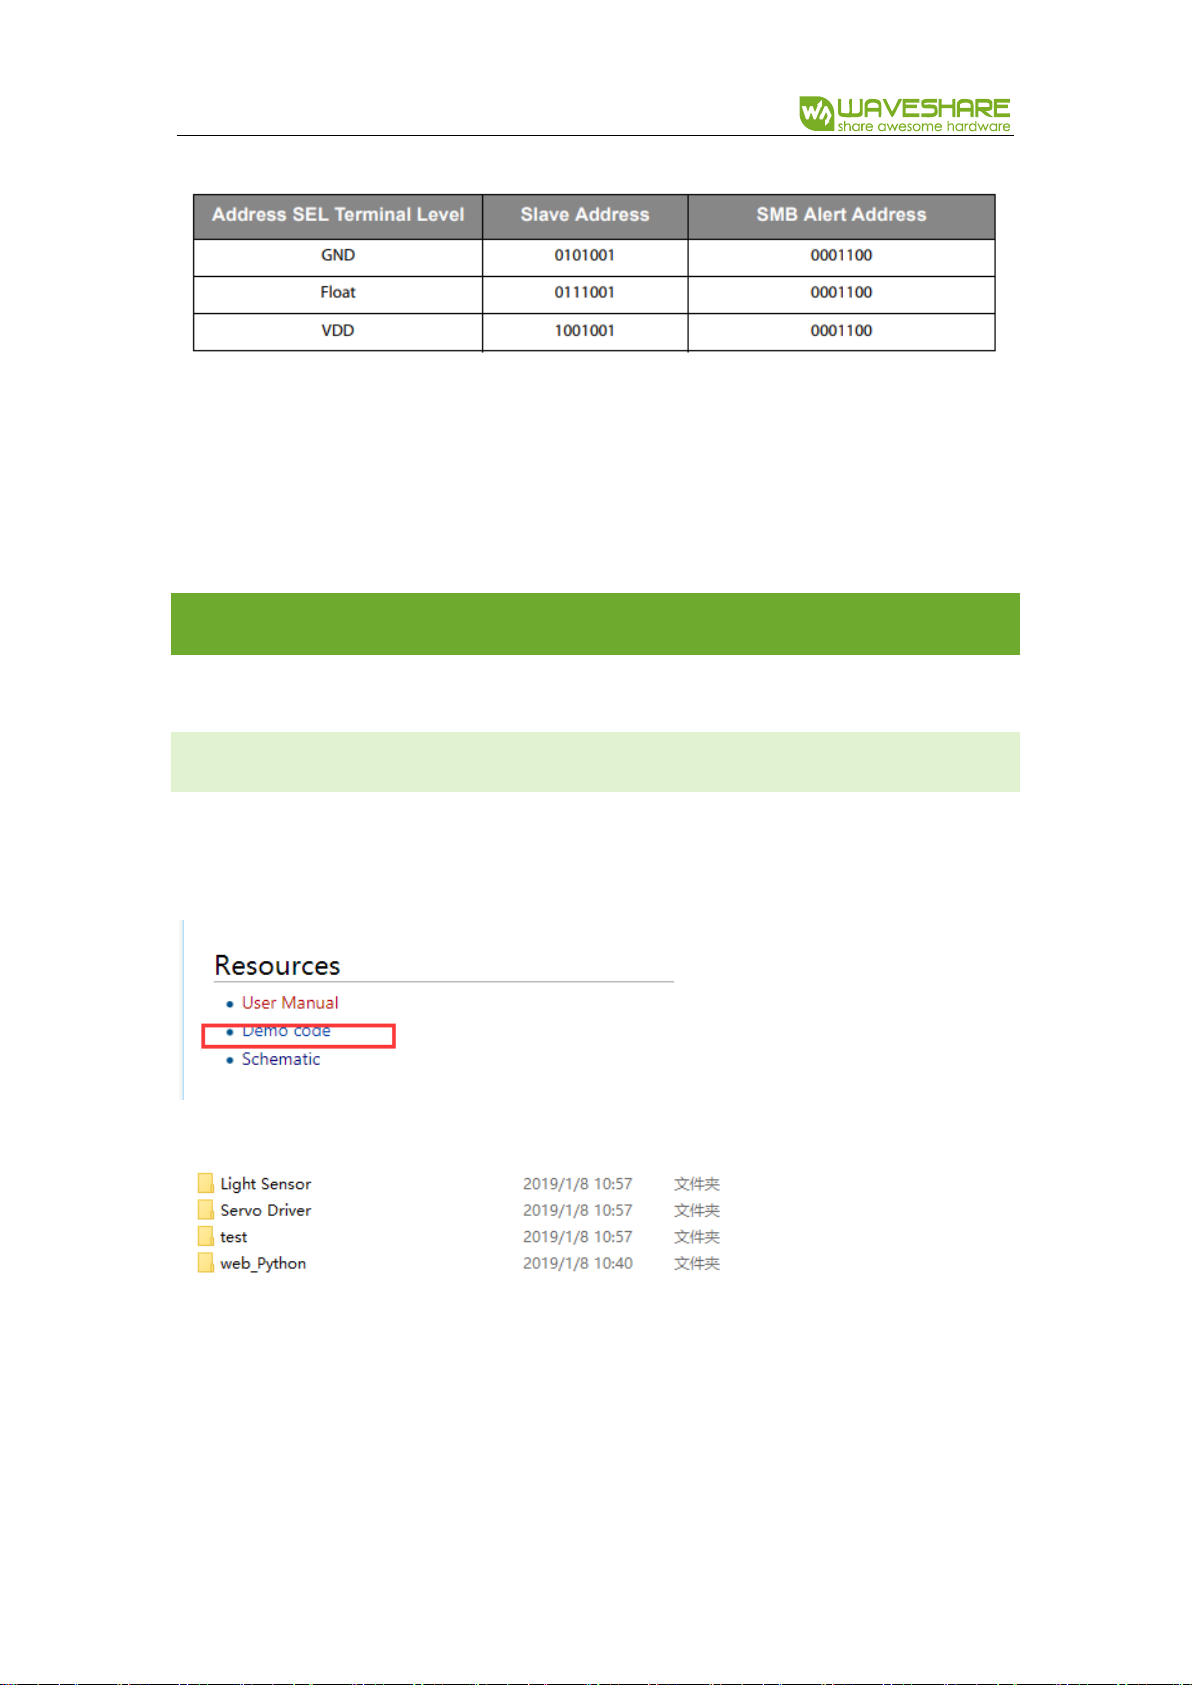
Search with key word “Pan-Tilt HAT” on Waveshare Wiki, open the wiki page and
download examples:
Uncompressing the 7z, you can get files as below:
Servo Driver: Examples which test servos (BCM2835, WiringPi and Python)
Light Sensor: Ambient light sensing examples (BCM2835, WiringPi and Python)
test: test codes, used before assembling
web_Python: Remote control example
TSL2581 Datasheet Page 13

Pan-Tilt HAT User Manual
Version: V1.0.0; Date: 2019.03.16 6 / 17
EXAMPLES
DOWNLOAD EXAMPLES TO RASPBERRY PI
You can download the demo code from wiki, uncompressing and copy to Raspberry
Pi, or directly clone it from github:
Open terminal of Raspberry Pi and download it:
git clone https://github.com/waveshare/Pan-Tilt-HAT
Change it execute permission and enter the folder:
sudo chmod 777 -R Pan-Tilt_HAT
cd Pan-Tilt_HAT
INSTALL LIBRARIES
To run the examples, you need to install related libraries first (wiringPi, bcm2835 and
python), otherwise, examples cannot work properly.
BCM2835 libraries:
http://www.airspayce.com/mikem/bcm2835/
Download the library from bcm2835 libraries and install:
wget http://www.airspayce.com/mikem/bcm2835/bcm2835-1.58.tar.gz
sudo tar zxvf bcm2835-1.xx.tar.gz
cd bcm2835-1.xx
sudo ./configure
make

Pan-Tilt HAT User Manual
Version: V1.0.0; Date: 2019.03.16 7 / 17
sudo make check
sudo make install
Note: The xx is the version number you download, for example, if the version you
download is bcm2835-1.52. then the command you should execute is sudo tar zxvf
bcm2835-1.52.tar.gz
wiringPi libraries:
sudo apt-get install git
sudo git clone git://git.drogon.net/wiringPi
cd wiringPi
sudo ./build
Python libraries:
sudo apt-get install python-pip
sudo pip install RPi.GPIO
sudo pip install spidev
sudo apt-get install python-imaging
sudo apt-get install python-smbus
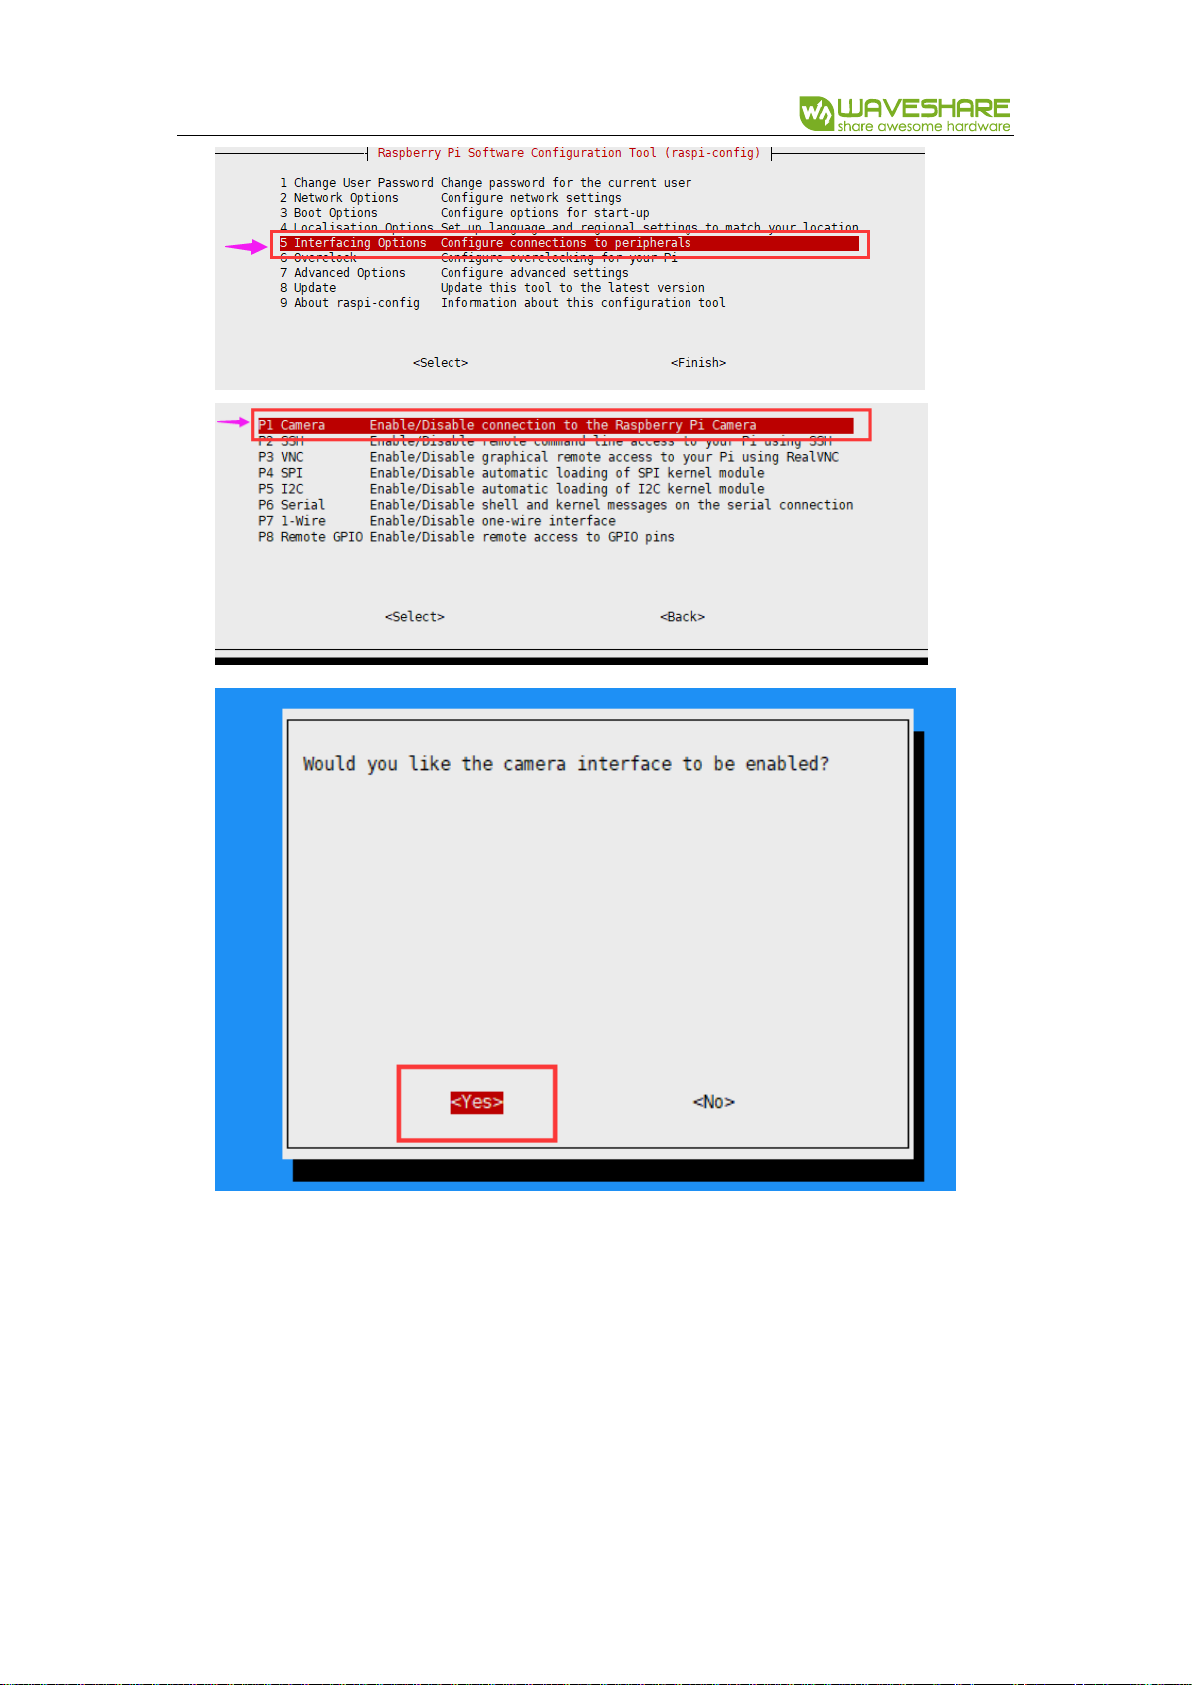
Enable I2C interface:
sudo raspi-config

Pan-Tilt HAT User Manual
Version: V1.0.0; Date: 2019.03.16 8 / 17
ASSEMBLY
Note: Before you assemble servos to Pan-Tilt HAT, please test the servo with test
codes to avoid of servo stuck when rotate
1. Connect servos to Pan-Tilt HAT
Brown wire
GND
Red wire
5V
Yellow wire
S1/S0
You should connect the Pan servo (close to HAT board) to S1, and connect Tilt
servo (close to camera) to S0. Please adjust the angle of the servo when assembling by
using the test codes, avoiding of damaging.

Pan-Tilt HAT User Manual
Version: V1.0.0; Date: 2019.03.16 9 / 17
2. test code
3. Run the test code
sudo make
sudo ./main
4. After running, both servos will rotate to 0-degree place (The starting place). Then
power off and assemble the servo as assemble guide. (Do not rotate the servo
when assembling)
Assemble guide: https://www.waveshare.com/img/devkit/accBoard/Pan-Tilt-
HAT/Pan-Tilt-HAT-assemble.jpg
A: Tilt servo
B: Pan servo
The starting status of servos are as image above, and the direction of arrow are the
rotate direction of servo.

Pan-Tilt HAT User Manual
Version: V1.0.0; Date: 2019.03.16 10 / 17
SERVO AND LI GHT SENSOR
To run the Servo Driver and Light Sensor examples. Please enter the folder and using
following commands to execute programs:
BCM2835 examples:
cd bcm2835
sudo ./main
wiringPi examples:
cd wiringpi
sudo ./main
Python examples:
sudo python main.py
Note: If it prompt that files is not exist when running bcm2835 or wiringpi codes,
please first execute command make and try again.
CAMERA
To use camera, you need to fist do settings
1. Connect Camera to Raspberry Pi
2. Enable Camera
sudo raspi-config
Pan-Tilt HAT User Manual
Version: V1.0.0; Date: 2019.03.16 11 / 17
3. Reboot Raspberry Pi
sudo reboot
4. Test camera
You can test the camera with command: raspistill -o image.jpg
About details about the raspistill command, you can type raspistill -hell on

Pan-Tilt HAT User Manual
Version: V1.0.0; Date: 2019.03.16 12 / 17
Terminal
Note that you should connect a display to Raspberry Pi for previewing camera.
5. Video recording
To record video via camera, you can use command: raspivid -o video.h264 -t 1000
For details about camera command, you can visit Raspberry Pi website.
WEB_CONTROL
1. Enable Camera by following the last chapter
2. Modify the modules file:
sudo nano /etc/modules
add statements bcm2835-v4l2 to end of file (Note that 4l2 is the lowercase “l”
instead of number 1)
reboot Raspberry Pi then you find a video0 is appear in /dev folder
3. Install libraries
sudo apt-get install libv4l-dev libjpeg8-dev
sudo apt-get install subversion

Pan-Tilt HAT User Manual
Version: V1.0.0; Date: 2019.03.16 13 / 17
4. Get information
Enter web_Python folder: cd Pan_Tile-HAT/web_Python
Type pwd to get the current path information:
Type ifconfig command to get the IP information
Note: I connect the Raspberry Pi to WIFI, so the IP address is wlan0’s, if you
directly connect network jack with cable, the IP address should be eth0’s
5. Modify main.py file: sudo nano main.py
Find os>chdir(‘ ’), change it to the path information you get above and add
/mjpg to the end. for example:

Pan-Tilt HAT User Manual
Version: V1.0.0; Date: 2019.03.16 14 / 17
Change the host to the IP address of your Raspberry Pi, for example:
save and exit
Pan-Tilt HAT User Manual
Version: V1.0.0; Date: 2019.03.16 15 / 17
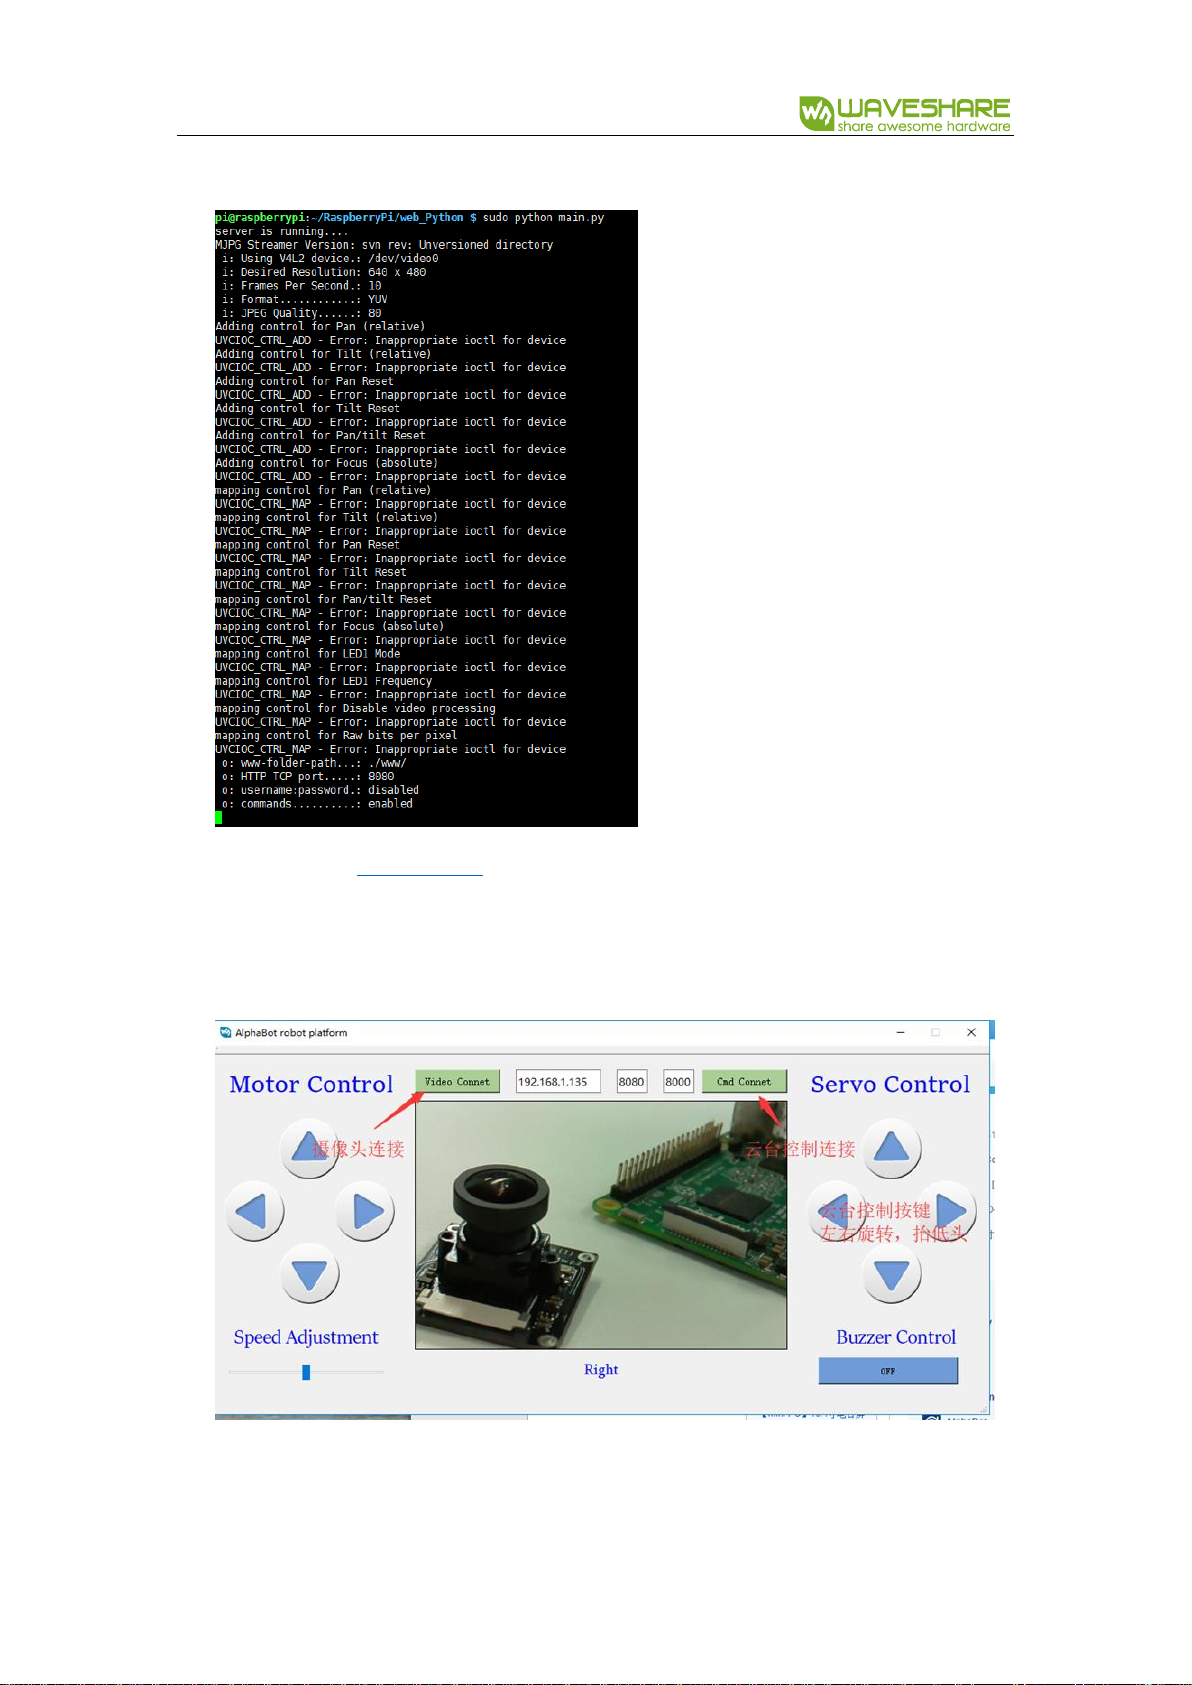
6. Run the example: sudo python mian.py:
7. Download the AlpahBot.exe software from Waveshare wiki and open it. Type IP
address of your Raspberry Pi to it and Click Video Connect and Cmd Connect to
enable connection
Note: The software only support Windows PC and some of the functions are
unavailable for Pan-Tilt HAT.
Pan-Tilt HAT User Manual
Version: V1.0.0; Date: 2019.03.16 16 / 17
8. To cancel the program, you need to disconnect Cmd and Camera first by pressing
Video Connet and Cmd Connet buttons. The Ctrl+C to stop program.
EXPECTED RESULT
Servo Driver:
The servos will rotate the Pan servo and Tilt servo
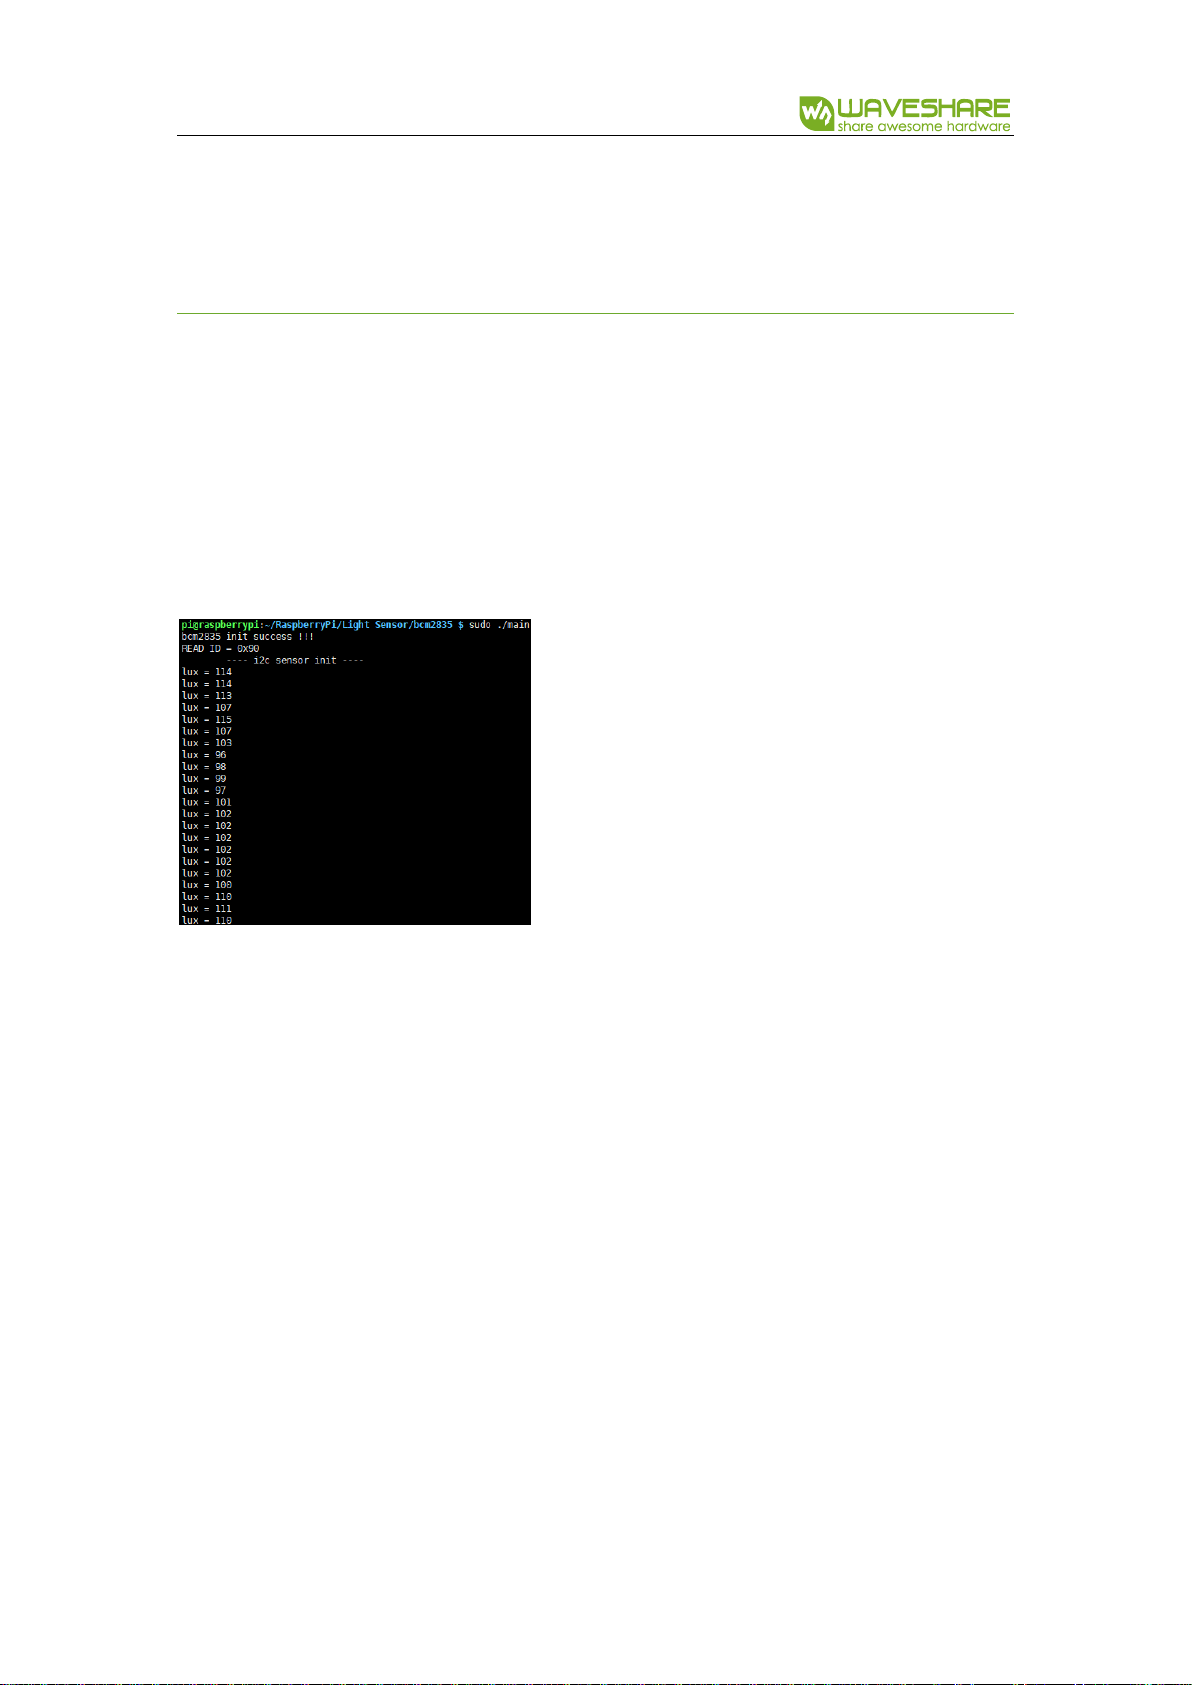
Light Sensor:
Print device ID (it is not the I2C address) then output light intensity value
Pan-Tilt HAT User Manual
Version: V1.0.0; Date: 2019.03.16 17 / 17
FAQ
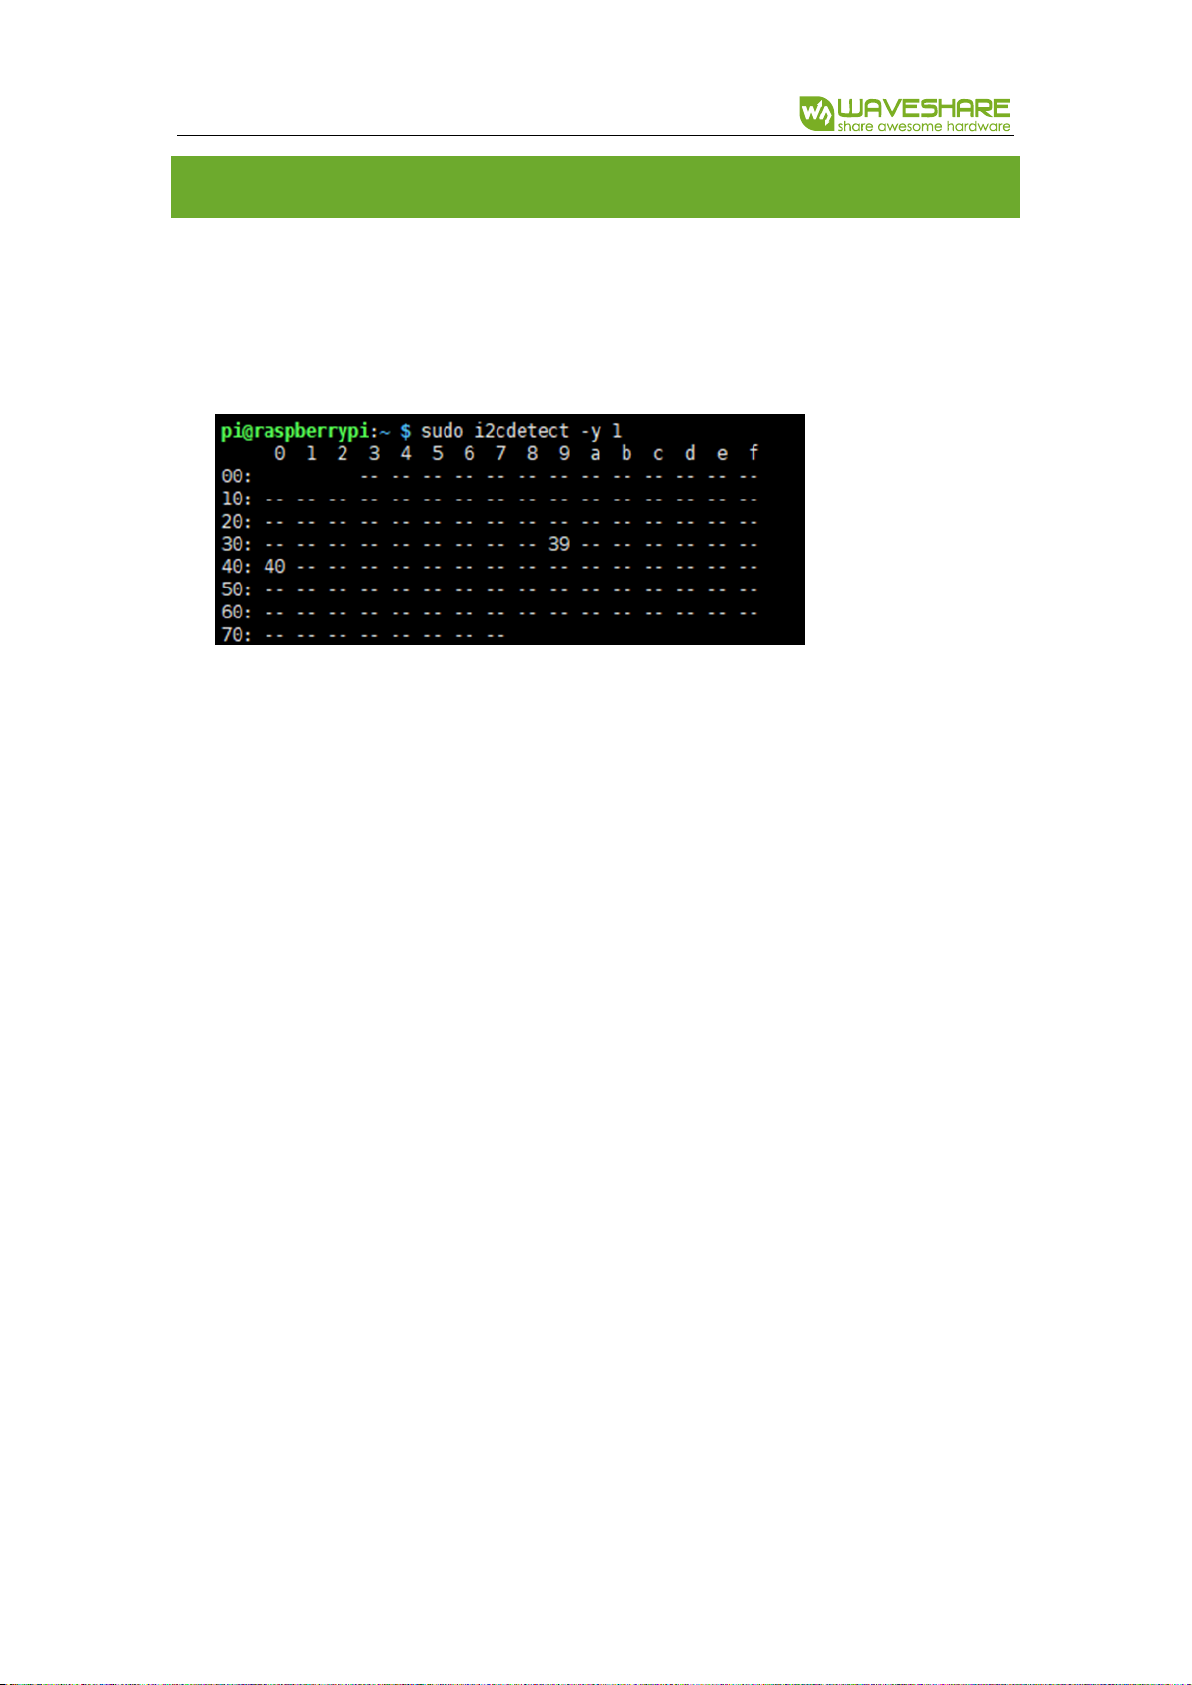
1. Why the ID printed is 0xf0 or 0x00, and intensity data is 0 after running light
sensor code?
A: Check I2C address first by command: sudo i2cdetect -y 1:
If the I2C addresses are incorrect in your Raspberry Pi, please check if you have
modified I2C address, and check if you have enabled I2C interface. The default I2C
device address of Light sensor is 0x39 and 0x40 is PCA9685’s.
2. Why I cannot run python or bcm2835 after running wiringpi example?
If you can run wiringpi example successfully but no the bcm2835 or python codes.
Please restart Raspberry Pi and test the two examples again.
 Loading...