

Page 1

8. Trendlog.exe
Program
WCC III
8. Trendlog.exe
Program
Page 2

T ABLE OF CONTENTS
SECTION 8:
TRENDLOG.EXE PROGRAM
Overview .....................................................8-1
How to Start or Run the
WCC3Trendlog.exe Program .......................8-1
Running the Program ..................................8-2
Set Trend Log Program Dialog ...................8-5
View Trendlog Data ....................................8-8
Page 3

8. TRENDLOG.EXE PROGRAM
Overview
SECTION 8:
TRENDLOG.EXE PROGRAM (SS5028)
The WCC3Trendlog.exe program is to be used if extensive logging
of any point or multiple points with in the WCC3 system is desired
or required. Multiple Trend Log Programs can be set up to trend
log virtually any point on the WCC3 system. It does require that
the user or contractor has a working knowledge of WCC3 point
addressing. The WCC3T rendlog.exe program requires that the end
user or contractor set up the desired points. It must be stressed that
the WCC3Trendlog.exe program does not do automatic logging of
every point in the WCC3 system. It must be setup by the end user
or contractor.
The WCC3Trendlog.exe program requires that the end user or
contractor set up what is called “Trend Log Programs” from within
the WCC3Trendlog.exe program. Each one of these “Trend Log
Programs” can trend log up to a near infi nite number of points on
the WCC3 system. These “T rend Log Programs” are incrementally
timed based and can be logged in intervals of 1 minute to hours,
days, or even months.
The WCC3Trendlog.exe program can be running in the minimized
mode under Windows, but must always be kept running so that the
desired data logging will still occur.
Trend logging multiple WCC III - MCD devices using
the WCC3Trendlog.ex e program.
If you are attempting to have trend logging on two or more separate
WCC III - MCD computers, you do not have to have two or more
WCC3Trendlog.exe programs running at the same time. The User
programmable trend log programs have separate IP addresses that
can be set up by the user to pull data from two or more WCC III MCD computers.
How to Start or Run the WCC3Trendlog.
exe Program (SS5028)
The WCC3Trendlog.exe shortcut icon should
have been installed on your WCC III Front
end computer desktop with the WCC III
Installation Software CD.
This WCC III Installation Software CD is
W attMaster Controls Part # DM1WC011-01X.
Open Database Connectivity (ODBC)
Open Database Connectivity (ODBC) provides a standard software
API method for using database management systems. The Data
format is normally saved in data format that only the WattMaster
trend log program can retrieve. But there is an option to save the
data in an “ODBC” type of format so that Microsoft Access / SQL
type programs can access, retrieve, and manipulate the data that
is saved from the fi les that the WCCTrendlog.exe program can
create.
Limitations of the WCC3Trendlog.exe program.
This WCC3Trendlog.exe program must be running on a user
computer at all times, as it does not save any trend log data within
the WCC III - MCD device. The program relies on a permanent
remote IP connection to the WCC III - MCD from an externally IP
connected user computer to fetch the desired data from the WCC
III - MCD device.
It is therefore recommended that the WCC3Trendlog.exe program
be put in the Windows startup fi le, so that every time that the end
user’s computer that has the WCC3T rendlog.exe program installed
on it is re-booted, this WCC3Trendlog.exe program is restarted
automatically.
To start the WCC3Trendlog.exe program, double-click the left
mouse button on the Shortcut Icon located on the Windows desktop.
The WCCIII Trendlog.exe Trend Manager Screen will appear.
WCC III Technical Guide
8-1
Page 4
8. TRENDLOG.EXE PROGRAM
Running the Program
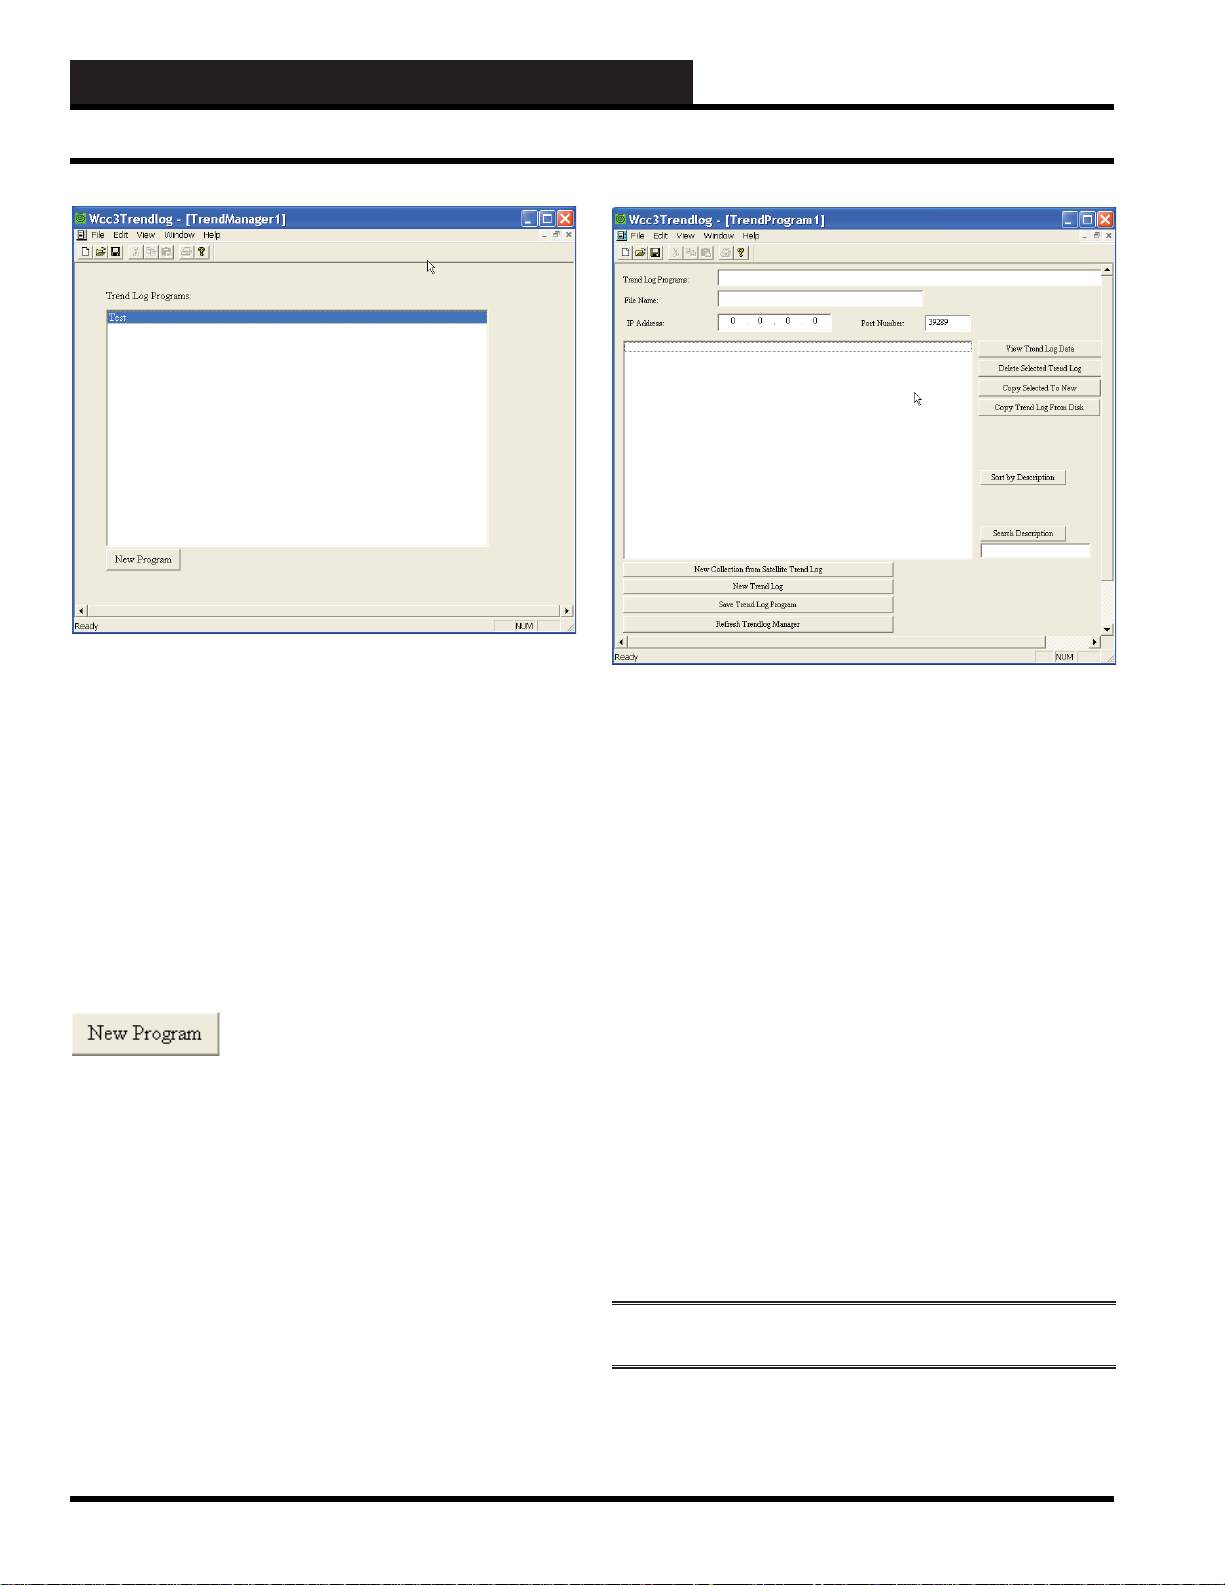
The TrendManager1 Screen will list all of the various user-
programmed trend log programs that have been programmed into
the WCC3 system for trend logging.
If you wish to view or modify any of the user-programmed trend
log programs, you must fi rst highlight and then select the desired
user program listing in the Trend log Program box with your left
mouse button and then click to enter it.
Remember to never exit this program if you are trend logging
points as this is the program that does the trend logging of
points and must always be running.
The <New Progr am> button allows the end user or contractor to
create a “new” trend log program. If you wish to create a new userprogrammed trend log program, you must fi rst select the <New
Program> icon button with your left mouse button and then
click to enter it. The WCC3 Trendlog TrendProgram Screen will
appear.
Trend Log Programs:
This is the fi eld that the end user or contractor can exactly “name”
what the data is that they are going to trend log. This naming
convention is very useful later when reviewing or trying to fi nd out
what and where specifi c WCC3 data points were logged. This may
require careful thought before proceeding.
Remember that you can have hundreds if not thousands of userprogrammed trend log programs, and this naming function will aid
in the fi nding of the desired user-programmed trend log later on.
File Name:
This is the WCC3 native data fi le name that the WCC3Trendlog.
exe program uses for storing the data that the end user or contractor
would have programmed so the WCC3Trendlog.exe program can
retrieve the data at a later point. This WCC3 native data format is
not the same format as used in ODBC. There is an option later to
save this data in ODBC format.
Remember that you can have hundreds if not thousands of userprogrammed trend log programs, and this fi le naming convention
will aid in the fi nding of the desired user programmed trend log at
a later date.
8-2
NOTE: This fi le will have a . tpg fi le extension.
WCC III Technical Guide
Page 5

8. TRENDLOG.EXE PROGRAM
Printing T enant Override Reports
IP Address:
The IP Address fi eld is the IP address of the WCC III - MCD that
you wish to connect to for the trend log data that you wish to trend
log. If you are trying to do trend logging on two or more separate
WCC III - MCD computers, you do not have to have two or more
WCC3Trendlog.exe programs running at the same time. A single
WCC3Trendlog.exe program can access two or more WCC III MCDs with different IP addresses.
Port Number:
The Port Number fi eld is the Port Number of the WCC III - MCD
that you wish to connect to for the trend log data that you wish to
trend log. Typically, it should be set for 39289, unless it has been
changed.
View Trend Log Data:
The <View Trend Log Data> button allows the end user or
contractor to view a user-created trend log program. To enter
the View Trend Log Data select (highlight) the desired user or
contractor created program with one click of your mouse’s left
button and then click the <View Trend Log Data> icon button.
If there is no trend log data available, the following warning
“There is no trendlog data.” This generally means that the user or
contractor has not had enough time to gather the required data from
the data that is being trend logged.
Copy Selected to New:
The <Copy Selected To New> button allows the end user or
contractor to copy an existing user-created trend log program
from the user-created fi le. This selected user programmed trend
log program was already created, but it can be further modifi ed
to suit the user’s new preference for trend logging. To select the
user-created trend log program for copying, select (highlight) the
desired user or contractor created program with one click of your
mouse’s left button and then click the <Copy Selected To New>
icon button.
See “Set Trend Log Program Dialog” for further programming
selection options and instructions.
You will be prompted to enter in a new fi le name, because this
newly created fi le will have the word “Copy” added to the end of
the newly created fi le name.
Copy Trend Log F rom Disk:
The <Copy Trend Log from Disk> button allows the end user or
contractor to copy an existing user-created trend log program from
the saved fi le that has already been saved on the user ’s computer
hard disk drive. This trend log fi le was already created and saved,
but it can be modifi ed in the new copied trend log. T o select “Copy
Trend Log From Disk”, click the <Copy Tr end Log from Disk>
icon button with your left mouse button.
See “Set Trend Log Program Dialog” for further programming
selection options and instructions.
Delete Selected Trend Log:
The <Delete Selected Trend Log> button allows the end user
or contractor to delete a user-created trend log program. To delete
the selected Trend Log Data, select (highlight) the desired user or
contractor created program with one click of your mouse’s left
button and then click the <Delete Selected Trend Log> button.
You will now be prompted to enter/select the desired fi le name of
the existing user-created trend log program from the saved fi les
listed in the Windows “Open” dialog box.
WCC III Technical Guide
8-3
Page 6

8. TRENDLOG.EXE PROGRAM
Running the Program
Sort by Description:
The <Sort by Description> icon button will rearrange the way
the user-programmed trend log programs will appear on the main
user program menu by grouping the user programs alphabetically
next to each other.
Remember, you can have hundreds if not thousands of userprogrammed trend log programs, and this sort function will aid in
the fi nding of the desired user-programmed trend log.
Search Description:
The <Search Description> icon button will allow you to search
the user-programmed trend log program’s fi eld on the main user
program menu by looking for the word match that is entered below
in the search word fi eld area.
Remember, you can have hundreds if not thousands of userprogrammed trend log programs, and this search function will aid
in the fi nding of the desired user-programmed trend log.
New Collection from Satellite Trend Log:
This <New Collection from Satellite Trend Log> button is
like the “New Trend Log” button. This <New Collection from
Satellite Trend Log> button allows the end user or contractor to
create a “new” trend log program. If you wish to create a new userprogrammed trend log program, you must fi rst click the <New
Collection from Satellite Trend Log> icon button.
See “Set Trend Log Program Dialog” for further programming
selection options and instructions.
NOTE: This option will trend log the satellite(s) ’ internal
trend logs, and only f or the “Change of State” and “Analog
Trend.”
New Trend Log:
This <New Trend Log> button is like the “New Program”
button that is located on the main screen of the WCC3Trendlog
(TrendManager1). This <New Trend Log> button allows the end
user or contractor to create a “new” trend log program. If you wish
to create a new user-programmed trend log program, you must fi rst
click the <New Trend Log> icon button.
See “Set Trend Log Program Dialog” for further programming
selection options and instructions.
Save T rend Log Program:
This <Save Trend Log Program> button will immediately save
the user-programmed trend log program to the fi le that is named in
the Set Trend Log Program Dialog Window.
8-4
See “Set Trend Log Program Dialog” for further programming
selection options and instructions.
Refresh Trendlog Manager:
Occasionally you may want to “refresh” the main user program
selection menu by clicking the <Refresh Trendlog Manager>
button. When adding a lot of new user-programmed trend log
programs, there may be a point when you may need to refresh the
main user program selection menu.
WCC III Technical Guide
Page 7

8. TRENDLOG.EXE PROGRAM
Running the Program
Set Trend Log Program Dialog
The “Set Trend Log Program Dialog” is a user programming
setup box that allows the end user or contractor to select the actual
WCC3 point structures that they wish to trend log along with the
following programming instructions:
Description Naming, File Naming, Saving interval of fi le time
durations, Data base cell coloring, Data base fi le saving selection
(ODBC)
Data Base Cell Colors
You can select the colors of the database fi le that you are creating
with the three “color” buttons that are available on this “Set Trend
Log Program Dialog Screen.”
This is the background color for the specifi c “cell” in the database
fi le that the end user or contractor can set. Please see the color
selection menu below for actual color selection. NOTE: The d efau lt
color for this fi eld is “O live Green.”
This is the color for the “frame” that surrounds the “cell” in the
database fi le that the end user or contractor can set. Please see the
color selection menu below for actual color selection. NOTE: The
default color for this fi eld is “White.”
This is the color for the “Chart” - for the “cells” in the database
fi le that the end user or contractor can set. The Background color
for the specifi c “cells” takes precedent over the overall “Chart”
color. Please see the color selection menu below for actual color
selection. NOTE: The default color for this fi eld is “Black. ”
Description:
When starting a “New Trend Log” you have at this point the option
to name or further refi ne the naming of the user-programmed
trend log with this “Description:” fi eld. The default value for this
“Description:” fi eld is “New Trend Log Set”, and the end user or
contractor really needs to change it or all of the user programmed
trend logs will have the same name, and the “Search Description”
or “Sort by Description” functions will be of no help to the end
user later on.
Remember that you can have hundreds if not thousands of userprogrammed trend log programs, and these “Sort by Description”
and “Search Description” functions will aid in the future fi nding of
the desired user-programmed trend log.
Background, Frame, and Chart
colors can be selected with the
Color Selection Menu. You
must fi rst select the desired
Background, Frame, or Chart
“Color” button you wish to
change with your left mouse
button, then select the desired
color and then click <OK>.
Please note that custom colors
can be created with the <Defi ne
Custom Color> button at the
bottom of the Color Selection
Menu. These newly created user-
defi ned “Custom colors” will be
displayed in one of the 16 custom
color boxes in the lower portion of the Color Selection Menu.
<Cancel> button will cancel your color selection option.
The
WCC III Technical Guide
8-5
Page 8

8. TRENDLOG.EXE PROGRAM
Running the Program
Filename:
The Filename is the actual fi le name on the end user’s computer
that the end user or contractor has selected for the data storage of
the trend log data for this particular User programmed trend log.
The WCC3Trendlog.exe program will automatically select a fi le
name for this fi eld if the end user or contractor has not selected a
fi le name.
NOTE: This fi le will hav e a .set fi le extens io n .
Save Interval:______Days______Hours______Minutes
There are three “Save Interval” selection boxes: Days, Hours, and
Minutes. These three boxes will determine when the user-selected
trend log data will be saved to the end user’s computer hard drive.
You can enter any value in these “Save Interval” selection boxes
with the following limits: 0 to 99 Days, 0 to 99 hours, 0 to 999
minutes.
Examples: If you wish to trend log 1 value every 15 minutes, you
would enter 15 into the “Minutes” selection box. If you wish to
trend log 1 value every 2 hours, you would enter 2 into the “Hours”
selection box. If you wish to trend log 1 value every week, you
would enter 7 into the “Days” selection box.
The Trend Log Columns: New Column
In the large box below “Trend Log Columns” is a listing of
user-generated and user-programmed trend log programs. With
the <New Column> button, you can create new or add more
columns to the user-created trend log program. This allows for a
full implementation of a spreadsheet type format for your WCC3
trend log database.
Set Trend Log Column:
The Set T rend Log Column Dialog Box allows you to create new or
add more columns to the user-created trend log program.
This column name selection box is the name that will appear at the
top of the data column that you are trend logging.
NOTE: The default setting for the sav e interval is a timed
interval trend log of 1 day .
Please note that there is not a set “starting time”. The “starting
time” is determined at the exact moment you have successfully
fi lled out enough information on this screen to enable the trend
logging to occur.
By toggling the <Timed Trend / Disable / Manual Trend> button,
you can later change this “starting time” if you are there at the
exact time you wish to set the starting time of the trend log. Each
time you click on this button, it will toggle to the state.
Time Column:
The <Time Column> button allows you assign a “name” to the
Time Column. It also allows you to set the pen width, pen color,
and pen style for this column.
The <Log Source> button allows the user to select any WCC3
satellite or system point address for logging into the user-created
trend log program. When selecting the <Log Source> button, a new
Logic Address Dialog Box will appear. This Logic Address Dialog
Box will allow the end user to select the exact WCC3 satellite or
system point they wish to log. Also, this <Log Source> button has
a quick view that is overlaid on top of the button. This overlaid text
is the address point currently selected for trend logging.
Example: 205A1 is Satellite address # 205 – Analog Input # 1.
After selecting the WCC3 satellite or system point that you wish to
trend log, you now must click <OK> to fi nish your selection of the
WCC3 system point you wish to trend log.
The <Pen> button will allow you to set the pen width, pen color,
and pen style for this column.
8-6
WCC III Technical Guide
Page 9
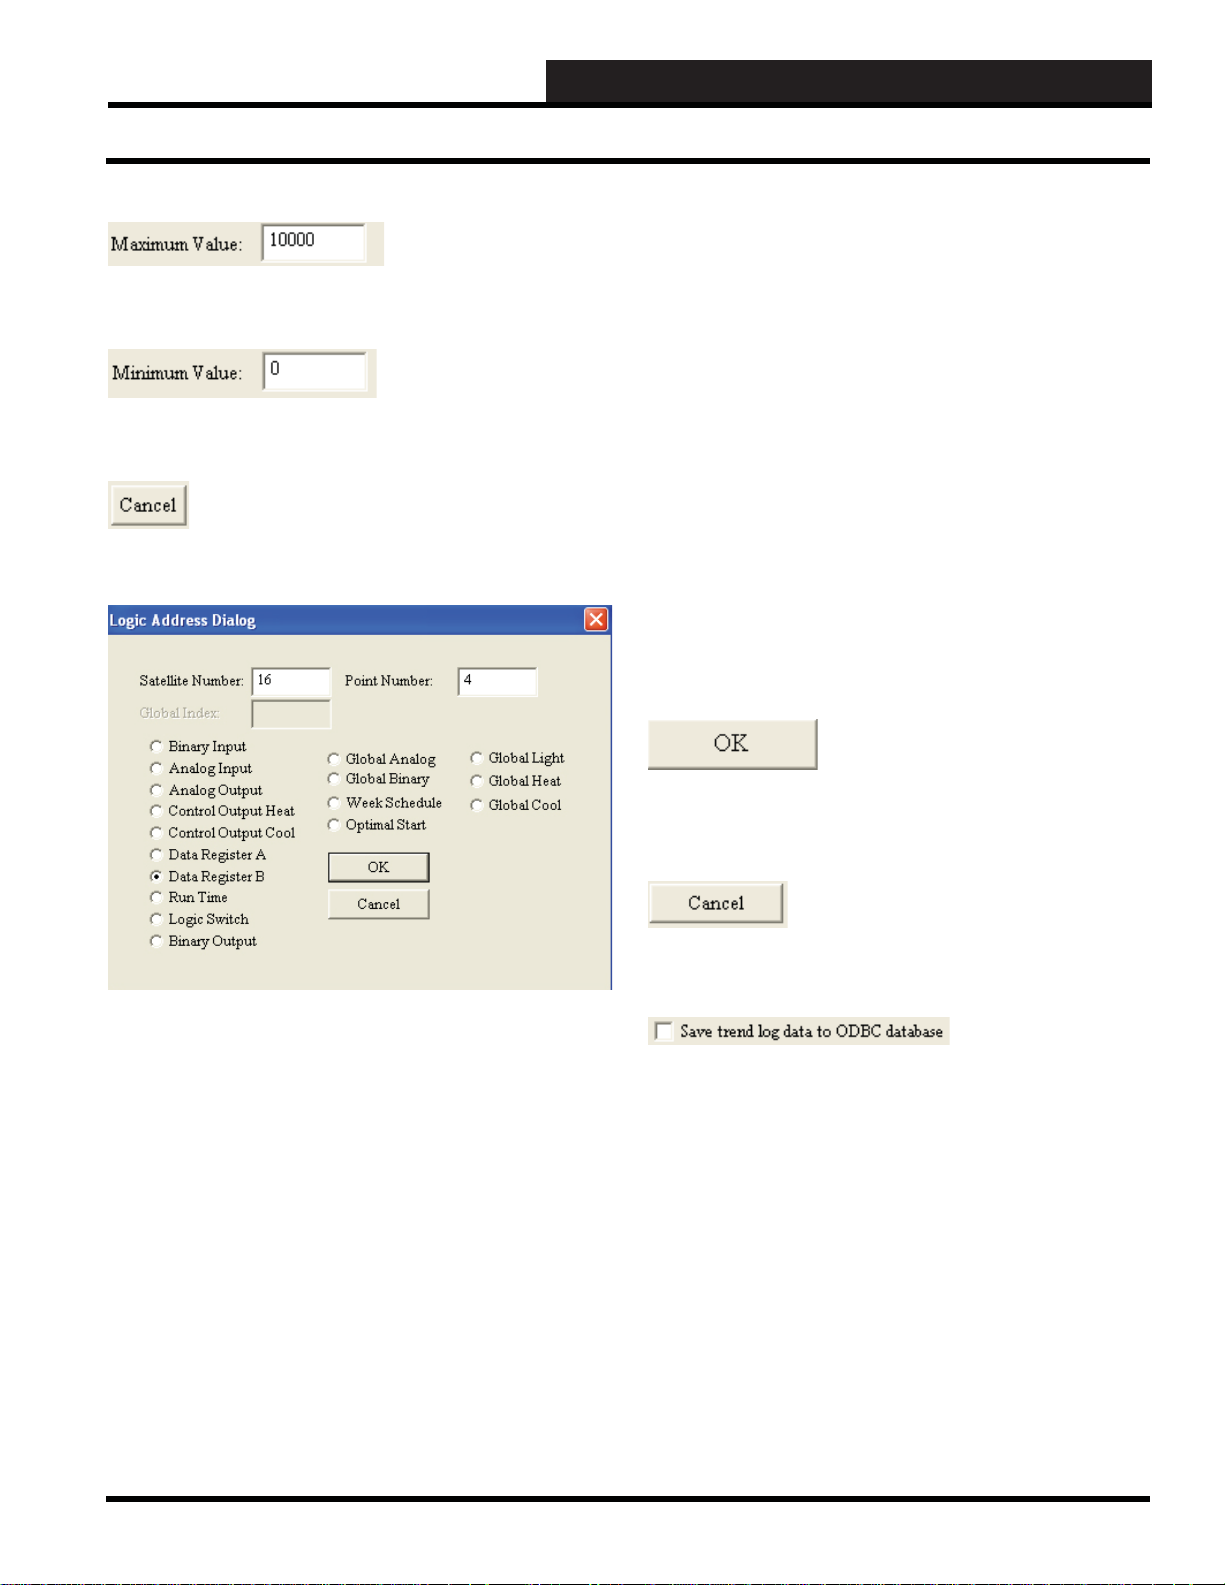
The “Maximum Value” box is the upper limit set point for this
trend log source data. The default value is 10000.
The “Minimum V alue” box is the lower limit set point for this trend
log source data. The default value is 0.
The <Cancel> button cancels this operation and returns you to the
previous screen.
8. TRENDLOG.EXE PROGRAM
Running the Program
Valid WCC3 point numbers
Satellite Address number – 1 to 239
Binary Input – 1 to 8 (Sat analog input used as Binary Input)
Analog Input – 1 to 8
Analog Output – 1 to 8
Control Output Heat – 1 to 8
Control Output Cool – 1 to 8
Data Register A – 1 to 8
Data Register B – 1 to 8
Runtime – 1 to 8
Logic Switch – 1 to 16
Binary Outputs – 1 to 16
Global Analog – 1 to 256
Global Binary – 1 to 512
Week Schedule – 1 to 128
Optimal Start – 1 to 128
Global Light – 1 to 500
Global Heat – 1 to 500
Global Cool – 1 to 500
All of the options on the left side of the Logic Address Dialog Box
require that a valid “Satellite address Number” be entered in the
box provided for proper operation.
The options on the middle and right side of the Logic Address
Dialog Box are WCC3 system points that do not require a “Satellite
Address Number” or “Point Number” for proper operation. These
options must have a “Global Index” number entered in the box
provided for proper operation.
After selecting the WCC3 system point that you wish to trend log,
you now must click <OK> to fi nish your selection of the WCC3
system point you wish to trend log.
The <Cancel> button cancels this operation and returns you to the
previous screen.
The save trend log data to ODBC data base check box.
Open Database Connectivity (ODBC) provides a standard software
API method for using database management systems. The Data
format is normally saved in data format that only the WattMaster
trend log program can retrieve. But there is an option to save the
data in an “ODBC” type of format so that Microsoft Access / SQL
type programs can access, retrieve, and manipulate the data that
is saved from the fi les that the WCCTrendlog.exe program can
create.
After selecting the “Save trend log data to ODBC database” check
box, you will need to enter a logically named ODBC database
source name and an ODBC database table name so that later you
can retrieve the data from this ODBC named database fi le.
WCC III Technical Guide
8-7
Page 10

8. TRENDLOG.EXE PROGRAM
Viewing Trendlog Data
View Trendlog Data
Once data has started to collect from the points that were chosen
to trend log, then this screen will display that data. The columns
will have the names above each one that the programmer assigned
to each column. This screen will not automatically update. To get
the most recent data, this screen will need to be closed and then
reopened.
Export:
The <Export> button will create an Excel fi le with the same
name as the Trend Program. This fi le will be created in the “WCC
Trendlogging” folder where the WCC Trendlog Program resides.
This will usually be C:\Program Files\WCCIII Trendlogging. The
Excel fi le will have an “.exe” extension. This Excel fi le will not
automatically update itself. Each time the <Export> button is
pressed, the data from the trend log is recorded in the Excel fi le.
8-8
View Chart:
The <View Chart> button will open a window with a line chart in
it. This will graphically display all the information for the Trend
Log. The time and date will be displayed horizontally across the
bottom of the chart. The values for the data will be displayed
vertically on the sides of the graph with the “Minimum Value” for
each column displayed at the bottom and the “Maximum Value”
for each column displayed at the top. If there are multiple points
being trended on this trend log, then you may want to change pen
colors, pen style, or pen width so that the chart is easier to view for
the different points.
WCC III Technical Guide
Page 11

Close:
The <Close> button will close the window and return to the list of
trendlogs for the current Trendlog Program.
Use Selected Columns:
The <Use Selected Columns> button will display only the
columns that are highlighted from the column list. To select or
deselect columns to display, click on each one.
8. TRENDLOG.EXE PROGRAM
Viewing Trendlog Data
Printing:
You have the option to print out the data from this trend log to a
local printer for a paper copy.
Delete:
The <Delete> button gives you the option to delete all current logs
displayed. The <Delete Selected Logs> button will delete only
highlighted logs.
WCC III Technical Guide
8-9
Page 12

8. TRENDLOG.EXE PROGRAM
8-10
WCC III Technical Guide
 Loading...