

Page 1

5. WCCUtility.exe Screens
WCC III
5. WCCUtility.exe Screens
Page 2

T ABLE OF CONTENTS
SECTION 5:
WCCUTILITY.EXE SCREENS
How to Start or Run the WCCUtility.exe
Program....................................................... 5-1
WCCUTILITY.EXE OVERVIEW .....................5-4
WCCUTILITY SCREENS ............................... 5-5
SAVE SATELLITE SCREEN ..........................5-7
RESTORE SATELLITE SCREEN ................... 5-8
COPY SATELLITE SCREEN .........................5-9
CLEAN SATELLITE SCREEN .....................5-11
BACKUP SATELLITES ............................... 5-23
BACKUP GLOBALS ....................................5-24
BACKUP SELECTIVES ............................... 5-25
RESTORE SYSTEM SCREEN .....................5-26
RESTORE SATELLITES .............................5-27
RESTORE GLOBALS .................................. 5-28
RESTORE SELECTIVES .............................5-29
COMM TEST ..............................................5-30
Converting Old WCC II Data Files .............5-31
SAVE SATELLITE AS SCREEN ..................5-12
SATELLITE RESET LOG ............................5-13
SATELLITE COMM LOST LOG ...................5-14
SATELLITE COMM ERROR LOG ................5-15
SYSTEM LOG .............................................5-16
ALARM LOG ...............................................5-17
DATA LOG .................................................. 5-18
ACKNOWLEDGE ALARM LOG ...................5-19
SYSTEM EVENT LOG.................................5-20
BackTask Created LOG Files ....................5-33
BackTask Created DAT Files ....................5-33
GLOBAL MATH ..........................................5-36
UPLOAD FILE ............................................5-37
DOWNLOAD FILE .......................................5-38
SET GLOBAL MAP VIEW AND
BRIDGE MAP .............................................5-39
COMM ERROR LOG ...................................5-21
BACKUP SYSTEM SCREEN ...................... 5-22
Page 3
WCCUTILITY.EXE SCREENS
Running the WCCUtility Program
SECTION 5:
WCCUTILITY.EXE SCREENS
__________________________________________
How to Start or Run the WCCUtility .
exe Program (SS5023)
The WCCUtility.exe shortcut icon should have
been installed on your WCC III front end computer
desktop with the WCC III Installation Software
CD. The WCC III Installation Software CD is
W attMaster Controls Part # DM1WC011-01X.
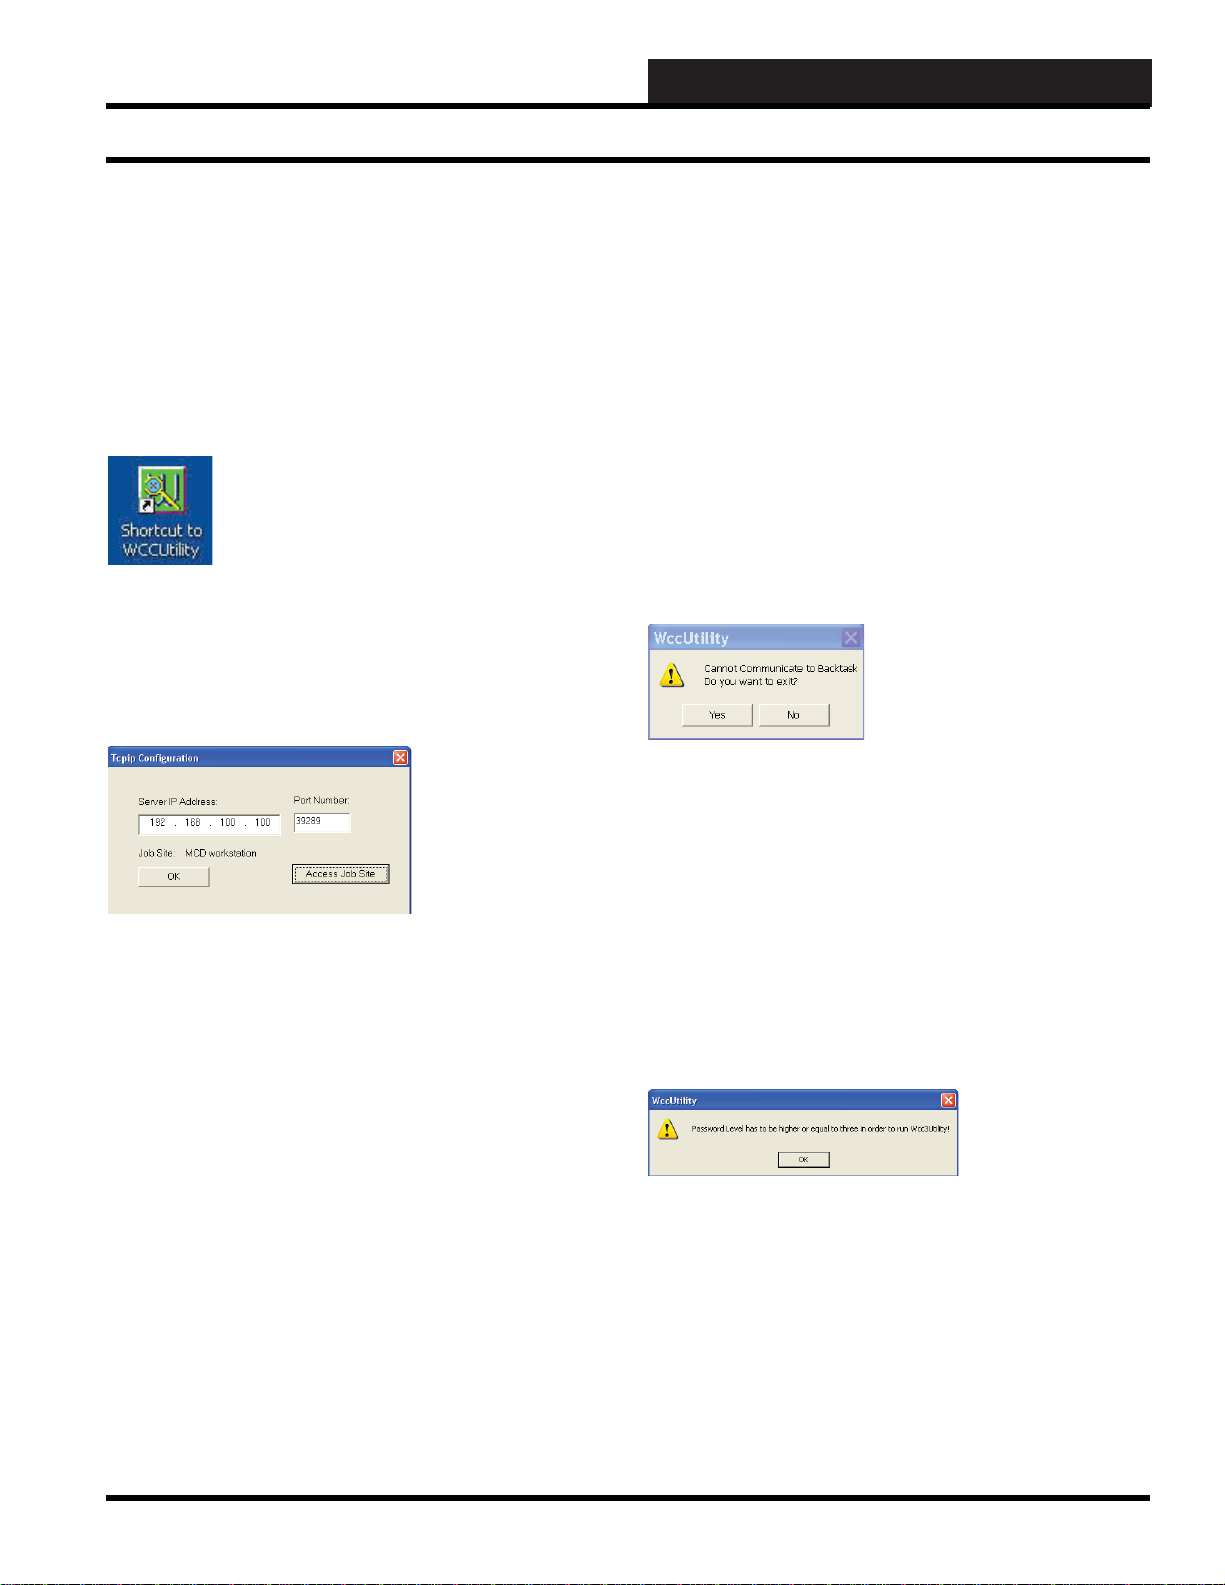
To start the WCCUtility.exe program, double-click the left mouse
button on the Shortcut Icon located on the Windows desktop.
After a short period of time, dependent upon the CPU speed of your
Windows based computer and the speed of your IP connection to
the internet, the WCC III T ype Connection Dialog Box will appear .
Port Number:
The WCC3.exe program opens a two-way , secure communications
port that then allows for communication between the WCC III
– MCD and the WCCUtility.exe program that is running on the
WCC III Front end computer. This IP Address connection is done
on a higher address port number than normal (WCC III connection
is port number 39289) to help reduce the risk of computer hacking.
Using your mouse, left-click on the
The Remote Access Dialog Window will appear.
By selecting <OK>, the WCCUtility.exe program will now start to
connect to the selected WCC III – MCD via this selected IP address
connection. It should bring up the WCCUTILITY Set Password
Dialog Screen within a new window. If the IP address connection
fails to connect to the WCC III – MCD, then another small dialog
box window will appear. This is the Cannot Communicate to
Backtask Dialog Box.
If you click
will have to fi gure out why you cannot connect to the WCC III –
MCD via the IP address connection.
<Y es>, you will exit the WCCUtility .exe program. You
<Access Job Site> button.
Server IP Address:
This is the static IP address of the WCC III – MCD. An IP Address
is like a phone number on the world wide web. The IP address for
the WCC III – MCD must be Static (does not change) as opposed
to Dynamic (constantly changing). This static IP address must be
provided by your internet service provider. (A static IP address
is the preferred IP connection method for the WCC III system to
function.) If you actually know the static IP address of the WCC
III – MCD that you wish to connect to, please enter it here in the
Server IP Address fi eld, or better yet, continue to the Remote Access
Dialog Window by selecting the
You can use a Dynamic IP Address with the WCC III – MCD,
but you must then have what is called a static “Host Name”. This
static “Host name” must then be provided by your internet service
provider and is limited to 58 total characters.
<Access Job Site> button.
If you click <No>, you will not exit the WCCUtility.exe program,
but instead you will be connected to the WCCUTILITY Set
Password Dialog Screen within a new window. This connection
to the WCCUTILITY Set Password Dialog Screen is not an
actual IP connection, but rather a “dummy” WCCUTILITY Set
Password Dialog screen. Once you click
WCCUtility.exe program and a message will be displayed stating
“Password level has to be higher or equal to three in order to run
Wcc3Utility!”.
<OK>, you will exit the
WCC III Technical Guide
5-1
Page 4
WCCUTILITY.EXE SCREENS
Running the WCCUtility Program
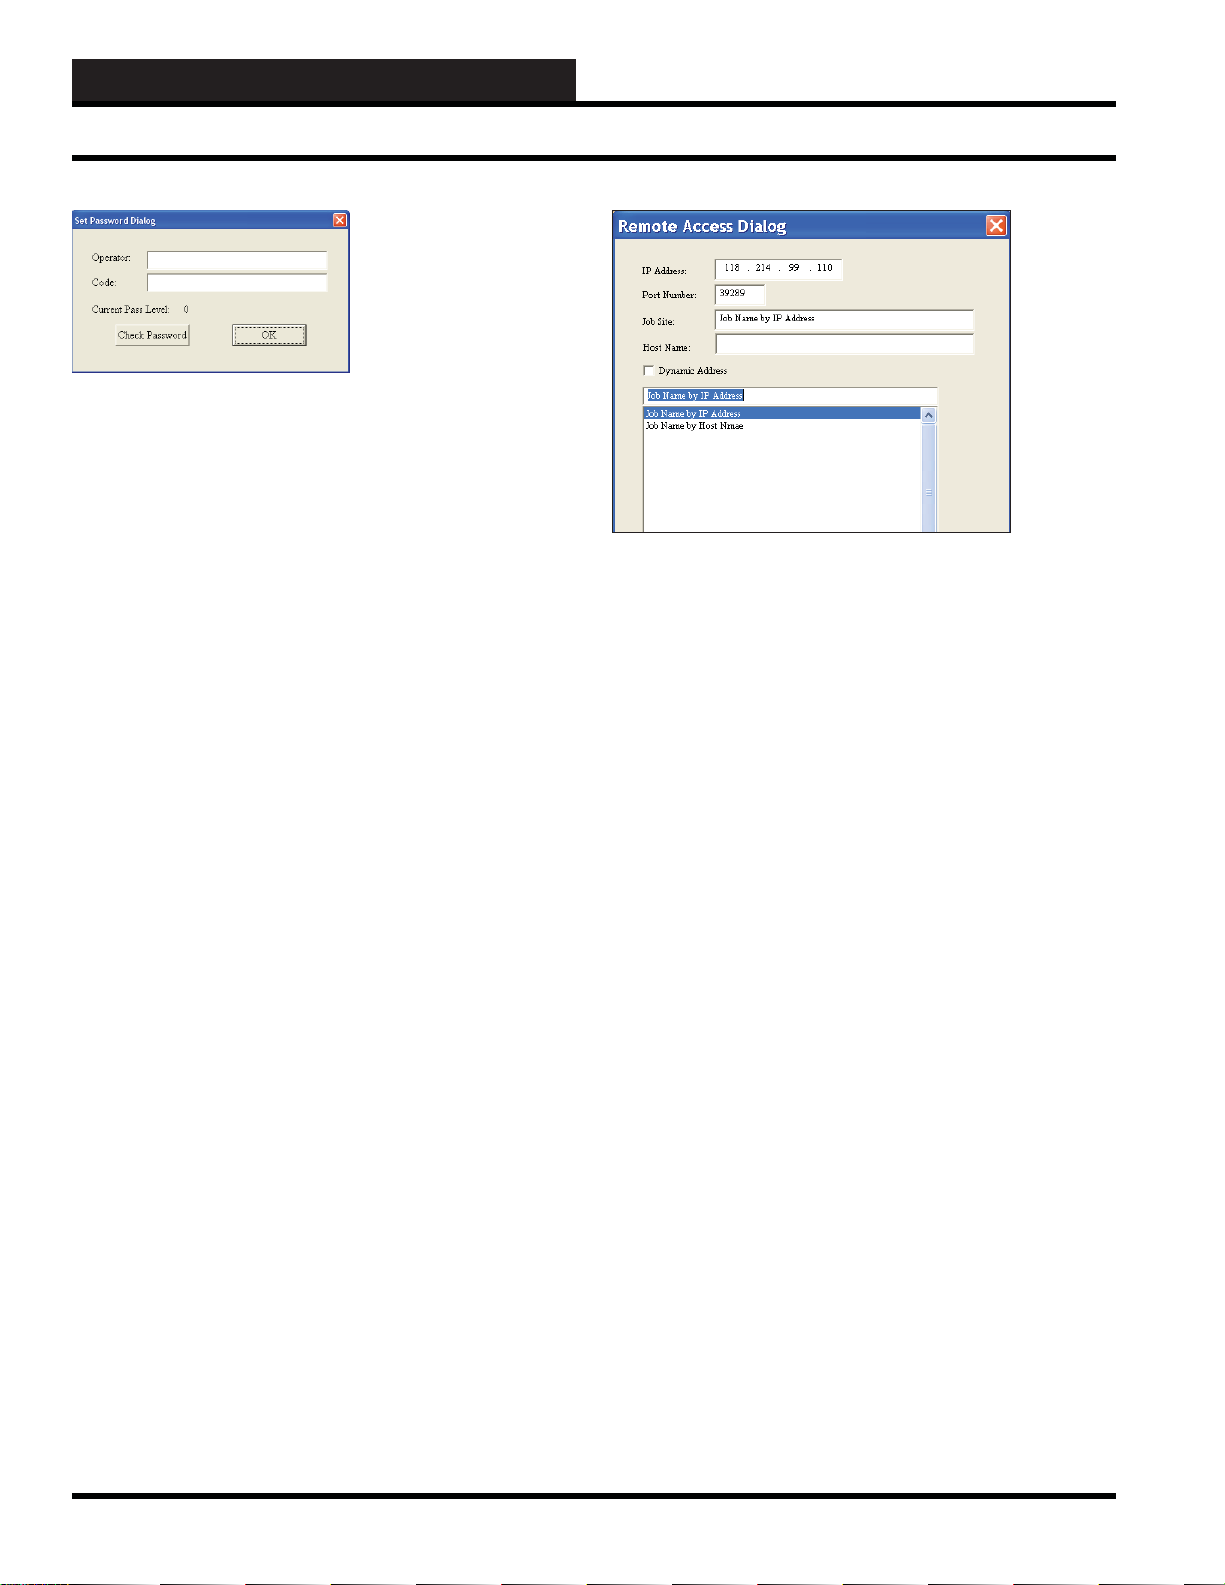
In the Set Password Dialog Screen, enter an “Operator:”
identifi cation and a “Code:” or password equal to at least a pass
level 3 that has been previously set up on the WCCIII System
Parameter – Operator Code Screen. (See the Operator Code
Screen of the System Parameter Screen in Section 3 for information
on setting up Operator Codes.) Click
“Current Pass Level:” changes to level 3 or higher, click <OK>.
By selecting
connect to the selected WCC III – MCD via this selected IP address
connection. It should bring up the WCCUtility Main Screen within
a new window. If the “Current Pass Level:” changes to a –1, 0, 1,
2 then you do not have access to the WCCIII – MCD. If you do
not have access to the WCCIII – MCD and you click
message will be displayed stating “Password level has to be higher
or equal to three in order to run Wcc3Utility!”.
<OK>, the WCCUtility .exe program will now start to
<Check Password>. If the
<OK> then a
The Remote Access Dialog Box will allow you to enter multiple
WCC III – MCD IP addresses based upon “Job Site” names. This
is done by typing in the name of the jobsite you wish to call your
system.
First you must select a “BLANK” line in the bottom box area
with your left mouse button. (This line will then be highlighted
in “Blue”.) You must then enter a Job Site name in the “Job Site”
fi eld, along with the static IP address and Port number (39289)
for the WCC III – MCD that you wish to connect to with the
WCCUtility.exe program.
If you are using a static “Host Name” instead of a static IP
address, please make sure that the Dynamic Address check box
has been selected, along with the static “Host Name” in the space
provided. As mentioned previously, you must get this static “Host
Name” from your internet service provider, and it is limited to 58
characters total.
Please note that this “Job Site” name will also be the name of a
subdirectory that will automatically be created in the Local disk C:\
ProgramFiles\WCCIII\WCCUtility subdirectory on the WCC III
Front end computer. The Remote Access Dialog Box also creates a
JobSite.dat data fi le in the C:\ProgramFiles\WCCIII\WCCUtility
subdirectory. This data fi le is not a viewable type of fi le. The
JobSite.dat fi le can be copied and then can be used on other WCC
III front end computers. This reused JobSite.dat will then recreate
the needed “Job Site” subdirectories on the other WCC III front
end computers upon the reselection of the Job Site IP address.
In an already fi lled out Remote Access Dialog Box, you can simply
select from the list of previously entered Job Sites that are displayed
in the bottom box fi eld. Then left-click
back to the Connection Dialog Box that was fi rst displayed. This
Connection Dialog Box now should have the desired IP address in
the Server IP Address location fi eld and the port number (39289)
in the Port Number location fi eld for the WCC III – MCD that you
wish to connect to with the WCCUtility .exe program.
<OK>. This will take you
5-2
WCC III Technical Guide
Page 5

WCCUTILITY.EXE SCREENS
Running the WCCUtility Program
IP Address:
This is the static IP address where the WCC III – MCD is located.
An IP Address is like a phone number on the world wide web.
The IP address for the WCC III – MCD must be static (does not
change) as opposed to Dynamic (constantly changing). This static
IP Address must be provided by your internet service provider.
(A static IP address is the preferred IP connection method for the
WCC III system to function.)
Port Number:
The WCCUtility.exe program opens a two-way, secure
communications port that then allows for communication between
the WCC III – MCD and the WCCUtility.exe program that is
running on the WCC III front end computer. This IP Address
connection is done on a higher address port number than normal
(WCC III connection is port number 39289) to help reduce the risk
of computer hacking.
Job Site:
This is the name of the jobsite you wish to call your system. Please
note that this name will also be the name of a subdirectory that
will automatically be created in the Local disk C:\ProgramFiles\
WCCIII\WCCUtility subdirectory.
Host Name:
You can use a Dynamic IP Address with the WCC III – MCD,
but you must then have what is called a static “Host Name”. This
static “Host name” must then be provided by your internet service
provider and is limited to 58 total characters.
When you have fi lled out all necessary fi elds, left-click
This will take you back to the Connection Dialog Box that was
fi rst displayed. This Connection Dialog Box now should have the
desired IP address in the Server IP Address location fi eld and the
port number (39289) in the Port Number location fi eld for the
WCC III – MCD that you wish to connect to with the WCCUtility .
exe program.
Left-click
was fi rst displayed. The Connection Dialog Box will have the
same IP address as listed originally before in the Server IP Address
location fi eld and the port number (39289) in the Port Number
location fi eld.
Left-click
Dialog Box to your Windows system default printer on the WCC
III front end computer. This print function is provided to give
you a hard paper backup copy of these IP address for the various
WCC III – MCD that you may have. This print function also
creates a Printscreen.dat data fi le in the C:\ProgramFiles\WCCIII\
WCCUtility subdirectory. This data fi le is not a viewable type of
fi le.
<Cancel> to return to the Connection Dialog Box that
<Print> to send all of this data in this Remote Access
<OK>.
WCC III Technical Guide
5-3
Page 6

WCCUTILITY.EXE SCREENS
WCCUtility Program Overview
WCCUTILITY.EXE OVER VIEW
The WCCUtility.exe program is used to do various WCC III
system functions which are not in the WCC3.exe program such as
are listed below:
Satellite Functions
Save Satellite Data
Restore Satellite Data
Copy Satellite Data
Clean Satellite Data (Blanks out the saved Data)
Save Satellite As
Satellite Reset Log
Satellite Comm Lost Log
Satellite Comm Error Log
WCC III System Logging Functions
System Log Log
Alarm Log
Data Log
Ack Alarm Log
System Event Log
MCD Comm Error Log
WCC III System Backup Functions
Backup System
Back up Satellites
Backup Globals
Backup Selectives
WCC III System Restore Functions
Restore System
Restore Satellites
Restore Globals
Restore Selectives
WCC III System Miscellaneous Functions
Comm T est
Convert Files
Global Math
Upload File
Download File
Setup Global Map
Set Bridge Map
5-4
WCC III Technical Guide
Page 7
WCCUTILITY SCREENS
WCCUTILITY.EXE SCREENS
Main Utility Screen
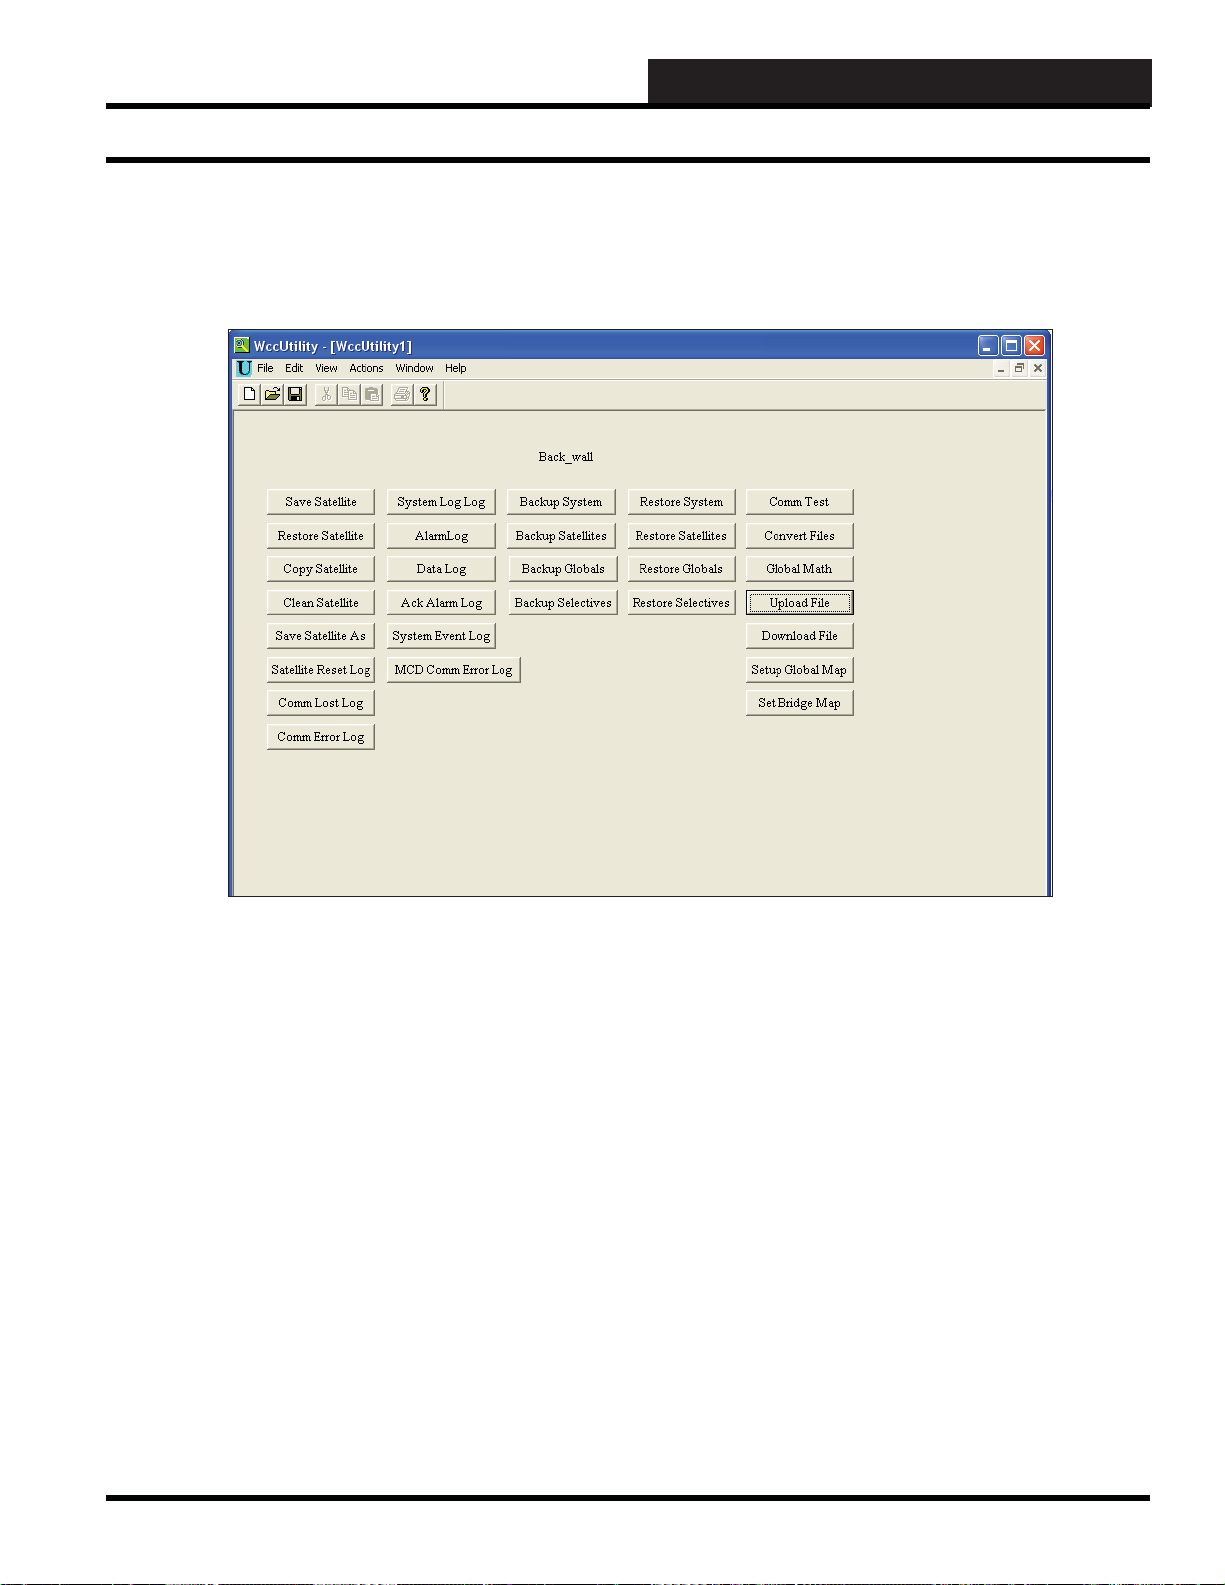
UTILITY SCREEN
The WccUtility Scr een will appear as shown. The Satellite functions
and Logging functions are described in detail as follows:
<Save Satellite>: This function will save satellite data to disk.
<Restore Satellite>: This function will restore information
from a saved satellite backup fi le in the event the data was lost or
unintentionally changed.
<Copy Satellite>: This function will copy data from one satellite
to another.
<Clean Satellite>: This function will clean a satellite of all its
data.
<Save Satellite As>: This function will save one satellite’s data
as another satellite’s data to disk.
<Satellite Reset Log>: This function will display the time and
date a satellite has reset.
<Comm Lost Log>: This function displays lost communication
log data per satellite.
WCC III Technical Guide
<Comm Error Log>: This function displays errors in the
communication log per satellite. Possible error messages are Bad
Sync, Bad Size.
<System Log Log>: Displays the time and dates the WCC III
system has been logged into, logged out, and the operator.
<Alarm Log>: Displays a list of all alarms that have occurred by
location, type, time, and date.
<Data Log>: Displays a list of all data that has been changed
recently and by whom and on what date and time.
<Ack Alarm Log>: Displays a list of all alarms that have been
acknowledged and by whom and on what date and time.
<System Event Log>: Displays the time and date of system
connections, disconnects, and satellite communications.
<MCD Comm Error Log>: Displays communication errors
between the MCD and satellites on the communication loop.
5-5
Page 8
WCCUTILITY.EXE SCREENS
Main Utility Screen
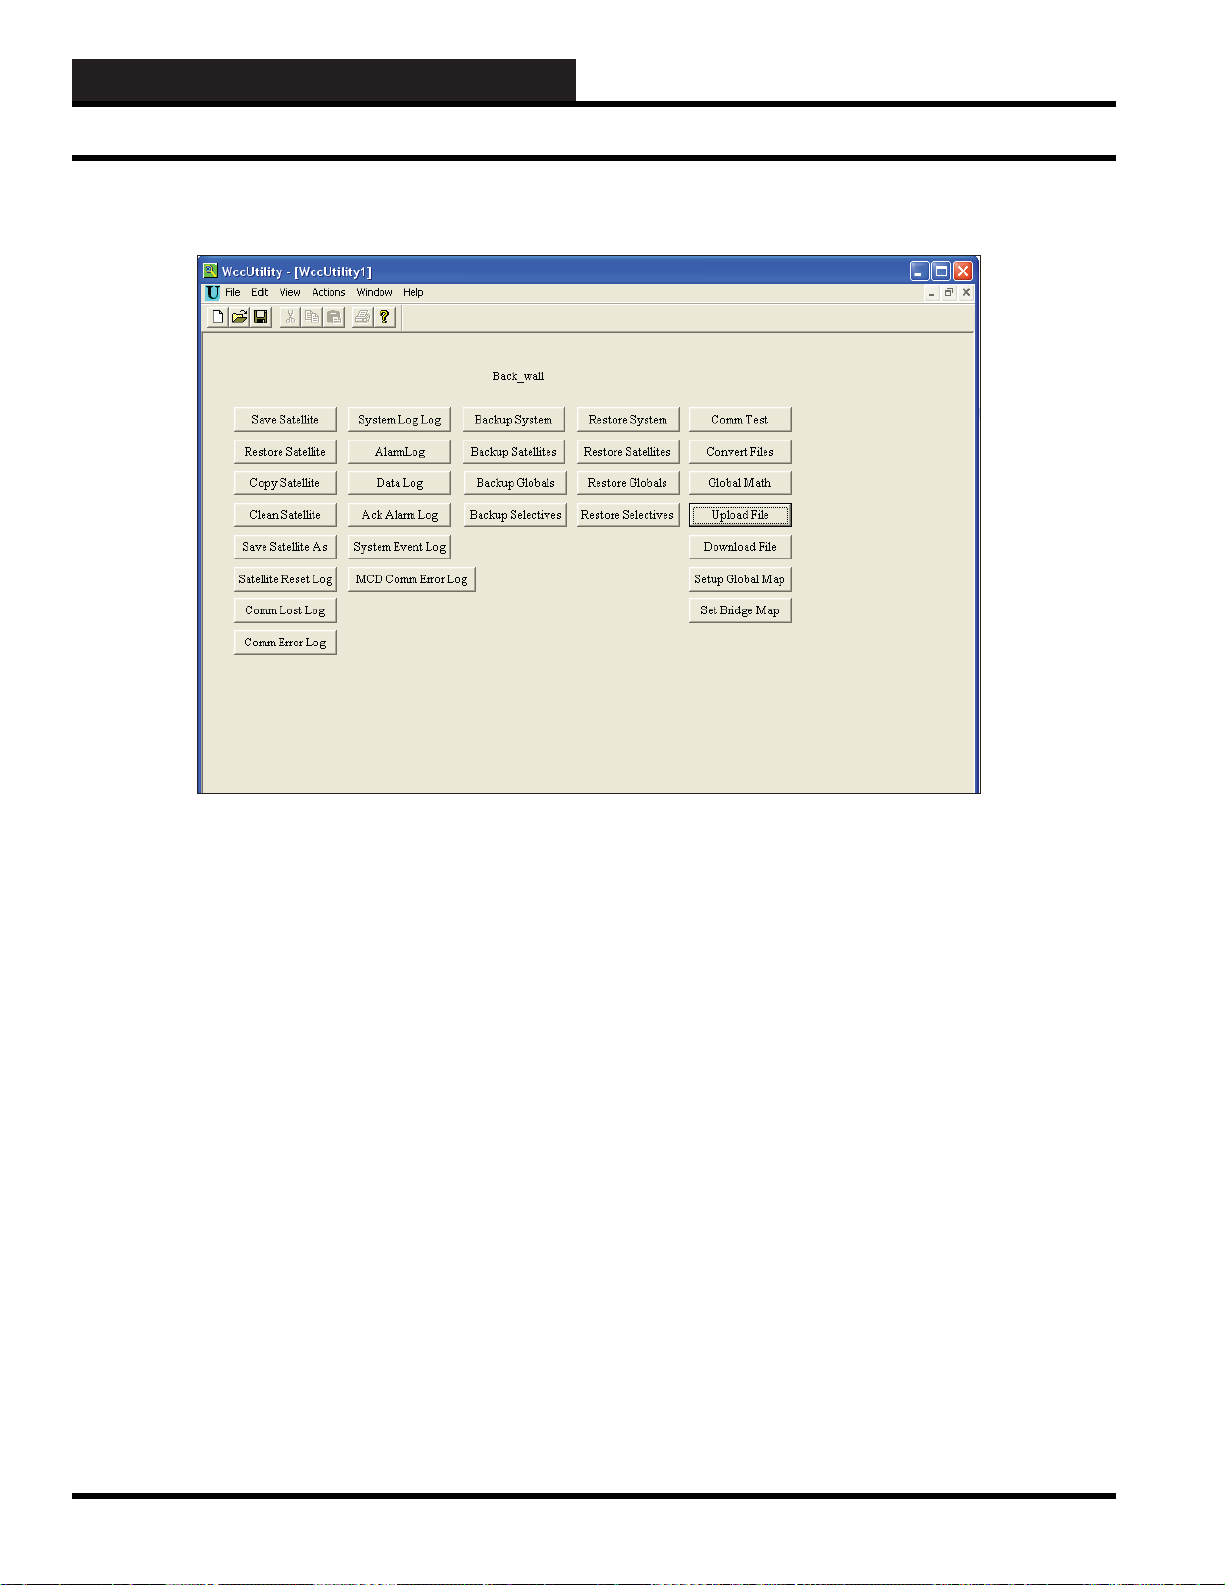
UTILITY SCREEN
<Backup System>: This function will backup all of the data from
the WCC III system in a fi le named WCC3SYSTEM.XML.
<Backup Satellites>: This function will backup all SAT III data
fi les into a single fi led named WCC3SATELLITES.XML.
<Backup Globals>: This function will back up all Globals (analog
and binary) data fi les into a single fi le named WCC3GLOBALS.
XML.
<Backup Selectives>: This function will allow selective backup
of the following fi le(s): Global Analog, Global Binary, Week
Schedules, Optimal Starts, Shed Restore, Duty Cycle, Energy
Consumption, Holiday Schedules, Proportional Reset, System
Parameters, Alarm Messages, Status Messages, Unit Messages,
Network Information, and PID Programs.
<Restore System>: This function will restore all of the WCC III
system data from a single fi le named WCC3SYSTEM.XML.
<Restore Satellites>: This function will restore all SAT III data
fi les from a single fi le named WCC3SATELLITES.XML.
<Restore Globals>: This function will restore all Globals (analog
and binary) data fi les from a fi le named WCC3GLOBALS.XML.
<Restore Selectives>: This function will allow selective restore
of the following fi le(s): Global Analog, Global Binary, Week
Schedules, Optimal Starts, Shed Restore, Duty Cycle, Energy
Consumption, Holiday Schedules, Proportional Reset, System
Parameters, Alarm Messages, Status Messages, Unit Messages,
Network Information, and PID Programs.
<Comm Test>: This function checks communications to and from
up to 10 selected satellites on a jobsite per window.
<Convert Files>: This function gives you the option to convert
WCC II fi les to WCC III fi les.
<Global Math>: This function recompiles all global analog math
routines from WCC II to WCC III.
<Upload File>: This function can be used to transfer fi les to the
WCC III - MCD.
<Download File>: This function can be used to transfer fi les from
the WCC III - MCD.
<Setup Global Map>: This is where global information can be
sent from the WCC II system to the WCC III - MCD.
<Set Bridge Map>: This is where satellite information can be sent
from the “new” WCC III - MCD to the old WCC II system.
5-6
WCC III Technical Guide
Page 9
WCCUTILITY.EXE SCREENS
SAVE SA TELLITE SCREEN
Save Sa tellite Screen
Save Sa tellite
The data which is entered on the following WCC III screens is
stored in the memory of the satellite controllers and is not stored
in the MCD:
1) Analog Inputs
2) Control Outputs
3) Analog Outputs
4) Trend Logs
5) Logic Switches
6) Binary Output
7) SCUSCR
However, you have the option of saving the information which is
in the satellite controllers on a disk in the remote WCC3 computer
(personal computer) to allow you to have a back-up copy of the
satellite data. We strongly encourage you to do this to avoid the
possibility of having to manually re-enter satellite data.
The satellite data may be saved on a disk which is in the remote
WCC3 computer (personal computer) located at the building being
controlled, or if you have our remote communications software,
you may save this information on a disk in a remote computer.
The information for up to 239 satellite controllers may be saved
on a hard disk.
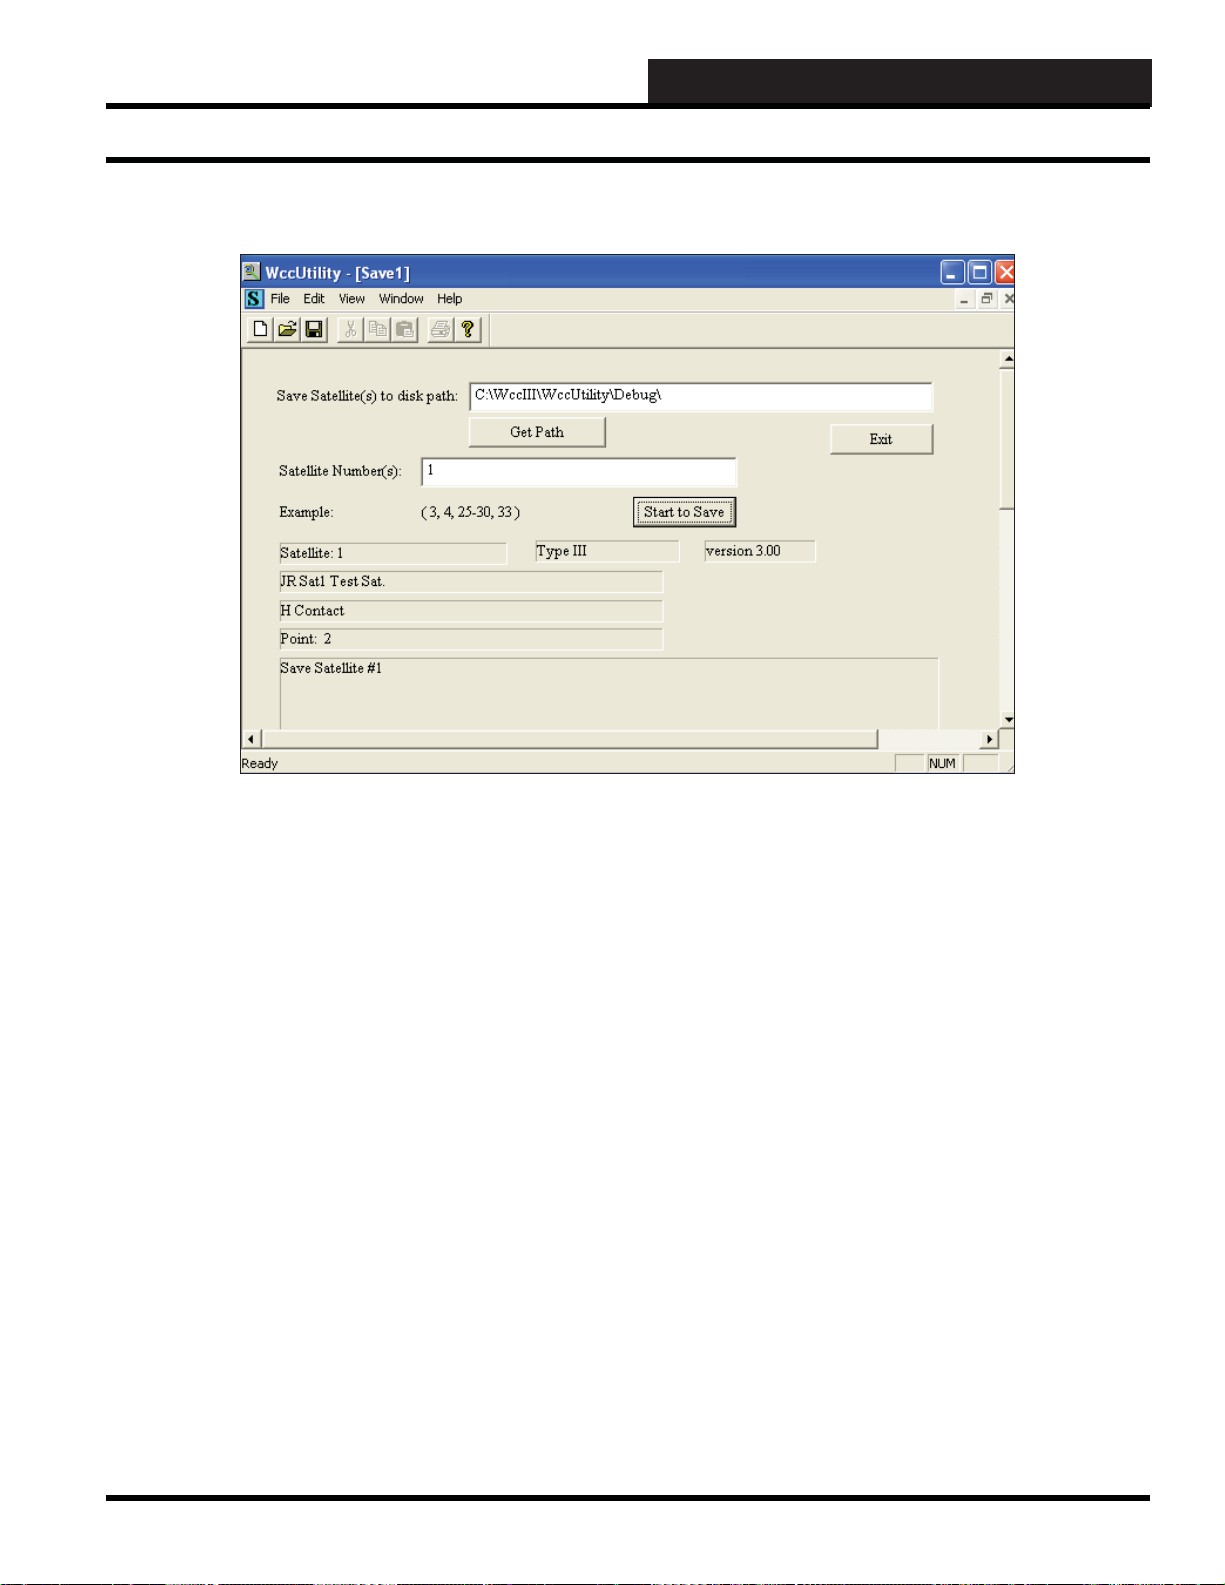
When you select
Screen will appear. Above is an example of a satellite save in
progress.
In the Save Satellite(s) to disk path data fi eld, type in the name of
the drive and, if applicable, the folder you wish to save the satellite
data. If you need to browse your system to fi nd the name of a
folder, select
Next, type in the number(s) of the satellites you wish to save to
disk. Separate the numbers with a space and a comma as shown in
the example. Then select
When the Save is complete, there will be a “fi nished!!” message
in one of the fi elds.
The system will give the satellite data the fi le name Sat#.DA T , with
the # representing the number of the satellite. If there is already a
.DAT fi le with the same SAT #, the earlier .DAT fi le will change
to a .BAK fi le.
Select
<Exit> to return to the WCC Utility Screen.
<Save Satellite>, the WccUtility Satellite Save
<Get Path>.
<Start to Save>.
WCC III Technical Guide
5-7
Page 10
WCCUTILITY.EXE SCREENS
Restore Satellite Screen
RESTORE SA TELLITE SCREEN
Restore Satellite
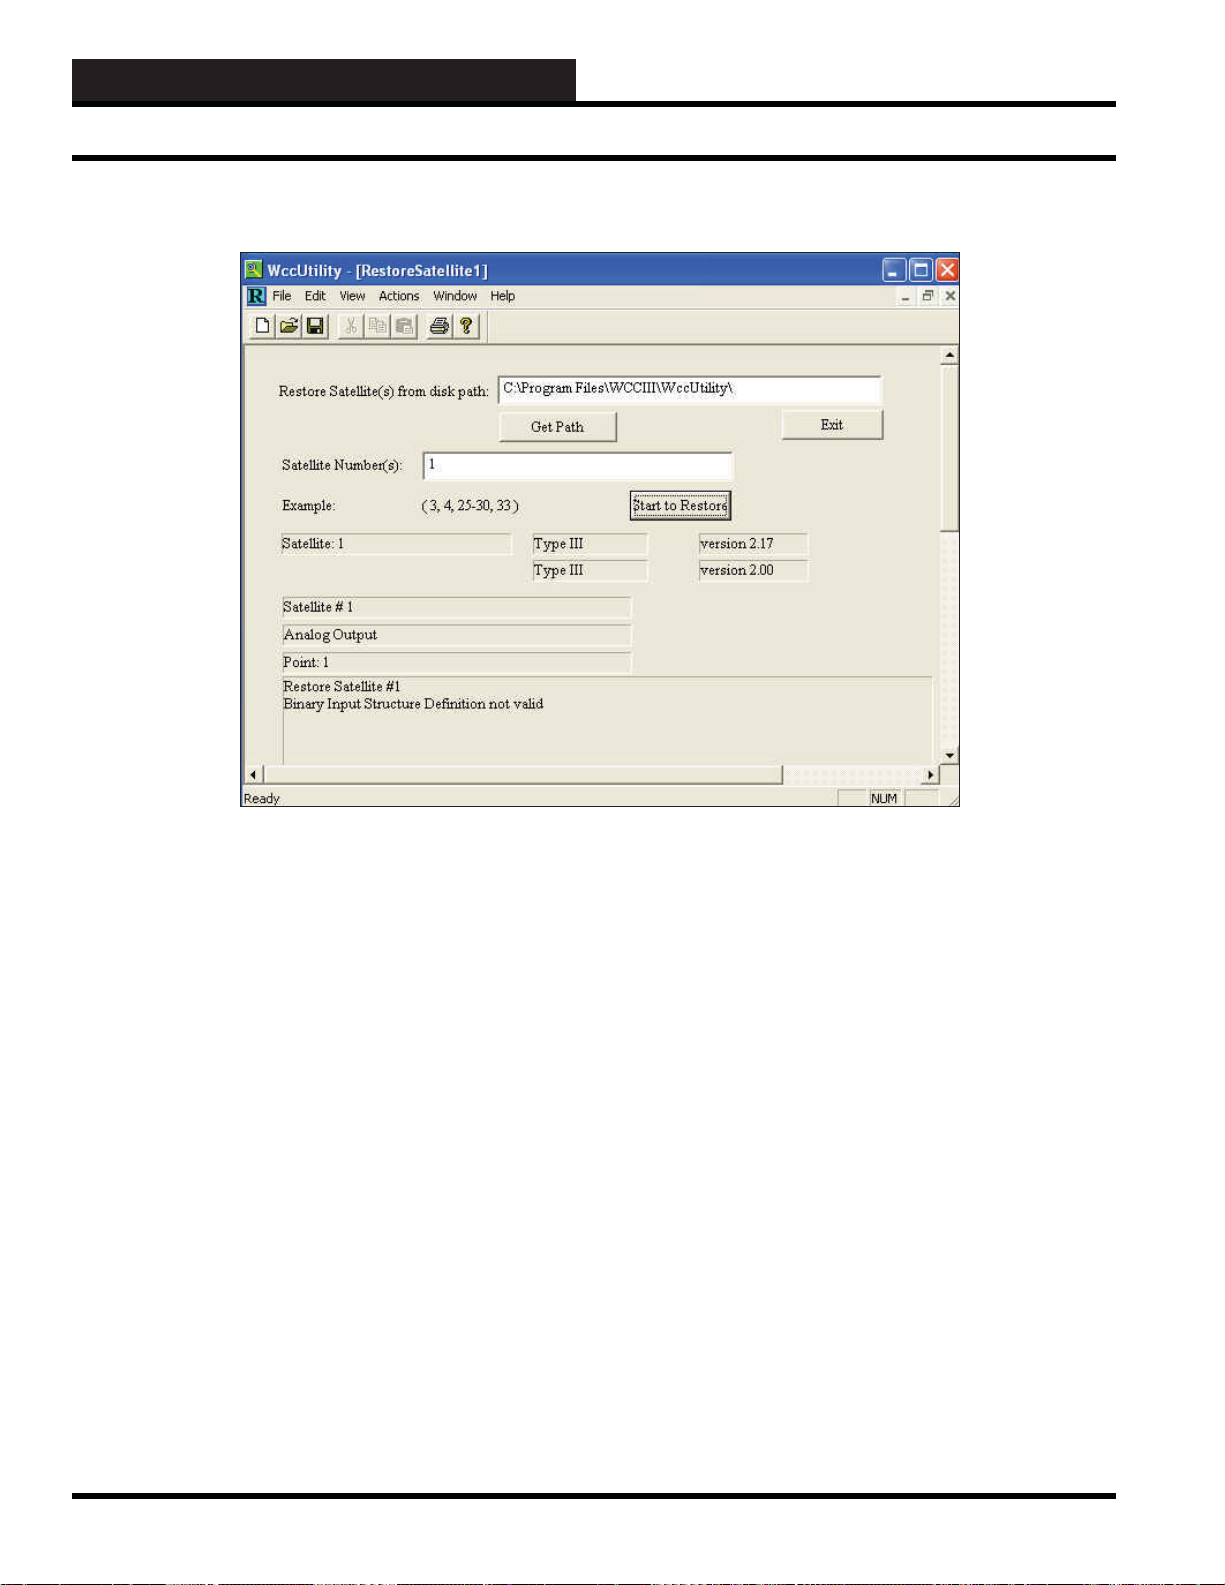
If you would like to restore information from a saved satellite
backup fi le, select <Restore Satellite> from the WccUtility Menu.
In the Restore Satellite(s) from disk path fi eld, type in the drive
and folder name where the satellite data is located. If you need to
browse to fi nd the drive and folder name, select
In the Satellite Number(s) fi eld, type in the satellite number(s) you
wish to restore from disk. Separate satellite numbers with commas
and/or designate a range of numbers with a dash as shown in the
Example fi eld on the screen.
<Get Path>.
When you are ready, select
to view the restoration progress in the fi elds located below the
<Start to Restore> button.
When the Restore is complete, there will be a “fi nished!!” message
in one of the fi elds.
If the system encounters any problems, it will display messages in
the message box at the bottom of the screen.
Select <Exit> to return to the WccUtility Screen.
<Start to Restore>. You will be able
5-8
WCC III Technical Guide
Page 11
WCCUTILITY.EXE SCREENS
COPY SATELLITE SCREEN
Copy Satellite Screen
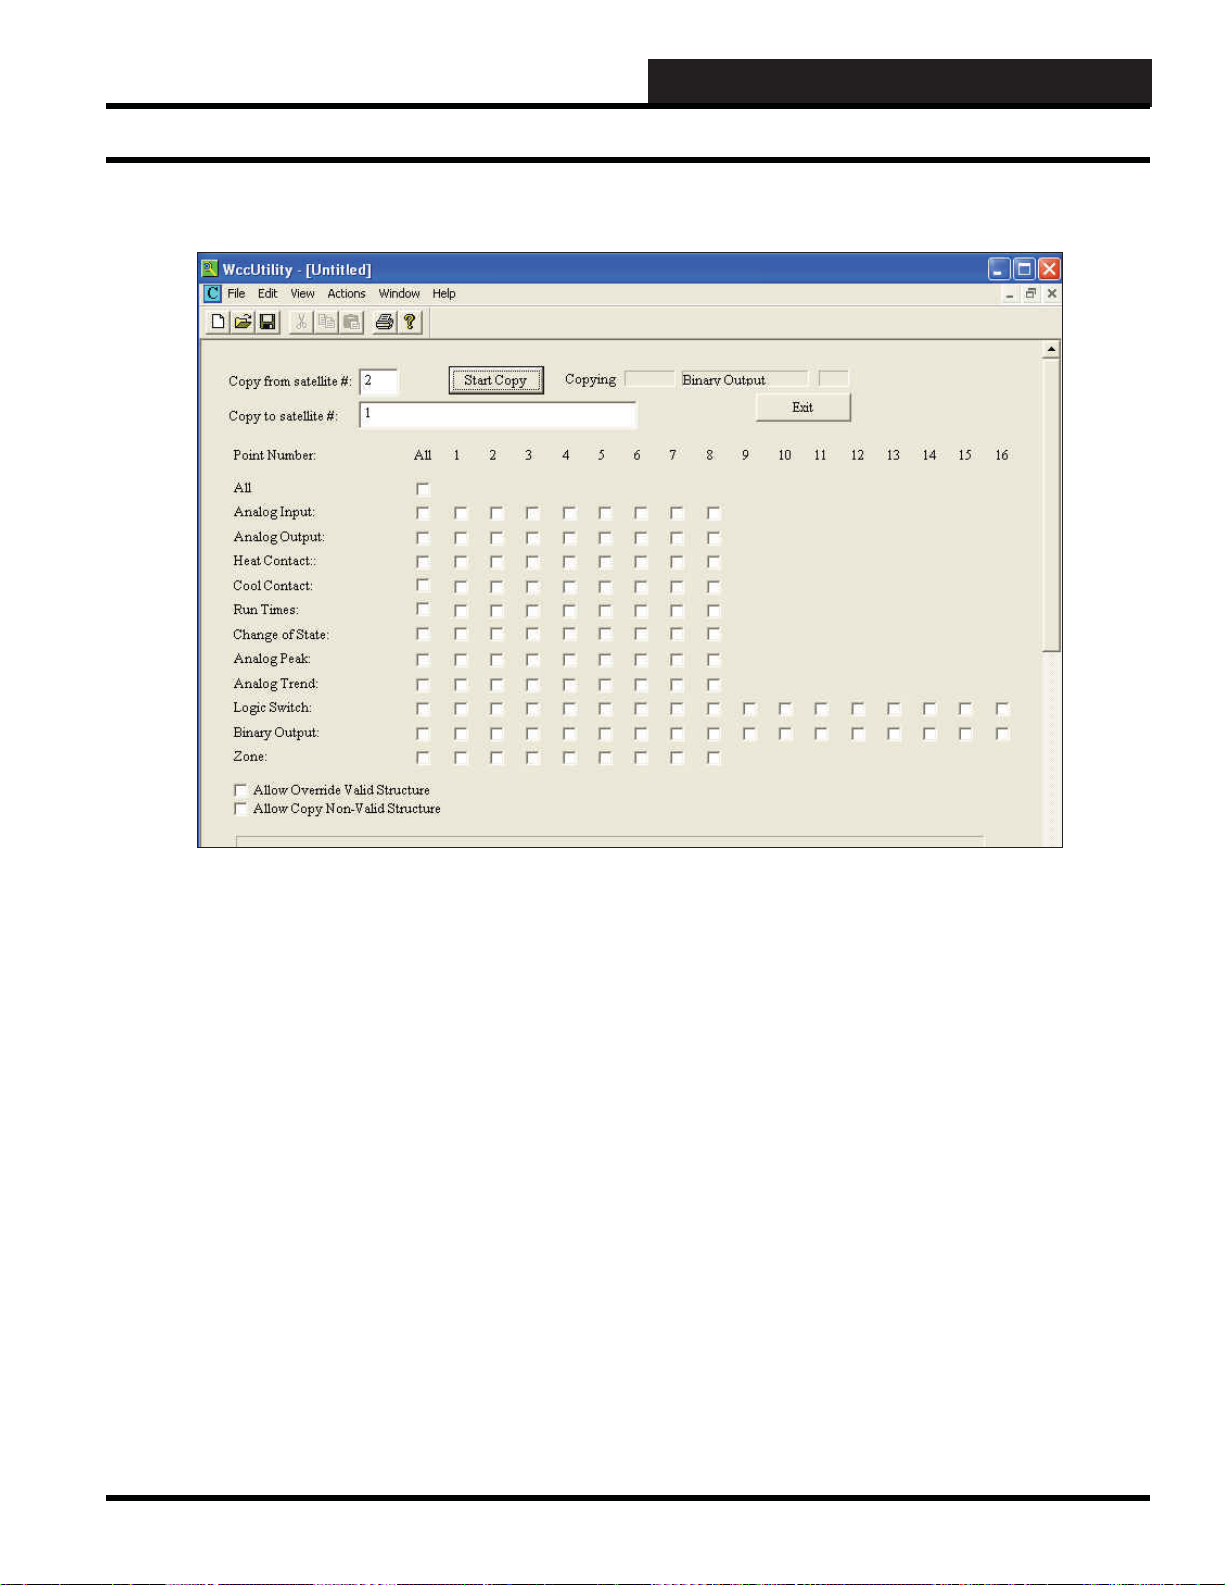
If you would like to copy information from one satellite to another,
select <Copy Satellite> from the WccUtility Menu.
Copy from Satellite #:
Specifi es the number of the satellite which has the information
which will be transferred to the other satellite(s).
Copy to Satellite #:
Specifi es the number for the satellite(s) which will receive the
information. You may input multiple satellites in this location by
using commas between and/or a dash for strings of satellites as in
the example below:
Copy from Satellite # : 2
Copy to Satellite # : 4, 6, 12, 21-27, 57, 158
In this example, we are copying information from Satellite #2 to
Satellites #4, 6, 12, 21, 22, 23, 24, 25, 26, 27, 57, and 158.
Point Number
The Point Numbers are the top row of numbers which are labeled
All and 1-16. This information corresponds to the addresses of the
satellites in question.
Point Name
The Point Names are “All, Analog Inputs and so on, ending with
Zone” located vertically on the left of the screen. These also
correspond to the addresses of the satellite controllers in question.
Specifying Points for Copy (*)
A checkmark must be indicated in each box which corresponds
with the “Point Name” and the “Point Number” on the screens you
are wanting to copy. To create a checkmark, click the left button
on your mouse.
WCC III Technical Guide
5-9
Page 12
WCCUTILITY.EXE SCREENS
Copy Satellite Screen
COPY SATELLITE SCREEN
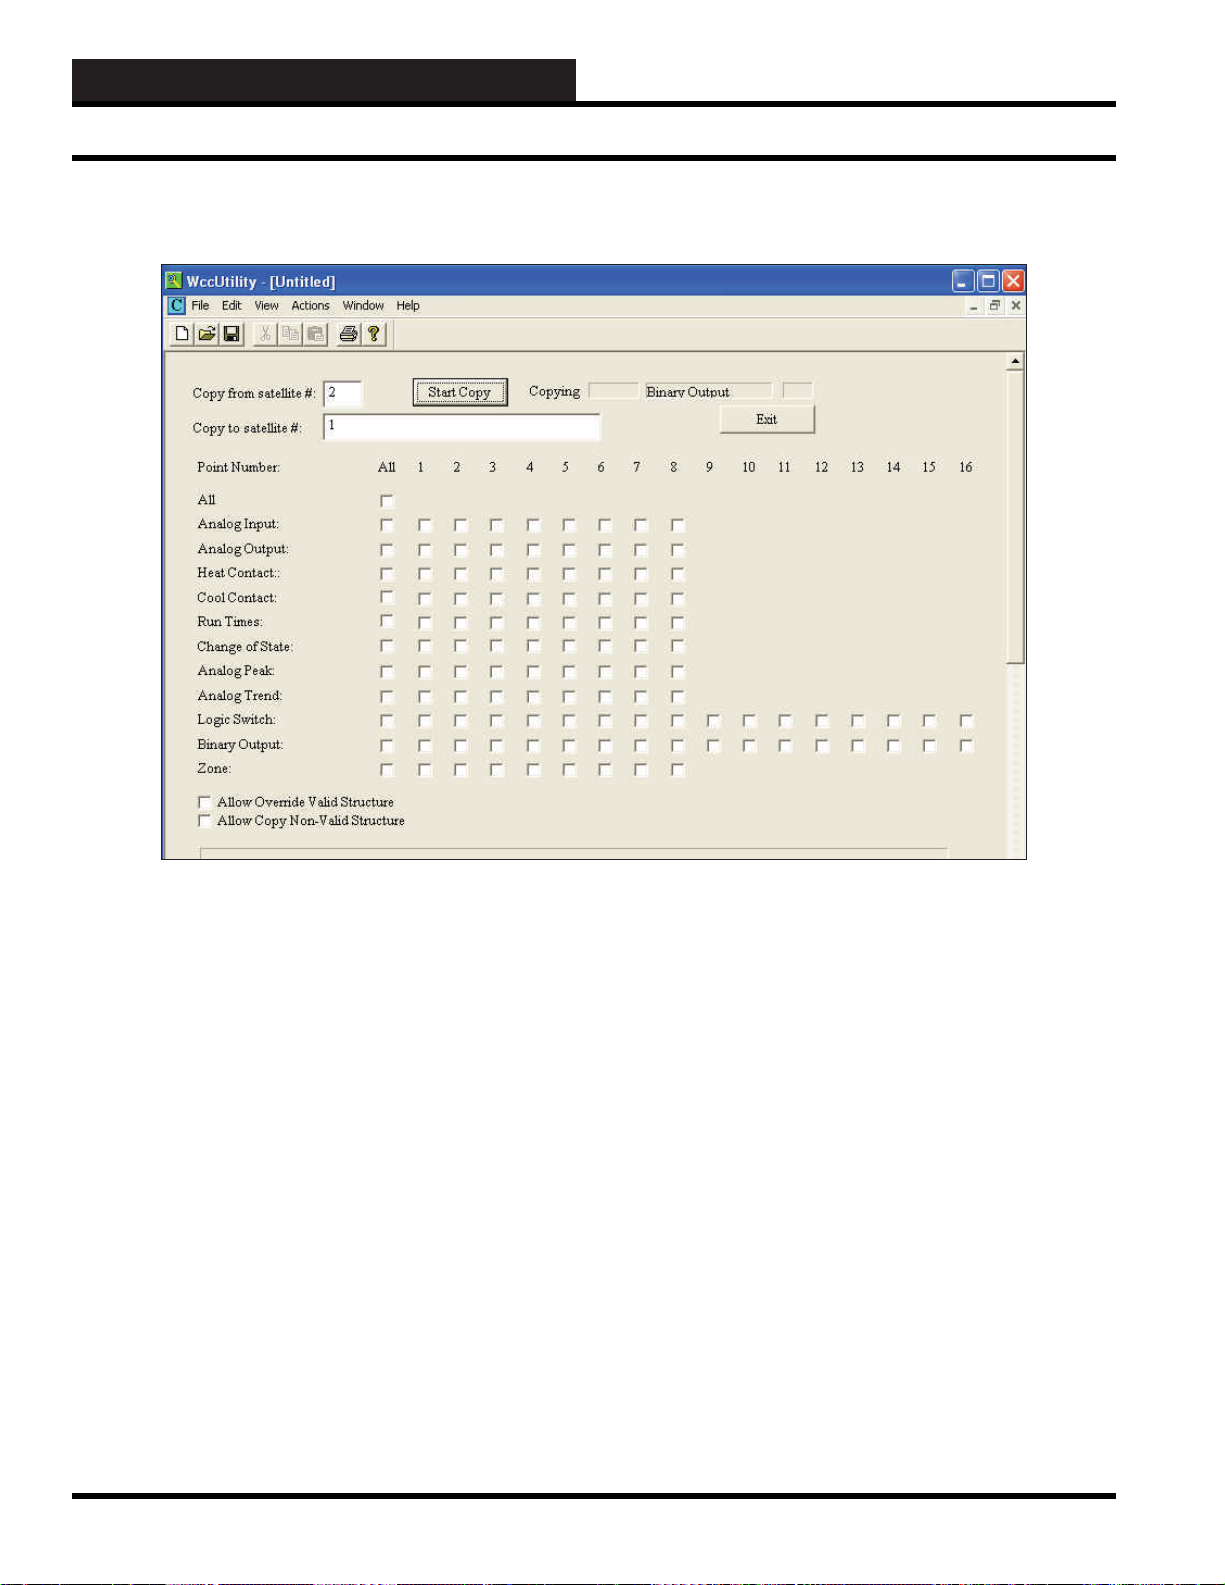
Allow Override Valid Structure
Y ou are given the choice of a YES or a NO answer for this question.
Place a checkmark in the selection box for a YES. Leave the box
blank for a NO. If the satellite which is receiving the information
has previously been programmed, but you would like to over-write
what is presently in it, choose YES. If you want to save what is
already in the satellite that is receiving the information, but want
the new information to be copied onto screens that are presently
blank, choose NO.
For example, if you are copying from satellite #1 to satellites #2
and #3, but satellite #3 has good information which you would like
to keep and #2 does not, then you would choose NO for this choice
so that the valid structures in #3 would not be written over.
Allow Copy Non-V alid Structure
You are given the choice of a YES or NO answer for this question.
Place a checkmark in the selection box for a YES. Leave the box
blank for a NO. If you do not want to include non-valid structures
(such as blank screens) from the satellite which is sending the
information, then a NO answer should be left in this location. If you
wish to include any non-valid structures (such as blank screens)
from the satellite you are copying from, then a YES answer should
be applied to this location.
You will generally leave the box blank to indicate NO. There are
not very many times non-valid structures from the source satellite
need to be included. This selection is generally used in troubleshooting to distinguish between a problem with the satellite’s
processor and the MCD processor by duplicating the programming
in the memory from one satellite controller to another.
Start Copy
When you are ready for the copy process to begin, simply click on
the <Start Copy> button at the top of the screen. The copy process
will automatically begin. The points being copied will show on the
screen.
If there are any problems, the system will describe them in the
message box located in the bottom portion of the screen.
T o return to the WccUtility Menu, you must select
<Exit>.
5-10
WCC III Technical Guide
Page 13
WCCUTILITY.EXE SCREENS
CLEAN SA TELLITE SCREEN
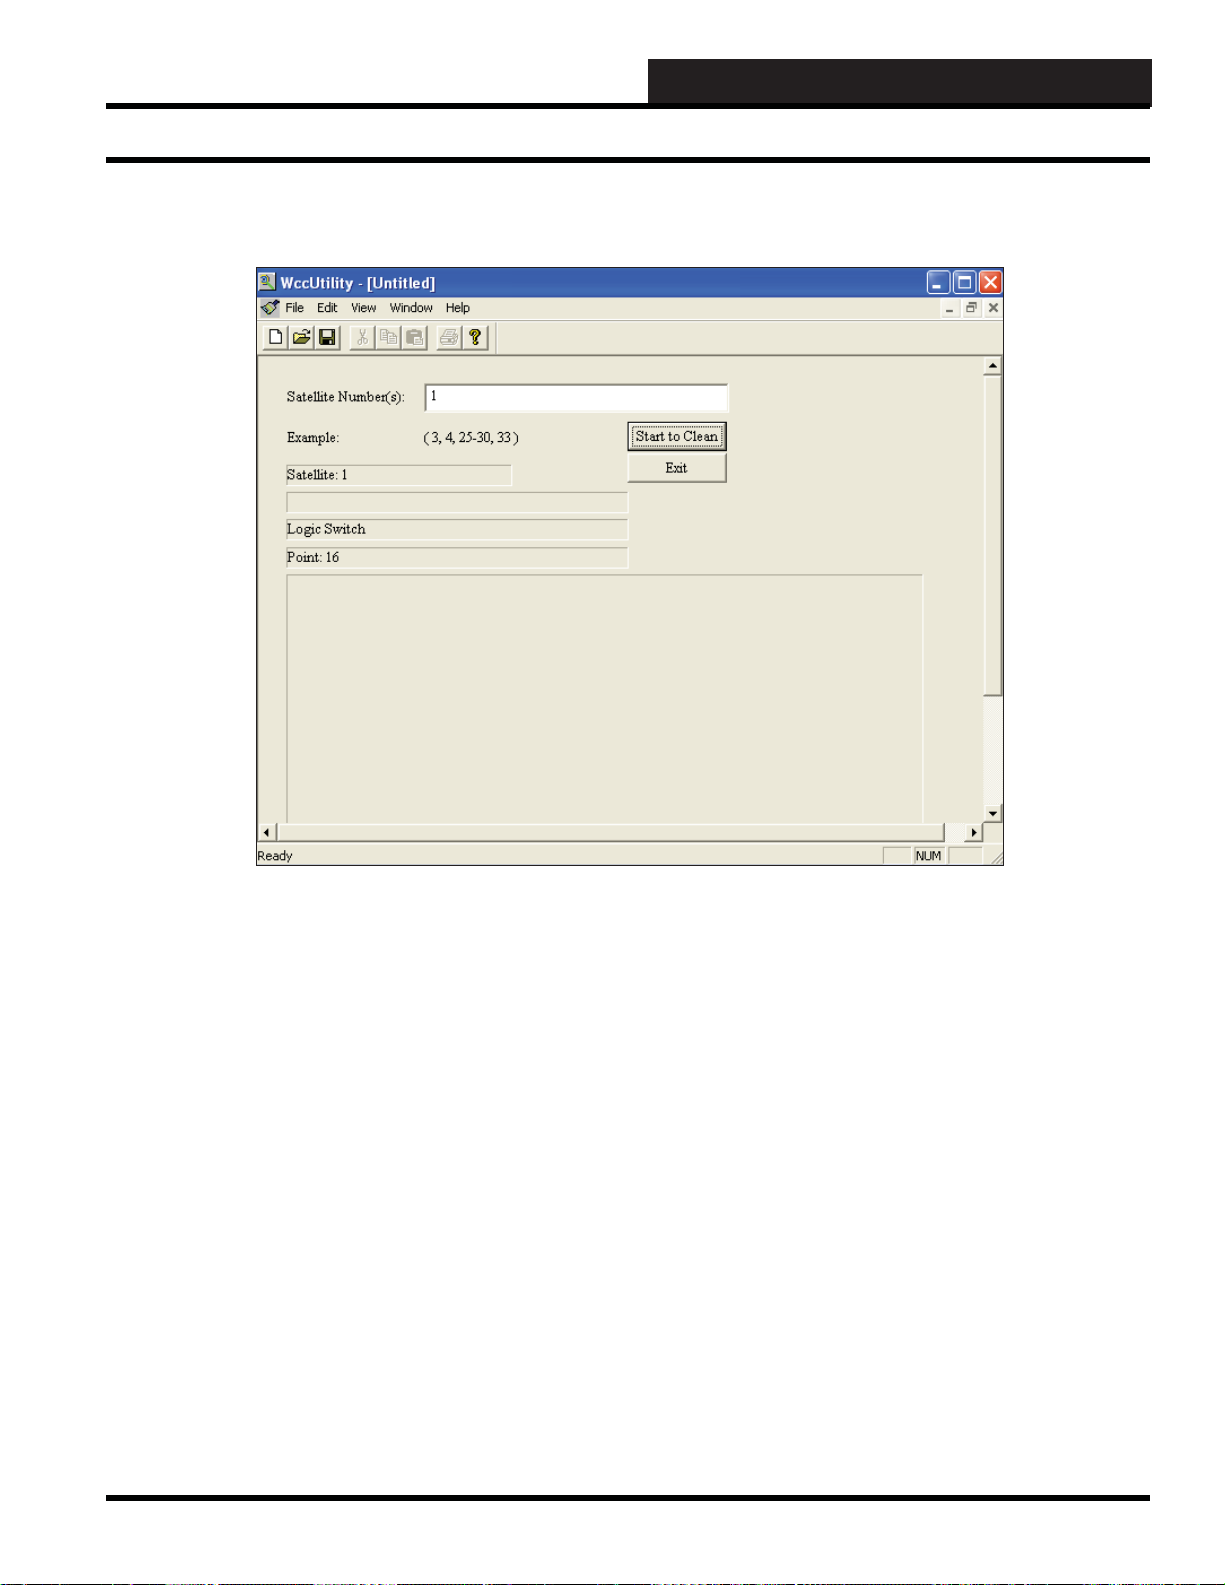
Clean Satellite Screen
If you would like to clean one or more satellites of all their data,
select <Clean Satellite> from the WccUtility Menu.
Satellite Number(s):
In the Satellite Number(s) fi eld, type in the satellite number(s)
you wish to clean. Separate satellite numbers with commas and
designate a range of numbers with a dash as shown in the Example
fi eld on the screen.
When you are ready, select
view the cleaning process in the data fi eld boxes.
If the system encounters any problems, it will display messages in
the message box at the bottom of the screen.
Select
<Exit> to return to the WccUtility Screen.
<Start to Clean>. You will be able to
WCC III Technical Guide
5-11
Page 14
WCCUTILITY.EXE SCREENS
Save Sa tellite As Screen
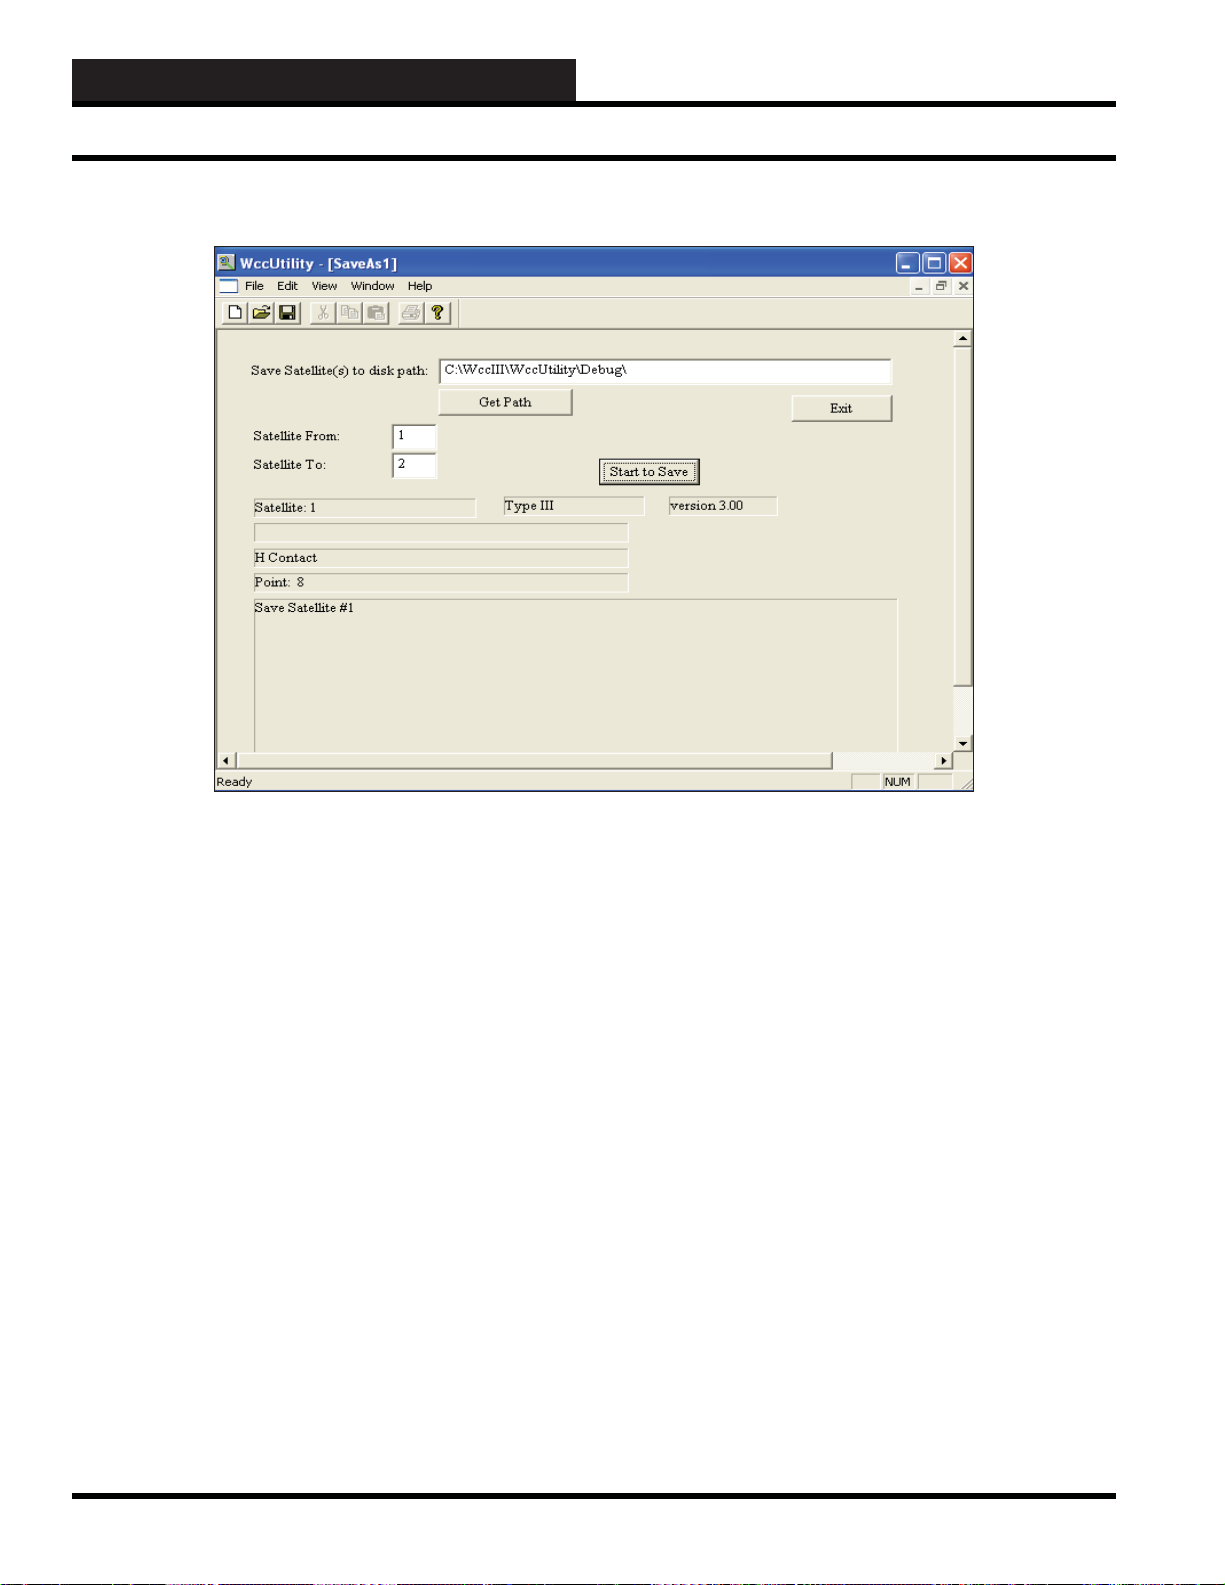
SAVE SA TELLITE AS SCREEN
If you would like to save satellites as, select <Save Satellite As>
from the WccUtility Menu. This allows you to save one satellite’s
data as another satellite’s data to the disk. It’s a combination copy/
save function.
Save Satellite(s) to Disk P ath:
Type in the name of the path - directory and/or subdirectory that
you wish to save the satellite data to. If you need to search for the
directory, select
Get Path:
Select the <Get Path> button to search for the directory and/
or subdirectory that you wish to save the satellite data to. Select
<Open> to have the path appear in the Save Satellite(s) to Disk
Path fi eld.
<Get Path>.
Satellite From:
Enter the number of the satellite you are saving data from.
Satellite T o:
Enter the number of the satellite you are saving the data to on the
disk.
Start to Save:
Select this button to start saving the data to the disk under the new
satellite fi le name. The system will give the satellite data the fi le
name Sat#.DAT , with the # representing the number of the satellite
being saved to. If there is already a .DAT fi le with the same SAT #,
the earlier .DAT fi le will change to a .BAK fi le.
Select
<Exit> to return to the WCC Utility Screen.
5-12
WCC III Technical Guide
Page 15

WCCUTILITY.EXE SCREENS
SATELLITE RESET LOG
Satellite Reset Log Screen
To view satellites that have been reset recently, select <Satellite
Reset Log> from the WccUtility Menu.
Satellite Number:
In the Satellite Number fi eld, type in the satellite number you wish
to view information on and then click
<Load>.
WCC III Technical Guide
The dates and times that the satellite was last reset will be
displayed.
<Print> to print the log. Select <Close> to return to the
Click
WccUtility Screen.
5-13
Page 16

WCCUTILITY.EXE SCREENS
Satellite Comm Lost Log Screen
SATELLITE COMM LOST L OG
T o view satellite information regarding lost communication, select
<Comm Lost Log> from the WccUtility Menu.
Satellite Number:
In the Satellite Number fi eld, type in the satellite number you wish
to view lost communication log data on and then click <Load>.
5-14
The dates and times that communication was last lost for the
entered satellite will be displayed.
Click <Print> to print the log. Select <Close> to return to the
WccUtility Screen.
WCC III Technical Guide
Page 17

WCCUTILITY.EXE SCREENS
Satellite Comm Error Log Screen
SATELLITE COMM ERROR L OG
T o view satellite communication errors, select <Comm Error Log>
from the WccUtility Menu.
Satellite Number:
In the Satellite Number fi eld, type in the satellite number you wish
to view errors on and then click
<Load>.
WCC III Technical Guide
The dates and times of the errors and the errors themselves will be
displayed.
<Print> to print the log. Select <Close> to return to the
Click
WccUtility Screen.
5-15
Page 18

WCCUTILITY.EXE SCREENS
System Log Screen
SYSTEM L OG
If you would like to view who has accessed the WCC III system
and on what dates and times the system has been operating, select
<System Log> from the WccUtility Menu.
You can print the entire log by selecting <Print All>. You can also
click on individual entries to highlight them and then click
Selected>
or <Print Between Selected>.
<Print
T o deselect entries you highlighted, click
T o refresh the screen’s data, click <Refresh>.
To delete one or more entries in the log, highlight the entries by
clicking on them, and then click
Between Selected>. To delete all entries, select <Delete All>.
Click <Close> to return to the WccUtility Menu
<Delete Selected> or <Delete
<Clear Selection>.
5-16
WCC III Technical Guide
Page 19

ALARM LOG
WCCUTILITY.EXE SCREENS
Alarm Log Screen
If you would like to view all alarms that have occurred recently,
<Alarm Log> from the WccUtility Menu.
select
You can print the entire log by selecting <Print All>. You can also
click on individual entries to highlight them and then click
Selected> or <Print Between Selected>.
<Print
T o deselect entries you highlighted, click <Clear Selection>.
T o refresh the screen’s data, click <Refresh>.
To delete one or more entries in the log, highlight the entries by
clicking on them, and then click <Delete Selected> or <Delete
Between Selected>
Click <Close> to return to the WccUtility Menu.
. To delete all entries, select <Delete All>.
WCC III Technical Guide
5-17
Page 20

WCCUTILITY.EXE SCREENS
Data Log Screen
DATA LOG
If you would like to view all data that has been changed recently
and by whom and on what date and time, select <Data Log> from
the WccUtility Menu.
You can print the entire log by selecting
click on individual entries to highlight them and then click <Print
Selected> or <Print Between Selected>.
<Print All>. You can also
T o deselect entries you highlighted, click <Clear Selection>.
T o refresh the screen’s data, click
To delete one or more entries in the log, highlight the entries by
clicking on them, and then click
Between Selected>. To delete all entries, select <Delete All>.
Click
<Close> to return to the WccUtility Menu.
<Refresh>.
<Delete Selected> or <Delete
5-18
WCC III Technical Guide
Page 21

WCCUTILITY.EXE SCREENS
Acknowledge Alarm Log Screen
ACKNOWLEDGE ALARM LOG
If you would like to view all alarms that have been acknowledged
and by whom and on what date and time, select <Ack Alarm Log>
from the WccUtility Menu.
You can print the entire log by selecting
click on individual entries to highlight them and then click
Selected>
or <Print Between Selected>.
<Print All>. You can also
<Print
WCC III Technical Guide
T o deselect entries you highlighted, click <Clear Selection>.
T o refresh the screen’s data, click
You can print the entire log by selecting <Print All>. You can also
click on individual entries to highlight them and then click
Selected> or <Print Between Selected>.
Click <Close> to return to the WccUtility Menu.
<Refresh>.
<Print
5-19
Page 22

WCCUTILITY.EXE SCREENS
System Event Log Screen
SYSTEM EVENT LOG
If you would like to view communication connections and closures
in the WCC III system, select <System Event Log> from the
WccUtility Menu.
T o deselect entries you highlighted, click
<Clear Selection>.
5-20
T o refresh the screen’s data, click
You can print the entire log by selecting
click on individual entries to highlight them and then click <Print
Selected> or <Print Between Selected>.
Click <Close> to return to the WccUtility Menu
<Refresh>.
<Print All>. You can also
WCC III Technical Guide
Page 23

WCCUTILITY.EXE SCREENS
COMM ERROR LOG
Comm Error Log Screen
If you would like to view MCD communications errors, select
<Comm Error Log> from the WccUtility Menu. This option is
only available on version 2.26 and above. The data in this log will
need to be viewed by WattMaster personnel to be able to tell what
type of error has occurred.
The dates and times that the error happened will be displayed.
To stop the log from updating, click
again, click
T o refresh the screen’s data, click <Refresh>.
Click <Close> to return to the WccUtility Menu
<Start Log>.
<Stop Log>. To start the log
WCC III Technical Guide
To delete one of more entries in the log, highlight the entries by
clicking on them and then click
Y ou can save the log to a fi le by selecting <Save to File>. This log
will be saved as a text document named MCDCommErrorLog in
C:\ProgramFiles\WCCIII\WCCUtilities.
You can print the entire log by selecting
click on individual entries to highlight them and then click <Print
Selected> or <Print Between Selected>.
T o remove this log from the MCD, click
<Clear Selection>.
<Print All>. You can also
<Remov e Log>.
5-21
Page 24

WCCUTILITY.EXE SCREENS
Backup System Screen
BACKUP SYSTEM SCREEN
If you would like to backup all information in the WCC III system,
select <Backup System> from the WccUtility Menu.
Backup to disk path:
Type in the name of the path - directory and/or subdirectory that
you wish to backup the satellite data to. If you need to search for
the directory, select
Get Path:
Select the <Get Path> button to search for the directory and/or
subdirectory that you wish to backup the satellite data to. Select
<Open> to have the path appear in the Backup to disk path
fi eld.
<Get Path>.
5-22
Start to Backup:
Select this button to start backing up the data to the disk. The system
will automatically backup the data in a fi le called WCC3SYSTEM.
XML. This will take several minutes. When the backup is complete,
there will be a “fi nished!!” message in one of the fi elds.
If there is already a WCC3SYSTEM.XML fi le, the earlier .XML
fi le will change to a .BAK fi le.
Select
<Exit> to return to the WCC Utility Screen.
WCC III Technical Guide
Page 25

WCCUTILITY.EXE SCREENS
BACKUP SA TELLITES
Backup Satellites Screen
If you would like to backup all satellite data fi les into a single fi le
named WCC3SATELLITES.XML, select
from the WccUtility Menu.
Backup to disk path:
Type in the name of the path - directory and/or subdirectory that
you wish to backup the satellite data to. If you need to search for
the directory, select <Get Path>.
Get Path:
Select the <Get Path> button to search for the directory and/or
subdirectory that you wish to backup the satellite data to. Select
<Open> to have the path appear in the Backup to disk path
fi eld.
<Backup Satellites>
WCC III Technical Guide
Start to Backup:
Select this button to start backing up the data to the disk. The
system will automatically backup the data in a fi le called
WCC3SATELLITES.XML. This will take several minutes. When
the backup is complete, there will be a “fi nished!!” message in one
of the fi elds.
If there is already a WCC3SATELLITES.XML fi le, the earlier
.XML fi le will change to a .BAK fi le.
Select
<Exit> to return to the WCC Utility Screen.
5-23
Page 26

WCCUTILITY.EXE SCREENS
Backup Globals Screen
BACKUP GLOBALS
If you would like to backup all satellite global fi les (analog and
binary) into a single fi le named WCC3GLOBALS.XML, select
<Backup Globals> from the WccUtility Menu.
Backup to disk path:
Type in the name of the path - directory and/or subdirectory that
you wish to backup the satellite data to. If you need to search for
the directory, select <Get Path>.
Get Path:
Select the <Get Path> button to search for the directory and/or
subdirectory that you wish to backup the satellite data to. Select
<Open> to have the path appear in the Backup to disk path
fi eld.
5-24
Start to Backup:
Select this button to start backing up the data to the disk. The
system will automatically backup the data in a fi le called
WCC3GLOBALS.XML. This will take several minutes. When
the backup is complete, there will be a “fi nished!!” message in one
of the fi elds.
If there is already a WCC3GLOBALS.XML fi le, the earlier .XML
fi le will change to a .BAK fi le.
Select
<Exit> to return to the WCC Utility Screen.
WCC III Technical Guide
Page 27

WCCUTILITY.EXE SCREENS
BACKUP SELECTIVES
Backup Selectives Screen
If you would like to perform a selective backup of certain fi les,
select <Backup Selectives> from the WccUtility Menu.
You can select the following fi les by placing a checkmark in the
box next to the fi lename: Global Analog, Global Binary, Week
Schedules, Optimal Start, Shed Restore, Duty Cycle, Energy
Consumption, Holiday Schedule, Proportional Reset, System
Parameters, Alarm Messages, Status Messages, Unit Messages,
Network Information, and PID Programs.
Backup to disk path:
Type in the name of the path - directory and/or subdirectory that
you wish to backup the satellite data to. If you need to search for
the directory, select <Get Path>.
Get Path:
Select the <Get Path> button to search for the directory and/or
subdirectory that you wish to backup the satellite data to. Select
<Open> to have the path appear in the Backup to disk path
fi eld.
WCC III Technical Guide
Filename:
Change the fi lename or it will default to WCC3SELECTIVES. If
you do not change this name, it may be impossible to tell what
selectives were backed up.
Start to Backup:
Select this button to start backing up the data to the disk. The
system will automatically backup the data in a fi le called
WCC3SELECTIVES.XML unless the fi lename has been changed.
This will take several minutes. When the backup is complete, there
will be a “fi nished!!” message in one of the fi elds.
If there is already an .XML fi le with the same name, the earlier
.XML fi le will change to a .BAK fi le.
Select
<Exit> to return to the WCC Utility Screen.
5-25
Page 28

WCCUTILITY.EXE SCREENS
Restore System Screen
RESTORE SY STEM SCREEN
If you would like to perform a system restore, select <Restore
System> from the WccUtility Menu.
Restore from disk path:
Type in the name of the path - directory and/or subdirectory that
you wish to restore the data from. If you need to search for the
directory, select
Get Path:
Select the <Get Path> button to search for the directory and/or
subdirectory that you wish to restore system data from. Select
<Open> to have the path appear in the Restore from disk path
fi eld.
<Get Path>.
Start to Restore:
Select this button to start restoring the data. The system will
automatically restore the saved data. This will take several minutes.
When the restore is complete, there will be a “fi nished!!” message
in one of the fi elds.
Select
<Exit> to return to the WCC Utility Screen.
5-26
WCC III Technical Guide
Page 29

WCCUTILITY.EXE SCREENS
RESTORE SA TELLITES
Restore Satellites Screen
If you would like to perform a satellite restore, select <Restore
Satellites> from the WccUtility Menu.
Restore from disk path:
Type in the name of the path - directory and/or subdirectory that
you wish to restore the data from. If you need to search for the
directory, select
Get Path:
Select the <Get Path> button to search for the directory and/or
subdirectory that you wish to restore system data from. Select
<Open> to have the path appear in the Restore from disk path
fi eld.
<Get Path>.
Start to Restore:
Select this button to start restoring the data. The system will
automatically restore the saved data. This will take several minutes.
When the restore is complete, there will be a “fi nished!!” message
in one of the fi elds.
Select
<Exit> to return to the WCC Utility Screen.
WCC III Technical Guide
5-27
Page 30

WCCUTILITY.EXE SCREENS
Restore Globals Screen
RESTORE GL OBALS
If you would like to perform a global restore, select <Restore
Globals>
Restore from disk path:
Type in the name of the path - directory and/or subdirectory that
you wish to restore the data from. If you need to search for the
directory, select <Get Path>.
Get Path:
Select the <Get Path> button to search for the directory and/or
subdirectory that you wish to restore system data from. Select
<Open> to have the path appear in the Restore from disk path
fi eld.
from the WccUtility Menu.
5-28
Start to Restore:
Select this button to start restoring the data. The system will
automatically restore the saved data. This will take several minutes.
When the restore is complete, there will be a “fi nished!!” message
in one of the fi elds.
Select
<Exit> to return to the WCC Utility Screen.
WCC III Technical Guide
Page 31

WCCUTILITY.EXE SCREENS
RESTORE SELECTIVES
Restore Selectives Screen
If you would like to perform a selective restore, select <Restore
Selectives> from the WccUtility Menu.
Restore from disk path:
Type in the name of the path - directory and/or subdirectory that
you wish to restore the data from. If you need to search for the
directory, select <Get Path>.
Get Path:
Select the <Get Path> button to search for the directory and/or
subdirectory that you wish to restore system data from. Select
<Open> to have the path appear in the Restore from disk path
fi eld.
WCC III Technical Guide
Filename:
Change the fi lename or it will default to WCC3SELECTIVES.
If you do not change this name, it may be impossible to tell what
selectives were restored.
Start to Restore:
Select this button to start restoring the data. The system will
automatically restore the saved data. This will take several minutes.
When the restore is complete, there will be a “fi nished!!” message
in one of the fi elds.
Select
<Exit> to return to the WCC Utility Screen.
5-29
Page 32

WCCUTILITY.EXE SCREENS
Comm T est Screen
COMM TEST
If you would like to check communications to and from satellites
on a jobsite, select <Comm Test> from the WccUtility Menu.
The default test speed is 1000 Milliseconds. You can enter a
different number in this fi eld.
5-30
Press <Start> to begin the communication testing. Press <Stop>
or <Close> when you have fi nished testing.
You can only test 10 satellites per window but you can have
multiple windows open.
WCC III Technical Guide
Page 33

WCCUTILITY.EXE SCREENS
Conv erting Old WCC II Data Files
CONVERTING FILES
The new WCC III system can use the same data fi les as the old
WCC II system, but they fi rst need to be converted to a new
format.
Y ou must get the WCC II data fi les off of the old WCC II computer’s
hard drive before you attempt to do the WCC II to WCC III fi le
conversion.
Copy the “old” WCC II fi les to a fl oppy disk. One copy of this
disk should be saved for future reference and another copy of this
disk (or electronic transfer of these data fi les) should be sent to
W attMaster Controls for conversion.
The following contains the instructions for the fi le conversion
whether or not you are performing the conversion yourself or
having WattMaster Controls do it for you.
When you are ready to convert WCC II fi les to WCC III fi les,
select
<Convert Files> from the WccUtility Menu.
This CONVERT FILES subprogram will assist you in converting
theses fi les from the “old” WCC II format to the “new” WCC III
format. The program will prompt you for the location of each of
the “old” WCC II individual data fi les.
The program will then ask you where you want to save the
converted fi les. You can choose your hard drive, a USB drive, etc.
Whatever source you choose, you will need to copy the fi les on
to a USB drive so that you can copy them to the WCC III – MCD
solid state hard disk.
The transferring of these WCC III data fi les is best done by using
the WCC “mcd-menu” batch fi le or remotely with the Webmin
program. The fi les will be copied into the WCC III Linux Backtask
subdirectory: /home/wcciii/.wine/drive_c/Backtask/
The BackTask created fi les are in binary type format and are not
accessible for viewing using common text editors. Instead, you
must use the WCCUtilities.exe to download the fi les for viewing.
WCC III Technical Guide
5-31
Page 34

WCCUTILITY.EXE SCREENS
Conv ert Files Screen
Below is a list of all of the fi les that the WCC II program could
create. Y ou may or may not have all of these fi les, because the WCC
II program will only create them if you use them. For example, if
you do not use the DUTY CYCLE program, there will be no data
fi le for it (the DUT.DAT fi le will be missing).
Convert File Cross Reference T able
New WCC III Filename Old WCC II Filename File Details
AlarmBits.dat Newly Created in WCC III
AlarmMessage.dat ALM.DA T Alarm Message Data
DutyCycleSchedule.dat DUT.DA T Duty Cycle Data
EnergyConsumption.dat EC.dat Energy Consumption Data
GeneralMessage.dat GM.DA T Message Screen Data
GlobalAnalog.dat GAD.DA T Global Analog Data
GlobalBinary .dat GBD.DA T Global Binary Data
HolidaySchedule.dat HD.DA T Holiday Data
LookUpTable.dat Newly created in WCC III
NetworkInformation.dat Newly created in WCC III
OperatorCode.dat OC.DA T Operator Code Data
OptimalSchedule.dat OSD.DAT Optimal Start Data
OverrideSchedule.dat OV .DAT Override Screen Data
PidProgram.dat Newly created in WCC III
ProportionalReset.dat Newly created in WCC III
ShedRestoreSchedule.dat SHD.DA T Shed / Restore Data
Backtask/StatusMessage.dat Newly created in WCC III
SystemParameter.dat SYS.DA T System Parameter Screen Data
Table.dat T ABLE.DAT File created when you rebuild SAT tables
T enantEvent_001_2009_09.dat TENT001.01 Specifi c Tenant Override File
TenantOverride.dat TENT.DA T Tenant Override Data
TenantOverrideRecord.dat Newly created in WCC III
UnitMessage.dat MSG.DAT Units of Measure / Message Screen
WeekSchedule.dat WKD.DAT Week Schedule Data
SA TXXX.DAT The XXX represent numbers
from 1 to 240.
This is the Satellite data fi le which is created
for each controller when it is “Saved to Disk”.
5-32
WCC III Technical Guide
Page 35

WCCUTILITY.EXE SCREENS
BackT ask Created Files
Other WCC II Data Files that are not used by the WCC III System:
Old WCC II
Filename
SE_DESC.DA T Description Search Data
SYS2.DA T System Parameters II Screen Data
NTS.DA T Custom Design Screen Data
ROOM.DA T Search / Override Data
ECSDESP.DAT Energy Consumption Data
SPKEY.DAT Special Keys Data
SE_LOGIC.DA T Logical Search Data
SE_GLOB.DA T Global Search Data
A TR.DAT Screen Colors Data
DUT.DA T Duty Cycle Data
STRING.DA T Data File Changing the COM Port Setting (for Modem)
MODEM.DA T Data File Used for the Latest INIT Strings (for Modem)
BackT ask Created L OG Files
All of these LOG fi les can be remotely downloaded for viewing
using the WCCUtilities.exe program’ s Download option.
File Details
SystemEvent.Log
This Log is appended whenever any WCC system event occurs.
This is a useful tool for tracking of when satellites are connected or
disconnected into the WCC III - MCD.
SystemLog.Log
This Log is appended whenever any WCC system event occurs.
This is a useful tool for tracking of whom and when somebody
logged into the WCC III - MCD.
Alarm.Log
This Log is appended whenever there is a new alarm. This log
fi le can be used in troubleshooting to show when and how often
a particular alarm occurs, to whom it was sent, and if email
transmission was successful. The Log is organized by alarm type.
DataLog.Log
This Log is appended whenever there is a new setpoint change,
schedule change, data point change, etc. This log fi le can be used
in troubleshooting to show the author and date of any change to a
data point within the WCC III - MCD.
AckLog.Log
This Log fi le is appended whenever a new alarm is acknowledged.
This log fi le can be used in troubleshooting to determine the date of
the alarm, the time, and person who acknowledged the alarm.
MCDCommErrorLog.Log
This Log is appended whenever any WCC MCD communication
errors occur. This is a useful tool for determining what types of
communication errors are occurring on the MCD communication
loop.
BackT ask Created DA T Files
All of these DAT fi les can be remotely downloaded for viewing
using the WCCUtilities.exe program’ s Download option.
AlarmBits.dat
This data fi le contains the current status of the alarms that the
BackTask.exe program has processed. This fi le is useful upon
reboot so that the WCC III - MCD does not resend Email alarms.
AlarmMessage.dat
This data fi le contains all of the user-programmable alarm messages
that are displayed on the WCC III Alarm Messages Screen.
WCC III Technical Guide
5-33
Page 36

WCCUTILITY.EXE SCREENS
BackT ask Created Files
BackT ask Created DA T Files (cont.)
DutyCycleSchedule.da t
This data fi le contains all of the actual data that is used in the user-
programmable data fi elds for all fi ve of the WCC III Duty Cycle
Program Scr eens.
EnergyConsumption.dat
This data fi le contains all of the actual data that is used in the
user-programmable data fi elds for all fi fty of the WCC III Energy
Consumption Screens.
GeneralMessage.dat
This data fi le contains all of the actual General messages that are
displayed in the user-programmable WCC III General Messages
Screens.
GlobalAnalog.dat
This data fi le contains all of the actual data that is used in the user-
programmable data fi elds for all 256 of the WCC III Global Analog
Screens.
GlobalBinary.dat
This data fi le contains all of the actual data that is used in the user-
programmable data fi elds for all 512 of the WCC III Global Binary
Screens.
LogOnOff.dat
This data fi le logs the on/off status of the current and past users of the
WCC III system. It works in conjunction with the OperatorCode.
dat fi le.
LookUpTable.dat
This data fi le contains all of the actual data that is used in the data
fi elds for the “Look Up T able Data” in the WCC III Global Analog
Screen.
NetworkInformation.dat
This data fi le contains all of the actual data that is used in the user-
programmable data fi elds for the WCC III Network Information
Screen.
OperatorCode.dat
This data fi le contains all of the actual data that is used in the
user-programmable data fi elds for the WCC III Operator Codes
Screen.
OptimalSchedule.dat
This data fi le contains all of the actual data that is used in the user-
programmable data fi elds for all 64 of the WCC III Optimal Start
Screen.
OverrideSchedule.dat
HolidaySchedule.dat
This data fi le contains all of the actual data that is used in the
user-programmable data fi elds for the WCC III Holiday Schedule
Screen.
This data fi le contains all of the actual data that is used in the user-
programmable data fi elds for the WCC III Overrides Screen.
PIDProgram.dat
This data fi le contains all of the actual data that is used in the user-
programmable PID Program fi elds for the WCC III PID Program
Screen.
5-34
WCC III Technical Guide
Page 37

WCCUTILITY.EXE SCREENS
BackT ask Created Files
ProportionalReset.dat
This data fi le contains all of the actual data that is used in the user-
programmable data fi elds for all 160 of the WCC III Proportional
Program Scr eens.
ShedRestoreSchedule.dat
This data fi le contains all of the actual data that is used in the user-
programmable data fi elds for all 10 of the WCC III Shed/Restore
Program Scr eens.
StatusMessage.dat
This data fi le contains all 30 of the user-programmable “On/
Off Messages” that are displayed in the WCC III ON/OFF/Unit
Messages Screen.
SystemParameter .dat
This data fi le contains all of the actual data that is used in the
user-programmable data fi elds for all 4 of the WCC III System
Parameter Screens.
Table.dat
This fi le is created when you rebuild SAT tables. This is one of the
most important fi les on the WCC III - MCD System. The Table.
dat fi le knows how each and every setpoint within each Satellite
is to be controlled by various Week Schedules, Binary Globals,
Optimal Starts, etc.
Table.bak
This fi le is created when the BackTask.exe program rewrites the
T able.dat fi le. This is a carry over from the “old” DOS based WCC
System. The Table.bak fi le knows how each and every setpoint
within each Satellite is to be controlled by various W eek Schedules,
Binary Globals, Optimal Starts, etc. If for any reason the T able.dat
fi le is corrupted, the BackTask.exe fi le will then use this Table.bak
fi le to recreate the last good Table.dat fi le.
TenantOv erride.dat
This data fi le contains all of the actual data that is used in the
user-programmable data fi elds for all 500 of the WCC III Tenant
Override Screens.
UnitMessage.dat
This data fi le contains the actual user-programmable “Unit of
Measure Messages” that are displayed in the WCC III ON/OFF/
Unit Messages Screen.
WeekSchedule.dat
This data fi le contains all of the actual data that is used in the user-
programmable data fi elds for all 128 of the WCC III W eek Schedule
Screens.
“CUSTOM SLIDE”.dat
This data fi le contains all of the actual data that is used in the user-
programmable data fi elds for all 60 of the WCC Custom Screens.
The name of the “CUSTOM SLIDE”.dat fi le must exactly match
the name of the text fi le (“CUSTOM SLIDE”.TXT) that is custom
created by the end user or contractor. This is an easily created nonpicture based screen.
“BIT MAP”.dat
This data fi le contains all of the actual data that is used in the user-
programmable data fi elds for all 60 of the WCC BitMap Screens.
The name of the “BIT MAP”.dat fi le must exactly match the name
of the bit mapped fi le (“BIT MAP”.bmp) that is custom created by
the end user or contractor. This is an easily created picture-based
screen.
WCC III Technical Guide
5-35
Page 38

WCCUTILITY.EXE SCREENS
Global Math Screen
GLOBAL MA TH
After the newly converted WCC III data fi les have been transferred
to the WCC III - MCD and then put into the correct location on the
solid state hard drive, you can activate the WCC III Global Math
functions.
The transferring of these WCC III data fi les is best done by using
the WCC “mcd-menu” batch fi le or remotely with the Webmin
program.
If you do not activate the Global Math function button, your global
function may not work correctly. Select <Global Math> from the
WccUtility Menu.
There is no confi rmation of completion. This should only have to
be done once.
5-36
WCC III Technical Guide
Page 39

UPLOAD FILE
WCCUTILITY.EXE SCREENS
Upload File Screen
If you would like to transfer a fi le, select <Upload File> from the
WccUtility Menu.
The UPLOAD FILE subprogram is a “ONE WAY” only fi le
transfer system to the WCC III - MCD.
All of the LINUX system fi les are case sensitive, usually all lower-
case letters. However, there are specifi c WCC III fi les names that
use the Windows fi le convention that capitalizes the fi rst letter. You
can successfully transfer fi les with the wrong case-sensitive fi le
names and they will not take effect due to the fact that they are not
considered the same fi le. They are treated as two different fi les.
File From: - Enter the actual long fi le name that you wish to transfer
to the WCC III - MCD, including the subdirectory paths.
<Get File> - Will allow you to select the fi le subdirectory source.
File To: - This will show the path/destination on the WCCIII -
MCD that the fi le will be saved to. There is a box underneath this
box with a drop-down arrow. Clicking on this arrow will show
four different possible paths where fi les can be uploaded onto
the WCCIII – MCD. These paths are C:\Backtask\, C:\Backtask\
StrFiles\, C:\Backtask\SlideFiles\, and C:\Backtask\WGCCFiles\.
The path to use depends on the type of fi le you are transferring to
the WCCIII – MCD.
<OK> - Select <OK> to transfer the fi le.
<Cancel> - Select <Cancel> to return to the WCCUtility Screen.
WCC III Technical Guide
5-37
Page 40

WCCUTILITY.EXE SCREENS
Download File
DOWNLOAD FILE
If you would like to download a fi le, select <Download File> from
the WccUtility Menu.
The DOWNLOAD FILE subprogram is a “ONE WAY” only fi le
transfer system to the WCC III - MCD.
All of the LINUX system fi les are case sensitive, usually all lower-
case letters. However, there are specifi c WCC III fi les names that
use the Windows fi le convention that capitalizes the fi rst letter. You
can successfully transfer fi les with the wrong case-sensitive fi le
names and they will not take effect due to the fact that they are not
considered the same fi le. They are treated as two different fi les.
From: File name: - Enter the actual long fi le name that you wish
to download from the WCCIII – MCD.
<Get File> - Will allow you to select the fi le from the Path that is
shown on the next line.
From: Path: - Shows the path/fi le-folder on the WCCIII – MCD
that <Get File> will look in for the fi le to be downloaded. The next
line has a drop down arrow that will list four different paths on the
WCCIII – MCD that fi les can be downloaded from. These paths
are C:\Backtask\, C:\Backtask\StrFiles\, C:\Backtask\SlideFiles\,
and C:\Backtask\WGCCFiles\.
To: File name: - Shows the actual long fi le name that you wish to
download from the WCCIII – MCD.
To: Path: - Shows the path/fi le-folder on the front end computer
that this fi le will be downloaded to. Click the <Browse> button to
change this path.
OK: - Select <OK> to download the fi le onto the front-end computer.
Cancel: - Select <Cancel> to return to the WCCUtility Screen.
Example:
You have to fi gure out where you want to download the fi le to
before you decide which fi le to download; otherwise, the fi le name
will not be correct unless you manually change it to the fi le you
want to download.
There must be a fi le in the folder on the front end computer you
can select to use as a “pointer.” This fi le can be any kind. This is
the only way this command knows which folder to download to.
Click the
<Browse> button and fi nd (select the fi le inside of the
folder) where you want to download the fi le to on the front end
computer. At this time the File name for the “To:” path will be
the fi lename of the fi le you selected for the path. This will change
when you select the fi le you want to download. This is why you
have to fi gure out where you are downloading the fi le to before you
select which fi le to download or manually change the fi le name in
to “T o:” path.
Choosing which fi le to download: There are 4 folders on the
MCD that you can download a fi le from: Backtask (default path),
StrFiles, SlideFiles, and WGCCFiles. Choose the path for the fi le
you want to download using the drop down arrow.
Click
<Get File> and choose the fi le you want to download. At this
time the File name in the “T o:” path should change to the fi le name
you selected for download.
Once the fi le has been downloaded, click the small “x” in the upper
right corner to close the download progress screen and go back to
the Main Menu Screen of the WCCUtility program.
5-38
WCC III Technical Guide
Page 41

WCCUTILITY.EXE SCREENS
Set Global Map View and Bridge Map
SET GLOBAL MAP VIEW AND BRIDGE MAP
Overview
The “WCC II to WCC III Global Bridge” board provides a means
for the new WCC III system to pass information to and from the
old WCC II system. A single “WCC II to WCC III Global Bridge”
board can simulate (mirror) up to 8 WCC II SAT II Controllers. A
“WCC II to WCC III Global Bridge” can also share Global Binary
and Global Analog information from WCC II to WCC III and
current values of the simulated (mirrored) satellites from WCC III
to WCC II. But this is a one way data fl ow for the Global data, the
direction is from the WCC II system to the WCC III system.
WccUtility .EXE Program Setup
Considerations and Limitations for
Global Bridge
To setup the Global Map for the “WCC II to WCC III Global Bridge”,
you only have to fi ll out the data in one “SetGlobalMapView”
window even if you have multiple “WCC II to WCC III Global
Bridges”. This is because all of the “WCC II to WCC III Global
Bridges” will have the same global analog/binary value that will
come from the WCC II front-end computer .
There are no limitations to the number of global analogs or global
binaries that you can setup from within the “SetGlobalMapView”
window. Of course, you cannot setup more than the WCC II limitations of 128 global analogs and 256 global binaries.
The BACKTASK.EXE program that is running on the WCC III
- MCD requires that the WccUtility.exe program be connected
(via an IP connection) to the WCC III - MCD, that the WccUtility.
exe program be opened and running at all times, and that the
“SetGlobalMapView” window also be opened at all times. This IP
connection must be made so that BACKT ASK.EXE can fetch and
retrieve the global values from the “old” WCC II system.
If you close the “SetGlobalMapView” window or the WccUtility.
exe program, the BACKTASK.EXE program will not be able to
retrieve any global values from the “old” WCC II system. This
means that the “SetGlobalMapView” window that does the global
analog and global binaries value transfers will not transfer these
global analog and global binaries values from the “WCC II to
WCC III Global Bridge” board to BACKTASK.EXE program of
WCC III - MCD.
WCC III Technical Guide
5-39
Page 42

WCCUTILITY.EXE SCREENS
Set Global Map View Screen
SET GLOBAL MAP VIEW
From the WCCUtility.EXE program there are two choices for the
“WCC II to WCC III Global Bridge” board. The fi rst selection
choice is <Setup Global Map>. This is where global information
can be sent from the WCC II system to the WCC III - MCD.
Get Global Value From Satellite: Enter the address for the
“WCC II to WCC III Global Bridge” board. This value should be
higher than the last satellite number on your system. After entering
the address, press the
the address. NOTE: The “WCCII to WCCIII Global Bridge” will
not show on the Satellite Summary Screen.
Set Update Speed: xxxx Milli-second: 1000 milliseconds is
entered for each “WCC II to WCC III Global Bridge” board on
the system. If you have three “WCC II to WCC III Global Bridge”
boards, then a value of 3000 milliseconds needs to be entered for
each “WCC II to WCC III Global Bridge” board. When desired
value is entered, press the
the “Set Update Speed” value.
<Add New Global Analog> Enter the number of the global
analog you wish to send from the WCCII to the WCCIII and press
<Set Satellite Number> button to lock in
<Set Update Speed> button to lock in
5-40
the button. The global will be added to the Global Analog fi eld at
the bottom of the screen. There is no limitation to the number of
global analogs entered.
<Delete Global Analog> Enter the number of the global analog
you wish to delete from the Global Analog box and press the
button. The global analog will disappear from the list.
<Add New Global Binary> Enter the number of the global binary
you wish to send from the WCCII to the WCCIII and press the
button. The global will be added to the Global Binary fi eld at the
bottom of the screen. There is no limitation to the number of global
binaries entered.
<Delete Global Binary> Enter the number of the global binary
you wish to delete from the Global Binary box and press the button.
The global binary will disappear from the list.
See Section 20 for wiring of the Global Bridge board and other
specifi c information.
WCC III Technical Guide
Page 43

WCCUTILITY.EXE SCREENS
SET BRIDGE MAP
Set Bridge Map Screen
From the WccUtility.exe program there are two choices for the
“WCC II to WCC III Global Bridge” board. The second selection
choice is <Set Bridge Map>. This is where satellite information
can be sent from the “new” WCC III - MCD to the old WCC II
system.
Bridge Satellite Number: Enter the address for the “WCC II to
WCC III Global Bridge” board. This value should be higher than
the last satellite number on your system.
<Load Map> After you type in the address Bridge Satellite (SAT
III) number, press the <Load Map> button to see your simulated
satellites (SAT II) that you have selected for simulation.
Simulate Satellites: Enter the satellite number(s) of which you
would like to simulate. There is a maximum of eight satellites per
“WCC II to WCC III Global Bridge” board. These are the SAT II
simulated addresses.
<Set Map> After entering (or adding) satellites to the “WCC II
to WCC III Global Bridge” board, you must press the <Set Map>
button to send the map information to the “WCC II to WCC
III Global Bridge” board. After the map information has been
received, the “WCC II to WCC III Global Bridge” board will
capture the current values from the satellites on the WCC III side
and provide them to the old BACKTASK program that is running
on the WCC II system side for use in the simulated SAT II satellite
logical address.
WCC III Technical Guide
5-41
Page 44

WCCUTILITY.EXE SCREENS
5-42
WCC III Technical Guide
 Loading...