


Oxicom 3000
Oxicom 3000
INSTRUCTION MANUAL
WATERS MEDICAL SYSTEMS
P.O. BOX 6117
ROCHESTER, MN 55901-6117
Telephone: (800)-426-9877
(507) 252-3784
Fax: (507) 252-3700
CEpartner4U BV
Esdoornlaan 13
3951DB; Maarn NL.
+31 (0) 6-516.536.26
Caution: Federal law restricts this device to sale by or on the order of a physician.
REV 042006
WPN 0000607.000
EC REP
IVD

This page intentionally left blank.

1
WATERS MEDICAL SYSTEMS
Customer Service
Waters Medical Systems provides toll-free telephone support to assist you with questions
both technical and non-technical. Most problems can be diagnosed over the phone;
however, if a representative needs to be called we can assist you. The toll-free number is
also used to order instruments, parts, disposables and product information. Orders are
also placed with a purchase order sent in on the Fax number shown below. When calling
with a technical-related question, ask for technical support and your call will be directed
quickly. All other questions can be directed to customer service.
Customer Service:
800-426-9877 (United States & Canada)
507-252-3784 (International calls)
507-252-3700 (Fax)
Returning Equipment
If we cannot resolve equipment problems over the phone, you may need to return your
instrument to Waters. All items to be returned must be issued a RMA (Return Material
Authorization) number in advance. This will prevent delays and possible refusal upon
delivery. All parcels should be shipped to our street address. Correspondence can be
sent to our post office box or use the Fax number above.
Parcels: Waters Medical Systems
Attn: Medical Systems RMA#
2112 15th Street NW
ROCHESTER MN 55901
Correspondence: Waters Medical Systems
Attn: Medical Systems
P.O. Box 6117
ROCHESTER MN 55903-6117

2
WATERS MEDICAL SYSTEMS
QUALITY POLICY
Provide products and services that meet our
customer's expectations, are defect free, and are
delivered on time.

3
TABLE OF CONTENTS
SECTION TITLE PAGE
Customer Support......................................................................................1
1 General Information..................................................................................5
1.1 Introduction............................................................................................7
1.2 Benefits..................................................................................................7
1.3 Theory of Operation...............................................................................8
1.4 Accuracy Limitations.............................................................................8
2 Operating Controls..................................................................................11
2.0 Operating Controls...............................................................................13
2.1 Front Panel Controls............................................................................13
2.2 Back Panel Controls.............................................................................15
2.3 DC-80 Disposable Cuvette ..................................................................15
3 Operating Instructions............................................................................17
3.1 Sample Preparation & Blood Handling ...............................................19
3.2 Power On & Warm-up.........................................................................21
3.3 Quality Control ....................................................................................22
3.4 O
2
Saturation Mode..............................................................................30
3.5 O
2
Content Mode .................................................................................31
3.6 Heparinize Cuvette...............................................................................35
4 Calibration................................................................................................37
4.1 Calibration Theory...............................................................................39
4.2 Blood Sample Preparation ...................................................................40
4.3 Determine Functional Oxygen Saturation ...........................................43
4.4 Calibration............................................................................................44
4.5 Oxygen Content Capacity Adjustment ................................................49
5 Maintenance .............................................................................................53
5.1 Maintenance Schedule.........................................................................55
5.2 Quality Control Filters - Cleaning .......................................................55
5.3 Sample Chamber Cleaning ..................................................................55
5.4 Factory Default Settings ......................................................................57
5.5 Error Codes..........................................................................................59
5.6 Erroneous Readings.............................................................................62
6 Appendix...................................................................................................66
Oxicom-3000 Specifications......................................................................68
Abbreviations.............................................................................................70
Equations....................................................................................................71
Worksheets.................................................................................................72

4
This page intentionally left blank.

5
SECTION 1
GENERAL INFORMATION

SECTION 1 GENERAL INFORMATION
6
This page intentionally left blank.

SECTION 1 GENERAL INFORMATION
7
INTRODUCTION
The Waters Medical Oxicom 3000
Whole Blood Oximeter is designed for today's
busy cardiac catheterization laboratory
requirements and standards. The Oxicom 3000
will provide accurate, repeatable saturation
measurements in less than ten seconds and will
automatically compute AVO
2
difference, if the
patient's hemoglobin has been entered.
The Oxicom 3000 optically measures the
light absorption of the blood to measure
functional oxygen saturation. Blood is infused
into a safe, convenient, single-use, disposable
cuvette. No special cleaning solution, calibrator,
or tubing is required.
1.2 BENEFITS
The Oxicom 3000 uses the latest
fiberoptic technology and a solid state detector
to provide accurate and repeatable oxygen
saturations. In the oxygen saturation mode, the
Oxicom 3000 will provide results in less than 10
seconds.
For convenience and accuracy in
determining cardiac output by the Fick method,
the Oxicom 3000 measures oxygen saturations
of arterial and venous samples and calculates
content and AVO
2
difference. Simply input the
patient's hemoglobin and insert the arterial and
venous samples and the Oxicom 3000 will
automatically compute the AVO
2
difference.
Contact with blood and contaminated
waste products is virtually eliminated with the
Oxicom 3000. Blood samples are injected into a
sealed, single-use disposable cuvette which is
easily inserted into the sample chamber located
on the front panel. After the sample is measured,
the cuvette and syringe are disposed with other
hospital wastes.
CAUTION:
Be sure that the cuvette and syringe are
disposed of in a manner consistent with good
hospital practices for infectious materials.
The introduction of fiberoptic
technology has eliminated the need for
maintaining tubing or pumps with the Oxicom
3000. No zeroing or calibration solutions are
required.
The Quality Control (QC) filters
supplied with your Oxicom 3000 allows the user
to check the calibration of the Oxicom 3000.
The set of filters consist of one translucent
plastic filter (QCl), and two precision glass
filters (QC2 and QC3).
The optical densities of these filters are
stored in the unit's microprocessor. When
inserted into the sample chamber the Oxicom
3000 measures the optical density and compares
it to the value stored. If the optical densities
match the display will read a %Sat value. After
affirming that the Oxicom 3000 is calibrated,
the unit is ready to use.
Liquid control samples are also available
but can not be used to calibrate in place of
whole blood.

SECTION 1 GENERAL INFORMATION
8
1.3 THEORY OF OPERATION
The Waters Oxicom 3000 is a Whole
Blood Oximeter with the capability to measure
functional oxygen saturation, calculate oxygen
content and AVO
2
difference (Arterial, Venous
Oxygen content difference). The Oxicom 3000
measures functional oxygen saturation of a 0.5
ml sample of whole blood. Then, using the
patient's total hemoglobin level, it will calculate
the oxygen content of that sample.
The Oxicom 3000 uses a silicon
photodetector and light emitting diodes (LED)
mounted in a sealed housing within the
instrument. The blood sample is contained in an
optically clear, disposable cuvette. The blood-
filled cuvette is inserted through the front of the
instrument into the sample chamber housing.
BLOOD IS NOT INFUSED INTO THE UNIT.
The optical density of the sample is
measured using two pulsed LEDs and one
photodiode. The Oxicom 3000 system is
designed to pulse on the infrared (IR) LED, and
measure the optical density at 805 nm
(manometers). Alternately, the red LED is
turned on and measures the optical density at
660 nm. The photodiode converts the light
transmitted through the blood filled cuvette into
a current proportional to the amount of incident
light. The current is processed by the
microprocessor and the functional %O
2
SAT is
calculated by the Oxicom 3000. When the
Oxicom 3000 is in the Content mode it will also
calculate and display the arterial and venous
content along with AVO
2
difference.
The amount of IR light absorbed by the
blood is relatively independent of the blood's
oxygenation. However, RED light absorption or
optical density , is strongly dependent on the
oxygen saturation. The ratio of the optical
densities at the two wavelengths is used to
calculate the functional oxygen saturation.
1.4 ACCURACY LIMITATIONS
LIPID SAMPLES:
Lipid (fat) particles in a blood sample
may distort the normal light scattering
and cause erratic readings.
HEPARIN AND SALINE:
Excess heparin and saline dilutes and
lowers the hemoglobin of the sample.
This artificially raises the percent
saturation reading of the sample and can
cause separation which further raise the
percent saturation reading. Experience
indicates samples with 10% or more
liquid heparin or saline will affect the
reading. Prior to withdrawing a sample
of blood from any arterial line, the
operator should aspirate 3-5 cc of blood
from the line to remove any residual
heparin or saline.
AIR BUBBLES:
Care should be taken to prevent
oxygenation of the sample, always point
the syringe and cuvette up. If micro
bubbles are present, the oxygen
saturation of the sample tends to rise 1-
2%.
INTERFERING DYES:
Indocyanine (Cardio) Green, Evans Blue
and Methylene Blue dyes absorb light at
the same frequencies as blood. The
presence of these dyes will effect oxygen
saturation readings of the Oxicom 3000.
Studies using interfering dyes must be
run after blood samples have been taken
to avoid erroneous readings.
OLD BLOOD SAMPLES:
Inserting the cuvette into the sample
chamber within 10 minutes is
recommended. If a delay is anticipated
and clotting may begin, the syringe
should be pre-coated with heparin.
CUVETTE HANDLING:
Care must be taken not to contaminate
the optical path of the cuvette. Do not
reuse cuvettes or the white plugs. Do not
lay the cuvette on edge; this will
increase the chance of blood separation.
The clear sampling area should be laid
face down.

SECTION 1 GENERAL INFORMATION
9
CARBOXYHEMOGLOBIN and
METHEMOGLOBIN:
The Oxicom 3000 is an oximeter which
uses two wavelengths to determine the
Functional Oxygen Saturation. Two
wavelength oximeters such as the
Oxicom 3000 cannot determine the
amount of carboxyhemoglobin or
methemoglobin. They can only
determine the percentage of
oxyhemoglobin as it relates to the total
hemoglobin available for oxygenation.

10
This page intentionally left blank.

11
SECTION 2
OPERATING CONTROLS
SECTION 2 OPERATING CONTROLS
12
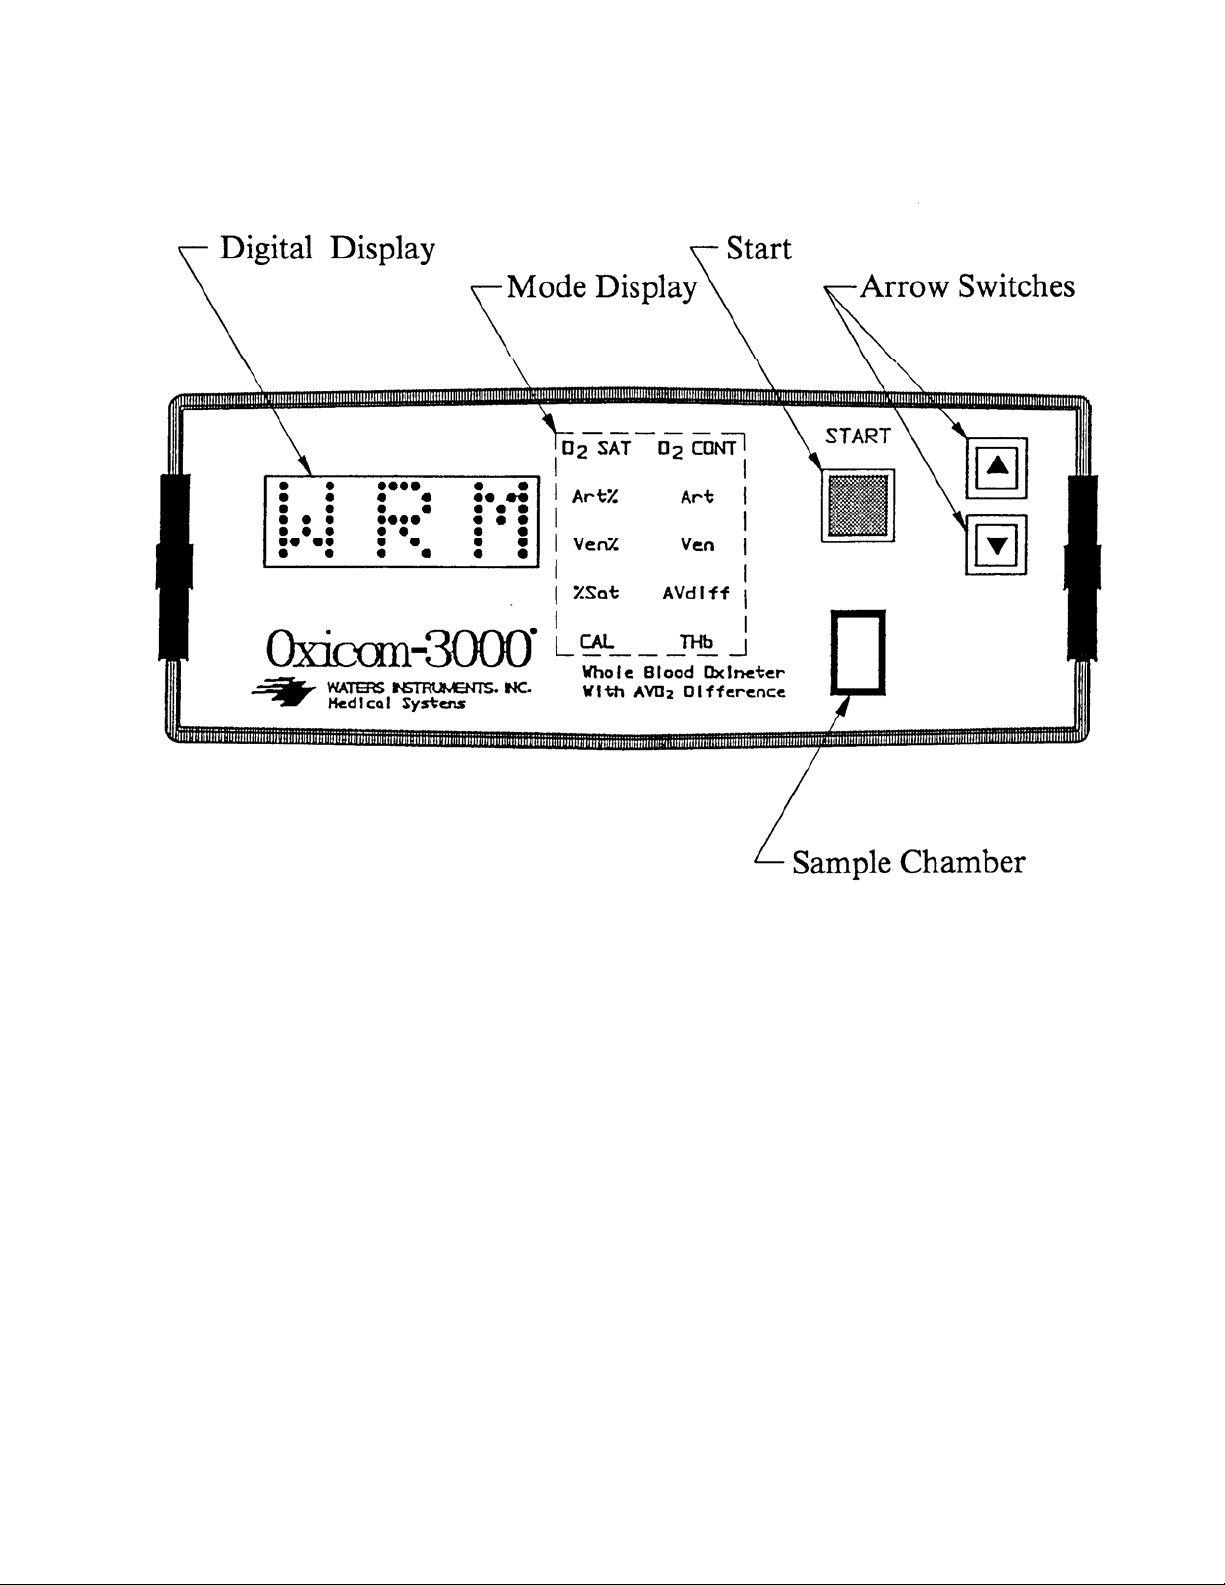
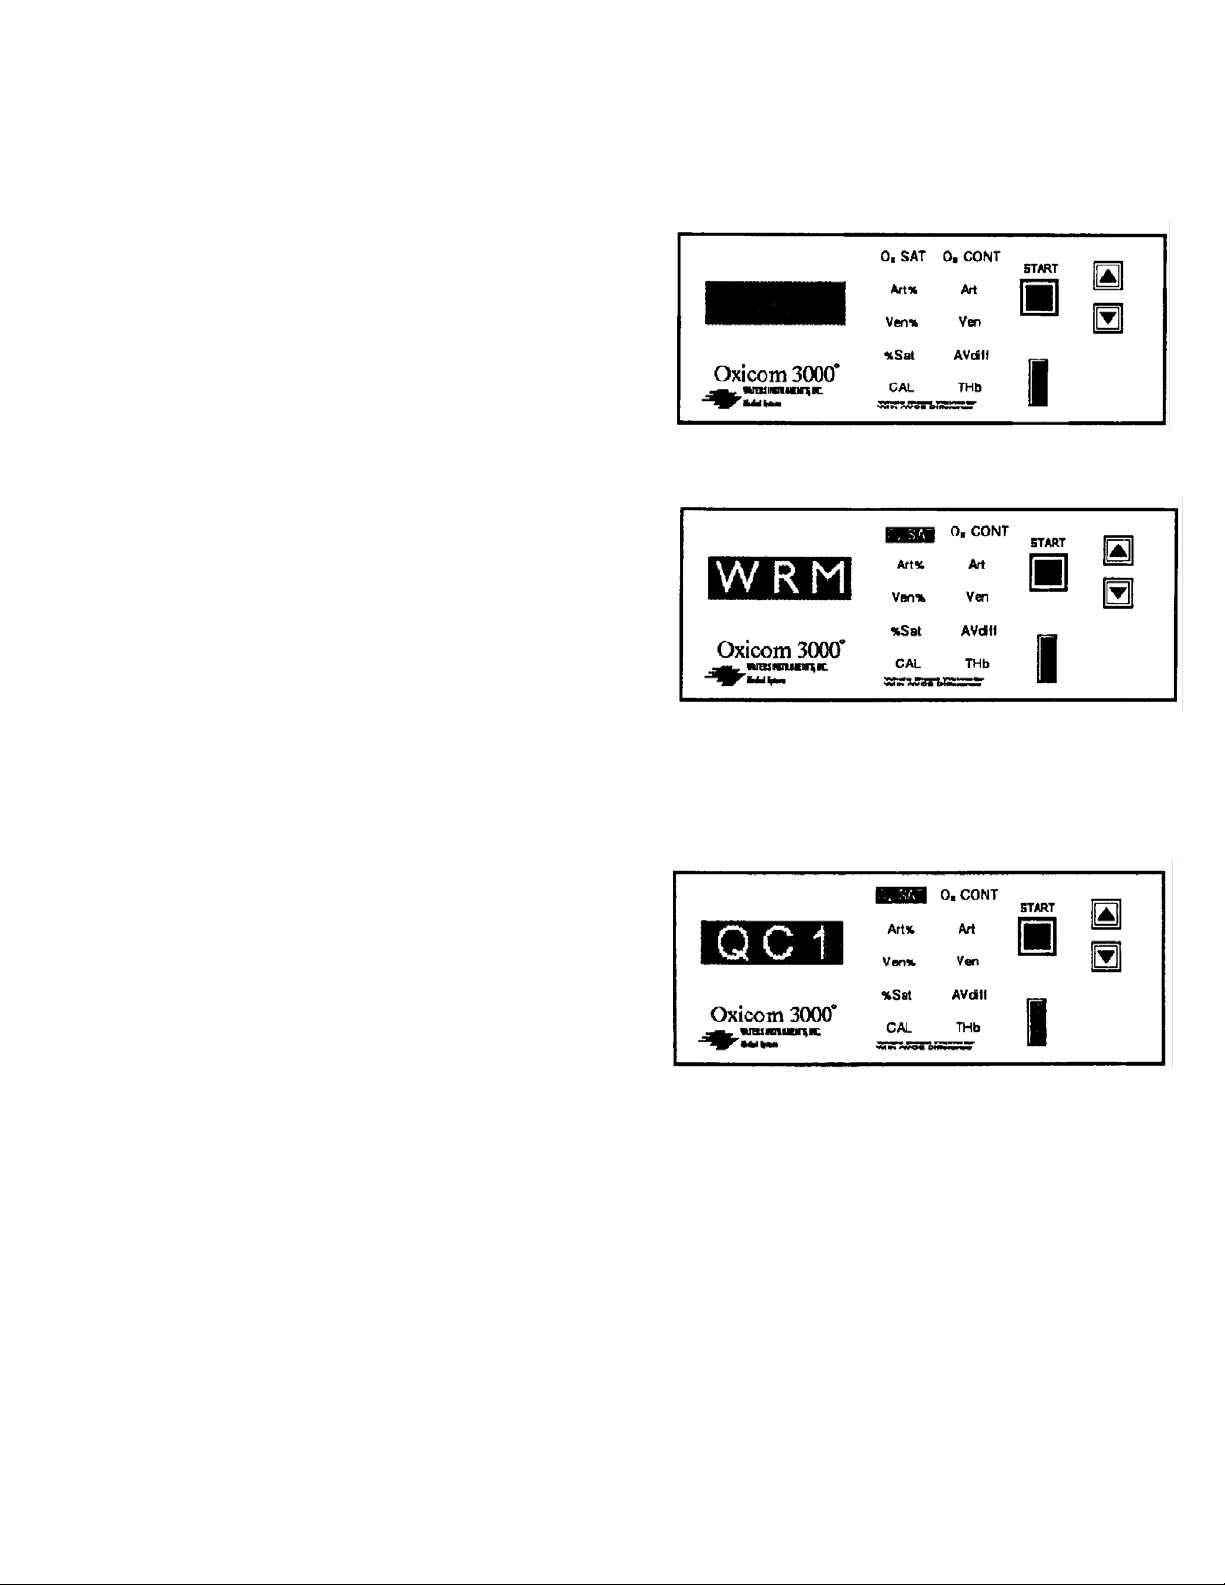
Oxicom 3000 Front Panel
Operating Controls
Figure 2.1

SECTION 2 OPERATING CONTROLS
13
2 OPERATING CONTROLS
This section describes the controls, displays and
markings on the Oxicom 3000.
2.3 FRONT PANEL CONTROLS
DISPLAY: The measurement display consists
of a three character display with two
decimal points. Whenever the decimal
points alternate positions the Oxicom
3000 is processing information. The
display provides the user with the
following information.
WRM - WaRM-up indicates that the Oxicom
3000 is in the timed 15 minute warm-up
period.
RDY - ReaDY indicates the Oxicom 3000 is
ready to accept blood samples. If the unit
has been turned off and on again, you
may bypass the warm-up by waiting 10
seconds and pressing START.
THb - Total Hemoglobin. The THb can be
entered by the user or the Oxicom 3000
will use the default value of 13.4, 13.6 or
13.9. To raise or lower the THb value,
use the up or down arrow switches. Push
the START button to enter the THb
value into the microprocessor. The new
value will be used for all future
calculations or until the Oxicom 3000 is
turned off. When the unit is turned on it
will always show one of the default
values 13.4, 13.6 or 13.9.
INS - INSert instructs the operator to insert the
cuvette.
RMV - ReMoVe, instructs the user to remove
the cuvette or Quality Control Filters
from the sample chamber.
ER1 - ER9 & ERa - ERe - ERror Codes l - 9
and a - e indicate the Oxicom 3000 was
unable to measure the blood samples.
Refer to Section 5.4 for more
information.
OCC - Oxygen Content Capacity. The OCC
value is used to calculate the O
2
content.
The factory set OCC is 1.34. To select
1.36 or 1.39, refer to section 4.7. The
Oxicom 3000 will remind the user of the
OCC value when in the O
2
CONT mode.
The default value for THb will be 10
times the OCC value.
* - The * symbol followed by any number
indicates that the %SAT value to be
displayed exceeds 99.9%. Example: If
the display reads *2.4 the actual value is
102.4.
Decimal Point - The two decimal points on the
display indicate the magnitude of the
reading and will alternately flash at one
second intervals during balancing and
calibration.
MODE DISPLAY: The Mode Display works in
conjunction with the Mode Switch
(O
2
CONT/O
2
SAT) on the back panel.
Depending on the position of the Mode
Switch, O
2
SAT or O
2
CONT will be lit
on the front panel. When in the O
2
SAT
mode the O
2
SAT and %Sat will function
together. When in the O
2
CONT mode
the following indicators will function:
Art%, Ven%, Art, Ven, AVdiff and
THb.
O
2
SAT - The Oxicom 3000 is operating in the
Oxygen Saturation mode. This mode
measures the functional oxygen
saturation of one sample and displays the
value as %Sat.
%Sat - % Saturation. The %SAT will light only
when the mode switch is in the O
2
SAT
position. The display shows the
functional oxygen saturation value of the
blood sample.

SECTION 2 OPERATING CONTROLS
14
O
2
CONT - The Oxicom 3000 is operating in
the Oxygen CONTent mode. This mode
measures the functional oxygen
saturation of a single sample and
calculates the oxygen content of that
sample based on the user entered THb
level. Then The Oxicom 3000 calculates
the AVO
2
difference of two paired
samples.
Art% - Arterial Oxygen Saturation percent (%).
The Art% will light only when the unit is
in the O
2
CONT mode. If the first
sample's saturation value is above 85%
SAT, the blood is assumed to be an
arterial sample. If both samples are
above 85% the higher will default to
arterial, the lower to venous
Ven% - Venous Oxygen Saturation percent
(%). The Ven% will light only when the
unit is in the O
2
CONT mode. If the first
sample's saturation value is lower than
85% SAT, the blood is assumed to be a
venous sample. If both samples are
below 85%, the lower will default to
venous and the higher to arterial.
Art - Arterial Oxygen Content. The Art light
indicates that the displayed reading is the
arterial oxygen content of the blood
sample.
Ven - Venous Oxygen Content. The Ven light
indicates that the displayed reading is the
venous oxygen content of the blood
sample. The arterial or venous oxygen
content is calculated by the %SAT
(Venous or Arterial) multiplied by THb
multiplied by 1.34.
%SAT (Venous) x THb x 1.34 = Venous Content
AVdiff - Arterial Venous difference. The
AVdiff is the difference in oxygen
content of the arterial and venous blood
samples.
THb - Total Hemoglobin. The THb indicator
will light when the number being
displayed is the total hemoglobin value
to be used in the content calculation. The
default value is 13.4. To raise or lower
the value press the appropriate arrow
switches.
CAL - The CALibration indicator will be lit
when the operator has entered the
calibration menu. Refer to the calibration
instructions Section 4.
START - The START button is used to initiate
blood sample measurements in both
saturation and content modes. It is also
used to lock into memory the total
hemoglobin value when in the content
mode. START also places the Oxicom
3000 in the calibration mode when
depressed and the POWER switch is
turned on.
Arrow Switches - The Up/Down Arrow
switches are functional only in the
content and calibration modes. In the
content mode , the switches allow the
operator to adjust the displayed value to
the correct total hemoglobin value to be
used during the test. The switches will
also allow the operator to review each
value shown on the mode display after
an AVO
2
calculation. In the calibration
mode, the operator will use the Arrows
to adjust the displayed value to the
correct functional saturation.
Sample Chamber - The disposable cuvette is
inserted into the sample chamber. The
display directs the user to INSert the
cuvette. DO NOT INJECT BLOOD
INTO THE SAMPLE CHAMBER.
SECTION 2 OPERATING CONTROLS
15
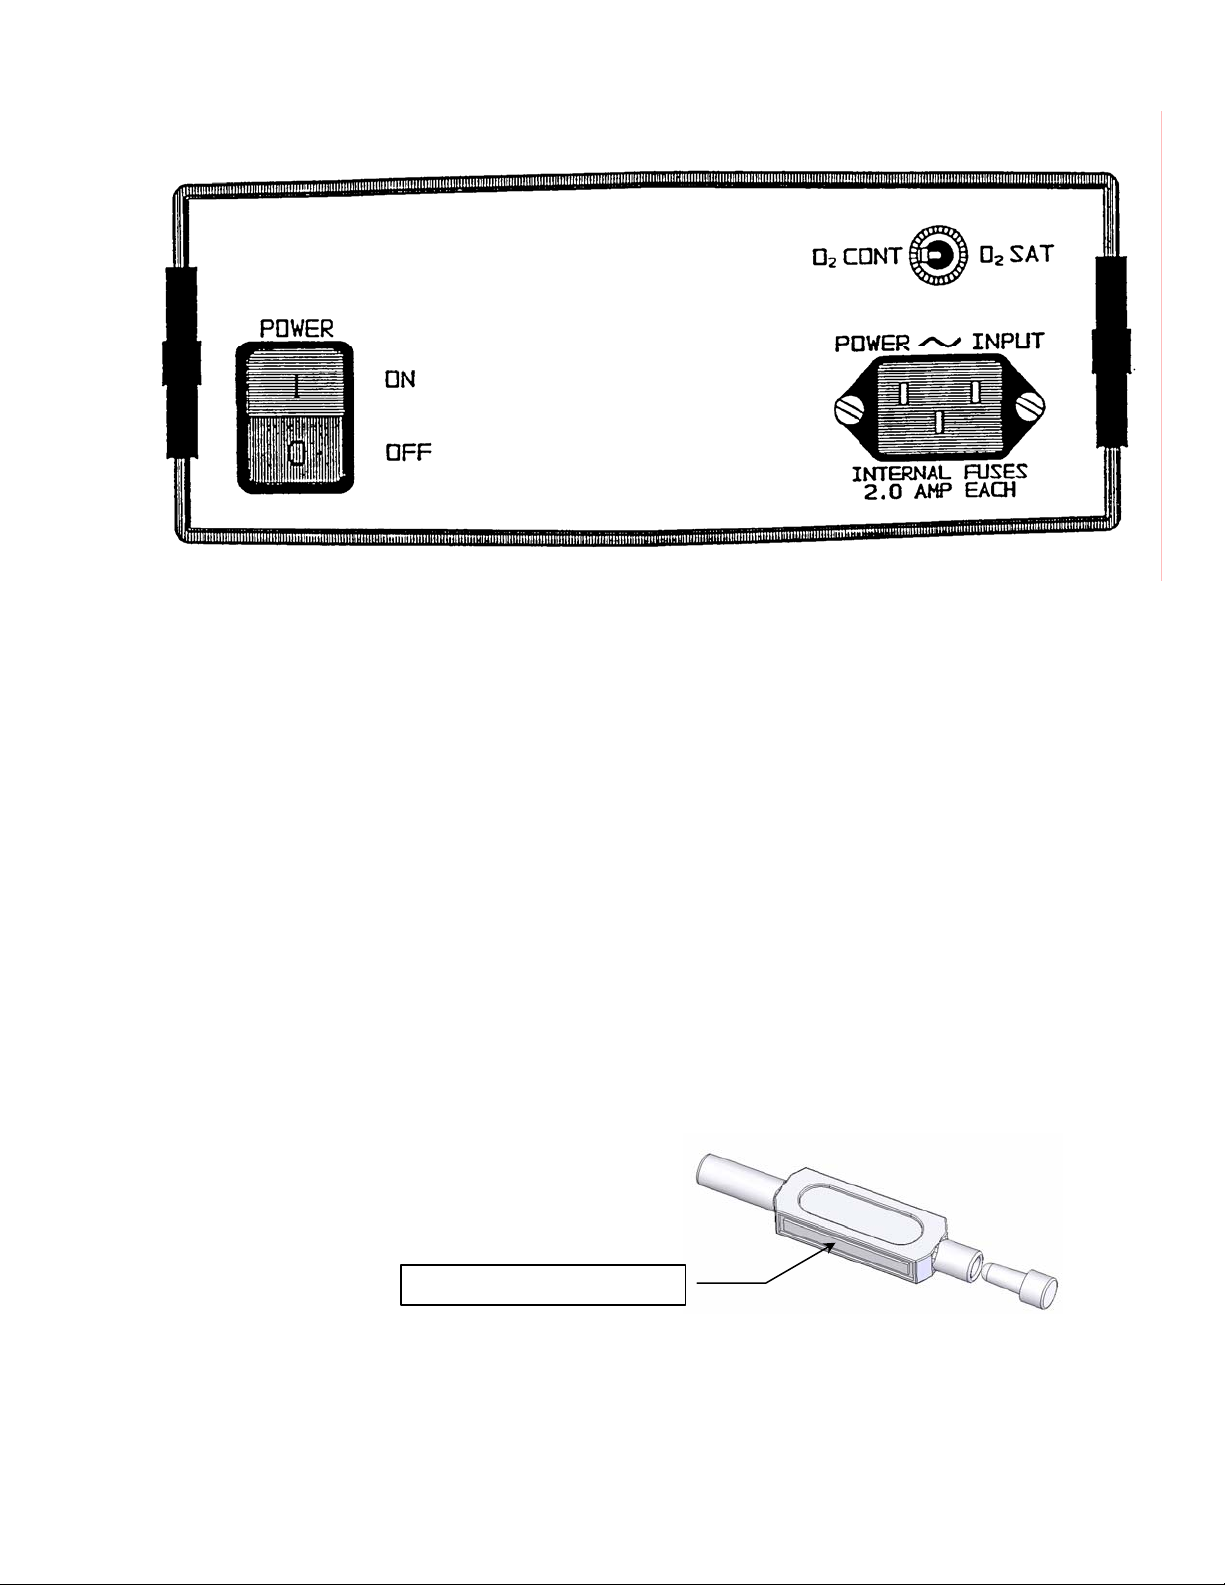
Oxicom 3000 Back Panel
Operating Controls
Figure 2.2
2.2 BACK PANEL CONTROLS
POWER - Switch applies AC power to the
Oxicom 3000. When the Oxicom 3000 is
turned On all the indicators on the front
panel will do a self test. "WRM" will be
displayed when completed.
O
2
SAT/O
2
CONT (Mode Switch) - This switch
selects either Oxygen SATuration
(O
2
SAT) or Oxygen CONtent
(O
2
CONT) mode of operation. If the
mode switch is changed once a test has
been initiated the test will be aborted.
POWER INPUT: Detachable AC power cord
connection.
2.3 DC-80 DISPOSABLE CUVETTE
The DC-80 cuvette is used to hold the
blood sample. It is a disposable single use
device. Do not reuse the cuvettes or filters. The
cuvette has a top and a bottom, a small panel
indicates bottom and should always be inserted
into the Oxicom downward. The porous filters
come with the cuvettes and are to be mounted
on the short neck of the cuvette. The filters
allow air to pass through when the cuvette are
being filled with blood, and prevent blood from
spilling from the tip of the cuvette. The filters
are also called cuvette caps, caps, or plugs.
Disposable Cuvette and Porous Filter
Figure 2-3
Position panel facing down.

16
This page intentionally left blank.

17
SECTION 3
OPERATING INSTRUCTIONS

SECTION 3 OPERATING INSTRUCTIONS
18
This page intentionally left blank.

SECTION 3 OPERATING INSTRUCTIONS
19
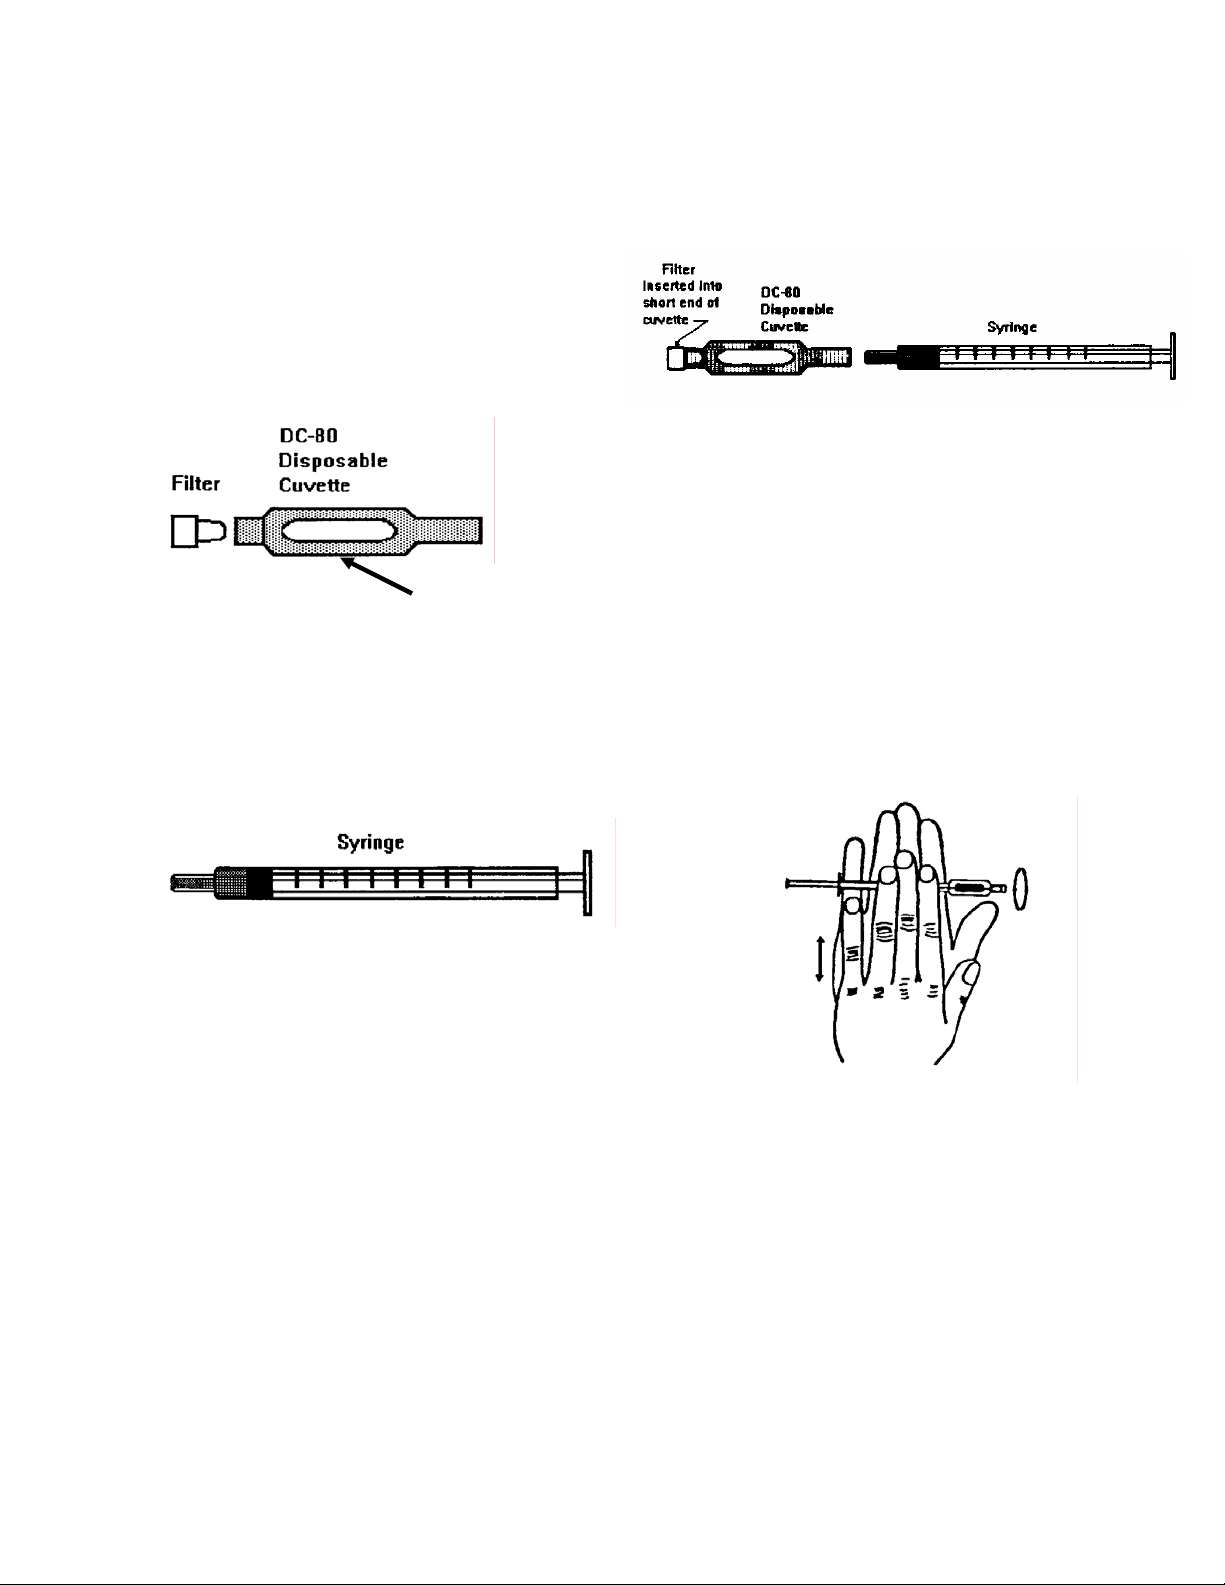
3.1 SAMPLE PREPARATION AND
BLOOD HANDLING
The Oxicom 3000 requires less than 0.5 cc
of blood to measure blood oxygen saturation.
The blood sample is withdrawn into a syringe.
A disposable cuvette with filter is placed on the
syringe. Blood is then infused into the cuvette
and the cuvette is inserted into the Oxicom 3000
sampling chamber. Syringes and cuvettes are
discarded after the sample has been measured.
The disposable Oxicom 3000 cuvettes are
not heparinized. Therefore, the user must take
the necessary precautions to prevent the blood
sample from clotting. If the oxygen saturation of
the blood sample is going to be determined
within ten minutes of withdrawing, no heparin is
required. If the sample is to be used for
calibration of the Oxicom 3000, heparin is
recommended, refer to Section 3.7.
For proper measurements, calibration and
personal safety, it is essential that you follow
these steps consistently.
HELPFUL HINTS:
All samples should be measured within
ten minutes of withdrawal. The sooner the
samples are measured the less likely the blood
cells will separate.
Evacuate any air bubbles that remain in
the syringe before mounting the cuvette. Air
bubbles within the cuvette may alter the reading,
especially during calibration.
Inspect the cuvette for cleanliness prior
to use. Do not touch the sampling area (the clear
surface) of the disposable cuvette. Handle the
cuvette by their edges or tips.
Do not allow the cuvette to lie on the
edge. Position the cuvette on the syringe so that
when laid down, one of the cuvette side's face
down. This will minimize any cell separation
that may occur if the sample is not measured
after withdrawal.
Place the porous filter (white plug) onto
the disposable cuvette before infusing the blood
from the syringe, except when calibrating the
Oxicom 3000.
Do not force the blood sample into the
cuvette. If a resistance is felt, discard and try
another cuvette and filter.
Do not allow the filters to come in
contact with any fluid prior to mounting on
cuvette.
Do not reuse cuvettes or white plugs.
The sample must be mixed prior to
inserting into the Oxicom 3000.
Samples diluted with saline or heparin
will cause erroneous readings. All residual
saline or heparin must be removed from the line
before aspirating into the sample syringe.
Cardiogreen dye and other dyes will
effect the oxygen saturation reading. All
saturation measurements must be made before
dye injections are made.
SECTION 3 OPERATING INSTRUCTIONS
20
SUPPLIES:
Disposable cuvette, one for each sample.
Porous filter, one for each cuvette.
Syringe, one for each sample.
Tissues or 4x4 gauze.
PROCEDURE
1. Prepare the cuvette and filters by mounting
the filters onto the short end of the cuvette.
2. Flush or withdraw enough blood from the
patient line in order to remove any saline. If the
line is not properly flushed the sample will be
contaminated and poor readings will result.
3. Withdraw 1 to 2 cc of blood from the line
into the syringe. Evacuate any air bubbles that
may be in the sample . If necessary, gently tap
the syringe to knock any air bubbles loose.
4. Mount and secure the long end of the
cuvette onto the syringe.
5. Holding the cuvette and syringe vertically,
slowly infuse the blood into the cuvette. Do not
allow any air bubbles to adhere to the internal
surface of the cuvette. Gently tap the cuvette if
bubbles begin to develop.
6. The sample should be mixed by rolling the
syringe between your hands in a horizontal
position.
7. Proceed to Section 3.2 for instructions on
measuring a blood sample.
Bottom panel
(Always position down)
SECTION 3 OPERATING INSTRUCTIONS
21
3.2 POWER ON & WARM-UP
USER ACTION
1. Turn the power switch (Back Panel) to the
On position.
2. When the warm up period has been
completed the display will show "QC1" for a
moment then "INS" will be displayed. This
indicates that the Oxicom 3000 is ready to
perform the Quality Control (QC) procedure.
To perform the QC procedure proceed to
Section 3.3, Step 1.
The Oxicom 3000 performs display and
indicator checks.
The Oxicom 3000 requires a minimum
warm-up period of 15 minutes. "WRM"
will be displayed during the warm up
period.
"QC1" momentarily displayed.
 Loading...