

Page 1
[ Care and Use ManUal ]
Extraction Manifold
CONTENTS
I. INTRODUCTION
II. IDENTIFYING PART S
III. USING THE WATERS
EXTRACTION MANIFOLD
IV. NEEDLE TIP INSTALLATION PROCEDURE
V. SPARE PARTS AND ACCESSORIES
I. INTRODUCTION
The Waters Extraction Manifold features:
Positions for up to twenty extraction cartridges.
Long needle tips which channel the cartridge effluents directly
into the corresponding collection vessels and eliminate immediate
fittings which could be a source of sample loss or crosscontamination in other manifold designs.
Vacuum gauge, control and release valves for monitoring and
adjustment of vacuum level to control flow rate.
A choice of four racks to accommodate a variety of collection
vessels.
Three-point interlocking system to ensure proper orientation of
racks, keying cartridge position to corresponding collection vessel.
Chemically resistant, non-contaminating construction of glass,
polyethylene, polypropylene, and Delrin™ components.
Individually controlled, needle-tipped valves (stopcocks), available
as accessories, permit simultaneous processing of samples when
drying of traditional SPE cartridges must be avoided.
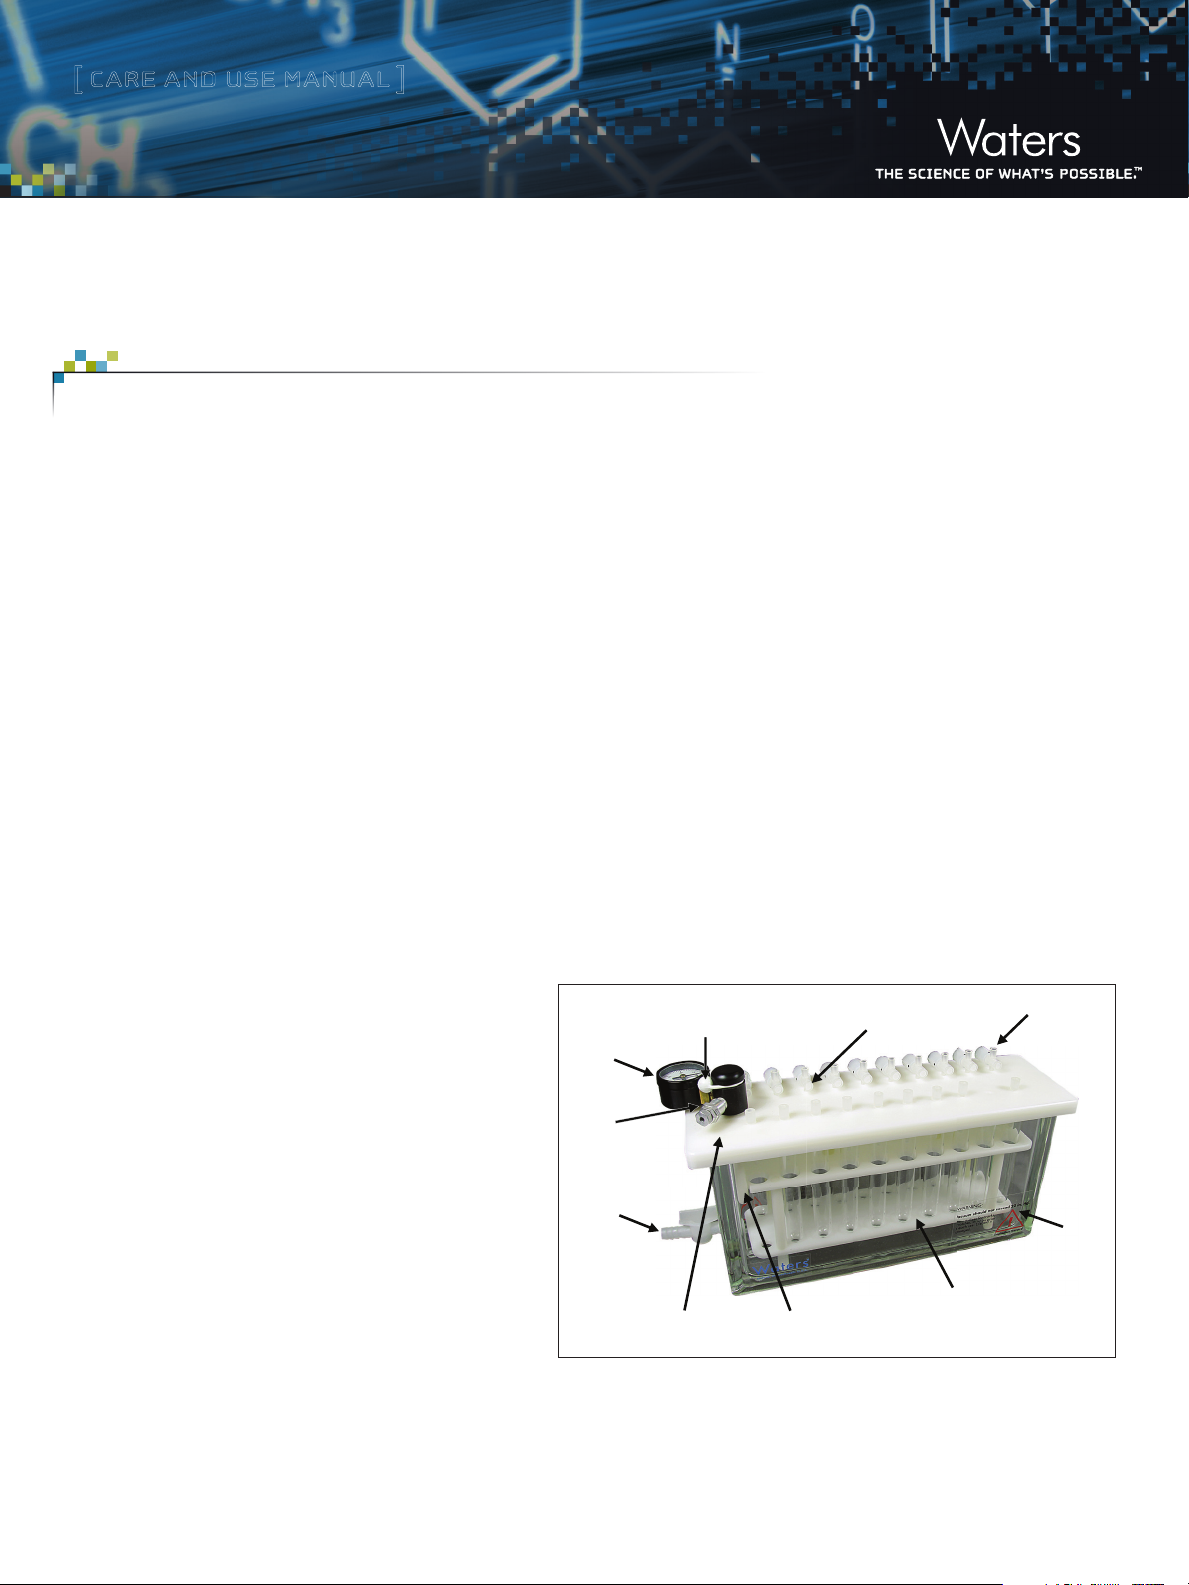
Ball Ring:
for vacuum release
Vacuum Gauge
Vacuum
Control Valve
Exit Valve: connected to
vacuum pump with inline
liquid trap using 3/8” ID
vacuum tubing.
Cover: its three legs interlock with rack top plate
Figure 1. Waters 20-Position Extraction Manifold.
Needle Tip
(option for 13 x 100 mm tubes shown)
Rack
Luer Plug
Chamber
Page 2

[ Care and Use ManUal ]
II. IDENTIFYING PARTS
Before assembling the Waters Extraction Manifold, ensure that you
have these parts (refer to Figure 1 on previous page):
In Extraction Manifold Package:
Glass chamber with exit valve installed
White Delrin cover* with polyethylene gasket,
vacuum gauge, control and release valves installed
Needle tips, long (polypropylene), 20/pk
Luer plugs, male (polypropylene), 25/pk
Needle tip ejector tool (not shown)
Packaged separately:
Rack, 20-position, as specified
*The three posts on the underside of the cover have two purposes. First, they
serve as elevated feet so that the cover can be set down conveniently on the
bench top without damaging the needle tips that protrude through the top of the
cover. Second, they align only one way with the corresponding notches in the
top plate on a rack. This makes is easier to keep track of a particular sample/
cartridge and its corresponding collection vessel.
Caution
Glass vessels under vacuum have a danger of implosion if
struck or damaged.
Inspect the glass chamber for cracks, scratches, or other
defects prior to each use.
Do not use a chamber with visible defects.
Do not exceed a vacuum level of 22” Hg (560 mm Hg).
III. USING THE WATERS EXTRACTION MANIFOLD
A typical solid-phase extraction (SPE) procedure consists of the
following steps:
a. Condition/equilibrate the cartridge bed.
b. Load the sample.
c. Wash off interferences.
are treated as waste. The waste is drawn down into a liquid trap
through the exit valve at the base of the glass chamber. However,
when optimizing or troubleshooting an SPE protocol, it may be
desirable to collect fractions in Steps b, c, and d; in this case, a
separate set of tubes will be used for each of these steps.
Procedure
1. Connect the vacuum source to the outlet of a liquid trap using
vacuum tubing. Connect the trap inlet to the exit valve at the
case of the glass chamber using 3/8” I.D. vacuum tubing.
Attention: Make certain that the liquid trap is compatible with, and
has sufficient capacity to collect, all the waste that will be generated
in your SPE procedure. If the trap capacity is too small, waste may
contaminate and/pr damage the vacuum pump.
2. Put the cover on the glass chamber.
3. Install a value (stopcock) in each of the 20 ports with the valve
handle pointing outward, perpendicular to the edge of the
chamber, so it is easily accessible for manipulation. Turn the
body of each valve slightly to seal its needle tip firmly in its
hold. The tips will extend into the mouths of the corresponding
collection vessels, once a rack is in place underneath the cover.
4. Put an extraction cartridge into each valve hub and seat it firmly.
5. Close all valves by turning handles until each indicator shows
that valve is in the closes position. See figure 2.
When using Waters Oasis® HLB Cartridges, stopcocks are not needed.
Instead, install a needle tip with female Luer hub into each of the 20
ports. Make sure that the ridges on the outside of a needle tip (at the
top just under the hub) mate with the grooves inside the hold in the
cover. Seal all unused tips with make Luer plugs. Put an Oasis HLB
Cartridge into each unplugged needle tip hub. See Figure 3.
6. Turn on the vacuum pump. Adjust control valve to set the
desired vacuum level.
7. Follow SPE protocol recommended for the type of cartridge
used and the application being done. Add fluid into all
cartridge reservoirs for each step before opening the valves
to start or resume flow.
d. Elute analyte(s) of interest.
The Waters Extraction Manifold permits these steps to be carried
out on up to twenty cartridges in parallel. Figure 1 shows the
manifold assembled (without cartridges or valves) with a rack of
tubes in place ready to collect the eluates in Step d. In Steps a–d,
a rack is not necessary as the eluates from these steps normally
2
Extraction Manifold
Page 3

[ Care and Use ManUal ]
Sep-Pak® Vac
Cartridge
Valve (stopcock)
OPEN CLOSED
Figure 2. Waters Sep-Pak® Cartridges
and most SPE devices are firmly
seated into the Luer hubs atop valves.
(Sep-Pak Classic Cartridges require
male-male Luer adapters for this
purpose.) Valve (stopcock) handle is
rotated to an open or closed position
(as indicated) to control the flow
through an individual cartridge.
Attention: Proper use of many SPE cartridges requires that the liquid level does not fall below the top frit. This is
especially true for Steps a and b listed above. Close each valve, as necessary, so as to prevent the cartridge from
drying out. Otherwise poor recovery and/or reproducibility may result. (See references on Waters website: www.
waters.com/oasis). This precaution is not necessary when using Waters Oasis HLB Extraction Cartridges.
Oasis™ HLB
Cartridge
Needle Tip
(polypropylene)
Figure 3. Waters Oasis HLB Extraction
Cartridges are fitted directly to the
needle tips. Note: No valves (stopcocks)
are needed.
8. To install or remove a rack of collection vessels, first close the exit valve (the pump can stay on;
alternatively, turn off the pump). Break the vacuum in the manifold changer completely by slightly
offsetting the white ball from its seal (see Figure 4). Then remove the cover. After a rack as been
installed or removed, replace the cover with the corresponding notches on the top plate of the rack. Then,
open the exit valve (and, if you had turned it off, turn on the vacuum pumps) to re-evacuate the chamber.
Vacuum may be temporarily increased by putting your finger over the bleed port hold at the end of the vacuum
control valve (see Figure 4). Once fluid flow begins, release your finger to restore preset vacuum level.
3
Extraction Manifold
Page 4

[ Care and Use ManUal ]
To remove a cartridge from the manifold, turn it while pulling it
up. The valve or needle tip) will remain in its socket. To remove
a valve or needle tip from the cover, pry it out carefully with the
ejector tool.
White Rubber Ball:
Locking Nut:
(in center) tighten it to
secure set position of
vacuum control valve
Vacuum Control Valve:
rotate outer end to adjust
vacuum to desired level
Bleed Port Hole:
cover it with your
finger tip to increase
vacuum temporarily
push it up or down slightly to
release vacuum in chamber
Needle Tip
Luer Plugs:
use to seal open
needle tips
Figure 4. Close-up View of Vacuum Control and Release Valve Assembly.
IV. NEEDLE TIP INSTALLATION PROCEDURE
Attention: To achieve proper sealing between the needle tips and the
holds on the cover, this procedure requires that the cover must be placed
on the glass chamber! Not following this requirement will result in
improper needle seating that can lead to low or lost vacuum pressure and/
or damage to the three alignment posts on the underside of the cover.
Make sure that the cover is resting on the class chamber’s edges and not
on the rack.
1. Remove the rack from inside the glass chamber. Alternatively,
with the rack inside the chamber, ensure that the cover’s 3
posts are in the correct alignment with the rack and are not
touching/resting on the rack.
5. For installed needle tips that are not in use, install the Luer
plug by pushing it down in the needle tip(s) input hold (see
Figure 7). Luer plus is used only on the needle tip. Do not
install Luer plug directly on the cover.
6. To remove any of the Luer plugs or columns, first twist the
part then pull upward (see Figures 7 and 8). Pulling is straight
upward is not recommended and can cause the needle tip to
disengage from the cover.
7. To remove needle tips and/or stopcock valves (if used), use the
ejector (see Figure 8).
To Remove Columns
Empty Tu be! Twist tube to break off contact, then pull upward.
Pulling directly upward without twisting is not recommended and can
casue needle tip to disengage from the cover.
Twist
and
Pull Up
Caution: Push down gently, pushing ejector down too fast or
too hard will cause the part to bounce off in the air
Figure 5. Lightly wiggle the needle tip while pushing it down in the hold. Press
it with your thumb and then using the ejector handle push it hard against the
hole to ensure a good contact (also see Figure 5 and Step 3 on the needle tip
installation procedure).
Place ejector ( handle portion) horizontally or diagonally across
two needles and press down to assure proper vacuum seal
Slide
Push Down Gently
To Remove any of the Needles/Stop cock Valves:
Slide ejector under t he needle tip or stopcock
valve and push ejector down.
2. Align and place the cover on the glass chamber, make sure it is
seating properly around the edges of the class chamber.
3. Insert a needle tip in the hold and lightly wiggle the needle
while pushing it down inside the hexagon hole until it feels that
the serrated portion of the needle body is seated against the
corners of the hexagon shaped hold on the cover (see Figure
5). Then with your thumb, push the needle as far as it can go.
Repeat the same steps, for the rest of the needle tips. The same
method is also used to install stopcock valves (if used).
4. Place the ejector handle portion, horizontally or diagonally,
on top of two needles and press it down hard. Repeat the same
steps on all the needles (see Figure 6). It is also applied toward
the installation of the stopcock valves (if used).
4
Extraction Manifold
Figure 6. Place ejector (handle position) horizontally or diagonally across two
needles and press down to ensure proper vacuum seal.
Page 5

[ Care and Use ManUal ]
Lightly wiggle the needle tip while pushing it down in the hole. Press it with your thumb and the using
the ej ector handle push it hard against the hole to assure a good contact (see also Figure. 2 and
step number 3 on the needle tip installations procedure sheet).
Needle Insertion
Needle Serated Area
Hexagon Shape Hole on the Cover
Correctly Seated Needle
Showing Aligned Serations
with Corners of Hexagon Hole.
Note: Picture shown are for illustration purposes only.
Figure 7. To remove Luer plug slowly twist the plug to break the contact, when it is loosened, then pull the plug
away. To install Luer plus push it in the needle tip hole(s).
To Remove Luer Plug:
Slowly twist the plug to break the contact,
when it is loosen then pull the plug away.
To Install the Luer Plug:
Push it in the needle tip hole(s).
Note: Luer plug is only to be used on the needle tip.
Do not install luer plugs directly on the cover!
Warning: When removing plug(s), do not pull the plug
staright upward, doing so can disengage the needle ti p.
Figure 8. To remove columns, empty tube. Twist tube to break off contact, then pull upward. Pulling directly
upward without twisting is not recommended and can cause needle tip is disengage from the cover. To remove any
of the needle/stopcock valves, slide ejector under the needle tip or stopcock valve and push ejector down.
5
Extraction Manifold
Page 6

[ Care and Use ManUal ]
V. SPARE PARTS AND ACCESSORIES
Spare Parts
Description Part Number
White Delrin cover, 20-position, w/o polyethylene
gasket w/o gauge assembly
Gauge assembly, vacuum, with control and
release valves
Gasket for 20-position cover WAT200690
Needle tip, long, with female Luer inlet, 20/pk WAT200691
Valve (stopcock), with long needle tip and female
Luer inlet, 20/pk
Luer plugs, male 20/pk WAT 058 851
Ejector tool for removing needle tips from cover WAT058839
Ball ring, white rubber WAT058840
Exit valve WAT200689
Glass chamber for 20-position manifold WAT200688
WAT200686
WAT200687
WAT200685
Accessories
Description Part Number
Waters Extraction Manifold, 20-position,
without rack
Rack, 20-position, for 13 mm x 75 mm tubes WAT200678
Rack, 20-position, for 13 mm x 100 mm tubes WAT200679
Rack, 20-position, for 16 mm x 75 mm tubes WAT200680
Rack, 20-position, for 16 mm x 100 mm tubes WAT 200 681
Reservoir, 30 cc (for Sep-Pak Plus, Light, Vac,
Classic Cartridges), 40/box
Reservoir, 60 cc (for Sep-Pak Plus, Light, Vac,
Classic Cartridges), 12/box
Adapter, male-male Luer (for Sep-Pak Classic
Cartridges), 100/pk
Adapter (to attached reservoir to 1-, 3-,
6-cc Sep-Pak Vac Cartridges, 12/bag
Adapter (to attached reservoir to 12-, 20-,
35-cc Sep-Pak Vac Cartridges, 10/bag
Vacuum pump (110 V, 60 Hz) 7250 0 0 417
Vacuum pump (220 V, 50 Hz) 725000604
Rack for 2 mL vials 186005234
Reversible vial rack for 1 and 4 mL vials WAT058871
WAT200677
WAT 01139 0
186005587
WAT 024310
WAT054260
WAT 048160
Complete Manifold Kits
Description Part Number
Waters Extraction Manifold, 20-position, complete, with rack for 13 mm x 75 mm tubes WAT200606
Waters Extraction Manifold, 20-position, complete, with rack for 13 mm x 100 mm tubes WAT300607
Waters Extraction Manifold, 20-position, complete, with rack for 16 mm x 75 mm tubes WAT200608
Waters Extraction Manifold, 20-position, complete, with rack for 16 mm x 100 mm tubes WAT200609
Waters, Oasis, and Sep-Pak are registered trademarks of Waters
Corporation. The Science of What’s Possible is a trademark of
Waters Corporation. All other trademarks are property of their
respective owners.
©2013 Waters Corporation. Produced in the U.S.A.
June 2013
WAT200683 Rev. A KP-P DF
Waters Corporation
34 Maple Street
Milford, MA 01757 U.S.A.
T: 1 508 478 2000
F: 1 508 872 1990
www.waters.com
 Loading...