

Page 1
Installation Procedures: Windows XP with Internet Explorer 5.x & 6.0 1
SOHO 6 Wireless Installation Procedure
Windows XP with Internet Explorer 5.x & 6.0
Before you Begin
Before you install the SOHO 6 Wireless, you must have:
• A computer with a 10/100BaseT Ethernet card installed and a Web browser, such as Internet
Explorer.
• A functional Internet connection–this connection must be a cable or DSL modem with a
10/100BaseT port, an ISDN router, or a direct LAN connection. If the Internet connection is not
functional, call your ISP.
• Two straight-through Ethernet network cables with RJ45 connectors. Crossover cables, which are
often red or orange in color, are not satisfactory. The SOHO 6 Wireless package includes one cable–
a second cable may have been supplied with your modem, if not, you will need to purchase a second
cable. Make sure that the cables are of sufficient length to connect the modem or router to the
SOHO 6 Wireless and the SOHO 6 Wireless to your computer.
• The method of network address assignment used by your ISP. The possible methods are static
addressing, DHCP, or PPPoE–call your ISP to determine this, if necessary.
• The two antennae supplied with the SOHO 6 Wireless attached to the appliance.
NOTE
The SOHO 6 Wireless
must
be installed to provide a separation distance of at least 20 centimeters from all
persons and must not be collocated or operating in conjunction with any other antenna or transmitter.
• The SOHO 6 Wireless serial number–found on the bottom of the appliance.
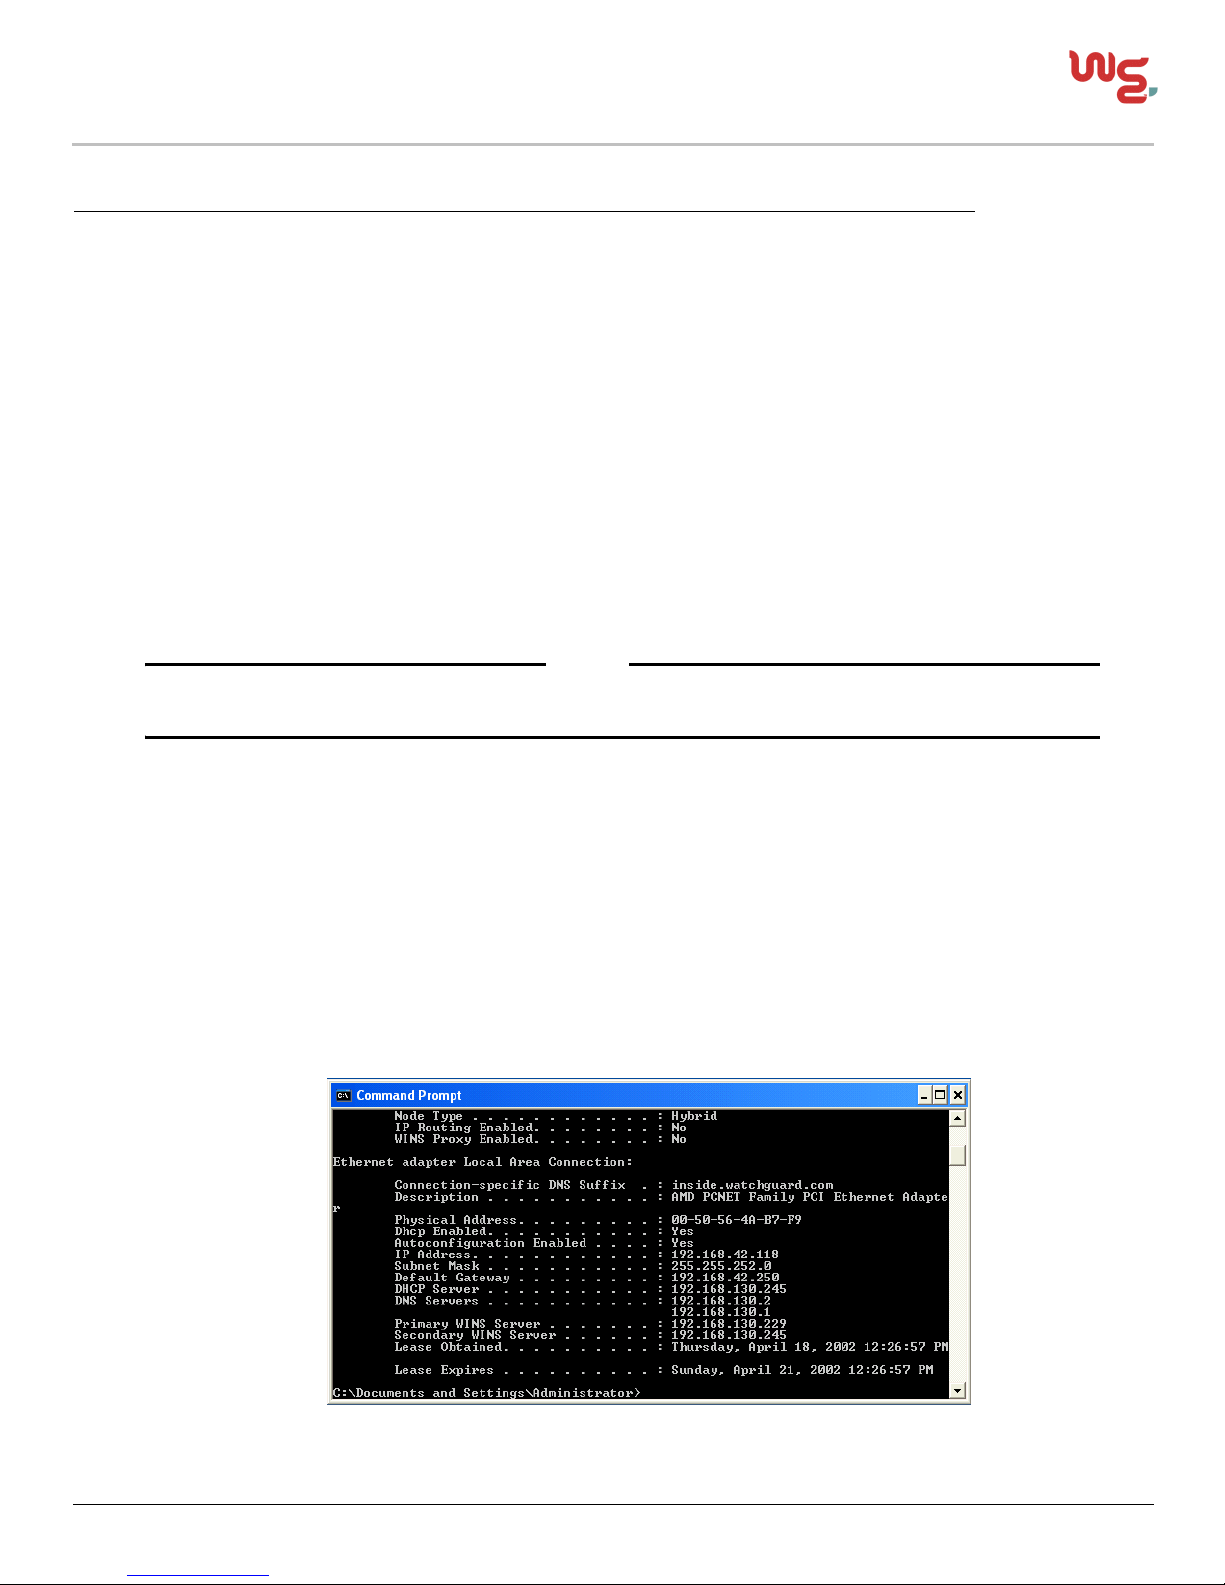
Examine and record your current TCP/IP settings
Examine the current TCP/IP settings of your computer and record them in the table below.
1 Select S t a r t => R u n .
The Run dialog box appears.
2Type Command in the field provided and click OK.
The Command Prompt window appears.
3 At the prompt, type ipconfig/all and then press Enter.
The TCP/IP settings are displayed.
4 Record the TCP/IP settings in the table below.
TCP/IP Settings Chart:
Page 2
SOHO 6 Wireless Installation Procedures: Windows XP with Internet Explorer 5.x & 6.0 2
Before you Begin
5 At the prompt, type exit and then press Enter to close the command prompt window.
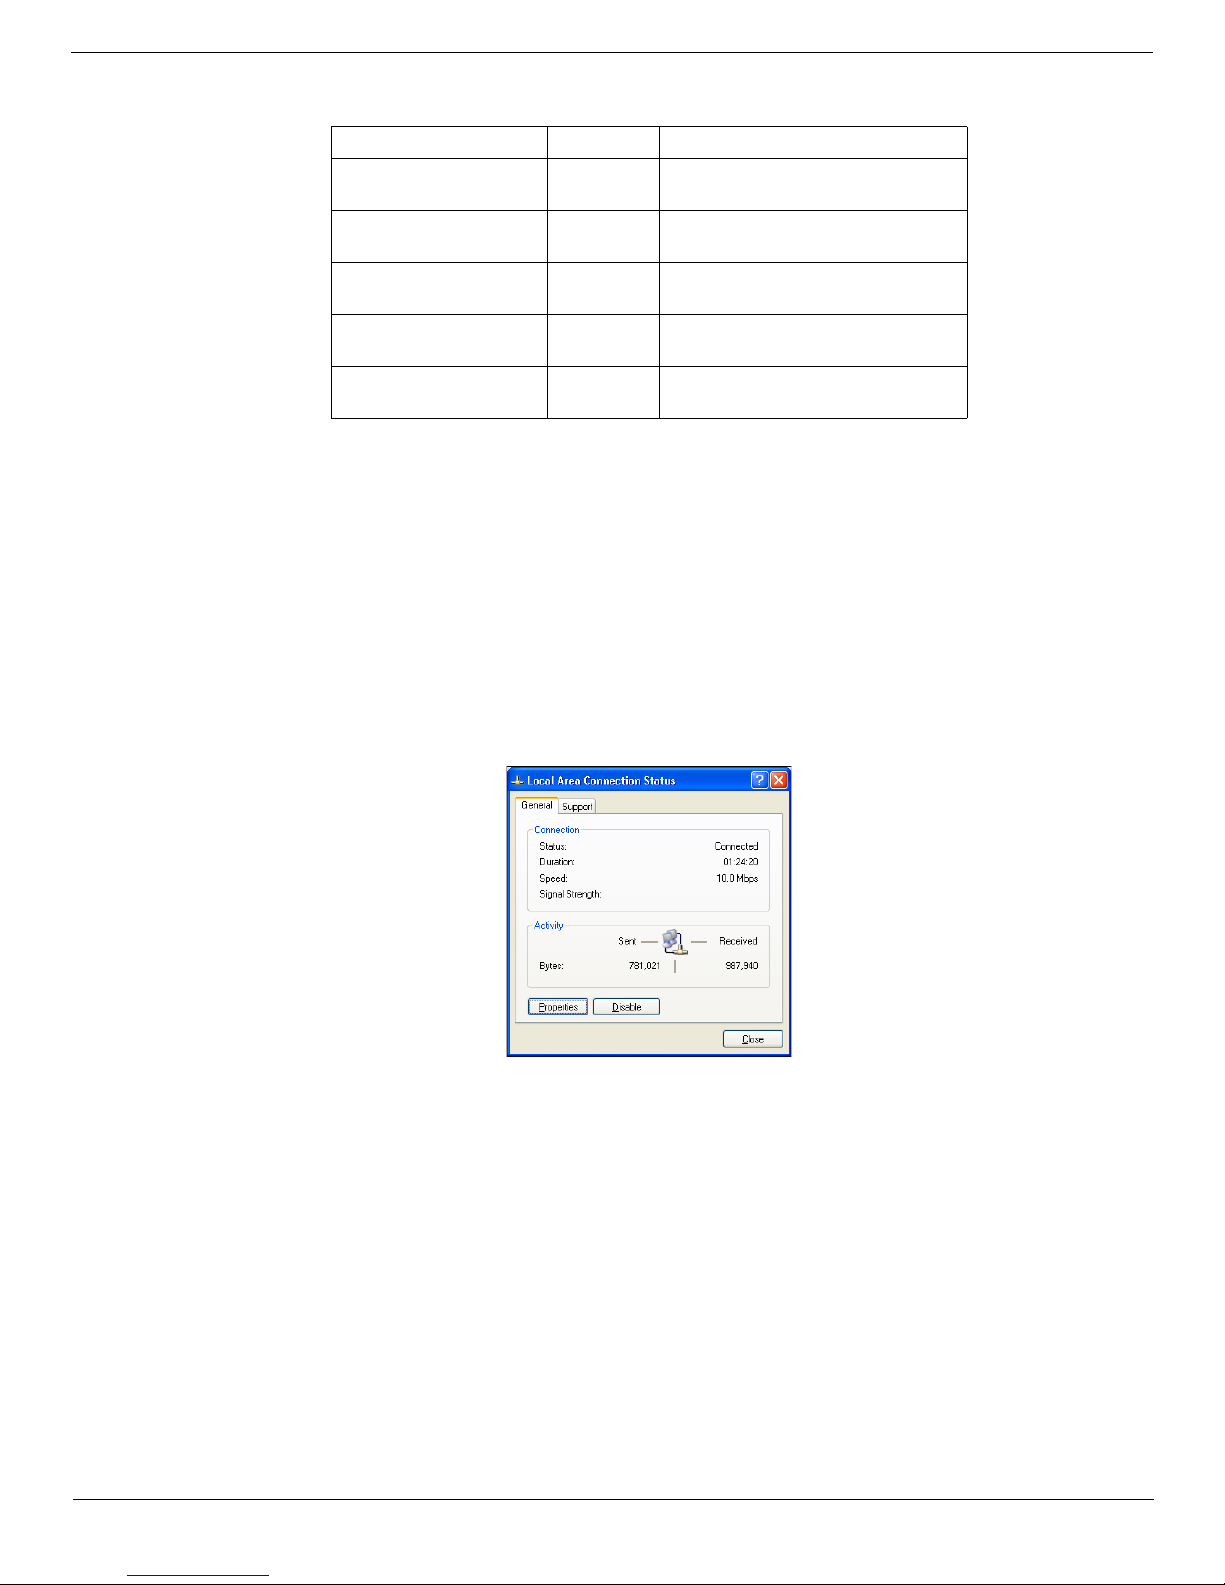
Enable your computer for DHCP
To open the configuration pages for the SOHO 6 Wireless, configure your computer to receive its IP
address through DHCP.
1 Select
Start => S e t t i n g s => Control Panel.
The Control Panel window appears.
2 Double-click the Network Connections icon.
3 Double-click the connection you use to connect to the Internet.
The network connection dialog box appears.
4Click Properties.
The network connection properties dialog box appears.
TCP/IP Setting Value
IP Address
. . .
Subnet Mask
. . .
Default Gateway
. . .
DNS Server(s) Primary
. . .
Secondary
. . .
Page 3
SOHO 6 Wireless Installation Procedures: Windows XP with Internet Explorer 5.x & 6.0 3
Before you Begin
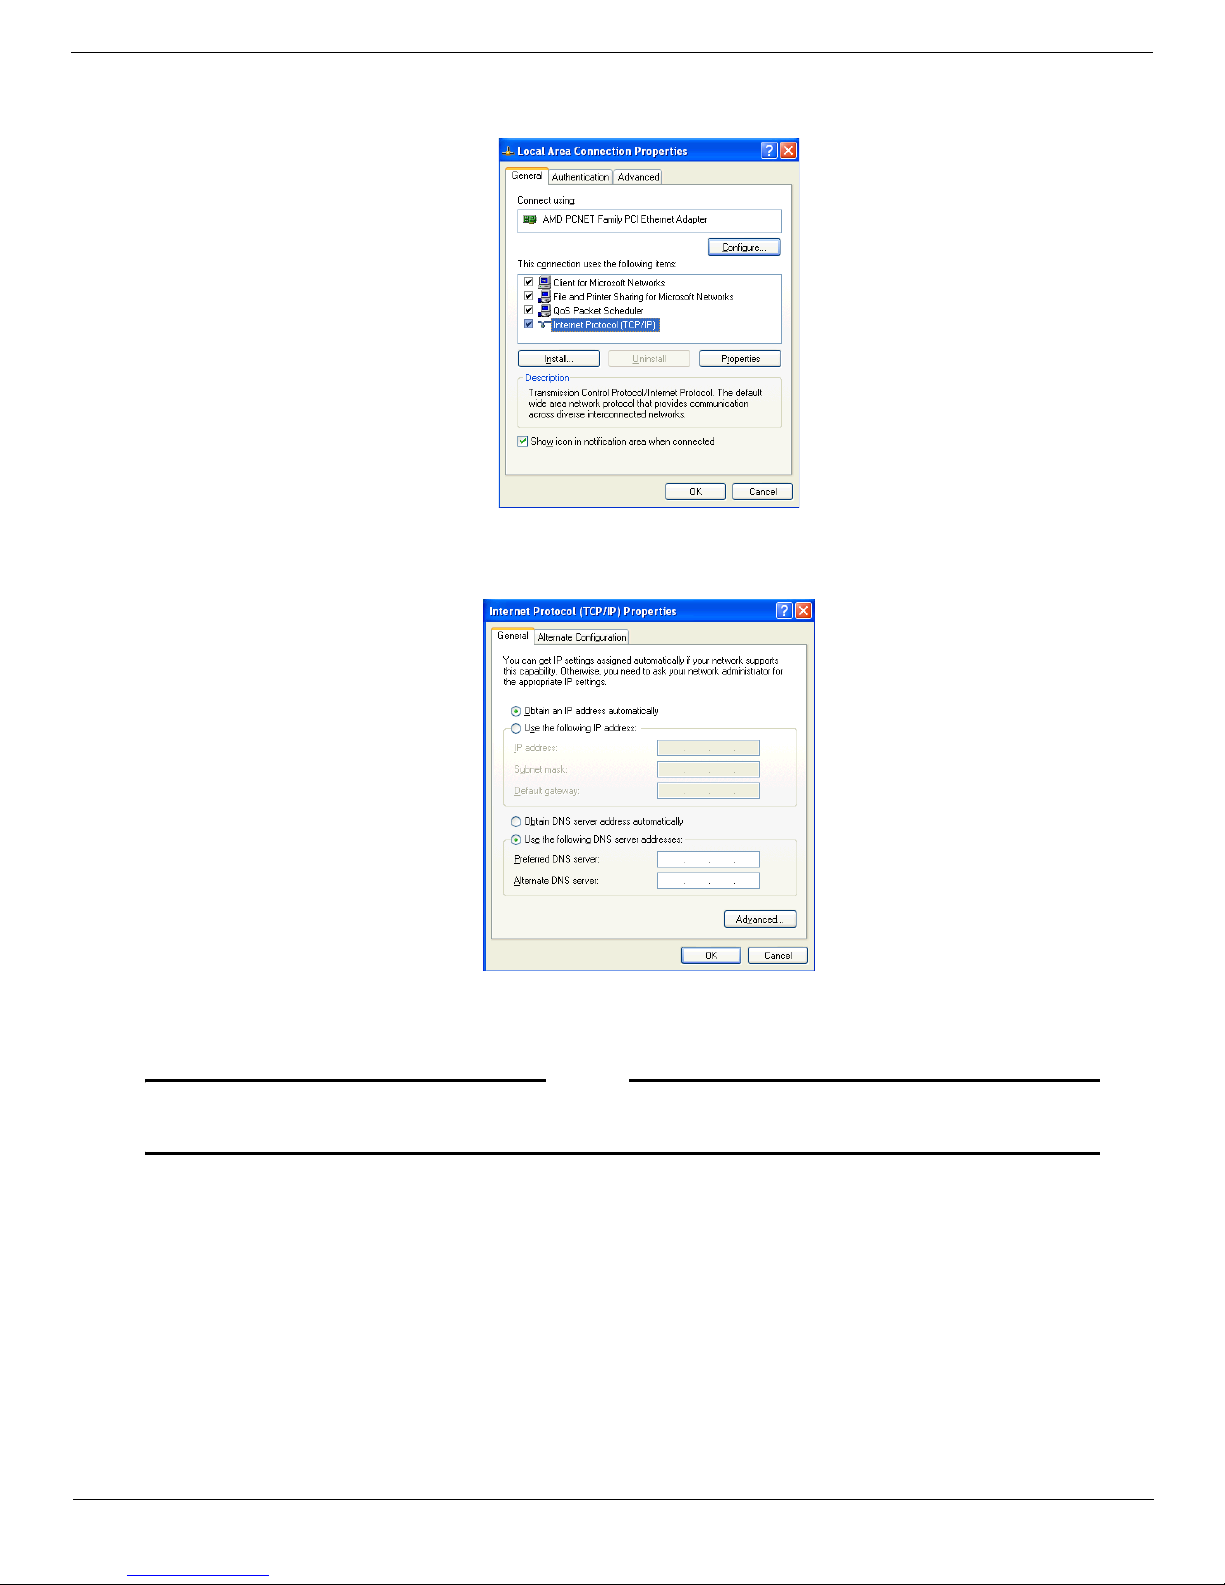
5 Double-click the Internet Protocol (TCP/IP) item.
The Internet Protocol (TCP/IP) Properties dialog box appears.
6 Select the Obtain an IP address automatically checkbox.
7 Select the Obtain DNS server address automatically checkbox.
NOTE
On Windows XP, you must be certain that you have full administrative rights on the computer or you will not
be able to change your TCP/IP Properties settings.
8Click OK to close the Internet Protocol (TCP/IP) Properties dialog box.
9Click OK to close the Network Connection Properties dialog box.
10 Click Close to close the network connection dialog box.
11 Close the Control Panel window.
Page 4

SOHO 6 Wireless Installation Procedures: Windows XP with Internet Explorer 5.x & 6.0 4
Install the SOHO 6 Wireless Appliance
Disable the HTTP proxy setting of your Web browser
To configure a SOHO 6 Wireless you must access the configuration pages in the SOHO 6 Wireless with
your Web browser. If the HTTP proxy setting in your browser is enabled, you cannot open these pages
to complete the configuration procedure.
1 Open Internet Explorer.
2 Select Tools => Internet Options.
The Internet Options window appears.
3Click the Advanced tab and then scroll down to the HTTP 1.1 settings.
4 Clear all of the HTTP 1.1 settings checkboxes.
5Click OK to close the Internet Options window.
Install the SOHO 6 Wireless Appliance
A maximum of four computers, printers, scanners, or other network peripherals can connect directly to
the SOHO 6 Wireless. These connections use the four, Ethernet ports (0-3). To connect a maximum of
four appliances, use the SOHO 6 Wireless as a network hub.
1 Shut down your computer.
2 If you connect to the Internet using a DSL or cable modem, disconnect the power from this device.
3 Disconnect the Ethernet cable that connects your DSL, cable modem, or other Internet connection to
your computer. Connect this cable to the WAN port on the SOHO 6 Wireless.
The SOHO 6 is connected directly to the modem or other Internet connection.
4 Connect one end of the straight-through Ethernet cable supplied with your SOHO 6 Wireless to any
one of the four, numbered, Ethernet ports (labeled 0-3) on the SOHO 6 Wireless. Connect the other
end into the Ethernet port of your computer.
Page 5

SOHO 6 Wireless Installation Procedures: Windows XP with Internet Explorer 5.x & 6.0 5
Configure the External Network of the SOHO 6 Wireless
5 If you connect to the Internet using a DSL or cable modem, restore the power to this device. The
indicator lights flash and then stop. The modem is ready for use.
6 Attach the AC adapter to the SOHO 6 Wireless and then connect it to a power source.
7 Restart your computer.
Configure the External Network of the SOHO 6 Wireless
Follow the instructions below to begin configuring the external network of your SOHO 6 Wireless and
then proceed to the specific, IP address assignment method utilized by your system: DHCP client,
Manual Configuration (static addressing), or PPPoE client.
Contact your ISP to determine which method they use to assign your IP address.
1 With your Web browser, go to the System Status page using the Trusted IP address of the SOHO 6
Wireless.
For example, go to: http://192.168.111.1.
2 From the navigation bar on the left side, select Network => External.
3 Proceed to the following configuration instructions as appropriate to your system.
Page 6

SOHO 6 Wireless Installation Procedures: Windows XP with Internet Explorer 5.x & 6.0 6
Configure the External Network of the SOHO 6 Wireless
The DHCP Client
The default configuration of the SOHO 6 Wireless is set to receive the external IP address information
using DHCP. If your ISP supports this method, the SOHO 6 Wireless receives the information when it
reboots and connects to the Internet. The SOHO 6 Wireless does not require any additional
configuration.
Your installation is now complete and you should be able to use your Internet connection. Verify this by
accessing the Internet.
Manual Configuration
If your ISP assigns static IP addresses, you must enter the TCP/IP settings into the SOHO 6 Wireless
manually.
1From the Configuration Mode drop list, select Manual Configuration.
The Manual Configuration page appears.
2 Type the TCP/IP settings you recorded from your computer during the installation process, see
“Examine and record your current TCP/IP settings”.
3Click Submit.
Your installation is now complete, and you should be able to use your Internet connection. Verify this by
accessing the Internet.
The PPPoE Client
If your ISP assigns IP addresses using PPPoE, your PPPoE login name and password are required to
configure the SOHO 6 Wireless.
1From the Configuration Mode drop list, select PPPoE Client.
The PPPoE Client configuration page appears.
2 Type the PPPoE login name and password supplied by your ISP.
Page 7

SOHO 6 Wireless Installation Procedures: Windows XP with Internet Explorer 5.x & 6.0 7
Troubleshooting the Connection
3 Select the Automatically restore lost connections checkbox.
This option keeps a constant flow of traffic between the SOHO 6 Wireless and the PPPoE server. This option allows
the SOHO 6 Wireless to keep the PPPoE connection open during a period of frequent packet loss. If the flow of traffic
stops, the SOHO 6 Wireless reboots.This provides for a more consistent Internet connection but will be seen as
continuous traffic by the ISP and regulated as such.
4Click Submit.
Your installation is now complete, and you should be able to use your Internet connection. Verify this by
accessing the Internet.
Troubleshooting the Connection
You can monitor the connection traffic through the SOHO 6 Wireless using the Event Log.
1 With your Web browser, go to the System Status page using the Trusted IP address of the SOHO 6
Wireless.
For example, go to: http://192.168.111.1.
2 From the navigation bar on the left side, select Logging.
Configure the Wireless Network
The SOHO 6 Wireless protects computers that are connected to it by Ethernet cable or wireless
connection. Because WatchGuard is concerned about the security of your network, the wireless network
is disabled on the SOHO 6 Wireless by default. This allows you to enable the wireless network after you
set up the desired security.
Configure the Optional Network for wireless networking
To activate the wireless network, you must enable the optional network. Follow these instructions to
configure the optional network:
1 Type the IP address of the trusted network in your browser window to connect to the System Status
page of the SOHO 6 Wireless.
The default IP address is: http://192.168.111.1
2 From the navigation bar on the left side, select Network => Optional (802.11b).
The Optional Network Configuration page appears.
3 Select the Enable Optional Network checkbox.
4 Type the IP Address and Subnet Mask of the wireless network in the applicable fields.
The default IP Address is 192.168.112.1. The default Subnet Mask is 255.255.255.0.
5 Select the Enable DHCP Server on the Optional Network check box.
6 Type the first IP address that is available for the computers from the DHCP server in the applicable
field.
The default is 192.168.112.2.
7 Type the WINS Server address, DNS Server primary address, DNS Server secondary address, and
DNS Domain server suffix.
8Click Submit.
9 Reboot the SOHO 6 if necessary.
Page 8

SOHO 6 Wireless Installation Procedures: Windows XP with Internet Explorer 5.x & 6.0 8
Configure the Wireless Network
Configure Security
1 From the navigation bar on the left side, select Network => Wireless Configuration.
The Wireless Network Configuration page appears.
2From the Encryption drop-down list, select the level of encryption you want applied to your
wireless connections.
Disabled
The default is Disabled, and you should use this option for the initial connection. Your wireless
connection is not using WEP when Disabled is selected.
40/64 bit WEP or 128 bit WEP
Once you complete the initial connection between your computer and the SOHO 6 Wireless, you
can change this option to use WEP. Select either 40/64 bit or 128 bit based on what the wireless
networking card in your computer supports.
3 If you are using WEP encryption, type a hexadecimal number in the Key text boxes.
You can type up to four keys that the wireless network will use to connect. If you have 40/64 bit WEP, the key must be
10 characters. If you have 128 bit WEP, the key must be 26 characters.
4 If you typed more than one key, select which key you want to use from the Default Key drop-down
list.
5 Select the Authentication mode you want to use for your wireless network connection.
Open System
This option does not support shared keys. If you disable encryption, this is the only option.
Shared Key
This option supports shared keys. If you enabled WEP, this option is enabled.
Change the Basic Settings
The SSID is the SOHO 6 Wireless identification number, and it is used to create the wireless connection
with the wireless computers.
To change the SSID of the SOHO 6 Wireless:
• In the Basic Settings section, type a new identification in SSID text box.
The default SSID is the 5 digit serial number for your SOHO 6 Wireless device. The first four digits of the serial
number are the product code and are not part of the SSID. The next five digits after the product code are the serial
number. The remaining characters are an encoded hash for security uses. The maximum identification length is 20
characters.
To change the Channel:
•From the Channel drop-down list, select the channel you want to use in your wireless connection.
Configure the Access Point Options
You can change the settings of how the SOHO 6 Wireless access point communicates with your wireless
network.
Restrict Access by Hardware Address
1 Select Enabled from the Restrict Access by Hardware Address drop-down list.
2Click Edit
The Allowed Hardware Addresses page appears.
3 Type the MAC Address of the computer you want to connect to the SOHO 6 Wireless.
4Click Submit.
Page 9

SOHO 6 Wireless Installation Procedures: Windows XP with Internet Explorer 5.x & 6.0 9
Install additional computers
Configure the Beacon Rate
In the AP Beacon Rate text box, type the beacon rate in milliseconds (100 through 10,000) that
you want the SOHO 6 Wireless to use.
The beacon rate is the rate the SOHO 6 Wireless sends out broadcasts so that the wireless
computers can find it.
Broadcast SSID
If you want the SOHO 6 Wireless to broadcast a beacon rate, select Enabled from the Broadcast
SSID in AP Beacon Frames drop-down list.
Respond to SSID query requests
Select Enabled in the Respond to SSID Query Requests drop-down list.
The wireless computers send out query requests to find if there are any wireless access points
that it can connect to.
Log Authentication Events
Select Enabled from the Log Authentication Events drop-down list.
Configure the Advanced Settings
‘You can change Maximum Transmit Rate and Fragmentation Threshold.
• Select the rate per Mbits per second from the Maximum Transmit Rate drop-down list.
• Type a value from 256 to 4096 in the Fragmentation Threshold field.
Configure the Wireless Card on your Computer
In order to access the SOHO 6 Wireless that you have now configured for your wireless network, you
must install and configure your wireless networking card. Refer to the manufacture’s documentation
for instruction on installing and configuring the device.
Install additional computers
Although the SOHO 6 Wireless has only four, Ethernet ports (labeled 0-3), you can connect more than
four appliances. Use one or more network hubs to make more connections.
The base model SOHO 6 Wireless includes a ten-seat license. This license allows a maximum of ten
appliances on the trusted network to connect to the Internet at the same time. There can be more than
ten appliances on the trusted network, but the SOHO 6 Wireless will only allow ten Internet
connections. A seat is in use when an appliance connects to the Internet and is free when the connection
is broken. License upgrades are available from the WatchGuard Web site:
http://www.watchguard.com/sales/buyonline.asp
To connect more than four appliances to the SOHO 6 Wireless, these items are necessary:
• An Ethernet hub
• A straight-through Ethernet cable, with RJ-45 connectors for each computer
• A straight-through Ethernet cable to connect each hub to the SOHO 6 Wireless
Follow the instructions in the sections above to prepare your computers to connect to the SOHO 6
Wireless, see “Before you Begin”.
Page 10

SOHO 6 Wireless Installation Procedures: Windows XP with Internet Explorer 5.x & 6.0 10
Register your SOHO 6 Wireless and Activate the LiveSecurity Service
Register your SOHO 6 Wireless and Activate the LiveSecurity Service
Once the SOHO 6 Wireless is installed and configured, you need to register the unit and activate your
bundled LiveSecurity Service subscription. Activation entitles you to receive threat alert notifications,
expert security advice, free anti-virus protection, software updates, technical support by web or phone,
and access to extensive online help resources and our user forum. You must also activate to retrieve
feature keys for any upgrades you have purchased.
Be sure that you have the SOHO 6 Wireless serial number handy. You will need this during the
registration process.
To register with the LiveSecurity Service:
1 Using your Web browser, go to:
http:\\www.watchguard.com\activate
NOTE
Yo u
must
have JavaScript enabled on your browser to be able to activate LiveSecurity Service.
If you are a returning customer, log in with your user name and password then choose your product and
continue by following the instructions on screen.
If you are a new WatchGuard customer, begin by creating a profile, then follow the instructions on
screen for activating a product.
Please use the table below to record your LiveSecurity Service identification information:
The SOHO 6 Wireless serial number is located on the bottom of the appliance. You create a LiveSecurity
Service user name and password when you register your SOHO 6 Wireless.
Please keep this information in a secure place.
Serial Number:
LiveSecurity User Name:
Password:
 Loading...