

Page 1
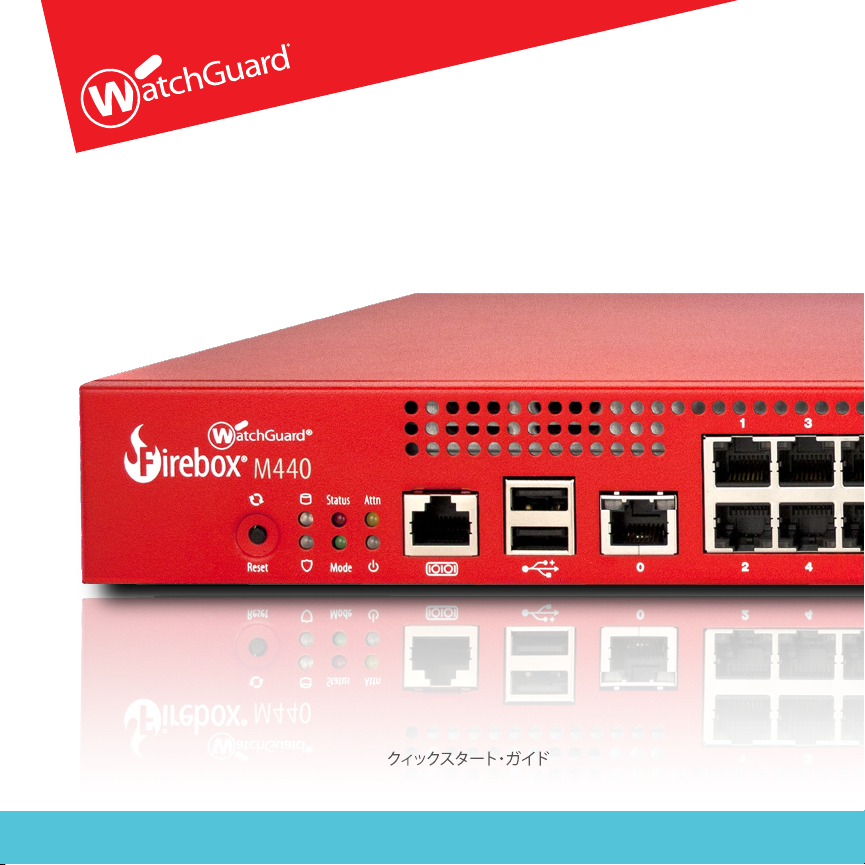
Firebox® M440
HW Model: SL4AE24
Quick Start Guide
Guide de démarrage rapide
Kurzanleitung
Guida introduttiva
WatchGuard® Technologies, Inc.
Page 2
English
Activate Your Device
1. Go to www.watchguard.com/activate
2. Log in to your WatchGuard account, or create a new account*.
*If you create a new account, return to www.watchguard.com/activate after you nish the account
creation process.
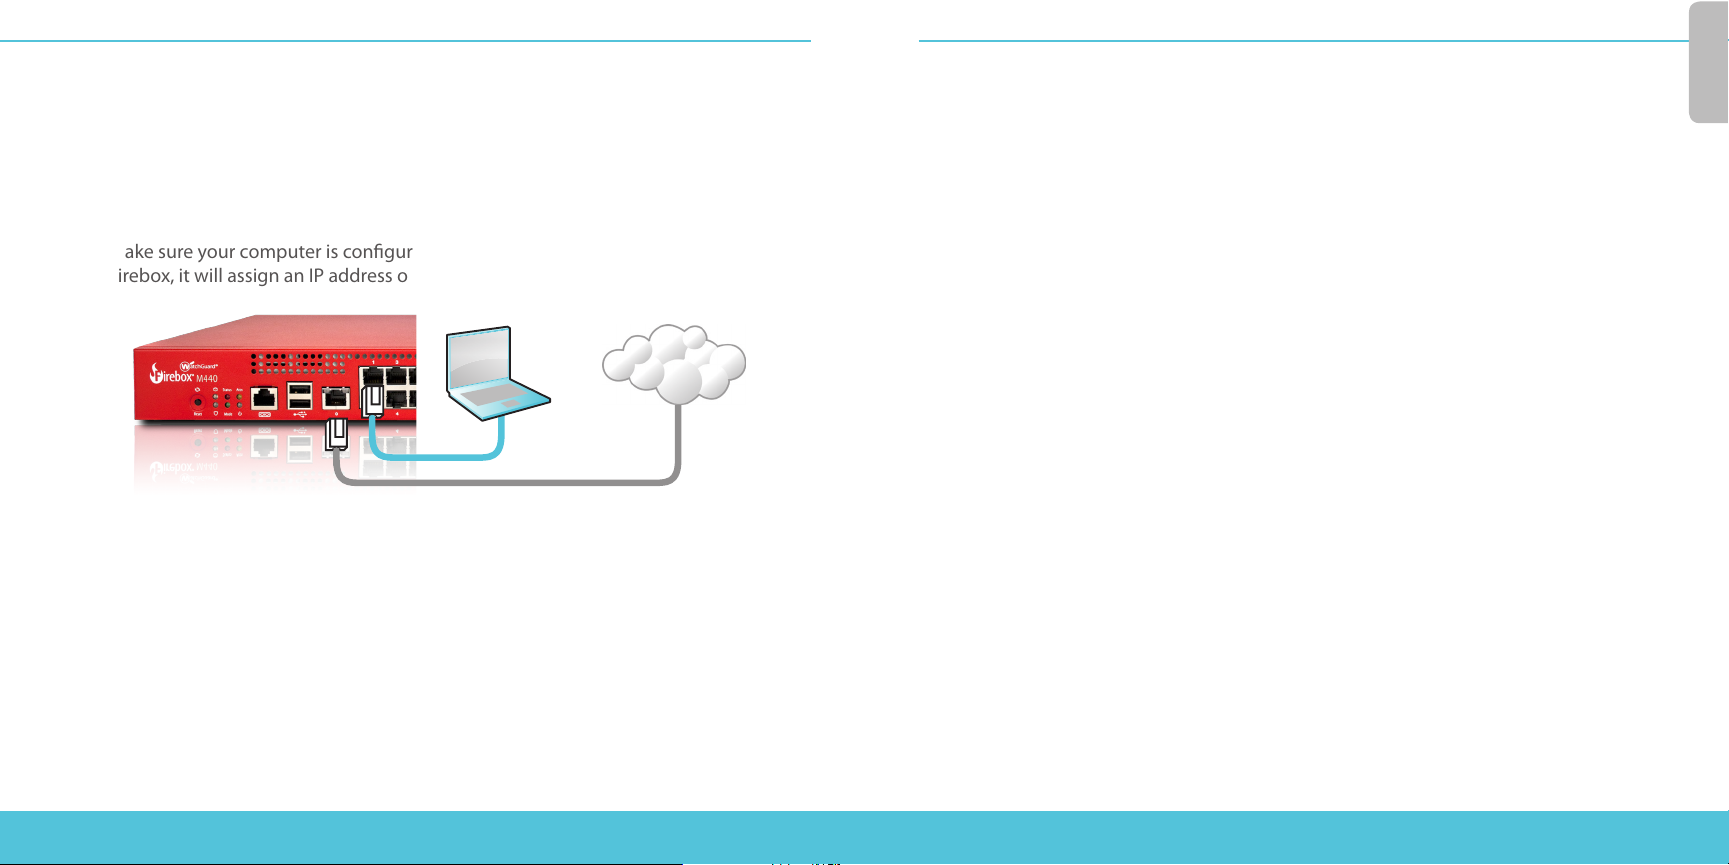
Connect Your Device and Power it On
Make sure your computer is congured to use DHCP. When you connect to the
Firebox, it will assign an IP address on the 10.0.1.0/24 network.
Computer
Eth 1
Eth 0
Internet
Connect to the Web UI
1. Go to https://10.0.1.1:8080
2. You can safely ignore certicate warnings, because the device uses a
self-signed certicate.
3. Log in with the user name admin and the passphrase readwrite.
4. Follow the directions in the Web Setup Wizard to create a basic conguration le for
a new device. Click More Information if you have questions.
5. When the Wizard completes, log in to the Web UI with the admin user account and
the Admin (readwrite) passphrase you set during the Wizard.
6. Install the Firebox in your network.
Your device has a basic conguration:
• Allows outbound TCP, UDP, and ping trac
• Blocks all unrequested trac from the external network
Next Steps
Congratulations! You have nished basic setup of your Firebox. You can use the Web UI
to view and edit your conguration and to manage and monitor your device. Or, you can
download and install WatchGuard System Manager (WSM) and use Policy Manager and the
WSM suite of management and monitoring tools. Here are some recommendations to help
you get started:
Verify your Internet connectivity
• With your Firebox installed in your network, make sure that your users can
successfully browse the Internet.
Get the latest software
To get the latest version of WSM and Fireware OS:
1. Go to www.watchguard.com/support and click Software Downloads.
2. Find the software downloads page for the Firebox M440 and select the software
you want to install.
To upgrade the Firebox OS:
1. Download and run the installation package for the latest version of Fireware OS.
This installs an upgrade le on your computer that you must upload to the Firebox
with the Web UI or Policy Manager.
2. If you use the Web UI, select System > Upgrade. If you use Policy Manager, select
File > Upgrade. The le name is M440.sysa-dl.
This installation extracts the upgrade le to the default location of C:\Program Files(x86)\
Common les\WatchGuard\resources\FirewareXTM\<version>\
On a computer with a Windows 32-bit operating system, the path is: C:\Program Files\Common
Files\WatchGuard\resources\FirewareXTM\<version>\
2 3
Page 3

English
Explore the Features and Functions of Your Firebox
Browse the Web UI or the tools in WatchGuard System Manager and click Help on any page or dialog
box to learn more about the management, monitoring, and security features of your Firebox..
About the Device Status Lights
Indicators for RJ45 interfaces – Interfaces 0 - 24 have two indicators. The left indicator
shows the interface connection status. The right indicator shows interface activity.
Indicator Indicator color Interface Status
Connection (left) Yellow Link at 10, 100, or 1000 Mbps
Not lit No link
Activity (right) Yellow, blinks Power on, network activity
Not lit No activity
Indicators for ber interfaces – The indicators to the right of interface 25 and 26 show
the connection speed for these interfaces. The top indicator shows the status of interface
25. The bottom indicator shows the status of interface 26.
Indicator Indicator color Interface Status
Connection Speed Yellow Link at 1Gbps
Green Link at 10 Gbps
Activity Yellow, blinks Power on, network activity
Storage ( ) – When there is activity on the compact ash, the storage indicator is yellow.
Status – The Status indicator is red for 30 seconds when there is a new management
connection to the device, or when the device is polled by WatchGuard System Manager.
Arm/Disarm ( ) – When the device is armed and ready to pass trac, this indicator is
green. When the device is powered on, but not ready to pass trac, this indicator is red.
Mode – The Mode indicator is green if the device can connect to the external network. It
ashes if the device cannot connect to the external network.
Attn – The Attn indicator is yellow when you start the device with the Reset button pressed.
Power ( ) – The power indicator on the left front of the device is green when the device
is powered on.
Power Button ( ) – Use this button to power the device o and on when the power
button on the rear of the device is set to the On position. When the Power button is green,
press and hold it for three seconds to power o the device. When the Power button is red,
press it briey to power on the device.
Reset the Device to Factory-Default Settings
If you ever need to, you can restore your Firebox to its factory-default settings. For example,
if you do not know the administrator account passphrase or you want to start over with
a new conguration, you can reset your device. Make sure you back up your device
conguration before you reset your device in case you want to restore it in the future.
To reset your device:
1. If necessary, use the power switch on the rear of the device to power it on.
2. Press and hold the Power button on the front of the device for three seconds to
power it o.
3. Press and hold the Reset button on the front left of the device, while you briey
press the Power button on the front of the device to power it on.
4. Continue to hold the Reset button until the Attn indicator begins to ash.
5. Release the Reset button.
6. Wait until the Attn indicator stops ashing and remains lit.
7. Press and hold the Power button for three seconds to power o the device.
8. Briey press the Power button to power on the device.
4 5
Page 4
Français
Activation de votre appareil
1. Rendez-vous à l'adresse www.watchguard.com/activate
2. Connectez-vous à votre compte WatchGuard ou créez un nouveau compte*.
*Si vous créez un nouveau compte, retournez à l'adresse www.watchguard.com/activate à la n du processus
de création de compte.
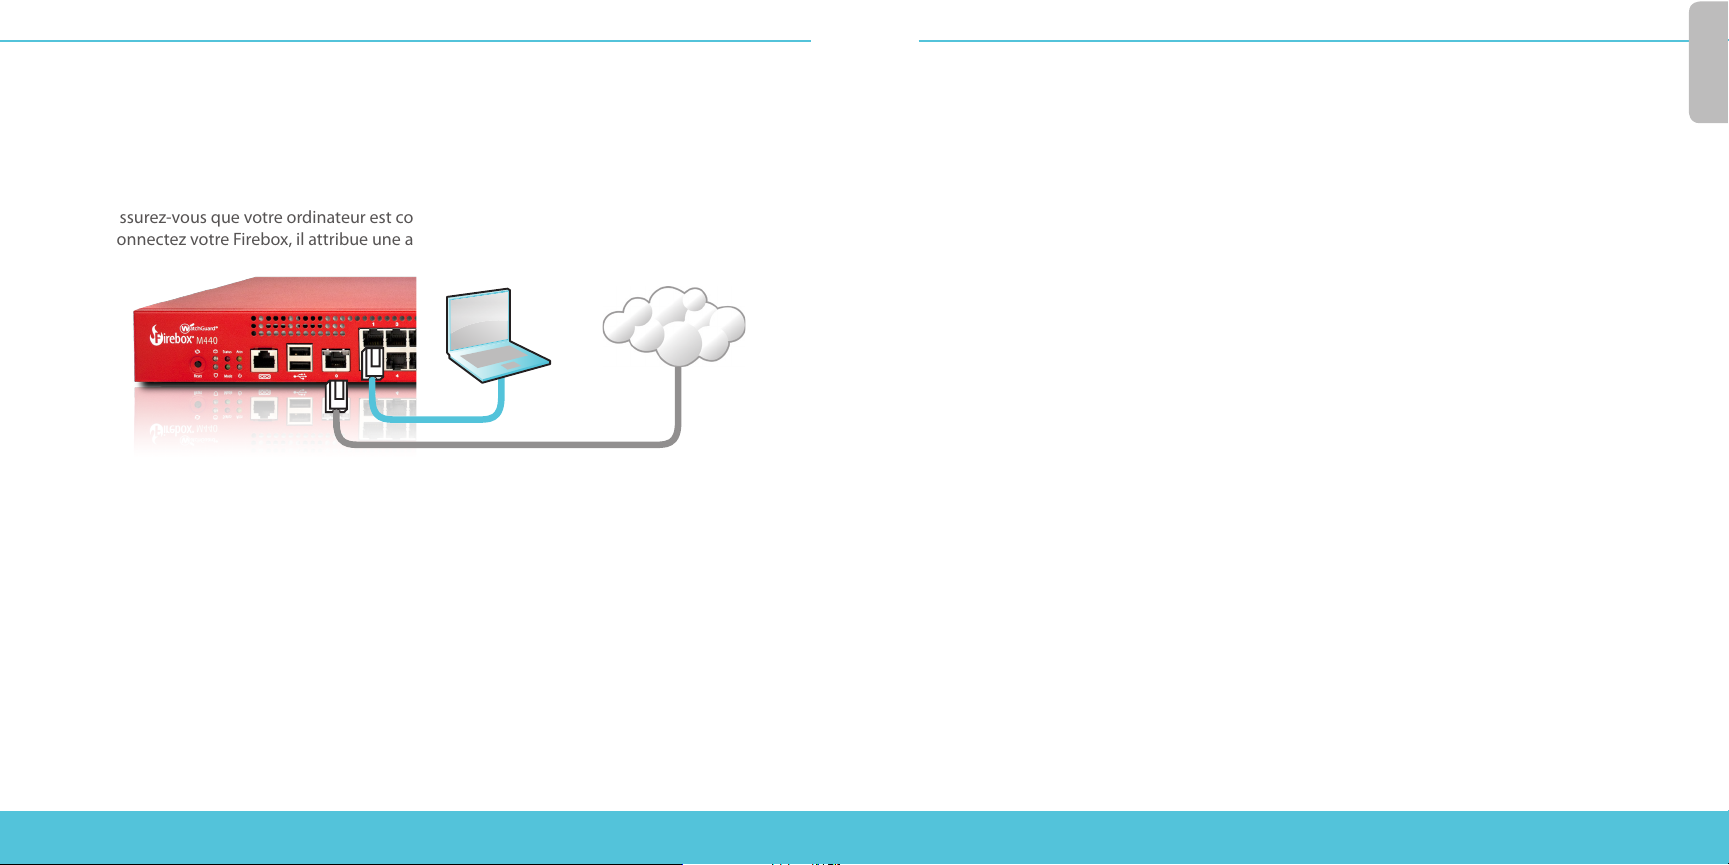
Branchement et mise sous tension de votre appareil
Assurez-vous que votre ordinateur est conguré pour utiliser le protocole DHCP. Lorsque vous
connectez votre Firebox, il attribue une adresseIP sur le réseau 10.0.1.0/24.
Ordinateur
Eth 1
Eth 0
Internet
Connexion à l'interface utilisateur Web
1. Rendez-vous à l'adresse https://10.0.1.1:8080
2. Votre appareil utilisant un certicat auto-signé, vous pouvez, sans risque, ignorer
les avertissements liés aux certicats.
3. Connectez-vous avec le nom d'utilisateur admin et le mot de passe readwrite.
4. Suivez les instructions de l'Assistant de conguration Web pour générer un chier
de conguration pour un nouvel appareil. Si vous avez des questions, cliquez sur
Plus d'informations.
5. Une fois que l'Assistant a terminé, connectez-vous à l'interface utilisateur Web avec
le nom d'utilisateur admin et le mot de passe Admin (readwrite) que vous avez dénis
dans l'Assistant.
6. Installez le Firebox dans votre réseau.
Votre appareil présente une conguration de base:
• Trac sortant TCP, UDP et Ping autorisés
• Blocage de tout le trac non demandé en provenance du réseau externe
Étapes suivantes
Félicitations! Vous avez à présent terminé la conguration de base de votre Firebox. Vous pouvez
utiliser l'interface utilisateur Web pour consulter et modier votre conguration, mais aussi pour
gérer et contrôler votre appareil. Sinon, vous pouvez télécharger et installer WatchGuard System
Manager (WSM) et utiliser Policy Manager et la suite WSM d'outils de gestion et de surveillance.
Voici quelques recommandations pour débuter:
Vériez votre connectivité Internet
• Une fois votre Firebox installé dans votre réseau, assurez-vous que vos utilisateurs peuvent
naviguer correctement sur Internet.
Procurez-vous le logiciel le plus récent
Pour obtenir la toute dernière version de WSM et du système d'exploitation Fireware:
1. Rendez-vous à l'adresse www.watchguard.com/support et cliquez sur Software
Downloads (Téléchargements de logiciels).
2. Recherchez la page des téléchargements de logiciels pour le Firebox M440 et sélectionnez
le logiciel à installer.
Pour mettre à niveau le système d'exploitation du Firebox:
1. Téléchargez et exécutez le package d'installation de la dernière version du système
d'exploitation Fireware. Ce package installe un chier de mise à niveau sur votre ordinateur.
Vous devez ensuite charger ce chier sur le Firebox à l'aide de l'interface utilisateur Web ou
de Policy Manager.
2. Dans l'interface utilisateur Web, sélectionnez System > Upgrade (Système > Mise à
niveau). Si vous utilisez Policy Manager, sélectionnez File > Upgrade (Fichier > Mise à
niveau). Ce chier est nommé «M440.sysa-dl».
Cette installation extrait le chier de mise à niveau dans l'emplacement par défaut
C:\Program Files(x86)\Common les\WatchGuard\resources\FirewareXTM\<version>\
Sur un ordinateur doté d'un système d'exploitation Windows 32bits, le chemin d'accès est le
suivant: C:\Program Files\Common Files\WatchGuard\resources\FirewareXTM\<version>\
6 7
Page 5
Français
Examen des fonctions de votre Firebox
Accédez à l'interface utilisateur Web ou aux outils de WatchGuard System Manager et cliquez sur
l'icône d'Aide d'une page ou d'une boîte de dialogue pour en savoir plus sur les fonctions de gestion,
de surveillance et de sécurité de votre Firebox.
À propos des témoins d'état de l'appareil
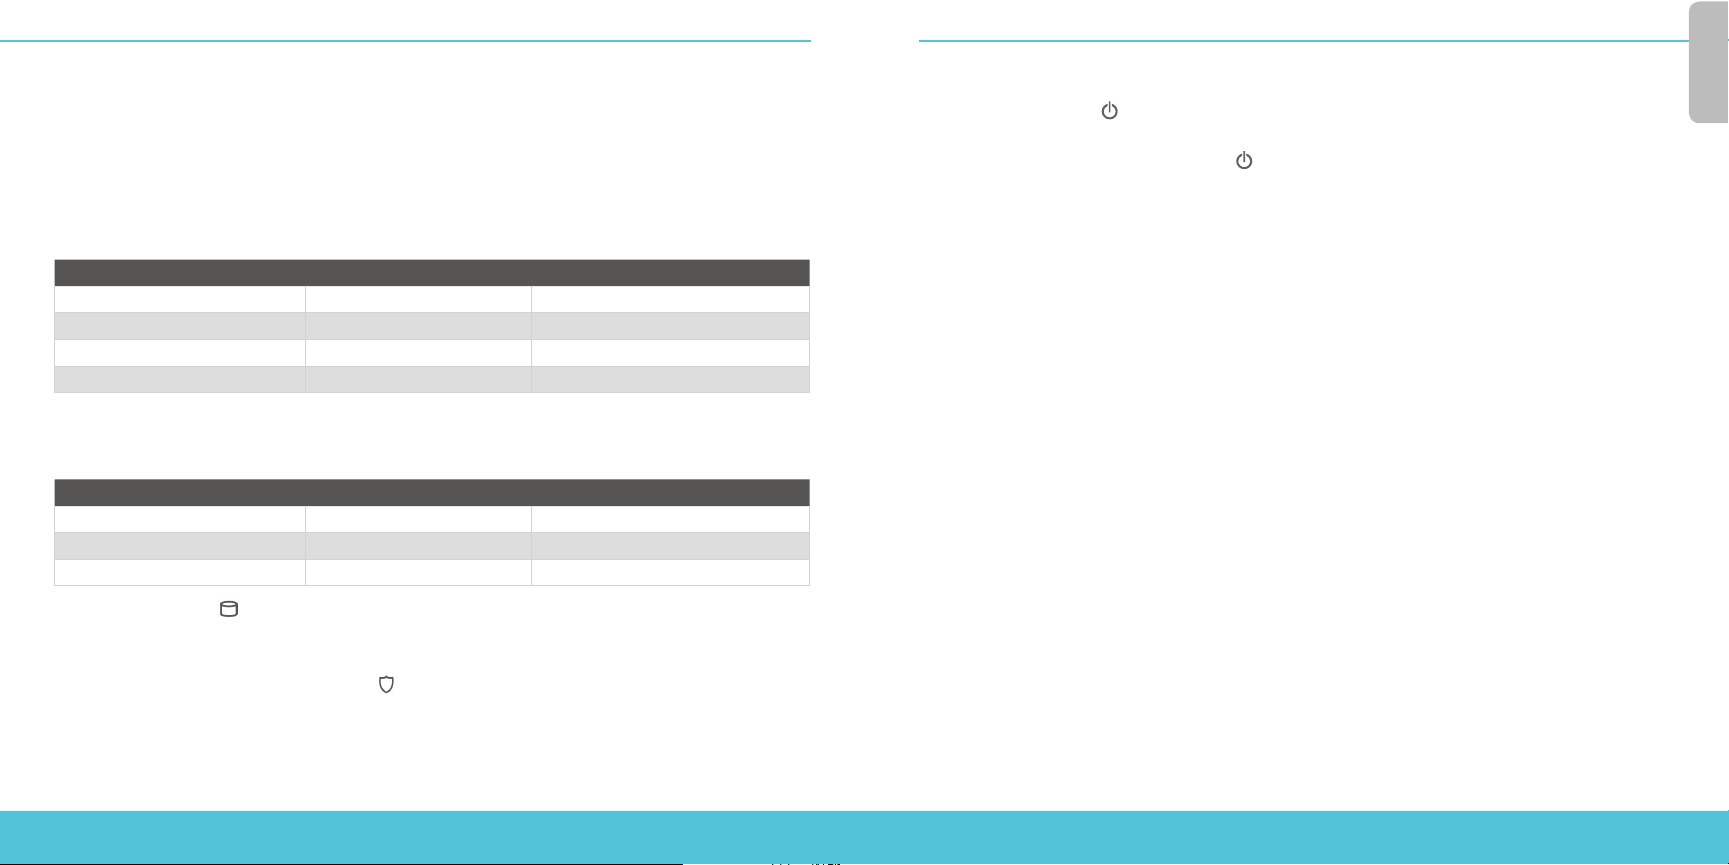
Indicateurs des interfaces RJ45: les interfaces 0 à 24 présentent deux indicateurs. L'indicateur
de gauche représente l'état de la connexion de l'interface. L'indicateur de droite représente l'activité
de l'interface.
Indicateur Couleur de l'indicateur État de l'interface
Connexion (à gauche) Jaune Liaison à 10, 100 ou 1000 Mbps
Éteint Aucune liaison
Activité (à droite) Jaune, clignotant Sous tension, activité réseau
Éteint Aucune activité
Indicateurs des interfaces bre: les indicateurs situés à droite des interfaces 25 et 26 représentent
la vitesse de connexion de ces interfaces. L'indicateur supérieur représente l'état de l'interface 25.
L'indicateur inférieur représente l'état de l'interface 26.
Indicateur Couleur de l'indicateur État de l'interface
Vitesse de la connexion Jaune Liaison à 1Gbps
Vert Liaison à 10 Gbps
Activité Jaune, clignotant Sous tension, activité réseau
Storage (Stockage) ( ): lorsque la mémoire Flash est active, l'indicateur de stockage est jaune.
Status (État): l'indicateur d'état passe au rouge pendant 30 secondes lorsque l'appareil reçoit une
nouvelle connexion de gestion ou lorsqu'il est sondé par WatchGuard System Manager.
Arm/Disarm (Activation/désactivation) ( ): lorsque l'appareil est activé et prêt à transmettre
du trac, cet indicateur passe au vert. Lorsque l'appareil est sous tension mais qu'il n'est pas prêt à
transmettre du trac, cet indicateur passe est rouge.
Mode: si l'appareil peut se connecter au réseau externe, cet indicateur est vert. Si l'appareil ne peut
pas se connecter au réseau externe, cet indicateur clignote.
Attn: cet indicateur est jaune lorsque vous démarrez l'appareil tout en maintenant le bouton
Reset (Réinitialiser) enfoncé.
Power (Alimentation) ( ): situé à l'avant gauche, l'indicateur d'alimentation est vert lorsque
l'appareil est sous tension.
Power Button (Bouton d'alimentation) ( ): ce bouton permet de mettre l'appareil sous tension
et hors tension lorsque le bouton marche/arrêt situé à l'arrière de l'appareil est sur la position On
(marche). Lorsque le bouton d'alimentation est vert, maintenez-le enfoncé pendant trois secondes
pour mettre l'appareil hors tension. Lorsque ce bouton est rouge, appuyez brièvement dessus pour
mettre l'appareil sous tension.
Rétablissement des paramètres d'usine de l'appareil
En cas de besoin, vous pouvez réinitialiser votre Firebox sur ses paramètres d'usine. Par exemple,
vous pouvez réinitialiser votre appareil si vous ne connaissez pas le mot de passe du compte
administrateur ou si vous souhaitez recommencer avec une nouvelle conguration. Assurez-vous de
sauvegarder la conguration de votre appareil avant de procéder à la réinitialisation an de pouvoir
la restaurer ultérieurement si nécessaire.
Pour réinitialiser votre appareil:
1. Au besoin, utilisez le bouton de marche/arrêt situé à l'arrière de l'appareil pour le mettre
sous tension.
2. Maintenez enfoncé le bouton Power (Alimentation) situé à l'avant de l'appareil pendant trois
secondes pour le mettre hors tension.
3. Maintenez enfoncé le bouton Reset (Réinitialiser) situé à l'avant gauche de l'appareil,
tout en appuyant brièvement sur le bouton Power (Alimentation) situé à l'avant gauche
de l'appareil pour le mettre sous tension.
4. Continuez de maintenir enfoncé le bouton de réinitialisation jusqu'à ce que l'indicateur
Attn commence à clignoter.
5. Relâchez le bouton de réinitialisation.
6. Attendez jusqu'à ce que l'indicateur Attn arrête de clignoter et reste allumé.
7. Maintenez enfoncé le bouton Power (Alimentation) pendant trois secondes pour mettre
l'appareil hors tension.
8. Appuyez brièvement sur ce bouton pour mettre l'appareil sous tension.
8 9
Page 6

Deutsch
Gerät aktivieren
1. Rufen Sie die Website www.watchguard.com/activate auf.
2. Loggen Sie sich in Ihren WatchGuard-Account ein oder erstellen Sie ein neues Konto*.
*Falls Sie ein neues Konto erstellen, kehren Sie nach erfolgreichem Abschluss zur Seite www.watchguard.com/activate
zurück.
Gerät anschließen und einschalten
Stellen Sie sicher, dass Ihr Computer für die Verwendung von DHCP konguriert ist. Wenn Sie
Ihre Firebox anschließen, wird eine IP-Adresse im Netzwerk 10.0.1.0/24 zugewiesen.
Computer
Eth 1
Eth 0
Internet
Verbindung zum Web-Interface herstellen
1. Rufen Sie die Website https://10.0.1.1:8080 auf.
2. Etwaig angezeigte Zertikatswarnungen können Sie ignorieren, da das Gerät ein
selbstsigniertes Zertikat verwendet.
3. Melden Sie sich mit dem Benutzernamen admin und dem Kennwort readwrite an.
4. Folgen Sie den Anweisungen im Web-Setup-Assistenten, um eine Basiskongurationsdatei
für ein neues Gerät zu erstellen. Klicken Sie bei weiteren Fragen auf More Information.
5. Melden Sie sich nach Abschluss des Assistenten mit dem Benutzerkonto admin und
dem Admin-Kennwort (readwrite), das Sie bei der Aktivierung festgelegt haben,
am Web-Interface an.
6. Installieren Sie die Firebox in Ihrem Netzwerk.
Ihr Gerät verfügt über die folgende Basiskonguration:
• Unterstützung für ausgehenden TCP-, UDP- und Ping-Datenverkehr
• Blockierung von nicht angefordertem Datenverkehr des externen Netzwerks
Weitere Schritte
Herzlichen Glückwunsch! Sie haben das Basis-Setup für Ihre Firebox abgeschlossen. Über das
Web-Interface können Sie Ihre Konguration anzeigen lassen sowie bearbeiten und Ihr Gerät
verwalten und überwachen. Alternativ können Sie den WatchGuard System Manager (WSM)
herunterladen und installieren und den Policy Manager und die WSM-Suite mit Management-
und Überwachungstools verwenden. Tipps für den Start:
Internetverbindung überprüfen
• Stellen Sie sicher, dass Ihre Nutzer nach der Installation der Firebox im Netzwerk
problemlos im Internet navigieren können.
Neueste Software implementieren
So rufen Sie die neueste Version von WSM und des Fireware-Betriebssystems ab:
1. Rufen Sie die Website www.watchguard.com/support auf und klicken Sie auf Software
Downloads.
2. Gehen Sie auf die Seite mit den Software-Downloads für die Firebox M440, und wählen Sie
die zu installierende Software aus.
So führen Sie ein Upgrade des Firebox-Betriebssystems durch:
1. Laden Sie das Installationspaket der neuesten Version des Firebox-Betriebssystems
herunter und starten Sie die Installation. Dadurch wird eine Aktualisierungsdatei auf Ihrem
Computer hinterlegt, die Sie über das Web-Interface oder Policy Manager zur Firebox
hochladen müssen.
2. Im Web-Interface wählen Sie die Option System > Upgrade aus. Wenn Sie Policy Manager
verwenden, wählen Sie File > Upgrade aus. Der Dateiname lautet M440.sysa-dl.
Bei dieser Installation wird die Aktualisierungsdatei per Voreinstellung im folgenden
Ordner extrahiert: C:\Programme(x86)\Gemeinsame Dateien\WatchGuard\Ressourcen\
FirewareXTM\<Version>\
Bei Verwendung eines Computers mit einem Windows-32-Bit-Betriebssystem lautet der Pfad wie
folgt: C:\Programme\Gemeinsame Dateien\WatchGuard\Ressourcen\FirewareXTM\<Version>\
10 11
Page 7

Deutsch
Merkmale und Funktionen der Firebox erkunden
Durchsuchen Sie das Web-Interface oder die Tools in WatchGuard System Manager und klicken Sie
auf einer beliebigen Seite oder in einem beliebigen Dialogfeld auf Help, um weitere Informationen
zu den Verwaltungs-, Überwachungs- und Sicherheitsmerkmalen Ihrer Firebox zu erhalten.
Informationen zu den Statusanzeigen des Geräts
Anzeigen für die RJ45-Schnittstellen – Die Schnittstellen 0 - 24 haben zwei Anzeigen. Die
linke Anzeige zeigt den Verbindungsstatus der Schnittstelle. Die rechte Anzeige zeigt die
Schnittstellenaktivität.
Anzeige Farbsignal Schnittstellenstatus
Verbindung (links) Gelb Link mit 10, 100 oder 1.000 MB/s
Leuchtet nicht Kein Link
Aktivität (rechts) Gelb, blinkt Eingeschaltet, Netzwerkaktivität
Leuchtet nicht Keine Aktivität
Anzeigen für Glasfaserschnittstellen – Die Anzeigen rechts von den Schnittstellen 25 und 26
zeigen die Verbindungsgeschwindigkeit für diese Schnittstellen. Die Anzeige ganz oben zeigt den
Status der Schnittstelle 25. Die Anzeige ganz unten zeigt den Status der Schnittstelle 26.
Anzeige Farbsignal Schnittstellenstatus
Verbindungsgeschwindigkeit Gelb Link mit 1 GB/s
Grün Link mit 10 GB/s
Aktivität Gelb, blinkt Eingeschaltet, Netzwerkaktivität
Storage ( ) – Wenn auf dem Compact-Flash-Speicher Aktivität stattndet, leuchtet die
Speicheranzeige gelb.
Status – Die Statusanzeige leuchtet 30 Sekunden lang rot, wenn eine neue Verwaltungsverbindung mit
dem Gerät hergestellt wurde oder das Gerät von WatchGuard System Manager angesprochen wird.
Arm/Disarm ( ) – Wenn das Gerät aktiv und bereit ist, Daten zu übertragen, leuchtet diese Anzeige
grün. Wenn das Gerät eingeschaltet, jedoch nicht bereit ist, Datenverkehr zu übertragen, leuchtet
diese Anzeige rot.
Mode – Die Modusanzeige leuchtet grün, wenn das Gerät eine Verbindung mit dem externen
Netzwerk herstellen kann. Die Anzeige blinkt, wenn das Gerät keine Verbindung zum externen
Netzwerk herstellen kann.
Attn – Diese Anzeige leuchtet gelb, wenn Sie das Gerät mit gedrückter Reset-Taste starten.
Power ( ) – Diese Anzeige links auf der Vorderseite des Geräts leuchtet grün, wenn das Gerät
eingeschaltet ist.
Power-Taste ( ) – Verwenden Sie diese Taste zum Aus- und Einschalten des Geräts, wenn die
Power-Taste auf der Rückseite des Geräts in der Position „On“ steht. Wenn die Power-Taste grün
leuchtet, halten Sie diese Taste zum Ausschalten des Geräts drei Sekunden lang gedrückt. Wenn
die Power-Taste rot leuchtet, drücken Sie zum Einschalten des Geräts kurz auf diese Taste.
Gerät auf die Werkseinstellungen zurücksetzen
Falls erforderlich, lassen sich jederzeit die Werkseinstellungen Ihrer Firebox wiederherstellen. Sie
können Ihr Gerät beispielsweise zurücksetzen, wenn Ihnen das Kennwort für das Administratorkonto
nicht mehr bekannt ist oder wenn Sie erneut ein Setup mit einer neuen Konguration durchführen
möchten. Sichern Sie jedoch unbedingt Ihre Konguration, bevor Sie das Gerät zurücksetzen, damit
Sie es künftig ggf. wiederherstellen können.
So setzen Sie das Gerät zurück:
1. Verwenden Sie zum Einschalten des Geräts ggf. den Netzschalter auf der Rückseite.
2. Halten Sie zum Ausschalten des Geräts die Taste Power auf der Gerätevorderseite für drei
Sekunden gedrückt.
3. Halten Sie die Taste Reset links auf der Vorderseite gedrückt, und drücken Sie zum Einschalten
des Geräts kurz auf die Taste Power auf der Gerätevorderseite.
4. Halten Sie die Reset-Taste solange gedrückt, bis die Anzeige Attn beginnt zu blinken.
5. Lassen Sie die Reset-Taste wieder los.
6. Warten Sie, bis die Attn-Anzeige aufhört zu blinken.
7. Halten Sie zum Ausschalten des Geräts die Power-Taste drei Sekunden lang gedrückt.
8. Drücken Sie zum Einschalten des Geräts kurz auf die Power-Taste.
12 13
Page 8
Italiano
Attivazione del dispositivo
1. Visitare www.watchguard.com/activate
2. Accedere al proprio account WatchGuard, oppure creare un nuovo account*.
*Se si crea un nuovo account, ritornare a www.watchguard.com/activate dopo aver terminato la procedura di creazione
dell’account.
Collegamento e accensione del dispositivo
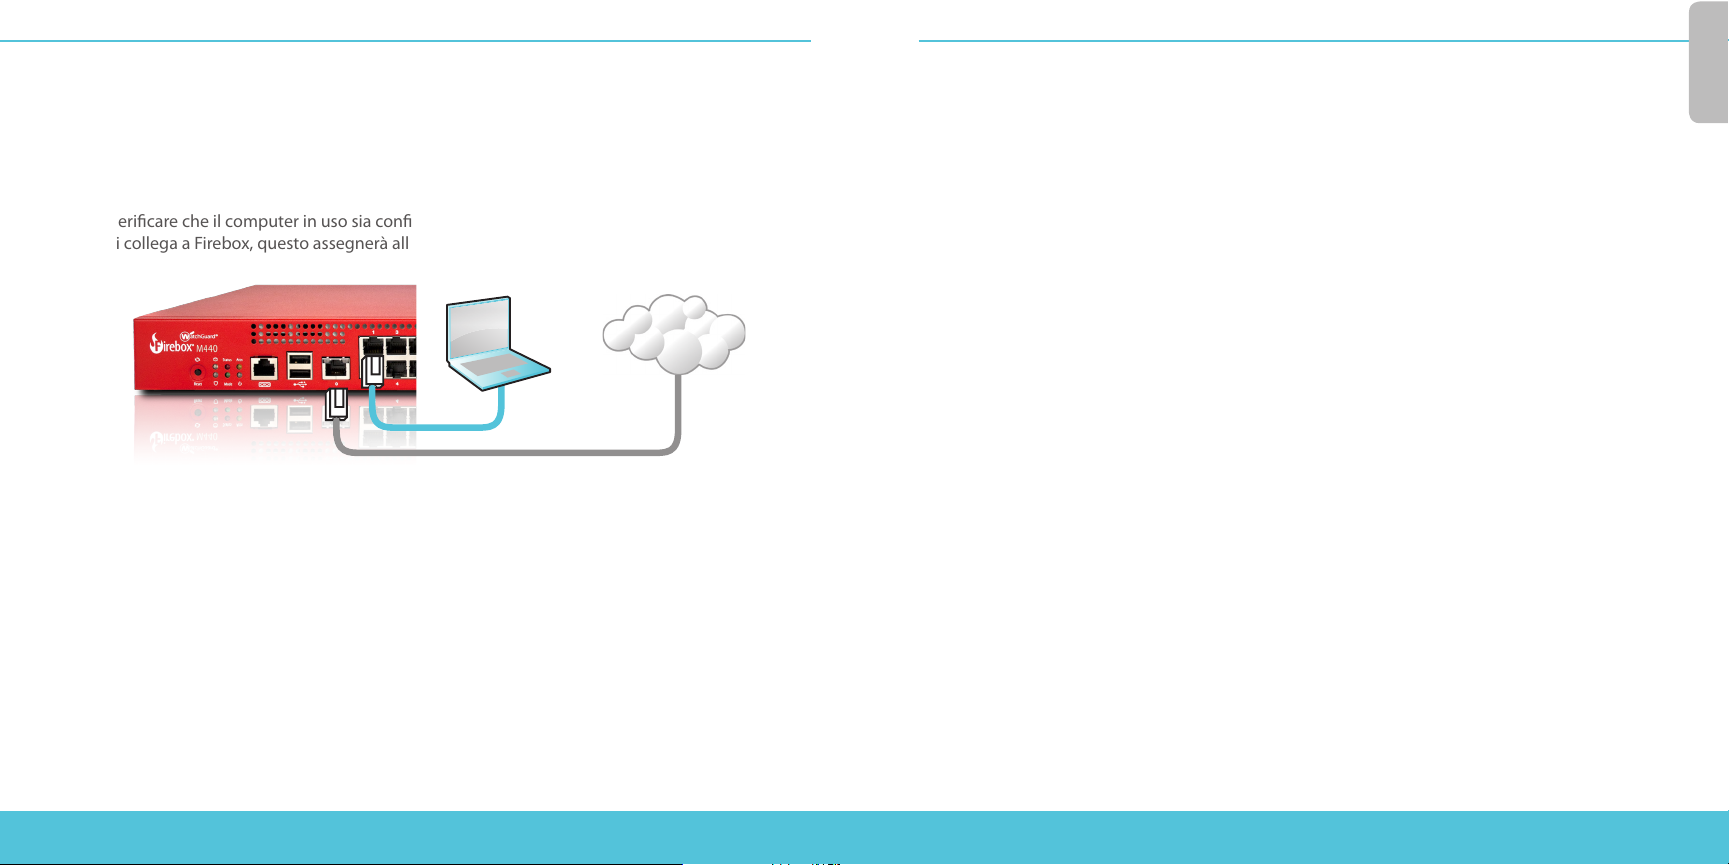
Vericare che il computer in uso sia congurato per utilizzare il protocollo DHCP. Quando ci
si collega a Firebox, questo assegnerà alla rete l’indirizzo IP 10.0.1.0/24.
Computer
Eth 1
Eth 0
Internet
Collegamento all’interfaccia utente web
1. Collegarsi a https://10.0.1.1:8080
2. È possibile ignorare tranquillamente qualsiasi avviso di certicato visualizzato perché
il dispositivo utilizza un certicato autormato.
3. Accedere con l’account utente admin e la passphrase readwrite.
4. Per creare un le di congurazione di base per il nuovo dispositivo, seguire le indicazioni
contenute nella procedura guidata per l’installazione basata sul Web. In caso di domande,
fare clic su Ulteriori informazioni.
5. Una volta completata la procedura guidata, accedere all’interfaccia utente basata sul web con
l’account utente admin e la passphrase (readwrite) impostata durante la procedura guidata.
6. Installare Firebox sulla rete.
Il dispositivo contiene una congurazione di base:
• Consente il traco TCP e UDP in uscita, e il ping
• Blocca tutto il traco non richiesto dalla rete esterna
Passaggi successivi
Congratulazioni! L’installazione di base del Firebox è stata completata. Per visualizzare e modicare
la congurazione in uso e per gestire e monitorare il proprio dispositivo, è possibile utilizzare
l’interfaccia utente basata sul web. In alternativa, è possibile scaricare e installare WatchGuard System
Manager (WSM) e utilizzare Policy Manager e la suite di strumenti gestionali e di monitoraggio WSM.
Di seguito alcuni consigli utili per iniziare:
Verica della connettività a Internet
• Dopo avere installato Firebox sulla propria rete, vericare che gli utenti possano navigare in
internet senza problemi.
Aggiornamento del software
Per ottenere l’ultima versione di WSM e del sistema operativo Fireware:
1. Visitare www.watchguard.com/support e fare clic su Software Downloads
2. Cercare la pagina per scaricare il software di Firebox M440 e selezionare il software che
si desidera installare.
Per aggiornare il sistema operativo Firebox:
1. Scaricare ed eseguire il pacchetto di installazione contenente l’ultima versione del sistema
operativo Fireware. Verrà installato un le di aggiornamento sul computer in uso che dovrà
essere caricato su Firebox attraverso l’interfaccia utente basata sul web o attraverso Policy
Manager.
2. Se si utilizza l’interfaccia utente basata sul web, selezionare System > Upgrade. Se si
utilizza Policy Manager, selezionare File > Upgrade. Il nome del le è M440.sysa-dl.
La procedura di installazione estrarrà il le di aggiornamento nel percorso predenito
C:\Program Files(x86)\Common les\WatchGuard\resources\FirewareXTM\<version>\
In un computer con in esecuzione il sistema operativo Windows 32-bit, il percorso è:
C:\Program Files\Common Files\WatchGuard\resources\FirewareXTM\<version>\
14 15
Page 9
Italiano
Esplorazione delle caratteristiche e delle funzionalità di Firebox
Per ulteriori informazioni sulle funzionalità di gestione, monitoraggio e sicurezza di Firebox, sfogliare
l’interfaccia utente basata sul web o gli strumenti di WatchGuard System Manager e fare clic su ?
o su qualsiasi altra pagina o nestra di dialogo.
Informazioni sulle spie di stato del dispositivo
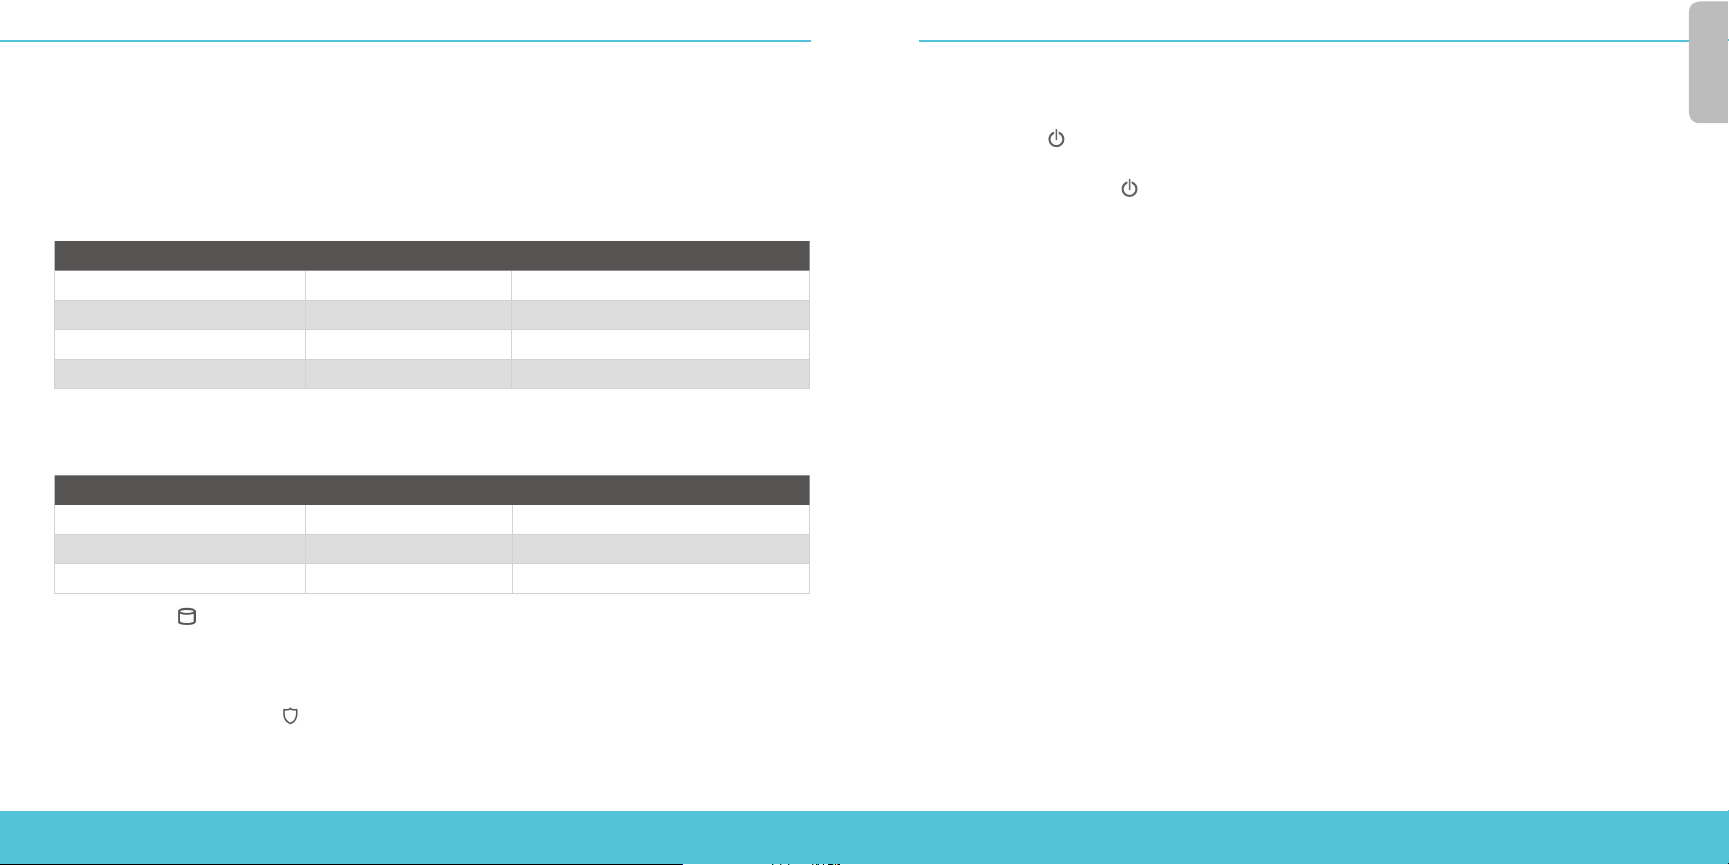
Indicatori per le interfacce RJ45 – Le interfacce 0-24 hanno due indicatori. L’indicatore di sinistra
mostra lo stato di connessione dell’interfaccia. L’indicatore di destra mostra l’attività dell’interfaccia.
Indicatore Colore dell’indicatore Stato dell’interfaccia
Connessione (sinistra) Giallo Collegamento a 10, 100 o 1000 Mbps
Spento Nessun collegamento
Attività (destra) Giallo, lampeggi Accensione, attività della rete
Spento Nessuna attività
Indicatori per le interfacce in bra - Gli indicatori a destra delle interfacce 25 e 26 mostrano la
velocità di connessione di tali interfacce. L’indicatore superiore mostra lo stato dell’interfaccia 25.
L’indicatore inferiore mostra lo stato dell’interfaccia 26.
Indicatore Colore dell’indicatore Stato dell’interfaccia
Velocità di connessione Giallo Collegamento a 1Gbps
Verde Collegamento a 10 Gbps
Attività Giallo, lampeggi Accensione, attività della rete
Archiviazione ( ) – Se la memoria Compact Flash è attiva, l’indicatore di archiviazione è giallo.
Stato – L’indicatore di stato è rosso per 30 secondi quando viene eettuata una nuova connessione
per la gestione del dispositivo, oppure quando il dispositivo viene sondato da WatchGuard System
Manager.
Attivazione/Disattivazione ( ) – Quando il dispositivo è attivo e pronto a trasmettere traco,
questo indicatore è verde. Quando il dispositivo è acceso, ma non è ancora pronto a trasmettere
traco, questo indicatore è rosso.
Modalità – Se il dispositivo può collegarsi alla rete esterna e inviare traco, l’indicatore Mode è
verde. Se il dispositivo non può collegarsi alla rete esterna, l’indicatore lampeggia.
Attn – L’indicatore Attn è giallo quando il dispositivo viene avviato premendo il pulsante Reset.
Alimentazione ( ) – L’indicatore dell’alimentazione a sinistra è verde quando il dispositivo viene
acceso.
Pulsante Alimentazione ( ) – Utilizzare questo pulsante per accendere e spegnere il dispositivo
quando il pulsante di alimentazione sul retro è impostato sulla posizione On. Quando il pulsante
Alimentazione è verde, tenerlo premuto per tre secondi se si desidera spegnere il dispositivo.
Quando il pulsante Alimentazione è rosso, premerlo brevemente per accendere il dispositivo.
Ripristino delle impostazioni di fabbrica del dispositivo
Se necessario, è possibile ripristinare le impostazioni di fabbrica di Firebox. Per esempio, è possibile
reimpostare il dispositivo se non si conosce la passphrase dell’account administrator o si desidera
riavviare con una nuova congurazione. Prima di ripristinare il dispositivo, assicurarsi di eseguire
il backup della congurazione del dispositivo qualora si desideri ripristinarlo in futuro.
Per ripristinare il dispositivo:
1. Se necessario, utilizzare l’interruttore dell’alimentazione sul retro del dispositivo per
accenderlo.
2. Tenere premuto per tre secondi il pulsante Alimentazione sul lato anteriore del dispositivo
per spegnerlo.
3. Tenere premuto il pulsante Reset premendo brevemente il pulsante Alimentazione sul lato
anteriore del dispositivo per accenderlo.
4. Continuare a premere il pulsante Reset nché l’indicatore Attn comincia a lampeggiare.
5. Rilasciare il pulsante Reset.
6. Attendere che l’indicatore Attn smetta di lampeggiare e rimanga acceso.
7. Tenere premuto il pulsante Alimentazione per tre secondi per spegnere il dispositivo.
8. Premere brevemente il pulsante Alimentazione per accendere il dispositivo.
16 17
Page 10
日本語
デバイスのアクティベーションを行う
1. www.watchguard.com/activate にアクセスします。
2. 登録済みのWatchGuardアカウントにログインするか、新しいアカウントを作成します*。
*新しいアカウントを作成する場合は、アカウント作成プロセスが完了してからもう一度
www.watchguard.com/activate にアクセスしてください。
デバイスを接続して電源を入れる
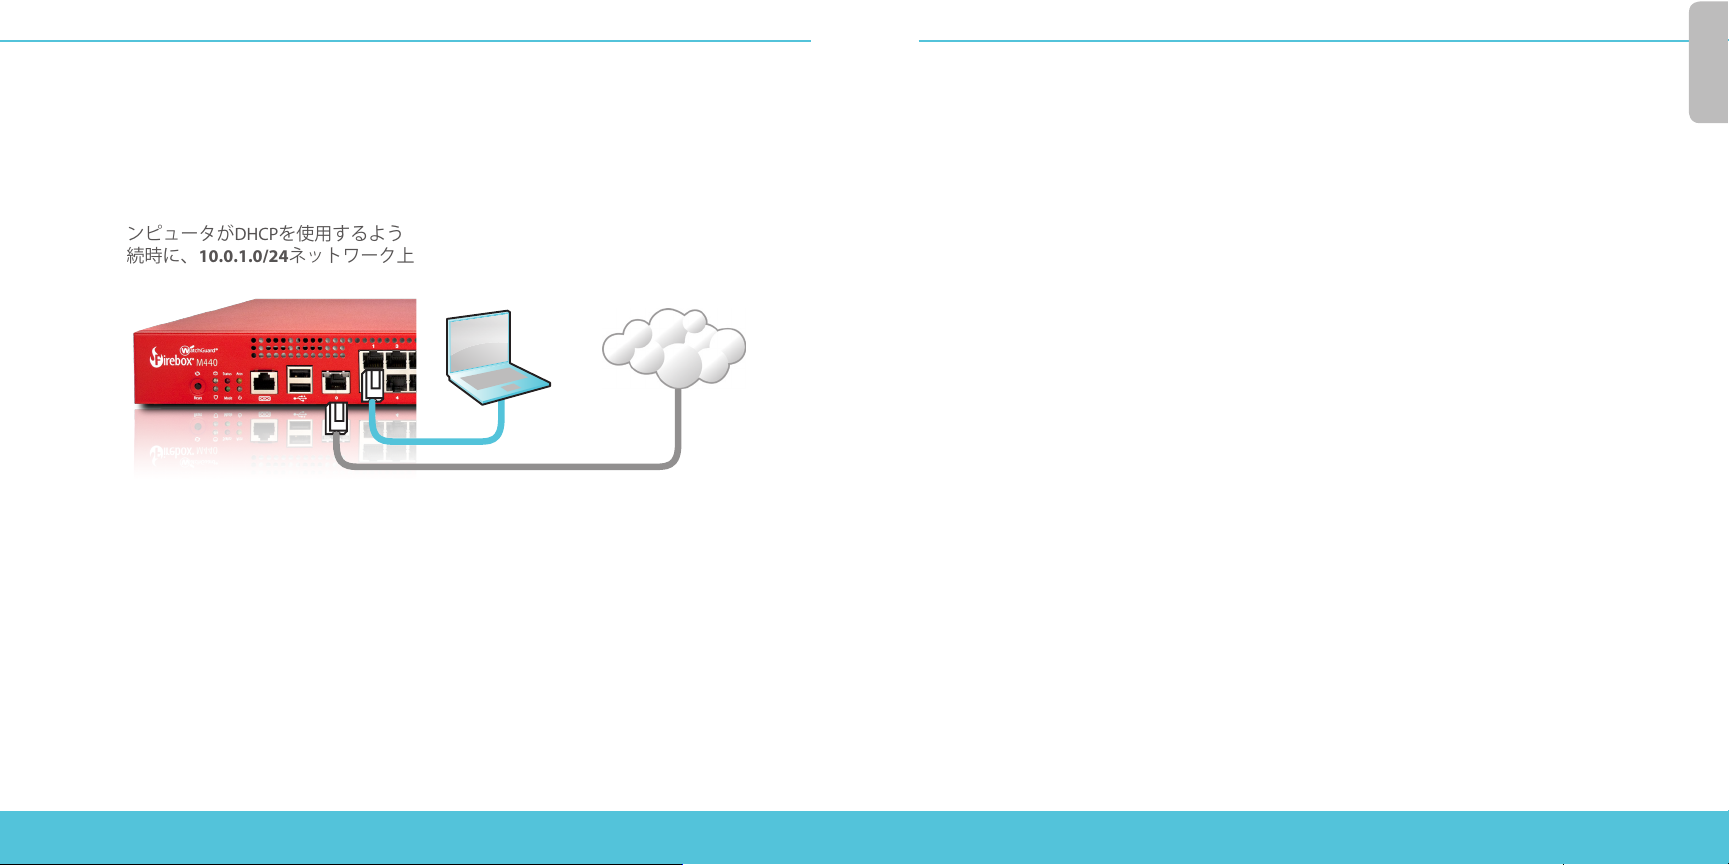
コンピュータがDHCPを使用するように設定されていることを確認します。Fireboxへの
接続時に、10.0.1.0/24ネットワーク上のIPアドレスが割り当てられます。
コン ピュータ インターネット
Eth 1
Eth 0
ウェブUIに接続する
1. https://10.0.1.1:8080 にアクセスします。
2. 自己署名証明書を使用するため、証明書に関する警告は無視してかまいません。
3. ユーザー名adminとパスフレーズreadwriteでログインします。
4. ウェブセットアップ・ウィザードの手順に従って、新しいデバイスの基本設定ファイル
を作成します。詳しい手順を確認する場合は、[More Information] をクリックしてくだ
さい。
5. ウィザードが完了したら、ウィザードで設定したユーザー・アカウントadminと管理用
パスフレーズreadwriteでウェブUIにログインします。
6. ネットワークにFireboxをインストールします。
デバイスの基本設定は次のとおりです。
• アウトバウンドのTCP、UDP、およびpingトラフィックを許可
• 外部ネットワークからのすべての要求されないトラフィックをブロック
次のステップ
おめでとうございます。これでFireboxの基本セットアップが完了しました。ウェブUIを使っ
て、設定を確認して編集したり、デバイスの管理/監視作業を行ったりできます。また、
WatchGuard System Manager(WSM)をダウンロードしてインストールし、Policy Managerや
WSMスイートに含まれる管理/監視ツールを利用することもできます。それらの作業の手始め
として、いくつかの推奨事項を次に示します。
インターネット接続を確認する
• ネットワークにインストールしたFireboxで、ユーザーがインターネットを正常に閲
覧できることを確認します。
最新のソフトウェアを入手する
WSMおよびFireware OSの最新バージョンを入手する手順は次のとおりです。
1. www.watchguard.com/support にアクセスし、[Software Downloads]をクリックします。
2. Firebox M440のソフトウェア・ダウンロード・ページを探し、インストールするソフ
トウェアを選択します。
Firebox OSをアップグレードする手順は次のとおりです。
1. 最新バージョンのFireware OSのインストール・パッケージをダウンロードして実行
します。アップグレード・ファイルがコンピュータにインストールされます。この
ファイルを、Web UIまたはPolicy Managerを使用してFireboxにアップロードする必
要があります。
2. ウェブUIを使用する場合は、System > Upgrade OSの順に選択します。Policy Managerを
使用する場合は、File > Upgradeの順に選択します。ファイル名はM440.sysa-dlです。
アップグレード・ファイルのデフォルトの展開先は、
files\WatchGuard\resources\FirewareXTM\<version>\
Windows 32
C:\Program Files\Common Files\WatchGuard\resources\FirewareXTM\<version>\
ビット・オペレーティング・システムを搭載したコンピュータの場合は、
C:\Program Files(x86)\Common
です。
です。
18 19
Page 11

日本語
Fireboxの機能について調べる
Fireboxの管理、監視、およびセキュリティの機能の詳細については、ウェブUIまたは
WatchGuard System Managerで確認できます。それぞれのページやダイアログ・ボックスで
[Help] をクリックしてください。
デバイスのステータス・ライトについて
RJ45インターフェイスのインジケータ – インターフェイス0~24には、それぞれ2つのインジ
ケータがあります。左側のインジケータはインターフェイスの接続ステータスを示し、右側の
インジケータはインターフェイスのアクティビティを示します。
インジケータ インジケータの色 インターフェイスのステータス
接続(左) 黄色 リンク速度10、100、または1000 Mbps
消灯 リンクなし
アクティビティ(右) 黄色の点滅 電源オン、ネットワーク・アクティビティ
消灯 アクティビティなし
ファイバー・インターフェイスのインジケータ – インターフェイス25および26の右にあるイン
ジケータは、それらのインターフェイスの接続速度を示します。上のインジケータがインター
フェイス25のステータス、下のインジケータがインターフェイス26のステータスを示してい
ます。
インジケータ インジケータの色 インターフェイスのステータス
接続速度 黄色 リンク速度1 Gbps
緑色 リンク速度10 Gbps
アクティビティ 黄色の点滅 電源オン、ネットワーク・アクティビティ
Storage ( ) – コンパクト・フラッシュに対するアクティビティがあるときに黄色に点
滅します。
Status – デバイスへの管理接続が新たに確立されたときに30秒間赤色に点灯します。
また、WatchGuard System Managerによるデバイスのポーリング時も同様に点灯します。
Arm/Disarm ( ) – デバイスの電源が入った状態で、トラフィックを送受信する準備ができて
いるときに緑色に点灯します。デバイスの電源が入っていても、トラフィックを送受信する準
備ができていないと赤色に点灯します。
Mode – 外部ネットワークに接続可能な状態のときに緑色に点灯します。外部ネットワークに
接続できないときは点滅します。
Attn – デバイスの起動時にリセット・ボタンを押すと黄色に点灯します。
Power ( ) – デバイス前面の左側にあるインジケータです。デバイスの電源が入っているとき
に点灯します。
電源ボタン ( ) – デバイス背面の電源スイッチがOnの側になっているときに、このボタンで
電源のオンとオフを切り替えることができます。このボタンが緑色のときは、3秒間長押しす
ると電源が切れます。赤色のときは、押してすぐに放すと電源が入ります。
デバイスの設定を工場出荷時の状態に戻す
必要に応じて、Fireboxの設定を工場出荷時の状態に戻すことができます。たとえば、管理者
アカウントのパスフレーズを忘れた場合や、新しい設定でセットアップをやり直したい場合
に、デバイスをリセットすることができます。デバイスをリセットするときは、後で復元する
場合に備えて、実行前に設定をバックアップしてください。
デバイスをリセットする手順は次のとおりです。
1. デバイスの電源が入っていない場合は、デバイス背面の電源スイッチを使用して電源を
入れます。
2. デバイス前面の電源ボタンを3秒間長押しして電源を切ります。
3. デバイス前面の左側にあるリセット・ボタンを押した状態で、デバイス前面の電源ボタ
ンを短く押して電源を入れます。
4. リセット・ボタンは、Attnインジケータが点滅するまで押したままにします。
5. リセット・ボタンを放します。
6. Attnインジケータが点滅から点灯に変わるまで待ちます
7. 電源ボタンを3秒間長押しして電源を切ります。
8. 電源ボタンを短く押して電源を入れます。
。
20 21
Page 12

Certications
Notices:
All WatchGuard products are designed and tested to meet strict safety requirements. These
requirements include product safety approvals and other global compliance standards. Please read
the following instructions carefully before operating the product, and refer to them as needed to
ensure the continued safe operation of your product. Additional information can be found in the
Hardware Guide located on the WatchGuard website:
http://www.watchguard.com/help/documentation/hardware.asp
Product Safety Certication
The WatchGuard product is safety certied under the following standards:
• CAN/CSA-C22.2 No.60950-1-07+A1:2011
• UL 60950-1:2007 R12.11
• EN 60950-1:2006+A11+A1+A12 (2nd Edition)
• IEC 60950-1:2005 (2nd Edition)+A1:2009
Safety Warning
• Do not place objects on the power cord.
• Do not obstruct the ventilation openings. These openings prevent overheating of the machine.
• Never push objects of any kind into slots or openings on this equipment. Making a contact with a
voltage point or shorting out a part may result in re or electrical shock.
• When removing or installing an appliance, follow the general installation safety instructions.
Disclaimer
WatchGuard shall not be held liable if the end user alters, modies, or repairs any WatchGuard
hardware appliance.
Hinweise Zur Sicherheit
Alle WatchGuard Produkte werden entwickelt und getestet, um strenge Sicherheitsanforderungen
zu erfüllen. Diese Anforderungen umfassen Produktsicherheit Zulassungen und andere globale
Compliance- Standards. Bitte lesen Sie die folgenden Anweisungen sorgfältig, bevor Sie das Produkt,
und bezeichnen sie als notwendig, um den sicheren Betrieb des Geräts zu gewährleisten. Weitere
Informationen nden Sie in der elektronischen Hardware Guide.
Die WatchGuard Produkt ist Sicherheit unter den folgenden Normen zertiziert:
• CAN/CSA-C22.2 No.60950-1-07+A1:2011
• UL 60950-1:2007 R12.11
• EN 60950-1:2006+A11+A1+A12 (2nd Edition)
• IEC 60950-1:2005 (2nd Edition)+A1:2009
Sicherheitshinweis
• Legen Sie keine Gegenstände auf das Netzkabel.
• Verdecken Sie nicht die Lüftungsönungen. Diese Önungen verhindern eine Überhitzung
der Maschine
• Stecken Sie niemals Gegenstände jeglicher Art in die Schlitze oder Önungen des Geräts stecken.
Der Kontakt mit einem spannungsführenden Punkt oder das Kurzschließen eines Bauteils kann zu
einem Brand oder elektrischen Schlag führen.
• Beim Entfernen oder Installieren eines Gerätes, nach den allgemeinen Installation
Sicherheitshinweise.
22 23
Page 13
Certications
Aviso De Seguridad
Todos los productos WatchGuard están diseñados y probados para satisfacer estrictos requisitos de
seguridad. Estos requisitos incluyen la homologación de productos de seguridad y otras normas
de cumplimiento global. Por favor, lea atentamente las siguientes instrucciones antes de utilizar
el producto, y se reeren a ellos como sea necesario para garantizar el funcionamiento seguro
y continuo de su producto. Información adicional se puede encontrar en la Guía del usuario
electrónica.
Certicación de seguridad del producto
El producto tiene certicación de seguridad WatchGuard bajo las siguientes normas:
• CAN/CSA-C22.2 No.60950-1-07+A1:2011
• UL 60950-1:2007 R12.11
• EN 60950-1:2006+A11+A1+A12 (2nd Edition)
• IEC 60950-1:2005 (2nd Edition)+A1:2009
Advertencia de seguridad
• No coloque objetos sobre el cable de alimentación.
• No obstruya las aberturas de ventilación. Estas aberturas evitan el sobrecalentamiento de
la máquina.
• Nunca introduzca objetos de ningún tipo en las ranuras o aberturas del equipo. El contacto
con puntos de voltaje o el cortocircuito de una pieza podría provocar un incendio o una descarga
eléctrica.
• Al extraer o instalar un electrodoméstico, siga las instrucciones generales de instalación
de seguridad.
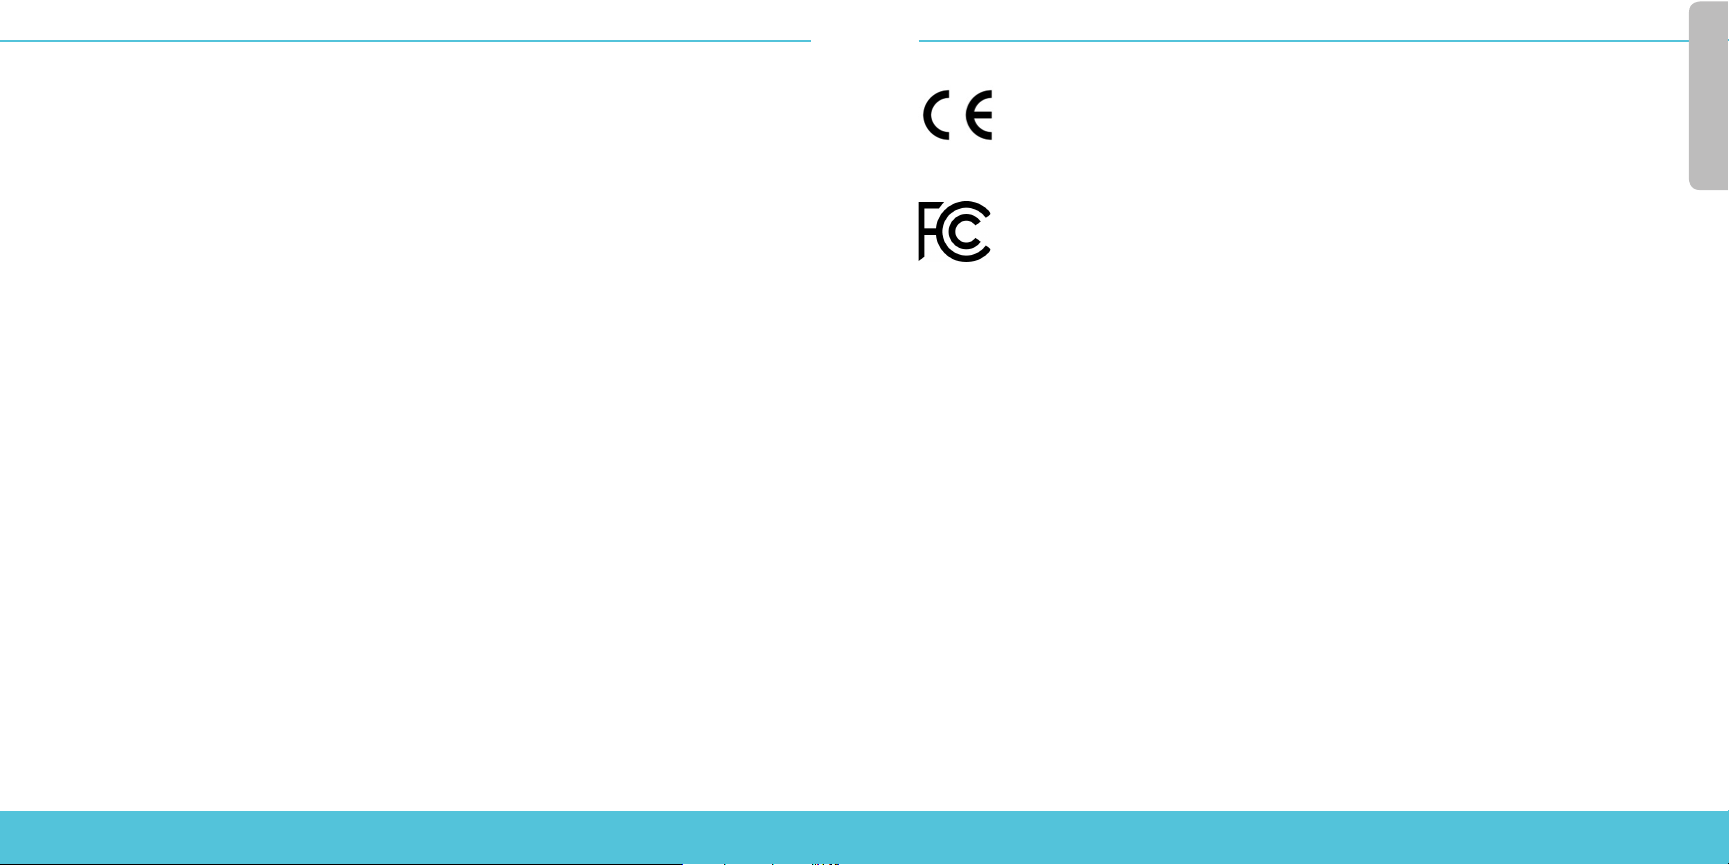
CE Notice:
The CE symbol on your WatchGuard Technologies equipment indicates that it is in
compliance with the Electromagnetic Compatibility (EMC) directive and the Low Voltage
Directive (LVD) of the European Union (EU).
Federal Communication Commission Interference Statement
This equipment has been tested and found to comply with the limits for a Class A
digital device, pursuant to Part 15 of the FCC Rules. These limits are designed to
provide reasonable protection against harmful interference in a residential installation.
This equipment generates, uses and can radiate radio frequency energy and, if not
installed and used in accordance with the instructions, may cause harmful interference to radio
communications. However, there is no guarantee that interference will not occur in a particular
installation. If this equipment does cause harmful interference to radio or television reception, which
can be determined by turning the equipment o and on, the user is encouraged to try to correct the
interference by one of the following measures:
• Reorient or relocate the device.
• Increase the separation between the equipment and receiver.
• Connect the equipment into an outlet on a circuit dierent from that to which the receiver
is connected.
• Consult the dealer or an experienced radio/TV technician for help.
FCC Caution: Any changes or modications not expressly approved by the party responsible for
compliance could void the user’s authority to operate this equipment.
Operation is subject to the following two conditions: (1) This device may not cause harmful
interference, and (2) this device must accept any interference received, including interference that
may cause undesired operation. RoHS Statement
The member states of the European Union approved directive 2002/95/EC, Restrictions of Hazardous
Substances (“RoHS directive”‘) that became valid on July 1, 2006. It states that all new electrical
and electronic equipment put on the market within the member states must not contain certain
hazardous materials. This device complies with the European Union’s R0HS directive 2002/95/EC and
similar regulations that may be adopted by other countries for European Sales.
24 25
Page 14

Certications
WEEE Statement
WEEE is a general set of requirements dictated in the EU Directive 2002/96/EC. This Directive
mandated that member EU countries enact regulations governing the Waste of Electrical and
Electronic Equipment (WEEE). The Directive, and its individual transpositions into specic country
laws and legislation, is aimed at the reduction of WEEE through reuse, recovery, and recycling
of WEEE.
WatchGuard is working in partnership with our European Union (EU) distribution partners to ensure
that our products are in compliance with the WEEE statutes, and that the recovery of our product per
the specic EU country legislative requirements is seamless for our product’s end users. If you have a
WatchGuard product that is at its end of life and needs to be disposed of, please contact WatchGuard
Customer Care Department at:
U.S. Customers: 877.232.3531 International Customers: +1.206.613.0456
WatchGuard is reasonably condent that our products do not contain any substances or hazardous
materials presently banned by any legislation, and do not present a risk due to hazardous materials.
WEEE recovery professionals should also note that these products do not have any materials that are
of particular high value in their individual form.
REACH
The new EU chemicals policy REACH (Registration, Evaluation, Authorization and restriction of
Chemicals) came into eect on June 1, 2007. REACH is Europe’s new chemicals legislation, which
is applicable in all 27 EU Member States as well as the EFTA European Economic Area (EEA).
REACH creates a new system for gathering information, assessing risks to human health and the
environment, and authorizing or restricting the marketing and use of chemicals produced or
supplied in the EEA. REACH has an impact on EEA producers and importers of nished products and
users of chemicals in the course of industrial or professional activities.
WatchGuard supports the overall REACH objective of improving the protection of human health
and the environment and will meet all applicable REACH requirements. WatchGuard is strongly
committed to working with our customers and supply chain to dene and implement the REACH
requirements and ensure a smooth transition to compliance.
One of the REACH requirements is that manufacturers and importers have the duty to register
substances they are producing or importing. In accordance with the regulations, the products of
WatchGuard do not need to be registered for the following reasons:
• WatchGuard does not import more than 1 metric ton per year of a substance as dened by REACH.
• WatchGuard products are non-chemical products that are not designed to release any substance
under normal and reasonably predictable application.
• Our products do not contain the listed substances at more than 0.1% by weight of the whole
product/part.
Industry Canada statement:
This device complies with RSS-210 of the Industry Canada Rules. Operation is subject to the following
two conditions: (1) This device may not cause harmful interference, and (2) this device must accept
any interference received, including interference that may cause undesired operation. CAN ICES3(A)/NMB-3(A)
Ce dispositif est conforme à la norme CNR-210 d’Industrie Canada applicable aux appareils radio
exempts de licence. Son fonctionnement est sujet aux deux conditions suivantes: (1) le dispositif ne
doit pas produire de brouillage préjudiciable, et (2) ce dispositif doit accepter tout brouillage reçu, y
compris un brouillage susceptible de provoquer un fonctionnement indésirable.
Japan VCCI Notice (Class A ITE)
これはVCCI評議会の基準に基づくクラスA製品です。本製品がラジオやテレビ受信機の近くで使用
されている場合は、電波障害を引き起こすことがあります。インストールして、取扱説明書に従って
機器を使用しています。
Taiwan Class A Notice:
警告使用者:這是A類產品,應使用並正確安裝。本產品可能會造成無線電干擾,在這種情況
下,用戶可能需要採取適當的措施。
警示 本電池如果更換不正確會有爆炸的危險,請勿自行更換電池
Mexico Notice:
La operación de este equipo está sujeta a las siguientes dos condiciones:
1) es posible que este equipo o dispositivo no cause interferencia perjudicial y
2) este equipo o dispositivo debe aceptar cualquier interferencia, incluyendo la que pueda causar su
propia operación no deseada.
26 27
Page 15
Certications
Korea Notice:
사용자안내문
기 종 별 사 용 자 안 내 문
A 급 기기
(업무용 방송통신기자재)
이 기기는 업무용(A 급)
전자파적합기기로서 판매자 또는
사용자는 이 점을 주의하시기
바라며, 가정외의 지역에서
사용하는 것을 목적으로
합니다.목적으로 합니다.
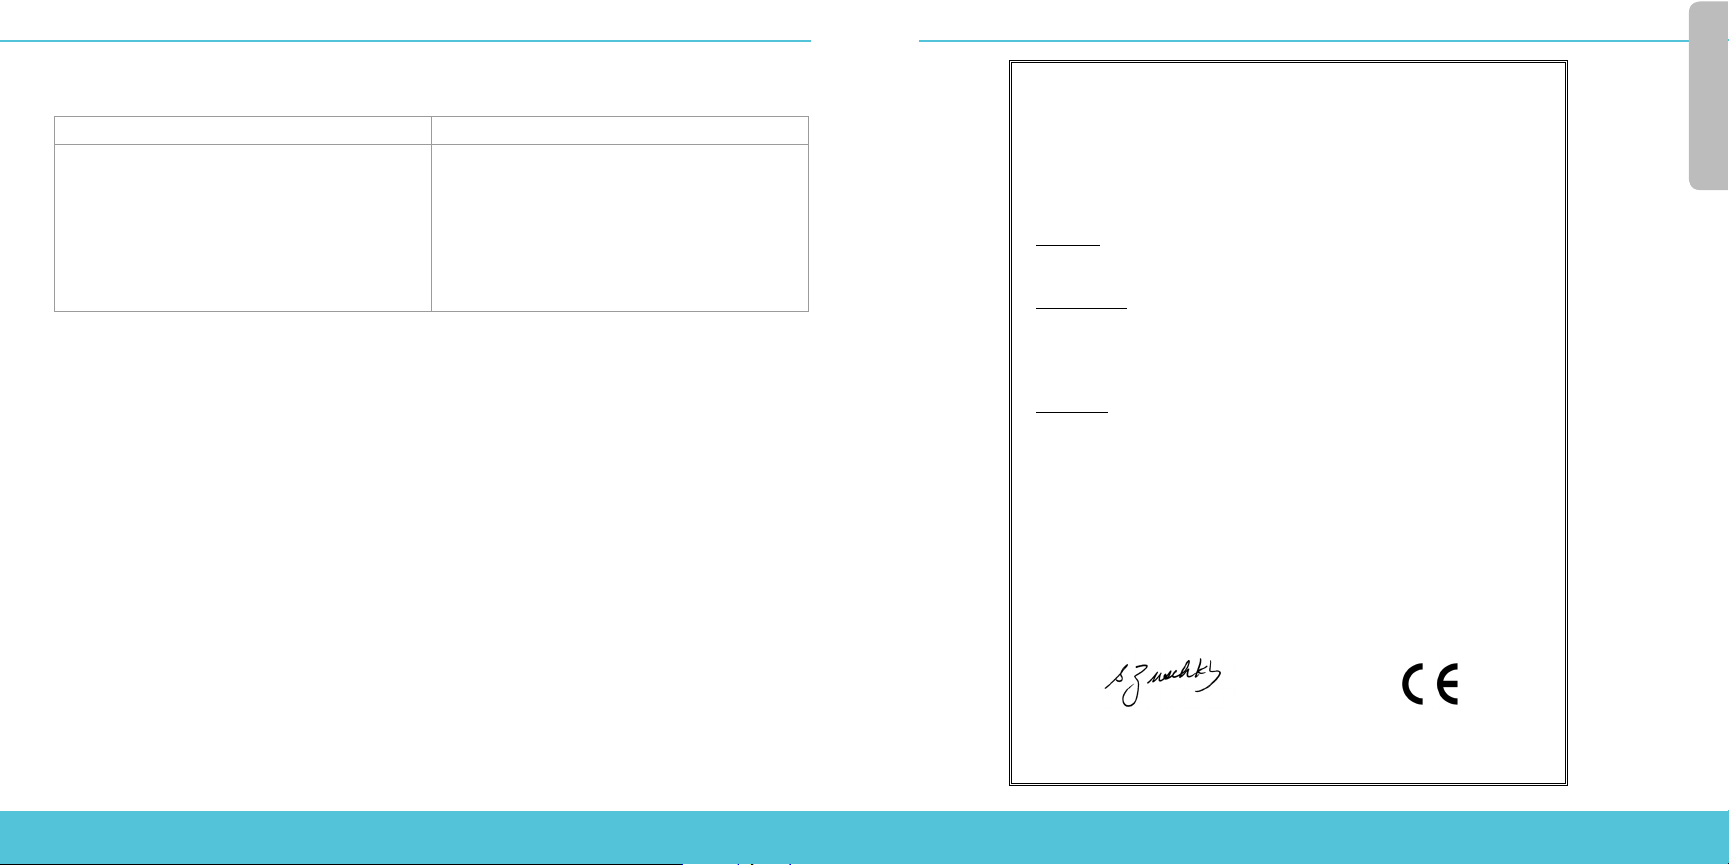
DECLARATIONOFCONFORMITY
WatchGuard Technologies, Inc.
505 Fifth Ave. South, Suite 500
Seattle, WA 98104-3892 USA
WatchGuard Technologies Inc. hereby declares that the product(s) listed below conform
to the European Union directives and standards identified in this declaration.
Product(s):
WatchGuard Model: Firebox M440
Hardware Model: SL4AE24
EU Directive(s):
Low Voltage (2006/95/EC)
Electromagnetic Compatibility (2004/108/EC)
RoHS (2002/95/EC)
WEEE Directive 2002/96/EC
REACH EC 1907/2006
Standard(s):
Safety: EN 60950-1:2006+A11+A1+A12
Emission: EN 55022:2010+AC:2011 Class A
FCC Part 15 Subpart B:2011 Class A
ICES-003: Issue 5 2012 Class A
AS/NZS CISPR 22:2009+Amdt 1:2010 Class A
EN 61000-3-2:2006+A1:2009+A2:2009
EN 61000-3-3:2013-08
Immunity: EN 55024:2010
IEC 61000-4-2: Edition 2.0 2008-12
IEC 61000-4-3: Edition 3.2 2010-04
IEC 61000-4-4: Edition 3.0 2012-05
IEC 61000-4-5: Edition 2.0 2005-11
IEC 61000-4-6: Edition 3.0 2008-10
IEC 61000-4-8: Edition 2.0 2009-09
IEC 61000-4-11: Edition 2.0 2004-03
Signature: RoHS
Full Name: Steve Zirschky
Position: Corporate Officer
Date: 15 June 2014 3665010001RevA
28 29
Page 16

Limited Hardware Warranty
This Limited Hardware Warranty (the “Warranty”) applies to the enclosed hardware product, not including any
associated software, which is licensed pursuant to a separate end-user license agreement and warranty (the
“Product”). BY USING THE PRODUCT, YOU (either an individual or a single entity) AGREE TO THE TERMS HEREOF.
If you do not agree to these terms, please return this package, along with proof of purchase, to the authorized
dealer from which you purchased it for a full refund. WatchGuard Technologies, Inc. (“WatchGuard”) and you agree
as set forth below or on the reverse side of this card, as applicable.
1. LIMITED WARRANTY. WatchGuard warrants that upon delivery and for one (1) year thereafter (the “Warranty
Period”): (a) the Product will be free from material defects in materials and workmanship, and (b) the Product,
when properly installed and used for its intended purpose and in its intended operating environment, will
perform substantially in accordance with WatchGuard applicable specications.
This warranty does not apply to any Product that has been: (i) altered, repaired or modied by any party
other than WatchGuard except for the replacement or inclusion of specied components authorized in, and
performed in strict accordance with, documentation provided by WatchGuard; or (ii) damaged or destroyed
by force majeure events, accidents, power spikes or similar events or by any intentional, reckless or negligent
acts or omissions of any party. You may have additional warranties with respect to the Product from the
manufacturers of Product components. However, you agree not to look to WatchGuard for, and hereby release
WatchGuard from any liability for, performance of, enforcement of, or damages or other relief on account of,
any such warranties or any breach thereof.
2. REMEDIES. If any Product does not comply with the WatchGuard warranties set forth in Section 1 above,
WatchGuard will, following the receipt of the product you claim is defective and at its option, either (a) repair
the Product, or (b) replace the Product with a like or similar product; provided, that you will be responsible
for returning the Product and for all costs of shipping and handling. Repair or replacement of the Product
shall not extend the Warranty Period. Any Product, component, part or other item replaced by WatchGuard
becomes the property of WatchGuard. WatchGuard shall not be responsible for return of or damage to any
software, rmware, information or data contained in, stored on, or integrated with any returned Products.
3. DISCLAIMER AND RELEASE. THE WARRANTIES, OBLIGATIONS AND LIABILITIES OF WATCHGUARD, AND YOUR
REMEDIES, SET FORTH IN PARAGRAPHS 1 AND 2 ABOVE ARE EXCLUSIVE AND IN SUBSTITUTION FOR, AND YOU
HEREBY WAIVE, DISCLAIM AND RELEASE ANY AND ALL OTHER WARRANTIES, OBLIGATIONS AND LIABILITIES
OF WATCHGUARD AND ALL OTHER RIGHTS, CLAIMS AND REMEDIES YOU MAY HAVE AGAINST WATCHGUARD,
EXPRESS OR IMPLIED, ARISING BY LAW OR OTHERWISE, WITH RESPECT TO ANY NONCONFORMANCE OR
DEFECT IN THE PRODUCT (INCLUDING, BUT NOT LIMITED TO, ANY IMPLIED WARRANTY OF MERCHANTABILITY
OR FITNESS FOR A PARTICULAR PURPOSE, ANY IMPLIED WARRANTY ARISING FROM COURSE OF
PERFORMANCE, COURSE OF DEALING, OR USAGE OF TRADE, ANY WARRANTY OF NONINFRINGEMENT, ANY
WARRANTY OF UNINTERRUPTED OR ERROR-FREE OPERATION, ANY OBLIGATION, LIABILITY, RIGHT, CLAIM
OR REMEDY IN TORT, WHETHER OR NOT ARISING FROM THE NEGLIGENCE (WHETHER ACTIVE, PASSIVE OR
IMPUTED) OR FAULT OF WATCHGUARD OR FROM PRODUCT LIABILITY, STRICT LIABILITY OR OTHER THEORY,
AND ANY OBLIGATION, LIABILITY, RIGHT, CLAIM OR REMEDY FOR LOSS OR DAMAGE TO, OR CAUSED BY OR
CONTRIBUTED TO BY, THE PRODUCT ).
4. LIMITATION AND LIABILITY. WATCHGUARD’S LIABILITY (WHETHER ARISING IN CONTRACT (INCLUDING
WARRANTY), TORT (INCLUDING ACTIVE, PASSIVE OR IMPUTED NEGLIGENCE AND STRICT LIABILITY AND FAULT )
OR OTHER THEORY) WITH REGARD TO ANY PRODUCT WILL IN NO EVENT EXCEED THE PURCHASE PRICE PAID
BY YOU FOR SUCH PRODUCT. THIS SHALL BE TRUE EVEN IN THE EVENT OF THE FAILURE OF ANY AGREED
REMEDY. IN NO EVENT WILL WATCHGUARD BE LIABLE TO YOU OR ANY THIRD PARTY (WHETHER ARISING IN
CONTRACT (INCLUDING WARRANTY), TORT (INCLUDING ACTIVE, PASSIVE OR IMPUTED NEGLIGENCE AND
STRICT LIABILITY AND FAULT) OR OTHER THEORY) FOR COST OF COVER OR FOR ANY INDIRECT, SPECIAL,
INCIDENTAL, OR CONSEQUENTIAL DAMAGES (INCLUDING WITHOUT LIMITATION LOSS OF PROFITS, BUSINESS,
OR DATA) ARISING OUT OF OR IN CONNECTION WITH THIS WARRANTY OR THE USE OF OR INABILITY TO USE
THE PRODUCT, EVEN IF WATCHGUARD HAS BEEN ADVISED OF THE POSSIBILITY OF SUCH DAMAGES. THIS
SHALL BE TRUE EVEN IN THE EVENT OF THE FAILURE OF ANY AGREED REMEDY.
5. MISCELLANEOUS PROVISIONS. This Warranty will be governed by the laws of the state of Washington,
U.S.A., without reference to its choice of law rules. The provisions of the 1980 United Nations Convention
on Contracts for the International Sales of Goods, as amended, shall not apply. You agree not to directly or
indirectly transfer the Product or use of the product or associated documentation to any country to which
such transfer would be prohibited by the U.S. Export laws and regulations. If any provision of this Warranty
is found to be invalid or unenforceable, then the remainder shall have full force and eect and the invalid
provision shall be modied or partially enforced to the maximum extent permitted by law to eectuate the
purpose of this Warranty. This is the entire agreement between WatchGuard and you relating to the Product,
and supersedes any prior purchase order, communications, advertising or representations concerning the
Product AND BY USING THE PRODUCT YOU AGREE TO THESE TERMS. IF THE PRODUCT IS BEING USED BY AN
ENTITY, THE INDIVIDUAL INDICATING AGREEMENT TO THESE TERMS BY USING THE PRODUCT REPRESENTS
AND WARRANTS THAT (A) SUCH INDIVIDUAL IS DULY AUTHORIZED TO ACCEPT THE WARRANTY ON BEHALF
OF THE ENTITY AND TO BIND THE ENTITY TO THE TERMS OF THIS WARRANTY; (B) THE ENTITY HAS THE FULL
POWER, CORPORATE OR OTHERWISE, TO ENTER INTO THE WARRANTY AND PERFORM ITS OBLIGATIONS
UNDER THE WARRANTY AND; (C) THE WARRANTY AND THE PERFORMANCE OF THE ENTITY’S OBLIGATIONS
UNDER THE WARRANTY DO NOT VIOLATE ANY THIRD-PARTY AGREEMENT TO WHICH THE ENTITY IS A PARTY.
No change or modication of the Warranty will be valid unless it is in writing and is signed by WatchGuard.
30 31
Page 17
WATCHGUARD TECHNICAL SUPPORT
1.877.232.3531
(U.S. and Canada)
+1.206.613.0456
(all other countries)
www.watchguard.com/support
ADDRESS: 505 Fifth Avenue South, Suite 500, Seattle, WA 98104
WEB: www.watchguard.com • U.S. SALES: 1.800.734.9905 • INTERNATIONAL SALES: +1.206.613.0895
© 2014 WatchGuard Technologies, Inc. All rights reserved. WatchGuard, the WatchGuard Logo, Fireware,
and LiveSecurity are registered trademarks of WatchGuard Technologies, Inc. in the United States and/or
other countries. All other trademarks and tradenames are the property of their respective owners.
P.N. 352-5010-001 Rev A 092514
 Loading...