

Page 1
Quick Start Guide
Guide de démarrage rapide
Kurzanleitung
Guida introduttiva
Guía Rápida
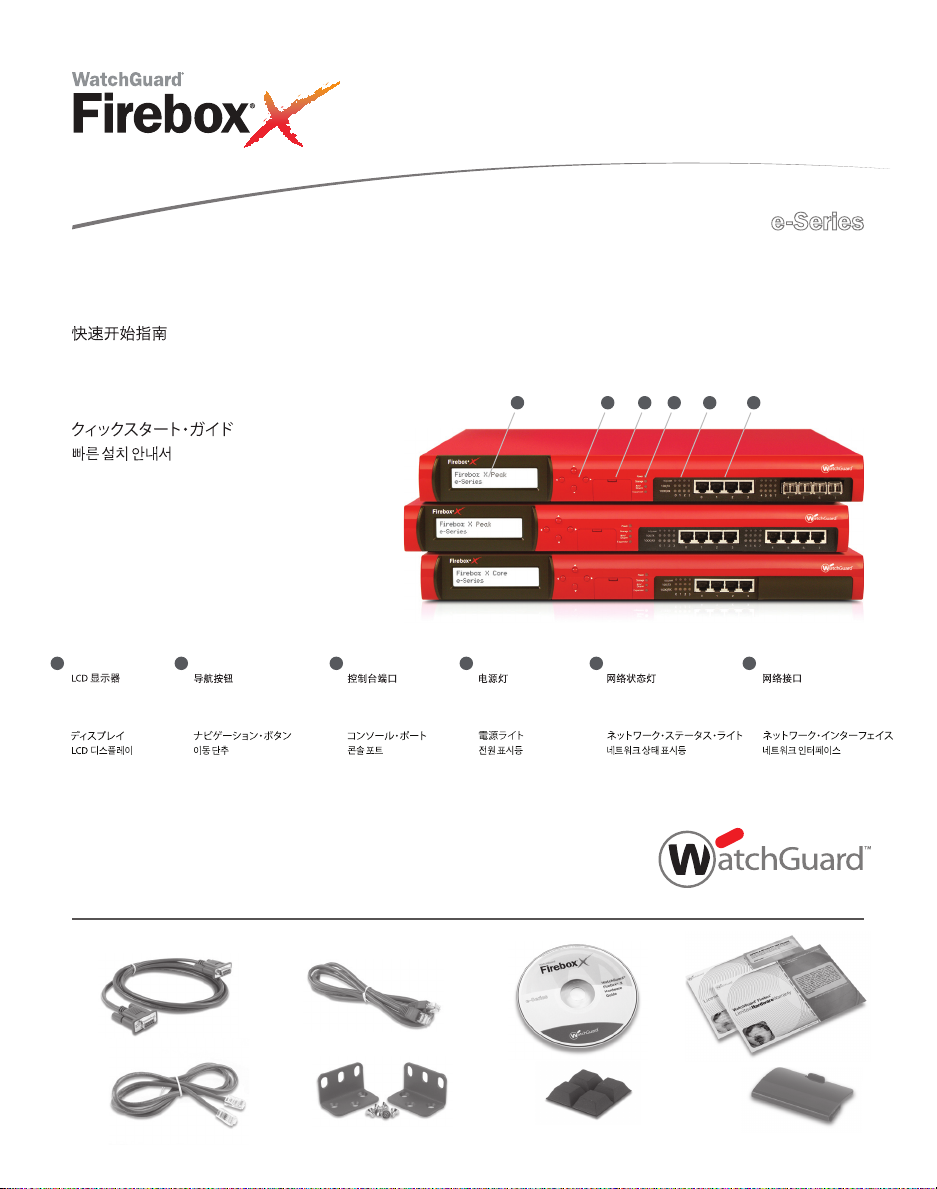
Firebox® X Core 550e, 750e, 1250e
Firebox® X Peak 5500e, 6500e, 8500e, 8500e-F
1
2
4 5 6
3
1
LCD Display
Écran à cristaux liquides
LCD-Display
Display LCD
Pantalla LCD
2
Navigation Buttons
Boutons de navigation
Navigationstasten
Pulsanti di navigazione
Botones de navegación
3
Console Port
Port console
Konsolenport
Porta console
Puerto de consola
4 5 6
Power Light
Témoin d’alimentation
Netzleuchte
Spia alimentazione
Luz de encendido
Network Status Lights
Témoins de l’état du réseau
Netzwerk-Statusanzeigen
Spie di stato rete
Luces de estatus de la red
Network Interfaces
Interfaces réseau
Netzwerkschnittstellen
Interfacce di rete
Interfaces de red
Page 2
English
Getting Started
Register with LiveSecurity® Service
1
• Find and record your serial number.
• Go to http://www.watchguard.com/activate
• Log in. (NOTE: If you are new to WatchGuard, follow the instructions to create a prole.)
• Follow the instructions on the screen.
• Copy your feature key to a text le. You will need it later.
Download software
2
• Continue or go to https://www.watchguard.com/archive/softwarecenter.asp
• Download the most current version of WatchGuard® System Manager and Fireware®
appliance software.
• Record the names and locations of the les you download.
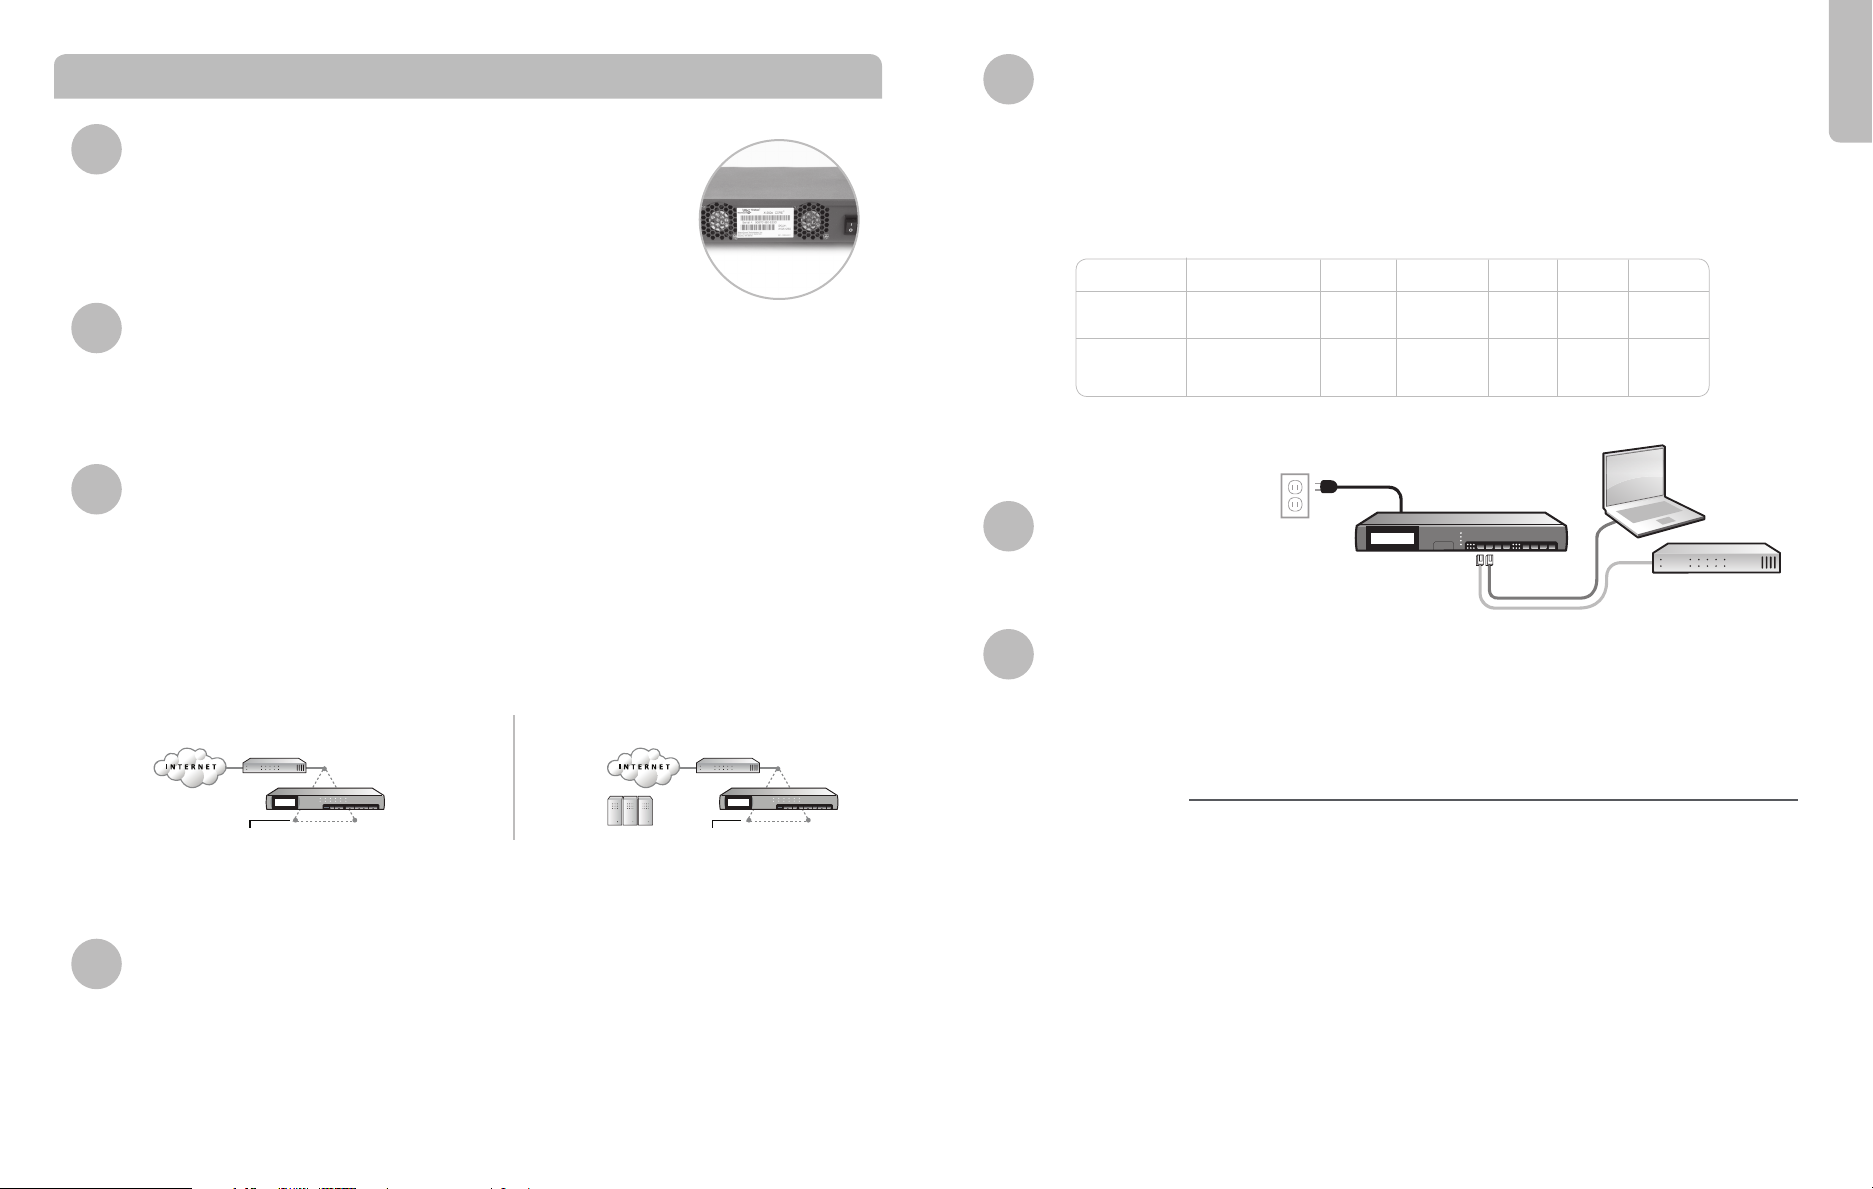
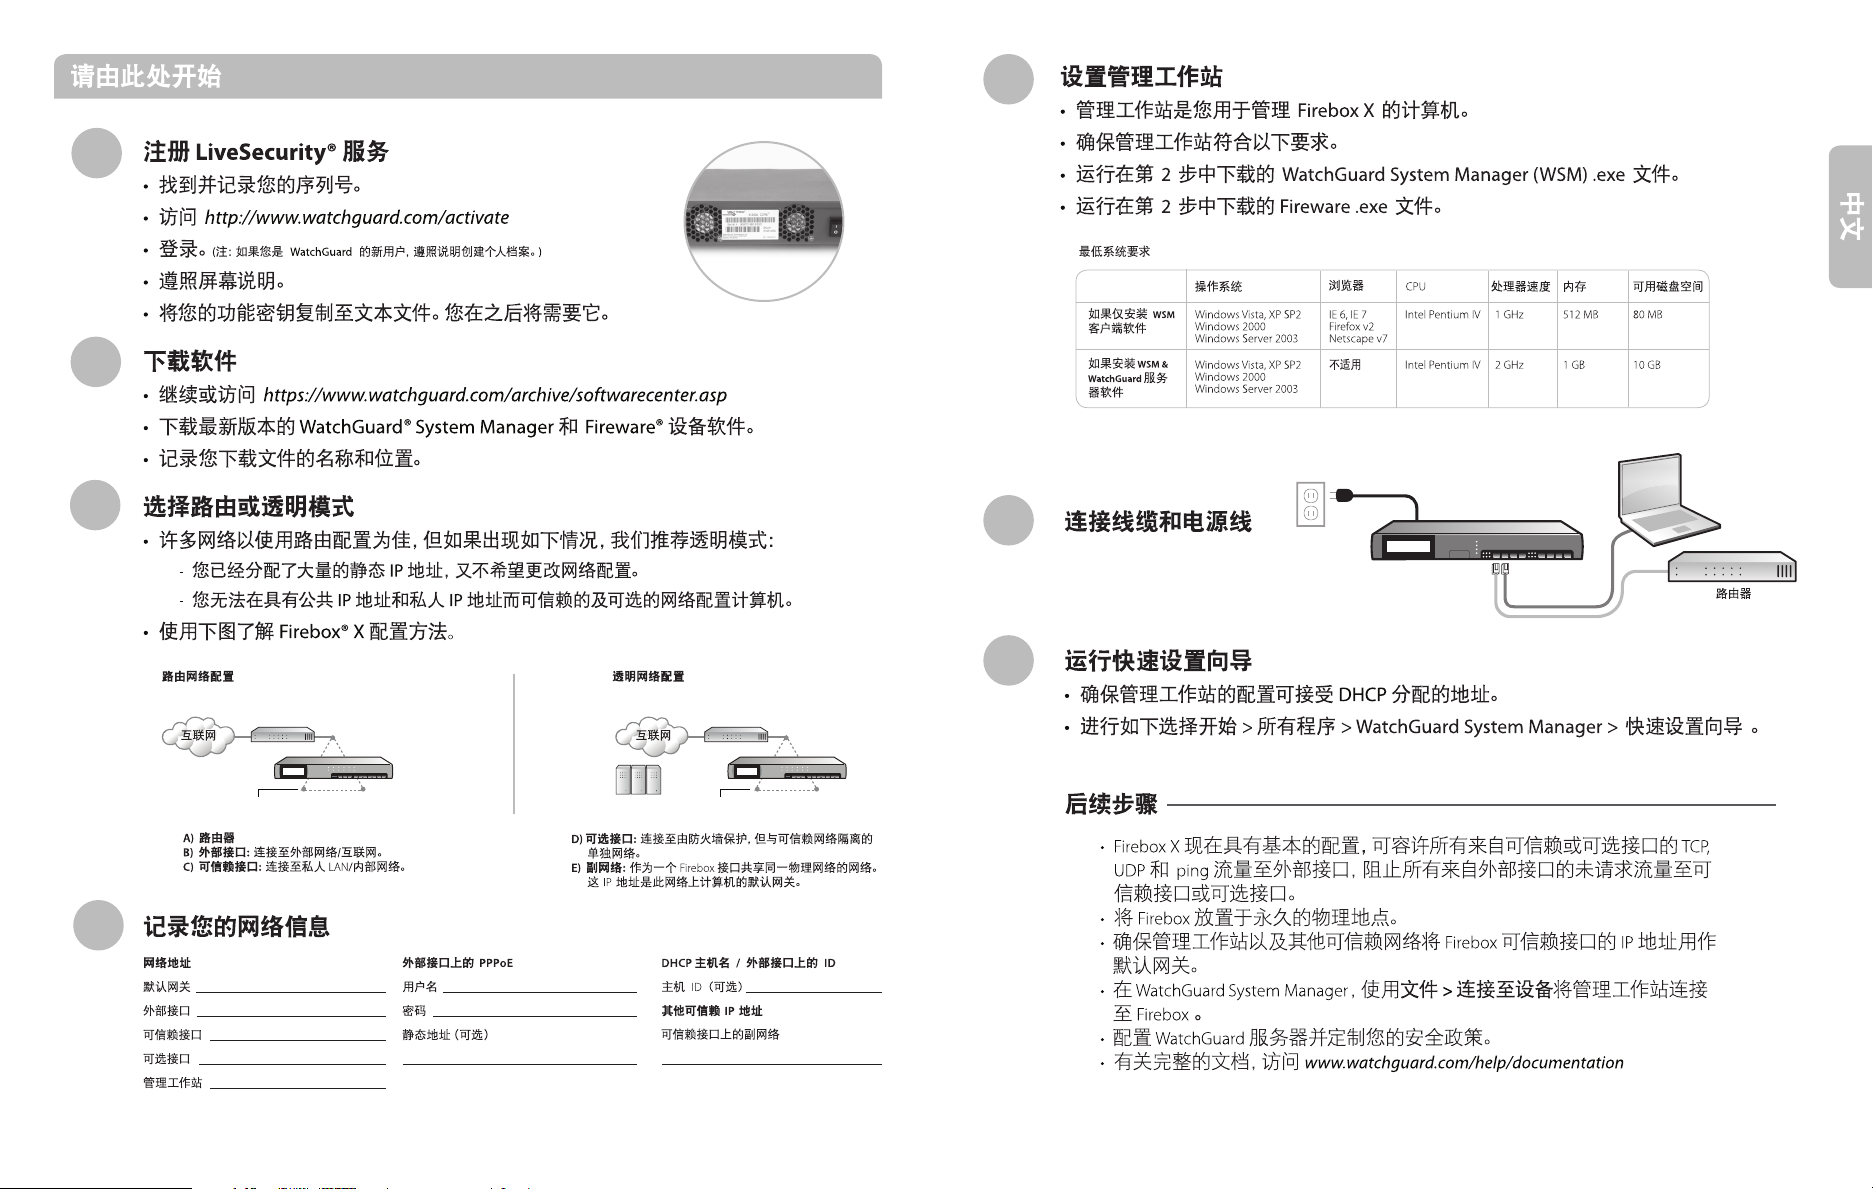
Choose between routed and drop-in mode
3
• Many networks operate best with a routed conguration, but we recommend drop-in
mode if:
- You have already assigned a large number of static IP addresses and do not want to change your
network conguration.
- You cannot congure the computers on your trusted and optional networks that have public IP
addresses with private IP addresses.
• Use the diagrams below to learn about Firebox® X conguration methods.
Routed N etwork Cong uration D rop-in Ne twork Congur ation
A) 50.1.1.1/24
B) 50.1.1.2/24
A) 50.1.1.1/24
B) 50.1.1.2/2
5
Set up the management station
• The management station is the computer you use to administer the Firebox X.
• Make sure the management station meets the requirements below.
• Run the WatchGuard System Manager (WSM) .exe le you downloaded in Step 2.
• Run the Fireware .exe le you downloaded in Step 2.
Minimum System Requirements
If you install WSM
client software only
If you install WSM &
WatchGuard Server
software
Operating Browser CPU Processor Memory Available
System Speed Disk Space
Windows Vista, XP SP2 IE 6, IE 7 Intel Pentium IV 1 GHz 512 MB 80 MB
Windows 2000 Firefox v2
Windows Server 2003 Netscape v7
Windows Vista, XP SP2 N/A Intel Pentium IV 2 GHz 1 GB 10 GB
Windows 2000
Windows Server 2003
Connect cables
6
7
4
and power cord
Eth 0 Eth 1
Router
Run the Quick Setup Wizard
• Make sure the management station is congured to accept DHCP-assigned addresses.
• Select Start > All Programs > WatchGuard System Manager > Quick Setup Wizard
4
C) 10.0.1.1/24 D) 172.16.1/24
A) Router
B) External Interface: Connects to the external network/Internet.
C) Trusted Interface: Connects to the private LAN/internal network.
172.16.0/2410.0.1.0/24
D) Optional Interface(s):
by the rewall but isolated from the trusted network.
E) Secondary Network:
network as one of the Firebox interfaces. This IP address is the
default gateway for computers on this network.
Record your network information
Netwo rk Addresses PPPoE on Ex ternal Inte rface
Default Gateway ___________________________ User Name ___________________________
External Interface __________________________ Password _____________________________
Trusted Interface ___________________________ Static Address (optional)
Optional Interface _________________________ _____________________________________
Management Station _______________________
C) 50.1.1.2/24E) 10.0.1.1/24 D) 50.1.1.2/2
Connects to a separate network protected
A network that shares the same physical
DHCP Hos tname / ID on Ex ternal Inter face
Host ID (optional) ________________________
Additi onal Trusted IP Add resses
Secondar y Network on th e Trusted Inter face
_______________________________________
4
Next Steps
• Your Firebox X now has a basic conguration that allows all TCP, UDP, and ping
trac from trusted or optional interfaces to the external interface, and blocks
all unrequested trac from the external interface to the trusted or optional
interfaces.
• Put the Firebox in its permanent physical location.
• Make sure the management station and the rest of the trusted network use the IP
address of the Firebox trusted interface as the default gateway.
• In WatchGuard System Manager, use
management station to the Firebox.
• Congure WatchGuard servers and customize your security policy.
• For complete documentation, go to www.watchguard.com/help/documentation
File > Connect to Device to connect the
Page 3
1
2
5
3
4
A) 50.1.1.1/24 A) 50.1.1.1/24
C) 10.0.1.1/24 D) 172.16.1/24
B) 50.1.1.2/24 B) 50.1.1.2/2
C) 50.1.1.2/24E) 10.0.1.1/24 D) 50.1.1.2/2
6
7
Page 4

Pour démarrer
Inscrivez-vous au Service LiveSecurity®
1
• Enregistrez votre numéro de série.
• Allez sur http://www.watchguard.com/activate
• Identiez-vous. (REMARQUE : si vous n’êtes pas encore inscrit chez WatchGuard, suivez les
instructions pour créer votre prol.)
• Suivez les instructions achées à l’écran.
•
Copiez votre clé dans un chier texte. Vous en aurez besoin ultérieurement.
Téléchargez le logiciel
2
• Allez sur https://www.watchguard.com/archive/softwarecenter.asp
• Téléchargez la dernière version des logiciels WatchGuard® System Manager et Fireware®.
• Enregistrez le nom et l’emplacement des chiers que vous avez téléchargés.
Choisissez le mode routé ou transparent (drop-in)
3
• En règle générale, les réseaux fonctionnent mieux avec une conguration routée.
Cependant, nous vous recommandons le mode transparent dans les cas suivants.
- Vous avez déjà un grand nombre d’adresses IP statiques et vous ne souhaitez pas modier
la conguration de votre réseau.
- Vous ne pouvez pas congurer avec des adresses IP privées les ordinateurs sur vos réseaux
de conance et optionnels qui ont des adresses IP publiques.
• Pour en savoir plus sur les méthodes de conguration du Firebox® X, référez-vous aux
schémas ci-dessous.
Congu ration de résea u routé Congura tion de réseau t ransparent
A) 50.1.1.1/24 A) 50.1.1.1/24
B) 50.1.1.2/24 B) 50.1.1.2/24
5
6
7
Paramétrez la station d’administration
•
La station d’administration est l’ordinateur que vous utilisez pour administrer le Firebox X.
• Vériez qu’elle respecte la conguration exigée indiquée ci-dessous.
• Ouvrez le chier WatchGuard System Manager (WSM).exe que vous avez téléchargé au
cours de l’étape 2.
• Ouvrez le chier Fireware.exe que vous avez téléchargé au cours de l’étape 2.
Conguration minimale exigée
Si vous installez seulement
le logiciel client WSM
Si vous installez les
logiciels WSM et
WatchGuard Server
Système Navigateur Processeur Vitesse du RAM
d’exploitation processeur sur le disque
Windows Vista, XP SP2 IE 6, IE 7 Intel Pentium IV 1 GHz 512 MB 80 MB
Windows 2000 Firefox v2
Windows Server 2003 Netscape v7
Windows Vista, XP SP2 N/A Intel Pentium IV 2 GHz 1 GB 10 GB
Windows 2000
Windows Server 2003
Espace disponible
Branchez le cordon
d’alimentation et les câbles
Eth 0 Eth 1
Routeur
Lancez l’assistant de conguration rapide
• Vériez que la station d’administration est congurée pour accepter les adresses DHCP.
• Sélectionnez Démarrer > Tous les programmes > WatchGuard System Manager > Quick
Setup Wizard
Français
4
C) 10.0.1.1/2410.0.1.0/24 D) 172.16.1/24 172.16.0/24
A) Routeur
B) Interface externe : se connecte au réseau externe/Internet.
C) Interface de conance : se connecte au réseau privé local
(LAN)/interne.
D) Interface(s) optionnelle(s) : se connecte(nt) à un réseau séparé
protégé par le pare-feu, mais isolé du réseau de conance.
E) Réseau secondaire : réseau partageant le même réseau physique
que l’une des interfaces du Firebox. Cette adresse IP est la passerelle
par défaut pour les ordinateurs sur ce réseau.
Enregistrez les informations sur votre réseau
Adress es du réseau PPPoE de l’ interface ex terne
Passerelle par défaut ________________________ Nom d’utilisateur ______________________
Interface externe __________________________ Mot de passe _________________________
I nterface de conance ______________________ Adresse statique (facultatif )
Interface optionnelle _______________________ _____________________________________
Station d’administration _____________________
C) 50.1.1.2/24E) 10.0.1.1/24 D) 50.1.1.2/24
Nom d’h ôte DHCP / ID de l’i nterface ex terne
ID hôte (facultatif ) ________________________
Adresses I P de conance suppléme ntaires
Réseau secondaire sur l’interface de conance
_______________________________________
Étapes suivantes
• Votre Firebox X a maintenant une conguration qui autorise tout le trac TCP,
UDP et ping des interfaces de conance ou optionnelles vers l’interface externe,
et bloque tout le trac indésirable de l’interface externe vers les interfaces de
conance ou optionnelles.
• Placez le Firebox à l’endroit où vous souhaitez l’installer dénitivement.
• Vériez que la station d’administration et le reste du réseau de conance utilisent
l’adresse IP de l’interface de conance Firebox comme passerelle par défaut.
• Dans WatchGuard System Manager, utilisez
connecter la station d’administration au Firebox.
• Congurez les serveurs WatchGuard et personnalisez votre politique de sécurité.
•
Pour obtenir une documentation complète, rendez-vous sur
www.watchguard.com/help/documentation
File > Connect to Device pour
Page 5

Erste Schritte
Registrierung beim LiveSecurity® Service
1
• Notieren Sie die Seriennummer Ihres Geräts.
• Besuchen Sie http://www.watchguard.com/activate
•
Melden Sie sich an.
• Folgen Sie den Bildschirmanweisungen.
• Kopieren Sie Ihren Feature Key in eine Textdatei. Sie benötigen ihn später noch.
Software-Download
2
• Besuchen Sie https://www.watchguard.com/archive/softwarecenter.asp
• Laden Sie die aktuellen Versionen des WatchGuard® System Manager und der Fireware®
Appliance-Software herunter.
• Notieren Sie sich Namen und Speicherort der heruntergeladenen Dateien.
Auswahl zwischen Routed- und Drop-In-Modus
3
• Viele Netzwerke funktionieren am besten mit einer Routed-Konguration. Wir
empfehlen allerdings die Verwendung des Drop-In-Modus, wenn:
- Sie bereits eine Vielzahl an statischen IP-Adressen zugewiesen haben und die Netzwerkkonguration
nicht ändern möchten.
- Sie die PCs in Ihren Trusted- und optionalen Netzwerken, die öentliche und private IP-Adressen
besitzen, nicht kongurieren können.
• Die nachfolgenden Diagramme zeigen die verschiedenen Firebox®-X-Kongurationen.
Kongur ation Routed -Netzwe rk Ko nguration Dr op-In- Netzwerk
(HINWEIS: Wenn Sie neu bei WatchGuard sind, erstellen Sie zunächst ein Prol.)
A) 50.1.1.1/24 A) 50.1.1.1/24
B) 50.1.1.2/24 B) 50.1.1.2/24
5
6
7
Einrichten der Management-Station
• Die Management-Station ist der für die Administration der Firebox X verwendete PC.
• Sie muss die nachfolgenden Anforderungen erfüllen.
• Starten Sie die in Schritt 2 heruntergeladene Ausführungsdatei für den WatchGuard
System Manager (WSM).
• Starten Sie die in Schritt 2 heruntergeladene Ausführungsdatei für die Fireware.
Mindest-Systemanforderungen
Betriebssystem Browser Prozessor Prozessorges Speicher Freier
chwindigkeit Speicherplatz
Bei Installation der WSMClient-Software
Bei Installation der WSM
und WatchGuard-ServerSoftware
Windows Vista, XP SP2 IE 6, IE 7 Intel Pentium IV 1 GHz 512 MB 80 MB
Windows 2000 Firefox v2
Windows Server 2003 Netscape v7
Windows Vista, XP SP2 N/A Intel Pentium IV 2 GHz 1 GB 10 GB
Windows 2000
Windows Server 2003
Anschließen von
Daten- und Netzkabeln
Eth 0 Eth 1
Router
Ausführen des Quick Setup Wizard
• Die Management-Station muss auf die Zuweisung von IP-Adressen per DHCP
konguriert sein.
• Wählen Sie Start > Alle Programme > WatchGuard System Manager > Quick Setup Wizard.
Deutsch
4
C) 10.0.1.1/2410.0.1.0/24 D) 172.16.1/24 172.16.0/24
A) Router
B)
Externe Schnittstelle: Für die Verbindung zum externen
Netzwerk/Internet.
C) Trusted-Schnittstelle: Für die Verbindung zum privaten LAN/
internen Netzwerk.
D) Optionale Schnittstelle(n):
separaten Netzwerk, das durch die Firewall geschützt, aber vom
Trusted-Netzwerk isoliert ist.
E) Sekundäres Netzwerk:
physikalischen Netzwerk bendet wie eine der Firebox-Schnittstellen.
Diese IP-Adresse ist der Standardgateway für alle PCs im Netzwerk.
Notieren der Netzwerkdaten
Netz werkadress en PPPoE der e xternen Sch nittstell e
Standardgateway __________________________ Benutzername ________________________
Externe Schnittstelle _______________________ K ennwort ____________________________
Trusted-Schnittstelle _______________________ Statische Adresse (optional)
Optionale Schnittstelle _____________________ _____________________________________
Management-Station _______________________
C) 50.1.1.2/24E) 10.0.1.1/24 D) 50.1.1.2/24
Für die Verbindung zu einem
Ein Netzwerk, das sich im gleichen
DHCP-H ostname/ID der ex ternen Schnitt stelle
Host-ID (optional) ________________________
Zusätzl iche Trusted IP-Adresse n
Sekundäres Netzwerk der Trusted-Schnittstelle
_______________________________________
Nächste Schritte
• Ihre Firebox X verfügt jetzt über eine Grundkonguration, die TCP-, UDP- und
Ping-Verkehr von Trusted- oder optionalen Schnittstellen zur externen
Schnittstelle zulässt bzw. unerwünschten Verkehr von der externen Schnittstelle
zu den Trusted- oder optionalen Schnittstellen blockiert.
• Stellen Sie die Firebox entsprechend Ihren Anforderungen auf.
• Ihre Management-Station und das restliche Trusted-Netzwerk müssen die
IP-Adresse der Trusted-Schnittstelle der Firebox als Standardgateway verwenden.
• Wählen Sie im WatchGuard System Manager
Verbindung zwischen Management-Station und der Firebox herzustellen.
• Kongurieren Sie WatchGuard-Server und Sicherheitsrichtlinien.
•
Die vollständige Dokumentation nden Sie unter
www.watchguard.com/help/documentation
File > Connect to Device, um die
Page 6

Per iniziare
Registrazione con LiveSecurity® Service
1
• Individuare e registrare il numero di serie.
• Digitare l‘indirizzo http://www.watchguard.com/activate
• Eseguire l‘accesso.
• Seguire le istruzioni visualizzate sullo schermo.
• Copiare la propria chiave funzionalità in un le di testo per poterla
utilizzare successivamente.
Download del software
2
• Passare all‘indirizzo https://www.watchguard.com/archive/softwarecenter.asp
• Scaricare la versione più aggiornata di WatchGuard® System Manager e del software
per l‘appliance Fireware®.
• Registrare i nomi e i percorsi dei le scaricati.
Scegliere tra modalità routing e drop-in
3
• Molte reti operano al meglio con una congurazione di routing ma si consiglia la
modalità drop-in se:
- È già stata assegnato un grande numero di indirizzi IP statici e non si desidera modicare la
- Non è possibile congurare con indirizzi IP privati i computer delle reti trusted e opzionali che
• Utilizzare gli schemi di seguito per informazioni sui metodi di congurazione
di Firebox® X.
Congu razione rout ing di rete Co ngurazion e di rete drop- in
(NOTA: se è la prima volta che si utilizza il sito WatchGuard, seguire le istruzioni per creare un prolo).
congurazione della rete.
hanno indirizzi IP pubblici.
A) 50.1.1.1/24 A) 50.1.1.1/24
B) 50.1.1.2/24 B) 50.1.1.2/24
5
6
7
Congurazione della stazione di gestione
• La stazione di gestione è il computer utilizzato per amministrare Firebox X.
• Assicurarsi che la stazione di gestione soddis i requisiti indicati di seguito.
• Eseguire il le .exe di WatchGuard System Manager (WSM) scaricato al passo 2.
• Eseguire il le .exe di Fireware scaricato al passo 2.
Requisiti minimi di sistema
Se è installato solo
il software client
WSM
Se è installato il
software WSM e
WatchGuard Server
Sistema Browser Processore Velocità Memoria Spazio su disco
operativo processore disponibile
Windows Vista, XP SP2 IE 6, IE 7 Intel Pentium IV 1 GHz 512 MB 80 MB
Windows 2000 Firefox v2
Windows Server 2003 Netscape v7
Windows Vista, XP SP2 N/A Intel Pentium IV 2 GHz 1 GB 10 GB
Windows 2000
Windows Server 2003
Connessione del cablaggio
e del cavo di alimentazione
Eth 0 Eth 1
Esecuzione della congurazione guidata rapida
• Assicurarsi che la stazione di gestione sia congurata per accettare gli indirizzi
assegnati da DHCP.
• Selezionare Start
> Tutti i programmi > WatchGuard System Manager > Quick Setup Wizard
Router
Italiano
4
C) 10.0.1.1/2410.0.1.0/24 D) 172.16.1/24 172.16.0/24
A) Router
B) Interfaccia esterna: collegamento alla rete esterna/Internet.
C) Interfaccia trusted: collegamento alla rete interna/LAN privata.
D) Interfacce opzionali:
dal rewall ma isolata dalla rete trusted.
E) Rete secondaria:
delle interfacce Firebox. Questo indirizzo IP è il gateway predenito
per i computer di questa rete.
Annotare le informazioni di rete
Indiri zzi di rete PPPoE su int erfaccia es terna
Gateway predenito _______________________ Nome utente _________________________
Interfaccia esterna ________________________ Password ____________________________
I nterfaccia trusted ________________________ I ndirizzo statico (opzionale)
Interfaccia opzionale ______________________ _____________________________________
Stazione di gestione ________________________
C) 50.1.1.2/24E) 10.0.1.1/24 D) 50.1.1.2/24
collegamento a una rete separata protetta
una rete che condivide la stessa rete sica di una
ID/nome ho st DHCP su inter faccia ester na
ID host (opzionale) ________________________
Indiri zzi IP truste d aggiuntivi
Rete secondaria su interfaccia trusted
_______________________________________
Passaggi successivi
• Firebox X adesso dispone di una congurazione di base che accetta tutto il
traco TCP, UDP e ping dalle interfacce trusted oppure opzionali all‘interfaccia
esterna e blocca tutto il traco non richiesto dall‘interfaccia esterna alle interfacce
trusted oppure opzionali.
• Collocare Firebox nella sua posizione sica permanente.
• Assicurarsi che la stazione di gestione e il resto della rete trusted utilizzi l‘indirizzo
IP dell‘interfaccia trusted Firebox come gateway predenito.
• In WatchGuard System Manager, selezionare
collegare la stazione di gestione a Firebox.
• Congurare i server WatchGuard e personalizzare i criteri di protezione.
•
Per la documentazione completa, consultare
www.watchguard.com/help/documentation
File > Connect to Device per
Page 7

1
2
5
3
4
10.0.1.0/24
A) 50.1.1.1/24
B) 50.1.1.2/24
C) 10.0.1.1/24 D) 172.16.1/24
172.16.0/24
A) 50.1.1.1/24
B) 50.1.1.2/2
C) 50.1.1.2/24E) 10.0.1.1/24 D) 50.1.1.2/2
6
4
4
7
Page 8

1
2
3
5
6
7
4
A) 50.1.1.1/24
B) 50.1.1.2/24
C) 10.0.1.1/24 D) 172.16.1/24
A) 50.1.1.1/24
B) 50.1.1.2/2
C) 50.1.1.2/24E) 10.0.1.1/24 D) 50.1.1.2/2
4
4
Page 9

Page 10

WATCHGUARD TECHNICAL SUPPORT
1.877.232.3531 +1.206.613.0456 www.watchguard.com/support
(U.S. and Canada) (all other countries)
ADDRESS: 505 Fifth Avenue South, Suite 500, Seattle, WA 98104
WEB: www.watchguard.com • U.S. SALES: 1.800.734.9905 • INTERNATIONAL SALES: +1.206.613.0895
© 2008 WatchGuard Technologies, Inc. All rights reserved. WatchGuard, the WatchGuard Logo, Firebox, Fireware,
Core, Peak, and LiveSecurity are either trademarks or registered trademarks of WatchGuard Technologies, Inc.
in the United States and/or other countries. All other trademarks and tradenames are the property of their
respective owners. P.N. 352-2554-010 WGPE66377_011708
 Loading...