

Page 1
WLS8600
Quick Reference Guide
Page 2

Wasp Barcode Technologies
1400 10th Street
Plano, Texas USA 75074
Tel. 214-547-4100
Tel. 214-547-4101
©2005-2013 Wasp Barcode Technologies, Inc. (an unpublished work
provided under license).
This product may be covered by one or more of the following patents:
Design Pat. AU 310201; AU 310202; CN 693980; CN735959; HK
0602013.5M001; HK 0602013.5M002; JP 1305693; KR 30-0460940; US
D570,843 S; USD588,596 S.
US Pat. 5,992,740; 6,305,606 B1; 6,517,003; 6,808,114 B1; 6,997,385 B2;
7,387,246 B2; 5,367,151; 5,449,893; 5,545,889; 6,098,877; 6,220,514 B1;
6,412,698 B2; 6,607,132 B1; 6,817,529 B2; 6,834,805 B2; 7,948,214 B2.
European Pat. 789,315 B1; 895,175 B1; 1,128,314 B1; 1,128,315 B1;
1,396,811 B1; 1,413,971 B1; 1,816,585 B1; 1,942,442 B1.
Additional patents pending.
Patents
Page 3

Table of Contents
Updates and Language Availability ..............................................................................1
Using the WLS8600 .............................................................................................................2
Aiming System ...........................................................................................................2
Setting Up the Reader ........................................................................................................3
Connecting the Cable .............................................................................................3
Connecting to the Host Interface ........................................................................4
Selecting the Interface Type ............................................................................................5
Interface Selection ....................................................................................................5
Keyboard Nationality ...............................................................................................7
PowerScan™ M8300 Default Configuration ...............................................................9
Programming .....................................................................................................................10
Restore Default .......................................................................................................10
Data Format Terminators ....................................................................................10
Operating Test ........................................................................................................10
Technical Features ............................................................................................................11
Default Values ....................................................................................................................12
Compliance .........................................................................................................................13
Laser Safety Compliance ..................................................................................... 13
LED CLASS ................................................................................................................14
CE Compliance ........................................................................................................14
FCC Compliance .....................................................................................................14
Power Supply ..........................................................................................................14
Wasp Barcode Technologies Limited Factory Warranty ..........................15
Service and Support ........................................................................................................16
Page 4

NOTES
Page 5

Updates and Language Availability
UK/US
The latest drivers and documentation updates for this product are available.
Contact WASP Technical Support.
I
Gli ultimi driver e aggiornamenti della documentazione per questo prodotto sono
Contattare WASP supporto tecnico.
Les derniers pilotes et mises à jour de documentation pour ce produit sont
Contactez le support technique WASP.
Die neuesten Treiber und Dokumentation Updates für dieses Produkt verfügbar sind.
Kontakt WASP Technical Support.
Los últimos controladores y actualizaciones de la documentación para este producto
Póngase en contacto con soporte técnico de WASP.
disponibili.
F
disponibles.
D
E
están disponibles.
Quick Reference Guide 1
Page 6
WLS8600
Using the WLS8600
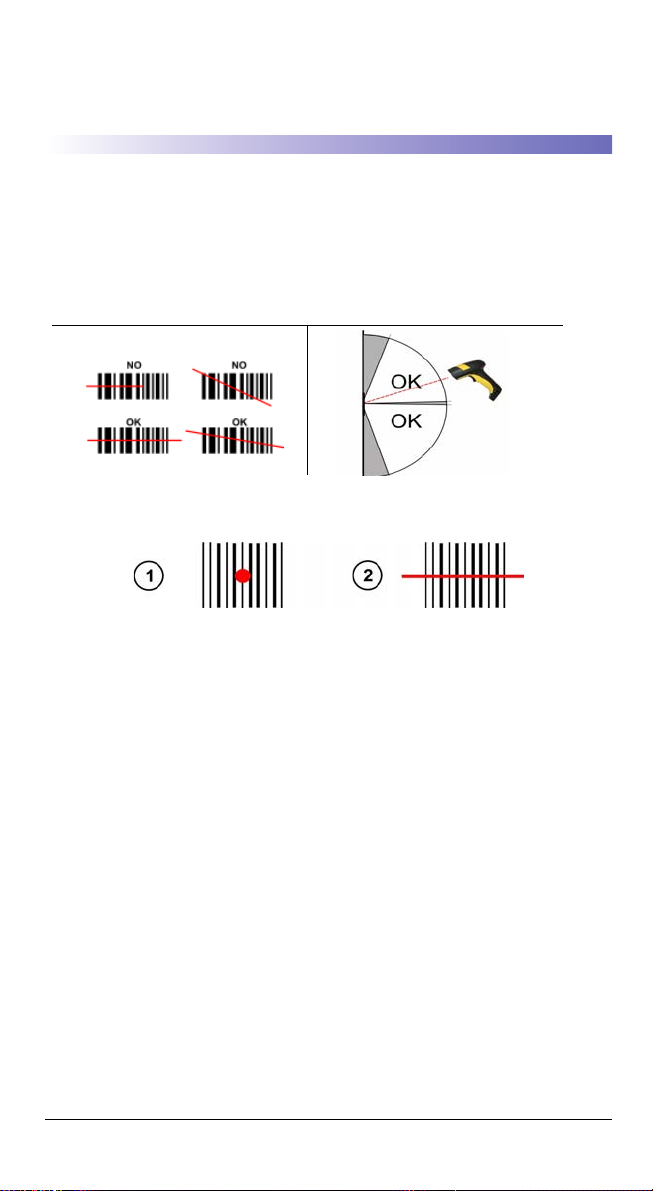
WLS8600 readers automatically scan barcodes at a distance. Simply aim and pull
the trigger. Code scanning is performed along the scan line emitted from the reading window. This line must cross the entire code. The best reading angles are indicated in the figure below.:
Aiming System
The WLS8600 provides an aiming system. If enabled, a partial trigger press produces a red spot, which should be aimed over the code center to get the best reading
performance, see figure (1) above. By completely pressing the trigger the scan line
appears to start code scanning (2).
After setting up the reader, you can enable or disable the aiming system by reading
the codes below:
Disable Aiming System (Default)
Ì$+Bj0$-"Î
Enable Aiming System
Ì$+Bj1$-'Î
Quick Reference Guide 2
Page 7
Setting Up the Reader
Align
Notch
Tab
Arrow
Setting Up the Reader
Follow the steps below to connect and get your reader up and communicating with
its host.
1. Connect the Cable to the reader and the Host.
2. Configure the Interface (see page 5).
3. Program the Reader starting on page 10 (optional, as needed).
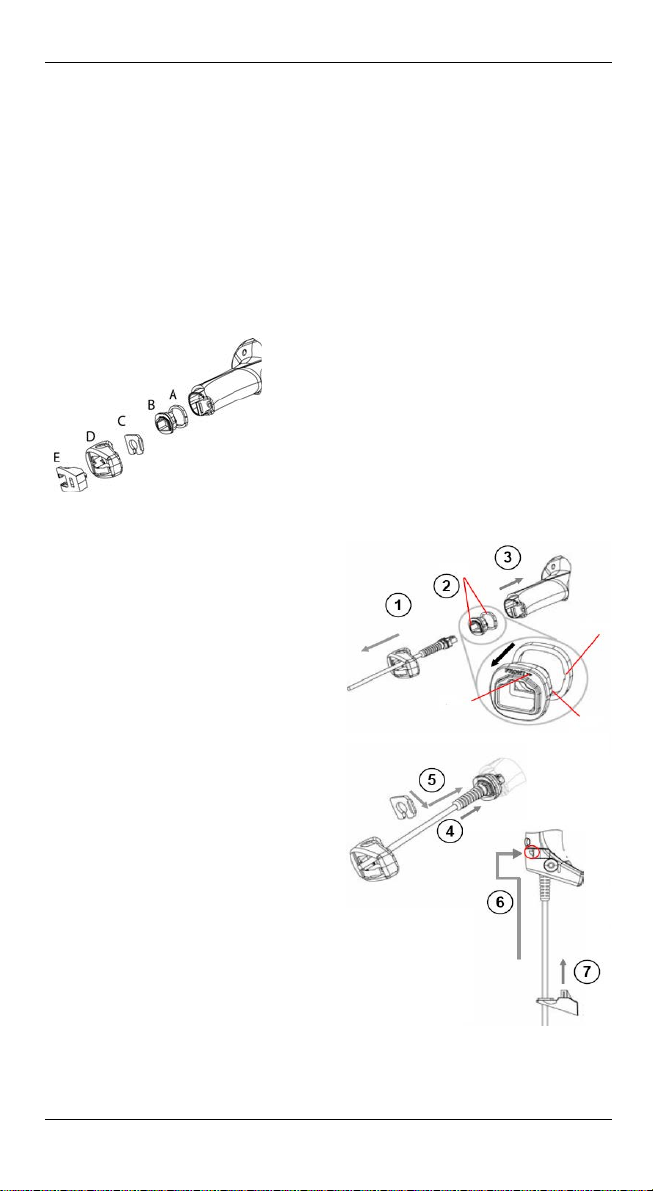
Connecting the Cable
A. Rubber gasket
B. Plastic boot
C. Cable spacer
D. Cover
E. Strain relief
1. Slip the cover over the cable.
2. Push the plastic boot into the rubber gasket. Take care that the tab
on the plastic boot is aligned with
the notch in the rubber gasket.
3. Push the plastic boot and gasket
into the handle. Ensure that the
“Front” marking on the plastic
boot is facing out, with the arrow
pointing towards the front of the
scanner.
4. Insert the cable into the socket of
the plastic boot.
5. Insert the cable spacer into the
cable wire and slide it towards the
handle.
6. Push the cover along the cable
towards the reader, and hook it
over the yellow “tooth”.
7. Insert the strain relief into the
cover and tighten the screw to fix
the whole assembly to the reader
handle.
Quick Reference Guide 3
Page 8
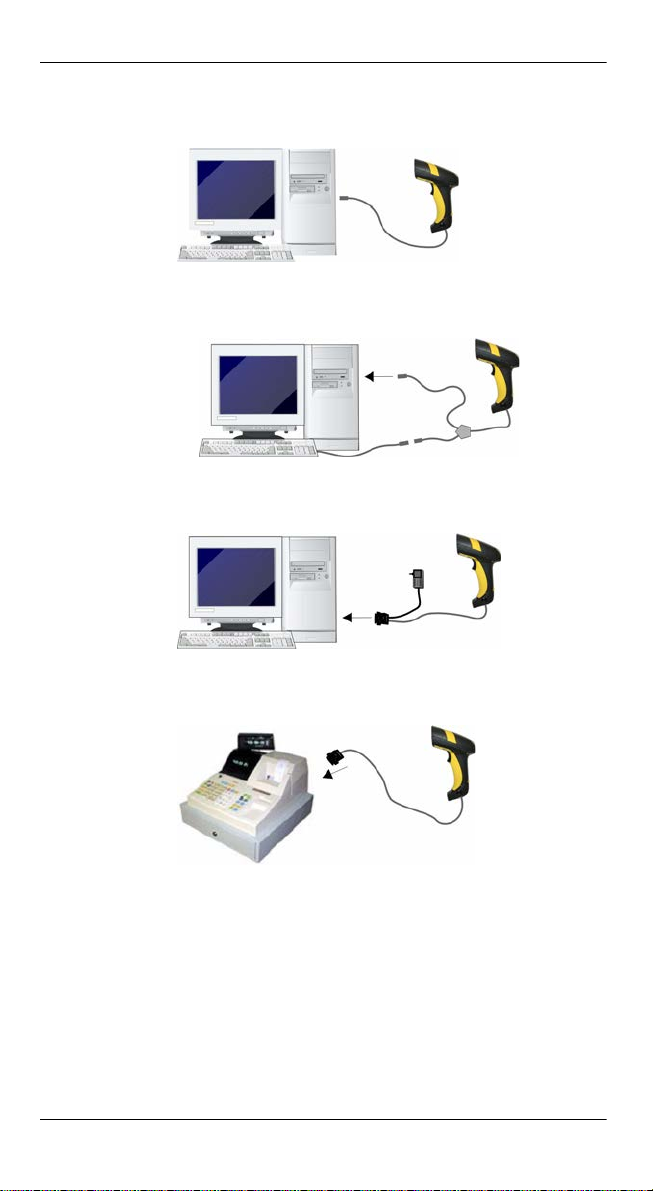
Connecting to the Host Interface
USB
WEDGE
RS-232
Setting Up the Reader
PEN
4 WLS8600
Page 9

Selecting the Interface Type
Selecting the Interface Type
Upon completing the physical connection between the reader and its host, proceed
directly to Interface Selection below for information and programming for the interface type the reader is connected to (for example: RS-232, Keyboard Wedge,
USB, etc.) and scan the appropriate barcode to select your system’s correct interface
type.
Interface Selection
Select one of the interface codes according to your application.
USB Interface Selection
USB-KBD
Ì$+UA03$-:Î
USB-KBD-ALT-MODE
Ì$+UA04$-@Î
USB-COM*
Ì$+UA02$-4Î
USB-IBM-Hand Held
Ì$+UA01$-.Î
USB-IBM Table top
Ì$+UA00$-(Î
USB KBD-APPLE
Ì$+UA05$-FÎ
* When configuring USB-COM, the relevant files and drivers must be installed from the USB
Device Installation software. Contact Wasp Technical Support for information.
Quick Reference Guide 5
Page 10

Pen Emulation Interface Selection
PEN
Ì$+CP6$-BÎ
RS-232 Interface Selection
RS-232 Standard
Ì$+CP0$-$Î
Fujitsu
Ì$+CM1$-ÈÎ
Wedge Interface Selection
Wedge IBM AT or PS/2 PCs
Ì$+CP500$-aÎ
Selecting the Interface Type
Nixdorf Mode A
Ì$+CM2EC0$->Î
ICL Mode
Ì$+CM0$-ÃÎ
PC Notebook
Ì$+CP505$-ÈÎ
PC Notebook - ALT mode
Ì$+CP508$-2Î
IBM AT - ALT mode
Ì$+CP507$-+Î
The Interface for IBM XT and IBM Terminals 3151, 347X and 348X can be selected from the WLS8600 Reference Manual available online at w
code.com
6 WLS8600
ww.waspbar-
Page 11

Selecting the Interface Type
Keyboard Nationality
USB-KBD and Wedge users should select one of the following wedge keyboard nationality codes according to the keyboard.
Belge
Ì$+FJ7$-8Î
Deutsch
Ì$+FJ3$-$Î
English
Ì$+FJ4$-)Î
Español
Ì$+FJ6$-3Î
Français
Ì$+FJ2$-ÊÎ
Italiano
Ì$+FJ1$-ÅÎ
Svenskt
Ì$+FJ5$-.Î
USA (Default)
Ì$+FJ0$-|Î
Quick Reference Guide 7
Page 12

Selecting the Interface Type
Keyboard Nationality (continued)
The following Keyboard Nationality selections are only valid for IBM AT compatible PCs:
Japanese
Ì$+FJ8$-=Î
Russian (Latin)
Ì$+FJ9$-BÎ
Russian (Cyrillic)
Ì$+FJA$-jÎ
Hungarian
Ì$+FJB$-oÎ
Slovenian, Croatian, Serbian (Latin)
Ì$+FJC$-tÎ
Romanian
Ì$+FJD$-yÎ
Czech Republic
Ì$+FJE$-~Î
8 WLS8600
Page 13

PowerScan™ M8300 Default Configuration
PowerScan™ M8300 Default Configuration
DATA FORMAT
code identifier disabled, field adjustment disabled, code length not transmitted,
character replacement disabled
CODE SELEC TION
Enabled codes
• EAN 8/EAN 13 / UPC A/UPC E without ADD ON
check digit transmitted, no conversions
• Interleaved 2/5
check digit control and transmission, variable length code; 4-99 characters
• Standard Code 39
no check digit control, variable length code; 1-99 characters
• Code 128
variable length code; 1-99 characters
Disabled codes
EAN 128, ISBT128, Code 93, Codabar, pharmaceutical codes, MSI, Code 11, Code 16K,
Code 49, GS1 DataBar™ (GS1 DataBar™ includes the following symbologies: GS1
DataBar Omnidirectional, GS1 DataBar Stacked, GS1 DataBar Expanded and GS1
DataBar Limited).
RADIO PARAMETERS
radio protocol timeout = 2 seconds, power-off timeout = 4 hours, transmission
mode = one-way, beeper control for radio response = normal, single store
disabled, batch mode disabled, find me enabled, radio RX timeout = disabled
Quick Reference Guide 9
Page 14

Programming
test
Programming
The reader is factory-configured with a set of standard default features. After scanning the interface barcode from the Interfaces section, select other options and customize your reader through use of the programming barcodes available in the
WLS8600 Reference Manual. Check the corresponding features section for your
interface, and also the Data Editing and Symbologies chapters of the PRG.
Restore Default
Restore Default
Ì$+$*oÎ
To change the settings refer to the WLS8600 Reference Manual.
Data Format Terminators
For your convenience, some common Terminators are given below. For other
Header/Terminator selections, Data Format and Advanced Data Format parameters, see the WLS8600 Reference Manual.
CR-LF
Ì$+EA120D0A$-ÃÎ
Enter
Ì$+EA1183$-0Î
Tab
Ì$+EA1184$-8Î
None
Ì$+EA10$-dÎ
Operating Test
Read the TEST code below.
Code 128
10 WLS8600
Page 15

Technical Features
Technical Features
WLS8600
Electrical Features
Power Supply
Max. Consumptio n: 0.076 mm (3 mils)
@ 4V
@5V
@30V
Sleep mode
Scan Rat 35 ± 5 scans/sec
Reading Indicators
Optical Features
Reading Field
(Typical performance at 20ºC /
68ºF on high quality barcodes)
Max. Resolution 0.076 mm (3 mils)
PCS 15%
Laser Features
Power (max) 0.9 mW
Scan Angle 42°
Laser Safety Class Class 2 EN 60825-1/CDRH
Environmental Features
Working Temperature -30 °C to + 50 °C / -22° to +122 °F
Storage Temperature -30 °C to + 70 °C / -22° to +158 °F
Humidity 90% non condensing
Drop Resistance IEC 68-2-32 Test ED 2 m
Protection Class IP65
Mechanical Features
Weight (without cable) about 295 g (10.4 oz)
Cable Length 2 m (6 ft 6 in)
Good Read Spot (green), Beeper
WLS8600
4 to 30 VDC
420 mA
310 mA
62 mA
4 mA
Good Read LED (green)
97.8 cm (38.5 in)
@ 40 mils
Quick Reference Guide 11
Page 16

Default Values
Default Values
USB-KBD DEFAULT SETTINGS
USA keyboard, FIFO enabled, inter-character and inter-code delays disabled, USB
keyboard speed normal.
DATA FORMAT: code identifier disabled, no field adjustment, code length not
transmitted, no header, terminator = ENTER, character replacement disabled.
RS-232 Standard DEFAULT SETTINGS
9600 baud, no parity, 8 data bits, 1 stop bit, no handshaking, delay disabled, rx
timeout 5 sec., ack/nack disabled, FIFO enabled, inter-character delay disabled,
serial trigger lock disabled.
DATA FORMAT: code identifier disabled, no field adjustment, code length not
transmitted, no header, terminator = CR-LF, character replacement disabled.
WEDGE DEFAULT SETTINGS
USA keyboard, caps lock off, caps lock auto-recognition enabled, num lock
unchanged, inter-character and inter-code delays disabled, control character
emulation = ctrl+shift+key.
DATA FORMAT: code identifier disabled, no field adjustment, code length not
transmitted, no header, terminator = ENTER, character replacement disabled.
PEN DEFAULT SETTINGS
interpret operating mode, conversion to code 39 disabled, output level normal,
idle level normal, minimum output pulse 600 μs, overflow medium, inter-block
delay disabled.
CODE SELECTION
Enabled codes
· EAN 8/EAN 13 / UPC A/UPC E without ADD ON
check digit transmitted, no conversions
· Interleaved 2/5
check digit control and transmission, variable length code; 4-99 characters
· Standard Code 39
no check digit control, variable length code; 1-99 characters
·Code 128
variable length code; 1-99 characters
Disabled codes
EAN 128, ISBT128, Code 93, Codabar, pharmaceutical codes, MSI, Code 11,
Code 16K, Code 49, GS1 DataBar™ Codes
12 WLS8600
Page 17

Compliance
Compliance
Laser Safety Compliance
The laser scanner conforms to the applicable requirements of both CDRH 21 CFR
1040 and EN60825-1 at the date of manufacture.
The laser light is visible to the human eye and is emitted from the output window (1).
Laser warning and classification label (2).
Use of controls or adjustments or performance of procedures other
than those specified herein may result in exposure to hazardous
WAR NIN G
The laser scanner utilizes a low-power laser diode. Although staring directly at the
laser beam momentarily causes no known biological damage, avoid staring at the
beam as one would with any very strong light source, such as the sun. Avoid that
the laser beam hits the eye of an observer, even through reflective surfaces such as
mirrors, etc.
The following information is shown on the laser scanner device class label:
visible laser light.
ITALIANO
FRANÇAIS
DEUTSCH
ESPAÑOL
Quick Reference Guide 13
LUCE LASER
NON FISSARE IL RAGGIO
APPARECCHIO LASER DI CLASSE 2
RAYON LASER
EVITER DE REGARDER LE RAYON
APPAREIL LASER DE CLASSE 2
LASERSTRAHLUNG
NICHT IN DEN STRAHL BLICKEN
PRODUKT DER LASERKLASSE 2
RAYO LÁSER
NO MIRAR FIJO EL RAYO
APARATO LÁSERDE CLASE 2
Page 18

Compliance
LED CLASS
Class 1 LED product.
CE Compliance
This is a Class A product. In a domestic environment this product
may cause radio interference in which case the user may be
WAR NIN G
required to take adequate measures.
FCC Compliance
Modifications or changes to this equipment without the expressed written approval
of Datalogic could void the authority to use the equipment.
This device complies with PART 15 of the FCC Rules. Operation is subject to the
following two conditions: (1) This device may not cause harmful interference, and
(2) this device must accept any interference received, including interference which
may cause undesired operation.
This equipment has been tested and found to comply with the limits for a Class A
digital device, pursuant to part 15 of the FCC Rules. These limits are designed to
provide reasonable protection against harmful interference when the equipment is
operated in a commercial environment. This equipment generates, uses, and can
radiate radio frequency energy and, if not installed and used in accordance with the
instruction manual, may cause harmful interference to radio communications. Operation of this equipment in a residential area is likely to cause harmful interference
in which case the user will be required to correct the interference at his own expense.
Power Supply
This device is intended to be connected to a UL Listed/CSA Certified computer
which supplies power directly to the reader or else be supplied by a UL Listed/CSA
Certified Power Unit marked “Class 2” or LPS power source rated 4 - 30 V, minimum
420 mA, which supplies power directly to the reader via the power connector of the
cable.
14 WLS8600
Page 19

Compliance
Wasp Barcode Technologies Limited Factory Warranty
Warranty Coverage
Wasp warrants to Customer that Wasp's products will be free from defects in materials and workmanship for a period of one year from product shipment. Wasp Barcode Technologies (“Wasp”)
hardware products are warranted against defects in material and workmanship under normal
and proper use. The liability of Wasp under this warranty is limited to furnishing the labor and
parts necessary to remedy any defect covered by this warranty and restore the product to its normal operating condition. Repair or replacement of product during the warranty does not extend
the original warranty term. Products are sold on the basis of specifications applicable at the time
of manufacture and Wasp has no obligation to modify or update products once sold.
If Wasp determines that a product has defects in material or workmanship, Wasp shall, at its sole
option repair or replace the product without additional charge for parts and labor, or credit or
refund the defective products duly returned to Wasp. To perform repairs, Wasp may use new or
reconditioned parts, components, subassemblies or products that have been tested as meeting
applicable specifications for equivalent new material and products. Customer will allow Wasp to
scrap all parts removed from the repaired product. The warranty period shall extend from the
date of shipment from Wasp for the duration published by Wasp for the product at the time of
purchase (Warranty period). Wasp warrants repaired hardware devices against defects in workmanship and materials on the repaired assembly for a 90 day period starting from the date of
shipment of the repaired product from Wasp or until the expiration of the original warranty period, whichever is longer. Wasp does not guarantee, and it is not responsible for, the maintenance of, damage to, or loss of configurations, data, and applications on the repaired units and
at its sole discretion can return the units in the “factory default” configuration or with any software or firmware update available at the time of the repair (other than the firmware or software
installed during the manufacture of the product). Customer accepts responsibility to maintain a
back up copy of its software and data. Refer to:
http://www.waspbarcode.com/Corporate/warrenty_periods_claims.asp
Warranty Claims Process
Refer to
http://www.waspbarcode.com/Corporate/return_policy.asp.
Warranty Exclusions
The Wasp Factory Warranty shall not apply to:
(i) any product which has been damaged, modified, altered, repaired or upgraded by
other than Wasp service personnel or its authorized representatives;
(ii) any claimed defect, failure or damage which Wasp determines was caused by faulty
operations, improper use, abuse, misuse, wear and tear, negligence, improper storage
or use of parts or accessories not approved or supplied by Wasp;
(iii) any claimed defect or damage caused by the use of product with any other instrument,
equipment or apparatus;
(iv) any claimed defect or damage caused by the failure to provide proper maintenance,
including but not limited to cleaning the upper window in accordance with product
manual;
(v) any defect or damage caused by natural or man-made disaster such as but not limited
to fire, water damage, floods, other natural disasters, vandalism or abusive events that
would cause internal and external component damage or destruction of the whole
unit, consumable items;
(vi) any damage or malfunctioning caused by non-restoring action as for example firm-
ware or software upgrades, software or hardware reconfigurations etc.;
(vii) the replacement of upper window/cartridge due to scratching, stains or other degra-
dation and/or
(viii) any consumable or equivalent (e.g., cables, power supply, batteries, keypads, touch
screen, triggers etc.).
Quick Reference Guide 15
Page 20

Service and Support
No Assignment
Customer may not assign or otherwise transfer its rights or obligations under this warranty except to a purchaser or transferee of product. No attempted assignment or transfer in violation of
this provision shall be valid or binding upon Wasp.
WASP'S LIMITED WARRANTY IS IN LIEU OF ALL OTHER WARRANTIES, EXPRESS OR IMPLIED, ORAL
OR WRITTEN, STATUTORY OR OTHERWISE, INCLUDING, WITHOUT LIMITATION, ANY IMPLIED
WARRANTIES OF MERCHANTABILITY, FITNESS FOR A PARTICULAR PURPOSE, OR NONINFRINGEMENT. WASP SHALL NOT BE LIABLE FOR ANY DAMAGES SUSTAINED BY CUSTOMER ARISING
FROM DELAYS IN THE REPLACEMENT OR REPAIR OF PRODUCTS UNDER THE ABOVE. THE REMEDY SET FORTH IN THIS WARRANTY STATEMENT IS THE CUSTOMER’S SOLE AND EXCLUSIVE REMEDY FOR WARRANTY CLAIMS. UNDER NO CIRCUMSTANCES WILL WASP BE LIABLE TO CUSTOMER
OR ANY THIRD PARTY FOR ANY LOST PROFITS, OR ANY INCIDENTAL, CONSEQUENTIAL IN-DIRECT, SPECIAL OR CONTINGENT DAMAGES REGARDLESS OF WHETHER WASP HAD ADVANCE
NOTICE OF THE POSSIBILITY OF SUCH DAMAGES.
Risk of Loss
Customer shall bear risk of loss or damage for product in transit to Wasp. Wasp shall assume risk
of loss or damage for product in Wasp’s possession. In the absence of specific written instructions for the return of product to Customer, Wasp will select the carrier, but Wasp shall not thereby assume any liability in connection with the return shipment.
Service and Support
Log on to
www.waspbarcode.com
and click on the links indicated for information.
16 WLS8600
Page 21

NOTES
Service and Support
Quick Reference Guide 17
Page 22

NOTES
Service and Support
18 WLS8600
Page 23

DECLARATION OF CONFORMITY
13
Wasp Barcode Technologies 1400 10th St Plano, Texas
La presente dichiarazione di conformità è rilasciata sotto la responsabilità esclusiva di Wasp Barcode Technologies. per:
This Declaration of Conformity is issued under the sole responsibility of Wasp Barcode Technologies for:
Cette déclaration de conformité est établie sous la seule responsabilité de Wasp Barcode Technologies:
Diese Konformitätserklärung wird unter der alleinigen Verantwortung des Wasp Barcode Technologies erteilt für:
Esta declaración de conformidad se expide bajo la exclusiva responsabilidad de Wasp Barcode Technologies para:
WLS8600; Barcode Reader
e tutti i suoi modelli
and all its models
et tous ses modèles
und seine Modelle
y todos sus modelos
sono conformi alle Direttive del Consiglio Europeo sottoelencate:
are in conformity with the requirements of the European Council Directives listed below:
sont conformes aux spécifications des Directives de l'Union Européenne ci-dessous:
den nachstehenden angeführten Direktiven des Europäischen Rats:
cumple con los requisitos de las Directivas del Consejo Europeo, según la lista siguiente:
2004/108/EC EMC Directive
2011/65/EU - RoHS Directive
Basate sulle legislazioni degli Stati membri in relazione alla compatibilità elettromagnetica ed alla
sicurezza dei prodotti.
On the approximation of the laws of Member States relating to electromagnetic compatibility and
product safety.
Basée sur la législation des Etats membres relative à la compatibilité électromagnétique et à la sécurité
des produits.
Über die Annäherung der Gesetze der Mitgliedsstaaten in bezug auf elektromagnetische Verträglichkeit und Produktsicherheit entsprechen.
Basado en la aproximación de las leyes de los Países Miembros respecto a la compatibilidad electromagnética y las Medidas de seguridad relativas al producto.
Questa dichiarazione è basata sulla conformità dei prodotti alle norme seguenti:
This declaration is based upon compliance of the products to the following standards:
Cette déclaration repose sur la conformité des produits aux normes suivantes:
Diese Erklärung basiert darauf, daß das Produkt den folgenden Normen entspricht:
Esta declaración se basa en el cumplimiento de los productos con las siguientes normas:
LASS A ITE),SEPTEMBER 2006:
EN 55022 (C
MENDMENT A1 (CLASS A ITE), OCTOBER 2007
A
EN 55024, SEPTEMBER 1998 :
MENDMENT A1:2001+A2:2003
A
LIMITS AND METHODS OF MEASUREMENTS OF RADIO DIS-
TURBANCE CHARACTERISTICS OF INFORMATION TECHNOLOGY
EQUIPMENTS
INFORMATION TECHNOLOGY EQUIPMENT
IMMUNITY CHARACTERISTICS
LIMITS AND METHODS OF MEASUREMENT
TECHNICAL DOCUMENTATION FOR THE ASSESSMENT OF
EN 50581, SEPTEMBER 2012:
Plano, Texas, Updates September 2013 Jeff Schmeling
ELECTRICAL AND ELECTRONIC PRODU CTS WITH RESPEC T TO
THE RESTRICTION OF HAZARDOUS SUBSTANCES
Vice President of Prod uct Development
Page 24

www.waspbarcode.com
Wasp Barcode Technologies
1400 10th Street
Plano, Texas USA 75074
820060290
(Rev H)
November 2013
 Loading...