

Page 1

Wasp Labeler User Manual
Page 2

Copyright © 2012
Wasp Barcode Techno logies
th
1400 10
St.
Plano, TX 75074
All Rights Reserved
STATEMENTS IN THIS DOCUMENT REGARDING THIRD PARTY PRODUCTS OR SERVICES ARE BASED ON INFORMATION
MADE AVAILABLE BY THIRD PARTIES. WASP BARCODE TECHNOLOGIES AND ITS AFFILIATES ARE NOT THE SOURCE OF
SUCH INFORMATION. THE INFORMATION IN THIS DOCUMENT IS SUBJECT TO CHANGE WITHOUT NOTICE.
Wasp Barcode Techno logies, the Wasp logo and Wasp Labeler are registered tra demarks and/or trademarks of Wasp Barcode
Technologies in the U nited States and other countri es. Ot her parties’ trademarks are t he property of their respective owne rs.
Software activatio n system lice nsed under Pat ent No. 5,490,216
Terms, co nditions, f eatures, hours and contact informatio n in this document are subject to change without notice. W asp is
committed to providi ng great products and exceptional customer service. Occasionally we may decide t o update our selection and
change o ur service off erings so please check www.waspbarcode.com
for the latest informatio n.
Wasp Labeler Install Key ________________________
(Printed on shipped material)
Wasp Labeler Registratio n Key ________________________
(Obtai ned from www.waspbarcode.com\register
)
Page 3

Wasp Labeler User Manual
Table of Contents
Chapter 1 - Gettin g Sta r te d ...................................................................................................................... 1
1.1 Introduction .................................................................................................................................... 1
1.2 Getting Sta r te d - Wasp Labeler Capabilities.................................................................................... 2
1.3 Getting Sta r te d - What is a Barcode?.............................................................................................. 4
1.4 Getting Sta r te d - Navigat i ng the Main Screen ................................................................................. 5
1.4.1 Section A: Help/R esizing Icons ................................................................................................ 6
1.4.2 Section B: Tabs ....................................................................................................................... 7
1.4.3 Section C: Ic on Toolbar.......................................................................................................... 10
1.4.4 Section D: Design Window ..................................................................................................... 10
1.4.5 Section E: Properties Box ...................................................................................................... 11
1.5 Getting Sta r te d - Creating a Static Label ....................................................................................... 14
1.6 Getting Sta r te d - Binding a Data Sour ce to an Objec t ................................................................... 20
1.7 Getting Sta r te d - Using String Bui l der t o C oncatenate Data .......................................................... 25
1.8 Getting Sta r te d - Creating Enumerated Labels .............................................................................. 32
1.9 Getting Sta r te d - Exampl e Labels ................................................................................................. 37
1.10 Barcode Symbology Reference .................................................................................................. 40
Chapter 2 - File Tab ............................................................................................................................... 51
2.1 File Tab Overview ........................................................................................................................ 51
2.2 Exporting a Barcode as an Image File .......................................................................................... 52
2.3 Exiting Wasp Labeler with Unsaved Labels .................................................................................. 53
Chapter 3 - Design Tab ......................................................................................................................... 54
3.1 Design Toolb ar Function Descriptions .......................................................................................... 55
3.2 Adding a Drawing Object .............................................................................................................. 59
3.3 Adding a Picture ........................................................................................................................... 63
3.3.1 Steps to Add a Pi cture to a Label: .......................................................................................... 63
3.3.2 Pi cture Properties Box: Format Tab ....................................................................................... 65
3.3.3 Pi cture Properties Box: Content Tab ...................................................................................... 67
3.4 Adding a Barcode ......................................................................................................................... 68
3.4.1 Steps to Add a Bar code ......................................................................................................... 68
3.4.2 Adding a Bar code: Properties Box .......................................................................................... 70
3.4.3 Barcode Proper ties ................................................................................................................ 79
3.5 Adding a Text Box ........................................................................................................................ 99
3.5.1 Steps to Add a Text Box ........................................................................................................ 99
3.5.2 Adding a Text Box: Pr opert ies Box ....................................................................................... 101
3.6 Content Options ......................................................................................................................... 108
3.6.1 Object Data Source - Date/Time .......................................................................................... 108
3.6.2 Object Data Source - Serial Alpha ........................................................................................ 109
3.6.3 Object Data Source - Database ............................................................................................ 111
3.6.4 Object Data Source - A nother Obj ect ................................................................................... 112
3.6.5 Object Data Source - User Defined List ................................................................................ 113
3.6.6 Object Data Source - S er ial Nu m ber .................................................................................... 116
3.6.7 Object Data Source - Prompt at Print ................................................................................... 118
3.6.8 String Builder ....................................................................................................................... 120
3.6.9 Formatting D ata ................................................................................................................... 124
Chapter 4 - Data Tab ........................................................................................................................... 137
4.1 Data Tab Overvi ew..................................................................................................................... 137
4.2 Connectin g to a CS V F ile ........................................................................................................... 139
4.3 Connectin g to a Micr osoft Acc ess Database ............................................................................... 141
4.4 Connectin g to an Excel Fi l e ........................................................................................................ 143
4.5 Connectin g to Micr osoft S QL Server ........................................................................................... 145
4.6 Data S ource - ODBC Compliant Data Source ............................................................................. 146
4.7 Connecting to QuickBooks® ....................................................................................................... 148
4.8 Connectin g to a Text F i le (delimited) ........................................................................................... 152
i
Page 4

Wasp Labeler User Manu al
Wasp Labeler User Manual
4.9 Creating a Wasp Labeler Data Source........................................................................................ 155
4.9.1 Deleting Columns or Data From the Database: .................................................................... 158
4.10 Sorting Data Source Content .................................................................................................... 158
4.10.1 Method 1: Sort D ata Usi ng Column Headers ...................................................................... 158
4.10.2 M ethod 2: Sort Data U sing the Sort Butt on ......................................................................... 159
4.11 Fil ter the D ata Source Content ................................................................................................. 162
4.11.1 C r eatin g a Fil ter ................................................................................................................. 162
4.11.2 D eleting a F i lter .................................................................................................................. 167
4.12 Joining Tables .......................................................................................................................... 168
4.12.1 Steps to Join Tables .......................................................................................................... 169
4.13 Refreshing Data Source In format ion ......................................................................................... 173
4.14 Editing the Data Source Connect ion ......................................................................................... 174
4.15 Removing the Data Source Connection .................................................................................... 175
Chapter 5 - Print Tab ........................................................................................................................... 176
5.1 Print Tab Overview ..................................................................................................................... 176
5.1.1 Print Toolbar Function Descriptions ...................................................................................... 177
5.1.2 Print Tab Proper ties Box - Number of C opies ....................................................................... 181
5.1.3 Print Tab Proper ties Box - Starting Label and Order ............................................................. 185
5.1.4 Print Tab Proper ties Box - Data S ource ................................................................................ 186
5.1.5 Print Tab Proper ties Box - Print Summary ............................................................................ 186
5.2 Page Setup Screen .................................................................................................................... 187
5.2.1 Access and Use the Page Setup Screen .............................................................................. 188
5.2.2 Creat e a Custom Layout ...................................................................................................... 189
5.2.3 Cop y a Layout ..................................................................................................................... 190
5.2.4 Delete a Layout.................................................................................................................... 192
Chapter 6 - Activating Wasp Labeler .................................................................................................... 193
6.1 Steps to Activate Wasp Labeler: ................................................................................................. 193
6.2 Updat ing Your Licens e: .............................................................................................................. 195
Chapter 7 - Running Labeler from a Command Line ............................................................................ 197
7.1 Application Execution ................................................................................................................. 197
Chapter 8 - About Screen .................................................................................................................... 198
8.1 Using/V i ewing the About Scr een ................................................................................................ 198
Index ................................................................................................................................................... 199
ii
Page 5

Wasp Labeler User Manual
1.1 Introduction
Thank you for your pur chas e of the Wasp Labeler bar code c r eati on software. This topic contains
information that will help famil i ar iz e you with b ar codes and show you how to create cu stomized
barcodes. The I ntr oductory Materials secti on contains im portant i nformation you shoul d fam i liarize
yourself wit h p r i or to creating bar codes .
Introductory Materials
Wasp Labeler Capabilities
What is a Barcode?
Navigating the Main Screen
Creating a Static Label
Binding a Data Source to an Object
Using String Builder to Concatenate Data
Creating Enumerated Labels
Example Labels
Bar cod e Sy m bo lo g y Reference
After you have read the introductory material s, you are ready to start us i ng Wasp Labeler . Click on t he
link below to go to the next step in the Getting Started section.
Software activation system licensed under Patent No. 5,490,216
Chapter 1 - Getting Started
1
Page 6

Wasp Labeler User Manual
1.2 Gett ing St arted - Wasp Labeler Capabilities
Wasp Labeler is a profession al label gener ati on ap plic ation designed to meet the most demanding
barcode labelin g an d printing requ i r ements. Easily gen er ate bar code lab el s, asset or inventory label s,
add r ess labels and envelopes with PostN et Zip Cod es, I D b adge labels, business checks, and date and
time stam ps for peri shable g oods, th en print your labels from any local or network Windows printer . You
can i m port data direc tly from your corporate databas es or you c an create a new Micros oft Acces s
database. In addition, Wasp Labeler can generate compliance labels for practically ev ery in du stry.
Wasp Labeler:
• Sup ports the following barcode languages:
• Prints the mo s t po pul a r 2D ba r c o de s :
• Sup ports any las er , dot matri x, th er mal or ink jet p r inter using a standard W i ndows pr int er
• Allows you t o edit m ult i ple labels concurrently.
• Allows you t o i np ut data on the label at pr i nt tim e.
• Capable of advanced gr aph i c resizing and gr aphic rotati on.
• Allows import of bitmap files (*.bmp), JPEG (*.jpg, *.jpeg, *.jpe, *jfif), PNG (*. pn g), TIFF
• Allows c onn ecting to extern al dat abases:
• Allows import of t ext files or Mi crosoft Excel worksh eets.
• Allows import of Q uickBooks
• Includes over 100 label layou t templates.
Wasp Labeler su pport s drawing objects includ ing text, lin es, rec tangles, ellipses , and barcodes . Eac h of
these drawing objects h as full edit capabilities includi ng draw style, size, position and color. I n addition,
practical l y any p icture can be imported onto th e label design, linked to the ori ginal file, or r etrieved from
a database.
AztecCode, Codabar, Cod e 128, C ode 39 , Cod e 93, DataM atrix, EanJ an1 3, EanJan8,
Interleaved2 of5, Isbn, Itf1 4, MaxiCode, MicroPDF417, MicroQRCode, Ms i , PD F417,
Postnet, QRCode, GS 1, GS1Stacked, G S1Omnidirectional, GS1Trunc ated, GS1Expanded,
GS1Limited, UCCEAN128, UPC-A, UPC-E
For a description of each of these s ymbol ogies, pl ease refer to the
Barcode Symbology
Reference.
DataMatrix, MaxiCode, Micr oPDF, Micr oQRCode, P DF417, Az tec Code and QRCode
driver.
(*.tiff, *.tif), GIF (*.gif), ICON (*ico).
Microsoft Access, Microsoft SQL Server, ODBC data sources,
QuickBooks
®
as well as c omma sep ar ated files or other delimit ed text files.
®
dat a ( version 2008 or later).
2
Page 7

Wasp Labeler User Manual
Wasp Labeler su pport s St atic, Serialization, Prompt at Print Time, External Dat a Sour ce, B ind t o
An other Object, and Date/Time for objects. The 'Promp t at Print Time' feature is used to interactively
enter information onto the lab el at pr i nt tim e. The 'Extern al Data S ource' feature al lows you to i mp or t,
vie w, and edit in format i on from th e m ost c om mon d atabases an d al lows your Text and Bar Code
objec ts t o r etrieve thei r source value from an ext er nal file. In addition , Wasp Labeler provid es the
capability to q uickly create your own datab ase.
3
Page 8
Wasp Labeler User Manual
1.3 Gett ing St arted - What is a Barcode?
A b ar code is a graphical r epresentation of a s et of numeric or alphanumeric charact er s that can be read
by a barcode s canner.
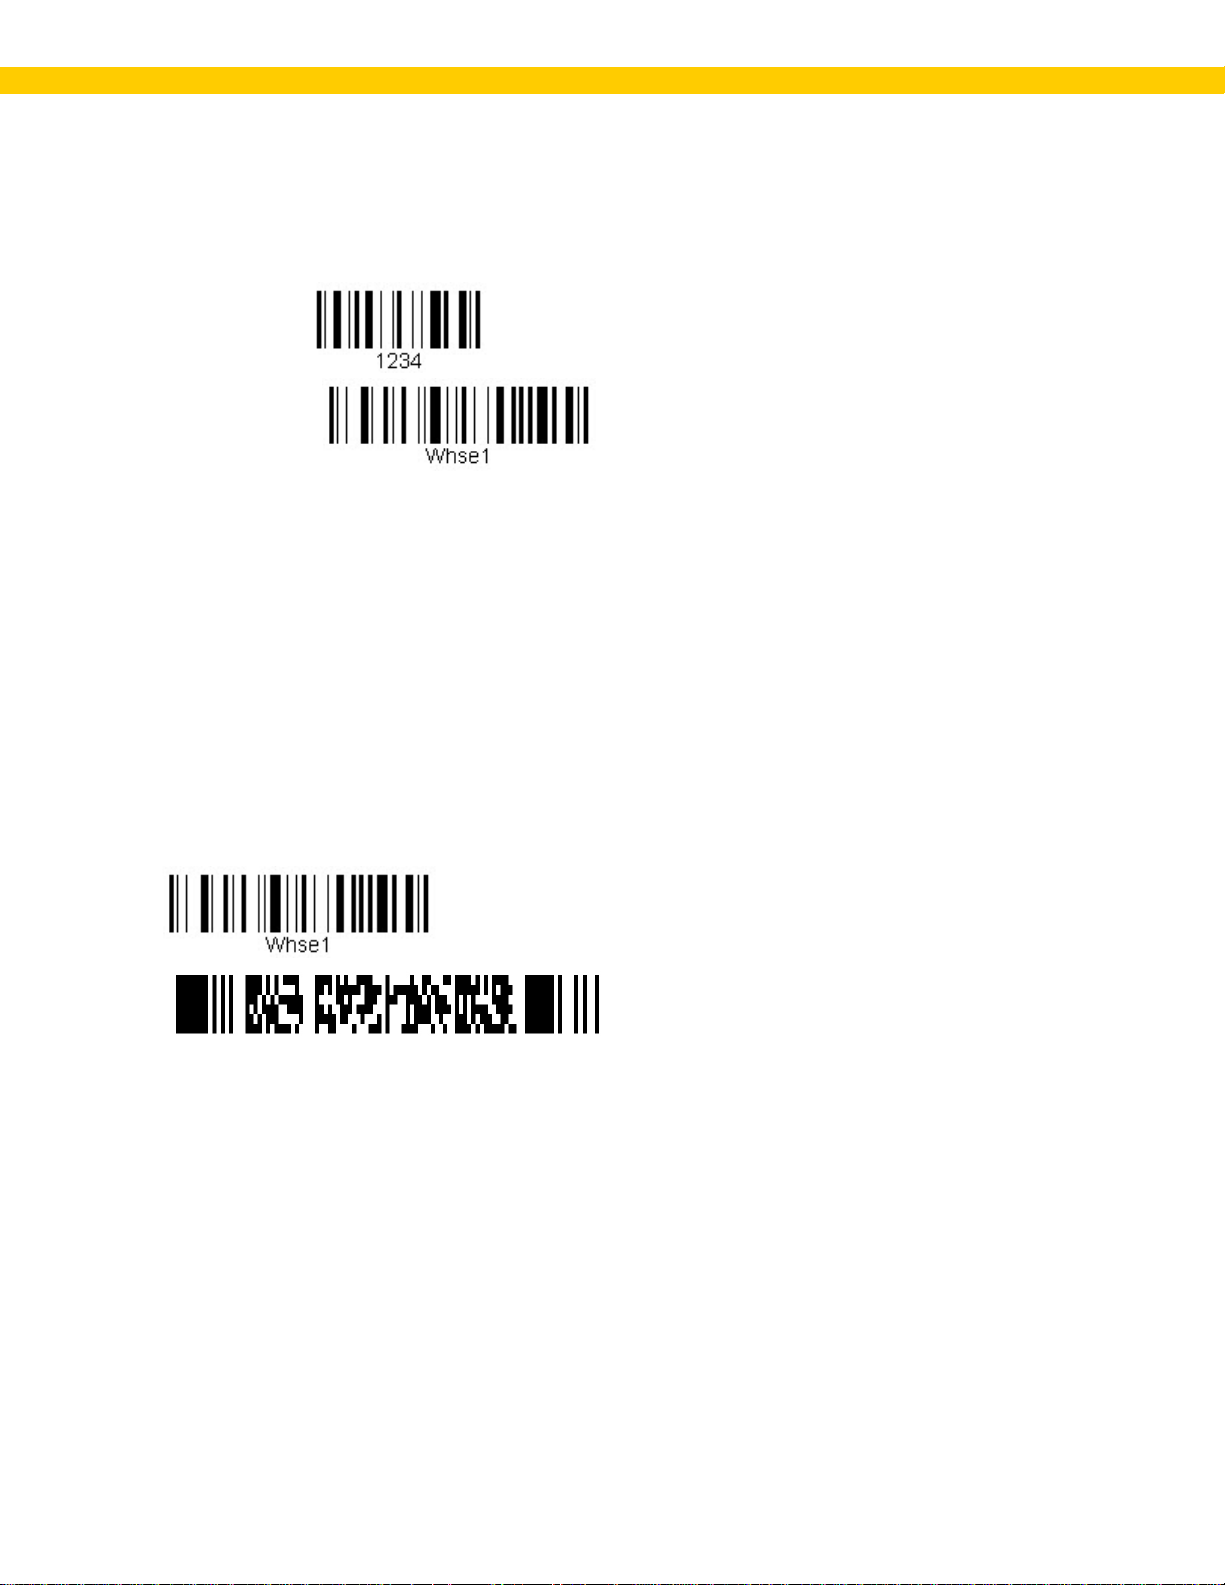
1234 becomes:
Whse1 becomes:
Ass igning a per manen t barcode to eac h site, location, item , s upp l ier and c ustomer creates an
environment where a mobil e device c an be used to easily keep track of inv entory movements an d
alleviates the prob lem of data-entry err or s.
Barcodes get wid er with the amount of numbers and ch ar acters you want repr esented by them. In
other words , the widt h is determined by t he am ount of number s or charact er s repr esented by the
barcode. Some barcode scanners have a limited wid th that th ey c an read . If you have very long item
numbers or location numb er s you may need to reconsider the num bering scheme or th e scan ner you
are using. Also be aware that many of the less expen sive barcode readers do not read barcodes t hat
are bent, at an angle, ar e too small or are damaged. Consider the possible di spos ition of your
barcodes before choosing a scanner.
There ar e man y different barcode formats or symbologies. The di fferent symb ologies can be thought of
as di fferent font s. Th e same charac ters are rep r esented by diffe r ent symb ologies in different wa ys . For
example, the two symbologies belo w represent th e same information (Whse1) .
.
.
These different formats exist to pr ovide wa ys to compress more data into a smaller sp ace, to represent
a diff er ent set of charact ers or to enable scanning at di fferent angles or distances.
When using Wasp Labeler, barcodes should be printed using a high quality laser or ink jet prin ter, or a
ther mal label prin ter. You wan t the barcode label t o be h ig h quality because low qu al ity bar codes are
harder to s can and usu al ly do not last lon g. W asp Labeler can print to a reg ular print er or a barcode
printer.
4
Page 9
Wasp Labeler User Manual
1.4 Gett ing St arted - Navigating the Main Screen
In this topic:
Help/Resizing Icons
Accessing Help
Resizing/Minimizing Wasp Labeler
Tabs
Icon Toolbar
Design Window
Properties Box
Hide/Show the Properties Box
Move the Properties Box
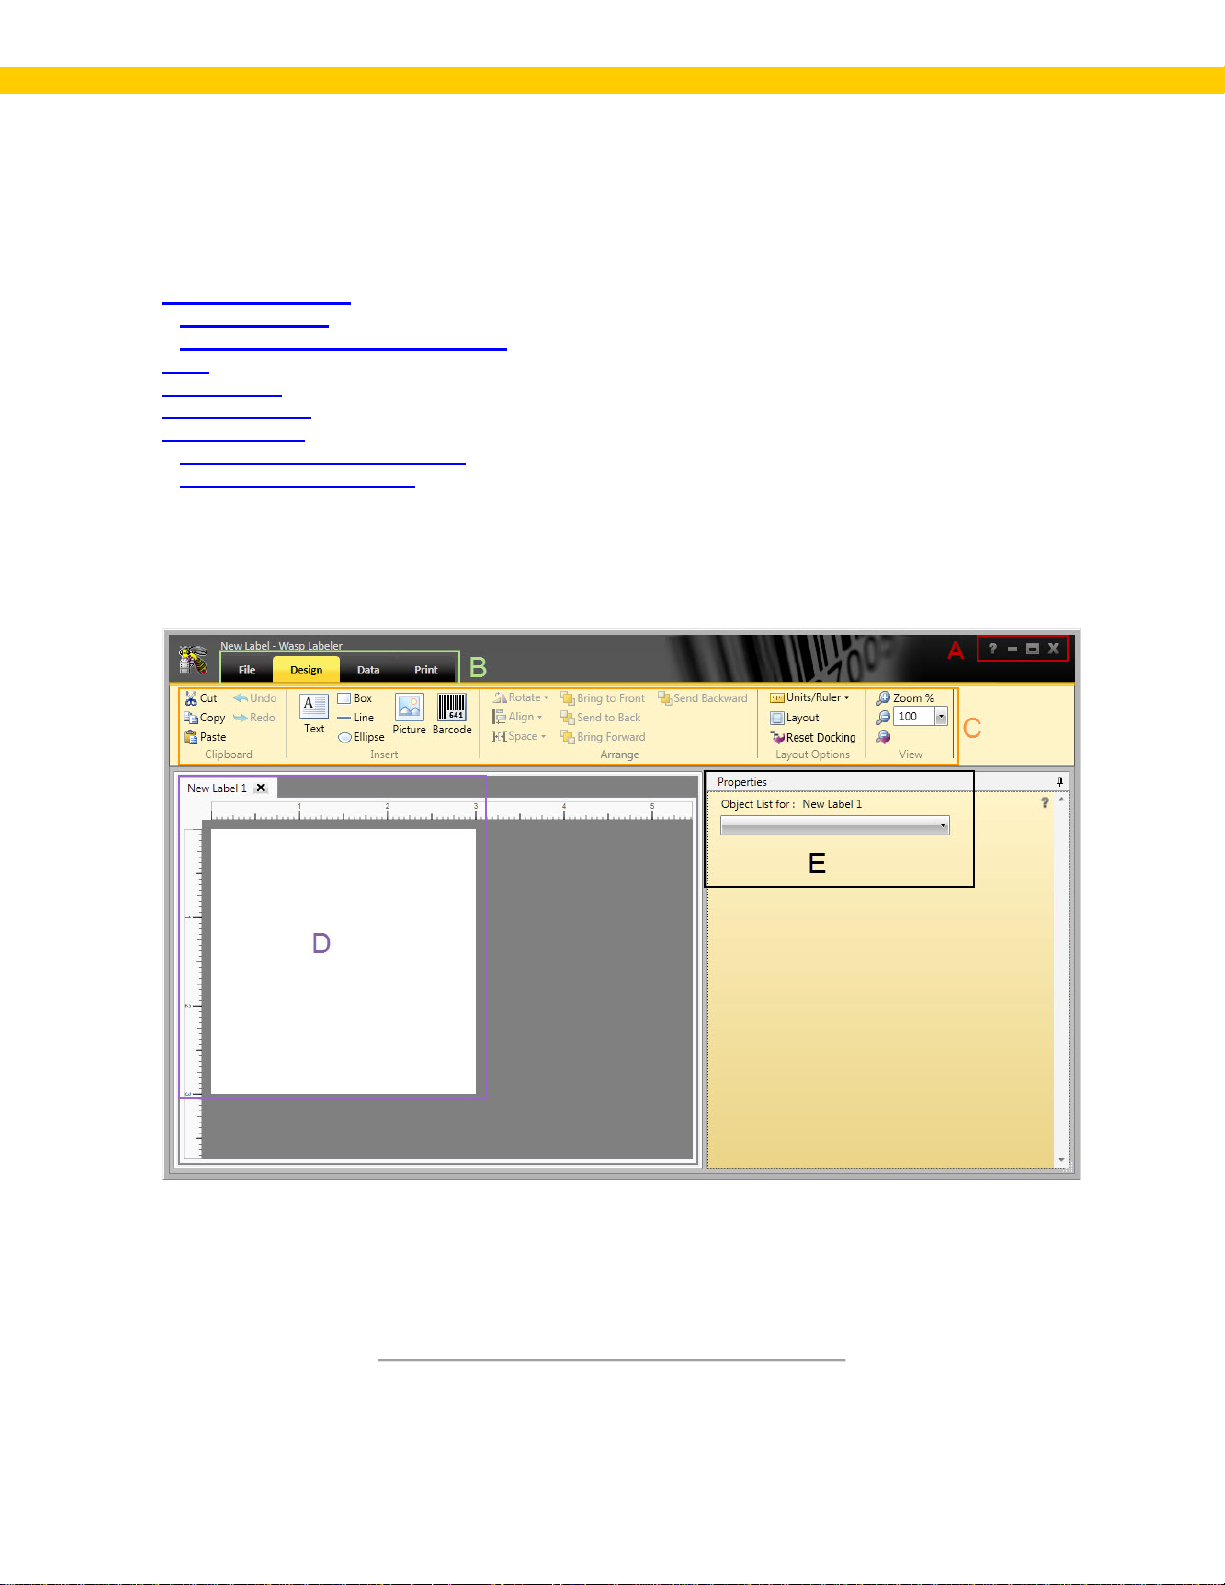
This topic provides a brief overview of Wasp Labeler's Main screen. The Main screen provid es access
to all of the featur es and functions you will need to create c ustomi zed labels or to create label s us i ng
the temp l ates. Use thi s topic to h el p fam i liarize yourself with getting ar ound in the ap plication. Links to
detailed i nstruc tions for using each functi on ar e provided throughout this topic.
A: Help/Resizing Icons
B: Tabs
C: I con Toolbar
D: Design Window
E: Proper ties Box
5
Page 10
Wasp Labeler User Manual
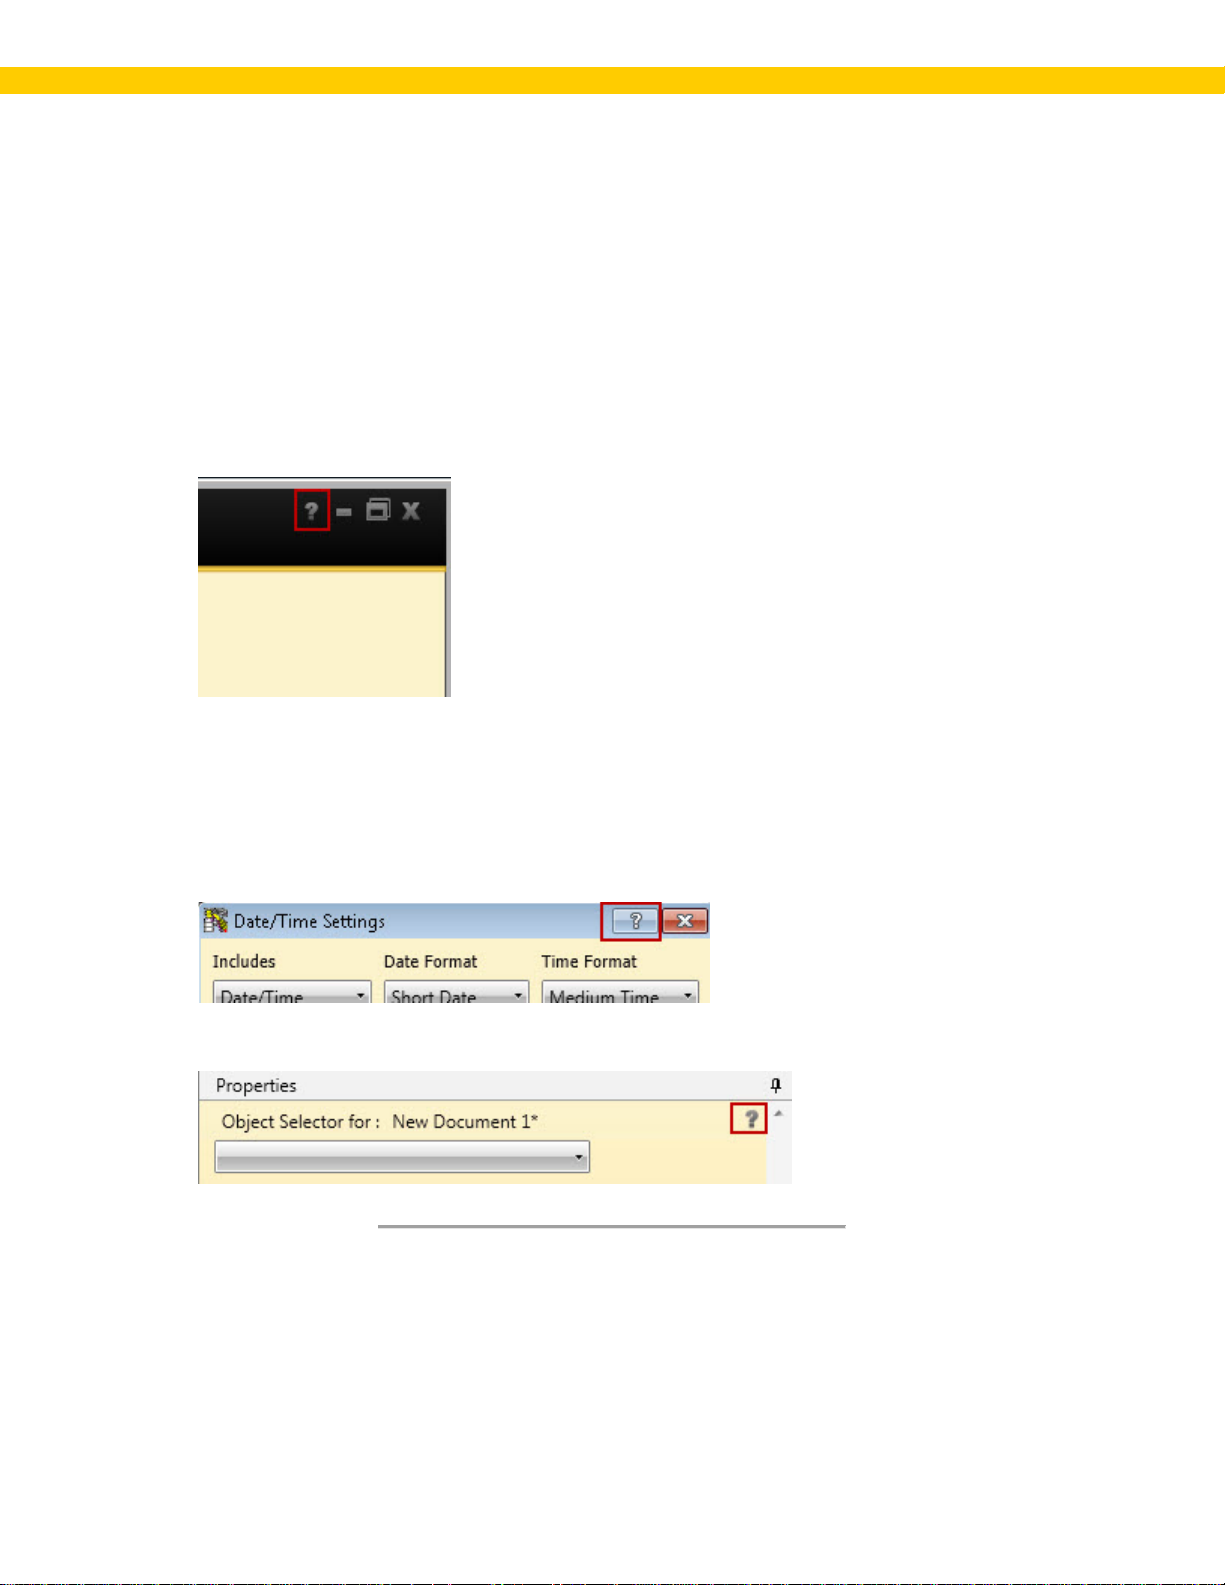
1.4.1 Section A: Help/Resizing Icons
This s ection contains ic ons that allow you to adjust th e size of t he Labeler s creen, access this Help file
or close the Label er window.
Acces si n g H elp
Launching the Help File: You can launch th is Help fil e from anywhe r e in the Labeler application
by clicking the ques tion m ar k icon in the top ri ght of the screen. Using this method launches the
Help with the topic related to the cu r r entl y open s creen/tab displayed. You can searc h for or
navigate to other topi cs as needed.
Context-Sensitive He lp : You can access a Help topic sp ecific to the screen or featur e you are
currently using by clicking on the small qu estion mar k arrow t hat appear on most screen s and in the
Properties box. Clicking the Help icon on the Properties box launches Help specific to the object
you hav e selected. You can also launch context-sensitive help by hitting the F7 key on your
keyboard.
Help Button Example - Screen
Help Button Example - Properties Box
6
Page 11
Wasp Labeler User Manual
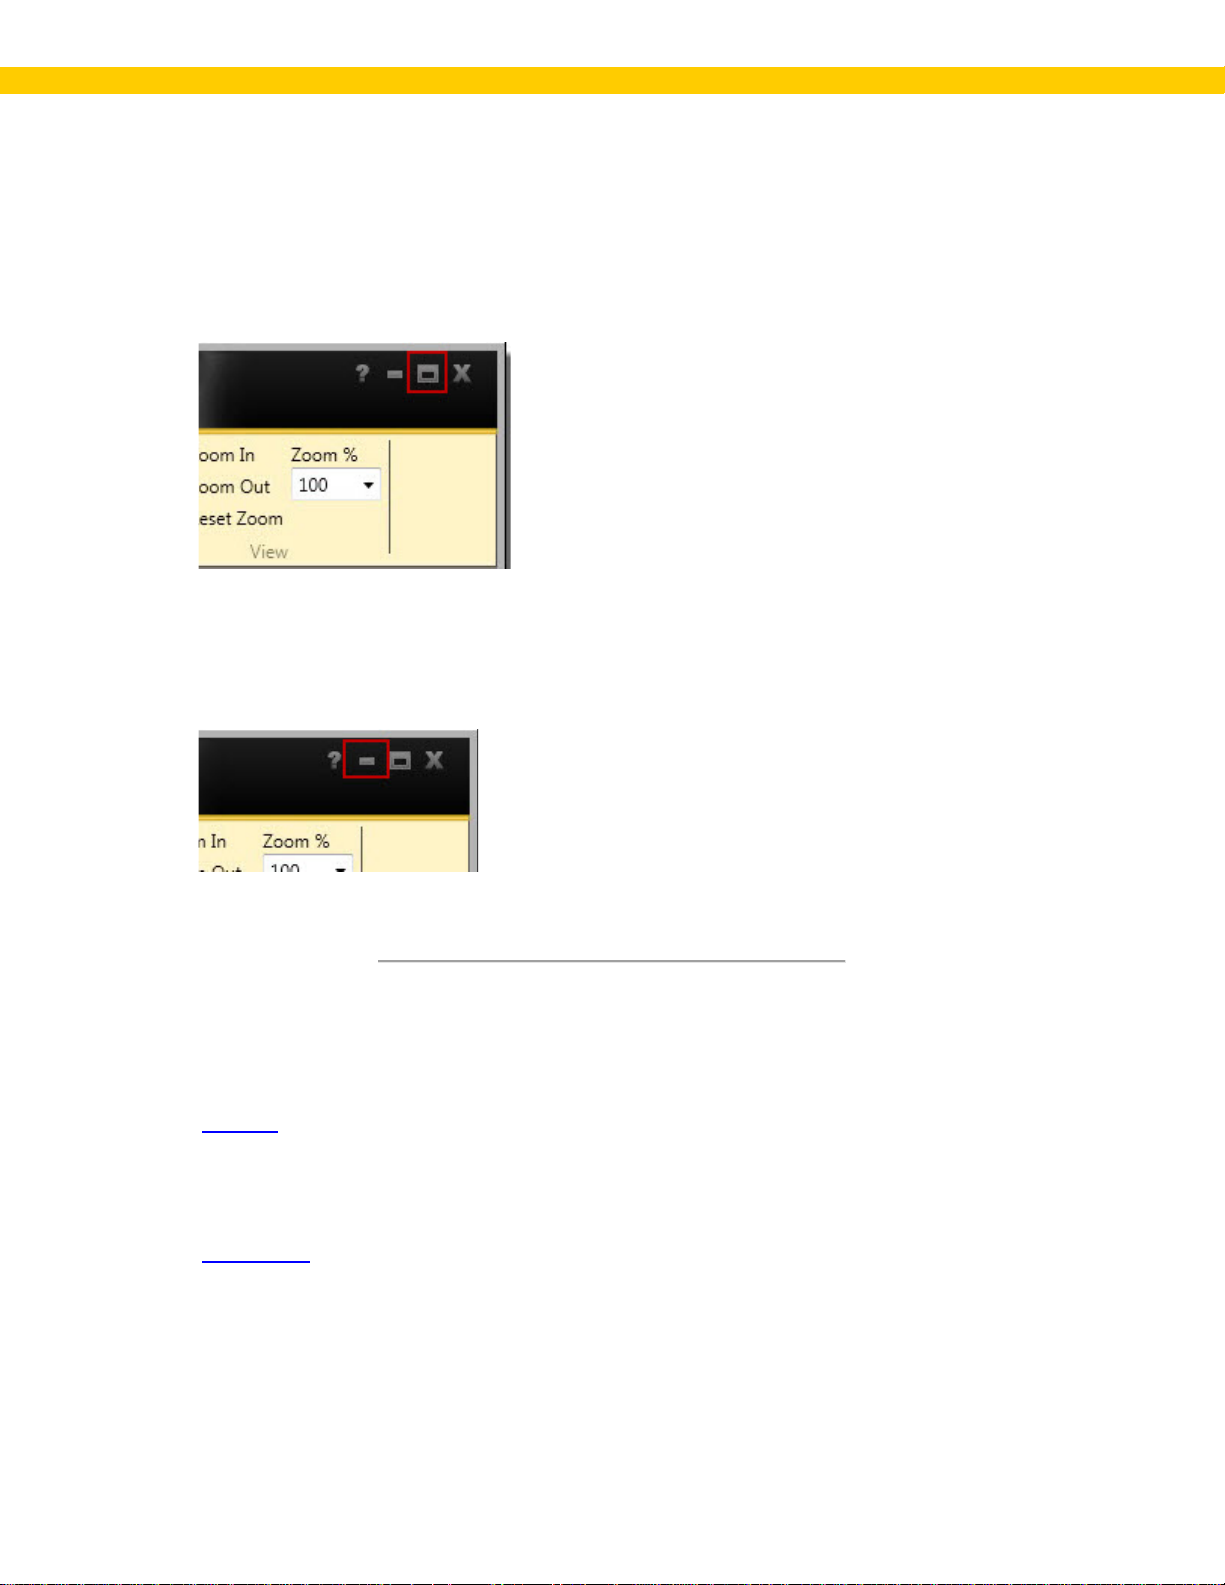
Resizing/Minimizing Wasp Labeler
Wasp Labeler can be resi zed to fit your whole scre en or reduc ed to appear as a porti on of your
screen.
To resize th e window, cli ck the icon in the top , right of the Main screen, as shown bel ow:
The screen will reduce in size when the ic on is clicked. You can r esize t he screen by dr agg i ng an y
of the corners or borders. Labeler will remember the size when i t is closed and re-opened.
To min imize the screen and place it on the taskbar, click the minimize icon in the top, right of the
Main sc r een, as shown below:
Lab el er will be placed on your t askb ar . To reopen it, click on the icon on your taskb ar .
1.4.2 Section B: Tabs
File Tab:
The File Tab contains s ave, open , and close opt ions. This t ab also allows you to l aun ch example
labels and check for updates to your software. Click on an icon to access a function.
Design Tab:
The Design Tab c ontain s all of the option s for cu stomizin g your l abel. Click on an icon to access that
function. The toolbar on thi s tab is divided i nto 5 secti ons:
Clipboard - This section contains basic commands such as Cut, Copy, Paste, Undo and Redo.
Insert - The Insert options allo w you to insert text, basic shapes, a pict ure or a barcode into your label.
Arrange - The Ar r ang e m enu allows for precision placement of objects or text you insert onto your
label.
7
Page 12
Wasp Labeler User Manual
Layout Options - Use t hese options to change the layout of your label or to hide/show the r uler along
the top and side of the label.
View - The V iew menu allows y ou to zoom i n or ou t.
Changes you make will appear in the Label Design window.
Data Tab:
The Data Tab allows you to add a database, spreadsheet, .csv file or other data source t o your lab el
project. You can then ass ociate an obj ect on your label, such as a text field or a barcode wit h the data
source.
8
Page 13
Wasp Labeler User Manual
P rint Tab:
The Pri nt Tab cont ai ns functi ons rel atin g to pr i nting your lab els, i ncluding Page Layout.
9
Page 14

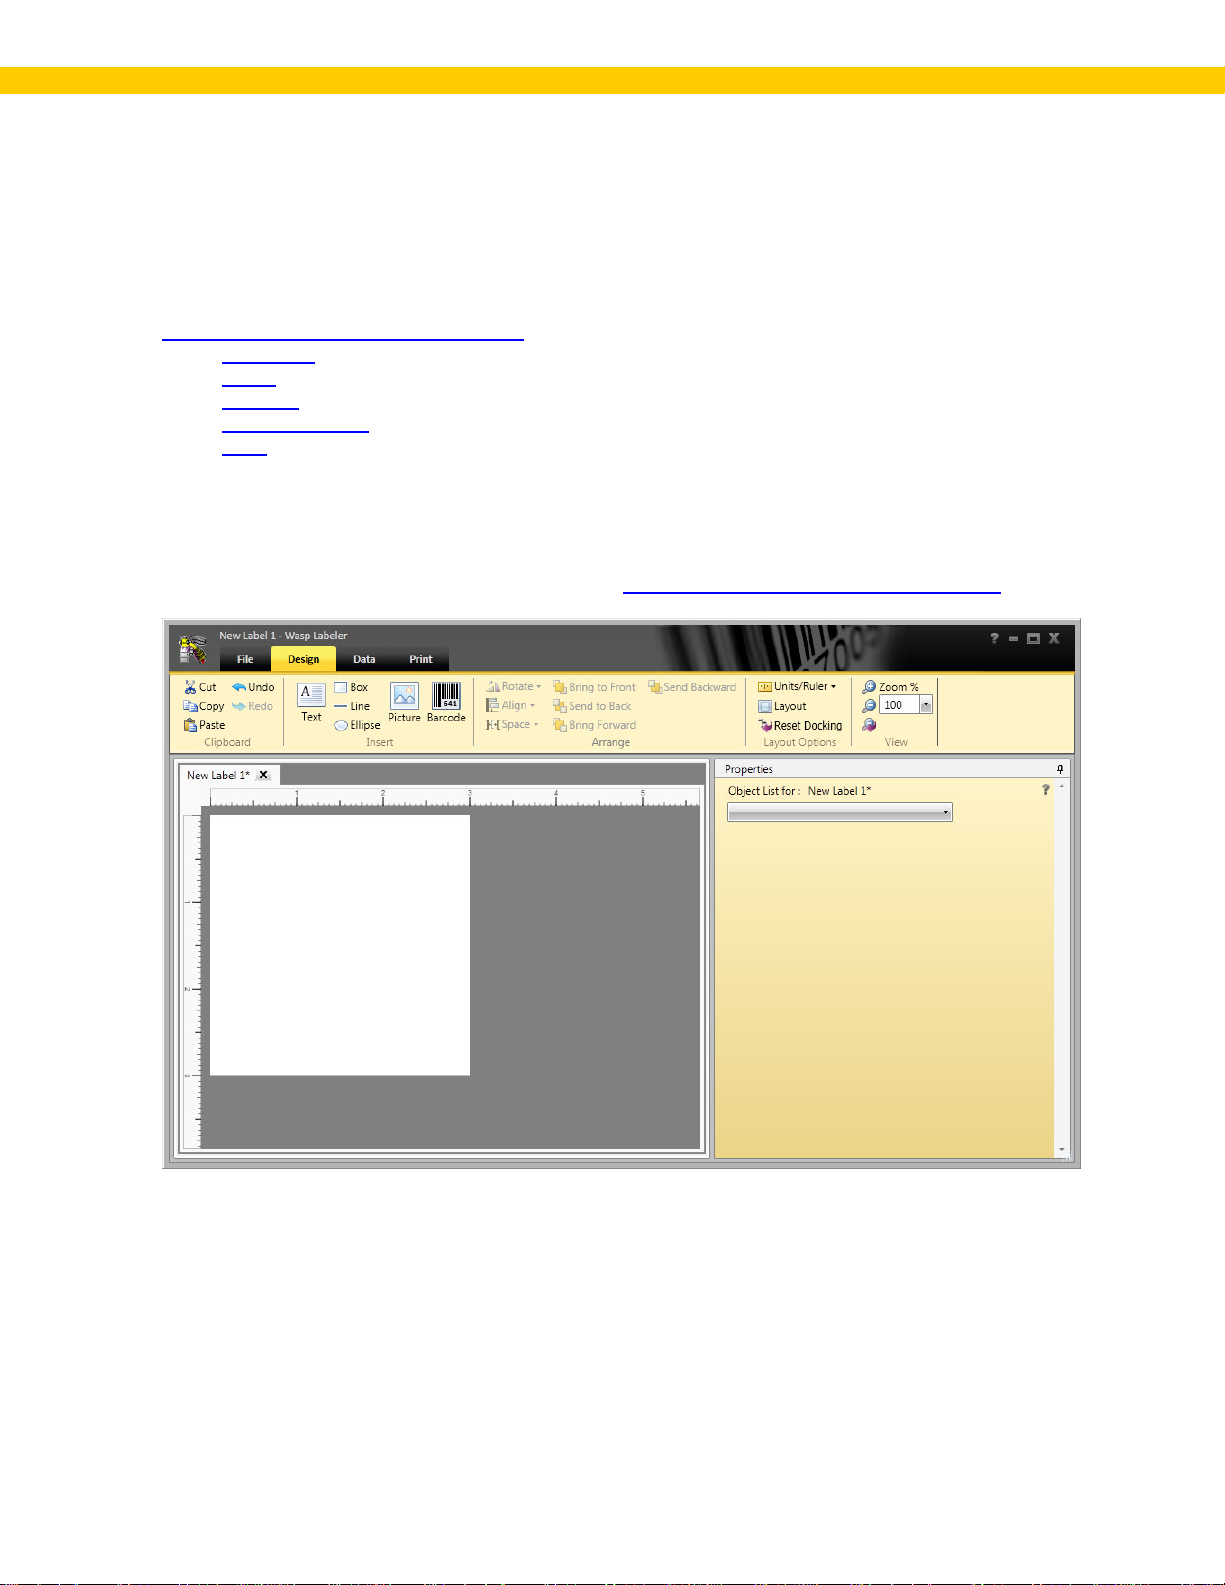
Wasp Labeler User Manual
1.4.3 Sec tion C: Icon Toolbar
The tabs at the top of th e Main screen allow you to switc h between functional ities . The tabs act as a
way to gr oup Wasp Label er ' s feat ures together by task. For instance, the File tab contains functionality
related to opening a new file, c losing a file, saving a file, etc ., while the Design tab contains
functionality related t o creating and designing your labels. When you first open Wasp Labeler, the
Design tab is displayed and this is the tab you will probably use the m ost.
You can switch t o a differ ent tab by cl icking on the desired tab l abel.
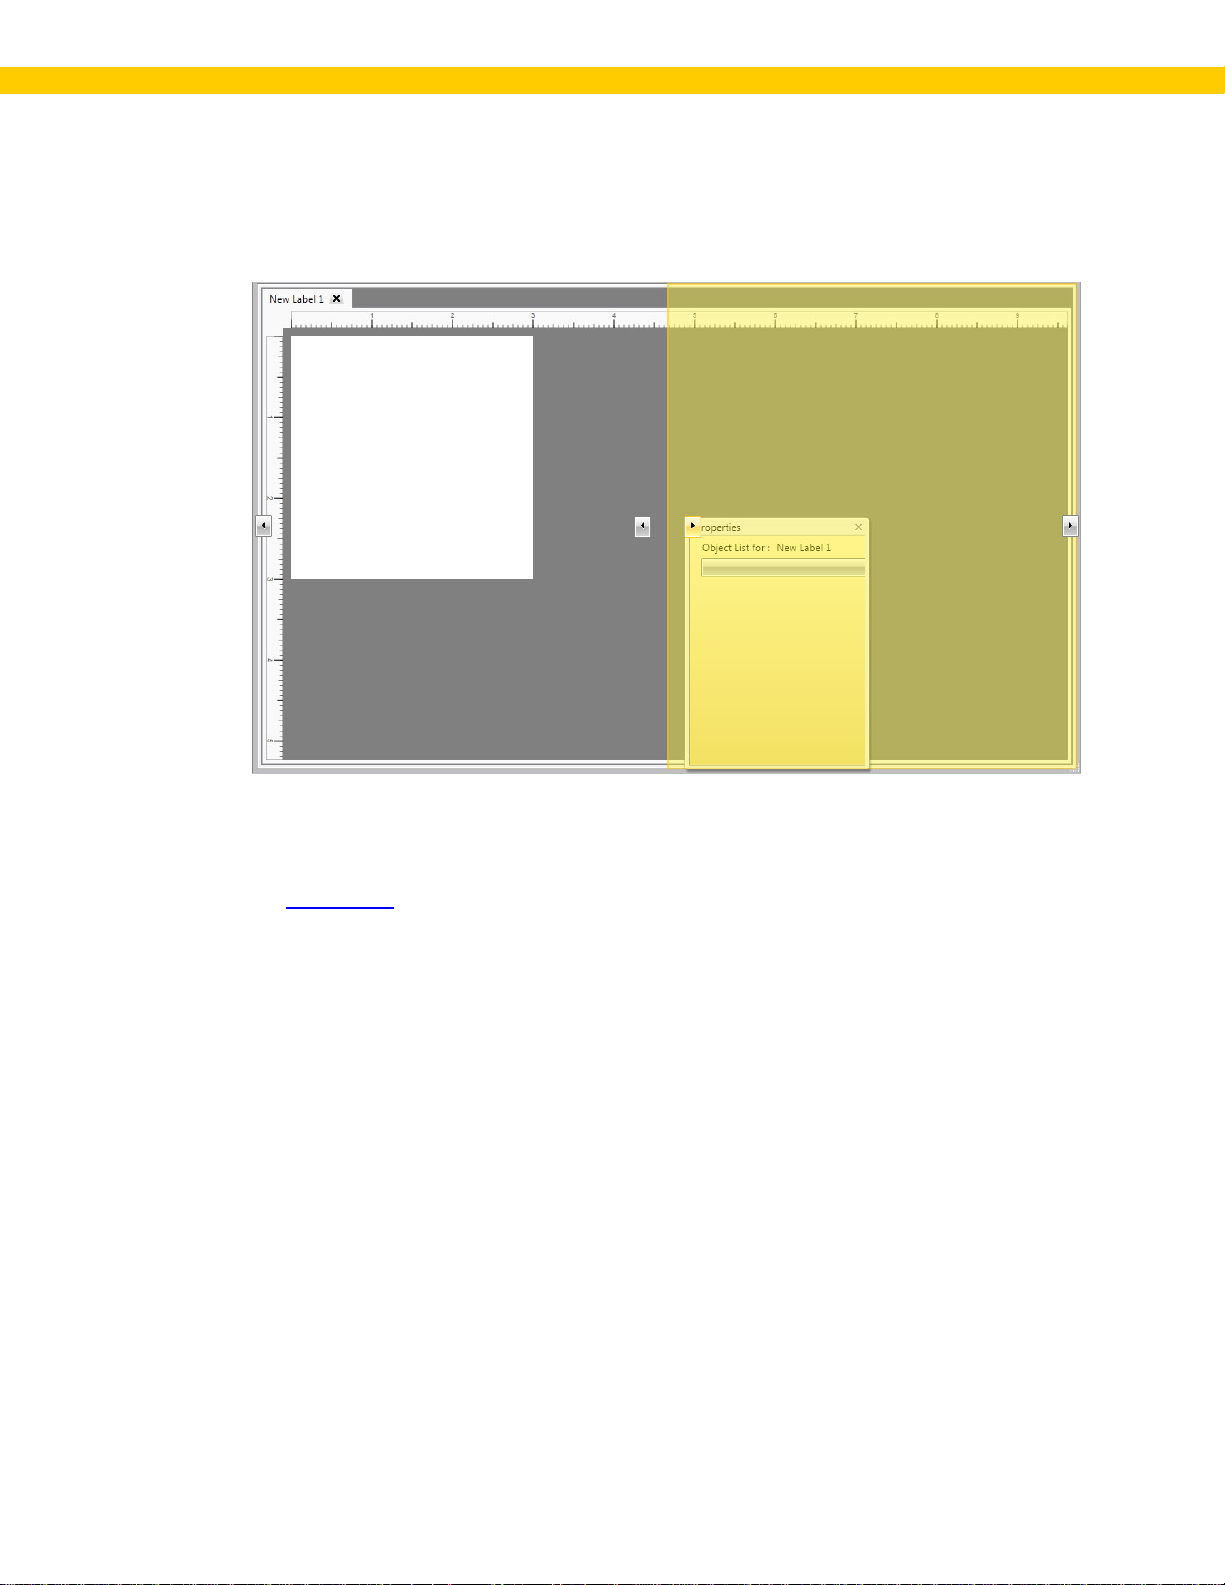
1.4.4 Sec tion D: Design Window
The Wasp Labeler Design window, by default, sh ar es sp ace on the Main screen wit h the Properties
box. You can Hide the Properties
resize the window, place your m ouse over the dividing line between the Design window and the
Properties box until your cursor turns into a double arrow, as shown below:
With the left bu tton held down on your mouse, drag the divid i ng line either left or r ight. Keep in mind
that you cann ot expan d the Design window over the Properties box. When the Design window
reaches it's maximum width, it will stop moving. If you need more design area,
Box.
box entir ely, or you c an resi ze the Design window as needed. To
hide the Properties
10
Page 15
Wasp Labeler User Manual
1.4.5 Section E: Properties Box
The Properties box contains options specific to t he type of objec t you have selected in the Design
window (barcode, text box, picture or drawing object). You can hide the Properties box or "dock" i t in a
differ ent locati on as needed.
Hide/ Show the Pro p ertie s Bo x
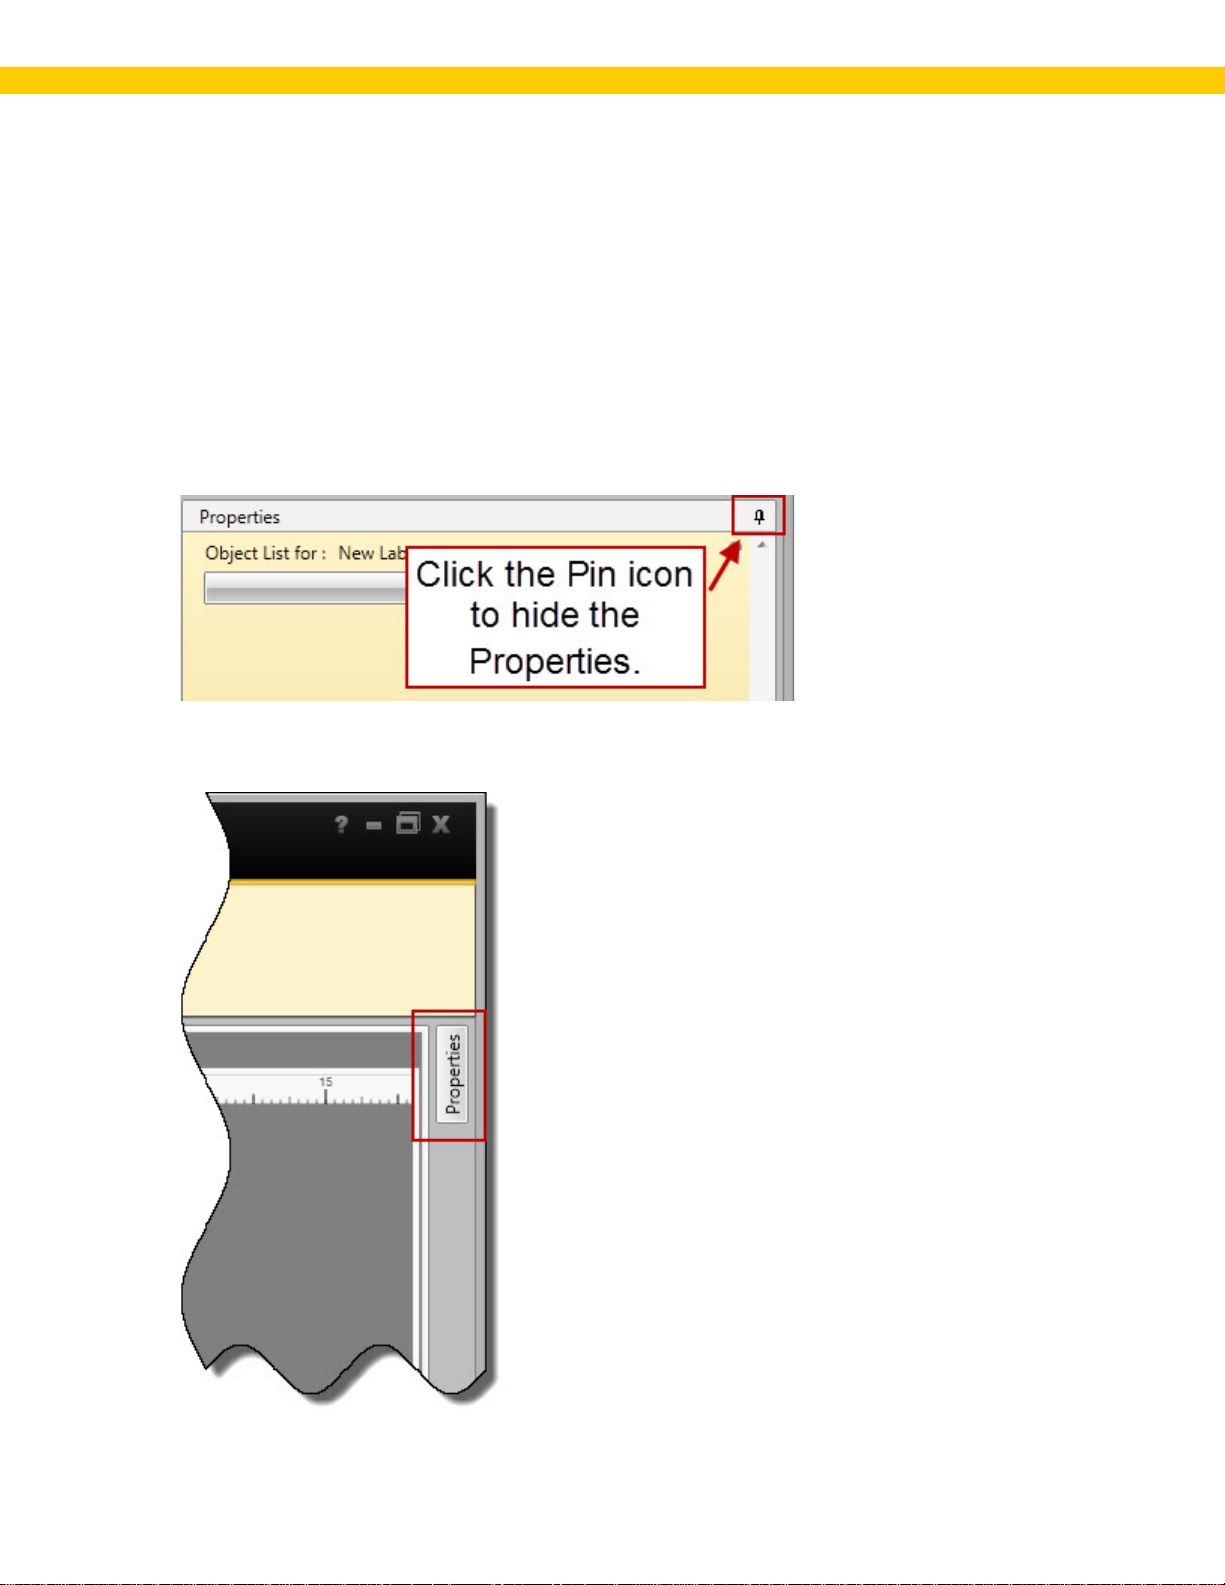
The Properties box is displayed on the Main screen by default. This box displays information
relating to the tab you ar e currentl y using. For exam ple, on the Design tab, the Properties box
displays the various options available to the selec ted object.. If you want to have a larger d esign
area, you can hide the Properties box by clicking on the Pin icon in the right-hand corner of th e box,
as shown below:
When the Properties box is hidden, a label will ap pear on the r i gh t side of t he sc r een as s hown
below:
11
Page 16
Wasp Labeler User Manual
M ov e the Pro per tie s Box
By default the Properties Box is docked on the right sid e of the Label er screen. You can m ove, or
redock, t he Properties Box to the center-left, center-right or left sid e of the screen as needed.
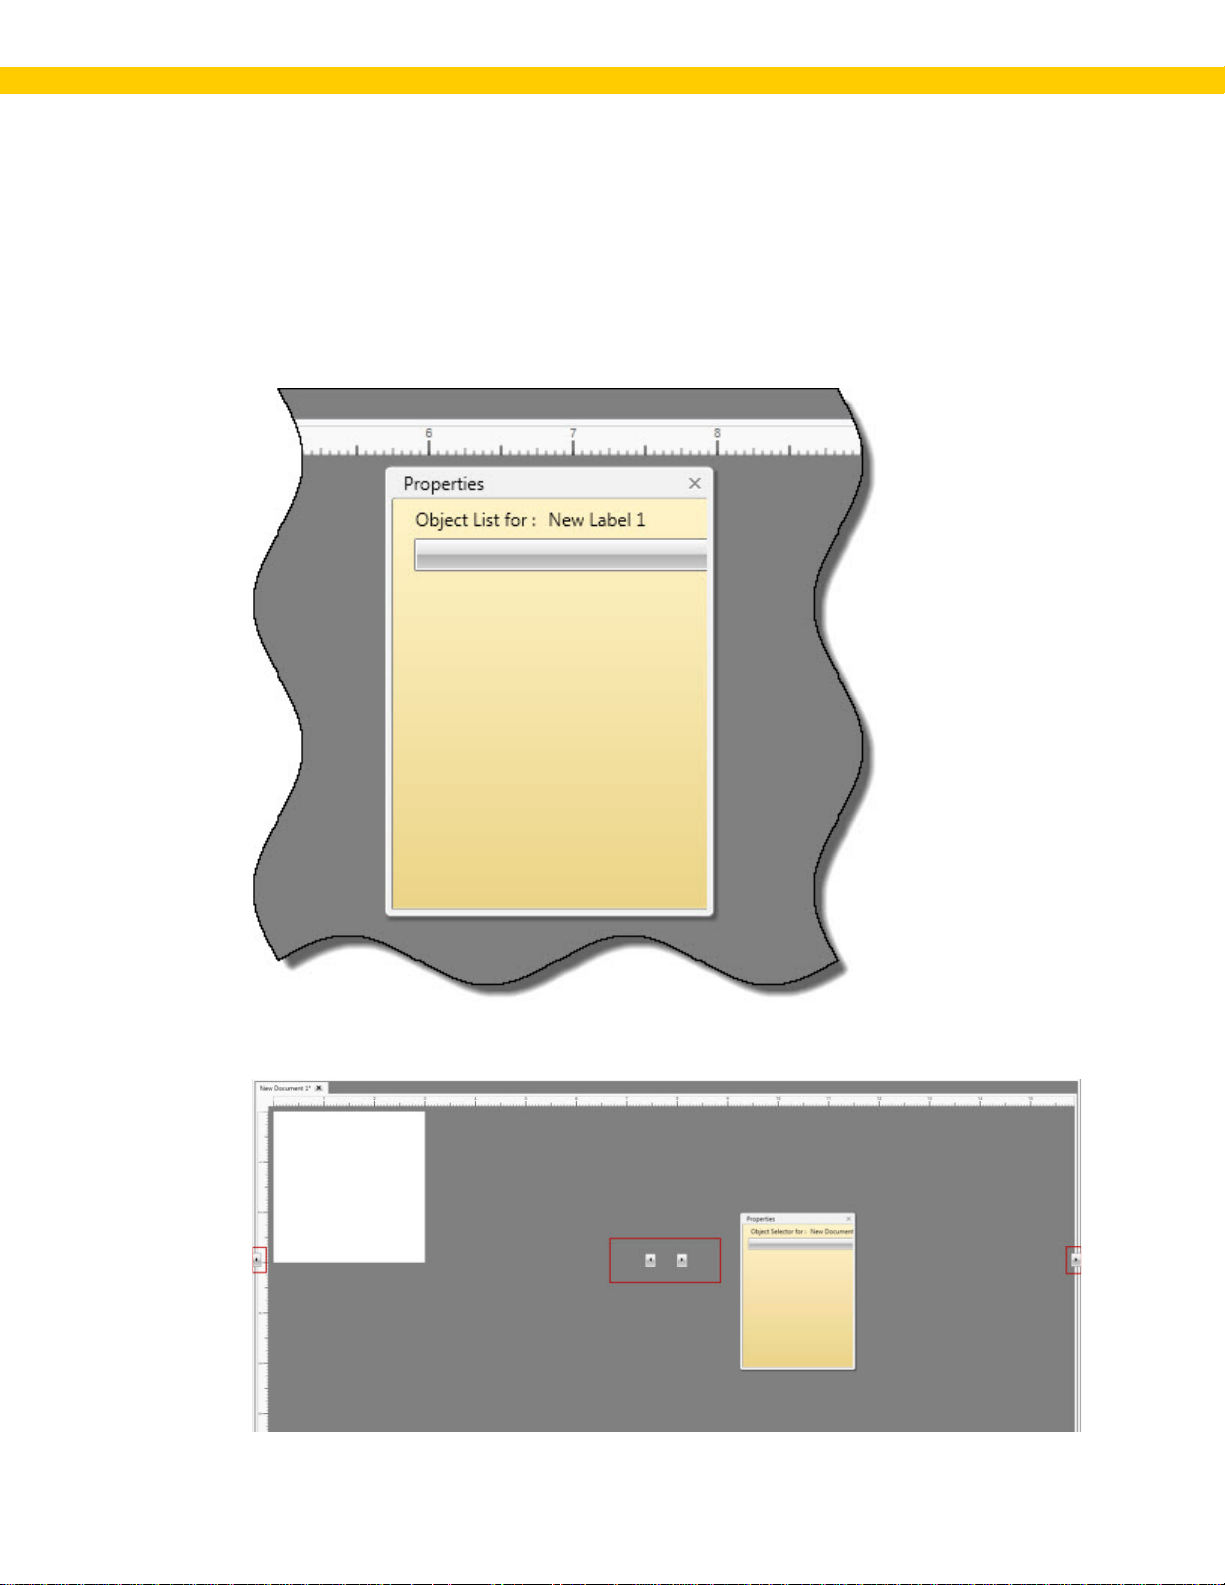
1. Click on t he top of the Properties Box and dra g it. The box will undock from it's current
locati on an d appear as a smal l , floati ng box similar to the example shown bel ow:
2. Drag the box to the center or le ft of th e screen. Arrows appear on the sc r een showi ng you all
dockable l ocations as shown below:
12
Page 17
Wasp Labeler User Manual
3. Drag the box to an ar r ow.. The screen will highlight yellow indicating the area in which the
box will appear if d ocked ther e. In the example shown below, the box would appear from t he
center of the window to the right.
You can then let go of the box and it will dock where indicated.
To move t he Properties box bac k to th e defaul t location, cli ck the Reset Docking icon on
the Design Tab
toolbar.
13
Page 18

Wasp Labeler User Manual
1.5 Gett ing St arted - C reating a St ati c La bel
Now that you ar e familiar with the basics of m oving ar ound the Main screen, you can begin creatin g
your lab els. This topic will take you through the steps to create the mos t basic label - a static barcode
label. A stat i c label means the in format ion on it does not change. The label does not pull information
from a database, i sn't serial i zed, etc.
For this example, we are going to c r eate one nam e badg e l abel contai ning a standar d Code 128
barcode an d a text field contai ning a name and employee ID n umber. Links are provided in each step
to detailed informat i on regarding the tabs and scr eens.
1. Open a document:
Open a New D ocument and make sure the Design
2. Add a barcode:
Click on the barcode icon and drag it to the Design window.
tab is select ed.
You can move the barcode around on you r label as needed by clicking on it and d rag ging it
where you want it.
14
Page 19
Wasp Labeler User Manual
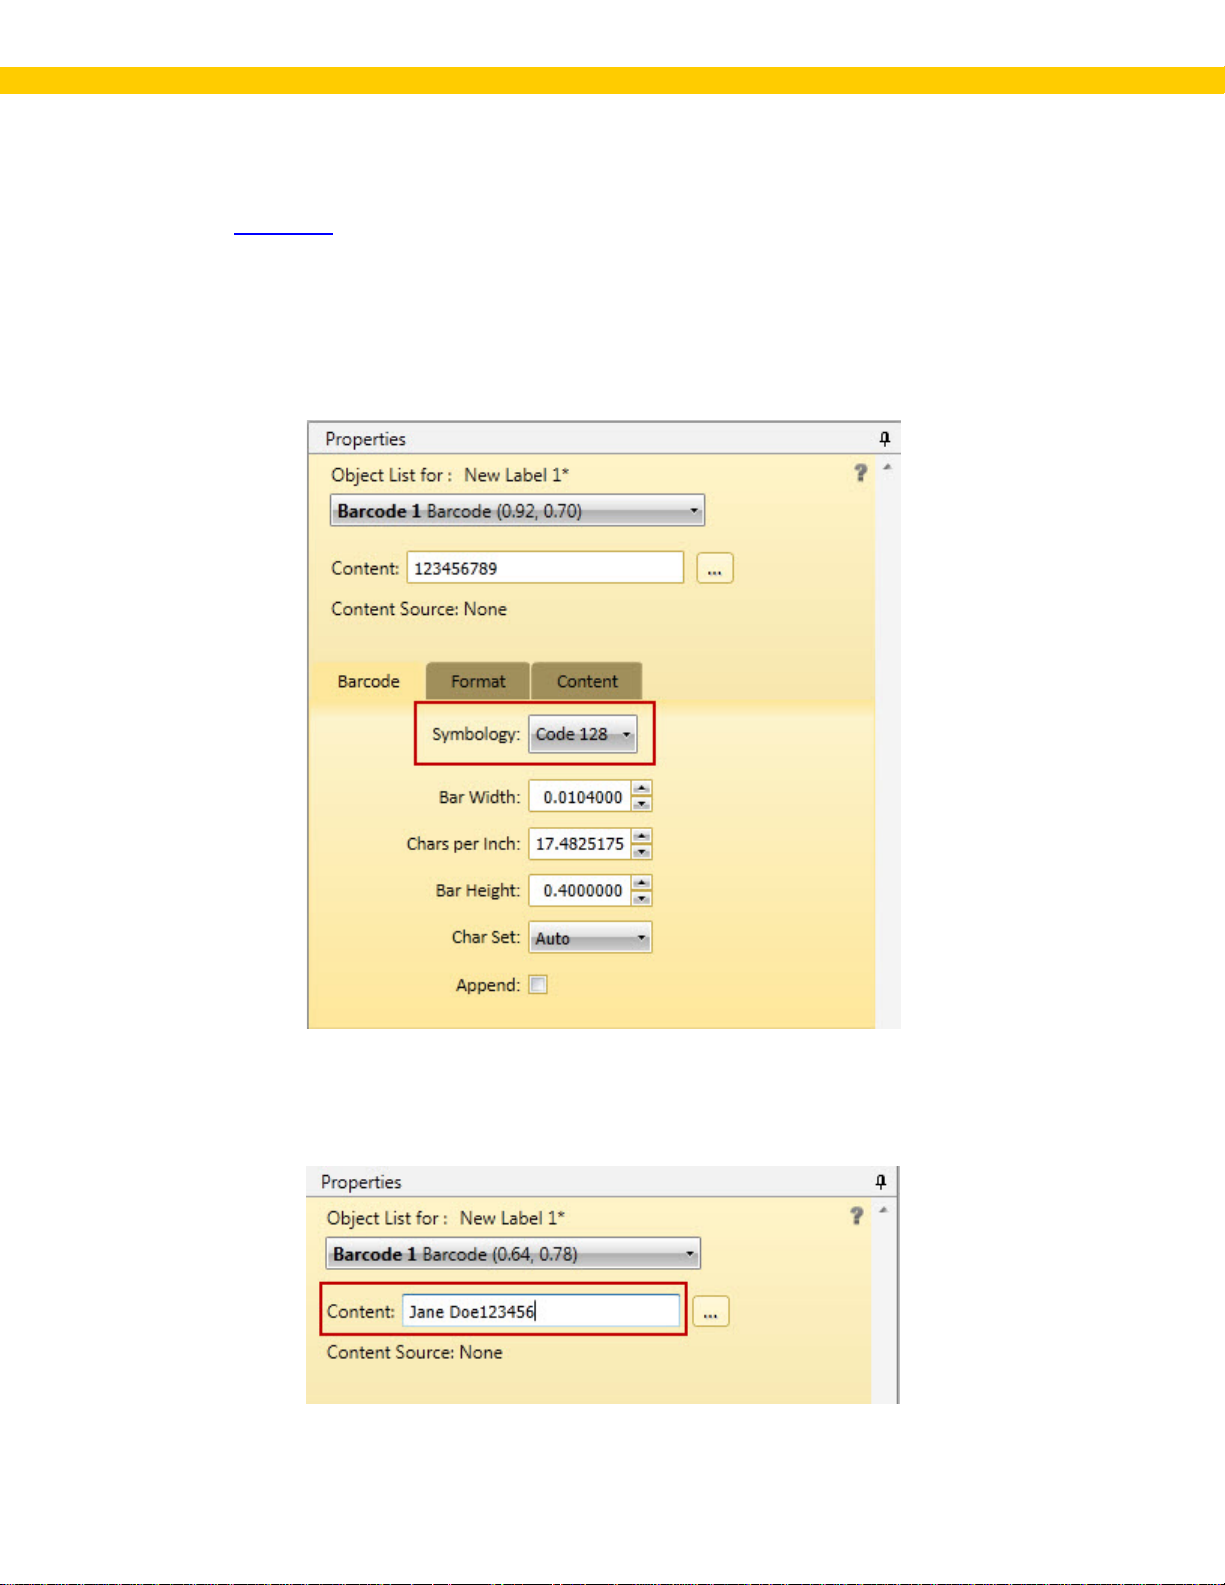
3. Define your barcode:
By default, a Code128 barcode with con tent123456789 will b e placed onto your label. Use t he
Properties
encoded in the barcode).
box to select the approp r i ate bar code and enter the c ontent (what you want
a. Make sure the barcode is selec ted i n the Design window.
b. Click the Barcode tab in the Properties box.
c. Make sure Cod e 12 8 is selected in th e Symbology dro p do wn box.
d. En ter the data you want en coded in the barcode in to the Content box. In this case, we
want th e em ployee name and employee ID num ber so entered Jane Doe123456 into
the Content box.
15
Page 20
Wasp Labeler User Manual
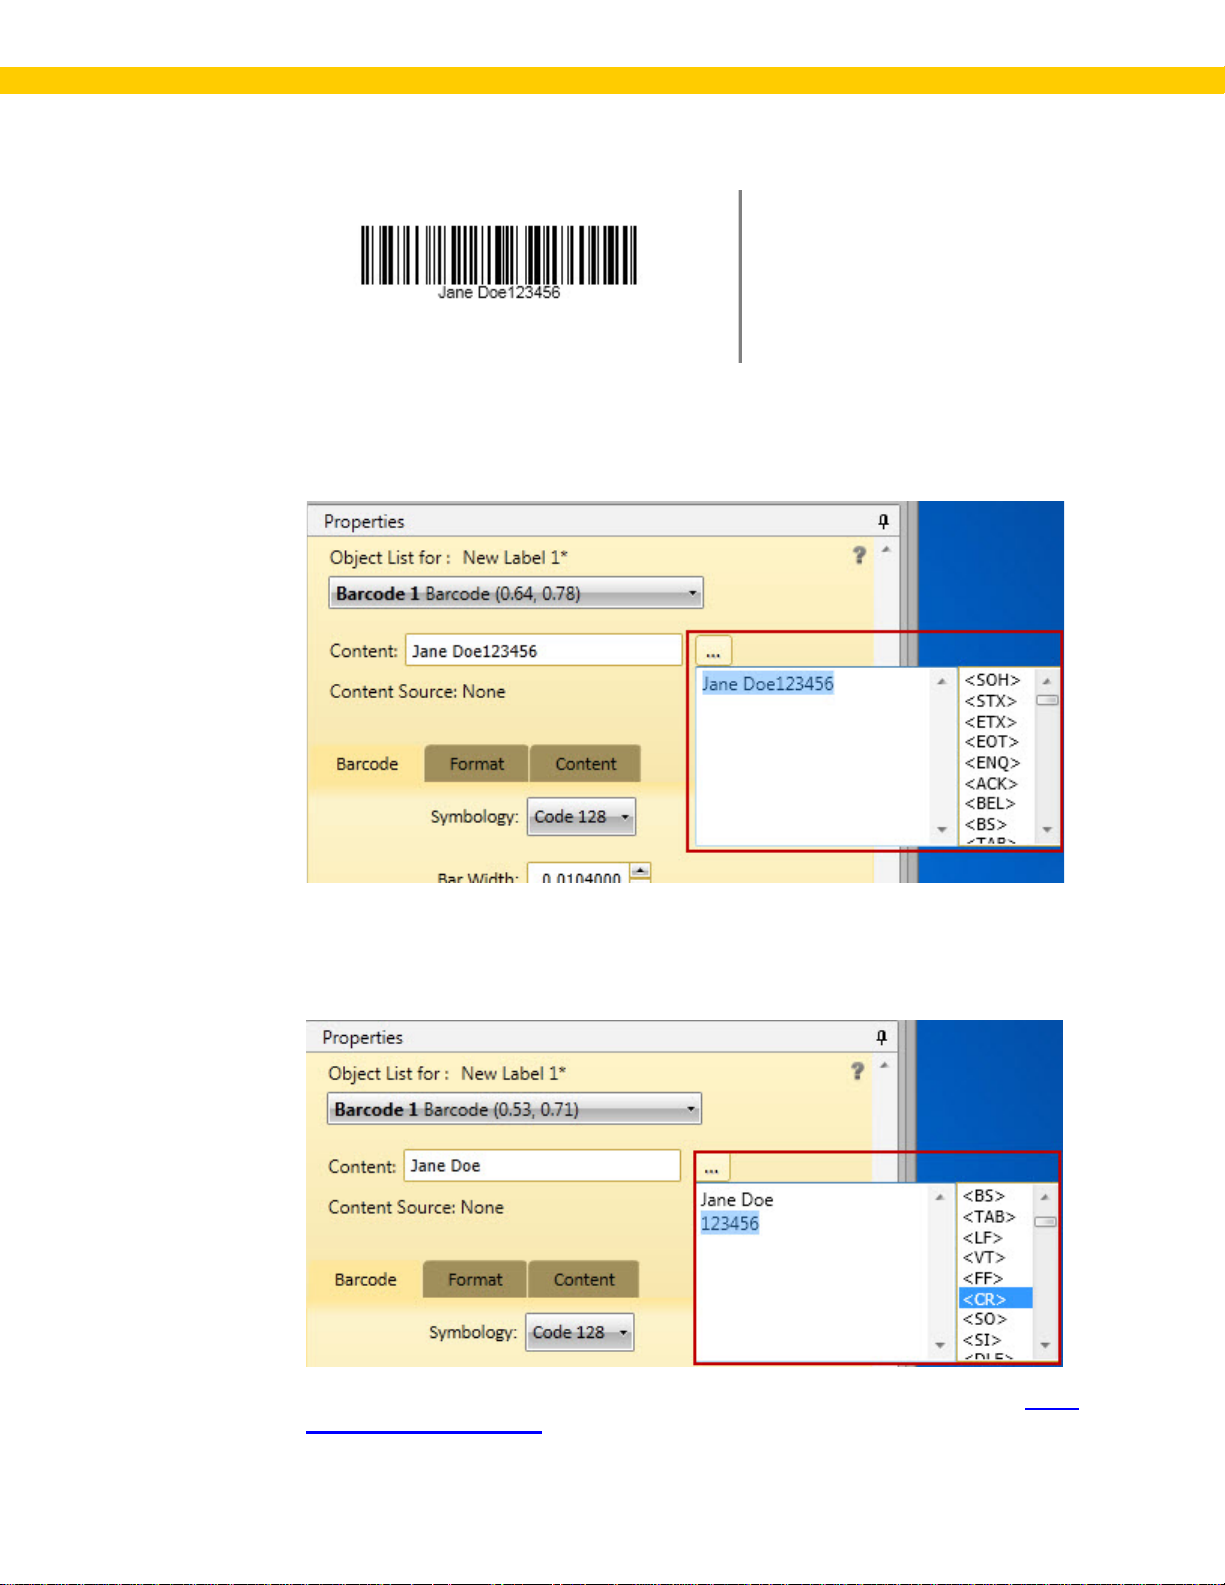
Note t hat your label chang es to display Jane Doe1 23456 bel ow t he bar code.
e. Now that we have the content in the barcode, we can specify how it should be
formatted. In this case, we want the em ployee ID n um ber to app ear below the
employee name. To d o thi s, click the ellipse (... ) button to th e r ight of the Content field.
The Special Characters menu opti on appear s.
Place your cursor where you want the break to oc cur. Here we will place th e cursor
after the e i n Doe. Then click the Special Characters button. A list of all available
special characters ap pears. Scroll through the list and select <CR> (c arriage return).
Now your data will ap pear as fol l ows:
Note: For a descri ption of the ASCII Special Ch ar acters , pl ease refer to the topic ASCII
Special Character Codes.
16
Page 21
Wasp Labeler User Manual
The barcode on you r design label will l ook similar to the foll owing:
4. Add additional objects to your label:
You can in clude addi tion al objects on your lab el as needed. In the case of t he nam e bad ge we
are cre atin g in this exampl e, a gr aphic such as a picture of the employee or a company logo
might be included. To add object s, you will follow the same step s you u sed for adding a
barcode. Click on the icon of th e object you want to add and drag i t to you r l abel.
5. Save you r label :
It i s a good idea to save your l abel periodically so you won't lose any informat ion in the event of
an unexpected shutdown. To save your Label , cli ck the File tab
. Select Save from the toolbar ,
then select a name and l ocation for your label. You can also save b y pressing CTRL + S on
your keyboa r d to save the l abel.
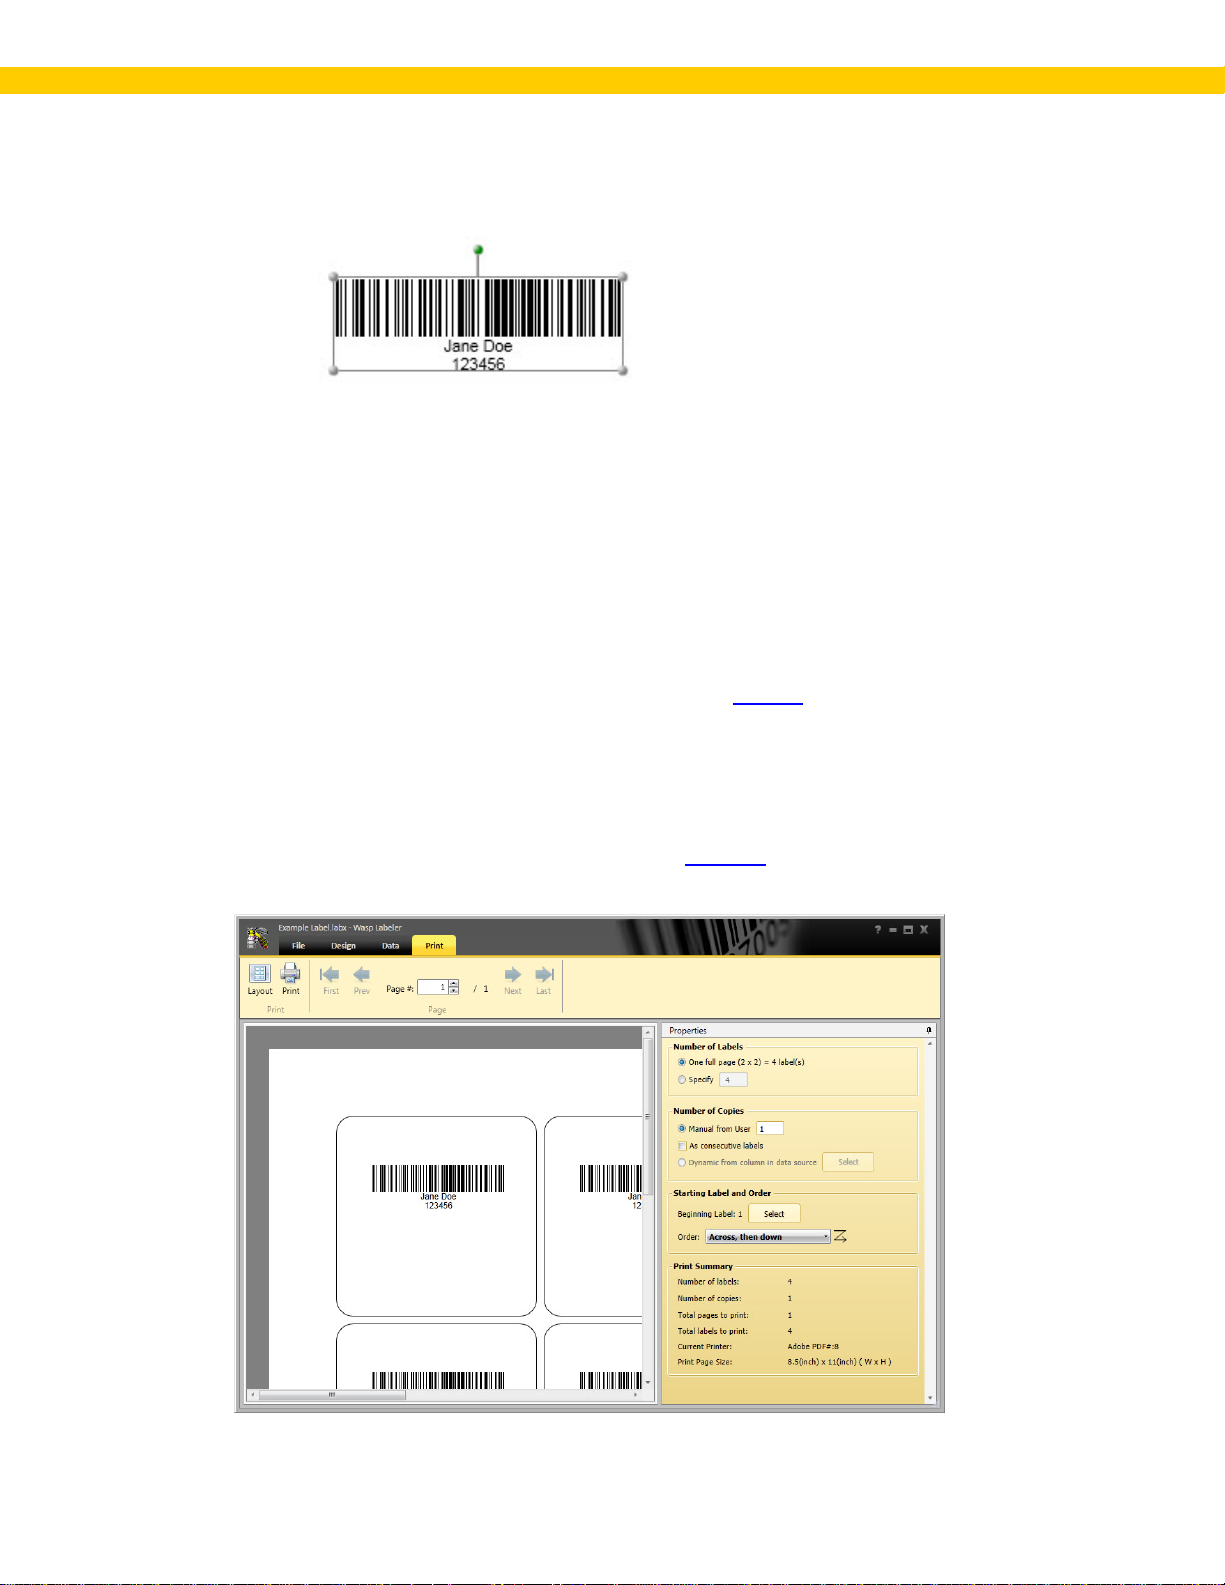
6. Choose the label stock on which you want to print:
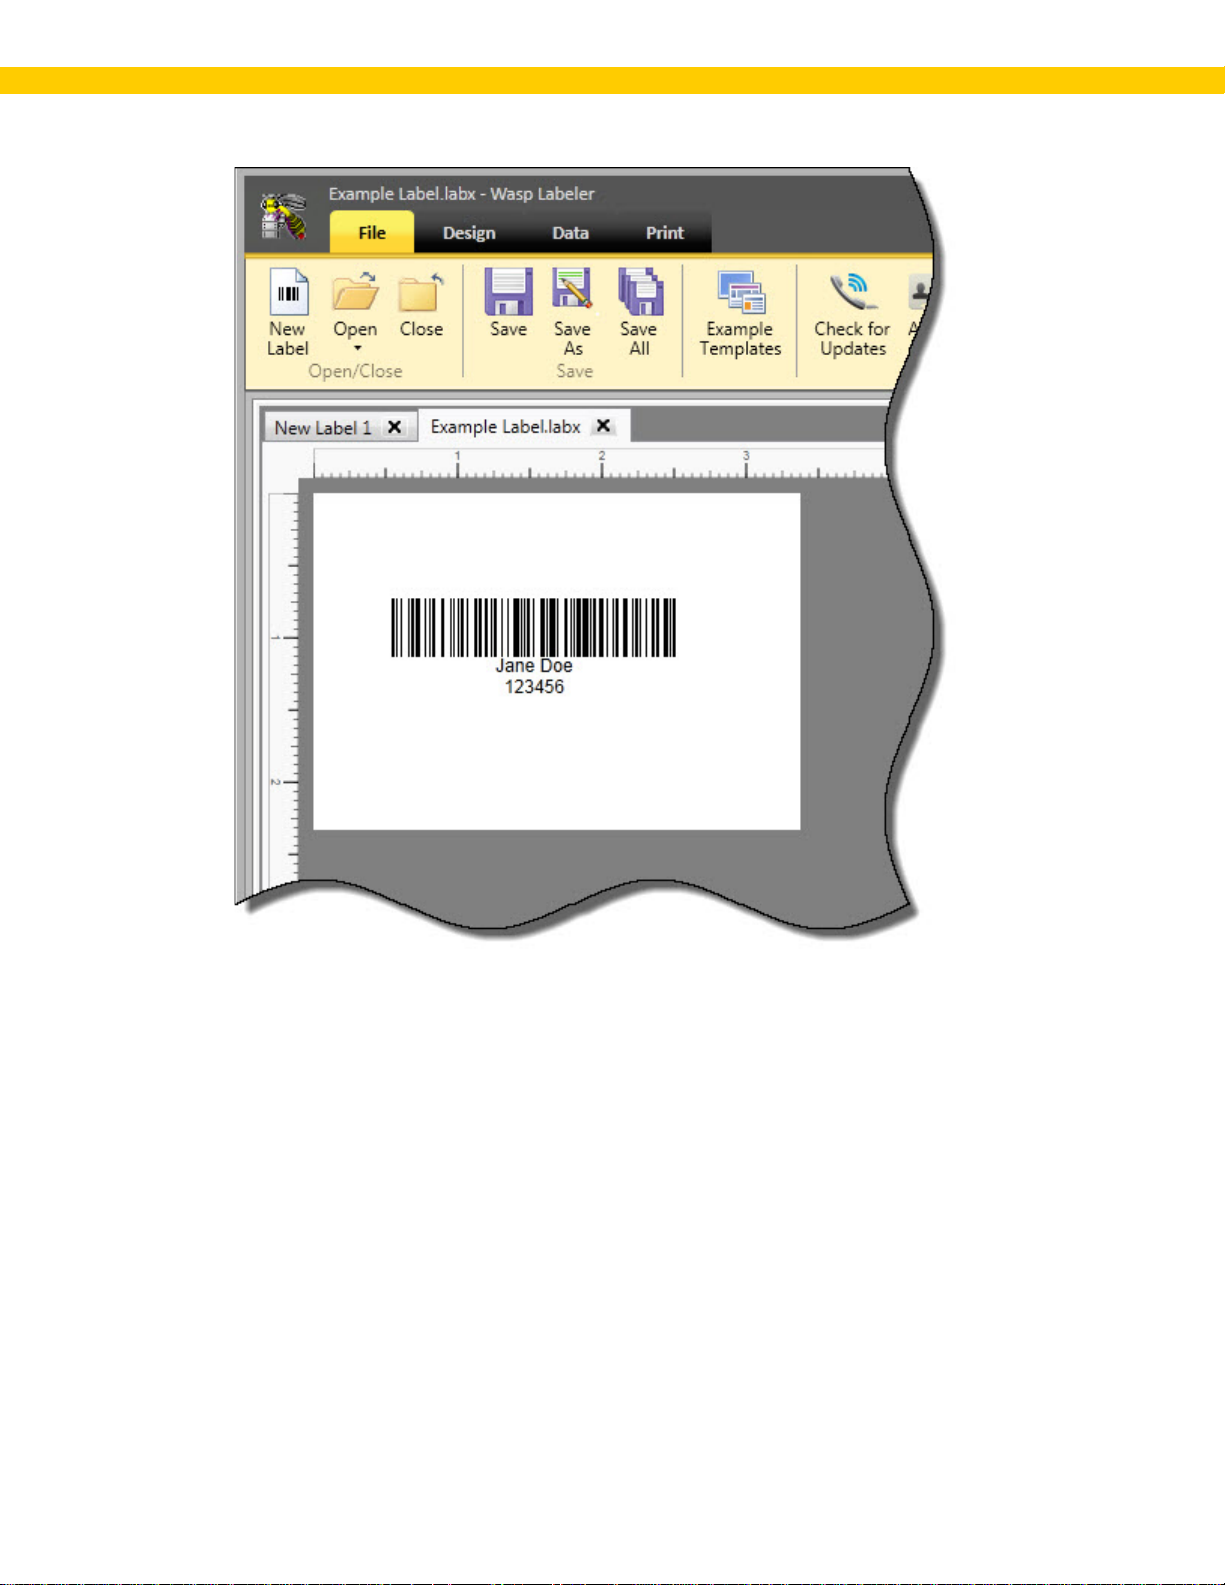
When you have your label d esigned the way you want, you can print i t to the label pr int er of
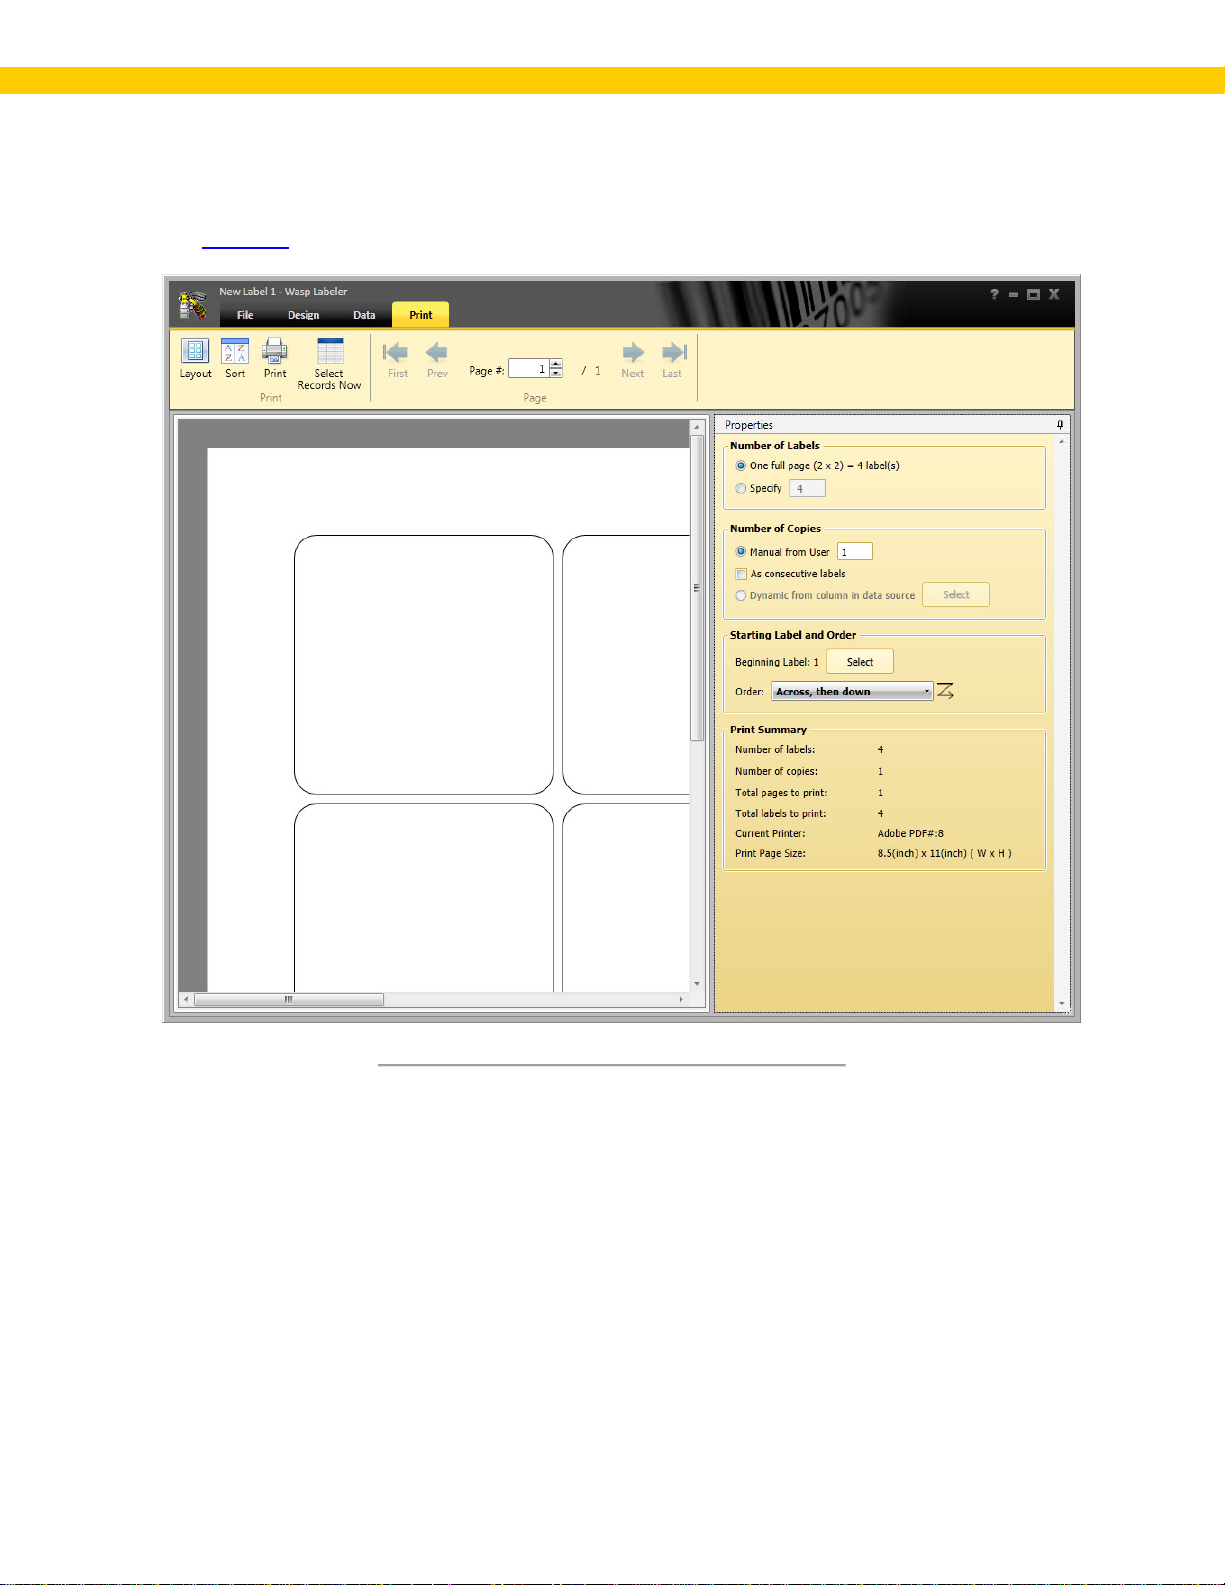
your choice. You c an select t he label st ock on the Print tab
. When you open the Print tab, an
exam ple of how your label will print is displayed as shown below:
17
Page 22
Wasp Labeler User Manual
The example i n the sc r een shot above sh ows a layout of 4 labels per pag e. To chang e the
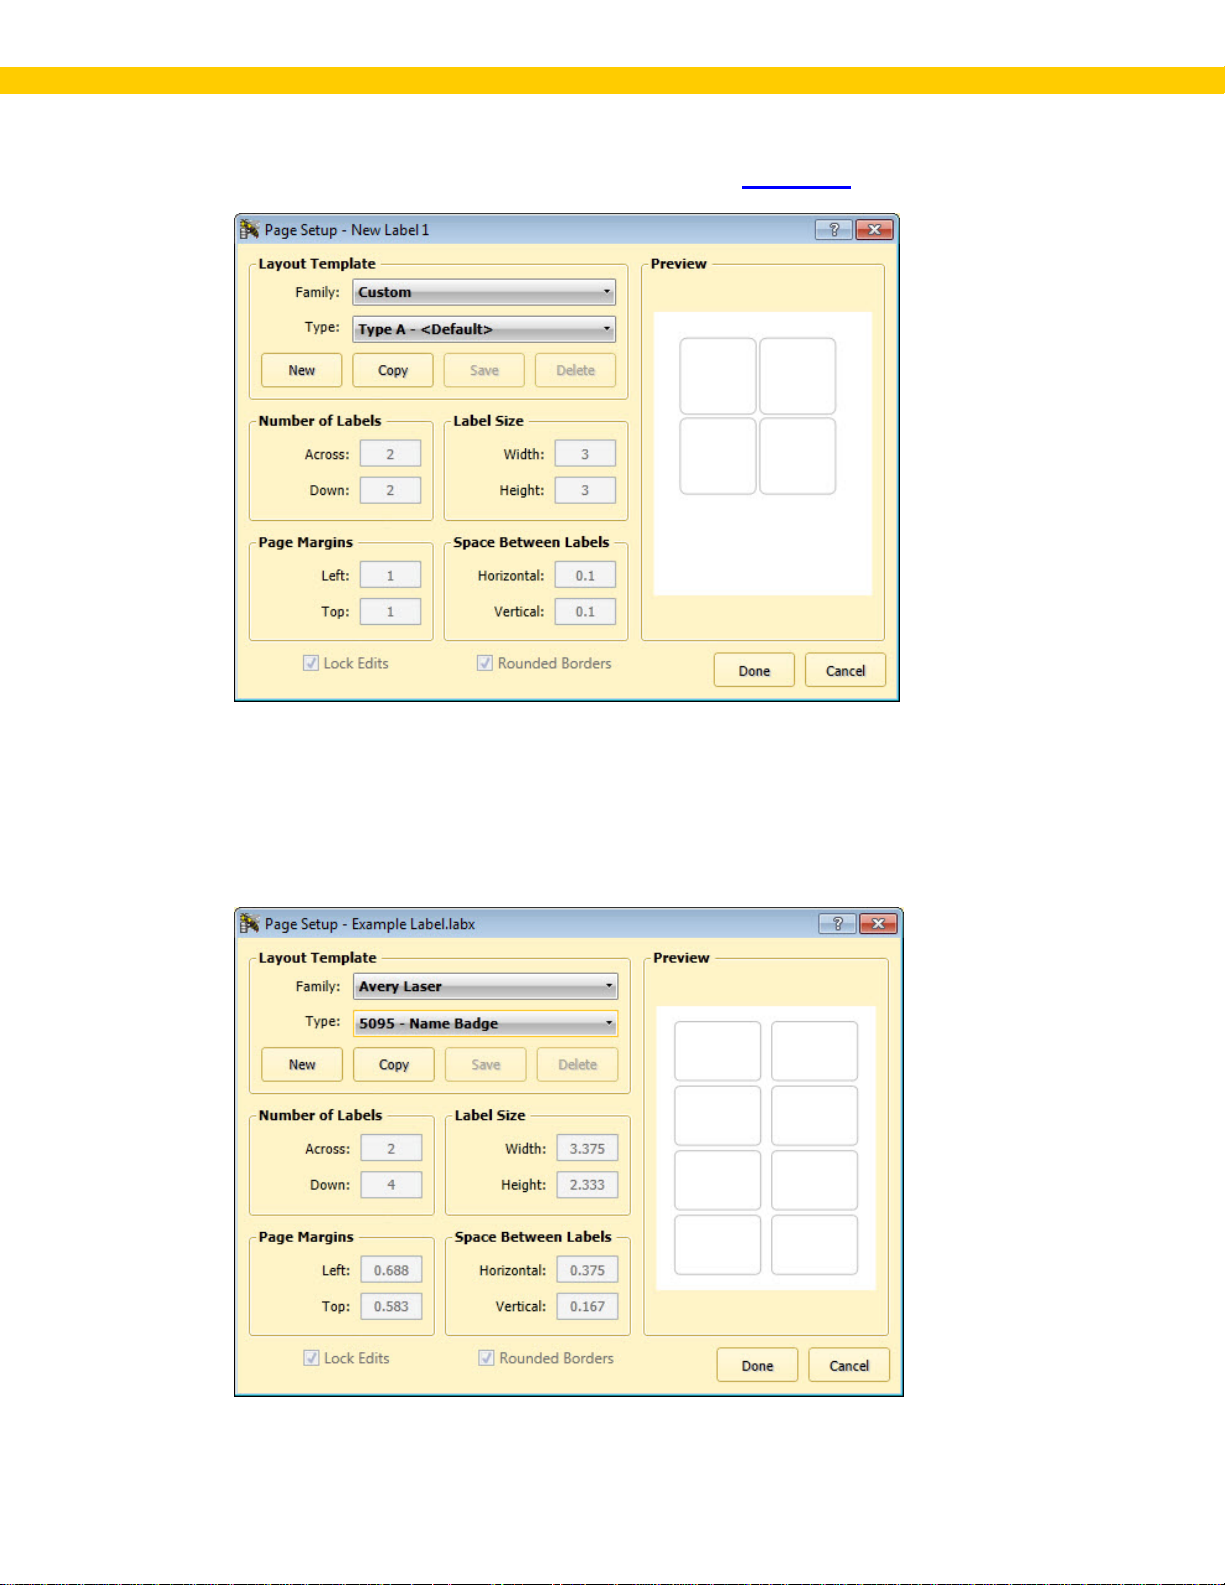
type of label , click the Layout button on the toolbar . The Page Setup
screen appears:
The Page Se tup screen allows you to choose a different label template or create custom
templates. The templat e should match the label stock you are us ing. For our exam ple label, we
want to p r int just one em ployee badge for Jane Doe. Let' s assum e our exam ple comp any uses
a laser printer with Avery name b adge labels for t he em ployee bad ges. In this case, we should
select Aver y Laser from the Family drop down and Name Badge from the Type drop down.
The screen will now look like this :
18
Page 23
Wasp Labeler User Manual
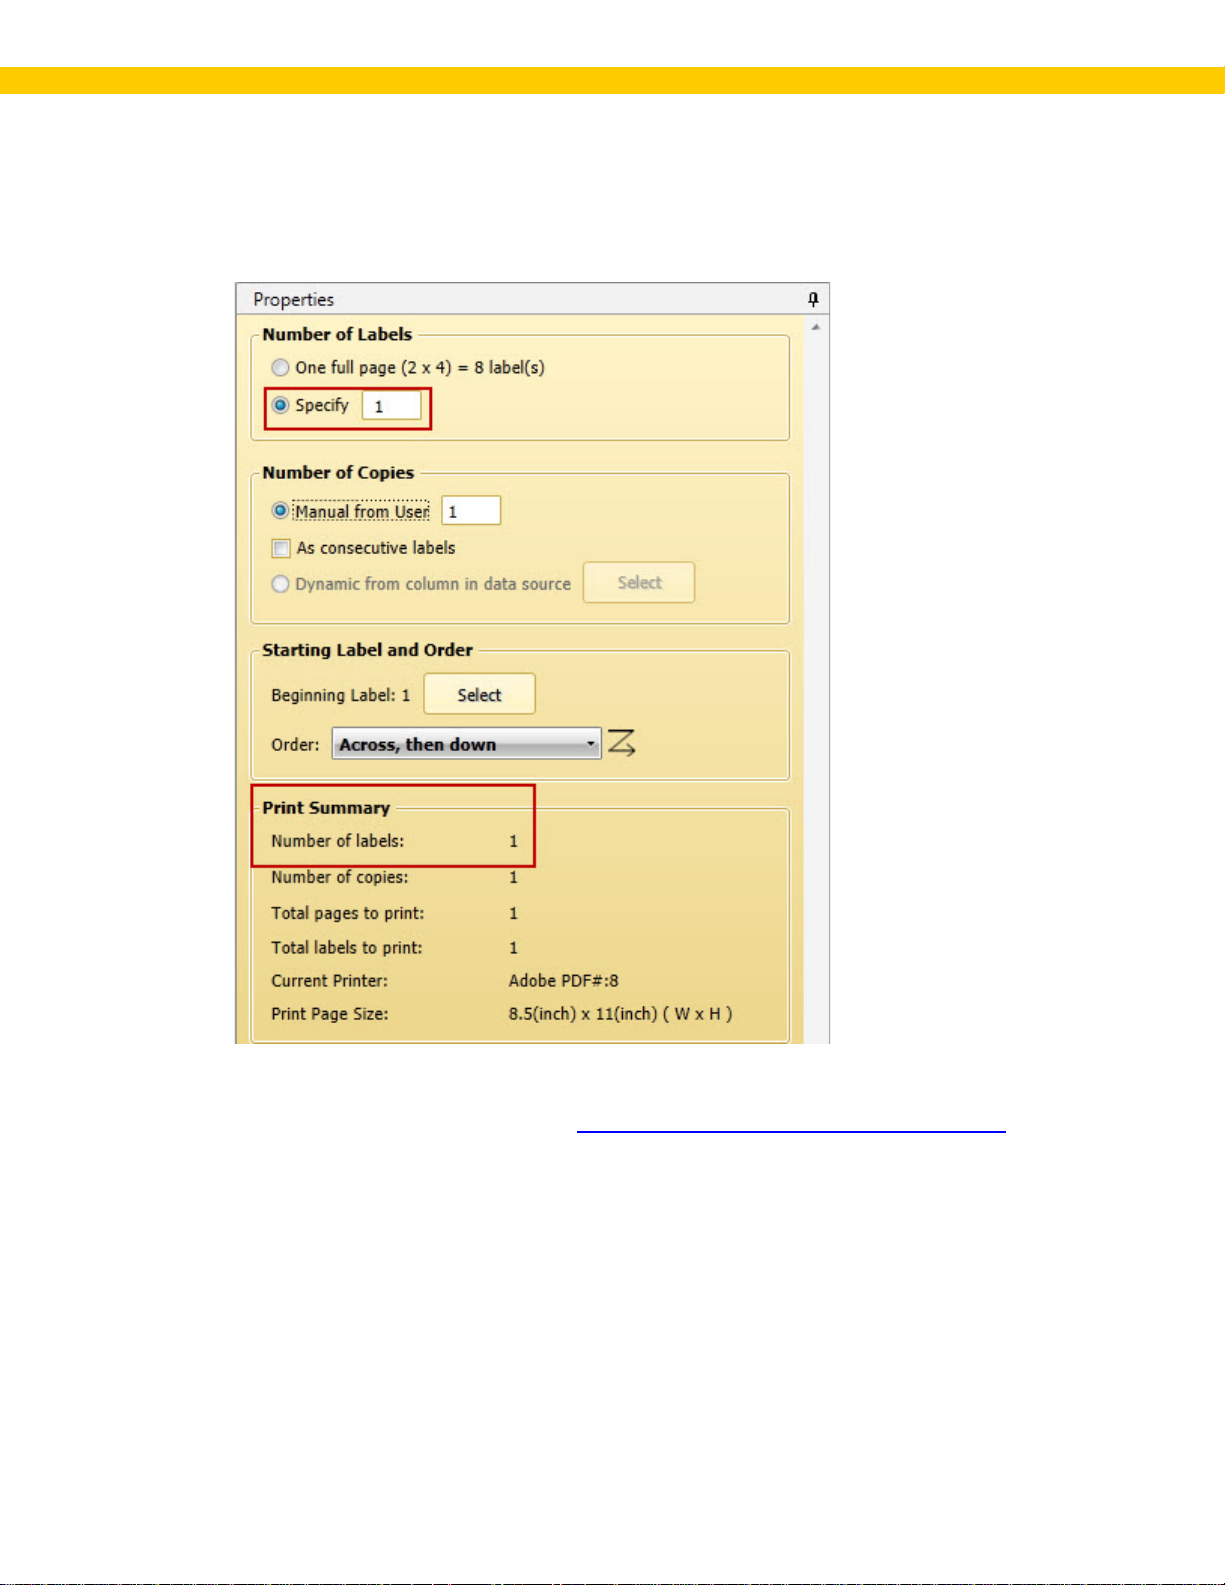
Click Done to close the Page Setu p screen. Notice that the Print Pr eview window changes
based on the Family and Type of label you selected. The Properties box indicates that 8
labels will be printed, because this particular type of l abel (Avery Name Badge) has 8 labels per
page. We just want to print one label, so in the Number of Labels sec tion select Specify and
enter 1 as s hown below:
7. Print your label:
Now you are ready to prin t your label. Click the Print button on the Print tab tool bar
standard Windows Print screen will appear allowing you to select a p r int er .
That' s i t! You've created a static barcode label. You can move on to the next step:
19
. The
Page 24

Wasp Labeler User Manual
1.6 Gett ing St arted - Binding a Data Source to an Object
Now that you can c r eate a basic label (see Gettin g Started - Creating a Static Label), l et's try binding
a data source to an object. This all ows you to creat e one label templat e, attach a database to it, t hen
let Labeler pu l l informati on from th e database when pr inting. For example, if you are cr eatin g em ployee
bad ges, you can create on e tem plat e bad ge, then bind a database contai ning all employee names and
ID numbers to object s on your label. When pri nting , Label er will pull the in format i on from t he database
and place it in the assoc i ated ( bound) barcod e or text b ox on the badge.
This topic will show you th e basic steps for att aching a d atabase to your label using the Static Label you
created in the previous step.
1. Open your label.
On the File tab, select the Open icon.
Recen tly opened files w ill ap pear in the drop down. If you see your l abel li sted, cl i ck on it t o
open. If you do not see your l abel in the lis t, c l ick Op en Files From Folder. Br ow se to you r
label and select it. It will appear i n the Design window.
20
Page 25
Wasp Labeler User Manual
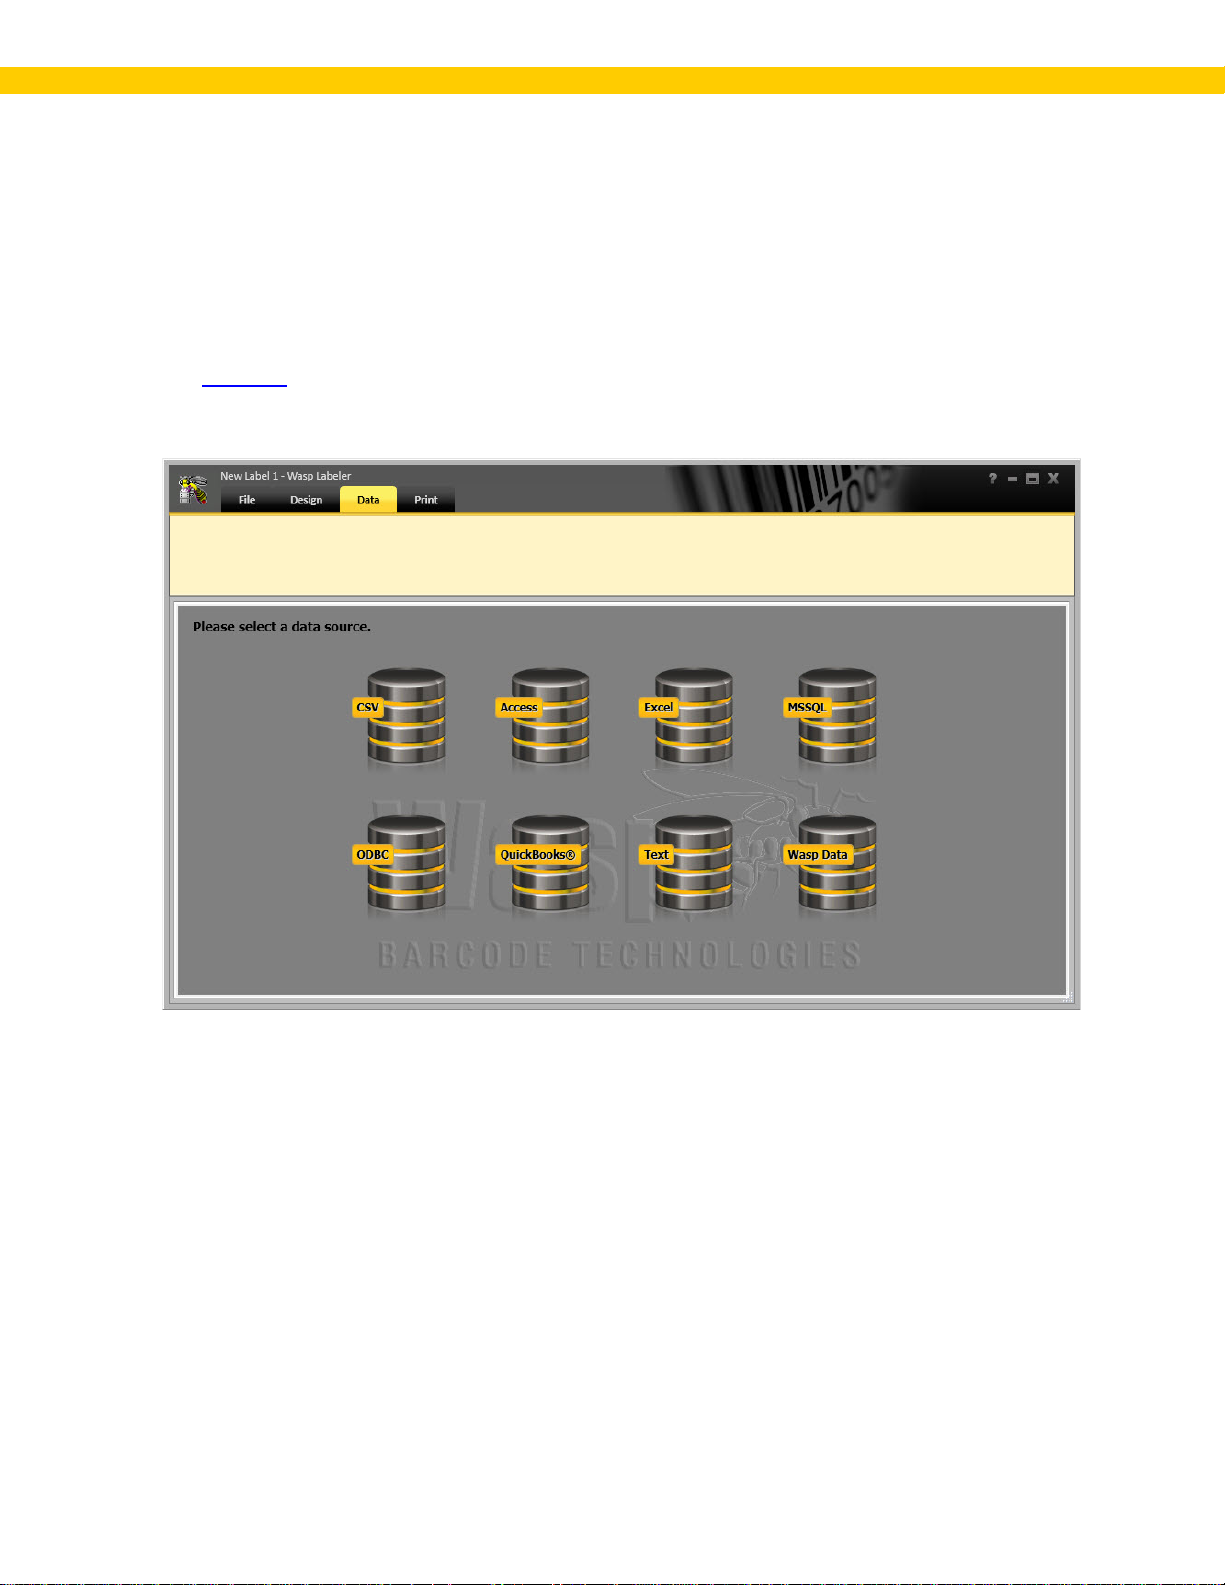
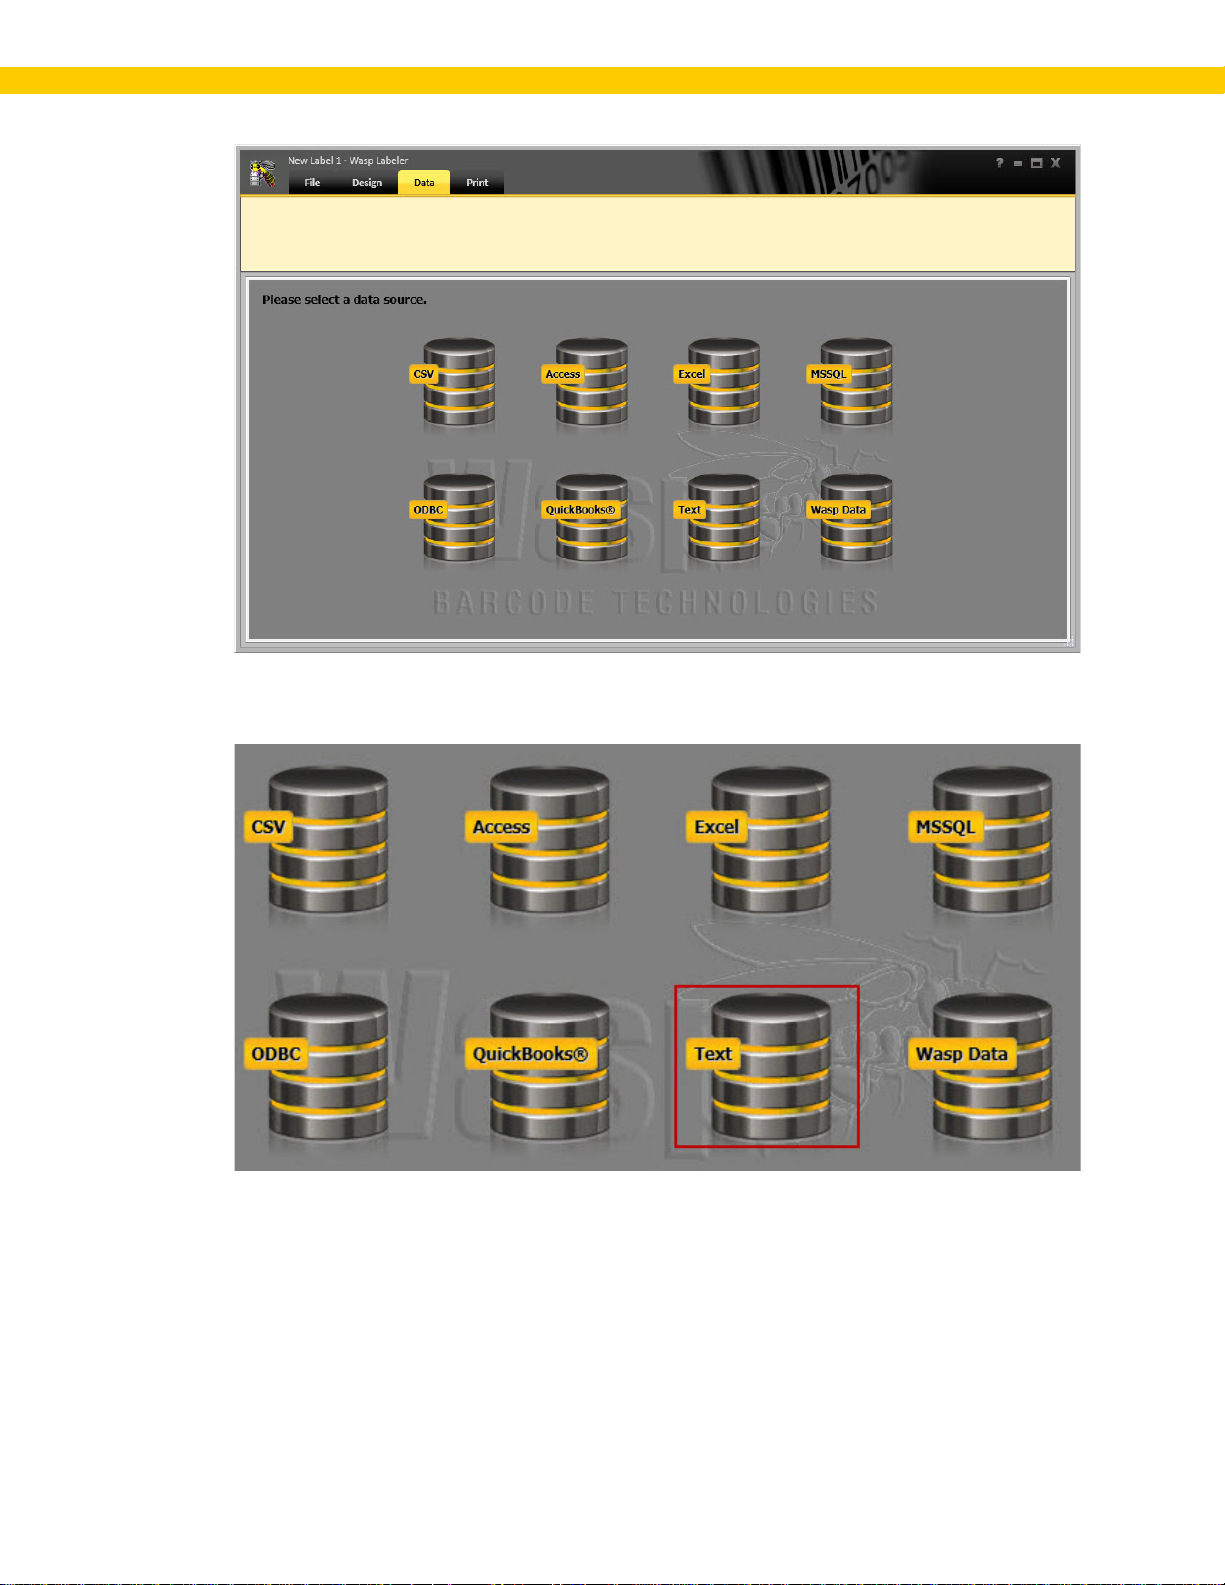
2. Select an External Data Source on the Data tab.
We'll add a dat a source to th i s project us ing th e Data tab. Your data sourc e opti ons are lis ted
on the Data tab.
21
Page 26
Wasp Labeler User Manual
Select the typ e of database you want to add. For this examp le, we want to add a .txt file that
contains a list of employee id s, and names so click on Text.
22
Page 27
Wasp Labeler User Manual
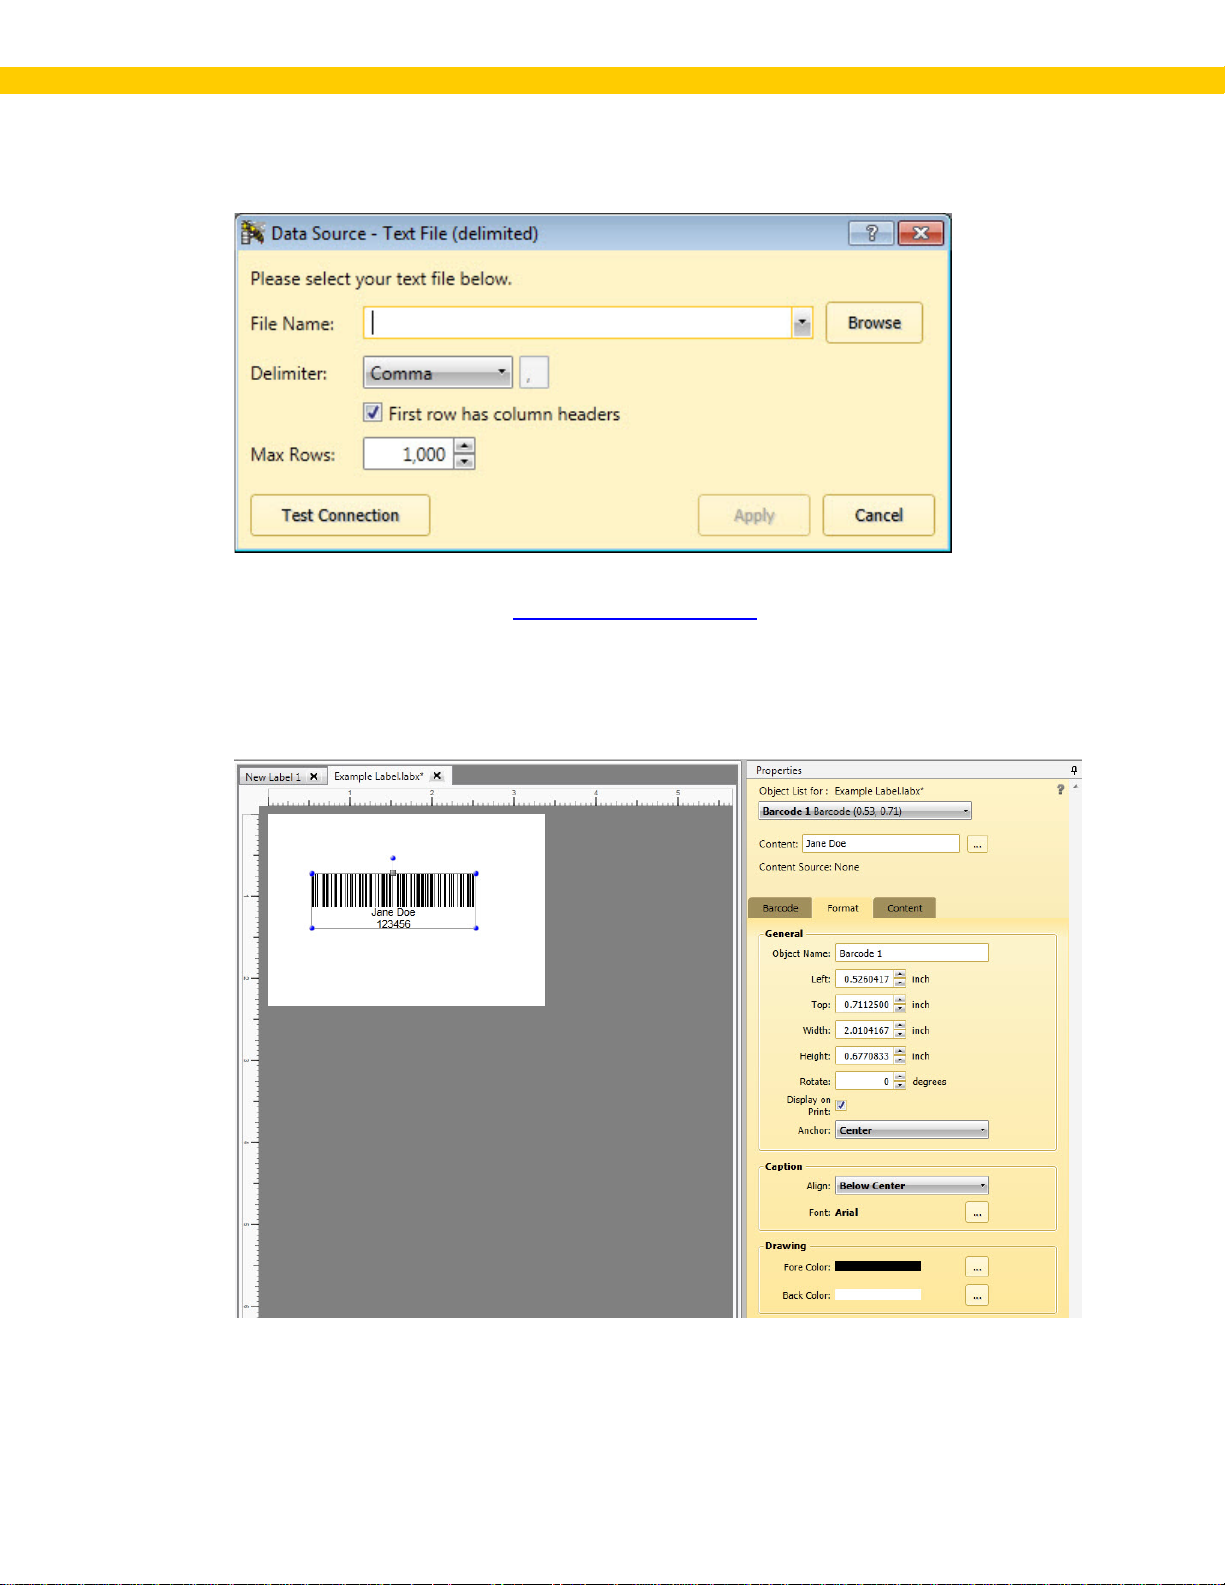
The Data Source - Text File (delimited) screen appears:
Select your file an d the ass ociated Delimiter, then click Apply. For detailed instructions on
add i ng a Text file, see the topic Connecting to a Text File
.
3. Bind an object on the label to a column in the data source.
On the Design tab, select the ob j ect t o which you wan t to bin d data. The p r opert y options for
the selected object app ear i n the Prop er ties box.
23
Page 28
Wasp Labeler User Manual
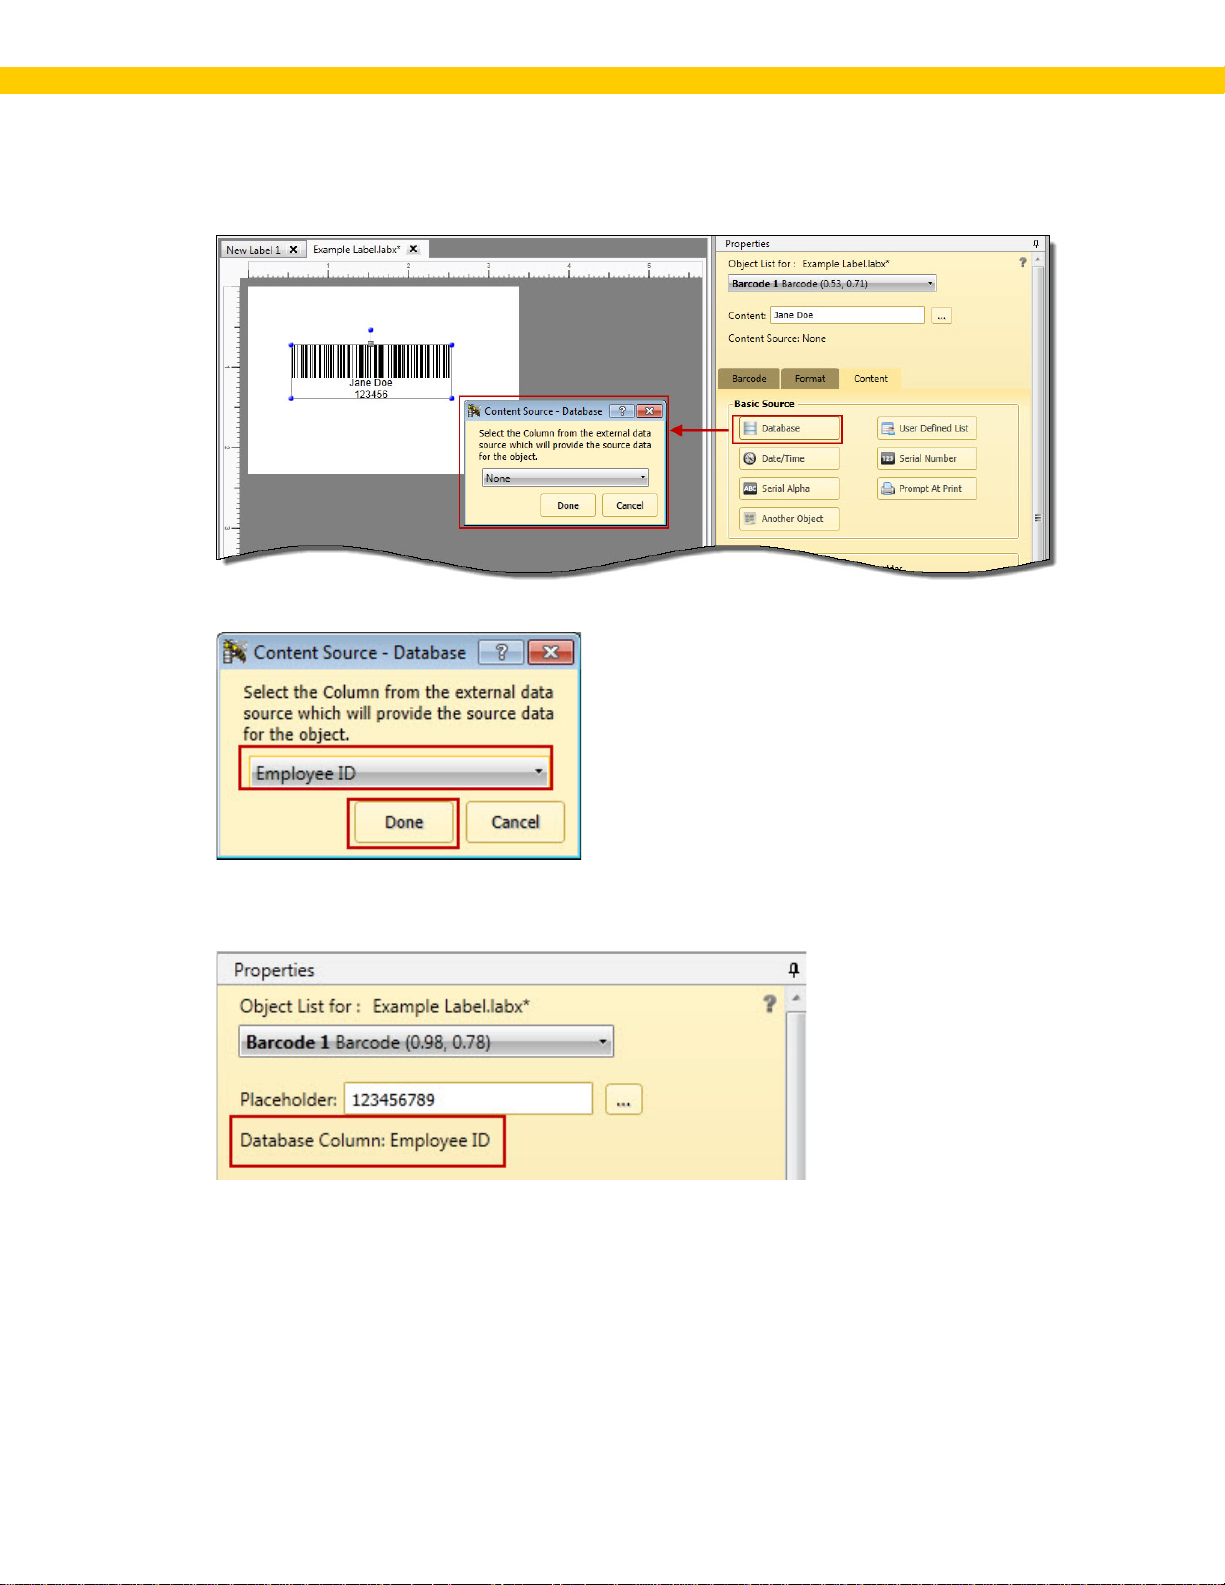
Here we h ave se l ected the barc ode object and want to bind it to th e Em ployee ID column in the
data source. On th e Properties box > Content tab, click th e Database button. A w i ndow
app ear s displaying al l available colu mns from the data source.
Select the approp r i ate column from the drop down list and click Done.
Notic e that the Properties Box now indicates that this object is using th e Employee ID col umn as
the data source.
That's all there is to adding a data source and binding an object to it. You can continue binding
objec ts t o colum ns or other data sourc es (Serialized Numbers or Letters , Data/Time, Etc.) as needed.
24
Page 29
Wasp Labeler User Manual
1.7 Getting Started - Using String Builder to Concatenate Data
In the pr evious example we learned how to add a data source t o the l abel project and bind an object to
a colu mn within that data source. Now let's learn how to c oncatenat e, or comb i ne, two dif feren t
colu mns. Joined data is called a "str i ng". Cr eatin g string s all ows you to bind data from two d ifferen t
colu mns i n your data sou r ce to one object. Continui ng the Employee Badge example: we p r eviousl y
bou nd the colum n cont aining the Employee ID to a barcode, now let's bind th e Em ployee First Nam e
and Employee Last Nam e colum ns to a t ext box.
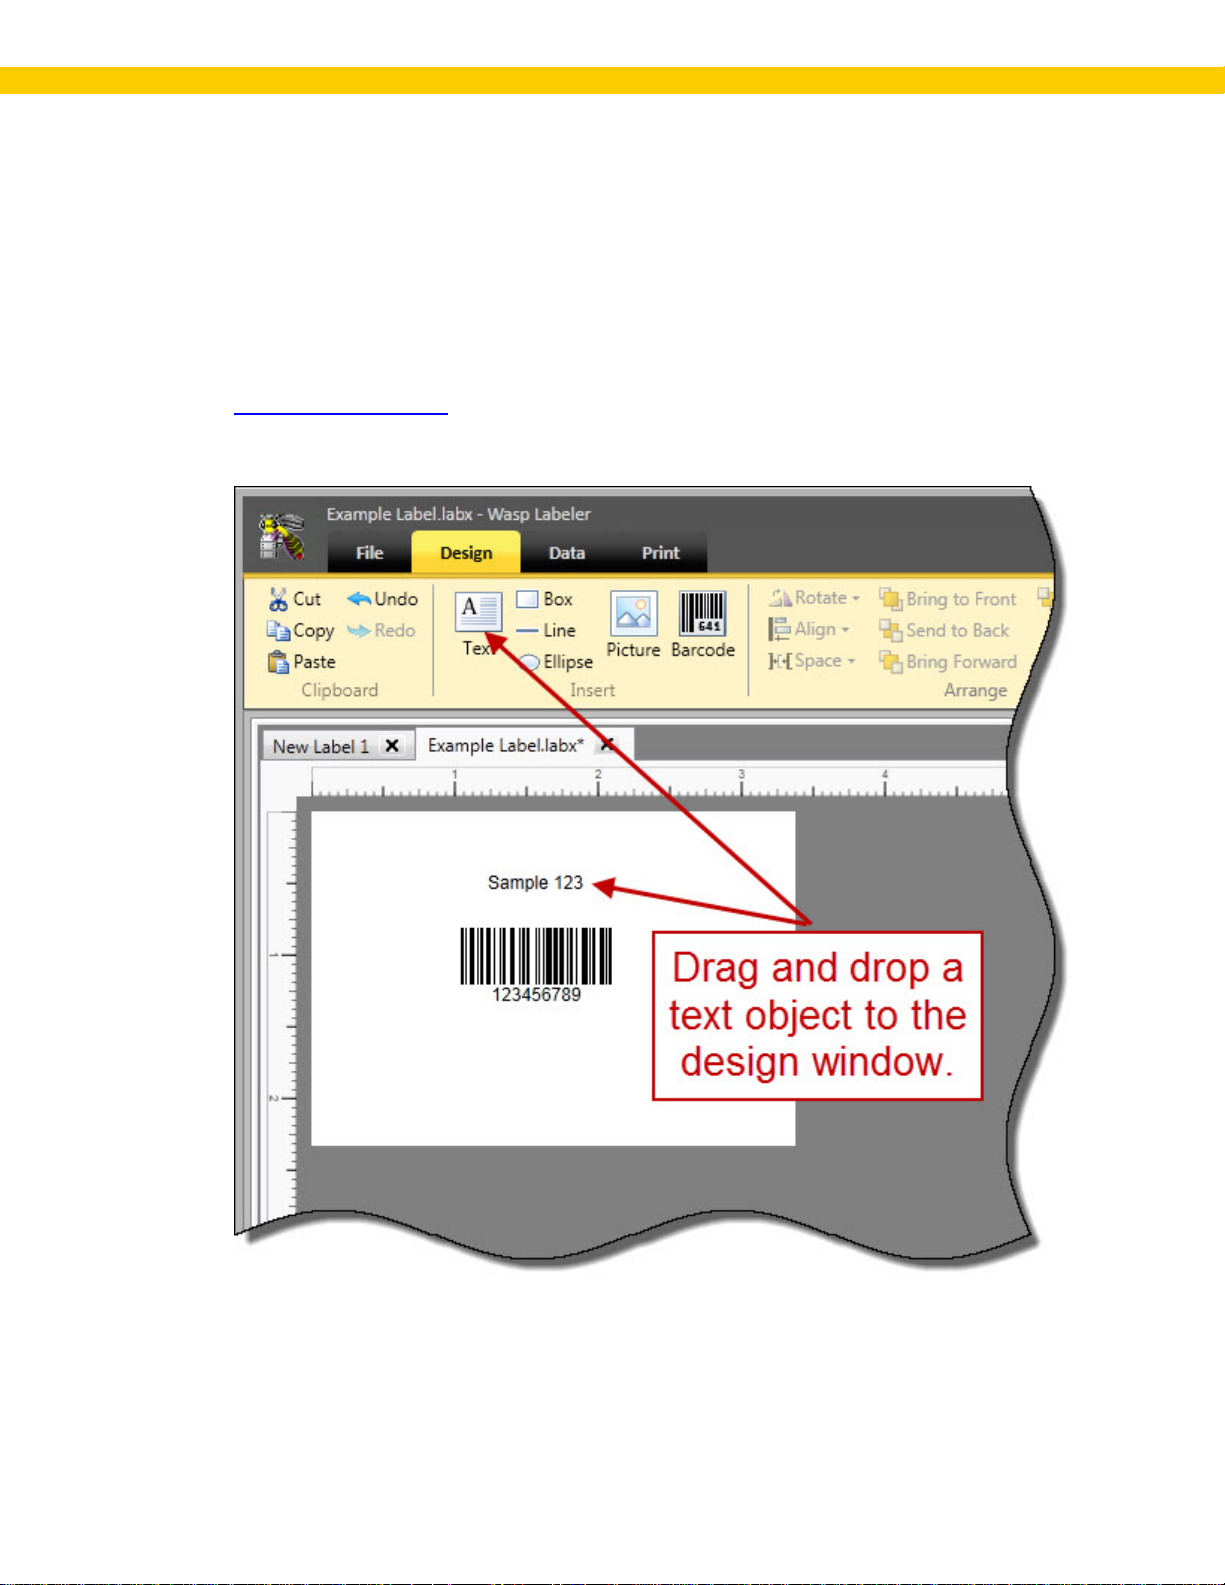
1. Add a Text Box Object
Click on the barcode icon and drag it to the Design window.
.
The Properties Box updates with options for t he text box.
25
Page 30
Wasp Labeler User Manual
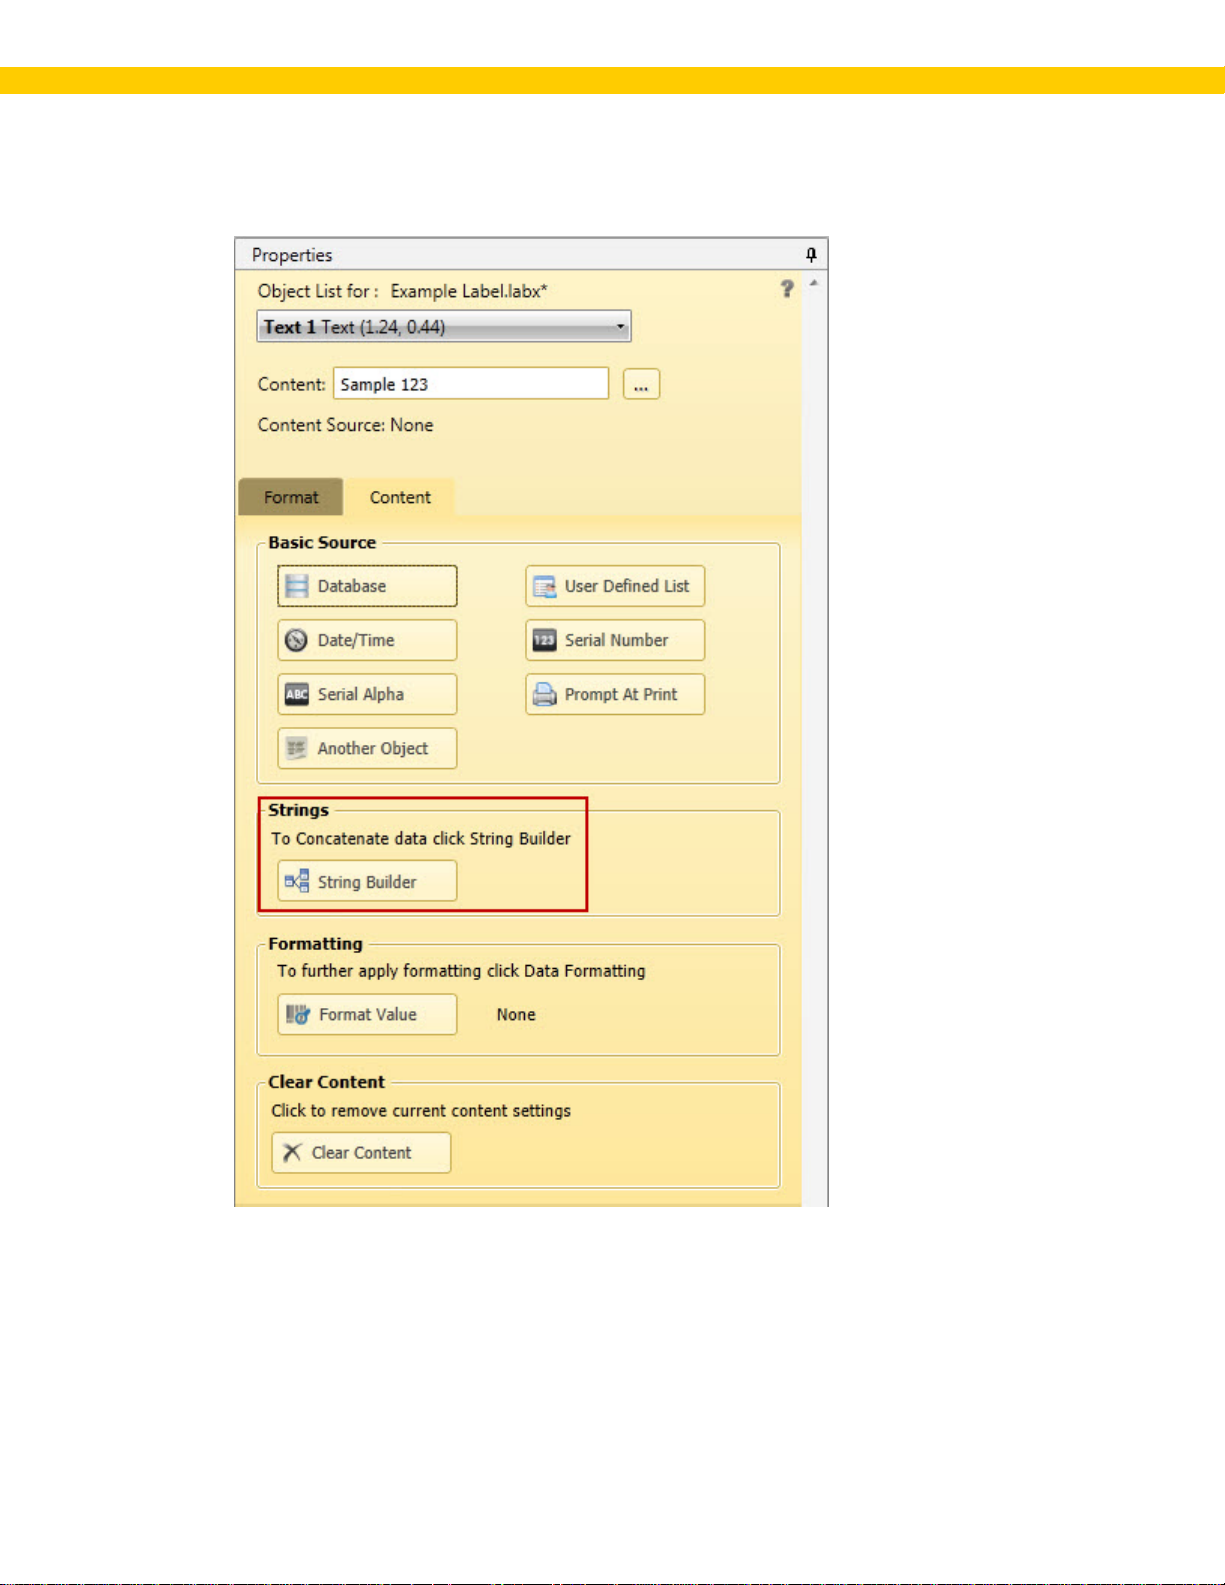
2. Create a String using String Builder.
On the Properties Box > Content tab, click the String Builder button.
26
Page 31

Wasp Labeler User Manual
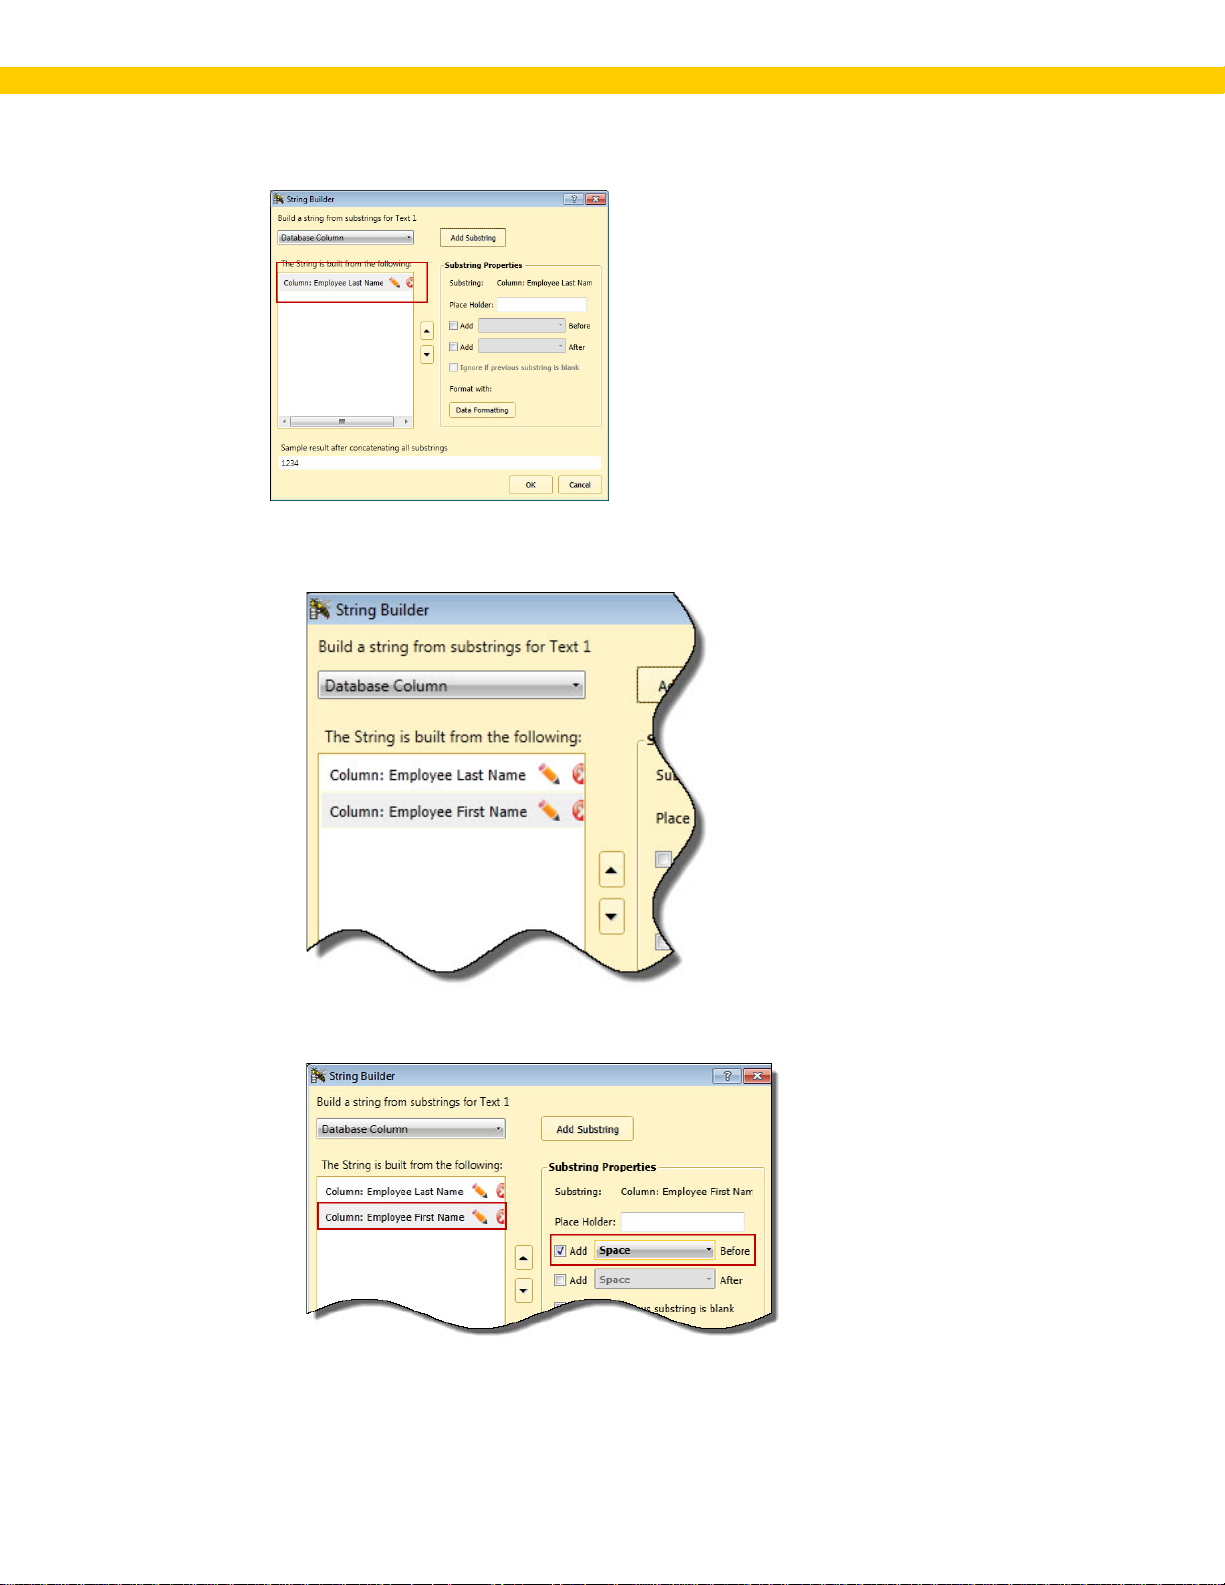
The String Builder screen appears .
For this example w e want to create a str ing con tain ing two databas e column s: Employee Last
Name and Employee First Name. Let' s assume we want the Las t Name first, then a comma and
a space, followed by the First Name. The r esult should look l i ke this:
Doe, John
a. First, select Database Column from the drop down, then click the Add Substring
button.
27
Page 32

Wasp Labeler User Manual
The Data Source - Database screen appear s allo wing you to sel ect a col umn.
b. Select Employee Last Name, then cli ck Done.
28
Page 33
Wasp Labeler User Manual
The substring appears in the window as shown:
c. Now repeat Step s a and b, but this time sel ect Employee First Name from the dr op
down list and clic k Done. Another substring will be added.
d. Highlight the substring Col umn: Employe e Fir st N ame and select Add Space Before
in the Substring Properties box.
29
Page 34

Wasp Labeler User Manual
e. Now we just need to add the comma. To do this, we'll add a static substring with the
character "," i n it . Select Static from the drop down m enu, then click Add Substring.
The Static content screen appears. Enter a comma in the text b ox provided, then click
OK.
f. The Static substring appears in the String list. Highlight it and click the up arrow icon
once to move it between the Employee Last Name and Emp loyee First Name
substrings.
30
Page 35

Wasp Labeler User Manual
g. Notic e that your s amp le dat a at the bottom of th e String Builder screen now shows the
correct formattin g for your data. Click OK to sav e your new stri ng . The Content
Source for your text box now shows <StringBuilder>.
31
Page 36

Wasp Labeler User Manual
1.8 Gett ing St arted - Creating Enumerated Labels
A common n eed when prin ting l abels is a "label counter " or "copy cou nter ". Counters tell you what
number out of a set each label represent s: i.e. 1 of 1 2, 2 of 12, 3 of 12, etc.
You can create th ese cou nter s us in g a text field and the String Builder screen. You have four
counter field options on the String Builder screen:
Label Counter - This c ounts the number of unique labels.
Label Total - The total num ber of u niqu e labels.
Copies Counter - This counts the number of copies of unique labels.
Copies Total - The total num ber of copies.
Example On e: Your wareh ouse wants t o create i nventory labels for a s et of 20 print er s. Each pri nt e r
is the same make and model, bu t has a unique serial number. You n eed a lab el that has a barcode
connected to your inventory database containing the inventory number for the printer t ype, a
serialized barcode representing the serial nu m ber an d a label counter.
Steps:
1. Add your Inventory Database
2. Insert a barcode ont o your lab el and connect it to the inventory number column in your
inventory database.
3. Insert another bar code and bind it to Serial Number. M ake su r e the Last value as next
print job's seed checkbox is selected on th e Serial Numb er Sett ing s screen.
4. Add a textbox to your label.
5. With the t ext box selected, click String Builder in the Properties Box > Content tab. The
String Builder screen appears.
6. On the String Builder screen, select Label Counter, then click Add Substring.
to the label project.
The substring will be added to the list as shown below:
32
Page 37

Wasp Labeler User Manual
7. Now select Static from the drop down and click Add Substring.
The Static window appears.
8. Highlight the sample text and type "of" (without quotation marks), then click OK.
9. With your Static substring hi ghlighted in the l ist, selec t Add > SP ACE Befor e and Add >
SPACE After.
33
Page 38

Wasp Labeler User Manual
10. Fin al ly, select Label Total from the drop down list and click Add Substring. Label Total will
be added to your substring list. Your screen sh ould look simi l ar to the foll owing:
11. On the Print tab enter 20 i n the Number of Labels > Specify field.
34
Page 39

Wasp Labeler User Manual
Now your label will look similar to the following:
Example Two: You ar e sending a shipm ent to a c ustomer. The items will be packed into t wo
separate boxes. You need identical l abels on each box with a cou nter i ndicatin g 1 of 2 and 2 of 2.
Steps:
1. Create your label as des ired
2. Add a textbox
3. With the t ext box selected, click String Builder in the Properties Box > Content tab. The
String Builder screen appears.
4. On the String Builder screen, select Copies Counter, then click Add Substring.
to your label.
The substring will be added to the list as shown below:
5. Now select Static from the drop down and click Add Substring.
35
Page 40

Wasp Labeler User Manual
The Static window appears.
6. Highlight the sample text and type "of" (without quotation marks), then click OK.
7. With your Static substring hi ghlighted in the l ist, selec t Add > SP ACE Before and Add >
SPACE After.
8. Finally, select Copy Total from t he drop down list and click Add Substring. Copy Total will
be added to your substring list. Your screen sh ould look simi l ar to the foll owing:
9. On the Print tab enter 2 in the Number of Copies > Manual from User field.
36
Page 41

Wasp Labeler User Manual
1.9 G etting Started - Example Labels
Wasp Labeler includes a s et of example lab els that you can ac cess for a qui ck d em onstration of various
Lab el er features. Ch oosing an exampl e label i s a good star ting point for your lab el d esign. Review t he
description s in the l i st of examp l e labels and choose one that best fits your need s.
1. On the File tab, select the Example Templates icon.
The Example T e mp l ates screen ap pears.
37
Page 42

Wasp Labeler User Manual
2. Scrol l th r ough the list of available label tem plat es. Hi ghlight a label t o see a preview an d
description.
3. To open an example tem plat e i n the design window, hig hlight a templ ate and click the Open
button. The label will open in the design window.
38
Page 43

Wasp Labeler User Manual
You can click on any of th e elements on the l abel and see their associated properties i n the
Properties box.
You can do a "Save As" fun ction to s ave the label u nder a d ifferen t name and m ake ch ang es to
it as needed. You cannot mak e changes directly to the label templat e. If you try to s ave
changes directly to the tem plat e file, the fol lowin g sc r een appears:
Click OK on the warning s creen to pi ck a new name and l ocation for your new label.
39
Page 44

Wasp Labeler User Manual
1.10 Barcode Symbology Reference
Note: All exam ple barcodes use the Wasp L abeler default propert i es unless otherwise not ed.
C
Codabar
Codabar is a variable length sym bology capable of encoding 16 characters within any length message.
Codabar can enc ode six special char acters ( "+" (plu s), "-" (minu s), "$" (dollar sign), "/" (s l ash), ":"
(colon), and " ." (point) ) and all numer ic digits . There are also 4 start/stop code choices possi ble when
usi ng the C odabar symbology. These characters ( A, B, C, or D ) m ust be included at the beginning or
ending of a string. Codab ar symbology for any new applications today should not be con sid er ed except
und er unusual cir cumstan ces because it is limited and out-dated.
Codabar is widely used i n library systems and blood banks and for s ome package trans port companies.
Codabar Example (No Check Digit)
C | D | E | G | I | M | P | Q | U
Code 11
Code 11 is used p r imarily in telecommunication s. The sym bol can encode any length str i ng consisting
of the digits 0-9 and the dash charact er (-). One or more modu l o-11 check digit(s) can be included.
Code 11 Example (No Check Digit)
40
Page 45

Wasp Labeler User Manual
Code 128
Code 128 is variabl e lengt h and encodes the ful l 128 ASCII charact er set. Each charact er i s
repres ented by 11 modules that can be on e of four bar widths . Cod e 128 is the most easily read code
with the highest mes sage integr i ty due to several separate message check r outi nes. Of all the c om mon
linear symbologi es, Code 128 i s the mos t flexibl e. It sup port s both alpha and num er i c ch ar acters easily,
has the highest number of charact er s per i nch, and is variable lengt h.
Code 128 is widely used in the shipping industry.
The Code 128 character set includes the digits 0-9, the letters A-Z (upper and lower case), and all
standard ASCII symbols and control codes. The codes are divided into t hree character set s: A, B, and
C.
• Character Set A - Contain s cap i tal letters, control characters and di gits.
• Character Set B - Contains all p rintable characters.
• Character Set C - Contai ns only numbers and the FN C1 char acter.
Code 128 Example
A special version of Code 128 called GS1
world wide in shipping and packaging industries.
(former ly known as UCC/EAN 128) i s used ext ensivel y
Code 39
Code 39 is variabl e l ength and is the most frequently used symbology in ind ustrial bar code systems
today. The pr i ncipal fe ature is to encode messag es using the fu l l alphanumeric character set. Three of
the nine elemen ts (bars) are wide and six elements are narr ow.
Code 39 Extended (Full ASCII Code): Standar d Code 39 contai ns only 43 ch ar acters ( 0-9, A-Z, $, /, %,
+). Code 39 can be extended to an 128 character symbol ogy (full AS CII) by combining one of th e
special characters ($, / , %, +) wit h a let ter (A -Z ) to form the characters that are not present in the
standard Code 39 symbolog y. For exampl e, in st andar d Code 39 a lowercase "a" cannot be
represented. In Code 39 Full ASCII, however, "a" is represented as "+A".
Code 39 Example (No Check Digit)
41
Page 46

Wasp Labeler User Manual
Code 93
Code 93 encodes the full 128 ASCII character set using 9 modules arranged into 3 bars with adjacent
spaces. Two of th e characters ar e chec k ch ar acters . Cod e 93 is sim ilar to C ode 39 but encodes more
characters per inch. Code 93 enc odes the full 128 ASCII charact er set and is encoded sim ilarly to Code
39 Extended.
Code 93 Example
D
Data Matrix
Data Matrix is a 2D, variable length symbology capable o f encoding all 128 ASCII characters and a
number of different c haracter sets. Each Data Matrix sym bol consists of a perimeter quiet zone, border
with two soli d edges and two dashed edges , and cells i nside the bord er wh ich ar e dark or l ight. The
border's two solid lines with data cells ar e used for s ymbol identification, orientation , and cell loc ation .
Data Matrix c an acc ommodate up to 500 MB per square inch with a data capacity of 1 to 2335
characters . Data M atrix has a hig h degr ee of redu ndancy an d resi sts pr int ing defects.
Data Matrix is popular for labelin g smal l products because it can encode many characters in a smal l
area. It is becoming the indust r y s tandard for marking small electr onic equi pment . It is also us ed in th e
aeronautical ind ustry an d the U S Dep ar tmen t of Defense. Data Matr ix bar codes can be read by sm ar t
phones by downloading a reader.
Data Mat r ix Examp l e
E
EAN/JAN
The EAN/JAN-13 is fixed length and is similar to the UPC -A s ymbol ogy, but en codes a 1 3th di git . Also,
the "12th and 13th" digits of an EAN-13, may represent a cou ntry c ode in its en tiret y or just the
beg i nning of th e country code, which may vary from 2 to 3 digi ts. The cod e 00-04 and 06-09 are
assigned to the United States. The nominal height for the EAN/JAN-13 bar c ode is one i nch. The
reduced size is 80% of the nominal size.
The EAN/JAN-8 is fixed length and is similar to the UPC-E code, but incl udes two more digi ts for t he
country code. The nominal height for the EAN/JAN-8 bar cod e i s one inch. The redu ced s i ze is 80% of
the nominal size.
42
Page 47

Wasp Labeler User Manual
EAN/J AN 8 Example
EAN/JAN 13 Example
G
GS1 (Formerly RSS)
The GS1 family contains thr ee linear symbologies to be used with the GS1 (formerly EA N.UCC )
system. Th e use of t his symbology is intended to c om ply with the GS1 applicat ion guidelines.
GS1 bar code symb ols are intended for enc oding identi fication num bers and data supp lementary t o the
identification. The admini stration of the numbering s ystem by G S1 ensures t hat id enti fi cation codes
assigned to particular items are unique worldwid e and they and th e associ ated supplem entar y data are
defin ed in a con sistent way. Th e major ben efit for the users of the GS1 sys tem i s the availabi l ity of
un i quely defi ned identification cod e and supplemen tary data formats for u se in thei r trad ing
transactions.
GS1-14 encodes the full 14-digit GS1 item identification i n a linear symbol that can be scanned
omnidirectionally by suitably programmed point-of-sale scanner s.
GS1-Limited enc odes a 14-digit GS1 item ident ification with indicator digits of zero or one in a lin ear
symbol for use on s mall items that will n ot be scanned at the poin t-of-sale.
GS1-14 Stac ked i s a variation of GS1-14 symbology that is stacked in two rows and is used when the
normal symbol wou ld be too wide for the application. It comes in two versions – a tru ncated versi on
used for small item m ar king applicat ions, and a taller omnidirectional version that is designed t o be r ead
by omnidirectional scan ners.
GS1 Expanded encodes GS1 item identification plus supplementary AI element strings such as weight
and "best before" date in a linear symbol that can be scann ed omnidi r ectionally by su i tably
programmed point-of-sa le scanners. G S1 Expanded can also be p r i nted i n multipl e rows as a stacked
column.
43
Page 48

Wasp Labeler User Manual
GS1Stac ked Omnidir ectional allows the full h eig ht GS1-14 to be printed i n two rows o f two segments
each, which red uces the overall length of the lin ear bar code so it can fi t better on certain packaging
configur ation s. The separator pattern between the two rows is design ed to elimin ate c r oss-row
scanning errors .
GS1 Truncated
An y member of the GS1 family can be printed as a stand-alone linear symbol or as a composite symbol
with an accomp anying 2D Composite component pri nted di r ectly above the GS1 linear c omp onen t.
GS1-128 (Formerly UCC/EAN 128)
GS1-128 is a Ser i al Shipping Container Code with a secu r e bar code sym bology. It all ows all
participants in the supply chain to use a common, standard solution for their individual tracking and
tracing needs.
The GS1-128 b ar code s ymbol ogy requires AIs to defin e the data ar chitectu r e. AIs are prefixes wh ich
indicate th e m eaning and format of t he d ata which follows. A mong the things they may be used for are
item id entification , measurements, quantities, traceabili ty, d ates, tran sacti on references and location
numbers.
GS1-128 Example
I
Interleaved 2 of 5
Interleaved 2 of 5 is a variabl e length, even-numbered, numeric bar c ode symbol. It is typicall y used in
industr ial and master carton labeling. The symbology uses bars t o r epresent the first c haracter and the
interleaved (wh ite) spaces to rep r esent th e secon d character. Each character has two wide el ements
and three nar r ow elemen ts. A m odulo 10 check character c an b e used to enhance data secu r i ty for
Interleaved 2 of 5 barcode s ymbol s. When this opti on is selected, th e l ast digit of the symbol is
assumed to be the check digit, and it i s com pared to a cal culated chec k digi t to verify the symbol.
Interleaved 2 of 5 Exam ple (No Check Digit)
44
Page 49

Wasp Labeler User Manual
ISBN
The International S tandard Book Num ber (ISBN) i s a unique machin e-readable identifi cation numb er
used to identi fy books. IS BN is b ased on an ISO International St andar d that was fir st publi shed in 1972
as ISO 2108. ISO 2108 sp ecifies the basic structu r e of an ISBN, the rules for its all ocation, and the
admini stration of the IS BN system.
ISBN barcodes have consisted of 13 digits since 2007. Prior t o 2007 they contain ed 13 di git s. An
Intern ation al Standard Book Number consists of 4 or 5 par ts:
• for a 1 3-digit ISBN, a GS1 (Code 128 ) prefix: 978 or 979 (indicating the industry; in this case,
978 denotes book publishing)
• the group identifier, (language-sharing country group)
• the publisher code,
• the item number, (title of t he book) and
• a check sum charac ter or a check digit.
The ISBN s eparat es its part s (group, publisher, title and check digit) with either a hyphen or a space.
Other than the check digit, no part of the ISBN will have a fixed number of digits
ISBN Example
ITF14
The ITF-14 Traded Un i t Case C ode is used in the r etail sector on outer cas es and pallets (traded unit s).
Based on Interleaved 2 of 5, the 14-digit code is numeric and used to displ ay the unique traded unit
number. Bearer bar s must be included i n horiz ontal form for codes prin ted on lab els, and as a full box
(with H gauges) when printed directly on corrugated surfaces.
ITF14 Example
45
Page 50

Wasp Labeler User Manual
M
MaxiCode
Predominantl y used by United P ar cel Service to sor t m ai l at h igh speed , MaxiCod e is well suited to
being read quickly and often in any direction. MaxiCode is a fixed-size 2D matrix barcode s ymbol ogy
having 86 6 hexagonal elements ar r anged in 33 rows around a central fin der patter n. The size of a
MaxiCode symb ol is 1. 1 inch by 1.05 inch. A single MaxiCode symbol can encod e up to 93 charac ters
of data and uses fi ve different cod e sets to encode all 256 ASCII charac ters. MaxiCode u ses three
un i que p r operties when encoding the data: Class of Service, C oun try Code, and Mod e.
Maxicode Example (Postal Code 75074, Country Code 840, Class of Service 003)
MicroPDF417
MicroPDF417 is a multi-row 2D symbology, derived from and closely based on PDF417. It is designed
for ap plications that need improved area effic iency but withou t the requi r ement for PDF417's maximum
data capac ity. A limited set of symbols is available, together with a fixed l evel of error correct ion for
each symb ol size. Module dimen sions are user-specified to enable symbol production and r eading by a
wide variety of t echniques.
MicroPDF417 Example
Micro QR Code
Micro QR Cod e i s a very small QR Cod e that fits app l icati ons that require a smaller space an d use
smaller am oun ts of data, such as ID of pri nted circuit boards and electroni cs p ar ts, etc.
Micro QR Code Example
46
Page 51

Wasp Labeler User Manual
MSI
The MSI ch ar acter s et consist of the numbers 0..9 as well as two "guard" characters (rep r esenting the
beg i nning and end of th e barcode). The symbology does not supp or t alp habetic charac ters.
MSI Example
P
PDF417
PDF417 is a stacked li near barcod e symbol form at used in a variety of app licat i ons, primarily transport,
identification cards, and in ventory management. PDF stands for P or tabl e Data File. Eac h character
consist s of 4 bars and 4 spaces i n a 17 m odule stru cture. The name of the symb ol is derived from the
format of the code. P D F stands for "P or tabl e D ata File" and "417" is derived from the module structu r e.
Each PDF417 s ymbol consis ts of 3 to 90 stacked rows surrounded by a quiet zone on all four sides.
Each row consist s of a leadin g qu i et zone, start pattern, left row indicator ch ar acter, one to thir ty dat a
characters , right row indicat or character, stop pattern, and trailing quiet zone.
PDF417 supports t ext compaction, numeric compaction, and byte compaction that correlate the
mapping between codewor d values and decod ed data. PDF417 can accommodate up to 340
characters per squar e inch with a maximum dat a capac i ty of 18 50 text characters .
PDF 417 Example
POSTNET
POSTNET (P ostal N um er ic Encoding Technique) is a barcode symbology that is used by the United
States P ostal Service t o assis t in direc tin g m ai l. The Z IP C ode or ZIP+4 c ode is encoded in hal f- and
full-height bars. Most often, the delivery point is added, usually being the last two digits of the address
or PO box number.
The barcode s tarts and ends with a full b ar ( often c alled a guard rail or fram e bar and represented as
the letter "S" in one versi on of the USPS TrueType Font) and has a ch eck digit after the ZIP, ZIP+4, or
delivery point. The encoding tabl e is shown on the right.
Each individual digit is represented by a set of f ive bar s, t wo of whic h are full bars (i .e. two-out-of-five
code). The full bars represent "on" bits in a pseudo-binary code i n whic h the places represent, from left
to right: 7, 4, 2, 1, 0. (Though in th is sch eme, zero is encoded as 11 decim al, or "binary" 11000.)
47
Page 52

Wasp Labeler User Manual
POSTNET Example
PLANET
PLANET stands for Postal AlphaNumeric Encoding Technique and is used b y th e United States Post
Office to identify and track pieces of mail. This barcode can be 12 or 14 digits long.
PLANET Example
Q
QR Code
A QR code (abbreviated from Q uick Response code) is a spec i fi c matrix bar code (or tw o-dimensional
code) that is readable by dedicated QR barcode read er s and camera teleph ones. The code con sist s of
blac k modules arr ang ed in a square p attern on a white backgroun d. The informatio n encoded may be
text, U RL, or other data.
QR Code Example
U
UPC-A
Each UPC-A barcode con sists of a scannabl e stri p of black bars and white s paces , above a sequence
of 12 numerical digits. N o letter s, char acters, or ot her content of any kind may appear on a standard
UPC-A barcod e. The digits and bars maintai n a on e-to-one cor r espondence - in other words, there is
only one way to r epr esent each 12-digit num ber visually, and there is only one way to represent each
visual barcode numericall y.
The UPC-A barcode is used on retail goods.
48
Page 53

Wasp Labeler User Manual
UPC-A Example
UPC-E
To allo w t he u se of UPC barcodes on smaller packages where a full 12-digit barcode may not fit, a
'zero-compressed ' version of UPC w as dev eloped called UP C -E. Thi s sym bology dif fers from UP C -A in
that it only uses a 6-di git code, does not use middle guard bars, and the end bit pattern (E) becomes
010101. The way in which a 6-digit UPC-E relates to a 12-digit UPC-A is det er mined by the last ( r i ghthand mos t) di gi t .
UPC-E Example
49
Page 54

Page 55

Wasp Labeler User Manual
2.1 File Tab Overview
The File tab contains basic functions that you would typicall y find on a Windows Fi l e menu. The Open,
Close and New Document functi ons are found on this tab. You can acc ess the Exampl e Templates
here or s earch for updates to Labeler. In addition, you can Activate the product from this tab and view
the About screen.
Chapter 2 - File Tab
File Toolbar Function Descriptions
• New Label - Click the New Label icon t o open a n ew label pr oject i n the Design window. You
can have multi ple label p r ojects open in the Design window at the same tim e.
• Open - Click the Open ic on to select a saved label project to open. When you click Open, a
drop down menu of recently opened label p r ojects appears. Selec t the project you want to
open from t he lis t or click Open Files From Folder to navigate to your p r oject.
• Close - Click the Close icon to close th e curr entl y active lab el project . If the project is unsaved,
you will be pr ompted to save it before closing.
• Save - Op ens an Expl or er window allowing you to navigate to a folder to save an d name your
project.
• Save As - All ows you to save an already saved projec t under a n ew n ame. This is useful if you
want to create a copy of a lab el th at can be c hanged without alterin g the or i ginal.
• Save All - Saves chang es to all projec ts currently open in the Design window.
• Example Templates - Lau nches the Example Templ ates. Pleas e r efer to the topic
Templates for a compl ete description of available t emplates .
Example
• Check for Updates - Open s an Int er net connec tion to Wasp Barcod e Techn ol ogies to
deter mine if any new updates ar e available for your vers ion of Labeler. If an update is found,
you will be pr ompted to install it.
51
Page 56

Wasp Labeler User Manual
1. Select the barcode, then right click to see the pop up menu.
• About - Opens the About screen. The About screen lists the version number and s er ial
number of your product. For a desc r i pti on and exampl e of the About screen please r efer to the
topic
• Update License - This i con only appears if you are running Wasp Labeler in Trial M ode. Click
on this button to acces s the Activate Labeler screen where you can enter your activation code
and register your softwar e.
• Exit - Closes the Wasp Labeler ap plication. If you have any unsaved label pr ojec ts open, the
Save and Ex it screen appears. Please see the topic Exiting Wasp Labeler with Unsaved
Labels for detailed instructions on using the Save an d Exit screen.
2.2 Exporting a Barcode as an Image File
You can export any bar code you create i n L abeler as an image fil e.
Steps to Export a Barcode as an Image File
About Screen.
2. Select Save a s image fr o m the po p up me nu:
The Export Barcode as Image File screen app ear s.
52
Page 57

Wasp Labeler User Manual
3. The Barcode Information secti on of the Export Barcode...screen
If you intend to
browser window will appear allo wing you to select a save location.
lists th e Symbology and Value encoded into the barcode.
Note: If th e bar code is bound to a database or ot her external
source, t he p l aceholder valu e will appear i n the Value field.
In the Target sec tion, select the Format to which you want to
convert your barcode. Options are:
Bitmap Image (BMP)
GIF Image (GIF)
JP EG Imag e (JPG)
PNG Imag e ( PNG)
TIFF Image (TIFF)
WMP Image (WMP)
4. En ter the Resolution you want for your i mag e. Res ol uti ons as low
as 72 dpi an d as high as 1800 dpi m ay be sp ecified .
print the image file for subsequent decoding by bar code s canners,
you should specify r esolution values no lower than 200 dpi. The
default of 300 dpi is ideal for printing. If you only intend to display
the image on a monitor, 72 dp i is sufficient .
5. Click the Export button when you are ready to save the imag e. A
2.3 Exiting Wasp Labeler with Unsaved Labels
Click the Close butt on on the File t ab to close th e Wasp Labeler appli cation. If you have any un saved
label projec ts open, the Save and Exit screen (shown below) appear s.
Select the lab el s you want t o save, then click Yes. A st andar d Windows browser sc r een ap pears
allowing you to choose a locati on an d nam e for your l abel. If you have selected to save mul tiple labels,
a browser window will ap pear f or each label.
Select No t o close wit hout savin g or Cancel to canc el the exit process and return to Labeler.
53
Page 58
Wasp Labeler User Manual
In this topic:
Design Toolbar Function Descriptions
Clipboard
Insert
Arrange
Layout Options
View
The Design tab cont ains all of t he op tion s for cu stomizing your l abel. This tab all ows you to place
items such as bar codes , text boxes, graphics and dr awing objects on to your label.
This topic provides details on the functions contained on the Design tab. For an exam ple of creati ng a
labe l using t he Design tab, please r efer to the topic Getting Started - Creat in g a S tat i c Lab el
Chapter 3 - Design Tab
.
54
Page 59

Wasp Labeler User Manual
3.1 Design Toolbar Function Descriptions
The toolbar on this tab is divided i nto 5 secti ons:
1. Clipboard
2. Insert
3. Arrange
4. Layout Options
5. View
Clipboard - This section contains basic commands:
• Cut - Removes the selected object from the can vas and saves it to the c l ipboard.
• Copy - Copies th e select ed ob j ect from the can vas and saves it to the clipboard.
• Paste - Places an object saved to t he cl i pboard onto a new location.
• Undo - Click th is icon to undo the most rec ent action.
• Redo - Cli ck this icon to redo the m ost rec ent action undone (by c l icking Undo).
Insert - The Insert options all ow you to insert text, basic shapes, a picture or a barcode in to your label.
After you insert an object, you can add content to it from a variety of sour ces. The optio ns in the
Properties box will vary depending on the type of object you chose to insert. These icons u se the
Drag and Drop method for placem ent. Place your cu r sor on the desired ob j ect, t hen dr ag it to the
Design window and drop it where you want it. You can place it more p r ecisely or move it as needed.
• Insert Text
content into you r text b ox or attach a database, string, spreadsheet , etc . to i t. For com plet e
ins tructions on adding a Textbox t o your l abel, please refer to the topic
• Insert Drawing Object - The Box, Line and Ellipse icons allow you to add bas ic shapes to your
label. You can add a rectangle, ell ipse or line. For c omp lete inst ru ctions on ad ding a shap e to
your lab el, please refer to the t opic
• Insert Pi cture - Thi s icon allows you to insert a graphi c onto your label. The supported graphic
format s are:
o Bitm ap Files (*.BMP)
o JPEG (*.JPG, *.JPEG, *.JPE, *.JFIF)
o PNG (*.PNG)
o TIFF (*.TIFF, *.TIF)
o GIF (*.GIF)
o ICON (*.ICO)
For compl ete in structions on adding a pict ure, pl ease refer to the topic Adding a Picture
• Insert Barcode - This icon allows you t o i nsert a barcode onto you r l abel. Afte r placi ng the
barcode, you can choos e the symb ology and data sourc e using the opti ons in the Properties
box. For complete in structions on adding a bar code to your label, please re fer to the topic
- This icon allows you to in sert a text box onto your lab el. You can enter stat i c
Adding a Textbox.
Adding a Drawing Object.
.
55
Page 60

Wasp Labeler User Manual
Adding a Barcode.
Arrange - The Ar r ang e m enu allows for precision placement of objects or text you insert onto your
label.
• Rotate - This option allows y ou to rotate a select ob ject clockwise or c ounter clock wise. Note
that you can also use the top grab point on a selected item to rotate it as shown below:
• Align - This option allows you to align a s elected obj ect or mult i ple selected obj ects. You can
align Left, Right, Top, Bottom, Vertical Center or Horizontal Center. To select multipl e
objec ts, click on th e objects whi l e holding down th e CTRL key.
All al i gnment s are relat ive to the fir st object you s el ect when using CTRL + click to select them.
If you select obj ects using CTRL + A , th e first object you added to the barcode will be used for
alignment. The obj ect th at is used for ali gnment , known as the base object, will appear
selected in blue as shown in the example below.
56
Page 61

Wasp Labeler User Manual
You have three barcodes on you r l abel and you w ant to align two of the
If you want t o change you r base object, hold down the SHIFT key and cli ck on a differen t obj ect.
The bl ue outline will change to the newly select ed object. The previous b ase object will still be
selected for alignment, but will no longer be th e base object.
Example - Using the Align Function
barcodes c enter ed hor izontally relative to t he third one. Use CTRL+ click to
select the barc odes, making sure to select the barcode to which you want the
other barcodes ali gn ed first. Your label will look sim ilar to the following:
57
Page 62

Wasp Labeler User Manual
Now select Align > Horizontal Center.
The barcodes are n ow alig ned r el ative to the cen ter of the first barcode you
selected.
• Space - Th is opti on allows you to evenly sp ace mult ip le selected objects acr oss or down.
• Bring to Front - Use th is opti on to move a s elected object in front of other objects.
• Send to Back - Use th is opti on to m ove a selected object behind other ob j ects.
• Bring Forward - Use this option to move a selected ob j ect forward .
• Send Backwar d - Use th is opti on to move a s elected object backward.
58
Page 63

Wasp Labeler User Manual
Layout Options - Use these options to change the layout of your label or to hide/show th e r uler along
the top and side of the label.
• Units/Ruler - Changes the ruler units. Option s are Inches, Centimeters and Millimeters
• Layout - Accesses the Page Setup
• Reset Docking- You can move and "redock" the Properties box to the left or cent er of the
Labeler w indow (by default it i s doc ked on the ri ght side of the screen). To move it back to the
defaul t positi on, click the Reset Docking icon.
View - The View menu allows you to zoom in or out of the Design window.
• Zoom In - Allows you to get a c lose up view of your label.
• Zoom Out - Allows you to see more of th e page at a red uced s i ze.
• Zoom - Select a p er centage from the drop down to zoom in on the label .
• Reset Zoom - Returns the view to default settings (100%).
screen wh er e you c an choose the label typ e/size.
3.2 Adding a Drawing Object
You can add Boxes, Lines and Ellipses to your label using the drag and drop m ethod. Drawing objects
can be moved, resiz ed an d cus tomized as needed.
1. On the Label Design tab click the Box, Line or Ellipse icon on the toolbar.
Drag and drop the object where you want the drawing ob j ect t o app ear on your l abel (y ou can
change the location at any time). Wh en you place th e object on your label, not ice that the
Properties box displays an y options for t he object.
59
Page 64

Wasp Labeler User Manual
2. You can move the drawing object by clicking on it and dragging it. Resize t he object by clicking
on a corner of the obj ect and draggi ng it . You can also enter precise siz e and locati on
coordinat es in the Properties Box > Format tab. Opti ons are:
• Object Name - You can op tion al ly enter a new name for the object here.
• Left - E nter the preci se locat ion you want your barcode relative to the left side of the
label.
• Top - Enter the pr ecise location you want your bar code relative to the top of t he
label.
• Width - Enter the width of your text bo x.
• Height - Enter the heigh t of your t ext b ox.
• Rotate - Rotat e the text b ox on your label.
• Display on Print - Make sure thi s checkb ox is selected i f you want the text box t o
display when your label is printed.
• Anchor - Select where you want to anchor the object on th e page. For example, if
you set the Anchor for a box to Top, then adj ust the Height, th e Top will stay in the
same position and the box will "grow" from the bottom. If you anchor it Center, the
center position will stay t he same and the box wi l l "g r ow" from the top and bottom.
60
Page 65

Wasp Labeler User Manual
Note: By defaul t the uni t of measurement i s inches. To chan ge thi s, select Units/Ruler on the
Design tab toolbar and select a different unit of measure.
The units on the Format tab will update with the new unit of m easure.
3. Add color an d/or change the line si ze us ing th e opti ons in the Drawing section of the Properties
box. Options are:
• Line Color - This is the color of the outlin e of your drawing object (or the color of the li ne).
This color defaul ts t o Black. Cl ick the ellipse bu tton (...) to view the color s election pop up,
shown below:
61
Page 66

Wasp Labeler User Manual
Click on a color to select i t or click More C olors ...to view the Advanced Color Palette
screen, shown below:
Click on an area of the palette and/or drag the arrow up or down on t he shade bar. A sample
of your c olor appear s in the l owe r , left corner. Click OK to save your s electi on.
• Line Style - Select how you want the outlin e to appear ( dashed, solid, dot, et c. ) from the d r op
down menu.
• Line Width - Enter how thick you wan t the outline (in pixels).
• Fill Color - (Ellipses and Boxes only) The fill color i s the color of th e int er ior of t he drawing
object. By default the fil l color is transparent. Click the ellip se button ( ...) to view the c ol or
selection pop up, shown above.
• Fill Style - (Ellipses and Boxes only) Select a style f or the i nterior of t he d r awing object.
By default the style is tran sparent.
62
Page 67

Wasp Labeler User Manual
3.3 Adding a Picture
In this topic:
Adding a Picture to a Label
Picture Properties Box: Format Tab
Picture Properties Box: Content Tab
You can add pictures t o your lab el eith er "st atically", meaning you add a single pictu r e that will appear
on all l abels, or you can lin k a pict ure placeholder to a database and have Labeler pul l the pi ctures onto
each l abel at print t ime. Labeler allows import of bitmap files ( *.bmp) , J PEG (*.jpg, *.jpeg, *.jpe, * jfif),
PNG (*.png), TIFF (*.tiff, *.tif), GIF (*.gif), ICON (*ico).
3.3.1 Steps to Add a Picture to a Label:
1. On the Label Design tab click the Picture icon on th e toolb ar .
Drag and drop the picture where you want it to ap pear on your label (you can change the
locati on at any time).
2. A b r owser window wil l appear allowin g you to navigate t o a pictur e file.
For Static Images: Browse to the desired gr aphic, then click OK. Your graphic will
app ear on the lab el. You can now use the Format tab or the buttons on t he Design
toolbar to edit you r image.
63
Page 68

Wasp Labeler User Manual
For Pictures Bound to a Database: If you do not want to import a singl e graphic, cli ck
Cancel on the browser window. This inserts a Placeholder representing your imag e as
shown below:
You can now u se the Format tab or t he buttons on the Design toolbar to edit the
plac emen t/alignment of your i mage. Us e the Proper ties Box > Content tab t o bind t he
pic ture object to a data sou r ce.
64
Page 69

Wasp Labeler User Manual
3.3.2 Picture Properties Box: Format Tab
The Format tab allows you to specify an exact locat ion f or a selected barcode on your label. You can
also en ter pr ecise height and width measurements on th is tab. Below is an exam ple of the Format tab.
The Format tab is divid ed into t wo sections, General and Picture.
Format Tab - General Options are:
• Left - E nter the preci se locat ion you want your barcode relative to the left side of the label.
• Top - Enter the pr ecise location you want your bar code relative to the top of t he label.
• Width - Enter the width of your text box.
• Height - Enter the heigh t of your t ext b ox.
• Rotate - Rotat e the text b ox on your label.
• Display on Print - Make sure thi s checkb ox is selected i f you want the text box t o display when
• Anchor - Select where you want to anchor the object on th e page. For example, if you set the
your label is printed.
Anchor for the i mage to Top, then adjust the Height, the Top will stay in the sam e positi on and
the picture will "grow" from the bottom. If you anchor i t Center, the center p osition will stay th e
same and the picture will "grow" from the top and bottom.
65
Page 70

Wasp Labeler User Manual
Note: By defaul t the uni t of measurement i s inches. To ch ange this, selec t Units/Ruler on the Design
tab toolb ar and select a differ ent unit of measure.
The units on the Format tab will update with the new unit of measure.
Format Tab - Picture Options are:
• Picture File - If you imp or ted a graph i c, th e path to it will b e list ed her e. Click the ellipse b utton
(...) to open a br owser window t o choos e a new graphic fil e.
• Link to File - This checkbox performs different functions depending on whether you have
bou nd the object to an actual picture or if y ou are u sing an external data source.
Link to a Pi cture: If this checkbox is NOT select ed, Labeler will save the pictur e to the .LAB fi l e.
If this box is not select ed, Labeler will save a link to th e picture in the .LA B file. Saving a link
decreases the size of th e .LAB file, however, if you move either t he .LAB fil e or the picture file
to a differen t location, the link will be broken and the picture will not display on the label. If you
select Link to File, mak e sure that any moves k eep the link intact.
Data Source: When the p icture is linked to a colu m n on the datas ource, the 'Link to File'
checkbox represents wh at typ e of data is in the colum n: a path to a pictu r e fi l e, or a ctual pi cture
data. Sel ect t his checkbox if t he linked column c ontain s a path to pic ture file (ex:
D:\Pictures\mypic. jpg). Do not s elect this c heckb ox if the column is an actu al picture file st or ed
in the database.
• Size - Selec t an option from t he drop down :
Original - Thi s options keeps the graphic at it's orig inal size.
Resize with Aspect Ratio - This opti on allows you to r esize the imag e ( by draggi ng the
corner s) wh ile maint aining aspect r atio.
Resize - This opti on allows you to r esize the im age (b y draggi ng the corners) without regard to
aspect rat io.
66
Page 71

Wasp Labeler User Manual
3.3.3 Picture Properties Box: Content Tab
The Content tab allows you to specify the con tent of your barcod e ( if you are not using a static picture) .
Below is an exampl e of the Content tab.
Bas i c Source Section
The Bas i c Source section lets you choose a s ource for the pi cture. Your options are:
Database
Prompt at Print
Clear Content Section
Click the Clear Content bu tton to remove the currently sel ected data sour ce (in cluding a string). When
this button is selected, the following question screen app ear s:
Click Yes to remove t he curren t data s ource or No to cancel and k eep the data sourc e.
67
Page 72

Wasp Labeler User Manual
1. On the Label Design tab click the Barcode icon on the toolbar .
to
3.4 Adding a Barcode
Add i ng a b ar code to your label is as simpl e as dragging and dr opping it wh er e you want it to appear.
After you have plac ed your bar code, you can selec t a sym bology, choose a data source (or bi nd i t to a
data source you h ave added via t he d ata source screen) or add static content, add and format a
caption, etc .
For a detailed example of adding a static barc ode to your label, p lease r efer to the topic
Started - Creat i ng a St at ic Label.
3.4.1 Steps to Add a Barcode
Getting
Drag and drop the i con wher e you want the barcode to appear on your label (you can
change the location at any t i me). You c an use the but tons on the Label Design toolbar
rotate the barcode, move it forward or backward, et c. When you place the b ar code on
your lab el, notic e that the
Properties box displays the options for defining your barcode.
68
Page 73

Wasp Labeler User Manual
y clicking on it and dragging it where you want.
Barcode Properties box - Content Tab
2. Define your barcode by using the Barcode Properties box - Barcode Tab
3. You can move y our b ar code on your label b
4. Attach your barcode to an exte r nal data source or define seri alization, date/ time, etc using
to sel ect th e
symbology and any available opti onal setting s for the selected symb ology.
You can enter p r ecise location coordinates using th e Barcode Properties box - Format
Tab.
the
.
69
Page 74

Wasp Labeler User Manual
1. Make sure your barcode object is selected in the Obje ct List drop down menu.
3.4.2 Adding a Barcode: Properties Box
In this topic:
Entering Static Data
Bar cod e T ab
Format Tab
Content Tab
Bas i c Source Section
String Builder Section
Formatting Section
After you add a barcode to a label, the Properties box p opulates with t he opti ons ava ilabl e to barcodes
(symbolog y, dat a source, formatt ing, et c.) You can use these options t o define the in format ion encoded
in your barcode, the capt ion th at appear s with your bar code or for pr ecise locat ion placement on you r
label.
Contents Box - Entering Static Data:
Static Data is data that does not change as your l abels ar e printed. The content for th at object will be
the same on each label. For a detailed example of creating a stat i c barcode, please refer to the topic
Getting Started - Creatin g a S tat ic Lab el
.
Steps to Enter Static Data
70
Page 75

Wasp Labeler User Manual
2. En ter your data directly into the Content text box. If yo u need to add special
of your barcode.
characters to your barcode, click the ellipse (...) butt on to the right of the Content
field.
The Special Characters list appears. Special Ch ar acters ar e ASC II Codes.
These are print able and non-printabl e marker s that tell a printer, scanner, etc.
how to handle spaces. For a com plet e list of ASCII Codes available, please re fer
to the topic ASCII Special Character Codes
.
3. The data you entered into the Content box will appear in t he text box on the
Sp ecial Charact er s List as shown in th e exampl e above.
Select any special char acters you want to appear in the Content
The data will change depending on the code you select. Note t hat codes that
repres ent a non-pr int able marker, s uch as a spac e or carriage return will be
repres ented by a s ymbol .
4. Click anywhere off of the Special Character box to close it .
The barcode on you r l abel wi l l chang e to depict the content you enter ed.
71
Page 76

Wasp Labeler User Manual
• MicroQRCode
Barcode Tab:
The Barcode tab on t he Properties box is where you will select the symbology for your barcode. This
tab also has field s for precision placemen t of your barcod e. Below is an exampl e of the Properties
Box > Barcode tab. The op tion s availabl e on this tab vary depen ding on th e symbology you have
selected. The examp le below is with Code 128 select ed, the act ual screen will look slight ly differ ent
depending on you r selected s ymbol ogy.
The fiel ds av ai lable on the Barcode tab vary depending on the symbolog y s el ected. Click a symbology
below to view a desc r ipt ion for t he related properties:
• Code 128
• Aztec Code
• Codabar
• Code 39
• Code 93
• Code 11
• Data Mat r ix
• EAN/J AN 8
• EAN/J AN 13
• Interleaved 2
• ISBN
• ITF 1 4
• Maxicode
• MicroPDF417
of 5
• MSI
• PDF417
• PLANET
• POSTNET
• QRCode
• GS1-14
• GS1 Limited
• GS1 Stack ed
Omnidirectional
• GS1 Truncated
• GS1 Expanded
• GS1 128
• UPC-A
• UPC-E
72
Page 77

Wasp Labeler User Manual
Format Tab:
The Format tab al l ows you to specify an exact l ocation for a selected barc ode on your lab el . You can
also en ter pr ecise height and width measurements on th is tab. Below is an exam ple of the Format tab.
The Format tab is divided in to three secti ons: General, Caption and Drawing.
Format tab - General options are:
• Object Name - You can option al ly enter a new name for the barcode object.
• Left - E nter the preci se locat ion you want your barcode relative to the left side of the label.
• Top - Enter the pr ecise location you want your bar code relative to the top of t he label.
• Width - Enter the width you want your bar code. This i s the width of your entire barcode,
• Height - Enter the heigh t you want your barcode. Thi s is the height of your entire barcode,
• Rotate - Rotat e the bar code on your label.
including the caption, if it has one. Keep in mind that this affects the density of your
barcode which could make it harder to scan.
including the caption, if it has one. Keep in m ind that a barcode that is too tall or too short
could cause distortion which could make it harder to scan.
73
Page 78

Wasp Labeler User Manual
• Display on Print - Make sure thi s checkb ox is selected i f you want the barcode to dis play when
your label is printed.
• Anchor - Select where you want to anchor the barcode on t he page. For example, if you set
the Anchor to Right, if the bar code grows or shrinks due to variable data from a data source,
the Right side will stay in t he same position and the barcode will "gro w" from the l eft. If you
anchor it Center, the center position will stay the same and the barcode will "grow" from th e
right and left.
Format tab - Caption options are:
• Align -Select an option from th e dr op down list to set the alignment of your caption above or
below your barcode.
• Font - Click the el lipse but ton (...) to selec t a font for you r caption. Below is an example of the
Font screen
Select the desired font from the Font Family drop do wn menu. Click on the desired Typeface
and font Size. A sample of your selec tion s will appear i n the Sample section.
Click OK to save your s electi ons or Cancel to close the Font s creen without saving your
selection.
Format tab - Drawing options are:
• Fore Color/Back Color - The Fore col or ( the color of your barcode) defaults to black. The
Back color (the back groun d color) defaults to white. Cl i ck the elli pse button ( ...) to view the
color selection pop up, shown bel ow:
74
Page 79

Wasp Labeler User Manual
Click on a color to select i t or click More C olors ...to view the Advanced Color Palette screen,
shown below:
Click on an area of the palette and/or drag the arrow up or down on t he shade bar. A sample of
you r color appears in t he lower, left corner. Click OK to save your s electi on.
75
Page 80

Wasp Labeler User Manual
Content Tab:
The Content tab allows you to specify the con tent of your barcod e ( if you are not using static data).
Below is an example of the Content tab.
This tab is divided i nto four secti ons:
• Basic Sou rce - This section is where you can bind the b ar code to a data sour ce, object, serial
number or alpha, date/time, etc.
• Strings - To add more t han on e data sourc e to the barcode, use the String Builder.
• Formatting - This section allows you to build on th e gener al formatting done to the capti on on
the Format tab an d to format the value, which is the barcode c ontent. You can create a
"mask", or format expression, t hat will be ap plied to all data/captions (if using a data sour ce, for
example).
• Clear Content - Click the Clear Content button to remove the dat a source from the barcode.
76
Page 81

Wasp Labeler User Manual
Basic Sou rce
This s ection lets you choose t he data that will be encoded into your barcode. Click on a source type t o
bind it to your object ( barcode, graph i c or textbox).
Sou r ce options for barc odes are:
Database
Date/Time
Serial Alpha
Another Object
User Defined List
Serial Number
Prompt at Print
String Builder
To add more than one data source to the b ar code, use the String Builder. Subst r i ng s concatenate, or
join, d i fferent values to b uild what app ear s to be a single text or barcode obj ect on the label from
multiple dat a sources. This option c an be for the followin g:
For exampl e, if you want y our barcod e to have a serialized n umb er fol l owed by a space, you woul d u se
the String Builder to accomplish this.
Click here for a detailed example of using String Builder to concatenate two different data
sources in your barcode.
Click here for detailed instructions on using the String Builder screen.
Formatting
The Formatting section on the Properties box > Data Source tab allo ws you to a dd formatting to your
barcode caption or to the value encoded in your barcode. To do t his you will create a For mat
Expression using the Format Value and Format Caption bu ttons i n this secti on.
Click here for detailed instructions on formatting barcode values and captions and for a list of
standard characters used to create Format Expressions.
1. To customi ze, or bui l d, the c apti on of a bar code by combining two or more data so urces (st atic
plus date/tim e, for exampl e) .
2. To compress two or more text or barcod e values of different len gths from an external dat a
source.
3. To compress mu lti-line text values to remove blank li nes.
77
Page 82

Wasp Labeler User Manual
Clear Content
Click the Clear Content bu tton to remove t he curren tly selec ted data source (including a string). When
this button is selec ted, the following quest ion screen appears:
Click Yes to remove t he curren t data s ource or No to cancel and k eep the data sourc e.
78
Page 83

Wasp Labeler User Manual
Code 128
Field
Description
Select Cod e 128 from the drop down list. For a comp lete list of
Thi s se tti ng determine s de ns i ty of the barcod e. Increase t he bar
width (applies to the individual bars in the barcode) and the density is
Char per inch
This s ettings stands for ch ar acter per inch. Code 128 is a dense
a scanner to read and m ay not b e scann able at all.
This s etting determines how tall your bar code will be. The bar height
There ar e three dif feren t character sets for Code 128 - A, B and C
Use the Append field to add any characters you want included at the
end of you r barcode.
3.4.3 Barcode Properties
Code 1 28 Pr op er t i es Bo x Option s
The table below lists the options available for Code 128 in the Properties box > Barcode tab.
Symbology
Bar Width
Bar Height
Char Set
available symbologi es along with examples and descri pti ons of each,
pleas e r efer to the topic
decreased. You might want a moredense barcode to fit on a small
label, for example. Keep in mind th at a barcode that is too d ense
may be harder for a scanner to read and may not be scannable at all.
barcode an d supports a r el atively hi gh charact er per inch . You can
add more characters per inch by increasing the number in this field,
resulting in a more dense barcode. Notice that as you increase the
number in the Char per inch field, the Bar Widt h field decreases. The
more c haracters y ou add per inch, the mor e dense your barcode will
be. Keep in mind that a barcode th at is too dense may b e hard er for
does not aff ect dens i ty.
and D efault . By leaving this set to D efault, Labeler wi l l det er mine the
best ch ar acter s et to use based on the content of you r barcode.
Default is the recommended setting to help you avoid.
• Character Set A - Cont ains capital letters , control charac ters
and digits.
• Character Set B - Cont ains all print able characters.
• Character Set C - Contains only numbers and the FNC1
character.
Barcode Symbology Reference.
Append
79
Page 84

Wasp Labeler User Manual
Aztec Code
Field
Description
Select Aztec C ode from th e drop down list. For a complete list of
Barcode Symbology Reference.
Thi s se tti ng determines the s ize of the barcode (al ong with error
This s ettings determines the amoun t of RS (Reed-Solomon) er r or
You can optionally create a "run e" con tain ing th e value 0 - 255, if
needed. Aztec runes are small, m achi ne-readable symbols.
A module i n an Azt ec barcode is a squ ar e dot and is the small est
it.
Aztec C ode Properties Bo x Option s
The table bel ow lists the option s available fo r Azt ec Code in th e Prope r ties box > Barcode tab.
Symbology
Code Format
Error
Correction
Code Rune
available symbologi es along with examples and descri pti ons of each,
pleas e r efer to the topic
correction and code modul e size). The smallest Aztec Code symbol
encodes 13 numeric or 1 2 alphabetic characters, while the largest
Aztec Code symbol encodes 3832 numeric or 3067 alphabetic
characters or 19 14 bytes of data. No qui et zone is required out side
the boun ds of th e symbol. There are 32 sizes from which to choose,
plus an ad dit ional 4 c om pact siz es. You can leave this setting at
Au to to have L abeler determine th e size based on the i ncluded
content.
correction for the bar code. This al lows t he sc anner to read the
barcode corr ectly even in the case of a part iall y damaged barcode.
You can choose from 5% to 95% of the data in the barcode for err or
correction.
The higher the am ount of data you select for error correcti on, the
larger your barcode will be. This makes your barcode less
susceptible to damage, but could pot enti ally mak e i t har der to r ead if
your bar code c ontai ns a lar ge amount of d ata. Th e defaul t set tin g i s
23%. This correction amount (23%) is usually the amount of
correction neces sary t o make your barcode data saf e from damage,
while a lso ensuri ng r eadabi lity b y most scann er s.
Code Module
Size
compon ent of the barc ode. In essence, the barc ode is mad e up of
many light and dark square modules. You can adjust the m odule size
up , which will incr ease the size of your barcode, or down to decreas e
80
Page 85

Wasp Labeler User Manual
Codabar
Field
Description
Select Cod abar from the drop down list. For a compl ete lis t of
Barcode Symbology Reference.
This s etting determines how tall your bar code will be. The bar height
does not aff ect dens i ty.
Thi s se tti ng determine s de ns i ty of the barcod e. Increase t he bar
width (applies to the individual bars in the barcode) and the density is
may be harder for a scanner to read an d may not be s cannable at al l.
Char per Inch
This s ettings stands for ch ar acter per inch. You can add more
characters per inch by increasing the number in this field, resulting in
barcodes.
Select the Check Di git checkbox to include an opti onal check d ig it
When this option is selected, the
compared to a cal culated check digit to verify the symbol.
Show in
Caption
When this opti on is selected , the c heck digit will appear in the
barcode caption.
Ratio
This is the wide to narrow bar rat i on. The default set tin g i s 2 (2:1).
Select a Start Character for your barcode or choose Auto to let
start. Your opti ons are: A, B, C or D.
Select a Stop Character for your barcode or choose Auto to let
options ar e: A, B, C or D .
Show
Start/Stop
Select this ch eckb ox to display t he Start and Stop characters i n the
caption of the barcode.
Codabar Properti es Box Opti on s
The table bel ow lists the option s available fo r C odab ar i n the Properties box > Barcode tab.
Symbology
Bar Height
Bar Width
Check Digi t
available symbologi es along with examples and descri pti ons of each,
pleas e r efer to the topic
decreased. You might want a more d ense barcode to fit on a small
label, for example. Keep in mind that a b ar code that is too d ense
a more dense barc ode. Notic e that as you i ncrease the number in
the Char per inch field, the Bar Width fiel d decreases. The more
characters you add per inch, the more d ense you r barcode will b e.
Keep in mind that a barcod e that is too dens e m ay be harder for a
scanner to read and m ay not b e scann able at all. It is recommended
that you do not exceed 12.8 characters per in ch for Codabar
on your barcode to enhance data securi ty. A check digit appears l ast
on the barcode an d checks for errors in the pr eceeding content. A
modulo 16 chec k character is used.
last digit of t he symbol is as sumed to be the ch eck digit, and it i s
Start
Character
Stop
Character
Lab el er assign one for you. A Start Charac ter at the beginn ing of a
barcode tel ls a sc anner or barcode re ader t hat the c ontent is about to
Lab el er assign one for you. A Stop Ch ar acter at the end of a barcod e
tells a scan ner or barcode reader that the con tent has ended. Your
81
Page 86
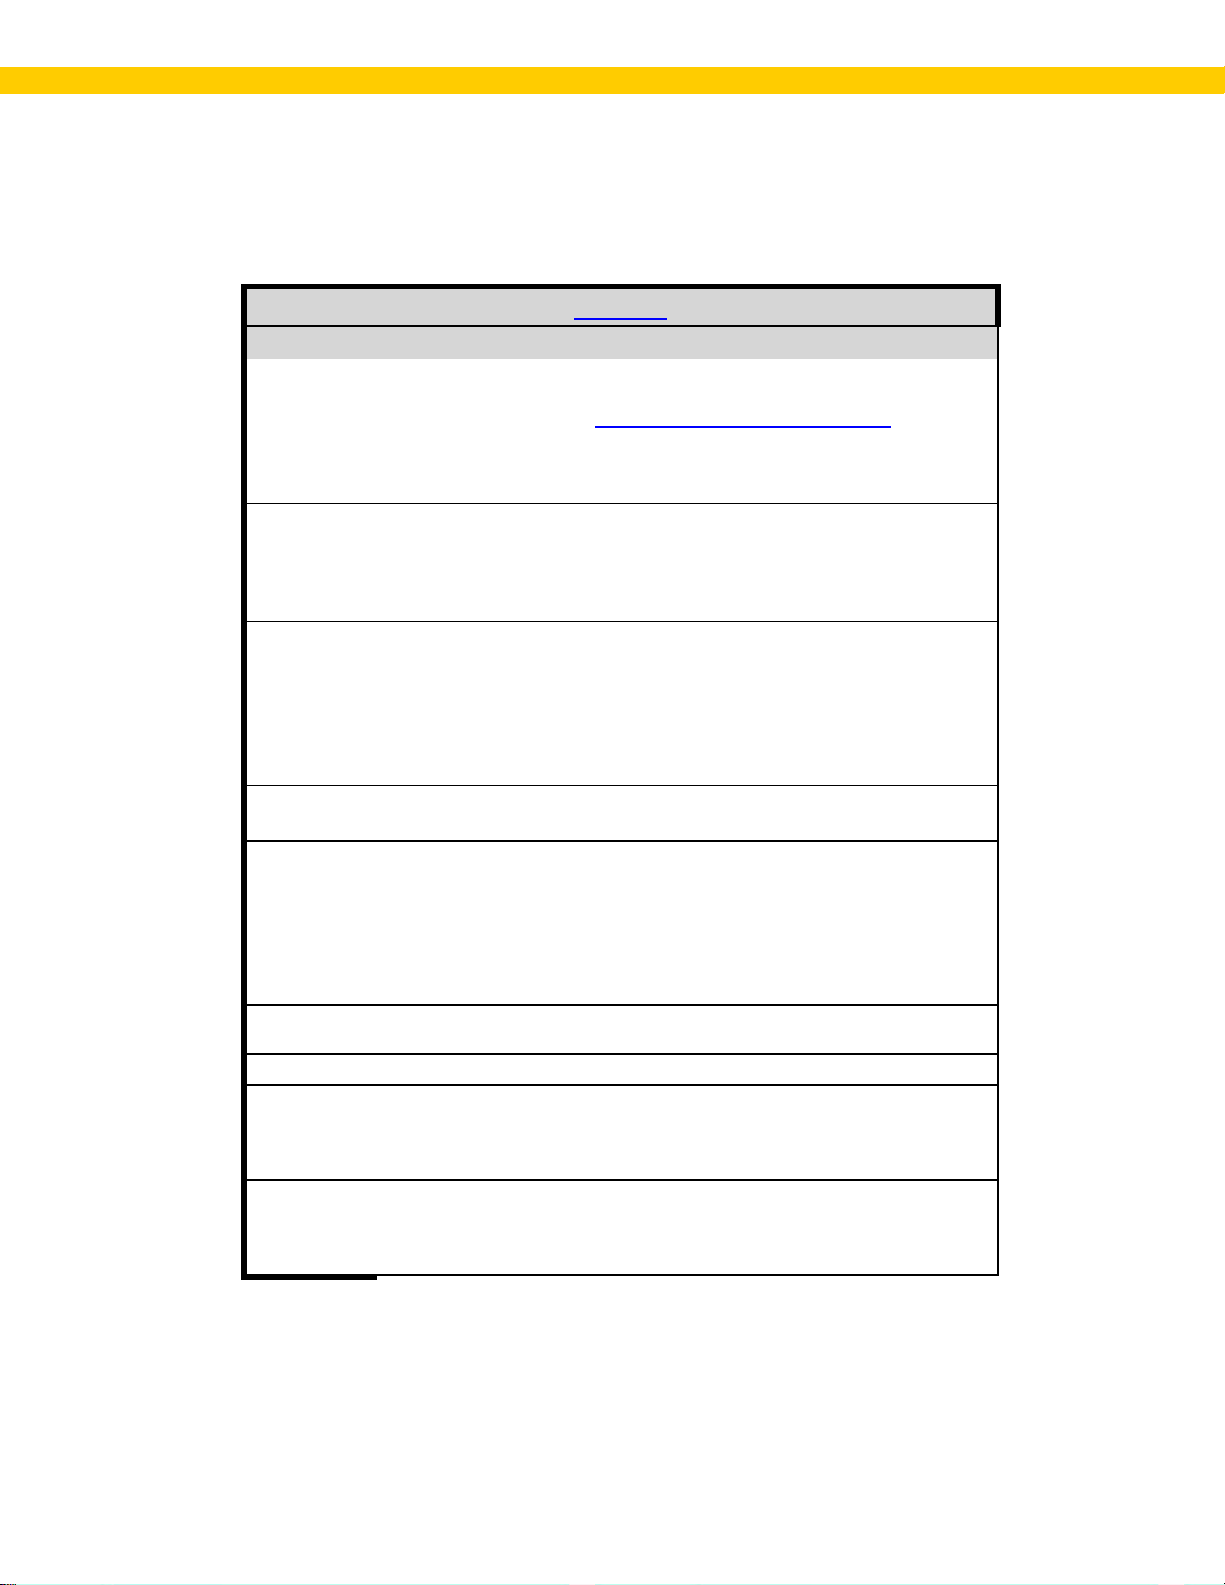
Wasp Labeler User Manual
Code 39
Select Code 39 from the drop down list. For a complet e list of
Barcode Symbology Reference.
Select this checkbox if you want this to be Code 39 Extended
using double character encoding.
This s etting determines density of the barc ode. Increase th e bar
dividual bars in the barcode) and the density is
may be harder for a scanner to read and may not be scannable at all.
This s ettings stands for ch ar acter per inch. You can add more
characters per inch by increasing the number in this field, resulting in
scanner to read and m ay not b e scann able at all.
The bar height
Select the Check Di git checkbox to include an opti onal check d ig it
Show in
Caption
When this option is selected, the check digit will appear in the
barcode caption.
Ratio
Select this ch eckb ox to display t he Start and Stop characters i n the
a reader where th e barcode content begins an d end s.
Select a Stop Character for your barcode or choose Auto to let
options ar e: A, B, C or D .
Code 39 Propert ie s Bo x Optio ns
The table bel ow lists the option s available fo r C ode 3 9 in t he Properties box > Barcode tab.
Field Description
Symbology
Extended
Bar Width
Char per I nch
Bar Height
Check Digi t
available symbologi es along with examples and descri pti ons of each,
pleas e r efer to the topic
symbology. Code 3 9 Exten ded supports all ASCI I charac ters by
width (applies to the in
decreased. You might want a more d ense barcode to fit on a small
label, for example. Keep in mind that a b ar code that is too d ense
a more dense barc ode. Notic e that as you i ncrease the number in
the Char per inch field, the Bar Width field decreases. The more
characters you add per inch, the more d ense you r barcode will b e.
Keep in mind that a barcod e that is too dens e m ay be harder for a
This setting determines how tall your barcode will b e.
does not aff ect dens i ty.
on your barcode to enhance data securi ty. A check digit appears l ast
on the barcode and chec ks for errors in the pr eceeding content. A
modulo 43 chec k character can be used t o enhance data securit y for
Code 39 s ymbols. The last di git of the sym bol is assumed to be the
check digit, and it is compared to a calc ulat ed check digit t o verify th e
symbol.
This is the wide to narrow bar rat i o. The default setting is 2 (2:1).
Show
Start/Stop
Stop
Character
captions of th e barcode. In Cod e 39 the * character is automatically
used as th e Start and Stop ch ar acters . Start and Stop characters tell
Lab el er assign one for you. A Stop Ch ar acter at the end of a barcod e
tells a scan ner or barcode reader that the con tent has ended. Your
82
Page 87

Wasp Labeler User Manual
Code 93
Select Cod e 93 from the drop down list. For a complete list of
Barcode Symbology Reference.
The bar height
This setting determines density of the barc ode. Increase th e bar
width (applies to the individual bars in the barcode) and the density is
Char per Inch
This s ettings stands for ch ar acter per inch. You can add more
characters per inch by increasing the number in this field, resulting in
scanner to read and may not be scannabl e at all.
Code 93 Propert ie s Bo x Optio ns
The table bel ow lists the option s available fo r C ode 93 in the Properties box > Barcode tab.
Field Description
Symbology
available symbologi es along with examples and descript ions of each,
pleas e r efer to the topic
Bar Height
Bar Width
This s etting determines how tall your bar code will be.
does not aff ect dens i ty.
decreased. You might want a more d ense barcode to fit on a small
label, for example. Keep in mind that a b ar code that is too dense
may be harder for a scanner to read and may not be scannable at all.
a more dense barc ode. Notic e that as you i ncrease the number in
the Char per inch field, the Bar Width fiel d decreases. The more
characters you add per inch, the more d ense you r barcode will b e.
Keep in mind that a barcod e that is too dens e m ay be harder for a
83
Page 88

Wasp Labeler User Manual
Code 11
Select Cod e 11 from the drop down list. For a complete list of
Barcode Symbology Reference.
The bar height
This s etting determines density of the barc ode. Increase th e bar
width (applies to the individual bars in the barcode) and the density is
Char per Inch
This s ettings stands for ch ar acter per inch. You can add more
characters per inch by increasing the number in this field, resulting in
scanner to read and m ay not b e scann able at all.
Field
Description
Select Data M atrix from the drop down list. For a complete list of
This s etting determines density of the barc ode. Increase th e bar
the barcode) and the density is
Code 11 Propert ie s Bo x Optio ns
The table bel ow lists the option s available fo r C ode 1 1 in t he Properties box > Barcode tab.
Field Description
Symbology
Bar Height
Bar Width
available symbologi es along with examples and descri pti ons of each,
pleas e r efer to the topic
This s etting determines how tall your bar code will be.
does not aff ect dens i ty.
decreased. You might want a more d ense barcode to fit on a small
label, for example. Keep in mind that a b ar code that is too d ense
may be harder for a scanner to read and may not be scannable at all.
a more dense barc ode. Notic e that as you i ncrease the number in
the Char per inch field, the Bar Width fiel d decreases. The more
characters you add per inch, the more d ense you r barcode will b e.
Keep in mind that a barcod e that is too dens e m ay be harder for a
Data Mat rix Pro per tie s Bo x Op tions
The table bel ow lists the option s available fo r D ata Matrix in the Properties box > Barcode tab.
Data Matrix
Symbology
Bar Width
available symbologi es along with examples and descr ipt ions of each,
pleas e r efer to the topic
width (applies to the individual bars in
decreased. You might want a more d ense barcode to fit on a small
label, for example. Keep in mind that a b ar code that is too d ense
may be harder for a scanner to read and may not be scannable at all.
Barcode Symbology Reference.
84
Page 89

Wasp Labeler User Manual
EAN/JAN 8
Select EAN/JAN 8 from the drop down list. For a complete l ist of
EAN/JAN 13
Select EAN/JAN 13 from the drop d own list. For a compl ete lis t of
Barcode Symbology Reference.
EAN/JAN 8 Properties Box Opti on s
The table bel ow lists the option s available fo r EAN /JA N 8 in the Properties box > Barcode tab.
Field Description
Symbology
% of N ominal
Specify Bar
Height
Bar Height
available symbologi es along with examples and descri pti ons of each,
pleas e r efer to the topic
The nominal siz e for a EAN /JAN barcode is 1inch. The usual
reduced size is 80% of the nominal size.
Chec k this box to enter a specific b ar height .
Enter the exact bar height in the field provided.
Barcode Symbology Reference.
EAN/JA N 13 Propertie s Box Optio ns
The table bel ow lists the option s available fo r EAN /JAN 13 in the Properties box > Barcode tab.
Field Description
Symbology
% of N ominal
Specify Bar
Height
Bar Height
available symbologies along with exampl es and descr i pti ons of each,
pleas e r efer to the topic
The nominal siz e for a EAN /JAN barcode is 1inch. The usual
reduced size is 80% of the nominal si ze.
Chec k this box to enter a specific b ar height .
Enter the exact bar height in the field provided.
85
Page 90

Wasp Labeler User Manual
Interleaved 2 of 5
Select Interl eaved 2 of 5 from the drop down list. For a com plet e list
This s etting determines density of the barc ode. Increase th e bar
width (applies to the individual bars in the barcode) and the density is
may be harder for a scanner to read and may not be scannable at all.
Char per Inch
This s ettings stands for ch ar acter per inch. You can add more
scanner to read and m ay not b e scann able at all.
Select the Check Di git checkbox to include an opti onal check d ig it
When this option is selected, the
compared to a cal culated check digit to verify the symbol.
Bearer bars are lines that can be added to frame y our barcod e. Your
Bearer Bar
Width
Interle av ed 2 of 5 Properti es Box Opt ion s
The table bel ow lists the option s available fo r Interleaved 2 of 5 in the Properties box > Barcode tab.
Field Description
Symbology
Bar Height
Bar Width
Check Digi t
Show in
Caption
of avail able sym bologies along wit h examples and desc r ipt ions of
each, please refer to the topic
This s etting determines how tall your bar code will be. The bar height
does not aff ect dens i ty.
decreased. You might want a more d ense barcode to fit on a small
label, for example. Keep in mind that a barcode that is too dense
characters per inch by increasing the number in this field, resulting in
a more dense barc ode. Notic e that as you i ncrease the number in
the Char per inch field, the Bar Width fiel d decreases. The more
characters you add per inch, the more d ense you r barcode will b e.
Keep in mind that a barcod e that is too dens e m ay be harder for a
on your barcode to enhance data securi ty. A check digit appears l ast
on the barcode and chec ks for errors in the pr eceeding content. A
modulo 10 chec k character is used.
last digit of t he symbol is as sumed to be the ch eck digit, and it i s
When this opti on is selected , the c heck digit will appear in the
barcode caption.
Barcode Symbology Reference.
Ratio
This is the wide to narrow bar rat i on. The default set tin g i s 2 (2:1).
options ar e None, Top and Bottom and Top, Bottom and Sides.
Bearer bars were introduc ed to pr event barc ode d i stortion wh en
Bearer Bars
flexib l e, ru bber stamps are used to print Int er leaved 2 of 5 barcodes
onto cardboard boxes. Add ing li nes all ar oun d the barcode s tam p or
just on the top an d sides of th e stamp was found to provide
add i tional st ability so the st am p did not bend as the box was b eing
stamped.
En ter the width for th e bearer bar(s).
86
Page 91

Wasp Labeler User Manual
Select ISBN from the drop down list. For a compl ete lis t of available
ITF14
Select ITF 14 from the drop down list. For a complete list of availabl e
Bar co de Symbolog y Reference.
The bar height
This s etting determines density of the barc ode. Increase th e bar
width (applies to the individual bars in the barcode) and the density is
Char per Inch
This s ettings stands for ch ar acter per inch. You can add more
characters per inch by increasing the number in this field, resulting in
scanner to read and m ay not b e scann able at all.
ISBN Propert ie s Bo x Optio ns
The table bel ow lists the option s available fo r ISBN in th e Properties box > Barcode tab.
ISBN
Field Description
Symbology
% of N ominal
Specify Bar
Height
Bar Height
symbologies along with exampl es and desc r ipt ions of each , please
refer t o the topi c
The nominal siz e for a EAN /JAN barcode is 1inch. The usual
reduced size is 80% of the nominal size.
Chec k this box to enter a specific b ar height .
Enter the exact bar height in the field provided.
Bar cod e Sy m bo lo gy Ref erence.
ITF 14 Properti es Box Opt ion s
The table below lists the options available for ITF 14 in the Properties box > Barcode tab.
Field Description
Symbology
Bar Height
Bar Width
symbologies along with exampl es and descr i pti ons of each, pl ease
refer t o the topi c
This s etting determines how tall your bar code will be.
does not aff ect dens i ty.
decreased. You might want a more d ense barcode to fit on a small
label, for example. Keep in mind that a b ar code that is too d ense
may be harder for a scanner to read and may not be scannable at all.
a more dense barc ode. Notic e that as you i ncrease the number in
the Char per inch field , the Bar Wid th field decr eases. The mor e
characters you add per inch, the more d ense you r barcode will b e.
Keep in mind that a barcod e that is too dens e m ay be harder for a
87
Page 92

Wasp Labeler User Manual
Bearer bars are lines that can be added to frame y our barcod e. Your
not bend as the b ox was being stamped.
Bearer Bar
Width
Maxicode
Field
Description
Select Maxicode from the drop down list. For a compl ete lis t of
Barcode Symbology Reference.
Select a Mod e from the dr op down list. Opt i ons are:
Note:
Country
En ter the C ountry Code of the dest i nati on add r ess. This field defaults
Class of
Service
Ratio
Bearer Bars
This is the wide to narrow b ar r ation . The default setting is 2 (2:1).
options ar e None, Top and Bottom and Top, Bottom and Sides.
Bearer bars must be included in hor izontal form for cod es pri nted on
labels, and as a full box (with H gauges) when printed directly on
corru gated surfaces.
Bearer bars were introduc ed to pr event barc ode d i stortion wh en
flexible rub ber stam ps are us ed to print barcod es onto cardboard
boxes. Adding lines all around the barcode stamp or just on the top
and sides of th e stamp provides ad dit i onal stabi lity so the s tamp di d
En ter the width for th e bearer bar.
M axicod e Pr o p er ties Box O p tions
The table bel ow lists the option s available fo r M axicode in the Properties box > Barcode tab.
Symbology
Mode
Postal Code
Code
available symbologi es along with examples and descri pti ons of each,
pleas e r efer to the topic
1. Mode 2 - Formatted dat a containi ng a structu r ed Carri er
Message wit h a numeric pos tal code. (Primari ly used for US
domestic destinations.)
2. Mode 3 - Formatted data containi ng a structur ed Carri er
Message wit h an alphanumeric postal code. ( Primar i ly used
for international d estinations.)
3. Mode 4 - Unformatted data with Standard Error C or r ection.
4. Mode 5 - Unformatted data with Enhanced Error Correction.
5. Mode 6 - Used for program ming hardware devic es.
UPS cod es us e M ode 2 or Mode 3.
En ter the post al code of the dest i nati on add r ess.
to 840 (United States) .
En ter the C l ass of Service c ode. These codes vary by carrier.
88
Page 93

Wasp Labeler User Manual
MicroPDF417
Field
Description
Select Micr oPDF417 from t he drop down list. For a compl ete list of
Barcode Symbology Reference.
The bar height
This s etting determines density of the barc ode. Increase th e bar
width (applies to the individual bars in the barcode) and the density is
may be harder for a scanner to read and may not be scannable at all.
Select the barcode version. The vers ion represents pr edefin ed
combinations of numbers of columns and rows
M icro PD F4 17 P ro p er ti es Box Options
The table bel ow lists the option s available fo r M i croPD F417 in the Properties box > Barcode tab.
Symbology
available symbologi es along with examples and descri pti ons of each,
pleas e r efer to the topic
Bar Height
Bar Width
This setting determines how tall your barcode will b e.
does not aff ect dens i ty.
decreased. You might want a more d ense barcode to fit on a small
label, for example. Keep in mind that a b ar code that is too d ense
Version
89
Page 94

Wasp Labeler User Manual
MicroQRCode
Select Micr oQRCode from the dr op down li st. For a complete l ist of
Barcode Symbology Reference.
Select the Cod e Version for your bar code. You have five opti ons:
Select the Err or C or r ection Level. Options are:
Select the typ e of data you want to encode. Opti ons are:
Code Module
Select the siz e ofyour barcode or let Lab el er deter mine the siz ed
MicroQRC o de Prop er ti es Box Opti on s
The table bel ow lists the option s available fo r M i croQRCode in the Properties box > Barcode tab.
Field Description
Symbology
Code Version
available symbologi es along with examples and descri pti ons of each,
pleas e r efer to the topic
• Auto - Use this option to have Lab eler selec t the version f or
you bas ed on the barcode's con tent.
• M1 - This versi on is capable of encoding:
o up to 5 numer ic characters with no error corr ection.
• M2 - This versi on is capable of encoding:
o up t o 10 numeric c haracters and 6 alphanumeric
characters with L err or correction or,
o up t o 8 numeric ch ar acters and 5 alphanumeric
characters with M error c orrec tion .
• M3 - This versi on is capable of encoding:
o up t o 23 numeric c haracters and 14 alphanumeric
characters with L err or correction or,
o 18 numeric characters and 11 alphanumeric
characters with M error c orrec tion .
• M4 - This versi on is capable of encoding:
o up to 35 num er i c ch ar acters and 21 alph anumeric
characters with L err or correction,
o up to 30 num er i c ch ar acters and 18 alph anumeric
characters with M error c orrec tion or ,
o up to 21 num er i c ch ar acters and 13 alph anumeric
characters with Q error correction level .
Error
Correction
Level
Code
Encoding
Size
• L - Approx 7% capability
• M - Approx 15% capability
• Q - Approx 25% capability
• H - Approx 30% capability
• AlphaNumeric
• Auto
• Byte
• Numeric
based on content or previous selections.
90
Page 95

Wasp Labeler User Manual
Select MSI from the drop down li st. For a compl ete lis t of available
The bar height
This s etting determines density of the barc ode. Increase th e bar
idth (applies to the individual bars in the barcode) and the density is
may be harder for a scanner to read and may not be scann able at all.
Char per Inch
This s ettings stands for ch ar acter per inch. You can add more
characters per inch by increasing the number in this field, resulting in
scanner to read and m ay not b e scann able at all.
Select the Check Digit checkbox to include an optional check d igit
perfo r m a check on the entire strin g including the first check digit.
MSI Properti es Bo x Option s
The table bel ow lists the option s available fo r M SI in the Prope r ties box > Barcode tab.
MSI
Field Description
Symbology
Bar Height
Bar Width
Check Digi t
Show in
Caption
symbologies along with exampl es and descr i pti ons of each, pl ease
refer t o the topi c
This s etting determines how tall your bar code will be.
does not aff ect dens i ty.
w
decreased. You might want a more d ense barcode to fit on a small
label, for example. Keep in mind that a b ar code that is too d ense
a more dense barc ode. Notic e that as you i ncrease the number in
the Char per inch field, th e Bar Width field d ecreases. The more
characters you add per inch, the more d ense you r barcode will b e.
Keep in mind that a barcod e that is too dens e m ay be harder for a
on your barcode to enhance data securi ty. A check digit appears l ast
on the barcode and chec ks for errors in the pr eceeding content. A
modulo 10 chec k digi t calculation is al ways perform ed on the data
strin g. A second m odulo 10 check digit is optional and is used to
When this opti on is selected , the c heck digit will appear in the
barcode caption.
Bar cod e Sy m bo lo gy Ref erence.
Ratio
This is the wide to nar r ow bar ratio. The default setting is 2 (2:1).
91
Page 96

Wasp Labeler User Manual
PDF417
Select PD F417 from the drop down list. For a complet e list of
Barcode Symbology Reference.
The bar height
This s etting determines density of the barc ode. Increase th e bar
the density is
Error
Level
Select the error cor rection level (1-8). The err or correction le vel
and the am ount of symbol damage th at could occur .
Select this ch eckb ox to trunc ate, or r emove, the right side of the
makes it mor e sus ceptible t o dam age.
PDF4 17 Properties Bo x Opti o n s
The table bel ow lists the option s available fo r PDF417 i n the Properties box > Barcode tab.
Field Description
Symbology
Bar Height
Bar Width
Columns
Rows
Correction
Truncate
available symbologi es along with examples and descri pti ons of each,
pleas e r efer to the topic
This s etting determines how tall your bar code will be.
does not aff ect dens i ty.
width (applies to the individual bars in the barcode) and
decreased. You might want a more d ense barcode to fit on a small
label, for example. Keep in mind that a b ar code that is too d ense
may be harder for a scanner to read and may not be scannable at all.
Select the number of columns for your b ar code (1-30).
Select the number of rows for your b ar code (3-90).
dep ends on the amount of dat a that needs to be en coded, the si ze
PDF417 barcode. This is useful if you need a smaller barcode, but
PLANET Properties Box Options
There are n o add i tion al opt ions for the PLANET bar code in the Proper ti es box > Bar code tab.
92
Page 97

Wasp Labeler User Manual
POSTNET
Select POSTNET from the dr op down list. For a com plet e l ist of
Barcode Symbology Reference.
Tall Bar
This s etting determines how tall the tal l bars on your barcode will be.
This s etting determines density of the barc ode. Increase th e bar
the density is
may be harder for a scanner to read and may not be scannable at all.
POSTNET Pro perti e s Box Opt ion s
The table bel ow lists the option s available fo r POSTNET in the Properties box > Barcode tab.
Field Description
Symbology
Short Bar
Height
Height
Bar Width
Columns
Ratio
available symbologi es along with examples and descri pti ons of each,
pleas e r efer to the topic
This s etting determines how tall the short bars on your barcode will
be. The bar height does not affect density.
The bar height does not affect density.
width (applies to the individual bars in the barcode) and
decreased. You might want a more d ense barcode to fit on a small
label, for example. Keep in mind that a b ar code that is too d ense
Select the number of columns for your bar code (1-30).
This is the wide to narrow bar rat i o. The default setting is (1:1).
93
Page 98

Wasp Labeler User Manual
QR Code
Select QR Code from the drop down list. For a complete list of
Select the Cod e Version for your bar code. You c an choose Au to to
Select the Err or C or r ection Level. Options are:
Select the typ e of data you want to encode. Opti ons are:
QR Code Properties Bo x Optio ns
The table bel ow lists the option s available fo r QR Code in the Properties box > Barcode tab.
Field Description
Symbology
Code Version
Error
Correction
Level
available symbologi es along with examples and descri pti ons of each,
pleas e r efer to the topic
have Labele r select th e version for you based on the barcode's
content, or s el ect Version V01 through V40.
• L - Approx 7% capability
• M - Approx 15% capability
• Q - Approx 25% capability
• H - Approx 30% capability
Barcode Symbology Reference.
Code
Encoding
Code Module
Size
• AlphaNumeric
• Auto
• Byte
• Numeric
Select the siz e ofyour barcode or let Lab el er deter mine the siz ed
based on content or previous selections.
94
Page 99

Wasp Labeler User Manual
GS1-14
Select GS1-14 from the drop down list. For a complet e list of
with examples and descriptions of each,
Barcode Symbology Reference.
This s etting determines density of the barc ode. Increase th e bar
dividual bars in the barcode) and the density is
may be harder for a scanner to read and may not be scannable at all.
The bar height
GS1 Limited
Select GS1 Lim ited from the drop down list. For a complete l ist of
Barcode Symbology Reference.
This s etting determines density of the barc ode. Increase th e bar
may be harder for a scanner to read and may not be scannable at all.
The bar height
GS1-14 Prop ertie s Box O ptio ns
The table bel ow lists the option s available fo r GS1-14 Code in the Prope r ti es box > Barcode tab.
Field Description
Symbology
available symbologi es along
pleas e r efer to the topic
width (applies to the in
Bar Width
decreased. You might want a more d ense barcode to fit on a small
label, for example. Keep in mind that a b ar code that is too d ense
Bar Height
This s etting determines how tall your bar code will be.
does not aff ect dens i ty.
GS1 Limited
The table bel ow lists the option s available fo r GS1 Limited Code in t he Properties box > Barcode tab.
Field Description
Symbology
available symbologi es along with examples and descri pti ons of each,
please refe r to the topic
width (applies to the individual bars in the barcode) and the density is
Bar Width
decreased. You might want a more d ense barcode to fit on a small
label, for example. Keep in mind that a b ar code that is too d ense
Bar Height
This setting determines how tall your barcode will be.
does not aff ect dens i ty.
95
Page 100

Wasp Labeler User Manual
Select GS1 Stacked Omnidirectional from the d r op down list. For a
Reference
This s etting determines density of the barc ode. Increase th e bar
width (applies to the individual bars in the barcode) and the density is
GS1 Truncated
Select GS1 Truncated from the drop down list. For a complete l ist of
Barcode Symbology Reference.
This s etting determines density of the barc ode. Increase th e bar
width (applies to the individual bars in the barcode) and the density is
The bar height
GS1 Stacked Omnidirectional
The table bel ow lists the option s available fo r GS1 Stacked Omnid i r ectional in the Properties box >
Barcode tab.
GS1 Stacked Omnidirectional
Field Description
Symbology
Bar Width
Bar Height
complet e list of av ailable symbol ogies al ong with examples and
description s of each, pl ease refer to the topic
.
decreased. You might wan t a more dense barcode to fit on a smal l
label, for example. Keep in mind that a b ar code that is too d ense
may be harder for a scanner to read and may not be scannable at all.
This s etting determines how tall your bar code will be. The bar height
does not aff ect dens i ty.
Barcode Symbology
GS1 Tru n cated Pr operties Box Opti ons
The table bel ow lists the option s available fo r GS1 Truncated i n the Properties box > Barcode tab.
Field Description
Symbology
available symbologi es along with examples and descri pti ons of each,
pleas e r efer to the topic
Bar Width
Bar Height
decreased. You might want a more d ense barcode to fit on a small
label, for example. Keep in mind that a barcode that is too dense
may be harder for a scanner to read and may not be scannable at all.
This s etting determines how tall your bar code will be.
does not aff ect dens i ty.
96
 Loading...