

Page 1

Quick Start Guide
Page 2

© Copyright Wasp Barcode Technologies 2014
No part of this publication may be reproduced or transmitted in any form or by any means
without the written permission of Wasp Barcode Technologies. The information contained in this
document is subject to change without notice.
Wasp and the Wasp logo are registered trademarks of Wasp Barcode Technologies. All other
trademarks or registered trademarks are the property of their respective owners.
Page 3
Step 1
Installation & SetupMobileAsset | Quick Start Guide
CONGRATULATIONS
Congratulations on your purchase of MobileAsset! This guide will take
you through the installation process and help you set up your software.
Most of the information available here is also available in the Getting
Started section of the online help.
INSTALL THE SOFTWARE .................2
SET UP YOUR DATABASE ................ 15
METHODS OF DATA ENTRY ..................18
MOBILEASSET WEB MODULE SETUP ....... 20
PRINT ASSET TAGS ....................... 22
AUDIT YOUR ASSETS .................... 23
BEGIN USING THE APPLICATION ....... 24
PROFESSIONAL EDITION INSTALL ..... 24
CONNECTING A MOBILE DEVICE ....... 28
ENTERPRISE EDITION INSTALL ......... 29
UPGRADING ENTERPRISE ............... 32
MANAGE MULTIPLE COMPANIES ....... 33
CONNECTING A MOBILE DEVICE ....... 35
MANUAL START PROCEDURES ......... 36
INSTALL THE SOFTWARE
1
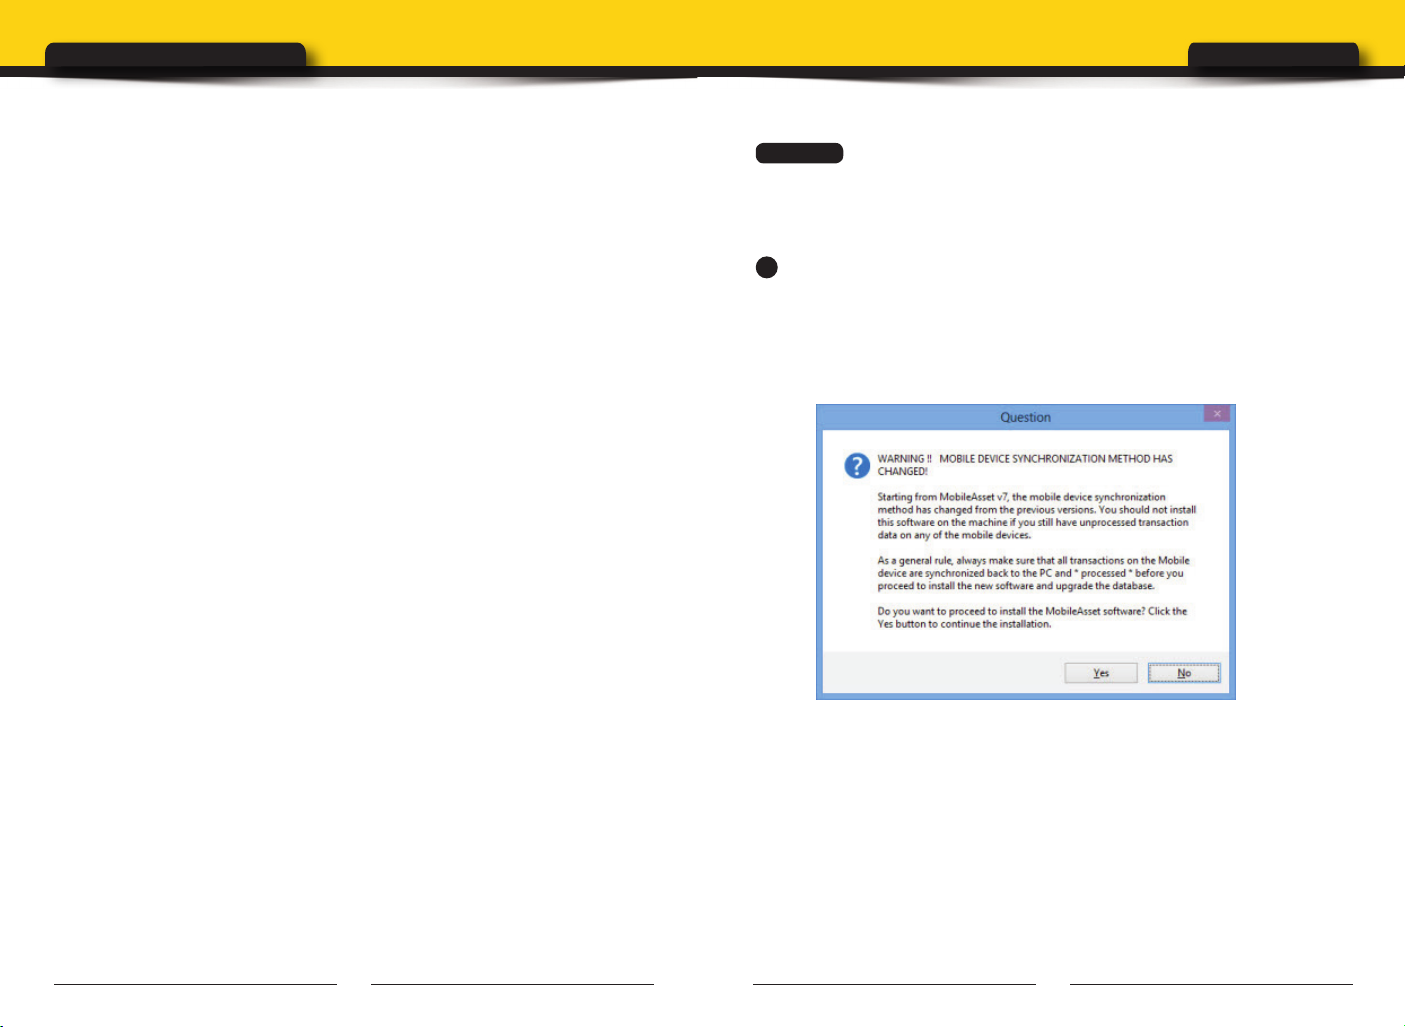
Insert the installation disk into your computer. The CD should
automatically run the MobileAsset installer. If the installer does not run,
you can manually start it by navigating to the CD on your computer and
selecting setup.exe.
The following question appears:
Beginning with MobileAsset v7, the mobile device sychronization method
has changed to an “on demand” method. The new sync method allows
you to sync automatically or manually over a wireless connection (or
when the mobile device is physically attached to the computer, if you do
not have wireless capability). This eliminates the needs to “process” data
from the mobile device.
Click Yes on this screen if you are upgrading from a previous version
and all of your devices have been synced and you are ready to install
MobileAsset. Also click Yes on this screen if this is a new installation.
1 2
Page 4
Installation & SetupMobileAsset | Quick Start Guide
2
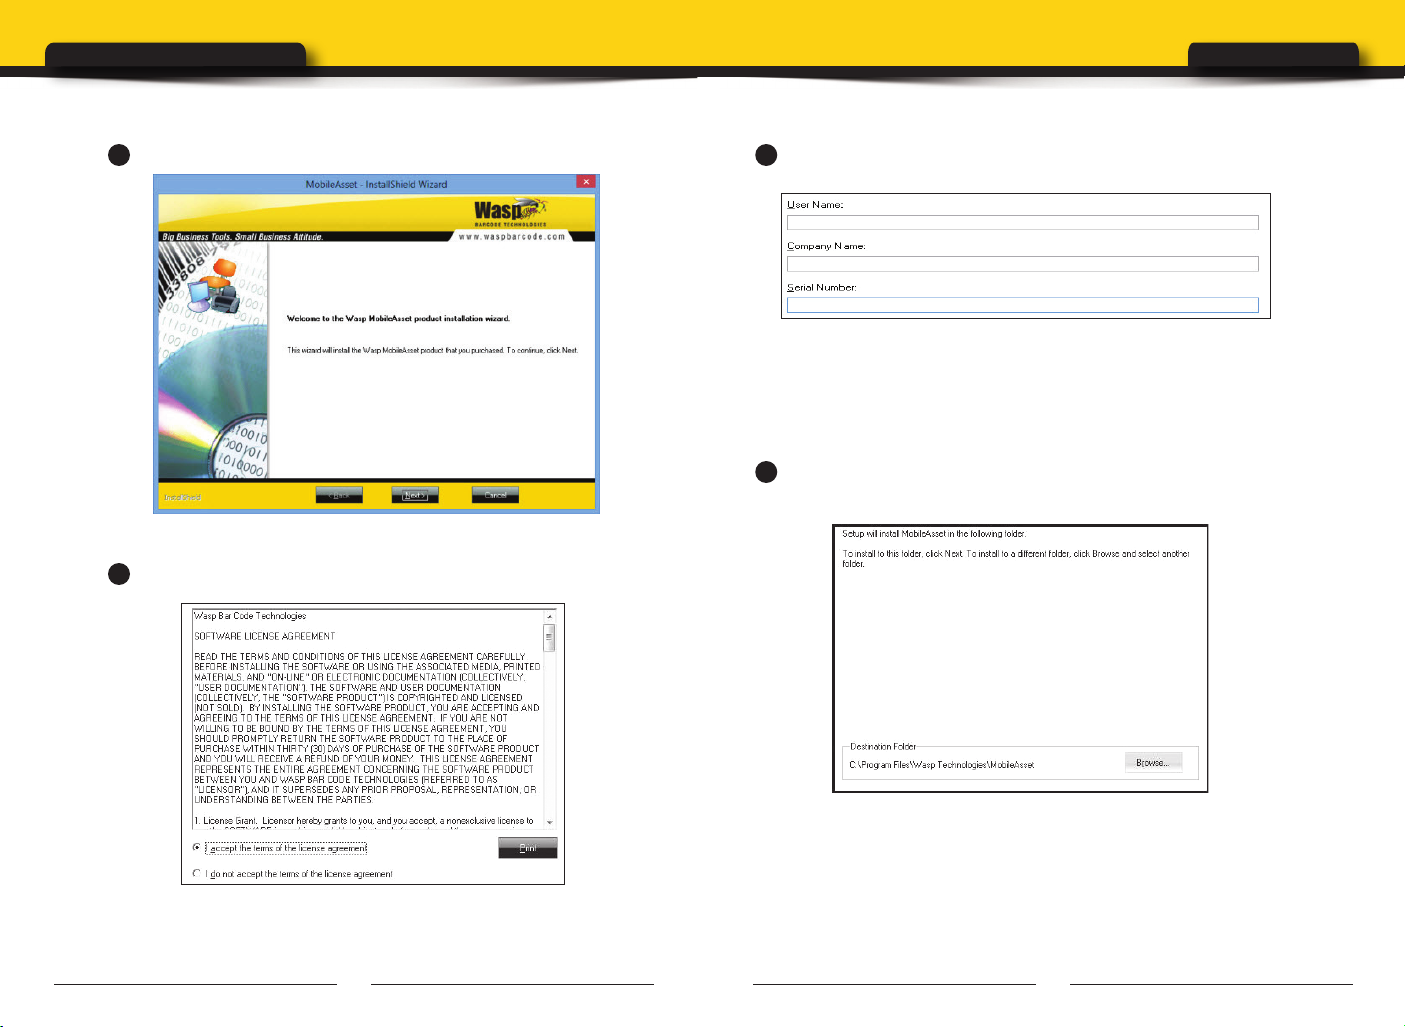
The installation wizard Welcome screen appears:
Click Next on this screen to begin installing MobileAsset.
3
Next the License Agreement screen appears.
4
The User Registration screen appears.
Enter your User Name (this can be any name of your choice), your
Company Name and the Serial Number. The serial number can be found
on or in the DVD case containing your MobileAsset software (19-digit
number).
5
Next, a screen displays listing the Destination Folder for installation
of MobileAsset: (C:\Program Files\Wasp Technologies\MobileAsset).
Review the license agreement, then select I accept the terms of the
license agreement. You will not be able to continue installing the
application until you select this option.
3 4
You can select a new destination by clicking the Browse button. Be aware
that the install location must be two levels deep. For example, the path
D:\Wasp Technologies\MobileAsset will work for the installation while
the path D:\MobileAsset will cause the install to fail. Accept the default
location (recommended) by clicking the Next button.
Page 5
Installation & SetupMobileAsset | Quick Start Guide
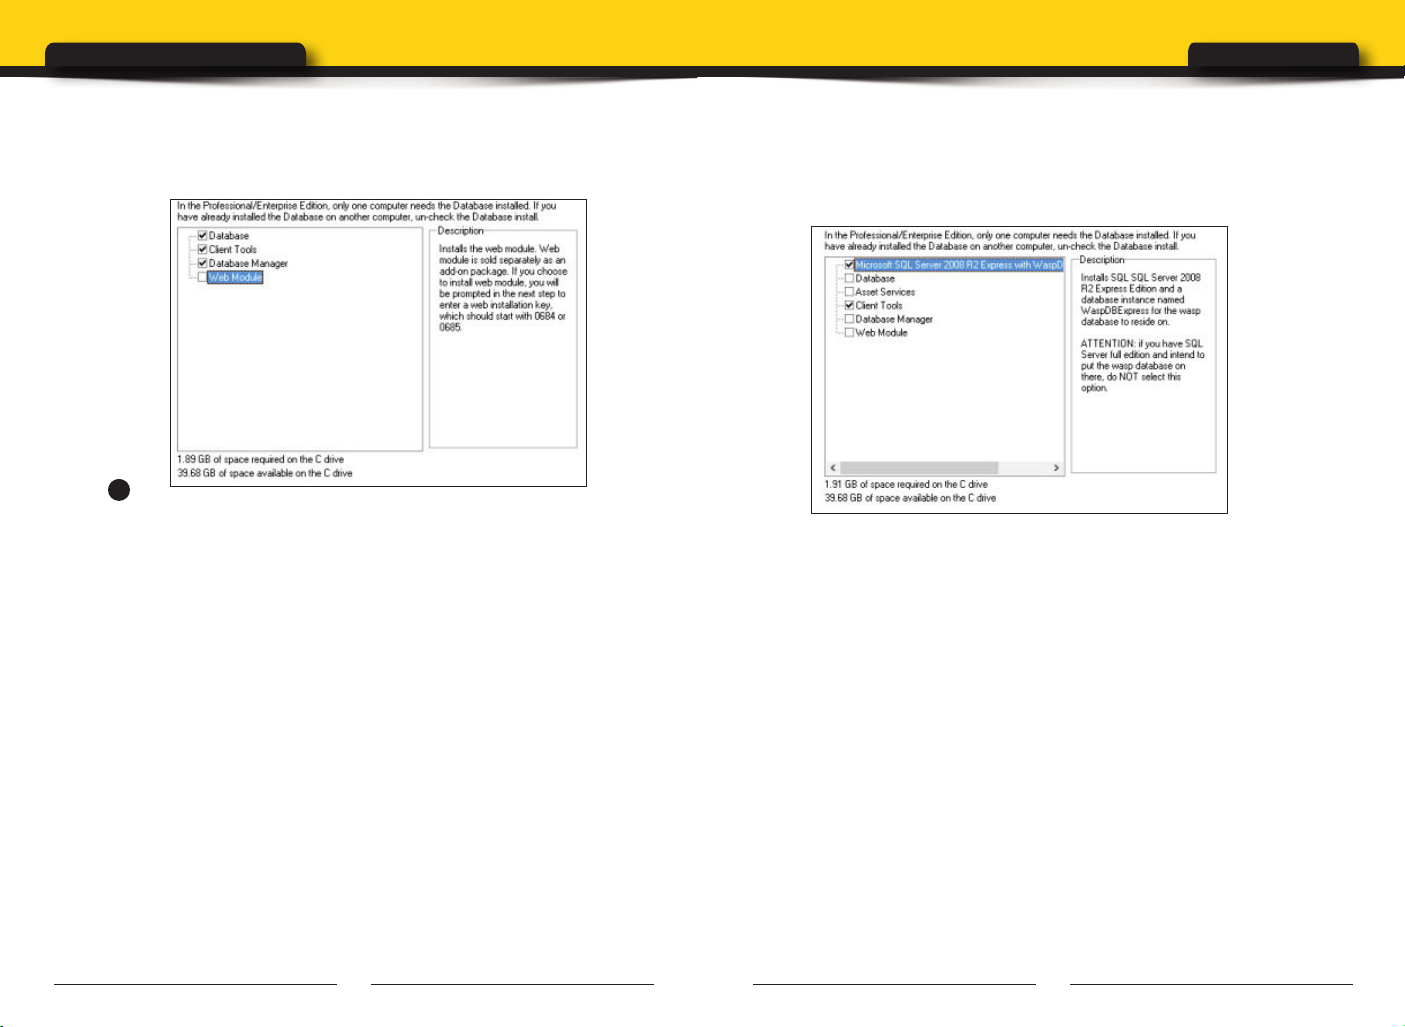
If you are installing the Professional version, this Select Installation
Type screen appears:
6
If you have already installed the database on another computer,
deselect the Database checkbox on this screen (you only need to install
the Client Tools to enable the software to talk to the database).
The Database Manager checkbox should be selected if:
• You are installing the Enterprise version and you will be
maintaining assets for multiple companies from this machine, or
You are installing the Professional or Enterprise version and you
•
will be backing up, restoring or maintaining the database from this
machine.
If you are installing the Enterprise version, this Select Installation Type
screen will also display the choice to install Microsoft SQL Server 2008
R2 Express with WaspDBExpress Instance.
Note: Do not select the Microsoft SQL Server option if you have the full
edition of SQL Server 2005/2008/2012 already installed and intend to
install the Wasp Database in that location.
The Web Module is a separate option that can be purchased with the
Professional and Enterprise editions. The Web Module checkbox should
be selected if you have purchased a Web Module license. Only select the
Web Module option if the machine on which you are installing has the
32-bit version of IIS already installed on it.
For information regarding the Database Manager feature please, refer
to the section Using MobileAsset to Manage Assets for Multiple
Companies on page 34.
5 6
Page 6
7
Web Module Installs Only. All others skip to Step 11.
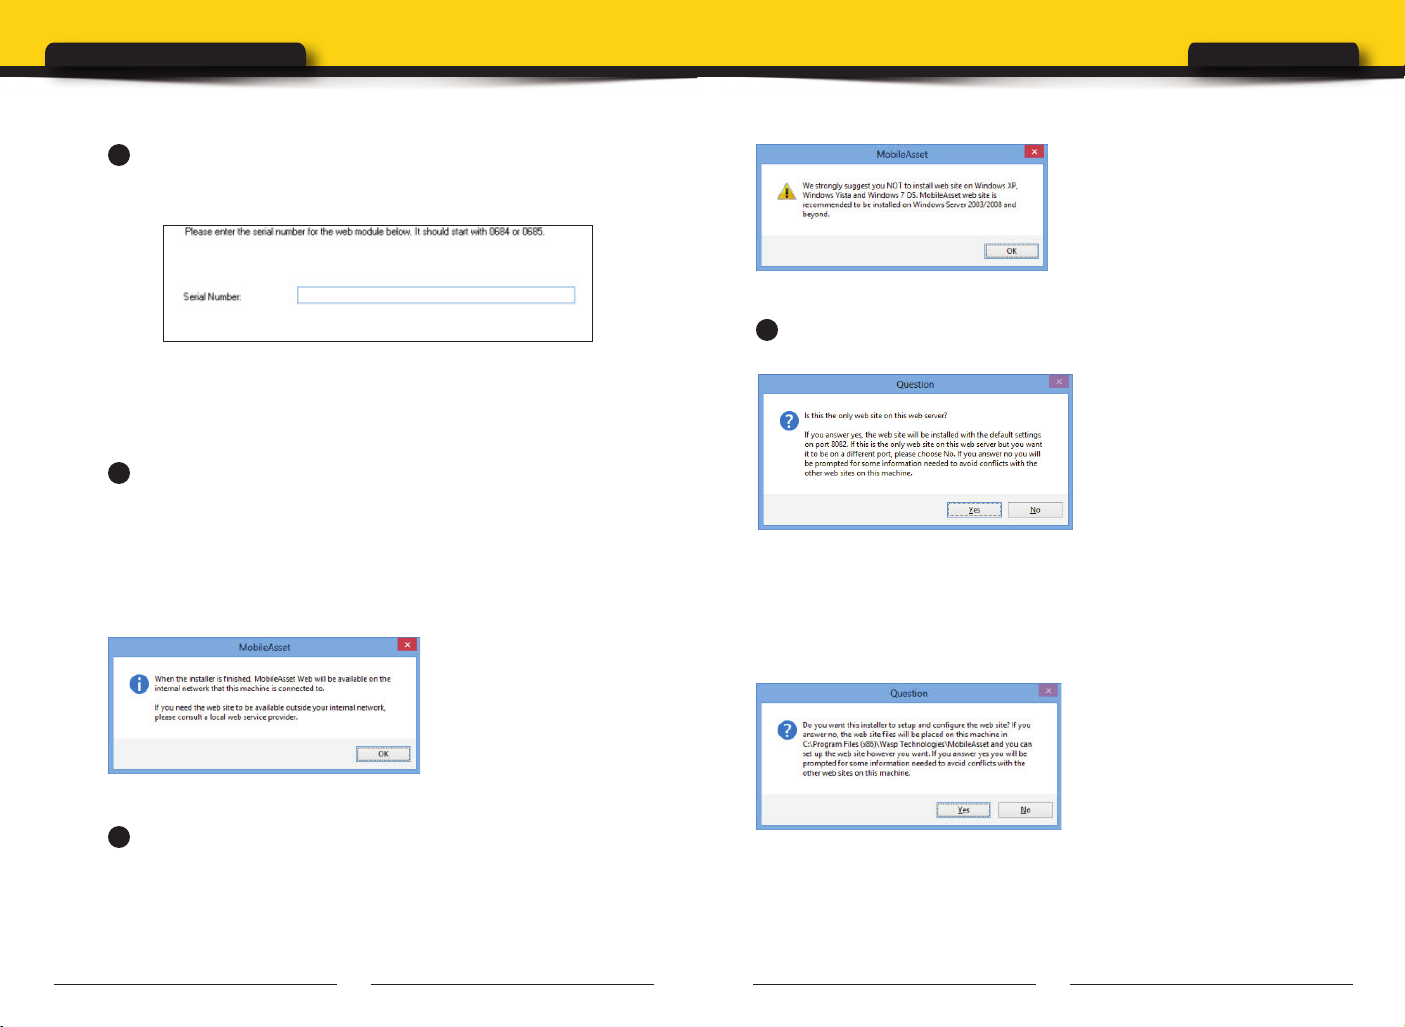
If you have selected to install the Web Module you will see the following
screen:
Note: Web module installation information is being provided for legacy
purposes only. Features new to MobileAsset version 7 will not be
available in MobileAsset Web.
8
Enter the serial number for the web module, beginning with 0684 or
0685, then click Next.
Click OK on this message to continue.
10
The following screen appears:
Installation & SetupMobileAsset | Quick Start Guide
A message will appear notifying you that MobileAsset Web will be
installed and available on your internal network (the network to which the
machine you are installing on is connected). You will need to contact your
internet service provider if you need it available outside of your network.
Click OK on this message to continue.
9
A message will appear advising you NOT to install MobileAsset Web
on Windows XP, Windows Vista or Windows 7 OS. MobileAsset Web
is recommended for installation on Windows Server 2003/2008 and
beyond.
7 8
If MobileAsset will be the only website on the server, click Yes. The Web
Module will install with the default settings using Port 8082. If there are
other websites on the server, click No. You will need to provide additional
information to avoid MobileAsset conflicting with your other websites.
The following screen appears when you click No:
If you do not want the MobileAsset installer to configure the MobileAsset
website for you, click No. All website files will be placed on the installion
computer in C:\Program Files (86x)\Wasp Technologies\MobileAsset. You
will need to access these files and configure the website.
Page 7
Installation & SetupMobileAsset | Quick Start Guide
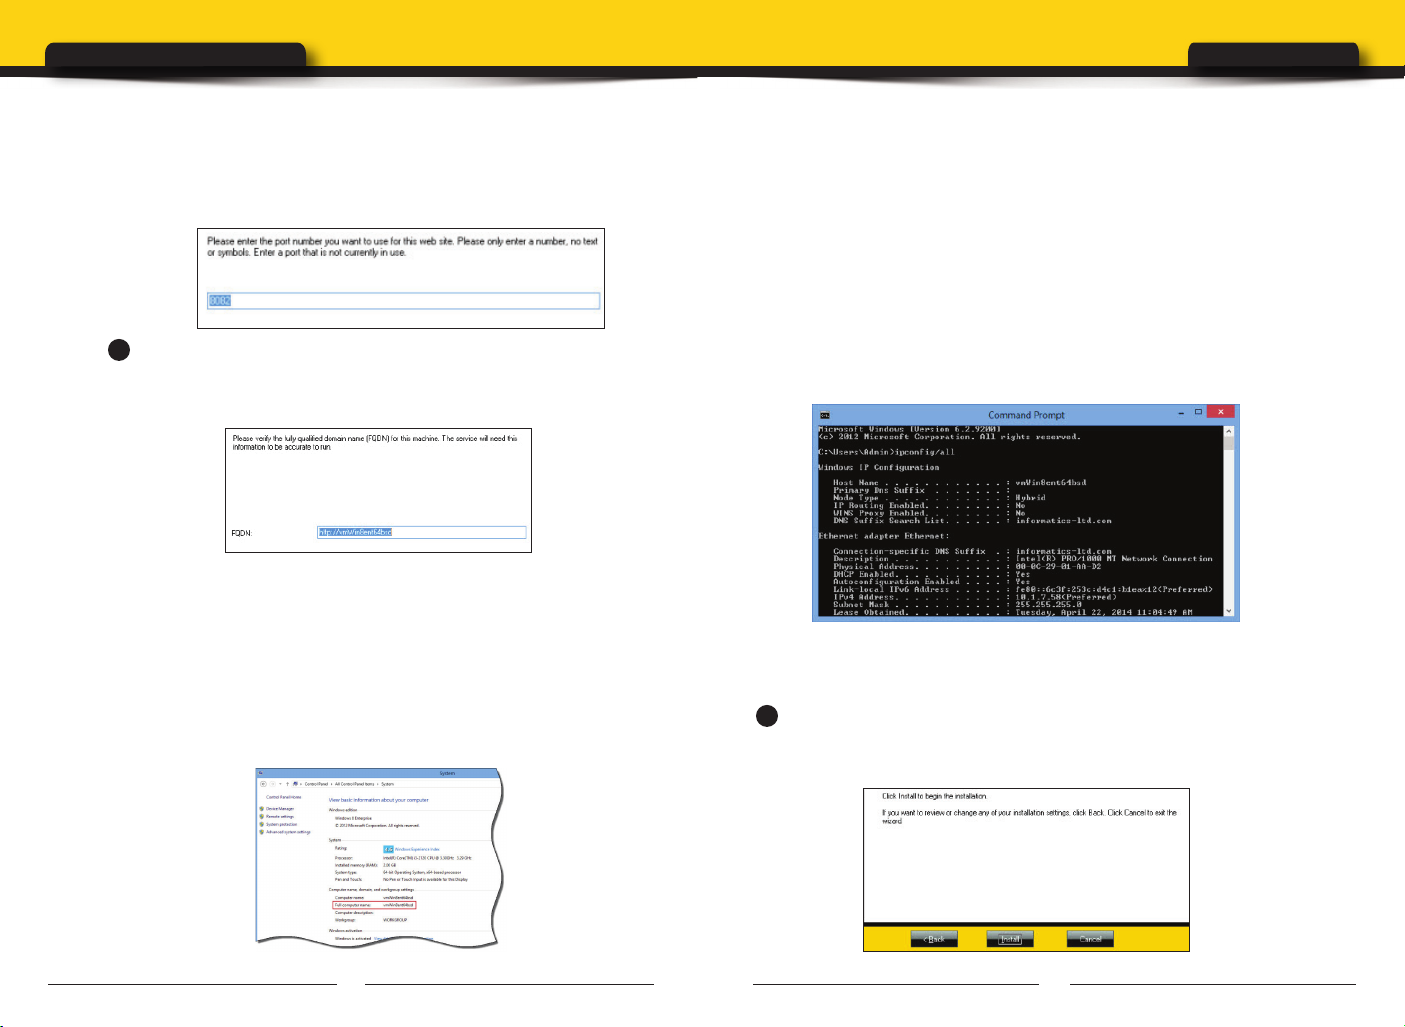
If you want the MobileAsset installer to automatically configure the
MobileAsset website to avoid conflicts with other websites on your
server, click Yes. You will be asked to provide the port number for the
website.
11
If this is a Pro or Enterprise version, the Fully Qualied Domain
Name screen appears. The Fully Qualified Domain Name (FQDN) is the
complete name of your machine.
Enter the complete domain name of this machine. The FQDN field may
appear pre-populated with a machine name. You should verify that the
machine name is correct using one of the methods described below:
Method 1:
Navigate to Start > Control Panel (classic view) > System. (in Win8 click
Control Panel > System.) The FQDN for this computer is listed as the Full
Computer Name.
Method 2:
Select the Start (Windows icon) key on your keyboard, then enter CMD in
the search field. CMD.exe will appear in the Programs section. (In Win8,
select the CMD icon from the toolbar.)
Select cmd.exe from the Programs section of the Start menu. The CMD
screen appears.
On the CMD screen, enter IPCONFIG/all at the prompt. Configuration
information for your machine will appear on the screen as shown below:
The FQDN is the Host Name followed by the Primary DNS Sufx. You
may have to scroll up on the CMD screen to view these two fields.
12
The installation confirmation screen appears. If you want to make
changes to your destination folder at this point, click the Back button.
If you are ready to install MobileAsset, click the Install button.
9 10
Page 8

Installation & SetupMobileAsset | Quick Start Guide
A series of progress screens will appear. The installation process may
take a few minutes.
13
Database Installation
a. During the install, the screen shown to
the right will appear: This wizard takes
you through the process of installing
your new database. Click Next on this
screen to continue installing.
b. Next, a progress message appears
notifying you that the software is
testing the connection.
You do not need to do anything at this point.
c. If you are installing the Professional or Enterprise version and
you are installing the DB Manager, a screen appears asking
you to create an access
code for the Database
Manager. This access
code serves as your
password to open the
Database Manager
after install. It is very
important that you make
a note of this password.
Enter the Access Code of your choice, then click the OK button.
d. A message appears asking if you want to backup the database
now:
Click Backup Database Now to accept the default backup location,
or click Backup to Different Location to select a custom directory
or name for your backup file. If you want to create the backup later,
click Skip Backup.
e. Click Finish on the Database Installer screen to continue.
f. The Database Installer will run again to install the Sample
Company Database. You will be prompted to backup the database
(screen shot above). The Sample Company database installation
will begin with the screen shown in step a, above.
g. Click Finish on the Database Installer screen to continue.
14
Next you will see a series of install screens for third party
applications, such as Crystal Reports and Adobe Air. You do not need to
do anything on these screens.
If you are upgrading from version 5 or 6, the Database Installer
will detect your existing database, upgrade it (leaving your
existing data intact) and create a backup both before and after
the upgrade.
11 12
Page 9

Installation & SetupMobileAsset | Quick Start Guide
15
If you are installing the Web Module, the following screen appears:
Make a note of the MobileAsset Web Module URL.
16
After MobileAsset installs, the WaspLabeler installation screen will
appear. WaspLabeler installs to allow you to view and edit labels that are
included in your MobileAsset system and to create new labels.This screen
lists prerequisites that must be installed in order for WaspLabeler to work
correctly.
17
The WaspLabeler Choose Destination screen will appear.
You can select a new destination by clicking the Browse button. Be aware
that the install location must be two levels deep. For example, the path
D:\Wasp Technologies\WaspLabeler will work for the installation while
the path D:\SWaspLabeler will cause the install to fail. Accept the default
location (recommended) by clicking the Next button.
A series of progress screens will appear as Labeler is installing.
After the entire installation process is complete, a screen will appear
asking if you want to reboot your computer. Select Yes, I want to restart
my computer now, remove any installation disks from their drives, then
click Finish. Your system will reboot.
Click Install on this screen.
Note: If you are upgrading the WaspLabeler program, select Repair, then Next.
13 14
MobileAsset and WaspLabeler icons will appear on your desktop.
Page 10

Installation & SetupMobileAsset | Quick Start Guide
Step 2
SET UP YOUR DATABASE
Now that your software is installed, you will want to take a few
minutes to properly enter information into your database.
For detailed information on any of the procedures listed in this document,
please refer to MobileAsset’s online help system. You can access the
online help by clicking Help > Contents from the toolbar or by selecting
the Help button on any screen.
Below is a brief outline of the steps required to set up your database.
These steps should be done in order.
entering information into your database; however, much of this data can
be imported. Importing data is discussed in this document in the section
titled
Methods of Data Entry (Importing vs. Manual Entry).
are planning on importing your information, we recommend that you
review the steps below to help you understand how the different types of
data interrelate.
If you have installed the MobileAsset Web Module, you can complete most
of your database setup on the Web. You will need to enter your Groups/
Users and Company Information on the PC application, then you can
complete the database setup on the Web Module. For more information
on getting started using the MobileAsset Web Module, please refer to the
section titled MobileAsset Web Setup on page 19.
1
First, open the MobileAsset application by double-clicking
on the icon on your desktop. You can also access MobileAsset from the
Start menu by selecting Programs>Wasp Technologies>MobileAsset.
The steps below discuss manually
Even if you
2
Create at least one additional user with Administration
privileges. By default, MobileAsset contains one Admin user
profile. You will want to create at least one more so that if one becomes
disabled you can still access the system.
Let MobileAsset Automatically Create User Proles Using Windows
NT Authentication: If you are using Windows NT Authentication, you
can set up a group in MobileAsset that matches your group name in the
Microsoft Active Directory. When users in this group access MobileAsset
for the first time their User account will be automatically created and
added to the Manage Users screen in MobileAsset (PC application).
Example: You have a group in your Active Directory named My Users
and you want everyone in My Users to have access to the MobileAsset
Web Module. Create a group with the name My Users in MobileAsset
using the MobileAsset PC application. Now when each member of the
Group My Users accesses MobileAsset, they will receive the usual
Windows Network Login Screen. They should enter their normal
network user name and password. MobileAsset will recognize the Active
Directory group’s name as matching the MobileAsset group name and
automatically create a user account for that user. You can then view
those user accounts in MobileAsset (Security > Manage Users). Keep in
mind that if you change the password on the user’s MobileAsset user’s
account, they will receive the regular login screen and must enter the new
password, rather than their network password.
3
Enter your company information. From the Main menu, select the
Administration icon, then click Company Information. All fields on the
company information screen are optional.
4
Enter all sites for your company. From the Main menu,
select the New icon, then click Site.
The Login screen will appear. The first time you access the
system, Admin will appear in the User Name field. You do not need to
enter a password. Click the OK button to launch the software.
15 16
A site is a major classification for areas that contain assets within your
company. For instance, if you have two warehouses, you might set up
MobileAsset to have two sites: Warehouse 1 and Warehouse 2.
Page 11

Installation & SetupMobileAsset | Quick Start Guide
You must enter at least one site and location before you can add assets
to your system.
5
Now you can enter the locations contained in each of your sites.
From the Main menu, select the New icon, then click Location. Assets
that you enter into your system must each be
location within that site. Using the example
assigned to a site and a
above, within Warehouse 1,
you might have three locations: Main Storage Area, Manager’s Office and
Administrative Office.
6
This step is optional. You can create departments for your company. This
may help you with assigning the assets. For instance, within your locations,
you may want to designate two departments. Continuing the example above,
within the Administrative Office, you could have two departments: Accounting
and Human Resources. This is a further classification to help you track your
assets.
To set up departments, from the Main menu, select the New icon, then
click Departments.
7
This step is optional.
You can enter all manufacturers for your assets.
From the Main menu, select the New icon, then click Manufacturers.
Manufacturers can later be assigned to Asset Types (see step 9).
8
If you will be calculating depreciation on your assets, set up your
Depreciation Classes next. These are created to determine a specific
Depreciation Method (straight-line, double declining, etc.) for an Asset
type (see step 9). The Asset Types are then assigned to specific assets
and the depreciation class tied to the asset type is used to calculate
depreciation.
To create Depreciation Classes, from the Main menu, click the New icon,
then select Depreciation Classes.
9
Now you need to create your asset types. Asset types are required
because each asset in your inventory is assigned to an asset type.
The asset type is a category or classification for assets. For instance,
17 18
you may have an asset type of IBM Laptop X6000 that defines the
manufacturer, size specs, etc. of this particular type of computer. Then
specific computers of the same type are assigned as assets to the IBM
Laptop X6000 asset type.
To create Asset Types, from the Main menu, select the New icon, then
click Asset Types.
10
This step is optional. You can create different categories to which
you can assign assets. This is another way to further define your assets.
You can add categories directly from the New Asset Type screen, if you
wish.
Now you are ready to begin entering individual assets. From the Main
menu, click the New icon, then click Assets.
Methods of Data Entry (Importing vs. Manual Entry):
There are two ways you can add information to your database: through
manual entry or by importing the data from an existing database.
Importing data can be much quicker if you wish to transfer a large amount
of information from an existing database to MobileAsset. Importing this
information also ensures you do not have typographical errors.
You must import the data in a set order. Detailed instructions for importing
data can be found in the online help. The outline below details the order
in which data must be imported into the system. For a more detailed
explanation and outline, please refer to the Import Strategies topic in the
online help. MobileAsset will only accept the data in this specific order
because each piece of information builds on the next to create a complete
profile for your assets. For instance, each asset must be assigned to a
specific location, therefore, you must import your locations first so that
MobileAsset will have this information prior to importing your assets.
Again, we strongly recommend that you review the information regarding
importing data in the online help before you being the import process.
Page 12

Installation & SetupMobileAsset | Quick Start Guide
Import Order:
A. Vendors (optional)
B. Manufacturers (optional)
C. Depreciation Classes
(optional – import if you will be calculating depreciation.)
D. Asset Types (required)
E. Departments
wish to assign them to specific departments, you must import
the departments prior to importing the employees. If you wish
to assign Assets to specific departments, but not employees,
you can import departments anytime before importing assets.)
F. Site (required)
G. Locations (required)
H. Assets (required)
I. Employees (optional – import if you will be checking out/in
assets to employees)
J. Customers (optional - impor t if you will be checking out/in
assets to customers)
If you plan on importing information, you should also keep in mind that some
types of supplemental information cannot be imported. For instance, if you
wish to assign Asset Types to specific Categories, you will need to manually
create these from the New Asset Type screen.
Imported data must be in .csv format. For further information, including
examples of properly formatted .csv files, please refer to the Import
Strategies topic in the online help.
(optional – if you will be impor ting employees
and
MobileAsset Web Module Setup
This information is being provided for legacy purposes only. New features
available in MobileAsset version 7 will not be available in MobileAsset
Web.The MobileAsset Web Module combines the asset tracking tools
found in the PC version with the accessibility and convenience of a webbased application. The web module utilizes the same database your PC
version does, so if you make changes to your assets on the PC, your
users will see those changes in the Web Module, and vice-versa. While
the Web Module is ready to use right after installation, there are a few
things to keep in mind as you get started.
Accessing the Web Module – After installation you should be able to
access the web module by typing http://<webservername>:8082/. If
you do not have Microsoft Silverlight installed, you may see a screen
prompting you to install it.
Follow the onscreen prompts to install Microsoft Silverlight. You will
need to close and reopen your browser. Silverlight will need to be
installed on each client machine that will be accessing the MobileAsset
Web Module. You will need Local Admin rights to each machine in order
to install Silverlight. Your IT department may be able to perform this
installation for you through update services.
Setting Your Internet Options for Maximum Performance - After you
open MobileAsset in your web browser, you should take a few minutes to
make sure your Internet options are set to allow maximum performance.
It is a good idea to perform the following steps prior to using the web
module. Note: These setting instructions are for Internet Explorer.
• Add MobileAsset to your list of “Safe Sites” – To do this, in
your browser go to Tools > Internet Options > Security > Local
Intranet > Sites. Add the web address of your MobileAsset Web
Module.
• Check the User Authentication settings on your browser – If
your company will be using Windows NT Authentication (see the
Security section, below) to log users onto the web module, you
19 20
Page 13

Installation & SetupMobileAsset | Quick Start Guide
can prevent them from seeing the Windows Network Login screen
each time they login. Go to Tools > Internet Options > Security >
Location Intranet > Custom levels. The Security Settings screen
appears. On the Security Settings screen scroll to the bottom.
In the User Authentication section, make sure Automatic Logon
with Current User Name and Password is selected. When this
option is selected, and your groups/users in the MobileAsset PC
application match those in your Microsoft Active Directory, users
are automatically logged into the MobileAsset Web Module without
having to enter their network login/password. Note: The settings
below are from Internet Explorer.
• Check your Active X settings – The Active X components are
used for printing reports from MobileAsset. Make sure all Active X
components are set to Enable or Prompt. These are found under
Tools > Internet Options > Security > Local Intranet > Custom
levels.
• Make sure popups are set to open in a new window or tab – On
the Internet Options screen – General tab, click on Tabs-Settings.
On the Tabbed Browsing Settings screen make sure the options
Always open popups in a new window or tab is selected.
• Set your Popup Blocker to Always Allow Popups From This
Site – If you have the popup blocker turned on, the first time you
use the web module you may see a message that a popup window
has been blocked. Select Always Allow Popups From This Site to
prevent this from happening.
For more detailed instructions, with screen shots, on completing the steps
above, or if you have problems printing from MobileAsset, please see the
Troubleshooting section found in the MobileAsset Online Help. To access
the online help, open the web module and click Help from any screen.
Security – Groups and users are set up in the MobileAsset PC application.
If you need to make corrections/additions to your users or groups, you will
need to do so on the PC. There are two ways you can set up users in the
MobileAsset PC application to have access to the MobileAsset Web Module:
21 22
1. Manually Enter Users: Create groups and users using the MobileAsset
PC application.
2. Let MobileAsset Automatically Create User Proles Using Windows
NT Authentication: If you are using Windows NT Authentication, you
can set up a group in MobileAsset that matches your group name in the
Microsoft Active Directory. When users in this group access MobileAsset
for the first time their User account will be automatically created and
added to the Manage Users screen in MobileAsset (PC application).
Example: You have a group in your Active Directory named My Users
and you want everyone in My Users to have access to the MobileAsset
Web Module. Create a group with the name My Users in MobileAsset
using the MobileAsset PC application. Now when each member of the
Group My Users accesses MobileAsset, they will receive the usual
Windows Network Login Screen. They should enter their normal
network user name and password. MobileAsset will recognize the Active
Directory group’s name as matching the MobileAsset group name and
automatically create a user account for that user. You can then view
those user accounts in MobileAsset (Security > Manage Users). Keep in
mind that if you change the password on the user’s MobileAsset user’s
account, they will receive the regular login screen and must enter the new
password, rather than their network password.
Getting Additional Help – If you need assistance setting up the
MobileAsset Web Module, you can refer to the Troubleshooting section
in the online help, or you can check the Troubleshooting the MobileAsset
Web Module page at the support site. The online troubleshooting page
is an update repository of tips for getting the most out of your web
application.
Step 4
PRINT ASSET TAGS
Asset tags should be printed and attached to each asset in your database.
When you created your assets, remember that you entered a number or
code for each asset in the Asset Tag field of the New Asset screen (if
Page 14

Installation & SetupMobileAsset | Quick Start Guide
you manually entered your assets) or in the Asset Tag column (if you
imported the data). Now an actual tag should be printed that contains the
Asset Tag number or code and (usually) a barcode for quick identification
and tracking. These tags should be affixed to each asset.
MobileAsset came bundled with the WaspLabeler application making the
creation of these asset tags simple. WaspLabeler was installed when you
installed MobileAsset. To print tags, first select the assets from the Asset
List for which you want to print tags, then click the Print Tags icon on
the
Asset List toolbar. You can select multiple assets using the SHIF T or ALT
keys.
Step 4
AUDIT YOUR ASSETS
Note: Test your mobile device to make sure data travels back and forth
correctly before starting to do actual work on the device.
Now that your database is set up and you have attached asset tags to
all assets, you should audit your assets. This ensures you have not
missed an asset, mis-labeled an asset, or assigned an asset to the wrong
location. The quickest way to do this is to use your mobile device. You
will need to set up your mobile device prior to performing this step.
Please refer to the Working With Mobile Devices section of your online
help system for assistance setting up, using and syncing your mobile
devices.
Synchronize the data you have collected on your mobile device back to the
PC.
If you have chosen not to install a mobile device, you will need to do
this audit manually, by physically checking each asset tag attached to an
asset and comparing against the database.
Step 5
BEGIN MANAGING YOUR ASSETS
You have now successfully set up MobileAsset. You can now use
MobileAsset’s powerful tools, including detailed reports, check-in/out
features and list views to quickly keep track of and manage your assets.
FOR PROFESSIONAL EDITION
INSTALLATION
MobileAsset Pro Edition takes advantage of your existing TCP/IP network
to allow up to five MobileAsset client workstations access to a single
database located at the MobileAsset server. The client software may
optionally be installed on the same machine where the MobileAsset
server database is installed.
Installation
MobileAsset Pro ships with one server license and five client licenses.
MobileAsset Pro Edition may be installed in your choice of these two
configurations.
Refer to the diagrams and hardware requirements below to decide how
you will deploy the licenses in your environment.
Minimum Server Conguration Recommended Server Conguration
750 MHz or faster processor 2.0+ GHz
2 GB of RAM 16 GB of RAM
60 GB of disk space 100 GB of disk space
DVD drive (for installation only)
32-bit or 64 bit version of: Windows 8, Windows 7 Professional,
Windows Server 2003, 2008, or 2012 (recommended)
23 24
Page 15

Minimum Client Conguration Recommended Client Conguration
750 MHz or faster processor 2.0+ GHz
1 GB of RAM 4 GB of RAM
10 GB of disk space 60 GB of disk space
DVD drive (for installation only)
1024 x 768 pixel display, 256 colors minimum
32-bit or 64 bit version of: Windows 8, Windows 7 Professional,
Windows Server 2003, 2008, or 2012 (recommended)
Installation & SetupMobileAsset | Quick Start Guide
For the client-only machine, refer to the Client Only section below.
2
Server with Client and 4 Clients
NOTE:
• MobileAsset server installation on Microsoft
®
Windows® 2000,
98SE, NT or ME machines are not suppor ted.
• MobileAsset clients will not work without connecting to a running
MobileAsset server.
• The database server will run automatically every time the computer
is rebooted.
1
Server and 5 Clients
When selecting the MobileAsset database server configuration shown
below, uncheck the Client Tools option on the Select Installation Type
screen, and only the database server will be installed on this machine.
When selecting the MobileAsset database server configuration shown
below, leave the check in the Client Tools option and the Database
option. The database server and one client will be installed on this
machine.
Remember that there are only five client licenses, so you might want to
deselect the Client Tools component if you would rather deploy all of your
client licenses on machines other than this database server machine. If you
deselect Database here, you will not be installing the server.
25 26
Page 16

Installation & SetupMobileAsset | Quick Start Guide
3
Client Only
The Client Tools component of MobileAsset Pro Edition can be installed
once a MobileAsset server has been installed and is running.
Deselect the Database (Server) component when the Select Installation
Type screen is presented, and click the Next button to install only the
Client
Tools component at machines other than the database server
machine.
Note: For information regarding the Database Manager option, please
refer to the section Using MobileAsset to Manage Assets for Multiple
Companies on page 32.
The Computer Name screen is displayed once the database server install
is complete.
Important:
Record your Computer Name before clicking the OK button. This name
must be known when you perform your Client Tools installation.
USING THE MOBILEASSET CLIENTS
The client licenses are “Fixed”. After you install a client license and
run that client, it will connect to the server and register itself with the
server. Information about that computer will be stored on the server. Any
authorized user can connect from that computer using that one license.
If five clients have been installed and registered with the ser ver and a
sixth client is installed, when that sixth client runs it will fail to connect
because all licenses have been used. Even if none of the other clients are
running the application, the sixth machine will be denied a license.
27 28
Functions you perform at any MobileAsset PC client machine will impact
other users at one of three possible levels, as illustrated in the following
table:
Function Performed
on a Client
Change Company Information X
Restore the database X
Add or change Security Privileges X
Import Data X
Edit Field Names X
Set Default Working Site X
Change any Option X
All Asset Management functions X
Change Labeler Labels X
Change Report Filters X
Mobile Device Database Filter Criteria X
Affects
All Users,
Everywhere
Affects Any
User Who
Logs On to
this Client
Affects Only
a Specic
User
CONNECTING A MOBILE DEVICE
One or more compatible mobile devices may be connected anywhere the
MobileAsset Client Tools are installed. You will have unlimited licenses to
connect Wasp Devices. Additional licenses for use with non-Wasp devices,
such as iphones/ipads or Android phone/tablets, are available for purchase.
Use the Quick Start Guide with the device to set up the hardware and refer
to the Working with Mobile Devices section in the MobileAsset online help.
To access the online help, from the MobileAsset software on your PC,
select Help > Contents or click Help from any MobileAsset screen.
Page 17

Installation & SetupMobileAsset | Quick Start Guide
FOR ENTERPRISE EDITION
INSTALLATION
MobileAsset Enterprise Edition takes advantage of your existing TCP/
IP network and your current installation of MS SQL Server to allow
an unlimited number of client workstations to access the MobileAsset
database. The client software may optionally be installed on the same
machine where the database is installed.
INSTALLATION
MobileAsset Enterprise ships with one server license and the ability to
connect an unlimited number of clients connections:
Refer to the diagram above and the hardware requirements below to
decide how you will deploy MobileAsset Enterprise in your environment.
Minimum Server Conguration Recommended Server Conguration
750 MHz or faster processor 2.0+ GHz
2 GB of RAM 16 GB of RAM
60 GB of disk space 100 GB of disk space
DVD drive (for installation only)
32-bit or 64 bit version of: Windows 8, Windows 7 Professional,
Windows Server 2003, 2008, or 2012 (recommended)
Minimum Client Conguration Recommended Client Conguration
750 MHz or faster processor 2.0+ GHz
1 GB of RAM 4 GB of RAM
10 GB of disk space 60 GB of disk space
DVD drive (for installation only)
1024 x 768 pixel display, 256 colors minimum
32-bit or 64 bit version of: Windows 8, Windows 7 Professional,
Windows Server 2003, 2008, or 2012 (recommended)
NOTE:
• MobileAsset server installation on Microsoft
98SE, NT or ME machines are not suppor ted.
• MobileAsset clients will not work without connecting to a running
MobileAsset server.
• The database ser ver will run automatically ever y time the computer
is rebooted.
Server Installation Procedures:
NOTE: Please ensure that the Database Administrator performs the
following procedures.
1
Place the CD into the CD ROM drive on your server. Run the installer
as usual. Mo
Full Version. If the server does not have SQL installed, you can select
to install the MS SQL Server that comes with MobileAsset (SQL Server
2008 R2 Express) on the Installation Type screen along with the
database. This configuration is available for 5 clients only. If you already
have it installed, select Database Only on the Installation Type screen.
bileAsset suppor ts Microsoft SQL Server 2005/2008/2012
®
Windows® 2000,
29 30
Page 18

Installation & SetupMobileAsset | Quick Start Guide
2
If you have more than one database instance installed, they will be listed
under the server.
NOTE: The Integrated Security check box is used to specify that the
SQL Server Wire Protocol driver request a secure (or trusted) connection
to SQL Server. SQL Server uses integrated login security to establish
connections using this data source, regardless of the current login
security mode at the server. Any login ID or password supplied is
ignored. The SQL Server system administrator must have associated your
Windows network ID with a SQL Server login ID.
When the Integrated Security check box is not checked you must specify
that SQL Server use standard login security to establish connections
using this data source. You must specify a Login ID and Password for all
connection requests.
Note: For information regarding the Database Manager feature, please
refer to the section Using MobileAsset to Manage Assets for Multiple
Companies on page 34.
If the database has been previously installed, the installer will upgrade
the database to the latest layout.
Now the server database installation is complete. If you have Microsoft
SQL Enterprise Manager, you will see that WaspTrack Asset (for
MobileAsset) has been installed under the Server and the Instance (if
applicable) that you specified.
UPGRADING FROM MOBILEASSET
ENTERPRISE VERSION 5 OR 6 TO
VERSION 7
1
The MobileAsset Installer should be run on each client machine to
upgrade the software.
2
On the database server machine that houses your database, you
should run the installer as usual. On the Select Installation Type screen,
select Database only.
If the machine that houses your database also contains a client program,
you will need to perform Step 1 and Step 2 on that machine.
Make sure that you select the correct database instance in the
server list to install MobileAsset database.
3
Click OK.
4
The same Wasp Database Installer windows will appear that display in
step 10 of the Install the Software section of this document (page 9).
31 32
Note on Running Scripts Manually: If you run the scripts manually to
install the database and you need multiple company access, the access
code for the Database Manager will not be set the first time you run the
Database Manager. To correct this, you must run the Database Manager
at least once to create the access code rather than leaving it blank. You
will be presented with the same Create Access Code screen that would
have appeared during a normal install:
Page 19

Leaving the access code blank may lower your database security level
and put your information in greater danger of being compromised.
USING MOBILEASSET TO
MANAGE ASSETS FOR MULTIPLE
COMPANIES
The Enterprise version of MobileAsset allows you to create databases for
multiple companies. This means that if you have two separate entities
for which you want to maintain assets, you can install one instance
of MobileAsset, then create two databases - one for each company.
Remember that a database is the repository for all information about
your company. Everything from your company’s name and address, to
employee and asset information is stored in the database. If you need to
track asset information for two separate companies, you wouldn’t want
to group that information into one database, as it would be impossible to
know to which company the asset belongs. Creating a database for each
company allows you to enter sites, locations, customers, employees,
assets, etc. that are specific to one company. In addition, each company
has its own security, so you can control who has access to a specific
company.
Installation & SetupMobileAsset | Quick Start Guide
The initial installation of MobileAsset creates one company for you to
use. To add more companies, you will need to use the Database Manager.
The Database Manager is a program that can be installed during the
MobileAsset installation. If you did not install it when you installed
MobileAsset, you will need to run the MobileAsset installer again and
select Database Manager on the Select Installation Type screen (Step
7 in the Install the Software section of this document). Leave the other
check boxes on this screen checked as they were for the initial install.
During the installation, you will be prompted to create an access code.
Make a note of the code you create, as you will need this to access the
Database Manager later. The Database Manager can be installed on any
machine, even if it has no other pieces of MobileAsset installed on it. It
does not consume a license if it is installed on a machine that does not
have the client on it.
To run the Database Manager, click Star t > All Programs > Wasp >
MobileAsset > Database Manager. Again, you will need to know the
access code you created during the installation to run the Database
Manager. Use the Online Help built into the Database Manager to learn
how to add and manage database (click the Help button or press F1 on
your keyboard when the Database Manager is running).
After multiple company databases are created using the Database
Manager, you can use the same MobileAsset icon that was created
during installation, or the MobileAsset Web Module, to access any of
the companies. Double click on the icon and enter your login name and
password. If the entered login and password match a login and password
set up in more than one company database,
you to select which company you want to access.
a screen will appear allowing
33 34
Page 20

Installation & SetupMobileAsset | Quick Start Guide
CONNECTING A MOBILE DEVICE
One or more compatible mobile devices may be connected anywhere
the MobileAsset Client os installed. You will have unlimited licenses to
connect Wasp Devices. If you purchased the Professional or Enteprise
Editions, additional licenses for use with non-Wasp devices, such as
iphones/ipads or Android phone/tables, are available for purchase.
In the Professional and Enterprise Editions, you will be able to perform
transactions on the mobile device and wirelessly transmit them back to
the PC in near real time using Wasp’s new SyncAnywhere feature. The
Standard Edition requires you to physically connect the device to the PC
to transmit data back and forth.
Use the Quick Start Guide with the device to set up the hardware and refer
to the Working with Mobile Devices section in the MobileAsset online help
for information on downloading and installing MobileAsset on your device.
To access the online help, from the MobileAsset software on your PC,
select Help > Contents or click Help from any MobileAsset screen.
MANUAL START PROCEDURES
1
Place the CD into the CD ROM drive on your computer.
2
In Windows 7, right click on the Start icon and click the Open
Windows Explorer option. In Windows 8, click on the folder icon on the
toolbar.
3
Click on the disk drive location containing your Installation CD to
expose the CD contents.
4
Locate the setup.exe program and double click on it. The installation
process will begin.
35 36
Page 21

Wasp Barcode Technologies
1400 10th Street
Plano, TX 75074
www.waspbarcode.com
0514US
 Loading...