

Page 1

Page 2

Wasp Barcode Maker Quick Start Guide
CONGRATULATIONS
Congratulations on your purchase of Wasp Barcode Maker!
This guide will take you through the installation process and help
understand how to create barcodes using this software.
The following topics are discussed in this document:
INSTALL THE SOFTWARE . . . . . . . . . . . . . . . . . . . . . . . . .1
STANDARD VS. PROFESSIONAL EDITIONS . . . . . . . . . . . .7
BARCODE MAKER PROGRAM FEATURES . . . . . . . . . . . . . .8
UNDERSTANDING BARCODES . . . . . . . . . . . . . . . . . . . . .10
CREATING BARCODES IN MICROSOFT WORD
USING THE ACTIVEX TOOLBAR . . . . . . . . . . . . . . . . . . . .12
CREATING A BARCODE IN EXCEL USING
THE FONT TOOLBAR . . . . . . . . . . . . . . . . . . . . . . . . . . .15
DECIDING WHEN TO USE FONT OR
ACTIVEX BARCODES IN EXCEL . . . . . . . . . . . . . . . . . . . .17
WHERE TO FIND ADDITIONAL INFORMATION . . . . . . . . . .18
1
Page 3
Wasp Barcode Maker Quick Start Guide
INSTALL THE SOFTWARE
1
Insert the installation disk into your computer.
Note for Windows Vista Users: You may see a screen alerting you
that the software needs permission to continue. Click Continue on
the message to start the installation program. This message
appears if UAC (User Account Control) is turned on.
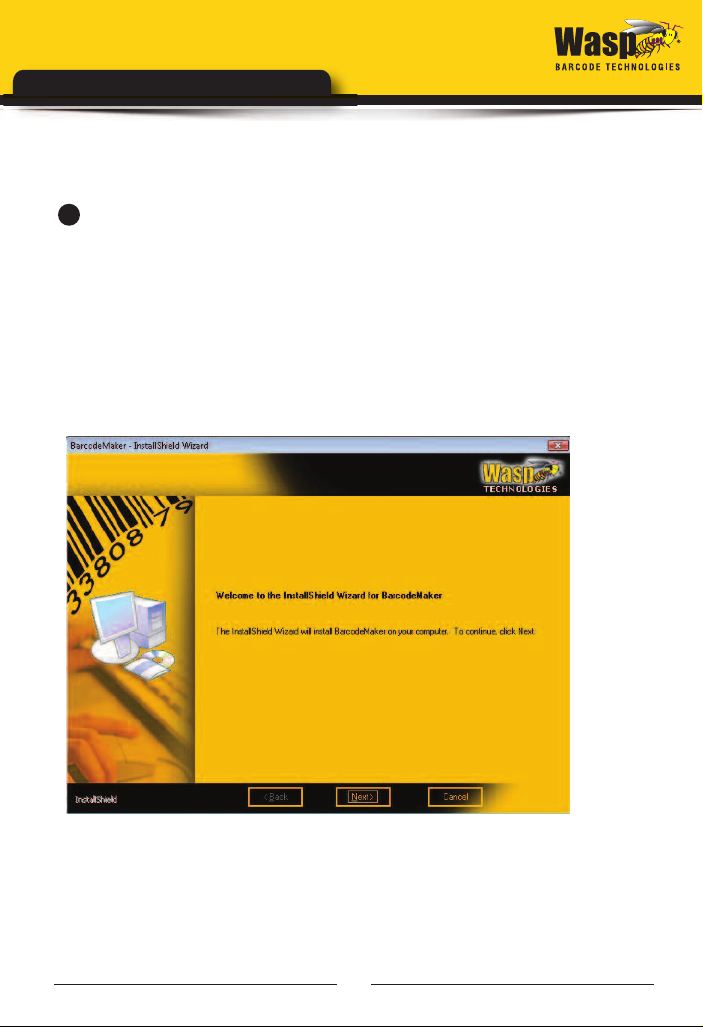
After the setup program finishes preparing the InstallShield wizard,
the following message appears:
If the setup program does not automatically start, right-click on
the Start icon and click the Explore option. Click on the disk
drive location containing your Installation CD to expose the CD
contents. Locate the Setup.exe program and double click on it.
The installation process will begin.
2
Page 4
Wasp Barcode Maker Quick Start Guide
2
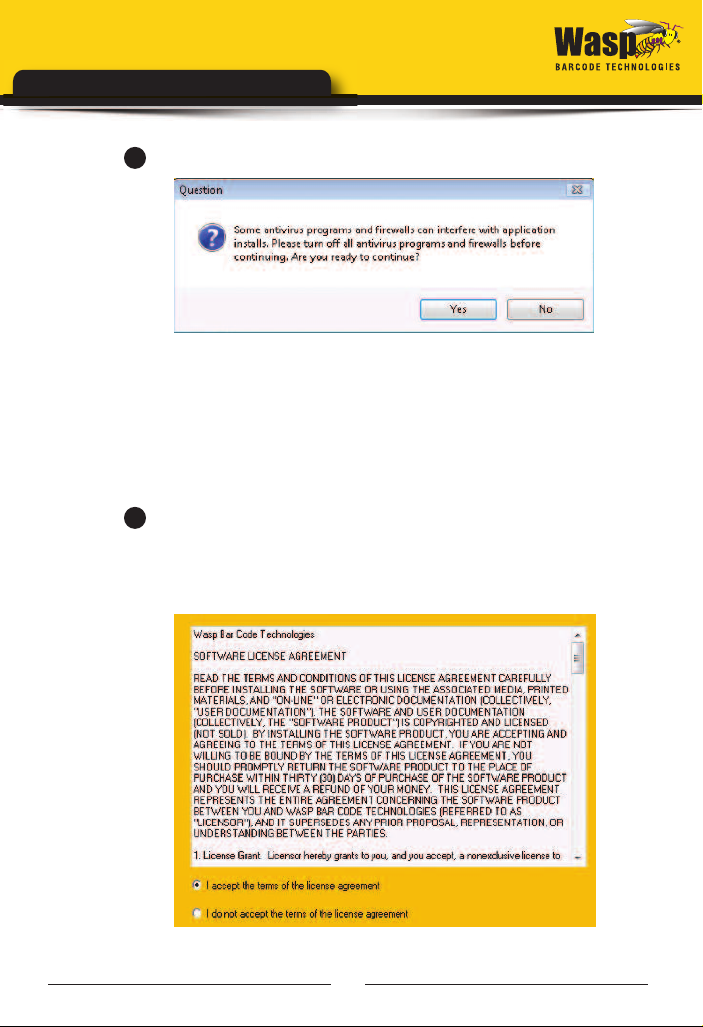
You may receive the following question:
You should turn off all anti-virus programs and firewalls before
proceeding with the installation. You can turn them back on after
the installation is complete. Click Yes when you are ready to
continue.
3
Click Next on this screen to begin installing Barcode Maker.
Next the License Agreement screen appears:
3
Page 5
Wasp Barcode Maker Quick Start Guide
4
Review the license agreement, then select I accept the terms
of the license agreement. Click the Next button to continue. You
will not be able to continue installing the application until you select
the I accept the terms of the license agreement option.
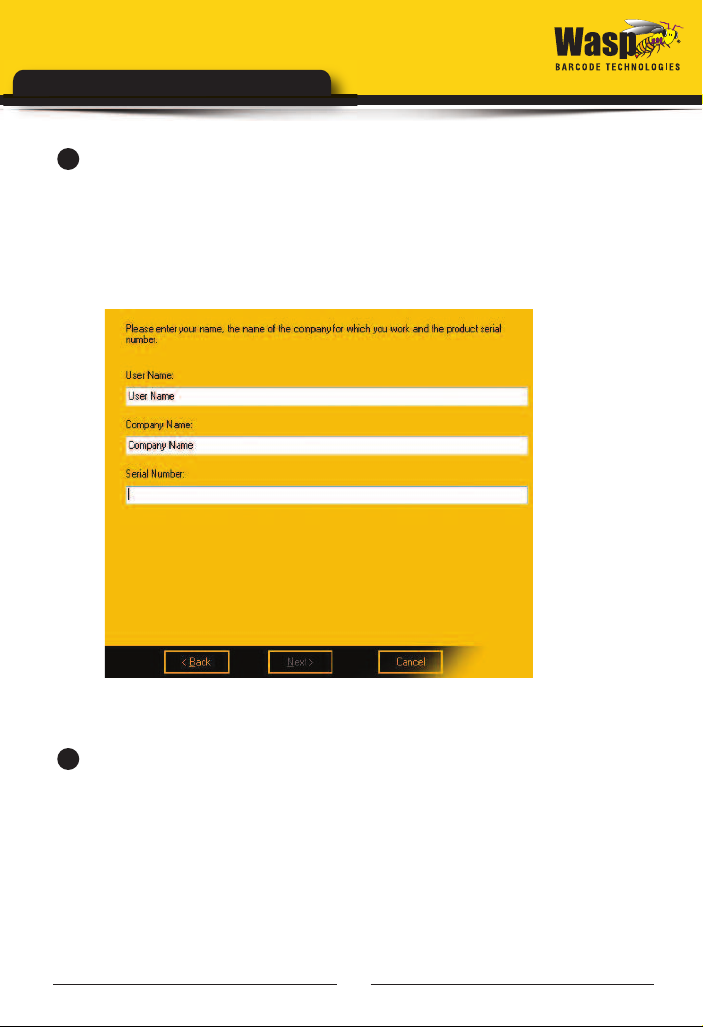
The User Registration screen appears:
5
Enter your User Name (this can be any name of your choice),
your Company Name and the Serial Number. The serial
number can be found on or in the case containing your
Barcode Maker software.
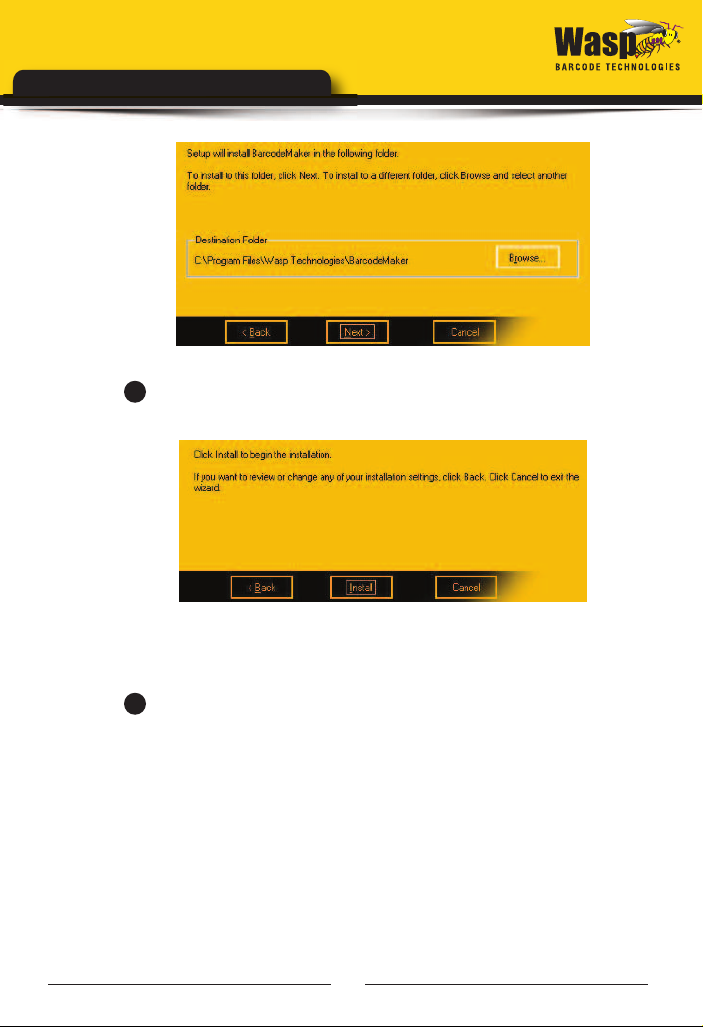
Next a screen displays listing the default Destination Folder for
installation of Barcode Maker:
4
Page 6
Wasp Barcode Maker Quick Start Guide
6
Click the Next button to continue. The Ready to Install
screen appears:
7
If you want to make changes to your destination folder at this
point, click the Back button. If you are ready to install Barcode
Maker, click the Install button.
A series of progress screens appear. The installation process may
take a few minutes. Some of the third party software installation
may not show progress; please be patient and give it a few minutes
to complete.
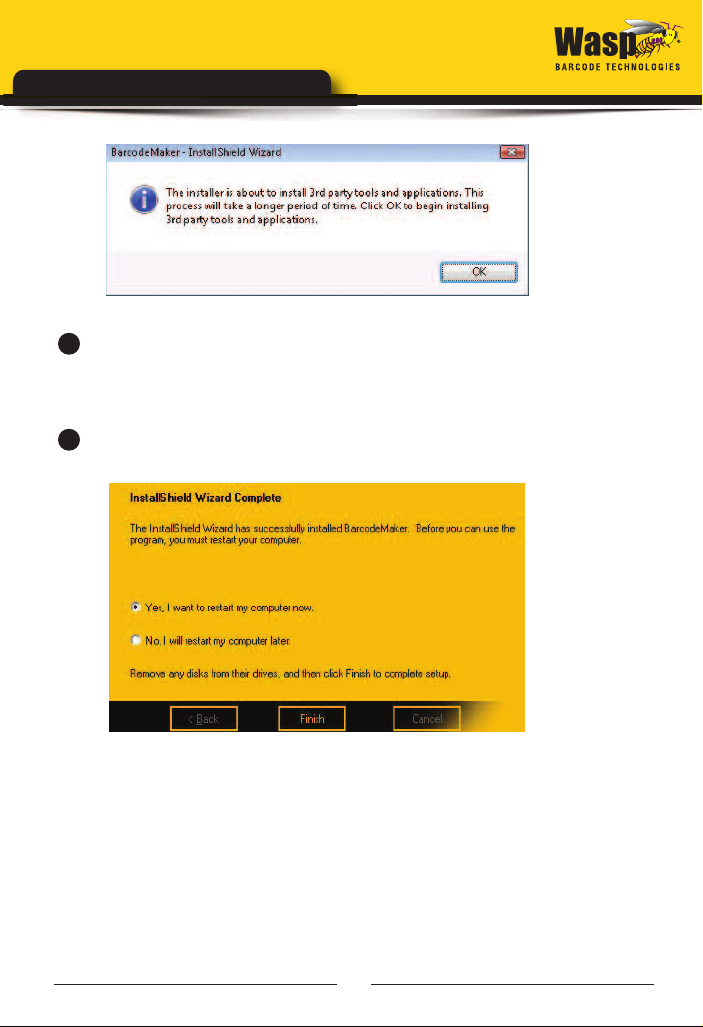
You may see a screen similar to the following:
5
Page 7
Wasp Barcode Maker Quick Start Guide
8
Click OK on this message to continue.
9
After the entire installation process is complete, a screen will
appear asking if you want to reboot your computer:
Select Yes, I want to restart my computer now, remove any
installation disks from their drives, then click Finish. Your system
will reboot. The Barcode Maker icon will appear on your desktop.
The first time you run your software you should visit our website
and register the software. When you register make sure to pick
Barcode Maker as the product and use the serial number you used
during installation to register. An activation key will be emailed to
you that will fully enable the application.
6
Page 8

Wasp Barcode Maker Quick Start Guide
STANDARD VS. PROFESSIONAL
EDITIONS
Wasp Barcode Maker is a powerful barcode creation program that
seamlessly allows you to create barcodes in Microsoft®Word,
Excel, and Access database, depending on the version you
purchased.
The Professional version of Wasp Barcode Maker allows you to:
• Create barcodes directly in Microsoft Word or Access using
the integrated ActiveX toolbar and share those files with other
people.
• Create barcodes directly in Excel using the integrated
ActiveX toolbar, or the Fonts toolbar and share those files with
other people
• Create barcodes in Crystal Reports
• Create a barcode directly in Barcode Maker, save it as a .bcm
file, and share the file with other people.
• Print and scan barcodes created using Barcode Maker.
• This version comes pre-packaged with 2D barcodes.
The Standard version of Wasp Barcode Maker allows you to:
• Create barcodes directly in Microsoft Word using the
integrated ActiveX toolbar and share those files with other
people.
7
Page 9

Wasp Barcode Maker Quick Start Guide
• Create barcodes using in Excel using the integrated ActiveX
toolbar, or the Fonts toolbar and share those files with other
people
• Create a barcode directly in Barcode Maker, save it as a .bcm
file, and share the file with other people.
• Print and scan barcodes created using Barcode Maker.
BARCODE MAKER PROGRAM
FEATURES
Below are features of the Barcode Maker program that are
important to understand.
Unavailable Options and Tools - After you select the barcode
symbology, the program makes your job easy because any
barcode attributes that do not apply to that symbology will not
be available to you on the toolbar or in the Barcode Maker Main
Window. For example, if the symbology does not support check
digit, the check digit box will be unavailable. This feature applies
as well to Special and Nonprintable Characters, described
below.
Special and Nonprintable Characters - Barcode Maker makes
it possible to add Special and Nonprintable Characters to the
barcode value by simply clicking a button and selecting an
ASCII Character from the list. Any Characters that do not apply
to a symbology become unavailable.
8
Page 10

Wasp Barcode Maker Quick Start Guide
Illegal and Incomplete Barcode Messages - If you enter a
barcode value that is not supported by a particular barcode
symbology, Barcode Maker will display a message letting you
know that the barcode value is either illegal or incomplete. For
example, the Interleaved 2 of 5 barcode symbology requires
numbers. If you include a letter in the barcode value, you will
receive a message telling you that there is an illegal character in
your barcode. An incomplete barcode is one that does not
include the required number of characters. For example,
PostNet, which is used to barcode zip codes, requires 5, 9 or 11
digits. If the barcode you enter only has 4 digits, you will
receive an incomplete character message.
Special and Nonprintable Characters: Certain barcode
symbologies use Special or Nonprintable Characters. For
example, Code 3 of 9 Full ASCII can be extended to an 128
character symbology (full ASCII) by combining one of the
special characters ($, /, %, +) with a letter (A-Z) to form the
characters that are not present in the standard Code 3 of 9
symbology. In standard Code 3 of 9 a lowercase "a" cannot be
represented. In Code 3 of 9 Full ASCII a lowercase "a" is
represented as "+A". See Barcode Symbologies in the Barcode
Maker online help for more information about the use of Special
and Nonprintable Characters in barcodes.
Check Digit - Check digit is a character included within a
barcode symbol that is used to perform a mathematical check
to ensure the accuracy of the scanned data. It checks that the
barcode meets the specifications set for the barcode
symbology. Not all barcode symbologies support check digit. If
you select a symbology that does not support check digit,
Barcode Maker makes check digit unavailable to you on the
toolbar or in the Main Window. See Barcode Symbologies in the
Barcode Maker online help for more information on barcode
symbology specifications.
9
Page 11

Wasp Barcode Maker Quick Start Guide
Bar Width - When you create barcodes, you have the option of
choosing a range of widths for your barcode.
Foreground/Background Colors - When you create a barcode,
you can choose a foreground color (the color of the barcode
itself) and a background color (the color of the surface behind
the barcode). Choose foreground and background colors that
print with sufficient contrast to be scannable. Black barcodes
on white backgrounds are commonly used because they scan
easily. It may be useful to test a few of your barcodes by
printing them out and scanning them.
UNDERSTANDING BARCODES
What is a Barcode?
Barcodes are symbols that store information. They simplify the
movement and sale of goods and the storage, movement, tracking
and use of information. Barcodes consist of a series of scannable
bars and spaces that can be printed on packages, cartons, bottles,
and other commercial products. The bars and spaces in each
symbol are grouped in such a way to represent a specific ASCII
character or function. In addition to the scannable part of a
barcode, many barcodes have readable numbers and letters that
appear below and surrounding the bars. With products in the
grocery store, for example, the barcode stores a number that is
associated with a product. Through the stored number, the barcode
can be set up to cross reference an electronic file with information
such as the price and on-hand inventory counts.
10
Page 12
Wasp Barcode Maker Quick Start Guide
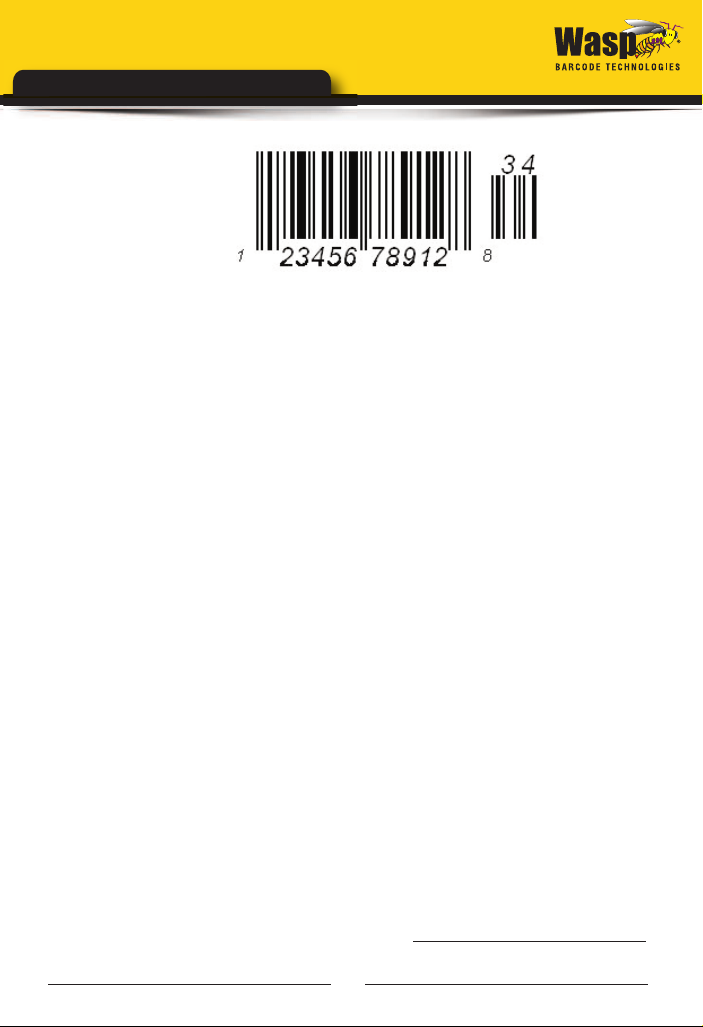
There are many different types of barcodes. Each type has its own
symbology, or set of rules. One very familiar barcode symbology is
UPC-A (Universal Product Code-A). UPC-A is fixed length and is
the most common UPC barcode for retail product labeling. It is
seen in most grocery stores across the United States. The
symbology encodes a 12-digit numeric only number. The first six
digits are assigned from the GS1 US in Lawrenceville, New Jersey
(formerly the Uniform Code Council or UCC), the next five digits are
assigned by the manufacturer, and the final digit is a modulo 10
check digit. The nominal height for the UPC-A barcode is one inch.
The reduced size is 80% of the nominal size.
Specifications, or rules, govern the way the bars and spaces are
grouped and whether or not and how numbers are used for each
barcode symbology. Various symbologies have been developed for
particular industries. Some examples are shipping and receiving,
manufacturing, retail, health care, transportation, document
processing and tracking, and libraries.
Choosing a Barcode Symbology
As a general rule, the business you are in and the need you have
for a barcode will determine the type of barcode you would use.
Some symbologies, such as UPC, are used for retail product
labeling and are licensed to the user by a third party. Code 3 of 9 is
the most popular of all the symbologies and is recommended for
first-time users. Please refer to Symbologies Supported in
11
Page 13

Wasp Barcode Maker Quick Start Guide
Barcode Maker for a list of symbologies supported in Barcode
Maker. Detailed information about barcode symbology standards
can be found in Barcode Symbologies found in the Barcode Maker
online help.
CREATING BARCODES IN
MICROSOFT WORD USING THE
ACTIVEX TOOLBAR
The following steps provide a basic outline for creating a barcode
using the ActiveX toolbar in Microsoft Word. For more detailed
instructions, please review the topic Creating Barcodes in
Microsoft Word and Excel in the Barcode Maker online help. To
access the online help, open Barcode Maker and click Help >
Contents.
1
Open a document in Microsoft Word. The Barcode Maker
toolbar appears in your document. If it does not appear, click the
Add-in option on the Word menu bar.
12
Page 14

Wasp Barcode Maker Quick Start Guide
2
Select a barcode type from the symbology box.
a. Enter a barcode value directly into the document and
select the value.
3
Click the New Barcode button. The barcode(s) appears in
your document and the Design Mode toolbox appears on the page.
Scroll over the barcode with your mouse. Use the move handle to
drag and drop the barcode, if desired.
13
Page 15

Wasp Barcode Maker Quick Start Guide
To resize the barcode, select it, then use the sizing handles to
increase or decrease the box surrounding the barcode.
Then, use the barcode properties to increase the font size to fit
the box.
To edit the barcode after it is created, select the barcode, and click
the Edit Barcode button on the ActiveX toolbar or right-click on the
barcode and select Edit. This opens the Barcode Maker Dialog Bar.
To leave the Dialog Bar, click anywhere in the document.
Note: To edit the barcode, you should right-click on it and select
Edit, or click the Edit Barcode button on the toolbar. Do not
double-click on the barcode, or a Visual Basic window will appear,
as is normal with ActiveX controls. If you do inadvertently open
the Visual Basic window, simply close it to return to Word and
continue working.
14
Page 16

Wasp Barcode Maker Quick Start Guide
CREATING A BARCODE IN
EXCEL USING THE FONT
TOOLBAR
1
Open a document in Excel. The Barcode Maker toolbar appears
in your document. If you do not see the toolbar, click the Add-In
option on Excel's menu bar.
Note: You can switch to the ActiveX toolbar bar clicking Switch to
ActiveX.
2
Select a symbology from the symbology box. Notice that once
you choose a symbology, some of the features on the toolbar
become unavailable because they are not a required by the
specifications for the chosen symbology. This program feature
makes choosing the symbology before you choose other barcode
attributes an efficient way to work.
15
Page 17

Wasp Barcode Maker Quick Start Guide
3
Select the cell (not the value in the cell) by clicking once on a
blank cell and then selecting the cell or cells with the values.
4
Click the Create Font Barcode button from the toolbar.
16
Page 18

Wasp Barcode Maker Quick Start Guide
DECIDING WHEN TO USE
FONT OR ACTIVEX BARCODES
IN EXCEL
As mentioned previously in this document, Barcode Maker
provides you with two options for creating barcodes in Microsoft
E x c e l .
This following information outlines when you should choose
each format:
Use the ActiveX barcode control for creating barcodes with the
Wasp Barcode Maker ActiveX toolbar when:
• You want to send the Excel spreadsheet to another user who
does not have Barcode Maker installed.
• You want to create a barcode that can be placed anywhere on
the Excel sheet (i.e. not bound to a cell).
• Your Excel spreadsheet will contain less than 200 barcodes
(number chosen for optimal performance).
• You want to link the value of a cell to a barcode, so that when
the value changes the barcode also changes.
• You want to control the Bar Width property and fine tune the
density of the generated barcode to be different than “High”,
”Medium”, ”Low”.
• You need 2D symbologies. The 2D symbologies are only
available through the ActiveX barcode control. 2D symbologies
are available in the Professional version.
17
Page 19

Wasp Barcode Maker Quick Start Guide
Use text barcode fonts by creating barcodes with the Wasp
Barcode Maker Fonts toolbar when:
• You want to create more than 200+ barcodes in the Excel
spreadsheet.
• You do not need portability (sending to another user who does
not have Barcode Maker installed) and printing will be done on
machines that have Barcode Maker installed.
• You want to use OCR fonts for Optical Character Recognition
Applications.
• You want to use MICR font to print checks. Please be aware
that the Wasp MICR must be picked from the Excel font list to
use the MICR fonts.
WHERE TO FIND ADDITIONAL
INFORMATION
You can find detailed information on creating barcodes using Wasp
Barcode Maker in the online help found in your software.
Additional information for all topics discussed in this Quick Start
Guide can be found in the Barcode Maker Help file. There is also a
.pdf of the Help file included on your installation CD that you can
view and/or print. When you are first learning to use Barcode
Maker, it is a good idea to have the Barcode Maker program open
18
Page 20

Wasp Barcode Maker Quick Start Guide
even if you are creating barcodes only in Word, Excel or Access so
you can quickly access the Help if needed.
After installation you can open Word, Excel, Access etc. and the
Barcode Maker toolbar(s) will be available to begin making
barcodes. To access the Barcode Maker help from these programs:
Open the Barcode Maker software by clicking on the icon on your
desktop or through the Start menu. Click on Help or press F1 in
the Barcode Maker software.
OR
Create a barcode in Word, Excel or Access. Highlight the barcode
and click the Edit button on the ActiveX or Font toolbar or
right-click on the barcode and select Wasp Barcode Maker Control
Object>Edit. The Dialog Bar will appear. Click the Help button on
the Dialog Bar to access Barcode Maker online help.
19
Page 21

Wasp Barcode Maker Quick Start Guide
You can use the Search tab in the help file to enter your question,
enter a keyword on the Index tab, or use the Table of Contents to
find information.
20
Page 22

Wasp®Barcode Technologies
1400 10th Street, Plano, Texas 75074
Tel: 214.547.4100 • Fax: 214.547.4101
www.waspbarcode.com
 Loading...