

Page 1

InventoryControl Printable Help
Page 2

Copyright © 2011
Wasp Barcode Technologies
th
1400 10
Plano, TX 75074
All Rights Reserved
St.
STATEMENTS IN THIS DOCUMENT REGARDING THIRD PARTY PRODUCTS OR SERVICES ARE BASED ON INFORMATION
MADE AVAILABLE BY THIRD PARTIES. WASP BARCODE TECHNOLOGIES AND ITS AFFILIATES ARE NOT THE SOURCE OF
SUCH INFORMATION. THE INFORMATION IN THIS DOCUMENT IS SUBJECT TO CHANGE WITHOUT NOTICE.
Wasp Barcode Technologies, the Wasp logo, InventoryControl and Labeler are registered trademarks and/or trademarks of Wasp
Barcode Technologies in the United States and other countries. Other parties’ trademarks are the property of their respective
owners.
Software activation system licensed under Patent No. 5,490,216
Terms, conditions, features, hours and contact information in this document are subject to change without notice. Wasp is
committed to providing great products and exceptional customer service. Occasionally we may decide to update our selection and
change our service offerings so please check
InventoryControl Install Key ________________________
(Printed on shipped material)
InventoryControl Registration Key ________________________
(Obtained from www.waspbarcode.com\register
www.waspbarcode.com
)
for the latest information.
Page 3

Table of Contents
Chapter 1 - Getting Started...........................................................................................................................1
1.1 Introduction..........................................................................................................................................1
1.2 User Log On........................................................................................................................................1
1.3 Using the Sample Company................................................................................................................2
1.4 Set Up Cycle Overview........................................................................................................................3
1.5 Step One - Create Users.....................................................................................................................4
1.6 Step Two - Enter Company Information..............................................................................................4
1.7 Step Three - Define Sites and Locations.............................................................................................4
1.8 Step Four - Add Users.........................................................................................................................5
1.9 Step Five - Print Location Labels ........................................................................................................6
1.10 Step Six - Enter Suppliers.................................................................................................................6
1.11 Step Seven - Print the Supplier Report.............................................................................................6
1.12 Step Eight - Create Items..................................................................................................................6
1.13 Step Nine - Print Item Labels ............................................................................................................7
1.14 Step Ten - Add Inventory .................................................................................................................7
1.15 Step Eleven - Print the Inventory by Location Report.......................................................................8
Chapter 2 - Introductory Materials ................................................................................................................9
2.1 Barcode Best Practices.......................................................................................................................9
2.2 What is a Barcode?...........................................................................................................................10
2.3 Choosing a Label Printer...................................................................................................................11
2.4 Designing and Labeling Sites and Locations....................................................................................12
2.4.1 What is a Site?............................................................................................................................12
2.4.2 What is a Location? ....................................................................................................................12
2.4.3 Labeling Sites and Locations......................................................................................................12
i
Page 4

2.5 Identifying Tracki
2.6 Labeling Items...................................................................................................................................15
2.7 Using Cost Tracking and Average Costing FAQ...............................................................................16
2.8 Using Custom Fields .........................................................................................................................22
2.9 System Administrator Information.....................................................................................................24
Chapter 3 - Business Examples..................................................................................................................25
3.1 About Our Business Examples..........................................................................................................25
3.2 Business Example Overviews...........................................................................................................25
3.3 Setting Up Security Privileges Business Example............................................................................27
3.4 Setting Up Sites and Locations Business Examples.........................................................................30
3.5 Setting Up Suppliers Business Examples.........................................................................................32
3.6 Entering Items Business Examples...................................................................................................33
ng Needs................................................................................................................14
Chapter 4 - PC Operation Basics................................................................................................................34
4.1 User Log On......................................................................................................................................34
4.2 About the About Screen ....................................................................................................................36
4.3 Main Screen ......................................................................................................................................38
4.3.1 Section A: Toolbar ......................................................................................................................39
4.3.2 Section B: Left-Hand Navigation.................................................................................................39
4.3.3 Section C: Main Functions..........................................................................................................40
4.3.4 Section D: Context-Sensitive Menus..........................................................................................40
4.5 Update License Screen.....................................................................................................................43
4.6 Selecting Sites...................................................................................................................................45
4.6.1 How to Select Sites:....................................................................................................................45
4.6.2 Source and Destination Examples:.............................................................................................46
4.7 Logging Out.......................................................................................................................................48
ii
Page 5

4.8 Check
4.8.1 Disabling the Automatic Version Check Feature:.......................................................................49
4.8.2 Performing a Manual Check:......................................................................................................50
4.9 Item Stock Level List Screen.............................................................................................................51
4.10 Alerts ...............................................................................................................................................52
4.11 Adding Notes...................................................................................................................................54
Chapter 5 - Creating New Data...................................................................................................................55
5.1 Creating a New Site...........................................................................................................................55
5.2 Creating New Customers..................................................................................................................57
5.3 Creating New Inventory and Non-Inventory Items............................................................................60
5.3.1 Accessing the Create New Item Screen:....................................................................................61
5.3.2 General Information Tab:............................................................................................................62
ing for Software Updates.........................................................................................................49
5.3.3 Location Settings Tab:................................................................................................................66
5.3.4 Additional Information Tab:.........................................................................................................68
5.3.5 Manage Suppliers Tab:...............................................................................................................70
5.3.6 Custom Text and Custom Numbers and Dates Tab:..................................................................72
5.3.7 Saving the New Item:..................................................................................................................72
5.6 Automatic Serial Numbers.................................................................................................................73
5.7 Creating New Locations....................................................................................................................74
5.8 Creating New Manufacturers.............................................................................................................76
5.8 Creating New Suppliers.....................................................................................................................80
Chapter 6 - Editing Data..............................................................................................................................84
6.1 Editing Items......................................................................................................................................84
6.2. Editing Assembly Items....................................................................................................................84
6.3 Editing Kit Items.................................................................................................................................85
iii
Page 6

6.4 Editing Sites
6.5 Editing Locations (or a Site and Location).........................................................................................85
6.6 Edit Customer....................................................................................................................................86
6.7 Editing Suppliers................................................................................................................................86
6.8 Editing Manufacturers........................................................................................................................86
6.9 Editing Pick Orders............................................................................................................................86
6.10 Editing Purchase Orders.................................................................................................................87
Chapter 7 - Assembly Items........................................................................................................................88
7.1 Assembly Overview...........................................................................................................................88
7.2 Creating an Assembly Item...............................................................................................................89
7.2.1 Accessing the New Assembly Item Screen:...............................................................................90
7.2.2 General Information Tab:............................................................................................................91
.......................................................................................................................................85
7.2.3 Location Settings Tab:................................................................................................................95
7.2.4 Assembly Tab:............................................................................................................................97
7.2.5 Additional Information Tab:.........................................................................................................99
7.2.6 Manage Suppliers Tab:.............................................................................................................101
7.2.7 Custom Text and Custom Numbers and Dates Tab:................................................................102
7.2.8 Saving the New Item:................................................................................................................102
7.3 Building Assembly Items .................................................................................................................103
7.4 Disassembling Assembly Items.......................................................................................................107
Chapter 8 - Using the List Screens...........................................................................................................112
8.1 Working with Lists............................................................................................................................112
8.1.1 Section A: Toolbar ....................................................................................................................113
8.1.2 Section B: Contents List ...........................................................................................................119
8.1.3 Section C: Buttons:...................................................................................................................121
iv
Page 7

8.1.4 Context
8.2 Item List Example............................................................................................................................123
8.3 Inventory List Example....................................................................................................................124
8.4 Site List Example.............................................................................................................................125
8.5 Location List Example .....................................................................................................................126
8.6 Customer List Example ...................................................................................................................127
8.7 Manufacturer List.............................................................................................................................128
8.8 Supplier List.....................................................................................................................................129
8.9 Pick Order List Example..................................................................................................................130
8.10 Purchase Order List Example .......................................................................................................131
8.11 Transaction List Example..............................................................................................................132
Chapter 9 - Inventory ................................................................................................................................133
-Sensitive Menus:.........................................................................................................121
9.1 Inventory Menu................................................................................................................................133
9.2 Manually Adding Inventory..............................................................................................................135
9.3 Removing Inventory.........................................................................................................................140
9.4 Moving Inventory.............................................................................................................................144
9.5 Checking In Inventory......................................................................................................................148
9.6 Checking Out Inventory...................................................................................................................152
9.7 Adjusting Inventory Amounts...........................................................................................................156
9.7.1 Adjusting Inventory:..................................................................................................................156
9.7.2 Duplicate Serial Numbers Warning:..........................................................................................160
Chapter 10 - Kit Items...............................................................................................................................161
10.1 Kitting Overview.............................................................................................................................161
10.2 Creating a Kit Item.........................................................................................................................163
10.2.1 Accessing the Create New Items Screen:..............................................................................163
v
Page 8

10.2.2 Kit Inf
10.2.3 Additional Information Tab:.....................................................................................................168
10.2.4 Custom Text and Custom Numbers and Dates Tab:..............................................................169
10.2.5 Saving the New Item:..............................................................................................................169
10.3 Removing Kit Items .......................................................................................................................170
Chapter 11 - Pick Orders ..........................................................................................................................174
11.1 Pick Order Overview......................................................................................................................174
11.2 Creating a Pick Order....................................................................................................................175
11.3 Editing Pick Orders........................................................................................................................179
11.4 Pick Order List Example................................................................................................................180
11.5 Picking Orders...............................................................................................................................181
Chapter 12 - Purchase Orders/Receiving..............................................................................................185
ormation Tab: ................................................................................................................166
12.1 Purchase Orders/Receiving Overview ..........................................................................................185
12.2 Creating a New Purchase Order...................................................................................................188
12.3 Editing Purchase Orders...............................................................................................................192
12.4 Purchase Order List Example .......................................................................................................193
12.5 Receiving Inventory from Purchase Orders ..................................................................................194
12.6 Purchase Order FAQ.....................................................................................................................198
12.7 Deleting Purchase Orders/Pick Orders.........................................................................................199
12.8 Receive/Pick Menu........................................................................................................................200
12.9 Managing Payment Methods.........................................................................................................202
12.9 Managing Payment Methods.........................................................................................................202
12.9.1 Adding Payment Methods:......................................................................................................202
12.9.2 Deleting/Printing/Exporting Payment Methods:......................................................................203
12.10 Managing Shipping Methods.......................................................................................................206
vi
Page 9

12.10.1 Adding Shipping Methods
12.10.2 Deleting/Printing/Exporting Ship Methods:...........................................................................207
12.11 Formatting PO and Pick Order Numbers....................................................................................210
12.12 Email Distribution List..................................................................................................................213
Chapter 13 - Creating/Editing/Printing Labels...........................................................................................214
13.1 Selecting a Label Printer...............................................................................................................214
13.2 Using the Labels Menu..................................................................................................................215
13.2.1 Editing Labels: ........................................................................................................................215
13.2.2 Creating Custom Labels:........................................................................................................216
13.2.3 Browsing to an Existing Label:................................................................................................217
13.3 Printing Labels from the List Screens............................................................................................218
Chapter 14 - Reports.................................................................................................................................220
:....................................................................................................206
14.1 Report Selection............................................................................................................................220
14.2 Report Viewer................................................................................................................................221
Chapter 15 - Administration ......................................................................................................................225
15.1 Administration Menu......................................................................................................................225
15.2 Company Information Screen........................................................................................................227
15.2.1 Entering Company Information:..............................................................................................227
15.2.2 Entering Multiple Address Types:...........................................................................................228
15.2.3 Deleting an Address Type: .....................................................................................................229
15.3 Adding Users/Editing Security Privileges......................................................................................230
15.3.1 Accessing the Security Privileges Screen:.............................................................................230
15.3.2 Adding Users to the Security Privileges Screen:....................................................................231
16.3.3 Editing User Profiles on the Security Privileges Screen:........................................................233
15.3.4 Making Users Inactive: ...........................................................................................................234
vii
Page 10

15.3.5 Copying Us
15.3.6 Security Privileges Definitions: ...............................................................................................235
15.4 Backing up the Database..............................................................................................................236
15.5 Restore the Database ...................................................................................................................237
15.6 Options Screen..............................................................................................................................238
15.6.1 Accessing the Options Screen:...............................................................................................240
15.6.2 Allow Negative Quantities on Mobile Devices........................................................................241
15.6.3 Allow Over Pick.......................................................................................................................242
15.6.4 Allow Over Receive ................................................................................................................242
15.6.5 Automatic Customer Number .................................................................................................242
15.6.6 Automatic Item Numbers:.......................................................................................................242
15.6.7 Automatic New........................................................................................................................242
er Security Profiles:..............................................................................................234
15.6.8 Automatic Notification of Low Order Items .............................................................................243
15.6.9 Decimal Places.......................................................................................................................243
15.6.10 Enforce Date Code as a True Date ......................................................................................243
15.6.11 Item Cost When Add Inventory from Mobile Device:............................................................243
15.6.12 Packing Slip for Session:......................................................................................................244
15.6.13 Transaction Code List:..........................................................................................................244
15.6.14 Check for Software Updates:................................................................................................244
15.6.15 Close New Form:..................................................................................................................244
15.6.16 Edit Field Names: .................................................................................................................245
15.6.17 Max Row Count:...................................................................................................................245
15.6.18 Previously Processed Mobile Data:......................................................................................245
15.6.19 Show Cost Information During Receiving:............................................................................246
15.6.20 Show Warning Messages:....................................................................................................246
viii
Page 11

15.6.21 SQL
15.6.23 Packing Slip CC Emails:.......................................................................................................247
15.6.24 Pick Order CC Emails:..........................................................................................................247
15.6.25 Purchase Order CC Emails: .................................................................................................247
15.6.26 SMTP Password:..................................................................................................................247
15.6.27 SMTP Port: ...........................................................................................................................247
15.6.28 SMTP Server: .......................................................................................................................247
15.6.29 SMTP SSL/TSL:....................................................................................................................247
15.6.30 SMTP User: ..........................................................................................................................248
15.7 Archiving Transactions..................................................................................................................249
15.8 Editing Field Names ......................................................................................................................250
15.8.1 Editing Field Names:...............................................................................................................250
Server Backup Location: ..............................................................................................246
15.8.2 Resetting Field Names to their Default Values:......................................................................252
15.9 Using Custom Fields .....................................................................................................................253
Chapter 16 - Importing/Exporting..............................................................................................................256
16.1 Importing Into the Database..........................................................................................................256
16.1.1 Tips for Importing Data:..........................................................................................................256
16.1.2 How to Import Data:................................................................................................................257
16.1.3 Required Import Fields: ..........................................................................................................261
16.1.4 Handling Import Errors:...........................................................................................................261
16.1.5 Notes on Importing Inventory:.................................................................................................262
16.2 Exporting to a Text File .................................................................................................................263
16.3 Related Data Fields.......................................................................................................................267
16.4 Import Specifics.............................................................................................................................269
16.4.1 Customer Import Format:........................................................................................................269
ix
Page 12

16.4.2 Inventory Import Format:
16.4.3 Item Import Format: ................................................................................................................271
16.4.4 Location Table Properties:......................................................................................................272
16.4.5 Manufacturer Table Properties:..............................................................................................273
16.4.6 Supplier Table Properties:......................................................................................................274
16.4.7 Data Type Definitions: ............................................................................................................275
Chapter 17 - Performing an Audit......................................................................................................278
17.1 Auditing Your Inventory.................................................................................................................278
17.2 Audit Flow Overview.....................................................................................................................279
17.3 Beginning the Audit .......................................................................................................................279
17.4 Using the Audit Screen..................................................................................................................280
17.5 Reviewing the Not Counted Items Report.....................................................................................283
........................................................................................................270
17.6 Reconciling the Counts .................................................................................................................283
17.7 Reviewing the Remainder of the Audit Reports............................................................................285
17.8 Ending the Audit............................................................................................................................285
Chapter 18 - Search Function...................................................................................................................286
18.1 Searching for Information..............................................................................................................286
18.2 Advanced Find...............................................................................................................................288
Chapter 19 – WDT2200............................................................................................................................291
19.1 WDT2200 - Setup the Device........................................................................................................291
19.2 WDT2200 - Creating the PDT Database.......................................................................................294
19.3 WDT2200 - Sending Data to PDT.................................................................................................299
19.4 WDT2200 - Receiving Data from PDT..........................................................................................304
19.5 WDT2200 - Data Cycle .................................................................................................................307
19.6 WDT2200 - Logging On ................................................................................................................307
x
Page 13

19.7 WDT2200 - Res
19.8 WDT2200 - Setting the Date and Time.........................................................................................310
19.9 WDT2200 - Main Menu.................................................................................................................313
19.10 WDT2200 - Interface...................................................................................................................314
19.11 WDT2200 - About Screen...........................................................................................................315
19.12 WDT2200 - Site Configuration ....................................................................................................315
19.13 WDT2200 - Adding Inventory......................................................................................................317
19.14 WDT2200 - Details Screen..........................................................................................................325
19.14.1 Viewing Details for Items with Tracked By options disabled: ...............................................325
19.14.2 Viewing Details for Items with One or More Tracked By Options Enabled: .........................327
19.15 WDT2200 - Adjusting Inventory ..................................................................................................329
19.16 WDT2200 - Auditing Inventory....................................................................................................336
etting the Device..................................................................................................308
19.17 WDT2200 - Moving Inventory......................................................................................................343
19.18 WDT2200 - Removing Inventory.................................................................................................351
19.19 WDT2200 - Removing Kit Items..................................................................................................359
19.20 WDT2200 - Picking Inventory for Orders ....................................................................................367
19.21 WDT2200 - Picking Kit Items ......................................................................................................373
19.22 WDT2200 - Receiving Inventory .................................................................................................380
Chapter 20 - Windows Mobile Device......................................................................................................386
20.1 Windows Mobile Device Data Cycle - Batch Device (No Wireless Connection)...........................386
20.2 Windows Mobile Device Data Cycle - Wireless Connection........................................................386
20.3 Windows Mobile Device - Interface...............................................................................................387
20.4 Windows Mobile Device - Default Settings ...................................................................................389
20.5 Windows Mobile Device - Rebooting.............................................................................................389
20.6 Windows Mobile Device - Enabling the Scanner ..........................................................................389
xi
Page 14

20.7 Windows Mobile
20.8 Setup and Synchronization Information ........................................................................................393
20.8.1 Batch Windows Mobile Device Synchronization.....................................................................393
20.8.2 Batch Windows Mobile Device - Setup the Mobile Device.....................................................394
20.8.3 Batch Windows Mobile Device - Sending the Database from the PC....................................403
20.8.4 Batch Windows Mobile Device - Retrieving Data from the Device.........................................409
20.8.5 Batch Pending Uploads Screen..............................................................................................411
20.8.6 Batch Mobile Devices Pending Uploads - Edit Transactions .................................................415
20.9 Wireless Devices...........................................................................................................................418
20.9.1 Windows Mobile Device Wireless Setup ................................................................................418
20.9.2 Enabling InventoryControl RF to Communicate with your Network Printer............................421
20.10 Tips for Setting Up and Using Windows Mobile Devices............................................................426
Device - Entering Alphanumeric Data................................................................392
20.10.1 WDT3200, 3200II, 3250 and 3250II Tips..............................................................................426
20.10.2 WPA1000 and WPA1000II Tips............................................................................................429
20.10.3 WDT1200, 1250, 1200II and 1250II......................................................................................435
20.11 Using InventoryControl and InventoryControl RF .......................................................................436
20.11.1 Windows Mobile Device - About Screen ..............................................................................436
20.11.2 Windows Mobile Device - Site Configuration........................................................................437
20.11.3 Windows Mobile Device - Pinning Fields..............................................................................438
20.11.4 Windows Mobile Device - Adding New Customers ..............................................................439
20.11.5 Windows Mobile Device - Adding a New Location...............................................................440
20.11.6 Windows Mobile Device - Adding New Suppliers.................................................................442
20.11.7 Windows Mobile Device - Adding Inventory.........................................................................443
20.11.8 Windows Mobile Device - Details Screen.............................................................................446
20.11.9 Windows Mobile Device - Checking Out Inventory...............................................................448
xii
Page 15

20.11.10 Windows Mobile Device - Checking In Inventory ...............................................................449
20.11.11 Windows Mobile Device - Moving Inventory......................................................................450
20.11.12 Windows Mobile Device - Removing Inventory..................................................................453
20.11.13 Windows Mobile Device - Removing a Kit Item..................................................................458
20.11.14 Windows Mobile Device - Receiving Inventory...................................................................461
20.11.15 Windows Mobile Device - Picking Items for Orders............................................................465
20.11.16 Windows Mobile Device - Picking Kit Items........................................................................468
20.11.17 Windows Mobile Device - Adjusting Inventory Quantities..................................................473
20.11.18 Windows Mobile Device - Auditing Inventory .....................................................................477
20.11.19 Windows Mobile Device - Searching for Information..........................................................482
20.12 Windows Mobile Device Troubleshooting...................................................................................485
Chapter 21 - Glossary...............................................................................................................................492
Index..........................................................................................................................................................495
xiii
Page 16

InventoryControl Printable Help
Chapter 1 - Getting Started
1.1 Introduction
We recommend that you read the information found in the Introductory Materials section of this Help file
and view the Getting Started prior to beginning setup of your system. The Introductory Materials and
video tutorials define key terms and explain concepts used throughout InventoryControl. These mate rials
provide valuable information to make the setup process smooth and simple.
In addition to explaining key terms and concepts, the Introductory Materials provide tips for creating your
inventory tracking system and provides real-world business examples detailing how you can customize
InventoryControl to work best for your needs. You will also find information on recommended guidelines
for creating barcodes in the Barcode Best Practices
your software you will find links to Business Examples. These examples detail how different business
types, using different versions of InventoryControl, setup their sites, locations, items, et c.
After you have reviewed these materials, click the Begin InventoryControl Set Up link below. A series of
steps will appear guiding you through the set up process. Each step provides a brief overview of the
process along with a link or links to the help topics containing detailed how to and explanatory
information.
section. As you work through the steps to set up
1.2 User Log On
The Log On screen appears when InventoryControl is first started and when you select File > Log Out.
Complete both fields, then click OK to logon to the system.
1
Page 17
InventoryControl Printable Help
The User Name field is not case sensitive.
The Password field is case sensitive. Asterisks will be displayed as you type the Password.
The first time you open InventoryControl you can enter the following information:
User Name: Admin
Password: (blank)
After log on, the password can be changed via File > Change Password.
The Admin account, or any other account with Administration Privilege, can use the Security Privileges
screen to add Users, set their privileges and reset their passwords. For more information on adding
users, please refer to the Adding Users/Editing Security Privileges
topic.
1.3 Using the Sample Company
The Sample Company contains a set of data you can use to learn about InventoryControl. You can
practice working with the features and functions contained in the software using this data.
You can enter information into the Sample Company; however, when upgrading to a new version, this
data will be lost. It is very important that you do not enter any information into the Sample Company that
you do not want to lose. The Sample Company is meant for training purposes only and should not be
used as your working database.
Accessing and Using the Sample Company
On the Log In screen, login as usual, making sure you select the Use Sample Database checkbox.
InventoryControl opens with InventoryControl - Wasp Inventory Sample Inc. displayed in the title bar.
2
Page 18

InventoryControl Printable Help
You can u
check inventory in and out, create purchase orders and pick orders, etc. On reports, the company name
and each address line will be followed by "trial". Mobile devices are not supported by the sample
database.
se the software as normal once logged in. You can create additional items and add inventory,
1.4 Set Up Cycle Overview
After you finish installing your software (using the InventoryControl Quick Start Guide as a reference) you
will need to set up your system by entering information into the software. This is referred to as a "cycle"
because in multi-warehouse installations you will need to repeat steps 3-7 for each site. The set up
process may take hours or even days depending on the size of your organization. While this m ay seem
overwhelming, keep in mind that the return on this time investment will pay off quickly. These steps will
result in a complete and accurate count of inventory that will allow you to start using InventoryControl to
manage your day-to-day business.
Keep in mind that you can continue to use your previous inventory tracking software while you are setting
up InventoryControl. The transition to InventoryControl should take place when you are ready to count
your inventory and enter the counts into the software.
Before starting this process, set aside a day or two when you can stop using the old system and transition
over to InventoryControl. The audit, or inventory counting, step must be done when you are not receiving
or shipping goods. Plan to perform the audit on a weekend or after hours, for example.
Set Up Cycle:
1. Design your barcode labeling system and designate barcode label ranges.
2. Import or input sites, locations, suppliers, manufacturers and customers into
InventoryControl.
3. Print barcodes and label sites and locations.
4. Import or input items, making sure to designate additional tracking needs like serial number
or lot.
5. Use your handheld or a report to do a complete inventory audit.
6. Using the audit results, print barcode labels for items and label every item.
7. Determine the best method of handheld use for your company and implement it.
If the initial setup process seems daunting, there are organizations that specialize in evaluating your
needs and setting up your warehouse for you using InventoryControl. If you need to find an organization
in your area to help with this process, please call Wasp Support and we will help you find an integrator.
3
Page 19

InventoryControl Printable Help
1.5 Step One - Create Users
Add Admin User - When you first log on to InventoryControl, you will use Admin as the user name and
leave the password blank. This default user profile gives you access to everything in the system. The
first step you should take upon logging in is to create at least one additional admin user (Administration
> Security). The new admin user should have rights to all areas of the system. You should also change
the password for the default admin profile. Since the default admin's password is initially blank, it is
important to change the password to prevent other users from logging in under this profile.
1.6 Step Two - Enter Company Information
Enter Company Information - Next you should enter your company's information (Administration >
Company Info). On the Company Information screen you will enter your company's name and any
addresses needed for receiving, shipping, corporate correspondence, etc. The company name you enter
on this screen will appear on all reports and in the title bar of InventoryControl. In addition, if you have
the Pro or Enterprise version of InventoryControl, the company name and addresses you enter will
appear on Pick Orders and Purchase Orders created in the system.
When you set up your company information, you should enter all addresses to which you might receive
inventory, ship inventory, store inventory as well as your corporate address and other business
addresses. Having these addresses entered will save you and your employees a lot of time when
creating purchase orders and pick orders and when moving, picking, receiving, adding and removing
inventory.
1.7 Step Three - Define Sites and Locations
Define Sites and Define Locations - Now you are ready to begin entering sites and locations into the
database. Locations are the areas into which you will assign inventory, while sites contain the various
locations. Usually a site is a warehouse or other building, but it can be an office, a truck, a field, etc.
We suggest creating one site for each building or structure that contains inventory. InventoryControl
requires that you define at least one site containing at least one location. You can also have multiple
sites that contain multiple locations. There is no limit to the number of locations you can assign to a site.
View Business Examples
Note: WaspNest Inventory only supports one Site.
A location is typically shorthand for a physical place such as a shelf in your warehouse. Commonly used
conventions include Location codes like this:
01 02 05 (for Row #, Shelf #, Bin #)
For the purposes of keeping track of your inventory items, your locations should represent the placement
within the site. If your site is a warehouse, the locations are shelves or racks. If your site is a building,
the locations may be offices. If you have a fleet of trucks, the locations may be containers in the truck.
When deciding how to label each location, choose a numbering scheme that can be interpreted when
reading just the label. For example, if you have 7 rows of 5 shelves each and each shelf has four levels,
your barcode label scheme should look like A010200 or row A, shelf 01, level 02, bin 00. If you have
inventory on trucks in containers, the truck can be a site and each bin in the truck is a location. Put a
barcode label on the inside of the truck door so the person moving inventory into or out of the truck can
just scan and move. The barcode label should have the barcode and the human readable text
4
Page 20

InventoryControl Printable Help
ption of the location as well.
descri
A distribution business, for example, typically places inventory at a specific location in one or more
warehouses. InventoryControl requires that you define at least one Site containing at least one Location.
If you have multiple warehouses, you can set each one up as a Site, then create multiple locations within
each site to represent the specific areas where you will be storing inventory. For instance, you might
setup a Site as Warehouse 1 containing Locations Shelf 1, Shelf 2 and Shelf 3.
A fleet business might define each vehicle as a Site with multiple Locations (bins, for example) within
each vehicle. In this case you could setup a Site as Vehicle 1 with Locations of Bin1, Bin2 and Bin3. Or
each vehicle could be a single Location operating out of one or more Sites. For example, the Site might
be Docking 1 with locations of Vehicle 1, Vehicle 2, etc.
A retail business might have multiple Locations at one Site or multiple Locations within each of several
Sites. InventoryControl has the flexibility to be configured however it best suits your business needs.
Remember that though you must have at least one site containing one location, you could have multiple
sites that contain multiple locations. There is no limit to the number of locations you can assign to a site.
It is important to note that you can have the same Location code defined at more than one Site - for
instance, Warehouse 1 and Warehouse 2 may each have Location codes of Shelf 1 - so always pay
attention to which Site you are working with when performing Inventory transactions.
Setting up your locations now will allow you to just pick a location from a list when you begin adding
inventory later. It is possible, however, to define locations as you add inventory. If you would prefer to do
this, skip to Step 6 - Enter Suppliers
If you already have location information contained in another database, you may want to use
InventoryControl's Import function rather than manually entering in this information.
For additional information on formatting your Location numbers and descriptions, please refer to the topic
Barcode Best Practices
.
.
1.8 Step Four - Add Users
Add Users - You should enter all users who will be using the system and you can assign spe c ific rights
to each user that limit their activities to certain functions. It is a good idea to give each user his or her own
user name and password rather than sharing a single user profile, as this allows you to keep track of who
performs specific functions in the system. InventoryControl keeps a detailed transaction history of every
action performed in the software. Each time an item is added, removed, moved, etc., the transaction is
logged by InventoryControl and is listed with the user name of the person who performed the transaction,
the date/time of the transaction and the type of transaction on the Transaction List (Main Screen >
Lists > Transaction List).
View Business Examples
5
Page 21

InventoryControl Printable Help
1.9 Step Five - Print Location Labels
Print Location Labels - If you have set up more than one location and you will be using a mobile device
with an integrated barcode scanner, it is a good idea to create Location labels for each location you have
entered into the system. This allows you to quickly scan a barcode label when auditing or adjusting
inventory at that location or when adding, removing, picking or receiving inventory to or from that location.
For ideas and examples of how to configure your labels, click here.
You can print labels automatically after creating your locations or you can print from the Location List
After printing your labels, attach them to each location. For example, if your locations are shelves, attach
a label to each shelf to identify it.
.
1.10 Step Six - Enter Suppliers
Enter Suppliers - Suppliers are those businesses or individuals from which you will be obtaining your
inventory. Your business might require that each Item in your inventory have an associated supplier. You
can have one supplier or many providing you with inventory.
If you already have supplier information contained in another database, you may want to use
InventoryControl's Import function rather than manually entering in this information.
View Business Examples
1.11 Step Seven - Print the Supplier Report
Print the Supplier Report - If you have chosen to import your suppliers or manually enter all suppliers
prior to adding items, you should print and review the Supplier Report to make sure all the information
was entered correctly. To run the Supplier Report, from the Main screen, select the Reports icon. On
the Select Report
screen, double click Supplier Report.
1.12 Step Eight - Create Items
Create Items - Items represent the actual material or good that you will have in your inventory. The item
is a classification that contains information such as manufacturer, suppliers, a description of the item and
unit of measure information. The item is not part of your inventory until you add quantity to it and specify
a location for it. For example, you might create an Item entry for Mouse - Wireless. Then you can add
inventory, or quantity, to that item at a specific location.
On the Create New Item screen, you can assign the item to multiple locations and even designate one
location as the primary location for this item. The primary location will then pre-populate the screen when
removing, adding, receiving (Pro and Enterprise Version Only) and picking (Pro and Enterprise Version
Only) this item.
If you are using the Enterprise or Professional version of InventoryControl, you can also create items that
are non-inventory. This is useful if you need to create an item for marketing pamphlets, counter displays
or anything you need to have on-hand but don't necessarily want to include in your inventory amounts. In
addition, you can create Kit or Assembly Items. Please refer to the topics Assembly Overview
Kitting Overview
for more information.
and
6
Page 22

InventoryControl Printable Help
If you already have item informatio
InventoryControl's Import function rather than manually entering in this information. For more information
on importing locations, please refer to the topic Importing Into the Database
View Business Examples
n contained in another database, you may want to use
.
1.13 Step Nine - Print Item Labels
Print Item Labels - Labels can be printed directly from InventoryControl via the Item List screen, at the
time a new Item is created or you can access Wasp Labeler to edit or create new labels.
1.14 Step Ten - Add Inventory
Add Inventory - Now that your items have been created, you are ready to add inventory, or quantity to
those items at specific locations. Adding inventory is often referred to as receiving inventory. You can
think of this step as stocking the InventoryControl program with the inventory that is in your warehouse.
Remember that inventory is not the same thing as items, even though inventory is made of items.
Adding inventory to an item means you are adding quantity to that item.
When you are adding inventory, you will enter information specific to your inventory such as Location,
Quantity, and Cost as well as specific tracked by information such as serial number, date codes and
pallet codes. Each time you add inventory for an Item, the transaction is stored separately in
InventoryControl allowing for multiple Locations and cost averaging.
If you already have inventory information contained in another database, you may want to use
InventoryControl's Import function rather than manually entering in this information.
A Note on Importing Inventory
If you choose to import your inventory you
MUST run a backup of your system BEFORE
you import the inventory data. Name the
backup file something that indicates it was run
immediately prior to importing inventory so you
can easily identify it if needed later. If you find
errors on your import file after you import
inventory, you will need to restore this backup to
return the system to the pre-import state (your
other information will be there). After restoring,
you can fix the import file as needed and reimport. ****DO NOT re-import after you have
already imported inventory without first
restoring the backup.**** Re-importing over
existing inventory data will add more inventory
to your items rather than fixing problem data.
Congratulations! You are now on your way to populating your inventory database. To add more
Items to your database, just return to Step 4 to setup your new Item, then Add your inventory for that
Item.
7
Page 23

InventoryControl Printable Help
1.15 Step Eleven - Print the Inventory by Location Report
Print the Inventory by Location Report - Printing the Inventory Location Report will allow you to check
that your inventory has been entered correctly.
After you have added your inventory you are ready to begin using InventoryControl. Now you can setup
your mobile devices, if needed, and begin keeping track of your inventory.
8
Page 24

InventoryControl Printable Help
Chapter 2 - Introductory Materials
2.1 Barcode Best Practices
In InventoryControl, when you are asked for a number to identify sites, customers, items, locations etc.,
you should always use a short sequential set of numbers or numbers and characters. Enter the full text
description of the site or location in the description field, not the number field. These numbers can then
be printed as a barcode and used to scan locations into mobile devices. You should estimate the largest
number of sites or locations you will have and pick a range of numbers that are reserved for each. For
instance, if you have up to 60 sites, you should reserve 100 to 199 for your sites. Each new site you
enter will get a number from this range. If you want to more closely tie the number to the site, add a one
or two letter designation to the end of the site number.
For example, use 100US to designate the main US warehouse and 101UK for the warehouse in the
United Kingdom. If you expect to have a few hundred suppliers, reserve 1000 to 2000 for suppliers.
Manufacturers can have 500 to 599. Items should start at 20000. This range reservation serves two
purposes. First, it allows those who know the ranges to easily distinguish a designation for the
warehouse from the designation for an item if all they see is a barcode on a paper or a box. Second,
reserving a range of numbers makes the process of deciding wh at number to use for new designations
much easier. If you add a manufacturer and you already used 512, the next is 513. For example, if a
stray box is presented to the warehouse manager and she sees barcodes with 100US C050100, she
knows this box was stocked in the US warehouse on row C shelf 05 bin 01.00. The box may also have a
barcode with 20104 which she knows is the item number and can b e used to put the item back into
inventory. Without these barcodes, the box might have to be opened to identify the item and then
someone would have to track where it came from and where to put it away.
Another thing to consider when creating your numeric representation for locations and items is that some
devices only support a reduced set of characters. Some mobile devices, such as the WDT2200, do not
have a keyboard that can support lower case letters or the entire range of special characters. With these
devices, if your item number is 10000(1) you will not be able to type the item number or scan in the
number from a barcode because the parentheses character is not suppo rted. All o
Our internal barcode labels use Code 128 which supports both lower and uppe r case characters, all
numbers and many special characters.
InventoryControl uses the symbology called Code 128 for all the pre-built labels. All the scanners and
mobile devices Wasp supplies can read Code 128. Best practices suggest you use Cod e 128 because it
supports all numbers, upper and lower case characters and most special characters. It also reduces the
size of most common barcodes.
9
Page 25

InventoryControl Printable Help
2.2 What is a Barcode?
A barcode is a graphical representation of a set of numeric or alphanumeric characters that can be read
by a barcode scanner.
123 becomes:
Whse1 becomes:
Assigning a permanent barcode to each site, location, item, supplier and customer creates an
environment where a mobile device can be used to easily keep track of inventory movements and
alleviates the problem of data-entry errors.
Barcodes get wider with the amount of numbers and characters you want represented by them. A
barcode's width is determined by the amount of numbers or characters represented by the barcode.
Some barcode scanners have a limited width that they can read. If you have very long item numbers or
location numbers you may need to reconsider the numbering scheme or the scanner you a re using. Also
be aware that many of the less expensive barcode readers do not read barcodes that are bent, at an
angle, too small or damaged. Consider the possible disposition of your barcodes before choosing a
scanner.
There are many different barcode formats or symbologies. The different symbologies can be though of
as different fonts. The same characters are represented by different symbologies in different ways. For
example, the two symbologies below represent the same information (Whse1).
.
.
These different formats exist to provide ways to compress more data into smaller space, to represent a
different set of characters or to enable scanning at different angles or distances. InventoryControl uses
the symbology called Code 128 for all the pre-built labels. All the scanners and mobile devices Wasp
supplies can read Code 128. Best practices suggest you use Code 128 because it supports all numbers,
upper and lower case characters and most special characters. It also reduces the size of most common
barcodes.
Barcodes should be printed using a barcode printer or, if you are using Wasp Labeler, using a high quality
laser or ink jet printer. You want the barcode label to be high quality because low quality barcodes are
10
Page 26

InventoryControl Printable Help
harder to scan and usually do not last long. InventoryControl is bundled with Wasp Labeler, which can
print to a regular printer or a barcode printer. Remember to keep plenty of extra label stock and printer
ribbons to make sure you never run out. To determine how to best provide good quality labels for daily
use, consider the kind of printer you are using.
2.3 Choosing a Label Printer
Organizations that have several hundred new inventory items a week will need to have a dedicated
barcode label printer at each site. They should use a good quality label media and use the feature built
into InventoryControl that automatically prints inventory tags as soon as the item is received on the PC.
The printer needs to be rates for several hundred labels a day and needs to print fast enough to avoid
costly slowdowns that can be caused when waiting to put away items after they are received because the
labels are not printed. Look for models that can print 4-6 inches per second and can handle media up to
4" wide. Wasp's WPL606 line of printers work well in warehouse conditions.
Many organizations will not need a high-end printer but will still save money and will get better quality
long-lasting labels if they use a desktop barcode label printer. These printers allow you to print one or a
hundred labels without waste and they are quicker and cheaper than using a standard printer. Wasp's
WPL305 line of printers work great for smaller volumes of printing.
A laser printer using standard sheets of labels may work great where product turnover is slow, conditions
are well-controlled or new items are not added often. In this case, use the included Labeler software to
indicate what label stock is being used. Labeler ships with many standard label templates pre-configured.
Pre-print a few pages more than what you have in stock to prepare for new items.
11
Page 27

InventoryControl Printable Help
2.4 Designing and Labeling Sites and Locations
2.4.1 What is a Site?
The term Site is used to describe any grouping of locations where you plan to store and track inventory.
Usually a site is a warehouse building but it can be an office, a truck or a field, etc.
Site design may be simple if your entire inventory is stored your two warehouses. If this is the case you
can just use the name of the warehouse as the site description. Use a simple site number like W100 in
case you ever need to type the site number into a handheld device. For the site number you can use any
easily identifiable information about the site like its address or its designation like 140010th or W1400.
Since this product only has two levels of location tracking, you need to design your sites to describe all
the levels above the actual physical location of the inventory.
If you have trucks that are tied to a warehouse you can make their site description a composite of the
warehouse and truck number, W1400T12. If you have a different buildings containing various rooms in
which items will be stored, make a composite name of the building and room number, B201R10. You
should always make the site number something that can be barcoded so that it can be printed and
scanned. See Barcode Best Practices
.
2.4.2 What is a Location?
For the purpose of keeping track of your inventory items, your locations should represent the placement
within the site. If your site is a warehouse, the locations are shelves or racks. If your site is a building,
the locations may be offices. If you have a fleet of trucks, the locations may be containers in the truck.
When deciding how to label each location, choose a numbering scheme that can be interpreted when
reading just the label. For example, if you have 7 rows of 5 shelves each and each shelf has 4 levels,
your barcode label scheme should look like A010200 or Row A, Shelf 01, Level 02, Bin 00. If you have
inventory on trucks in containers, the truck can be a site and each bin in the truck is a location. Each bin
should get a numeric location designation like 100, 200 or 200. If you do not have locations within the
truck, each truck can be a location: T1, T2, T3. Put a label on the inside of the truck door so the person
moving inventory into the truck can just scan and move. The label barcode should have the barcode and
the human readable text description of the location as well.
2.4.3 Labeling Sites and Locations
Every location where inventory can be stored in your warehouse should have a printed barcode securely
attached near the location. This is important because adding, removing or moving inventory using the
InventoryControl software requires a location. All processes that require a location are both sped up and
made more accurate if you use a barcode to identify each location. Also using a consistent numbering
scheme makes finding items in the warehouse much easier. These labels can be stuck to the frame of
the shelves, attached to the bin, put on a card and hung from the racks or even stuck to the floor as in the
example below:
The first step for designing your labels is to decide on what type of label to print the barcode. A variety of
barcode label stock exists that can withstand any environment. There are two kinds of barcode label
12
Page 28

InventoryControl Printable Help
printers. Thermal transfer printers that work like an ink jet or laser printers that print by transferring ink
from a ribbon to the label paper (stock). Direct Thermal printers do not have a ribbon but use heat to print
onto a special label stock. The thermal transfer printers are more expensive to operate but can print on a
wider array of label stock and the labels last longer in various kinds of environments. Direct thermal
labels are cheaper but may fade if exposed to friction, heat or direct sunlight. Most barcode printers will
print both thermal transfer and direct thermal. You want a printer that will do both because what you are
using the label for will determine if you should use thermal transfer or the direct thermal. You may need
both kinds of labels available for printing.
For all kinds of organizations, you may want to consider using the cheaper direct thermal labels for
identifying individual items because you will put them on the packaging of items that will be discarded by
the consumer or on item tags used to identify the item at removal time. Use the cheaper label stock when
it will be used and discarded. It is often cheaper to reprint a few labels on the cheaper stock if one label
is damaged than to use the more expensive stock. You should label your warehouse locations with
labels that will last and can take some abuse because you don't want to have to continually reprint and
replace these labels.
If your labels contain information you want to be permanent, such as serial numbers, you should use
thermal transfer labels on a high quality label stock or, perhaps, polypropoline and a resin ribbon. The
importance of the label will determine what stock it is printed on. A serial number that you use for returns
or contract maintenance needs to be readable for a long time.
If your labels will be exposed to heat because of the device they are attached to or through exposure to
the sun you should use thermal transfer labels. For most locations ina fleet vehicle you should use
thermal transfer.
If the majority of your labels are disposable any cheap stock will work fine. Often the major issue is how
to apply the label to the item so that the scanner can read the barcode. Make sure the barcode is
attached to a flat surface in a place w here it will not get scratched or damaged.
Before you label your locations you need to come up with a numbering scheme for each location and
item. In InventoryControl there are two fields that describe where the item is: Site and Locations.
13
Page 29

InventoryControl Printable Help
2.5 Identifying Tracking Needs
Sometimes it is important to be able to associate an exact item or range of items with an exact customer,
serial number, date code or shipment date. This can be important for support and maintenance purposes
or for recalls. Often larger cost items that have a warranty or support contract are tracked by serial
number so that if the item is sent back for maintenance you can be sure you are not fixing a product that
is out of warranty. Some items need to be tracked by lot or date code because the batch they are in is
important or they are perishable.
InventoryControl allows you to specify up to four required tracking fields (Serial Number, Lot, Date Code
and Pallet) and three optional tracking fields (PO, Supplier and Customer). Selecting a tracking field
means that when you process an add, remove, move, audit, pick or receive for this item you will be forced
to specify a value for the tracking fields you specified. The three optional tracking fields are always
available when Adding and Removing items and can be filled out as needed. You can also sele ct to
make these optional fields required on the Create New Item
optional fields by selecting it on the Create New Item screen the field becomes required for that item. You
can select tracking fields on the Edit Item screen as long as no inventory has been added to the item.
screen. When you select to use one of the
Serial Number is the most common and is different from the rest of the tracking fields. Serial Numbers
must be unique for each piece of inventory. When an item is tracked by serial number, a unique serial
number must be entered for each individual piece of that item you enter into inventory. When the item is
removed or moved, the system will also require the serial number. This allows the location and
movement of the item to be tracked exactly. The other tracking fields are not required to be unique. If you
are tracking by lot you could add 100 items with lot number 206.
Date Code is used if the item has an expiration date or production date that is important for recalls or
tracking. Do not use the Date Code field to track when an item is added to InventoryControl. Each Add
transaction in InventoryControl is time-stamped to allow you to track when an item was added. To track
when an item is added, view the Transaction List
Transaction Report
There are also three optional tracking fields: PO, Supplier and Customer. As mentioned above, these
fields are special fields for the Add and Remove functions that can be filled out but are not required
unless you make them required when the item is created.
The required and optional track by fields can be renamed to reflect the names you use. For more
information, please refer to the topic Editing Field Names
After inventory is added to an item, the selections you made to the four tracking fields cannot be changed
without first removing all inventory from that item.
.
(Main Screen > Lists > Transactions) or run the
.
Tracking Fields Best Practices:
Make sure you specify what you want to track before adding inventory.
Make sure you print a label for each track by field you have selected to use
and attach them to each item. If the labels are not physically attached to
each item, it will be very difficult for you to keep track of which items should
be tracked by a specific field.
14
Page 30
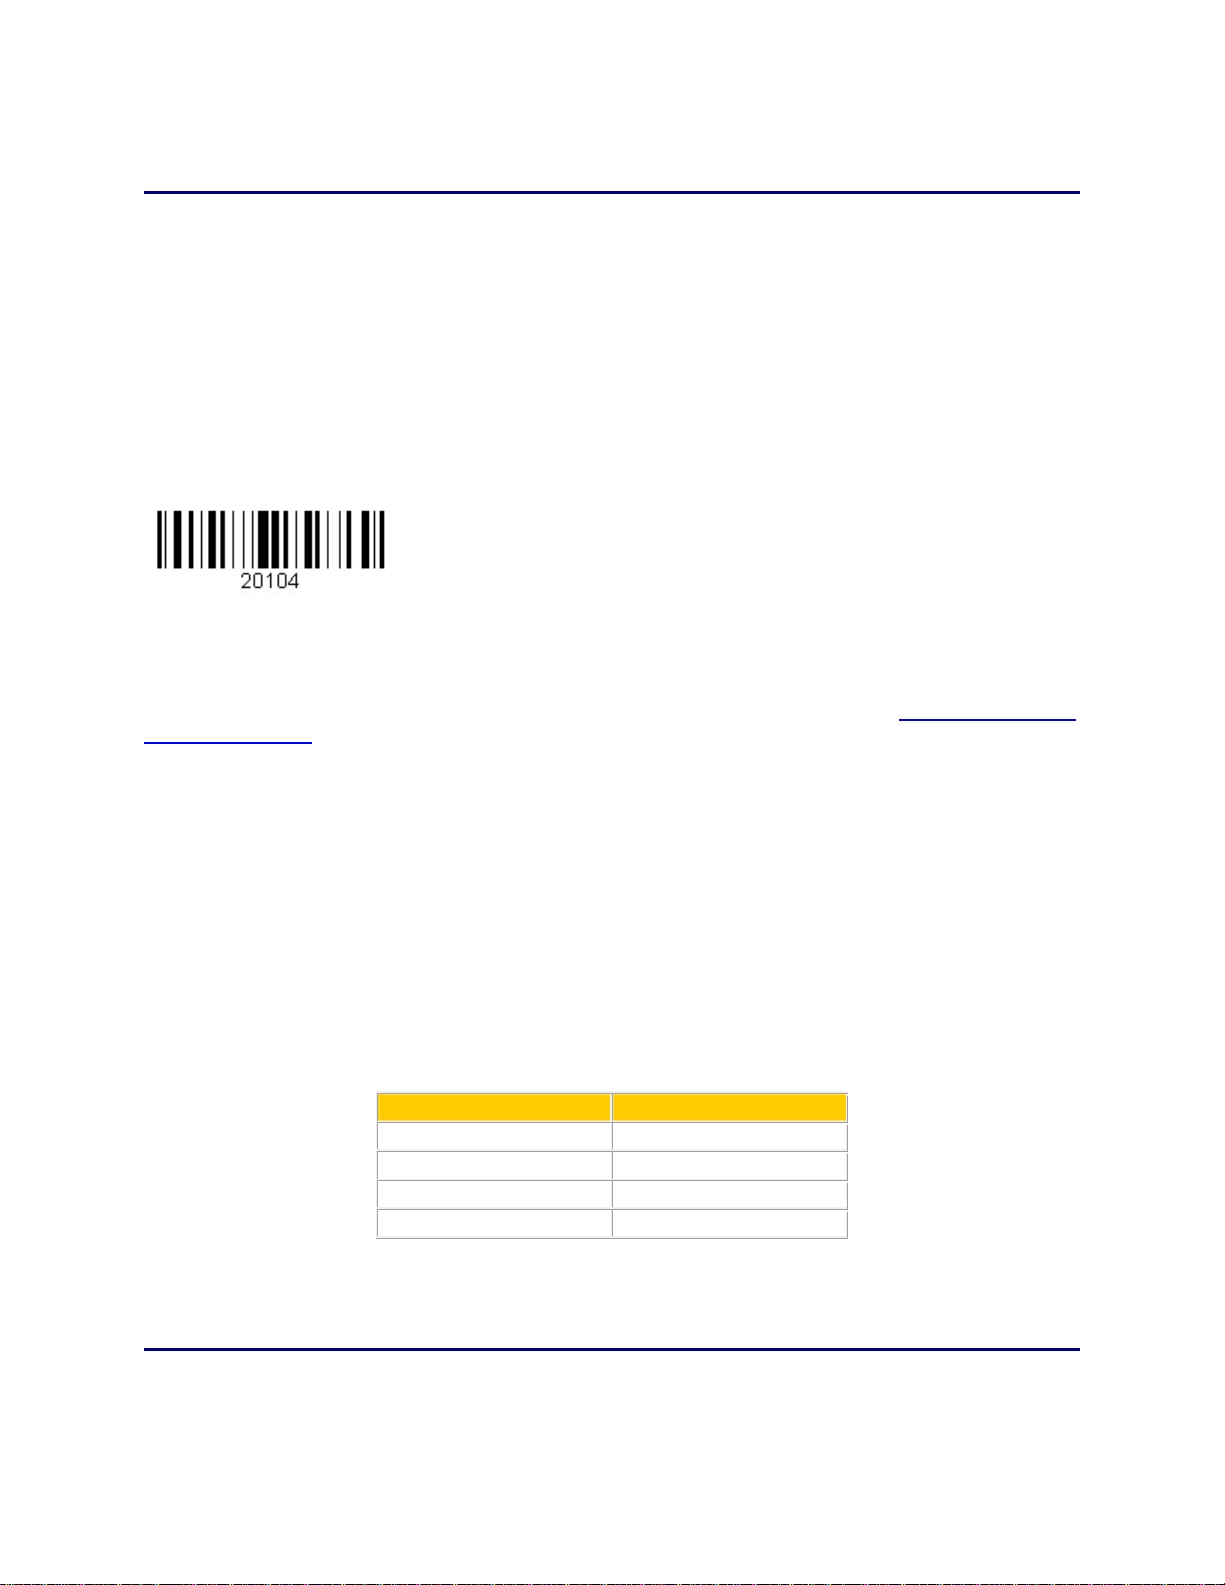
InventoryControl Printable Help
2.6 Labeling Items
Just as every location should have a barcode, each individual piece of inventory needs a barcode. You
should print your item numbers on labels and put them on each individual item before they are put away
on a shelf. You get the same time saving and accuracy benefits from labeling inventory items as you get
from labeling the locations, but on a greater scale. Sometimes it is not feasible to have a label on each
piece of inventory because the item is too small. In this case, put the item's barcode on the container in
which the item is stored on the shelf. The label should have the item name as well as a number
representing the item encoded as a barcode as in the example shown below:
It is important not to use a text description or abbreviation as the item number because a numbering
scheme is more flexible and easier to encode to a small barcode. Most labeling software can be set up to
use a number for the barcode and to print the description or item name under the barcode.
InventoryControl allows you to print your item barcodes as the inventory comes in or pre-print barcodes
from the Item List screen to apply.
If you pick a numbering scheme and stick to it you will find that you start to recognize the numbers as
easily as the names. The specific numbering scheme you use to identify the items can start at 1000 and
count up, if that is what you want. Some companies assign all or part of the SKU number they are issued
as the item number. Because item models may change over time or sub-models may become available,
you may need to use a numbering scheme that can adapt without losing the item's identity. Many
companies allow gaps in the numbering scheme to allow for this growth and for changes. For instance,
one item number is 19500 and another is 19600. When an optional feature is added to the 19500, it is
assigned 19510 since both are kept in inventory. The 19600 item is discontinue and another model takes
its place and is assigned 19601. This way, the 195xx line of products is maintained and are easily
identified with each other.
Recommended Barcode Ranges
Barcode Label Range
Sites 100-199
Manufacturers 500-599
Suppliers 1000-2000
Items 20000 and up
15
Page 31

InventoryControl Printable Help
2.7 Using Cost Tracking and Average Costing FAQ
What cost methods are used by InventoryControl?
InventoryControl provides four costing options:
Moving Average - When this method is used, the average cost of a particular item is
recalculated based on each purchase.
Example: You purchased 100 computers for $500 each. When you have 10 computers left in
stock, you purchase 100 more, but now your cost for the computers is $600 each.
InventoryControl will calculate the cost of this item as following:
Cost of original computers = 10 x 500 = $5,000
Cost of new computers = 100 x 600 = $60,000
The combined cost of all of the computers is $65,000
Average cost of all of this type of computer that you have in inventory (110 computers) is 65,000
/ 110 = 590.91
First-In, First-Out (FIFO) - When this method is used, the inventory that is added first is removed
first.
Example: If you added or received 50 Barcode Laser Scanners on the 1st, 8th and 15th, you
would end up with 150 scanners. If on the 17th you remove 60 scanners, all of the scanners that
came in on the 1st and 10 scanners from the 8th would be removed because the scanners on the
1st were first in and, therefore, will be first out. Next to be removed would be scanners from the
8th.
This also is how the average cost is calculated. If the scanners on the 1st cost $300 each and
the scanners on the 8th and 15th cost $320 and $315 each, the average co st on the 16th would
be $311.67.
50 scanners x $300 = $15,000 (from the 1st)
50 scanners x $320 = $16,000 (from the 8th)
50 scanners x $315 = $15,750 (from the 15th)
-----------$46,500 / 150 = $311.67 average cost
On the 17th you removed 60 scanners so the average cost will become:
40 scanners x $320 = $12,800 (from the 8th)
50 scanners x $315 = $15,750 (from the 15th)
----------$28,550 / 90 = $317.23 average cost
Inventory valuation is calculated by multiplying the quantity by the average price. The inventory
value on the 16th is $46,000 or 150 x $311.67. After 60 are removed the inventory value is
$28,550 or $317.23 x 90.
Last-In, First-Out (LIFO) - When this method is used, the inventory that is added last (most
recently) is removed first.
16
Page 32

InventoryControl Printable Help
50 scanners x $300 = $15,000 (from the 1st)
50 scanners x $320 = $16,000 (from the 8th)
50 scanners x $315 = $15,750 (from the 15th)
-----------$46,500 / 150 = $311.67 average cost
On the 17th you removed 60 scanners so the average cost will become:
40 scanners x $320 = $12,800 (from the 8th)
50 scanners x $300 = $15,000 (from the 1st)
----------$27,800 / 90 = $308.89 average cost
Legacy Method (the method used in previous versions of InventoryControl) - This is the method
used in previous versions of InventoryControl. The legacy method uses FIFO and manages cost
by location and track by level.
How do I determine my Stocking Unit?
The quantity of an item on all screens and reports is counted using the Stocking Unit you specify or
eaches (ea.) if you do not specify a unit. The stocking unit can be entered for each item on the New or
Edit Item screen's Additional tab (shown below):
When you enter the stocking unit, you need to pick the smallest unit of measure that you will ever use to
remove a whole item. A good test to use when deciding what the stocking unit should be is to ask
yourself how you count and refer to one unit. Think about what your answer would be if you were asked
to count how many of this item you have. If the answer is 100 feet of rope, for example, "feet" or "ft" is the
stocking unit. If the answer is 20 scanners, then "ea" is the stocking unit because "each" is common
when the unit itself is not a standard unit of measure. If the answer is 100 boxes or nails, then "box" or
"bx" is the stocking unit.
17
Page 33

InventoryControl Printable Help
We will address what you do if you remove in partial quantities or purchase the item in larger quantities
than the stocking unit later in this topic.
What is the Cost for my item?
When you input cost for an item into the New or Edit Item screen, the cost is your cost for purchasing
one of the stocking units. If one barcode laser scanner costs $300 you would enter 300 into the cost field.
If you remove fractional quantities of an item, the cost should still be for one whole stocking unit. Let's
use rope as an example. Normally the rope is sold in increments of a foot so the Stocking Unit is ft. Each
foot costs $0.12 making the cost 12 cents. Continuing the rope example, assume that exact multiples of
feet are rarely sold. In this case you could change the stocking unit to inches since that is the lowest unit
or measure. Since InventoryControl does not do the math for you when determining the quantity you are
adding and the cost at add time, you should choose one that makes it easiest for you to add and remove.
Regardless of the stocking unit you choose, the cost should be entered for one whole stocking unit.
How is Cost handled when I Add Inventory on the PC?
When inventory is added on the PC, it is assigned a cost for each 1 unit. If you add 20 scanners in the
Add screen, the cost will automatically default to the Item Cost (the cost you entered on the New or Edit
Item screen > General tab).
18
Page 34

InventoryControl Printable Help
If your cost for this add is different from the cost on the item record, you can change the cost on the Add
screen to represent the actual cost.
For example, if you purchased these 20 scanners for a discount, change the Cost on the Add screen
before you add the items. In the example below, the user received a $50.00 discount on the whole order
for ordering 20 scanners so the Cost entered on the Add screen should be $297.50.
20 scanners x $300 = $6,000 - $50 = $5,950 / 20 scanners = $297.50 per scanner.
You are still putting the individual scanner price into the Cost field and you must do the math to make
sure it is the correct price.
Tips!
Since there is limited space on the reports and screens, we suggest you always
put in an abbreviation for the stocking unit.
If you don't enter a cost when you add items or if you put in the wrong cost, there
is no way to edit that transaction and change the price after it has been completed.
Changing the cost on the Add screen does not change it on the Edit Items screen.
The next time you add Barcode Laser Scanners, for example, the cost will still
default to $300. If you want to change the default cost you can change the cost on
the Edit Item screen by going to Main Screen > Lists > Item. On the Item List,
select the item you wan to change and then click the Edit button. You can then
edit the cost. This only changes the cost that is shown automatically the next time
you add an item
The List Price and Sale Price fields on the Create New Item screen are for
information purposes only. These fields are not used on any reports.
What is the Cost for Order Units Per Supplier?
In the Professional and Enterprise versions of InventoryControl you are able to specify multiple Order
Units per Supplier of an item. When you enter an Order Unit that is different from the Stocking Unit,
you are telling the system that you are ordering in one unit but when the items are received they will be
broken into the different units.
For example, if you order your Barcode Laser Scanners in boxes of 5 but your stocking unit is Each, you
need to specify the cost of a box of 5 when you create the Order Unit Settings on the Create New or
Edit Item screen, Manage Suppliers tab, as shown in the image below:
19
Page 35

InventoryControl Printable Help
How is Zero Cost Inventory Handled?
If inventory is added or received at $0, that quantity is ignored for average price and valuation purposes.
The only way stock gets added at $0 is if you import inventory or specify a $0 cost at add or receive time.
50 scanners x $300 = $15,000 (from the 1st)
50 scanners x $320 = $16,000 (from the 8th)
1 scanner was found and added to inventory at $0
50 scanners x $315 = $15,750 (from the 15th)
-----------
$46,750 / 150 = $311.67 average cost
20
Page 36

InventoryControl Printable Help
The average cost is not $309.60 ($46,750 / 151). Since there is no way to edit the cost of an add or
receive after it is processed, InventoryControl ignores the $0 cost adds. If an item is accidentally added
at $0 cost the average and valuation would be incorrect until that item is removed through FIFO.
If you do want $0 cost items to be included in the average you can add them at $0.01. Although this
would not produce an exact average or valuation, it would have the same effect as averaging in $0 cost
items over time.
Inventory that is added using the Adjust screen is added at the average cost for that item at the time of
the adjustment. This way the average is not affected since, in most cases, the cost of that item is not
known.
Inventory valuation includes the zero cost items when it calculates. The valuation is the number of units
times the average price.
$311.67 x 151 scanners = $47,062.17
How is Cost Handled when Receiving against a Purchase Order?
If you have the Pro or Enterprise version, you can create a purchase order (PO) and receive against that
PO. When you do this, the stocking unit's cost is calculated from the cost that is on the PO. Please refer
to Purchase Orders Overview
How is Cost Handled When Adding and Receiving on the Mobile Devices?
If you are adding inventory on a mobile device, the cost will transfer as either the Item Cost or the
Average Cost, depending on the selection made on the Options screen
Keep in mind that there is no way to change the price after the handheld transactions are processed on
the PC.
If you have the Enterprise or Pro version and the inventory is received against a PO on the handheld, the
item cost is calculated from the cost on the PO. If the final cost is different from what was put on the PO
you can edit the handheld transactions as described above.
How is Cost Handled when Importing Inventory?
Inventory does not import with a cost. If you intend to use cost you should manually add your inventory
using the Add screen and specify the cost. Usually you can calculate the average cost of your existing
inventory and it is recommended that you use the average cost number to start with.
for more information on using Purchase Orders.
.
21
Page 37

InventoryControl Printable Help
2.8 Using Custom Fields
InventoryControl allows you to create custom fields on your Items, Sites, etc. This enables you to capture
information that is specific to your business needs. The Custom Texts and Custom Numbers and
Dates tabs can be found on each of the following screens:
Create New Customer
Create New Manufacturer
Create New Item
Create New Site
Create New Location
Create New Supplier.
Note: The Edit Field Names option on the Options screen must be enabled in order to enter custom
text, numbers and dates. For more information on the Options screen, please refer to the Options
Screen topic. Below is an example of the Custom Texts tab found on the screens mentioned above:
Note: The fields seen above are not visible when the Edit Field Names option is turned off and no
customizations have been applied.
Custom Numbers fields will accept values ranging from -999999999999999.9999 to
999999999999999.9999.
22
Page 38

InventoryControl Printable Help
Custom Dates will be displayed in the same format as found elsewhere in the product: "day of the
week, month dd, ccyy"
Example:
In this example, with the Edit Field Names option enabled, we have clicked on the Custom Text 1 label
(on the Custom Texts tab of the Create New Customer screen) to edit it. The Form field is grayed-out
because this label only occurs on the Customer screen.
Click OK to save the customization or Cancel to abort.
When the Edit Field Names option is subsequently disabled, the Customer Screen > Custom Texts tab
appears as shown below:
23
Page 39

InventoryControl Printable Help
This field will also be seen in the Edit Customer screen.
2.9 System Administrator Information
Knowledge Base Available to Provide Answers and Solutions
The Wasp Bar Code Knowledge Base is available to help you troubleshoot database issues. To access
the Knowledge Base, go to www.waspbarcode.com/support
Video Tutorials and Printed Manual
The video tutorials can be found in the How to Videos folder and a PDF version of the printed manual
can be found in the Quick Start Guides folder on your installation CD. You can also access the video
tutorials from the internet at: www.waspbarcode.com/videos
Changing the System Administrator Password Can Affect Repair Installs
, then select Knowledge Base.
.
The System Administrator database password must be blank. If you change the System Administrator
database password, you will not be able to replace database files.
Supported Mobile Devices
Data can be sent to the PC from any of the two supported devices: the WDT2200 and Windows Mobile
Devices, including the WDT3200, WDT3200II and WPA206.
24
Page 40

InventoryControl Printable Help
Chapter 3 - Business Examples
3.1 About Our Business Examples
Throughout the help topics you will see links to business examples. These examples outline three
hypothetical companies that represent generic business models and how each would commonly use this
product. Find the example company that most closely resembles your business and study the scenario
included for it in each section of this document. Remember that even though one the example
companies may not exactly match your business, these example are broad enough that at least one
should encompass all or part of your business needs.
Each of the three companies uses a different version of InventoryControl. The three versions are:
Standard - Contains a wide range of options to help you track your inventory including automatic
notification of low-stocked items, check in/out capabilities, add/remove feature, tracking and audit
as well as full access to mobile devices.
Professional - All of the features of the Standard version plus it allows for multiple PC's on the
network to run InventoryControl. Pick Order, Purchase Order and Receiving capabilities are
available along with the ability to assign multiple suppliers to each item.
Enterprise - The top-of-the-line package, Enterprise incorporates all of the benefits of the
Professional edition and is installed on your company's SQL server.
Note: Even though our example distribution company is using the Enterprise version of InventoryControl,
this does not necessarily mean that all distribution companies should use this version. The version of
InventoryControl used should be based on your business needs, rather than your business type.
3.2 Business Example Overviews
Distributing - Enterprise Version of InventoryControl
Basic Needs:
Multiple Sites and Locations
Multiple computers running InventoryControl
Multiple mobile devices in each Location
Preferred suppliers for items
Item tracking by serial number and pallet code
Pick, Receive, Move, Adjust, Add, Remove and Audit at the PC and on the mobile devices
Sebastian Distributing has been in business for many years and has previously used a different inventory
software. They have a great deal of inventory in multiple warehouses that they need to manage with
InventoryControl. Each warehouse will be a site with multiple locations. The supervisor of each
warehouse will use a computer equipped with InventoryControl, but the general manager will be the one
who has full administrative privileges. In addition, they have preferred suppliers they would like to
associate with each item in their system and will be creating pick and purchase orders as needed. To
accommodate all of these needs, they have purchased the Enterprise version of InventoryControl.
Workers in the warehouses will be issued handheld mobile devices to scan barcode labels when
receiving goods from suppliers and picking goods for shipment.
25
Page 41

InventoryControl Printable Help
Fleet - Professional Version of InventoryControl
Basic Needs:
Multiple Sites, Multiple Locations
One PC running InventoryControl
One mobile device at each Site
Inventoried and Non-Inventoried Items
Track some inventory by serial number
Pick, Receive, Move, Adjust, Add, Remove and Audit at the PC and on the mobile devices.
Rusty's Cable Service has been using a different inventory software. They consider the vehicles to be
sites with one location and a storage facility is another site with multiple locations. Most of their inventory
is kept in the vehicles. They are looking for a way to easily set up this site/location relationship and to
keep track of inventory as it comes into the storage facility, is transferred to the vehicles, and is sold to a
customer.
Their inventory consists of items that will eventually be sold to customers such as cable boxes, remotes,
and various types of cable as well as items that will remain in inventory, such as tools and other
installation equipment. In addition, they have non-inventory items such as pamphlets and cable guides.
They want the ability to track cable boxes and remotes by serial number. They also want to equip each
driver with a mobile deice that can be used to add, remove, move and adjust items as needed.
Mid-sized Reseller - Standard Version of InventoryControl
Basic Needs
One Site, Multiple Locations
One PC running InventoryControl
No mobile devices but a barcode scanner is used at the PC.
Add, Remove, Adjust, Move and Audit
The example used here is an antique reseller, but this information applies to many different types of
businesses, such as second-hand shops, hobby shops, beauty salons, etc., and even small
medical/veterinarian businesses who want to track pharmaceuticals and other supplies.
Brady's Bargains is a mid-sized antique reseller with one site and two locations: the storage area and the
sales floor. They currently do not have an inventory program and have been keeping up with inventory
manually using Excel spreadsheets. They will not be creating purchase orders or pick orders and do not
need the ability to assign multiple suppliers to an item, therefore, they have chosen the Standard version
of InventoryControl. In addition, Brady's Bargains will not be using mobile devices; they will be inputting
information directly into the PC. This shop will be using InventoryControl in conjunction with QuickBooks
for their accounting needs and with an unrelated POS system. It is important to note that though
InventoryControl does have scanning capabilities and tracks inventory, it is not a POS system and does
not perform inventory billing.
26
Page 42

InventoryControl Printable Help
3.3 Setting Up Security Privileges Business Example
Note: For step by step instructions on adding users, please refer to the topic Adding Users/Editing
Security Data.
Business Type: All - This example can apply to all business types and InventoryControl versions.
Step 1 - Prior to adding sites create at least one admin user: Sebastian Distributing has two
warehouses into which they receive goods from suppliers. They then ship those goods to carious
customers around the country. The manager Pat will be the primary user of the InventoryControl software
and will keep track of inventory movements by running reports. Pat will also serve as the system
administrator and will take care of maintaining user profiles, creating backups and other administrative
tasks. Pat should set herself up with administrative privileges upon accessing the system for the first
time. This will set up one administrator besides the default administrator profile. Cha nges to Pat's user
profile do not go into effect until she logs back in again. After setting herself up in the system, Pat should
log out of InventoryControl, then log back in using her new user name and password.
Since Pat will have access to all sites, the User can access all current and future sites option should
be checked. As Pat adds Sites, she will automatically have permission to all of them.
Below is an example of Pat's Security privileges:
27
Page 43
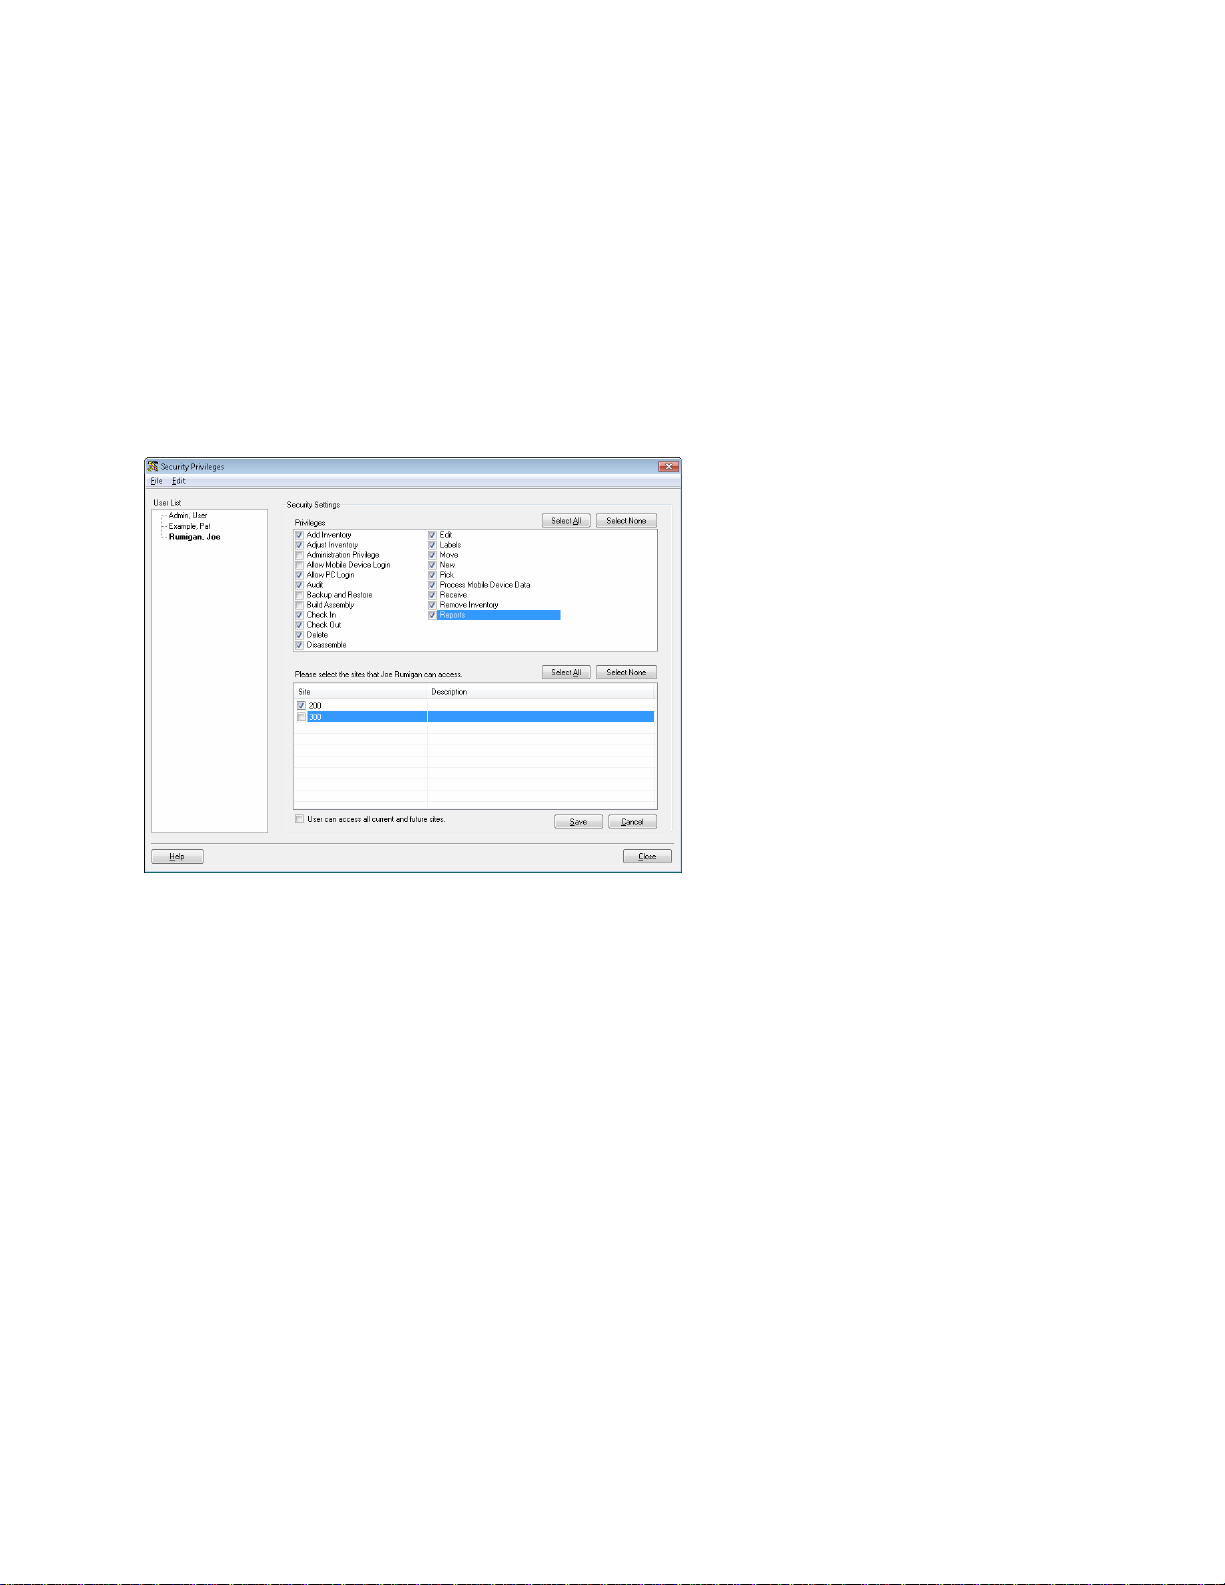
InventoryControl Printable Help
Step 2 - After adding sites and locations continue adding users: When she has completed entering
her sites and locations, Pat continues setting up security profiles for her employees who will be using
InventoryControl. She oversees a supervisor at each of her two warehouses, which are her sites. Each
supervisor will need to occasionally log on to the PC to perform basic functions such as manually adding,
removing or adjusting inventory, performing audits, checking inventory in and out to customers, etc., and
also creating pick orders and purchase orders as needed. The supervisors need access to m ost of the
system but do not need full administrative privileges as they will not be creating users, backups or run
reports.
Each of these users should have access only to the warehouse were they work. Below is an example of
the supervisor's Security screen:
Within the warehouses there are several workers who will be using mobile devices to add and remove
inventory and to perform audits. These workers will use InventoryControl exclusively on the mobile
device and will not need to log on to the PC.
These workers only need access to specific locations.
On the next page is an example of the warehouse worker's Security screen:
28
Page 44

InventoryControl Printable Help
Keep in mind that you should set up each worker with his or her own user name and password. You can
use the Copy User feature (Edit > Copy User) to quickly add profiles for users with the same settings.
This allows you to retain the privileges you have selected after entering a new User Name and
Password.
29
Page 45

InventoryControl Printable Help
3.4 Setting Up Sites and Locations Business Examples
Note: For step-by-step instructions on adding sites, please refer to the topic Creating New Sites. For
step-by-step instructions on adding locations, please refer to the topic Creating New Locations
Business Type: Distributing - Multiple Sites/Multiple Locations
Sebastian's Distributing has two warehouses. Each warehouse contains various bins, shelves, etc that
will physically contain the inventory. Since this business has multiple warehouses, each warehouse can
be setup as a Site, then multiple locations can be created within each site to represent the specific areas
where inventory will be stored.
They want to set up their site names based on the city where the warehouse is located and their location
names based on where the inventory is kept within the site. However, they also want the ability to scan
their sites/locations using the handheld barcode scanners, so they know the site/locations should be a
short combination of numbers and characters. Since their warehouses are located in Guthrie, Oklahoma
and Plano, Texas they want the Site Description to be Guthrie Warehouse and Plano Warehouse. The
Site Codes are set up as numbers: 100G for the Guthrie warehouse and 101P for the Plano warehouse.
They follow a similar pattern with their locations. The Location Description details where and what the
location is (Guthrie Wrehouse, Row A, Shelf 01, Bin 00) and the Location Code is a scannabl e
abbreviation of this (GA0100).
.
Although this business has only two sites, it has many locations; therefore, they create a .csv file of the
sites and locations by exporting this information from the old inventory system and importing it into
InventoryControl. For details on importing, refer to the topics Importing Into the Database
Specifics/Database Properties. After importing, each site and location should be manually reviewed in
InventoryControl to make sure all information is included.
Business Type: Fleet - Multiple Sites/Multiple Locations with From/To Sites Set on the Mobile
Devices
The owner of Rusty's Cable Company has narrowed down his options for setting up his sites and
locations to two possibilities. He can define the base garage as the site with each vehicle being a
location, along with a storage area setup as a location as well. In this instance the site could be named
Docking1 and the vehicles set up with names consisting of the abbreviation VEH followed by the last four
digits of the VIN number for that vehicle. Alternatively, each vehicle could be set up as a site with one
location. For example, the site might be VEH plus the last four digits of the VIN, such as VEH1234, with
locations being the various bins and shelves within the vehicles. The flexibility of the site/location design
allows companies such as Rusty's fleet business to conform the software to fit their needs.
Rusty has decided to set up his storage area as a site with locations of shelves and his vehicles as sites
with one location because he knows that he can use the Site Configuration screen to make each mobile
device specific to a vehicle. The Site Configuration screen on the mobile devices allows him to
designate one site as the From (Remove, Move, Pick) site and one as the To (Add, Mov e, Recei ve) site.
He can make the From and To sites the same sites, if needed.
and Import
Since the usual transfer of inventory for his business flows directly to the vehicles via add/receive, then to
the customer via remove, he can set up the From and To sites as the specific vehicles. When his
employees then use the device, any lists and searches are limited to the locations contained in that
specific vehicle when adding or removing inventory. If employees need to move inventory from the
30
Page 46

InventoryControl Printable Help
ge area to a truck, they can quickly change the settings on the Site Configuration screen and make
stora
the From site the storage area. Using the Site Configuration screen saves the employee the time it
would take to filter through inventory in all sites. For detailed information on the Site Configuration
screen on the PC please see the topic Selecting Sites
Configuration screen on the mobile device, please see the topic WDT2200 - Site Configuration
Windows Mobile Device Site Configuration
In addition, since Rusty wants his employees to be able to scan sites and locations, he makes sure his
Site/Location Codes are short sets of numbers and characters and his Site/Location Descriptions are
longer, more detailed descriptions of the code. For example, a Site Code is VEH1234 and the Site
Description is VIN 789001234 - White Ford Econoline.
Business Type: Reseller - One Site/Multiple Locations
Brady's Bargains has multiple locations at one site. The store itself is set up as the site with locations
consisting of areas on the sales floor and areas within a storage area. The manager manually inputs the
site and locations using the Create New Site and Create New Location screen. Though they will not be
using mobile devices, they do have a barcode scanner at the PC that will be used to scan labels on items.
Knowing this, they make sure they set up their Site and Location codes to be scanner friendly. They
have set up their Site Code as 100 and the Site Description as Main Store. Their Location Codes
follow the pattern of SFA2R12 with Location Descriptions of Sales Floor, Aisle 2, Rack 12.
.
. For detailed information on the Site
or
31
Page 47

InventoryControl Printable Help
3.5 Setting Up Suppliers Business Examples
Note: For step by step instructions on creating suppliers, please refer to the topic Creating New
Suppliers.
Business Type: Distributing and Fleet - Multiple Suppliers for Each Item
Sebastian Distributing has established relationships with many different suppliers to obtain their goo ds.
Which supplier they use for a particular item varies depending on how much they are ordering and what
Site (warehouse) they are ordering for. Due to this, they want to be able to associate more than one
supplier with each item and be able to mark a preferred supplier for some items. To do this, they simply
import the entire list of suppliers so they are all added to the database at once (refer to the topic Importing
into the Database). Later, after they add their items, they can assign as many suppliers as needed to
each item and designate one as the preferred supplier. Since all of the suppliers are already in the
database, they can quickly select which suppliers to associate rather than having to enter each supplier
manually. They can even designate specific shipping unites of measure for each suppli er to use for
ordering the item.
Business Type: Reseller - One Supplier for Some Items
Brady's Bargains has a list of suppliers from which they regularly receive certain items that they have
been maintaining by hand. They will manually input these suppliers on the Create New Suppliers screen
before they add the items. They can later manually associate the suppliers to an item using the Edit Item
screen/Manage Suppliers tab. Since they are using the Standard version of InventoryControl, they are
limited to entering one supplier and one shipping unit of measure for each item.
32
Page 48

InventoryControl Printable Help
3.6 Entering Items Business Examples
Note: For step by step instructions on adding items, please refer to the topic Creating New Items.
Business Type: Distributing - Items with Preferred Suppliers
Sebastian Distributing has many items in their existing database so they will be importing their item
information. They also want to streamline the purchase order process for their employees. Many items
are typically ordered from the same supplier so they manually enter the preferred supplier information on
the Manage Suppliers tab on the Edit Item screen for each item after the items are imported. They also
set up the preferred shipping unit of measure for each supplier on this tab. By doing this, the preferred
supplier information and associated preferred unit of measure will appear on new purchase orders as
soon as the item is added to the order.
Another time-saving step they take is to make sure all Item Codes are scannable. They enter the longer,
descriptive name in the Item Description field.
Business Type: Fleet - Items with Primary Locations
Items are typically assigned to the same locations in Rusty's Cable Company. The manager of Rusty's
Cable Company has set up their sites as vehicles and each vehicle contains basically the same locations.
There are bins for certain types of cables, a bin for remotes, a rack for cable boxes, etc. The
configuration for each vehicle is the same. For each item, they want to designate a primary location
within each site (vehicle). By doing this, when a user receives or adds an item using the mobile device or
on the PC the primary location will automatically appear on the screen, saving the employee from having
to search for it. (The location can be changed to something other than the primary location, if needed).
This is true for picking or removing inventory as well - the item will be removed from the primary location
by default unless the user changes the location.
Designating primary locations works for Rusty's Cable Company in conjunction with the Site
Configurations they have selected. The manager has set a primary location for each item in each site
and each mobile device's From/To sites are set to a specific vehicle.
To set up primary locations the manager can simply import items, making sure the import file contains a
column designating the item as having a preferred location (a Y should be in the Supplier column for that
item). Please refer to the Item Import Templates found in your installation folder or on your installation
CD for an example of this.
Business Type: Reseller - Items Imported
Brady's Bargains imports their item list from their existing Excel spreadsheet. They will also be tracking
some items so they make sure to import this information correctly. Refer tot he Item Import Templates
found in your installation folder or on your installation CD and to the topics, Importing Into the Database
and Import Specifics/Database Properties
.
33
Page 49

InventoryControl Printable Help
Chapter 4 - PC Operation Basics
4.1 User Log On
The Log On screen appears when InventoryControl is first started and when you select File > Log Out.
Complete both fields, then click OK to logon to the system.
The User Name field is not case sensitive.
The Password field is case sensitive. Asterisks will be displayed as you type the Password.
The first time you open InventoryControl you can enter the following information:
User Name: Admin
Password: (blank)
34
Page 50

InventoryControl Printable Help
After log on, the pa
The Admin account, or any other account with Administration Privilege, can use the Security Privileges
screen to add Users and set their privileges and reset their passwords. For more information on adding
users, please refer to the Adding Users/Editing Security Privileges
ssword can be changed via File > Change Password.
topic.
35
Page 51

InventoryControl Printable Help
4.2 About the About Screen
The About Screen allows you to view and manage licenses and provides program version details.
Note: All screen shots in this help file are of InventoryControl Professional Edition. The screens in other
versions of InventoryControl and in WaspNest Inventory may differ. For information on the benefits of
upgrading your version of InventoryControl or WaspNest Inventory, please select Help > Benefits of
Upgrading on the Main screen.
Using/Viewing the About Screen:
1. From the Main Screen, click Help > About. The About screen appears.
.
This screen displays your version and basic license information.
2. Click the Licenses button to view additional licenses and your mobile device licenses. Below is
an example of the Licenses screen:
36
Page 52

InventoryControl Printable Help
3. Click OK to return to the About screen.
4. Click OK to close the About screen.
37
Page 53
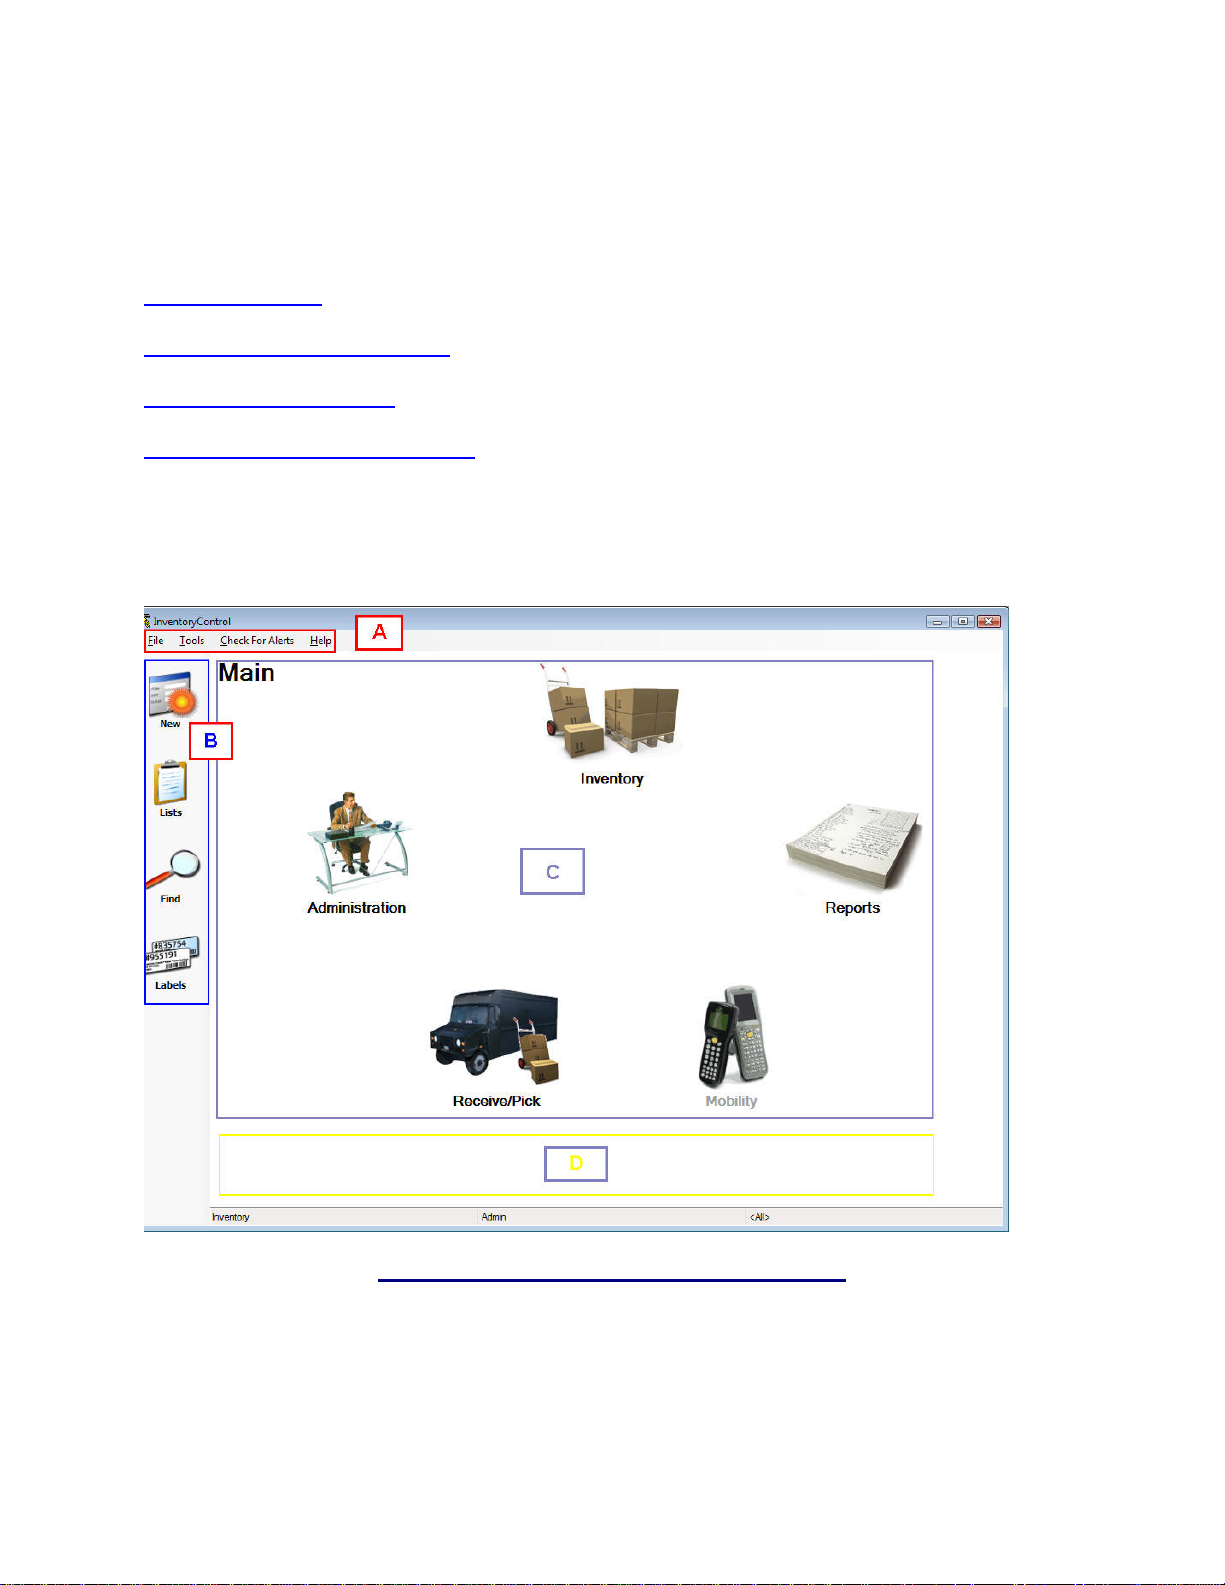
4.3 Main Screen
The Main screen is divided into four sections:
InventoryControl Printable Help
Section A: Toolbar
Section B: Left-Hand Navigation
Section C: Main Functions
Section D: Context-Sensitive Menu
Below is an example of the Main screen:
Note: The Receive/Pick icon only appears on Pro and Enterprise Versions. The Receive/Pick and
Mobility icons do not apply to WaspNest Inventory.
38
Page 54

4.3.1 Section A: Toolbar
The toolbar provides access to the following functions:
File Menu:
InventoryControl Printable Help
Change Password
Log Off
Exit - Exits the system.
Tools Menu:
Options
software behave.
Select Site
than one Site and multiple Locations within each Site.
Archive Transactions
Reset All Field Names - This option resets any field names you have customized through the
Edit Field Names function.
Reset All Grid Settings - This option resets all settings (sorting, grouping, hidden columns) you
may have made to your list screens to their default settings.
Check For Alerts:
When selected an Alerts drop down list
Help Menu:
Contents/Index/Search - Accesses this help file.
Update Licenses
Check for Updates
software and alert you if any exist. You can then download the updates at your convenience. the
software automatically searches for updates at start up. This option allows you to manually
search for updates at other times. Checking for Updates requires internet access.
- Logs the current user off of the system.
- Accesses the Options screen where you can customize how certain aspects of the
- Accesses the Select Site screen. InventoryControl allows you to work with more
- Allows the user currently logged in to change his/her password.
- Allows you to store older data in an archive.
will appear displaying any alerts, such as overdue items.
- Allows you to update your existing license(s).
- When this option is selected, the system will search for updates to the
4.3.2 Section B: Left-Hand Navigation
This software contains a menu on the left side of the Main Screen that provides access to the following
features:
New - Displays a menu of all Create New screens (Customer, Locations, Items, etc.). Select
which type of data you want to create from the menu.
Lists - Displays a menu of all Lists in the system. Select which List you want to view from the
menu. For detailed information on using the list screens, please refer to the topic Working with
Lists.
39
Page 55

InventoryControl Printable Help
Find
Labels
- Displays a menu of data options from which to search (Customer, Locations, etc.) Select
which type of data you want to search. A Find screen appears allowing you to quickly search for
information.
- Displays a menu of labels you can print. Printing Labels utilizes the Labeler software
that come bundled with your program. For detailed instructions on using the Labeler software,
please refer to the Labeler help file (accessible through the Labeler software).
4.3.3 Section C: Main Functions
This section displays the primary functions of this software. To access any of these functions:
1. Click on an icon. A menu of options for that function appears at the bottom of the screen (section
D - described below).
2. Click on an icon in the menu to access that function.
Available menu options are:
Administration
the system, maintaining user security profiles, backing up and/or restoring the database,
importing/exporting information and maintaining your company information.
- This option provides access to basic administrative functions such as adding users to
Inventory
can add or remove inventory, move inventory from one location to another, adjust inventory amounts and
audit all inventory in your system.
Reports
reports.
Mobility - This option does not apply to WaspNest Inventory. This option provides access to your mobile
device options.
Pick/Receive
- This options provides access to the pick/receive features of the software.
- This option provides access to the inventory features of the software. From this menu you
- This option opens the Reports screen allowing you to select from a wide range of available
- This option does not apply to WaspNest Inventory. (Pro and Enterprise Versions Only)
4.3.4 Section D: Context-Sensitive Menus
The bottom of the Main Screen will display a menu based on the selection you make from the Main
Functions icons.
Note: Security does not apply to WaspNest Inventory.
Examples:
40
Page 56

InventoryControl Printable Help
Administr
Inventory Menu
Note: Check-In, Check-Out, Assemble and Disassemble do not apply to WaspNest Inventory.
Receive/Pick Menu
Note: Pro and Enterprise Versions Only
ation Menu
Mobility Menu
Note: Mobility does not apply to WaspNest Inventory.
This example is of the WDT2200 menu. The icons in this menu will look different if you are using a
Windows Mobile® /CE™ mobile device, but the options will be the same.
Reports Menu
This icon opens the Select Report screen. For more information on the Select Report screen, please
refer to the topic Selecting Reports
.
41
Page 57

InventoryControl Printable Help
4.4 Changing Your Password
This feature allows the user currently logged in to change his or her password.
Note for WaspNest Users: This feature is not available in WaspNest Inventory. For information on the
benefits of upgrading your version of InventoryControl or WaspNest Inventory, please select Help >
Benefits of Upgrading on the Main screen.
Changing Your Password:
1. From the Main Screen, click File > Change Password. The Change Password screen appears.
2. Enter your old password, your new password, then confirm your new password. As passwords
are typed, asterisks will be displayed. Passwords are case sensitive.
3. Click OK to save your changes.
42
Page 58

InventoryControl Printable Help
4.5 Update License Screen
The Update License screen allows you to enter a regular License Key to upgrade from the Demo
version, or an Update License Key to increase the number of Mobile Devices InventoryControl will
support. You can also view the install serial number and activation code information.
Updating License(s):
1. From the Main Screen, click Help > Update License. The Update License screen appears.
2. If the program has not yet been activated, you will be prompted to enter an Activation Code now.
Click on the registration link that appears above the serial number and then complete the
information on the Wasp support page. An email will be sent back to you that contains the
Activation Code. Type this code back into the Activation Code field, then click OK to activate
the program.
If the program has been activated, the following screen appears:
43
Page 59

InventoryControl Printable Help
3. Enter a new Serial Number to add additional features such as additional mobile device licenses.
4. Click OK or click Cancel to exit without updating. Exit and restart the software to use the new
key.
If you use this form to upgrade from the Demo version to a Licensed version of this software, the License
Key you enter here will be displayed on the About screen.
If you use this form to increase the number of Mobile Devices InventoryControl will support, your original
License Key will continue to be displayed in Help > About, but it will display the new number of mobile
devices permitted.
44
Page 60

InventoryControl Printable Help
4.6 Selecting Sites
InventoryControl allows you to work with more than one Site and multiple Locations within each Site. At
any time, you can limit all your transactions to a specified Source, a specified Destination, or allow
transactions at All Sites. These are chosen on the Select Site screen.
Note for WaspNest Inventory Users: WaspNest Inventory only allows for one Site. For information on
the benefits of upgrading WaspNest Inventory, please select Help > Benefits of Upgrading on the Main
screen.
Keep in mind that you can only select sites to which you have been given access in Security
Selecting a Source on the Select Site screen determines the locations available in the Location field of
the Add, Remove, Check-In, Check-Out, Adjust and Audit functions. It will also determine the
locations available in the From Location field of the Move function. Only locations within the Site
selected in the Source field will be available for these functions.
Destination determines the locations available in the Move function's To Location field.
Remember, you are selecting Sites on this screen. When you select a site, you are limiting the inventory
functions to locations within that site.
For information on adding new sites, please refer to the Creating a New Site
adding new locations, please refer to the Creating New Locations
A Note on Importing: The site specified in the Destination field of the Select Site screen can impact the
Locations into which imported inventory will be recorded. When something other than <all> is specified
as your Source site, imported inventory will be put into Locations at the specified Source. If you have
varying site information you wish to import along with the location and quantity data for each Item
Number, you must make sure the Source is set to <all> before importing data into the Inventory table.
This topic discusses:
How to Select Sites
topic.
topic. For information on
.
Source and Destination Examples
4.6.1 How to Select Sites:
1. From the Main Screen, select Tools > Select Site. The Select Site screen appears:
45
Page 61
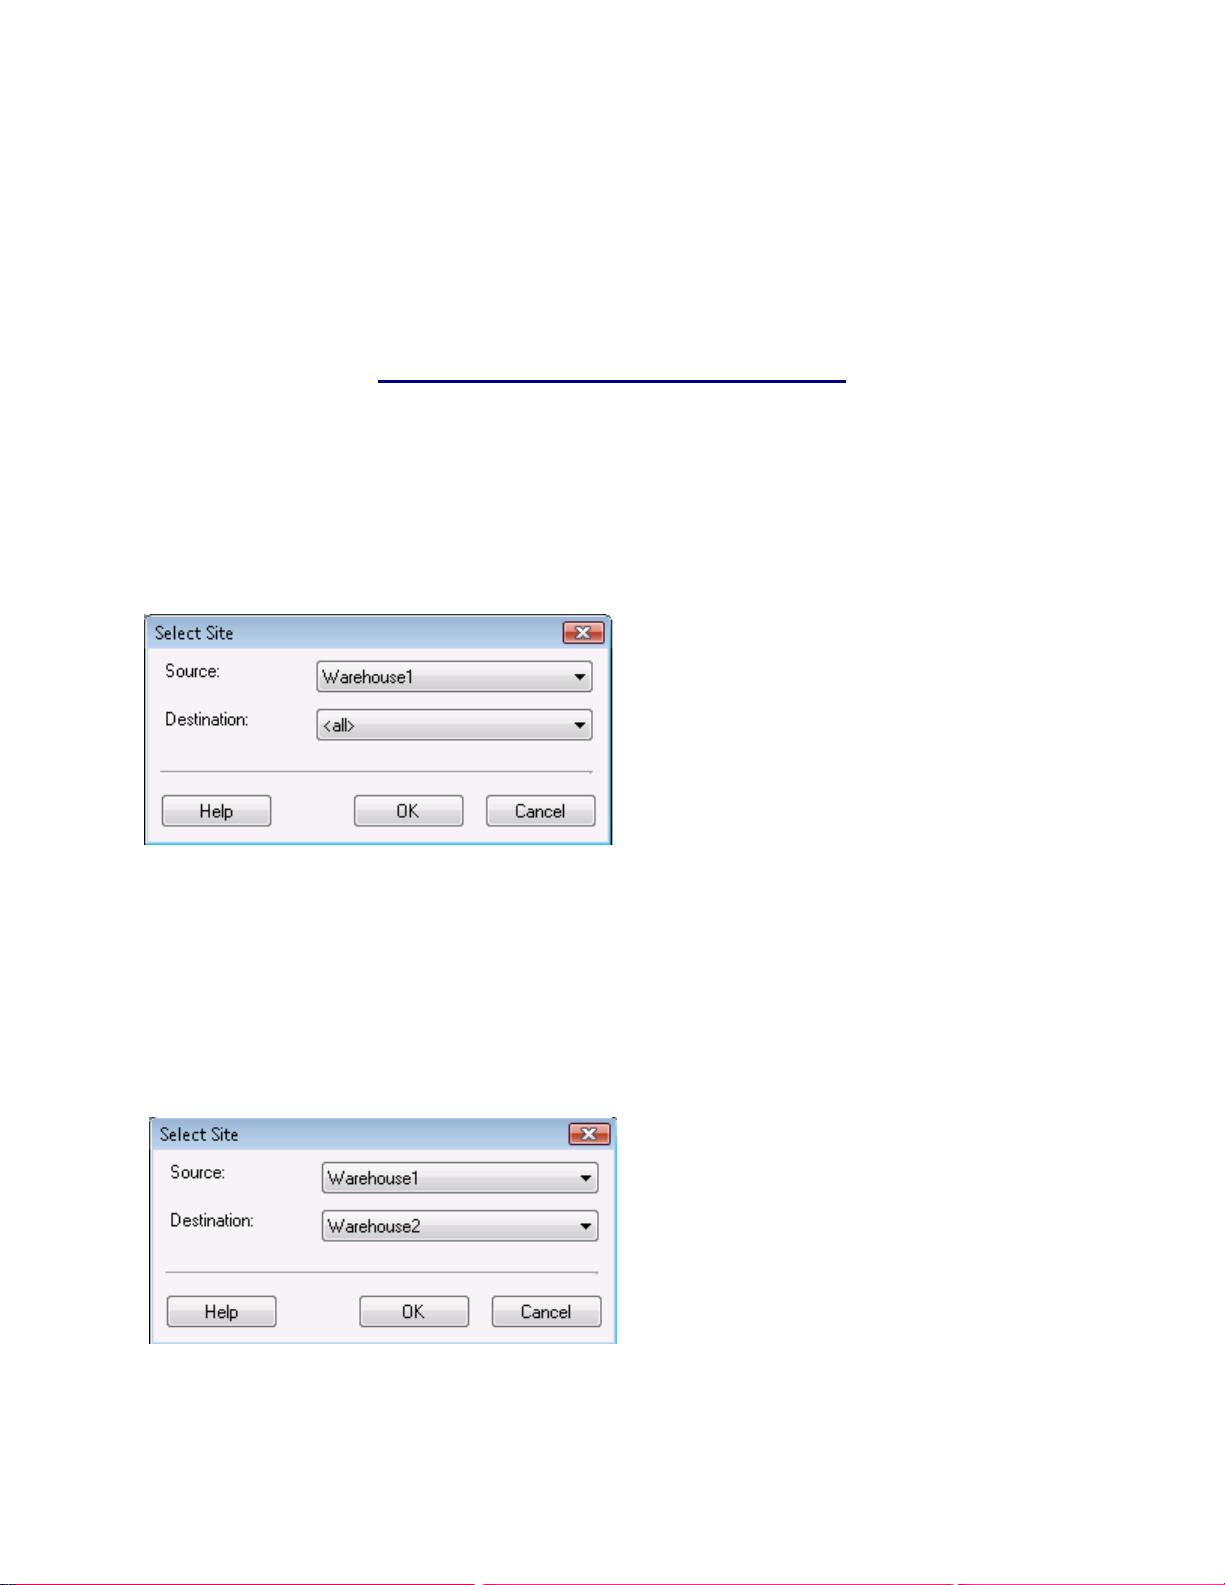
InventoryControl Printable Help
By default, all locations are allowed in all functions. This is designated by choosing <all> in both
the Source and Destination fields, as shown above.
2. Select the Source and Destination Site to which you want to limit transactions. All locations you
have entered in the system will appear in the drop down lists.
3. Select OK to save your changes.
4.6.2 Source and Destination Examples:
Example 1:
If you want to limit the available locations for adding, removing, checking in/out, adjust and auditing
inventory to one location (in this example, Warehouse1), you would select that location in the Source field
as shown below:
In the above example, inventory can be moved from a location within Warehouse 1 to any other location
at another site..
Example 2:
If you want to limit the available locations for adding, removing, checking in/out, adjust and auditing
inventory to one location (in this example, Warehouse1), and you want to limit move destinations to one
site (in this example, Warehouse2), you would select Warehouse1 in the Source field and Warehouse2 in
the Destination field as shown below:
46
Page 62
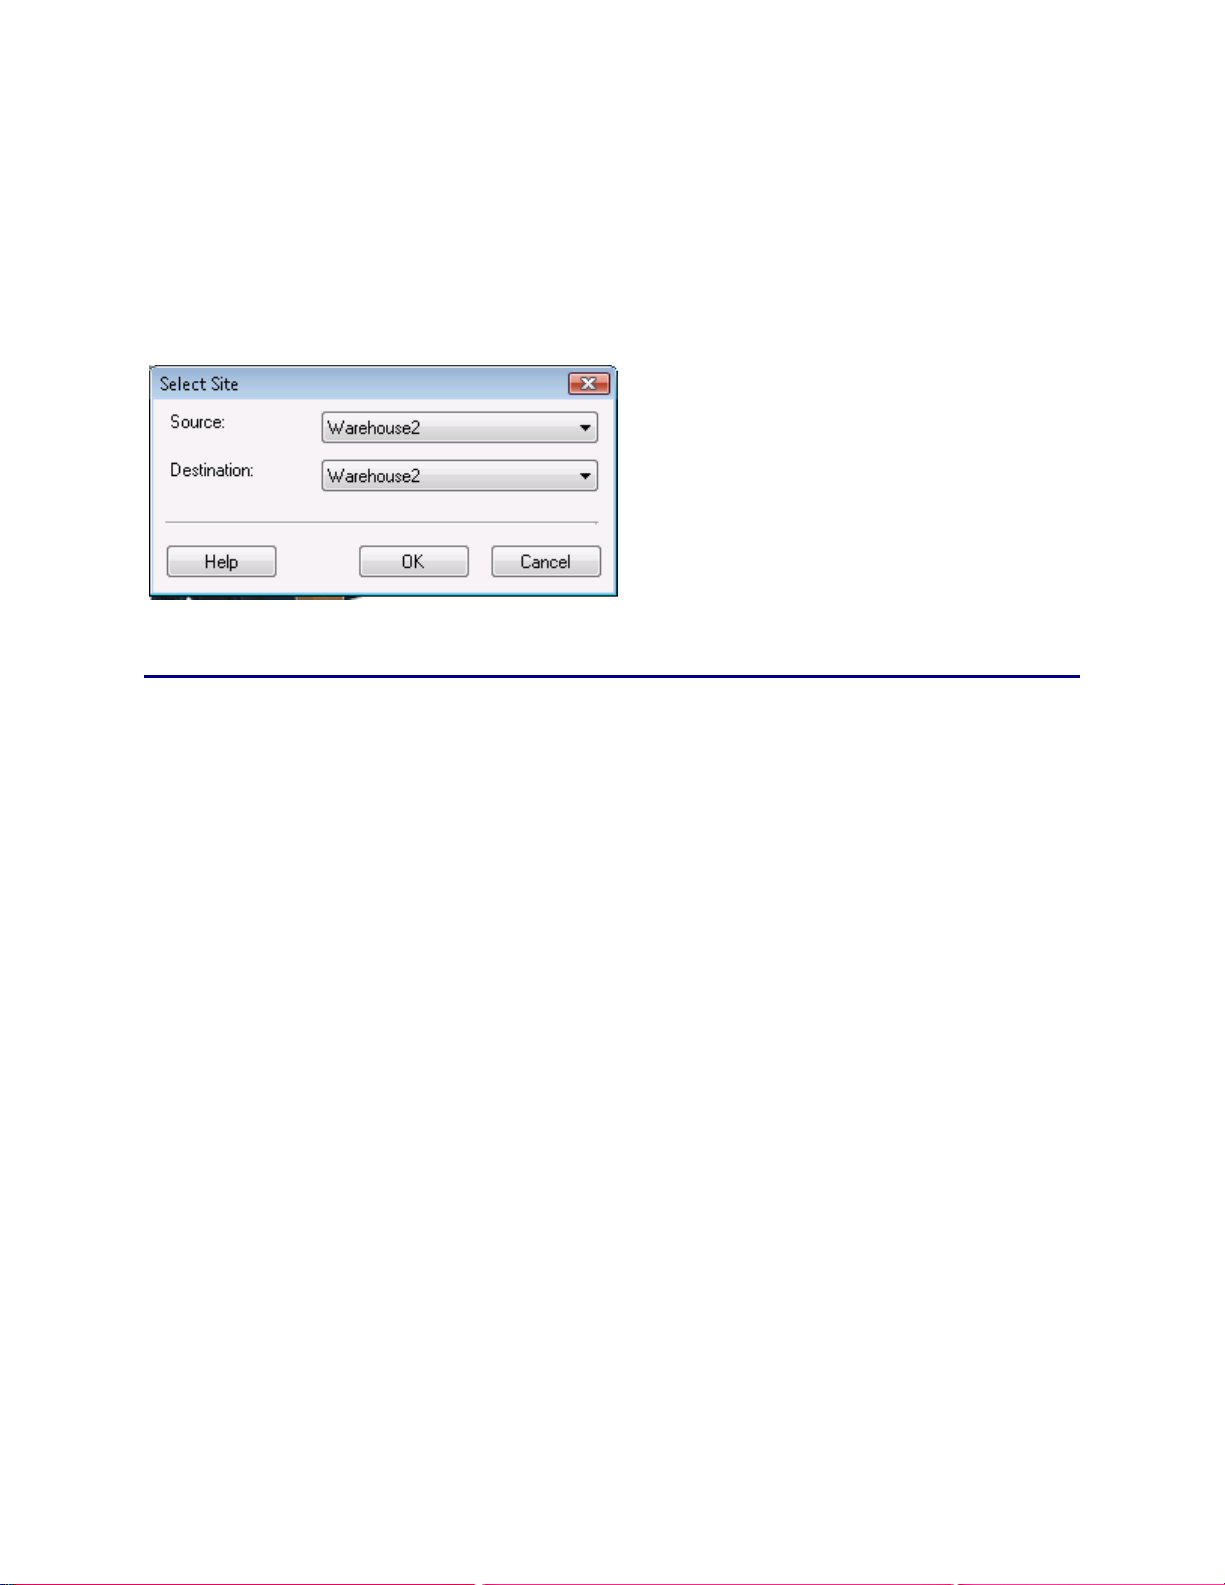
Example 3:
InventoryControl Printable Help
If you want to limit the available lo
inventory to one location (in this example, Warehouse2), and you want to limit move destinations to
locations in the same site, you would select Warehouse2 in the Source field and Warehouse2 in the
Destination field as shown below:
cations for adding, removing, checking in/out, adjust and auditing
47
Page 63
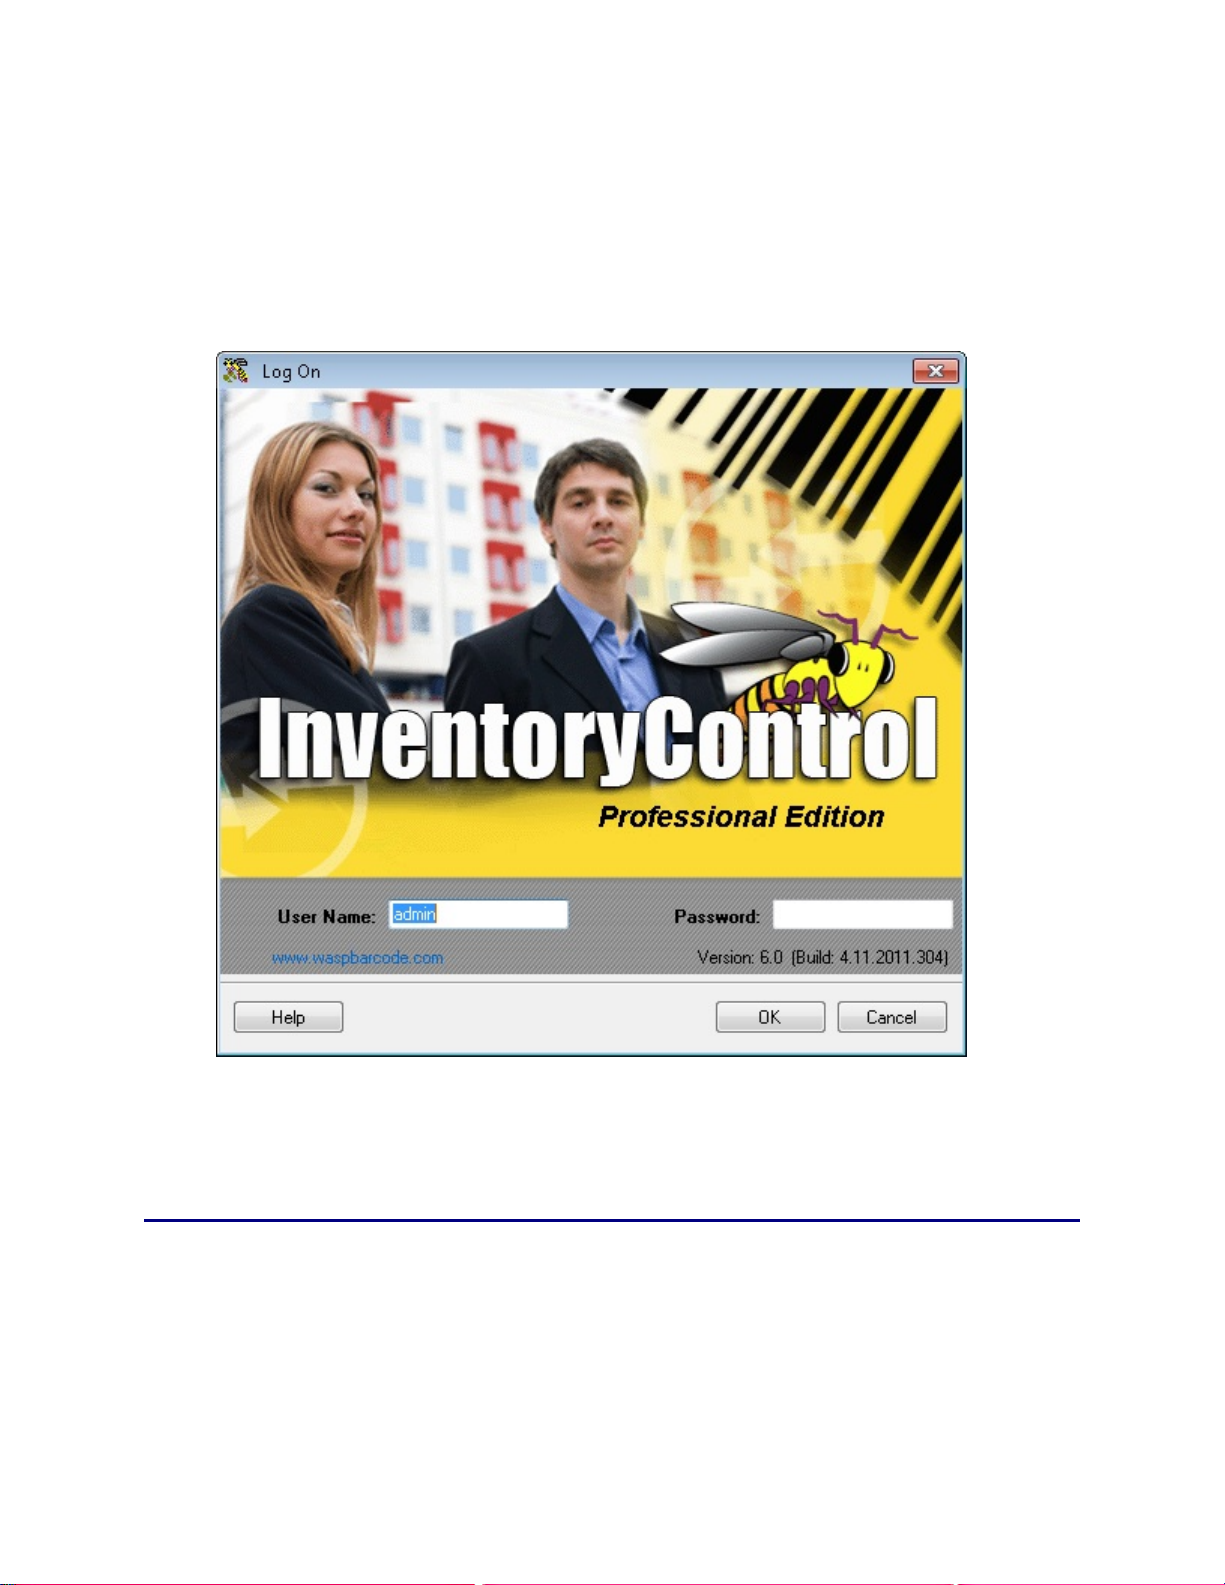
InventoryControl Printable Help
4.7 Logging Out
Logging Out allows the current user to log out of the system so another user can log in, if needed.
1. From the Main Screen, click File > Log Out. The Log On screen appears allowing another user
to log in.
2. Enter a valid User Name and Password and press OK to log on again or click Cancel to exit.
Note: You can also log in as a different user by going to Administration > Security > Log in
as Different User.
48
Page 64

InventoryControl Printable Help
4.8 Checking for Software Updates
By default, the software will check for updates to the application and notify you if a more recent version is
available when you login to the system. You can then access the Updates website and download the
latest version. This ensures you are always working with the most up-to-date version available to you.
This feature is turned on by default.
InventoryControl must be installed on a machine with Internet access to check for updates.
You can turn off the automatic check and perform periodic manual checks, or leave the option on and
perform a manual check, if desired.
This topic discusses:
Disabling the Automatic Version Check Feature
Performing a Manual Check
4.8.1 Disabling the Automatic Version Check Feature:
1. From the Main Screen, select Tools > Options. The Options screen appears:
49
Page 65
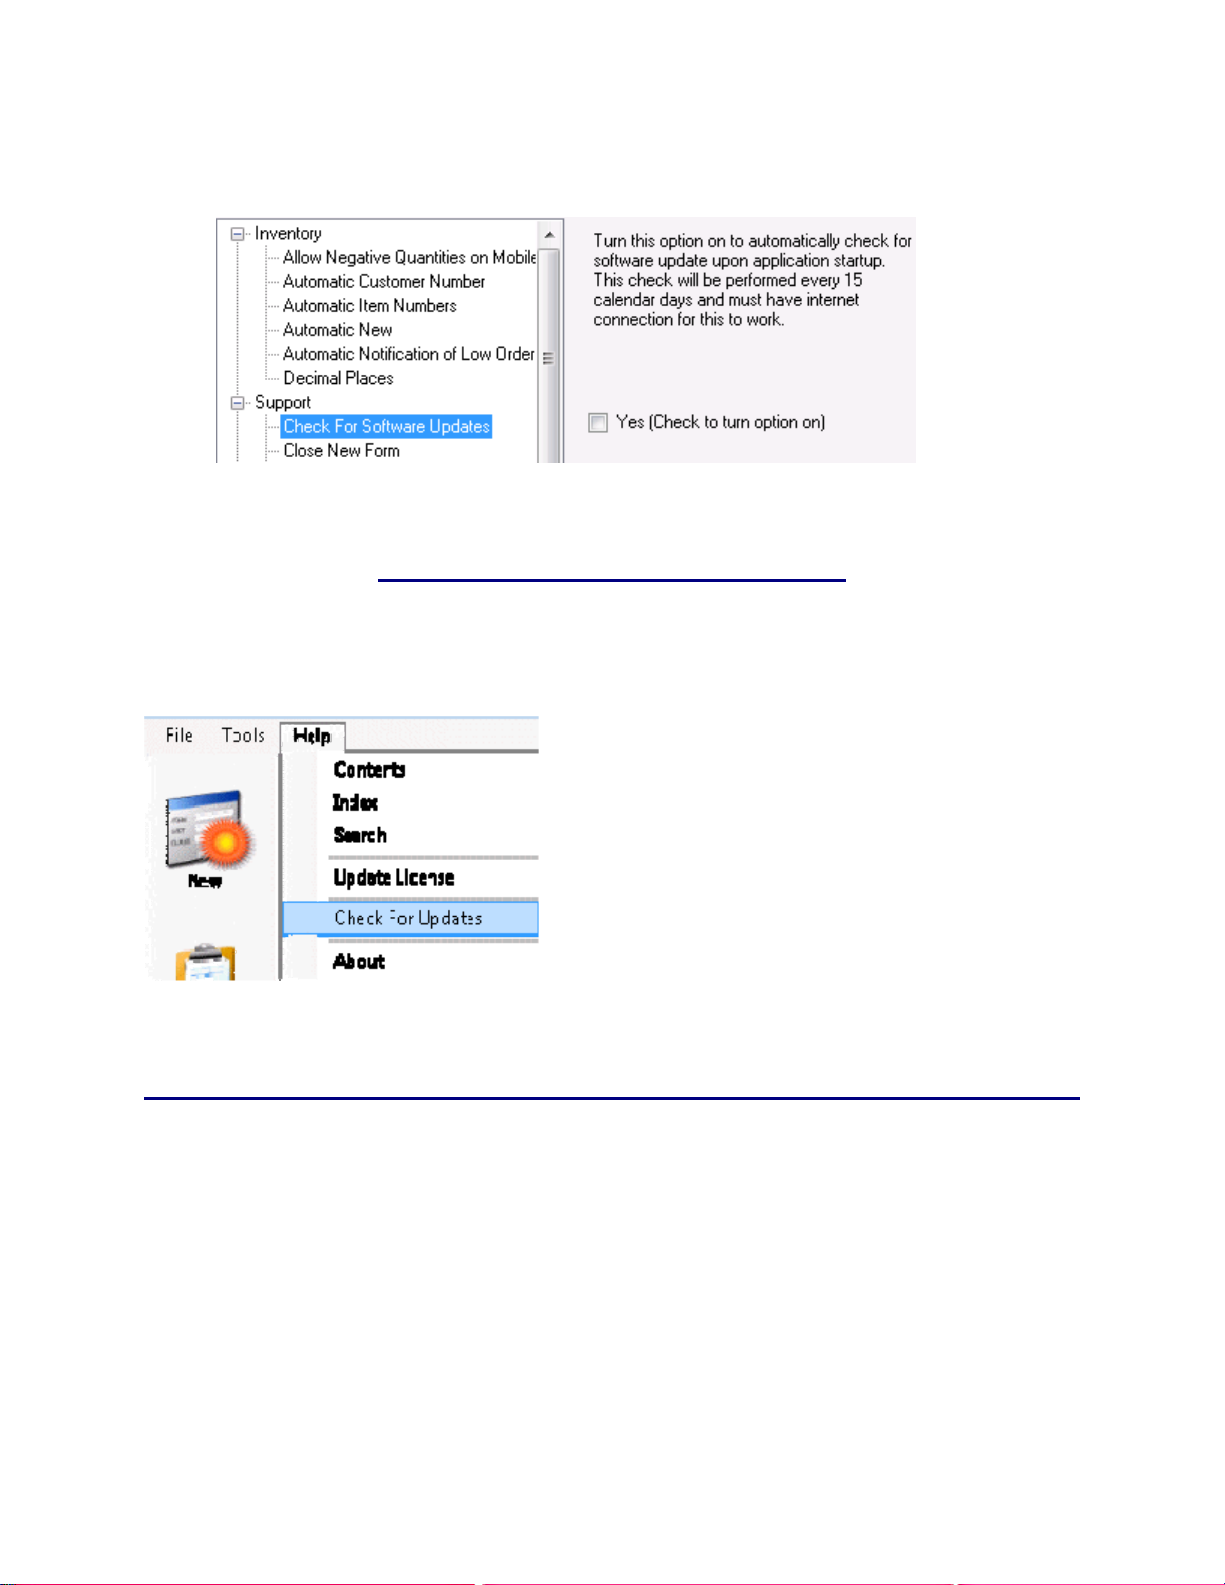
InventoryControl Printable Help
2. Highlight the Check for Software Updates option and deselect the Yes checkbox.
3. Click OK to save your changes and to Close the Options screen. The option is now disabled.
You can manually check for updates as needed.
4.8.2 Performing a Manual Check:
From the Main Screen, click Help > Check for Updates.
The system will automatically check for a newer version and notify you if one is available. This procedure
can be performed at any time.
50
Page 66

InventoryControl Printable Help
4.9 Item Stock Level List Screen
The software can automatically notify you of under-stocked items, broken down by location. By enabling
the Automatic Notification of Low Order Item on the Options screen, the software will display the Item
Stock Level List when you first start up the system. This screen contains items that have a Quantity
value equal to or less than the Reorder Quantity value set for that item and location on the Location tab
of the Create New or Edit Item screen. For more information on enabling and disabling this options,
please refer to the Options Screen
In order for items to appear on this screen, a Reorder Quantity must be entere d on the Location tab of
the Create New Item screen or, after the item is created, on the Edit Item screen.
Below is an example of the Item Stock Level List:
Click the View Report button at the bottom of the screen to display the Reorder Report.
topic.
You can use this report to aid you in creating purchase orders for the under-stocked items.
51
Page 67

InventoryControl Printable Help
4.10 Alerts
InventoryControl contains built alerts that you can display to tell you when action needs to be taken on
certain items or orders in the system. To access the Alerts feature , select Chec k for Alerts from the
Main screen.
Note for WaspNest Users: Alerts are not available in WaspNest Inventory. For more information on the
benefits of upgrading, please select Help > Benefits of Upgrading on the Main screen.
The following is a list of Alerts that might appear on your system:
Kit Item(s) with incomplete info This function applies to Pro and Enterprise Version users only.
Assembly items with incomplete info This function applies to Pro and Enterprise Version users
only.
Checked Out Item(s) Past Due
Purchase Orders Past Due This function applies to Pro and Enterprise Version users only.
Pick Orders Past Due This function applies to Pro and Enterprise Version users only.
Expired Items - This alert displays all items with expired date codes.
Items Understocked by Location
Items Understocked by Item Totals
Items with Negative Quantity
Items Understocked by Forecasted Item Totals - This alert appears if InventoryControl determines
items need to be re-ordered taking into account the quantity available in house, the quantity on order (via
purchase orders), and the quantity scheduled to be removed (via pick orders).
The alert appears if the Total Available plus the quantity on order via Purchase Orders is less than the
quantity needed for scheduled Pick Orders (Committed – (Total Available + On Order)).
On the next page is an example of the Alerts menu:
52
Page 68

InventoryControl Printable Help
53
Page 69

InventoryControl Printable Help
4.11 Adding Notes
Several screens in the software provide the option to add notes to the record. Clicking on the Add Note
button allows you to associate any comments you may have with the record you are creating or editing.
This is useful to keep comments associated with the record.
Enter your notes in the text box, then click OK to save and exit.
Notes are displayed along with the date/time it was entered and the user name of the user who added it.
54
Page 70

InventoryControl Printable Help
Chapter 5 - Creating New Data
5.1 Creating a New Site
Note: You can only have one site in WaspNest Inventory.
The Create New Site screen allows you to add a new Site to your database. Typically, a Site is a
building that contains one or more inventory Locations. It is usually a building, but it might also be a fleet
vehicle, with one or more bins that can be defined as inventory Locations within that vehicle. For more
information on Locations, please refer to the Creating New Locations
It is not uncommon to use this product with only one Site defined. A minimum of one Site is required.
Adding a New Site:
1. From the Main screen, select New > Site.
OR
From the Main screen, select Lists > Site. On the Site List, select the New icon.
The Create New Site screen appears:
topic.
2. Enter a Site and Description. Description allows you to enter a description of the Site. This is
useful when the Site value is vague (For example, Site "H7" could be described as "Hangar 7").
Notes is a text field available to record any additional information you might have about this Site.
Click the Add Notes button to edit the Notes field.
55
Page 71

InventoryControl Printable Help
3. For information about the Custom Texts and Custom Numbers and Dates tabs, see Using
Custom Fields.
4. When you have finished adding information, click the OK/Save button. The system behaves
differently at this point depending on your settings on the Options screen.
When the Close New Form option is turned off: Click Save to commit your entry or click
Close to exit the form.
When the Close New Form option is turned on: Click OK to commit your entry and exit
the form or Cancel to exit the form without saving your entry.
For more information about the Options screen, please refer to the Options Screen
topic.
56
Page 72

InventoryControl Printable Help
5.2 Creating New Customers
The Create New Customer screen allows you to add a new customer to your database. When you are
setting up your software for the first time, you may want to import your customers rather than adding them
one at a time through this screen. For information on importing information into your database, please
refer to the Import Into Database
Adding a Customer:
1. From the Main screen, select New > Customer.
OR
From the Main screen, select Lists > Customer. On the Customer List, select the New icon.
The Create New Customer screen appears:
topic.
Note: This screen is opened automatically when Checking Out or Checking In inventory and a
new customer name is entered.
2. Type in the customer information. The Customer No. and Address Type fields are required; all
other fields are optional. The customer name and address can then be selected when cre ating
57
Page 73

InventoryControl Printable Help
Pick Orders (Pro and Enterprise versions only).
If you have the Automatic Customer Numbers option selected on the Options screen, the
Customer No. field will appear populated with the next number in the sequence. For further
information on the this option, please refer to the Options Screen
topic.
The software provides you with the ability to enter a Billing Address, Receiving Address and/or
Shipping Address for your customers. To enter multiple address, follow the steps below:
a. On the Company Information screen, enter your company name. Select what type of
address you will be entering from the Address Type drop down menu.
b. Enter the remainder of the address information, then click OK. You will be returned to
the Administration Menu.
c. Click the Company Info icon again. The Company Information screen will reappear
populated with the information you just entered.
d. Select a different address type of the Address Type drop down menu. The address lines
(Address 1 and 2, City, State, Postal Code and Country) will clear while all other
company information will remain on the screen.
e. Enter the new address information, then click OK. Repeat these steps for each address
type.
3. When you have finished entering data in the General Information tab, click the Additional
Information tab (this tab is optional).
58
Page 74
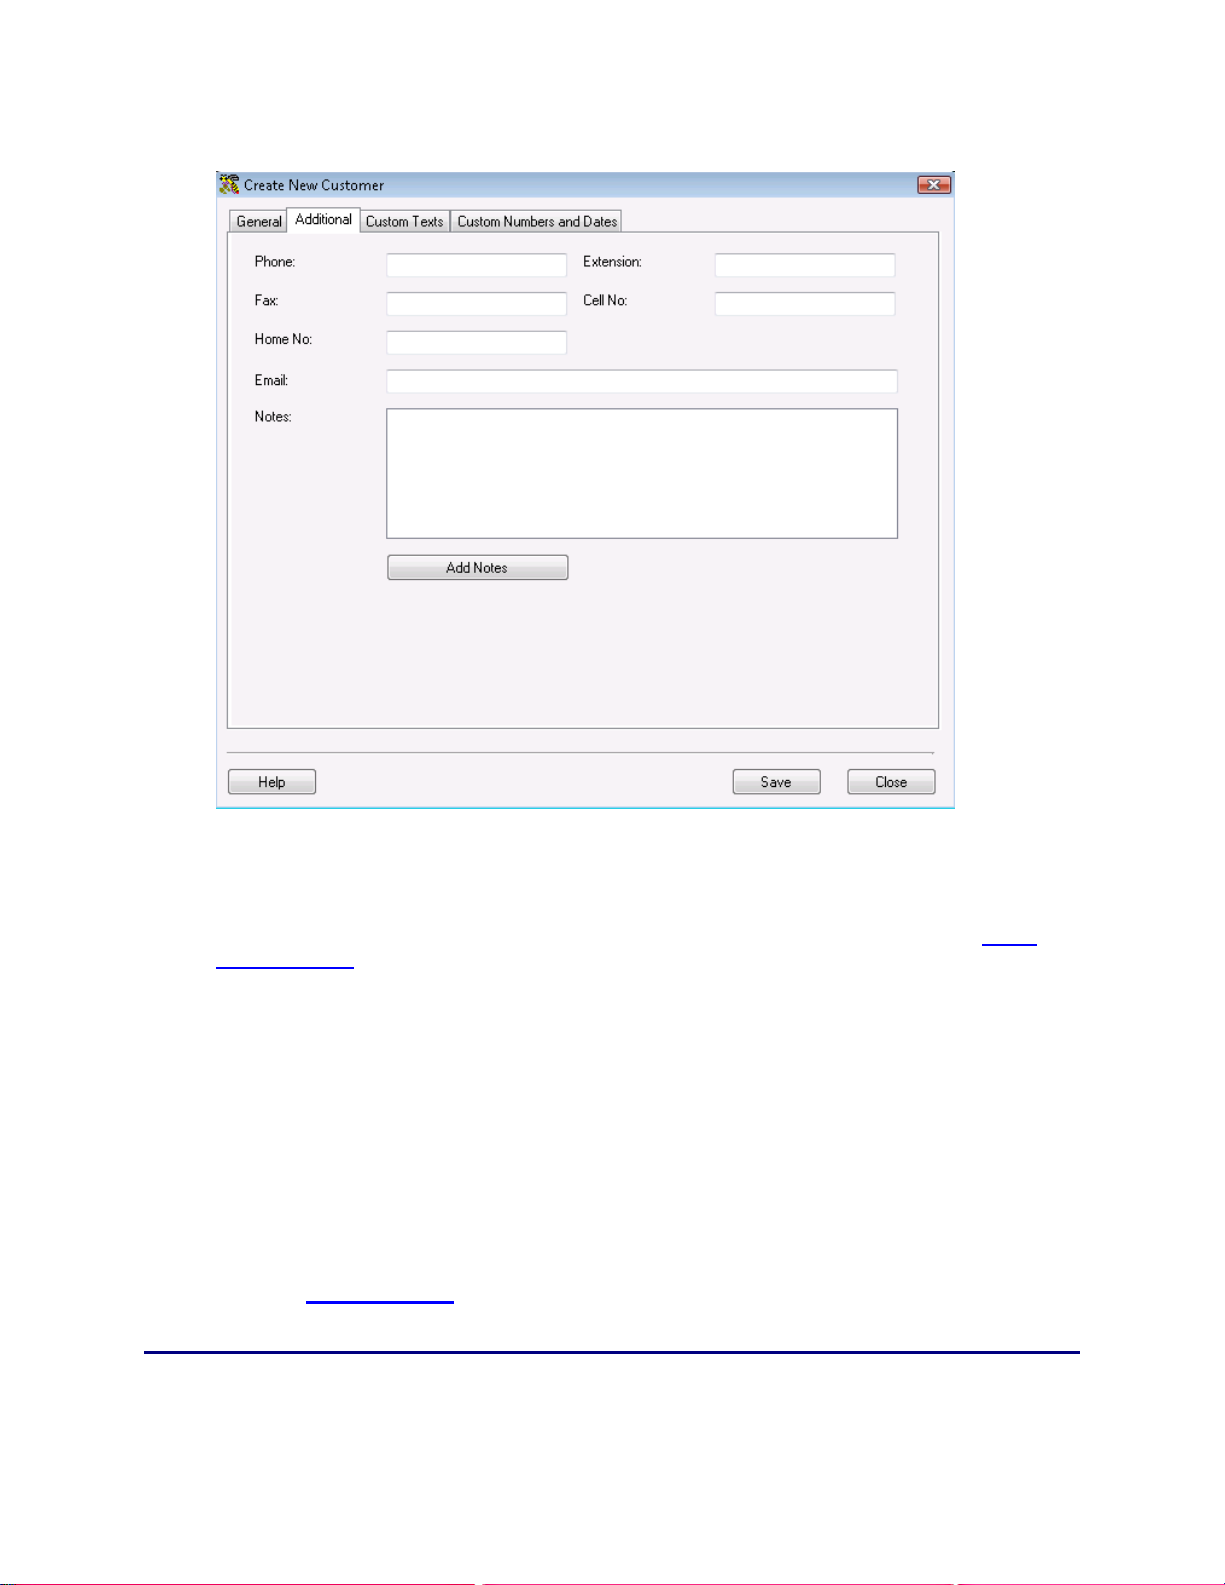
InventoryControl Printable Help
The Additional Information tab provides optional fields where you can record the customer's
Phone, Extension, Fax, Cell No., Home No. and Email. In addition, you can create notes on
this customer on this tab by clicking the Add Notes button.
4. For information about the Custom Texts and Custom Numbers and Dates tabs, see Using
Custom Fields.
5. When you have finished adding information, click the OK/Save button. The system behaves
differently at this point depending on your settings on the Options screen.
When the Close New Form option is turned off: Click Save to commit your entry or click
Close to exit the form.
When the Close New Form option is turned on: Click OK to commit your entry and exit
the form or Cancel to exit the form without saving your entry.
For more information about setting the Close New Form option on the Options screen, please
refer to the Options Screen
topic.
59
Page 75

InventoryControl Printable Help
5.3 Creating New Inventory and Non-Inventory Items
The Create New Item screen allows you to add a new Item to your database and to specify how you
want to track each item (by Serial Number, Lot, Date Code and/or Pallet).
What is an Item? - Items represent the actual material or good that you will have in your inventory. For
example, you might create an Item entry for Mouse - Wireless. Then you can add inventory, or quantity,
to that item. If you are using the Enterprise or Professional version of this software, you can also create
items that are non-inventory. This is useful if you need to create an item for marketing pamphlets,
counter displays or anything you need to have, but for which you don't need to track quantity.
What is a Non-Inventory Item? - A non-inventory item is anything you order or receive, but do not want
to track the location and quantity of. An example of a non-inventory item might be marketing materials
like a product flyer that is taken to trade shows or put in product boxes. Once you are out you may never
buy more of that item and you don't need to know how many are left. You may need to include noninventory items on a purchase order and verify receipt to have a payment paper trail but you do not need
to keep track of the item after it is received. InventoryControl allows you to add non-inventory items onto
purchase orders in the Pro and Enterprise versions.
Note: For information on the benefits of upgrading your version of InventoryControl or WaspNest
Inventory, please select Help > Benefits of Upgrading on the Main
When you are setting up your software for the first time, you may want to import your items rather than
adding them one at a time through this screen. For information on importing information into your
database, please refer to the Import Into Database
This topic discusses:
Accessing the Create New Item Screen
General Information Tab
Location Settings Tab
Additional Information Tab
Manage Suppliers Tab
Custom Texts/Custom Numbers and Dates Tab
Saving the New Item
topic.
screen.
60
Page 76
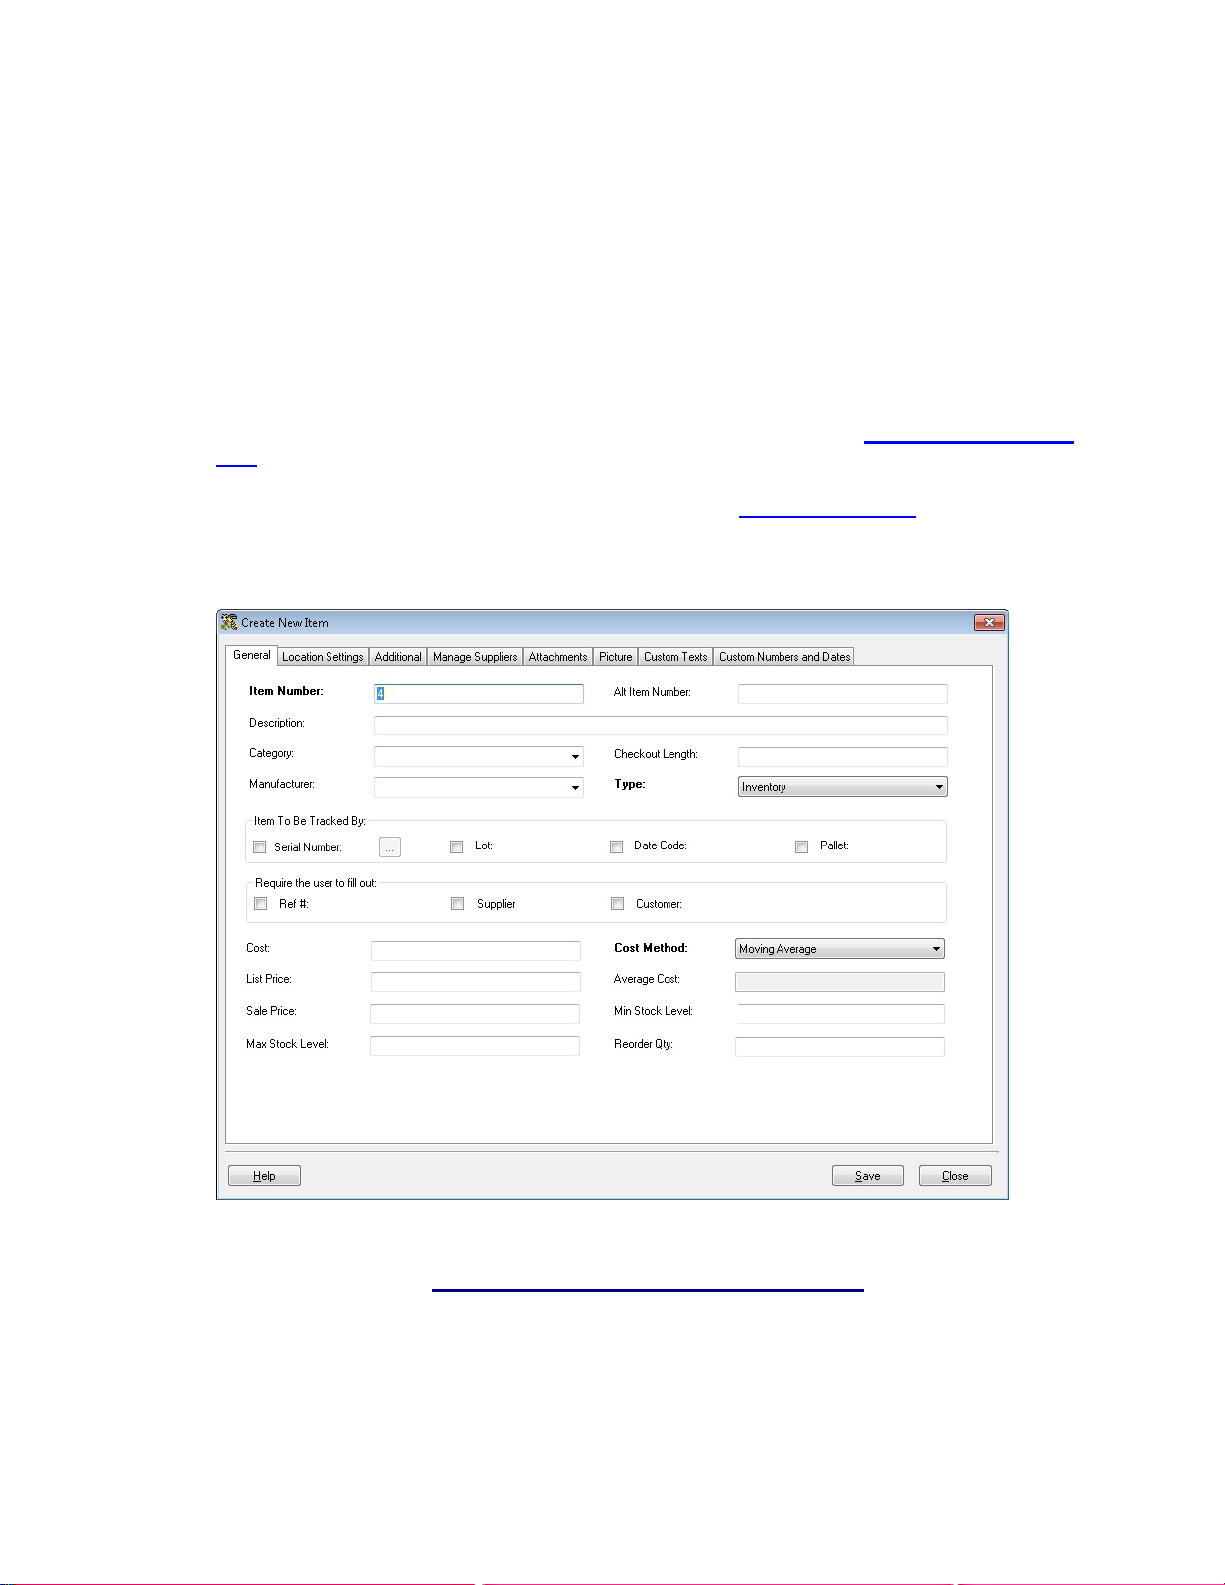
5.3.1 Accessing the Create New Item Screen:
1. From the Main screen, select New > Item >Inventory or Non-Inventory.
OR
From the Main screen, select Lists > Item. On the Item List, select the New icon.
Note: For information on creating Assembly Items, please see the topic Creating an Assembly
Item (Pro and Enterprise versions only).
InventoryControl Printable Help
For information on creating Kit Items, please see the topic Creating a Kit Item
Enterprise versions only).
The Create New Item screen appears:
(Pro and
61
Page 77
InventoryControl Printable Help
5.3.2 General Information Tab:
The General Information tab is where you will enter the basic information about the item. Please see
the screen shot above for an example of this tab.
To create the item, enter information in the provided fields. Much of this information is optional. You can
be as detailed as you need, but at a minimum you must enter the Item Number. Below are descriptions
of each field on this tab.
Field Description
The Item Number is often available on a barcode label already attached to the
item, such as a UPC code or SKU number. Using an existing barcode for the
Item Number allows you to scan or manually enter the number from each item as
it comes in without having to print and affix your own barcode inventory item
labels. Item numbers in InventoryControl cannot exceed 31 characters.
Item Number
(Required)
Category
Checkout
Length
Manufacturer
Type (Pro and
Enterprise
Versions
Only)
Do not use a description as the item number. You should enter a numeric value
in the Item Number field. A description of the item can be entered in the
Description field.
Automatic Item Numbers: If you have the Automatic Item Numbers option
selected on the Options screen, the Item Number field will appear populated
with the next number in the sequence. For example, if you just created item
number 1001, the next number will be 1002. For further information on this
option, please refer to the Options Screen
A Category is an optional classification you can give to your items. This provides
you with another way to group your items. For example, you could create a
Category called laptops and assign that category to any laptop items you have.
You might have multiple items representing different makes and models of
laptops. If you assign the category "Laptops" to all of those items, you can then
group your list by Category and quickly see all laptop items.
You can create new Categories by typing in the desired name in the Category
field. You will receive a message asking if you want to save the new Category.
Select Yes to save. Categories you have already created will appear in a drop
down list.
This field specifies the default period, in days, that this Item can be checked out
to a customer.
This is the entity that manufactured the item. This field is optional and provides
another way to sort and group your items. When a new Manufacturer is typed
into the Manufacturer field, you will receive a message asking if you want to save
the value as a new Manufacturer.
Select Non-inventory if you do not want this item to be inventoried, or select
Inventory to inventory this item. This field will not appear on the Standard
version.
Non-Inventoried items are those items, such as marketing pamphlets, that you
have on hand, but do not want to track.
topic.
62
Page 78
InventoryControl Printable Help
The Item To Be Tracked By section contains check boxes which determine
whether the Serial Number, Lot, Date Code and/or Pallet of an item will be used
to track its movement through your inventory. For a more detailed explanation of
tracking fields, please refer to the topic Identifying Tracking Needs
.
When you are creating your item it is important that you determine how you want
to track each item. Typically, small items that are all the same may not need to
have any Track Bys selected. Items such as printers may need to be tracked by
Serial Number, so returns and maintenance can be properly tracked. Medical
supplies or food may need to be tracked by Date Code and/or Lot.
If you choose to track by one or more of these fields, you will be prompted to
complete them each time you perform a transaction, such as check out, move,
remove, add, etc., on this item. For example, if you are tracking item 2233 -VZ
Laptop by serial number. Now you want to move a quantity of 5 of this item from
on location to another. You will be prompted to enter a unique and valid serial
number for each laptop you are moving so that your inventory can be accurately
tracked.
Tracked By options cannot be changed after you add inventory to the item.
If you need to change a tracked by item, you will have to remove all
inventory from that item, delete the item and create a new record.
Item to be
Tracked By
Track
by
Serial
Number
Lot
Date
Code
Pallet
How is it
used?
Serial Numbers
must be unique
for each item
and limit you to
managing one
item at a time.
These numbers
are provided by
the
manufacturer to
indicate from
which batch
these items
were made.
Date Code track
the expiration or
other "use by"
date.
Pallet refers to
the pallet from
which the item
was received.
Example
Equipment such as
printers and radios or
anything for which you
need to know which
specific item you are
using.
Medical
Supplies
Pharmaceuticals
Food products
Food
Chemicals
Manufacturing
Supplies
Building
Supplies
63
Page 79

Automatic
Serial
Numbers
(Does not
apply to
WaspNest)
InventoryControl Printable Help
You can choose to have the program automatically create and assign serial
numbers each time you add inventory for this item (whether manually using the
Add Inventory feature or by Receiving Inventory). For example, you create the
item "2233 - VZ Laptop" and select to track by serial number. You the enable
automatic serial numbers by performing the steps described here. You choose
1000 as your starting number. Now, when you add inventory to this item,
InventoryControl will automatically assign serial number to each item starting with
1000. If you add inventory of 500 to this item, the serial numbers assign by
InventoryControl will be 1000 - 1500.
To enable Automatic Serial Numbers:
Click the button to the right of the Serial Number check box. The Auto
Serial Number Options screen is displayed:
Require the
User to Fill
Out (Does not
apply to
WaspNest)
Cost
Check the Auto Increment Serial Numbers checkbox to have the
software automatically assign incremented serial numbers.
Enter a Starting Number. This number determines the number at which
the serial number sequence starts. Since this option is applied at the
Item level, each Item in the program may have its own unique series of
serial numbers.
Click OK to accept your entries.
This section contains check boxes which act much like the Tracked By boxes, but
contains a different set of fields (PO, Supplier and Customer) which are always
available for use, even if they are not required. For example, if the option is not
enabled for the Supplier Code field, a user adding inventory can enter a value for
Supplier Code if he knows it or skip entering a value if he doesn't. If this option is
enabled, a value for Supplier Code is required to complete the transaction.
Cost specifies the amount your company paid to get this item into inventory. This
is an optional tool to help you track your average cost. Cost handling in
InventoryControl is designed to show you the average cost and current value of
your inventory. You can use this cost information for other purposes as well,
such as determining pre-tax and purchase order totals and receiving totals.
This amount represents your cost for purchasing one of the stocking units for this
item. If one Barcode Laser Scanner costs $300.00 you will enter 300 into the
cost field. If you have items in your inventory that are sold in fractional quantities,
64
Page 80
InventoryControl Printable Help
you will need to decide which stocking unit to use. For example, if you have
Rope as an item and it costs you $0.12 a foot, you would enter 12 in the Cost
field and Feet as the Stocking Unit (entered on the Additional tab). If you rarely
sell the rope in exact multiples of feet, you may want to enter your Stocking Unit
as Inches, since this is the lowest unit measured, and enter your cost per inch in
the Cost field. It is up to you how you want to calculate this; however, you should
make sure that the Cost you enter is the cost for one whole Stocking Unit (either
Feet or Inches, in our example).
Keep in mind that you can enter a new cost on the Add Inventory screen if you
purchase this item at a discount.
For a detailed description for using Cost Tracking and Average Costing,
please see the topic Using Cost Tracking and Average Costing.
Select how you want InventoryControl to calculate cost for this item. Options are:
Legacy Method - This is the method used in previous versions of
InventoryControl. The legacy method uses FIFO and manages cost by location
and track by level.
Note: If you upgrade your version of InventoryControl to version 6 (which
contains additional methods), all existing items will be imported with the legacy
method. You can change to a new option on the Edit Item screen.
Cost Method
Average Cost
Moving Average - When this method is used, the average cost of a particular
item is recalculated based on each purchase. Cost is calculated on the item
level.
FIFO - When this method is used, the inventory that is added first is removed
first. Cost is calculated on the item level.
LIFO - When this method is used, the inventory that is added last (most recently)
is removed first. Cost is calculated on the item level.
For a detailed description for using Cost Tracking and Average Costing,
please see the topic Using Cost Tracking and Average Costing.
This is a calculated value that averages the cost paid for the current Quantity.
This will be blank when you are entering a new item, but will appear when you
are viewing the Edit Item screen for an item that has inventory (quantity).
If you have 20 quantity of this item at cost 10.00 and add another 30 quantity at
cost 8.00,
Average Cost = ((20 x 10.00) + (30 x 8.00)) / 50 = 8.80
Removes are calculated using the inventory calculation method you specified.
For example, if you are using the FIFO method, if you later remove 5, 5 of the
$10.00 items will be removed first,
Average Cost = ((15 x 10.00) + (30 x 8.00)) / 45 = 8.67
When calculating Average Cost, the software does not include records that have
an average cost of zero. When you run an Inventory Cost Report, the software
65
Page 81

InventoryControl Printable Help
does include zero cost quantities when calculating Total Cost.
List Price
Sale Price
Min Stock
Level
Max Stock
Level
Reorder Qty
.
Note: The Minimum Stock Level, Maximum Stock Level and Reorder Quantity fields found on this
tab represent these levels at the item level only, meaning these are the stock levels for this item
throughout all locations. This means if you have 4 locations, these are the quantities you want to have
spread out among those locations. If you want to maintain these levels by location, you can do so on the
Location Settings tab (described below).
The fields below only appear on the Edit Item screen.
This field specifies a manufacturer's list price for an item. This field is for your
information only and is not included on any reports.
This field specifies the price at which you sell an item. This field is for your
information only and is not included on any reports.
This field specifies the minimum stock level you wish to maintain for this item.
This field specifies the maximum stock level you wish to maintain.
This field specifies the quantity at which you want to reorder inventory.
The Total Available counter is the sum of Total Checked-Out and Total In-House.
The Total Checked-Out counter is the quantity of this item that is currently Checked-Out.
The Total In-House counter is the Total Available less the Total Checked-Out.
The Total On Order counter is the quantity of this item that is currently included on an
active Pick Order.
The Total Buildable (applies to Assembly Items only) is the quantity that can be built of
this Assembly Item based on the inventory levels of the component items.
The Committed counter (applies to Assembly, Inventory and Non-Inventory items only) is
the number that has been committed to a pick order.
The Total Shippable (applies to Kit Items only) is the total on hand amount minus
committed quantities for all component items. (Committed is inventory that is contained on
a pick order.)
5.3.3 Location Settings Tab:
When you have completed the General Information tab, click the Location Settings tab. This tab allows
you to enter all locations where this item will be in inventory and to designate a primary location. You can
assign items to more than one location. This tab uses the List functionality for grouping, ordering, filtering
and deleting.
66
Page 82

InventoryControl Printable Help
Complete the fields on this screen as described below:
Primary Location - Select this checkbox if this will be the primary location at this site for this
item. A primary location can be selected for each Site you have setup in the system. When you
select a primary location, when you Receive quantities of that item from a purchase order, they
will automatically be assigned to that location. Also, when you Pick quantities of that item for
pick orders, they will automatically be removed from that location. You can change these
locations when picking and receiving if necessary. In addition, the primary location will appear in
any location fields (on the Add inventory screen, for example), however; you can change the
location, if needed.
Only one primary location can be selected per site.
Site and Location - Click in the box and select a Site and Location from the drop down list.
Only sites and locations you have previously selected will appear in this list. Select More to
view the Site or Location List. You can also select New Location or New Site to access the
Create New screen. These represent the site and the location where the inventory will reside.
Quantity - This number is populated from the Inventory for this item. This number displays how
many of this item is currently in stock at the selected site and location. If you are creating a new
item this field will be blank (0).
Max Stock Level - Enter the maximum number of this item that you want to have in stock for the
selected site and location. This number can be 0 or a positive number, negative numbers are
not allowed.
Min Stock Level - Enter the minimum number of this item that you want to have in stock for the
selected site and location. This number can be 0 or a positive number, negative numbers are
not allowed.
Reorder Qnty - Enter the number at which you want to reorder this item for the selected Site
and Location. You can set an option in the software so that the system warns you at login of
67
Page 83

InventoryControl Printable Help
any inventory items that have hit their reorder quantity. For further information on setting this
option, please refer to the Options Screen
After you have completed all fields, hit ENTER to begin a new line. Your screen will look
similar to the following after hitting ENTER:
topic.
5.3.4 Additional Information Tab:
When you have finished entering information on the Location Settings tab, click the Additional tab. The
Additional Information tab provides optional fields where other information about the Item can be
recorded. An example of this tab is shown below:
68
Page 84

InventoryControl Printable Help
Complete the fields on this tab as described below:
Stocking Unit is the portion by which the quantity will be tracked. At the item level, this should
be "Eaches", meaning you should enter how you want each item of this type to be measured.
(Examples: bag, barrel, basket, block, bottle, box, carton, container, drum, gallon, jar, pack,
package, pallet, section, tub, vial, etc.)
When entering the stocking unit, you need to pick the smallest unit of measure that you will use
to remove a whole item. A good test to use when deciding what the stocking unit should be is to
think about what your answer would be if you were asked to count how many of this item you
have. If the answer is 100 feet of rope "feet or "ft" is the stocking unit. If the answer is 20
scanners, then "each or "ea." is the stocking unit. Each is common when the unit itself is not a
standard unit of measure. If the answer is 100 boxes of nails then "box" or "bx" is the stocking
unit.
You will have the opportunity on the Managing Suppliers tab to enter the Order Unit used by
the supplier for shipping purposes (Box, Pallet, Lot, etc.). This is useful if you purchase in larger
quantities than you stock. The Order Unit will be used when creating Purchase Orders rather
than the "Eaches" UOM that is entered on this tab. Please see the Managing Suppliers Tab
section, below.
Dimension Unit is the increment to be used for Length, Width and Height. (Examples: inch,
foot, yard, millimeter, centimeter, meter, etc.)
Length is the length of one Unit of Measure expressed in Dimension Units.
69
Page 85

InventoryControl Printable Help
Width is the width of one Unit of Measure expressed in Dimension Units.
Height is the height of one Unit of Measure expressed in Dimension Units.
Weight Unit is the increment to be used for mass. (Examples: ounce, pound, ton, milligram,
gram, kilogram, metric ton, etc.)
Weight is the mass of one Unit of Measure expressed in Weight Units.
Manager is used to record the name of someone who manages this inventory item.
File Reference is used to record the path to a relevant file that might be an image file,
documentation, specifications, etc. This field does not function as a hyperlink. It's just a static
field where a filename or path and filename can be recorded.
Add Notes allows you to record any additional information.
5.3.5 Manage Suppliers Tab:
This tab allows you to identify which suppliers you will use for this item and enter detailed supplier
information, such as unit of measure. Pro and Enterprise users can enter multiple suppliers for an item
and mark one as the default, or preferred supplier. Standard version users can enter only one supplier
for each item. WaspNest Inventory users can enter only one supplier for each item.
70
Page 86

InventoryControl Printable Help
Adding Suppliers to an Item:
To use this tab you must first select suppliers for this item in the Supplier screen. To do this:
a. Click the New button at the bottom of the list. The fields to the right of the Supplier
screen are enabled.
b. Select a Supplier Code from the drop down list. You can also select New Supplier from
the list to create a new supplier.
c. Enter the SKU number for this item in the Supplier Item SKU field.
d. Enter the description of this item given by the supplier in the Supplier Item Description
field.
e. Enter the number of days lead time the supplier needs to process orders for this item in
the Lead Time (in days) field. The lead time is the time from the requisition date to the
delivery date. For example, if you need the item by the 15th of the month and the
supplier requires 5 days to deliver the order, you would enter 5 here to ensure the order
is sent to the supplier timely.
f. The Status field displays the supplier's current status (Active or Inactive). You can
change the status by making a new selection from the drop down menu.
g. You can make this the default supplier for this item by checking the Make this the
default Supplier while ordering this item checkbox (Pro and Enterprise versions
only). When this is selected, this supplier will automatically populate purchase orders for
this item. You can change the supplier on the purchase order, if needed.
h. Any notes entered for this supplier will appear in the Notes section.
i. You can enter the supplier' s unit of measure settings in the Order Unit Settings screen
(Pro and Enterprise versions only). This is the unit used by the supplier when shipping
this item. This may be box, pallet, etc. This is different from the "Eaches" stocking unit
you entered on the Additional tab. For example, you may have entered "jar" for the
stocking unit on the Additional tab, but the supplier may ship the item in boxes
containing 10 jars. When creating purchase orders, you would want to specify the Order
Unit as box rather then jar (or you could end up with 100 boxes of jars rather than 100
jars).
You can also enter the number of the item contained in each of the Order Units and the
Cost of the Order Unit.
If you are tracking cost and have entered information in the Cost field (General Tab) and
in the Stocking Unit field (Additional Tab), when you receive the item, InventoryControl
will do the math and will calculate the cost per item received.
For example, if you order item Barcode Laser Scanners in boxes of 20 at $3500, but your
stocking unit is each, you need to specify the cost of a box of 20 when you are setting up
your Supplier information here. When the item is received, InventoryControl will calculate
the cost per item received. $3500/20 = $175.00.
You can enter multiple order units, if needed. When you are creating your purchase
71
Page 87

InventoryControl Printable Help
orders you can then select which one you want to use.
j. When you are done entering supplier information, click the Custom Texts or Custom
Numbers and Dates tab (these tabs are optional).
Deleting Suppliers from an Item:
a. Highlight the supplier you want to delete from this item in the Supplier screen.
b. Click the Delete button.
5.3.6 Custom Text and Custom Numbers and Dates Tab:
For information about the Custom Texts and Custom Numbers and Dates tabs, see Using Custom
Fields.
5.3.7 Saving the New Item:
When you have finished adding information, click the OK/Save button. The system behaves differently at
this point depending on your settings on the Options screen.
When the Close New Form option is turned off: Click Save to commit your entry or click
Close to exit the form.
When the Close New Form option is turned on: Click OK to commit your entry and exit
the form or Cancel to exit the form without saving your entry.
For more information about the Options screen, please refer to the Options Screen
topic.
72
Page 88

InventoryControl Printable Help
5.6 Automatic Serial Numbers
You can choose to have the program automatically create and assign serial num bers each time you add
inventory for this item (whether manually using the Add Inventory feature or by Receiving Inventory). This
option is available when creating a new item on the Create New Item screen. For complete details on
creating a new item, please refer to the Creating New Item
1. Click the checkbox to make the item you are adding or editing auto increment the serial number
for each item added into inventory.
2. If you are using alphabetic or alphanumeric values as Serial Numbers, the Automatic Serial
Number option will still generate a numeric Serial Number, beginning with the value of entered in
the Starting Number Field, if it does not exist already.
3. Click OK to set the options.
topic.
73
Page 89

InventoryControl Printable Help
5.7 Creating New Locations
The Create New Location screen allows you to add a new Location to an existing Site or a new Location
to a new Site. Locations are places within a Site where inventory resides. The site is usually a building,
but it might also be a fleet vehicle, with one more bins that can be defined as inventory Locations within
that vehicle. For example, a site might be setup as Building 1 with a location of Supply Closet.
A location is typically shorthand for a physical place such as a shelf in your warehouse. Commonly used
conventions include Location codes like this:
01 02 05 (for Row #, Shelf #, Bin #)
When you are setting up your software for the first time, you may want to import your locations rather than
adding them one at a time through this screen. For information on importing information into your
database, please refer to the Import Into Database
Adding Locations:
1. From the Main Screen, click New > Location.
OR
From the Main Screen, click Lists > Location. Then click the New icon on the Location List.
The Create New Location screen will appear.
topic.
2. Select a site from the Site drop down menu, then enter the name of your new Location. The
Site and Location fields are both required.
74
Page 90

InventoryControl Printable Help
You can type in the name of a new site in the Site field. A message will appear asking if you
want to add it to your database. Select Yes to add it. The Create New Site screen will appear
allowing you to setup the new site. Complete this screen, the click OK to return to the Create
New Location screen. For detailed information on entering a new site, please refer to the
Creating a New Site
Description allows you to enter a description of the Location. This is useful when the Location
value is vague (For example, Location "A7B2" could be described as "Aisle 7 Bin 2").
Click the Add Notes button to add additional information to this record.
3. For information about the Custom Texts and Custom Numbers and Dates tabs, see Using
Custom Fields.
4. When you have finished adding information, click the OK/Save button. The system behaves
differently at this point depending on your settings on the Options screen.
When the Close New Form option is turned off: Click Save to commit your entry or click
Close to exit the form.
When the Close New Form option is turned on: Click OK to commit your entry and exit
the form or Cancel to exit the form without saving your entry.
For more information about the Options screen, please refer to the Options Screen
topic.
topic.
75
Page 91

InventoryControl Printable Help
5.8 Creating New Manufacturers
The Create New Manufacturer screen allows you to add a new Manufacturer to your database. A
Manufacturer is typically the company or organization that creates an item you will inventory. If a
Manufacturer is also your Supplier for an Item, it is best to setup the company in the software as both a
Manufacturer and a Supplier.
When you are setting up your software for the first time, you may want to import your manufacturers
rather than adding them one at a time through this screen. For information on importing information into
your database, please refer to the Import Into Database
Adding a New Manufacturer:
1. From the Main Screen, click New > Manufacturer.
OR
From the Main Screen, click Lists > Manufacturer. Then click the New icon on the
Manufacturer List.
The Create New Manufacturer screen will appear.
topic.
Note: This screen is opened automatically from the Create New Item screen when a new
76
Page 92

InventoryControl Printable Help
manufacturer name is entered.
2. Enter information on this screen as needed. The Name and Address Type fields are required,
all other fields are optional.
The software provides you with the ability to enter a Billing Address, Receiving Address and/or
Shipping Address for your manufacturers. To enter multiple address, follow the steps below:
a. On the Company Information screen, enter your company name. Select what type of
address you will be entering from the Address Type drop down menu.
b. Enter the remainder of the address information, then click OK. You will be returned to
the Administration Menu.
c. Click the Company Info icon again. The Company Information screen will reappear
populated with the information you just entered.
d. Select a different address type of the Address Type drop down menu. The address lines
(Address 1 and 2, City, State, Postal Code and Country) will clear while all other
company information will remain on the screen.
e. Enter the new address information, then click OK. Repeat these steps for each address
type.
3. When you have finished entering data in the General Information tab, click the Additional tab
(this tab is optional).
77
Page 93
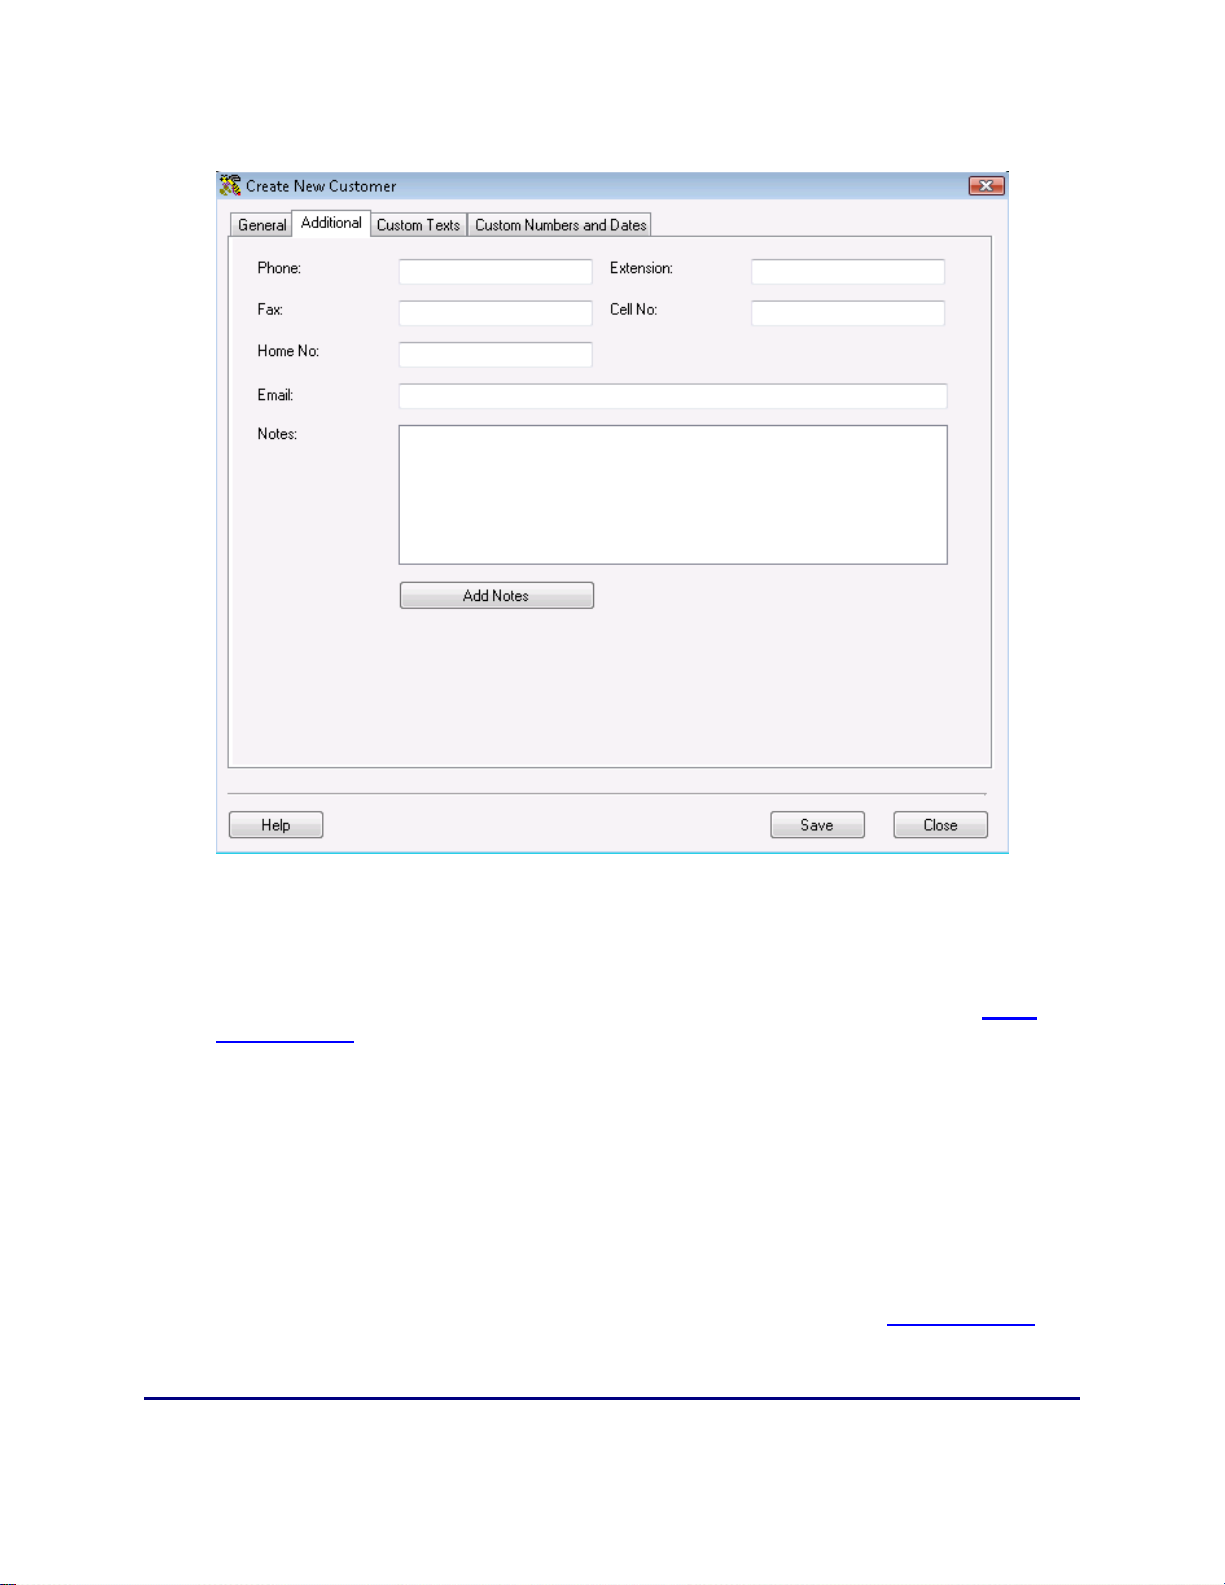
InventoryControl Printable Help
The Additional tab provides optional fields where you can record the manufacturer's Phone,
Extension, Fax, Cell No., Home No. and Email. In addition, you can create notes on this
manufacturer on this tab by clicking the Add Notes button.
4. For information about the Custom Texts and Custom Numbers and Dates tabs, see Using
Custom Fields.
5. When you have finished adding information, click the OK/Save button. The system behaves
differently at this point depending on your settings on the Options screen.
When the Close New Form option is turned off: Click Save to commit your entry or click
Close to exit the form.
When the Close New Form option is turned on: Click OK to commit your entry and exit
the form or Cancel to exit the form without saving your entry.
For more information about the Options screen, please refer to the Options Screen
topic.
78
Page 94

InventoryControl Printable Help
79
Page 95

InventoryControl Printable Help
5.8 Creating New Suppliers
The Create New Supplier screen allows you to add a new supplier to your database. A supplier is
typically the company or organization from which you obtain an Item you will inventory. If a manufacturer
is also your supplier for an Item, it is best to add the company in the software as both a Manufacturer and
a Supplier.
When you are setting up your software for the first time, you may want to import your suppliers rather than
adding them one at a time through this screen. For information on importing information into your
database, please refer to the Import Into Database
For examples of how specific business types setup their suppliers, please refer to the topic Setting up
Suppliers Business Examples.
Adding New Suppliers:
1. From the Main Screen, click New > Suppliers.
OR
From the Main Screen, click Lists > Suppliers. Then click the New icon on the Supplier List.
The Create New Supplier screen appears.
topic.
80
Page 96

InventoryControl Printable Help
2. Enter information on this screen as needed. The Supplier Code and Address Type fields are
required, all other fields are optional. Supplier Codes cannot exceed 25 digits. Make sure the
Supplier Code is a number and the Supplier Description is the detailed description of the
supplier.
The software provides you with the ability to enter a Billing Address, Receiving Address and/or
Shipping Address for your suppliers. To enter multiple address, follow the steps below:
a. On the Create New Supplier screen, enter your company name. The default address
type is Supplier Billing. You can choose this option, or type in a new address type.
b. If you have entered a new address type, the following screen appears:
81
Page 97

InventoryControl Printable Help
Click Yes to add this address type to your database.
c. Enter the remainder of the address information. You can then enter another address
type, or continue completing the rest of the supplier information. Repeat these steps for
each address type.
3. When you have finished entering data in the General Information tab, click the Additional
Information tab (this tab is optional).
The Additional Information tab provides optional fields where you can record the
82
Page 98

InventoryControl Printable Help
manufacturer's Phone, Extension, Fax, Cell No., Home No. and Email. In addition, you can
create notes on this manufacturer on this tab by clicking the Add Notes button.
4. For information about the Custom Texts and Custom Numbers and Dates tabs, see Using
Custom Fields.
5. When you have finished adding information, click the OK/Save button. The system behaves
differently at this point depending on your settings on the Options screen.
When the Close New Form option is turned off: Click Save to commit your entry or click
Close to exit the form.
When the Close New Form option is turned on: Click OK to commit your entry and exit
the form or Cancel to exit the form without saving your entry.
For more information about the Options screen, please refer to the Options Screen
topic.
If a supplier with the same Supplier Code is found, the message below will appear when you try to
save.
Enter a different Supplier Code to continue.
83
Page 99

InventoryControl Printable Help
5.11 Creating a Kit Item
Chapter 6 - Editing Data
6.1 Editing Items
The Edit Items screen allows you to modify an existing item. This screen is accessed from the Item List
by highlighting an item in the list, then clicking the Edit button on the toolbar. For more information on
using the List screens, see the Working with Lists
The Edit Items screen is identical to the New Item screen, except all the information previously entered
for the item appears on the screen. You can change any of this information. For information on using
each tab of the screen, please refer to the Create New Item
topic.
topic.
6.2. Editing Assembly Items
Pro and Enterprise Versions Only
Note: For information on the benefits of upgrading your version of InventoryControl or WaspNest
Inventory, please select Help > Benefits of Upgrading on the Main screen.
The Edit Assembly Items screen allows you to modify an existing assembly item. This screen is
accessed from the Item List by highlighting an assembly item in the list, then clicking the Edit button on
the toolbar. For more information on using the List screens, see the Working with Lists
The Edit Assembly Items screen is identical to the New Assembly Item screen, except all the
information previously entered for the item appears on the screen. You can change any of this
information. For information on using each tab of the screen, please refer to the Create an Assembly
Item topic.
When editing assembly items, there are two points to keep in mind:
1. You will need to sync the mobile device in order for the changes to be transferred.
2. The change of configuration will not impact mobile transactions already done on the device.
Example: You create an assembly item with two component parts, Item 1 and Item 2. Later, you
edit the assembly item to have three component parts, Item 1, Item 2 and Item 3.
topic.
84
Page 100

InventoryControl Printable Help
6.3 Editing Kit Items
Pro and Enterprise Versions Only
Note: For information on the benefits of upgrading your version of InventoryControl or WaspNest
Inventory, please select Help > Benefits of Upgrading on the Main screen.
The Edit Kit Items screen allows you to modify an existing kit item. This screen is accessed from the
Item List by highlighting a kititem in the list, then clicking the Edit button on the toolbar. For more
information on using the List screens, see the Working with Lists
The Edit Kit Items screen is identical to the New Kit Item screen, except all the information previously
entered for the item appears on the screen. You can change any of this information. For information on
using each tab of the screen, please refer to the Creating a Kit Item
When editing Kit items, there are two points to keep in mind:
1. You will need to sync the mobile device in order for the changes to be transferred.
2. The change of configuration will not impact mobile transactions already done on the device.
topic.
topic.
6.4 Editing Sites
The Edit Site screen allows you to modify an existing site. This screen is accessed from the Site List by
highlighting a site in the list, then clicking the Edit button on the toolbar. For more information on using
the List screens, see the Working with Lists
The Edit Site screen is identical to the New Site screen, except all the information previously entered for
the site appears on the screen. You can change any of this information. For information on using each
tab of the screen, please refer to the Create New Site
topic.
topic.
6.5 Editing Locations (or a Site and Location)
The Edit Location screen allows you to modify an existing location. This screen is accessed from the
Location List by highlighting an location in the list, then clicking the Edit button on the toolbar. For more
information on using the List screens, see the Working with Lists
The Edit Location screen is identical to the New Location screen, except all the information previously
entered for the location appears on the screen. You can change any of this information. For information
on using each tab of the screen, please refer to the Create New Location
topic.
topic.
85
 Loading...