

Page 1

3D Printer I3 V2
visit
www.wanhao3dprinter.com
to view the latest
version of this manual
Model : Duplicator I3V2
INSTRUCTION MANUAL
Page 2

Page 3

Important
Getting the most out of your 3D Printer:
Read the manual carefully
It will help you get set up with ease
Visit www.wanhao3dprinter.com
We’ve got additional support videos and guides
Join Wanhao Technical Forum for online support
https://groups.google.com/forum/#!forum/wanhao-printer-3d
Google Forum
Email [email protected]
We’re always happy to help
Warranty Note
If you experience any issues with this product, or it’s
performance is not what you had expected, please contact
us at WANHAO before returning the item to the store.
It is likely that we can resolve any problems for you via
phone or email.
We can be reached through your local distributor. Or on
Phone: +86-571-23290996(Mon-Sat; 8:30am-5:00pm)
Email: [email protected]
Web: www.wanhao3dprinter.com
Page 4

3D Printer
Warranty Details
The product is guaranteed to be free from defects in workmanship and mother board for a period
of 12 months from the date of purchase. The extruder is guaranteed to be free of defects for 90
days. Printing with materials other than WANHAO FILAMENTS which require temperatures above
250 °C or which are different from those recommended on the website www.wanhao3dprinter.
com, will result in the immediate loss of the Warranty. Defects that occur within this warranty
period, under normal use and care, will be repaired, replaced or refunded at our discretion.
The benets conferred by this warranty are in addition to all rights and remedies in respect of
the product that the consumer has under the China laws. In case you purchase from WANHAO
distributor, your warranty shall be covered by distributor’s Warranty and honored by WANHAO
distributor too.
Our goods come with guarantees that cannot be excluded under the Chinese Consumer Law.
You are entitled to a replacement or refund for a major failure and for compensation
for any other reasonably foreseeable loss or damage. You are also entitled to have the goods
repaired or replaced if the goods fail to be of acceptable quality and the failure does not amount to
a major failure.
AFTER SALES SUPPORT
86-571-23290996
MODEL: Duplicator I3 V2 PRODUCT CODE: 0105002
Page 5
Safety Instructions
Before you get started, please read these important safety instructions.
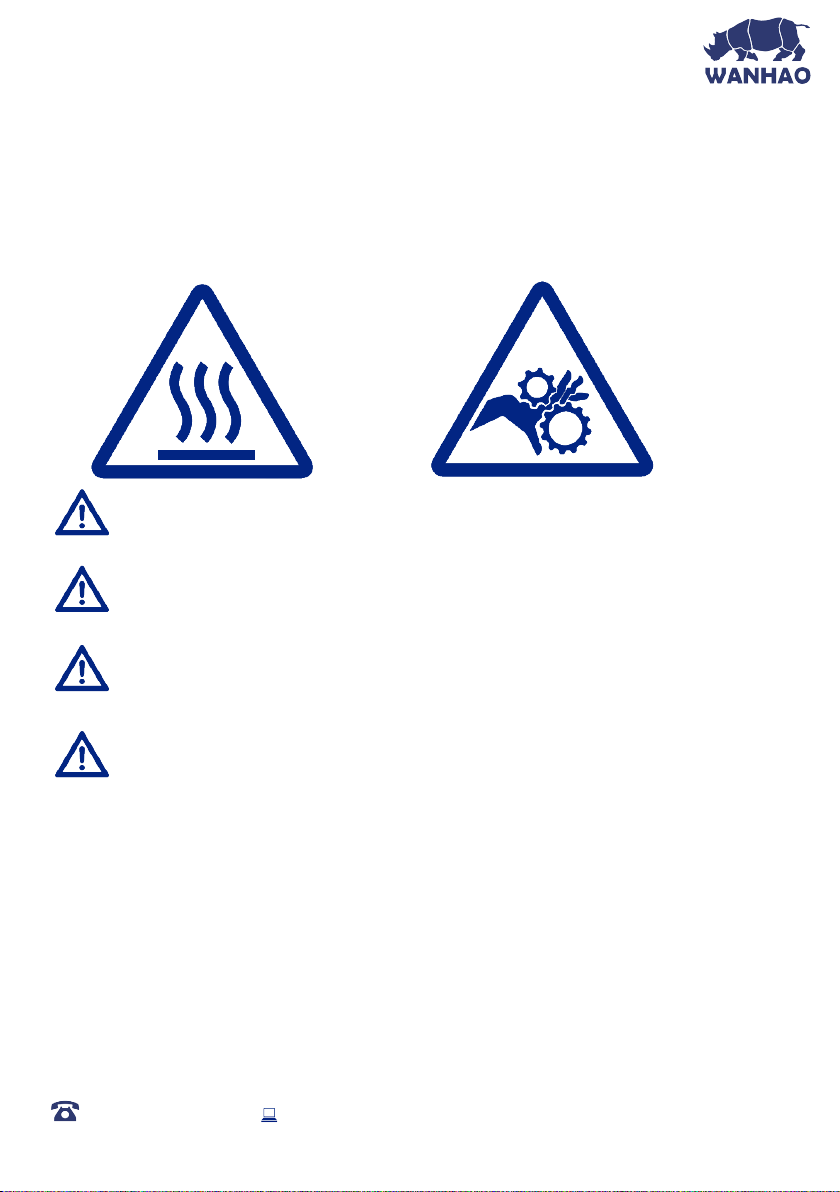
CAUTION: The WANHAO 3D Printer generates high temperatures and includes moving parts
that can cause injury. Never reach inside of the WANHAO 3D Printer while it is in operation,
and allow time for the printer to cool down after operation.
HOT SURFACE MOVING PARTS
Vapours/fumes may be irritating at operating temperatures. Always use the WANHAO
3D Printer in an open, well ventilated area.
Do not leave the WANHAO 3D Printer unattended during operation
Contact with extruded material may cause burns. Wait for printed objects to cool before
removing them from the build platform.
Always take care when using the Scraper. Never direct the Scraper towards your ngers.
• The printer must not be exposed to water or rain, or damage will occur.
• The printer is designed to be used with ambient temperature ranging 15°C - 30°C, and humidity
ranging 20% - 50%. Operating outside these limits may result in low quality models.
• In case of emergency, turn off the 3D printer at the power outlet.
• It is recommended that you use eye protection when cleaning/sanding printed models to avoid
small particles contacting eyes.
AFTER SALES SUPPORT
86-571-23290996
Model : Duplicator I3 V2
5
Page 6

Contents
Warranty Details
Safety Instructions
Parts List
Technical Specications
Product Overview
Quick Guide
Introduction
Installation
Setup
Printer Front View
Printer Rear View
Print Bed
Control Box
Construct and Connect
Levelling the Bed
Printing a File
1.1 What is 3D Printing?
1.2 From 3D Design to Printed 3D Object:
1.3 Good 3D Printing Practices
1.4 Unboxing and Assembly
1.5 Control Panel
2. Levelling the Heated Print Bed
3. Filament
4. Using the Micro SD Card
5. Removing 3D Objects from the Bed
1.5.1 Main Display
1.5.2 Menu Map
1.5.3 Default Conguration
3.1 Filament Types
3.2 Inserting Filament:
3.3 Removing Filament:
3.4 Storage:
4.1 Loading les from your Computer:
4.2 Printing from the Micro SD Card:
4
5
8
9
10
10
11
12
13
14
14
15
16
18
18
18
20
21
21
23
23
23
25
26
26
27
27
28
29
29
29
29
30
30
AFTER SALES SUPPORT
86-571-23290996
Model : Duplicator I3 V2
6
Page 7

Using Cura
6. Creating a GCODE File using Cura
6.1 Installing Cura
6.2 Adding your WANHAO 3D Printer to Cura
6.3 Loading a 3D Design into Cura
6.4 Viewing and Positioning your 3D Model in Cura
6.5 Quick Print Settings
6.5.1 Exporting your GCODE File:
6.6 Advanced Print Settings
6.6.1 Basic Tab Options
6.6.2 Advanced Tab Options
6.6.3 Plugins Tab
6.6.4 Start/End GCODE Tab
6.6.5 Expert Settings
Servicing
7. Servicing your 3D Printer
7.1 Replacing the Print Mat
7.2 Nozzle Cleaning
7.3 Routine Component Check
7.4 Storing
Finishing
8. Finishing Techniques
8.1 Useful Tools/Equipment
8.2 Removing Support Material
8.3 Sanding
8.5 Surface Coating
Troubleshooting
9. Troubleshooting
9.1 Printing Problems
10.2 Connectivity Problems
10.3 Other Problems
10. Useful Terms
Appendix
References
Repair and Refurbished Goods or Parts Notice
31
31
31
32
32
32
35
36
36
36
39
42
42
43
48
48
48
48
49
49
50
50
50
50
51
51
52
52
52
53
54
54
56
56
58
AFTER SALES SUPPORT
86-571-23290996
Model : Duplicator I3 V2
7
Page 8
Parts List
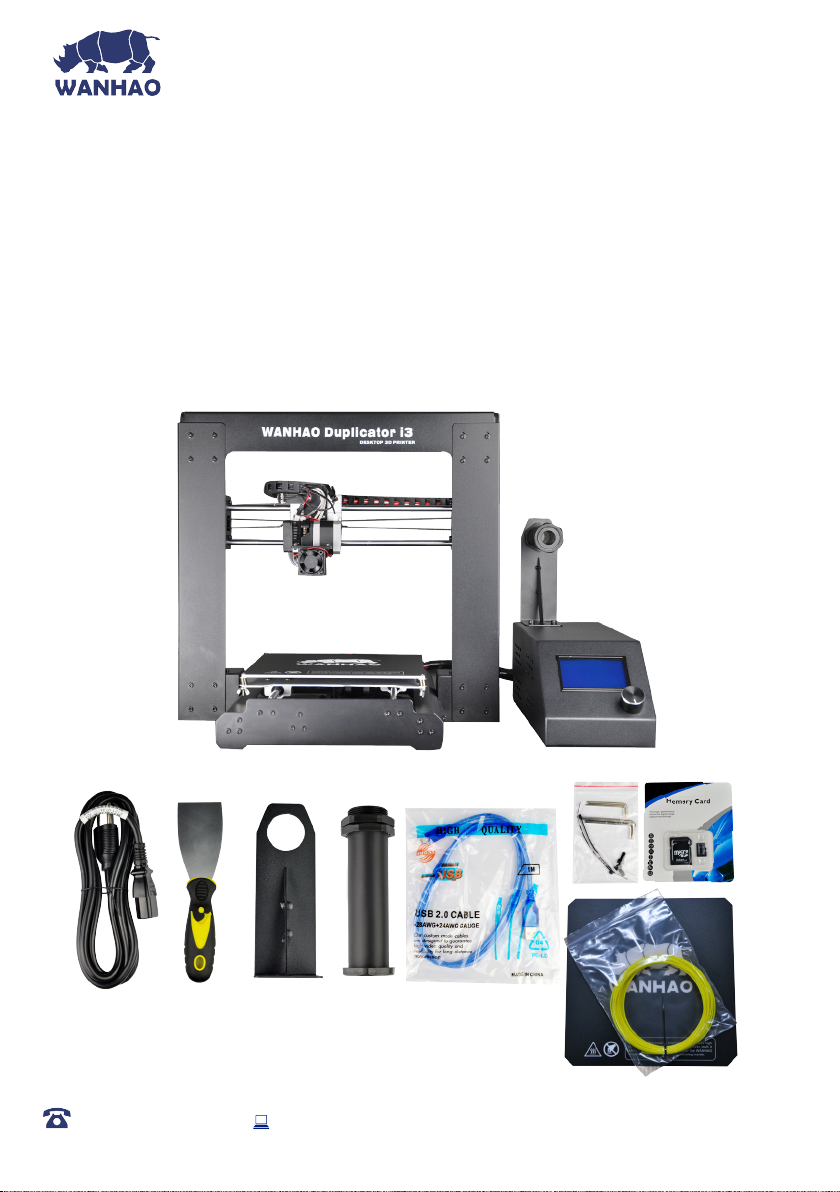
1 x WANHAO 3D Printer
(Control Box, Extruder Tower,
Heated Print Bed)
1 x Filament Spool Holder
1 x Filament Spool Stand
1 x Power Cable
1 x USB Cable
1 x 4GB MicroSD Card
1 x Scraper
1 x PTFE Tube
1 x Hex Key Set
6 x Hex Bolts
2 x Cable Ties
1 x 10m PLA Filament
2 x Print Bed Mats
1 x Instruction Manual
1 x Getting Started Guide
1 x Warranty Card
AFTER SALES SUPPORT
86-571-23290996
Model : Duplicator I3 V2
8
Page 9

Technical Specications
Printing
Print Technology: Fused Filament Fabrication (FFF)
Build Volume: 200 x 200 x 180mm
Layer Resolution: 0.1 – 0.4mm
Positioning Accuracy: X 0.012mm
Y 0.012mm
Z 0.004mm
Extruder Quantity: Single Extruder
Nozzle Diameter: 0.4mm
Print Speed: 10mm/s - 70mm/s
Travel Speed: 10mm/s - 70mm/s
Supported Print Materials: WANHAO Branded PLA, ABS, PVA,
HIPS, Wood, Flex, Conductive
Temperature
Ambient Operating Temperature: 15°C – 30°C
Operational Extruder Temperature: 170°C - 240°C
Operational Print Bed Temperature: 30°C - 70°C
Software
Slicer Software: Cura Wanhao Edition 15.04
Cura Input Formats: .STL, .OBJ, .DAE, .AMF
Cura Output Format: .GCODE
Connectivity: Micro SD Card, USB port (Expert users only)
Electrical
Input Rating: 100-240V AC, 50/60Hz, 3.5A
Physical Dimensions
Printer Frame Dimensions: 400 x 410 x 400mm
Weight: 10KG
AFTER SALES SUPPORT
86-571-23290996
Model : Duplicator I3 V2
9
Page 10
Product Overview
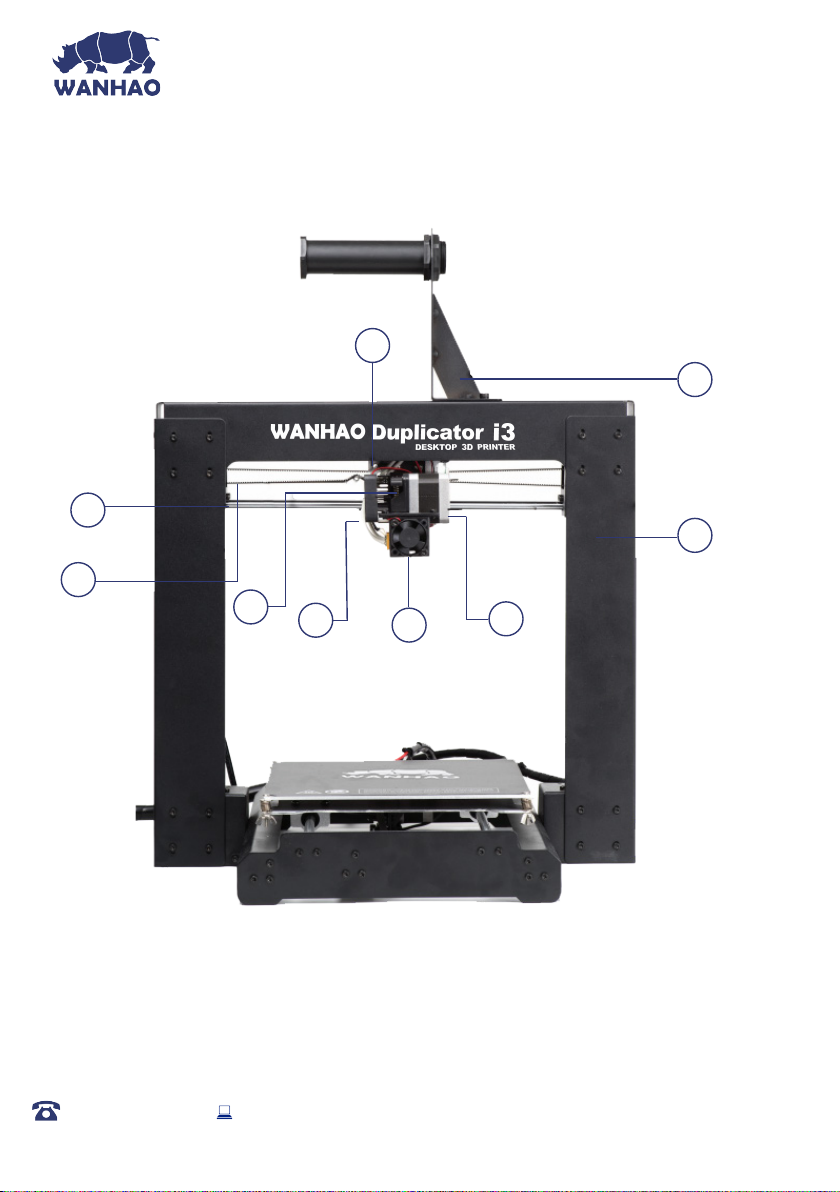
Printer Front View
5
1
2
3
4
6
7
8
9
1. X Rail
2. X Belt Drive
3. Extruder Spring Lever
4. Extruder Cooling Fan
AFTER SALES SUPPORT
86-571-23290996
5. X Stop (Micro Switch)
6. Filament Cooling Fan
7. Extruder Driving Motor
8. Filament Spool Holder
Assembly
9. Tower Frame
Model : Duplicator I3 V2
10
Page 11
Product Overview
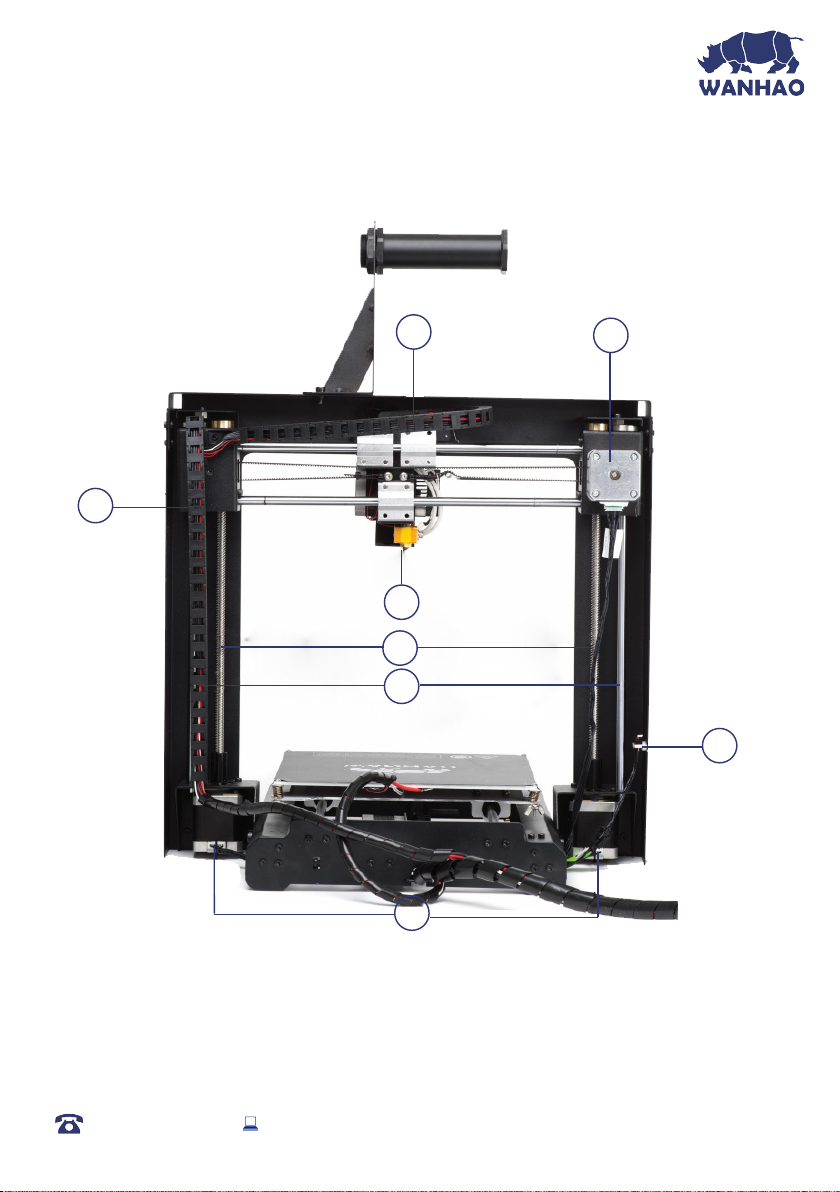
Printer Rear View
1
2
3
4
5
6
7
1. X Cable Track
2. X Axis Stepper Motor
3. Z Cable Track
AFTER SALES SUPPORT
86-571-23290996
4. Extruder
5. Z Drive Screw
6. Z Rod
8
7. Z Stop (Micro Switch)
8. Z Axis Stepper Motor
Model : Duplicator I3 V2
11
Page 12
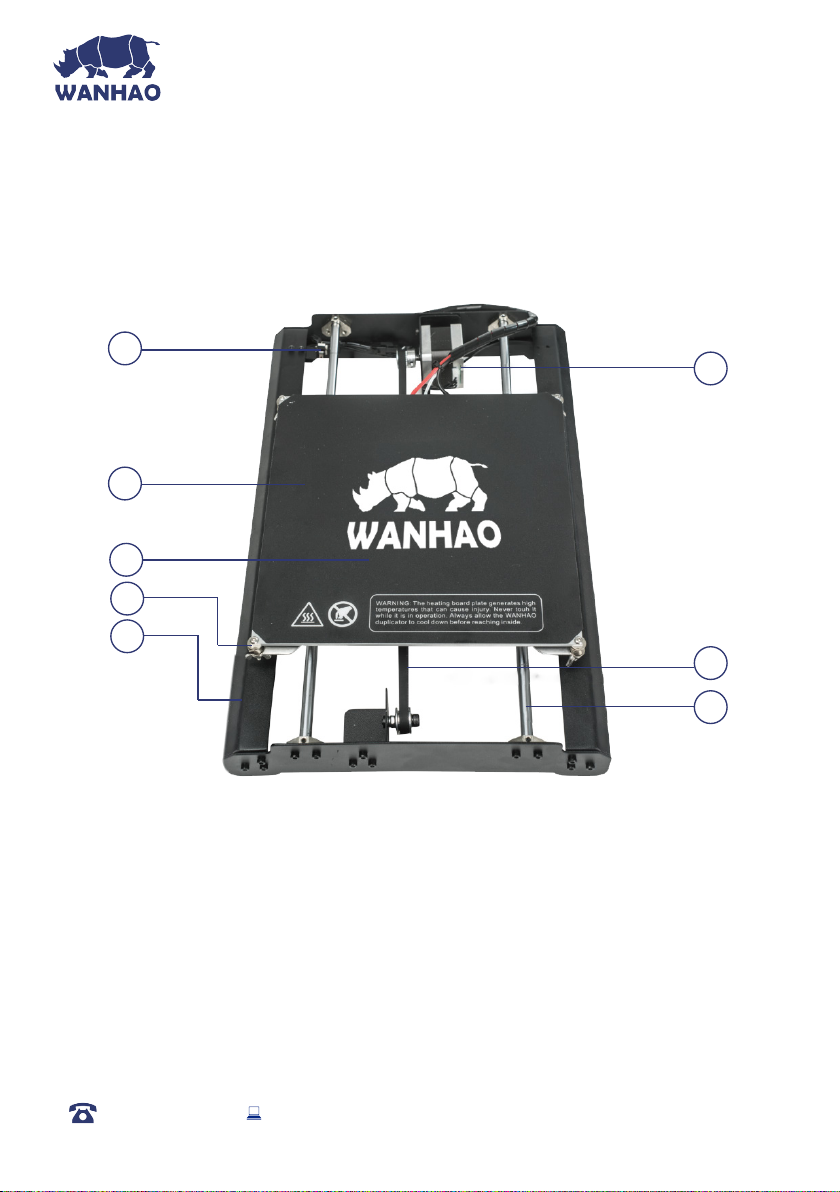
Product Overview
Printer Bed
1
2
3
4
5
1. Y Stop (Micro Switch)
2. Heated Print Bed
3. Printing Mat
4. Levelling Wing Nut
Assembly
5. Print Bed Frame
6
7
8
6. Y Axis Stepper Motor
7. Y Belt Drive
8. Y Rail
AFTER SALES SUPPORT
86-571-23290996
Model : Duplicator I3 V2
12
Page 13
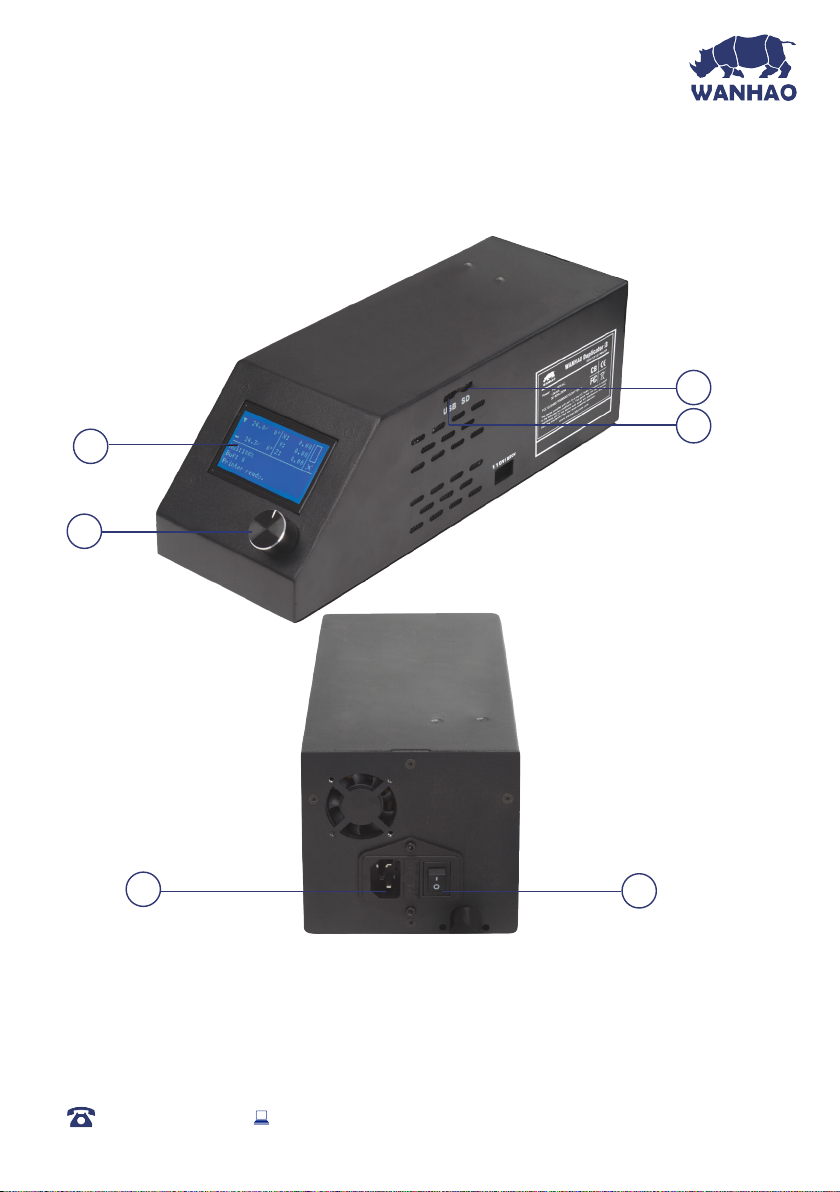
Product Overview
Control Box
3
1
2
5
1. LCD Display
2. Navigation Dial
3. Micro SD Port
4. Mini USB Port
4
6
5. Power Socket
6. Power Switch
AFTER SALES SUPPORT
86-571-23290996
Model : Duplicator I3 V2
13
Page 14
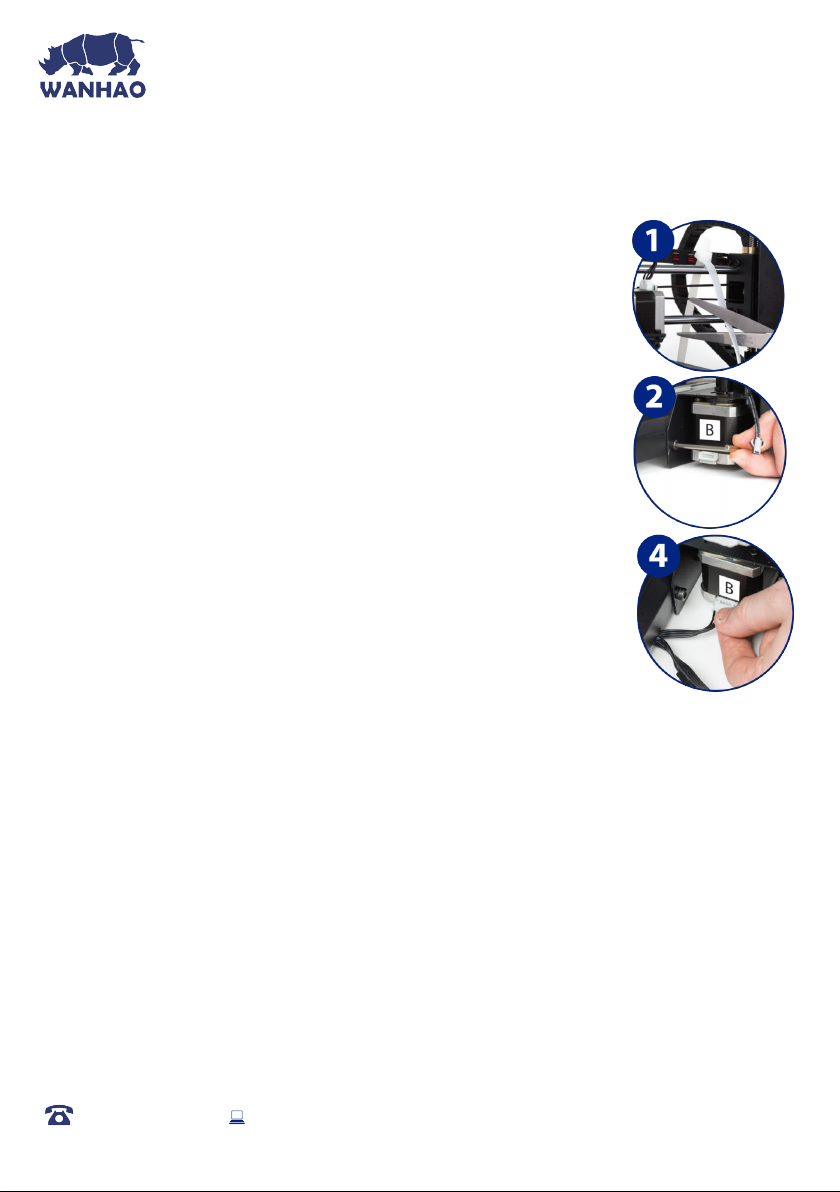
Quick Guide
Construct and Connect
1.
Place the Control Box, Extruder Tower and Heated Print Bed on a
clean, level work space. Carefully remove the cable tie that holds the
Extruder in place
2. Insert the Heated Print Bed lengthways between the legs of the
Extruder Tower and align the bolt holes on each side. Using the Hex
Wrench, insert and tighten the two external bolts. Place printer on
its side, then insert and tighten the two internal bolts
3. Carefully cut the cable tie on the left side of the Heated Print Bed
Base. Then, on the left side, insert the long cable connector marked
‘A’ into the motor connector of the Extruder Tower marked ‘A’
4.
On the left side, insert the short cable connector marked ‘B’ into the
motor connector of the Extruder Tower marked ‘B’
5.
On the right side, insert the white connector marked ‘C’ into the
motor connector of the Extruder Tower marked ‘C’
6. On the left side, insert the black connector marked ‘D’ into the black
connector of the Extruder Tower marked ‘D’Tower marked ‘D’
7.
Remove the outer plastic nut from the Filament Spool Holder, then insert the threaded
into the large hole of the Filament Spool Holder Stand. Tighten the plastic nuts on each
side to secure
8. Position the Filament Spool Holder Stand on top of the Extruder Tower, then insert
the bolts and tighten with the Hex Wrench
9.
Ensure the power switch is in the OFF position, then insert the Power Supply Cable into the
back of the Control Box. Insert the other end into a nearby mains power outlet. Turn on the
power outlet, then turn on the 3D Printer, using the switch on the back of the Control Box
10. Wait for the printer to initialise, with Printer Ready shown at the bottom of the LCD. Press the
Navigation Dial to enter the menu system. Rotate the Dial until Position is highlighted, then
press the Dial to select. Rotate the Dial until Z. Pos. Fast is highlighted, then press to select.
Rotate the Dial clockwise, raising the Extruder so that you can easily access the Heated Print
Bed. Turn off your 3D Printer
AFTER SALES SUPPORT
86-571-23290996
Model : Duplicator I3 V2
14
Page 15
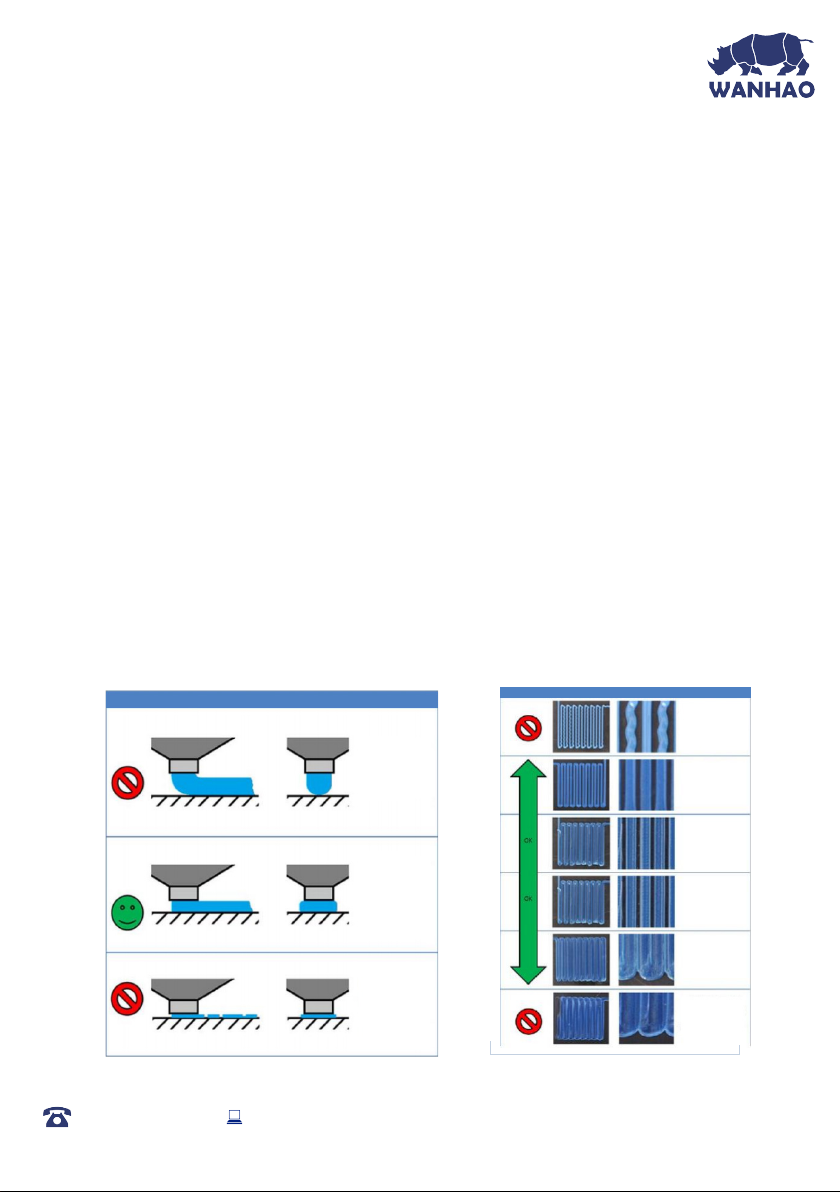
Quick Guide
Levelling the Bed
1. Squeeze each corner of the printing bed, and tighten each wing nut to reduce the distance
between plates to a minimum. Wipe the top of the Heated Print Bed with a clean, lint-free
cloth to ensure no dust particles or other objects are on the Heated Print Bed. Remove all the
white tape covering the X, Y, Z axis stop micro switch prior to the next step
2. Using the switch on the back of the Control Box, turn on the WANHAO 3D Printer.
Once initialised, press the Navigation Dial to enter the menu system. Navigate to and select
Position then select Home All. Your 3D printer will now try to align to the home position, on
the front left corner of the Heated Print Bed. Once aligned, turn off the 3D printer
3. With the printer powered off, check the Z axis level. The X rail should be parallel to the Heated
Print Bed. If it is not, manually rotate the right hand side Z axis stepper motor to level it
4. Manually move the Extruder to one corner of the Heated Print Bed to check the distance
between the nozzle and Heated Print Bed. Rotate the wing nut to raise the Heated Print Bed.
The distance between the Extruder and bed should be 0.1mm or roughly the thickness of
an A4 sheet of paper. The paper should have very slight friction as you move it under the
Extruder but should still slide freely
5. Move the Extruder to each of the other corners and repeat the process. Move the Extruder to
the centre of the Heated Print Bed and test the gap with a sheet of paper. Keep adjusting and
testing until the gap is uniform on all points of the bed
CHECKING CHART
SIDE VIEW END VIEW COMMENTS
AFTER SALES SUPPORT
86-571-23290996
Nozzle Too High:
Insufcient contact
area resulting in
poor adhesion and
extrusion skipping.
OK:
Filament pushed
into the build
surface slightly to
maximize surface
area contact while
still allowing good
extrusion ow.
NOZZLE TOO LOW:
Not enough
clearance for the
lament to be
extruded... this will
result in damage to
the extruder and/or
build surface.
Model : Duplicator I3 V2
RAFT
MAGNIFICATION
NOTES
NOZZLE TOO HIGH:
Wavey tracks,or tracjs
narrower than 1.2mm
(use vernier callpers
to check)
NOZZLE TOO LOW:
Trancks sides pushed
over neighbouring
tracks.
15
Page 16
Quick Guide
Printing a File
IMPORTANT NOTE: Levelling the bed is an extremely important step and if it is not done
correctly every time, your prints will fail or be of poor quality
1. Turn on the 3D Printer, using the switch on the back of the Control Box. Once initiated, press
the Dial to enter the menu system. Navigate to, and select Position > Z Pos. Fast. Turn the
Dial to the rig ht to raise the Extruder to about 30mm. Press the Dial to return to the previous
menu and select back
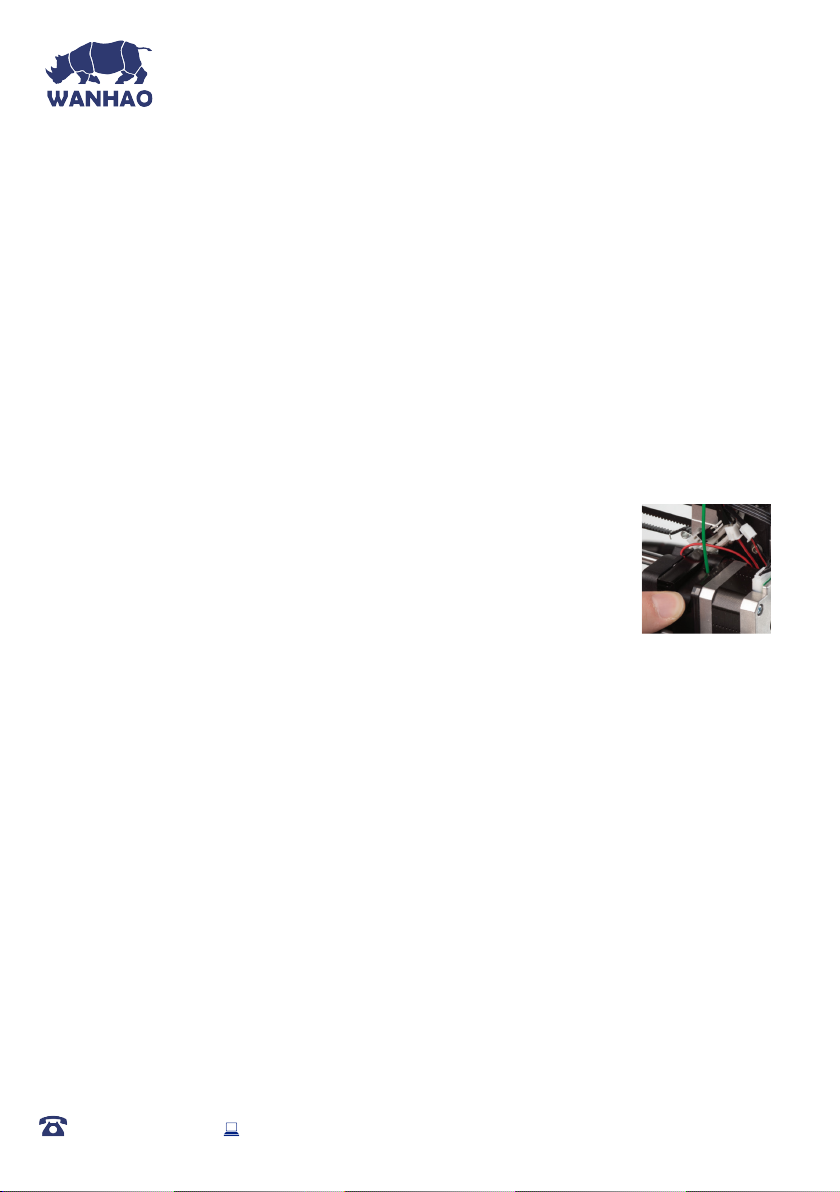
2. Navigate to, and select Quick Settings. Navigate to and select Preheat PLA. Wait for the 3D
printer to automatically return to the home screen, after approximately 15-30 seconds
3. Check the temperature of the Extruder and plate on the LCD. When the temperatures are
within a few degrees of the target, you are ready to insert the lament.
NOTE: Preheat PLA will still be shown, even after temperatures have been
reached. Insert the end of the lament into the hole on the Extruder as shown
4. While holding the lament in place with one hand, press the Dial
to enter the menu system. Navigate to and select Extruder > Extr.
Position. Gently push down on the lament while turning the Dial clockwise. You will feel
the filament being pulled into the Extruder. Continue until a few centimetres have
extruded out of the nozzle. Carefully clean the extruded lament off the Heated Print Bed
and nozzle using a cloth taking care not to burn yourself on the hot surfaces
5. Insert the included MicroSD card into the slot on the side of the Control Box. Press the
Dial to enter the menu system. Navigate to and select SD Card > Mount Card > Print File
AFTER SALES SUPPORT
86-571-23290996
Model : Duplicator I3 V2
16
Page 17
Quick Guide
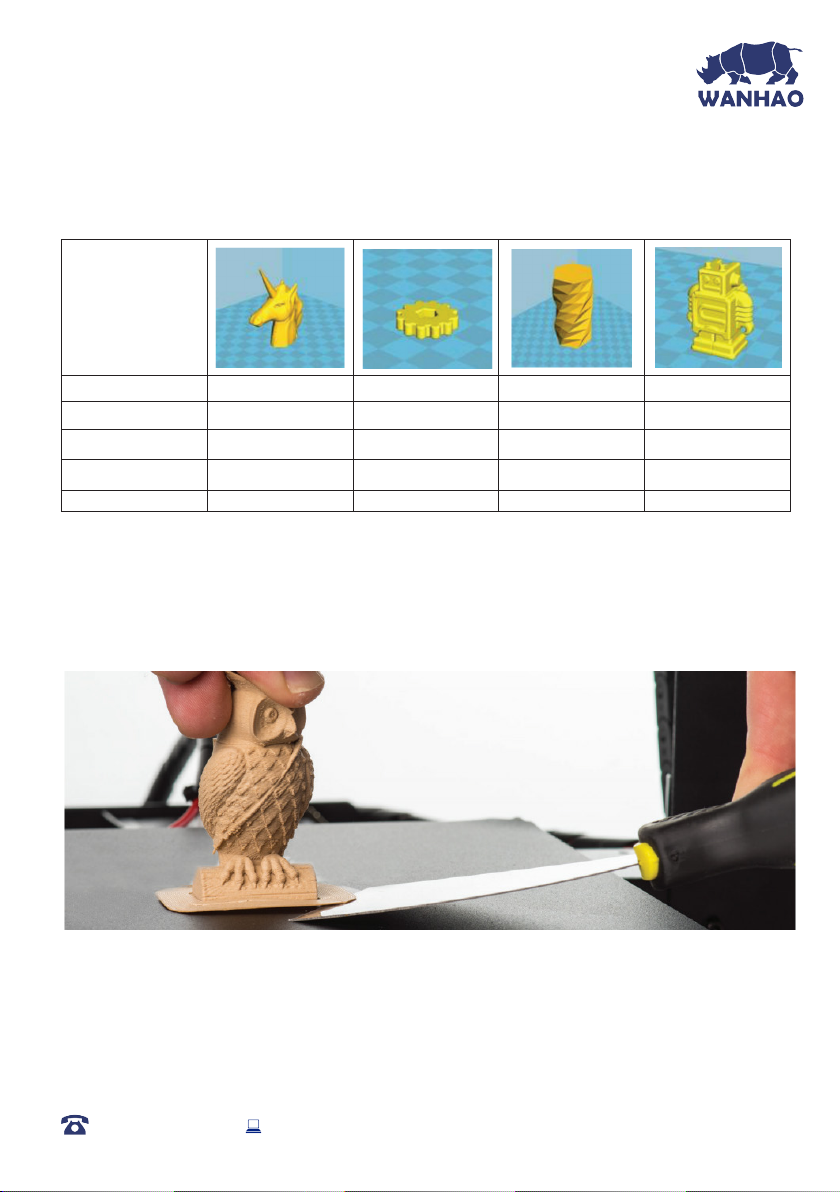
6. You can now select one of our pre-loaded les below by navigating to, and selecting the le
name:
File Name:
Size (LxWxH):
Inll:
Resolution:
Print Time:
7. Your printer will now commence heating the Extruder and Heated Print Bed to the correct
printing range, before returning to the home position and commencing the print
8. Once your printer has completed printing the le, the nozzle and Heated Print Bed will
commence cooling down. Once cooled, turn off your 3D printer and carefully remove
the 3D printed object using the supplied Scraper and gently lifting the object with your hand
Always take care when using the Scraper. Never use excessive force or scrape towards your
hand.
NOTE: Always keep the Scraper as level as possible. Scraper can damage the print mat if not used correctly
Unicorn
47x19x51mm
100%
0.2mm
50min
M3 Thumbscrew
19x19x4mm
100%
0.1mm
6min
Vase
50x50x100mm
0%
0.2mm
1hr 43min
WANHAOBot
26x34x15mm
20%
0.1mm
36min
AFTER SALES SUPPORT
86-571-23290996
Model : Duplicator I3 V2
17
Page 18

Introduction
1.1 What is 3D Printing?
3D Printing is a process whereby a real object is created from a 3D Design. Fused Filament
Fabrication (FFF) is one of the most common technologies used by 3D Printers to achieve this. FFF
works on an ‘additive’ principle by laying down material, such as PLA or ABS lament, in layers to
create a 3D object.
1.2 From 3D Design to Printed 3D Object:
3D Design Slice to GCODE Setup 3D Printer 3D Printing Process 3D Printed Object
3D Design
Having a 3D Design is the rst step to creating a 3D Object. There are
a number of free 3D Designs that can be downloaded and printed for
personal use. Websites such as Thingiverse.com, Pinshape.com and
YouMagine.com are a good place to start, but there are many more
available!
Alternatively, you can create your own 3D Design using 3D Modelling Software. Programs such as
SketchUp or Blender allow this, however this can take some practice before successfully modelling
your 3D Design. After you’ve nished your 3D Design, you can export it as an .STL le, to be
imported into a ‘Slicer’ program such as Cura.
Slice to GCODE
A ‘Slicer’ converts a 3D Design (usually in .STL or .AMF format) into
individual layers. It then generates the machine code (such as GCODE) that
the 3D Printer will use for printing.
We recommend Cura, as it uses a simple interface and includes a large amount of support material.
AFTER SALES SUPPORT
86-571-23290996
Model : Duplicator I3 V2
18
Page 19
Introduction
Setup 3D Printer
It’s important to set up your printer before every print. We’ve included some
steps on page 20 in section 1.3 ‘Good 3D Printing Practices’ for you to quickly
refer to each time.
3D Printing Process
Now that you’ve loaded a GCODE le onto the printer, it will commence
heating up the Extruder and Heated Print Bed, then start printing. While
printing, the nozzle will move along the X and Y axis as each layer is printed.
This can take some time, depending on the size of the 3D model, print speed
of the 3D printer and resolution of each layer.
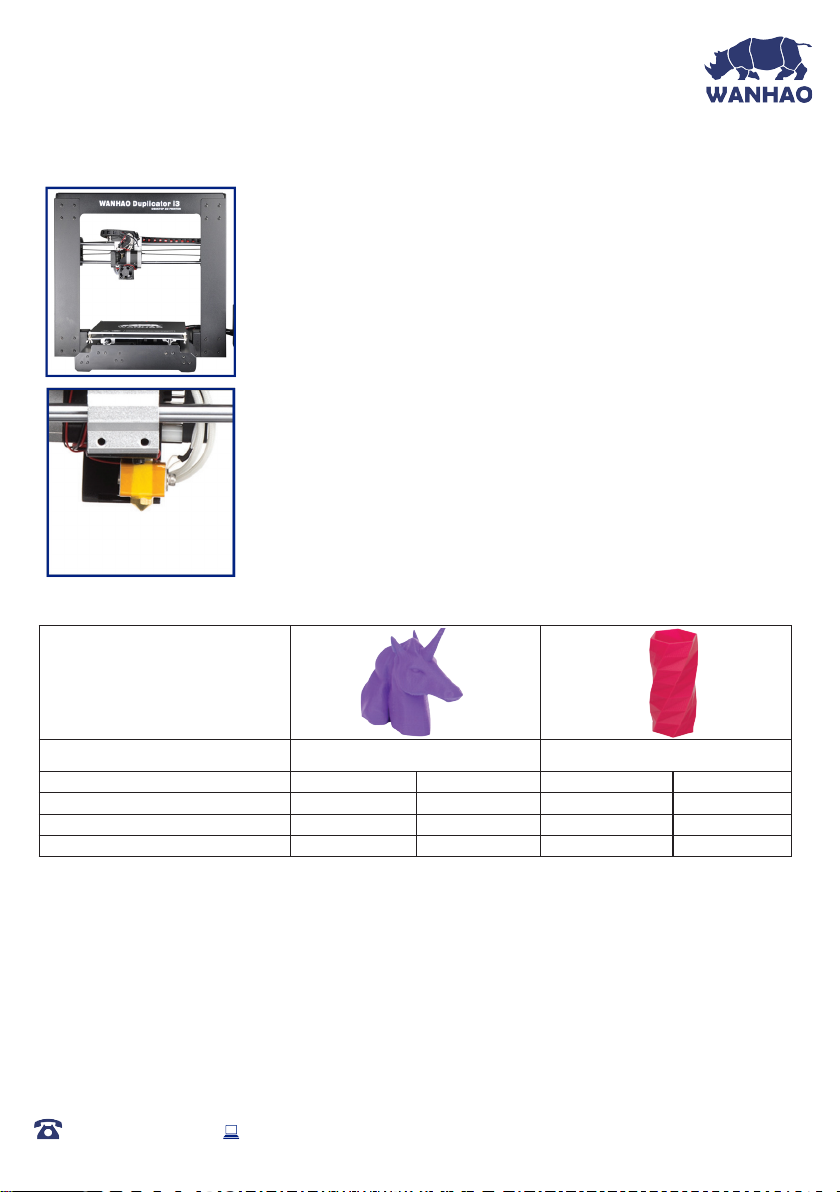
Here is an example of how size, inll, and resolution can effect printing time:
Dimensions:
Inll:
Resolution:
Print Time:
Filament Used:
3D Printed Object
Once the printer has completed all of the layers, you will have a 3D Printed Object. The results are
certainly worth it, with 3D models ranging from simple to complex.
The WANHAO 3D Printer is compatible with a broad range of lament types and is capable of
printing 3D models ranging from small and simple to complex objects with moving parts. What you
print is limited only by your imagination.
AFTER SALES SUPPORT
86-571-23290996
62.5 x 25.75 x 67.75mm 70 x 70 x 140mm
20%
2mm
53min
4m
0%
2mm
39min
2.54m
Model : Duplicator I3 V2
20%
2mm
6hr 40min
45m
20%
1mm
13hr 12min
45.67m
19
Page 20

Introduction
1.3 Good 3D Printing Practices
Please refer to these steps during every print to ensure the best quality.
Before Printing
1. Ensure your GCODE le is correctly setup, lament diameter is set to to 1.75mm and correct
temperature settings for the material you are using (refer to table 3.1, page 27)
2. Check all cables and connectors are connected
3. Check that Heated Print Bed is level and approximately 0.1mm from the nozzle
4. Check that Heated Print Bed is clean and dust free and nozzle does not have excess material
stuck to it
Always check Gcode
le settings match
lament and printer
Always check
Print Mat is clean
and there is no
residual plastic
Always check Extruder
& Print Bed
Temperatures are set
for correct lament type
Always check all
cords are
connected
Always check
Extruder distance is
0.1mm from Print Mat
Always check
Print Bed is level
During Printing
1. Closely monitor the rst layer being printed – Most problems will occur in the rst layer. If
problems occur, stop the 3D Printer at the power outlet
2. Do not leave the 3D Printer unattended while in operation
3. Keep hands clear while machine is operating
After Printing
1. Wait for the Heated Print Bed and Extruder to cool down
2. Carefully remove 3D Object. Never use Scraper towards your body. Keep Scraper evenly at
when scraping to avoid damage to the Heated Print Bed. Damaged Heated Print Bed will
affect adhesion for future prints
3. Store 3D printer in a clean, dry environment
AFTER SALES SUPPORT
86-571-23290996
Model : Duplicator I3 V2
20
Page 21
Installation
1.4 Unboxing and Assembly
Your WANHAO 3D Printer is packed tightly and carefully -- take your time unpacking it.
To view a step by step video of the Unboxing and Assembly, visit
www.wanhao3dprinter.com/Video/i3 video/wanhao i3 unboxing
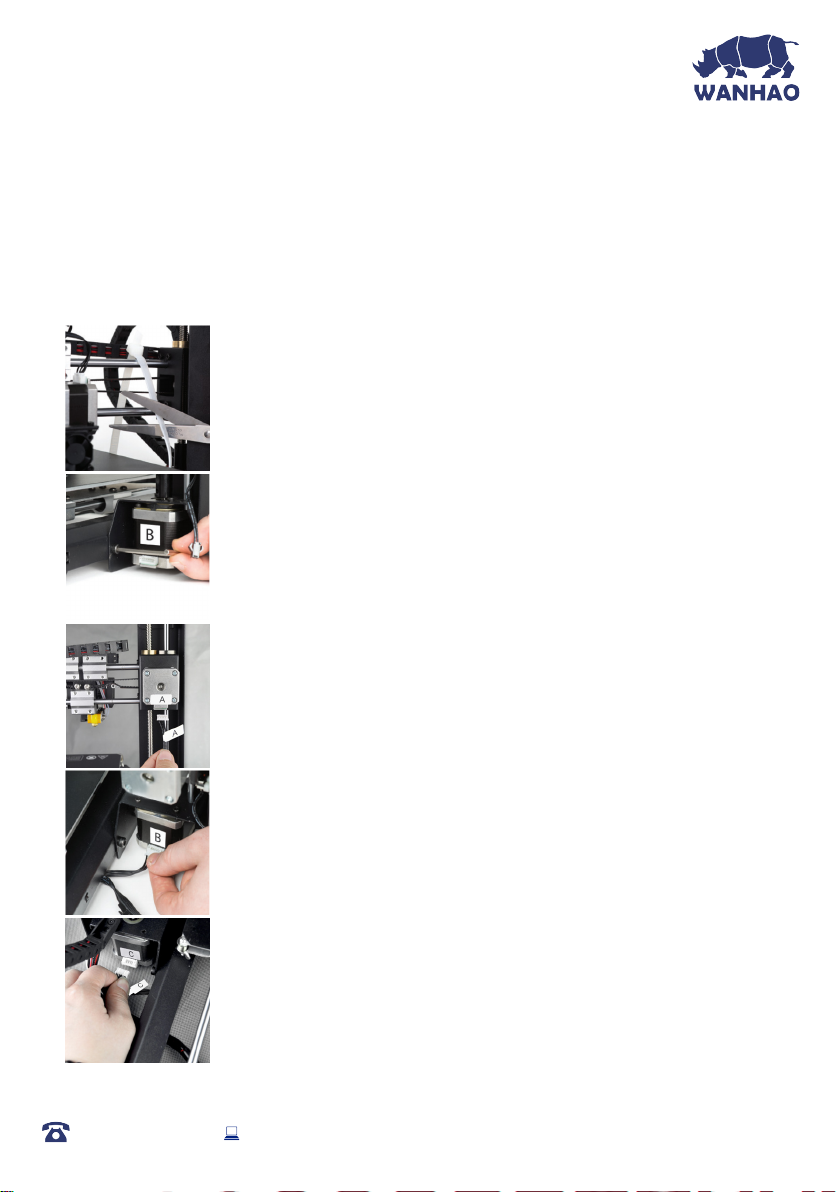
1. Place the Control Box, Extruder Tower and Heated Print Bed on a
clean, level work space. Carefully remove the cable tie that holds
the Extruder in place
2. Insert the Heated Print Bed lengthways between the legs of the
Extruder Tower and align the bolt holes on each side. Using the Hex
Wrench, insert and tighten the two external bolts. Place printer on its
side, then insert and tighten the two internal bolts
3. Ctarefully cut the cable tie on the left side of the Heated Print Bed.
Then, on the left side, insert the short cable connector marked ‘A’ into
the motor connector of the Extruder Tower marked ‘A’
AFTER SALES SUPPORT
86-571-23290996
4. On the left side, insert the long cable connector marked ‘B’ into the
motor connector of the Extruder Tower marked ‘B’
5. On the left side, insert the white connector marked ‘C’ into the black
connector of the Extruder Tower marked ‘C’
Model : Duplicator I3 V2
21
Page 22

Installation
6. On the left side, insert the black connector marked ‘D’ into the Z
axis end stop switch marked ‘D’.
7. Remove the outer plastic nut from the Filament Spool Holder, then
insert the threaded end into the large hole of the Filament Spool
Holder Stand. Tighten the plastic nuts on each side to secure
8. Position the Filament Spool Holder Stand on top of the Extruder
Tower, with the Filament Spool Holder centred on the stand. Insert
two bolts and tighten with the hex wrench until secure
9. Ensure the power switch is in the OFF position, then insert the Power
Supply Cable into the back of the Control Box. Insert the other end
into a nearby mains power outlet. Turn on the power outlet, then turn
ton the 3D Printer, using the switch on the back of the Control Box
AFTER SALES SUPPORT
86-571-23290996
10. Wait for the printer to initialise, with ‘Printer Ready’ shown at the
bottom of the LCD. You’ve successfully setup your WANHAO 3D
Printer
Model : Duplicator I3 V2
22
Page 23
Installation
1.5 Control Panel
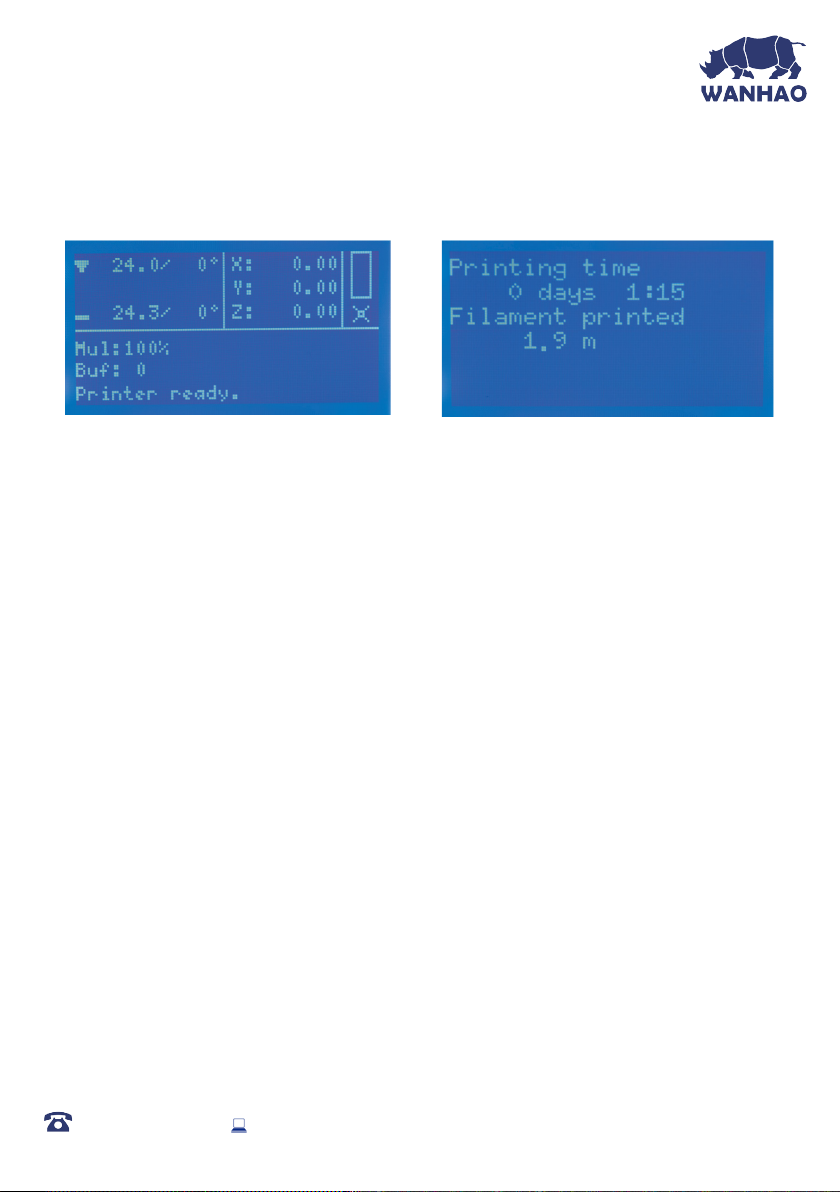
1.5.1 Main Display
Extruder Temperature: (Current °C / Set °C)
Print Bed Temperature: (Current °C / Set °C)
Extruder Co-ordinates: X, Y, and Z (mm)
Mul: Displays current speed multiplier. Default value is 100%
Buf: Displays current GCODE steps in the buffer
Message Display:
• Printer Ready: Printer is initiated and awaiting input
• Idle: Printer currently in idle state
• Stepper Disabled: Motors are disabled and free to be moved by hand
• Preheat PLA / Preheat ABS: Extruder and bed temperatures set and active
• Printing…: 3D Object is being printed, % displayed
Printing Time: Total time spent printing
Filament Printed: Total length of lament fed through the Extruder in metres
1.5.2 Menu Map
Quick Settings:
• Home All: Returns Extruder and bed to home position using stop switches
• Speed Mul.: Default 100%. Motor speed multiplier. Speed of the motor is
multiplied by this rate
• Flow Mul.: Default 100%. Printer ow multiplier. Amount of lament extruded is
multiplied by this rate
• Preheat PLA: Sets Extruder to 215°C and Heated Print Bed to 60°C
• Preheat ABS: Sets Extruder to 245°C and Heated Print Bed to 90°C
• Cooldown: Sets Extruder and Heated Print Bed to 0°C
• Disable Stepper: Disables all motors so they are free to be moved by hand
AFTER SALES SUPPORT
86-571-23290996
Model : Duplicator I3 V2
23
Page 24

Installation
Print File: If an SD Card is mounted, les can be quickly accessed here.
Position:
• Home All: Returns Extruder and bed to home position using stop switches
• Home X / Y / Z: Returns specic axis to home position using stop switches
• X / Y / Z Pos. Fast: Quickly adjust the location of a specic axis
• X / Y / Z Position: Precisely adjust the location of a specic axis
• Extr. Position: Adjust the Extruder driving motor to feed, insert or remove lament
Extruder:
• Bed Temp: Manually set the bed temperature 30°C and 70°C
• Temp. 1: Manually set the Extruder temperature between 170°C and 240°C
• Extruder 1 Off: Quickly return the Extruder temperature to 0°C
• Extr. Position: Adjust the Extruder driving motor to feed, insert or remove lament
• Set Origin: Returns Extruder position value to 0mm
Fan Speed: Adjust the Extruder cooling fan to your desired percentage
SD Card:
• Print File: Select a le to be printed from the MicroSD Card
• Mount Card: If inserting the MicroSD Card after the 3D printer has initiated, card can be
mounted using this setting
• Unmount Card: Safely unmount the MicroSD Card
• Delete File: Select a le to be deleted from the MicroSD Card
Debugging:
• Echo: Off. Echo GCODE steps to conrm what has been received
• Info: On. Show printing information on the main display
• Errors: On. Show errors on the main display
• Dry Run: Off. Perform the GCODE steps without extruding any lament
AFTER SALES SUPPORT
86-571-23290996
Model : Duplicator I3 V2
24
Page 25

Installation
1.5.3 Default Conguration
The following settings show the default conguration values of the WANHAO 3D Printer.
We’ve set these to provide optimal quality for your 3D printed models, however, if you wish to
adjust these settings, we recommend this to be done by only highly experienced users, as print
quality and 3D printer durability may be affected.
• General
Baudrate: 115200
Stepper Inactive: 360s
Max Inactive: 0s
• Acceleration
Print X: 1000
Print Y: 1000
Print Z: 100
Move: X
Move: Y
Move: Z
Jerk: 20.0
Z-Jerk: 0.3
• Feedrate
Max X: 200
Max Y: 200
Max Z: 2
Home X: 40
Home Y: 40
Home Z: 2
• Extruder
Steps/mm: 96.0
Start FR: 20
Max FR: 50
Accel: 5000
Stab. Time: 1
Wait Units: 0mm
Wait Temp.: 150C
Control: Dead Time
DT/PID P: 7.00
PID I: 2.00
PID D: 40.00
Drive Min 40
Drive Max 230
PID Max: 255
• Store to EEPROM: Save conguration settings to the internal storage, to be re-loaded on
reboot
• Load f. EEPROM: Return conguration settings to the last reboot
AFTER SALES SUPPORT
86-571-23290996
Model : Duplicator I3 V2
25
Page 26

Setup
2. Levelling the Heated Print Bed
It is important to ensure the Heated Print Bed is level and set to approximately 0.1mm distance
prior to printing.
1. With the printer initialised, press the Navigation Dial to enter the menu system
2. Rotate the Dial until Position is highlighted, then press the Dial to select
3. Rotate the Dial until Z. Pos. Fast is highlighted, then press to select
4. Rotate the Dial clockwise, raising the Extruder so that you can easily access the Heated
Print Bed
5. Turn off your 3D Printer
6. Check the Z axis level. The X rail should be parallel to the Heated Print Bed. If it is not,
manually rotate the right hand side Z axis stepper motor to level it
7. Squeeze each corner of the Heated Print Bed, and tighten each wing nut to reduce the
distance between plates to a minimum
8. Wipe the top of the Heated Print Bed with a clean, lint-free cloth to ensure no dust particles or
other objects are on the surface
9. Turn on the 3D Printer, using the switch on the back of the Control Box
10. With the printer initialised, press the Navigation Dial to enter the menu system
11. Navigate to and select Position > Home All. Your 3D printer will now try to align to the ‘home’
position, on the front left corner of the Heated Print Bed
12. Once aligned, turn off the 3D printer
13. With the printer powered off, move the Extruder to one corner of the Heated Print Bed to
check the distance between these components
14. Rotate the wing nut to raise the Heated Print Bed. A good distance is 0.1mm, and will allow a
sheet of paper to slide freely with slight friction between the Extruder and Heated Print Bed
15. Move the Extruder to each of the other corners and repeat the process. Move the Extruder to
the centre of the Heated Print Bed and test the gap with a sheet of paper. Keep adjusting and
testing until the proper gap is present at all points
IMPORTANT NOTE: Levelling the bed is an extremely important step and if it is not done
correctly every time, your prints will fail or be of poor quality
AFTER SALES SUPPORT
86-571-23290996
Model : Duplicator I3 V2
26
Page 27
Setup
3. Filament
The WANHAO 3D Printer uses high quality PLA and ABS laments. Only use quality
WANHAO laments as using generic laments may damage your 3D Printer, affect the
print quality and may void your warranty. Extra lament including multiple colours
and types are available from the online store at id.aliexpress.com/store/120824
For beginners, we recommend using PLA materials as they are easy to print and does not
produce fumes when printing. Before using other types of laments, ensure you understand the
advantages and disadvantages of other laments and their proper usage.
3.1 Filament Types
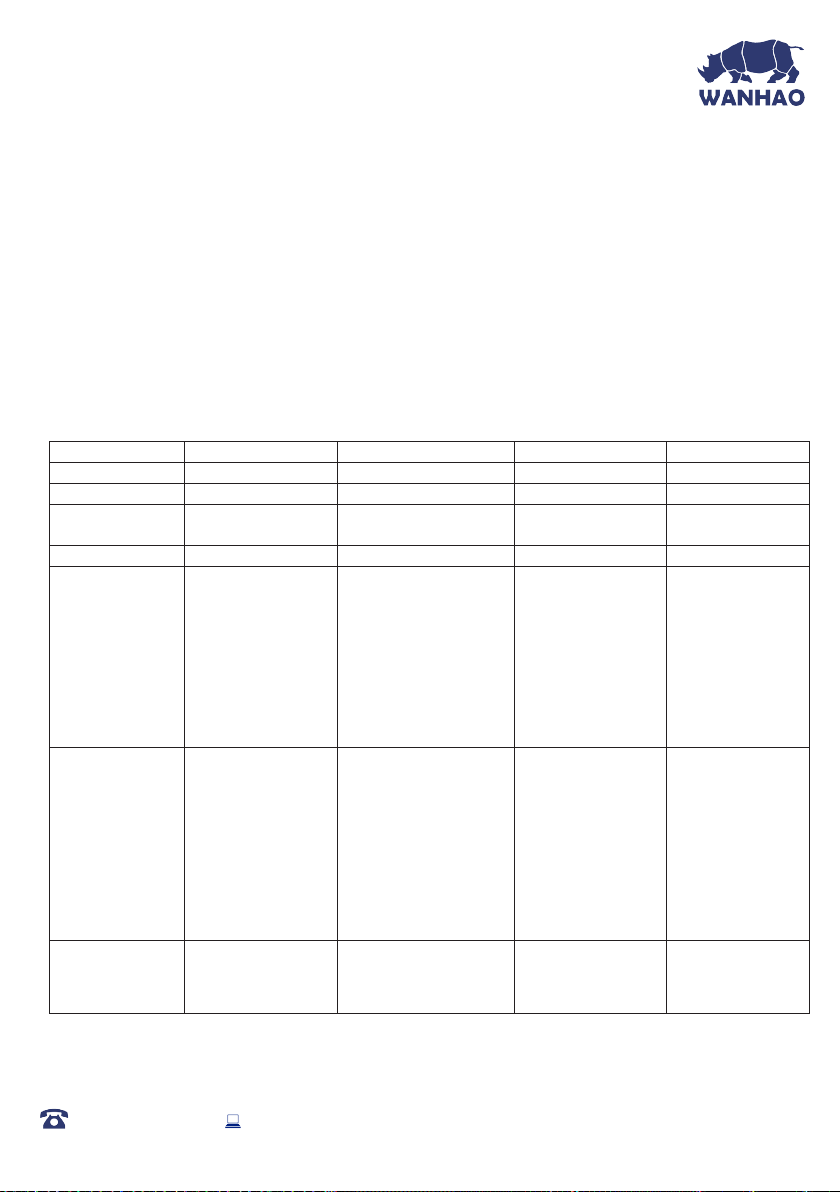
Filament Type PLA ABS PVA HIPS
Extruder Temp: 195ºC 210ºC 185ºC 220ºC
Heat Bed Temp 60ºC 90ºC 50ºC 60ºC
Ofcial Name: Polyactic Acid Acrylonitrile
Butadiene Styrene
Printing Level: Basic Advanced Advanced Advanced
Advantages: • Bioplastic
• Non-Toxic
• Less warping
issues
• Hard or soft/
exible variants
• High print
speed
• Smooth nish
• Durable
• Ideal for
mechanical
parts
Polyvinylv Alcohol High Impact
Polystyrene
• Water soluble
• Non-Toxic
• Lightweight
• Cost effective
• Dissolvable in
Limonene
Disadvantages: • Low heat
resistance
• Easier to break
than ABS
• Requires
thicker walls
than ABS
Finishing: • Sanding
possible
• Limited gluing
AFTER SALES SUPPORT
86-571-23290996
• Petroleumbased
• Nonbiodegradable
• Heated Print
Bed required
• Fumes when
printing
• Sunlight
deterioration
• Easy sanding
• Easily soluble in
acetone
• Sensitive to
high heat.
Do not heat
over 190
• Gluing Only • Gluing Only
Model : Duplicator I3 V2
• Only available
in white
27
Page 28
Setup
Alternative types of PLA
These PLA Alternatives require advanced knowledge of the 3D Printer. Please visit
www.wanhao3dprinter.com for details of lament types and parameters.
NOTE: Only use WANHAO Filament with your 3D Printer, using other filaments may
damage your 3D Printer and may void your warranty.
3.2 Inserting Filament:
1. With the printer initialised, press the Navigation Dial to enter the menu system
2. Navigate to, and select Quick Settings
3. Navigate to, and select Preheat PLA or Preheat ABS - depending on the material in use
4. Wait for the 3D printer to automatically return to the home screen, after approximately 15-30
seconds
5. Check the temperature of the Extruder and plate on
the LCD. When the temperatures are within a few
degrees of the target, you are ready to insert the lament
NOTE: Preheat PLA/ABS will still be shown, even after
temperatures have been reached
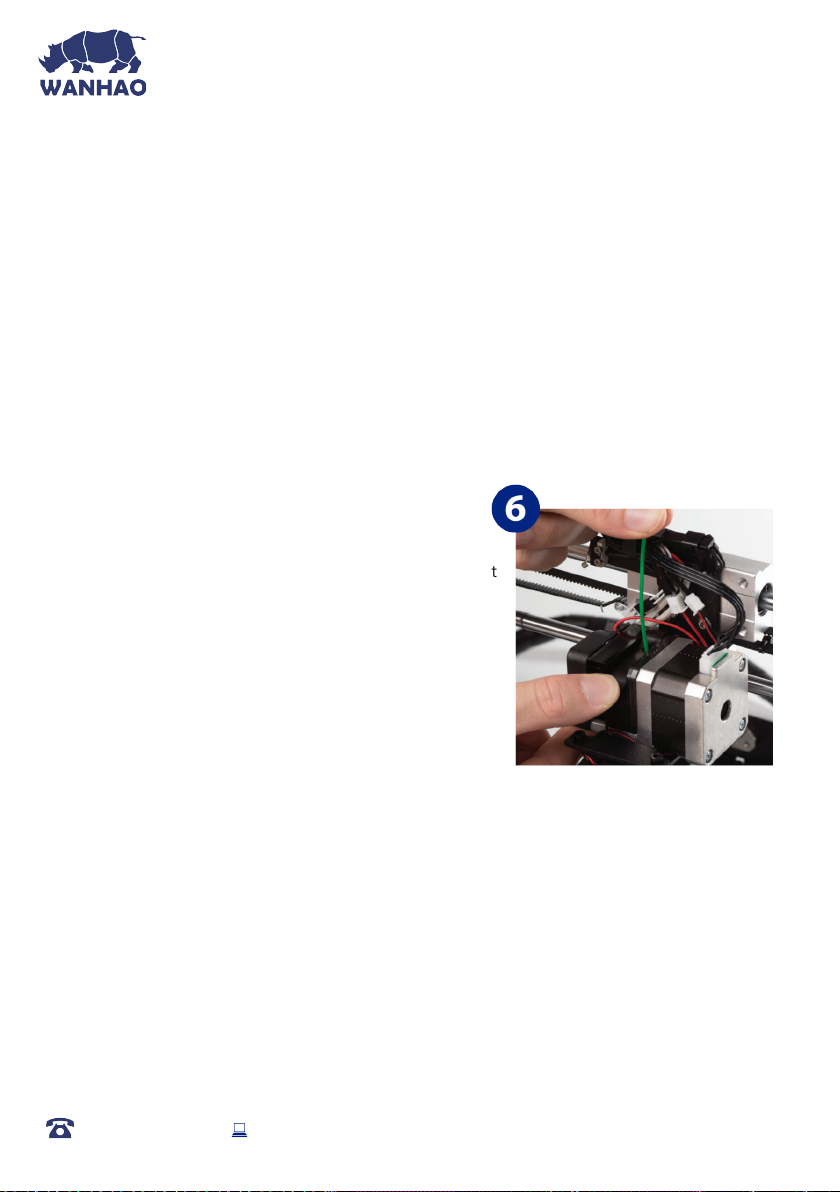
6. Carefully insert the included lament sample into the
hole on the Extruder as shown
7. While holding the lament in place with one hand, press
the Dial to enter the menu system
8. Navigate to and select Extruder > Extr. Position.
9. Gently push down on the lament while turning the Dial clockwise. You will feel the lament
being pulled into the Extruder. Continue until a few centimetres have extruded out of the
nozzle
10. Carefully clean the extruded lament off the Heated Print Bed and nozzle
WARNING: Extruder and Heated Print Bed will still be hot
AFTER SALES SUPPORT
86-571-23290996
Model : Duplicator I3 V2
28
Page 29

Setup
3.3 Removing Filament:
1. With the printer initialised, press the Navigation Dial to enter the menu system.
2. Navigate to, and select Quick Settings > Preheat PLA or Preheat ABS depending on the
material.
3. Wait for the 3D printer to automatically return to the home screen, after approximately 15-30
seconds.
4. Check the temperature of the Extruder and plate on the LCD. When the temperatures are
within a few degrees of the target, you are ready to remove the lament.
NOTE: Preheat PLA/Preheat ABS will still be shown, even after temperatures have been reached.
5. Depress the Extruder spring lever. Push down on the lament gently so that it starts to
extrude from the nozzle.
6. When lament is extruding, quickly, but gently pull the lament upward. If it is done correctly,
the end of the lament will pull out into a thin hair like strand.
NOTE: The aim is to sever the lament where is it soft (inside the nozzle). Swift upward action will
ensure that the lament does not cool down before exiting the nozzle inlet. If the lament gets
stuck, please see the troubleshooting section.
3.4 Storage:
Both PLA and ABS laments are sensitive to moisture. If stored in a humid environment, the quality
of the lament can deteriorate, with a tendency to bubble and spurt from the nozzle tip. This will
affect print quality, so when storing PLA or ABS for an extended period of time, follow these tips.
• Store in a sealed, air tight bag/container. We recommend a vacuum seal bag
• Store with a silica gel (moisture absorber) pack. One is included with each lament spool
4. Using the Micro SD Card
4.1 Loading les from your Computer:
1. Insert your MicroSD Card into a card reader or memory card slot and connect to your
computer (refer to your computer manual for further instructions if required)
2. The Micro SD Card will appear as a folder (refer to your computer manual for further
instructions if required)
3. Copy your converted GCODE les to the Micro SD card, then safely remove
AFTER SALES SUPPORT
86-571-23290996
Model : Duplicator I3 V2
29
Page 30

Setup
4.2 Printing from the Micro SD Card:
1. Insert the included MicroSD card into the slot on the side of the Control Box, ensuring that
the metal contacts are facing upwards
2. Press the Navigation Dial to enter the menu system
3. Navigate to and select SD Card > Mount Card > Print File
4. Navigate to your desired GCODE File, then press the Dial to commence printing
Your WANHAO 3D Printer will now heat up the Extruder and Heated Print Bed before
printing your 3D object
NOTE: If selecting ‘Print File’ shows no les, chances are the SD Card has not been mounted. Select
‘Unmount SD Card’, then ‘Mount SD Card’ to remount your SD Card into the side of your Control Box
NOTE: If Extruder temperature is set at 0°C after attempting to print a le, the imported GCODE may
have some compatibility issues with the printer. Manually change the Extruder temperature using
Extruder > Temp 1 or Quick Settings > Preheat PLA or ABS depending on material used
5. Removing 3D Objects from the Bed
When the WANHAO 3D Printer has completed printing your 3D printed object, it’s time to
remove the object from the bed.
1. Wait until the Extruder and Heated Print Bed have cooled down to room temperature. This
will allow the plastic to contract, making it easier to remove
2. Using the Scraper, carefully ‘wedge’ under one of the edges of the 3D object. Take care
tokeep the Scraper at with the bed, as to not cause damage to the Print Mat
3. As one edge begins to lift, gently manoeuvre the Scraper forward to continue to ‘wedge’
between the 3D object and the Heated Print Bed
4. Once the part has fully separated from the bed, it is safe to remove
NOTE: Never scrape towards your body, or injury could occur
NOTE: Removing a 3D object, particularly one with a large surface size, can be a long process.
Never rush when removing a 3D printed object
TIP: If you are persistently having trouble removing 3D printed objects, try the following:
• Use a layer of blue masking tape (designed to not leave behind residue) on the Heated Print
Bed. Be sure to remove and replace after each print
• Check if the printing mat is damaged and replace if needed
Replacement mats can be purchased at id.aliexpress.com/store/120824
AFTER SALES SUPPORT
86-571-23290996
Model : Duplicator I3 V2
30
Page 31
Using Cura
6. Creating a GCODE File using Cura
A GCODE le provides the essential temperature settings and movement information for your
WANHAO 3D Printer. A number of ‘Slicer’ software exists, which convert a 3D model le into
a series of 3D printable layers. Cura is a free Open Source slicer software released on the AGPLv3
license. It’s available on MacOS X and Windows.
6.1 Installing Cura
1. Install the le located on your included MicroSD card or download Cura from
http://www.wanhao3dprinter.com/Down load Software/Duplicator i3
2. Select a destination folder for the install, then press ‘Next’
3.
Select the components to install, then press ‘Install’
4.
Once complete, press ‘Finish’
5. Refer to your computer manual for further instructions on the above steps if required
AFTER SALES SUPPORT
86-571-23290996
Model : Duplicator I3 V2
31
Page 32
Using Cura
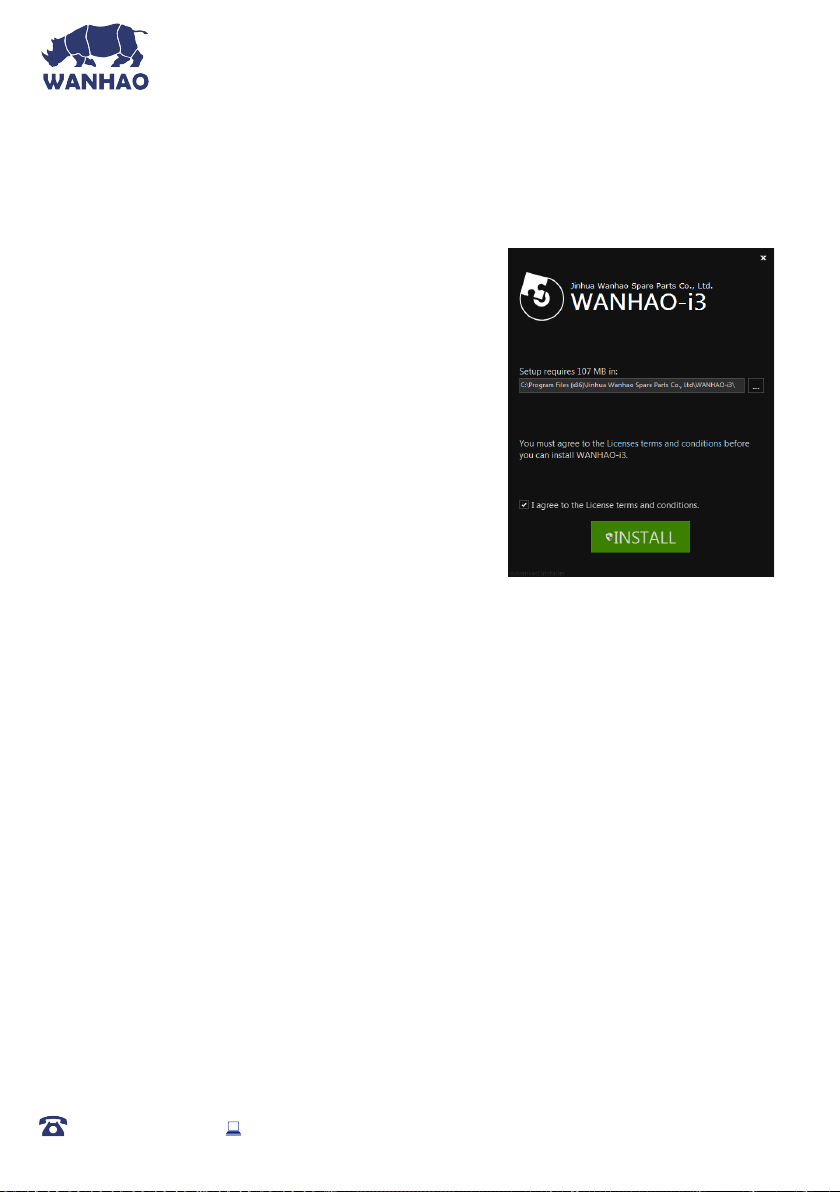
6.2 Install CURA WANHAO edition onto your
computer
1. Double click the le: CURA_WANHAO_15.04.EXE
2. Follow the instruction and click install and next.
3. The software has already embedded all the basic
settings for your Wanhao i3.
6.3 Loading a 3D Design into Cura
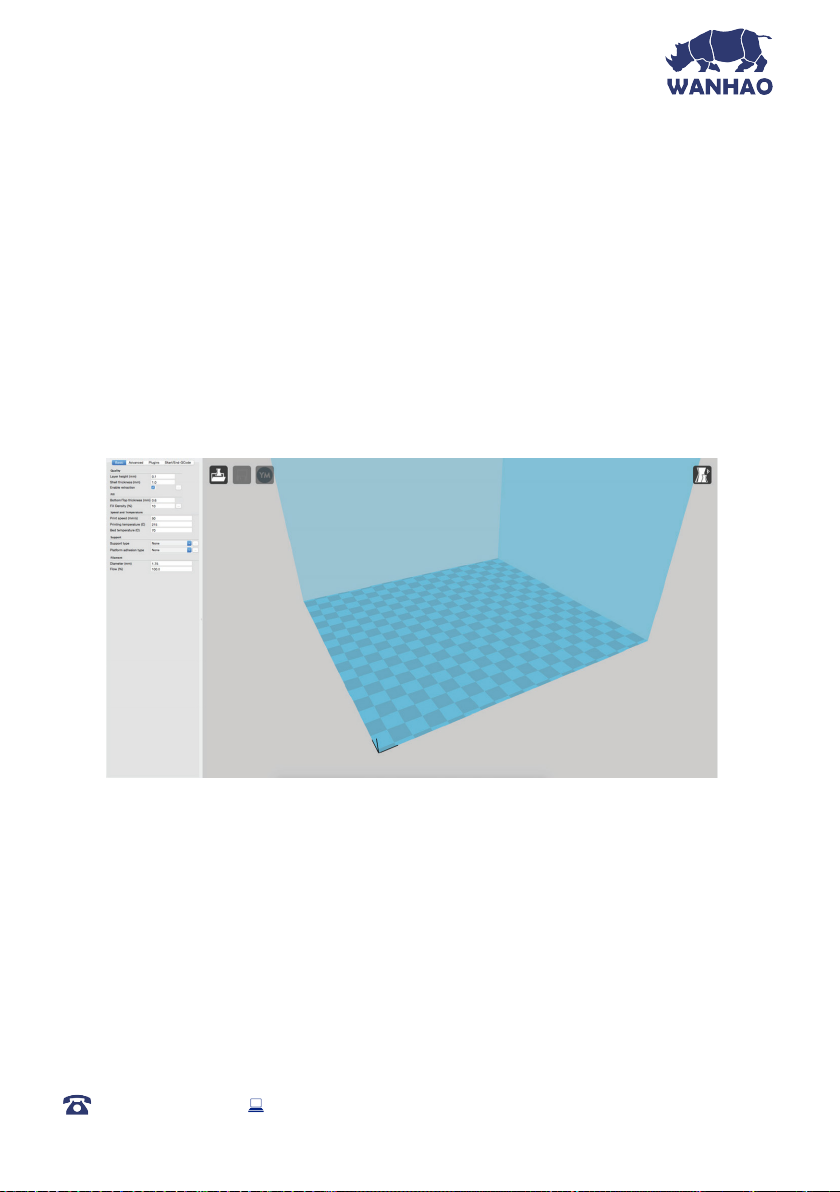
1.
Clear the platform using File > Clear platform…
2.
Then, load your 3D Design le onto the platform using
File > Load model le…
3.
Load any le with the following extensions: .STL, .OBJ, .
DAE, .AMF
TIP: You can load more than one le onto the platform. Cura will automatically move the
additional les to t.
NOTE: Files in grey are outside of the print area and need to be moved or scaled to t.
6.4 Viewing and Positioning your 3D Model in Cura
Changing the View:
•
Zooming In/Out: Use the mouse scroll wheel
•
Rotating the View: Hold down the right mouse button and move the mouse
Move Position:
Move your model to change where it is printed on the build plate. Do this by left clicking on the
model and dragging it to the desired location. The black outlined corner represents the lower left
hand corner of the Heated Print Bed on your printer.
AFTER SALES SUPPORT
86-571-23290996
Model : Duplicator I3 V2
32
Page 33
Using Cura
Rotate
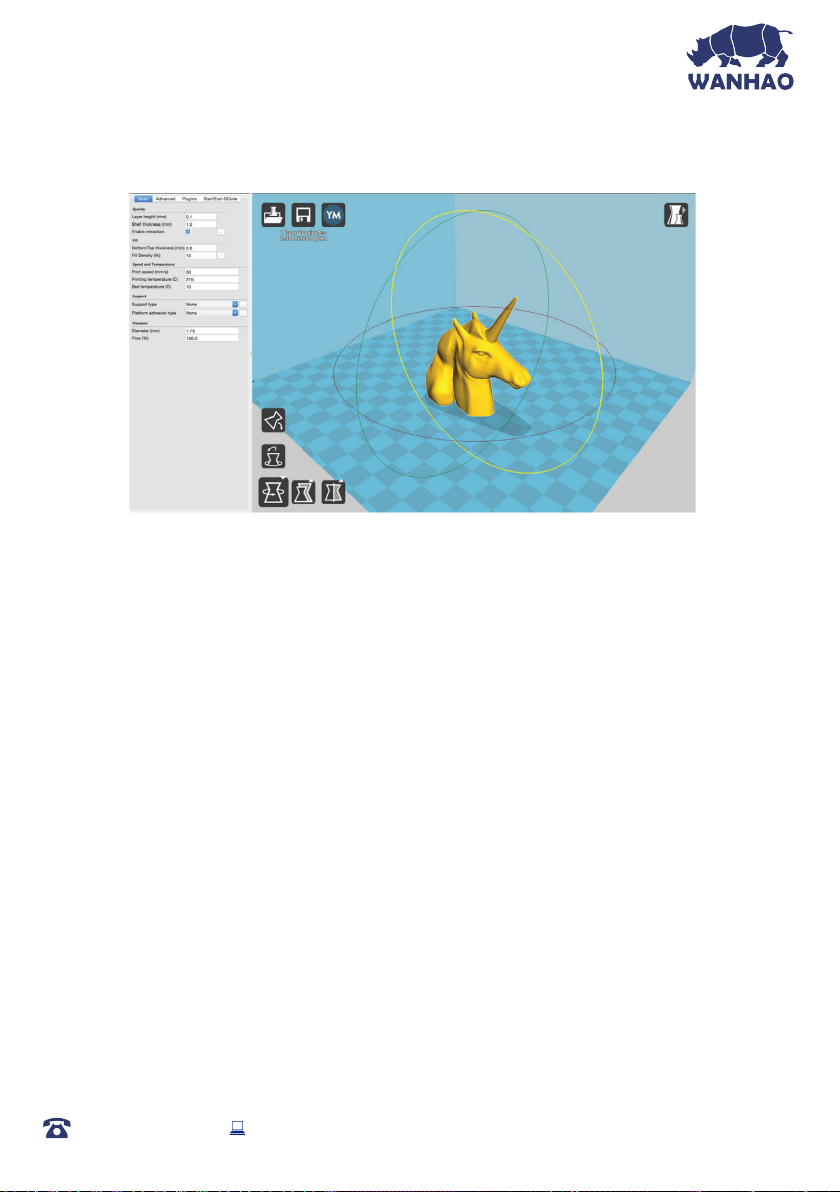
The Rotate button will give you the ability to orient your model in along all three axes. Once you
click the rotate button, three circles will surround your model. The red circle will allow you to rotate
around the Z axis. The Yellow circle will rotate around the Y axis. The Green circle will rotate around
the X axis.
Lay Flat
The Lay Flat button will ensure that the at portion of your print is securely attached to the bed.
It is highly recommended to use this option after rotating your model in the Z direction, as it will
help prevent adhesion issues during the print.
Reset
The Reset button will return your model to the original orientation as dened by the CAD program
used to create the model.
Scale
The Scale button displays the model dimensions, along with the ability to scale along the X Y or
Z axes. Anything below the number 1.0 will reduce the objects size, while anything above the
number 1.0 will increase the objects size. As a default, it will be set to uniform scaling. This will
cause the X Y and Z axes to be scaled by the same amount when you make a change to any of
them. To disable this, select the lock in the lower section of the scaling window.
TIP: Ensure your model is selected by left clicking on it. When selected, the model will have a
white outline
AFTER SALES SUPPORT
86-571-23290996
Model : Duplicator I3 V2
33
Page 34
Using Cura
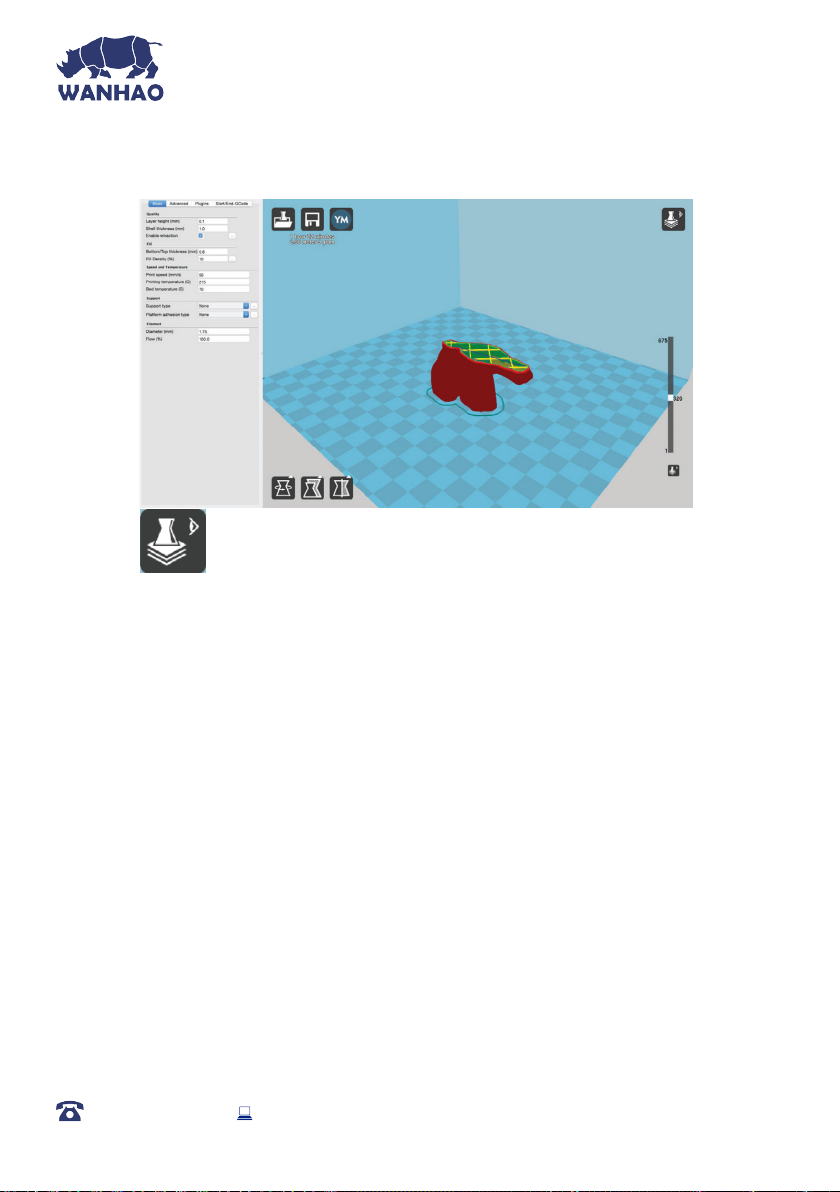
View Mode
This mode allows you to view your model in a variety of different ways.
This can be helpful for spotting issues before the print even starts.
Normal
This is the standard view and shows the solid outer surfaces of the model.
Overhang
Overhang mode shows where your model may need support material. Red highlighted areas show
overhangs and more severe angles and areas where support material is recommended. Refer to
page 38 for information on how to add support material to your model.
Ghost
Ghost view mode makes the model translucent to allow you to see what is behind it.
Xray
Xray is very similar to Ghost mode. It will allow you to see into objects, ensuring that inner details
are correct.
Layers
To view the toolpath of your print head and to ensure no skipped layers or gaps, use this option.
Use the slide bar on the right hand side of the window to move up and down through the
toolpath layers.
AFTER SALES SUPPORT
86-571-23290996
Model : Duplicator I3 V2
34
Page 35
Using Cura
6.5 Quick Print Settings
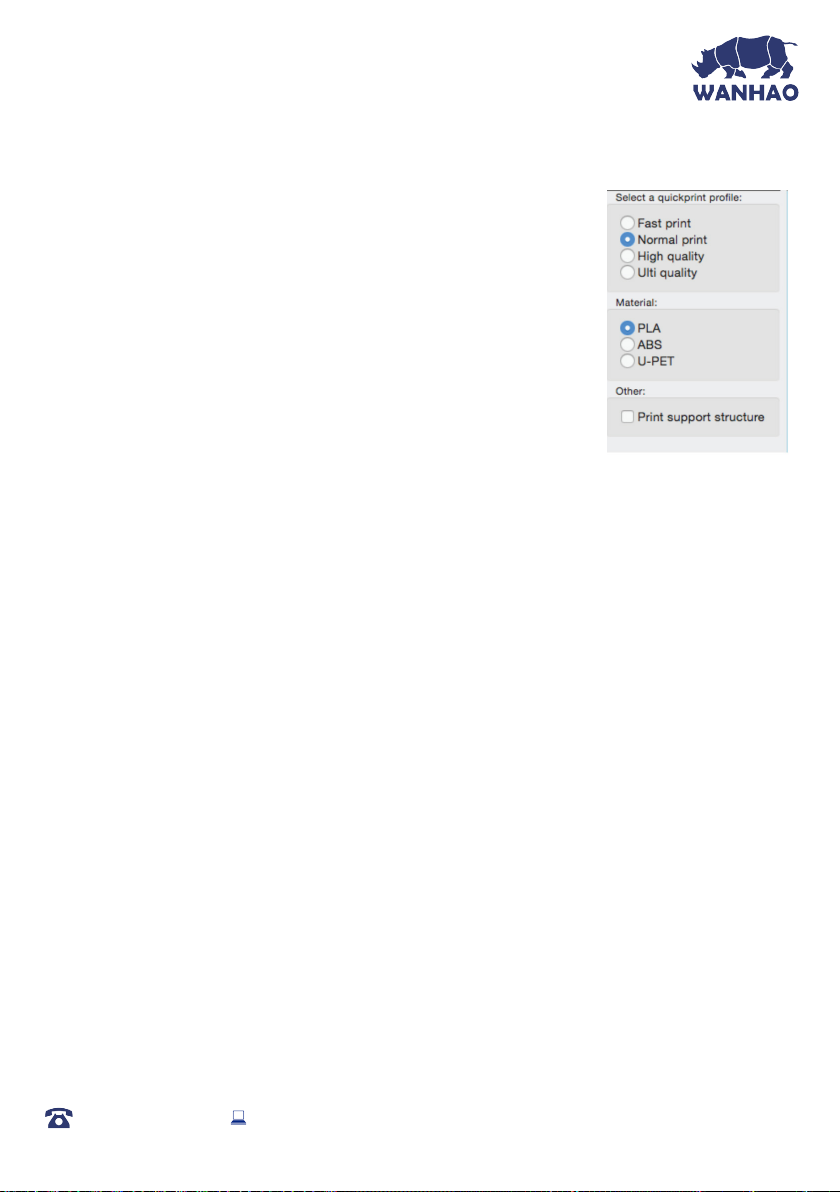
Quick Print mode allows you to quickly set the quality, material,
diameter and support structure of your intended GCODE le.
Enter quick print mode by selecting Expert > Switch to Quickprint…
High Quality
Designed to give greater detail and ner objects. This will have a smaller
layer height, which will make each layer thinner, so that curves seem
more natural and walls seem less noticeable.
Medium Quality
Designed to give a medium resolution, by increasing the layer height and print speeds. This will
make the organic curves slightly more step-like than the ne setting, but will reduce printing time.
Fast Quality
Designed for the fast prints, where overall model nish is not of concern. Most commonly used for
quick iteration of designs found in rapid prototyping.
Material Selection
Choose your desired lament. The WANHAO 3D Printer includes a 10 metre sample of PLA to
be used in your rst print.
Other laments are available for purchase at id.aliexpress.com/store/120824
Diameter
Ensure this is always set to match the lament diameter. Your 3D Printer only accepts WANHAO
1.75mm laments.
NOTE: Advanced users can ne tune the diameter value to allow for tolerance if needed
Printing Support Material
Your WANHAO 3D printer is able to print models that have angles and overhangs, some of
these models will require support material depending on the overhang distance and angle. Turn
this option on if your model could benet from support material.
AFTER SALES SUPPORT
86-571-23290996
Model : Duplicator I3 V2
35
Page 36
Using Cura
6.5.1 Exporting your GCODE File:
Take note of the time and length required to print your 3D object. From the top menu, select
File > Save GCODE. You can now save your GCODE to your desired directory.
NOTE: Always reopen the GCODE le again in CURA to conrm that all slices of the model have
been included. This will open in the ‘layers’ view, if you want to see your object, select ‘normal’
view
6.6 Advanced Print Settings
Advanced print mode should not be used until you have gained sufcient experience with 3D
printing. In order to have more control of your slicing and GCODE generation, switch to advanced
print mode.
Enter advanced print mode by selecting Expert > Switch to full settings…
Loading a Prole
When you rst switch to Full Settings, Cura will revert to very generic settings. We recommend
using our tested proles that are available at www.wanhao3dprinter.com. You will want to
choose the prole that matches your lament and quality needs. Once downloaded, you can
load the le into Cura by selecting File > Open Prole. Choose your desired prole.
This will automatically update all of your settings for use with your print
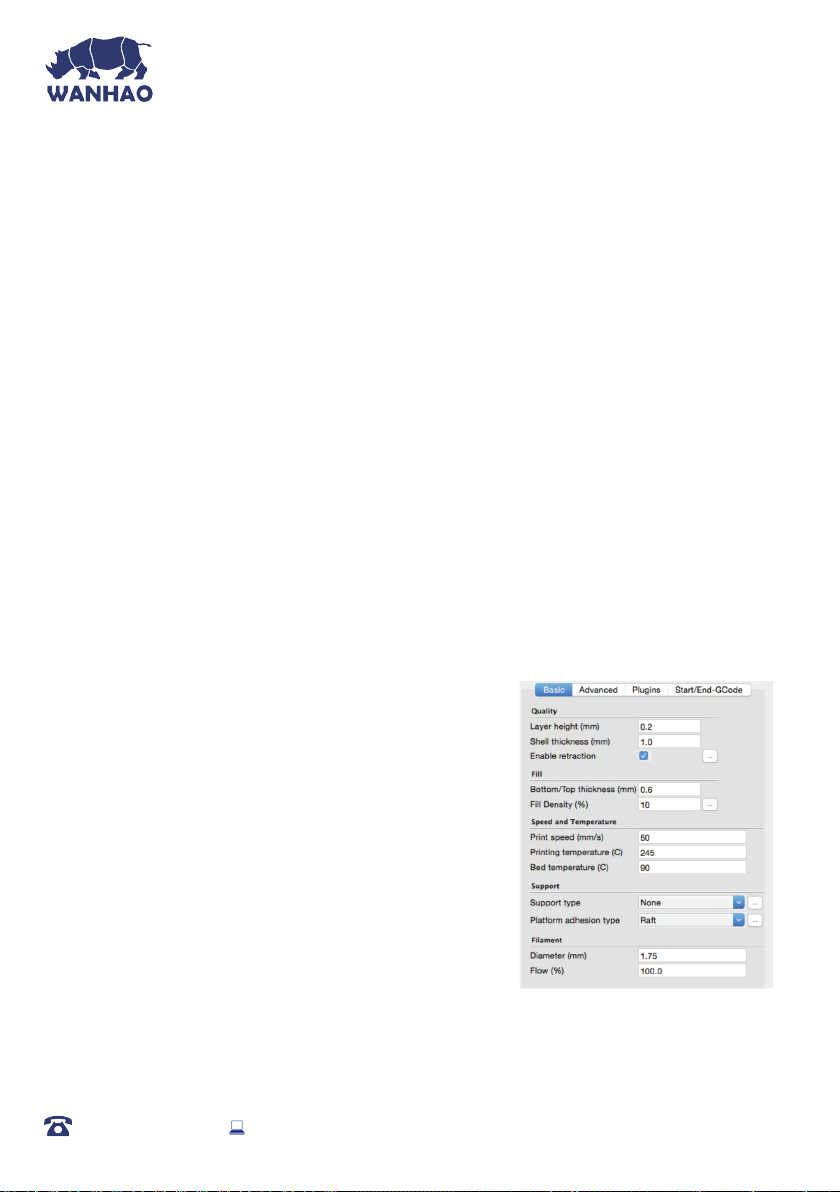
6.6.1 Basic Tab Options
QUALITY
Layer Height (mm)
The thickness of each printed layer is known as the Layer
Height. The smaller the layer height, the smoother curves
will appear. Larger layer heights are better for bridging and
overhangs. Smaller layer heights will also increase print
time, as it will take more layers to complete the object.
er.
Shell Thickness (mm)
This denes the number of vertical walls that comprise the
outside of your model. We recommend keeping this set to
multiples of your nozzle width. Your WANHAO 3D Printer is equipped with a 0.4 mm nozzle.
AFTER SALES SUPPORT
86-571-23290996
Model : Duplicator I3 V2
36
Page 37

Using Cura
Enable Retraction
Retraction tells your printer to pull lament out of the Extruder upon travel moves. Travel moves
are when your print head moves from one area of the print, to another without laying down
lament. We recommend keeping this on for all lament types, and adjusting the retraction length
and speed for the specic lament.
FILL
Bottom/Top Thickness (mm)
Also known as Surface Layers; this will determine how thick the top and bottom layers are. A larger
number here will create a thicker top and bottom which can be helpful for strength, bridging, and
quality purposes. We recommend using a number which is a multiple of your layer height.
Eg: If using a layer height of 0.2mm, set the thickness to 0.4, 0.6 or 0.8mm
Fill Density (%)
This number is expressed as a percentage. 0% will give a completely hollow print, while 100% will
give you a completely solid object. We recommend 20% to 40% ll density as it is functional for
most prints.
SPEED AND TEMPERATURE
Print Speed (mm/s)
Your overall printing speed can be adjusted here. If no other speeds are determined in the
later sections your printer will automatically default to this speed. This speed will be different,
depending on what type of lament you are using. We recommend setting speed to 30mm/s.
Printing Bed Temperature (C)
When using different lament materials, you’ll need to update the desired Extruder and Heated
Print Bed temperature. Any temperatures specied here will be used to automatically set both
the
Extruder and Heated Print Bed. Your print will not begin until these temperatures are met. As a
guide, refer to Table 3.1 on page 27 for temperature settings.
AFTER SALES SUPPORT
86-571-23290996
Model : Duplicator I3 V2
37
Page 38
Using Cura
SUPPORT
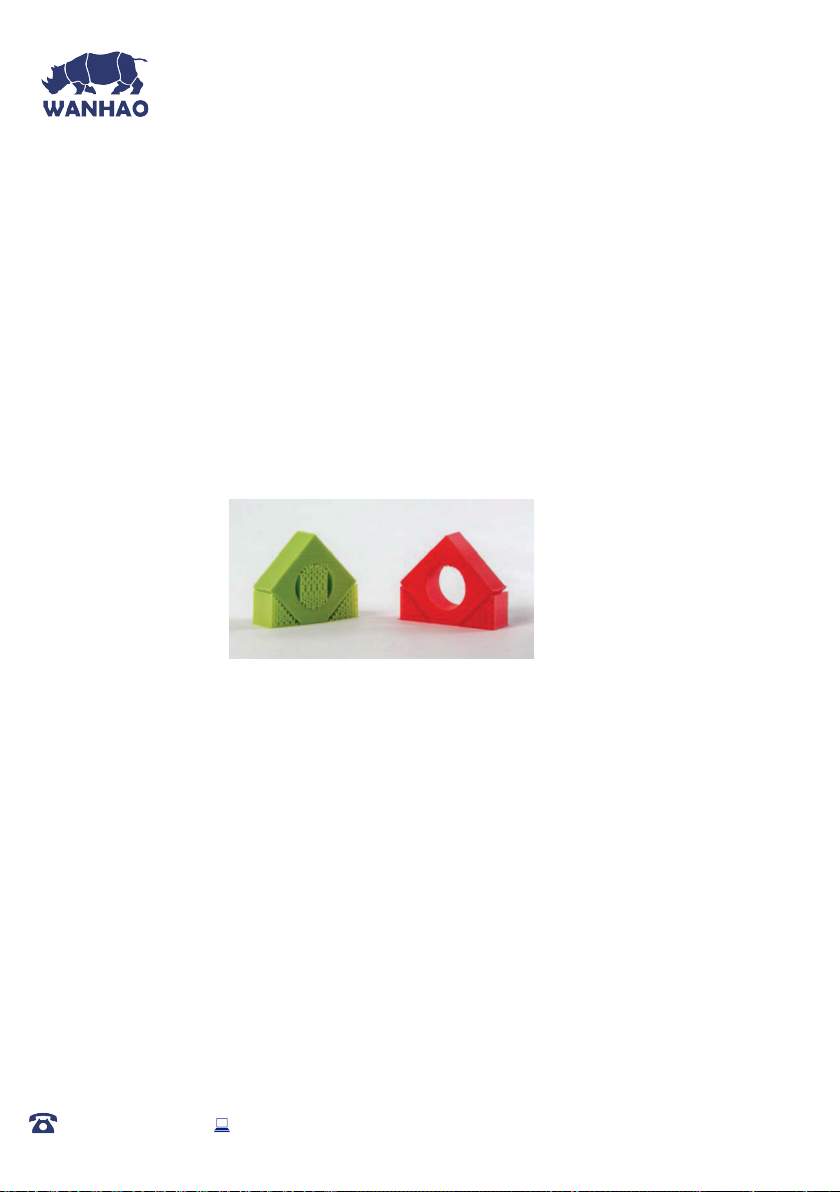
Support Type
Some models will require support material in order to print properly. This will usually occur when
an object has an angle in relation to the Heated Print Bede between 0 to 45 degrees. It is highly
recommended to orient your object so that it minimizes or eliminates the need for support.
Touching Buildplate
This causes the support material to build up between the Heated Print Bed and the object.
The red example is ‘Touching Buildplate’
Everywhere
This prints support material between the Heated Print Bed and object as well as between
the object and itself. The green example is ‘Support Everywhere’.
Platform Adhesion Type
Some models have a small surface area contacting the plate. This can create adhesion issues
causing your part to pop off at some point during the print. To x this, use either ‘Brim’ or ‘Raft’.
Raft is better used when a model has small contact points with the Heated Print Bed and
overhangs.
Brim
Brim will create a single layer of lament, contacting and surrounding your model. This will
increase the surface area of the part contacting the build platform thereby preventing it
from popping off the Heated Print Bed. Brim will also help in situations where you are seeing
corner lift.
Brim settings can be adjusted by selecting ‘...’ next to the tab.
Raft
Raft will generate a layer of material underneath your object. Raft was more often used
before the addition of heated plates to increase surface area. Raft settings can be adjusted
by selecting ‘...’ next to the tab.
AFTER SALES SUPPORT
86-571-23290996
Model : Duplicator I3 V2
38
Page 39
Using Cura
FILAMENT
Diameter (mm)
The lament diameter setting is one of the more important settings. Make sure that you update
this value periodically with your average lament diameter. While your lament may be referred to
as 1.75mm, it is more likely going to be near 1.7mm +/- 0.1mm. You will want this to be an accurate
average, as it will allow your printer to correctly calculate how much lament it is pulling into the
Extruder.
Flow (%)
This controls how much lament your printer is extruding in relation to speed. This setting is
mainly used to adjust for lament density variations. Leave this value at 100% as changing it can
lead to surface quality issues.
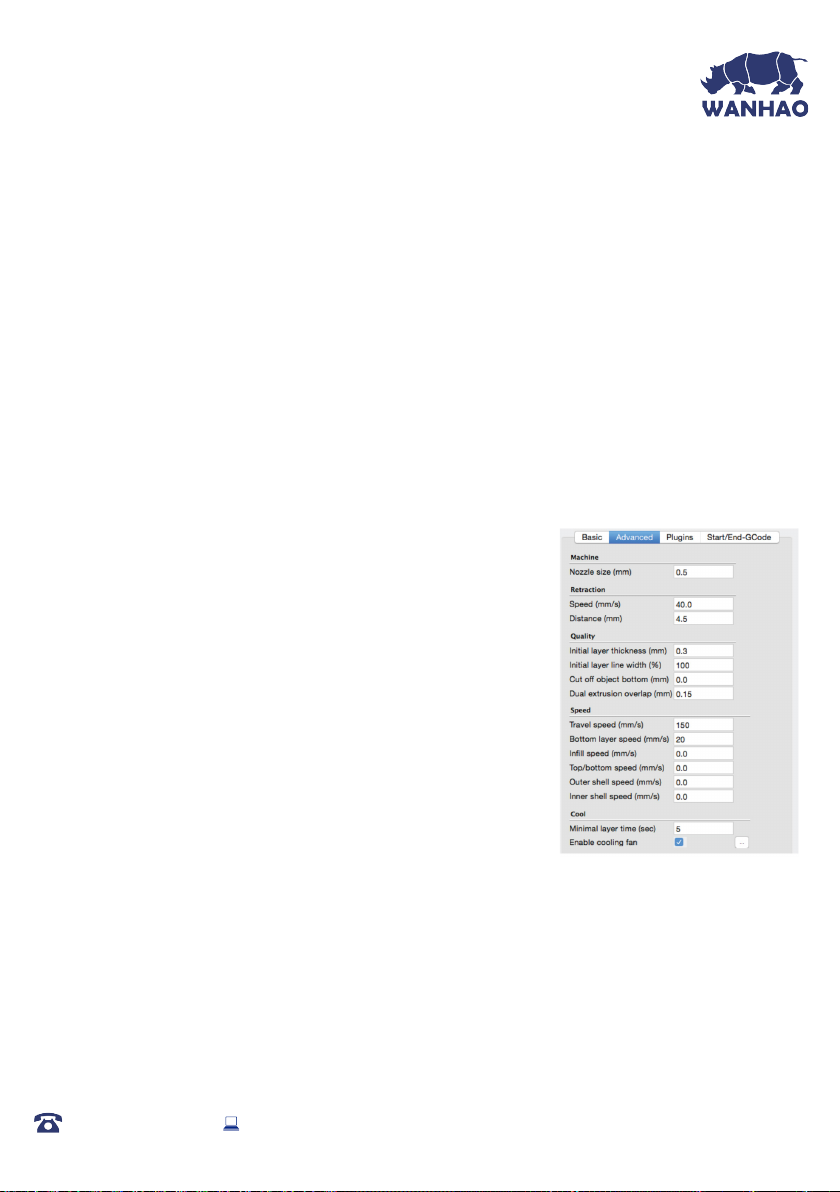
6.6.2 Advanced Tab Options
MACHINE
Nozzle Size (mm)
This denes your nozzle size. The slicing engine uses this value
combined with your other settings to determine how quickly
to feed lament into your Extruder. The WANHAO 3D
Printer uses a 0.4mm nozzle.
RETRACTION
Speed (mm/s)
Retraction Speed determines the speed at which your
lament is reversed out of the Extruder for travel moves and
when changing direction during printing. We recommend
keeping this set to 40mm/s.
Distance (mm)
Retraction Distance determines how much lament is pulled out of your Extruder on travel moves
and when changing direction. You will want to adjust this depending on temperature settings
and lament type. Higher thermal retaining laments such as PLA behave better with a longer
retraction distance. Anywhere from 1mm to 3mm is a good starting range.
AFTER SALES SUPPORT
86-571-23290996
Model : Duplicator I3 V2
39
Page 40

Using Cura
QUALITY
Initial Layer Thickness (mm)
This will control how thick your rst printed layer height is printed onto the Heated Print Bed.
Having a larger initial layer height will help prevent your part from popping off the plate. Your
WANHAO 3D Printer auto levelling system could be affected if you change this from the
standard proles. Adjust at your own risk.
Initial Layer Line Width (%)
This will control how wide your rst extruded lament path is for the initial layer. A wider line
width will help with bed adhesion. We recommend 125% as a good starting place. For models with
moving printed in place parts, a smaller initial layer line width is recommended.
Dual Extrusion Overlap (mm)
This will determine how far your Dual Extruders will overlap when laying down material. This will
help adhesion between the two different colours or types of lament. This setting is not applicable
to the WANHAO 3D Printer, it is only for printers with dual Extruders.
SPEED
Travel Speed (mm/s)
This setting will determine how fast your print head moves while not extruding lament. A normal
travel speed of 125 - 150mm/s is recommended.
Bottom Layer Speed (mm/s)
This will control your initial layer speed. In general, a slower initial layer speed will help with rst
layer adhesion.
Inll Speed (mm/s)
This is how fast your print head speed will be while laying down the interior portion of your model.
Faster speeds are usually tolerable here, as none of the inll will be visible from the outside of your
object. However, if you go too fast compared to your inner and outer shells, you can have adhesion
issues or globs of lament left behind from the print head.
AFTER SALES SUPPORT
86-571-23290996
Model : Duplicator I3 V2
40
Page 41

Using Cura
Outer Shell Speed (mm/s)
This will be the outermost surface of the model. This is the most important setting, as it controls
the speed of your print head on the visible layers. As a general rule of thumb, the slower you go the
better looking print you will get.
Inner Shell Speed (mm/s)
This affects vertical walls that are in between the outer shell and inll. This will not be visible but
will help support the outer shell and the inll. We recommend keeping this speed setting between
your inll speed and your outer shell speed.
COOL
Minimal Layer Time
This will determine a minimum amount of time your printer will spend laying down each layer. If
your layer print time falls below this your printer will automatically slow down to reach this time
before moving onto the next layer. Tweaking this can help get cleaner, crisper prints.
Enable Cooling Fan
Enables operation of your Extruder’s active cooling fan. The fan settings can be adjusted by
selecting ‘...’ next to the tab..
AFTER SALES SUPPORT
86-571-23290996
Model : Duplicator I3 V2
41
Page 42
Using Cura
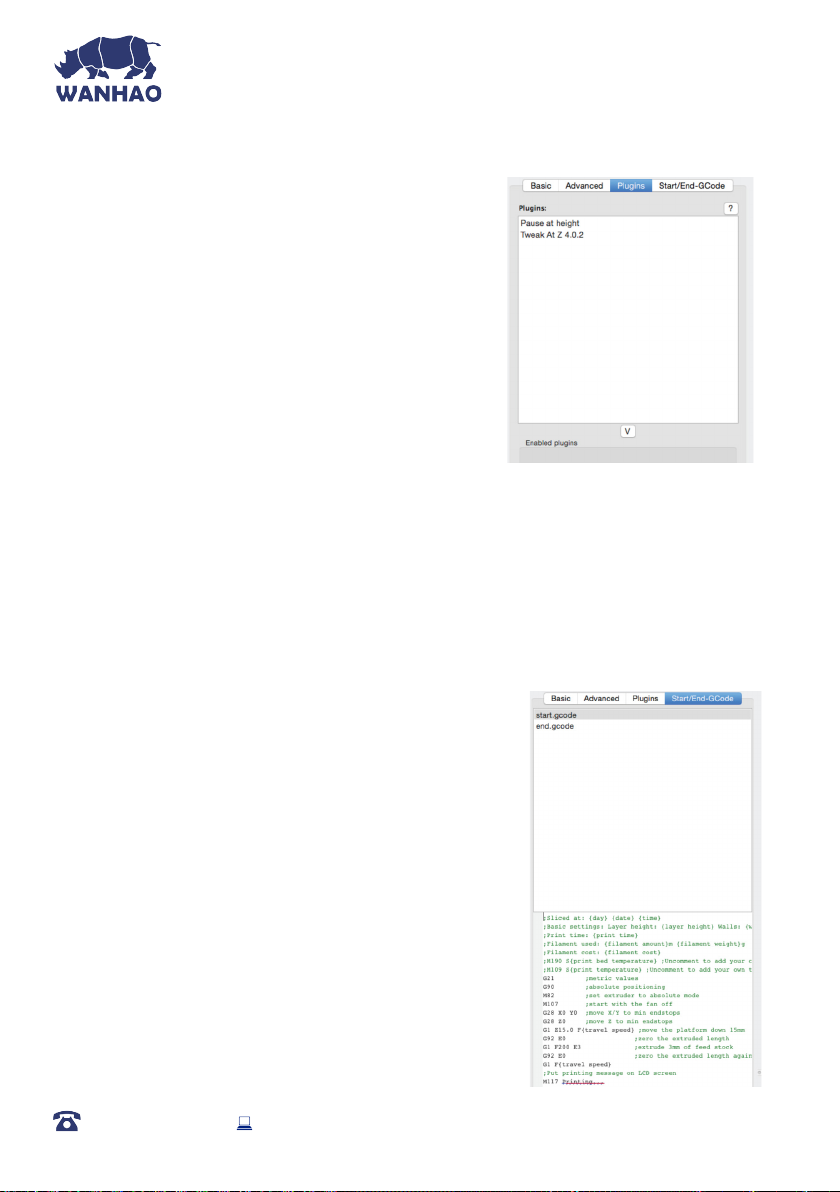
6.6.3 Plugins Tab
Plugins are custom settings which will alter your print at
specic points. The two that come pre-loaded with Cura
are Tweak at Z, and Pause at Height. More plugins and
information can be found here:
http://wiki.ultimaker.com/Category:CuraPlugin
To activate one of these highlight the desired plugin and
click the drop-down arrow directly below the Plugins box.
Tweak at Z
Make basic changes at specied Z heights. You can
determine the Z height or layer count at which you want to make a change. Then choose how
you would like to change your settings. You can alter temperatures, fan speeds, and print
speeds. Fine tuning these for specic STL les, can produce cleaner prints.
Pause at Z Height
Pause your print at a specied height. You can also specify where to move the print head
and how much lament to retract. This will prevent ‘blobs’ from accumulating on your print
while paused. This setting is most commonly used when switching colours of laments in the
middle of a print.
6.6.4 Start/End GCODE Tab
Custom Gcode allows for complex automatic printer
movements and operations. By adding custom Gcode into
the start or end of your le, you can alter how it prints. A
comprehensive list of Gcode commands can be found here:
http://reprap.org/wiki/G-code
We recommend new users to leave this as provided.
AFTER SALES SUPPORT
86-571-23290996
Model : Duplicator I3 V2
42
Page 43

Using Cura
6.6.5 Expert Settings
Expert settings will give you more specic options for your retraction, skirt, active cooling, inll,
support, brim, raft, and special settings. To gain access to this section you go to Expert > Open
Expert Settings or on your keyboard press Control + E.
Retraction
Retraction pulls lament out of your nozzle when it is not extruding to prevent your print head
from dripping on your object. This section is where you will control how your Extruder retracts its
lament.
Minimum Travel (mm)
This sets the minimum travel distance of your print head in order to retract. If your print
head is not moving this far during travel moves, it will not retract.
Enable Combing
This option prevents your print head from travelling over holes in the X/Y plane when
printing.
This will slightly increase print time, but will prevent strings from getting caught on the
holes during travel moves. We recommend keeping this setting on.
Minimal Extrusion before Retracting (mm)
This will control the distance at which retraction occurs if the printing movement exceeds
the minimum extrusion amount. This will prevent a retraction move, if your Extruder has not
put out Xmm of lament since its last retraction.
Z Hop When Retracting (mm)
This will raise your print head Xmm while retracting. This setting helps prevent ooze, and
strings from being deposited on your print.
AFTER SALES SUPPORT
86-571-23290996
Model : Duplicator I3 V2
43
Page 44

Using Cura
Skirt
Skirt creates a line around the outside of your object. This is most commonly used to prime the
Extruder. In order to prevent missed lament at the beginning of a print, we recommend you leave
this setting on.
Line Count
This will dene the number of loops the Skirt creates around the outside of your object.
Smaller models will require more loops to properly prime the Extruder.
Start Distance (mm)
This will dene the distance away from your model that the skirt will be created. If using as an
envelope to prevent drafts, it is recommended to be closer to your object.
Minimal Length (mm)
This will dene the minimum extruded line length for the skirt. This will over ride your line
count, producing as many lines as required to reach the minimal length.
Cool
This section will dene how your Extruder cooling fan will operate during the print. Your fan will
not start until it has reached 25% or higher for speed settings. If your print speeds are slowed down
due to minimal layer time, the fan will run between minimum and maximum speed based upon
how much the layer is slowed down.
Fan on at Full Height (mm)
The fan will not turn on for the rst layer. The fan will then be scaled between 0% and your
minimum fan speed based on layer height. It is especially helpful with high temperature
retaining laments such as PLA.
Fan Speed Min (%)
Once the Z height is reached for Fan on at Full Height setting, this will be the speed your fan
runs at.
Fan Speed Max (%)
This is the fastest speed at which your fan will ever run. When your print speed is slowed
down due to Minimal Layer Time settings, your fan will run between minimum and maximum
speed. The maximum fan speed is reached when your printer speed is slowed by 50% or
greater.
AFTER SALES SUPPORT
86-571-23290996
Model : Duplicator I3 V2
44
Page 45

Using Cura
Support
You dene how your support material is generated here. You must have a support type in the ‘Basic
Settings; in order for these support settings to have an effect.
Structure Type
You can choose between a ‘Grid’ or a ‘Line’ pattern for your support material. The grid will be
a checkerboard pattern in the X and Y direction. The line option will produce lines along the
Y-axis for support. The grid will provide stronger support than the line option, but will be
harder to remove.
Overhang Angle for Support (deg)
This will determine where support material is generated. In general you will be able to print
a model with 45 to 90 degree angles in relation to the Heated Print Bed without support. We
recommend leaving this setting at 45 degrees.
Fill Amount (%)
This will determine how dense your support material is printed, similar to Inll Percentage.
The higher percentage the better support, but it will be harder to remove the support
material and will use more lament.
Distance X/Y(mm)
This will determine how far away from your object in the X/Y plane that the support material
is being placed.
Distance Z (mm)
This will determine how far away your support material is from your object in the vertical
direction. A smaller number here is better for support, but makes it harder to remove.
Black Magic
This section allows you to transform your model into a hollow shell, a single layer thick
Spiralize the Outer Contour
This causes your Z-axis to be constantly moving upward as you are printing your single outer
wall shell. This results in no layer change lines, giving a much smoother surface. This setting is
typically only used for artistic objects as they will be fragile.
Only Follow Mesh Surface
This will cause your print to follow the outside of your model, building it completely hollow
with a single wall outer shell. The only difference between this and Spiralize, is that the Z-axis
moves regularly. That is, it prints a layer and then moves up to the next one.
AFTER SALES SUPPORT
86-571-23290996
Model : Duplicator I3 V2
45
Page 46

Using Cura
Brim
Brim circles the base of the print while making contact, helping adhere the print to the Heated
Print Bed. This is only one layer thick, and can be easily removed post-print. This section denes
how the brim is formed when brim is activated in ‘Basic Settings’.
Brim Line Amount
This will determine the distance the brim will cover around the outside of your object. The
more brim used, the better your part will adhere to the plate.
Raft
Raft is a platform built underneath your object, designed to help adhesion and prevent warping.
It will lay down support material, and then a platform on top of the supports. Your model will be
built on top of this platform. The bottom surface of your printed object will not be as clean or as
even when using this option. Raft is typically not recommended.
Extra Margin (mm)
This determines the distance around the outside of your object that the raft is created. This
can be helpful for ensuring no warping occurs in the lower layers.
Line Spacing (mm)
This will determine the spacing between support lines for the raft. A small spacing makes
the support structures closer together improving strength of the raft, but uses more
lament.
Base Thickness (mm)
This denes how thick your raft will be.
Base Line Width (mm)
This will dene how wide your support material is for the raft. This setting will determine
how well the surface layers of the raft print.
Interface Thickness (mm)
This will determine how thick the surface layers of the raft are. The surface layers are the
platform that is built upon the supports.
Interface Line Width (mm)
This will determine how wide the top layers of the platform will be. In general, you can keep
this set to your nozzle size, as surface quality of the removable raft is not important.
AFTER SALES SUPPORT
86-571-23290996
Model : Duplicator I3 V2
46
Page 47

Using Cura
Airgap
This will dene the distance between your raft and your print. A larger gap will make your
part easier to remove, but will make the bottom of your print look worse.
Surface Layers
This will determine the number of layers that create the ‘platform’ of your raft. If you have a
wide line spacing, you may want to increase this number to ensure a solid platform.
Fix Horrible
These are some of the more advanced and experimental options. They are designed to help repair
models with errors to make them suitable for 3D printing. However they may not always work.
Please be cautious when using these options as they can have unintended effects on your print
quality.
Combine Everything (Type-A)
This will attempt to x all external mesh errors, while keeping internal holes intact. This can
accidentally ll in intentional internal holes.
Combine Everything (Type-B)
This will ignore all internal holes of the model and only focus on the external holes. This is
helpful when only the outside nish of the model is important.
Keep Open Faces
This will ignore all manifold errors in the object. It can create issues generating the Gcode as
Cura does not know how to interpret the open holes. This option should only be used if you
are sure that the holes in the mesh are intended. In general, you should not use this option.
Extensive Stitching
This causes Cura to automatically add triangle mesh in an attempt to x manifold errors. This
algorithm will greatly increase Gcode generation time and may end up adding in
un-intended mesh. It is recommended that you repair your model through your CAD
program before attempting this option.
AFTER SALES SUPPORT
86-571-23290996
Model : Duplicator I3 V2
47
Page 48
Servicing
7. Servicing your 3D Printer
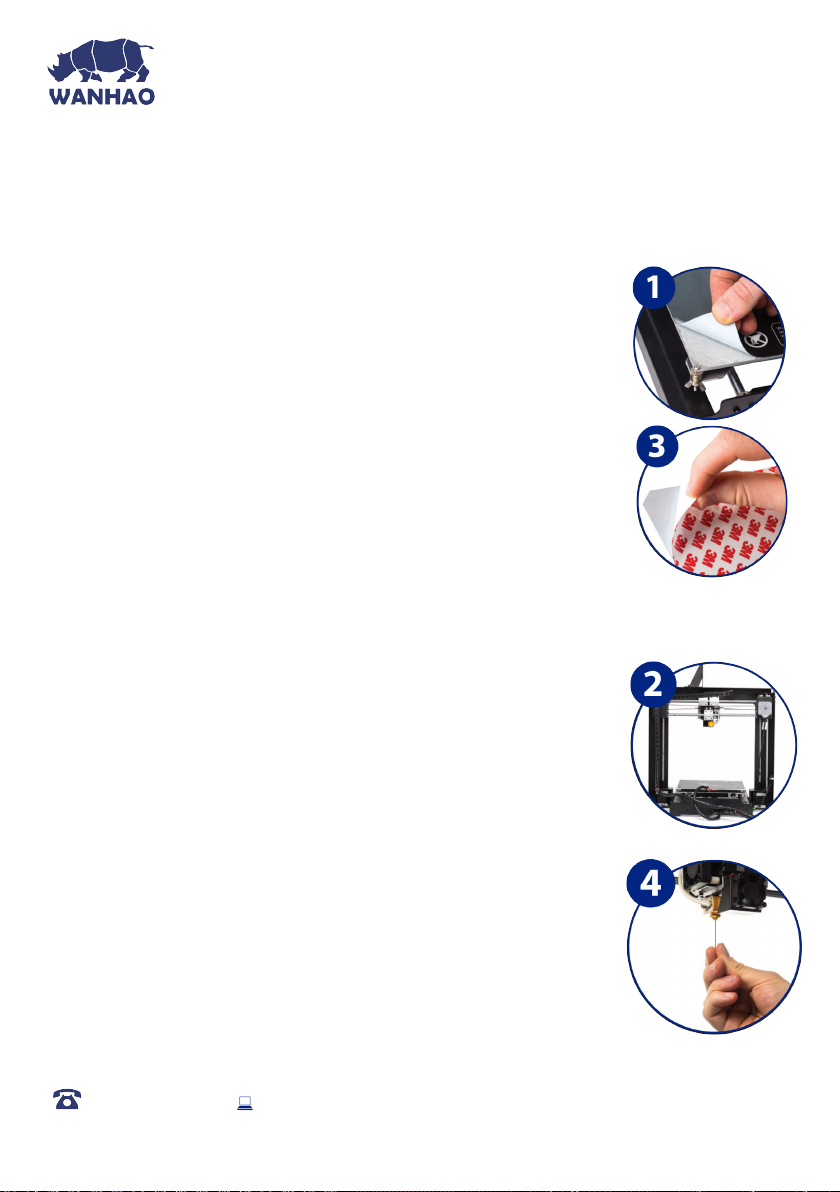
7.1 Replacing the Print Mat
The WANHAO 3D Printer includes 2 x Print Mats. Additional Print
Mats are available for purchase from id.aliexpress.com/store/120824
1. Remove the current Print Mat by slowly peeling from one corner
2. Using rubbing alcohol and a microber towel, carefully remove any
residual adhesive left on the Heated Print Bed
3. Peel the 3M backing from the new Print Mat
4. Gently place the new Print Mat onto the Heated Print Bed, making
sure to align with each edge. It is recommended to start at a corner
to ensure no bubbles become present
5. Use the Scraper to apply pressure on the new Print Mat, ensuring
strong adhesion. Keep the Scraper level as it can damage the Print
Mat
TIP: Warming the bed slightly may make removal easier. You can also use masking tape in lieu of
a Print Mat. Blue painters tape is recommended.
7.2 Nozzle Cleaning
If your Extruder nozzle becomes blocked, follow these steps to clean the
nozzle.
1. Remove the existing lament using steps from section 3.3
‘Removing Filament’
2. Raise the Extruder using Position > Z Pos. Fast, then rotating the
Dial clockwise
3. Heat the Extruder to 215°C
4. Using a clean 0.4mm drill bit, insert the drill bit into the nozzle by
hand, twisting while inserting
5. Remove the drill bit from the nozzle, twisting while removing
6. Repeat steps ‘4’ and ‘5’ three times, then follow the steps in section
3.2 ‘Inserting Filament’ to re-insert the lament into the nozzle
AFTER SALES SUPPORT
86-571-23290996
Model : Duplicator I3 V2
48
Page 49
Servicing
7.3 Routine Component Check
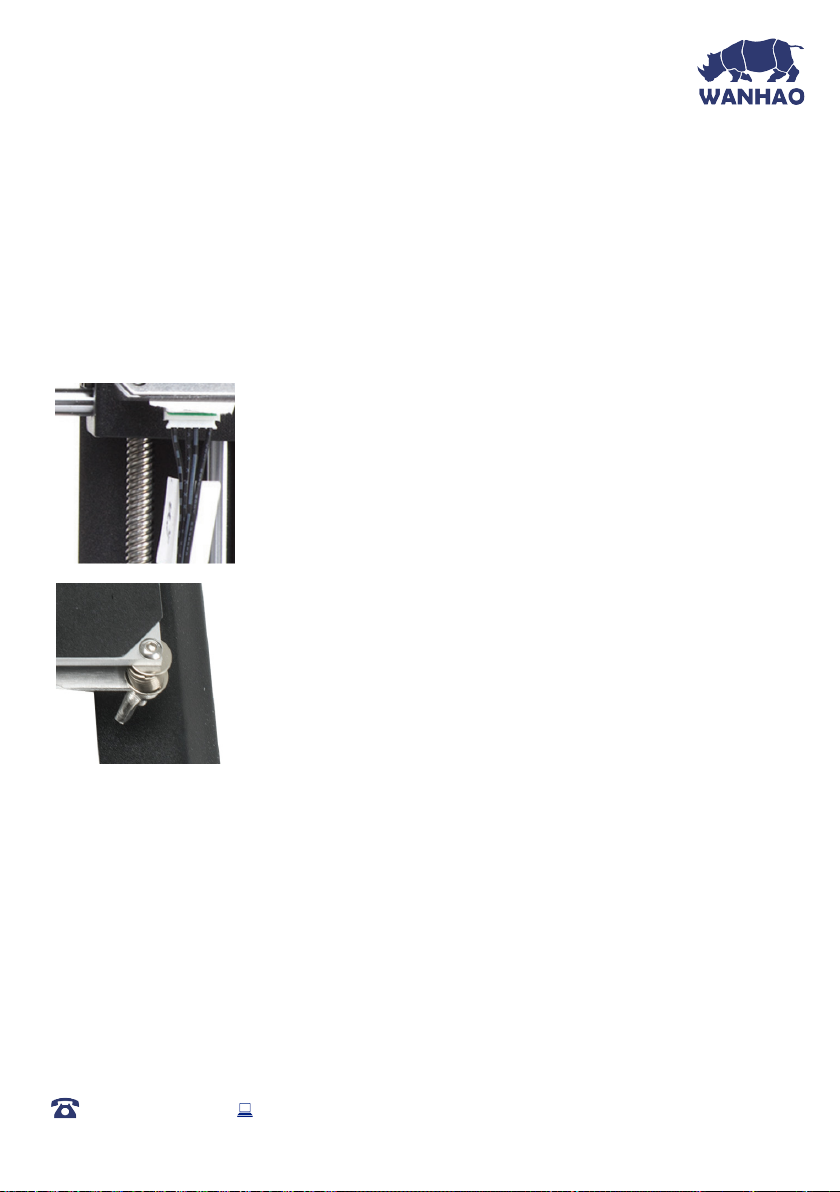
Motor Connectors
Loose motor connections could cause a 3D print to fail. It’s a good habit to routinely check for any
damage to the connectors or the black cables.
Axis Lubrication
Regular lubrication of the X and Y Axis rods is important for the longevity
and smooth running of your printer. The rods can be lubricated with oil or
grease. We recommend using bearing grease, and to apply generously to
both the X Axis and Y Axis rods.
Nuts and Bolts
Loose nuts and bolts could affect the geometry of the 3D Printer. Check
that all nuts and bolts remain rmly tightened. If required, re-tighten using
the hex wrench.
7.4 Storing
Always store your 3D Printer in a cool, dry location that is free from dust.
AFTER SALES SUPPORT
86-571-23290996
Model : Duplicator I3 V2
49
Page 50
Finishing
8. Finishing Techniques
8.1 Useful Tools/Equipment
• Safety Goggles
• Mask
• Long-nose Pliers
• Wire cutters
• Sandpaper (100,200,300,400,500,600 Grit)
• Medium, ne and extra ne sanding sponges
• Acrylic based primer spray paint
• Acrylic based spray paint (colour of your choice)
• Acrylic based varnish spray paint
NOTE: Different paint types are also compatible with PLA and ABS. Consult your local paint supplier
for the best compatibility for your intended purpose.
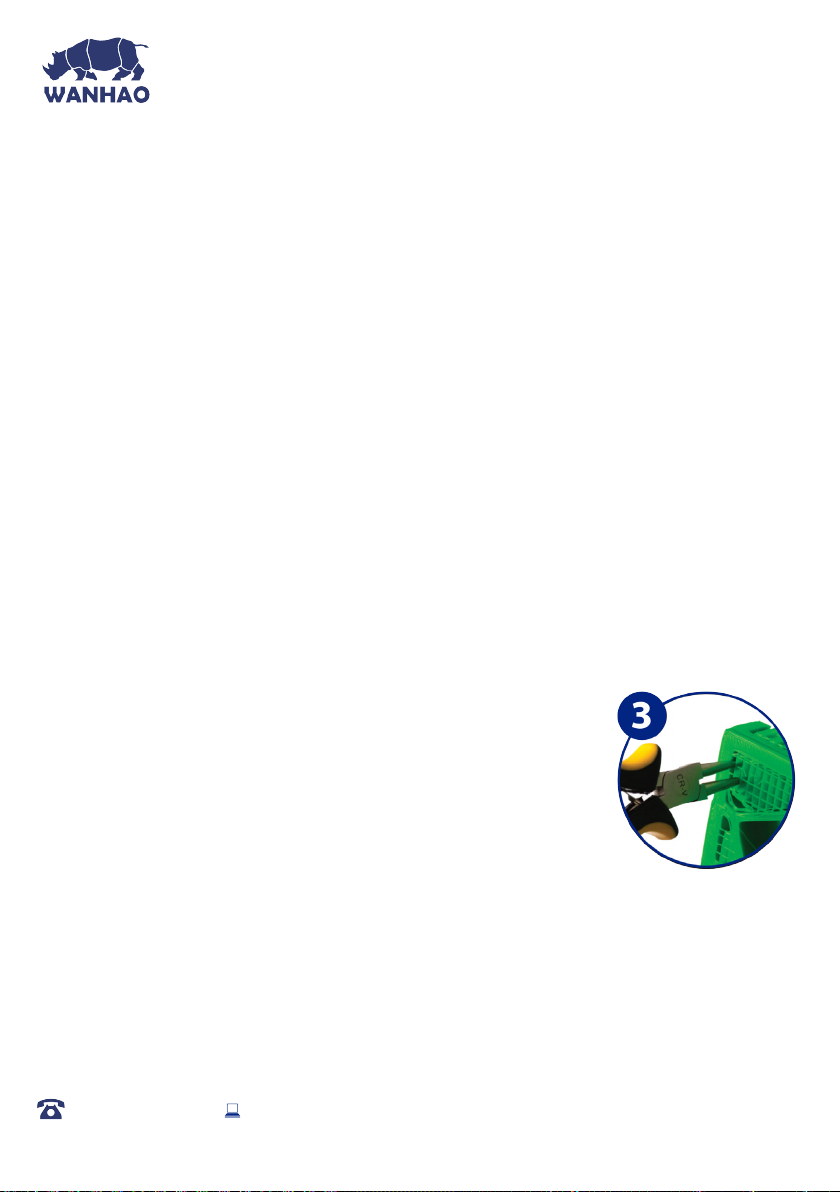
8.2 Removing Support Material
Even after support material is removed by hand, residual material will remain.
1. Ensure that safety goggles and a mask are worn for protection
2. Remove most of the support material by hand, taking care not to
damage the 3D object
3. Using the long-nose pliers, carefully grasp some of the remaining
material, then twist to remove. Repeat until no more material can be
removed.
4. Using the wire cutters, cut away any excess lament.
AFTER SALES SUPPORT
86-571-23290996
Model : Duplicator I3 V2
50
Page 51

Finishing
8.3 Sanding
Though Fused Filament Fabrication (FFF) is capable of producing high quality objects straight out
of the machine, the layer lines will be visible. Sanding will reduce these ‘step’ marks in the model.
1. Ensure that safety goggles and a mask are worn for protection
2. Starting with 100 grit sandpaper, carefully sand your 3D object using small, circular motions
NOTE: PLA is less resistant to high temperatures caused by sanding. Take your time sanding your
3D object to avoid damage.
3. Using the medium sanding sponge, sand difcult to reach areas of your 3D object
4. Gradually increase the sandpaper grid until the 3D print is smooth
TIP: Spraying a primer ller will also help to reduce the layer lines on the 3D Object. This can
then be sanded away and repeated, until the desired smoothness is achieved
8.5 Surface Coating
Finally, to make your models more presentable, follow these steps;
1. Ensure that safety goggles and a mask are worn for protection
2. Ensure that your 3D object is clean and free from dust
3. Spray your model using an acrylic based primer, following the directions of your primer
4. Allow appropriate time to dry before applying additional coats
5. Spray your model using an acrylic based paint of your colour. Allow appropriate time to dry
6. Spray your model using an acrylic based varnish, following the directions of your varnish.
Allow appropriate time to dry before applying additional coats.
NOTE: Different paint types are also compatible with PLA and ABS. Consult your local paint supplier
for the best compatibility for your intended purpose.
Congratulations! Your 3D object now looks like a professionally nished product!
AFTER SALES SUPPORT
86-571-23290996
Model : Duplicator I3 V2
51
Page 52

Troubleshooting
9. Troubleshooting
If having any troubles when using the 3D printer, please refer to the troubleshooting guide below,
or call customer support on 86-571-23290996
You can also visit Please visit www.wanhao3dprinter.com/Video/i3 video/wanhao i3 unboxing
for support videos and advanced tutorials.
9.1 Printing Problems
Clicking sound from one of the stepper motors
One of your stepper motors may not be connected properly. Check each connection and then
inspect the cable routing for any faults
File not printing
Remove the Micro SD Card and insert into your Computer. Open the GCODE le using a text editor
(eg. Notepad), and inspect if GCODE is readable or not. If le consists of multiple ‘ÿÿÿÿ’ symbol,
then le has been corrupted. Try reformatting your Micro SD Card and reloading the GCODE le.
NOTE: Reformatting will delete all les on your MicroSD card
Not extruding when starting to print
Ensure that the nozzle temperature has been set to match your material
Not sticking to the bed
• Ensure that the bed is clean and free from dust
• Check that the bed is level and set to a distance of approximately 0.1mm
• If there are defects / deep scratches in the printing mat, it may need to be changed. Change
the mat or use blue painters masking tape
• Add a brim or raft to your le
• Check that the bed temperature matches your material
• Ensure nozzle to bed gap is not bigger than 0.1mm. Material will solidify if gap is large
Models Warping/Curling
• Check that the bed temperature matches your material
• Check the inll % of your GCODE. The higher the inll, the more likely to warp
• Add a brim or raft to your le
AFTER SALES SUPPORT
86-571-23290996
Model : Duplicator I3 V2
52
Page 53

Troubleshooting
Model appears very ‘stringy’
• Ensure that the lament diameter is set to match your lament spool (1.75mm), then try
creating a new GCODE before printing again
• Check you are using the correct temperature for the lament used
Print stopped halfway
• Check that the GCODE le is complete and not corrupt
• Check the original model le
The motor does not stop at the end of axis
Check that the stop micro switches are aligned with the motor mount and registering.
The print head/bed does not move
• Check the part can be moved by hand when stepper motor is disabled. Clear anything that is
blocking the path
• Check that the motor is turning (using position menu). If motor turns but belt does not, you will
need to tighten the gear motor gear nut. Please visit www.wanhao3dprinter.com/Video/
i3 video/wanhao i3 unboxing
10.2 Connectivity Problems
My 3D Printer isn’t turning on
Check that you have correctly inserted the power cable into the rear of the Control Box, the power
cord is plugged into the mains outlet and that the Control Box power switch is on.
Micro SD Card not shown
Navigate to SD Card, select Unmount SD Card, then select Mount SD Card. Your Micro SD card
should now appear in the menu.
AFTER SALES SUPPORT
86-571-23290996
Model : Duplicator I3 V2
53
Page 54

Troubleshooting
10.3 Other Problems
Filament stuck when removing
Please visit www.wanhao3dprinter.com/Video/i3 video/wanhao i3 unboxing for a video on
how to clear the nozzle with stuck lament.
Where can I buy more lament?
If you require more lament, visit our online store, id.aliexpress.com/store/120824V to purchase
various colours and types.
What brand of lament should I buy?
We recommend using only WANHAO branded lament. Lower quality generic laments can
damage your 3D Printer and potentially void your warranty.
What types of lament can my 3D Printer Print?
The WANHAO 3D Printer accepts various types of laments including PLA, ABS, PVA, HIPS
and specialty laments such as wood, exible, luminous and conductive. For our full range of
laments visit id.aliexpress.com/store/120824
10. Useful Terms
ABS Filament
Commonly used plastic lament with good strength and industrial properties
Display
Provides the main interface for operating the 3D Printer
Firmware
Software that is programmed into the electronic board
GCODE
Code that is produced using the slicing process. Describes the movements and temperature
settings of your 3D printer
AFTER SALES SUPPORT
86-571-23290996
Model : Duplicator I3 V2
54
Page 55

Troubleshooting
Heated Print Bed
Surface that your 3D objects are printed onto
Nozzle
Opening at the bottom of the print head where lament is pushed through
Micro SD Card
Secure Digital memory card. This is where your GCODE les can be stored and accessed by the 3D
Printer
PLA Filament
Commonly used plastic lament with low environmental impact
Slicing
Process that turns a 3D Design into a code that can be used by 3D Printers
Spool
Filaments of PLA and ABS are wrapped, creating a spool
Stepper Motor
DC motors that move in discrete steps. This allows for precise positioning and/or speed control
.stl
A common le format for 3D Designs/Models
USB Cable
This cable allows communication between the WANHAO 3D Printer and a computer, using
the USB port of the computer
AFTER SALES SUPPORT
86-571-23290996
Model : Duplicator I3 V2
55
Page 56
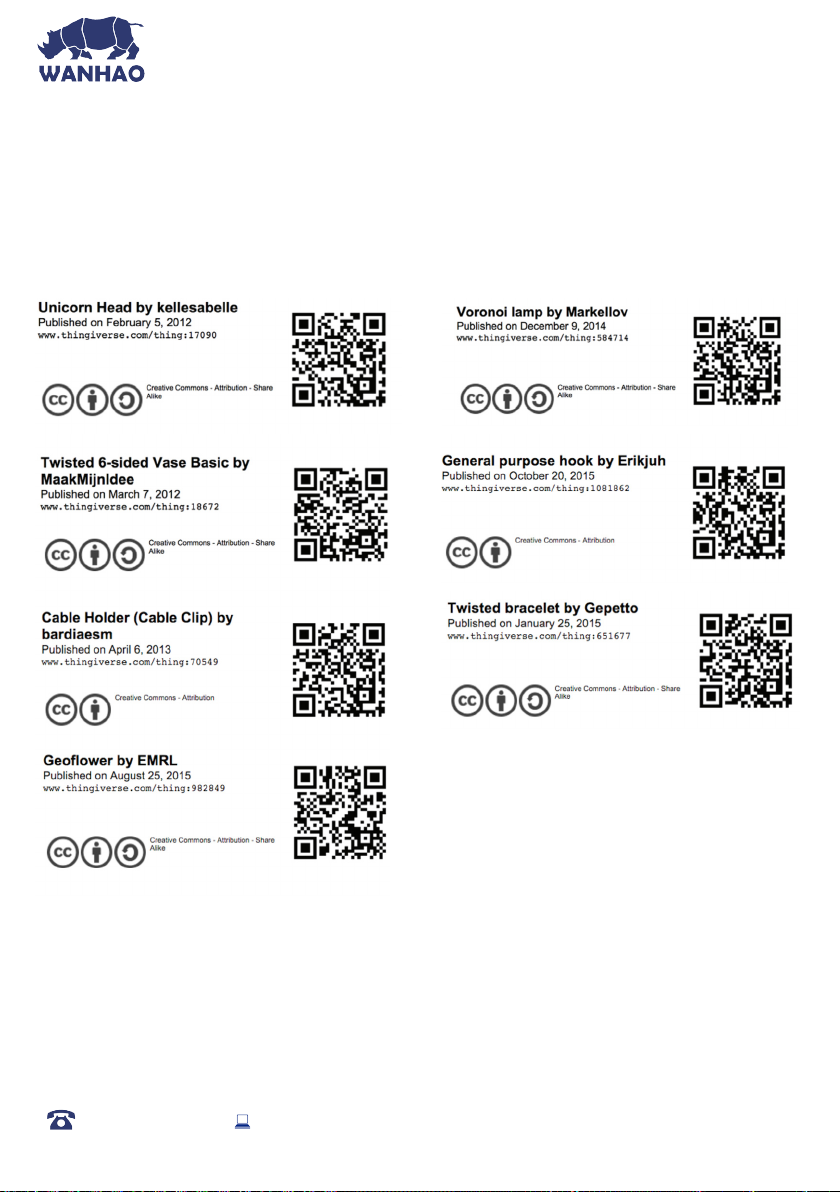
Appendix
References
Some of the 3D Models used in this manual and other included materials were sourced from the
below:
AFTER SALES SUPPORT
86-571-23290996
Model : Duplicator I3 V2
56
Page 57

Page 58

3D Printer
Repair and Refurbished Goods
or Parts Notice
Unfortunately, from time to time, faulty products are manufactured which need to be
returned to the Supplier for repair.
Please be aware that if your product is capable of retaining user-generated data (such as les
stored on a computer hard drive, telephone numbers stored on a mobile telephone, songs
stored on a portable media player, games saved on a games console or les stored on a USB
memory stick) during the process of repair, some or all of your stored data may be lost.
We recommend you save this data elsewhere prior to sending the product for repair.
You should also be aware that rather than repairing goods, we may replace them with
refurbished goods of the same type or use refurbished parts in the repair process.
Please be assured though, refurbished parts or replacements are only used where they
meet WANHAO’s stringent quality specications.
If at any time you feel your repair is being handled unsatisfactorily, you may escalate your
complaint. Please telephone us on 86-571-23290996 or write to us at:
WANHAO Precision Casting Co.,Ltd
77, RENMING ROAD, JINHUA, CHINA
WANHAO Help Desk 86-571-23290996
(Operating Hours: Mon - Sat; 8:00am - 5:00pm)
[email protected]
www.wanhao3dprinter.com
AFTER SALES SUPPORT
86-571-23290996
MODEL: Duplicator I3 V2 PRODUCT CODE: 0105002
Page 59

Page 60

 Loading...