

Page 1
you can
MARK I
WANHAO
Duplicator
8
USER MANUAL
High Resolution Resin 3D Printer
Page 2

Page 3

Important
Getting the most out of your 3D Printer:
Read the manual carefully
It will help you get set up with ease
Visit www.wanhao3dprinter.com
We’ve got additional support videos and guides
Join Wanhao Technical Forum for online support
Google Forum
https://groups.google.com/forum/#!forum/wanhao-printer-3d
Email support@wanhao3dprinter.com
We’re always happy to help
Warranty Note
If you experience any issues with this product, or it’s
performance is not what you had expected, please contact
us at WANHAO before returning the item to the store.
It is likely that we can resolve any problems for you via
phone or email.
We can be reached through your local distributor. Or on
Phone: +86-571-23290996(Mon-Sat; 8:30am-5:00pm)
Email: support@wanhao3dprinter.com
Web: www.wanhao3dprinter.com
3
Page 4
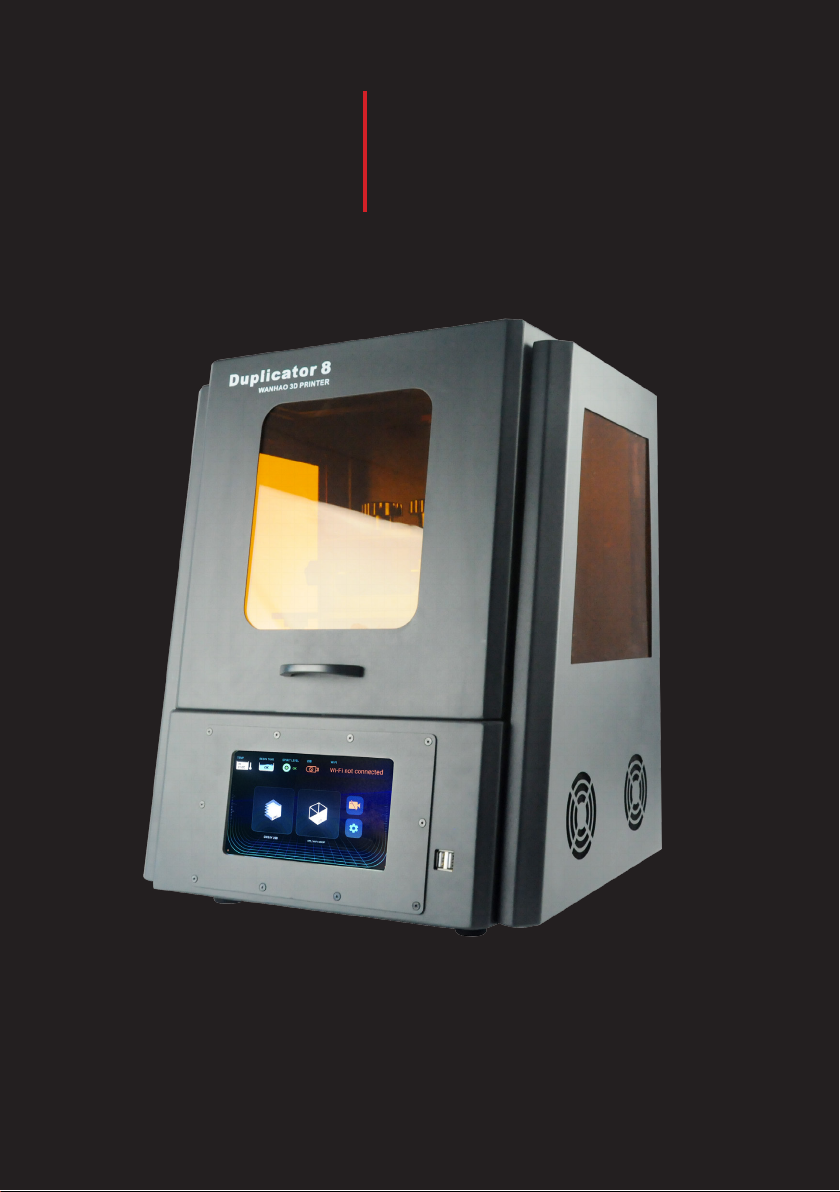
3D Printer
1
Warranty Details
The product is guaranteed to be free from defects in workmanship and mother board for a
period of 12 months from the date of purchase.The LCD display is consumable parts with Minimal
working hours 1200 hours. You may need to purchase and replace it after 1200 hours. Printing
with materials other than WANHAO resin which are different from those recommended on the
website www.wanhao3dprinter.com,may cause result in damage the printer or bad printing
quality. Defects that occur within this warranty period, under normal use and care, will be repaired,
replaced or refunded at our discretion. The benefits conferred by this warranty are in addition
to all rights and remedies in respect of the product that the consumer has under the China laws.
In case you purchase from WANHAO distributor, your warranty shall be covered by distributor’s
Warranty and honored by WANHAO distributor too. Our goods come with guarantees that cannot
be excluded under the Chinese Consumer Law. You are entitled to a replacement or refund for a
major failure and for compensation for any other reasonably foreseeable loss or damage. You are
also entitled to have the goods repaired or replaced if the goods fail to be of acceptable quality
and the failure does not amount to a major failure.
AFTER SALES SUPPORT
86-571-23290996
4
support@wanhao3dprinter.com
Model : Duplicator 8 MARK I
Page 5
Technical Specifcations
Technical Specications
Machine Type DLP (Digital Light Processing) 3D Printer
Extruder System 405 nm UV lamp, DLP
Enclosure Type Tilt Hood with UV safe glass
Max printable area 192*120*180mm
Software Internal Wanhao Slicer , all STL le
UV Type 405nm UV light
Material supported 405nm Resin
Max printing speed Up to 30mm/hour
Case Material Steel Case Construction
Projection Size 8.9 inch LCD
Accuracy X 0.075mm
Y 0.075mm
Z 0.035~0.1mm
LCD display Front
Net Weight(kg) 22kg
Gross Weight(kg) 28kg
Packing size(cm) 470*460*575mm
Layer Thickness 35-100 micron
Certifcation FCC,CE, CB
Plateform Holder 4 bolt adjusting system
Rail locking system Steel bolt locking frame
Plateform Aluminum building plate
Price Range Varied for different country
Power supply unit Inside 110 AND 250V(Auto Switch), 50/60Hz,
4.0A (input), and takes standard IEC cable
Typical application • Prototyping, Modeling, Jewelry, Dentistry,
Gaming and Art Applications.
• Great for Professional use or DIY hobbyists.
AFTER SALES SUPPORT
86-571-23290996
support@wanhao3dprinter.com
Model : Duplicator 8
5
Page 6
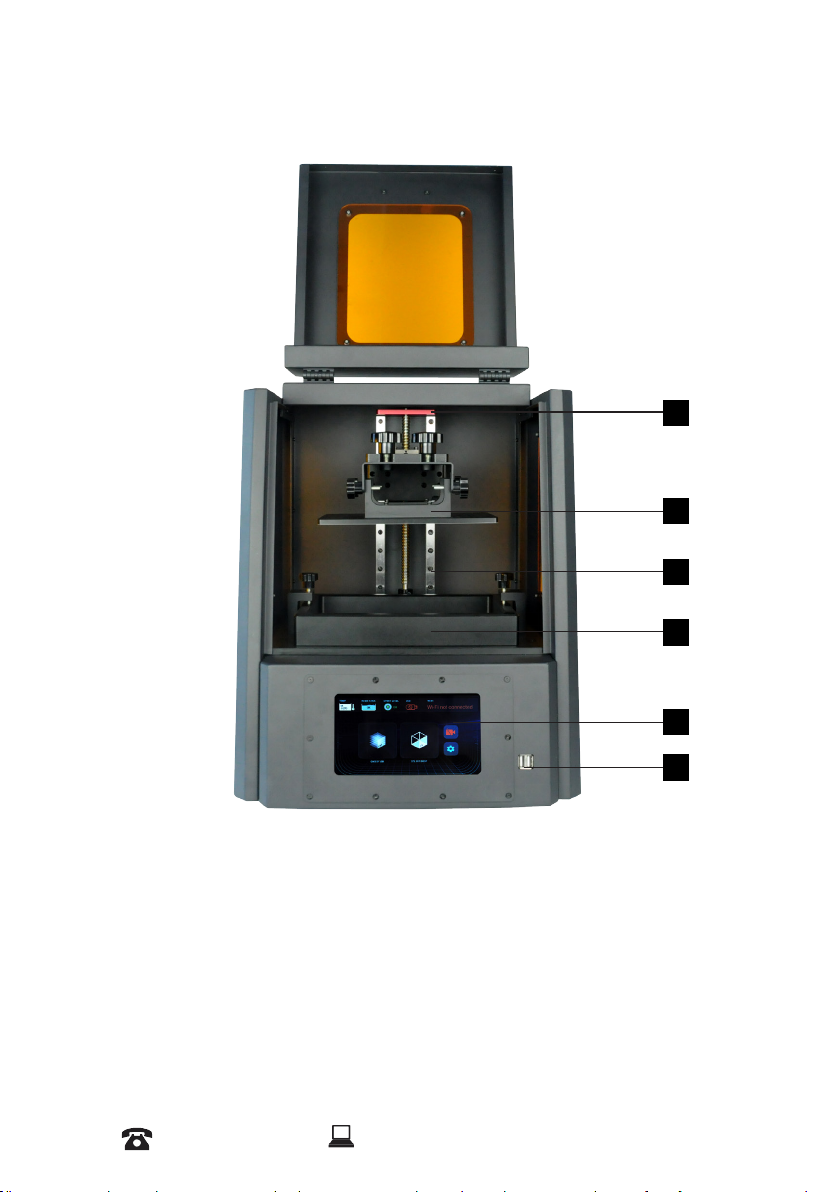
Product Overview
1
2
3
4
5
6
Red Anti Wobble Cover
1.
Aluminum Super Flat Build Plate
2.
3. Z Axis Rail
AFTER SALES SUPPORT
6
86-571-23290996
support@wanhao3dprinter.com
Super Flat, Re-usable Vat
4.
5. Tuch Screen
6. USB Slot
Model : Duplicator 8 MARK I
Page 7
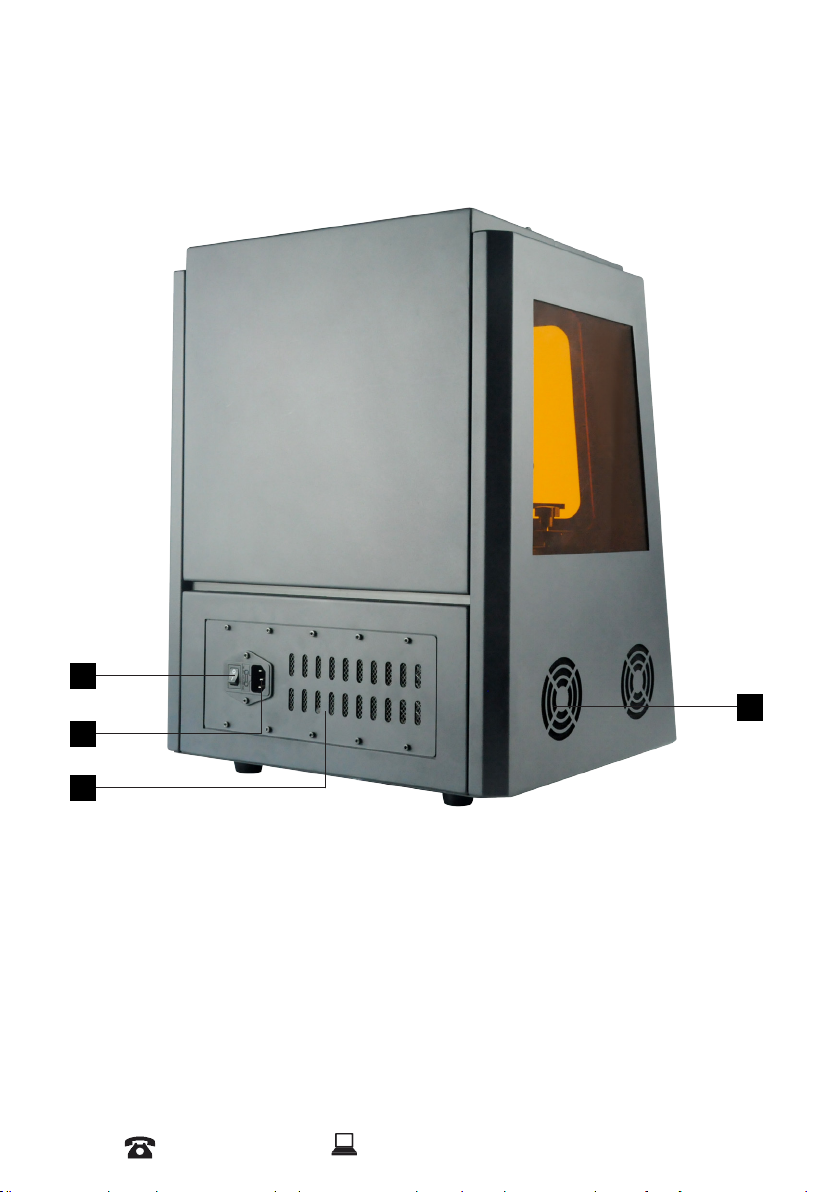
Product Overview
7
8
9
7. Power Switch
8.
AFTER SALES SUPPORT
86-571-23290996
Plug Socket
support@wanhao3dprinter.com
9. Vent Holes
10. Triple Cooling Fan
Model : Duplicator 8 MARK I
10
7
Page 8
A
Before you get started, please read these important safety instructions.
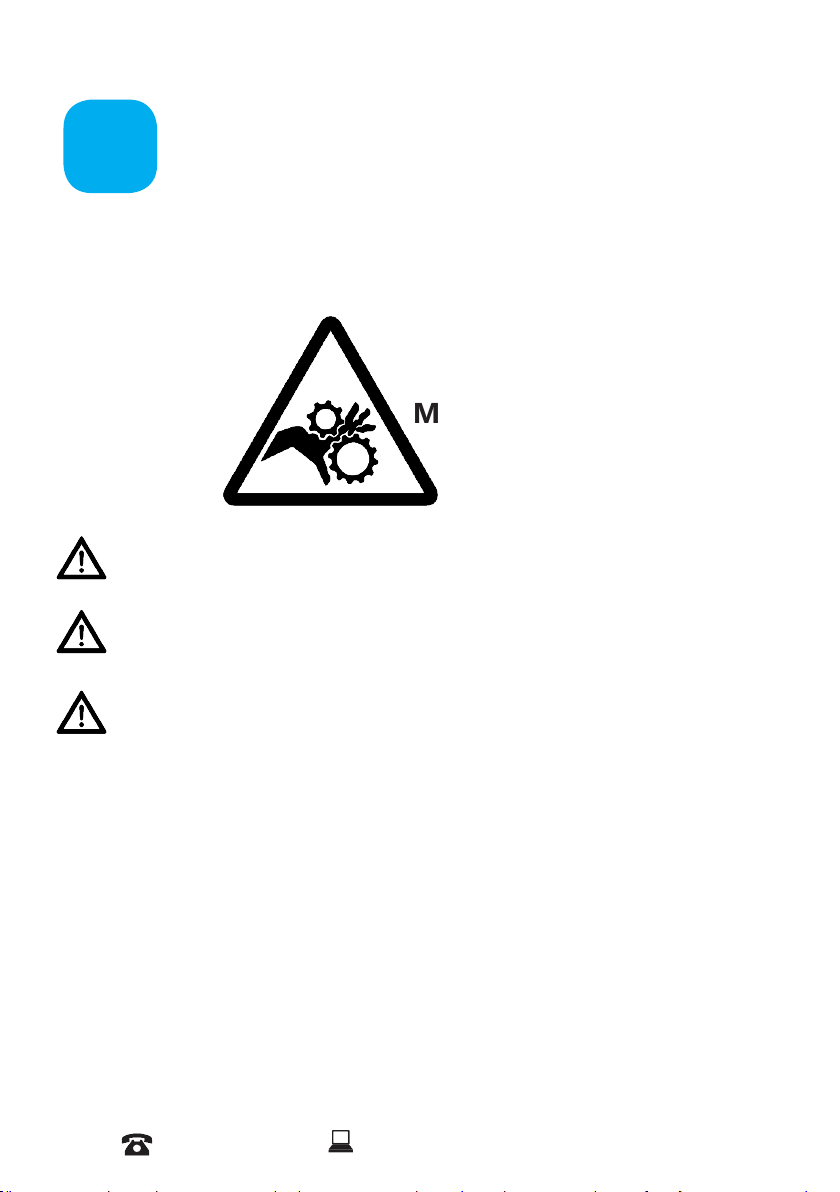
CAUTION : The WANHAO 3D Printer includes moving parts that can cause injury. Never reach
inside of the WANHAO 3D Printer while it is in operation, and allow time for the printer to cool
down after operation.
Safety Instructions
MOVING PARTS
Do not leave the WANHAO 3D Printer unattended during operation
Always wear the glove while handling resin or printing object.
Always take care when using the Scraper. Never direct the Scraper towards your ngers.
• The printer must not be exposed to water or rain, or damage will occur.
• The printer is designed to be used with ambient temperature ranging 15°C - 30°C, and humidity
ranging 20% - 50%. Operating outside these limits may result in low quality models.
• In case of emergency, turn off the 3D printer at the power outlet.
• It is recommended that you use eye protection when cleaning/sanding printed models to avoid
small particles contacting eyes.
AFTER SALES SUPPORT
8
86-571-23290996
support@wanhao3dprinter.com
Model : Duplicator 8 MARK I
Page 9

B
You have just purchased a new type of 3D printer using Direct UV-light Printing (DUP)
technology. This is a newly applied-for method of LCD image creation allow controlled UV
light get through the LCD screen which hardens liquid with the light from an UV light source.
This revolutionary system is a new way of printing that uses normal UV light as the energy
providing source to initiate the free radical polymerisation necessary to change the liquid
imagepac resin into your hardened object.
Congratulations
The principle behind your printer
There are two surprising advantages of this new DUP technology:
i) We can use high resolution low cost LCD screens that are widely available as monitors,
tablets, mobile phone and televisions providing phenomenal value for money, which we
pass directly onto you.
ii) The energy used by Duplicator 8 MARK I printers is again an order of magnitude lower
than used in comparable systems. This is good for your energy bills and the ecology, but
there is a huge performance advantage in that there is no unnecessary energy created. All
of the available photons strike photoinitiators and hand over their energy. In comparable
Digital Light Projector and laser systems there is a lot of excess energy which can lead to
over-cure.
Safety Information
Read the instructions carefully. Keep this document for future reference. Follow all warnings
and instructions marked on the product.
Observe the following guidelines when connecting and disconnecting power cord to the
printer.
- Insert the Power cable cord into the socket at back of printer.
- Turn off the printer before Unplug the power cord.
- The printer cooling fan is suppose to run when you tun on the printer.
- Operate on a table or at, stable surface, ensuring that the machine cannot fall
and is level.
- Do not operate outdoors.
- Do not allow resin or any liquids to get inside the chassis, wipe up any
liquid spills immediately.
- Store the printer in its original packaging when not in use.
- Plug off the cable cord when not used for a long period of time.
AFTER SALES SUPPORT
86-571-23290996
support@wanhao3dprinter.com
Model : Duplicator 8 MARK I
9
Page 10

Electrical power
C
This 3D printer is connected to the electrical network with an INPUT of 110 or 240 VAC,
50/60 Hz, and has an operational voltage of 12 V.
- Do not allow anything to rest on the power cord. Do not locate this product where
people will walk on the cord.
- If an extension cord is used with this product, make sure that the total ampere rating
of the equipment plugged into the extension cord does not exceed the extension
cord ampere rating. Also, make sure that the total rating of all products plugged
into the wall outlet does not exceed the fuse rating.
- Do not overload a power outlet, strip or receptacle by plugging in too many devices.
- Use the product only with the supplied power supply cord set. If you need to
replace the power cord set, make sure that the new power cord meets the
following requirements: detachable type, UL listed/CSA certied, VDE approved
or its equivalent, 4.5 meters (15 feet) maximum
- In case of malfunction disconnect the printer immediately from network.
- Do not attempt to x this product by yourself, as opening or removing covers may
expose you to dangerous voltage points or other risks. Refer all reparation to
qualied service personnel. For contact the technical service please send an email
to your national supplier or www.wanhao3dprintr.com
Unplug this product from the wall outlet and refer servicing to qualied service personnel
when:
- The power cord or plug is damaged, cut or frayed.
- Liquid was spilled into the product.
- The product was exposed to rain or water.
- The product has been dropped or the case has been damaged.
- The product exhibits a distinct change in performance, indicating a malfunction.
- The product does not operate normally after following the operating instructions.
- Keep the printer out of the reach of small children.
Disposal instructions
Do not throw this electronic device into the waste when discarding. To minimize pollution and
ensure utmost protection of the global environment, please recycle or return to WANHAO for
recycling.
AFTER SALES SUPPORT
10
86-571-23290996
support@wanhao3dprinter.com
Model : Duplicator 8 MARK I
Page 11

D
Useful advice
Have supervision when used by a minor.
The resin is an irritant to skin and eyes. Always wear gloves when coming into contact with
the liquid resin.
The printer should be operated on a stable and level surface, preferably away from direct
ambient light and with sufcient space to be able to open doors
The tool kit contains
- D8 ash disk 16GB x1
- Dongle x1
- 2.0mm Allen key x1
- 2.5mm Allen key x1
- Funnel x1
- Scarper x1
- Bolt x2
- Power cord x1
- D8- disposable medical gloves (a set of 2) x2
Note: 500ml resin ( for free ) will be shipped by DHL.
Recommended items
- Gloves
- Paper towels
- industrial alcohol
- Soft brush or sponge to clean the object
- Plastic container to rinse the resin
Minimum computer requirements
- Dual Core processor or above.
- Windows or Linux OS
- Software is Compatible with Mac.
- 4 GB RAM memory or above.
AFTER SALES SUPPORT
86-571-23290996
support@wanhao3dprinter.com
Model : Duplicator 8 MARK I
11
Page 12

E
How to install D8
Procedure
1.0
Download the Chitu software from the link below based on your
PC System.
https://www.chitubox.com/download.html?fbclid=IwAR3Jn2D91b42PjfRIIKMezmtvTTCIW
u7ne88i_KXEofp7ryCGL6Z0M7FT9Y
Follow up with steps
and Install the software.
2.1
Click on Setting and choose D8 printer and click on OK. D8 printer Displays and
settings are pre congured. Based on the model and your preferences you can modify
setting in these menus.
2.2
Load a model on the platform.
AFTER SALES SUPPORT
12
86-571-23290996
support@wanhao3dprinter.com
Model : Duplicator 8 MARK I
Page 13

2.3
In this bar you can add supports automatically and manually to your model.
3.1
After you ensure the setting click on Slice.
3.2
In the Slicing process you can see the printing time and other information about the
model. You can also slide the slider to up and down and see the layers of the model you
are going to print.
Click on Export and save the le as a Zip le.
Slicer starts to write
and save the le.
AFTER SALES SUPPORT
86-571-23290996
support@wanhao3dprinter.com
Model : Duplicator 8 MARK I
13
Page 14

4.1
Printing by USB
4.1.1
After slicing process copy the sliced model into the USB memory that comes with
printer or any other USB memory that your prefer to place the le in.
4.1.2
In the Home Screen press on CWS BY USB, Choose the Sliced le press on Print
Now, Printer starts to load the model and lower the building platform and the printing
process begins.
4.2
Printing by WIFI
4.2.1
Insert the Dongle
14
AFTER SALES SUPPORT
86-571-23290996
support@wanhao3dprinter.com
Model : Duplicator 8 MARK I
Page 15

4.2.2
Go to setting and choose WiFi
4.2.3
Click on the available WiFi and enter your password.
4.2.4
After success connection, input the IP address given by
printer in your PC web browser and connect to D8.
4.2.5
Upload the File
4.2.6
Press on Print Now
AFTER SALES SUPPORT
86-571-23290996
support@wanhao3dprinter.com
Model : Duplicator 8 MARK I
15
Page 16

PREPARE DUPLICATOR 8 FOR PRINTING
5.0
Preparing Printer
5.1
Plug the power cord and turn on the printer, Printer starts to
boot up. Wait until you access to Home Screen.
5.2
Slid the vat smoothly on the LCD screen and align the spots
on the Vat with two knobs on the left and right.
16
5.3
Tighten the knobs on the both side, Make sure tight them
enough and don’t put too much Pressure.
AFTER SALES SUPPORT
86-571-23290996
support@wanhao3dprinter.com
Model : Duplicator 8 MARK I
Page 17

6.0
Mounting printing platform
6.1
Mount the printing platform on the holding plate and tighten
two knobs on top of it, Make sure is tight enough that the printing
platform does not move or shake.
6.2
Loosen four knobs on the printing on the right and
the left side of the platform.
AFTER SALES SUPPORT
86-571-23290996
support@wanhao3dprinter.com
Model : Duplicator 8 MARK I
17
Page 18

6.3
On Home Screen Press on Setting> Z Height >Reset.
Building platform starts to lower and home positioning.
6.4
After the platform homed and reached into the vat, with little
bit of press tighten the four knobs in front and the back of printing
plate.
18
AFTER SALES SUPPORT
86-571-23290996
support@wanhao3dprinter.com
Model : Duplicator 8 MARK I
Page 19

7.0
Pouring resin
7.1
In order to pour the resin into vat your need to lift the printing
platform. Press on upper icon for few times and give a good
distance between vat and printing plate. Shake the bottle continuously
before open it then pour the resin inside the vat as shown in the pictures
below.
AFTER SALES SUPPORT
86-571-23290996
support@wanhao3dprinter.com
Model : Duplicator 8 MARK I
19
Page 20

Cleaning the machine
F
and your printed objects
These steps will reduce any resin spillage and keep your machine clean.
1. Move the platform up enough so the base of your object is clear of the vat.
Remove the hood on the print platform. Tilt the platform backwards in
order for the excess resin to drip back into the vat.
2. With absorbent paper under it, remove the platform completely and set it down
on a surface that will not be affected by resin. Place the hood back on immediately
to protect the resin in the vat from light.
3. Remove any excess polymer with paper rst. Place the platform to a washing-up
bowl and remove the objects by sliding the scraper in at their base. Wash off any
liquid polymer by alcohol.You can gently clean it with a soft brush or sponge,
taking care not to damage it, it will not achieve full hardness until after post
exposing in light. If you have an ultrasonic cleaner this will clean it without the
possibility of damaging it.
4. Check it is thoroughly clean then place it in a container for 10-20 minutes in an area
with bright sunlight. You can use light from a UV lamp. When it has been
completely post exposed, it will be stronger and have a dry surface. You will notice
that it darkens in colour as it is exposed to light. Dry it and check that it is dry, if
not repeat.
5. Clean the build platform with industrial alcohol , chip off any cured resin and
dry it before inserting it back into the printer.
6. You should empty the vat and clean it every time in case you have any solid
pieces on the bottom, as these would prevent the platform from homing
correctly. Loosen the Z brackets and remove the vat from the printer, pour the resin
back into the bottle through a strainer. Place the vat on a at surface and wipe the
base of the vat with absorbent paper. Make sure it is clean and not damaged. If it
is not at, clean and tight like a drum, remove the lm and replace it with a new piece.
7. If you have a leak on the screen it is easy to remove the hardened resin
without damaging the screen by shipping it off with a blunt non-serrated knife.
AFTER SALES SUPPORT
86-571-23290996
support@wanhao3dprinter.com
Model : Duplicator 8 MARK I
21
Page 21

Detailed Chitu
G
workshop software instructions
System Compatibility
Chitu is native to the Windows Operation System and Mac Operation System.
Main screen
Click to open les in one of the following formats: .STL.OBJ, Zip le
Click to save the current object as a .ZIP le. The .STL format allows
you to prepare a scene to be printed repeatedly in the future, together with
supports and positioning.
These four buttons Left, Front,Top and Original.Clicking these allow you to
view the 3D objects within their boundary box. You can add supports in this
function.
22
Clicking this button accesses the “Slice” screen. You can see the individual
slices that have been generated as well as the Zip.
In Settings you can congure the slicing and printing proles
In this bar you can add supports automatically and manually to you model.
AFTER SALES SUPPORT
86-571-23290996
support@wanhao3dprinter.com
Model : Duplicator 8 MARK I
Page 22

1. Loading a Model
2. Scene View
Click to open les in one
of the following formats:
STL,OBJ, Zip le
Selecting
You can select the model by
clicking on the model or select it
from the File List.
AFTER SALES SUPPORT
86-571-23290996
support@wanhao3dprinter.com
Removing a Model
You can remove all models by
marking the Select All box and
clicking on the Trash Bin icon.
Model : Duplicator 8 MARK I
23
Page 23

Cloning a model
You can click load current model.The cloned object will appear in the scene view.
3. Tools Bar
In tool bars you can Move, Rotate, Scale and Mirror the Object.
The Move function allows you to move objects on the build platform along the
x:y:z axis by the distance entered.
From left to right, the other tools are:
* The ‘Put on the plate’ button will position the bottom of the model to rest on
the bottom of the build platform.
* The ‘Center’ button will center the model at (0,0,0).
Auto-Arrange will automatically lay out all models to t on the build platform.
Any model that does not t within the build platform will be moved outside the
build area.
* The ‘Resert’ button will put the model in the position where you set(X,Y,Z)
AFTER SALES SUPPORT
24
86-571-23290996
support@wanhao3dprinter.com
Model : Duplicator 8 MARK I
Page 24

4. Scaling objects
5. Rotating Objects
6. View Options
A model can be scaled (reduced or
increased) by selecting it, and using
the ‘Scale’ view to enter in a new
scaler value. Press the tick button to
re-scale your object.
A model can be scaled (reduced or
increased) by selecting it, and using
the ‘Scale’ view to enter in a new
scaler value. Press the tick button to
re-scale your object.
This will allow you to see through
the objects in the scene to see the
geometry Show Slice Preview
on Scene.
7. View Options
AFTER SALES SUPPORT
86-571-23290996
support@wanhao3dprinter.com
This will allow you to see through
the objects in the scene to see the
geometry Show Slice Preview
on Scene.
Model :Duplicator 8 MARK I
25
Page 25

8. Working with Model Support tools
Using Supports
Supports are sometime required to properly attach a model to the build space.
Because of the nature of DPP the lower layers must be supported by the supports
unless it has a wide surface in the rst layers.
Adding a single Support
A single support can be generated by clicking the manual support button/
Angled Supports
Supports can be angled inwards towards the objects they support. This can often resolve
clearance issues with vertical supports. You can turn a vertical support into an angled
support by selecting it, and holding the ‘Ctrl’ key and clicking on the model you want to
support.
AFTER SALES SUPPORT
26
86-571-23290996
support@wanhao3dprinter.com
Model : Duplicator 8 MARK I
Page 26

9.Slice view
In the Slice View screen we get the following information:
You can see the printing time and other information about the model. You can also slide
the slider to up and down and see the layers of the model you are going to print.
10.Saveles
Click on Export and save the le as a Zip le.
AFTER SALES SUPPORT
86-571-23290996
support@wanhao3dprinter.com
Model :Duplicator 8 MARK I
27
Page 27

11.Save a Scene
Click to save the current object as a .STL le. The .STL format allows
you to prepare a scene to be printed repeatedly in the future, together with supports
and positioning.After models have been loaded and manipulated on the build
platform, the entire scene can be saved as an STL model for later use. These scene
les can be used to create a scene with supports, slice the scene, and later load to
print your scene without the need for re-slicing.
12.
From this screen we will be able to control the motors of the printer , which means
displacing the build base over the Z axis, as well as controlling the LCD.In this section
of the Control screen we have the buttons that will allow us to move the Z position
of the build base. Using the value indicated as z Rate (at the bottom) you can change
the speed of progress measured in millimeters / minute.
13.Others functions
Wall Thickness: This eld is to set the thickness of each slice in mm. The default is
.05mm (20 slices per mm)
Bottom Layer Count: This species the number of ‘bottom layers’ that receive the
longer exposure time.
Exposure Time per Layer: This time value specifies how long the projector will
display an image slice on a per-layer basis.
Bottom Layer exposure time: In order to ensure the model is properly adhered to
the bottom of a vat, a longer exposure time can be used for a specied number of
bottom layers.
Light -off Delay: This setting can delay the UV led lighting before starting to print.
Bottom Light -off Delay This setting can delay the bottom lighting before starting to
print.
Lifting Speed:When a layer is printed on a bottom up machine, a large amount of
force may be required to separate the slide from the vat. This speed indicates how
fast to perform the lift, a slower speed may be required to help vat separation.
Retract speed:After the lift occurs, this speed indicates how fast the z axis should
travel back to the initial start position.
27
AFTER SALES SUPPORT
86-571-23290996
support@wanhao3dprinter.com
Model :Duplicator 8 MARK I
Page 28

3D Printer
Repair and Refurbished Goods
or Parts Notice
Unfortunately, from time to time, faulty products are manufactured which need to change
components or return to the Supplier for repair
Please be aware that if your product is capable of retaining user-generated data (such as les
stored on a computer hard drive, telephone numbers stored on a mobile telephone, songs
stored on a portable media player, games saved on a games console or les stored on a USB
memory stick) during the process of repair, some or all of your stored data may be lost.
We recommend you save this data elsewhere prior to sending the product for repair.
You should also be aware that rather than repairing goods, we may replace them with
refurbished goods of the same type or use refurbished parts in the repair process.
Please be assured though, refurbished parts or replacements are only used where they
meet WANHAO’s stringent quality specications.
If at any time you feel your repair is being handled unsatisfactorily, you may escalate your
complaint. Please telephone us on 86-571-23290996 or write to us at:
WANHAO Precision Casting Co.,Ltd
77, RENMING ROAD, JINHUA, CHINA
WANHAO Help Desk 86-571-23290996
(Operating Hours: Mon - Sat; 8:00am - 5:00pm)
support@wanhao3dprinter.com
www.wanhao3dprinter.com
AFTER SALES SUPPORT
86-571-23290996
support@wanhao3dprinter.com
Model : Duplicator 8 MARK I
35
Page 29

Page 30

REV1.1
 Loading...