

Page 1
Page 2

Page 3

Important
Getting the most out of your 3D Printer:
Read the manual carefully
It will help you get set up with ease
Visit www.wanhao3dprinter.com
We’ve got additional support videos and guides
Join Wanhao Technical Forum for online support
Google Forum
https://groups.google.com/forum/#!forum/wanhao-printer-3d
Email support@wanhao3dprinter.com
We’re always happy to help
Warranty Note
If you experience any issues with this product, or it’s
performance is not what you had expected, please contact
us at WANHAO before returning the item to the store.
It is likely that we can resolve any problems for you via
phone or email.
We can be reached through your local distributor. Or on
Phone: +86-571-23290996(Mon-Sat; 8:30am-5:00pm)
Email: support@wanhao3dprinter.com
Web: www.wanhao3dprinter.com
Page 4
3D Printer
support@wanhao3dprinter.com
Warranty Details
The product is guaranteed to be free from defects in workmanship and mother board for a
period of 12 months from the date of purchase.The LCD display is consumable parts with Minimal
working hours 1200 hours. You may need to purchase and replace it after 1200 hours. Printing
with materials other than WANHAO resin which are different from those recommended on the
website www.wanhao3dprinter.com,may cause result in damage the printer or bad printing
quality. Defects that occur within this warranty period, under normal use and care, will be repaired,
replaced or refunded at our discretion. The benefits conferred by this warranty are in addition
to all rights and remedies in respect of the product that the consumer has under the China laws.
In case you purchase from WANHAO distributor, your warranty shall be covered by distributor’s
Warranty and honored by WANHAO distributor too. Our goods come with guarantees that cannot
be excluded under the Chinese Consumer Law. You are entitled to a replacement or refund for a
major failure and for compensation for any other reasonably foreseeable loss or damage. You are
also entitled to have the goods repaired or replaced if the goods fail to be of acceptable quality
and the failure does not amount to a major failure.
AFTER SALES SUPPORT
86-571-23290996
support@wanhao3dprinter.com
Model : Duplicator 7
Page 5
support@wanhao3dprinter.com
A
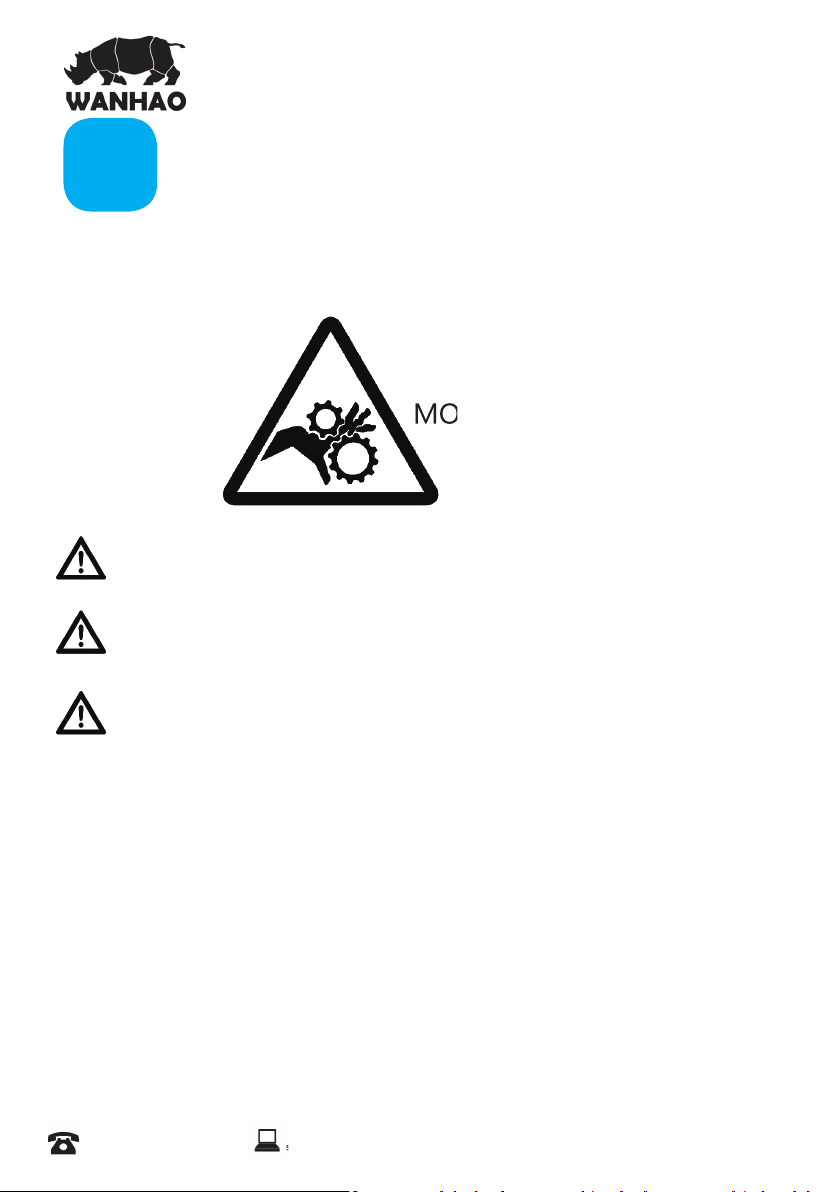
Before you get started, please read these important safety instructions.
CAUTION: The WANHAO 3D Printer includes moving parts that can cause injury. Never reach
inside of the WANHAO 3D Printer while it is in operation, and allow time for the printer to cool
down after operation.
Safety Instructions
MOVING PARTS
Do not leave the WANHAO 3D Printer unattended during operation
Always wear the glove while handling resin or printing object.
Always take care when using the Scraper. Never direct the Scraper towards your ngers.
• The printer must not be exposed to water or rain, or damage will occur.
• The printer is designed to be used with ambient temperature ranging 15°C - 30°C, and humidity
ranging 20% - 50%. Operating outside these limits may result in low quality models.
• In case of emergency, turn off the 3D printer at the power outlet.
• It is recommended that you use eye protection when cleaning/sanding printed models to avoid
small particles contacting eyes.
AFTER SALES SUPPORT
86-571-23290996
support@wanhao3dprinter.com
Model : Duplicator 7
3
Page 6

Contents
support@wanhao3dprinter.com
Warranty Details
A. Safety Instructions 3
B. Congratulations
The principle behind your printer
Safety Information
C. Electrical power
Disposal instructions
D. Useful advice
The box contains
Recommended items
Minimum computer requirements
E. Installation & assembly instructions
F. Prepare the Duplicator 7 for printing
G. Cleaning the machine and your printed objecIts
H. Detailed Creation workshop software instructions
System Compatibility
Main screen
1. Loading a Model
2. Scene View
3. Object Info
4. Move View
5. Mirroring Objects
6. Scaling Objects
7. Rotating Objects
8. View Options
9. Working with Model Support tools
10. Saving a Scene
11. Slice View
12. Control
13. Con gure
13.1 Con gure Machine
13.2 Con gure Slicing Pro le
14. Slicing a Model
15. Connecting Software to Duplicator 7
Repair and Refurbished Goods or Parts Notice
2
5
5
5
6
6
7
7
7
7
8
15
18
19
19
19
20
21
21
22
22
22
23
23
24
24
25
26
27
27
29
31
31
33
AFTER SALES SUPPORT
86-571-23290996
support@wanhao3dprinter.com
Model : Duplicator 7
Page 7

support@wanhao3dprinter.com
B
You have just purchased a new type of 3D printer using Direct UV-light Printing (DUP)
technology. This is a newly applied-for method of LCD image creation allow controlled UV
light get through the LCD screen which hardens liquid with the light from an UV light source.
This revolutionary system is a new way of printing that uses normal UV light as the energy
providing source to initiate the free radical polymerisation necessary to change the liquid
imagepac resin into your hardened object.
Congratulations
The principle behind your printer
There are two surprising advantages of this new DUP technology:
i) We can use high resolution low cost LCD screens that are widely available as monitors,
tablets, mobile phone and televisions providing phenomenal value for money, which we
pass directly onto you.
ii) The energy used by Duplicator 7 printers is again an order of magnitude lower than
used in comparable systems. This is good for your energy bills and the ecology, but there
is a huge performance advantage in that there is no unnecessary energy created. All of the
available photons strike photoinitiators and hand over their energy. In comparable Digital
Light Projector and laser systems there is a lot of excess energy which can lead to over-cure.
Safety Information
Read the instructions carefully. Keep this document for future reference. Follow all warnings
and instructions marked on the product.
Observe the following guidelines when connecting and disconnecting power cord to the
printer.
- Insert the Power cable cord into the socket at back of printer.
- Turn off the printer before Unplug the power cord.
- The printer cooling fan is suppose to run when you tun on the printer.
- Operate on a table or fl at, stable surface, ensuring that the machine cannot fall
and is level.
- Do not operate outdoors.
- Do not allow resin or any liquids to get inside the chassis, wipe up any
liquid spills immediately.
- Store the printer in its original packaging when not in use.
- Plug off the cable cord when not used for a long period of time.
AFTER SALES SUPPORT
86-571-23290996
support@wanhao3dprinter.com
Model : Duplicator 7
5
Page 8
Electrical power
support@wanhao3dprinter.com
C
This 3D printer is connected to the electrical network with an INPUT of 110 or 240 VAC,
50/60 Hz, and has an operational voltage of 12 V.
- Do not allow anything to rest on the power cord. Do not locate this product where
people will walk on the cord.
- If an extension cord is used with this product, make sure that the total ampere rating
of the equipment plugged into the extension cord does not exceed the extension
cord ampere rating. Also, make sure that the total rating of all products plugged
into the wall outlet does not exceed the fuse rating.
- Do not overload a power outlet, strip or receptacle by plugging in too many devices.
- Use the product only with the supplied power supply cord set. If you need to
replace the power cord set, make sure that the new power cord meets the
following requirements: detachable type, UL listed/CSA certi ed, VDE approved
or its equivalent, 4.5 meters (15 feet) maximum
- In case of malfunction disconnect the printer immediately from network.
- Do not attempt to x this product by yourself, as opening or removing covers may
expose you to dangerous voltage points or other risks. Refer all reparation to
quali ed service personnel. For contact the technical service please send an email
to your national supplier or www.wanhao3dprintr.com
Unplug this product from the wall outlet and refer servicing to quali ed service personnel
when:
- The power cord or plug is damaged, cut or frayed.
- Liquid was spilled into the product.
- The product was exposed to rain or water.
- The product has been dropped or the case has been damaged.
- The product exhibits a distinct change in performance, indicating a malfunction.
- The product does not operate normally after following the operating instructions.
- Keep the printer out of the reach of small children.
Disposal instructions
Do not throw this electronic device into the waste when discarding. To minimize pollution and
ensure utmost protection of the global environment, please recycle or return to WANHAO for
recycling.
AFTER SALES SUPPORT
86-571-23290996
support@wanhao3dprinter.com
Model : Duplicator 7
6
Page 9

support@wanhao3dprinter.com
D
Useful advice
Have supervision when used by a minor.
The resin is an irritant to skin and eyes. Always wear gloves when coming into contact with
the liquid resin.
The printer should be operated on a stable and level surface, preferably away from direct
ambient light and with suf cient space to be able to open doors
The box contains
- Wanhao Duplicator 7 LCD printer with black hood and platform
- Power cable cord
- VAT with lm
- HDMI cable to connect the 3D printer to the secondary video output of
your computer (2).
- USB cable to connect your computer to the printer.
- 1 replacement lms for the VAT
- plastic spatula
- 250ml UV resin
Recommended items
- Gloves
- Paper towels
- industrial alcohol
- Soft brush or sponge to clean the object
- Plastic container to rinse the resin
Minimum computer requirements
- Dual Core processor or above.
- Windows or Linux OS
- Software NOT compatible with MAC
- 4 GB RAM memory or above.
- Double video output graphics card (one for your monitor, one for the
Printer HDMI, with 500MB memory or above. A laptop with dual video output(HDMI)
is also possible.
AFTER SALES SUPPORT
86-571-23290996
support@wanhao3dprinter.com
Model : Duplicator 7
7
Page 10
support@wanhao3dprinter.com
Installation
E
& assembly instructions
1.0 To set the printer display
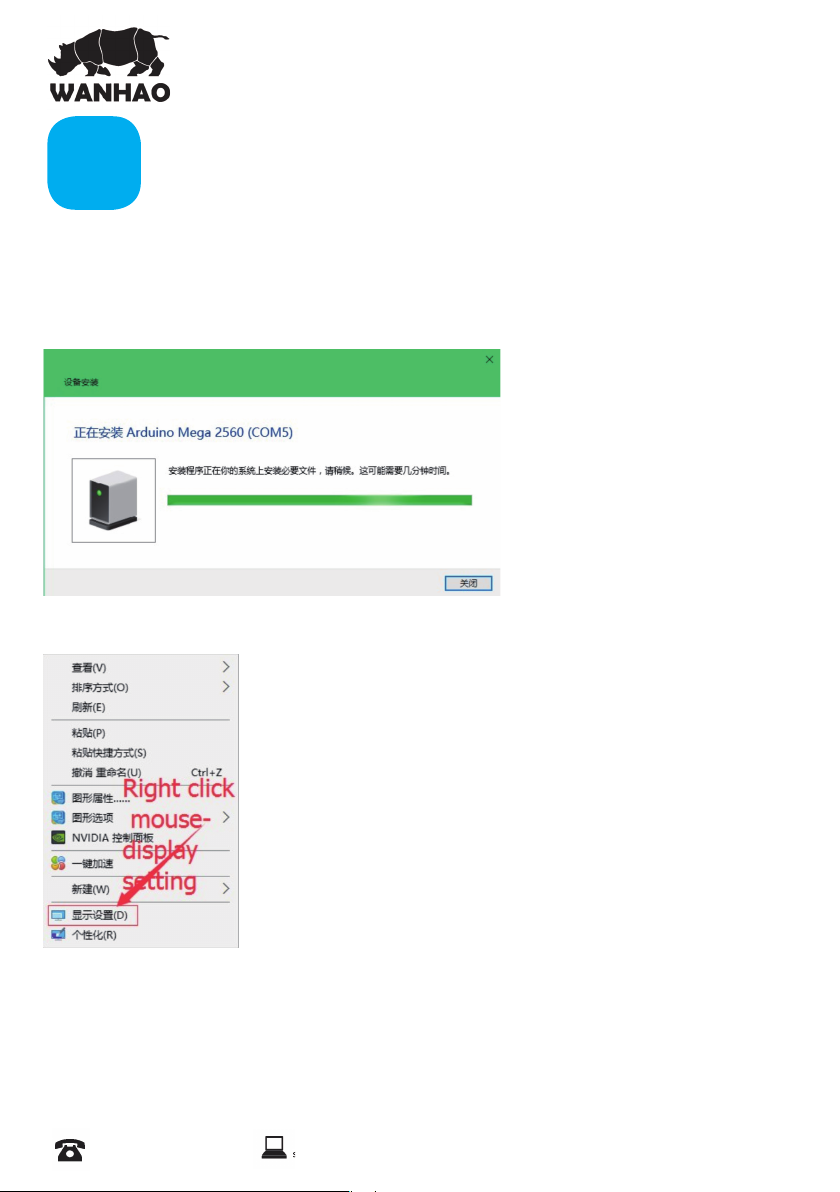
1.1 Right click the mouse and click the display setting.
1.
Turn on the printer, connect the HDMI cable and USB cable to the computer.
2
The computer would install the Arduino Mega 2560 driver automatically.
1.3 Right Click the mouse and click the display setting
1.4 Click the display No.2, then the No.2 display would be highlighted in green color.
1.5 If your display is not lateral. Change it to lateral by click direction and choose lateral.
1.6 Commit the change.
AFTER SALES SUPPORT
86-571-23290996
support@wanhao3dprinter.com
Model : Duplicator 7
8
Page 11

support@wanhao3dprinter.com
2.0 To set the software: Creation Workshop.
2.1 Decompress the Creation workshop. Click the Creation Work shop
logo to run software.
2.2 Click the Con gure
AFTER SALES SUPPORT
86-571-23290996
support@wanhao3dprinter.com
Model : Duplicator 7
9
Page 12

support@wanhao3dprinter.com
2.3 Con gure the machine
Click con gure
Choose the current connection port. ( could be Com5, Com6… depending on your
computer )
2.4 Choose screen size: 1560*1440 from Available Display Click + to add the secondary
screen Apply the change.
AFTER SALES SUPPORT
86-571-23290996
support@wanhao3dprinter.com
Model : Duplicator 7
10
Page 13
support@wanhao3dprinter.com
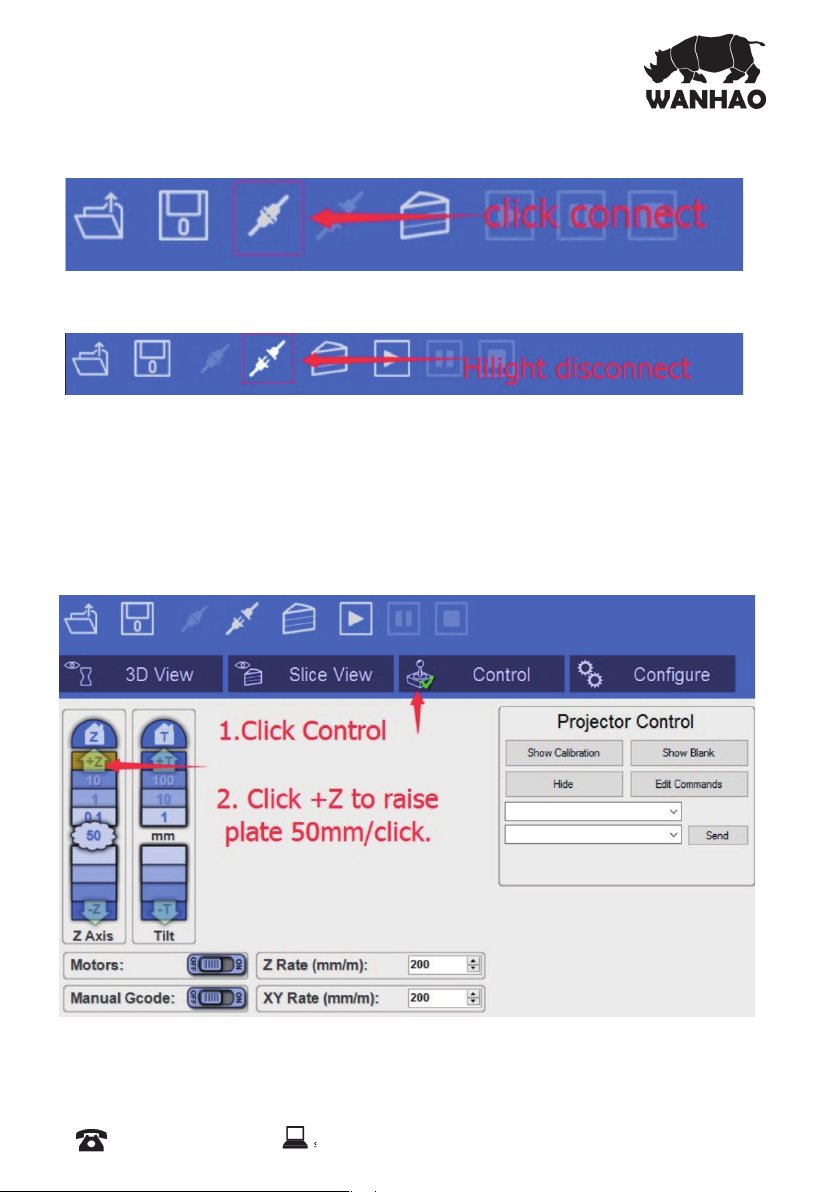
2.5 Click the connection button to link the printer and computer.
Then the disconnection button would be highlighted.
3.0 Testing the Z axis movement and raise the Z axis by 50mm minimal. So we can check if
the rst layer printing work or not. .
Click the Control, Then click the “+Z” to raise the building plate by 50mm/click.
P.S: Z button= Z axis home.
10= raise Z by 10mm/click
1= raise Z by 1mm/click
-z= lower Z by 50mm/click
AFTER SALES SUPPORT
86-571-23290996
support@wanhao3dprinter.com
Model : Duplicator 7
11
Page 14

support@wanhao3dprinter.com
4.0 Open the printing le and Check the rst layer work or not.
4.1 Click the open le button .
4.2 Choose and open any 3D model in STL or OBJ
4.3 To do 3D view and adjust the object. Then click “+” to add RAFT and SUPPORT.
AFTER SALES SUPPORT
86-571-23290996
support@wanhao3dprinter.com
Model : Duplicator 7
12
Page 15

support@wanhao3dprinter.com
4.4 To click the +__ to add the RAFT, so the rst layer would be the RAFT.
4.5 Right click the screen and move the print object, so you would see the image of
Raft like below.
AFTER SALES SUPPORT
86-571-23290996
support@wanhao3dprinter.com
Model : Duplicator 7
13
Page 16
support@wanhao3dprinter.com
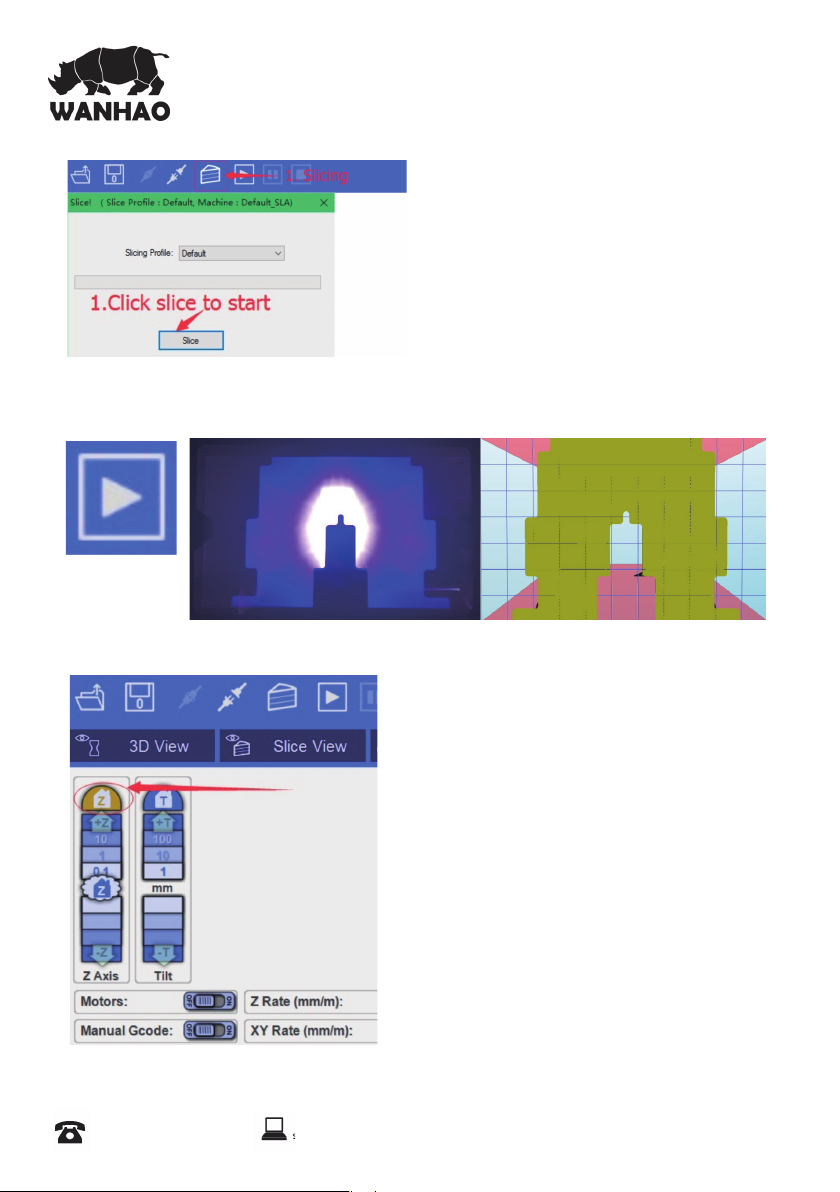
4.6 Click the slicing and con rm slice. The print object would be sliced.
4.7 Click Print button. So you would see the image to be projected on
the LCD screen which is exactly the same like your computer screen
rst layer.
Congratulations! You have successfully installed the machine. Now you can start
your rst print.
AFTER SALES SUPPORT
86-571-23290996
5.0 First Print
5.1 To click home Z axis. So building plate
would start from home position.
5.2 Repeat the 7.0 to print the rst object.
support@wanhao3dprinter.com
Model : Duplicator 7
14
Page 17

support@wanhao3dprinter.com
Prepare the
F
Now you have your printer installed and con gured. Please read these
software instructions to understand the different settings before starting.
Let’s start by printing the rst object using the stock WANHAO resin and do the
printout at the lowest resolution so that the test doesn’t take too long. You will
nd some test objects (STL le) in the folders supplied with the software.
1. Switch on your computer and the switch on the Duplicator 7. Open the
software and load an object (STL, OBJ or AMF).
2. With the object loaded and located in the build area check the settings of the
printing pro le.
3. Set the values in the “setting” elds to:
- layer thickness = 0.100 mm,
- exposure time = between 6.000-12.000
- for other resins and resolutions check the exposure times stated
- exposure time for bottom layers = between 100.000 and 120.000 ms
- number of such bottom layers = between 3 and 5
These settings can be adjusted depending upon the complexity of the desired
object. Finally click “Apply Changes” to save if you had to change any values,
if you don’t click this your data will not be re-set.
Duplicator 7 for printing
AFTER SALES SUPPORT
86-571-23290996
support@wanhao3dprinter.com
Model : Duplicator 7
15
Page 18

The screen should look as follow:
support@wanhao3dprinter.com
4. Now click “3D View” and check that the object is correctly placed inside the
printing area. Press the slice button to start the slicing operation. A
con rmation window will show:
You can check again that the correct pro le is being used and if not, you can
select the correct one. Always click on the “Slice” button if you adjust the
layout in any way.
5. Now check the “Slice View” screen to check that the rst layer of every object
is in contact with the build base. If it is above the build platform it will
not adhere. If you click on the view box located in the bottom left corner
you can scroll forward through the slicing views using the slider bar and
check that the object is always inside the build area. Make sure that objects
are 2 squares inside the edge of the build area shown.
AFTER SALES SUPPORT
86-571-23290996
support@wanhao3dprinter.com
Model : Duplicator 7
16
Page 19

6. Place the vat on top of the LCD screen and tighten the retaining Z brackets down
support@wanhao3dprinter.com
to secure it. If you tighten it too much the LCD screen will go white at the edges.
The tray should not be able to be lifted up.
7. Slide the platform onto the platform arm and rmly tighten the central knob. Loosen
the 4 screws at the sides so there is free movement of the platform up and
down (IMPORTANT if these knobs are not completely loose you could crush the
bottom screen when lowering it with the home function).
8. Press the “Home” button to lower the platform onto the screen. The platform will
move down to be resting on the screen (level 0 in Z axis.) and stop. Remove the
hood. With one hand press down on the middle of the glass platform and with the
other tighten a side bolt, then repeat with the other bolt. Now the 3 knobs should be
tight. You can check that the platform is making contact with the screen by pressing
lightly when it is on and it will appear white in the corners. You can check the screen
is working by pressing the “show calibration” button located in the “Control” tab and
a grid will appear. It is now locked in the home position.
9. Press the +10 steps button in “Control” and the platform will rise enough
to pour resin in under it. Remove the hood and ll the vat with resin. Prints don’t
consume a lot of resin, a quarter full vat will be enough for a medium sized print.
Note, once started, the print can’t be paused and re lled so it’s safer to over- ll and
re-use the resin. Place the hood back on the printer and move the platform back to
home by hitting the -1 step button 10 times, leave a few seconds between click to
enable the resin to move out. It is essential it is grounded before starting printing,
if you miss-count it is safer to press an additional step, the platform will not move
further when correctly located.
10. Now you are ready to print, press “play”. Once the print has nished, the Computer
will show “print 100% complete” and will stop. Don’t remove the hood during the
print or the print will stop.
AFTER SALES SUPPORT
86-571-23290996
support@wanhao3dprinter.com
Model : Duplicator 7
17
Page 20

Cleaning the machine
support@wanhao3dprinter.com
G
and your printed objects
These steps will reduce any resin spillage and keep your machine clean.
1. Go to “control” and move the platform up enough so the base of your object is
clear of the vat. Remove the hood on the print platform. Tilt the platform backwards
in order for the excess resin to drip back into the vat.
2. With absorbent paper under it, remove the platform completely and set it down
on a surface that will not be affected by resin. Place the hood back on immediately
to protect the resin in the vat from light.
3. Remove any excess polymer with paper rst. Place the platform to a washing-up
bowl and remove the objects by sliding the scraper in at their base. Wash off any
liquid polymer by alcohol.You can gently clean it with a soft brush or sponge,
taking care not to damage it, it will not achieve full hardness until after post
exposing in light. If you have an ultrasonic cleaner this will clean it without the
possibility of damaging it.
4. Check it is thoroughly clean then place it in a container for 10-20 minutes in an area
with bright sunlight. You can use light from a UV lamp. When it has been
completely post exposed, it will be stronger and have a dry surface. You will notice
that it darkens in colour as it is exposed to light. Dry it and check that it is dry, if
not repeat.
5. Clean the build platform with industrial alcohol , chip off any cured resin and
dry it before inserting it back into the printer.
6. You should empty the vat and clean it every time in case you have any solid
pieces on the bottom, as these would prevent the platform from homing
correctly. Loosen the Z brackets and remove the vat from the printer, pour the resin
back into the bottle through a strainer. Place the vat on a fl at surface and wipe the
base of the vat with absorbent paper. Make sure it is clean and not damaged. If it
is not fl at, clean and tight like a drum, remove the lm and replace it with a new piece.
7. If you have a leak on the screen it is easy to remove the hardened resin
without damaging the screen by shipping it off with a blunt non-serrated knife.
AFTER SALES SUPPORT
86-571-23290996
support@wanhao3dprinter.com
Model : Duplicator 7
18
Page 21

Detailed Creation
H
workshop software instructions
System Compatibility
Creation Workshop is a .NET 3.5 application written in C#. This is native to the Windows
Operating System, but it also runs on many versions of Linux/Posix using the Mono
Framework http://www.mono-project.com/Main_Page . You will need to download and
install Mono when using Creation Workshop on a Linux-based system. Windows users may
need to run the application as Administrator.
Main screen
Click to open les in one of the following formats: .STL, .OBJ, .3DS or .AMF. You
can also open scene les with the .CWS extension.
Click to save the current object as a .STL or .CWS le. The .CWS format allows
you to prepare a scene to be printed repeatedly in the future, together with
supports and positioning.
Click to start the connection between your computer and your Duplicator 7
3d printer. Once the button is grayed out, this means that the printer is
connected.
Click this button to disconnect your printer from the computer. If the button is
grayed out, it means that the machine is currently disconnected.
AFTER SALES SUPPORT
86-571-23290996
support@wanhao3dprinter.com
Model : Duplicator 7
19
Page 22

1. Loading a Model
support@wanhao3dprinter.com
These three buttons start, pause and stop a print. These
buttons only become active once you have sliced your object.
Clicking this button allows you to view the 3D objects within
their boundary box. You can add supports in this function.
Clicking this button accesses the “Slicing” screen. You can see
the individual slices that have been generated as well as the
G-code.
This allows you to control the z axis motor, home it and lift it
after a print has nished.
This is the setup screen that allows you to con gure the slicing
and printing pro les.
AFTER SALES SUPPORT
86-571-23290996
Click here to ‘Load’ your le. Multiple objects can be loaded and manipulated
independently. You can also open scene les with the .CWS extension.
support@wanhao3dprinter.com
Model : Duplicator 7
20
Page 23

2. Scene View
support@wanhao3dprinter.com
The Scene View allows you to manipulate various aspects of the scene.
Selecting
You can select a model by double clicking on the model, or selecting it with the
scene view
Removing a Model
You can remove a model by right-clicking on the name in the scene graph and
selecting “Remove”.
The Minus sign “-” will also remove the current model.
You can also delete a model by selecting it and then pressing the “delete” key on
your keyboard.
Cloning a model
You can select a model in the scene and click the “+” sign to clone it. The cloned
object will appear in the scene view.
3. Object Info
AFTER SALES SUPPORT
86-571-23290996
support@wanhao3dprinter.com
Model : Duplicator 7
21
Page 24

4. Move View
support@wanhao3dprinter.com
The Move function allows you to move objects on the build platform along the
x:y:z axis by the distance entered.
From left to right, the other tools are:
The ‘Place on Platform’ button will position the bottom of the model to rest on the
bottom of the build platform.
The ‘Center’ button will center the model at (0,0,0).
Auto-Arrange will automatically lay out all models to t on the build platform.
Any model that does not t within the build platform will be moved outside the
build area.
5. Mirroring Objects
The Mirror view allows you to mirror
the selected object on the speci ed
axis.
6. Scaling objects
AFTER SALES SUPPORT
86-571-23290996
support@wanhao3dprinter.com
A model can be scaled (reduced or
increased) by selecting it, and using
the ‘Scale’ view to enter in a new
scaler value. Press the tick button to
re-scale your object.
Model : Duplicator 7
22
Page 25

7. Rotating Objects
support@wanhao3dprinter.com
Rotating a model works in a similar way to
moving a model. Simply select the model
you want to work with, and use the X/Y/
Z +/- buttons to rotate the model by your
speci ed degrees.
8. View Options
The view option allows you to manipulate
various views and models.
On the top row from left to right:
50% Alpha-Blending toggle.
This will allow you to see through
the objects in the scene to see the
geometry
Show Slice Preview on
Scene. After slicing this toggles
on/off the view of the 3D view of
the current slice layer as selected
by the horizontal scrollbar.
Show Console. This toggle button shows or hides the debug window.
This window is used for debugging purposes.
On the bottom row from left to right are tools to change the way the objects
appear on the screen:
Show objects with a bounding box.
Show objects with an outline
Show selected objects in a different color
AFTER SALES SUPPORT
86-571-23290996
support@wanhao3dprinter.com
Model : Duplicator 7
23
Page 26

9. Working with Model Support tools
support@wanhao3dprinter.com
Using Supports
Supports are sometime required to properly attach a model to the build space.
Because of the nature of DPP the lower layers must be supported by the supports
unless it has a wide surface in the rst layers.
Adding a single Support
A single support can be generated by clicking the manual support button.
AFTER SALES SUPPORT
86-571-23290996
support@wanhao3dprinter.com
Model : Duplicator 7
24
Page 27

Moving Supports
support@wanhao3dprinter.com
After a manual or automatic support has been generated, individual supports can be moved
around the x:y plane the same way models can be moved. Select the support by double
clicking on it to select it, and hold down the ‘Shift’ key on your keyboard and move the
mouse. Supports will automatically scale vertically under the model they support.
Angled Supports
Supports can be angled inwards towards the objects they support. This can often resolve
clearance issues with vertical supports. You can turn a vertical support into an angled support
by selecting it, and holding the ‘Ctrl’ key and clicking on the model you want to support.
Manual Confi guration
Under the Support Generation view, you can click ‘show downward facing polys’. This will
highlight all polygons in the model that are pointed downward by the speci ed degree. This
helps you manually place supports under un-supported downward facing areas of a model.
Auto Support on Grid
After a model is loaded into the scene and selected, you can automatically generate a ‘bed
of nails’ support for the model by selecting . You can specify the grid spacing and the size of
the generated supports. If you wish to only generate supports on downward facing polygons,
check the boxes under ‘support general’ and ‘generate only on downward’
Adaptive supports
You can add supports to areas in the model that are unsupported. There are 2 algorithms to
help you accomplish this.
10. Saving a Scene
Click to save the current object as a .STL or .CWS le. The .CWS format
allows you to prepare a scene to be printed repeatedly in the future,
together with supports and positioning.
After one or more models have been loaded and manipulated on the build platform, the
entire scene can be saved as an STL model for later use. Simply click on the ‘File->Save Scene
STL’ menu item to save the scene model. This will fl atten all models in a scene into a single
STL file. Scenes can also be saved to CWS files.. These scene files can be used to create a
scene with supports, slice the scene, and later load to print your scene without the need for
re-slicing.
11. Slice View
In the Slice View screen we get the following information:
AFTER SALES SUPPORT
86-571-23290996
support@wanhao3dprinter.com
Model : Duplicator 7
25
Page 28

There are two buttons for each of the available options.
support@wanhao3dprinter.com
- The rst option has the same name as the screen itself (Slice View).
In this setting we can see (as shown in the image) each successive layer
of the generated "Slicing". With the lower bar we can scroll through the
entire slicing result to check each of the layers. In the upper left corner we
can see the total number of layers that have been generated. In the lower
left corner we have a ( ) button to turn the projector on and expose the
selected layer. This can be useful to check the positioning of the vat.
- G-Code View: On this screen you can see the G-code generated during
the "Slicing" operation. This option is intended for advanced users.
We recommend to leave this screen untouched.
12. Control
Opening the Control screen shows you the following dialogues
AFTER SALES SUPPORT
86-571-23290996
support@wanhao3dprinter.com
Model : Duplicator 7
26
Page 29

From this screen we will be able to control the motors of the printer , which means displacing
support@wanhao3dprinter.com
the build base over the Z axis, as well as controlling the LCD.
In this section of the Control screen we have the buttons that will allow us to move
the Z position of the build base. As you can see, we have 4 buttons for
each direction, 50, 10, 1 and 0.1 mm. Using the value indicated as z
Rate (at the bottom) you can change the speed of progress measured in
millimeters / minute. We also nd the home button. This is similar in function
to the button that we have described above in the 3D View screen, that is, if
you click it, the whole build base will rise to the detector limit, where it will seek
the zeros of each axis, then descend to a lower position. The descent is
done rst fast then slow. This home also includes a stage where the build base
raises to a higher position so as to be able to prepare the machine to pour the resin in and
eave it ready to lower the base and start printing.
With this box you can control the image exposed by the LCD with the following options:
- Show Calibration: A red grid is projected. This will
allow you to check if your projector is well focused -on
the vat bottom.
Show Blank: A black screen is shown, meaning a screen
that won't cure the resin instantly.
- Hide: This option hides the slice projection screen,
allowing the projector to display the main desktop
background (the extended part).
- Edit Commands: This option allows you to edit
commands to control the projector. Fields beneath this
are not of recommended use.
13. Confi gure
13.1 Confi gure Machine
Machine Connection COM Port
Once a Machine profile has been selected, the ‘Configure’ button on the ‘Machine
Connection’ box can be selected to show the Connection setup screen.
This screen allows you to choose the correct COM port and speed to communicate with the
printers’ controller card via serial connection.
*NOTE – The current version of the application will allow connections up to 115200 bps.
Please ensure your controller rmware is con gured for the speed chosen.
AFTER SALES SUPPORT
86-571-23290996
support@wanhao3dprinter.com
Model : Duplicator 7
27
Page 30

Setting up display devices
support@wanhao3dprinter.com
Available Displays
This shows you the available configured and connected displays on the system. You can
click the Refresh button to refresh the list of displays. The ‘+’ button will add a display to the
Con gured display box.
Confi gured Displays.
This area shows the displays that will be used for projection on the system. Once a display
is added to this area, it can be selected to con gure the LCD controls. Typically, only one
display is used. Creation Workshop can support 2 projectors – each with the same resolution
and projection size either in a horizontal or vertical format.
Machine Controls:
There is a column of check boxes on the right hand side of the
machine configuration screen. Enabling these allows you to
customize the controls that appear on the ‘Manual Control’ screen.
Select the controls that are appropriate for your machine.
AFTER SALES SUPPORT
86-571-23290996
support@wanhao3dprinter.com
Model : Duplicator 7
28
Page 31

The ones shown in the screen show are the ones suggested to start working with the
support@wanhao3dprinter.com
LCD printer.
Saving your changes
After you have configured your machine profile, be sure to click the “Save Changes”
button to save and apply the changes.
13.2 Confi gure Slicing Profi le
In order to slice a model into images, you must rst set up a slicing pro le. A default
pro le has been created the rst time the application was started. You can create new
slicing profiles and manage them in much the same way you can manage machine
profiles. The ‘Slice Profiles Config’ tab item will allow you to create, delete, or edit a
slicing and building pro le.
On the left side of the screen we can see the following:
o Pro le in Use: In this drop down box we can select the pro le we are currently
using, within a list of previously available pro les. The software come preloaded
with a number of preset pro les based on our resins. We recommend using
the XY resolution of 100 µm. With this pro le you can perform your rst
printouts with the test gures provided.
o Con gured Slicing Pro les: In this dialogue we can see the list of all pro les that
are available. The program comes preloaded with several pro les created at
different types of resolution (100 and 50 µm) and for different resins. We will
keep updating the pro les and sharing the les online at “support”. We expect
these pro les to be enough as there may be prints that vary in complexity and
layer thickness. You can also create a new pro le using the button or delete one
by pushing the button. If
AFTER SALES SUPPORT
86-571-23290996
support@wanhao3dprinter.com
Model : Duplicator 7
29
Page 32

you want to create a new pro le, carefully read the section “Creation of new
support@wanhao3dprinter.com
printing pro les”.
Slice Thickness: This eld is to set the thickness of each slice in mm. The default is .05mm (20
slices per mm)
Exposure Time per Layer: This time value speci es how long the projector will display an
image slice on a per-layer basis.
Bottom Layer exposure time: In order to ensure the model is properly adhered to the
bottom of a vat, a longer exposure time can be used for a specified number of bottom
layers.
# Bottom Layers: This specifies the number of ‘bottom layers’ that receive the longer
exposure time.
Blanking time between layers: This is a time delay that allows the machine to perform a ‘Lift/
tilt/slide’. You may have to experiment with this value to determine a proper timing for your
machine.
Resin Price per liter
You can specify the cost of the resin used here. This is used to calculate printing costs under
the ‘File->Calculate Volume & Costs’ menu item.
Lift and Sequence Time:
This time speci es in milliseconds how long the lift and retract sequence takes. You can use
the “Auto Calc” button to generate a time estimate for the lift and retract. This value may
need to be modi ed based on the speed of your machine.
Lift Distance: This is the distance that the printer will raise and lower the Z axis after the
exposure has taken place.
Z Lift Speed:
When a layer is printed on a bottom up machine, a large amount of force may be required
to separate the slide from the vat. This speed indicates how fast to perform the lift, a slower
speed may be required to help vat separation.
Z Lift Retract speed:
After the lift occurs, this speed indicates how fast the z axis should travel back to the initial
start position.
Slide/Tilt Value: for machine with a slide or tilt mechanism connected to the X axis, this
value speci es how much to more in conjunction with the Lift.
X/Y Pixel Offset: This X/Y value allows you to offset the rendered image by a pixel amount.
AFTER SALES SUPPORT
86-571-23290996
support@wanhao3dprinter.com
Model : Duplicator 7
30
Page 33

Build Direction: Top down or Bottom up. This value determines which direction the Lift
support@wanhao3dprinter.com
occurs. For a bottom up machine, this is used to peel the model from the bottom of the
build vat, sometimes in conjunction with a tilt/slide. For a Top-down machine, this makes the
lift operation dip into the resin.
Image Slice Export Options
This allows you to control how the generated image slices and gcode les are saved. You
have the option of exporting to Zip le or to a subdirectory when the ‘Export Images and
GCode’ button is checked. If this is left unchecked, slices and gcode will still be generated,
but not saved to disk.
14. Slicing a Model
Once you have loaded one or more models, con gured your
machine pro le, and con gured your build & slicing pro le, you can
slice a model. Choose the Slice Icon from the toolbar to bring up
the Slicing Screen.
You can change the currently selected slicing pro le to use.
Click the ‘Slice’ button to begin slicing. You can stop slicing by pressing the
‘ Cancel’ button. If your slicing pro le is con gured to export images, a
progress bar will appear here. Otherwise, just the gcode for the scene
will be generated and the images will be rendered during build-time.
15. Connecting Software to Duplicator 7
You can connect to your 3d printer with the ‘Connect’ toolbar item.
Please ensure that you’re properly con gured your machine pro le
as well as setting up the correct COM port before connecting.
AFTER SALES SUPPORT
86-571-23290996
support@wanhao3dprinter.com
Model : Duplicator 7
31
Page 34

Page 35

3D Printer
support@wanhao3dprinter.com
Repair and Refurbished Goods
or Parts Notice
Unfortunately, from time to time, faulty products are manufactured which need to change
components or return to the Supplier for repair
Please be aware that if your product is capable of retaining user-generated data (such as les
stored on a computer hard drive, telephone numbers stored on a mobile telephone, songs
stored on a portable media player, games saved on a games console or les stored on a USB
memory stick) during the process of repair, some or all of your stored data may be lost.
We recommend you save this data elsewhere prior to sending the product for repair.
You should also be aware that rather than repairing goods, we may replace them with
refurbished goods of the same type or use refurbished parts in the repair process.
Please be assured though, refurbished parts or replacements are only used where they
meet WANHAO’s stringent quality speci cations.
If at any time you feel your repair is being handled unsatisfactorily, you may escalate your
complaint. Please telephone us on 86-571-23290996 or write to us at:
WANHAO Precision Casting Co.,Ltd
77, RENMING ROAD, JINHUA, CHINA
WANHAO Help Desk 86-571-23290996
(Operating Hours: Mon - Sat; 8:00am - 5:00pm)
support@wanhao3dprinter.com
www.wanhao3dprinter.com
AFTER SALES SUPPORT
86-571-23290996
support@wanhao3dprinter.com
Model : Duplicator 7
Page 36

 Loading...