

Page 1
WANHAO DUPLICATOR7 PLUS
GETTING STARTED GUIDE
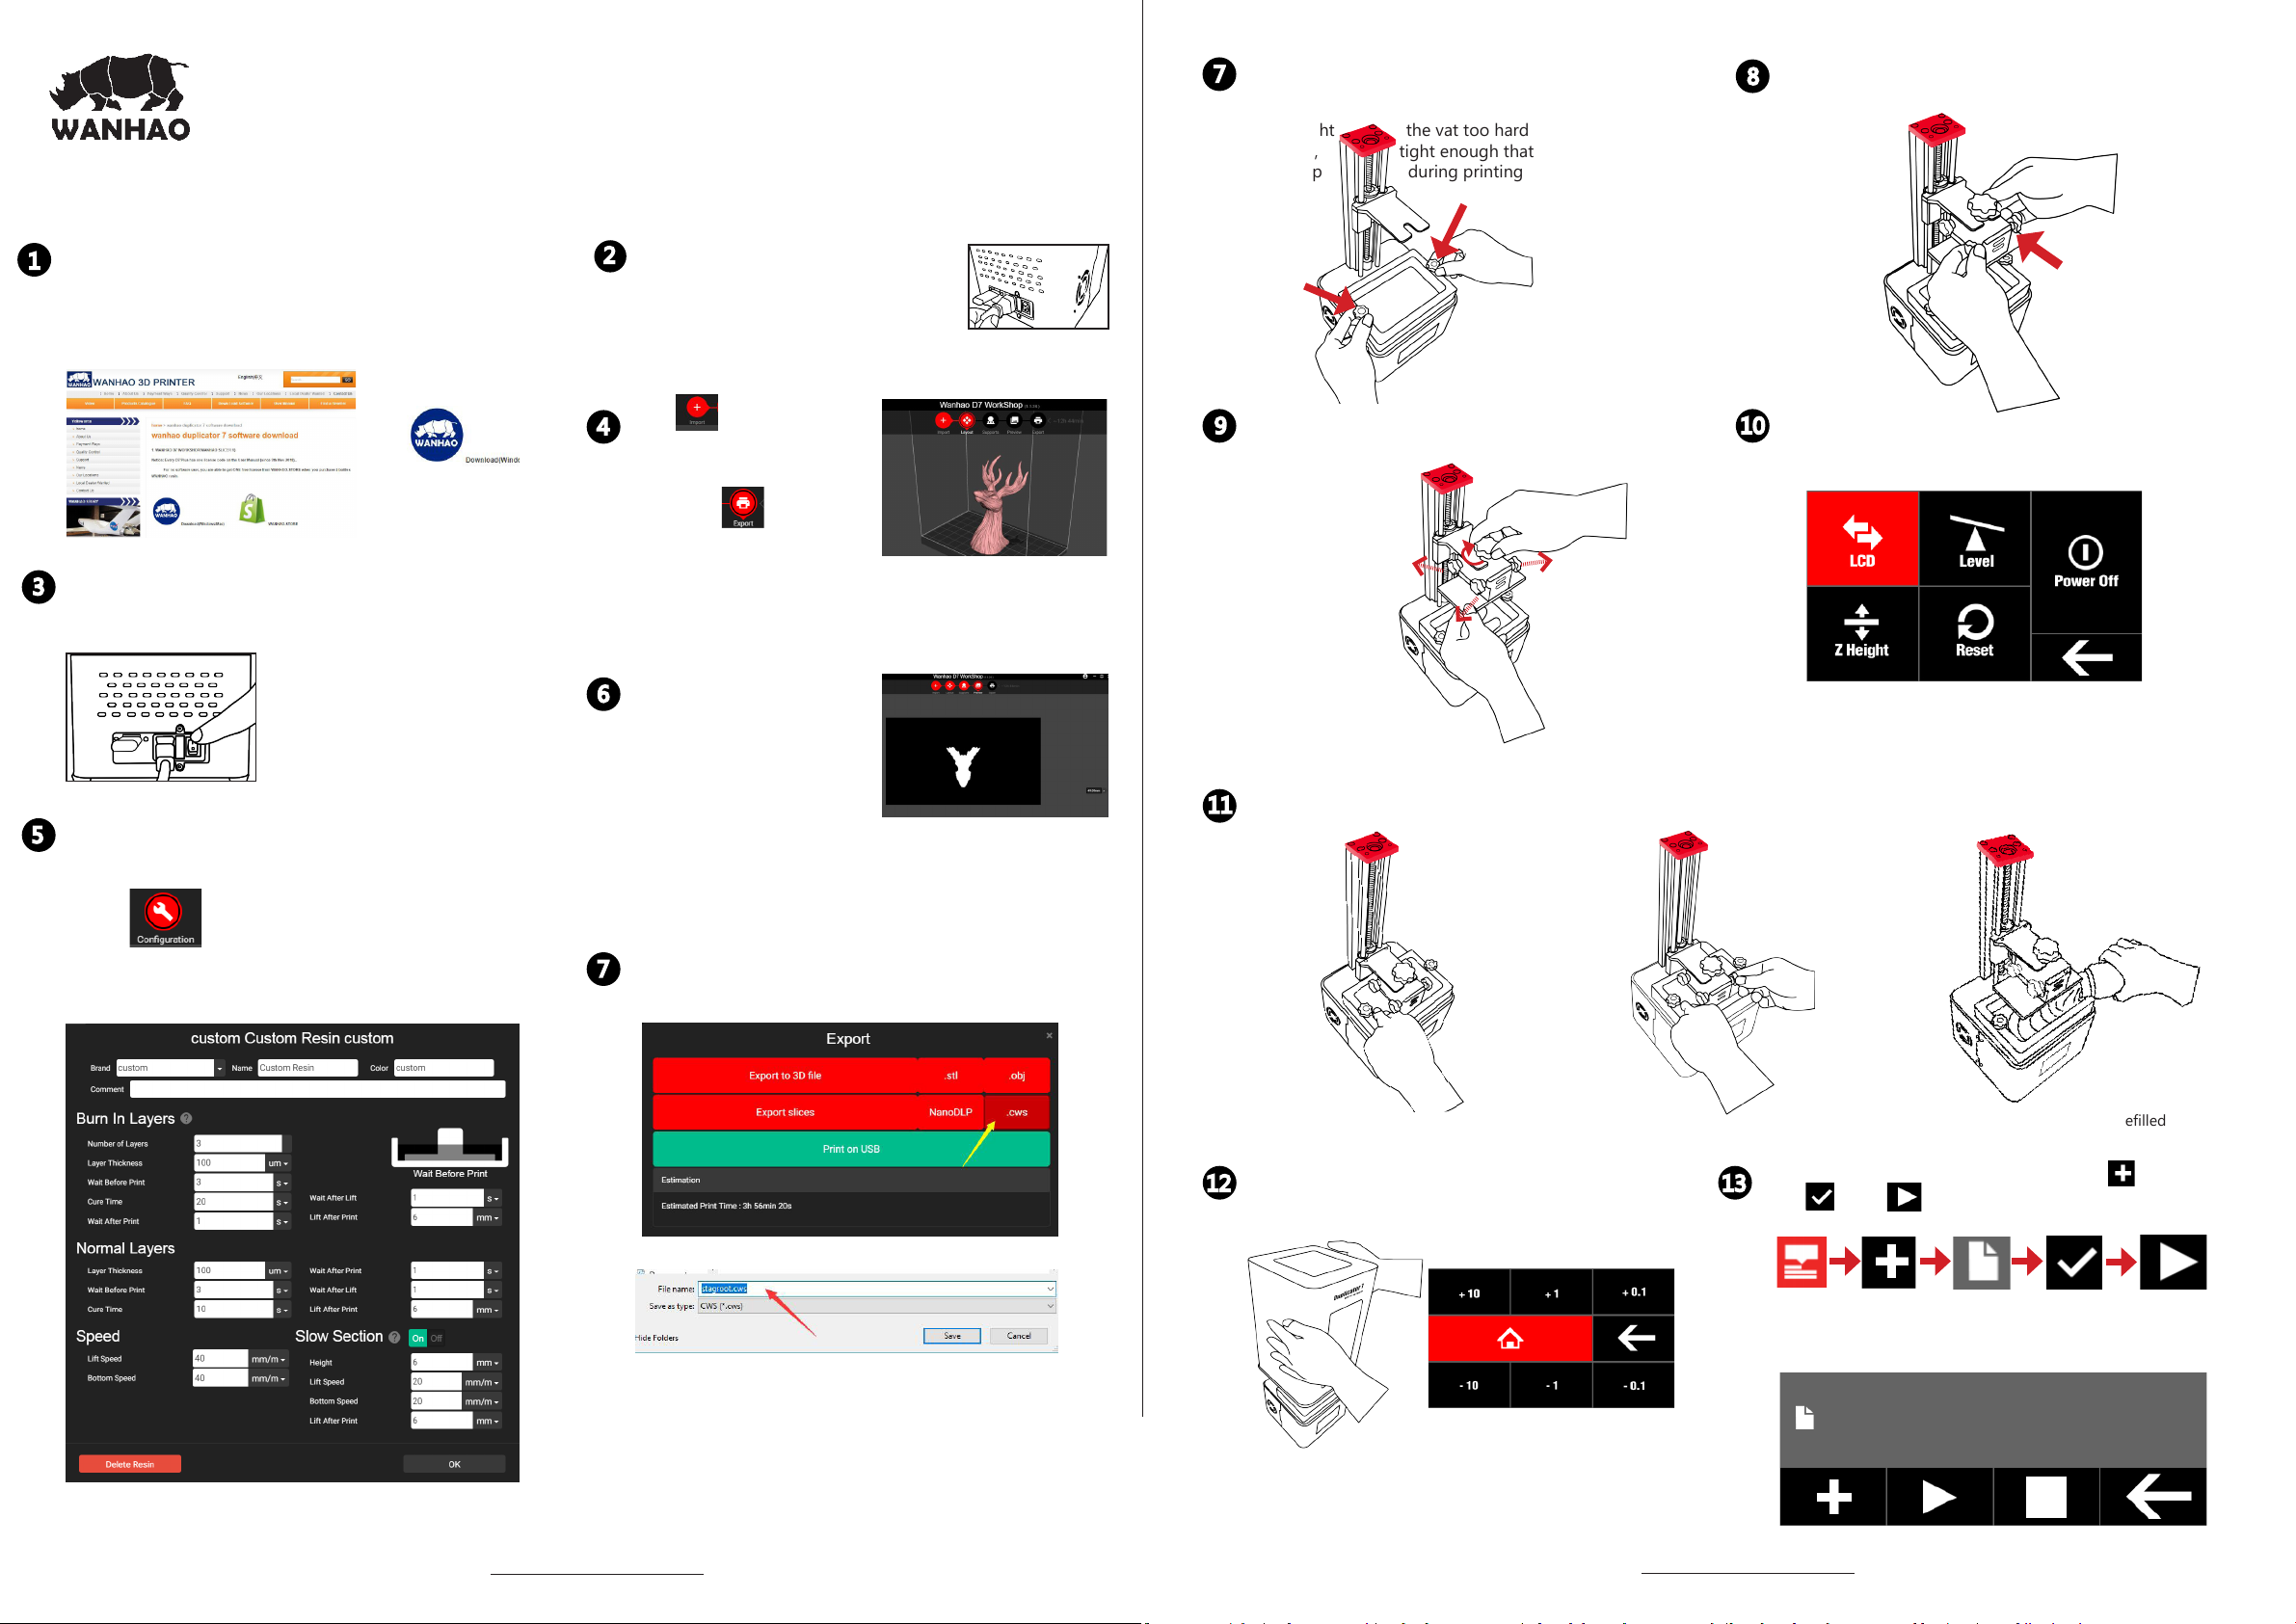
PREPARE DUPLICATOR 7 PLUS FOR PRINTING
7
Place vat on top of the LCD screen and tighten vat
screws to keep it tight on the printer. Make sure that
don’t tight the vat too hard that may damage
the LCD, tight enough that the vat shouldn't
be lift up during printing process.
Slide the building plate onto the building plate holder.
8
Make sure the build compound with groove side toward
the printer.
DOWNLOAD AND INSTALL SOFTWARE
1
Go to www.wanhao3dprinter.com—Download software—D7/
plus online and install the software. The license shall be provided
through email. Should you don’t have receive the email. Please
contact the distributor or Wanhao for the license.
SWITCH ON PRINTER
3
Turn on the switch behind the printer. Open the
software and load the object (STL,OBJ )
SLICER CONFIGURATION
5
UNPACK AND CONNECT CABLES
2
With the printer switched off, connect:
Connect the power supply to printer.
Click to import the
4
3D le( STL, OBJ), You can
add support, change direction
etc.
Then Click to slice the
object into CWS le( China
Wanhao Slicer). Copy the le
into the ash disk.
Click on preview and you
6
can see the sliced Layers
that are going to be printed
on your Duplicator 7 Plus.
You can see the layers by
sliding the slider up and
down on the right side of the screen.
Tighten the Building plate knob and loosen the
9
four screws at the sides so the platform can move
freely up and down.
NOTE: Ensure that building plate’s screws are completely free when
lowering the platform to avoide damage the screen.
Press the the building platform smoothly with one hand and tighten 4 screws. All 4 screws should be now tighten. Now lift
11
the building plate and ll the vat with resin. Print don’t consume a lot of resin, a quarter full vat is enough for a medium sized
print.
10
Click LCD to ensure correct projection.
And click level to begins the leveling step.
For different object you may want different resolution and
speed.
Go to to configure the resin, speed, USB
connection, Gcode and so on. The detail explanation and
the manual can be download from USER MANUAL and
WANHAOUNIVERSITY.COM.
Click on export then .cws and save the model as
7
.cws le. Software start to render and generate
the printing le. Copy this le into ash disk.
a. b. c.
NOTE: Don’t push the build platform too hard
to avoid breaking the LCD screen.Make sure the
platform touches the screen sufciently.
Place the hood back onto the printer. In control
12
panel press Z home and place the platform on
home position
13
NOTE:once started, the print can’t be paused and relled
so it's safer to over-ll and reuse the resin.
Insert the ash disk. Click Print-Add le Conrm
le -PLAY
NOTE: Before PLAY, loading le may take few seconds. Until you see
layers quantity displayed, click PLAY. Should you have question, go to
VIDEO guidance on our website.
Layer
1/200
Printing Time
min
TIP: If you experience any issue conguring the screen resolution or usb port.Visit our video tutorial at WANHAO VIDEO at
www.wanhao3dprinter.com.
TIP: If you experience any issue conguring the screen resolution or usb port.Visit our video tutorial at WANHAO VIDEO at
www.wanhao3dprinter.com.
Page 2

CLEANING AND FINISHING THE PRODUCT
14
Wear gloves and remove the hood from the printer, loosen the building plate knob and rotate with little bit angle and let
leftover resin drop into the vat, remove as much liquid from the plate and object as possible for further prints. Use the plastic
scraper to remove the printed object safely.
Note: Place the hood back to protect the resin from light to prevent the resin lose its properties.
POST PROCESSING
15
WANHAO D7 PLUS
GETTING
Place the platform to a washing-up bowl. Remove the objects by sliding the scraper in at their base.
Wash off any liquid polymer in alcohol container. You can gently clean it with a soft brush or sponge,
take care not to damage it, it will not achieve full hardness until after post exposing in light. An
ultrasonic cleaner will clean your objects without the possibility of damaging them.
Check your object is thoroughly clean as resin cannot be easily removed afterwards and then
leave it under water in sunlight for about 10 minutes. The longer you leave it under water the
darker the colour will get, some colour change is inevitable. When it is completely post-exposed
it will be strong and have a dry surface. Empty the contents of the vat back into the bottle by
pouring through a sieve.With the vat on a at surface wipe the inside thoroughly with absorbent
paper.Replace the lm when damaged.
STARTED
GUIDE
Alcohol
WANHAO FACTORY CO.,LTD
NO.198 Gaoke Road FuYang HangZhou China
WANHAO Help Desk: 86-571-23290996
(Operating Hours: Mon-sat ; 8:00am -5:00pm)
support@wanhao3dprinter.com
www.wanhao3dprinter.com
REV.B
 Loading...