

Page 1
&--i
!II
~
~~
~
a 1;11
r
!I"!
~,
~
~
~
fl
~
.~
I
~
i
III
Ci::I
a
n
~
II
,
~
June 1964 Edition
.,
I)Q!I
B
re R.~
Sman"
Cal. .22 I. r. .
k}
II
III
.. 'JIll - .
"
0
"".,..
.~~)
.
.
II
iI!
III
fle~
~
\
P
I ru
II
..
1:1
III
rP
jla
Q
a
Instruction Manual
~
,IfJii'
~
,@.. III
II
IF
1\
II
l11li
)
I
J
~~
,
Page 2
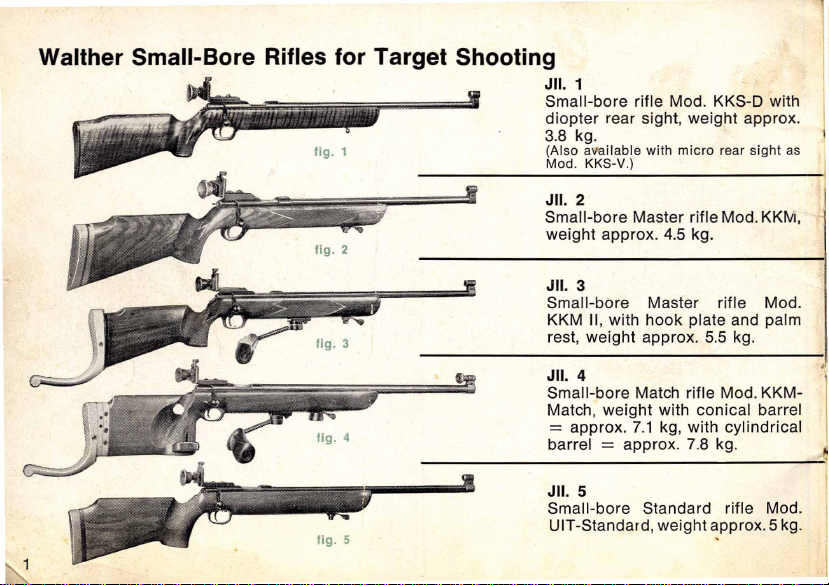
Walther Small-Bore Rifles for Target Shooting
~
JII. 1
Small-bore rifle Mod. KKS-D with
diopter rear sight, weight approx.
3.8 kg.
(Also available
Mod. KKS-V.)
JII. 2
Small-bore Master rifle Mod. KKM,
weight approx. 4.5 kg.
JII. 3
Small-bore Master rifle Mod.
KKM II, with hook plate and palm
rest, weight approx. 5.5 kg.
JII. 4 '.
Small-bore Match rifle Mod. KKM-
Match, weight with conical barrel
approx. 7.1 kg, with cylindrical
=
barrel
JII. 5
Small-bore Standard rifle Mod.
UIT -Standard, weight approx. 5 kg.
with
micro rear sight as
approx. 7.8 kg.
=
Page 3
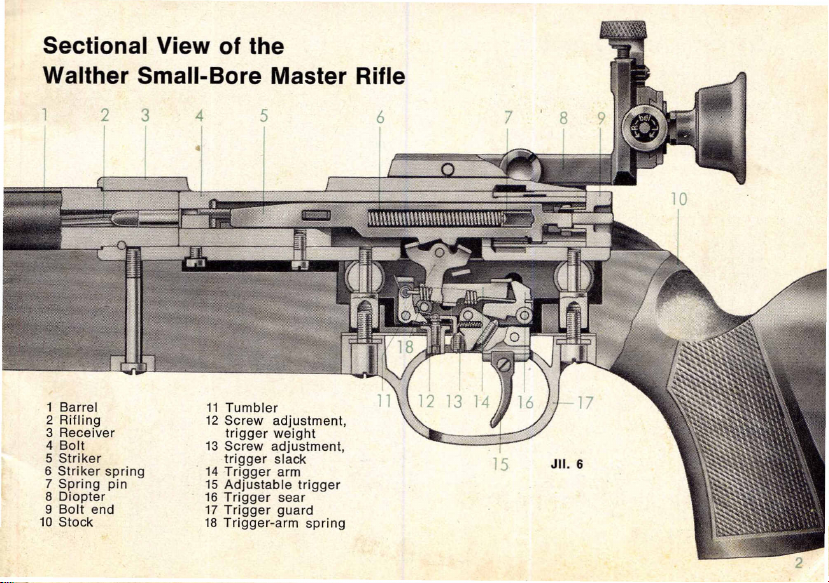
Sectional View of the
Walther Small-Bore Master Rifle
1 Barrel
2 Rifling
3 Receiver
4 Bolt
5 Striker
6 Striker spring
7 Spring pin
8 Diopter
9 Bolt end
10 Stock
4
.
5
11 Tumbler
12 Screw adjustment,
trigger weight
13 Screw adjustment,
trigger slack
14 Trigger arm
15 Adjustable trigger
16 Trigger sear
17 Trigger guard
18 Trigger-arm spring
Page 4
General Advice on the use of W A LTHE R Small-Bore Rifles:
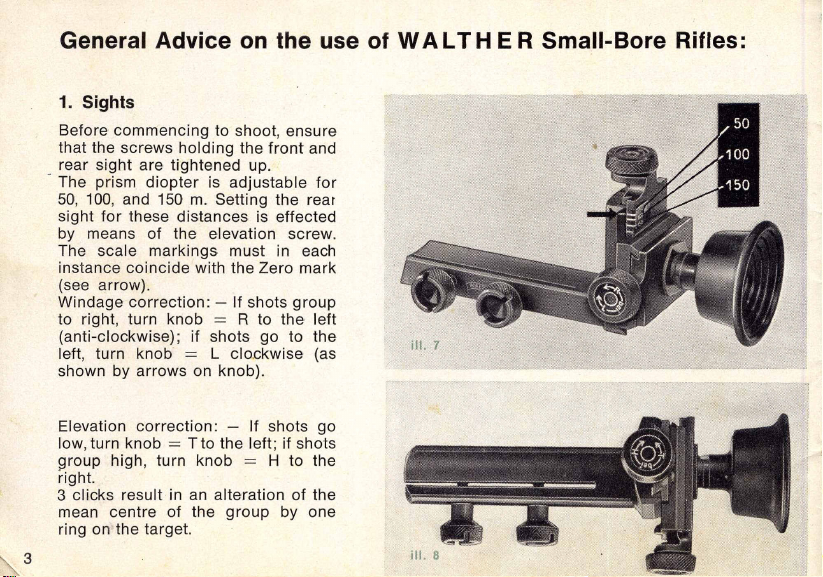
1. Sights
Before commencing to shoot, ensure
that the screws holding the front and
rear sight are tightened up.
-
The prism diopter is adjustable for
50, 100, and 150 m. Setting the rear
sight for these distances is effected
by means of the elevation screw.
The scale markings must in each
instance coincide with the Zero mark
(see arrow).
Windage correction:
to right, turn knob=R to the left
(anti-clockwise); if shots go to the
left, turn knob
shown by arrows on knob).
If shots group
-
L clockwise (as
=
ill. 7
Elevation correction:
low, turn knob
group high, turn knob
right.
3 clicks result in an alteration of the
mean centre of the group by one
ring on the target.
",3
Tto the left; if shots
=
If shots go
-
H to the
=
Page 5
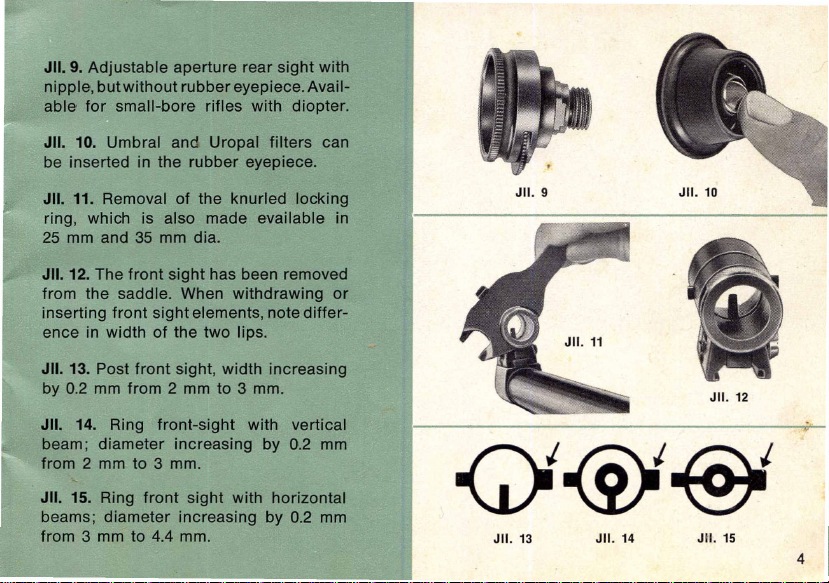
JII. 9. Adjustable aperture rear sight with
nipple, but without rubber eyepiece. Avail-
able for small-bore rifles with diopter.
II
JII. 10. Umbral and Uropal filters can
be inserted in the rubber eyepiece.
JII. 11. Removal of the knurled locking
ring, which is also made evailable in
25 mm and 35 mm dia.
JII. 12. The front sight has been removed
from the saddle. When withdrawing or
inserting front sight elements, note differ-
ence in width of the two lips.
JII. 13. Post front sight, width increasing
by 0.2 mm from 2 mm to 3 mm.
JII. 14. Ring front-sight with vertical
beam; diameter increasing by 0.2 mm
r-
from 2 mm to 3 mm.
JII. 15. Ring front sight with horizontal
beams; diameter increasing by 0.2 mm
from 3 mm to 4.4 mm.
JII. 9
JII. 10
JII. 12
Qi@i@i
JII. 13
JII. 14
JII. 15
4
Page 6
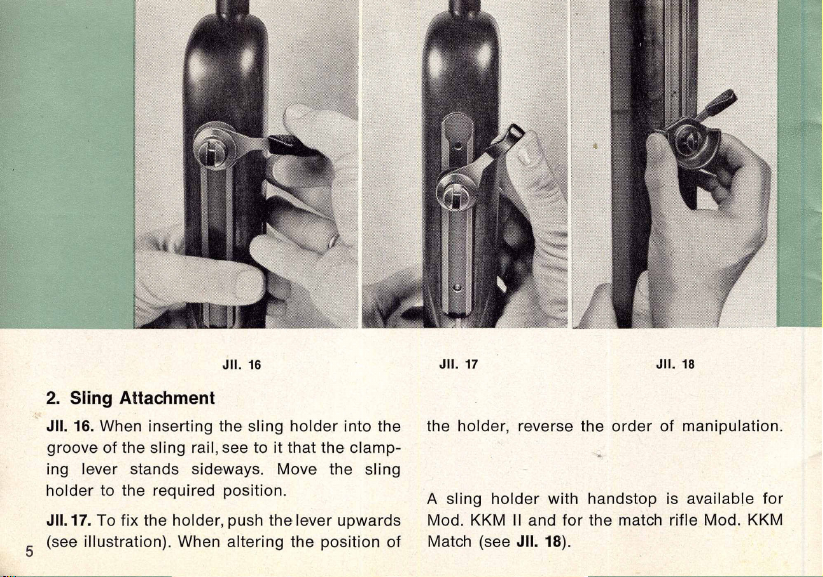
JII. 16
2. Sling Attachment
;."
JII. 16. When inserting the sling holder into the
groove of the sling rail, see to it that the clamp-
ing lever stands sideways. Move the sling
holder to the required position.
JII.17. To fix the holder, push the lever upwards
(see illustration). When altering the position of
5
JII. 17 JII. 18
the holder, reverse the order of manipulation.
A sling holder with handstop is available for
Mod. KKM II and for the match rifle Mod. KKM
Match (see JII. 18).
Page 7

3. WALTHER Rifle Sling
JII. 19. Push sling end (a) through
loop (b), then apply sling swivel and
buckle (c). Adjust length as required
by the shooter. When applying the
sling to the left upper arm (left-hand-
ed shooters, to the right upper arm),
push loop (b) back until the sling fits
the arm firmly. Finally, push fixing
hook (d) through both parts of the
sling and insert locking pin in the
holes in the hook.
JII. 20. Attach the sling swivel to the
sling holder. The rifle may now be
brought up to the shooting position.
The sling, owing to its rigid method
of fixing, cannot change its firm
position.
ill. 20
Page 8

t
L
JII. 21
4. Match Triggers
JII. 21. Match trigger. The trigger is adjustable
lengthwise and can be made to slope outwards
to either the left or the right.
Screw 1 for adjustment of trigger pull and let-
off (to increase, turn right; to decrease, turn
left). Screw 2 for adjustment of trigger slack
(to shorten, turn right; to lengthen turn left).
7
JII. 22
JII. 22. Match trigger with set-trigger. To use
the device, push trigger 1 forward until it is
engaged (in direction of arrow). The rear trig-
ger now has a very light and instantaneous let-
off.
If trigger 1 is set and the shot is not to be fired,
apply safety at once and open the breech
carefully!
This is not a combination trigger!
Page 9

5. Rubber butt plates and hook plates
JII. 23. Hook plate with dove-tail bar, adjust-
able vertically, for Models KKM II and KKM-
Match.
JII. 24. Rubber but plate with dove-tail bar.
To shift vertically, loosen the two screws
indicated by arrows.
JII. 23
.
JII. 24
JII. 25. Hook plate with extension device. To
adjust, loosen the two screws indicated by
arrows, then shift to the required length by
turning the Allen screw in the middle. The
toothed rack is provided with a graduated
scale. Tighten the two outer screws again
when the length has been adjusted.
When removing either plate from the stock, be
careful not to damage the dove-tail slot in the
butt.
JII. 26. Knurled screw, to replace
Allen screw, can be supplied
.
upon request.
JII. 26 III
jf
r
Page 10

6. Palm Rests
JII. 27
JII. 28 JII. 29
JII. 27. Palm rest with extension. Can be
adjusted to suit, - laterally and vertically.
The grip can be turned.
JII. 30. To fit the palm rest, loosen the clam-
ping screw in front and insert base in the
sling rail, then tighten the clamping screw.
Set the p'osition of the rest by means of the
Allen screw (see illustration) and turn the
grip as required (see arrow).
The palm rests (JII. 28 and JII. 29) are atta-
ched to the sling rail in the same manner
as the sling holder.
9
JII. 28. Palm rest with
support fitting,
direct
-
grip and height adju-
stable.
ill. 30
JII. 29. Palm rest with
cork grip. The position
and height of the grip
are adjustable.
Page 11

7. Dismantling the WALTHER
Small-Bore Rifle Action
JII. 31. Opening the breech, thereby
cocking the action: Push the bolt-
lock on the left on the action body
down (see arrow) and withdraw th(>
bolt.
JII. 32. Hold the bold firmly with the
left hand, uncock the bolt by turning
the bolt handle fully over to the left
(see arrow in illustration 32).
Page 12

JII. 33. The bolt is uncocked. Note
the position of the bolt handle. The
inner end of the bolt handle now
stands close to the striker groove in
the bolt.
JII. 34. Turn the safety lever fully
over to the left (in the direction of
the arrow).
Page 13

JII. 35. Withdraw the bolt-end with
the safety lever to the rearward.
Ensure that the spring pin opposite
the safety lever (as indicated by
arrow) does not faJI out. Hold the
bolt horizontally.
III
JII. 36. Withdraw the bolt-handle unit
to the rearward. Here again, see that
the spring pin (a) does not fall out.
Hold the bolt horizontally.
Page 14

1/1.38
JII. 37. Withdraw striker and striker
spring to the rearward.
JII. 38. Depress the striker spring and
remove to the forward together with
forked spring pin.
The action is now completely dis-
mantled.
Page 15

8. Assembling the WALTHER
Small-Bore Rifle Action
JII. 39. Insert the striker spring. Push
the upper end down and slip on to
pinted lip in thellllupper end of the slot
in the striker.
l1li
JII. 40. Insert the striker in the bolt
and push until the point of the striker
appears in the hole in the bolt face
(see arrow).
Ensure that the spring pin in the bolt
end (b) does not drop out and goes
astray.
III
ill. 40
14
Page 16

JII. 41. Put the bolt handle on the
bolt. Make sure that the spring pin
(a) is seated correctly in the notch
(b) in the bolt handle unit at the
lug (c).
The part concerned is shown enlarg-
ed in the right-hand corner, to
explain the exact positioning.
JII. 42. Bolt, complete with bolt
handle, as well as bolt-end with
safety lever, seen from above. When
replacing the bolt-end, make sure
that the wider lug on the latter is
seated correctly in the wider recess
in the bolt, as shown by arrow.
Page 17

JII. 43. As shown in the illustration,
push the bolt handle forward, fit the
bolt-end firmly to the bolt as describ-
ed before, then turn fully over to the
right together with lhe bolt.
JII. 44. Hold the bolt firmly with the
left hand and turn the bolt handle to
the right with the right hand. The
bolt may now be put back into the
action body. When doing so, press
the bolt lock on the action body
downward.
Page 18

F
9. Care of the rifle
After shooting, clean the bore of the
barrel thoroughly and wipe with a
patch saturated with non-resinous
and acid-free oil.
JII. 45. Place "the fingertip over the
muzzle so as to prevent the tip of
the cleaning rod (jag) from coming
out of the muzzle. Do not push the
jag with the patch right out of the
muzzle and then try to withdraw the
rod by force.
Lubricate the bolt lightly and leave
a thin coat of oil on all metal parts
when the rifle is not in use. Wipe
the bore with a dry patch before use.
It is recommended to remove the
lead deposit from the chamber with
a brass wire brush (NOT WITH A
STEEL. WIRE BRUSH) after firing
about 1 000 shots. The brush must
penetrate the barrel to a depth of
not more than 60-80 mm. Oil the
bore again
afterwards.
t
r
1
Page 19

Index to Contents:
The various models of
WALTHER small-bore rifles
Sectional view of the .
WALTHER small-bore Master rifle
Sights
Sling attachment
WALTHER shooting sling
Match triggers
Rubber- and hook plate
Palm rests
Dismantling the WALTHER
small-bore rifle action
Assembling the WALTHER
small-bore rifle action
.
Care of the rifle
WALTHER Kit case
Test Card
on back of cover
..
Page
2
3-4
5
6
7
8
9
10-13
14-16
17
18
JII. 46
WALTHER
Kit Case
(J/I. 46)
containing:
screw-driver,
cleaning cloth,
2 oil bottles
with drip oiler,
screw-lid box
for front singht
elements.
)
18
Page 20

10. Test Card
Small-bore rifle No .........................
Model
10 shots at 50 m
Signature:
Some of the more important successes
achieved with WAL TH~R rifles in 1962 and
II 1963.
a a~
World Championships Cairo 1962: fJ
:Silver-, 4 Bronze Medals, and several
nt2'nt places among the ,Ten Best' marksme,t. [t.
II II
European Championships Oslo 1963~ ~
3 Gold" 3 Silver-, and 1 Bronze Medal, a&i
fJ:'~nerCip!aces among the ,Ten Best:'~:Uksml;h
compe II1g In t e severa pOSI lona events.
'
Swiss National Chaillpionships 1963: g
Record score in the "Three-positional:!le~,~
I
r
attained with a WALTHER small-bore rifle:
1169 pgints.
"
~
'"
a .
.~ hI\.
r
a
~
I T
fi
D
IIIII
IU
III
ft
Ii
lOt
a
rill
1\1
~World Postal Match 1963:
Highest score/attained with a WALTHER small-
bore rifle: 1154 points.
~
II n
p:o~~~t:
J'
foI~
III
:;,
~~
J
a
J
~
~
'"
 Loading...