

Page 1
Zielfernrohr 3-9x40 mit
Absehen 8
Bedienungsanleitung
Mit Ihrem Walther Zielfernrohr 3-9x40 haben Sie ein feinmechanisches
Präzisionsinstrument erworben. Wenn Sie die folgenden Punkte beachten, wird das Zielfernrohr eine lange Lebensdauer aufweisen.
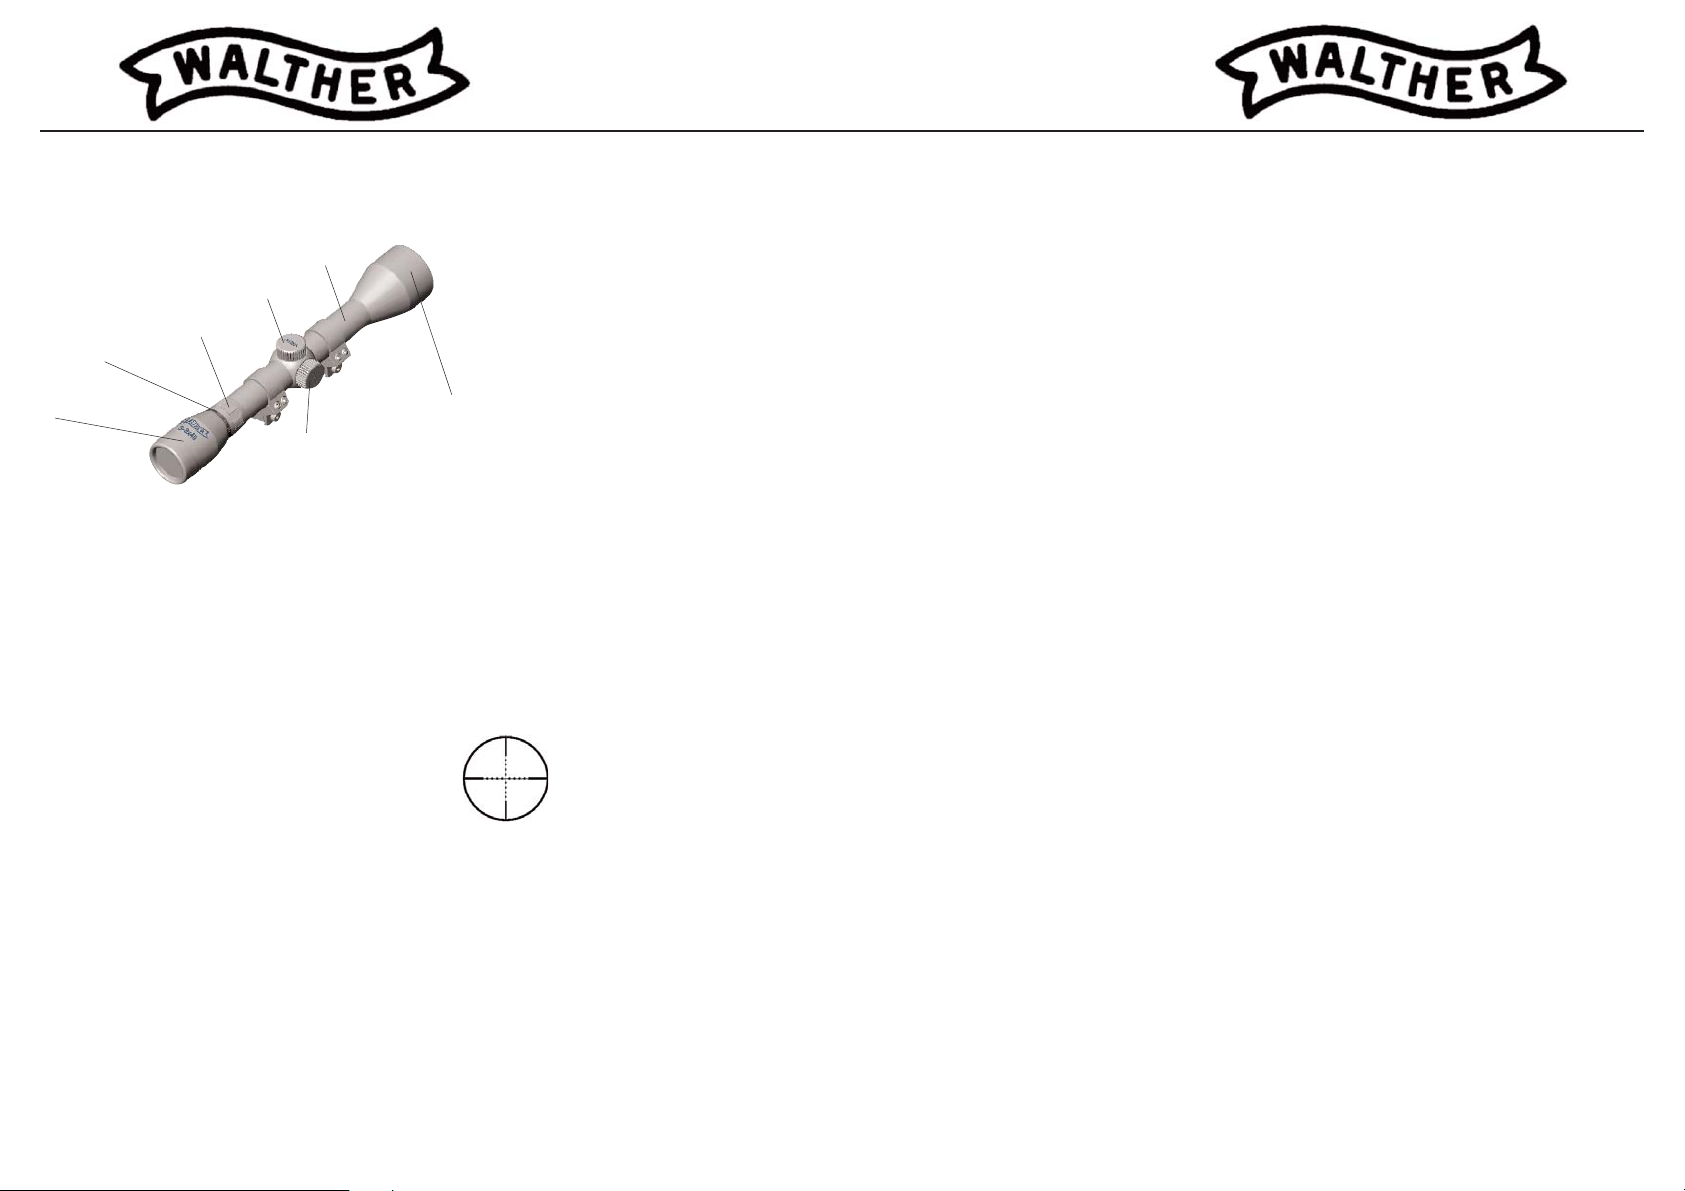
1. Okular
2. Konterring
3. Vergrößerungseinstellung
2
1
4
3
5
7
4. Höhenverstellung
5. Tubus
6. Objektiv
7. Seitenverstellung
6
Scharfeinstellung
Zur Scharfeinstellung den gerändelten Konterring lösen.
Die Scharfeinstellung des Bildes erfolgt durch Drehen des Okulares (dem
Auge zugewandten Teiles des Zielfernrohres). Nach der Scharfeinstellung
den Konterring wieder fixieren. Es empfiehlt sich, diese Einstellung bei
der größtmöglichen Vergrößerung von 9-fach vorzunehmen, das Bild
bleibt dann über den gesamten Vergrößerungsbereich gleichbleibend
scharf. Schauen Sie in einem Abstand von ca. 8 bis 10 cm (3 bis 4 inch)
durch das Zielfernrohr. Nur dann sehen Sie das volle Gesichtsfeld.
Absehen
Das Zielfernrohr ist mit dem Absehen 8 ausgestattet.
Über den gesamten Verstellbereich bleibt die Größe des
Absehens konstant. Daher ist auch eine
Entfernungsschätzung
mittels des Abstandes der großen Balken des Absehens
nicht möglich.
Justierung des Absehens
Das Justieren des Zielfernrohres zur Korrektur der Abweichungen der
Treffpunktlage, erfolgt mittels der Höhenverstellung (oben auf dem
Tubus) und der Seitenverstellung (rechts an dem Tubus). Zum Einstellen
sind die Schutzkappen zu entfernen, danach kann die jeweilige
Einstellschraube verdreht werden. Zum schnelleren Einstellen sind die
Schrauben mit einer Klick-Rasterung versehen, wobei 1 Klick eine
Veränderung der Treffpunktlage von 7 mm auf 100 m (0,25 inch auf
100 yards) ergibt. Beim Justieren ist wie folgt vorzugehen:
• Bei Tiefschuss obere Stellschraube in Richtung "UP" drehen.
• Bei Rechtsschuss seitliche Stellschraube in Richtung "L" drehen.
Bei Hochschuss oder Linksschuss ist entsprechend umgekehrt zu verfahren. Nach der Korrektur der Treffpunktlage müssen die Schutzkappen
unbedingt wieder aufgeschraubt werden, um das Eindringen von
Feuchtigkeit oder Schmutz zu verhindern.
Das Absehen ist mittenzentriert, es bleibt bei allen Verstellungen immer
im Zentrum des Bildes.
Variable Vergrößerung
Über den vor dem Okular befindlichen Stellring lässt sich die Vergrößerung stufenlos von 3-fach bis 9-fach einstellen. Die Zahl gegenüber dem Markierungspunkt gibt die eingestellte Vergrößerung an.
Pflege und Wartung
Ihr Walther-Zielfernrohr bedarf keiner besonderen Wartung. Grobe
Schmutzteilchen (z. B. Sand) auf den Linsen nicht einfach abwischen,
sondern wegblasen oder mit einem Haarpinsel entfernen.
Fingerabdrücke auf den Linsen können nach einiger Zeit die Oberfläche
angreifen. Die einfachste Art, die Linsen zu säubern, ist sie anzuhauchen
und mit einem sauberen Optikreinigungstuch nachreiben.
Die brünierten Metallteile sollten wie die brünierten Waffenteile gepflegt
werden. Bei Bedarf mit leicht geöltem Lappen abwischen.
Nach dem Schießen sollten die Staubschutzkappen wieder auf das
Zielfernrohr gesetzt werden.
Technische Daten
Vergrößerung: 3-fach bis 9-fach
Mittelrohrdurchmesser: 30 mm
Objektivdurchmesser: 40 mm
Absehen: 8
Gesichtsfeld auf 100 m:
3-fache Vergrößerung 12,0 m
9-fache Vergrößerung 4,5 m
Dot-Abstand
bei 3-facher Vergrößerung ca. 31 cm auf 100 m
Gewicht mit Montage: 515 g
Länge: 305 mm
Zubehör
Staubschutzkappen, Bedienungsanleitung, Zielfernrohrmontage
Montage
Vor dem Aufsetzen des Zielfernrohres müssen unbedingt folgende
Punkte beachtet werden:
- Vergewissern Sie sich, dass die Waffe entladen ist.
- Halten Sie den Lauf immer in eine Richtung, in der das Geschoss
keinen Schaden anrichten kann.
Das Zielfernrohr ist bereits werksseitig mit 2 Montageblöcken zur
Montage für Waffen mit einer Picatinny Schiene ausgerüstet. Lösen
Sie zuerst die 8 Schrauben, mit denen die Montageblöcke an den
Tubus (Rohr) des Zielfernrohres verbunden sind so, dass Sie sich frei
verschieben lassen. Lösen Sie nun die Rändelschrauben an den
Montageblöcken, die Halteklaue öffnet sich. Setzen Sie die
Montageblöcke auf die Picatinny-Schiene und ziehen Sie die
Rändelschrauben an. Richten Sie das Zielfernrohr so aus, dass der
Höhenverstellturm genau senkrecht steht und achten Sie auf den
Augenabstand von ca. 8 - 10 cm zum Okular, wenn sich die Waffe
im Anschlag befindet. Dann mit den 8 Schrauben das Zielfernrohr an
den Montageblöcken festschrauben. Nach einigen Schüssen sollten
die Rändelschrauben nochmals nachgezogen werden.
Vertrieb und Service:
Umarex Sportwaffen GmbH & Co KG
D - 59717 Arnsberg Postfach 2720
D - 59757 Arnsberg Donnerfeld 2
Telefon 02932 / 638-01
Telefax 02932 / 638-222
Internet: www.umarex.de
e-mail: sale@umarex.de
04.05 2.1517
Page 2
Telescopic sight 3-9 x 40 Reticle 8
Operation instructions
Your Walther telescopic sight 3-9x40 which you have now acquired is a
highly precise optical instrument. Make sure that you adhere to the
following instructions and you will enjoy a long service life of your
scope.
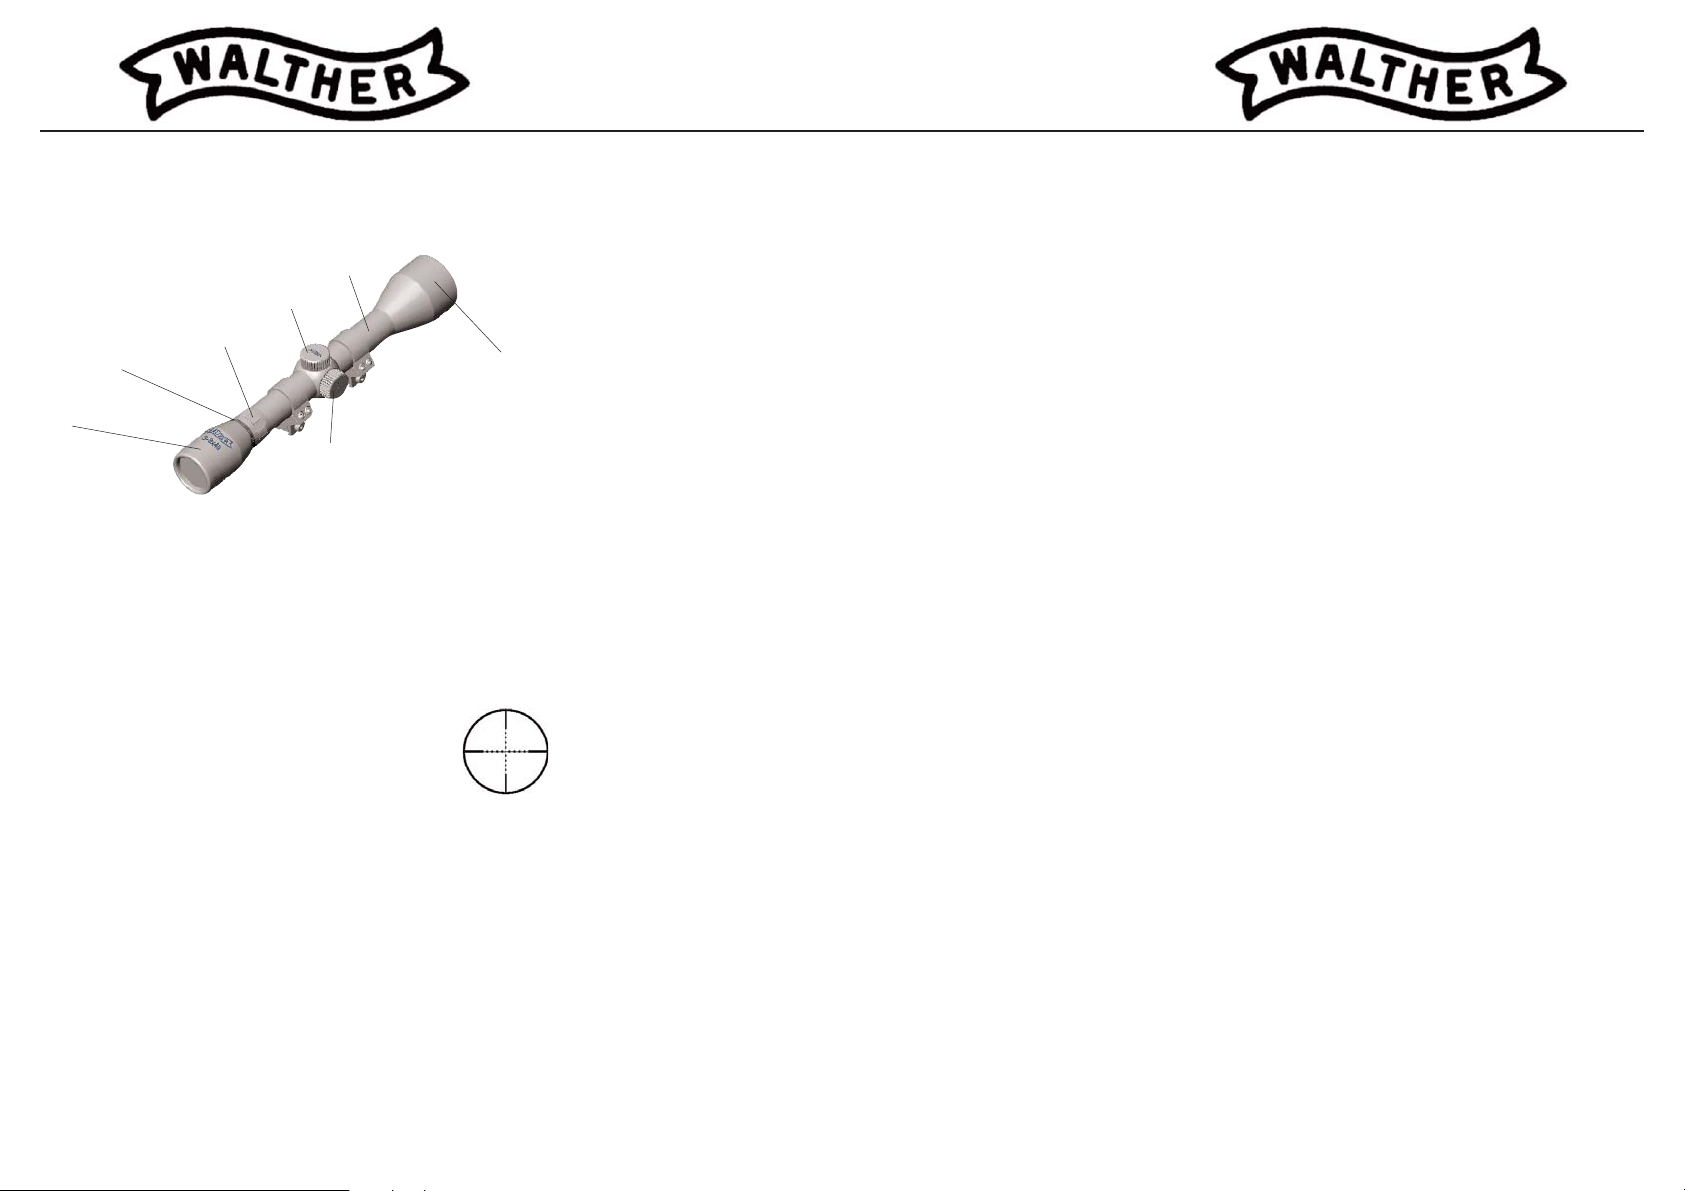
1. ocular
2. fastening ring
3. magnification adjustment
2
1
4
3
5
4. elevation adjustment
5. tube
7
6. objective lens
7. windage adjustment
6
Focusing
For focusing loosen the fastening ring.
Focusing of the image is by turning the ocular (the part of the scope
you look into with the eye). After focusing tighten the fastening ring.
It is recommended to adjust this setting at the largest possible magnification of 12x as the image will then remain distinct over the entire
range of magnification. Keep an eye relief of approx. 8 to 10 cm (3 to 4
inches) and look through the scope. Only then will you benefit from the
full field of view.
Reticle
The scope has a reticle of the type 8. The size of the
reticle remains the same over the entire range of
adjustment. This also means that it is not possible to
estimate distances by means of the space of the large
crosshairs of the reticle.
· if point of impact is too low, turn upper adjustment screw towards
"UP"
· if point of impacts is too far right, turn side-mounted adjustment screw
towards "L"
If point of impact is too high or too far left, turn the adjustment screws
accordingly. After these adjustments, the protective caps are to be put
back on in order to prevent the penetration of dampness or dirt. The
reticle ist centrally adjusted, it always remains in the centre of the image
during all adjustments.
Variable magnification
The setting ring situated in front of the ocular lens is used to set the
continuously adjustable magnification from 4-fold to 12-fold. The number opposite the marking dot shows the set magnification.
Care and maintenance
Your Walther telescoping sight does not require any special maintenance. Do not simply wipe coarse dirt particles (such as sand) off the lenses
but blow it away or use a fine brush to remove it. The simplest way to
clean lenses is to breathe at them and then softly wipe them down with
a clean optical cloth. The blued metal parts should be given the same
treatment as other blued parts of the weapon. Use a cloth slightly dampened with gun oil if required.
After shooting, the dust protection caps should be replaced.
Technical data
magnification: 3-fold to 9-fold
tube diameter: 30 mm
objective lens diameter: 40 mm
reticle: 8
Mounting
Prior to the mounting of the telescope sight, the following measures
have to be taken:
-Check your weapon, it must be unloaded.
-Always hold the muzzle of your gun in a safe direction so that an
unintentional discharge cannot cause any damage.
The telescopic sight in its as delivered condition is already fitted with
two mounting blocks which can be used for standard picatinny rails.
First loosen the 8 screws which hold the mounting blocks on the
tube until the blocks can be freely moved. Now loosen the knurled
screws on the mounting blocks, the retaining claw will now open.
Place the blocks on the rail and tighten the knurled screws. Adjust
the telescopic sight in a way that the elevation adjustment turret is
at a right angle and make sure the eye relief is approx.
3-4 " (8-10 cm) with the gun mounted. Now tighten the 8 screws
on the mounting been fired, the knurled screws should be
retightened.
Adjustment of the reticle
Adjustment of the scope on order to correct deviations of the point of
impact is by means of the elevation adjustment (on top of the tube) and
the windage adjustment (on the right side of the tube). To do so, the
dust protection caps have to be removed, then a coin can be used to
turn the appropriate adjustment screw. To facilitate the adjustments, all
screws have a click-adjustment. 1 click changes the point of impact by
.25 inches on 100 yards (7 mm on 100 m). To change the adjustment,
proceed as follows:
field of view on 100 m:
3-fold magnification 12,0 m on 100 m
9-fold magnification 4,5 m on 100 m
dot distance
at 3-fold magnification approx. 31 cm on 100 m
weight including mount: 515 g
length: 305 mm
Accessories:
Dust protection caps, lithium battery 3V CR 2032,
Operation instructions, HighPower mount
Service:
Umarex Sportwaffen GmbH & Co KG
D - 59717 Arnsberg Postfach 2720
D - 59757 Arnsberg Donnerfeld 2
Telefon 02932 / 638-01
Telefax 02932 / 638-222
Internet: www.umarex.de
e-mail: sale@umarex.de
04.05 2.1517
 Loading...