

Page 1

Bedienungsanleitung
Operating Instructions
Central Display -- Affichage central
Achtung: Bitte lesen Sie vor Gebrauch des Zentraldisplays diese Bedienungsanleitung sorgfältig!
Attention: Please read these operating instructions carefully before using the central display!
Attention: Veuillez lire attentivement ces instructions avant l’utilisation de l’affichage central!
Note d’utilisation
RG Zentraldisplay
Page 2

Inhaltsverzeichnis -- Contents -- Table des matiË res
Allgemeines 3..........................................................................................
Technische Daten 3.....................................................................................
Schematischer Aufbau LTS 4.............................................................................
Funktionen des Zentraldisplays 4.........................................................................
Benennung der Hauptteile 5..............................................................................
Batteriewechsel / Betrieb mitRG-Netzteil 6.................................................................
Zuordnung von mehreren Anlagen 7-8.....................................................................
Serielle Schnittstelle 8-10................................................................................
Men¸ 11-25...........................................................................................
Schiefl spiele -- Fun Games 25-29.........................................................................
Dart 29-36............................................................................................
IPSC 37-38............................................................................................
Einstellungen 38-42.....................................................................................
Spielbeschreibungen 42-45..............................................................................
‹ bersicht Men¸ struktur 46-47............................................................................
Lieferprogramm LTS 48..................................................................................
General information 3...................................................................................
Te chnicalinformation 3..................................................................................
Schematic Diagram LTS 4...............................................................................
Central display functions 4...............................................................................
Identification of the main components 5....................................................................
Changing the batteries 6.................................................................................
Allocation of several systems 7-8.........................................................................
Serial interface 8-10....................................................................................
Menu 11-25...........................................................................................
Fun Games 25-29......................................................................................
Darts 29-36...........................................................................................
IPSC 37-38............................................................................................
Settings 38-42.........................................................................................
Game descriptions 42-45................................................................................
Menu structure 30-32...................................................................................
Overview LTS programme 48.............................................................................
GÈ nÈ ralitÈ s 3..........................................................................................
SpÈ cifications techniques 3..............................................................................
SchÈ ma de la structure LTS 4............................................................................
Fonctions de lí È cran dí affichage central 4...................................................................
DÈ signation des principaux composants 5..................................................................
Remplacement des piles 6...............................................................................
Classement de plusieurs installations 7-8..................................................................
Interface en sÈ rie 8-10..................................................................................
Menu 11-25...........................................................................................
Jeux de tir -- Fun Games 25-29...........................................................................
Dart 29-36............................................................................................
IPSC 37-38............................................................................................
Einstellungen 38-42.....................................................................................
Spielbeschreibungen 42-45..............................................................................
Structure du menu 30-32................................................................................
Accessoires spÈ ciaux LTS 33............................................................................
2
Page 3
Allgemeines
General information
Généralités
Lichtschießen auf das elektronische Ziel mit Spielsteuerung und
Auswerten über das Zentraldisplay
ist ein Bestandteil des Laser Training System (LTS).
Die elektronischen Ziele aus dem
Röhm LTS--Programm können von
allen RG-Laserwaffen beschossen
und über das Zentraldisplay ausgewertet werden.
Die Anlagen sind vorzugsweise
im Innenbereich zu verwenden,
keinesfalls dürfen sie Feuchtigkeit
ausgesetzt werden.
Laser shooting at the electronic target with game control and scoring
via the central display unit comprises part of the Laser Training
System (LTS).
It is possible to shoot at the electronic targets and central display units
in the Röhm LTS product range
using RG laser guns.
The devices should preferably be
used indoors. Under no circumstances should they be exposed to moisture.
Le tir au laser sur cible électronique
avec instructions de jeu et évaluation des résultats sur l’affichage
central fait partie intégrante du
Laser Training System (LTS).
Les cibles électroniques et les affichages centraux de la gamme
Röhm LTS peuvent être utilisés
avec tous les types d’armes avec
RG-laser.
Ces équipements doivent de
préférence être utilisés en intérieur
et ne peuvent en aucun cas être
exposés à l’humidité.
3
Attention!
In the event of improper use of the
device, the manufacturer accepts no
responsibility and does not undertake to pay any claims for compensation. Damage may be caused particularly by rough handling, for example, falling from the rack. As the
supplier, we accept no liability for
such damage. The user is solely
responsible for any damage or
injuries.
Achtung!
Bei unsachgemäßer Handhabung
des Gerätes übernimmt der Hersteller keinerlei Verantwortung oder
Zahlung von Schadensersatzforderungen Insbesondere rohe Behandlung wie z. B. ein Herunterfallen von
der Ablage kann zu Schäden führen, wofür wir als Lieferant nicht
verantwortlich sind.
Allein der Benutzer haftet für evtl.
Schäden oder Verletzungen.
Attention!
En cas de manipulation inadéquate
de l’appareil, le fabricant décline
toute responsabilité et rejette toute
demande de dommages et intérêts.
En particulier, les manipulations brutales, comme laisser tomber l’appareil de son support, peuvent occasionner des dégâts pour lesquels
nous ne pouvons êtres tenus pour
responsables en tant que fournisseurs. Seule la responsabilité de
l’utilisateur est engagée en cas de
dommages et de blessures.
Röhm GmbH
Abteilung Verkaufsberatung
Postfach 1161
89565 Sontheim/Brenz
Telefon: 07325/16-0
e-mail: inforg@roehm-rg.de
Internet: www.roehm-rg.de
Röhm GmbH
Abteilung Verkaufsberatung
Postfach 1161
89565 Sontheim/Brenz
Telephone: 07325/16-0
e-mail: inforg@roehm-rg.de
Internet: www.roehm-rg.de
Röhm GmbH
Abteilung Verkaufsberatung
Postfach 1161
89565 Sontheim/Brenz
Téléphone: 07325/16-0
e-mail: inforg@roehm-rg.de
Internet: www.roehm-rg.de
Copies of these instructions for use
can be obtained from the manufacturer free of charge.
Le présent manuel d’utilisation peut
également être obtenu gratuitement
par la suite auprès du fabricant:
Diese Bedienungsanleitung ist auch
nachträglich kostenlos vom Hersteller zu beziehen.
Dimensions (L/H/P) m m 160/115/74
Poids total g 370
Portée env. 15 m
Piles 4x AA (Micro)
RG-Bloc d’alimentation 6V D C/max. 0,5A
Interface en série D-SUB 9polig
Température max. +50
o
C
d’utilisation min. --10
o
C
Dimensions (L/H/W) mm 160/115/74
Total weight g 370
Range approx. 15 m
Batteries 4x AA (Micro)
RG-Mains adapter 6V DC/max. 0,5A
Serial interface D-SUB 9polig
Temperature m ax. +50
o
C
for operation min. --10
o
C
Maße (L/H/B) mm 160/115/74
Gewicht g 370
Funkreichweite ca. 15 m
Batterien 4x AA (Micro)
Buchse für RG-Netzteil 6V DC/max. 0,5A
Serielle Schnittstelle D-SUB 9polig
Einsatztemperatur max. +50
o
C
min. -- 10
o
C
Technische Daten
Technical information -- Données techniques
Page 4
Funktionen des Zentraldisplays
Central display functions -- Fonctions de l’écran d’affichage central
4
The central display is used to
control the electronic radio targets.
A system consists of a central
display and a minimum of one,
maximum 16 radio target(s).
The central display receives the
data from the radio targets via:
S Hit signal
S Weapon identification
The target can also receive instructions from the central display
however:
S Release for shelling
S Block when time expires
S Activate fixed-programmed games
The central display communicates
with the marksman via the target
loudspeaker:
S Game instructions
S Results
S Comments on the progress of
the game
The central display may alternatively
be connected to a computer:
S Results schedule and progress of
the game are passed on
L’écran d’affichage central est
responsable de la gestion des cibles
électroniques.
Une installation se compose d’un
écran d’affichage central et d’au
minimum une et d’au maximum
seize cibles.
L’écran reçoit, depuis les cibles,
des données concernant:
S l’annonce du coup réussi
S la signalisation de l’arme
La cible peut également recevoir
des consignes de la part de l’écran
d’affichage central:
S libérer pour le tir
S bloquer une fois le temps écoulé
S activer les jeux programmés de
manière fixe
L’écran d’affichage central
communique au tireur, via le hautparleur de la cible, les:
S instructions relatives aux jeux
S résultats
S commentaires sur l’évolution de la
partie
L’écran d’affichage central peut être
connecté à un ordinateur:
S la liste des résultats et l’évolution
de la partie sont transmises à
l’ordinateur
Das Zentraldisplay ist zur Verwaltung der elektronischen Funkziele
zuständig. Eine Anlage besteht
aus einem Zentraldisplay und
mindestens einem, maximal 16
Funkziel.
Das Zentraldisplay empfängt von
den Funkzielen die Daten über:
S Treffermeldung
S Waffenkennung
Das Ziel kann aber auch vom
Zentraldisplay Anweisungen
empfangen:
S Freigeben zum Beschuss
S Sperren nach Ablauf der Zeit
S Aktivieren der fest programmier-
ten Spiele
Das Zentraldisplay kommuniziert
über den Ziellautsprecher mit dem
Schützen:
S Spielanweisungen
S Ergebnisse
S Kommentare zum Spielverlauf
Das Zentraldisplay ist optional mit
einem Computer verbunden:
S Ergebnislisten und Spielverlauf
werden weitergeleitet
Schematischer Aufbau LTS
Schematic Diagram LTS -- Schéma de la structure LTS
Page 5
Benennung der Hauptteile
Identification of the main components -- Désignation des principaux composants
5
LCD Display
Menüknopf mit Dreh/Drück-
Funktion
Stromversorgung
a) über 4 Stück AA Batterien
im Batteriehalter
b) Netzbuchse für den Betrieb
mittels RG-Netzteil
(siehe Zubehör)
Schalter für Ein/Aus
Einschaltkontrolle ist die
rote LED rechts unten.
Serielle Schnittstelle RS232
für Datenübertragung mittels
D-SUB (Datenkabel 9pol/9pol
Stecker/Buchse, Kabel 9-adrig,
Belegung 1:1 zu Beziehen im
Elektronik-Fachhandel)
DIP Schalter zur Kodierung
der Funkübertragung, zugänglich durch das Batteriefach
1
2
3
4
5
6
7
LCD Display
Menu button with turning/
pressing function
Electricity supply
a) via 4 AA batteries in the battery
holder
b) via the connection on the left
hand side using the RG mains
adapter (see accessories).
Switch on the right for On/Off
The status indicator is the red
LED bottom right
Serial interface RS232 for data
transmission via D-SUB (data
cable 9pol/9polplug/bush, cable
9-strand, pin allocation 1:1
available from electronics
stockists)
DIP switch for coding the radio
transmission, accessible via
battery compartment
Écran d’affichage à cristaux
liquides
Bouton-poussoir rotatif du menu
Alimentation
a) 4 piles AA insérées dans le
logement à piles
b) via la prise sur le côté gauche et
le bloc d’alimentation RG
(voir accessoires)
Interrupteur Marche/Arrêt à
droite
Le voyant DEL rouge situé en
bas à droite permet de contrôler
l’activation
Interface en série RS232 pour
le transfert de données au moyen
d’un D-SUB (fiche/prise femelle
avec câble de données 9 pôles/
9 pôles, câble 9 fils, affectation
1:1 disponible dans les magasins
d’électronique)
Commutateur DIP pour le
codage du transfert radio, accès
via le compartiment à piles
1
2
3
4
5
6
7
1
2
3
4
5
6
7
3
1
7
2
4
6
5
Page 6
6
Batteriewechsel
Changing the batteries
Remplacement des piles
Bei schwächer werdenden Batterien beginnt die rote Einschaltkontrolle auf der rechten Seite zu blinken. Sie sollten jetzt alle Batterien
wechseln.
Im mittleren oberen Bereich des
Batteriedeckels leicht drücken und
dabei nach unten schieben.
Ist das Zentraldisplay für längere
Zeit außer Betrieb, entnehmen Sie
die Batterien.
Verbrauchte Batterien dürfen nicht
in den Hausmüll! Bitte an den vorgegebenen Sammelstellen als Sondermüll abgeben.
As the batteries become weak, the
red on/off indicator on the right hand
side begins to flash.
You should now change all batteries.
If the display is out of operation for a
long time, remove the batteries.
Used batteries must not be thrown
away with household rubbish.
Please dispose of them at the collection
points reserved for hazardous waste.
Lorsque les piles faiblissent, le témoin
de fonctionnement rouge situé sur le
côté droit se met à clignoter.
Remplacez toutes les piles. Si la cible
doit rester hors tension pendant une
période prolongée, retirez-en les piles.
Les piles usagées ne doivent pas être
jetées avec les ordures ménagères!
Veuil lez les déposer dans les centres
de collecte de déchets spéciaux.
To avoid damages use only the
Mains adapter from RG.
Il est important d’utiliser exclusivement le bloc d’alimentation RG afin
d’éviter toute déterioration.
Verwenden Sie ausschließlich das
RG-Netzteil um Schäden zu vermeiden.
Betrieb mit RG-Netzteil
RG Mains adapter -- Bloc d’alimentation RG
Page 7
Tenir compte des indications
suivantes lors de la première mise
en marche:
Une installation peut compter jusqu’à
16 cibles pour un seul écran d’affichage central. Parallèlement à cette
installation, 8 autres peuvent être
activées simultanément pour obtenir
un maximum de 128 cibles ! Le classement nécessaire ne doit, en règle
générale, être effectué qu’une seule
fois, avant la première mise en marche.
Commutateur codé
Toutes les cibles et tous les écrans
d’affichage sont é quipés d’un commutateur codé composé de huit commutateurs individuels. En ce qui concerne
l’écran d’affichage, le commutateur
codé est accessible via le compartiment à piles. La position des différents
interrupteurs peut être facilement
modifiée au moyen d’un outil adapté
(stylo à bille).
Commutateur à bascule vers le bas:
Arrêt
Commutateur à bascule vers le haut:
Marche (on)
L’affectation de s commutateurs est la
suivante:
No. 1-- 4 non affectés
No. 5-- 7 fonctionnement avec
plusieurs installations
No. 8 non affecté
7
Zuordnung von mehreren Anlagen
Allocation of several systems -- Classement de plusieurs installations
Vor dem ersten Betrieb bitte
beachten:
Eine Anlage kann aus einem
Zentraldisplay mit bis zu16 Zielen
bestehen. Parallel können 8 Anlagen nebeneinander betrieben
werden. Das sind max. 128 Ziele!
Die notwendige Zuordnung ist in
der Regel einmalig vor der ersten
Inbetriebnahme durchzuführen.
Kodierschalter
Alle Ziele und Zentraldisplays sind
mit einem Kodierschalter mit acht
Einzelschaltern ausgestattet. Dieser ist beim Zentraldisplay durch
das Batteriefach erreichbar.
Die Einzelschalter lassen sich
mittels eines geeigneten Hilfswerkzeugs (Kugelschreiber)
bequem umlegen.
Kippschalter unten: Aus
Kippschalter oben: An (on)
Die Schalter haben folgende
Belegung:
Nr. 1 -- 4 nicht belegt
Nr. 5 -- 7 Betrieb mit mehreren
Anlagen
Nr. 8 nicht belegt
Hinweis:
Eine neue Einstellung wird erst
nach dem erneuten Einschalten
des Gerätes aktiv.
Ab Werk sind die Schalter 1--7
sowohl an den Zielen als auch am
Zentraldisplay auf ”aus” gestellt.
Dadurch ist gewährleistet, dass
Sie sofort mit dem Betrieb einer
Anlage beginnen können.
Please note before starting up
for the first time:
A system may consist of a central
display with up to 16 targets.
8 systems can be operated alongside each other simultaneously.
That is a total of max. 128 targets!
The necessary allocation should as
a rule be carried out once only before starting up for the first time.
Coding switches
All targets and central displays are
fitted with a coding switch with eight
individual switches.
It can be accessed by means of the
battery compartment in the case of
the central display.
The individual switches can easily
be relocated by means of a suitable
auxiliary tool (ball pen).
DIP switch bottom: off
DIP switch top: on
The switches are assigned as
follows:
No. 1--4 not allocated
No. 5--7 operation with several
systems
No. 8 not allocated.
Note:
A new setting is only activated
when the machine has been
switched on again.
Ex works switches 1--7 are set in
the ”off” position both on the targets
and central display.
This ensures that you can begin
operation with one system
immediately.
Remarque:
Un nouveau réglage ne sera activé
qu’après la remise en marche de l’appareil. En usine, les commutateurs 1--7
des cibles ainsi que ceux de l’écran d’affichage sont positionnés sur Arrêt. Ce
procédé vous permet de mettre immédiatement en marche une installation.
ON DIP
12345678
Page 8
8
Mise en marche avec plusieurs
installations: Commutateurs 5--7
Afin de prévenir l’apparition de
parasites lors de la mise en marche
de plusieurs installations au même
endroit, les commutateurs 5--7 sur la
cible et l’écran d’affichage sont codés.
Les positions des commutateurs
doivent être harmonisées sur l’écran
d’affichage et sur les cibles attribuées.
Il est ainsi possible de faire fonctionner
simultanément 8 installations avec
chacune 16 cibles sans risque de
parasites.
Betrieb mit mehreren Anlagen:
Schalter 5--7
Damit es keine Funkstörungen
beim Betrieb mit mehreren Anlagen
im gleichen Raum gibt, werden die
Schalter 5--7 am Ziel und am Zentraldisplay als Kodierung verwendet. Die Schalterstellungen müssen
am Zentraldisplay und an den zugewiesenen Zielen übereinstimmen.
Dadurch ist es möglich bis zu
8 Anlagen mit je 16 Zielen gleichzeitig störungsfrei zu betreiben.
Operation with several systems:
Switches 5-- 7
To prevent any radiointerference
when operating several systems in
the same area, switches 5--7 are
used as coding on the target and the
central display. The settings of the
switches must match on the central
display and the allocated targets.
By this means it is possible to
operate up to 8 systems each with
16 targets simultaneously without
problem.
Anlage Nr. Schalter Nr. 5 Schalter Nr. 6 Schalter Nr. 7
System No. Switch No. 5 Switch No. 6 Switch No. 7
No. de cible Commutateur No. 5 Commutateur No. 6 Commutateur No. 7
1
2
3
4
5
6
7
8
Serielle Schnittstelle
Serial interface -- Interface en série
Vous pouvez connecter le câble de
données à votre ordinateur.
Les informations de l’écran central
pourront de cette manière figurer
sur le PC. Vous avez également la
possibilité d’imprimer les listes des
vainqueurs.
Lors d’événements de plus grande
ampleur, le public peut suivre le match
directement via un projecteur portable
et un grand écran.
Per Datenkabel können Sie eine
Verbindung zu Ihrem Computer
herstellen. Dadurch ist es möglich
die Informationen des Zentraldisplays auf dem PC darzustellen.
Über einen Drucker können Siegerlisten ausgedruckt werden.
Bei größeren Veranstaltungen kann
dem Publikum der Spielverlauf über
einen Beamer und einer Großleinwand direkt vermittelt werden.
You can make a connection to your
computer using the data cable.
By this means it is possible to display the information from the central
display on the PC. Winners’ lists can
be printed out using the printer.
For larger events the progress of
the game can be transmitted directly
to the public by means of a beamer
and large-screen.
Schalter Aus -- Off -- Arrêt
Schalter An -- On -- Marche
Page 9

9
Exemple de transmission de
données entre l’écran d’affichage
central et le PC:
Connectez l’écran central (port RS232)
au port en série de votre PC (COM1)
au moyen d’un câble en série (fiche/
prise femelle 9 pôles/9 pôles, câble 9
fils, affectation 1:1 disponible dans les
magasins d’électronique)
-- Allumez le PC
-- Exécutez le programme
”HYPERTERMINAL”
Beispiel für die Datenübertragung
zwischen Zentraldisplay und PC:
Verbinden Sie das Zentraldisplay
(RS232 Port) und serielles Port Ihres
PCs (COM1) unter Verwendung eines seriellen Verbindungskabels
(9pol./9pol. Stecker/Buchse, Kabel
9-adrig, Belegung 1:1 -- zu Beziehen
im Elektronik-Fachhandel)
-- Schalten Sie den PC ein
-- Führen Sie das Programm
“HYPERTERMINAL” am PC aus
Example of data transmission
between central display and PC:
Connect the central display (RS232
port) and serial port of your PC
(COM1) using a serial connector
cable (9pol./9pol. plug/bush, cable
9-strand, allocation 1:1 -- available
from electronics stockists)
-- Switch on the PC
-- Execute the ”HYPERTERMINAL”
program on the PC
-- HyperTerminal est lancé.
Une fenêtre intitulée ”Description de
la connexion” s’ouvre.
Donnez un nom à la ”Nouvelle
connexion”.
-- HyperTerminal startet mit dem
Fenster “Beschreibung der Verbindung“. Legen Sie einen beliebigen
Namen für eine “Neue Verbindung”
fest.
-- HyperTerminal starts with the
window ”Description of connection”.
Assign any name for a ”New connection”.
Page 10
10
-- Vous voyez ensuite apparaître la
fenêtre ”Connecter à”. Sélectionnez
dans le menu ”Connecter via” l’option
”COM1” (port de série RS232)
-- Le paramétrage des ”Propriétés
COM1” doit s’effectuer de la manière
suivante:
-- Danach sehen Sie das Fenster
”Verbinden mit”. Wählen Sie im
Menü “Verbinden über:” die Option
“COM1” (serielles Port RS232)
-- Die “Eigenschaften von COM1“
müssen wie folgt eingestellt werden:
Then you see the window ”Connect
to”. From the menu ”connect via:”
select option
”COM1” (serial port RS232)
-- The ”Properties of COM1” must
now be set as follows:
-- The HyperTerminal connection set
up is now complete.
-- Die HyperT erminal Verbindung ist
jetzt eingerichtet.
-- La connexion HyperTerminal est
maintenant établie.
-- The data shown on the
HyperTerminal is now the same
as on the central display.
-- Es werden jetzt die gleichen Daten
auf dem HyperTerminal angezeigt
wie auf dem Zentraldisplay.
-- Les données affichées par le
programme HyperTerminal sont
identiques à celles qui apparaissent
sur l’écran central.
Page 11
11
Menü
Menu
Die komplette Struktur des Menüs können Sie der Übersicht
auf Seite 46-47 entnehmen.
Anwählen und bestätigen von
Menüfeldern
Zum Aufrufen und Bedienen der
Menüfunktionen wird der Menüknopf verwendet.
S Menüfelder anwählen: Knopf
drehen bis die Markierung auf dem
gewünschten Feld steht.
S Menüfelder bestätigen: Knopf
drücken.
Aufbau des Menüs
Das Display zeigt max. 8 Zeilen:
Zeile1 (Kopfzeile): Zeigt an in
welchem Menü Sie sich gerade
befinden
Zeile 2 --> zurück:setzt das
Menü um eine Stufe zurück
--> weiter: ruft das nächste
Menü auf
Menüs ohne --> zurück bzw.
--> weiter verlassen Sie durch
Knopfdruck
Zeile 3-19: Listeneinträge, sie werden durch scrollen des Menüknopfs
nach oben oder nach unten geschoben.
The complete structure of the
menu is shown in the overview
on pages 46-47.
Selection and confirmation of
menu fields
The menu button is used to call up
and operate menu functions.
S Select menu fields: rotate the
button until the highlighting is on
the required field.
S Confirm menu fields: press the
button.
Structure of the menu
The display has max. 8 lines:
Line1 (Headline): indicates which
menu you are currently in
Line 2 --> back: takes the menu one
stage back
--> forward: calls up the next menu
You can exit menus without --> back
or
--> forward by pressing the button
Lines 3-19: List entries; they are
pushed up or down by scrolling the
menu button.
Vous trouverez aux pages 46-47 la
structure complète du menu.
Sélection et confirmation des
champs du menu
Utilisez le bouton du menu pour sélectionner et utiliser les fonctions du
menu.
S Sélectionner des champs du menu:
tourner le bouton jusqu’à ce que le curseur ait sélectionné le champ souhaité.
S Confirmer les champs du menu:
presser le bouton.
Structure du menu
L’écran affiche au maximum 8 lignes:
Ligne 1 (titre) : vous indique dans quel
menu vous vous trouvez
Ligne 2 --> Retour : revenir une étape
en arrière dans le menu
--> Suivant: accéder menu
suivant
Pour quitter les menus qui ne propo-
sent pas de fonctions ”Retour” ou
”Suivant”, pressez le bouton
Ligne 3-19: entrées des listes. Vous
pouvez les faire défiler vers le haut ou
vers le bas en tournant le bouton du
menu.
Start-up image
After switching on, the Röhm logo
appears for three seconds as a
start-up image.
Image d’accueil
Dès que l’appareil est mis en marche,
le logo Röhm apparaît durant trois
secondes en tant qu’image d’accueil.
Startbild
Nach dem Einschalten erscheint für
drei Sekunden das Röhm Logo als
Startbild.
Language selection
When switching on the central
display for the first time, you are
requested for the selection of the
menu language. Please select the
desired language from the list.
Later changing of the menu
language is at any time possible in
the menu option Settings / Service.
Choix de la langue
Lors de la première mise en route de
l’écran central, vous serez invités à
choisir la langue.
Veuillez faire votre choix dans la liste
des langues proposées. Vous pourrez modifier ce choix ultérieurement à
tout moment par le menu Réglages/
Service.
Sprachauswahl
Beim erstmaligen Einschalten des
Zentraldisplays werden Sie zur Auswahl der Menüsprache aufgefordert.
Bitte wählen Sie aus der Liste die
gewünschte Sprache aus. Ein späteres Umstellen der Menüsprache ist
jederzeit über den Menüpunkt Einstellungen/Service möglich.
Page 12
12
Main menu
Choose between DSB disciplines
(German Sports Federation) and
FUN Games.
In ”Settings” check the recorded
targets, names list, marksman
identification and service functions.
Menu principal
Sélectionnez soit les disciplines DSB
soit les FUN Games.
Vérifiez, dans ” Paramètres ” les
cibles enregistrées, la liste des noms,
la signalisation des tireurs et les
fonctions de service.
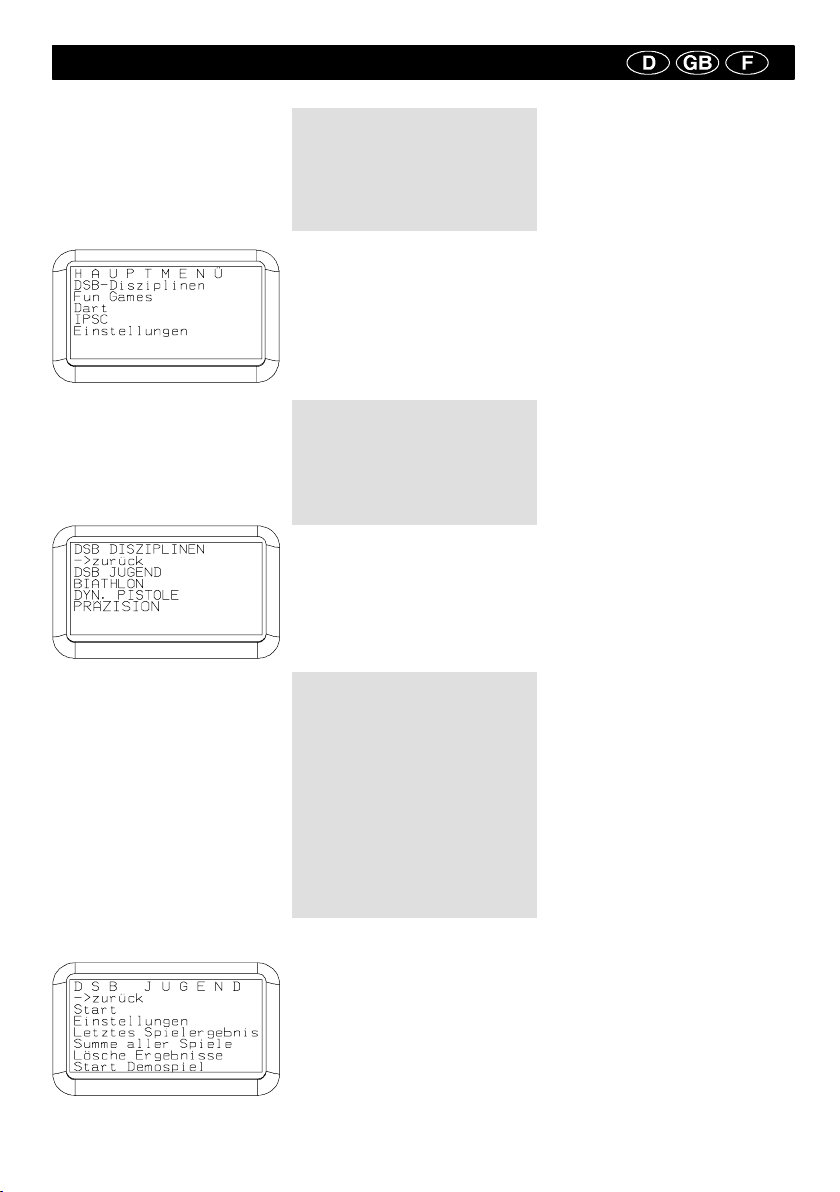
Hauptmenü
Wählen Sie zwischen DSB-Disziplinen und FUN Games, Dart und
IPSC.
Überprüfen Sie in ”Einstellungen ”
die angemeldeten Ziele, Namensliste, Schützenkennung und die
Sevicefunktionen.
1.0 DSB Disciplines
You can choose between ”dynamischen Schießen ”DSB Jugend””
(dynamic shooting, ”DSB” youth discipline), biathlon, various dynamic
DSB pistol disciplines and classical
precision shooting.
1.0 Disciplines DSB
Vous avez le choix entre trois jeux:
DSB jeunes
Biathlon
PAC
1.0 DSB-Disziplinen
Sie haben die Auswahl zwischen
dem dynamischen Schießen ”DSB
Jugend”, Biathlon, verschiedenen
dynamischen Pistolendisziplinen des
DSB und dem klassischen Präzisionsschießen.
1.1.0 DSB Youth
This game only works with RG
Lasers such as in RG Light-Point.
An active shooting game played by
one or more marksmen simultaneously.
You want to call up the game DSB
Youth and have entered the targets
and marksman/marksmen in the
main menu under Settings.
Now press Start.
The detailed game instructions are
given on page 42.
1.1.0 DSB jeunes
Ce jeu ne fonctionne qu’avec des
lasers RG comme ceux dont disposent les RG Light-Point. Il s’agit d’un
jeu actif auquel peuvent participer un
seul tireur ou plusieurs tireurs en
même temps. Vous sélectionnez le
jeu DSB jeunes et définissez via des
réglages dans le menu principal les
cibles et le(s) joueur(s). Sélectionnez
ensuite Start.
La description détaillée du jeu se
trouve en page 42.
1.1.0 DSB Jugend
Dieses Spiel funktioniert nur mit RGLasern wie z.B. im RG Light-Point.
Ein aktives Schießspiel, das einzelne oder mehrere Schützen
gleichzeitig spielen.
Sie wollen das Spiel DSB Jugend
aufrufen und haben im Hauptmenü
unter Einstellungen die Ziele und
den (die) Schützen angemeldet,
dann drücken Sie auf Start.
Die ausführliche Spielanleitung finden Sie auf Seite 42.
MAIN MENU
DSB Disciplines
Fun Games
Dart
IPSC
Settings
DSB DISCIPLINES
--- > b a c k
DSB YOUTH
BIATHLON
MLP
PRECISION
DSB YOUTH
--- > b a c k
Start
Random exposure
Last game score
Total of all games
Delete scores
Start demo game
MENU PRINCIPAL
Disciplines DSB
Fun Games
Dart
IPSC
Paramètres
DISCIPLINES DSB
--- > R e t o u r
DSB JEUNES
BIATHLON
PAC
DSB JEUNES
--- > R e t o u r
Start
Mode aléatoire
Dernier total
Somme de toutes les parties
Supprimer les résultats
Page 13
13
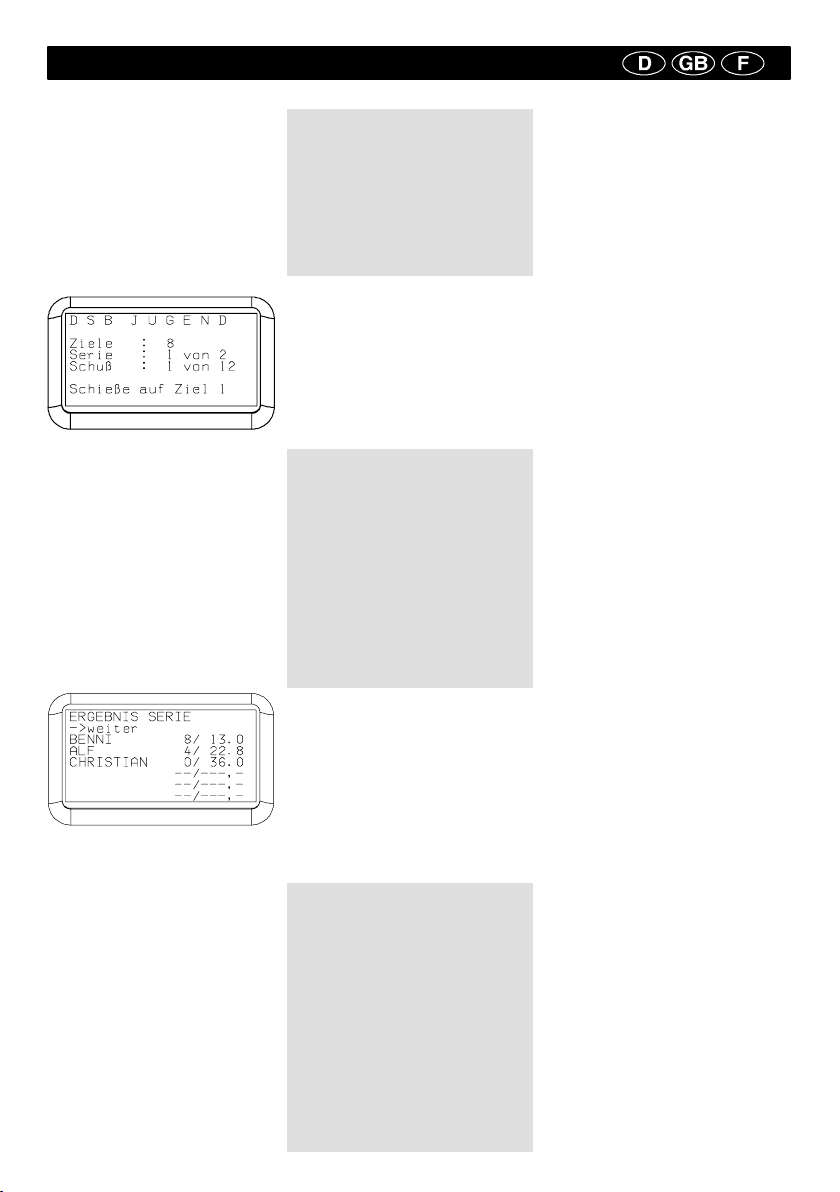
1.1.1.0 Start (DSB Jugend)
On the display, you can see how
many targets are registered, which
series is running currently, and
which shot is currently enabled for
which target.
When several weapons are shooting at the same target at the same
time, only the first hit counts.
2.1.1.1 c) Start
Le jeu commence.
L’écran affiche le nombre de cibles
enregistrées, la série en cours et la
cible pour le prochain coup.
Si plusieurs armes tirent en même
temps, seul le coup du premier tireur
sera pris en compte.
1.1.1.0 Start (DSB Jugend)
Das Spiel startet.
Am Display ist ersichtlich wie viele
Ziele angemeldet sind, welche Serie
gerade abläuft und welcher Schuss
auf welches Ziel gerade freigeschaltet ist.
Beim Beschuss mit mehreren Waffen gleichzeitig zählt nur der erste
Treffer.
1.1.1.1 Series Score
When one series has expired, the
current result of the last series appears immediately.
The number of hits and time required are displayed after the name of
the marksman. If there are several
marksmen, a ranking list is drawn
up automatically according to hits
and in the event of a tie according
to time.
The next series starts immediately
by pressing “--> forward”.
1.1.1.1 Résultat d’une série
Le résultat de la dernière série apparaît dès que celle-ci est terminée.
Le nombre de tirs réussis et le temps
apparaissent après le nom du tireur.
Si plusieurs tireurs jouent en même
temps, un classement est automatiquement créé en fonction des tirs et,
en cas d’égalité, en fonction des temps
réalisés.
La série suivante commence immédiatement après avoir sélectionné
“--> suivant ”.
1.1.1.1 Ergebnis Serie
Nach dem Ablauf einer Serie erscheint sofort das aktuelle Ergebnis
der letzten Serie.
Dabei wird hinter dem Namen des
Schützen die Trefferanzahl und die
benötigte Zeit angezeigt. Bei mehreren Schützen wird automatisch eine
Rangliste nach Treffern und bei Treffergleichheit nach Zeit erstellt.
Mit dem Druck auf ”--> weiter” startet
sofort die nächste Serie.
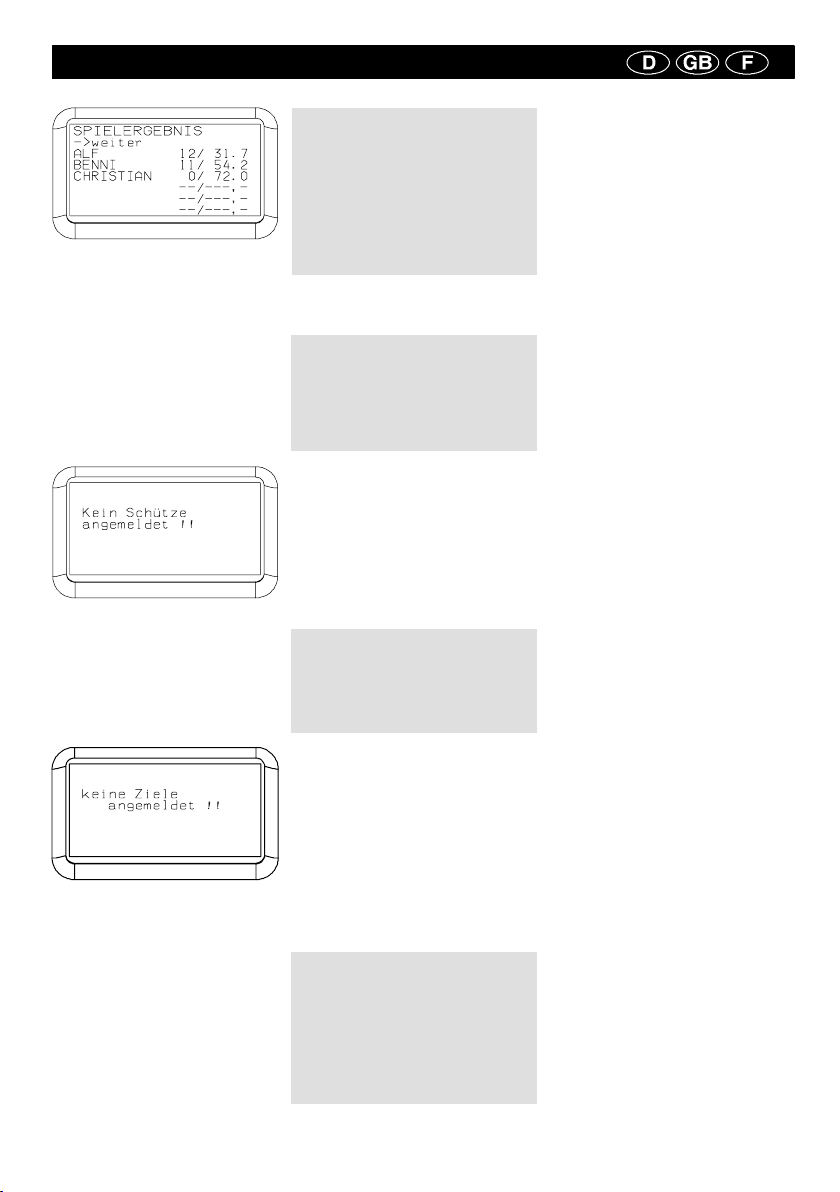
1.1.1.2 Game result
After finishing the last pre-set
series, the game result appears
after ”--> weiter” (continue).
Here, next to every shooter’s
name, the number of hits is displayed and the time required. In the
case of several shooters, a ranking
list is automatically created according to hits, and if the number of
hits is the same, then according
to time. The last game result is
retained even if the central display
is switched off.
You can go back to ”Start” by
selecting ”--> weiter” (continue).
1.1.1.2 Start -- Total
Au terme de la dernière série prédéfinie, les résultats des joueurs apparaissent après ”--> Suivant”. Le nombre de
tirs réussis et le temps réalisé s’affichent après le nom du tireur. Si plusieurs tireurs jouent en même temps,
un classement est automatiquement
créé en fonction des tirs et, en cas
d’égalité, en fonction des temps réalisés. Tous les tireurs qui n’ont pas
réussi de tirs valables ainsi que tous
ceux qui ne participent pas à la rencontre sont enregistrés sous ”0 coup”
avec le temps de tir maximal.
1.1.1.2 Spielergebnis
Nach Abschluss der letzten voreingestellten Serie erscheint nach
”--> weiter” das Spielergebnis:
Dabei wird hinter dem Namen des
Schützen die Trefferanzahl und die
benötigte Zeit angezeigt. Bei mehreren Schützen wird automatisch eine
Rangliste nach Treffern und bei Treffergleichheit nach Zeit erstellt.
Auch nach Abschalten des Zentraldisplays bleibt das letzte Spielergebnis erhalten.
Die Anwahl ”--> weiter” bringt Sie
wieder auf Start.
DSB YOUTH
Targets : 8
Series:1of2
Shot : 1 of 12
Shots at target 1
SERIES SCORE
---> forward
BENNI 8 / 13.0
ALF 4 / 22.8
CHRISTIAN 0 / 36.0
--- / ---
--- / ---
--- / ---
DSB JEUNES
Cibles : 8
Série:1de2
Tir : 1 de 12
Tirez sur la cible 1
TO TAL SÉ RIE
--- > S u i v a n t
BENNI 8 / 13.0
ALF 4 / 22.8
CHRISTIAN 0 / 36.0
--- / ---
--- / ---
--- / ---
Page 14
14
GAME RESULT
-> continue
ALF 12 / 31,7
BENNI 11 / 54,2
CHRISTIAN 0 / 72.0
Score du Jeu
-> continue
ALF 12 / 31,7
BENNI 11 / 54,2
CHRISTIAN 0 / 72.0
1.1.1.3 Potential error message
Did you forget to register?
First register the shooter(s).
By pressing the button, you return
to the registration menu and then
directly back to ”Start”.
1.1.1.3 Message d’erreur éventuel
Inscription oubliée ?
Inscrivez d’abord le ou les tireur(s).
Appuyez sur le bouton pour aller au
menu d’inscription puis revenir directement sur Start (départ).
1.1.1.3 Mögliche Fehlermeldung
Anmeldung vergessen?
Melden Sie zuerst den/die Schützen
an.
Durch drücken des Knopfs führt Sie
das Menü zur Anmeldung und direkt
wieder zurück auf Start.
No shooters registered! Aucune cible enregistrée!!
1.1.1.4 Potential error message
No targets registered?
By pressing the button, you return
to the registration menu and then
directly back to ”Start”.
1.1.1.4 Message d’erreur éventuel
Pas de cible annoncée ?
Appuyez sur le bouton pour aller au
menu des annonces puis revenir directement sur Start (départ).
1.1.1.4 Mögliche Fehlermeldung
Es sind keine Ziele angemeldet?
Stellen Sie sicher, dass genügend
Ziele eingeschaltet zur Verfügung
stehen.
No targets activated! Aucune cible enregistrée!!
1.1.2.0 Settings
Attention:
Please note that if these parameters are changed during a competition, a fair ranking list under ”Spielergebnis” (”Game Result”) and
”Summe aller Spiele” (”Total of all
games”) is no longer possible.
1.1.2.0 Paramètres
Attention:
Notez que si vous modifiez ces paramètres pendant la compétition, un
classement honnête sous ”Spielergebnis (Score)” et ”Summe aller
Spiele (Total des parties)” ne sera
plus possible.
1.1.2.0 Einstellungen
Achtung:
Bitte beachten Sie, dass durch eine
Änderung dieser Parameter während des Wettkampfs eine faire
Rangliste unter ”Spielergebnis” und
”Summe aller Spiele” nicht mehr
möglich ist.
Page 15
15
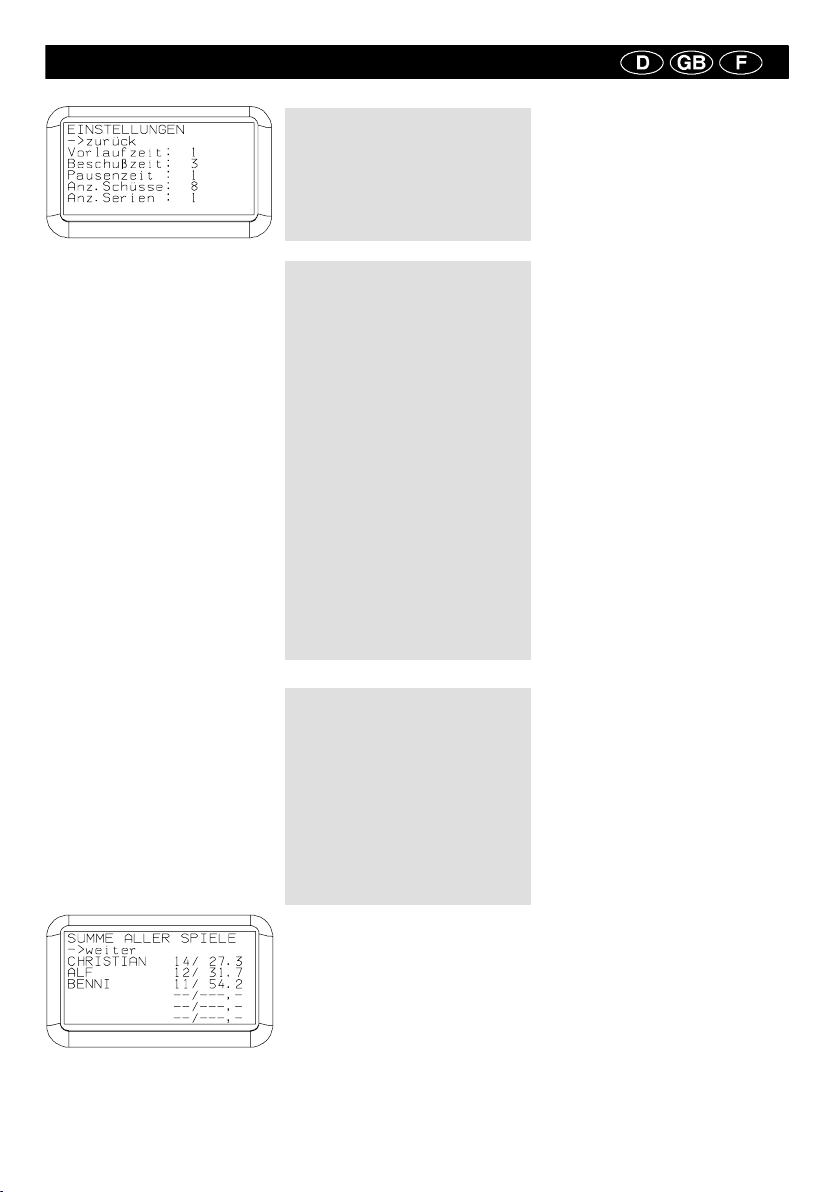
TOTAL OF ALL GAMES
--- --- > f o r w a r d
Christian 14 / 27,3
Alf 12 / 31,7
Benni 11 / 54,2
TOTAL DES PAR TIES
--- --- > f o r w a r d
Christian 14 / 27,3
Alf 12 / 31,7
Benni 11 / 54,2
Settings
-> back
lead time 1
shooting time 3
pause time 1
no. of shoots 8
no. of sessions 1
Paramètres
-> retour
Temps de préparation 1
Temps de tir 3
Temps de latence 1
Nombre de tirs 8
Nombre de séries 1
· Vorlaufzeit (lead time) : This is the
time between the press of the start
button and the enabling of the first
target. It can be set to between
1-10 seconds.
· Beschusszeit (shooting time):
Time span during which the target
will accept a hit. This time is terminated after the first hit. It can be set
to between 1-10 seconds.
· Pausenzeit (pause time): Time
span between the ”Beschusszeiten” (shooting times) of the individual targets. It can be adjusted to
between 0-10 seconds.
· Anz. Schüsse: (No. of shots) The
number of shots must not necessarily be equivalent to the number of
targets. You can enter between
1-48 shots.
· Anz. Serien: (No. of series) A
”Spielergebnis” (game result) can
consist of one or several series.
Here, you can choose between
1-10 series.
· Vorlaufzeit (Temps de préparation) :
Il s’agit du temps de latence entre la
pression du bouton de démarrage et
la disponibilité de la première cible ;
vous pouvez le régler entre 1 à 10
secondes.
· Beschusszeit (Temps de tir) : Temps
de latence jusqu’à ce que la cible
affiche une touche. Ce temps s’arrête
dès la première touche. Vous pouvez
le régler entre 1--10 secondes.
· Pausenzeit (Pause) : Temps de
latence entre le tir de chaque cible.
Vous pouvez le régler entre 0 et 10
secondes.
· Anz. Schüsse (Nombre de tirs) :
Le nombre de coups de feu ne doit
pas forcément correspondre au
nombre de cibles. Vous pouvez saisir
de1à48tirs.
· Anz. Serien (Nombre de séries) :
Le score d’une partie peut être
constitué de une ou plusieurs séries.
Vous pouvez ici choisir entre 1 à 10
séries.
· Vorlaufzeit: Das ist die Zeit zwischen dem Drücken das Startknopfs
und dem Freischalten des ersten
Ziels, sie kann zwischen 1-- 10 Sekunden eingestellt werden.
· Beschusszeit: Zeitspanne in der
das Ziel einen Treffer annimmt.
Sie wird nach dem ersten Treffer
abgebrochen. Sie kann zwischen
1-10 Sekunden eingestellt werden.
· Pausenzeit: Zeitspanne zwischen
den Beschusszeiten der einzelnen
Ziele. Sie kann zwischen 0-10
Sekunden justiert werden.
· Anz. Schüsse: Die Anzahl der
Schüsse muß nicht der Anzahl
der Ziele entsprechen. Sie können
zwischen 1-48 Schüsse eingeben.
· Anz. Serien: Ein Spielergebnis
kann aus einer oder mehreren
Serien bestehen. Hier haben Sie
die Möglichkeit zwischen 1-10
Serien zu wählen.
1.1.3.0 Total of all games
Here, all results of the individual
games are totalled up. Here again,
next to every shooter’s name, the
number of hits is displayed and the
time required. In the case of several shooters, a ranking list is automatically created according to hits,
and if the number of hits is the
same, then according to time.
The total of all game results is retained, even after switching off the
central display.
1.1.3.0 Total des parties
Ici, sont comptés tous les résultats
pour chaque jeu. Lorsque la série
est finie, le nombre de touches et le
temps s’affichent derrière le nom du
tireur. S’il y a plusieurs tireurs, une
liste de classement est automatiquement établie en fonction du nombre
de touches, et dans le cas d’un
nombre identique de touches, en
fonction du temps.
Même après avoir éteint l’afficheur
central, le total des scores est
conservé.
1.1.3.0 Summe aller Spiele
Hier werden alle Ergebnisse der einzelnen Spiele aufaddiert. Dabei wird
hinter dem Namen des Schützen die
Trefferanzahl und die benötigte Zeit
angezeigt. Bei mehreren Schützen
wird automatisch eine Rangliste
nach Treffern und bei Treffergleichheit nach Zeit erstellt.
Auch nach Abschalten des Zentraldisplays bleibt die Summe aller Spielergebnisse erhalten.
Page 16

16
1.1.4.0 Delete scores
After changing the settings, for
example, it is advisable to delete
the score lists completely.
To do this, go to delete.
1.1.4.0 Supprimer les résultats
Après avoir modifié les paramètres
de réglage, par ex., il est utile de supprimer complètement les listes des
résultats. Pour ce faire, allez dans
Supprimer.
1.1.4.0 Lösche Ergebnisse
Z. B. nach Änderung der Einstellungen ist es sinnvoll, die Ergebnislisten
komplett zu löschen. Gehen Sie
dazu auf löschen.
1.2.0 Biathlon
Five radio targets or five multifunctional targets are required.
Start: 5 targets are enabled for
shooting with no time limit.
The description of this discipline
can be found on page 43.
1.2.0 Biathlon
Il faut cinq cibles radio ou cinq cibles
multifonctions.
Start (Départ) : 5 cibles sont offertes
sans limite de temps.
Vous trouverez la description de la
discipline en page 43.
1.2.0 Biathlon
Es werden fünf Funkziele oder
fünf Multifunktionsziele benötigt.
Start: 5 Ziele werden zeitlich unbegrenzt zum Beschuß freigegeben.
Die Disziplinbeschreibung finden
Sie auf Seite 43.
DELETE SCORES
--- > b a c k
Delete
SUPPRIMER LES RÉSULTATS
--- > R e t o u r
Supprimer
1.1.5.0 DYNAMIC SHOOTING
DEMO -- DSB YOUTH
DISCIPLINE
Without shooter ID and with fixed
settings
10 shots are enabled at 3-second
intervals at any number of targets.
The demo version of ”DSB Jugend”
(dynamic shooting, DSB youth
discipline) is therefore especially
suitable for demonstrations.
1.1.5.0 DSB Jugend (DSB Jeunes)
DEMO
Sans identifiant du tireur et avec
réglage fixe.
10 tirs à intervalles de 3 secondes
sur un nombre libre de cibles.
La version démo de DSB Jugend
(DSB Jeunes) est spécialement indiquée pour les démonstrations
(Démo).
1.1.5.0 DSB JUGEND DEMO
Ohne Schützenkennung und mit
fester Einstellung.
10 Schüsse werden im Abstand von
3 Sekunden auf eine beliebige Anzahl Ziele freigeschaltet.
Die Demo Version von DSB Jugend
ist dadurch speziell für Vorführungen
geeignet.
DYNAMIC SHOOTING DEMO
Shot: 9 of 10
Hit: 8
Time: 22.8 s
Shoot on target 4
SUPPRIMER LES RÉSULTATS
--- > R e t o u r
Supprimer
1.1.4.1 Delete
Deleting...
The menu contents of ”Ergebnisliste” (result list) are deleted.
1.1.4.1 Lösche
Der Menüinhalt “Letztes Spielergebnis” und “Summe aller Spiele” ist
gelöscht.
DELETE SUPPRIMER
1.1.4.1 Supprimer
Le contenu du menu ”Letztes Spielergebnis (Derniers scores)” et ” Summe
aller Spiele (Total des parties)” est
supprimé.
Page 17

17
BIATHLON
--- > b a c k
Start
Hit area: middle
Number of shots: 5
1.2.2 Biathlon results
After the start, five black targets
appear on the display. After a hit,
the target turns white. The number
of registered ”Schüsse” (shots)
and ”Treffer” (hits) are displayed in
the lines underneath.
You can return to ”Start” by pressing the menu button.
1.2.2 Scores Biathlon
Au démarrage, cinq cibles noires apparaissent sur l’afficheur . Après une
touche, la cible devient blanche. Le
nombre de tirs enregistrés (Schüsse)
et de touches (Treffer) s’affichent
dans les lignes en dessous.
Appuyer sur le bouton du menu pour
revenir sur ”Start” (Départ).
1.2.2 Biathlon Ergebnisse
Nach dem Start erscheinen fünf
schwarze Scheiben auf dem Display. Nach einem Treffer wird die
Scheibe weiß. Die Anzahl der registrierten Schüsse und der Treffer
werden in den Zeilen darunter angezeigt.
Ein Druck auf den Menüknopf bringt
Sie wieder auf ”Start”.
BIATHLON
Hit: 3of5
Numb. of shots: 3 of 5
1.2.1 Biathlon settings
When 5 radio targets are used with
one hit area, the degree of difficulty
can be increased by using smaller
patterns.
With five multi-functional targets,
you have the option of electronically shrinking the hit area,
however:
large hit area: D 100 mm
(entire target)
medium: D 63 mm
small: D 25 mm
Here it makes sense to increase
the number of shots to more than 5
(reloader) because misses outside
of the hit area are detected up to
the edge of the target.
1.2.1. Paramètres Biathlon
L’utilisation de 5 cibles radio avec une
zone de touche permet d’augmenter
le niveau de difficulté avec des cible
plus petites.
Avec cinq cibles multifonctions, vous
pouvez toutefois diminuer électroniquement la zone de touche :
Zone de touche grande : D100mm
(cible entière)
moyenne : D 63mm
petite : D 25mm
Ici, augmenter éventuellement le
nombre de 5 tirs (recharger) car les
loupés hors de la zone de touche
sont reconnus jusqu’au bord de la
cible.
1.2.1 Biathlon Einstellungen
Bei Verwendung von 5 Funkzielen
mit einer Trefferfläche kann der
Schwierigkeitsgrad mit kleineren
Schablonen erhöht werden.
Mit fünf Multifunktionszielen haben
Sie jedoch die Möglichkeit die Trefferfläche elektronisch zu verkleinern:
Trefferfläche
groß: D100mm (ganze Scheibe)
mittel: D 63mm
klein: D 25mm
Hier macht es Sinn die Anzahl der
Schüsse von 5 eventuell zu erhöhen
(Nachlader), denn Fehlschüsse außerhalb der Trefferfläche bis zum
Scheibenrand werden erkannt.
BIATHLON
Touches: 3 of 5
Nomb. de tirs: 3 of 5
BIATHLON
--- > r e t o u r
Départ
Zone de touche: middle
Nombre de tirs: 5
Page 18

18
MLP
--- > b a c k
Start
Hit area: middle
Numb. of shots: 5
1.3.1.0 MLP
The description of this discipline
can be found on page 43.
Start: 5 targets are enabled to be
shot at with a time limit.
1.3.1.0 MLP
Vous trouverez la description de la
discipline en page 43.
Start (Départ) : 5 cibles avec limite
de temps.
1.3.1.0 MLP
Die Disziplinbeschreibung finden Sie
auf Seite 43.
Start: 5 Ziele werden zeitlich begrenzt zum Beschuss freigegeben.
1.3.1.1. MLP settings
Analysis: The results of the last
round can be queried.
Lead time: 1--10 seconds
Shooting time: 3, 4, 6, 8, 10, 20,
150 seconds
Hit area:
-- When 5 radio targets are used
with one hit area, the degree of
difficulty can be increased by using
smaller patterns.
-- With five multi-functional targets,
you have the option of electronically shrinking the hit area,
however:
large hit area: D 100 mm (entire
target)
medium: D 63 mm
small: D 25 mm
1.3.1.1. Paramètres MLP
Analyse : Vous pouvez demander les
résultats du dernier tour.
Vorlaufzeit (Temps de préparation) :
1--10 secondes
Beschusszeit (Temps de tir) : 3, 4, 6,
8, 10, 20, 150 secondes
Trefferfläche (Zone de touche) :
-- Si vous utilisez 5 cibles radio avec
une zone de touche, vous pouvez
augmenter la difficulté avec des
cibles plus petites.
-- Avec cinq cibles multifonctions,
vous pouvez toutefois diminuer
électroniquement la zone de touche :
Trefferfläche groß (Zone de touche
grande) : D100mm (cible entière)
mittel (moyenne) : D 63mm
klein (petite) : D 25mm
1.3.1.1. MLP Einstellungen
Analyse: Die Ergebnisse des letz-
ten Durchgangs können abgefragt
werden.
Vorlaufzeit: 1--10 Sekunden
Beschusszeit: 3, 4, 6, 8, 10, 20,
150 Sekunden
Trefferfläche:
-- Bei Verwendung von 5 Funkzielen
mit einer Trefferfläche kann der
Schwierigkeitsgrad mit kleineren
Schablonen erhöht werden.
-- Mit fünf Multifunktionszielen haben
Sie jedoch die Möglichkeit die Trefferfläche elektronisch zu verkleinern:
Trefferfläche groß: D100mm
(ganze Scheibe)
mittel: D 63mm
klein: D 25mm
1.3.0 Dynamic Pistol
The DSB disciplines can be found
here.
MLP = Five shot air pistol
OSP = Rapid fire pistol
Sportpistole (sport pistol) = Duel of
KK sport pistols
1.3.0 Pistolets dynamiques
Vous trouvez ici les disciplines DSB
MLP = pistolets pneumatiques à tir
multiple
OSP = pistolets olympiques à tir
rapide
Sportpistole = duel de pistolets
sport KK
1.3.0 Dynamische Pistole
Hier finden Sie die DSB Disziplinen
MLP = Mehrschüssige Luftpistole
OSP = Olympische Schnellfeuerpistole
Sportpistole = Duell von Sportpistole
KK
DYNAMIC PISTOL
--- > b a c k
Start
MLP
OSP
Sport Pistol
PISTOLETS DYNAMIQUES
--- > r e t o u r
Start
MLP
OSP
Pistolets Sport
MLP
--- > r e t o u r
Start
Zone de touche moyenne
Nomb. de tirs: 5
Page 19

19
MLP analysis
--- > b a c k
S h o t --- T a r g e t --- T i m e --- R a t i n g
Graphics
1.3.1.3 MLP analysis
The analysis menu shows you:
-- shot: Order of shots
-- target: Order of hit targets
-- time: Time intervals between the
shots
-- rating: T = hit; F= miss
With --> back you return to start.
By selecting graphics at the bottom, you get to the graphical part of
the analysis.
1.3.1.3 Analyse MLP
Le menu ”Analyse” vous indique :
-- Schuss (Tir) : enchaînement des
coups de feu
-- Ziel (Cible): enchaînement des
cibles touchées
-- Zeit (Temps): intervalles entre les
coups de feu
-- Wert (Valeur): T = touche ;
F= erreur
Pour revenir sur Start (départ),
appuyer --> zurück (retour).
Sélectionner tout en bas ”Graphik”
(Représentation graphique) pour passer à la partie graphique de l’analyse.
1.3.1.3 MLP Analyse
Das Analysemenü zeigt Ihnen :
-- Schuß: Reihenfolge der Schüsse
-- Ziel: Reihenfolge der getroffenen
Ziele
-- Zeit: Zeitabstände zwischen den
Schüssen
-- Wert: T = Treffer ; F= Fehler
Mit --> zurück kommen Sie wieder
auf Start.
Durch selektieren am unteren Ende
”Grafik” kommen sie zum grafischen
Tei l der Analyse.
1.3.1.4 MLP graphics
The graphics will show you in
which sector the shots hit. The
selected shot is shown in black on
the target.
With --> back, the MLP analysis will
appear again.
1.3.1.4 Représentation
graphique MLP
La représentation graphique vous indique la zone où les tirs ont eu lieu.
Le tir sélectionné dans la cible est
maintenant représenté en noir.
Revenir à l’analyse ”MLP Analyse”
avec --> zurück (retour).
1.3.1.4 MLP Grafik
Die Grafik zeigt Ihnen in welchem
Sektor die Schüsse lagen. Der angewählte Schuß wird in der Scheibe
schwarz ausgelegt.
Mit --> zurück erscheint wieder ”MLP
Analyse”
MLP graphics
--- > b a c k
shot 1
shot 2
shot 3
shot 4
shot 5
MLP
Hit: 4 of 5
1.3.1.2 MLP results
After the start, five black targets
appear. The current shooting time
can be seen at the upper right.
After a hit, the target turns white.
The number of hits is displayed in
the bottom line.
By pressing the menu button, you
get to the analysis menu.
1.3.1.2 Scores MLP
Au démarrage, cinq cibles noires apparaissent. En haut à droite, est indiqué le temps du tir en cours.
Après une touche, la cible devient
blanche. Le nombre des touches est
indiqué dans la ligne inférieure.
Appuyer sur le bouton du menu pour
aller au menu Analyse.
1.3.1.2 MLP Ergebnisse
Nach dem Start erscheinen fünf
schwarze Scheiben. Rechts oben
steht die aktuelle Beschusszeit.
Nach einem Treffer wird die Scheibe
weiß. Die Anzahl der Treffer ist in
der unteren Zeile angezeigt.
Ein Druck auf den Menüknopf bringt
Sie in das Analysemenü.
MLP
Touc he s: 4 d e 5
Analyse MLP
--- > r e t o u r
T i r --- C i b l e --- T e m p s --- R a t i n g
Graphics
MLP graphique
--- > r e t o u r
tir 1
tir 2
tir 3
tir 4
tir 5
Page 20

20
OSP
--- > b a c k
Start
Settings
1.3.2.0 OSP Olympic rapid-firing
pistol
The description of this discipline
can be found on page 44.
Five ”Multifunktionsziele (MFZ)”
(multi-functional targets) are
required.
The time sequence is defined.
Six rounds each 2x8 seconds,
2x6 seconds and 2x4 seconds are
each called, one after the other, by
pressing ”Start”.
1.3.2.0 OSP Pistolets olympiques à
tir rapide
Vous trouverez la description de la
discipline en page 44.
Il faut cinq cibles multifonctions
(MFZ).
Le déroulement temporel est fixé.
Appeler six tours successifs de respectivement 2x8 secondes, 2x6 secondes et 2x4 secondes en appuyant
sur ”Start (Départ)”.
1.3.2.0 OSP Olympische
Schnellfeuerpistole
Die Disziplinbeschreibung finden Sie
auf Seite 44.
Es werden fünf Multifunktionsziele
(MFZ) benötigt.
Der zeitliche Ablauf ist festgelegt.
Sechs Durchgänge zu 2x8 Sekunden , 2x6 Sekunden und 2x4 Sekunden werden jeweils durch Drücken
auf ”Start” nacheinander abgerufen.
OSP
--- > r e t o u r
Départ
Réglages
1.3.2.1 OSP Settings
Ring value,
Bulls-eye: 0-10 (D 25 mm)
Middle: 0-10 (D 63 mm)
Outside 0-10 (D 100 mm)
Tip: If the targets are set up at a
distance of approx. 6 m, this is
equivalent to ring values of 10,
8 and 6 on the original target. The
targets should be approximately
18 cm apart.
Vorlaufzeit (lead time): 1-10
seconds.
1.3.2.1 Paramètres OSP
Valeur de la zone
Mille: 0-10 (D25mm)
Centre: 0-10 (D63mm)
Extérieur: 0-10 (D100mm)
Astuce : Si les cibles sont placées à
une distance approximative de 6m,
cela correspond aux valeurs des cibles d’origine 10, 8, 6. L’écart entre
les cibles doit être d’environ 18cm.
Vorlaufzeit (Temps de préparation) :
1-10 secondes
1.3.2.1 OSP Einstellungen
Ringwert
Zentrum: 0-10 (D25mm)
Mitte: 0-10 (D63mm)
Außen: 0-10 (D100mm)
Tipp: Werden die Ziele in ca. 6m
Entfernung aufgestellt, entspricht
das auf der Originalscheibe den
Ringwerten 10, 8, 6. Der Abstand
zwischen den Zielen sollte dabei
etwa 18cm betragen.
Vorlaufzeit: 1-10 Sekunden
1.3.2.2 OSP Results
After the start, five black targets
appear on the display. At the upper
right, you can see the current
shooting time and the round.
Hit targets turn white. The assigned ring value is displayed.
After the time is up, the ring
number of the current series and
the ”Gesamt” (total) ring number
are displayed.
By pressing the menu button, you
get to the ”Analysemenü” (analysis
menu).
1.3.2.2 Paramètres OSP
Au démarrage, cinq cibles noires apparaissent sur l’afficheur. En haut à
droite, est affiché le temps du tir et le
tour en cours.
Les cibles touchées deviennent blanches. La valeur affectée à la zone
s’affiche.
Une fois le temps écoulé, la valeur
pour la série en cours et le total des
zones s’affichent.
Appuyer sur le bouton du menu pour
aller au menu Analyse.
1.3.2.2 OSP Ergebnisse
Nach dem Start erscheinen fünf
schwarze Scheiben auf dem Display. Rechts oben steht die aktuelle
Beschusszeit und der Durchgang.
Getroffene Scheiben werden weiß.
Der zugewiesene Ringwert wird
dargestellt.
Nach Ablauf der Zeit wird die Ringzahl der aktuellen Serie und die
Gesamtringzahl angezeigt.
Ein Druck auf den Menüknopf bringt
Sie in das Analysemenü.
Page 21

21
1.3.2.3 OSP analysis
The Analyse (analysis) menu will
show you :
-- Schuss (shot): Order of shots
-- Ziel (target): Order of hit targets
-- Zeit (time): Time intervals
between the shots
-- Ring: ring number
With --> zurück (back) you return
to start. By selecting ”Grafik”
(graphics) at the bottom, you get to
the graphical part of the analysis.
1.3.2.3 Analyse OSP
Le menu ”Analyse” vous indique :
-- Schuss (Tir) : enchaînement des
coups de feu
-- Ziel (Cible) : enchaînement des
cibles touchées
-- Zeit (Temps) : intervalles entre les
coups de feu
-- Ring (zone) : valeur de la zone
Pour revenir sur Start (départ),
appuyer --> zurück (retour).
Sélectionner tout en bas ”Graphik”
(Représentation graphique) pour
passer à la partie graphique de
l’analyse.
1.3.2.3 OSP Analyse
Das Analysemenü zeigt Ihnen:
-- Schuss: Reihenfolge der Schüsse
-- Ziel. Reihenfolge der getroffenen
Ziele
-- Zeit: Zeitabstände zwischen den
Schüssen
-- Ring: Ringzahl
Mit - -> zurück kommen Sie wieder
auf Start. Durch selektieren am unteren Ende ”Grafik” kommen sie
zum grafischen Teil der Analyse.
OSP ANALYSIS
--- > b a c k
S h o t --- T a r g e t --- T i m e --- R i n g
Graphics
OSP ANALYSE
--- > r e t o u r
T i r --- C i b l e --- T e m p s --- Z o n e
Graphique
1.3.2.4 OSP Graphics
The graphics will show you in
which sector the shots hit.
The selected shot is shown in
black on the target.
By selecting ”--> zurück” (back),
the ”OSP Analyse” (analysis)
appears again.
1.3.2.4 OSP Représentation
graphique
La représentation graphique vous indique la zone où ont eu lieu les coups
de feu. Le tir sélectionné dans la cible
est maintenant représenté en noir.
Sélectionner ”--> zurück (retour)”
pour retourner à l’analyse ”OSP
Analyse”.
1.3.2.4 OSP Grafik
Die Grafik zeigt Ihnen in welchem
Sektor die Schüsse lagen.
Der angewählte Schuss wird in der
Scheibe schwarz ausgelegt.
Durch selektieren von ”--> zurück”
erscheint wieder ”OSP Analyse”.
1.3.3.0 Sport pistol
The description of this discipline
can be found on page 44.
The DSB discipline Sportpistole
KK (Sport pistols KK) consists of
precision shooting and duel
shooting. You can simulate duel
shooting here.
To do this, a ”Multifunktionsziel
(MFZ)” (multi-functional target) is
required.
1.3.2.4 OSP Pistolet sport
Vous trouverez la description de la
discipline en page 44.
La discipline DSB Sportpistole
(pistolets sport) KK comprend tir
de précision et duel.
Ici, vous pouvez simuler un duel.
Pour ce faire, il faut une cible multifonctions (MFZ).
1.3.3.0 Sportpistole
Die Disziplinbeschreibung finden Sie
auf Seite 44. Die DSB Disziplin
Sportpistole KK besteht aus Präzisionsschießen und Duellschießen.
Hier können Sie Duellschießen
simulieren.
Dazu wird ein Multifunktionsziel
(MFZ) benötigt.
OSP Graphic
--- > b a c k
Shot 1
Shot 2
Shot 3
Shot 4
Shot 5
OSP Graphique
--- > r e t o u r
Tir 1
Tir 2
Tir 3
Tir 4
Tir 5
Sport pistol
--- > b a c k
Start
Settings
Pistolet sport
--- > r e t o u r
Start
Adjustement
Page 22

22
1.3.2.3 SpoPi settings
Ring value
Bulls-eye: 0-10 (D25mm)
Middle: 0-10 (D63mm)
Outside: 0-10 (D100mm)
Lead time: 1-10 seconds
Shooting time: 1-10 seconds
Pause time: 1-10 seconds
Number of series:1-10
Tip: If the target is set up at a di-
stance of approx. 6 m, this is equi-
valent to ring values of 10, 8 and 6
on the original target.
1.3.2.3 Paramètres SpoPi
Valeur de la zone
Mille: 0-10 (D25mm)
Centre: 0-10 (D63mm)
Extérieur: 0-10 (D100mm)
Temps de préparation: 1-10 secondes
Temps de tir: 1-10 Sekunden
Pause: 1-10 Sekunden
Nombre de séries: 1-10
Astuce : Si la cible est placée à une
distance approximative de 6m, cela
correspond aux valeurs de la cible
d’origine 10, 8, 6.
1.3.3.1 Einstellungen SpoPi
Ringwert
Zentrum: 0-10 (D25mm)
Mitte: 0-10 (D63mm)
Außen: 0-10 (D100mm)
Vorlaufzeit: 1-10 Sekunden
Beschusszeit: 1-10 Sekunden
Pausenzeit: 1-10 Sekunden
Anzahl Serien: 1-10
Tipp: Wird das Ziel in ca. 6 m Entfernung aufgestellt, entspricht das auf
der Originalscheibe den Ringwerten
10, 8, 6.
1.3.2.3 SpoPi settings
Ring value
Bulls-eye: 0-10 (D25mm)
Middle: 0-10 (D63mm)
Outside: 0-10 (D100mm)
Lead time: 1-10 seconds
Shooting time: 1-10 seconds
Pause time: 1-10 seconds
Number of series:1-10
Tip: If the target is set up at a di-
stance of approx. 6 m, this is equi-
valent to ring values of 10, 8 and 6
on the original target.
1.3.3.1 Einstellungen SpoPi
Ringwert
Zentrum: 0-10 (D25mm)
Mitte: 0-10 (D63mm)
Außen: 0-10 (D100mm)
Vorlaufzeit: 1-10 Sekunden
Beschusszeit: 1-10 Sekunden
Pausenzeit: 1-10 Sekunden
Anzahl Serien: 1-10
Tipp: Wird das Ziel in ca. 6 m Entfernung aufgestellt, entspricht das auf
der Originalscheibe den Ringwerten
10, 8, 6.
1.3.2.3 SpoPi settings
Ring value
Bulls-eye: 0-10 (D25mm)
Middle: 0-10 (D63mm)
Outside: 0-10 (D100mm)
Lead time: 1-10 seconds
Shooting time: 1-10 seconds
Pause time: 1-10 seconds
Number of series:1-10
Tip: If the target is set up at a distance of approx. 6 m, this is equivalent to ring values of 10, 8 and 6
on the original target.
1.3.3.1 Einstellungen SpoPi
Ringwert
Zentrum: 0-10 (D25mm)
Mitte: 0-10 (D63mm)
Außen: 0-10 (D100mm)
Vorlaufzeit: 1-10 Sekunden
Beschusszeit: 1-10 Sekunden
Pausenzeit: 1-10 Sekunden
Anzahl Serien: 1-10
Tipp: Wird das Ziel in ca. 6 m Entfernung aufgestellt, entspricht das auf
der Originalscheibe den Ringwerten
10, 8, 6.
1.3.3.2 Pistolets sport (cible activée)
Appuyer sur ”Start (Départ)” pour lancer les séries entrées conformément
aux données temps.
Vous reconnaissez la cible activée à
la diode lumineuse verte.
Le début d’une nouvelle série est
confirmé par un signal sonore.
1.3.3.2 Sport pistols (target
activated)
After pressing ”Start”, the entered
series run according to the time
specifications.
The activated target can be recognized by the green LED.
When a new series is started, this
is indicated by an acoustic signal.
1.3.3.2 Sportpistole (Ziel aktiviert)
Nach dem Drücken auf ”Start” laufen
die eingegebenen Serien entsprechend den Zeitvorgaben ab.
Das aktivierte Ziel ist an der grünen
Leuchtdiode erkennbar.
Der Start einer neuen Serie wird
akustisch unterstützt.
Settigns SpoPi
--- > b a c k
Ring value Bulls-Eye: 10
Ring value Middle: 8
Ring value Outside: 5
Lead time: 3
Shooting time: 3
Pause time: 7
Number of series: 3
Adjustement SpoPi
--- > r e t o u r
Valeur mille: 10
Valeur centre: 8
Valeur extérieur: 5
Temps de preperation: 3
Temps de tir: 3
Pause: 7
Nombre de séries: 3
Sport Pistols
Serie: 2of3
Shot: 3 of 5
Ring: 105
Shoot on targe
Pistolets sport
Série: 2of3
Tir: 3 of 5
Valeur: 105
Tir de cible
1.3.3.3 Pistolets sport (cible
bloquée)
Pendant la pause, le dernier coup de
feu s’affiche avec la valeur de la zone
et le temps requis.
1.3.3.3 Sport pistols
(target blocked)
During the pause time, the last shot
with ring value and required time
are displayed.
1.3.3.3 Sportpistole (Ziel gesperrt)
In der Pausenzeit wird der letzte
Schuss mit Ringwert und benötigter
Zeit angezeigt.
Sport Pistols
Serie: 2of3
Shot: 3 of 5
Ring: 105
Shoot on targe
Pistolets sport
Série: 2of3
Tir: 3 of 5
Valeur: 105
Tir de cible
Page 23

23
1.3.3.4 Score pist-sport
La liste des scores indique le total des
zones et chaque série. Dès qu’on
quitte la partie avec ”- -> zurück
(retour)”, les valeurs sont supprimées.
1.3.3.4 SpoPi results
The result list shows the ”Gesamt”
(total) ring number and the results
of the individual series. After exiting
with ” -- > zurück” (back), these
values are deleted.
1.3.3.4 Ergebnis SpoPi
Die Ergebnisliste zeigt die
Gesamtringzahl und die einzelnen
Serien. Nach dem Ausstieg mit ”-->
zurück” sind diese Werte
gelöscht.
Results SpoPi
--- > b a c k
Total 223 rings
Serie 1: 68 rings
Serie 2: 80 rings
Serie 3: 75 rings
Score pist-sport
--- > r e t o u r
Total 223 rings
Série 1: 68 rings
Série 2: 80 rings
Série 3: 75 rings
1.4. Précision
L’option ”Präzision (Précision)” permet
de simuler la plupart des compétitions
statiques.
Pour ce faire, il faut une cible multifonctions (MFZ).
Ce jeu ne fonctionne qu’avec des laser
RG comme pour le RG Light-Point par
exemple.
1.4. Precision
With ”Präzision” (Precision) you
can simulate most static competitions.
To do this, a ”Multifunktionsziel
(MFZ)” (multi-functional target) is
required.
This game only works with RG
lasers, such as in the RG Light
Point.
1.4. Präzision
Mit ”Präzision” können Sie die
meisten statischen Wettbewerbe
simulieren.
Dazu wird ein Multifunktionsziel
(MFZ) benötigt.
Dieses Spiel funktioniert nur mit RGLasern wie z.B. im RG Light-Point.
Precision
--- > b a c k
Start
Settings
Results
Delete Results
Score pist-sport
--- > r e t o u r
Départ
Adjustement
Score
Supprime des résultats
1.4.1 Départ
Vous voulez appeler le jeu ”Präzision
(Précision)” et vous avez annoncé la
cible MFZ et le ou les tireur(s) dans le
menu principal sous ”Einstellungen”
(Paramètres); appuyez ensuite sur
Start (Départ).
La cible apparaît à droite sur l’écran.
Après le premier coup de feu, le nom
du tireur s’affiche à gauche en première ligne.
Les 5 lignes suivantes affichent le
numéro du tir et la valeur de la zone.
Suit le chiffre de la série en cours et
son score ; en dessous, le total. Dans
la représentation graphique, le dernier
tir est en noir. Après le deuxième tir, le
point de rencontre est représenté par
une croix
Si deux ou plusieurs joueurs tirent en
même temps sur la cible, les valeurs
du dernier tireur s’affichent.
1.4.1 Start
You want to call the game ”Präzision” (Precision), and once you
have registered the multi-functional
targets and the shooter(s) under
Einstellungen (Settings) in the
Hauptmenü (main menu), press
start.
The target appears on the right
side of the display. After the first
shot, the shooter name appears in
the first line on the left side of the
display.
The next 5 lines show the shot
number and the ring value. Afterwards, the ring number of the current series is shown and under this
the total ring number (Gesamt)
achieved so far. In the graphics,
the last shot is shown in black.
After the second shot, the centremost hit is shown with a cross.
If there are two or more shooters
shooting at the target at the same
time, the values of the last shooter
are displayed.
1.4.1 Start
Sie wollen das Spiel ”Präzision”
aufrufen und haben im Hauptmenü
unter Einstellungen das MFZ und
den (die) Schützen angemeldet,
dann drücken Sie auf Start.
Auf dem Display erscheint rechts
die Zielscheibe. Nach dem ersten
Schuss wird auf der linken Seite in
der ersten Zeile der Schützenname
angezeigt.
Die nächsten 5 Zeilen zeigen die
Schussnummer und den Ringwert
an. Danach folgt die Ringzahl der
aktuellen Serie und darunter die bis
dahin erzielte Gesamtringzahl. In der
Grafik ist der letzte Schuss schwarz
ausgelegt. Nach dem zweiten
Schuss wird der mittlere Treffpunkt
durch ein Kreuz dargestellt.
Wenn zwei oder mehr Schützen
gleichzeitig auf das Ziel schießen,
werden die Werte des letzten Schützen angezeigt.
Page 24

24
BENNI
1. 8
2. 10
3. 8
4. 5
5. 10
Serie 1:41
Total 41
BENNI
1. 8
2. 10
3. 8
4. 5
5. 10
Série 1:41
Total 41
1.4.2 Einstellungen (Paramètres)
Valeur de la zone
Mille: 0-10 (D25mm)
Centre: 0-10 (D63mm)
Extérieur: 0-10 (D100mm)
Temps de préparation: 0-10 secondes
Temps de tir: 1-300 secondes ou
”arrêt”
Nombre de tirs (par série): 1-10
Nombre de séries): 1-12
Pour une cible placée à une distance
de 10m, une touche dans le mille correspond à une valeur 5 pour une cible
d’origine Carabine 10 m.
Pour la cible avec pistolet à 10m:
Mille: 9
Centre: 7, Außen (extérieur) : 5.
1.4.2 Settings
Ring value
Bulls-eye: 0-10 (D 25 mm)
Middle: 0-10 (D 63 mm)
Outside: 0-10 (D 100 mm)
Lead time: 0-10 seconds
Shooting time: 1-300 seconds or
”aus” (”off”)
Number of shots (per series): 1-10
Number of series: 1-12
If the target is set up at a distance
of 10 m, a hit in the bulls-eye is
equivalent to a ring value of 5 on
the original 10 m rifle target.
For the 10 m pistol target, this
results in:
Bulls-eye: 9
Middle: 7
Outside: 5
1.4.2 Einstellungen
Ringwert
Zentrum:0-10 (D25mm)
Mitte: 0-10 (D63mm)
Außen: 0-10 (D100mm)
Vorlaufzeit: 0-10 Sekunden
Beschusszeit: 1-300 Sekunden
oder ”aus”
Anzahl Schüsse (pro Serie): 1-10
Anzahl Serien: 1-12
Wird das Ziel in 10m Entfernung aufgestellt, entspricht das bei einem
Treffer ins Zentrum einem Ringwert
von 5 auf der Originalscheibe
Gewehr 10m.
Für die Scheibe Pistole 10m
ergeben sich:
Zentrum:9
Mitte: 7
Außen: 5
Settings
--- > b a c k
Bulls-eye: 10
Middle: 8
Outside: 5
Lead Time: 3
Shooting time: off
Number of shots: 4
Numbere of series: 2
Paramètres
--- > r e t o u r
Mille: 10
Centre: 8
Extérieur: 5
Temps de préparation: 3
Temps de tir: arrêt
Nombre de tirs: 4
Nombre de séries: 2
1.4.3 Liste des scores
Affiche la liste de classement des participants au tir dans ce tour.
Attention: Pas de poursuite de la liste
de classement en cas de tour
supplémentaire.
1.4.3 Result list
Shows the ranking list of the
shooters who participated in this
round.
Attention: The ranking list is not
continued in a further round.
1.4.3 Ergebnisliste
Zeigt die Rangliste der in diesem
Durchgang beteiligten Schützen an.
Achtung: Die Rangliste wird bei
einem weiteren Durchgang nicht
fortgeschrieben.
Result list
--- > c o n t i n u e
1. Christian 327 R
2. Alf 317 R
3. Benni 305 R
Liste des scores
--- > s u i v a n t
1. Christian 327 R
2. Alf 317 R
3. Benni 305 R
Page 25

25
1.4.4.1 Supprimer scores1.4.4.1 Delete results1.4.4.1 Lösche Ergebnisse
Delete results
--- > b a c k
Delete
Supprimer s cores
--- > r e t o u r
Supprimer
1.4.4.2 Supprimer....
Suppression du contenu du menu
”Ergebnisliste (Liste des scores)”.
1.4.4.2 Deleting...
The menu contents of ”Ergebnisliste” (result list) are deleted.
1.4.4.2 Lösche....
Der Menüinhalt ”Ergebnisliste” ist
gelöscht
2.0. FUN GAMES
Jeux de tir
2.0. FUN GAMES
Shooting games
2.0. FUN GAMES
Schießspiele
FUN G AMES
--- > b a c k
Precision shooting
Rapid-fire shooting
On/Off shooting
Duel against the target
Duel against another player
FUN G AMES
--- > r e t o u r
Tir de précision
Tir rapide
Tir marche-arrêt
Duel contre la cible
Duel contre un joueur
Les jeux 1 à 3 peuvent être joués de
deux manières.
a) Commande de jeu par suites de
sons --> Schussgeräusch ”Nein
(bruits de coups de feu : non)”
b) Commande de jeu par langage
parlé et bruits de coups de feu -->
Schussgeräusch ”Ja” (bruits de coups
de feu : oui)”
Vous pouvez activer ou désactiver les
bruits de coups de feu au point de
menu 5.0.
Les jeux 4 et 5 ne se jouent qu’avec
un support parlé.
Games 1-3 can be played two
ways:
a) Game control via sound
sequences --> Schussgeräusch
(shooting noise) ”Nein” (no)
b) Game control through speech
and shooting noises --> Schussgeräusch (shooting noise) ”Ja” (yes)
The shooting noise can be activated/deactivated via menu item 5.0.
Games 4 and 5 are only played
with speech support.
Die Spiele 1-3 können auf zwei
Arten gespielt werden:
a) Spielsteuerung über To nfolgen -->
Schussgeräusch ”Nein”
b) Spielsteuerung durch Sprache
und Schussgeräusche -- > Schussgeräusch ”Ja”
Das Schussgeräusch kann unter
Menüpunkt 5.0 ein- oder ausgeschaltet werden.
Die Spiele 4 und 5 werden nur mit
Sprachunterstützung gespielt.
Deleting Supprimer
Page 26

26
2.0.1 Tir de précision:
a) Commande de jeu par suite de
sons
Après activation de la cible, un son de
contrôle signale le départ.
Chaque touche est signalée par une
suite de sons et par l’allumage du
témoin lumineux vert. Au bout de trois
secondes, le témoin lumineux s’éteint,
vous pouvez de nouveau tirer sur la
cible.
Après 20 touches, la suite de sons
retentit trois fois.
Il s’ensuit une pause de 20 secondes,
puis un son de contrôle valide la cible
pour les 20 prochaines touches.
b) Commande de jeu par langage
parlé et bruitage
Après activation de la cible, le
message sonore ”go” donne le signal
de départ.
Chaque touche est indiquée par un
”Bruit de coup de feu” et par
l’allumage du témoin lumineux vert.
Au bout de trois secondes, le témoin
lumineux s’éteint, vous pouvez de
nouveau tirer sur la cible. Au bout de
20 touches, le tireur est récompensé
par des applaudissements.
Il s’ensuit une pause de 20 secondes,
puis le message ”go” donne le signal
de départ pour les 20 prochaines
touches.
Le tir de précision permet par ex. à
un entraîneur d’évaluer les progrès
de son groupe par la saisie du nombre
de coups de feu sur le laser RG (par
ex. RG Light-Point) et de changer le
niveau de difficulté avec d’autres tailles
de cibles.
2.0.1 Precision shooting:
a) Game control via sound
sequences
After activating the target, a control
sound beeps as a start signal.
A hit is indicated by a sound sequence and the lit--up green LED.
After three seconds, the light goes
out and the target can be shot at
again.
After 20 hits, the sound sequence
repeats three times.
Now there is a 20-second pause,
after which there’s a control beep,
enabling the target for the next 20
hits.
b) Game control via speech and
noises
After the target is activated, ”go”
is announced as a start signal.
A hit is indicated by a ”shooting
noise” and the lit-up green LED.
After three seconds, the light goes
out and the target can be shot at
again.
After 20 hits, the shooter is rewarded with applause.
Now there is a 20-second pause,
after which ”go” is announced for
the next 20 hits.
Präzisionsschiessen (precision
shooting) offers the trainer the option of monitoring the training progress of his group by means of the
shot number input on the RG Laser
(e.g. RG Light-Point) and to
change the degree of difficulty by
using other target patterns.
2.0.1 Präzisionsschiessen:
a) Spielsteuerung über Tonfolgen
Nach dem Einschalten des Ziels ertönt ein Kontrollton als Startzeichen.
Ein Treffer wird durch eine Tonfolge
und durch aufleuchten des grünen
Lichts angezeigt. Nach drei Sekunden erlischt das Licht, das Ziel kann
wieder beschossen werden.
Nach 20 Treffern kommt eine dreimalige Wiederholung der Tonfolge.
Nun folgt eine 20 Sekunden Pause,
danach gibt ein Kontrollton das Ziel
wieder frei für die nächsten 20
Treffer.
b) Spielsteuerung über Sprache
und Geräusche
Nach dem Einschalten des Ziels
kommt die Ansage ”go” als Startzeichen.
Ein Treffer wird durch ein ”Schuss-
geräusch” und durch aufleuchten
des grünen Lichts angezeigt. Nach
drei Sekunden erlischt das Licht,
das Ziel kann wieder beschossen
werden.
Nach 20 Treffern wird der Schütze
mit Applaus belohnt.
Nun folgt eine 20 Sekunden Pause,
danach kommt die Ansage ”go” für
die nächsten 20 Treffer.
Das Präzisionsschiessen bietet z.B.
einem Trainer die Möglichkeit durch
Schusszahleingabe am RG Laser
(z.B. RG Light-Point) die Trainingsfortschritte seiner Gruppe zu kontrollieren und durch andere Zielschablonen den Schwierigkeitsgrad zu
verändern.
2.0.2 Tir rapide
a) Commande de jeu par suite de sons
Après activation de la cible, un son de
contrôle signale le départ.
Chaque touche est signalée par un
court signal sonore et l’allumage bref
du témoin lumineux vert. Ce qui autorise une succession très rapide de tirs
(max.7/seconde).
b) Commande de jeu par langage
parlé et bruitage
Après activation de la cible, le
message sonore ”go” donne le signal
de départ.
Chaque touche est indiquée par un
”Bruit de coup de feu” et par l’allumage bref du témoin lumineux vert.
De rapides touches successives
déclenchent à chaque fois un bruit de
coups de feu chevauchant le
précédent. Ce qui autorise une succession très rapide de tirs (max.7/seconde).
2.0.2 Rapid-fire shooting:
a) Game control via sound
sequences
After activating the target, a control
sound beeps as a start signal.
A hit is indicated by a short sound
and the flash of the green LED.
This makes very fast shot sequences (max. 7/second) possible.
b) Game control via speech and
noises
After the target is activated, ”go”
is announced as a start signal.
A hit is indicated by a ”shooting
noise” and the flash of the green
LED.
Fast, consecutive hits trigger a
shooting noise every time, and superimpose the previous one. This
makes very fast shot sequences
(max. 7/second) possible.
2.0.2 Schnellfeuerschiessen:
a) Spielsteuerung über To nfolgen
Nach dem Einschalten des Ziels ertönt ein Kontrollton als Startzeichen.
Ein Treffer wird durch einen kurzen
Ton und durch aufblitzen des grünen
Lichts angezeigt. Dadurch sind sehr
schnelle Schussfolgen (max.7/
Sekunde) möglich.
b) Spielsteuerung über Sprache und
Geräusche
Nach dem Einschalten des Ziels
kommt die Ansage ”go” als Startzeichen.
Ein Treffer wird durch ein ”Schuss-
geräusch” und durch aufblitzen des
grünen Lichts angezeigt.
Schnell hintereinander angebrachte
Treffer lösen jedes Mal ein neues
Schussgeräusch aus und überlagern das vorherige. Dadurch sind
sehr schnelle Schussfolgen
(max.7/Sekunde) möglich.
Page 27

27
2.0.3 Tir marche-arrêt
a) Commande de jeu par suite
de sons
Après activation de la cible, un son de
contrôle signale le départ.
Le témoin lumineux vert est allumé.
Chaque touche est représentée et
différenciée par deux sons différents et
par le changement du témoin lumineux
vert qui s’allume et s’éteint.
b) Commande de jeu par langage
parlé et bruitage
Après activation de la cible, le
message sonore ”go” donne le
signal de départ.
Le témoin lumineux vert est allumé.
Chaque touche est représentée et
différenciée par deux coups de feu
différents et par le changement du
témoin lumineux vert qui s’allume et
s’éteint.
2.0.3 On/Off shooting
a) Game control via sound
sequences
After activating the target, a control
sound beeps as a start signal.
The green light is on.
The individual hits are distinguished by two different sounds and
switching the green light on and off.
b) Game control via speech and
noises
After the target is activated, ”go”
is announced as a start signal.
The green light is on.
The individual hits are distinguished and represented by two different shooting sounds and the
green light switching on and off.
2.0.3 An-Aus Schiessen
a) Spielsteuerung über Tonfolgen
Nach dem Einschalten des Ziels ertönt ein Kontrollton als Startzeichen.
Das grüne Licht ist an.
Die einzelnen Treffer werden durch
zwei verschiedene Töne und durch
den Wechsel des grünen Lichts zwischen an-aus dargestellt und unterschieden.
b) Spielsteuerung über Sprache
und Geräusche
Nach dem Einschalten des Ziels
kommt die Ansage ”go” als Startzeichen.
Das grüne Licht ist an.
Die einzelnen Treffer werden durch
zwei verschiedene Schussgeräusche und durch den Wechsel des
grünen Lichts zwischen an--aus
dargestellt und unterschieden.
2.0.4 Duel contre la cible
Le but du jeu est d’être plus rapide
qu’un ennemi imaginaire et de le toucher le plus rapidement possible. Le
temps pour ce faire est fixé à trois secondes pendant lequel un tireur peut
tirer une ou plusieurs fois si nécessaire. Vous pouvez changer le niveau
de difficulté avec la taille de la cible.
La partie s’arrête lorsque le tireur a
touché 10 fois ou manqué trois fois la
cible.
Après enclenchement, la cible reste
inactive. Le message suivant retentit :
”shoot to start”
Le tireur commence le duel en tirant de
son poste ; dès qu’il touche la cible, la
touche est indiquée par un signal sonore. Il s’ensuit une pause de 5 secondes pendant laquelle le tireur peut
prendre position.
Au bout des cinq secondes, le tireur
peut reprendre le tir avec le message
sonore ”ready”.
Un générateur aléatoire émet dans les
secondes qui suivent un bref signal
sonore et le témoin lumineux vert s’allume pendant trois secondes.
Pendant ce temps, le joueur peut tirer.
--Si le tireur touche pendant la durée
définie, la touche est confirmée par un
bruit de coup de feu et l’extinction du
témoin lumineux vert par la cible.
-- S’il loupe la cible, un rire retentit, et
confirme le loupé.
2.0.4 Duel against the target
The purpose of the game is to be
faster than an imaginary opponent
and to hit him as quickly as possible. The time is fixed at three seconds during which a shooter can
fire a shot, or, if necessary, several
shots. The degree of difficulty can
be changed by using different target patterns.
The game is over when the shooter
has hit ten times or missed three
times.
After switching on, the target
remains inactive. The following
announcement comes: ”Shoot to
start”
The shooter starts the duel from
where he’s standing by hitting the
target. The target confirms this with
a beep. A 5-second pause follows,
in which the shooter can get into
position.
After these five seconds, the target
enables the start by announcing
”Ready”.
Controlled by a random generator,
within the next few seconds there
is a short beep and the green light
goes on for three seconds.
The target can be shot at during
this time.
-- If the shooter hits in the specified
time, the target confirms this with a
shooting noise and the green light
goes out.
-- But if the shooter doesn’t hit, the
”miss” is indicated by a ”laugh”.
2.0.4 Duell gegen das Ziel
Zweck des Spiels ist es, schneller
zu sein als ein imaginärer Gegner
und diesem möglichst schnell einen
Treffer zu verpassen. Die Zeit dazu
ist festgelegt auf drei Sekunden in
der ein Schütze einen Schuss oder
wenn erforderlich mehrere Schüsse
abgegeben kann. Der Schwierigkeitsgrad kann über Zielschablonen
geändert werden.
Das Spiel endet, wenn der Schütze
zehnmal getroffen oder dreimal verfehlt hat.
Nach dem Einschalten bleibt das
Ziel inaktiv. Die Ansage kommt:
”shoot to start”
Der Schütze startet das Duell von
seinem Standort aus, indem er einen Treffer setzt, das Ziel quittiert
das durch einen Ton. Nun folgt eine
Pause von 5 Sekunden in welcher
der Schütze seine Position einnehmen kann.
Nach den fünf Sekunden gibt das
Ziel durch die Ansage ”ready” den
Start frei.
Gesteuert durch einen Zufallsgenerator kommt innerhalb der nächsten Sekunden ein kurzer Signalton
und das grüne Licht geht für drei Sekunden an.
Das Ziel kann in der Zeit beschos-
sen werden.
-- Trifft der Schütze in der vorgegebenen Zeit, wird das durch das Ziel
mit einem Schussgeräusch und erlöschen des grünen Lichts quittiert.
-- Trifft er jedoch nicht, wird der
”Miss” durch ein ”Lachen” quittiert.
Page 28

28
Dans les deux cas, la prochaine
séquence repart automatiquement.
Les messages d’information envoyés
au tireur en cas de touche ou de loupé
sont les mêmes.
A la dixième touche, le joueur est
récompensé par des applaudissements.
Au troisième loupé de la série, la cible
réagit avec un ”game over” et le rire
mentionné ci-dessus.
Exemples :
Si le tireur a touché sept fois la cible et
la manque ensuite pour la troisième
fois, la partie est perdue.
Si le tireur manque deux fois la cible,
mais la touche ensuite 10 fois d’affilée,
il termine la partie en vainqueur.
Lorsque la partie est terminée, le tireur
est invité par le message ”shoot to
start” à recommencer une partie en
touchant la cible.
In both cases, the start of the next
sequence starts automatically.
The confirmation responses to the
shooter remain the same for hits or
misses.
After the tenth hit, the shooter gets
applause to signal his success.
After missing for the third time within the course of the series, the
target reacts by saying ”game
over” followed by the same gloating laugh as before.
Examples:
If the shooter has seven hits and
then misses the target for the third
time, the game is over for him.
If the shooter has two misses and
then hits ten times in a row, he
ends the game as the winner.
After a game has ended, the shooter is prompted to restart the game
with a hit with the command
”Shoot to start”.
In beiden Fällen erfolgt danach automatisch der Start der nächsten Sequenz.
Die Rückmeldungen an den Schützen bei Treffer oder Nichttreffer bleiben gleich.
Beim zehnten Treffer bekommt er
als Erfolgsmeldung einen Applaus
zugesprochen.
Beim dritten Fehlschuss im Verlauf
der Serie reagiert das Ziel mit einem
”game over” und dem schon oben
erwähnten hämischen lachen.
Beispiele:
Hat der Schütze sieben Treffer und
verfehlt dann das Ziel zum dritten
Mal, ist das Spiel für ihn verloren.
Hat der Schütze zwei Fehlschüsse
und trifft danach zehn mal in Folge,
beendet er das Spiel als Sieger.
Nachdem ein Spiel geendet hat, wird
der Schütze durch die Aufforderung
”shoot to start” aufgefordert, das
Spiel durch einen Treffer neu zu
starten.
2.0.5 Duel contre un joueur
(uniquement possible avec deux laser
RG)
Dans cette partie, deux tireurs équipés
de deux armes s’affrontent en même
temps.
Le but du jeu est d’être plus rapide que
l’adversaire et de toucher la cible le
premier.
Les deux tireurs peuvent tirer une ou
plusieurs fois si nécessaire. L’intérêt
particulier réside dans la programmation d’un nombre limité de coups simulant le magasin d’un pistolet ou d’un
revolver à barillet. Veuillez pour ce
faire, vous reporter aux instructions du
laser RG au paragraphe Commande
des boutons (Tasterbedienung).
Vous pouvez également modifier le niveau de difficulté avec la taille de la cible.
Commande de jeu par langage parlé
et bruitage seulement.
Après enclenchement, le message suivant invite le 1er joueur à tirer :
”player one, shoot to start”.
L’un des joueurs s’annonce en tirant
sur la cible, ce qui confirme le tir de la
première arme avec le message
”player one” pour le joueur 1.
Le message est suivi de la deuxième
invitation :
”player two, shoot to start”,
suivi du tir de la deuxième arme confirmé par un.
2.0.5 Duel against another player
(is only possible with two RG
lasers)
In this game, two shooters with two
weapons compete against each
other at the same time.
The purpose of the game is to be
faster than the opponent and to be
thefirstonetohitthetarget.
Both shooters can fire one or, if necessary, several shots. It becomes
especially suspenseful if a limited
number of shots is entered, which
simulates the magazine capacity of
a pistol or drum revolver. See also
the instructions of the RG laser in
the section on button operation.
The degree of difficulty can also be
changed by using different target
patterns.
Game control only via speech
and noises:
After switching on, the following
command is heard:
”Player one, shoot to start”.
So, one of the players shoots at
the target to indicate he is player
one. The target confirms the shot
of the first weapon by saying
”Player one”.
After that comes the second command:
”Player two, shoot to start”.
After the shot from the second
weapon, the target announces
2.0.5 Duell gegen einen Mitspieler
(ist nur mit zwei RG-Lasern möglich)
Bei dem Spiel treten zwei Schützen
mit zwei Waffen gleichzeitig gegeneinander an.
Zweck des Spiels ist es, schneller
zu sein als der Gegner und als erster einen Treffer auf das Ziel zu
setzen.
Beide Schützen können einen oder
wenn erforderlich mehrere Schüsse
abgeben. Ein besonderer Reiz wird
erzielt durch die Eingabe einer begrenzten Schusszahl welche die Magazinkapazität von einer Pistole oder
einen Trommelrevolver simulieren.
Siehe dazu in der Anleitung des RG
Lasers den Abschnitt Tasterbedienung.
Der Schwierigkeitsgrad kann auch
über Zielschablonen geändert werden.
Spielsteuerung nur über Sprache
und Geräusche:
Nach dem Einschalten kommt die
Aufforderung:
”player one, shoot to start”.
Als erstes meldet sich also einer der
Spieler mit einem Schuss bei dem
Ziel an. Dieses quittiert den Schuss
der ersten Waffe mit der Ansage
”player one” für Spieler 1.
Darauf folgt die zweite Aufforderung:
”player two, shoot to start”.
Dem Schuss aus der zweiten Waffe
folgt ein
Page 29

29
”player two” pour tireur 2.
Le codage du laser Röhm permet à la
cible de différencier les deux armes et
de conserver cette affectation tout le
long de la partie.
L’annonce est suivie d’une pause de 5
secondes pendant laquelle les tireurs
prennent leurs positions.
Au bout des cinq secondes, le tireur
peut reprendre le tir avec le message
sonore ”ready”.
Un générateur aléatoire émet dans les
secondes qui suivent un bref signal
sonore et le témoin lumineux vert s’allume pendant trois secondes.
Les joueurs peuvent ensuite tirer. Le
tireur touchant la cible le premier est
signalé par le message : ”the w inner
is player one ( two) et il est récompensé par des applaudissements.
5 secondes plus tard, nouveau message ”ready” : le duel suivant commence.
”Player two”.
The target distinguishes the two
weapons by means of the Röhm
Laser coding, and the weapon allocation is maintained during the entire game.
After the registration, there is a 5
second pause in which the shooters can get into position.
After these five seconds, the target
enables the start by announcing
”Ready”.
Controlled by a random generator,
within the next few seconds there
is a short beep and the green light
goes on for three seconds.
The target can be shot at. The
shooter with the first hit is indicated
with the announcement: ”The winner is player one ( two)” and is additionally rewarded with applause.
After 5 seconds, the target says
”Ready” and the next duel begins.
”player two” für Schütze 2.
Durch die Kodierung der Röhm Laser kann das Ziel die beiden Waffen
unterscheiden und behält diese Zuordnung über das ganze Spiel.
Nach der Anmeldung folgt eine
Pause von 5 Sekunden in der die
Schützen ihre Positionen einnehmen.
Nach den fünf Sekunden gibt das
Ziel durch die Ansage ”ready” den
Start frei.
Gesteuert durch einen Zufallsgenerator kommt innerhalb der nächsten
Sekunden ein kurzer Signalton und
das grüne Licht geht für drei Sekunden an.
Das Ziel kann beschossen werden.
Der Schütze mit dem ersten Treffer
wird angezeigt mit der Ansage: ”the
winner is player one ( two) und
wird zusätzlich mit Applaus belohnt.
Nach 5 Sekunden kommt wieder die
Ansage ”ready” und das nächste
Duell startet.
3.0 DART
Vous trouverez la description de cette
discipline en page 44.
3.0 DARTS
The description of this discipline
can be found on page 44.
3.0 DART
Die Disziplinbeschreibung finden Sie
auf Seite 44.
3.1.0 Highscore
Start (Départ) : autorisation de tirer sur
la cible MFZ.
Player (Joueur) : nombre de participants à la partie (1 à 16)
Durchgänge (Tours) : nombre de tours
( 1 -- 1 0 )
3.1.0 Highscore
Start: The multi-functional target is
enabled for being shot at.
Players: Number of participating
shooters (1--16)
Durchgänge (rounds): Number of
rounds (1--10)
3.1.0 Highscore
Start: Das MFZ wird zum Beschuss
freigegeben.
Player: Anzahl der teilnehmenden
Schützen (1--16)
Durchgänge: Anzahl der Runden
( 1 -- 1 0 )
HIGHSCORE
--- > b a c k
Start
Player: 3
Rounds: 8
HIGHSCORE
--- > r e t o u r
Départ
Joueur: 3
Tour s: 8
3.1.1
Au démarrage, s’affiche le premier
tireur. Après chaque touche, le score
obtenu s’affiche.
Le score apparaît comme total après
3 touches
ou après interruption en actionnant le
bouton du menu.
Après trois touches ou annulation,
c’est au tour du tireur suivant.
3.1.1
After the start, the display of the
first shooter appears.
After every hit, the number of
points is displayed. The total number of points appears after 3 hits
or after cancelling by pressing the
menu button.
The next shooter follows after three
hits or cancelling.
3.1.1
Nach dem Start erscheint die Anzeige des ersten Schützen.
Nach jedem Treffer wird die erzielte
Punktzahl angezeigt.
Die Gesamtpunktzahl erscheint als
Total nach 3 Treffern oder nach Abbruch durch betätigen des Menüknopfs. Nach drei Treffern oder Abbruch folgt der nächste Schütze.
Page 30

30
3.1.2
Alafindutour,lescores’affichede
suite.
Le score total s’affiche derrière le nom
du tireur.
Appuyer sur ”--> weiter (suivant)” pour
lancer tout de suite le tour suivant.
Appuyer sur ”zurück (retour)” pour
interrompre la partie en cours.
3.1.2
At the end of the round, the current
result is displayed immediately.
Here, the total number of points is
displayed next to the name of the
shooter.
By pressing ”--> weiter” (continue)
the next round is started immediately.
The current game is terminated by
pressing ”zurück” (back).
3.1.2
Am Ende des Durchgangs erscheint
sofort das aktuelle Ergebnis.
Dabei wird hinter dem Namen des
Schützen die Gesamtpunktzahl angezeigt.
Mit dem Druck auf ”--> weiter” startet
sofort der nächste Durchgang.
Mit dem Druck auf ”zurück” wird das
aktuelle Spiel abgebrochen.
HIGHSCORE
Round: 1
Player: 2
HIGHSCORE
Tour s: 1
Joueur: 2
3.1.4
Message d’erreur éventuel après le
départ : ”Es wird ein Multifunktionsziel
benötigt!!!”(Cible multifonctions MFZ
requise !!!)
Vérifiez que vous disposez d’une cible
multifonctions.
3.1.4
Potential error message after the
start: ”Es wird ein Multifunktionsziel
benötigt!!!” (”A multi-functional
target is required!!!”).
Make sure that an activated
multi-functional target is available.
3.1.4
Mögliche Fehlermeldung nach dem
Start: ”Es wird ein Multifunktionsziel
benötigt!!!”.
Stellen Sie sicher, dass ein Multifunktionsziel eingeschaltet zur Verfügung steht.
RESULT
--- > c o n t i n u e
Player 1 199 P
Player 2 237 P
Player 3 156 P
SCORE
--- > s u i v a n t
Player 1 199 P
Player 2 237 P
Player 3 156 P
3.1.3
Lorsque les tours programmés sont
terminés, appuyer sur ”--> weiter
(suivant)” : le score final apparaît.
Le score total s’affiche derrière le nom.
S’il y a plusieurs tireurs, une liste de
classement est automatiquement
créée en fonction des scores.
3.1.3
After the pre-set rounds are completed, the final result appears after
pressing on ”--> weiter” (continue).
Here, the total number of points is
always displayed after the shooter’s name.
In the case of several shooters, a
ranking list is automatically created
according to the number of points.
3.1.3
Nach Abschluss der voreingestellten
Durchgänge erscheint nach Druck
auf ”--> weiter”.
das Endergebnis.
Dabei wird hinter dem Namen die
Gesamtpunktzahl angezeigt.
Bei mehreren Schützen wird automatisch eine Rangliste nach Punktzahl erstellt.
TOTAL RESULT
--- > b a c k
Player 3 792 P
Player 2 711 P
Player 1 699 P
SCORE TOTAL
--- > r e t o u r
Player 3 792 P
Player 2 711 P
Player 1 699 P
Page 31

31
3.2.0 Jeux 01
Start (Départ) : autorisation de tirer sur
la cible MFZ.
Player (Joueur) : nombre de participants à la partie (1 à 16)
Wert (Valeur) : Nombre de points devant être résorbés (101/201/.../901)
3.2.0 01 Games
Start: The multi-functional target is
enabled for being shot at.
Players: Number of participating
shooters (1-16)
Wert (value): Number of points
which must be ”worked off”
(101/201/.../901)
3.2.0 01-Spiele
Start: Das MFZ wird zum Beschuss
freigegeben.
Player: Anzahl der teilnehmenden
Schützen (1-16)
Wert: Anzahl der Punkte, die abgebaut werden müssen
(101/201/.../901)
A multi --- functional target is
required!!!
Cible multifonctions MFZ
requise !!!
01-GAMES
Round 1
Player 3
JEUX 01
Tour s: 1
Joueur: 3
3.2.1
Au démarrage, le premier tireur
s’affiche.
Après chaque touche, le score obtenu
s’affiche.
Le score total est soustrait de la valeur
précédemment paramétrée.
Ce score apparaît comme total après
3 touches
ou après interruption de la partie en
actionnant le bouton du menu.
Après trois touches ou annulation,
c’est au tour du tireur suivant.
3.2.1
After the start, the display of the
first shooter appears.
After every hit, the number of
points is displayed.
The total number of points is subtracted from the pre-set value.
The total number of points appears
as a total after 3 hits
or after cancelling by pressing the
menu button.
The next shooter follows after three
hits or cancelling.
3.2.1
Nach dem Start erscheint die Anzeige des ersten Schützen.
Nach jedem Treffer wird die erzielte
Punktzahl angezeigt.
Die Gesamtpunktzahl wird dem voreingestellten Wert abgezogen.
Die Gesamtpunktzahl erscheint als
Total nach 3 Treffern
oder nach Abbruch durch betätigen
des Menüknopfs.
Nach drei Treffern oder Abbruch
folgt der nächste Schütze.
3.2.2
A la fin du tour, le résultat en cours
s’affiche de suite.
Le score total s’affiche derrière le nom
du tireur.
Appuyer sur ”--> weiter (suivant)” pour
lancer tout de suite le tour suivant.
Appuyer sur ”--> zurück (retour)” pour
interrompre la partie en cours.
3.2.2
At the end of the round, the current
result appears immediately.
Here, the total number of points is
displayed next to the name of the
shooter.
By pressing ”--> weiter” (continue)
the next round is started immediately. The current game is terminated by pressing ”zurück” (back).
3.2.2
Am Ende des Durchgangs erscheint
sofort das aktuelle Ergebnis.
Dabei wird hinter dem Namen des
Schützen die Gesamtpunktzahl angezeigt.
Mit dem Druck auf ”--> weiter” startet
sofort der nächste Durchgang.
Mit dem Druck auf ”--> zurück” wird
das aktuelle Spiel abgebrochen.
01-GAMES
--- > b a c k
Start
Player: 3
Val ue: 50 1
JEUX 01
--- > r e t o u r
Joueur: 3
Valeur: 501
Page 32

32
3.2.3
Once a shooter reaches 0, the final
result appears after pressing ”weiter” (continue).
Here, a 0 is displayed after the
name of the winner.
For all other shooters, their remaining points appear next to their names.
In the case of several shooters, a
ranking list is automatically created
according to the number of remaining points.
3.2.3
Lorsqu’un tireur a atteint la valeur 0,
appuyer sur ”weiter (suivant)” pour
afficher le score final.
Un 0 s’affiche alors derrière le nom
du gagnant.
Pour les autres joueurs, les points
restants s’affiche.
S’il y a plusieurs tireurs, un classement est automatiquement créé en
fonction des points restants.
3.2.3
Erreicht ein Schütze den Wert 0,
erscheint nach Druck auf ”weiter”
das Endergebnis.
Dabei wird hinter dem Namen des
Gewinners eine 0 angezeigt.
Bei allen anderen Schützen erscheint die Restpunktzahl.
Bei mehreren Schützen wird automatisch eine Rangliste nach Restpunktzahl erstellt.
RESULT
Player 1 425 P
Player 2 398 P
Player 3 414 P
Player 4 501 P
SCORE
Player 1 425 P
Player 2 398 P
Player 3 414 P
Player 4 501 P
TO TAL RES ULT
--- --- > b a c k
Player 3 0 P
Player 2 30 P
Player 1 40 P
Player 4 501 P
SCORE TOTAL
--- > r e t o u r
Player 3 0 P
Player 2 30 P
Player 1 40 P
Player 4 501 P
3.2.4
Potential error message after the
start: ”Es wird ein Multifunktionsziel
benötigt!!!” (”A multi-functional
target is required!!!”).
Make sure that an activated
multi-functional target is available.
3.2.4
Message d’erreur éventuel après le
départ : ”Es wird ein Multifunktionsziel
benötigt!!!”(Cible multifonctions MFZ
requise !!!)
Vérifiez que vous disposez d’une
cible multifonctions.
3.2.4
Mögliche Fehlermeldung nach dem
Start: ”Es wird ein Multifunktionsziel
benötigt!!!”.
Stellen Sie sicher, dass ein Multifunktionsziel eingeschaltet zur
Verfügung steht.
A multi --- functional target is
required!!!
Cible multifonctions MFZ
requise !!!
3.3.0 Cricket
Start: The multi-functional target is
enabled for being shot at.
Players: Number of participating
shooters (1--16)
3.3.0 Cricket
Start (Départ) : autorisation de tirer
sur la cible MFZ.
Player (Joueur) : nombre de participants à la partie (1 à 16)
3.3.0 Cricket
Start: Das MFZ wird zum Beschuss
freigegeben.
Player: Anzahl der teilnehmenden
Schützen (1--16)
Page 33

33
3.3.1
After the start, the display of the
first shooter appears.
After every hit, the number of
points is displayed.
In the graphics on the right, a total
overview of the hits is displayed
graphically on the number fields.
A light point in a number field is
equivalent to one hit in this field.
A dark point in a number field is
equivalent to two hits in this field.
A lightly shaded number field indicates 3 hits on this field.
The respectively current shooter
can win points on this field.
A darkly shaded number field
means that all players have hit this
field 3x.
No more points can be won on darkly shaded fields.
The total number of points appear
(according to the game description)
after 3 hits on the target or after
cancelling by pressing the menu
button.
The next shooter follows after three
hits or cancelling.
3.3.1
Au démarrage, s’affiche le premier
tireur.
Après chaque touche, le score obtenu s’affiche.
La partie droite de l’image affiche un
aperçu général des touches sur les
zones de la cible.
Un rond blanc dans une zone correspond à 1x touche dans ce champ.
Un rond noir dans une zone correspond à 2x touches dans ce champ.
Une zone de couleur claire correspond à 3x touches dans ce champ.
Le tireur en jeu peut cibler des points
sur ce champ.
Une zone grisée signifie que tous les
joueurs ont touché ce champ 3x.
On ne peut plus marquer de points
dans un champ grisé.
Le score apparaît comme total (conformément à la description du jeu)
après 3 touches sur la cible
ou après une interruption avec le
bouton du menu.
Après trois touches ou annulation,
c’est au tour du tireur suivant.
3.3.1
Nach dem Start erscheint die Anzeige des ersten Schützen.
Nach jedem Treffer wird die erzielte
Punktzahl angezeigt.
Im rechten Schaubild wird eine Gesamtübersicht der Treffer auf den
Zahlenfeldern grafisch angezeigt.
Ein heller Punkt in einem Zahlenfeld
entspricht 1x Treffer auf dieses Feld
Ein dunkler Punkt in einem Zahlenfeld entspricht 2x Treffer auf dieses
Feld.
Ein hell schraffiertes Zahlenfeld bedeutet 3x Treffer auf dieses Feld.
Der jeweils aktuelle Schütze kann
auf diesem Feld Punkte erzielen.
Ein dunkel schraffiertes Zahlenfeld
bedeutet, dass alle Spieler dieses
Feld 3x getroffen haben.
Auf den dunkel schraffierten Felder
kann nicht mehr gepunktet werden.
Die Gesamtpunktzahl erscheint als
Total (gem. Spielbeschreibung) nach
3 Treffern auf das Ziel
oder nach Abbruch durch betätigen
des Menüknopfs.
Nach drei Treffern oder Abbruch
folgt der nächste Schütze.
CRICKET
--- > b a c k
Start
Player: 3
CRICKET
Round: 4
Player: 2
CRICKET
--- > r e t o u r
Départ
Joueur: 3
CRICKET
Tour s: 4
Joueur: 2
Page 34

34
3.3.2
At the end of the round, the current
result appears immediately.
Here, the total number of points is
displayed next to the name of the
shooter.
A star also appears next to the
currently leading shooter. Under
the shooter, all numbers are listed
which were already hit 3x.
By pressing ”--> weiter” (continue)
the next round is started immediately.
The current game is terminated by
pressing ”zurück” (back).
3.3.2
A la fin du tour, le résultat en cours
s’affiche de suite.
Le score total s’affiche derrière le
nom du tireur.
Le meneur de la partie en cours est
signalé par une étoile. Sous le tireur
sont listés toutes les zones ayant
déjà été touchées 3x.
Appuyer sur ”--> weiter (suivant)”
pour lancer tout de suite le tour suivant.
Appuyer sur ”--> zurück (retour)” pour
interrompre la partie en cours.
3.3.2
Am Ende des Durchgangs erscheint
sofort das aktuelle Ergebnis.
Dabei wird hinter dem Namen des
Schützen die Gesamtpunktzahl
angezeigt.
Hinter dem momentan führenden
Schützen erscheint zusätzlich ein
Stern. Unter dem Schützen sind alle
Zahlen aufgeführt, die bereits 3x
getroffen wurden.
Mit dem Druck auf ”--> weiter” startet
sofort der nächste Durchgang.
Mit dem Druck auf ”--> zurück” wird
das aktuelle Spiel abgebrochen.
RESULT CRICKET
--- > c o n t i n u e
Player 1: 351 P
1415 18 20 50
SCORE CRICKET
--- > s u i v a n t
Joueur 1: 351 P
1415 18 20 50
3.3.3
If all number fields are hit by a
shooter 3x and this shooter has the
highest total number of points, the
final result (Endergebnis) is displayed.
In the case of several shooters, a
ranking list is automatically created
according to the number of points.
3.3.3
Si un tireur touche 3x toutes les zones et atteint le score total le plus
élevé, le score final s’affiche.
S’il y a plusieurs tireurs, une liste de
classement est automatiquement
créée en fonction des scores.
3.3.3
Werden alle Zahlenfelder von einem
Schützen 3x getroffen und hat dieser
die höchste Gesamtpunktzahl,
erscheint das Endergebnis.
Bei mehreren Schützen wird
automatisch eine Rangliste nach
Punktzahl erstellt.
TO TAL RES ULT
--- > b a c k
1. Player 3 277 P
2. Player 2 240 P
3. Player 1 198 P
4. Player 4 0 P
SCORE TOTAL
--- > r e t o u r
1. Joueur 3 277 P
2. Joueur 2 240 P
3. Joueur 1 198 P
4. Joueur 4 0 P
A multi --- functional target is
required!!!
Cible multifonctions MFZ
requise !!!
3.3.4
Message d’erreur éventuel après le
départ : ”Es wird ein Multifunktionsziel
benötigt!!!”(Cible multifonctions MFZ
requise !!!)
Vérifiez que vous disposez d’une
cible multifonctions.
3.3.4
Mögliche Fehlermeldung nach dem
Start: ”Es wird ein Multifunktionsziel
benötigt!!!”.
Stellen Sie sicher, dass ein Multifunktionsziel eingeschaltet zur Verfügung steht.
3.3.4
Potential error message after the
start: ”Es wird ein Multifunktionsziel
benötigt!!!” (”A multi--functional target is required!!!”).
Make sure that an activated
multi-functional target is available.
Page 35

35
3.4.0 Fox hunt
Start: The multi-functional target is
enabled for being shot at.
Bonus Fuchs (Bonus fox): individual fox ”head-start” (0-100)
Jäger (Hunter): Number of participating hunters (1-15)
Durchgänge (rounds): Number of
rounds (1-10).
3.4.0 Chasse au renard
Start (Départ) : autorisation de tirer
sur la cible MFZ.
Bonus Fuchs (Bonus du renard) :
avance individuelle du renard (0-100)
Jäger (Chasseur) : nombre de
chasseurs participants (1 à 15)
Durchgänge (Tours) : nombre de
tours (1-10).
3.4.0 Fuchsjagd
Start: Das MFZ wird zum Beschuss
freigegeben.
Bonus Fuchs: individueller
Vorsprung des Fuchses (0-100)
Jäger: Anzahl der teilnehmenden
Jäger (1-15)
Durchgänge: Anzahl an Runden
(1-10).
FOX HUNT
--- > b a c k
Start
Bonus Fox: 50
Hunter: 3
Rounds: 8
CHASSE AU RENARD
--- > r e t o u r
Départ
Bonus du renard: 50
Chasseur: 3
Tours: 8
3.4.1 a
After the start, the display of the
fox appears.
After every hit, the number of
points is displayed. The total
number of points appears as a total
after 3 hits or after cancelling by
pressing the menu button.
The first hunter follows after three
hits or cancelling.
3.4.1 a
Au démarrage, le renard s’affiche.
Après chaque touche, le score obtenu s’affiche. Ce score apparaît
comme total après 3 touches ou
après interruption de la partie en
actionnant le bouton du menu.
Après trois touches ou annulation,
le premier chasseur suit.
3.4.1 a
Nach dem Start erscheint die Anzeige des Fuchses. Nach jedem
Treffer wird die erzielte Punktzahl
angezeigt.
Die Gesamtpunktzahl erscheint als
Total nach 3 Treffern oder nach
Abbruch durch betätigen des
Menüknopfs.
Nach drei Treffern oder Abbruch
folgt der erste Jäger.
Fox h unt
Round: 4
Fox
1. 50
2. 3
3. 50
Total: 75
Fox: 75
Chasse au renard
Tour: 4
Renard
1. 50
2. 3
3. 50
Totale: 75
Renard: 75
3.4.1 b
Après chaque touche, le score ciblé
s’affiche.
Ce score apparaît comme total après
3 touches
ou après interruption de la partie en
actionnant le bouton du menu.
Après trois touches ou annulation,
c’est au tour du chasseur suivant.
Le chasseur peut voir le score total
du renard.
3.4.1 b
Nach jedem Treffer wird die erzielte
Punktzahl angezeigt.
Die Gesamtpunktzahl erscheint als
Total nach 3 Treffern
oder nach Abbruch durch betätigen
des Menüknopfs. Nach drei Treffern
oder Abbruch folgt der nächste
Jäger. Des weiteren ist die Gesamtpunktzahl des Fuchses für den
Jäger ersichtlich.
3.4.1 b
After every hit, the number of
points won is displayed. The total
number of points appears as a total
after 3 hits or after cancelling by
pressing the menu button.
The next hunter follows after three
hits or cancelling.
In addition, the hunter can see the
total number of points of the fox.
Fox h unt
Round: 4
Hunter 1
1. 19
2. 50
3. 18
Total: 87
Fox: 75
Chasse au renard
Tour: 4
Chasseur
1. 19
2. 50
3. 18
Totale: 87
Renard: 75
Page 36

36
3.4.2
At the end of the round, the current
result appears immediately.
Here, the total number of points is
displayed next to the name of the
shooter.
By pressing ”--> weiter” (continue)
the next round is started immediately.
The current game is terminated by
pressing ”zurück” (back).
3.4.2
A la fin du tour, le résultat en cours
s’affiche de suite.
Le score total s’affiche derrière le
nom du tireur.
Appuyer sur ”--> weiter (suivant)”
pour lancer tout de suite le tour suivant.
Appuyer sur ”--> zurück (retour)” pour
interrompre la partie en cours.
3.4.2
Am Ende des Durchgangs erscheint
sofort das aktuelle Ergebnis.
Dabei wird hinter dem Namen des
Schützen die Gesamtpunktzahl
angezeigt.
Mit dem Druck auf ”--> weiter” startet
sofort der nächste Durchgang.
Mit dem Druck auf ”--> zurück” wird
das aktuelle Spiel abgebrochen.
RESULT
---> forward
Fox : 75 P
Hunter 1: 87 P
Hunter 2: 0 P
SCORE
--- > s u i v a n t
Renard: 75 P
Chasseur 1: 87 P
Chasseur 2: 0 P
3.4.3
The final result is displayed after
the pre-set rounds have been completed or when a hunter has won at
least the same number of points as
the total number of points of the
fox.
The player with the highest total
number of points won the game.
The total number of points appears
next to the shooters’ names.
In the case of several shooters, a
ranking list is automatically created
according to the number of points.
3.4.3
Le score final s’affiche lorsque les
tours programmés sont terminés ou
lorsqu’un chasseur a atteint ou
dépassé le score total du renard.
Le joueur ayant le score total le plus
élevé a gagné la partie.
Le score total apparaît derrière les
noms des tireurs.
S’il y a plusieurs tireurs, une liste de
classement est automatiquement
créée en fonction des scores.
3.4.3
Das Endergebnis wird, nach
Abschluss der voreingestellten
Durchgänge oder wenn ein Jäger
die Gesamtpunktzahl des Fuchses
erreicht oder überboten hat,
angezeigt.
Der Spieler mit der höchsten
Gesamtpunktzahl hat das Spiel
gewonnen.
Hinter den Namen der Schützen
erscheint die Gesamtpunktzahl.
Bei mehreren Schützen wird automatisch eine Rangliste nach Punktzahl erstellt.
TO TAL RES ULT
--- > b a c k
1. Hunter 1: 87 P
2. Fox: 75 P
3. Hunter 2: 0 P
SCORE
--- > s u i v a n t
1. Chasseur 1: 87 P
2. Renard: 75 P
3. Chasseur 2: 0 P
3.4.4 Error message
Potential error message after the
start: ”Es wird ein Multifunktionsziel
benötigt!!!” (”A multi-functional
target is required!!!”).
Make sure that an activated
multi-functional target is available.
3.4.4 Message d’erreur
Message d’erreur éventuel après le
départ : ”Es wird ein Multifunktionsziel
benötigt!!!”(Cible multifonctions MFZ
requise !!!)
Vérifiez que vous disposez d’une
cible multifonctions.
3.4.4 Fehlermeldung
Mögliche Fehlermeldung nach dem
Start: ”Es wird ein Multifunktionsziel
benötigt!!!”.
Stellen Sie sicher, dass ein Multifunktionsziel eingeschaltet zur
Verfügung steht.
A multi --- functional target is
required!!!
Cible multifonctions MFZ
requise !!!
Page 37

37
4.0 IPSC
The description of this discipline
can be found on page 45.
The central display can be used as
a timer by a second person.
4.0 IPSC
Vous trouverez la description de cette
discipline en page 45.
L’afficheur central peut être utilisé
comme minuterie par une deuxième
personne.
4.0 IPSC
Die Disziplinbeschreibung finden Sie
auf Seite 45.
Das Zentraldisplay kann von einer
zweiten Person als Timer genutzt
werden.
IPSC
--- > b a c k
Start
Settings
Results
IPSC
--- > r e t o u r
Départ
Paramètres
Score
4.1.0 IPSC Settings
Ziele (targets): 1-16
Vorlauf (lead time): 1-10 seconds
Make sure that enough radio or
multi-functional targets are
registered. A shooter identifier is
not necessary.
4.1.0 Paramètres IPSC
Ziele (Objectifs) : 1-16
Vorlauf (Préparation) : 1-10 secondes
assurez-vous avoir sélectionné
suffisamment de cibles radio ou
multifonctions. Il n’est pas nécessaire
au tireur d’avoir un identifiant.
4.1.0 Einstellungen IPSC
Ziele: 1-16
Vorlauf: 1-10 Sekunden
Stellen Sie sicher, dass genügend
Funk-- oder Multifunktionsziele angemeldet sind. Eine Schützenkennung
ist nicht notwendig.
SETTINGS IPSC
--- > b a c k
Targets: 10
Lead Time: 3
Paramètres IPSC
--- > r e t o u r
Objectifs: 10
Préparation: 3
4.1.1 IPSC
After the lead time has elapsed, all
targets are enabled for shooting.
This can be seen by the green LED
and the acoustic announcement
”Ready”.
The shooting time runs in the background there, and every time there’s a hit, it is automatically noted in
the list after the number of the
target.
4.1.1 IPSC
Une fois le temps de préparation
écoulé, toutes les cibles sont validées
pour le tir. La diode lumineuse verte
et le message sonore ”Ready” vous
le signalent.
A partir de là, le décompte du temps
de tir commence en arrière-plan et
sera automatiquement noté dans la
colonne à chaque touche après le
numéro de la cible.
4.1.1 IPSC
Nach Ablauf der Vorlaufzeit werden
alle Ziele zum Beschuss freigegeben. Erkenntlich ist das an der
grünen Leuchtdiode und akustisch
durch die Ansage ”Ready”.
Die Beschusszeit läuft ab da im
Hintergrund mit und wird bei jedem
Treffer automatisch in der Liste nach
der Nummer des Ziels notiert.
IPSC
Target: 2 4,5
Target: 4 8,0
Target: 3 11,9
IPSC
Objectif: 2 4,5
Objectif: 4 8,0
Objectif: 3 11,9
Page 38

38
4.1.2 IPSC result
After all targets have been hit, or
when the time is stopped by pressing the button, the overall result
(Gesamt) appears in the third line.
First the number of hit targets, then
the total time.
4.1.2 Score IPSC
Lorsque toutes les cibles sont
touchées ou le temps stoppé par
pression du bouton, le score total
apparaît dans la troisième ligne.
D’abord, le nombre des cibles
touchées, ensuite la durée totale.
4.1.2 Ergebnis IPSC
Nachdem alle Ziele getroffen sind
oder durch Knopfdruck die Zeit angehalten wird erscheint in der dritten
Zeile das Gesamtergebnis. Zuerst
die Anzahl der getroffenen Ziele,
dann die Gesamtzeit.
5.0 Settings
Beleuchtung (lighting): Here, you
can adapt the display contrast to
the ambient light in stages from
0-100.
Attention when operating with batteries: Display lighting consumes a
lot of energy!
Schussgeräusch (shooting noise):
Ja/Nein (yes/no) --> The shooting
noise is generated in the target’s
loudspeaker and can be switched
on or off for all disciplines here.
The other items are handled in the
following submenus.
5.0 Paramètres
Beleuchtung (Eclairage) : vous
pouvez adapter le contraste de l’afficheuràlalumièredelapiècede0à
100. Attention en mode batterie :
l’éclairage de l’afficheur consomme
beaucoup de courant !
Schussgeräusch (Bruit de coups de
feu) : Ja (oui)/Nein (non) --> vous
pouvez activer ou désactiver le bruit
des coups de feu dans le haut--parleur pour toutes les disciplines.
Les autres aspects sont traités dans
les sous-menus suivants.
5.0 Einstellungen
Beleuchtung: Sie können hier den
Displaykontrast dem Raumlicht
anpassen in den Stufen 0-100.
Achtung bei Batteriebetrieb: Displaybeleuchtung ist stromintensiv!
Schussgeräusch: Ja/Nein --> Das
Schussgeräusch wird im Lautsprecher am Ziel erzeugt und kann hier
für alle Disziplinen ein- oder ausgeschaltet werden.
Die anderen Punkte werden in den
folgenden Untermenüs behandelt.
SETTINGS
--- > b a c k
Register targets
Name list
Shooter ID
Lightening: 0
Service
Shooting Noise: Yes
Paramètres
--- > r e t o u r
Annoncer cibles
Liste de noms
Identifiant du tireur
Eclairage: 0
Service
Bruit de coups de feu: Oui
RESULT IPSC
--- > b a c k
Tota l: 3 1 1, 9
Target: 2 4,5
Target: 4 8,0
Target: 3 11,9
SCORE IPSC
--- > r e t o u r
Tota le: 3 11 ,9
Objectif: 2 4,5
Objectif: 4 8,0
Objectif: 3 11,9
5.1 Register targets
This submenu manages the activated radio targets. With the line ”autodetect”, the targets are searched
for and active ones are marked
with ”aktiv”. If the target is a multi-functional target, this is designated
with ”MFZ” on the left (MultiFunktionsZiel). Up to 16 targets can be
displayed in a system.
If you would like to select a certain
number of these targets, e.g. 5 of
them for a biathlon, then simply
”unregister” the ones you don’t
need.
5.1 Annoncer cibles
Ce sous-menu administre les
cibles radio activées. Avec la ligne
”autodetect”, recherche des cibles et
affichage côté droit avec ”aktiv
(activée)”. S’il s’agit d’une cible multifonctions, ”MFZ” apparaît à gauche.
Une installation peut représenter
jusqu’à 16 cibles.
Si vous voulez sélectionner un
nombre défini de ces cibles, par ex. 5
pour Biathlon, supprimez simplement
l’excédent.
5.1 Ziele anmelden
Dieses Untermenü verwaltet die eingeschalteten Funkziele. Mit der Zeile
”autodetect” werden die Ziele gesucht und auf der rechten Seite dargestellt mit ”aktiv”. Handelt es sich
dabei um ein Multifunktionsziel erscheint links ”MFZ”. Bis zu 16 Ziele
können in einer Anlage dargestellt
werden.
Wollen Sie aus diesen Zielen eine
bestimmte Anzahl auswählen, z.B. 5
Stück für Biathlon, melden Sie die
Überzähligen einfach ab.
Page 39

39
To do this, the marker is placed at
the target and confirmed by pressing the menu button. Now the
word ”inaktiv” (inactive) appears
after the target. This process can
be reversed, of course, by reselecting the target.
Which target is currently being addressed is indicated by the green
light on the targets.
This way, it can be easily seen
whether two targets have the same
number.
Pour ce faire, sélectionnez la cible
souhaitée et confirmez la suppression en appuyant le bouton du menu.
Le message ”inaktiv” (inactif) s’affiche
maintenant derrière la cible. Vous
pouvez annuler cette procédure en
resélectionnant la cible.
Le témoin lumineux vert sur les cibles
vous indique la cible concernée.
Cela permet de facilement détecter
les numéros attribués en double.
Dazu wird die Markierung auf das
Ziel gestellt und durch drücken des
Menüknopfs bestätigt. Hinter dem
Ziel erscheint nun ”inaktiv”. Dieser
Vorgang lässt sich durch ein erneutes Anwählen natürlich wieder rückgängig machen.
Welches Ziel gerade angesprochen
wird zeigt das grüne Licht an den
Zielen.
Eine doppelte Nummernbelegung
lässt sich damit sehr leicht feststellen.
5.2 Name list
For games with a result evaluation,
it makes sense to fill out the name
list. To do this, place the marker at
a free position from 1-16 and press
the menu button. This will bring you
to the submenu ”Editname”.
Entries are retained even after
switching off.
5.2 Liste de noms
Pour les jeux avec évaluation des
scores, il est recommandé de remplir
la liste des noms. Pour ce faire,
sélectionnez une position de 1 à 16 et
appuyez le bouton du menu. Cela
vous amène au sous-menu ”Editname” (Editer nom).
Les données saisies seront conservées après la mise hors tension.
5.2 Namensliste
Bei Spielen mit einer Ergebnisauswertung ist es sinnvoll die Namensliste auszufüllen. Dazu stellen Sie die
Markierung auf eine freie Position
von 1-16 und drücken den Menüknopf. Das bringt Sie auf das Untermenü ”Editname”.
Eintragungen bleiben auch nach
dem Abschalten erhalten.
REGISTER TARGETS
--- > b a c k
autodetect
Target 1: active
Target 2: active
MFZ 3: inactive
ANNONCER CIBLES
--- > r e t o u r
autodetect
Target 1: activée
Target 2: activée
MFZ 3: inactif
NAME LIST
--- > b a c k
1. Alf
2. Benni
3. Christian
LISTEDENOMS
--- > r e t o u r
1. Alf
2. Benni
3. Christian
Page 40

40
5.3 Shooter ID
This menu corresponds to that of
the ”Namensliste” (name list). In
shooting games with result evaluation, the weapon (with RG Laser) is
assigned the name of a shooter.
To do this, place the marker on the
desired name and press the menu
button.
5.3 Identifiant du tireur
Ce menu communique avec la ”liste
de noms”. Pour les parties avec une
évaluation des scores, on affecte ici
l’arme au nom d’un participant (avec
laser RG). Pour ce faire, sélectionnez
le nom souhaité et appuyez le bouton
du menu.
5.3 Schützenkennung
Dieses Menü korrespondiert mit der
”Namensliste”. Bei Schießspielen mit
einer Ergebnisauswertung wird hier
der Waffe (mit RG Laser) der Namen eines Mitspielers zugewiesen.
Dazu stellen Sie die Markierung auf
den gewünschten Namen und drükken den Menüknopf.
EDITNAME
3: Christian
SHOOTER ID
--- > b a c k
1: Alf 119
2: Benni ---
3. Christian ---
EDITER NOM
3. Christian
IDENTIFIANT DU TIREUR
--- > r e t o u r
1: Alf 119
2: Benni ---
3. Christian ---
5.2.1 Editname
With this menu, you can make all
alphanumeric entries.
The editing menu consists of:
· The alphanumeric block with
letters, special characters and
numbers
· The 5 control fields
( ) Space for deleting the
marked characters
--> Shift entry marker to
the right
<-- Shift entry marker to
the left
(CL) Deletes the entire entry
<OK> with OK, you complete the
entry and return to the
name list.
· The editing field for up to nine
characters with the entry marker.
5.2.2 Editer nom
Dans ce menu, vous pouvez
effectuer toutes les entrées
alphanumériques.
Le menu d’édition est composé :
· du pavé alphanumérique avec
lettres, symboles et chiffres
· des 5 champs de commande
( ) espace pour supprimer les
symboles sélectionnés
--> décaler la sélection saisie
à droite
--> décaler la sélection saisie
à gauche
(CL) efface la saisie complète
<OK> avec OK, confirmez la saisie
et revenez dans la liste de noms
· Du champ d’édition dans lequel
vous pouvez saisir jusqu’à neuf
symboles.
5.2.1 Editname
Mit Hilfe dieses Menüs nehmen Sie
alle alphanumerischen Eintragungen
vor.
Das Editiermenü besteht aus:
· Dem alphanumerischen Block mit
Buchstaben, Zeichen und Ziffern
· Den 5 Steuerfeldern
( ) Leerzeichen zum Löschen
der markierten Zeichen
--> Eingabemarkierung nach
rechts verschieben
<-- Eingabemarkierung nach
links verschieben
(CL) Löscht den ganzen Eintrag
<OK> mit OK schließen Sie den
Eintrag ab und kommen in
die Namensliste zurück
· Dem Editierfeld für bis zu neun
Zeichen mit der Eingabemarkierung.
5.3.1 Assign shooter
All RG Lasers transmit a unique
number with the light beam. This is
assigned the selected name by
shooting on any registered target.
If several shooters are playing with
their own weapons, repeat this process for every weapon.
5.3.1 Affecter tireur
Tous les laser RG émettent un
numéro unique avec le rayon laser.
Ce numéro est affecté au nom sélectionné par le tir sur n’importe quelle
cible annoncée. Si plusieurs tireurs
participent au jeu avec leurs propres
armes, répétez la procédure pour
chaque arme.
5.3.1 Schütze zuordnen
Alle RG-Laser senden mit dem
Lichtstrahl eine einmalige Nummer.
Diese wird durch den Schuss auf ein
beliebiges angemeldetes Ziel dem
ausgewählten Namen zugewiesen.
Sind mehrere Schützen mit eigenen
Waffen an dem Spiel beteiligt, wiederholen Sie den Vorgang für jede
Waffe.
Page 41

41
5.4 Service
The SERVICE menu will lead you
further into the submenus.
5.4 Service
Le menu SERVICE vous transfère
aux sous-menus.
5.4 Service
Das Menü SERVICE leitet Sie weiter
in Untermenüs.
SHOOTER ID
1: Alf 119
Please shoot on any registered
target
IDENTIFIANT DU TIREUR
1: Alf 119
After switching off the central display, the shooter allocation to the
weapon is lost!
Avec l’extinction de l’afficheur central,
vous perdez l’affectation tireur/arme !
Nach Abschalten des Zentraldisplays ist die Zuordnung Schütze zu
Waffe wieder verloren!
SERVICE
--- > b a c k
Radio graphics
Version info
Demo game
SERVICE
--- > r e t o u r
Graphique radio
Info sur l a version
Jeu de démonstration
5.4.1 Radio graphics
The radio graphics will give you a
quick overview of the radio situation between the central display
and the registered targets.
Two rows with 16 bars each are
shown. For every target, there is a
fixed position in the display.
Here, the bar position from left to
right represents the corresponding
radio channel number 1-16 of the
target.
The top row represents the quality
of the data packets. The bottom
row represents the signal strength
of the radio signal.
The bar length is not linear. I.e., a
bar which is only half as long as a
full bar doesn’t mean that there is
only 50% quality or signal strength.
The radio graphics should therefore not be used as a measuring
device, but just as an aid to get an
overview.
5.4.1 Graphique radio
Le graphique radio vous donne un
aperçu rapide de la situation entre
afficheur central et les cibles
annoncées.
Le diagramme représente deux lignes
de respectivement 16 colonnes.
Chaque cible possède une position
fixe dans l’affichage. La position de la
colonne de gauche à droite
représente le numéro correspondant
au canal radio 1 à 16 de la cible.
La ligne supérieure représente la
qualité des blocs de données. La
ligne inférieure représente l’intensité
du signal radio.
La hauteur des colonnes n’est pas
linéaire. Cela signifie qu’une demicolonne ne signifie pas 50% de
qualité ou d’intensité de signalisation.
C’est pourquoi il ne faut pas utiliser le
graphique radioguidé comme appareil
de mesure, mais seulement comme
aide pour garder un aperçu global.
5.4.1 Funkgrafik
Die Funkgrafik gibt Ihnen einen
schnellen Überblick über die Funksituation zwischen Zentraldisplay und
den angemeldeten Zielen.
Es werden zwei Reihen mit je 16
Balken dargestellt. Pro Ziel gibt es
eine feste Position in der Anzeige.
Dabei stellt die Balkenposition von
links nach rechts die entsprechende
Funkkanalnummer 1-16 des Ziels
dar.
Die obere Reihe repräsentiert die
Qualität der Datenpakete. Die untere
Reihe repräsentiert die Signalstärke
des Funksignals.
Die Balkenlänge ist nicht linear. D.h.
ein halblanger Balken bedeutet nicht
50% Qualität oder Signalstärke.
Die Funkgrafik sollte daher nicht als
Messgerät benutzt werden, sondern
nur als Hilfsmittel um einen Überblick zu erhalten.
RADIO GRAPHICS GRAPHIQUE RADIO
Page 42

42
5.4.2 Version info
The current software version of the
central display is documented
here.
Starting on ”Apr 19 2006”, the software is capable of handling
multi-functional targets.
5.4.2 Info sur la version
Il s’agit de la version logiciel utilisée
par l’afficheur central.
A partir du ”19 avril 2006”, le logiciel
peut être utilisé avec cible multifonctions.
Les anciennes versions peuvent être
mises à jour.
5.4.2 Versionsinfo
Hier ist der aktuelle Softwarestand
des Zentraldisplays dokumentiert.
Ab ” Apr 19 2006” ist die Software
Multifunktionsziel tauglich.
Ältere Versionen lassen sich auf
Anfrage nachrüsten.
Roehm Central Display
V0.8W07
Apr 19 2006
Roehm Affichage central
V0.8W07
Apr 19 2006
5.4.3 Demo game
This allows the target and weapon
function be very easily checked.
In addition, the hits are displayed
for several seconds on the display.
In addition, the target and shooter
ID are indicated.
5.4.3 Jeu de démonstration
Cette option permet de vérifier de
manière très simple la fonction des
cibles et des armes.
La cible touchée reste affichée
pendant quelques secondes sur
l’afficheur. Cible et identifiant du tireur
sont alors désignés.
5.4.3 Demospiel
Damit lässt sich sehr einfach die
Funktion der Ziele und der Waffen
überprüfen.
Zusätzlich wird der Treffer für einige
Sekunden auf dem Display dargestellt. Dabei wird das Ziel und die
Schützenkennung benannt.
DEMO GAME
Hits: 4
Target: 2
Id.: 119
Name
JEU DE DEMONSTRATION
Touc he : 4
Cible: 2
Id.: 119
Nom
Game descriptions Description des jeuxSpielbeschreibungen
1.1.0 Dynamic shooting
(DSB youth)
In the ”Namensliste” (name list),
the shooters or clubs can enter
their names. A shooter can then be
clearly allocated to a rifle or attached module via a so-called shooter ID within the discipline.
Entered names remain intact even
when the device is switched off, but
can be overwritten.
1.1.0 DSB Jeunes :
Les tireurs ou équipes peuvent
inscrire leur nom dans la liste des
noms. Dans cette discipline, vous
pouvez affecter distinctement une
arme ou un module à un tireur avec
son identifiant.
Les noms entrés sont conservés
après extinction de l’appareil, mais
vous pouvez aussi les écraser.
1.1.0 DSB Jugend:
In der Namensliste können sich die
Schützen oder Vereine mit Namen
eintragen. Innerhalb der Disziplin ist
dann eine eindeutige Zuordnung
eines Schützen zu einem Gewehr
oder Anbaumoduls über die sogenannte Schützenkennung möglich.
Eingetragene Namen bleiben auch
nach dem Ausschalten des Geräts
erhalten, können jedoch überschrieben werden.
5.4.4 Language selection
Please select the desired language
from the list.
5.4.4 Choix de la langue
Veuillez faire votre choix dans la liste
des langues proposées.
5.4.4 Sprachauswahl
Bitte wählen Sie aus der Liste die
gewünschte Sprache aus.
Page 43

43
1.2.0 Biathlon:
For the individual shooting units,
each of the 5 targets must be hit
with one shot each. As soon as a
target has been hit, there is a beep
and the green light goes on, so that
everyone can see whether the shot
was a hit or not. If a target is not
hit, the shooter must run a penalty
lap or a penalty time is added to
the total time. Shots are fired in the
standing aiming position at 35 mm
targets and in the lying aiming position at 15 mm targets at a distance
of 10 m.
In addition to the light and sound
signals, the central display also
shows which targets have already
been hit. With the option of limiting
the shot number to 5 on the rifle
and of even simulating reloading
with a pause time, the discipline
can be perfectly simulated.
1.2.0 Biathlon :
Chaque tour comprend 5 cibles qui
devront toutes être touchées par un
seul tir chacune. Dès que la cible est
touchée, un signal sonore retentit et
le témoin de contrôle vert s’allume ;
chacun peut ainsi savoir si la cible a
été touchée ou non. Lorsqu’une cible
est manquée, le tireur a une pénalité :
tour supplémentaire ou temps ajouté
à la durée totale. On tire debout sur
des cibles de 35 mm et couché sur
des cibles de 15 mm à 10m de
distance.
L’afficheur central indique, en plus
des signaux lumineux et sonores, la
cible venant d’être touchée. En limitant à cinq le nombre de coups sur
l’arme et avec la pause simulant le
rechargement, la simulation de la discipline est parfaite.
1.2.0 Biathlon:
Bei den einzelnen Schießeinheiten
müssen je 5 Ziele mit je einem
Schuss getroffen werden. Sobald
das Ziel getroffen wird, ertönt ein
Signalton und das grüne Kontrolllicht
geht an, so dass jeder erkennen
kann, ob der Schuss ein Treffer war
oder nicht. Wird ein Ziel nicht getroffen, so muss der Schütze eine Strafrunde laufen, oder es wird eine
Strafzeit zur Gesamtzeit addiert.
Geschossen wird im Stehendanschlag auf Ziele von 35 mm und im
Liegendanschlag auf Ziele von 15
mm bei 10m Entfernung.
Das Zentraldisplay zeigt zusätzlich
zu den Licht- und Tonsignalen welche Ziele bereits getroffen sind.
Durch die Möglichkeit die Schusszahl am Gewehr auf fünf zu begrenzen und durch eine Pausenzeit sogar Nachlader zu simulieren, lässt
sich die Disziplin perfekt simulieren.
1.3.1 MLP five shot air pistol:
Targets: 5 targets which lie next to
each other are shot at. The target
bulls-eyes must be at the same
height and be 300 mm apart.
As soon as a target has been hit,
there is a beep and the green light
goes on.
Target patterns: For youth range:
59.5 mm, for adult range: 40.0 mm.
Distance: 10 m.
Aiming position: Standing,
free-handed (ready position)* -see page 44.
Program: A 30-shot round consists of 6 series of 10 seconds
each. A 60-shot round consists of
12 series of 10 seconds each.
Each series consists of 5 shots at
5 targets. In addition to the light
and sound signals, the central display also shows which targets
have already been hit.
With the option of limiting the
number of pistol shots to five,
the discipline can be perfectly
simulated.
1.3.1 Pistolets pneumatiques à tir
multiple MLP :
Cibles : Tirer sur 5 cibles disposées
les unes à côté des autres. Les centres des cibles doivent tous être à
même hauteur et à une distance de
300 mm chacune.
Dès que la cible est touchée, un signal sonore retentit et le témoin de
contrôle vert s’allume.
Taille des cibles : Pour jeunes :
59,5 mm, pour adultes : 40,0 mm.
Distance : 10 m.
Appui : Position debout sans appui
(Position finale)* -- voir page 44.
Programme : Un tour de 30 tirs est
composé de 6 séries de
respectivement 10 secondes. Un
tour de 60 tirs est composé de
12 séries de respectivement 10
secondes. Chaque série comprend
5 tirs sur 5 cibles. L’afficheur central
indique, en plus des signaux
lumineux et sonores, la cible venant
d’être touchée. En limitant le nombre
de coups du pistolet à cinq, vous
pouvez simuler parfaitement la
discipline.
1.3.1 MLP Mehrschüssige
Luftpistole:
Ziele: Es wird auf 5 nebeneinander
befindliche Ziele geschossen. Die
Scheibenmittelpunkte müssen sich
auf gleicher Höhe befinden und einen Abstand von 300 mm haben.
Sobald das Ziel getroffen wird, ertönt
ein Signalton und das grüne Kontrolllicht geht an.
Zielschablonen: Für Nachwuchsbereich: 59,5 mm, für Erwachsenenbereich: 40,0 mm.
Entfernung: 10 m.
Anschlag: Stehend freihändig
(Fertighaltung)* -- siehe Seite 44.
Programm: Ein 30-Schuss-Durch-
gang besteht aus 6 Serien in je
10 Sekunden. Ein 60-SchussDurchgang besteht aus 12 Serien in
je 10 Sekunden. Jede Serie besteht
aus 5 Schüssen auf 5 Ziele. Das
Zentraldisplay zeigt zusätzlich zu
den Licht- und Tonsignalen welche
Ziele bereits getroffen sind.
Durch die Möglichkeit die Schusszahl der Pistole auf fünf zu begrenzen, lässt sich die Disziplin perfekt
simulieren.
Page 44

44
1.3.2 OSP Olympic rapid-firing
pistol
Targets: 5 targets standing next to
each other 75 cm apart.
Aiming position: Standing, freehanded (ready position)*
Program: The competition consists of 60 shots, which are to be
shot in two program halves, each
with 30 shots. A program half is divided into six 5-shot series, two
each within 8, 6 and 4 seconds.
Sportpistole KK (KK sport
pistols)
Targets: A multi-functional target
Aiming position: Standing,
free-handed (ready position)*
Program: The competition
program consists of one round
each of precision and duel
shooting, each with 30 shots.
1.4.0 Precision shooting:
Six series, each with five shots,
within five minutes.
1.3.3 Duel shooting:
For each of the six series with five
shots each, the targets are activated for three seconds five times
(green light) and then blocked for
seven seconds.
For every target activation, only
one shot may be fired.
*Ready position:
For competitions with five shot air
pistols, Olympic rapid-firing pistols
and duel sport pistols. The shooter
lowers his arm by at least 45 degrees from the horizontal. In this
position, the shooter expects the
signal for shooting without bending
or moving his arm.
1.3.2 Pistolets olympiques à
tir rapide OSP
Cibles : 5 cibles l’une à côté de l’au-
tre avec un écart de 75cm.
Appui : Position debout sans appui
(Position finale)*
Programme : La compétition comprend 60 tirs à disputer en deux
semi--programmes de 30 tirs chacun.
Le semi--programme est réparti en 6
séries de 5 tirs, dont deux en 8, 6 et 4
secondes.
Pistolets sport KK
Cibles : Une cible multifonctions
Appui : Position debout sans appui
(Position finale)*
Programme : Le programme de
compétition comprend au total deux
tours, Duel et Précision, de 30 tirs
chacun.
1.4.0 Tir de précision
Six séries de cinq tirs en cinq
minutes.
1.3.3 Duel : Pour chacune des six
séries de cinq tirs, les cibles sont
activées cinq fois pendant respectivement trois secondes (témoin lumineux vert) et bloquées pendant
chacune sept secondes.
Un seul tir autorisé par activation de
cible.
*Position finale :
Pour la compétition avec des pistolets
pneumatiques à tir multiple, pistolets
olympiques à tir rapide et duels avec
pistolets sport. Le tireur baisse le
bras d’au moins 45 degrés à partir de
la position horizontale. Dans cette
position, le tireur attend le signal de tir
sans bouger ou plier le bras.
1.3.2 OSP Olympische
Schnellfeuerpistole
Ziele: 5 Ziele nebeneinander
stehend im Abstand von 75cm.
Anschlag: Stehend freihändig
(Fertighaltung)*
Programm: Der Wettbewerb
besteht aus 60 Schuss, die in zwei
Halbprogrammen à 30 Schuss zu
bestreiten sind. Das Halbprogramm
gliedert sich in sechs 5-SchussSerien, je zwei hiervon innerhalb
8, 6 und 4 Sekunden.
Sportpistole KK
Ziele: Ein Multifunktionsziel
Anschlag: Stehend freihändig
(Fertighaltung)*
Programm: Das Wettkampfprogramm besteht aus je einem Durchgang Präzision- und Duellschießen
zu je dreißig Schuss.
1.4.0 Präzisionsschießen:
Sechs Serien zu je fünf Schuss in
fünf Minuten.
1.3.3 Duellschießen:
Für jede der sechs Serien zu je fünf
Schuss werden die Ziele fünf mal für
je drei Sekunden aktiviert (grünes
Licht) und für jeweils sieben Sekunden gesperrt.
Bei jeder Aktivierung des Ziels darf
nur ein Schuss abgegeben werden.
*Fertighaltung:
Für die Wettbewerbe Mehrschüssige
Luftpistole, Olympische Schnellfeuerpistole und Sportpistole Duell. Der
Schütze senkt den Arm um mindesten 45 Grad aus der Waagerechten. In dieser Haltung erwartet der
Schütze das Signal zum Schießen,
ohne den Arm zu beugen oder zu
bewegen.
3.0 Darts
3.1 Highscore
In this game, a maximum of 16
shooters can participate.
The goal of every shooter is to get
the highest number of points according to the pre-set rounds. The
shooter with the highest number of
points after all rounds wins.
3.0 Dart
3.1 Highscore
16 tireurs maximum peuvent jouer à
cette partie.
Le but de chaque tireur est d’atteindre le score maximum pendant les
tours programmés. Le tireur ayant le
score le plus élevé à la fin de tous les
tours a gagné.
3.0 Dart
3.1 Highscore
An diesem Spiel können maximal 16
Schützen teilnehmen.
Ziel des jeweiligen Schützen ist es,
nach den voreingestellten Durchgängen die höchste Punktzahl zu erzielen. Gewonnen hat der Schütze
mit der höchsten Punktzahl nach allen Durchgängen.
Page 45

45
3.2 01 games
In this game, a maximum of 16
shooters can participate.
The goal of each shooter is to
shoot the preset value
(101/201/.../901) down to zero.
When the target is hit, the initial
value is reduced by the respective
number of points for the hit. The
shooter who gets to 0 first wins.
3.2 Jeux 01
16 tireurs maximum peuvent jouer à
cette partie.
L’obj ectif de chaque tireur est de tirer
la valeur programmée
(101/201/.../901) à zéro. Chaque
touche sur la cible réduit la valeur
de départ en conséquence. Le tireur
ayant atteint le premier la valeur 0 a
gagné.
3.2 01-Spiele
An diesem Spiel können maximal 16
Schützen teilnehmen.
Ziel des jeweiligen Schützen ist es,
den voreingestellten Wert
(101/201/.../901) auf Null zu schießen. Angebrachte Treffer auf dem
Ziel reduzieren den Anfangswert um
die jeweilige Trefferpunktzahl. Gewonnen hat der Schütze, der als Erster den Wert 0 erreicht.
3.3 Cricket
In this game, a maximum of 16
shooters can participate.
The number fields
13,14,15,16,17,18,19,20 and 50
must be hit 3x.
The shooter who hits all numbers
3x first and also has the highest
number of points wins the game.
The mandatory part is to hit the
number fields 3x.
Every further hit on a number field,
which has been hit by the current
player 3x already, wins points if
there is at least one other player
who has not yet fulfilled his obligatory 3 hits on the respective
number field.
3.3 Cricket
16 tireurs maximum peuvent jouer à
cette partie.
Il faut toucher 3 fois les zones
13,14,15,16,17,18,19,20 et 50.
Le tireur ayant le premier touché 3x
toutes les zones et cumulant le nombre maximum de points a gagné la
partie.
Il faut toucher 3 x les zones.
Chaque fois que le joueur touche une
zone qu’il a déjà touchée 3x, il
cumule des points s’il y a au moins
un autre joueur en course qui n’a pas
rempli son contrat (3 touches) sur la
zone.
3.3 Cricket
An diesem Spiel können maximal 16
Schützen teilnehmen.
Die Zahlenfelder
13,14,15,16,17,18,19,20 und 50
müssen 3x getroffen werden.
Der Schütze der zuerst alle Zahlen
3x getroffen hat, und zusätzlich den
höchsten Gesamtpunktestand aufweist, gewinnt das Spiel.
Der Pflichtteil besteht darin, die
Zahlenfelder 3 x zu treffen.
Jeder weitere Treffer auf ein Zahlenfeld, das vom aktuellen Spieler
bereits 3x getroffen wurde, ergibt
Punkte, wenn es mindestens noch
einen weiteren Mitspieler gibt, der
seine Pflicht (3 Treffer) auf dem
jeweiligen Zahlenfeld nicht erfüllt hat.
3.4 Fox hunt
In this game, a maximum of 16
shooters, but a minimum of 2 shooters, can participate.
One shooter, who is designated as
the ”Fuchs” (fox), is given a ”head-start” in front of the others, which
can be individually set. The goal of
the fox is to end the game with the
highest result. The goal of the ”Jäger” (hunter) is to catch up to the
number of points the fox has within
the round or to make more points.
That hunter wins who is the first to
win the same number as or more
points than the fox. If no hunter is
able to do this, the fox wins.
3.4 Chasse au renard
Pour ce jeu, il faut 16 tireurs maximum et 2 tireurs minimum.
Un tireur désigné comme renard,
obtient sur les autres une avance individuellement paramétrable. L’objectif du renard est de finir la partie avec
le score le plus élevé. L’objectif du
chasseur est de rattraper ou dépasser le score du renard pendant la partie. Le premier qui atteint ou dépasse
le score du renard a gagné. Si aucun
chasseur n’y arrive, le renard a
gagné.
3.4 Fuchsjagd
An diesem Spiel können maximal 16
Schützen, jedoch mindestens 2
Schützen, teilnehmen.
Ein Schütze, der als ”Fuchs” bezeichnet wird, erhält einen Vorsprung vor den anderen, der individuell eingestellt werden kann. Ziel
des Fuchses ist es, am Ende mit
dem höchsten Ergebnis das Spiel zu
beenden. Ziel der Jäger ist es, die
Punktzahl des Fuchses innerhalb
der Runden einzuholen bzw. zu
überbieten. Gewonnen hat der Jäger, der als Erster eine gleiche oder
höhere Punktzahl wie der Fuchs erzielt. Gelingt es keinem Jäger dies
zu erreichen, hat der Fuchs gewonnen.
4.0 IPSC
IPSC stands for ”International
Practical Shooting Confederation”.
Up to 16 targets are placed in any
configuration to form a course.
Every target can be shot at several
times.
4.0 IPSC
IPSC signifie ”International Practical
Shooting Confederation”, en français
”association de tir sportif au pistolet”.
Jusqu’à 16 cibles peuvent être
placées n’importe où dans un parcours. On peut tirer plusieurs fois sur
chaque cible.
4.0 IPSC
IPSC steht für ”International Practical Shooting Confederation”, auf
deutsch am besten mit ”sportlichem
Pistolenschießen” beschrieben.
Bis zu 16 Ziele werden in einem Parcour beliebig platziert. Jedes Ziel
kann auch mehrmals beschossen
werden.
Page 46

46
Menüstruktur
Menu structure
Structure du menu
Page 47

47
Page 48

Lieferprogramm LTS (nicht im Lieferumfang enthalten)
Overview LTS programme (not part of scope of delivery)
Accessoires LTS (non livrés avec l’arme)
Lichtgewehr RG Light Point
Light gun -- Pistolet Laser
mit offener Visierung
Bestell-Nr.1028390
ohne Visierung
Bestell-Nr.1028384
Trainingssystem -- Training S ystem BEAMHIT 190
Beamhit 190 inkl. LTX-interner Laser, Bestell-Nr. 1028346
Beamhit 190 inkl. LT-externer Laser, Bestell-Nr. 1028345
Système d’entraînement Beamhit 190
Elektronisches Ziel, Grundvariante
Electronic target, basic model
Cible électronique, variante de base
Bestell.-Nr. 1024258
Elektronisches Funkziel,
mit Netzwerkfunktion
Electronic target, with network operation
Cible électronique, avec fonction réseau
Bestell.-Nr. 1028376
Multi-Funktionsziel, m it Netzwerkfunktion
Multi- operational t arget, wit h net work operation
Cible multifonction, avec fonction réseau
Bestell.-Nr. 1028377
Laser-Anbaumodul
Laser accessory unit,
Module d’extension laser
Bestell-Nr. 1024257
Kaliberdorne für alle gängi gen Kaliber
auf Anfrage.
Calibre rods for all standard cal ibres on
request
Adaptateur de calibre pour tous les cali bres courants, sur demande.
Stativ, zur Befestigung
einer LTS-Zielscheibe
Tripod, for mountig of
one LTS target
Support de fixation
d’une cible LTS
Bestell.-Nr. 1019569
Schiene zur Befestigung von 5 LTS-Zielen
(Ziele nicht im Lieferumfang enthalten)
Rail, for mounting of 5 LTS targets
Rails de fixation de 5 cibles LTS
Bestell-Nr. 1037298
Komplettes, computer-
gesteuertes System im
Aktentaschenformat.
Eine exakte Trefferaus-
wertung und Haltelinie-
nanzeige ist möglich.
Zielschablonen-Set: 5 verschiedene Größen
zur Variierung des Schwierigkeitsgrades
Targe t set: 5 different sized targets for varying
the degree of difficulty. -- Jeu de cibles: 5 tailles
différentes pour varier le degré de difficulté.
Bestell-Nr. 1048386
Zielschablonen-Set für Diopterschießen: 5 Scheiben
mit gleicher Vorderseite und unterschiedlicher
Trefferfläche auf der Rückseite
Target template set w ith 5 targets for shooting with diopter sight.
Jeu de c ibles pour tir dioptrique avec 5 tailles
Bestell-Nr. 1048387
RG-Netzteil passend für Zentraldisplay
und elektronisches Ziel
RG Mains adapter
Bloc d’alimentation RG
Bestell.-Nr. 1048382
Id.-Nr. 483935 /1106
RÖHM GmbH S Postfach 1161 S 89565 Sontheim/Brenz S Telefon 0 73 25/16-0 S Fax 0 73 25/16-492
Homepage: http://www.roehm-rg.de S e-mail: inforg@roehm-rg.de
750.00.16
750.00.05
750.00.00
750.00.01
750.00.06
750.00.04
750.00.14
750.00.09
750.00.18
750.00.19
Donnerfeld 2 • D-59757 Arnsberg • Tel.: 02932/638-100 • Fax: 02932/638-149 • sales@carl-walther.de • www.roehm-lts.de
Carl Walther Gmbh • Vertrieb / Sales / Distribution
750.00.15
B
 Loading...