

Page 1
DIGITAL TERRESTRIAL RECEIVER
OPERATING INSTRUCTIONS
WP11DTB
BE WALKER WISE...logon to www.walker.ie
SAORVIEW Digital Receiver
Page 2

1
CONTENTS
1. GENERAL PROPERTIES ...................................................................................................... 2
2. SAFETY PRECAUTIONS ....................................................................................................... 3
3. PREPARING .......................................................................................................................... 4
3.1. REMOTE CONTROL ........................................................................................................... 4
3.2. CONNECTIONS .................................................................................................................. 5
3.2.1. CONNECTION TO THE TV .............................................................................................. 5
3.2.2. PUTTING INTO OPERATION .......................................................................................... 6
3.2.3. SOCKETS ........................................................................................................................ 6
4. REMOTE CONTROL FUNCTIONS ........................................................................................ 7
4.1. REMOTE CONTROL LAYOUT ............................................................................................ 7
MENU INTERFACE .................................................................................................................... 9
FIRST TIME INSTALLATION ..................................................................................................... 9
MAIN MENU ............................................................................................................................. 10
5. CHANNEL LIST .................................................................................................................... 10
5.1. NAVIGATING THE WHOLE LIST OF CHANNELS ............................................................ 10
5.2. MOVING CHANNELS ........................................................................................................ 11
5.3. DELETING UNWANTED CHANNEL ................................................................................. 11
5.4. RENAMING CHANNELS ................................................................................................... 11
5.5. ADDING LOCKS TO CHANNELS ..................................................................................... 11
5.6. SETTING FAVOURITES ................................................................................................... 11
6. PROGRAMME GUIDE (7 DAYS EPG) ................................................................................. 12
7. TIMERS ................................................................................................................................ 12
8. SETUP ................................................................................................................................. 13
8.1. CONFIGURATION MENU ................................................................................................. 13
8.1.1. DIGITAL AUDIO OUTPUT .............................................................................................. 13
8.1.2. AUDIO DELAY................................................................................................................ 14
8.1.3. LOW POWER ................................................................................................................. 14
8.1.4. FAVOURITE MODE ....................................................................................................... 14
8.1.5. CHANNEL LIST .............................................................................................................. 14
8.1.6. ACTIVE ANTENNA ......................................................................................................... 14
8.1.7. RECEIVER UPGRADE - OAD ........................................................................................ 14
8.1.8. TV SETTINGS ................................................................................................................ 15
8.1.8.1. TV TYPE ...................................................................................................................... 15
8.1.8.2. DISPLAY FORMAT ..................................................................................................... 15
8.1.8.3. TV OUT ....................................................................................................................... 15
8.1.8.4. HDMI RESOLUTION ................................................................................................... 15
8.1.9. PARENTAL CONTROL .................................................................................................. 15
8.1.9.1. MATURITY LOCK ........................................................................................................ 15
8.1.9.2. MENU LOCK ............................................................................................................... 15
8.1.9.3. SET PIN ....................................................................................................................... 16
8.1.10. TIME SETTINGS .......................................................................................................... 16
8.2. LANGUAGE ....................................................................................................................... 16
8.3. INSTALLATION ................................................................................................................. 17
8.3.1. AUTOMATIC SEARCH ................................................................................................... 17
8.3.2. MANUAL SEARCH ......................................................................................................... 17
8.3.3. FIRST TIME INSTALLATION ......................................................................................... 17
9. MEDIA BROWSER ............................................................................................................... 18
10. SOFTWARE UPGRADE THROUGH USB ......................................................................... 20
11. MESSAGES ....................................................................................................................... 21
12. CHANNEL NAVIGATION ................................................................................................... 22
13. VOLUME CONTROL .......................................................................................................... 22
14. TROUBLESHOOTING GUIDE ........................................................................................... 23
15. TECHNICAL SPECIFICATIONS ......................................................................................... 24
Page 3

2
1. GENERAL PROPERTIES
DVB and VBI Teletext
200 Channels
English, German, French, Spanish, Portuguese,
Italian, Finnish, Swedish, Danish, Norwegian,
Slovak OSD.
DVB 7 days event information (7 days EPG)
TV scart (with RGB and CVBS support)
HDMI output
Format resolution: 1080i, 720p, 576p
Last watched channel saving
Automatic search for all channels
Stand-by mode channels search support
(optional)
5 timers can be used either for recording or as
a sleep timer
Timer function (TV timer) programmable via
EPG
5 Favourite list
Parental lock options at different levels
Channel lock (password protected)
Menu/Installation lock (password
protected)
Low power consumption (less than 1 W)
(Optional)
RECEPTION :
DVB-T Compliant
Input frequency range: VHFIII; 174–
230 MHz, 8 MHz bandwith
UHFIV and UHFV; 470-862 MHz,
8MHz bandwith
Input signal level: min: -79 dBm
max: -15 dBm
Supports 16-, 64-QAM modulations
Signal strength and quality bar for
antenna adjustment
Manual and automatic search options
VIDEO & OSD :
Video: MP @ ML, PAL, 4:3/16:9
MPEG-4 AVC/H.264 HP@L4
Video Decoder
Screen Format: Letterbox 14:9,
Letterbox 16:9 and center cut out.
8-bit OSD colour, 720x576 pixels
Decoding & Video Out: PAL
AUDIO:
Audio: MPEG-1 layer I / II, MPEG-2
layer II, MPEG-2 AAC, MPEG-4 AAC
Multi-format audio decoder
Multi language audio support (up to
10)
Audio mute and volume control
SYSTEM RESOURCES
ST40 32 bit superscalar RISC CPU @
266 MHz
4 X 32 Mbyte (128 MB) RAM memory
8 Mbyte Flash memory
Page 4
3
2. SAFETY PRECAUTIONS
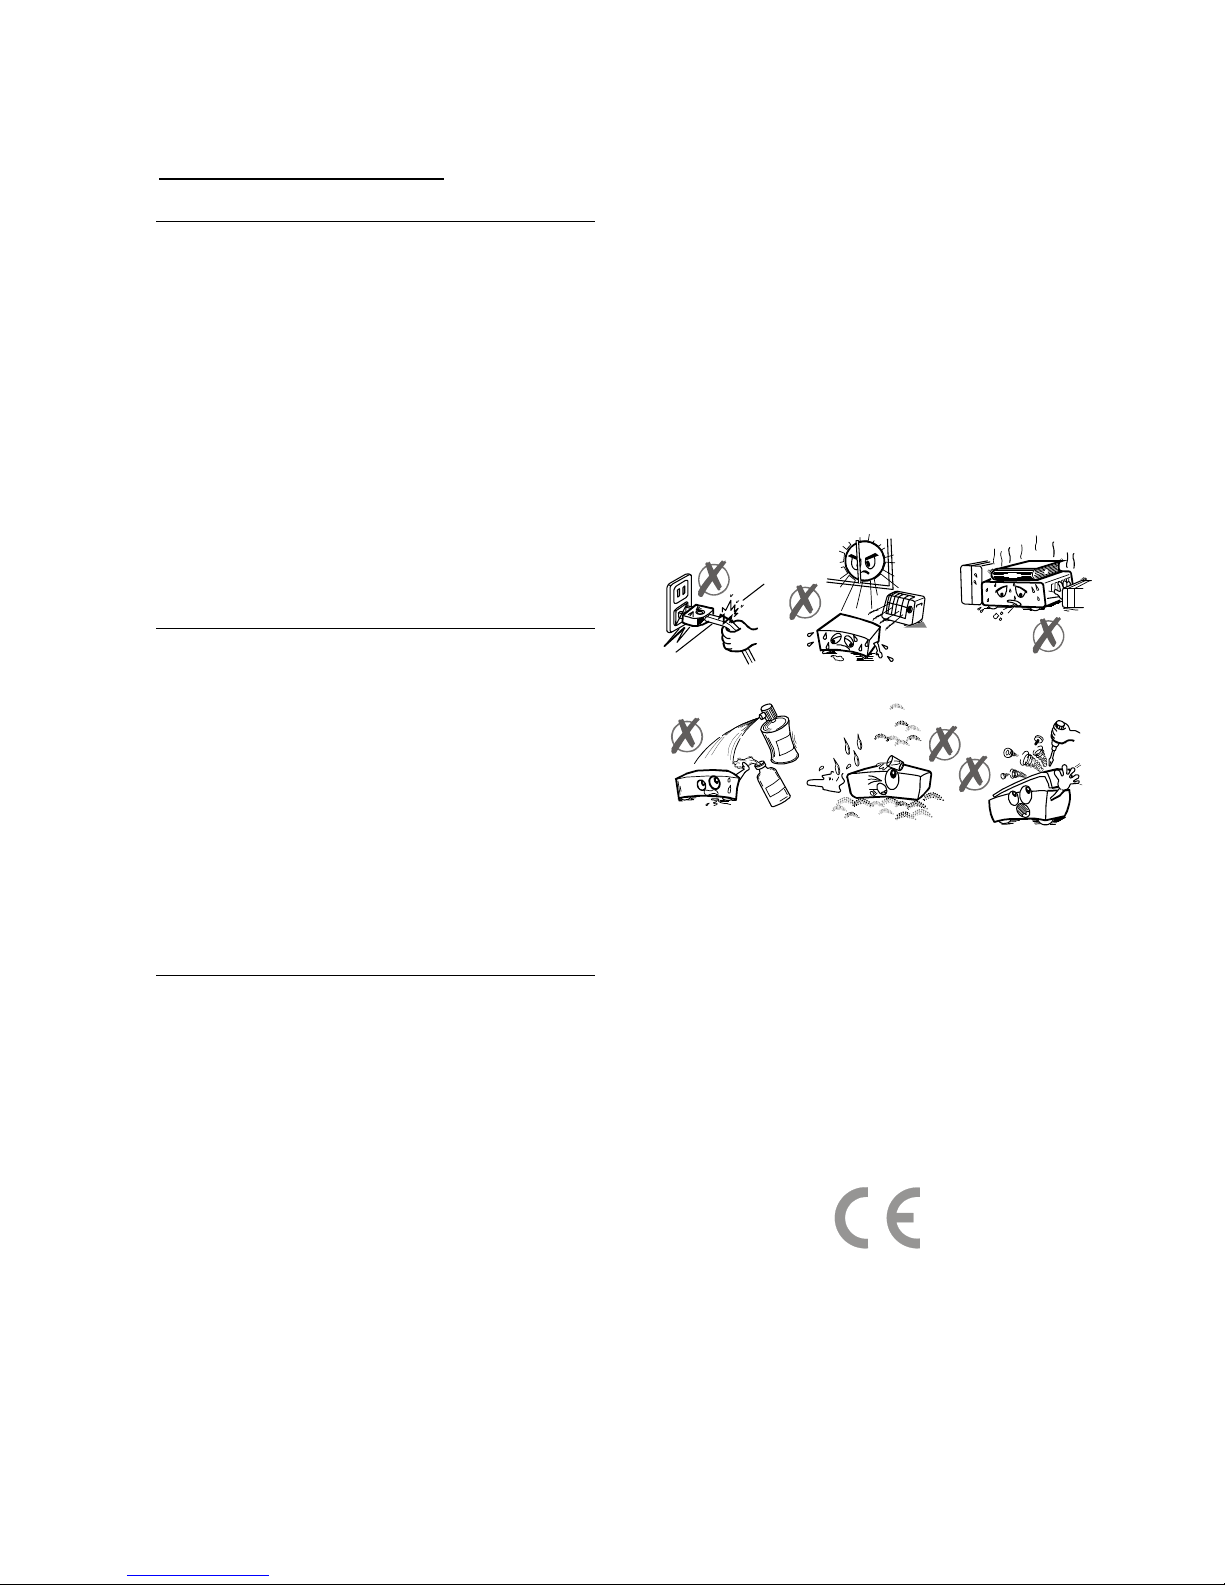
Power Source
Always use the provided AC adapter.
Operate only from the power source specified
on the AC adapter.
During use of the AC adapter, the surface of it
gets hot. This is normal and not a failure.
Do not cover the case of the AC adapter with
any material, while it is in operation. Leave 15
cm space (minimum) around the AC adapter.
The rating information and safety caution of the
AC adapter are on it’s case.
Warning: When the set is not in use for a long time,
disconnect it from the mains supply.
Power Cord
Do not place the unit, a piece of furniture, etc., on
the power cord (mains lead), or pinch the cord.
Handle the power cord by the plug. Do not pull out
the plug by tugging the cord and never touch the
power cord when your hands are wet as this could
cause a short circuit or electric shock. Never make
a knot in the cord or tie it with other cords. The
power cords should be routed in such a way that
they are not likely to be stepped on. Check the
power cord once in a while. When you find it
damaged, ask closest service agent for help. When
the AC power cord needs to be changed, it should
be done at a qualified service shop only.
Choice of Location
• Please do not place the set in a place subject to
direct sun light, excessive dust or mechanical shock
or in a location near heat sources.
• The set should be placed on a solid and safe
base. Do not place the apparatus on a soft surface
such as a rug that might block the ventilation holes
on the bottom.
• A location should not be selected such as a room
with high humidity, as the condensation, arising in
the kitchen for example, may cause malfunction or
damage the set.
• Heating or other thermal radiation under the set
also may cause malfunction or damage the set.
• The hot air, which arises during the operation,
should be ventilated with sufficient air circulation.
Please do not put the set into closed areas and do
not cover it.
• Please avoid the contact of the set with water or
humidity. Do not put into operation near bath,
swimming pools.
• Take care to provide a good air circulation. Place
the apparatus in a location with adequate ventilation
to prevent heat build-up in the apparatus.
• Should any solid object or liquid fall into the
cabinet, unplug the apparatus and have it checked
by qualified personnel before operating it any
further.
Apparatus shall not be exposed to dripping or
splashing and no objects filled with liquids,
such as vases, shall be placed on the
apparatus.
The mains plug is used as the disconnect
device, the disconnect device shall remain
readily operable.
CAUTION
Batteries shall not be exposed to excessive heat
such as sunshine, fire or the like.
Page 5
4
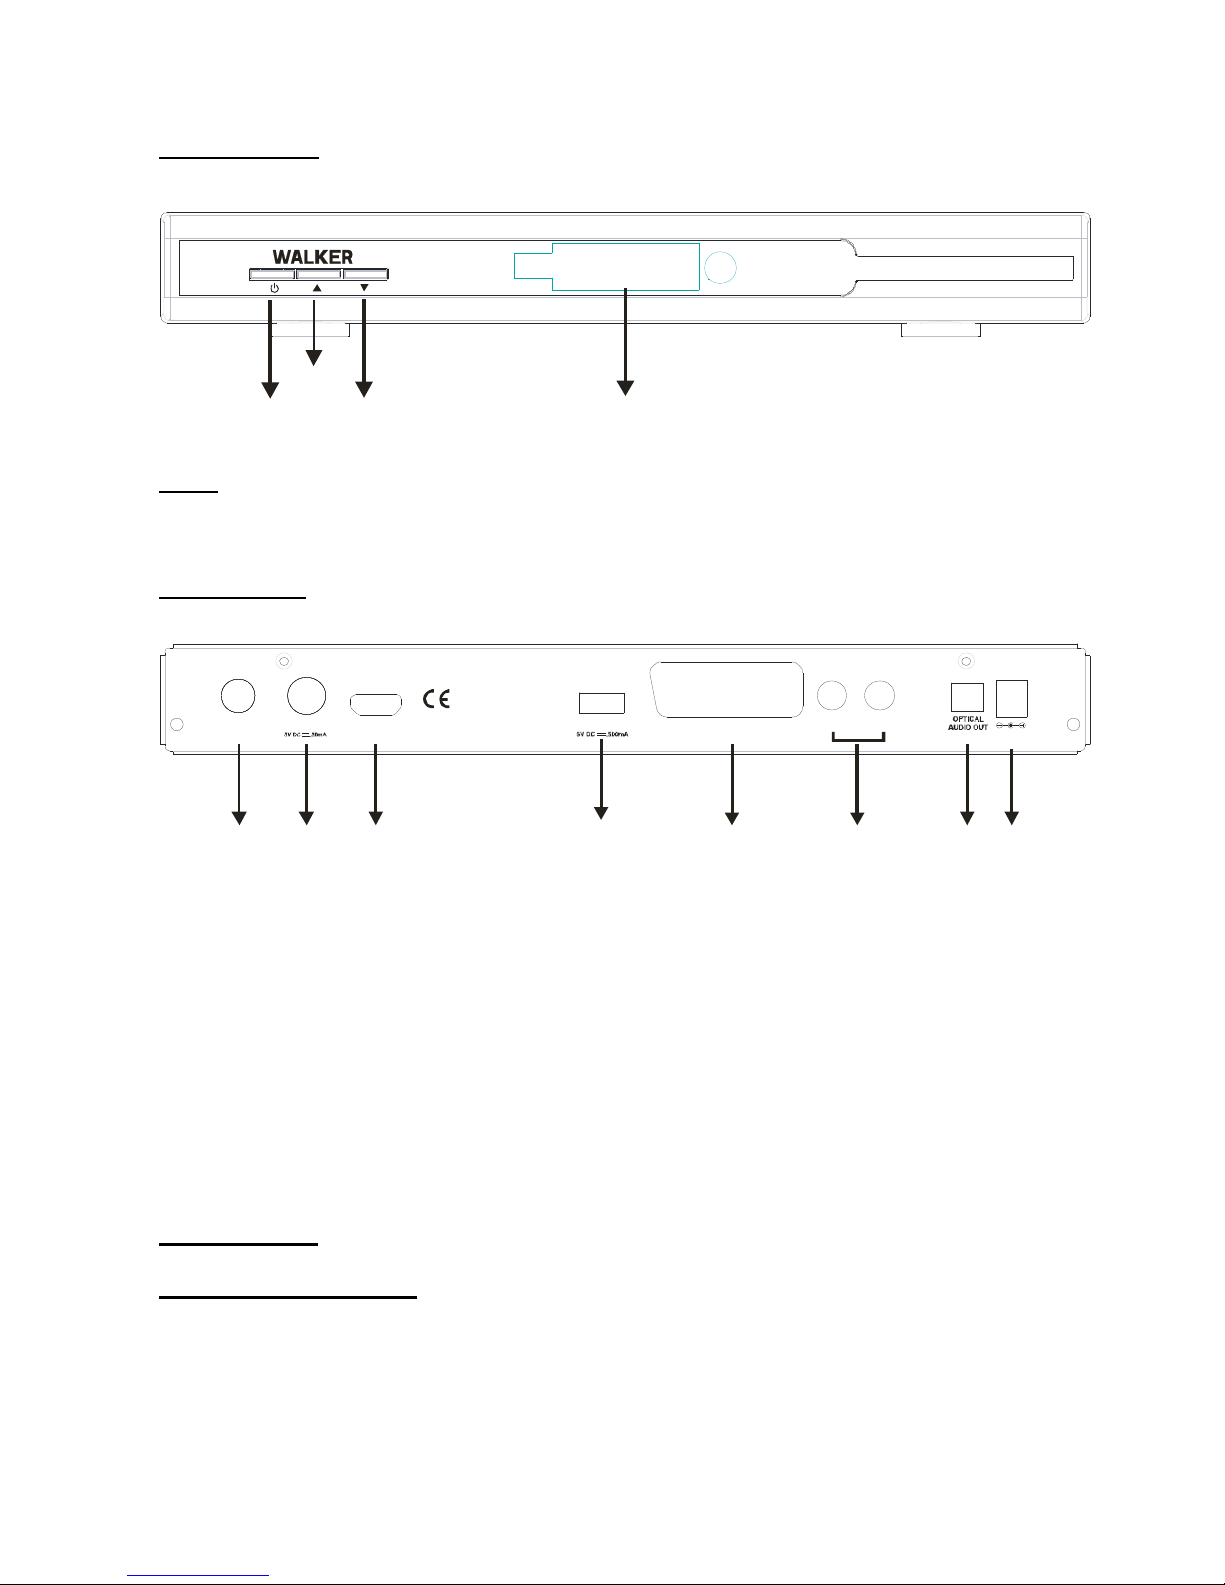
FRONT PANEL
SAORVIEW Digital Receiver
ON /O FF
KEY
PRO G
DOW N
PRO G
UP
DISPLAY
NOTE: No display will be shown in standby mode in order to keep the power consumption to a minimum and
save energy.
REAR PANEL
35027700
SCART (TV)
TV OUT
AUDIO L AUDIO R
HDMI OUT
DC IN
USB
ANT. IN
123
4
567
8
1. TV OUT : To watch analogue channels on the TV
2. ANTENNA IN : Aerial input
3. HDMI OUT : HDMI video output
4. USB INPUT
5. TV SCART : TV SCART connection
6. ANALOGUE AUDIO LEFT/RIGHT : Analogue Audio output
7. OPTICAL AUDIO : Optical Digital Audio Output
8. POWER SUPPLY : DC IN (12V)
3. PREPARING
3.1. REMOTE CONTROL
First open the battery cover on the underside of the remote control. Put in both batteries 1.5 Volt (RO3/AAA)
referring to the imprinted symbols (+/-) in the battery case and put on the battery cover again. While using the
remote control, direct it towards the front side of the receiver. If the remote control does not work or the chosen
function does not work, the batteries are most probably exhausted and they should be replaced as soon as
possible. Please use only the leak proof batteries. It is best to remove the batteries from the remote unit if you
will not be using the remote control unit for long time.
Page 6
5
3.2. CONNECTIONS
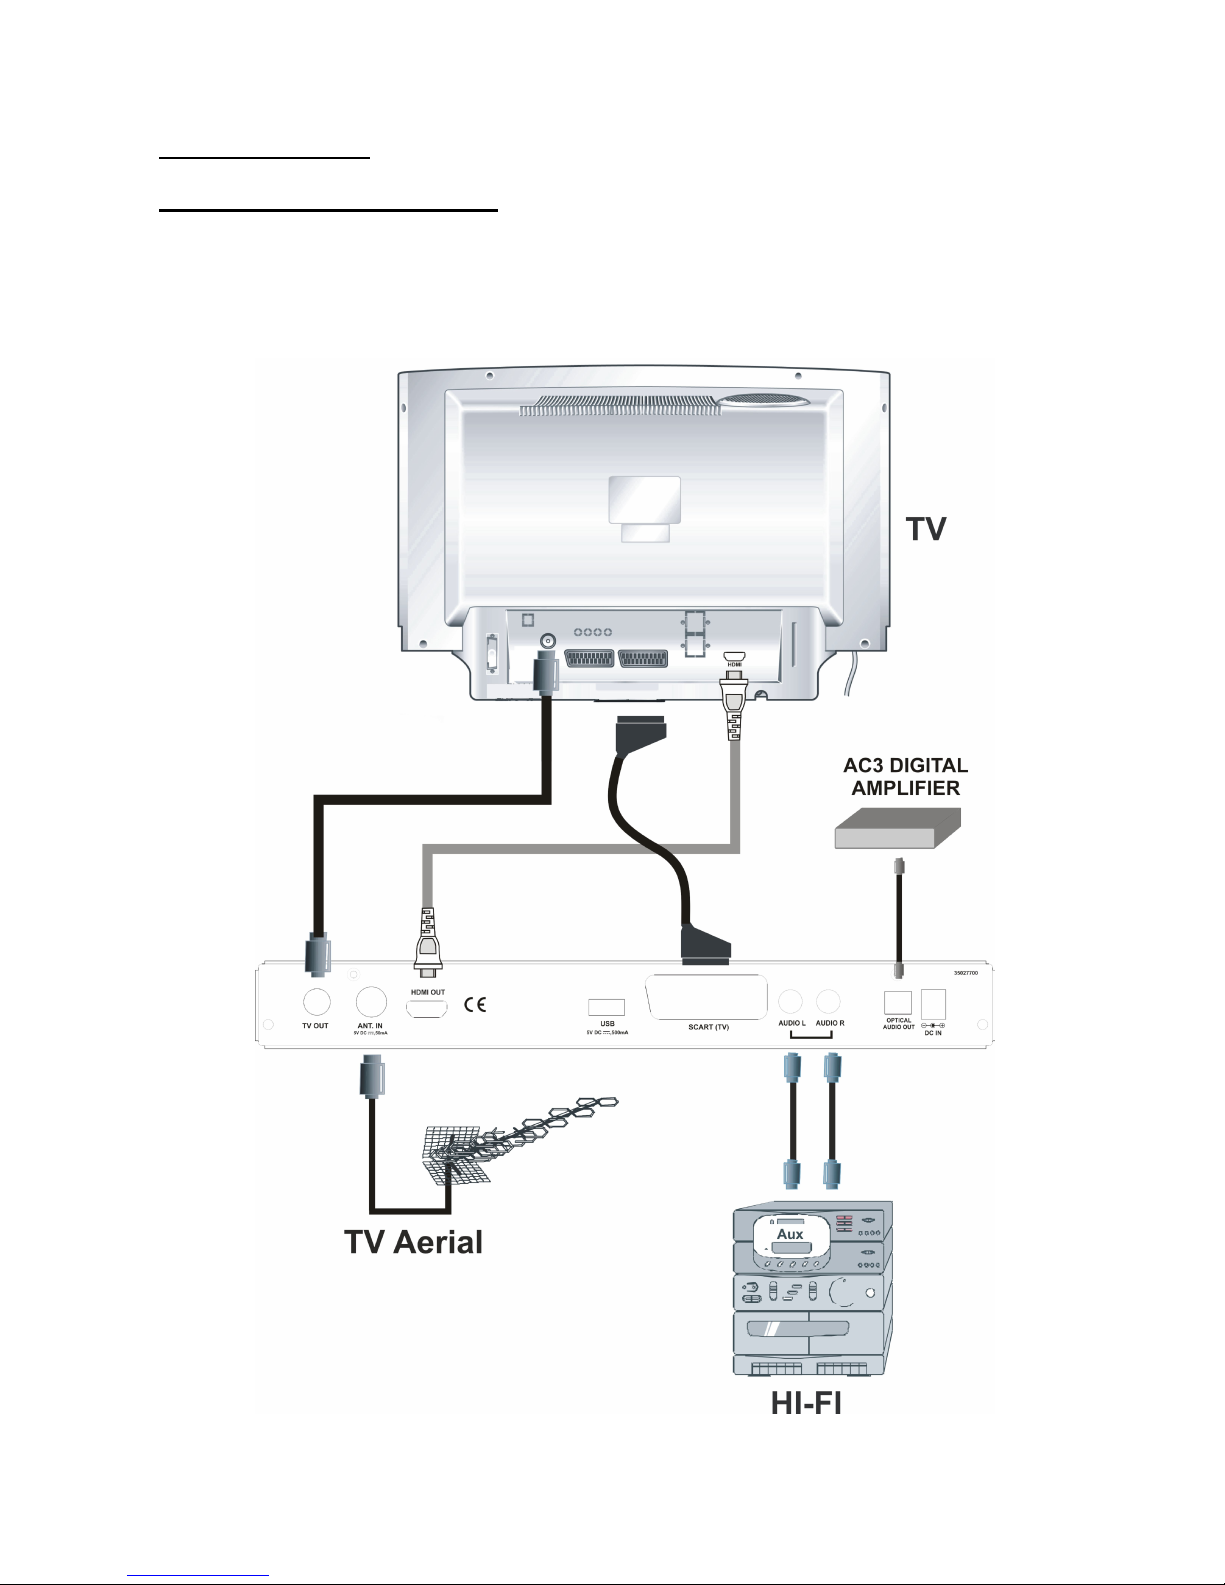
3.2.1. CONNECTION TO THE TV
Connect your set-top box with a scart cable using the TV scart connector on the rear panel to your television’s
scart connector or use an HDMI cable to connect the HDMI output of your receiver to the HDMI input of your TV
(only if your TV has an HDMI input).If you want to get a high quality picture, prefer the HDMI output. The set-top
box gives RGB or CVBS output. If you want to get the picture via scart connector and your TV’s scart connector
has an RGB input, then you can switch your digital set-top box to RGB mode, by toggling TV out menu to RGB
mode, in configuration menu. So, you will be able to achieve high performance from your digital set-top box.
Page 7

6
1) Connect one end of Scart cable to TV Scart connector on the STB and the other end of to a Scart connector
on your TV
3.2.2. PUTTING INTO OPERATION
Be sure that you put through all the cable connections. After plugging in the mains cord of the set-top-box to the
mains supply, a red light will be seen on the front panel (Standby mode). When the set-top-box is first powered
up please wait for about 7 seconds before activating the receiver since booting of software will take some time.
Then, you can turn on your digital set-top box by pressing the standby button on the remote control. You will
see that the red light on the front panel will change to blue (Power on mode).
Note: If your set-top-box supports low power mode, then ANT OUT will not work while the box is in standby
mode.
3.2.3. SOCKETS
TV SCART
Two IEC Connectors, ANT IN is the antenna input. TV OUT is for to output the loop through of analogue or
digital signals.
HDMI output
Analogue audio output (left/right)
Optical Audio Output (digital audio output)
USB input (optional)
Page 8
7
4. REMOTE CONTROL FUNCTIONS
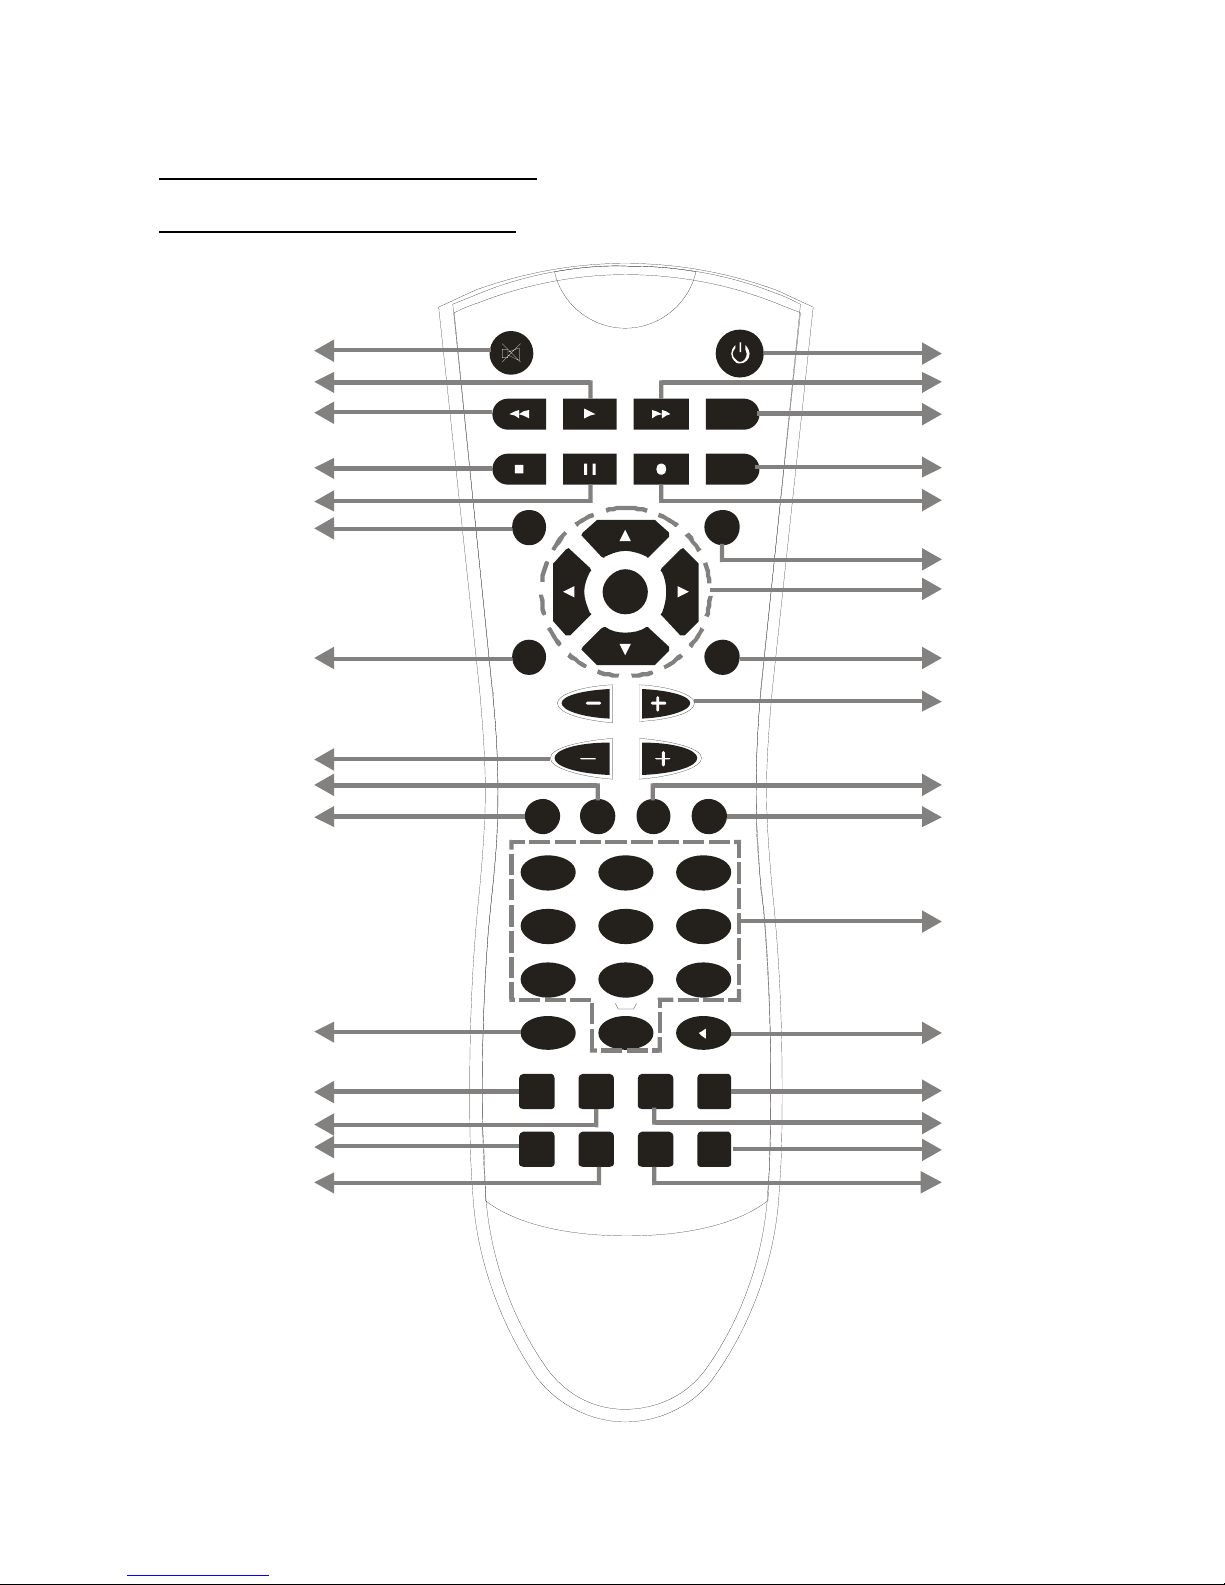
4.1. REMOTE CONTROL LAYOUT
OK
TEXT BACK
MENU
INFO
PR
VOL
2 3
5 6
7
8 9
0
ABC DEF
GHI JKL MNO
LIB.
P P
SUBT.
1
4
PQRS TUV WXYZ
FAV. WIDE
GUIDE
PIP PIP- SWAPPIP+
TIMERS
AUX
1
2
3
4
5
6
7
8
9
10
11
12
13
14
15
16
17
18
19
20
21
22
23
24
25
26
27
28
29
30
31
32
Page 9

8
BUTTON FUNCTION
1. Standby ON / Standby
2. (optional) Search Forward
3. LIB. Media Browser menu
4. Timers Timer Setup
5. (optional)
Record button
6. Info I-Bar
7. Direction buttons / OK Navigation / Entering the channel list
8. Back / Exit Exit
9. P+ / P- Channel Up / Down
10. Yellow Yellow Teletext function button / Audio mode selection
11. Blue Teletext function button / Change language
12. Number buttons Numerical buttons
13. PP Swap channels (with last viewed channel)
14. Wide TV aspect ratio mode
15. Subt. Show / Hide Subtitles
16. Swap Change the HDMI resolution
17. PIP + (optional)
PIP Window Channel Up
18. Mute Mute
19. Used in “Media Browser and EPG” menu
20. (optional) Search backward
21. Used in “Media Browser and EPG” menu
22. (optional) Pause / Timeshift
23. Guide Electronic Program Guide
24. Text Display Teletext
25. V+ / V - Volume UP / DOWN
26. Green
Green Teletext function button (used also in “Media Browser”
menu).
27. Red Red Teletext function button (used also in “Media Browser” menu)
28. Aux No function
29. Menu Enter menu / Exit menu
30. Fav Favourite list
31. PIP (optional) Show / Hide PIP window
32. PIP- (optional) Previous channel in PIP window
Page 10
9
MENU INTERFACE
FIRST TIME INSTALLATION
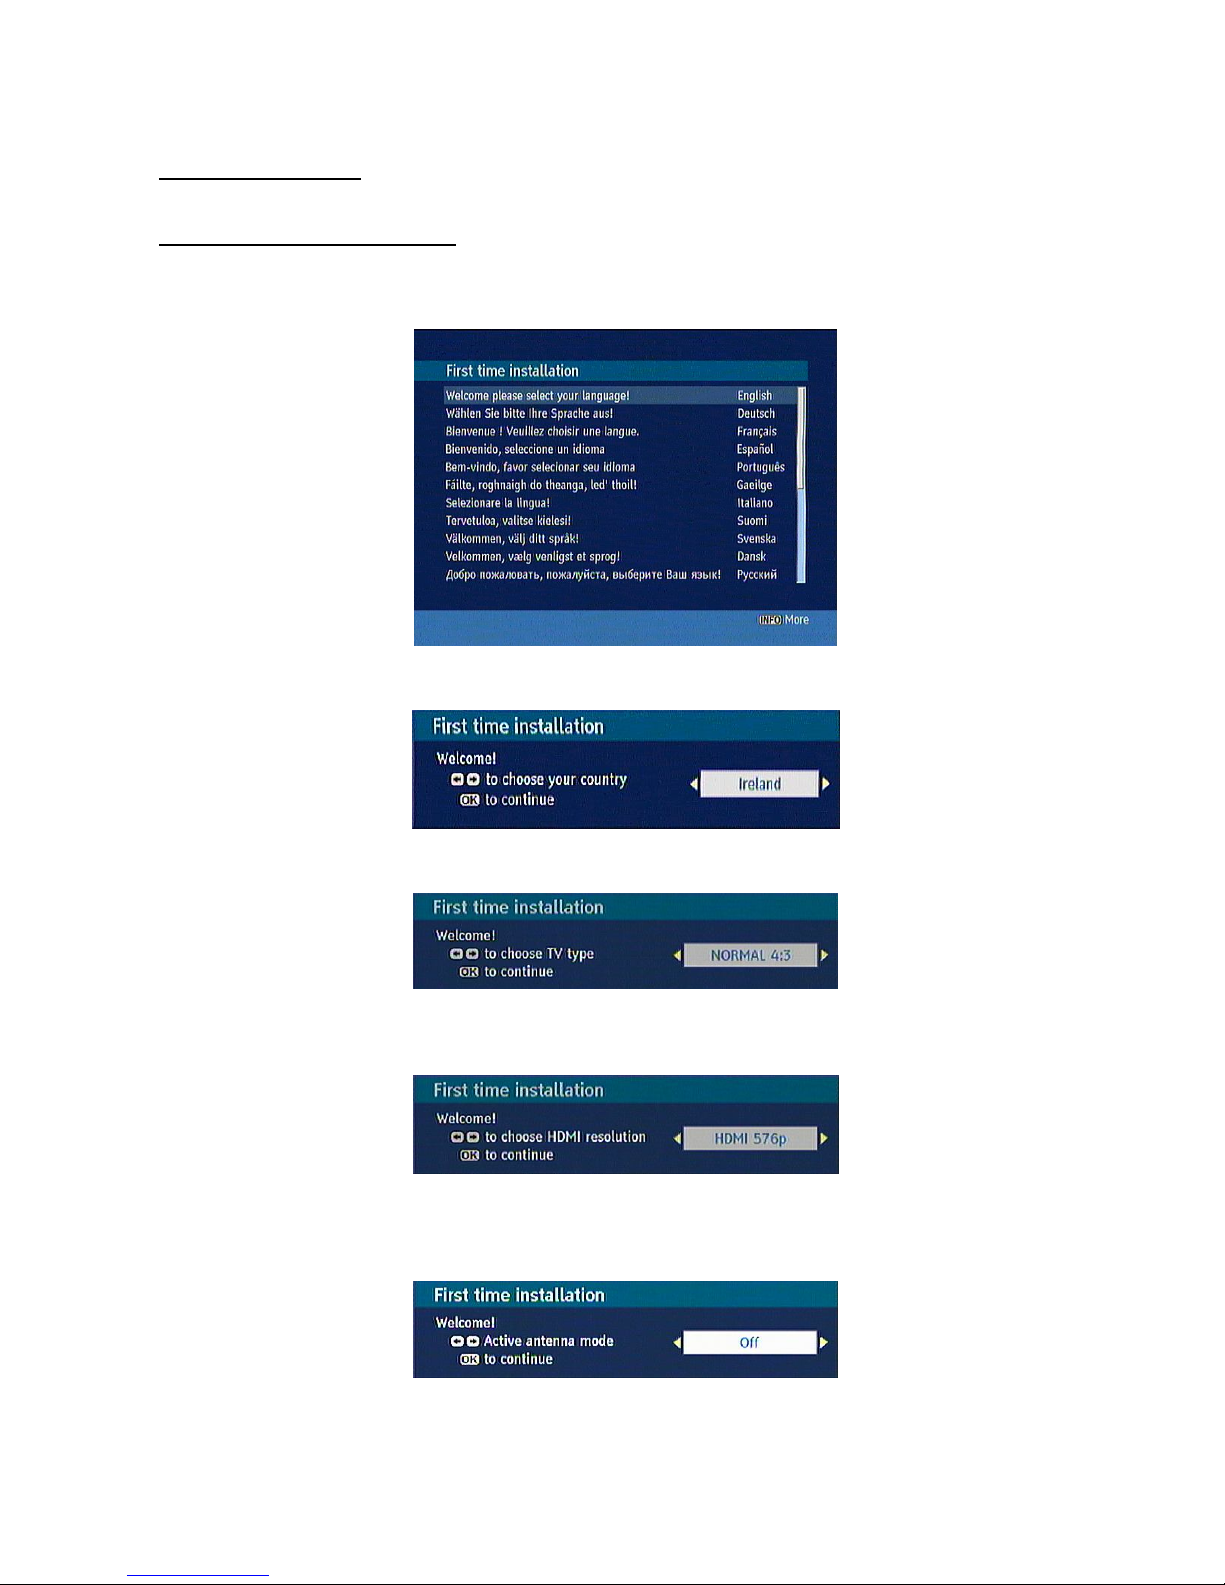
When the box is opened from stand-by mode and if there is no channel stored in the database, First Time
Installation Menu window is displayed on the screen. In the first window, menu language is asked.
Then, you are asked to choose the country you are located.
After choosing the country, you have to set your TV type in the next window.
The next menu will ask you to choose the HDMI resolution. If you intend just using the Scart output then just
press SELECT and continue the scanning process.
Using the [LEFT] or [RIGHT] buttons on the remote control, you can select between; 576p, 720p and 1080i.
Please check the HDMI resolutions supported by your TV set and select the most appropriate one from this
menu. Afterwards set the antenna supply;
Page 11
10
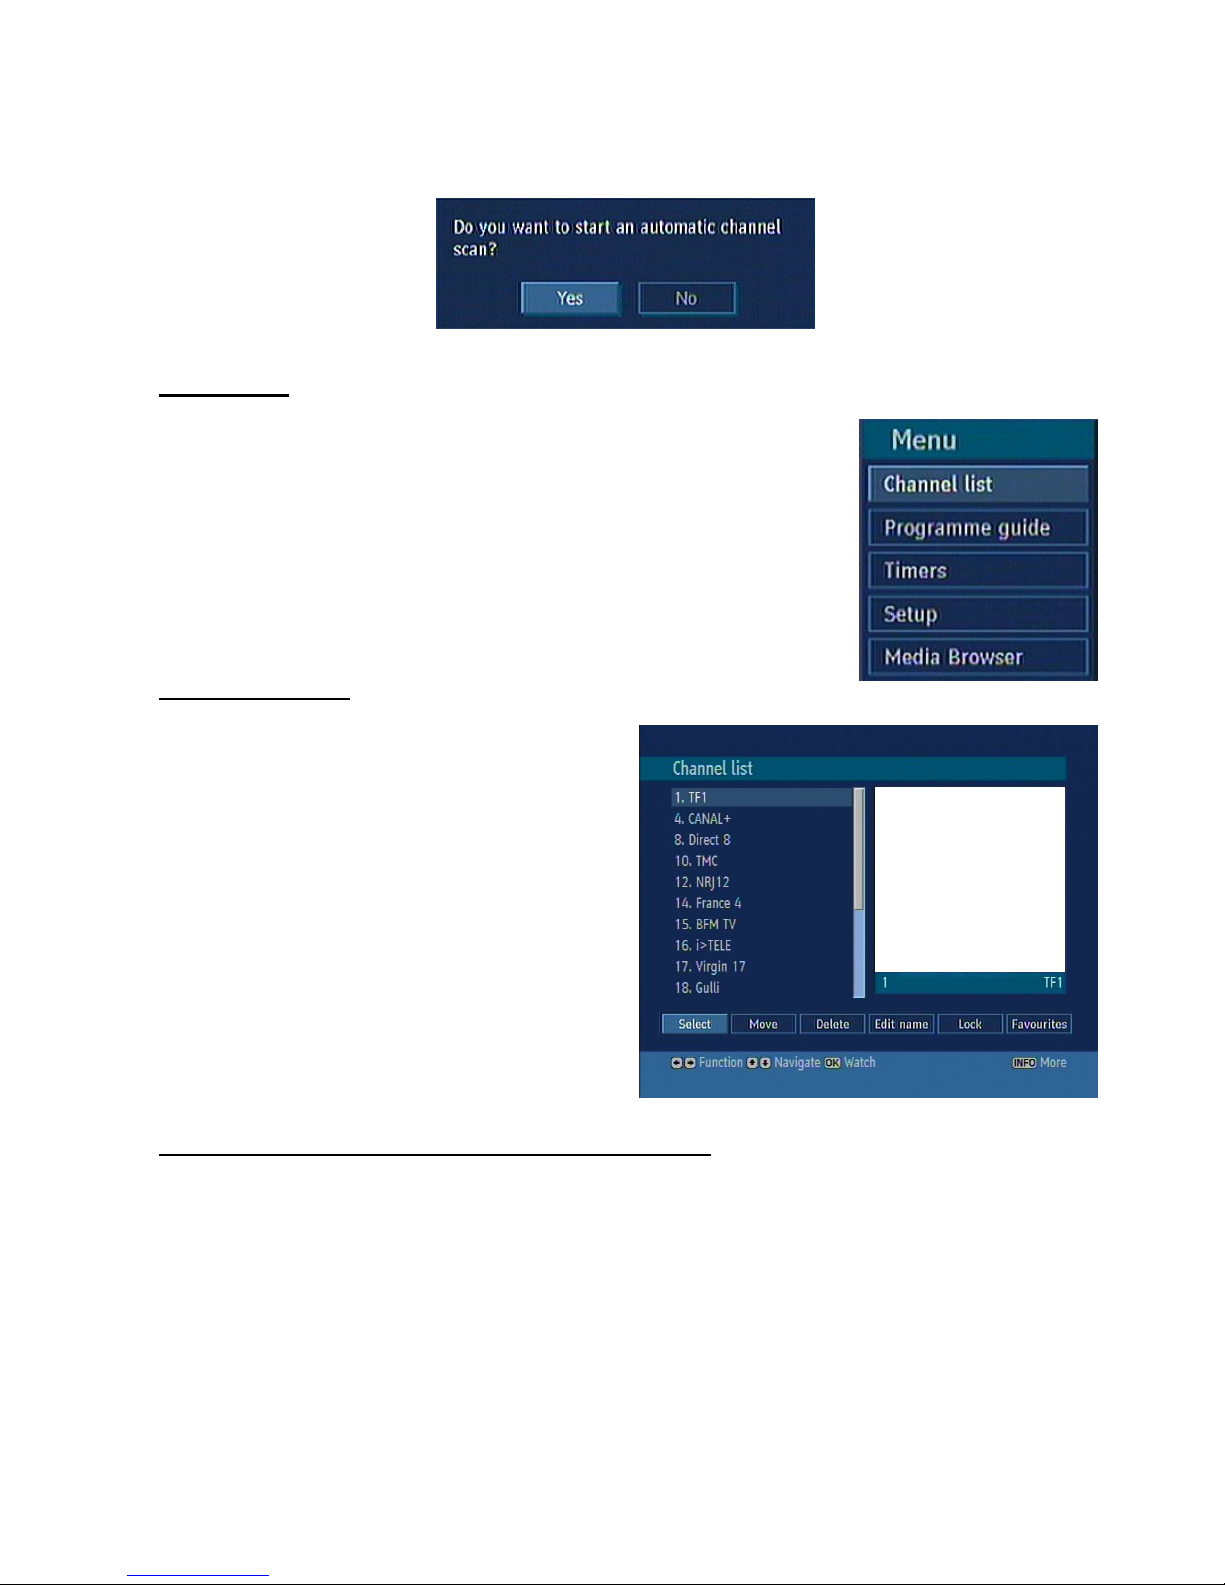
Then “Do you want to start an automatic channel scan?” pop-up menu is displayed. Auto search can be started
by selecting the “Yes” button. The box will automatically find the channels and store them for you.
MAIN MENU
The Main Menu is accessed, pressing the MENU button. The items accessed
through the Main Menu are:
1.) Channel List
2.) Programme guide
3.) Timers
4.) Setup
5.) Media Browser
5. CHANNEL LIST
The following operations can be performed in this
menu:
1. Navigating the whole list of channels
2. Moving channels
3. Deleting unwanted channels
4. Renaming channels
5. Adding locks to channels
6. Setting the favourite list
Channel table is the place where the channels are
managed.
5.1. NAVIGATING THE WHOLE LIST OF CHANNELS
In the channel table “▲ / ▼” serves for moving the focus to the previous or next channel, RED / GREEN
BUTTON for page up and page down. To watch a specific channel highlight it using, RED BUTTON / GREEN
BUTTON then press OK. Then the name and number of the selected channel will be displayed on the bottom of
the preview screen. If the selected channel is password protected then a pop up menu is displayed. If the
correct code is entered then the selected channel can be watched. Also you can select another channe l by
navigating with “▲ / ▼” buttons. The scroll Bar in middle of the screen shows relative position of the currently
visible channels with respect to the whole list.
Page 12
11
5.2. MOVING CHANNELS
Reordering the list can be done by moving the programs one by one to new positions. In order to do that, the
"Move" button should be highlighted by pressing the “◄ / ►” keys. Using the “▲ / ▼” keys, select the
programme which should be moved and press the OK button. Then, enter the new channel number of the
programme you want to move and the programme will be settled as you entered. In some countries, the order of
the channels is arranged automatically by the broadcaster. This is called logical channel number (LCN). If the
selected country has LCN support, the channels will be enumerated one by one, beginning from number 1. You
cannot move any programme to a position after the last saved one. If you try to do this, both programmes will
change their places. If LCN support is not available, you can move the channels between 1-999.
5.3. DELETING UNWANTED CHANNEL
To delete a channel highlight it using “▲ / ▼” /RED/GREEN, then highlight the “Delete” button using “◄ / ►”
and press OK. A message is displayed to confirm your decision, if you still want to delete press OK once more
and the channel will be deleted, else the operation will be cancelled if you select “NO”.
5.4. RENAMING CHANNELS
To rename a specific channel, the name must be highlighted and then select the "Edit Name" button and OK
button must be pressed. Following previous procedure, the name appears on the middle of the screen with the
first character highlighted. Now “◄ / ►” moves to the previous/next character. “▲ / ▼” toggles the current
character, i.e., ‘b’ character becomes ‘a’ on “▼” and ‘c’ on “▲” . Pressing the numeric buttons ‘0...9’ replaces
the highlighted character with the characters printed above the button one by one as the button is pressed.
Pressing MENU cancels the editing and OK saves the new name.
5.5. ADDING LOCKS TO CHANNELS
Channel Locking provides a password-protected access to channels selected by parents. In order to lock a
channel you should know the parental Lock password (set to 0000 in the factory and can only be changed from
the Configuration Menu), then highlight the channel to be locked and select the “Lock” button, when OK is
pressed a password dialog is displayed. Enter the parental Lock code, press OK and the Lock icon will be
displayed in front of the selected channel. Repeat the same operation to cancel the Lock.
5.6. SETTING FAVOURITES
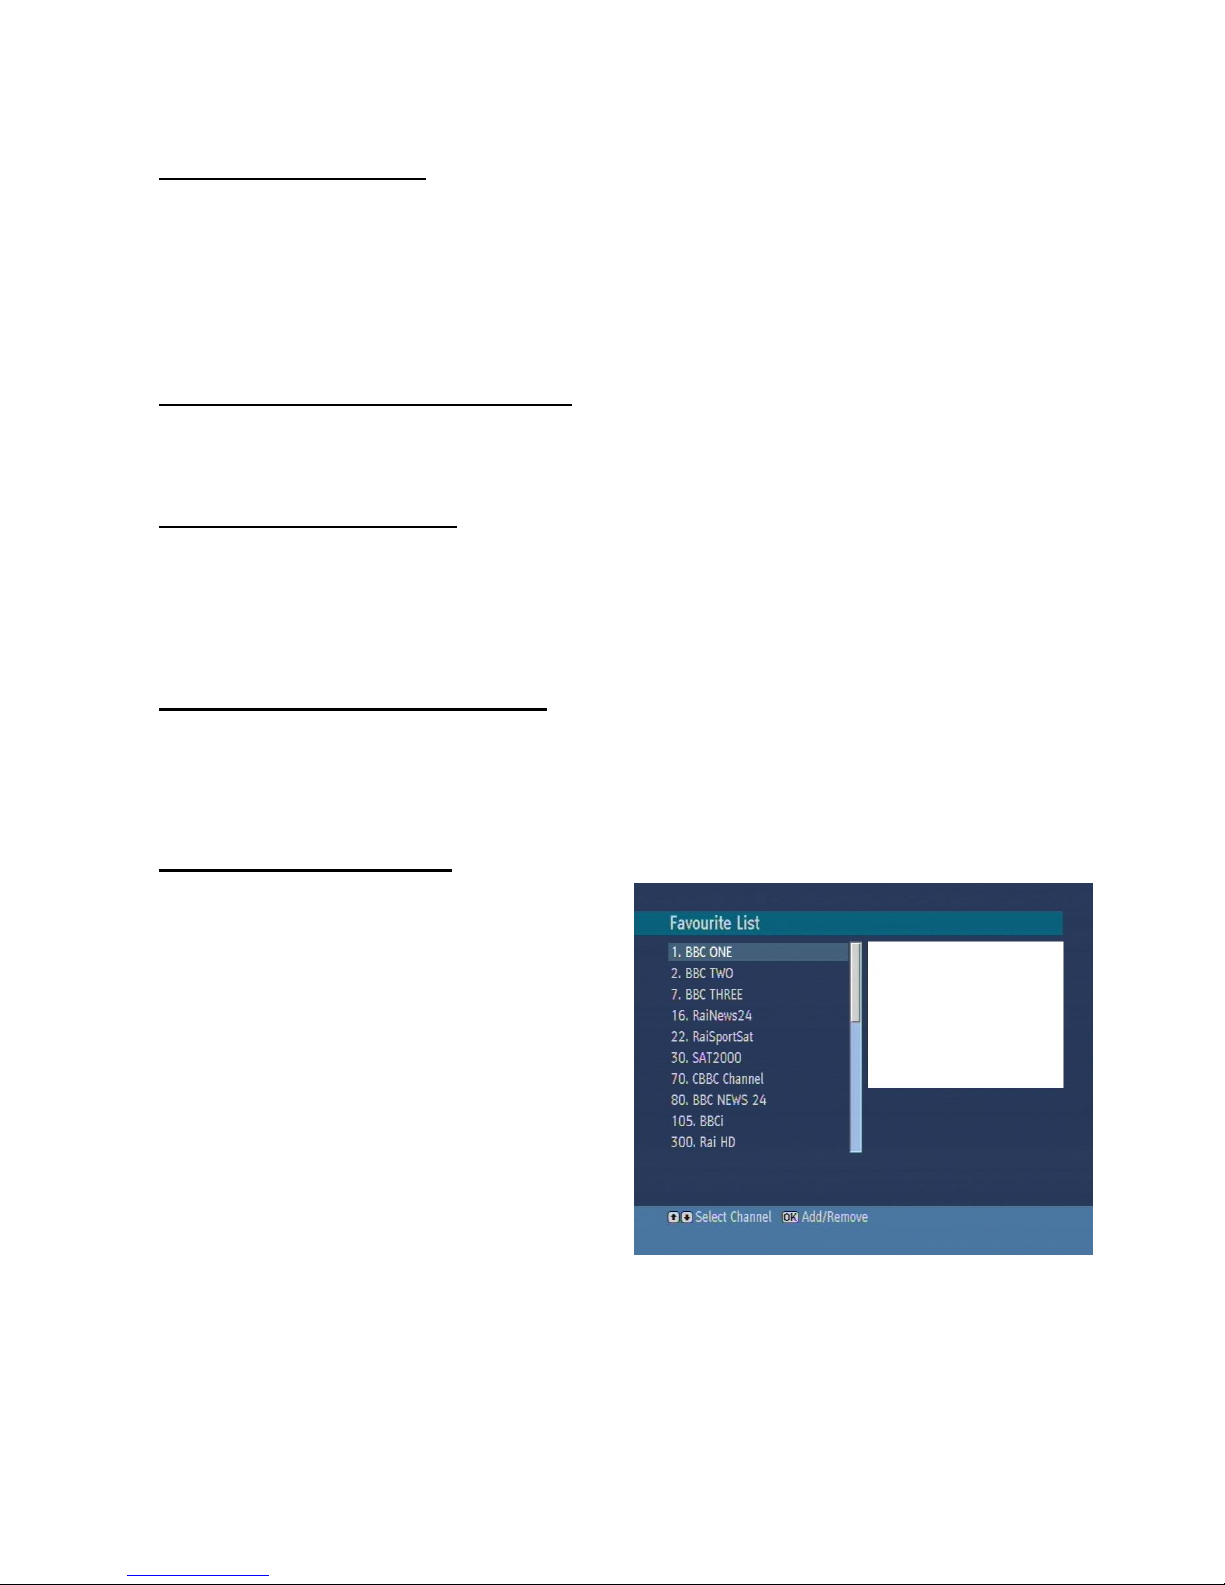
Favourite list provide an easy way to group programs
in a customizable way. In the channel list Table menu
the programs can only be added or removed from a
favourite list.
In order to add or remove a program from a favourite
list, highlight the “Favourite” button using “◄ / ►”
buttons, the favourite submenu will be displayed. Then
select the program to be added / removed to/from the
favourite list using “▲ / ▼” , choose the favourite list
name (in which the program will be added) using “◄ /
►” buttons then press OK. The favourite program
icon will be displayed or removed in/from the selected
program bar. Pressing Menu button saves all your
settings.
Pressing Menu button saves all your settings.
Page 13
12
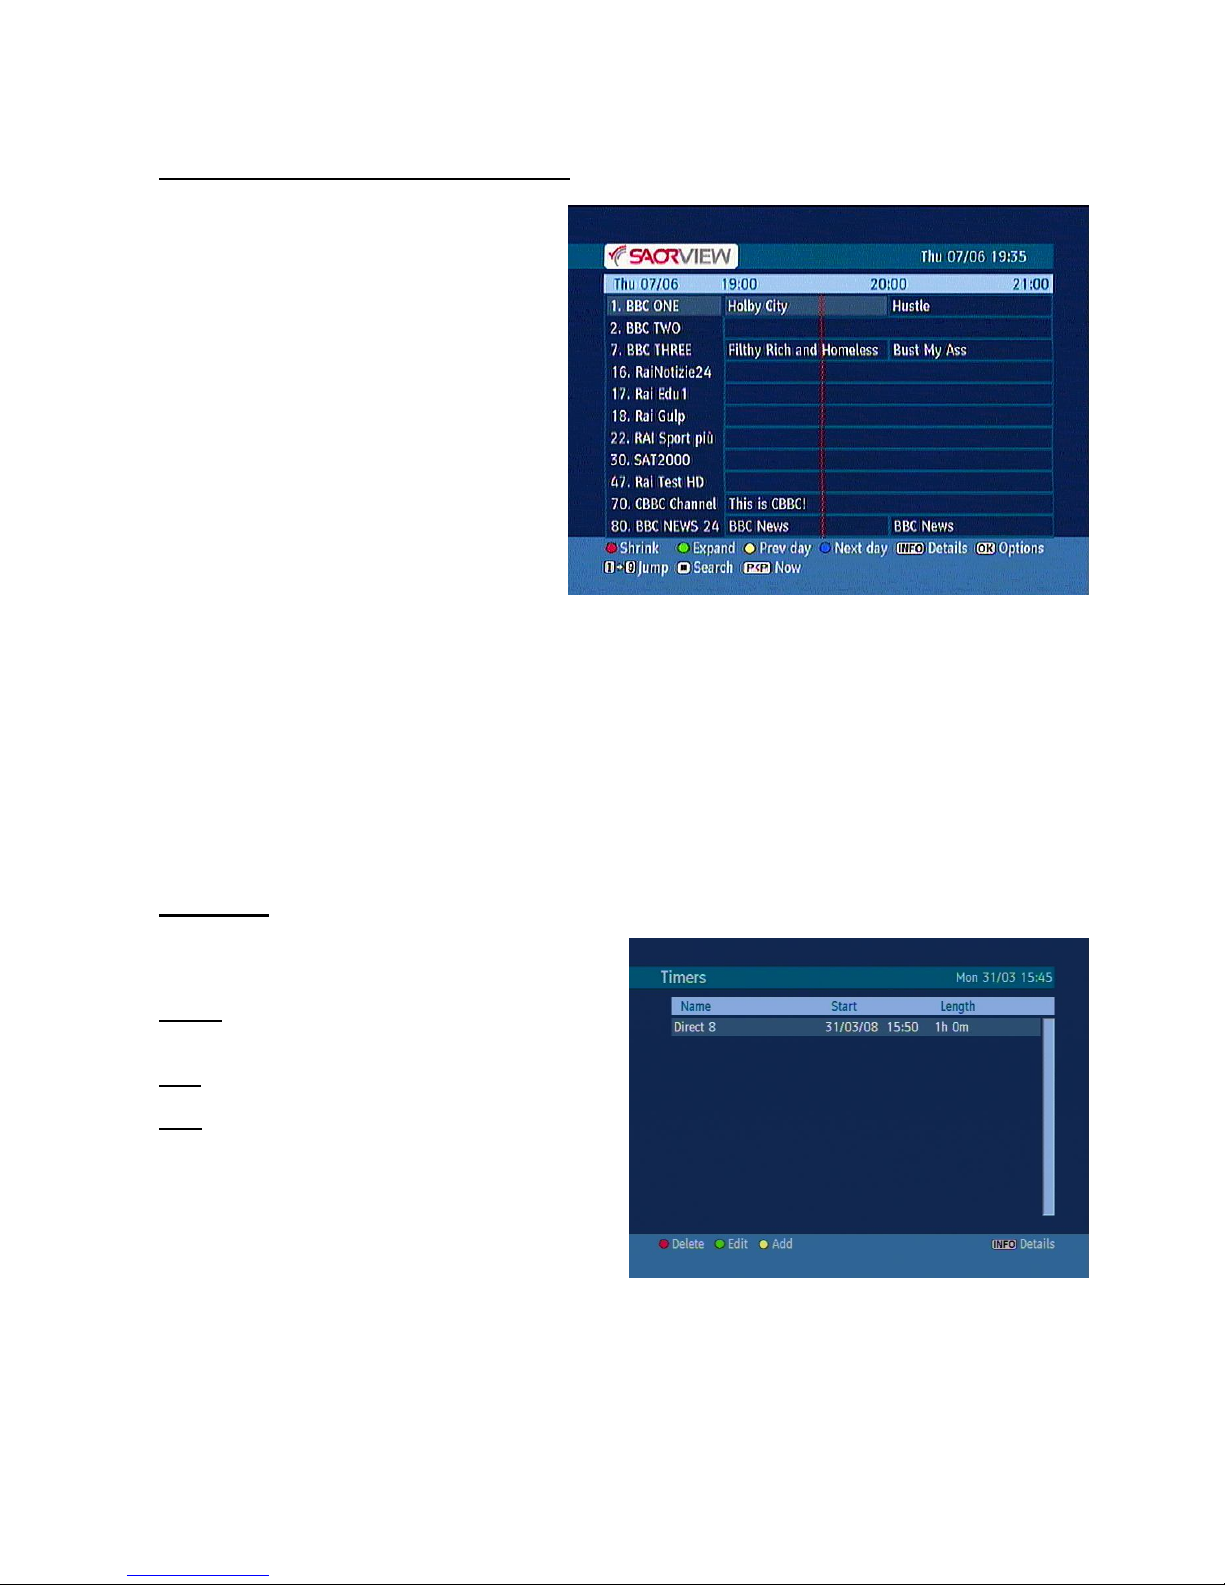
6. PROGRAMME GUIDE (7 DAYS EPG)
Electronic Program Guide appears on the
screen. It is able to get Information of the
channel - programs weekly by means of 7DAY–EPG. All programs of channels are
displayed. The current program is highlighted
and if you press the info button, there will be a
brief information about the programs of the
channel, such as: name, short/extended event
description, start & end time. By pressing “◄ /
►” buttons continuously the time scale can be
changed. If there is any event information data
available only program names and dates are
displayed. Across the bottom of the screen
there is an info bar showing all the available
commands which are listed below.
RED BUTTON (SHRINK) : make the info boxes smaller.
GREEN BUTTON (EXPAND) : make the info boxes larger.
YELLOW BUTTON(PREV DAY) : displays the programs of previous day.
BLUE BUTTON (NEXT DAY) : displays the programs of next day.
INFO (DETAILS) : displays the short extended programs in detail.
OK (OPTIONS) : shows the programme options include “Select Channel”.
NUMERIC BUTTONS (JUMP) : go to preferred channel directly via numeric buttons.
(SEARCH) : activates “Guide Search” window.
P<P (NOW) : shows the current programme.
7. TIMERS
To display the “Timers” window, press activate it from
main menu. The features of this menu are like below:
Delete: You can delete the highlighted single timer or
series timer.
Edit: You can edit the saved timers.
Add: By pressing this button, you will go to the “Add
Timer” menu.
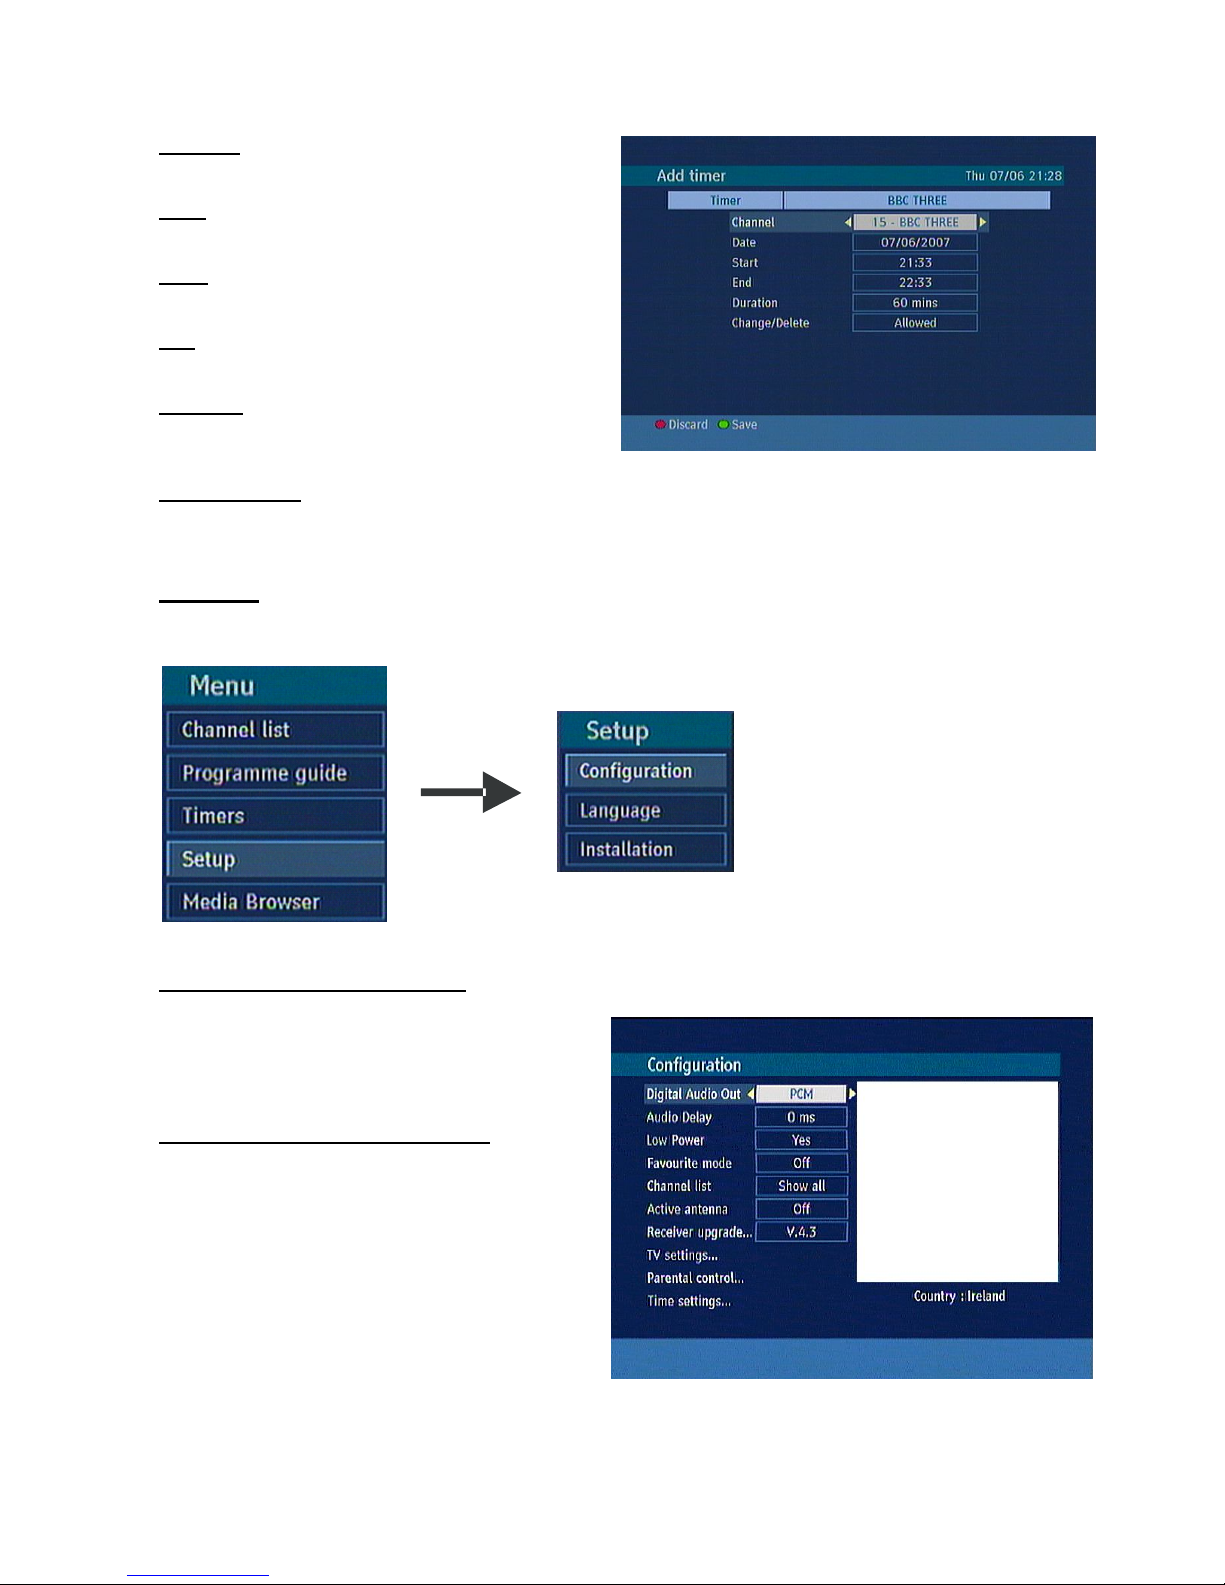
To add a Timer press YELLOW button on the remote
and the, “Add Timer “ windows appears.
Page 14
13
Channel: “◄ / ►” buttons will navigate the user
through the TV or Radio list.
Date: By using either “◄ / ►” or “0,1,2…,9”
buttons start date is entered.
Start: By using either “◄ / ►” or “0,1,2…,9”
buttons start time is entered.
End: By using either “◄ / ►” or “0,1,2…,9” buttons
end time is entered.
Duration: Displays the duration of the recording.
This is automatically worked out after the start and
end times have been entered.
Change /Delete: permit or prohibit any modifications for other users.
When a Timer Start time is reached, the receiver switches to the set channel. Save the adjustments by means
of GREEN button or cancel with RED button. Edit the list via GREEN button and delete with the RED button.
8. SETUP
The adjustments in this menu are:
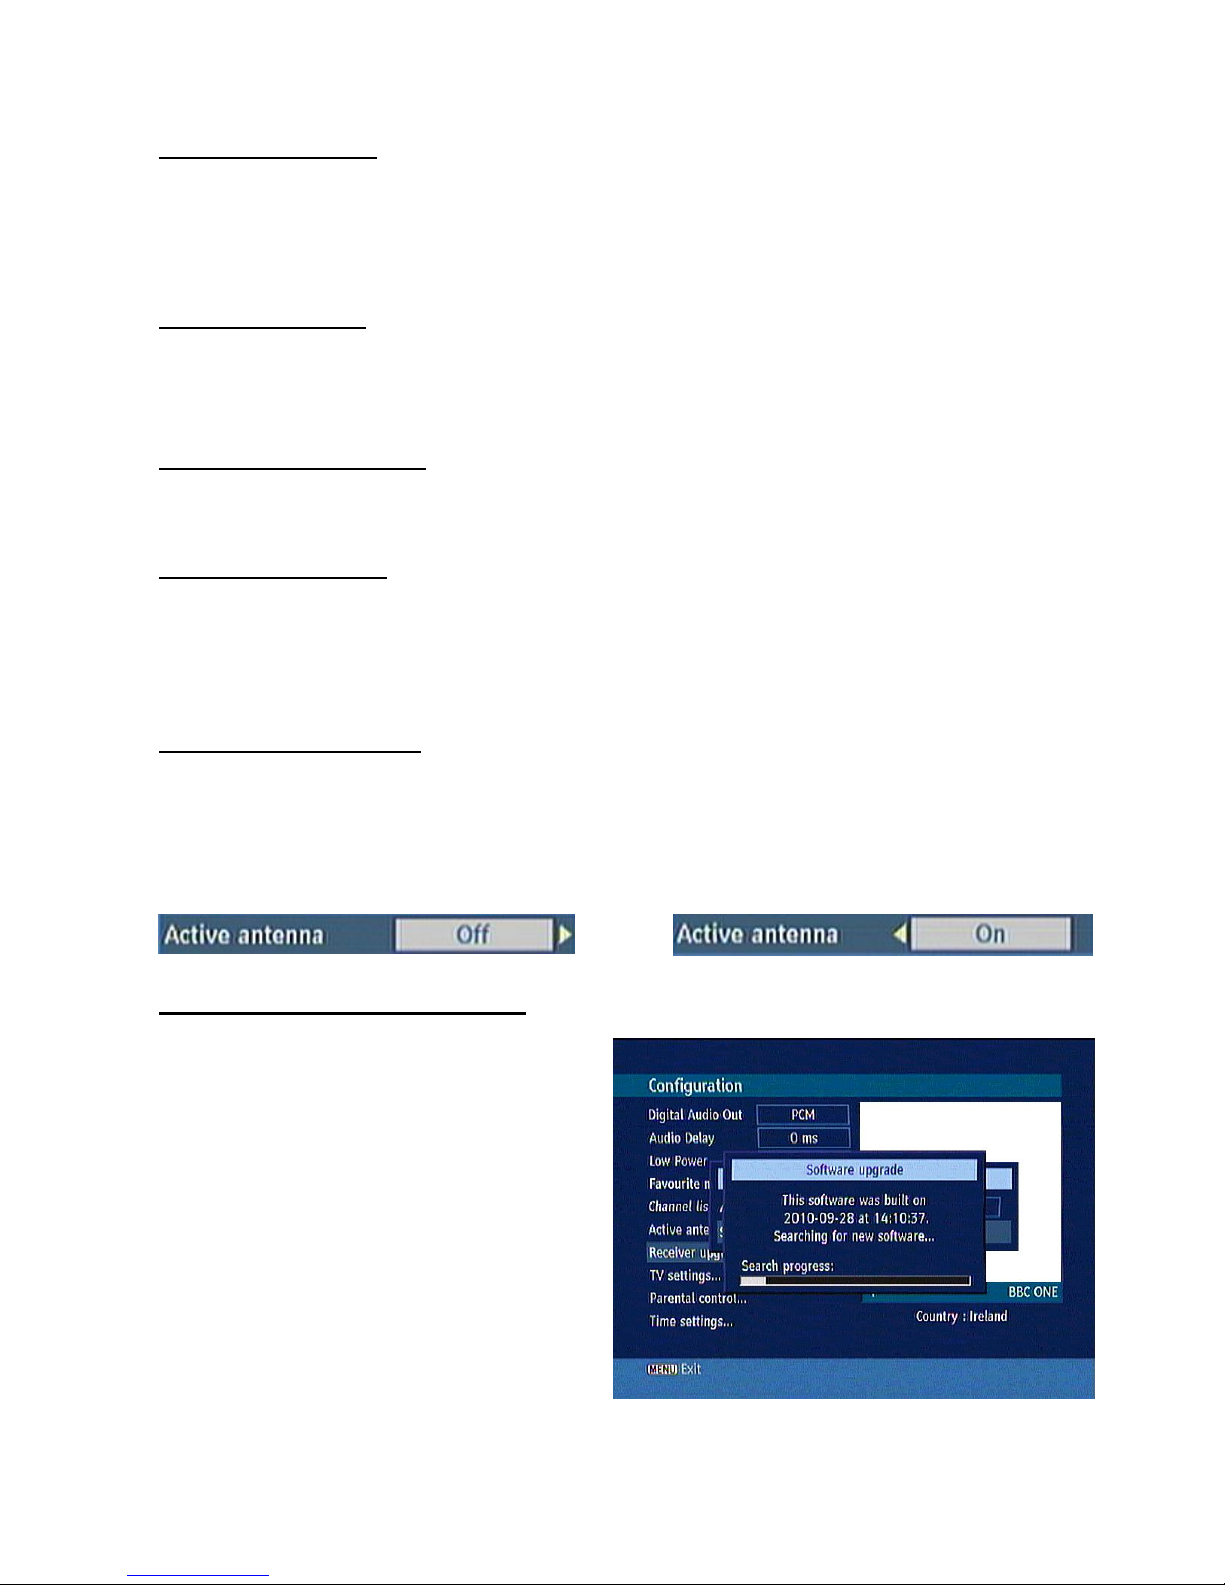
8.1. CONFIGURATION MENU
You can configure the settings of your set top box.
Select Configuration from Setup menu and press
OK to enter this menu. Press the BACK button on
the remote to exit.
8.1.1. DIGITAL AUDIO OUTPUT
Use the “▲ / ▼” buttons to go to the PCM Audio
option. Use the “◄ / ►” buttons to toggle between
PCM and Compressed. If you choose PCM and you
select a broadcasting with PCM audio, the default
audio output will be PCM, but if you choose
Compressed, the audio output will be Compressed
Stereo. Note that you need a digital audio amplifier
with PCM support connected to Digital optical
output, to experience PCM audio.
Page 15
14
8.1.2. AUDIO DELAY
By pressing
“▲ / ▼”
buttons on the remote control, you can set to Audio Delay to desired value. You can use
this setting when there is a synchronization problem in the received broadcast . Press
“◄ / ►”
buttons to change
the delay.
Note: This function will be available while using Optical Audio out only.
8.1.3. LOW POWER
If you select YES, low power mode will be activated. In low power mode the power consumption is less then 1 W (in
standby). The front display will show no time information (in standby). If low power mode is deactivated, all functions will be
reactivated.
8.1.4. FAVOURITE MODE
This function enables or disables the favourite channel list mode by pressing “◄ / ►” buttons. If there is no
favourite listing, a warning message is displayed.
8.1.5. CHANNEL LIST
Use “▲ / ▼” buttons to go to Channel List option. Use “◄ / ►” buttons to toggle Channel List Mode. If you
select “TV Only” you navigate through only TV channels, if you select “Radio Only” you navigate through only
radio channels, if you navigate “Text Only” you navigate through only Text channels with the PR+/PR- buttons. If
you choose “Show All” all, channels can be navigated with the PR+/PR- buttons. To save the recent changes
and exit; press the MENU button.
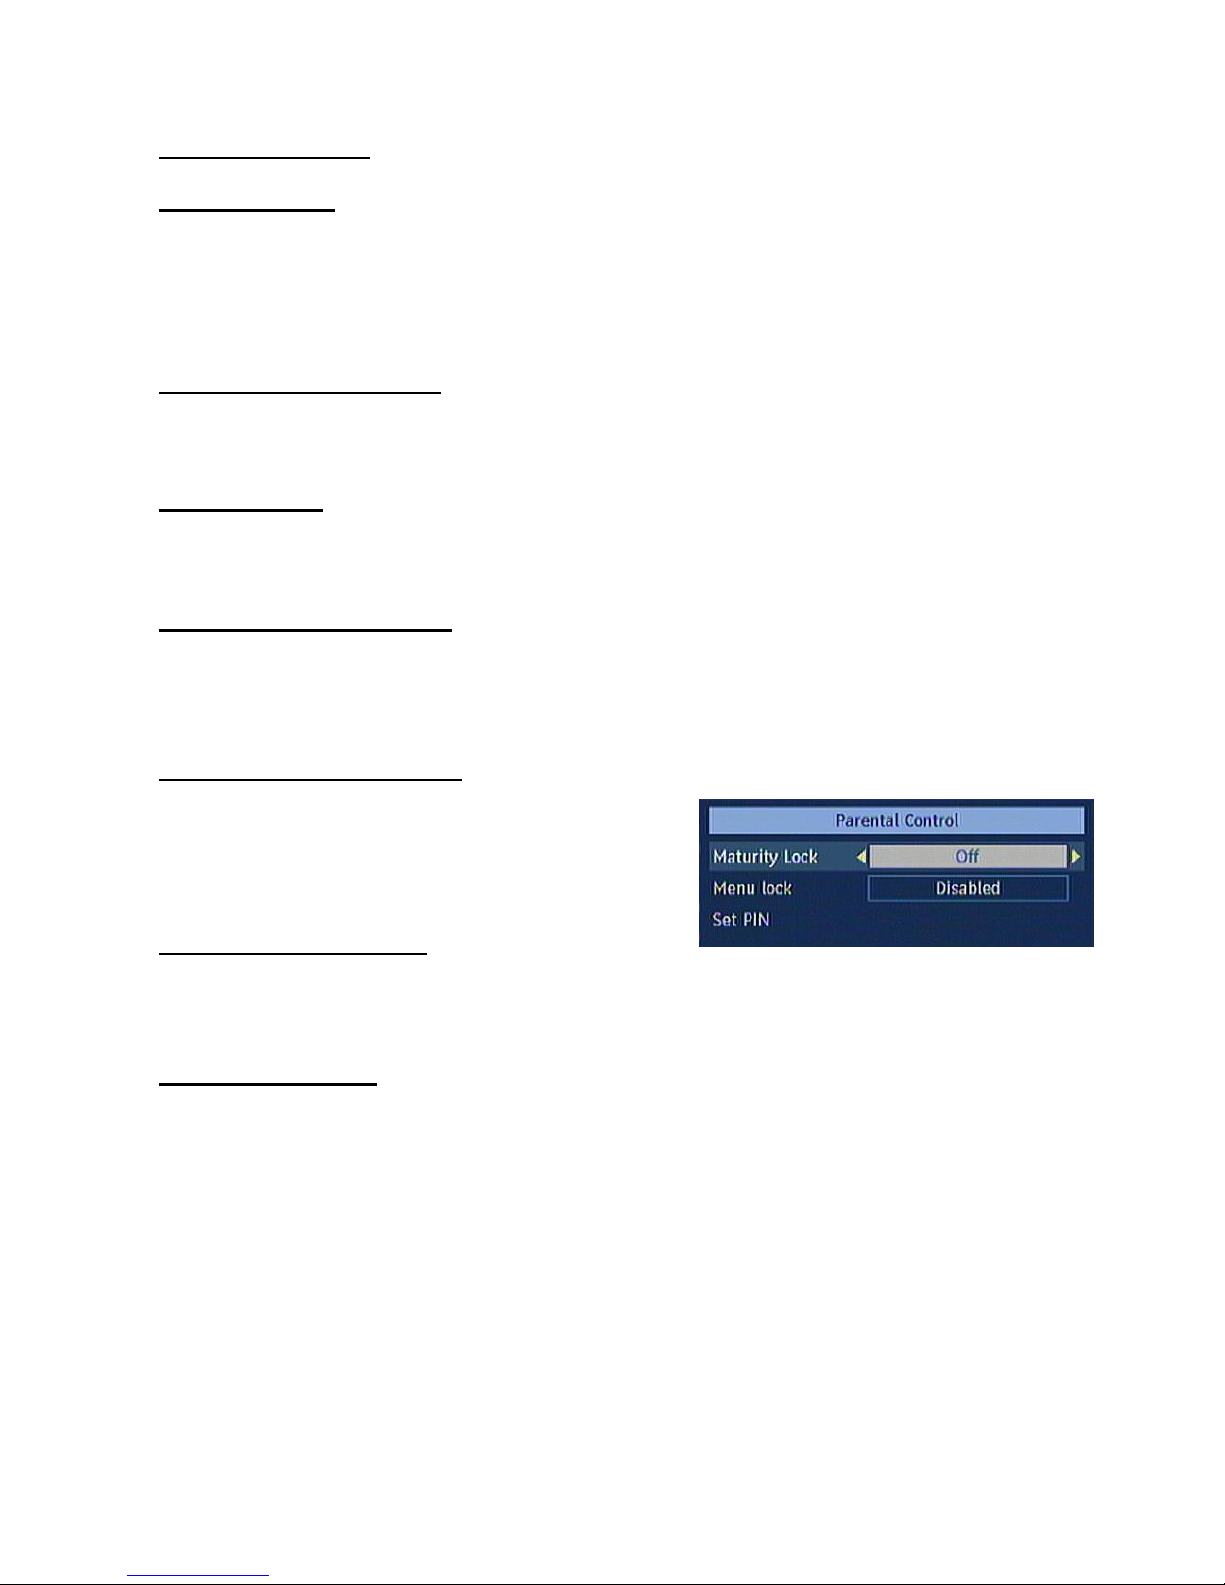
8.1.6. ACTIVE ANTENNA
Use “▲ / ▼” buttons to go to Active Antenna Setting. The setting will be OFF as default. If you want connect the
receiver to an active antenna that is an instrument amplifying the received signal then you must change the
Antenna Power Supply setting to ON. The DVB-T receiver can supply 30mA (5V active antenna output). Please
do not use a normal passive antenna (do not short circuit the ANT IN connector) while Antenna Power
Supply setting is ON. This may cause to a breakdown in your DVB-T receiver.
8.1.7. RECEIVER UPGRADE - OAD
Over Air Download (OAD): To ensure that your
STB always has the most up to date information.
Please ensure that after use it is set to its standby
mode. The STB automatically powers up at 3.00
A.M. each day and searches for any new
information which may be broadcast and will
download this to your receiver automatically. This
operation will normally take approximately 30
minutes.
Page 16
15
8.1.8. TV SETTINGS
8.1.8.1. TV TYPE
Digital terrestrial television channels can broadcast programmes in a widescreen format which must be output
differently to normal and widescreen TV sets. This function tells the receiver the screen format of the TV
connected so that broadcasts are displayed correctly. Highlight the TV Type line in the Configuration menu and
use the “◄ / ►” buttons to select “4:3” if you have a standard TV set connected or “16:9” if it is a widescreen
TV. This function duplicates the selection made at the time of first installation and can be used if you change TV
sets.
8.1.8.2. DISPLAY FORMAT
Use “▲ / ▼” button to select Display Format and then press “◄ / ►” button to set this setting as Auto, Letter Box or Pan &
Scan for 4:3 tv set and Auto, pillar box, zoom for 16:9 tv set.
8.1.8.3. TV OUT
The receiver can output RGB, CVBS and YPbPr signal from the TV SCART on the rear panel. Although the
RGB format results in a better quality picture. Not all equipment can cope with an RGB signal.
8.1.8.4. HDMI RESOLUTION
This receiver can give HDMI output in 3 different resolutions: 576p, 720p and 1080i from the HDMI connector
on the rear panel. In order to get best picture quality, please check the HDMI resolutions suppo rted by your
TV set and select the most appropriate one from this menu. Note that only stored channels can be watched
over HDMI, not VCR input. This function duplicates the selection made at the time of first installation.
8.1.9. PARENTAL CONTROL
Use “▲ / ▼” buttons to go to “Parental Control” option. Press
OK button to enter the menu. A box asking for the lock button
is displayed. The button is set to “0000” initially. Enter lock
button. If it is incorrect, "Wrong Pin" is displayed. If it is correct,
the Parental Control Menu is displayed.
8.1.9.1. MATURITY LOCK
Use “▲ / ▼” buttons to go to Maturity Lock option. Use “◄ / ►” buttons to toggle Maturity Lock Mode. When
set, this option gets the maturity information from the broadcast and if this maturity level is disabled, does not
show video-audio.
8.1.9.2. MENU LOCK
In menu lock you can set locking for All Menus, or the Installation Menu to restrict access to these menu's. If the
menu lock is disabled, there will be free access to the menu system. Use “/” buttons to go to Menu Lock
option. Use “/” buttons to choose Menu Lock Mode.
DISABLED : All menus are unlocked.
ALL MENUS : All Menus are accessible only with the correct lock button. So the user can’t add, delete,
rename, channels, can’t set timers.
INSTALLATION MENU : Installation menu is locked. So the user can’t add channels. Changes will be updated
after exiting ‘Configuration Menu’.
Page 17
16
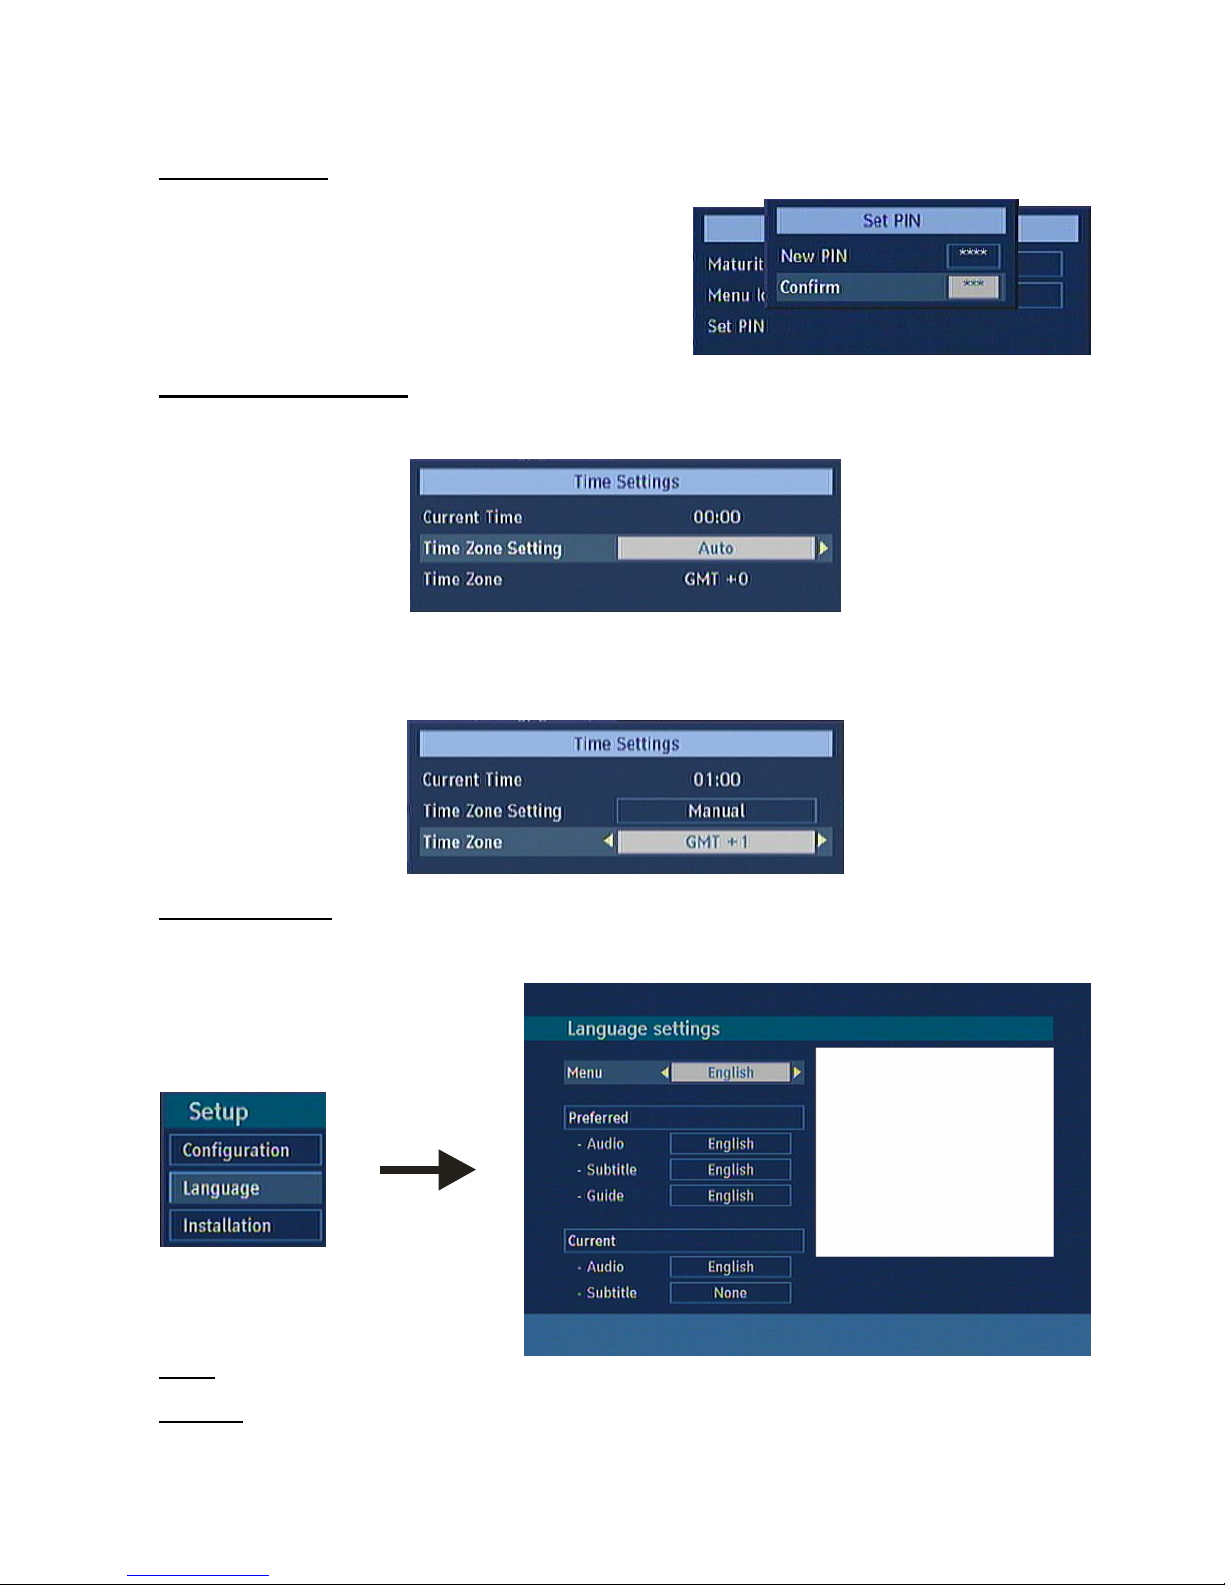
8.1.9.3. SET PIN
Use “/” buttons to go to “Set PIN” option. Press OK to
display the “Set PIN” window. Use NUMERIC buttons to enter
new pin number you will need to input your new pin a second
time for verification purposes. If both pin numbers are four
digits long and the same, the pin will be changed. The factory
default pin number is 0000, if you change the pin number
make sure you write it down and keep it safe.
8.1.10. TIME SETTINGS
Use the “▲ / ▼” buttons to go to the Time Settings option. Press OK button to enter the Time Settings Menu.
In the Time Zone Setting option, if you choose Auto, your default time zone of your country will be set. If you
select Manual, you will be able to define the Time Zone by your own.
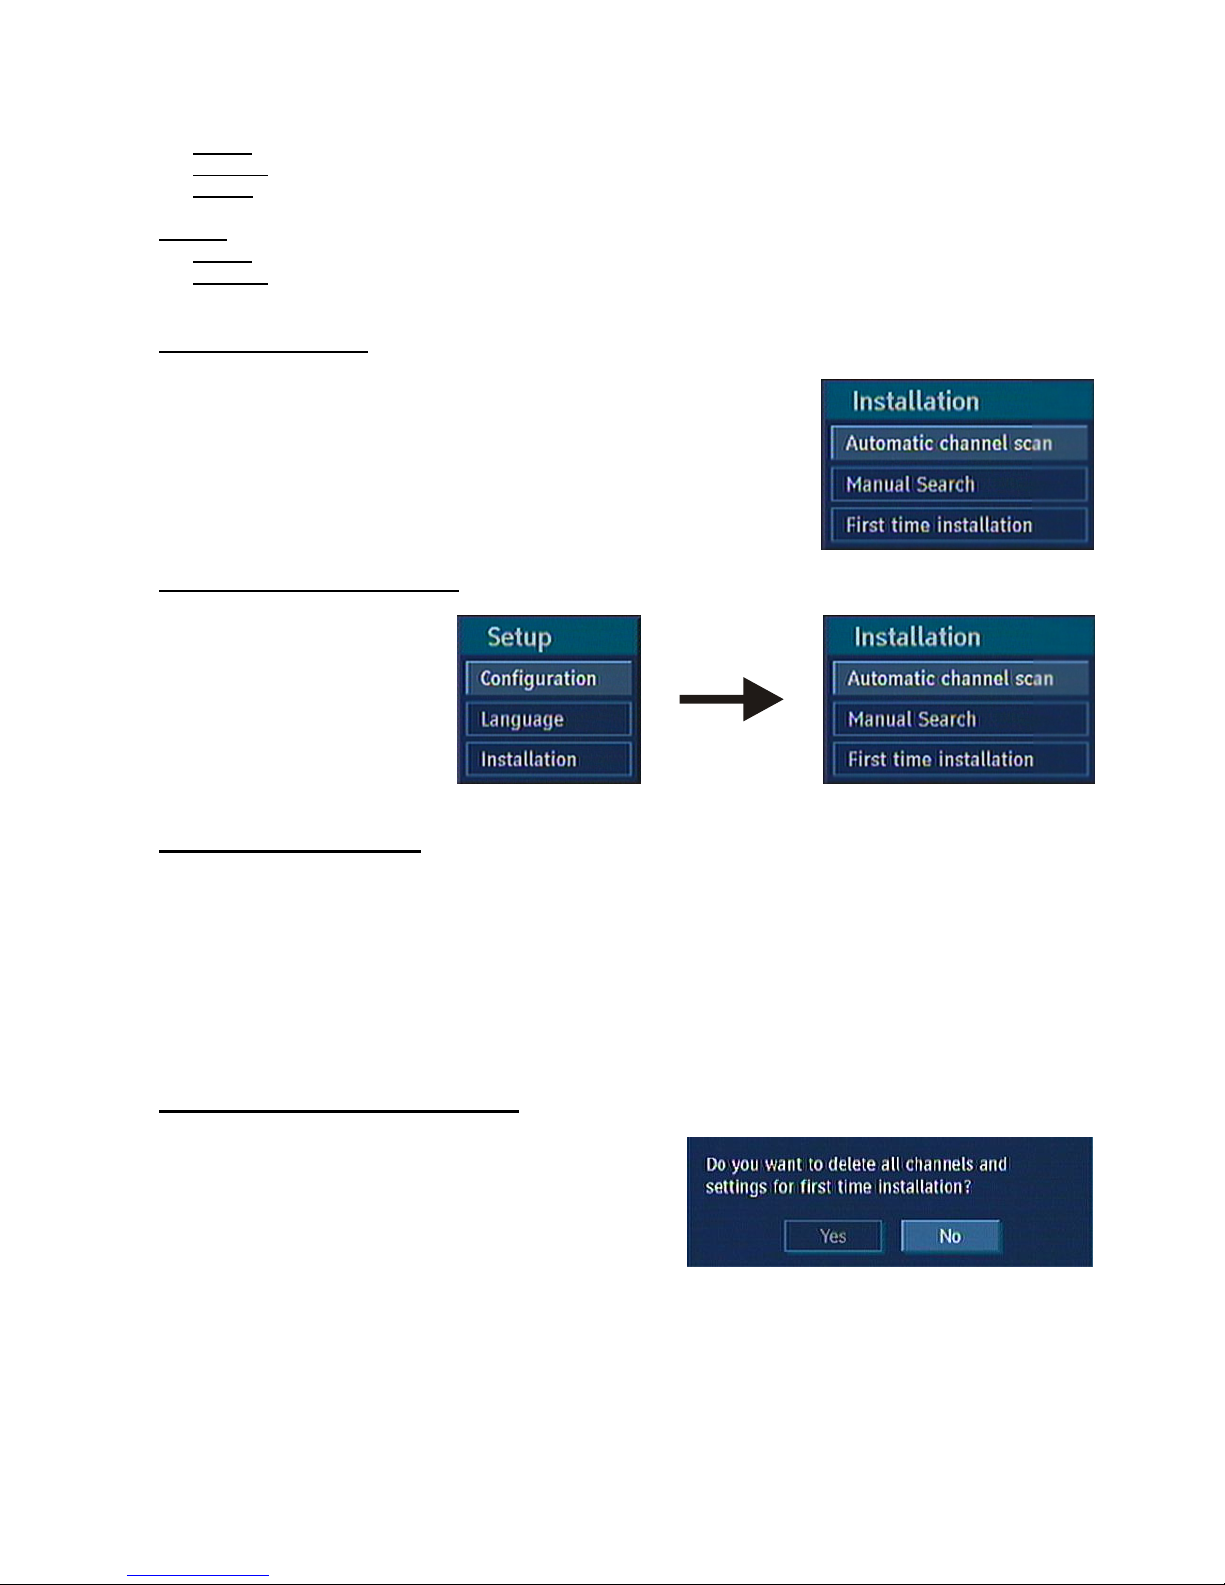
8.2. LANGUAGE
In this menu the user can adjust the preferred language. Language is changed by pressing OK button.
Menu: shows the language of the system
Preferred
These settings will be used if available. Otherwise the current settings will be used.
Page 18
17
Audio: by pressing “/” buttons change the audio language.
Subtitle: alter the subtitle language with“/” buttons. The chosen language will be seen in subtitles.
Guide: by pressing “/” buttons change the guide language.
Current
Audio: if audio language is supported change the audio language by pressing “/” buttons
Subtitle: if subtitle is backed up alter the subtitle language with“/” buttons. The chosen language will be
seen in subtitles.
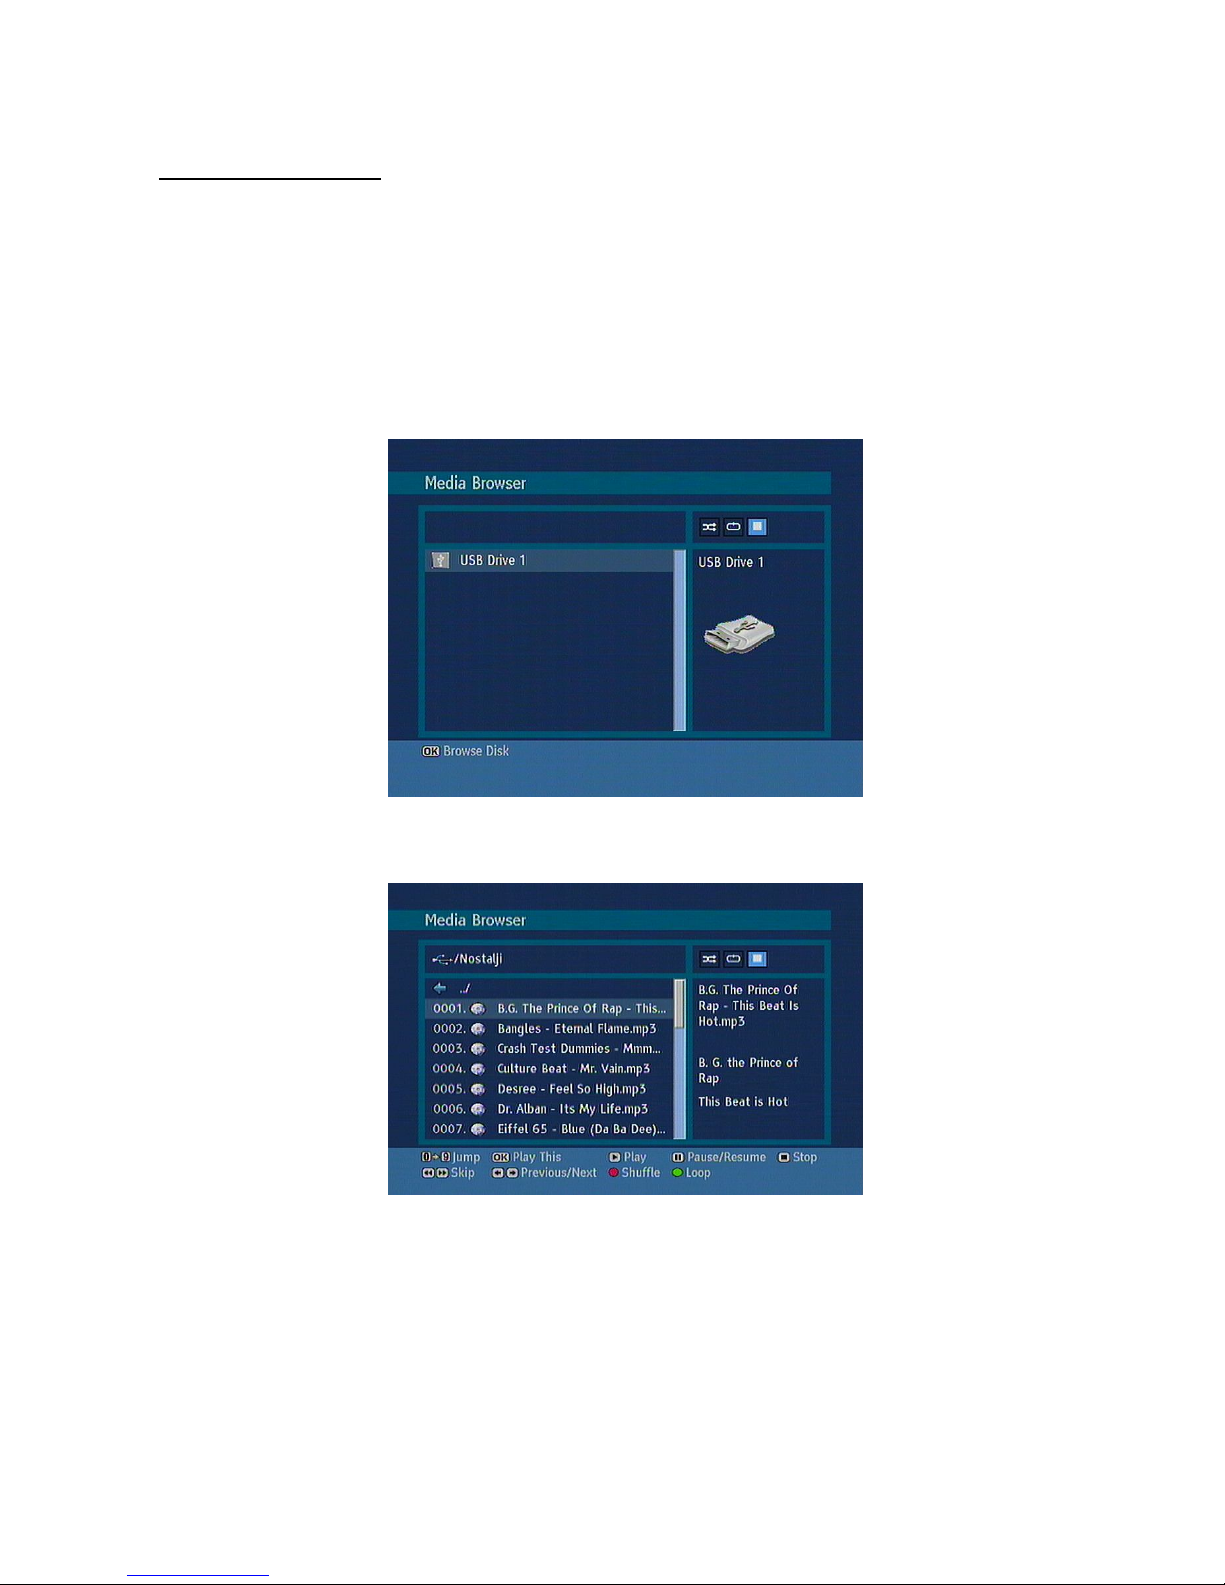
8.3. INSTALLATION
The Installation menu mainly intends to help you for building a Channel Table
into your receiver in most efficient way. These are located in Installation
Menu:
1. Automatic Search
2. Manual Search
3. First Time Installation
8.3.1. AUTOMATIC SEARCH
Automatic search is started by
selecting OK in the auto-search
pop up menu. All the multiplexes
are searched and a channel table
is created automatically. Any
existing channels will be erased.
All channels found are stored in a
sorted form with respect to their
channel numbers.
8.3.2. MANUAL SEARCH
After the OK button is pressed, in Installation Menu, the Manual Search window appears on the screen. Manual
search can be done in 2 different ways.
1.Channel search:
Only Channels can be searched. Enter the number by using the numeric buttons and press OK to commence.
2.Frequency search:
Channels can be searched according to their frequencies. Enter the number via numeric buttons and press OK
to begin.
8.3.3. FIRST TIME INSTALLATION
The user can use this item to load default settings, which had
been loaded to the receiver at the factory. To install factory
settings, highlight ‘First Time Installation’ menu and press OK
button, then you will be asked to confirm for deleting all
channels and settings. By selecting YES and pressing the
OK button, the whole channel table will be deleted. After the
factory settings are loaded, ‘First Time Installation’ will begin.
Page 19
18
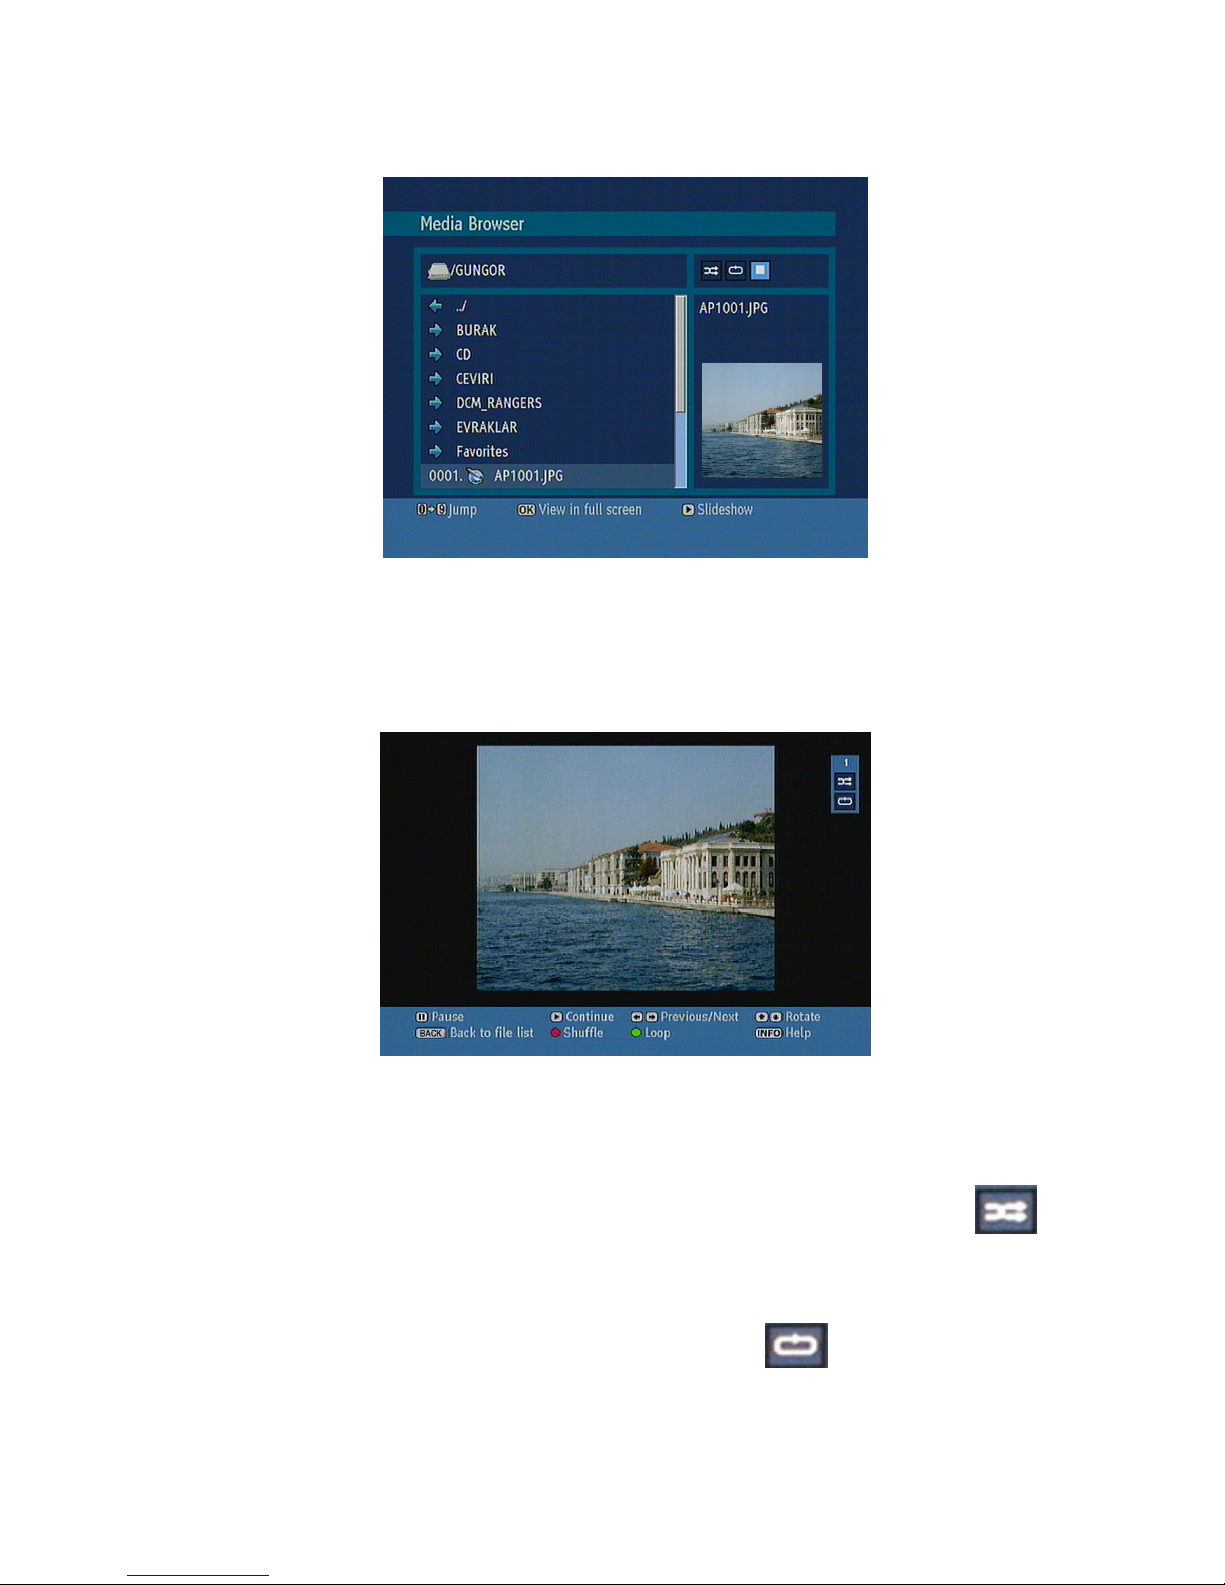
9. MEDIA BROWSER
You can play the MP3 and JPEG files from a USB / MEMORY CARD device like memory stick, multiple card
reader etc. When you connect a USB / MEMORY CARD device, the receiver recognizes it automatically and
displays USB Drive 1, USB drive 2 etc. icons on screen. Which device you want to use, please highlight it using
direction buttons and press OK button.
Note: Some USB / MEMORY CARD compliant devices may not be supported.
Note: If USB / MEMORY CARD device is not recognized after power off/on or First Time Installation, first, plug
the USB / MEMORY CARD device out and power off/on the box. Plug the USB / MEMORY CARD device in
again.
Playing Media Files:
Play This plays the selected file.
Play This+Loop plays the selected file repeatedly.
Play+Loop plays all media files starting with the selected file repeatedly.
Play+Loop+Shuffle plays the files randomly. If shuffle mode is enabled previous/next functions will also jump
to the tracks randomly.
Play plays all media files in the folder starting with the selected one.
Pause/Resume Pause and resume playing file.
Stop Stop the playing file.
Skip skip the playing file forward and backward.
Previous/Next jumps to previous or next file to play.
Page 20
19
Viewing JPEG Files
Jump jump to selected file using the numeric buttons.
OK view the selected picture in full screen.
Play / Slideshow start to slideshow with all pictures in the folder.
Slideshow Options:
Pause (Pause button) Pause the slideshow.
Continue (Play button) continue with the slideshow.
Previous/Next jump to previous or next file of slideshow.
Rotate rotate the picture using up/down buttons.
BACK back to file list.
Shuffle shows the files randomly and continuous in current folder and
icon turns the highlighted icon. If during a slideshow the shuffle mode is
enabled, the next pictures will be choosen randomly (If the loop function is
not enabled, the slideshow will stop at the end. If the loop function is
enabled, after the slideshow ends, it will start again and again).
Loop slideshow goes on continuously and icon turns the highlighted
icon.
Info activate the operations bar.
Page 21
20
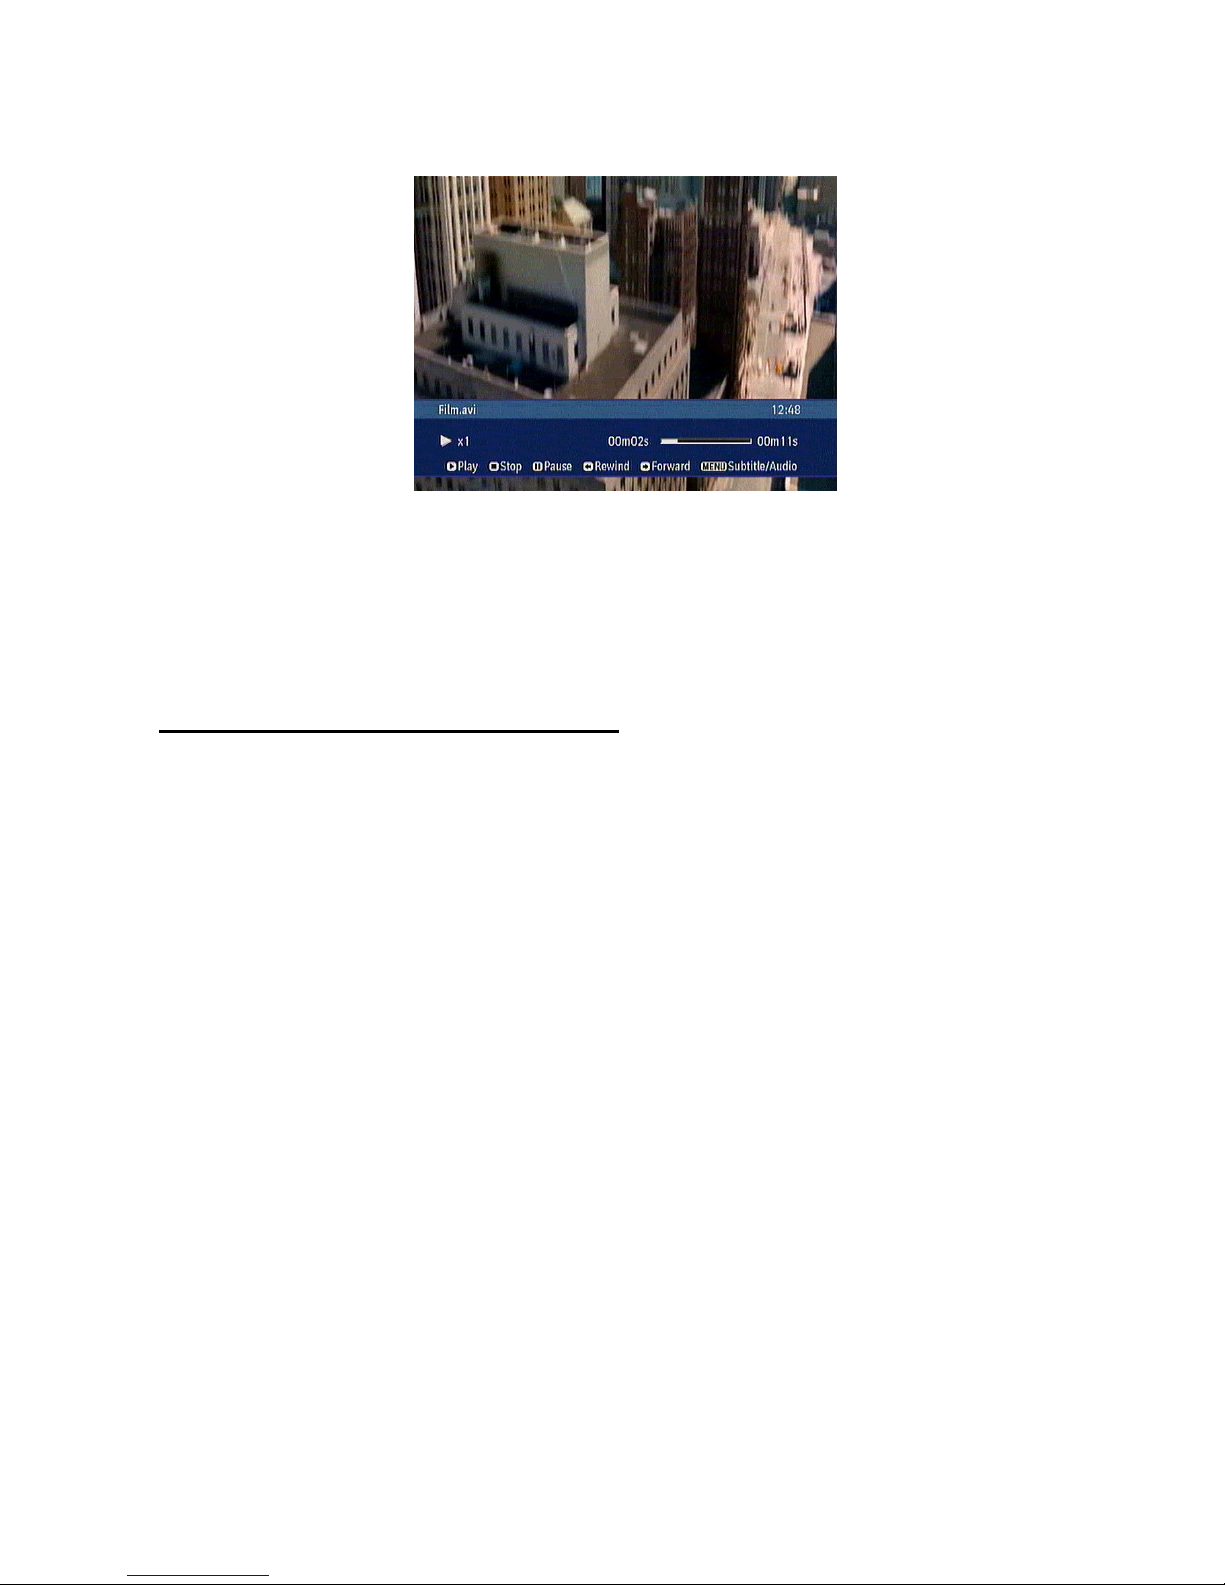
Divx Options:
Play begins with the playback of the file.
Stop stops the playback of the file.
Pause pauses the playback of the file.
Rewind pressing the left arrow button fast rewinds the file (x1, x2, x4, x8 and x16).
Forward pressing the right arrow button fast forwards the file (x1, x2, x4, x8 and x16).
MENU back to file list.
10. SOFTWARE UPGRADE THROUGH USB
Software upgrade is possible via USB disk by folowing the steps below.
1. Copy the bin file, including higher version than the software loaded in flash, into the USB flash memory
root directory. This file should be named upgrade.bin.
2. Insert the USB disk.
3. Digital module performs version and CRC check. If version and CRC check is successful, then a
message prompt appears to notify user about new version. If the user confirms loading of new version,
upgrade.bin file is written into flash unused slot.
4. Digital module disables the previous software in the flash and then a system reset is performed.
5. After the reset, digital module starts with new software.
Page 22
21
11. MESSAGES
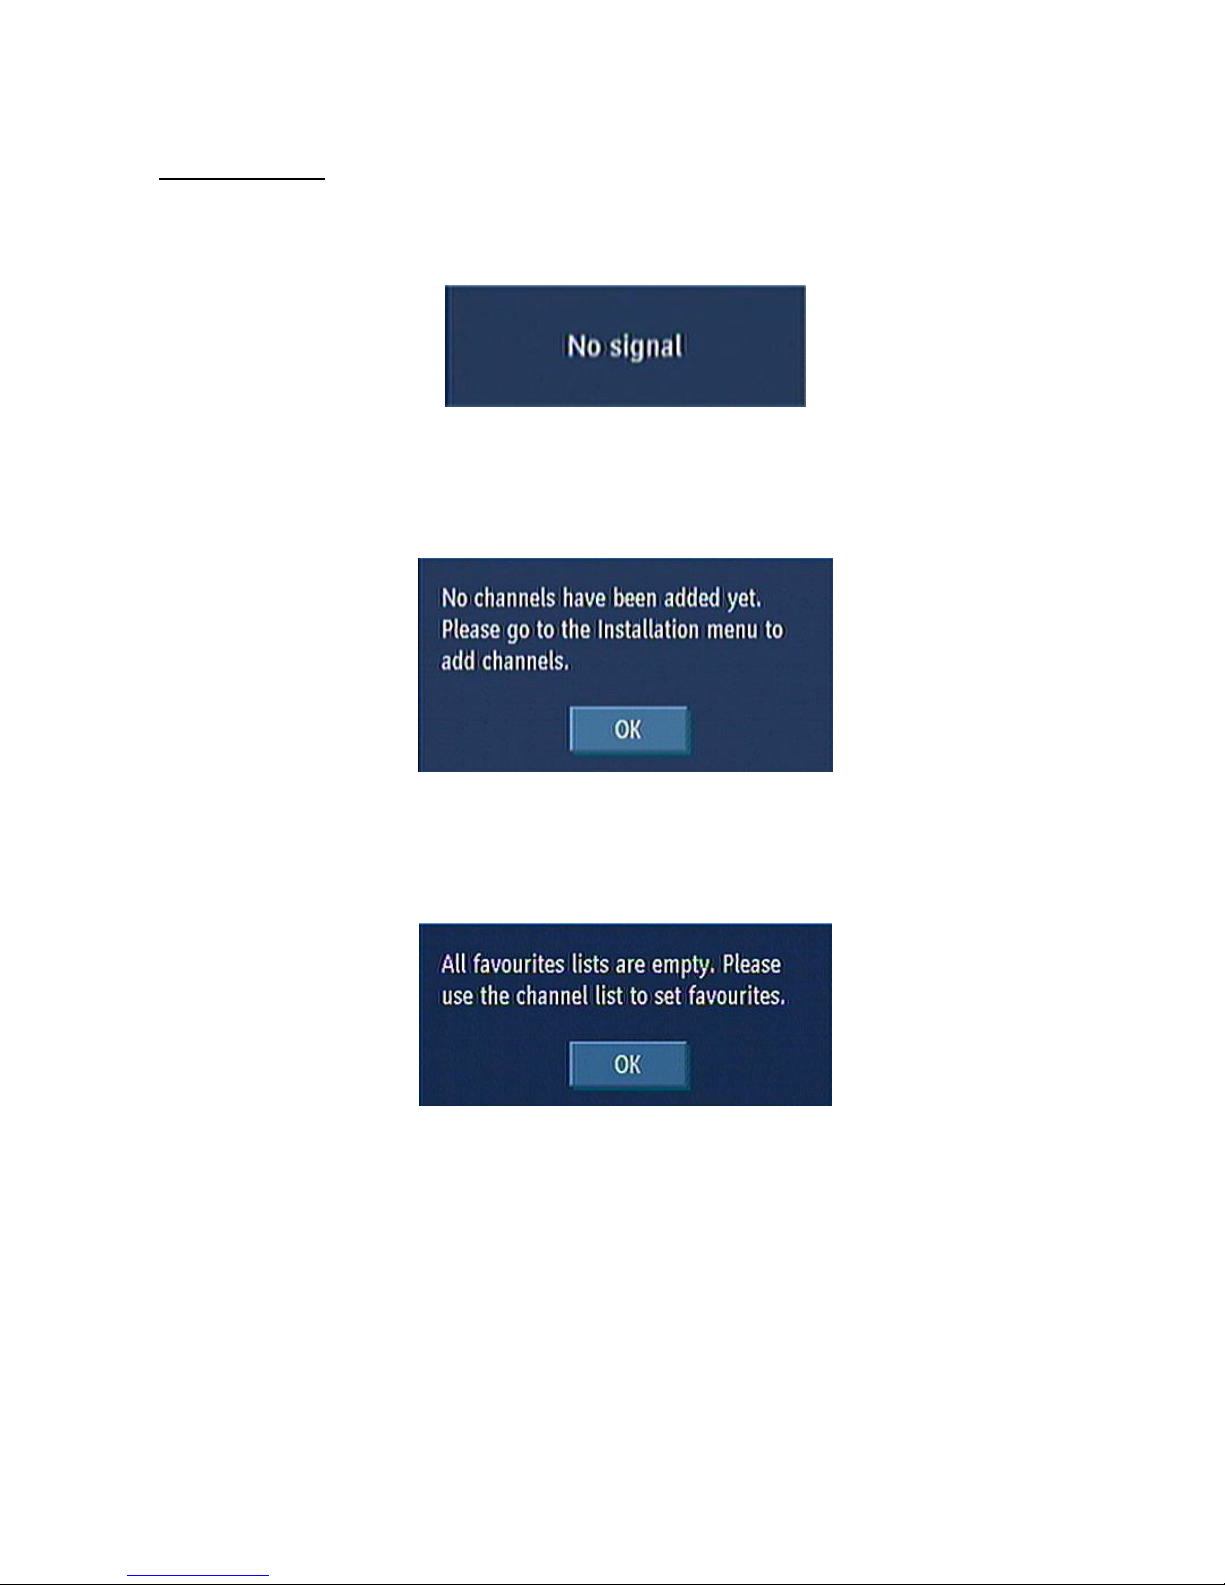
When the box receives no signal (e.g. the antenna cable is disconnected), “NO SIGNAL” message is seen on
the screen.
When there is no channel stored in the box, Timer Menu, Channel Table Menus are not accessible. Channel
navigation is not allowed. Therefore, trying to enter these menus or do channel navigation will display a warning
message on the screen.
When there is no menu on the screen, you can switch between Favourite Lists using the FAV. button. If the
favourite list is empty, following warning message is displayed:
Page 23
22
12. CHANNEL NAVIGATION
Channel “P+/P-” Buttons: Pressing “P+/P-” buttons will help you to go to the next or the previous channel in
the list.
Numeric Buttons: Pressing a number button will activate a small digit entry window on the left upper corner of
the screen. After a digit is entered, the box will wait for 2 seconds till you enter another digit. If no digit is entered
during these 2 seconds, then the box will switch to the entered number channel.
If a number that is greater than the maximum number of channels is entered, the box will switch automatically to
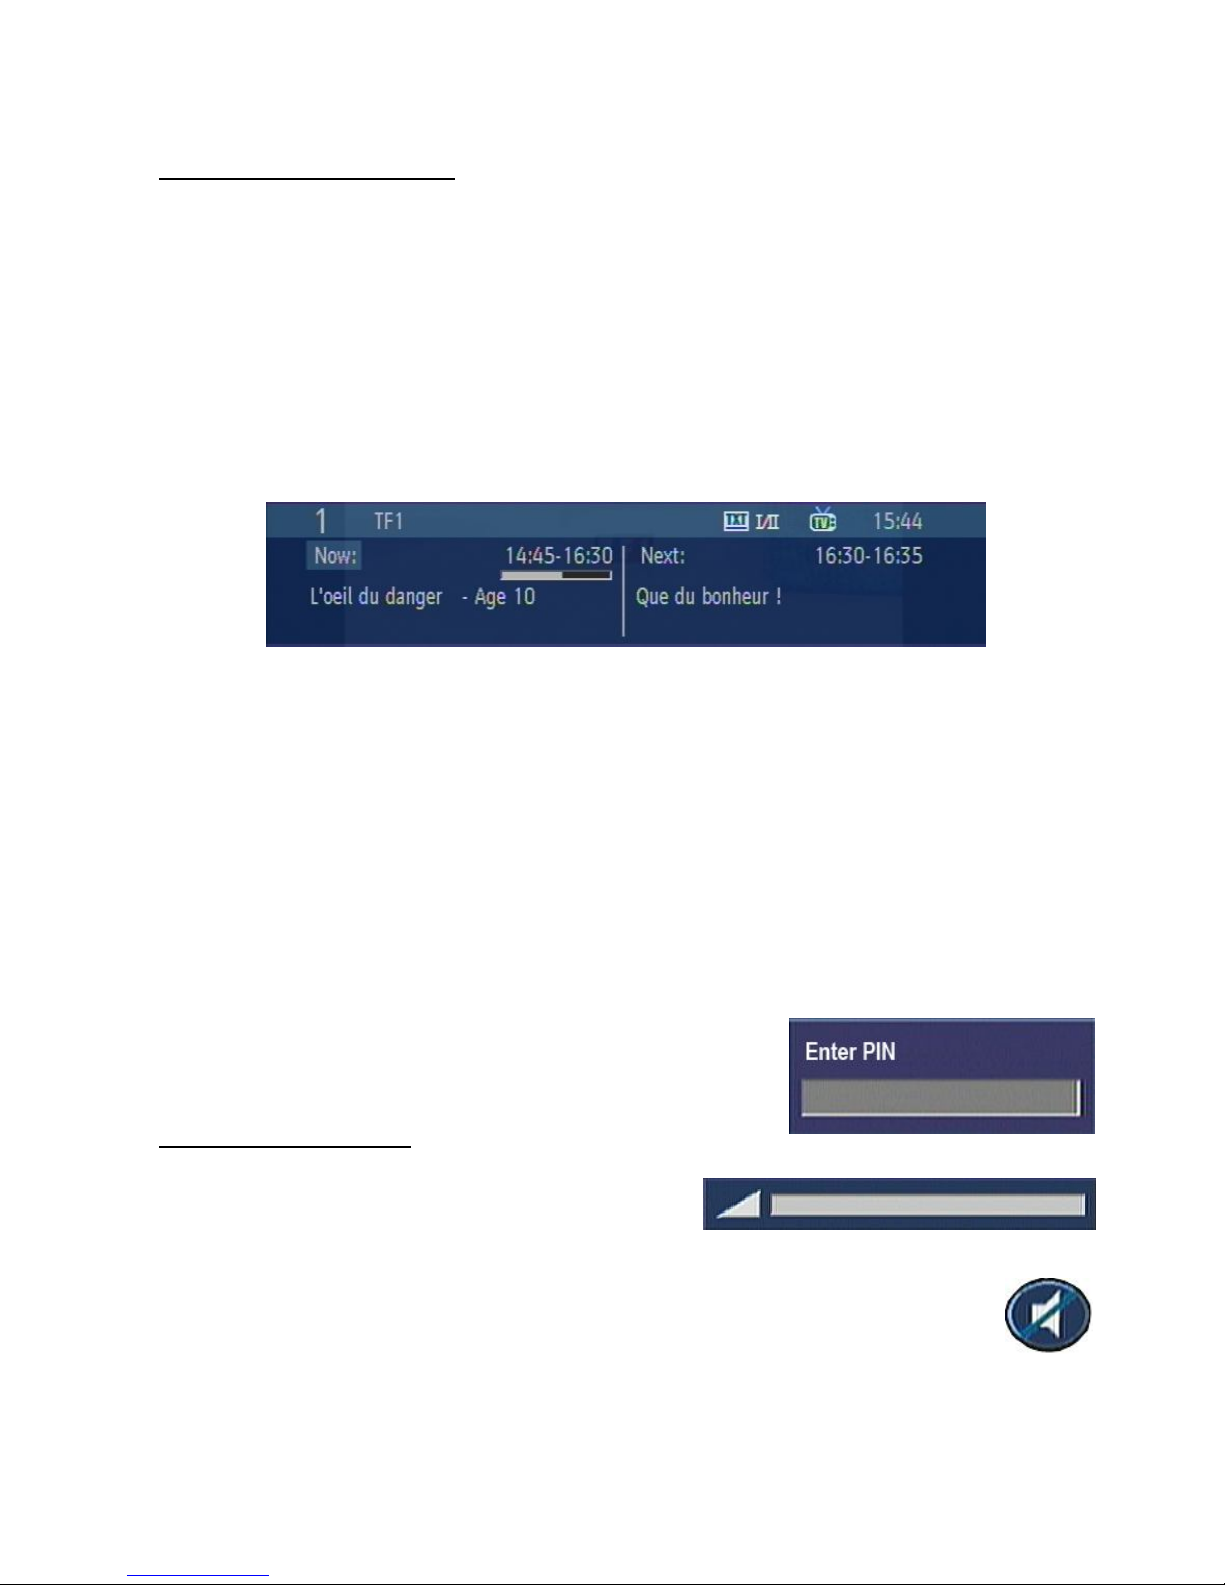
the last channel. Each time the box switches to the desired channel, an information window is displayed on the
lower part of the screen. The small bar on top right of the banner indicates the current signal quality.
When INFO button is pressed, and when changing channels the information window is displayed on the lower
part of the screen. The small bar indicates the program duration. On the channel info window there are:
Current event name next event name, and their start and end times.
Program duration bar.
Program mode (TV or Radio).
Channel number.
Name of the channel.
The second press of the info button brings up a box containing a brief description of the currently viewed
programme.
You can now use the > button to change the programme description to that of the next programme on the
current channel.
On a blank screen, if you press the up/down buttons, the info banner will appear and you can switch between
channels saved in the list. To watch one of them, press the OK button. If you press the INFO button, you will
switch to the last watched channel and the info banner will be closed.
When switching to a locked channel (channel), lock code is requested via
a window as shown in the picture. Only after the correct code is entered,
it is allowed to access to this channel. To skip this channel, Channel
“P+/P-”buttons must be used.
13. VOLUME CONTROL
When “V+ / V-” buttons are pressed, a banner is displayed, this
shows the present volume level graphically. By keeping these
buttons pressed, the sound can be increased with “V+” or
decreased “V-“ button.
When the MUTE button is pressed, a mute symbol is displayed on the screen. This symbol will
disappear in 3 or 4 seconds after the MUTE button is pressed. The mute symbol is not displayed on
the screen in case of any menu displayed.
Page 24
23
14. TROUBLESHOOTING GUIDE
TROUBLE POSSIBLE REASONS WHAT TO DO
The standby led is not lit. Mains cable is not connected.
Check if the mains cable is plugged
into the power socket.
No picture or sound. No signal or weak signal.
Check the signal cable and scart
connectors.
The settings you have done in the
menus have not been changed.
The digital set-top box was
unplugged without first going to
standby.
Before unplugging your digital set-
top box, wait for going to standby.
The remote control is not working.
The digital set-top box is in
standby.
Remote control is incorrectly
aimed.
Battery exhausted.
Press the standby button
Check if nothing blocks the front
panel.
Change the batteries.
You have forgotten any channel
lock code.
Start first time installation. After then,
the lock will be removed.
After you turn the receiver to
Standby mode, please note that
you have to wait 10 seconds,
before you turn it on again.
Video is ok for HDMI output, but
audio is not ok.
Because of HDMI line is crashed.
Unplug and plug TV and STB at the
same time.
Please do not use a normal passive
antenna (do not short circuit the
ANT IN connector) while Antenna
Power Supply setting is ON. This
may cause breakdown in your
DVB-T receiver.
Page 25
24
15. TECHNICAL SPECIFICATIONS
GENERAL
Supply Voltage : 220 - 240 V AC, 50-60Hz
Input Frequency : 174MHz - 862 MHz
Power consumption : 16 W (max)
Active antenna output : 5 V
Operating temperature : 5ºC to +40ºC
Storage temperature : -20ºC to +70ºC
Humidity : 25 to 75 % rel
Physical dimensions : 295x170x40 mm
Weight : 900 g
Standby Low Power Consumption (Optional) : Less than or equal to 1 W
DIGITAL CAPABILITIES
Transmission Standards: DVB-T, MPEG2
DVB-T, MPEG4
i. DEMODULATION
Symbolrate: COFDM with 2K/8K FFT mode.
Modulation: 16-QAM - 64-QAM FEC for all DVB modes (automatically found)
ii. VIDEO
H.264 (MPEG-4 part 10) main and high profile level 4.1/MPEG-2 MP@HL video decoder.
HD display multi format capable (1080i, 720p, 576p)
- HDMI encoded output one standart definition display
- Analogue SD output: RGB and CVBS
iii. AUDIO
MPEG-1 layer I/II, MPEG-2 layer II, MPEG-2 AAC, MPEG-4 AAC
Sampling frequencies supported are 32, 44.1 & 48 kHz
REMOTE CONTROL
Operating Distance : 10m Max.
Batteries : 2x1.5V (R-03/AAA)
TV SCART
Video output : Composite video signal; 1 Vp-p±3dB/75
Audio output : 2 Vrms / Z = 10k
Function switching : 12V / 6V for 4:3 / 16:9 / Z = 10k
Page 26

25
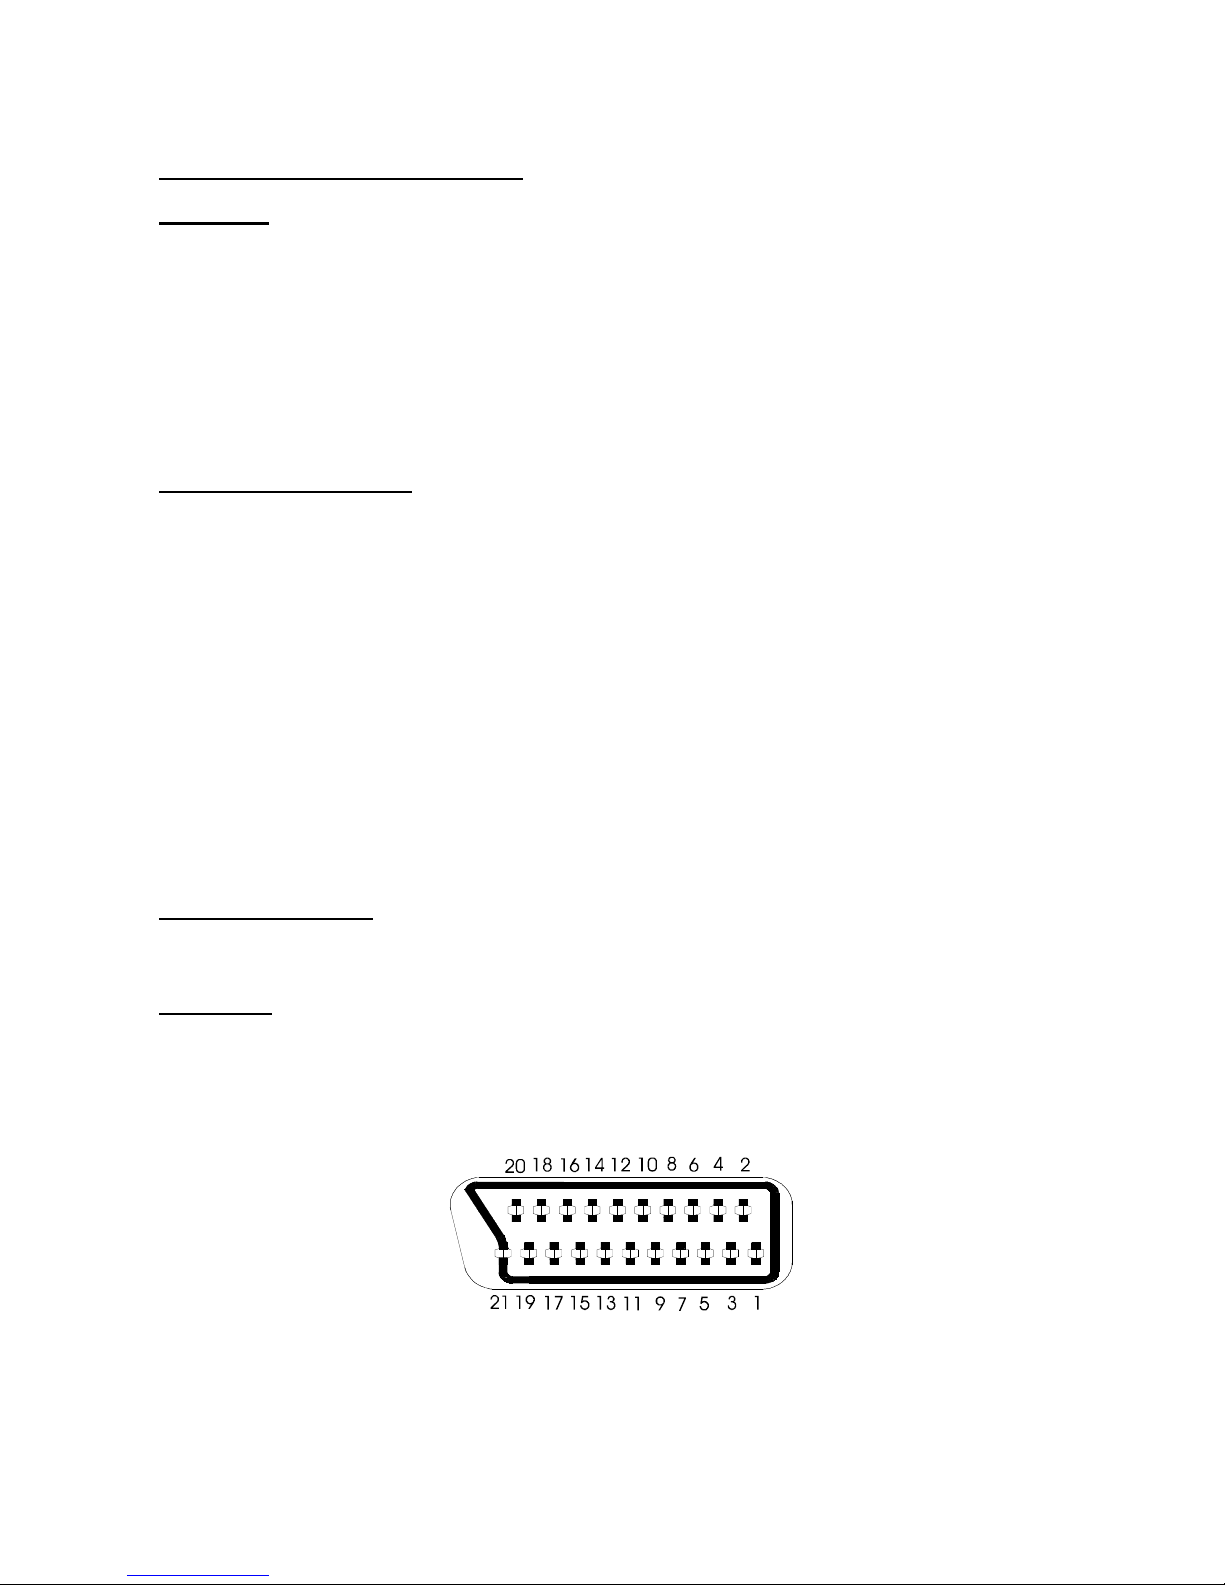
TV SCART SOCKET
PIN SIGNAL PIN SIGNAL
1 Audio Right Output 12 TX
2 Audio Right Input 13 GND
3 Audio Left Output 14 GND
4 GND 15 RED Output
5 GND 16 Fast Blanking Output
6 Audio Left Input 17 GND
7 BLUE Output 18 GND
8 Function Switching Output 19 CVBS Output
9 GND 20 CVBS Input
10 RX 21 GND
11 GREEN Output
HARDWARE CONFIGURATION
Main Processor : ST Micro STx7101
Flash Memory : 8 Mbyte
SDRAM : 4 X 32 Mbyte (128 MB)
Demodulator : ST Micro STV0362
Page 27

ENG
Following information is only for EU-member states:
The use of the symbol indicates that this product may not be treated as
household waste. By ensuring this product is disposed of correctly, you will
help prevent potential negative consequences for the environment and
human health, which could otherwise be caused by inappropriate waste
handling of this product. For more detailed information about recycling of
this product, please contact your local city office, your household waste
disposal service or the shop where you purchased the product.
 Loading...