Waldorf Edition User Manual
User Manual
Attack
D-Pole
PPG Wave 2.V

Waldorf Edition
User Manual 2 Waldorf
Waldorf Music will not be liable for any erroneous information contained in this
manual. The contents of this manual may be updated at any time without prior notice. We have made every effort to ensure that the information herein is accurate and
that the manual contains no contradictory information. Waldorf accepts no liabilities
in regard to this manual other than those required by local law.
This manual or any portion of it, may not be reproduced in any form without the
manufacturer's written consent. All product and company names are or ® trademarks of their respective owners.
© Waldorf Music GmbH, Lilienthal Str. 7, D-53424 Remagen, Germany
www.waldorfmusic.de
Programming: Jürgen Fornoff, Wolfram Franke, Giuliano Orsini, Stefan
Stenzel
AAX Porting: Thomas Rehaag
Grafic Design: Design Box, Wolfram Franke, Steinberg Soft- and
Hardware GmbH
Manual/Layout: Holger Steinbrink
Sound design and beta testing:
Holger Bahr, Volker Barber, Raymund Beyer, Mert Ergün, Wolfram Franke, Christian
Halten, Axel Hartmann, Jörg Hüttner, Arnd Kaiser, Dirk Krause, Till Kopper, Peter
Kuhlmann, Sascha Kujawa, Dominik De Leon, Hubertus Maas, Dr. Georg Müller,
Michael Johnson, Mark Pulver, Jörg Schaaf, Marcus-S. Schröder, Henry
Stamerjohann, Sven Steglich, Holger Steinbrink, Stefan Stenzel, Wolfgang Thums
Many thanks to Christian Bacaj, Karsten Dubsch, Willie Eckl, Joachim Flor, Michael
von Garnier, Frank Schneider, Kurt “Lu” Wangard, 吴海彬 and anyone we have
forgotten.

Waldorf Edition
User Manual 3 Waldorf
Installation of the Waldorf Edition
System Requirements for Windows
In order to be able to use the Waldorf Edition, you will need at least:
A PC with a Pentium IV or AMD Athlon 1 GHz processor or better, we recom-
mend a fast CPU.
64 MB free RAM.
Windows XP or newer.
VST 2.4 compatible host application such as Steinberg Cubase or newer. This
must be correctly installed on your computer.
or
AAX compatible host application such as Pro Tools 10. This must be correctly in-
stalled on your computer.
w Please also observe the system requirements of your host application!
w The Waldorf Edition runs within 32 bit as well as 64 bit host applications.
Installation under Windows
Installation from CD-ROM:
1. Start your computer and launch your operating system. Insert the Waldorf Edition
CD-ROM into your DVD/CD-ROM drive. If you have enabled the Autostart function
in Windows, the Installer will start automatically and you can proceed with Step 5
below. If not, please proceed as follows:
2. Launch the Explorer or open the window “My Computer”.
3. Double click on the icon for the drive that holds the Waldorf Edition CD-ROM.
4. Double click on the Waldorf Edition Installer icon. This launches a special installation program.
5. Follow the on-screen instructions.
6. After installing the Waldorf Edition you will have to activate the program on your
computer. Please refer to the chapter “Activation of the Waldorf Edition”.
Installation of a Downloaded Installer File:
1. Refer to the folder where the downloaded Waldorf Edition zip archive is located.
2. Double click on the archive file to extraxt it.
3. Double click on the Waldorf Edition Installer icon. This launches a special installation program.
4. Follow the on-screen instructions.
5. After installing the Waldorf Edition you will have to activate the program on your
computer. Please refer to the chapter “Activation of the Waldorf Edition”.

Waldorf Edition
User Manual 4 Waldorf
System Requirements for Mac OS X
In order to be able to use the Waldorf Edition, you will need at least:
Mac with 1.5 GHz Intel processor or better.
Mac OS X 10.6 or newer.
128 MB of free RAM.
VST 2.4 compatible host application or a VST3 compatible host application such
as Steinberg Cubase. This must be correctly installed on your computer.
or
An AudioUnit 2.0 compatible host application such as Apple Logic or Garage-
Band. This must be correctly installed on your computer.
or
An AAX compatible host application such as Pro Tools 10. This must be correctly
installed on your computer.
w Please also observe the system requirements of your host application!
w The Waldorf Edition runs within 32 bit as well as 64 bit host applications.
Installation under Mac OS X
Proceed as follows to install the Waldorf Edition:
Installation from CD-ROM:
1. Quit all other applications so that you return to the Finder. Disable any system activity monitoring software or extension. Then insert the Waldorf Edition CD into your
computer’s DVD/CD-ROM drive.
2. If required, double click on the Waldorf Edition icon to open the CD window.
3. Double click on the Waldorf Edition Installer icon to load the installation software. Follow the instructions on the screen.
5. After installing the Waldorf Edition you will have to activate the program on your
computer. Please refer to the chapter “Activation of the Waldorf Edition”.
Installation of a Downloaded Installer File:
1. Refer to the folder where the downloaded Waldorf Edition archive is located.
2. Double click on the archive file to extraxt it.
3. Double click on the Waldorf Edition Installer DMG icon. This launches a special
installation program.
4. Follow the on-screen instructions.
5. After installing the Waldorf Edition you will have to activate the program on your
computer. Please refer to the chapter “Activation of the Waldorf Edition”.

Waldorf Edition
User Manual 5 Waldorf
Activation of the Waldorf Edition
The Waldorf Edition uses a copy protection system based on the users email adress
as well as a personalized serial number.
Proceed as follows to activate the Waldorf Edition:
1. Start your host application.
2. Load one of the Waldorf Edition plug-ins, no matter what plug-in.
3. An input field occurs. In the upper field, please enter the email adress that was
used for purchasing the Waldorf Edition. In the lower field, please enter the 20 digit
serial number which you have received with your purchase.
w If you own the Waldorf Edition CD version, please contact our support to re-
ceive a corresponding serial number: support@waldorfmusic.de
4. Click on the OK button to confirm your data. From now on, the waldorf Edition is
authorized for this computer.
w If you want to use the Waldorf Edition on other computers, please proceed in
the same way as described above.
Waldorf Edition
User Manual 6 Waldorf
Waldorf Attack Percussion Synthesizer
Introduction
The Waldorf Attack offers a straightforward sound structure that faithfully emulates a
wide range of percussion sounds, from those of well-known classic drum or rhythm
generators to new, unique drum sounds such as bass drums and snare drums over
shakers as well as heavily modulating synth effects. In addition, the Attack offers
ways to create amazing bass and lead sounds.
To understand how to create these sounds, you should know a little about how the
classic drum machines worked. Basically, those drum machines had special analog
circuitry for each drum sound they could produce. These analog circuits were often
built in a very strange manner, sometimes consisting only of a handful of filters
without any kind of oscillator or envelope, or perhaps simply a noise generator with
one envelope. Each was made to create just one particular drum sound in a more or
less authentic way. But it was just this assertiveness and distinctiveness of character
which are responsible for the fame and popularity of these sounds that endures
today.
For the coming Millennium, the Attack will continue this story!
Besides the regular manual, the following sections offer some insights as to how particular sounds were built, and give information about how to achieve similar results
with the Waldorf Attack.

Waldorf Edition
User Manual 7 Waldorf
Content Attack
Introduction ........................................................... 6
Using the Attack .................................................... 8
Audio Channels of the Attack .................... 8
Loading Banks and Kits ............................. 8
Storing Banks and Kits ............................... 8
Selection of a Kit ....................................... 9
Selection and Naming of Sounds ............... 9
Playing the Attack Live ............................ 10
The Solo Function of the Attack .............. 10
Functions of the Edit Menu ...................... 10
Functions of the Preset Menu .................. 11
MIDI Functions ....................................... 11
Playing the Attack Polyphonically ........... 11
MIDI Control of the Attack ...................... 11
Special Function Modulation Wheel ....... 12
Controlling through the RemoteSL ........... 12
Polyphony of the Attack .......................... 13
The Controls ........................................... 13
Key Combinations ................................... 14
The "Automatic" Keyboard ...................... 14
The User Interface of the Attack ........................ 15
Oscillator Section .................................... 15
Mixer Section .......................................... 18
Filter Section ........................................... 19
Amplifier Section .................................... 23
Delay Effect Sections ............................... 24
Envelopes ................................................ 26
Programming Drum Sounds .............................. 27
MIDI Controller List ................................ 32

Waldorf Edition
User Manual 8 Waldorf
Using the Attack
You can play the Attack via MIDI like any other instrument, and record what you
play on a MIDI track. To make sure, press a key on your MIDI keyboard. You should
now hear a sound. If you don’t hear anything, determine first whether your host application receives MIDI data at all. If you notice considerable latency times (delay)
when you play the Attack via MIDI, please read the chapter "Playing the Attack
Live".
If you don’t want to play the Attack exclusively from the integrated screen key-
board, make sure that your host application receives MIDI data that you generate
from your external MIDI Master keyboard.
To activate the Attack as a virtual instrument please consult the corresponding
documentation of your host application.
Audio Channels of the Attack
The audio signals that are created by a virtual instrument are automatically routed to
the Channel Mixer of your host application. Open this mixer. For each open Attack
plug-in, you find six stereo channel strips in the Channel Mixer. These are named
„Atk 1L“, „Atk 1R“ through „Atk 6L“ and „Atk 6R“ (note that some hosts only show
the names of the left channels). By using the Output parameter in the Amplifier section, you can assign the audio signals to any of the output channels.
Using the Channel Mixer, you can comfortably mix the signals created with the Attack and treat them in the same manner as audio tracks. You can apply EQ, effects,
or other external studio gear, and process the audio in diverse ways.
If needed, you can transform any or all Attack tracks into an audio file. To do this,
simply use the “Export Audio” function of your host application. Please find more
information in the corresponding documentation.
w To get the most out of the Attack, please make sure that you use the latest soft-
ware version of your host application.
Loading Banks and Kits
An Attack (drum-) Kit consists of 24 different sounds. The Attack comes with several
preset kits, created by renowned sound designers.
A Bank consists of 16 complete kits, each with 24 sounds.
You can load complete banks or single kits. For information on loading, please read
the corresponding manual section of your host application.
When you use the Attack as AudioUnit on the Macintosh, you can only play the first
kit of a loaded bank. You can, however, copy individual sounds from one of the other 15 kits to the first kit through the Preset menu, if you have loaded a bank that
contains 16 kits.
Storing Banks and Kits
In the Attack, you can save both single kits or a complete bank.

Waldorf Edition
User Manual 9 Waldorf
You can save complete banks or single kits. For information on saving, please read
the corresponding manual section of your host application.
When you save your song or project file, the following information is saved with it:
The number of Attack modules used in the song.
Which banks and kits were used.
The changed settings of edited sounds are also stored.
w However, if you wish to use the edited version of a program in another song,
then you must save that kit manually before.
Importing VST or AudioUnit Presets into the corresponding plug-in format (Macintosh only)
VST and AudioUnit use different formats to save the plug-in data. If you had created
a kit in a VST host and want to use it in an AudioUnit host (or vice versa), please
proceed as follows:
Save the kit in the original host as a single Preset or Program. In VST hosts, those
files typically have the suffix „fxp“, in AudioUnit hosts they are called „aupreset“.
Quit that host and start the other host that supports the corresponding plug-in
format. Open an instance of the plug-in.
Select „Import File...“ in the „Edit“-menu of the plug-in editor.
Select the file to import from the Open dialog.
Confirm the selection with OK.
The Preset or Program is loaded and can be played as usual.
Selection of a Kit
To select a kit from a bank, please read the corresponding chapter in the manual of
your host software.
w AudioUnits (Macintosh only) only support the first kit natively. The other kits of
a bank are stored and loaded anyway but you should avoid to use them because AudioUnits don’t support anything like „Program Changes“.
Selection and Naming of Sounds
To select a sound from a kit, please proceed as follows:
Click on the Sound selector button on the left hand side of the plug-in.
You will hear the chosen sound. If you want to disable this, hold down the shift
button on your computer keyboard while selecting the sound.
To (re-) name a sound, please proceed as follows:
Hold down the [Alt] key on your computer keyboard while selecting a sound.
Now you can enter a new name.

Waldorf Edition
User Manual 10 Waldorf
Playing the Attack Live
If you notice considerable latency times (delay) when you play the Attack via MIDI,
then the sound/audio card that you use and/or its driver is the source of the problem.
If the problem occurs within your system and recording by playing in real time is
important to you, then it is recommended that you replace your sound card and its
driver with a fast audio card and an ASIO driver (or CoreAudio driver for Mac OS X)
that have been optimized for the shortest possible latency time. When playing back
Attack data from a MIDI Track, latency does not occur.
The Solo Function of the Attack
With the Solo button in the upper left corner of the plug-in, you can listen
to a sound by itself. This is helpful if you want to listen to one particular
sound while triggering different sounds with the sequencer. All other sounds are muted when this function is active. The Solo button lights up in red when the function is
active. Of course you can choose different sounds while soloing, and only the
selected sound will be heard. To deactivate the Solo function, simply click the button again.
Functions of the Edit Menu
The Attack offers several different functions for convenient organization of kits and
sounds. In the edit menu in the upper left corner of the plug-in you can choose the
following functions:
Import File... (Mac OS X version only) imports a VST or AudioUnit program.
Copy Sound copies the sound into the buffer.
Paste Sound puts the copied sound into any desired place. This is useful when
creating variations of one particular sound.
w Please keep in mind, that the buffer can hold only one sound at a time. As soon
as a second sound is copied with the Copy Sound function, the previously
selected sound is erased from the buffer. After inserting a sound with Paste
Sound, the sound is still in the buffer and can be inserted into yet another position.
Copy Kit copies the kit into the buffer.
Paste Kit inserts the copied kit at any position. This is useful when exchanging
kits between different songs.
With Compare Sound you can compare the edited sound with the original. As
soon as the Compare function is activated, the sound changes back to its original
settings and the Compare function in the edit menu gets a flag. Reselecting the
function brings up the edited version again.
With Compare Kit you can compare the edited drum kit with the original. As
soon as the Compare function is activated, the kit changes to its original settings
and the Compare function in the edit menu gets a flag. Reselecting the function
brings up the edited version again.

Waldorf Edition
User Manual 11 Waldorf
Recall Sound restores the sound to its original saved settings. Use this function if
you’re not happy with the edited sound.
Recall Kit restores the drum kit to its original saved settings. Use this function if
you’re not happy with the edited drum kit.
Functions of the Preset Menu
The Preset menu in the upper left corner of the plug-in offers different entries with
suggested default preferences for the various drum sounds and kits as well as two
random functions. Select the corresponding entry when you know what sort of drum
sound you wish to program.
Init Sound restores the selected sound to its basic settings.
Random Sound creates a random sound. With this parameter you easily can
create new and possibly interesting sounds.
Init Kit restores the drum kit to its basic settings.
Random Kit creates a random drum kit. With this parameter you easily can crea-
te new and interesting kits.
MIDI Functions
The MIDI interface of the Attack is identical in its most aspects to the interface of
most common synthesizers. When the MIDI connection is set up, the Attack can be
played over the key range from C1 to G9 if required. The 24 sounds can be played
through MIDI notes C1 to B2, thus affording 1 sound per key. This is a common layout for a drum and percussion synthesiser, making it possible to play the sounds on
the keyboard next to each other.
Additionally, the upper 12 sounds of the Attack can be played melodically and polyphonically on the keyboard on MIDI Channels 1 through 12. This is because the
Attack is capable of producing other sounds such as basses or leads with its synthesis
functions. These sounds call for playing over a greater key range than 1 key. For these 12 sounds, the key range from C3 to G9 is available for melodic playing.
w Please note that playing sounds melodically is only possible for the upper 12
sounds on MIDI channels 1 to 12.
Playing the Attack Polyphonically
The Attack offers a 5 octave keyboard. If you choose one of the upper 12 sounds
with the sound select button, the Attack’s keyboard and pitch bender appears onscreen, allowing you to play the selected sound melodically with your mouse on that
keyboard or via a connected MIDI keyboard. As soon as you select one of the lower
12 sounds, the keyboard becomes invisible.
MIDI Control of the Attack
All functions of the Attack can be controlled by MIDI controller data. The sounds 1
through 12 receive MIDI controllers from #12 to #59, while sounds 13 through 24
receive #72 to #119. This is only possible when transmitting on channels 1 through
Waldorf Edition
User Manual 12 Waldorf
12. Channel 16 is reserved for controlling both delays with controllers. As an addendum to this manual, you’ll find a table showing all the controller assignments.
w Example: You want to distort a snare drum on Sound 2 dynamically. Therefore,
you create controller data on MIDI channel 2 (= Sound 2) for the Drive parameter (MIDI controller #39). At the same time you want to bring up ring modulation for a bass on Sound 16. To do this you create a MIDI controller #89 on
MIDI channel 4 (= Sound 16). If you want to change the parameter of Delay 1,
use the corresponding MIDI controller on MIDI channel 16.
You can control the knobs of the Attack with an external MIDI controller unit (a
hardware fader or knob box) or a MIDI master keyboard. Additional MIDI controller
data can be created graphically or numerically on an editor (e.g. the List or Controller Editor of Steinberg Cubase). The corresponding MIDI controllers and their assignments can be found in the appendix of this manual.
Please note that control changes edit the sound instantly, just like automation that
uses system exclusive data.
Special Function Modulation Wheel
The modulation wheel of your master keyboard (MIDI controller 1) is only available
for sounds 13 through 24 on the MIDI Channels 1 through 12. It controls Cutoff, in
a range beginning at the selected value to the maximum, which is useful for bass and
lead sounds.
Controlling the Attack through the Novation RemoteSL
Certain parameters of the Attack can be controlled through the Novation RemoteSL.
The RemoteSL offers 24 encoders, potentiometers and sliders that can be mapped on
up to 72 different parameters.
As you can immediately see, 72 parameters is by far not enough to control every parameter of each of the 24 sounds. Therefore, we mapped the 9 most important parameters of the first 8 sounds on the RemoteSL. These parameters are:
RemoteSL Controls
Attack Parameter
Page 1 Encoders 1...8
Oscillator 1 Pitch Sound 1...8
Page 1 Pots 1...8
Oscillator 1 FM Sound 1...8
Page 1 Sliders 1...8
Envelope 2 Decay Sound 1...8
Page 2 Encoders 1...8
Oscillator 2 Pitch Sound 1...8
Page 2 Pots 1...8
Oscillator 1 FM Envelope Sound 1...8
Page 2 Sliders 1...8
Envelope 1 Decay Sound 1...8
Page 3 Encoders 1...8
Filter Drive Sound 1...8
Page 3 Pots 1...8
Filter Cutoff Sound 1...8
Page 3 Sliders 1...8
Amplifier Volume Sound 1...8
w The host application must support the Novation RemoteSL and its „AutoMap“
feature to be able to control the Attack. Please read the documentation of the
corresponding host application.
Waldorf Edition
User Manual 13 Waldorf
Polyphony of the Attack
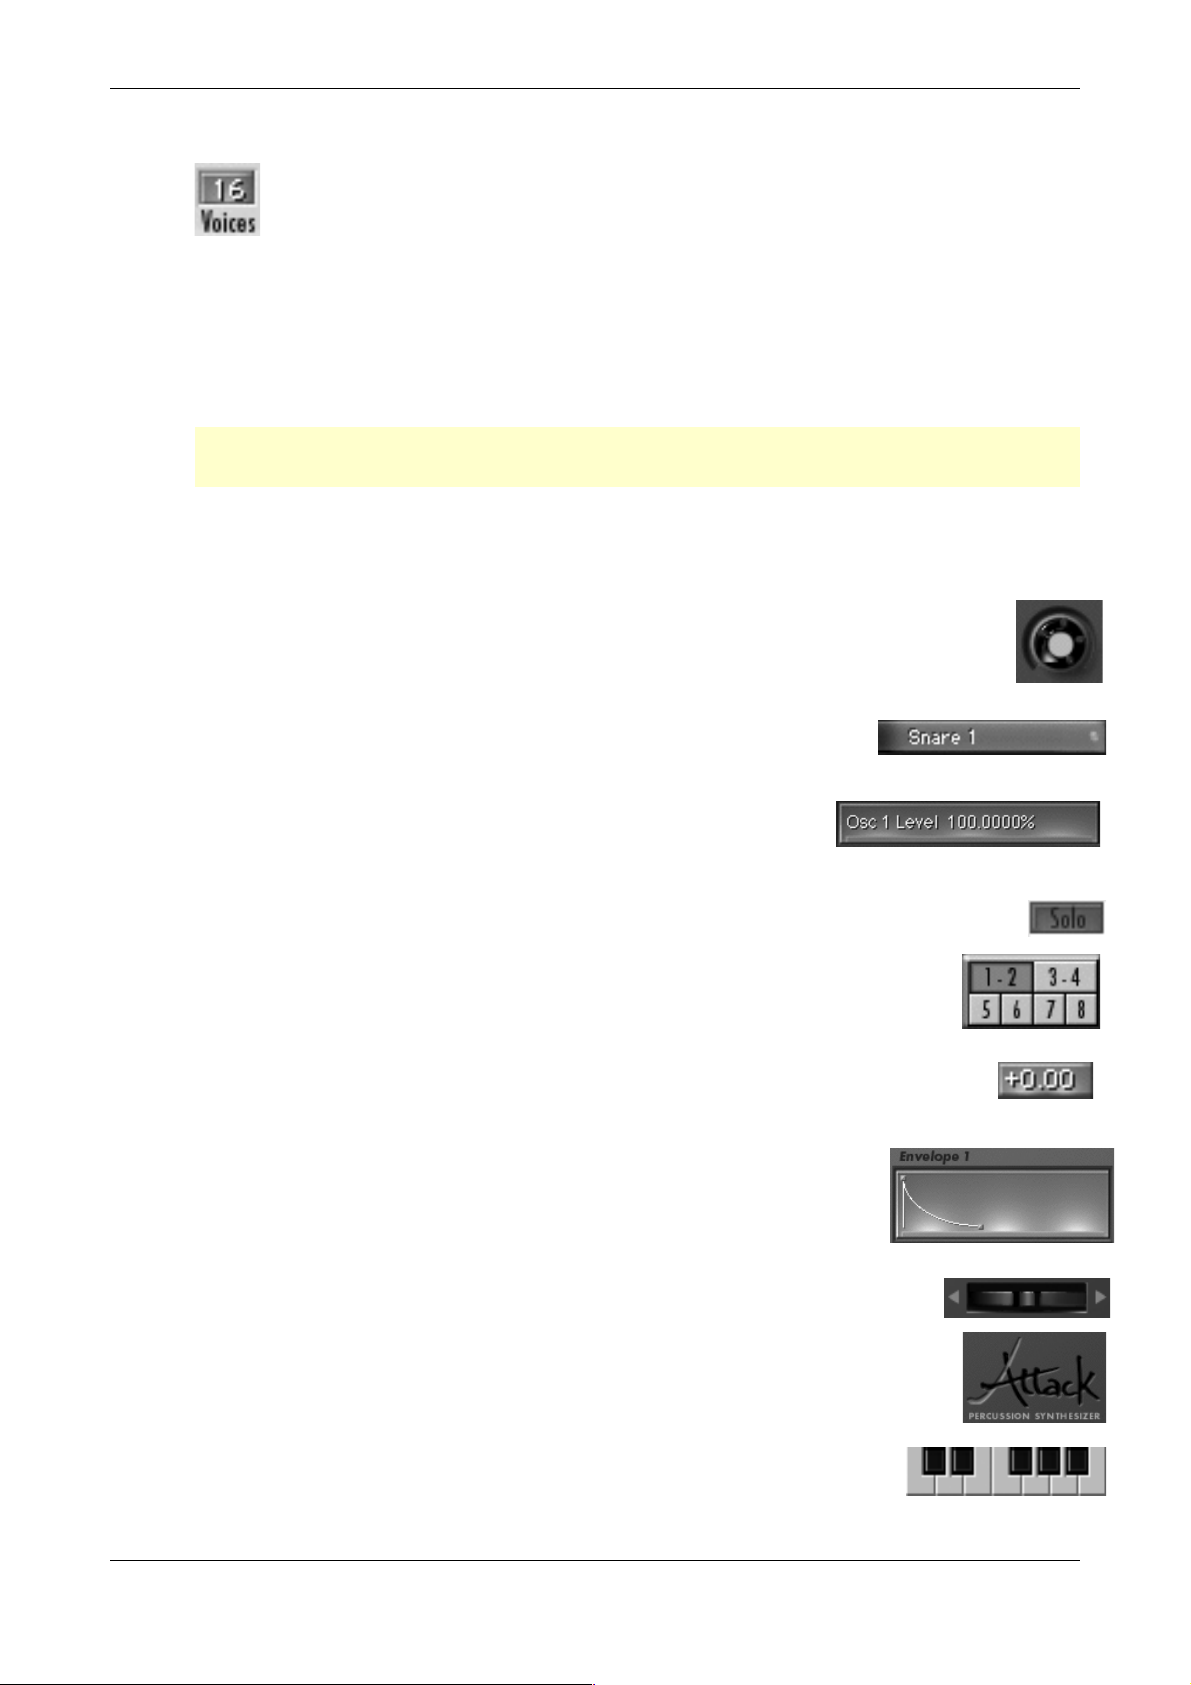
The Attack has up to 64 voices. The number of available voices depends on
available processor power. The number of voices can easily be set on the
plug-in user interface. All you have to do is use the mouse button to increase
or decrease the value in the voice display.
Keep in mind that each additional voice demands additional calculating power from
your computer. Try to set the number of voices to a sensible value, especially if you
simultaneously use other plug-ins and if you also play back audio tracks with your
host application.
w Hint: Even if no voice is sounding, the Attack creates a little processor load be-
cause of the two stereo delays which have to be calculated.
The Controls
Simply use the mouse to set the Attack’s controls.
Dials: To set this type of control, click on it, hold down the mouse button
and drag the mouse around the dial in a circle. Dragging in a larger circle
increases the value resolution that is available. The Attack display simultaneously shows the actual value of the corresponding parameters.
Sound select button: By clicking a Sound select button once,
you select the corresponding sound.
Display: If your turn a dial, its parameter name and nu-
meric value is shown in the display. If you move the cursor over a parameter without clicking, the current numeric value is displayed.
Switches: By clicking a switch once, you switch the corresponding func-
tion on or off.
Button group: By clicking a button of a group, you select the corres-
ponding function.
Value selector: Position the mouse pointer on the value, hold down the
mouse button and drag up or down. If you hold down the [Shift] key
while changing the value, you will get another value scale area.
Envelope graphic display: Click on one of the handles and
drag the mouse to continuously and smoothly change the envelope parameters, or click into any envelope phase to let its
value jump there.
Pitch bender: To change the pitch, click on the bender and drag
the mouse to the left or right. The pitch bender snaps back into its
center position as soon as you let go of the mouse button.
Attack logo: If you click on the Attack logo, a window opens with
program information and MIDI controller documentation.
Automatic keyboard: This integrated keyboard pops up automa-
tically. For more information, refer to the chapter “The automatic keyboard”.

Waldorf Edition
User Manual 14 Waldorf
Key Combinations
If you hold down the [Strg] key (on the PC) or [Command] key (on a Mac compu-
ter) when you click on a control, its value is automatically set to its default (e.g.
Cutoff is set to 100%, Env to 0%).
You can increase the resolution of a dial by holding down the [Shift] key on your
computer keyboard when use the “linear knob mode”. If a dial is set to “circle
mode” (so that you change a value by dragging around the dial in a circle), then
you can temporarily change to “linear knob mode” by holding down [Alt].
The "Automatic" Keyboard
The Attack has a 5 octave keyboard in its user interface. When selecting one of the
upper 12 sounds, the Attack’s keyboard screen will appear. You can play these
sounds melodically through your MIDI keyboard or by clicking on the displayed
keyboard with your mouse. When selecting one of the lower 12 sounds, the keyboard is hidden.
Waldorf Edition
User Manual 15 Waldorf
The User Interface of the Attack
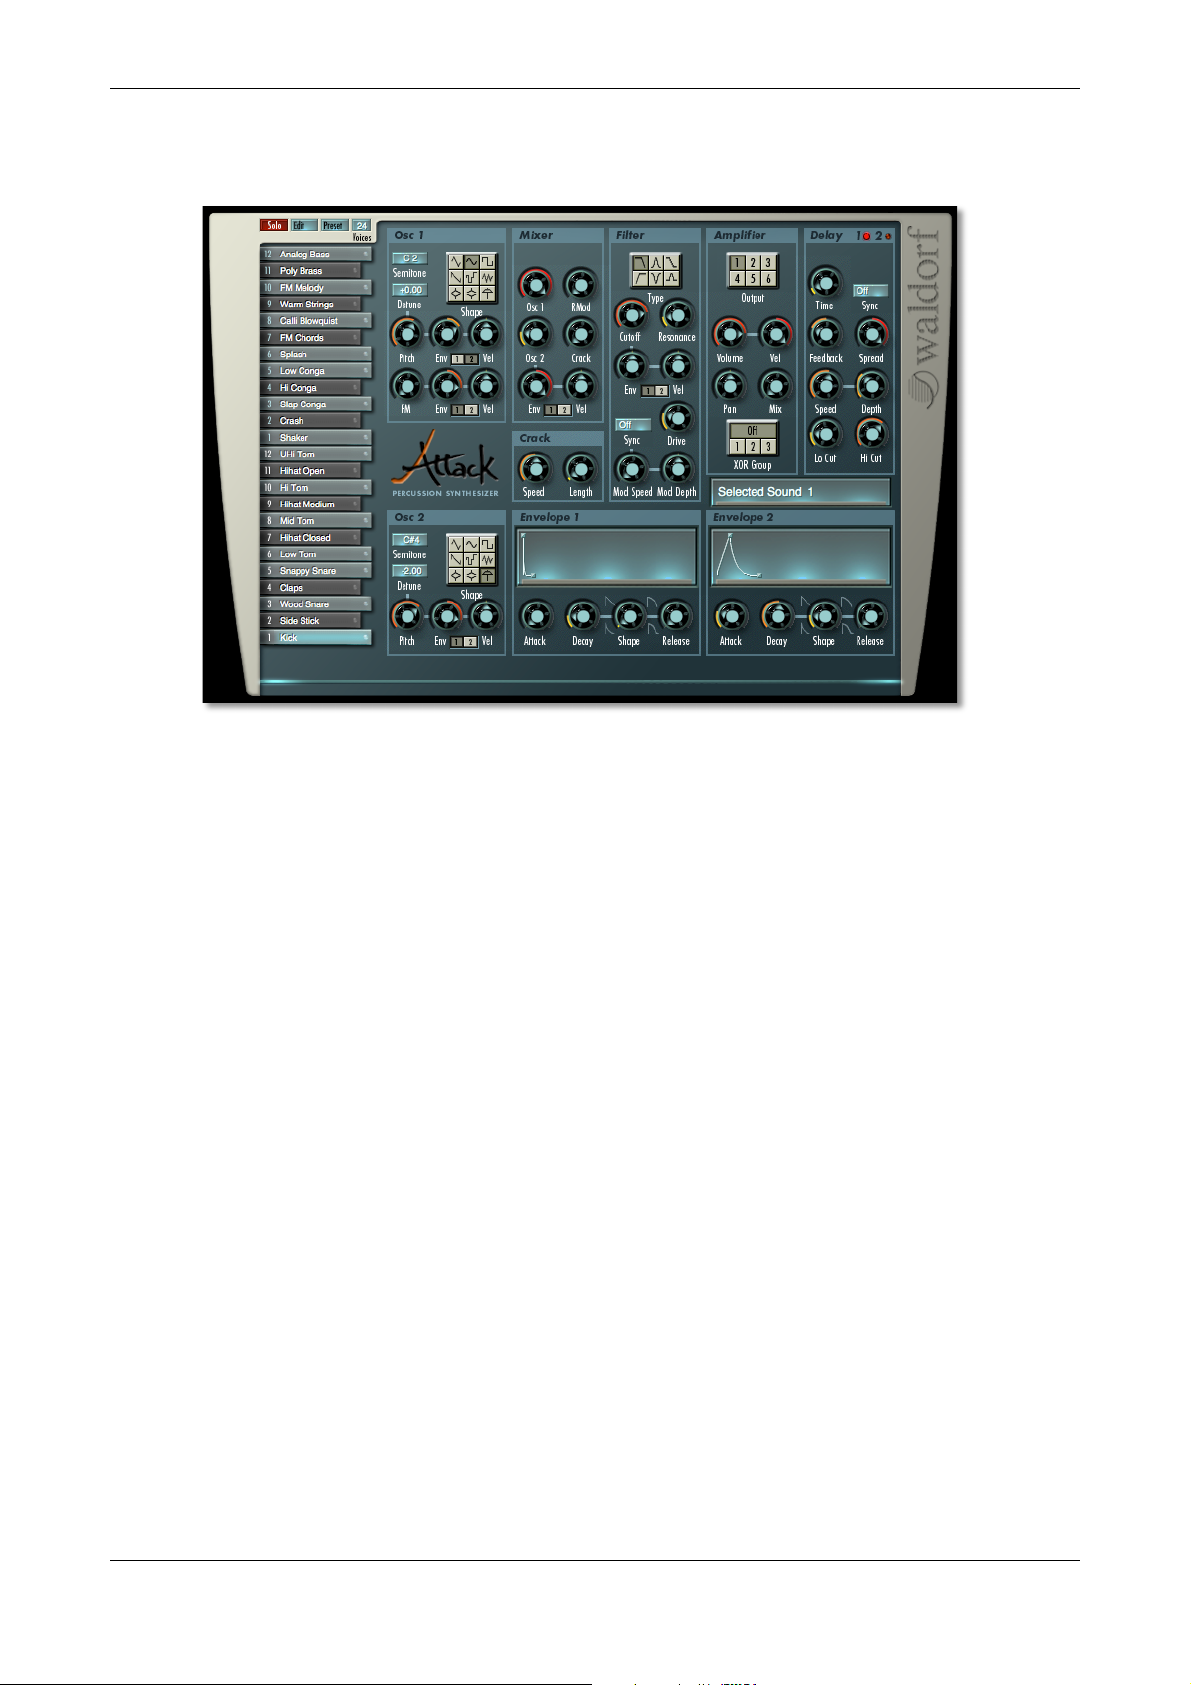
The user interface of the Attack is split into useful segments for easy access to different parameters. Though the Attack is primarily designed for creating drum and percussion sounds, the setup is reminiscent of a synthesiser offering subtractive synthesis. To the left you can see 24 Sound Select buttons in the form of a stylized keyboard positioned vertically. With these buttons you can select the sounds of a drum
kit. Next appear parameter groups for both Oscillators, the Mixer, the Filter, the Amplifier, the Delay effects, the Crack Modulator and settings for both Envelopes. A display as well as some pop-up menus round out the programming interface.
Due to its flexible synthesis structure, the Attack is capable of creating classic synthesiser sounds, especially basses and leads.
Oscillator Section
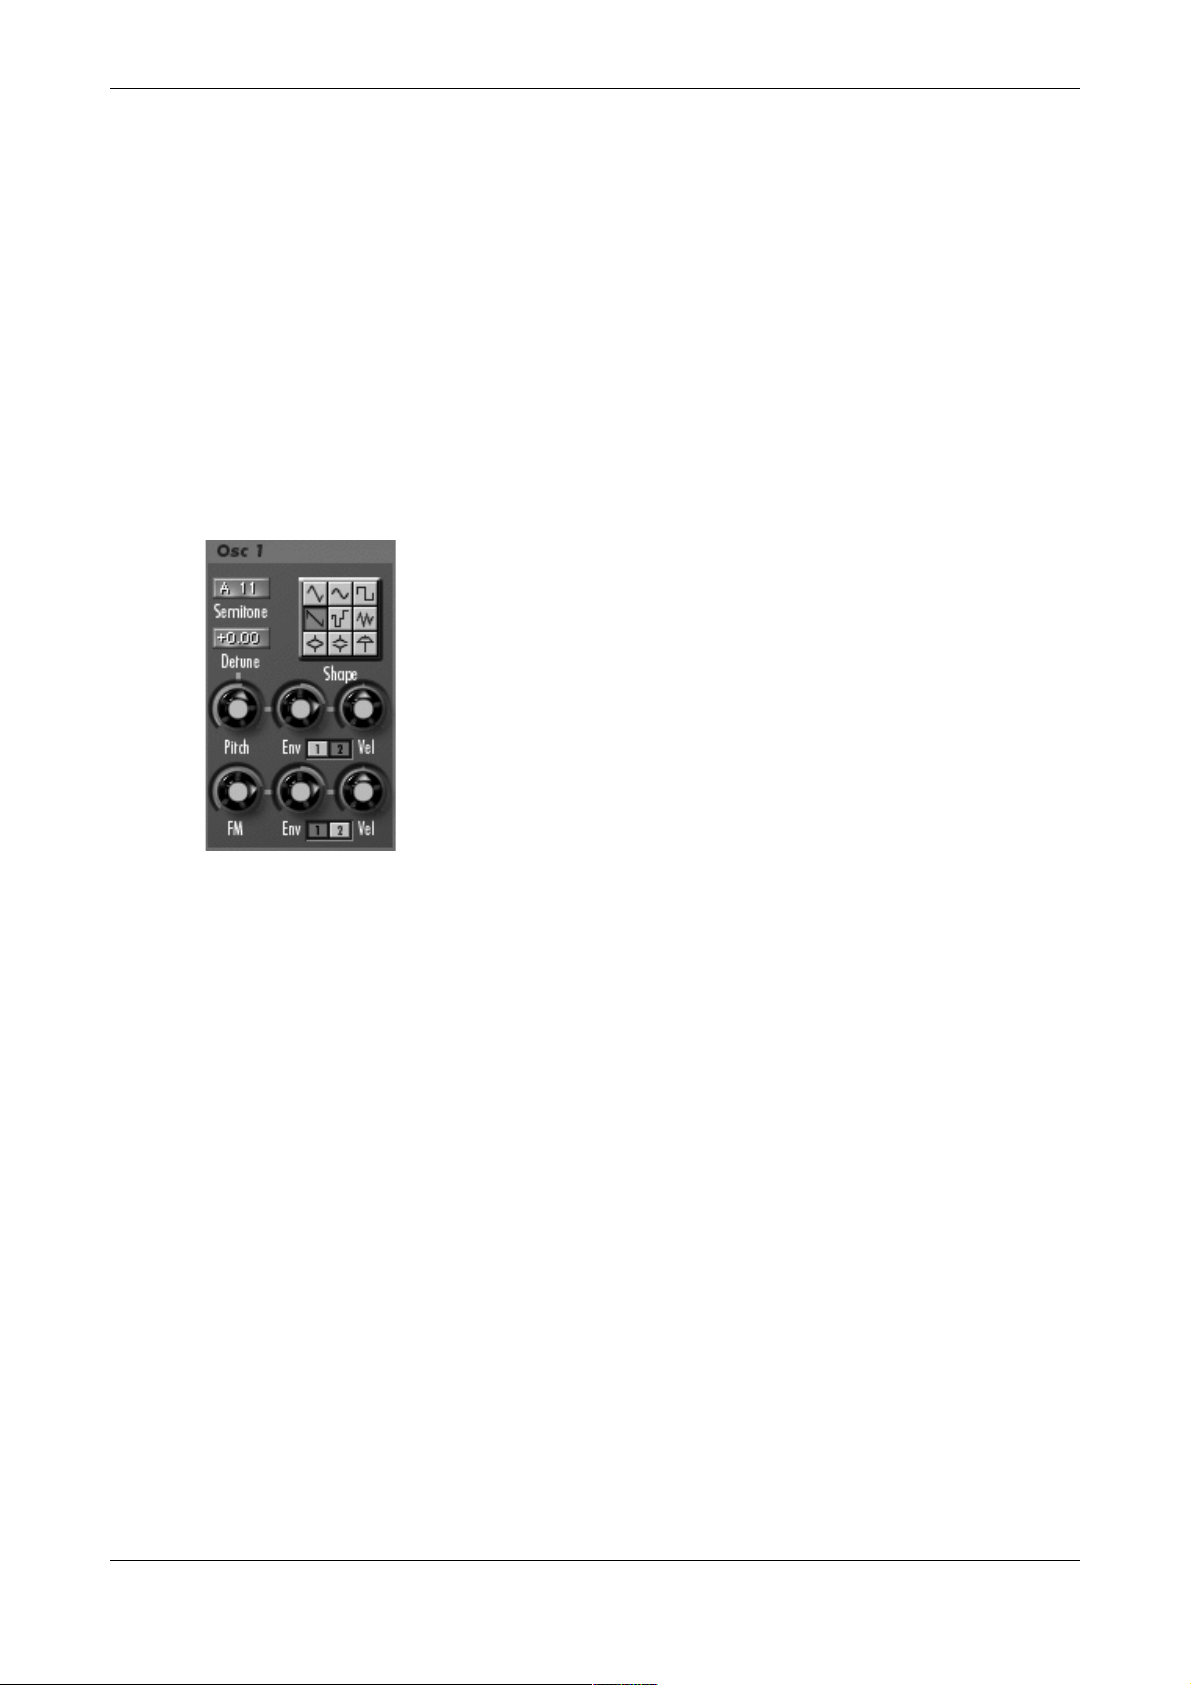
The Attack is equipped with two oscillators that have almost
identical functionality. Oscillator 1 additionally contains an integrated FM (frequency modulation) section. The following explanation is valid for both oscillators.
Pitch 0.007984...<20000 Hz
Sets the pitch of the oscillator over a very wide range. This is necessary to reproduce
drum and percussion sounds.
Semitone C-11...E 10
This parameter works with Pitch, setting the pitch of the oscillator in semitone steps.
This is useful for melodic sounds. Lead and Solo sounds sound interesting when you
set one oscillator to e.g. a fourth (+5 semitones).
Detune -50...+50
This parameter also works with Pitch, fine-tuning the oscillator in cents. The audible
result of detuned oscillators is a chorus or flanger effect. Use a positive setting for
one oscillator and an equivalent negative setting for another.
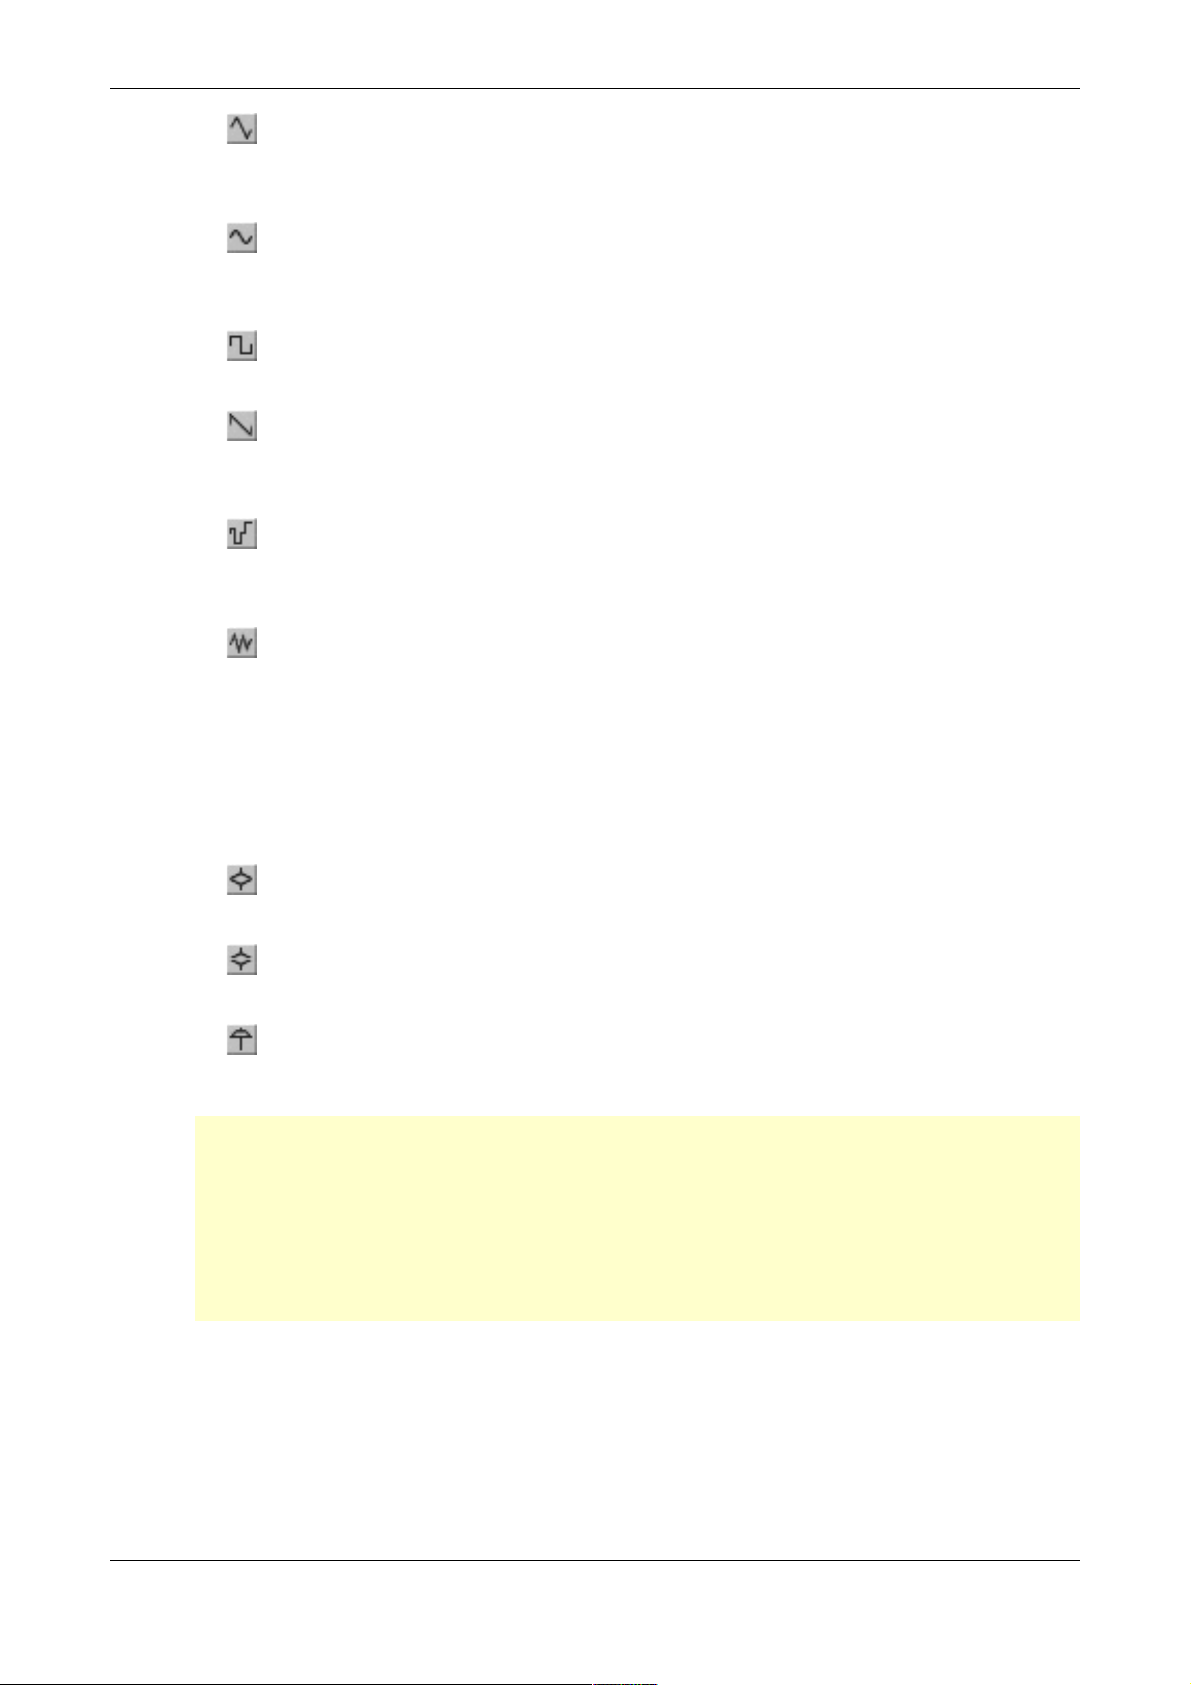
Shape (Waveform) Tri, Sine, Pulse, Saw, S&H, Noise, Sample 1-3
Sets the type of waveform to be generated by the oscillator. The parameter is called
Shape instead of “waveform”, because it doesn’t necessarily set only classic synthesizer waveforms, but it also generates noise, sample&hold and three samples. However, the term “waveform” is used interchangeably throughout this manual. The
following shapes are currently available:
Waldorf Edition
User Manual 16 Waldorf
Triangle selects the triangular waveform. The triangle mainly consists of odd
harmonics with very low magnitudes. It is perfect for nearly all drum and percussion sounds.
The Sine waveform consists of the fundamental frequency only. It has no har-
monics at all. With a sine wave you can create clean bass drums and snares. The
sine wave is also perfect for FM.
Pulse selects the pulse waveform. This waveform produces a hollow / metallic
sound and is perfect for bass drums and snare drums.
Saw selects the sawtooth waveform. A sawtooth wave has all the harmonics of
the fundamental frequency in descending magnitude. This waveform is pleasing
to the ear. You can use it for bass and lead sounds.
S&H (Sample&Hold): S&H samples a random value and holds it. Pitch selects
the time of this process. S&H is perfect for industrial-type FX sounds and as an FM
source.
Noise is a fundamental source for any kind of analog-type percussion, especi-
ally hi-hats and snare drums. Also, wind and other sound effects can be created
by using noise. If noise is selected, you can “color” it with the Pitch knob. Negative values create pink noise (fewer high frequencies), positive values a blue noise
(fewer low frequencies).
The next three buttons don´t set an oscillator waveform; instead, you can choose a
sample for further programming.
Sample 1 contains a closed hi-hat. It can be processed with Pitch and FM and
all other synthesis functions.
Sample 2 contains an open hi-hat. It can be processed with Pitch and FM and
all other synthesis functions.
Sample 3 contains a crash cymbal. It can be processed with Pitch and FM and
all other synthesis functions.
w The square, sine, triangle and sawtooth waveforms always start at full amplitu-
de to create a necessary start click. This is characteristic of drum and percussion sounds. To avoid this click, simply open up the attack value for Envelope
2 by a small amount. When creating typical synthesizer sounds you might like
to avoid the flanging effect caused by detuned oscillators. This effect is caused
by the fixed phase of the waveforms. To do this, assign a short pitch envelope
to one of the oscillators.
Pitch Env (Envelope) -100%...100%
Sets the amount of pitch modulation from Envelope 1 or 2 (depending on the settings). Positive amounts will raise the pitch when envelope modulation is applied.
Negative amounts will lower the pitch when envelope modulation is applied. Use
this parameter to create time-dependent pitch changes.

Waldorf Edition
User Manual 17 Waldorf
w Pitch Env is one of the most important parameters in drum programming be-
cause it simulates the character of a real drum.
Pitch Vel (Velocity) -100%...100%
Determines the amount of influence the selected envelope has on the pitch, based
on key velocity. This parameter works similarly to the Pitch Env parameter, with the
difference that its intensity is velocity based. Use this feature to give a more expressive character to the sound. When you hit the keys smoothly, only minimal modulation is applied. When you hit harder, the modulation amount also gets stronger.
The overall modulation applied to the pitch modulation is calculated as the sum of
both the Pitch Env and Pitch Vel parameters. Therefore you should always bear
this total in mind, especially when pitch does not behave as you expect. You can also create interesting effects by setting one parameter to a positive and the other to a
negative amount.
FM (Frequency Modulation)
Sets the amount of frequency modulation that is applied to Oscillator 1 by Oscillator
2. The sound will get more metallic and sometimes even drift out of tune. Triangle
waves, sine waves and noise are especially suited for FM. To change the frequency
modulation dynamically, use an envelope or velocity. The FM range of the Attack is
very wide, so that you can generate nearly chaotic FM out of periodic waveforms like sine waves. This is necessary to create hi-hats.
If you use noise as FM source, the sound will become more tonal when you use higher FM settings. To create a vibrato, set Oscillator 2 to a deep pitched triangle waveform and use very low FM settings. Playing this sound at low octaves creates a
wobble effect.
w FM background hints: The frequency modulation of the Attack modulates the
phase of Oscillator 1 with the amplitude of Oscillator 2. This effect can be very
strong, such that there can be phase overflows by a factor of 8. This creates
noisy waveforms – perfect for drum sounds. Lower FM settings generate many
different spectra of a metallic character. A FM envelope can change the metallic character to chaotic FM, also necessary for drum sounds. Another point to
observe is that FM into the Attack is scaled linearly.
FM Env -100%...100%
Sets the amount of FM with Envelope 1 or 2 (depending on the settings). Positive
amounts will raise FM when envelope modulation is applied. Negative amounts will
lower FM. Use this parameter to create time-dependent FM changes.
FM Vel -100%...100%
Determines the amount of influence the selected envelope has on FM, based on key
velocity. This parameter works similarly to the FM Env parameter, but with the difference that its intensity is velocity based. Use this feature to give a more expressive
character to the sound. When you hit the keys smoothly, only minimal modulation is
applied. When you hit harder, the modulation amount also gets stronger.
Waldorf Edition
User Manual 18 Waldorf
The overall modulation applied to FM is calculated as the sum of both the FM Env
and FM Vel parameters. Therefore you should always bear this total in mind, especially when FM does not behave as you expect. You can also create interesting effects
by setting one parameter to a positive and the other to a negative amount.
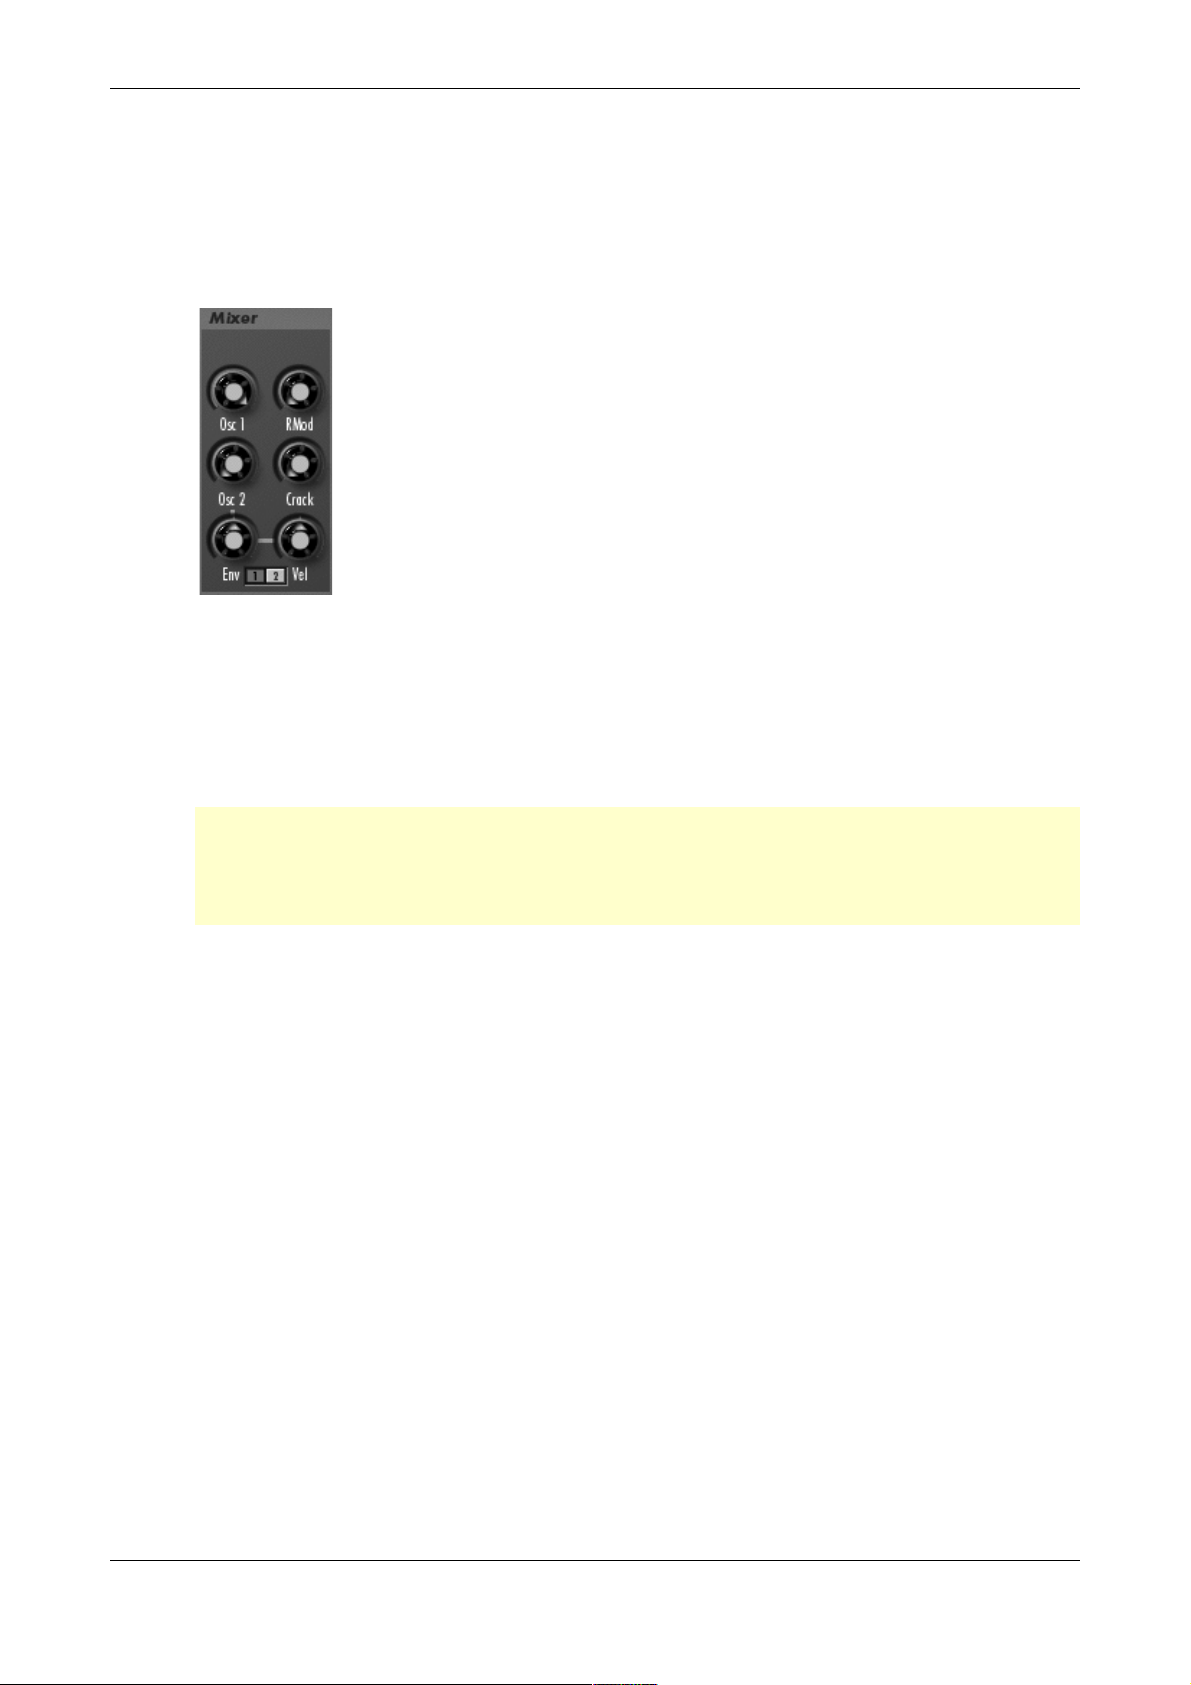
Mixer Section
In the Mixer, you control the volumes of the two oscillators. Ring modulation and Crack modulation can be applied optionally to extend
the Attack´s tonal range.
Osc 1 0%...100%
Volume of Oscillator 1.
Osc 2 0%...100%
Volume of Oscillator 2.
w If the sum of all mixer signals (Osc 1, Osc 2 and Ring Modulator) is higher than
100%, filter saturation will be attained. At this point Resonance doesn´t make
any volume difference, as it does in the normal filtering process. Use this phenomenon for additional sound manipulation.
Env (Envelope) -100%...100%
This controls the influence of Envelope 1 or 2 on the Oscillator 2 level. With positive
settings, the level is increased by the modulation of the envelope, and with negative
settings, the level is decreased. Use this parameter to change the volume of Oscillator 2 independently over time.
Vel (Velocity) -100%...100%
Determines the amount of influence the selected envelope has on level of Oscillator
2, based on key velocity. This parameter works similarly to the Env parameter, with
the difference that its intensity is velocity based. When you hit the keys smoothly,
the level of Oscillator 2 only rises minimally. When you hit harder, the level will rise
higher.
The overall modulation applied to Oscillator 2 level is calculated as the sum of both
the Env and Vel parameters. Therefore you should always bear this total in mind,
especially when the level does not behave as you expect. You can also create interesting effects by setting one parameter to a positive and the other to a negative
amount.
Waldorf Edition
User Manual 19 Waldorf
Rmod (Ring Modulation) 0%...100%
Volume of the ring modulation between Oscillators 1 and 2. From a technical point
of view, ring modulation is the multiplication of two oscillators’ signals. The result of
this operation is a waveform that contains the sums and the differences of the source
frequency components. Since ring modulation generates disharmonic components, it
can be used to add metallic distorted sound characteristics. This is useful when generating crashes or cowbells. Please note that in a complex waveform all harmonic
components behave like interacting sine waves, resulting in a wide spectral range of
the ring modulated sound.
Ring modulation can result in unwanted low frequencies when the pitches of Oscillators 1 and 2 don’t differ very much. This is logical because, for example, when you
use one oscillator set to 100 Hz and the second set to 101 Hz, the resulting ring modulation is 201 Hz and 1 Hz, and 1 Hz is very low.
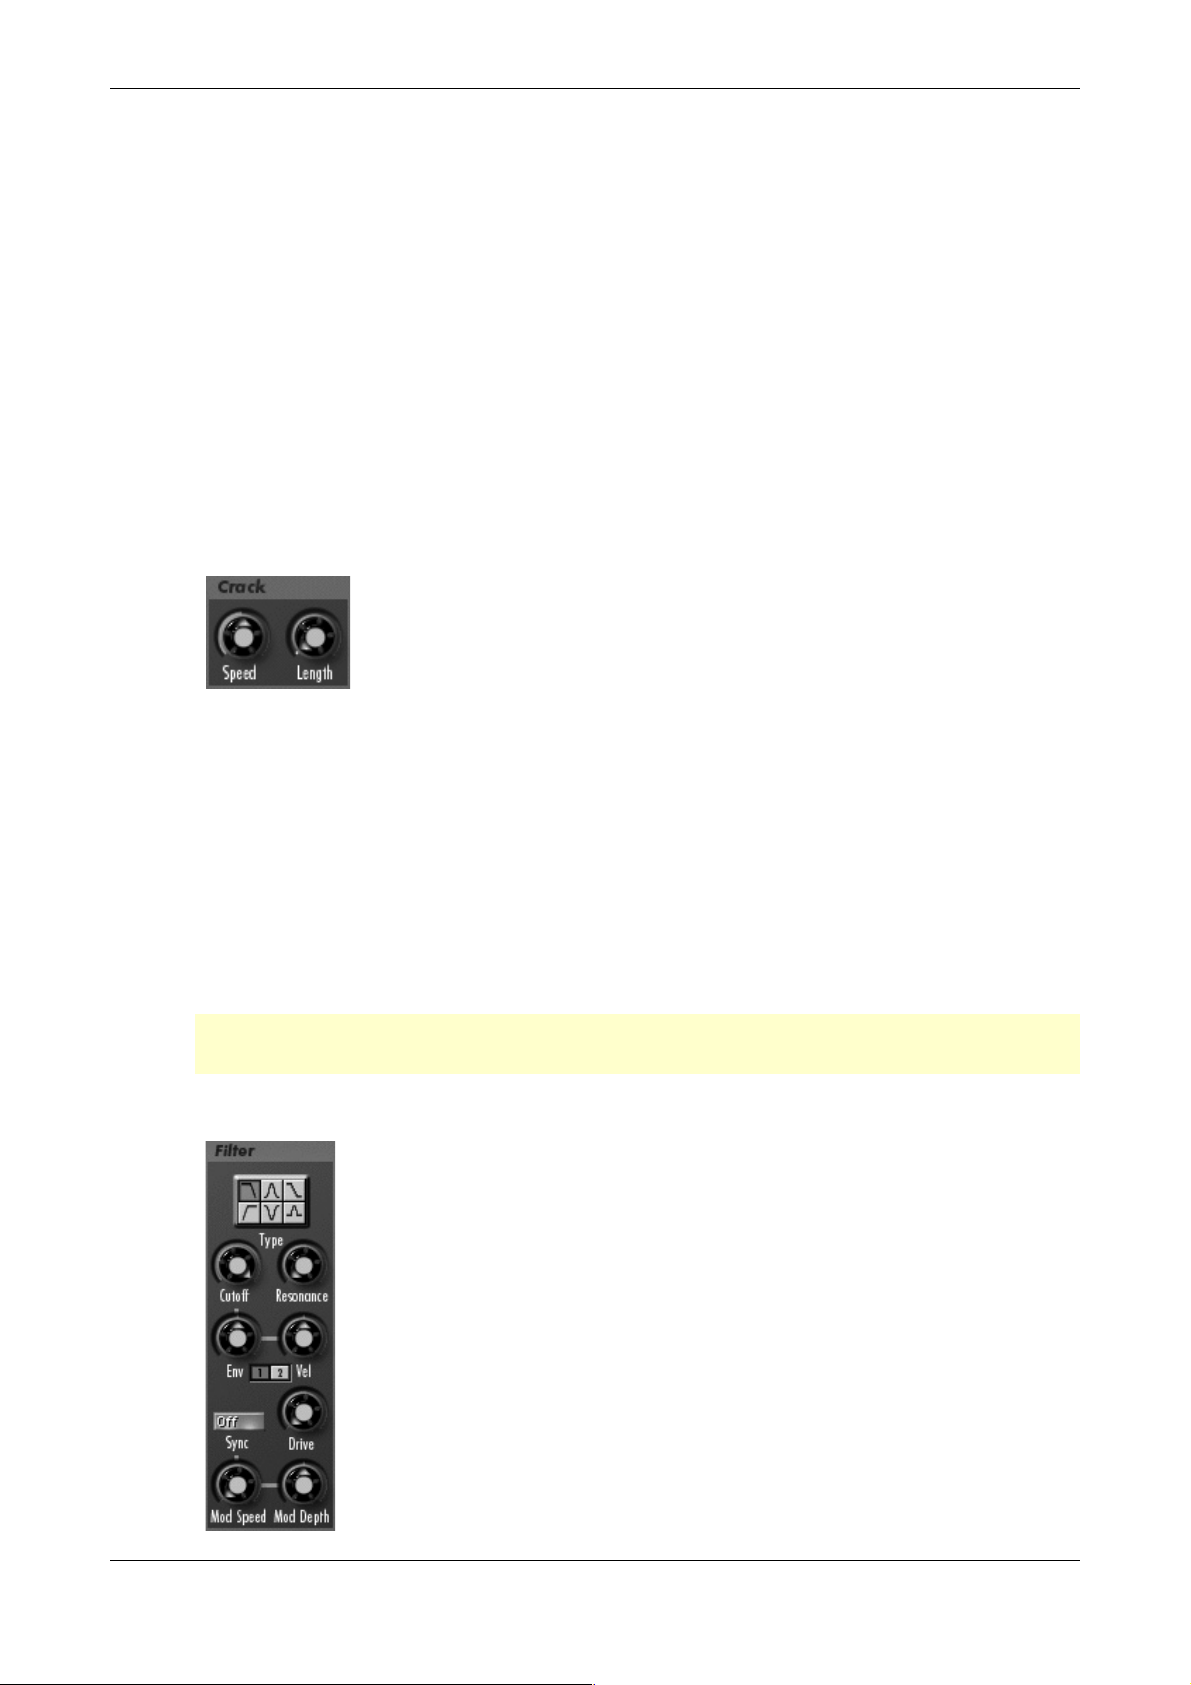
Crack 0%...100%
Fades in the Crack Modulator. The Crack Modulator was designed
especially for creating hand clap sounds. Technically it is an amplitude modulation using a sawtooth waveform. The speed and the
number of waveforms can be chosen. After transmitting its intended
modulation, the Crack Modulator resumes emission of a constant signal.
The Crack Modulator superimposes its effect on all other mixer signals (Oscillator 1
and 2, Ring Modulator).
Crack Speed 1Hz...5000Hz
Determines the frequency of the Crack Modulator.
Crack Length 1 Cycles...
∞
Cycles
Determines the number of modulations the Crack Modulator creates.
w To program an authentic sounding handclap, set Crack Speed to 105 Hz and
Crack Length to 3 cycles.
Filter Section
Once the audio signal leaves the mixer, it is sent to the filters. The Attack offers a multimode filter with different filter types.
In a subtractive synthesizer a filter is a component that have significant influence on sound characteristics. But the Attack was designed
to make drum and percussion sounds, for which the filter is used
merely for fine tuning the sound. Yet you can also create bass and
lead sounds which definitely require a filter.
For now, we’ll explain the basic function of a filter, discussing the type used most commonly in synthesizers: the low pass filter.
The low pass filter type dampens frequencies that lie above a specified
cutoff frequency. Frequencies below this threshold are barely affected.
The frequency below the cutoff point is called the pass band range,
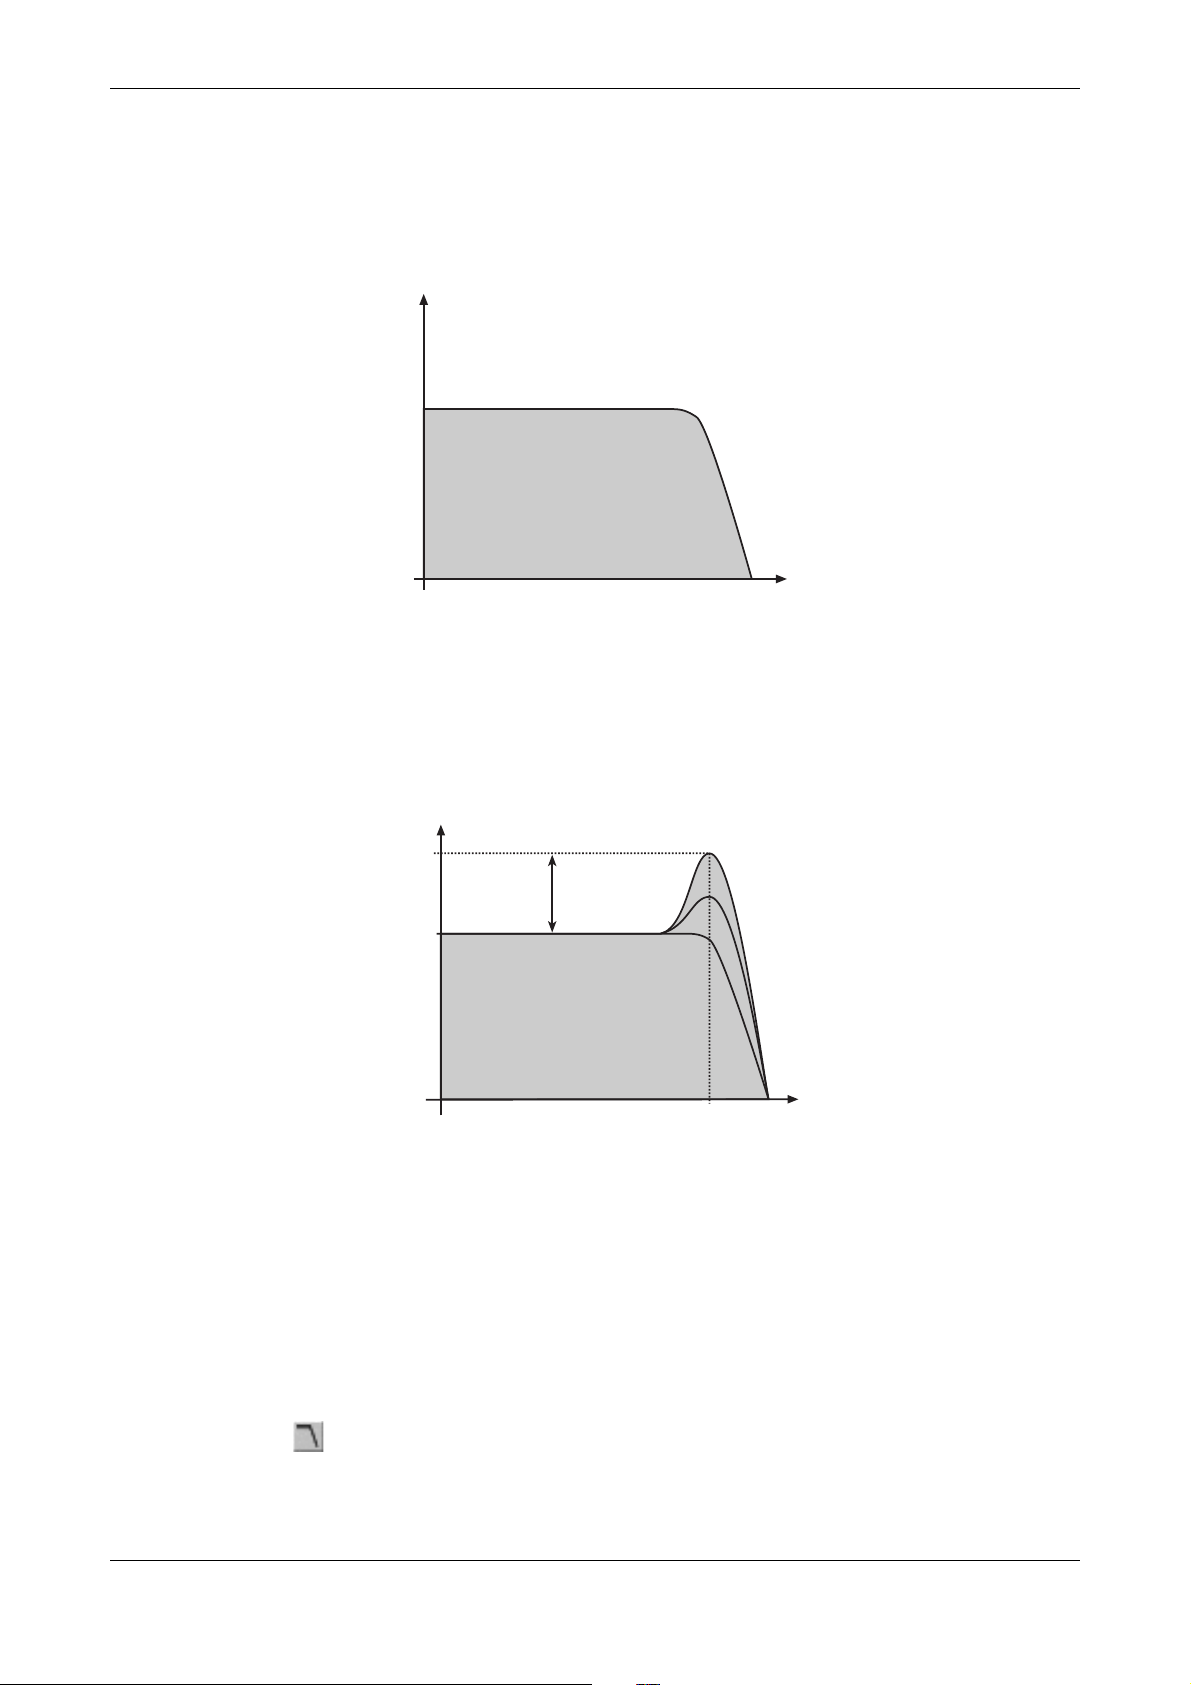
Waldorf Edition
User Manual 20 Waldorf
and the frequencies above are called the stop band range. The Attack´s filter dampens frequencies in the stop band with a certain slope. The slope is 12dB per octave.
This means that the level of a frequency that lies an octave above the cutoff point
will be 12dB less than those frequencies of the signal that fall into the pass band. The
following picture shows the basic principle of a low pass filter:
Low pass filter principle
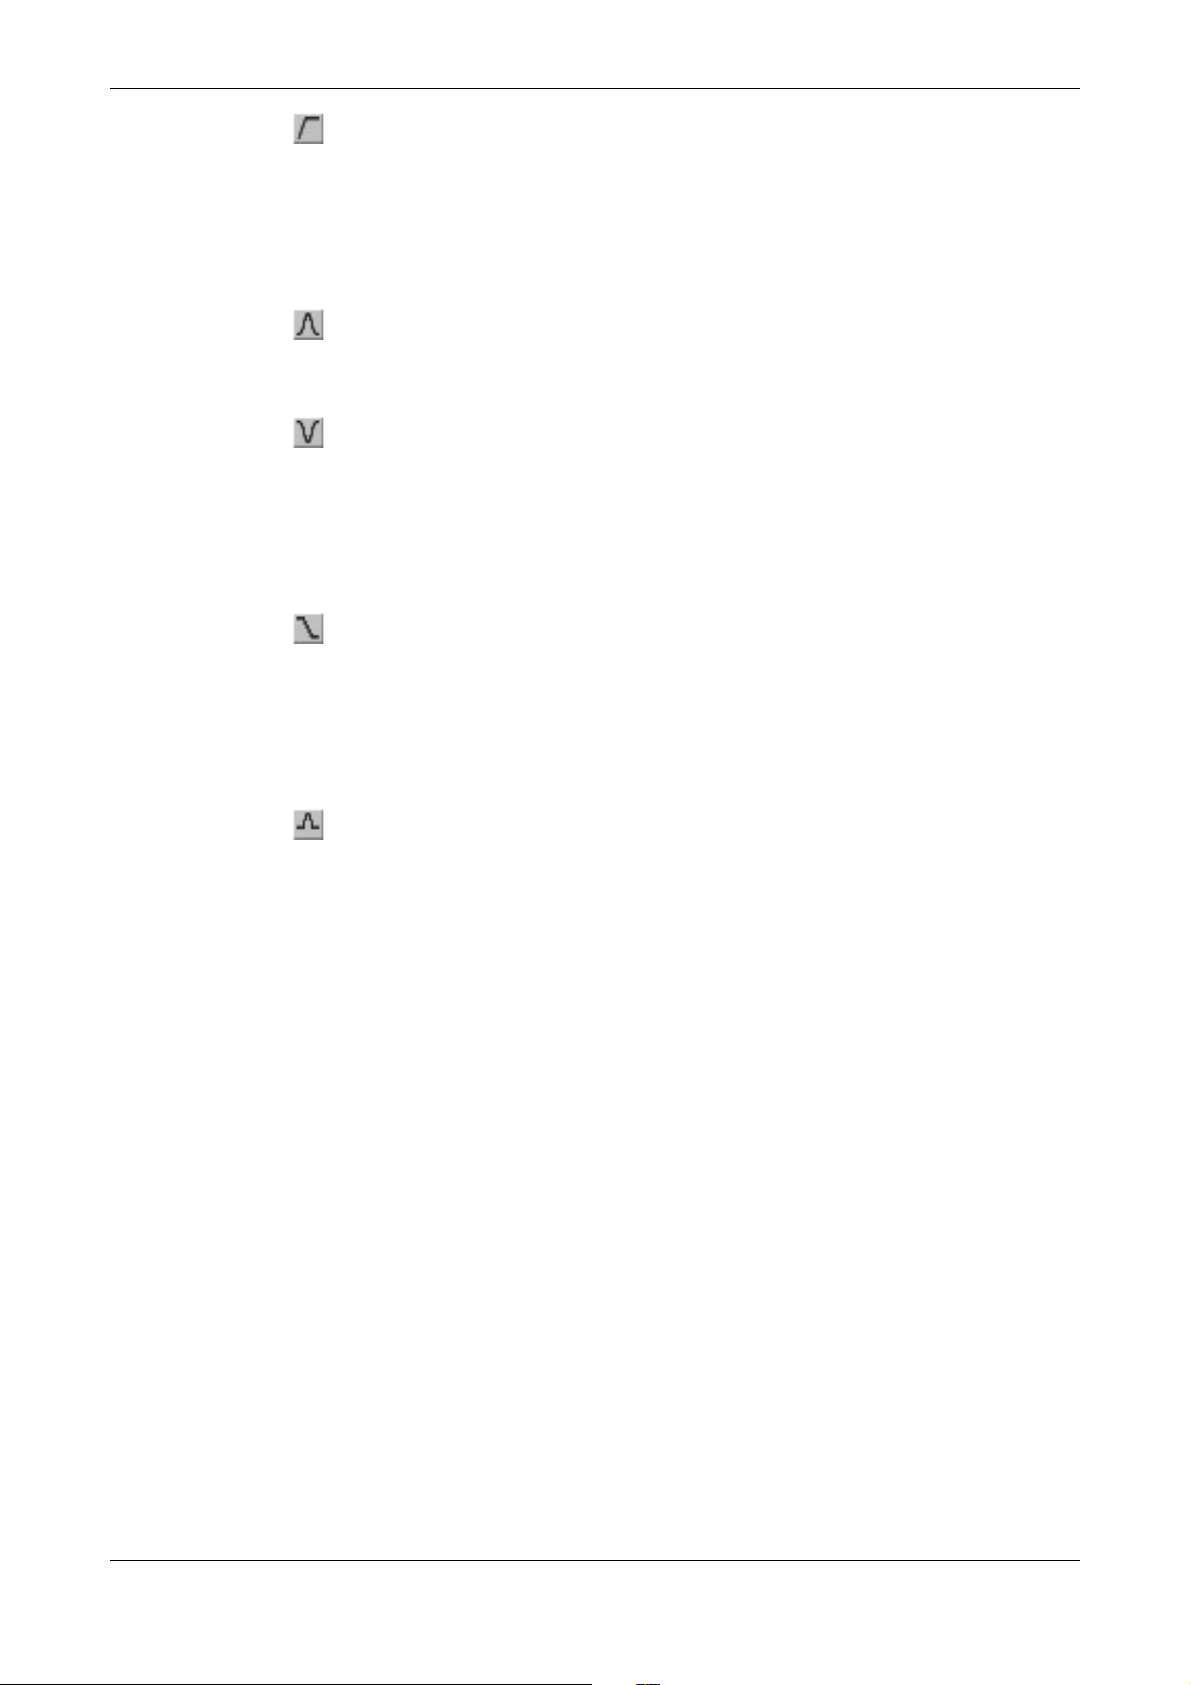
The Attack´s filter also features a resonance parameter. Resonance in the context of a
low, band or high pass filter means that a narrow frequency band around the cutoff
point is emphasized. The following picture shows the effect of the resonance parameter on the filter’s frequency curve:
Low pass filter resonance
If the resonance is raised to a great enough extent, then the filter will begin selfoscillation, i.e. the filter generates an audible sine wave even when it does not receive an incoming signal.
Beside the low pass filter, the Attack offers the following filter types:
Type (Filter Types)
The following filter types are available when selected with the mouse:
12 dB Low Pass Filter. Use this type if you want to create sounds with a
typical audible filtered character; for example, bass or lead sounds. With a
low pass filter you can shape bass drums or snare drums.
!"#$%#&'(
)#*#+
,%-.//
!"#$%#&'(
)#*#+
,%-.//
0#1.&2&'#
Waldorf Edition
User Manual 21 Waldorf
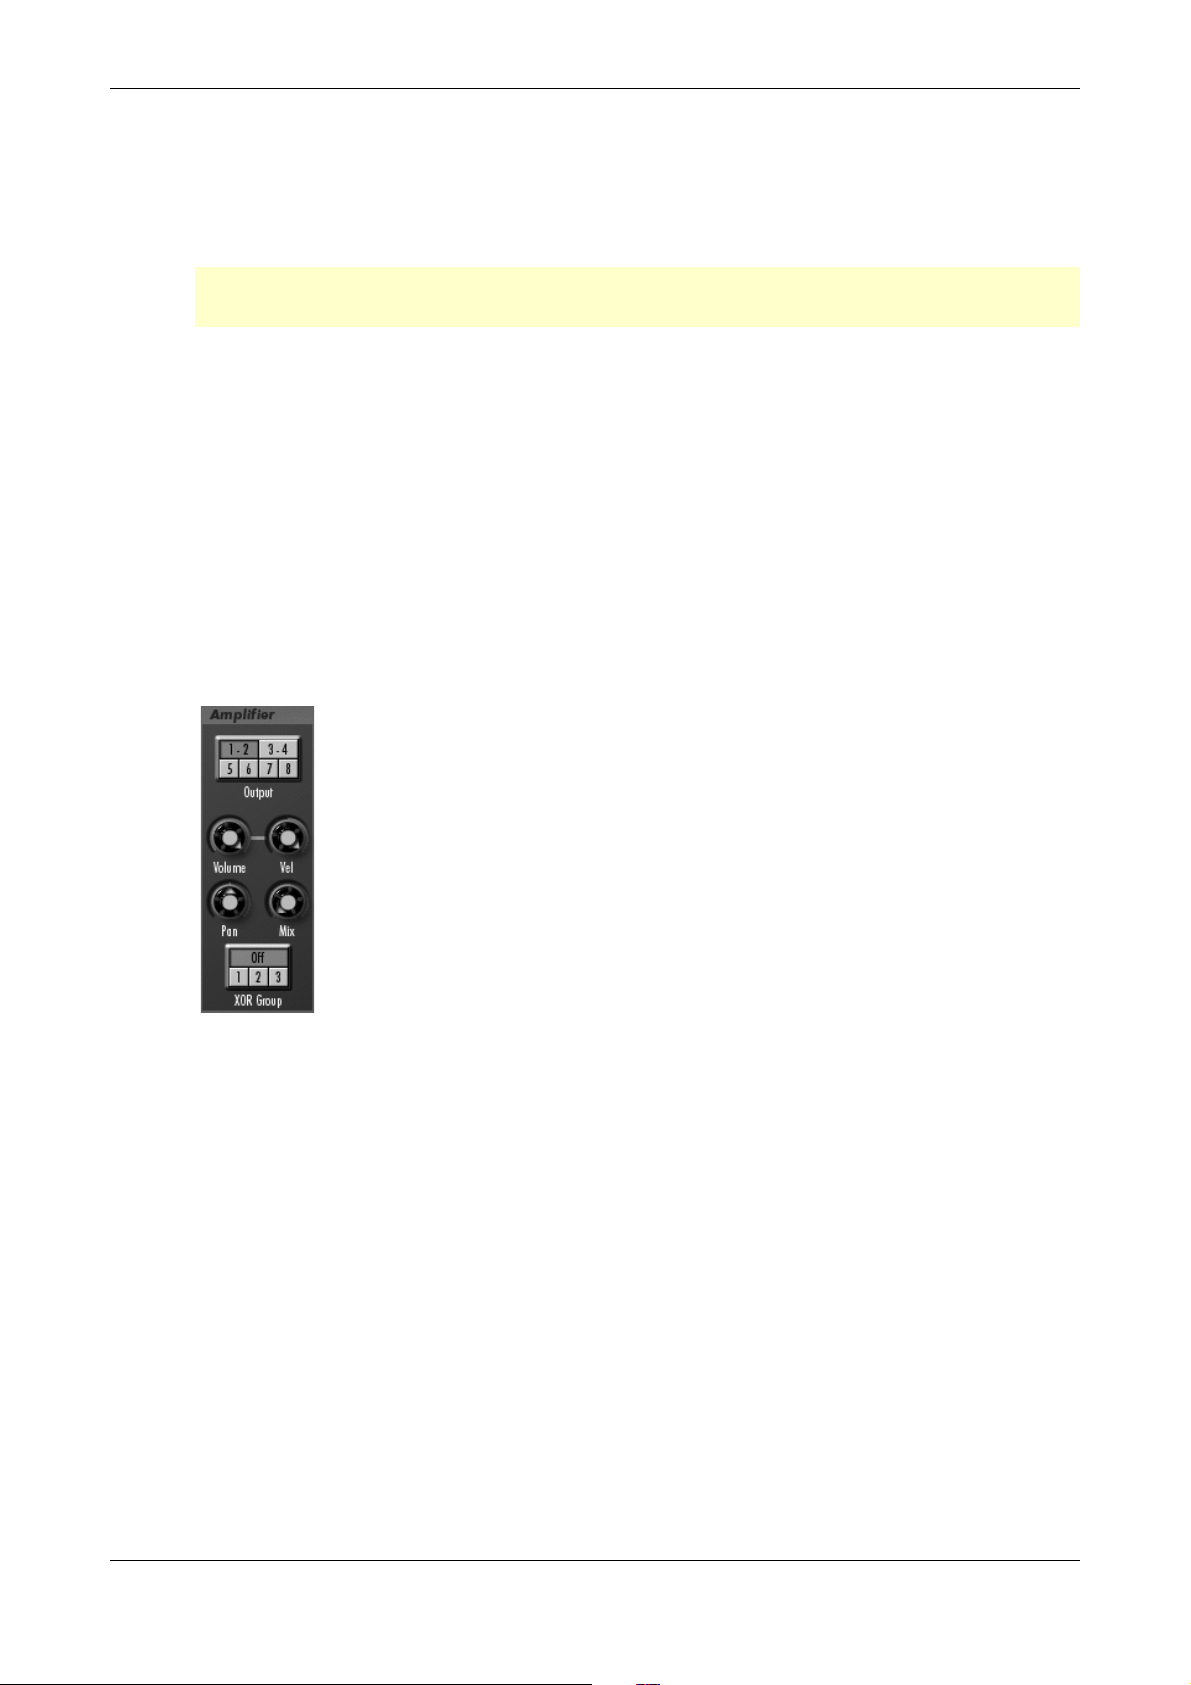
12 dB Hi Pass Filter. This type is useful to thin out a sound’s bass fre-
quencies. This may also give interesting results in conjunction with cutoff
frequency modulation. By doing this you can "fly-in" a sound, starting with
its high harmonics and then coming up to its full frequency range. You can
cut the bass and mid range of high frequency drum sounds like hi-hats or
crashes.
12 dB Band Pass Filter. This type removes frequencies both below and
above the cutoff point. As a result, the sound character gets thinner. Use
these filter types when programming effect and percussion-like sounds.
12 dB Notch Filter. This type is the opposite of the band pass type. It
dampens frequencies around the cutoff point. Frequencies below or above
the cutoff point are passed through. Use this filter type for programming effect sounds. Resonance has no great influence because it raises the frequencies that the notch filter dampens. You can hear a little effect of phase
changes, but not to any great degree.
EQ Lo- or Hi- Shelf Filter: Unlike a normal synthesiser filter, this filter
type works like an equalizer. When the resonance parameter is set below
50%, the filter works as Hi Shelf, raising high frequencies up to 12 db. Values over 50% cause the filter to work as Lo Shelf. Now, deep frequencies
can be raised up to 12db. The Cutoff knob sets the center frequency of the
Shelf EQ.
EQ Bell Type Function: Like the EQ Lo- or Hi-Shelf, this filter type has
an equalizer function. The Resonance knob serves as gain, raising or lowering the frequency set with the Cutoff knob up to 12db.
Cutoff 11.56 Hz...18794 Hz
Controls the cutoff frequency for the low pass and high pass filter types, and the center frequency for the band pass and notch filter types. It has a special function for the
EQ Type Filter.
When the low pass type is selected, all frequencies above the cutoff frequency are
dampened.
When the high pass type is selected, all frequencies below the cutoff frequency
are dampened.
When the band pass type is selected, only frequencies near the cutoff setting will
be passed through.
When the notch type is selected, the frequencies near the cutoff frequency are
dampened.
When EQ Lo- or Hi-Shelf is selected, the cutoff knob selects the start frequency of
the Shelf EQ.
When EQ Bell Type is selected, the frequencies near the cutoff frequency are
boosted or dampened with the Resonance parameter.

Waldorf Edition
User Manual 22 Waldorf
Resonance 0%...100%
Controls the emphasis of the frequencies around the cutoff point (exept the EQ filter
types). Use lower values to give more brilliance to the sound. At higher values the
sound acquires a typical filter character with a strong boost around the cutoff frequency. When the setting is raised to maximum, the filter starts to self-oscillate, generating a pure sine wave. This feature can be used to create typical solo sounds.
Env (Filter Envelope Amount) -100%...100%
Determines the amount of influence the selected envelope has on cutoff frequency.
For positive settings, the filter cutoff frequency is increased by the modulation of the
envelope, and for negative settings, the cutoff frequency is decreased. Use this parameter to change the timbre of the sound over time. Sounds with a hard attack
usually have a positive envelope amount that makes the start phase bright and then
closes the filter for a darker sustain phase.
Vel (Filter Velocity) -100%...100%
Determines the amount of influence the selected envelope has on the cutoff frequency, based on key velocity. This parameter works similarly to the Filter Env parameter, with the difference that its intensity is velocity based. Use this feature to
give a more expressive character to the sound. When you hit the keys smoothly, only
minimal modulation is applied. When you hit harder, the modulation amount also
gets stronger.
The overall modulation applied to the filter’s cutoff frequency is calculated as the
sum of both the Filter Env and Filter Vel parameters. Therefore you should always
bear this total in mind, especially when the filter does not behave as you expect. You
can also create interesting effects by setting one parameter to a positive and the other
to a negative amount.
Drive 0 dB...54 dB
Determines the amount of saturation that is added to the signal. If set to 0, no saturation will be added or, in other words, the signal will remain clean. Lower values will
add some harmonics to the signal, resulting in a warm character. Increasing the value will bring in more and more distortion, suitable for harder lead sounds and effects.
Sync
Makes the low frequency oscillator (LFO) sync the filter modulation either to the key
press or to the tempo of the host application (assuming that it is capable of sending
the needed timing information to the Attack). When you click on the Sync button, a
pop-up menu will appear to select the different settings.
Off lets the LFO run freely.
Key makes the triangle waveform of the LFO start at the maximum ampli-
tude whenever a key is pressed.
8 Bars to 1/64 syncs the triangle waveform of the LFO in musical note va-
lues.
Waldorf Edition
User Manual 23 Waldorf
1/2. Bars to 1/64. syncs the triangle waveform of the LFO to dotted note
values.
1/1t Bars to 1/64t syncs the triangle waveform of the LFO to third note va-
lues.
w With positive Mod Depth values the LFO starts at maximum amplitude, and
inversely, with negative values it starts at minimum amplitude.
Mod Speed S&H...1000 Hz
The integrated Low Frequency Oscillator (LFO) creates a Triangle wave to modulate
filter frequency. Mod Speed determines the frequency of the LFO. At low values, it
might take several minutes for the LFO to perform a complete cycle, while higher values are in the audible range. A setting of S&H creates a random value which will be
held for the length of a tone (independent from the Sync settings).
Mod Depth -100%...100%
Determines the amount of filter frequency modulation by the LFO.
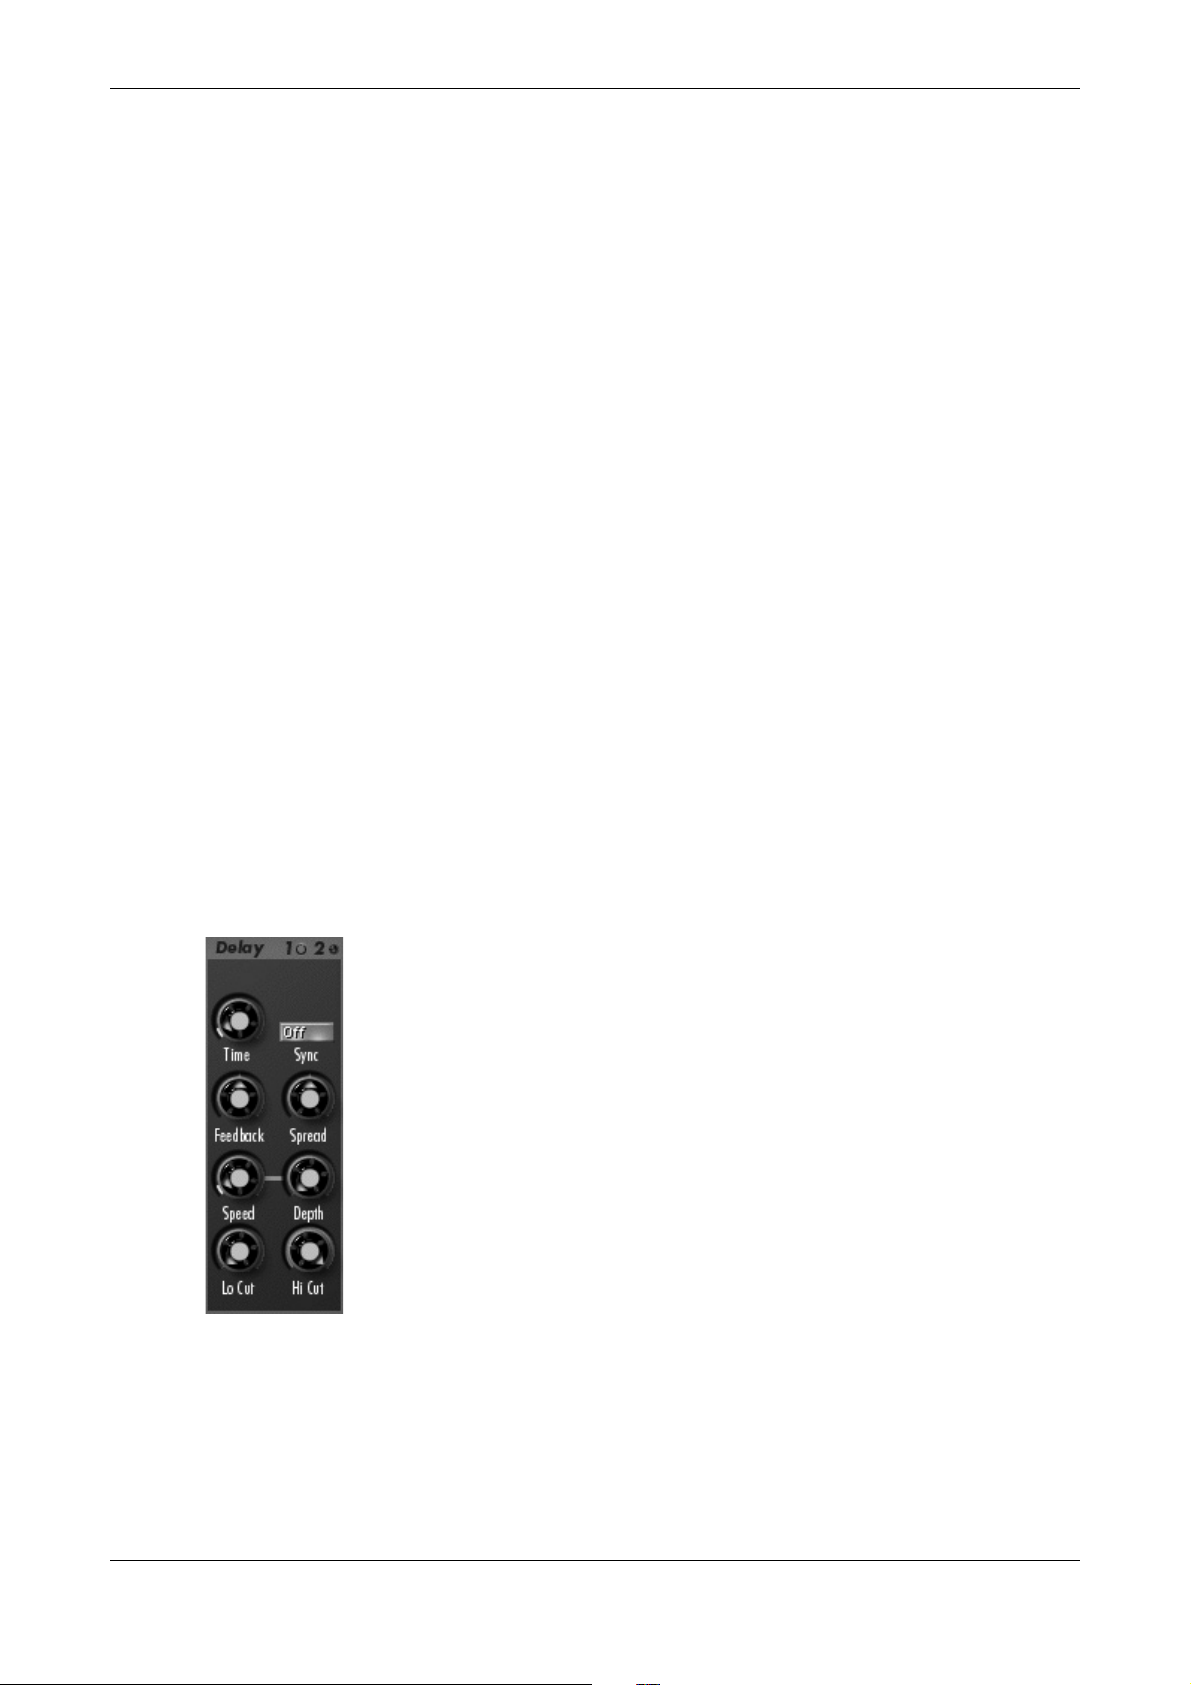
Amplifier Section
This section is found near the end of the Attack’s signal routing, follo-
wed by the Delay FX section. Its purpose is to set the volume of the
sound.
It is important to know that Envelope 2 always controls the amplifier
level.
Additionally the Amplifier section offers sound output, panning and effect send levels.
Output 1...6
The Attack offers 6 stereophonic audio outputs. This parameter sets the audio output
of the selected sound. You can use this function to assign different effects or EQ settings to sounds of a kit.
Please take into account that Delay 1 only appears on stereo output 1, and Delay 2
only on stereo output 2. Outputs 3 to 6 are always dry.
Volume -
∞
dB...0 dB
Sets the output volume of the selected sound.
Vel (Velocity) -100%...100%
Specifies by how much volume will be affected by keyboard velocity. Use this feature to give more expression to the sound. With a setting of 0, velocity will have no
effect on volume. For positive settings, the volume rises with higher velocities. This is
the most commonly used setting. With negative settings, the volume decreases at
Waldorf Edition
User Manual 24 Waldorf
higher velocities. This gives an aypical character suitable for effect sounds. The maximum volume is always set with the Volume parameter.
Pan (Panning) 100%L...Center...100%R
Determines the position in the stereo panorama. When the setting is to the left, the
sound is panned far left; when the setting is to the right, it is panned far right. If you
want to situate the sound in the middle of the stereo panorama, use the Center setting. Because the delay effects are independent from the pan settings, the higher the
proportion of delayed signal in your mix, the less pronounced the panning effect wil
be.
Mix 100:0%...0:100%
This parameter controls the volume ratio between the original signal and the effect
output of the integrated delay effects. If set to 100:0, the dry signal is sent to the
outputs only, so that no effects can be heard. Higher values will increase the effect
signal. At the maximum setting, 0:100, the pure effected signal will be heard.
XOR Group Off, 1, 2, 3
Assigns the selected instrument to one of the three XOR groups. When several
instruments of the same XOR group receive MIDI notes, the sounding instrument will
be muted by the succeeding one. Use this function to program realistic hi-hats,
especially if only the open or closed hat should be heard. This parameter can also be
used to create monophonic synth sounds. When you set the sync parameter in the
filter section to Off and assign different instruments to the same XOR group, the LFO
stays in sync nonetheless, since the same voice is always triggered.
Delay Effect Sections
The Attack offers two independent Modulation Delay effects. These
effects are tied to outputs 1 and 2. When a sound is routed to 1, delay
1 is selected automatically, and similarly delay 2 appears at output 2.
A delay creates repeats of the input signal. The delay time can be set
either in milliseconds or in musical note values if Sync is selected
(this assumes that your host application can send tempo information
to the plug-in). The maximum delay time is 2 seconds. Additionally,
the delay can be modulated.
Time 0ms...2000ms
Sets the length of the delay tap in milliseconds or note values depending on the
Sync setting (if your host application supports VST 2.4 or higher).

Waldorf Edition
User Manual 25 Waldorf
Sync
Syncs the delay time to the tempo of the host application (assuming that it is capable
of sending needed timing information to the Attack). When you click on the (delay-)
Sync button, a pop-up menu will appear to select the different settings.
Off allows no synchronisation. Time can be set in milliseconds.
2 Bars to 1/64 syncs the delay time in musical note values.
1/2. Bars to 1/64. syncs the delay time in dotted note values.
1/1t Bars to 1/64t syncs the the delay time in third note values.
Feedback -100%...100%
Controls the amount of signal that is routed back into the delay line. Lower feedback
values will by definition produce fewer echoes than higher values. Very short delay
time settings can be colored by feedback settings.
Spread 50:100%...100:50%
Spreads the left and right delay output to half of the delay time maximum. Settings
from 50:100% or 100:50% create a typical ping pong delay.
Speed 0.01 Hz...10 Hz
The delay effect can be modulated in its delay time with the integrated low frequency oscillator (LFO). Speed determines the frequency of the LFO.
Depth 0%...100%
Controls the modulation depth when delay time is changed by means of the LFO.
The depth ranges from no delay to the amount set by the Time parameter.
Lo Cut
Dampens the lower frequencies of the signal generated by the delay effect. The filter
is inserted before the feedback loop, thus dampening each successive step. Lower
values suppress deeper frequencies from the feedback.
In conjunction with the Hi Cut Parameter, the delay effect can thus be narrowed to a
certain frequency range.
Hi Cut
Dampens the higher frequencies of the signal generated by the delay effect. The filter
is inserted before the feedback loop, thus dampening each successive step. This
creates the typical dulled effect familiar from natural delays. Lower values suppress
deeper frequencies from the feedback. In conjunction with the Lo Cut Parameter,
the delay effect can thus be narrowed to a certain frequency range.

Waldorf Edition
User Manual 26 Waldorf
Envelopes
The envelopes create a control signal that varies
with time. They are used, for example, to
modulate the filter settings or the level of a
sound within a given period of time. The
envelopes are structured identically, and offer
Attack, Decay, Shape and Release. Attack and
Decay can also be graphically edited. If you press a key, the envelope is started. The
envelope parameter has the following functions:
Attack defines the period of time for the envelope to rise to its maximum.
Decay defines the time for the envelope to fall to 0.
Shape controls the shape of the Decay and Release phases. You can shade
from exponential to linear to inverse exponential, or to a combination of
exponential and inverse exponential (cosine like).
After you let go of the key, Release defines the period of time it takes for
the envelope to sink back to zero. If you turn Release fully left, this parameter is ignored. This is the most useful setting for drum sounds.
Both envelopes can be edited quickly and easily with the mouse. Editing is simplified by the graphic changes you see in the corresponding function.
To edit, click on the respective handle and drag in the desired direction. The changes and their parameter names are visible in the display.
Keep the following in mind:
w Envelopes 1 and 2 are structured identically. Attack and Decay are time-
dependent parameters, which is why they can only be moved horizontally.
Envelope 1
Envelope 1 allows you to manipulate different sound parameters. The intensity of
modulation is controlled with the corresponding Env or Vel parameter.
Envelope 2
Envelope 2 is structured identically to Envelope 1, but is pre-routed to the amplifier
level.

Waldorf Edition
User Manual 27 Waldorf
Programming Drum Sounds
To understand how to create drum sounds, you should know a little about how the
classic drum machines worked. The following sections give some insights how particular sounds were built and information how to achieve similar results on the Waldorf Attack.
Roland TR-808 Bass Drum
On the Roland TR-808, this sound was made by one filter with a high resonance setting,
triggered by a short impulse. Two controls were provided to adjust the bass drum:
"Tone" was used to set the pitch by changing the filter's cutoff frequency, and "Decay" was used to set its resonance, which in turn controlled the decay rate.
On the Attack, you could use the filter´s self-oscillation by triggering it with a short
noise impulse made by the second oscillator, whose volume you can control by an
envelope.
But a better way is to use Oscillator 1 playing a sine wave, and by changing the
initial click impulse by means of the filter.
Roland TR-909 Bass Drum
The Roland TR-909 used an oscillator and a noisy click, controlled by three envelopes, to create a bass drum sound. The oscillator played a sine wave whose pitch
was controlled by an envelope and the "Tune" control. The rate of the envelope’s
decay was not adjustable.
This oscillator signal was routed to an amplifier with an envelope whose "Decay" parameter adjusted the decay rate of the envelope. The second part of the bass drum
sound was made with a short impulse and a low pass filtered noise generator, both
summed and routed into another envelope that controlled their output volume. The
"Attack" parameter controlled the overall pulse/noise level, and the decay rate of the
envelope was not adjustable.
On the Attack, you can make this sound as follows: Oscillator 1 plays a sine wave,
and Envelope 2 is used to modulate its pitch. This means that the pitch of the oscillator becomes higher or lower depending on the setting of the Decay parameter of Envelope 2, but this slight variation doesn't affect the drum sound once it has been set
up.
The noise of the impulse can be ignored, because it is low pass filtered anyway. But
how do we create an impulse with the Attack? The answer is simply to use a square
wave with a very low pitch setting for Oscillator 2, and to control its level with a
very short envelope. Now we have an impulse. This impulse is low pass filtered afterwards with a slightly resonating filter, preferrably set to around 5000Hz with a resonance of around 18%.
With the Oscillator 1 Pitch and Pitch Env controls you can adjust the sound of the
bass drum, while Envelope 2 Decay controls its length.
 Loading...