

Page 1

W
W A L C H E M
IWAKI America Inc.
ebMaster®ONE Controllers
Web
Master®ONE
Water Treatment Controller
Instruction Manual
Five Boynton Road Hopping Brook Park Holliston, MA 01746 USA
TEL: 508-429-1110 FAX: 508-429-7433 WEB: www.walchem.com
Page 2

Notice
© 2014 WALCHEM, Iwaki America Inc. (hereinafter “Walchem”)
Five Boynton Road, Holliston, MA 01746 USA
(508) 429-1110
All Rights Reserved
Printed in USA
Proprietary Material
The information and descriptions contained herein are the property of WALCHEM. Such
information and descriptions may not be copied or reproduced by any means, or
disseminated or distributed without the express prior written permission of WALCHEM,
Five Boynton Road, Holliston, MA 01746.
Statement of Limited Warranty
WALCHEM warrants equipment of its manufacture, and bearing its identification to be
free from defects in workmanship and material for a period of 24 months for electronics
and 12 months for mechanical parts and electrodes from date of delivery from the factory
or authorized distributor under normal use and service and otherwise when such
equipment is used in accordance with instructions furnished by WALCHEM and for the
purposes disclosed in writing a the time of purchase, if any. WALCHEM’s liability under
this warranty shall be limited to replacement or repair, F.O.B. Holliston, MA U.S.A. of
any defective equipment or part which, having been returned to WALCHEM,
transportation charges prepaid, has been inspected and determined by WALCHEM to be
defective. Replacement elastomeric parts and glass components are expendable and are
not covered by any warranty.
THIS WARRANTY IS IN LIEU OF ANY OTHER WARRANTY, EITHER EXPRESS OR
IMPLIED, AS TO DESCRIPTION, QUALITY, MERCHANTABILITY, and FITNESS FOR
ANY PARTICULAR PURPOSE OR USE, OR ANY OTHER MATTER.
180272 Rev AC
Jan 2014
Page 3

TABLE OF CONTENTS
INTRODUCTION ........................................................................................................................................... 1
1.0
2.0 SPECIFICATIONS ......................................................................................................................................... 1
2.1 .....MEASUREMENT PERFORMANCE ..................................................................................................................... 1
2.2.....ELECTRICAL ................................................................................................................................................... 2
2.3.....MECHANICAL ................................................................................................................................................. 3
2.4.....VARIABLES AND THEIR LIMITS ....................................................................................................................... 5
3.0 UNPACKING & INSTALLATION ............................................................................................................. 10
3.1 .....UNPACKING THE UNIT .................................................................................................................................. 10
3.2 .....MOUNTING THE ELECTRONIC ENCLOSURE ................................................................................................... 10
3.3.....INSTALLATION.............................................................................................................................................. 10
3.4.....ICON DEFINITIONS ........................................................................................................................................ 14
3.5 .....ELECTRICAL INSTALLATION ......................................................................................................................... 18
4.0 FUNCTION OVERVIEW ............................................................................................................................ 27
4.1 .....FRONT PANEL ............................................................................................................................................... 27
4.2.....DISPLAY ....................................................................................................................................................... 27
4.3..... KEYPAD ....................................................................................................................................................... 28
4.4 .....ACCESS CODES ............................................................................................................................................. 28
4.5.....INITIAL STARTUP .......................................................................................................................................... 28
4.6 .....COMMUNICATING WITH THE WEBMASTERONE .......................................................................................... 30
4.7.....STARTUP ...................................................................................................................................................... 36
4.8 .....SHUT DOWN ................................................................................................................................................. 36
5.0 OPERATION – USING LOCAL DISPLAY AND KEYPAD .................................................................... 36
5.1 .....INPUT SUMMARY .......................................................................................................................................... 36
5.2 .....INDICES ........................................................................................................................................................ 37
5.3 .....OUTPUT SUMMARY ...................................................................................................................................... 37
5.4.....ALARMS ....................................................................................................................................................... 37
5.5 .....CALIBRATION ............................................................................................................................................... 37
5.7 .....SET POINTS .................................................................................................................................................. 44
5.8 .....COMMUNICATION ......................................................................................................................................... 48
5.9 .....ACCESS CODES ............................................................................................................................................. 50
5.10...SOFTWARE UPGRADE ................................................................................................................................... 50
5.11...COPY TO USB DISK ...................................................................................................................................... 50
5.12...FEATURE ACTIVATIONS ............................................................................................................................... 51
5.13...CONTROLLER RESTART ................................................................................................................................ 51
6.0 OPERATION – USING PC .......................................................................................................................... 51
6.1.....MENU SELECTION LINKS .............................................................................................................................. 52
6.2.....START UP MENU ........................................................................................................................................... 52
6.3 .....SYSTEM SUMMARY MENU ........................................................................................................................... 57
6.4 .....SENSOR MENU - CONDUCTIVITY INPUT ........................................................................................................ 58
6.5 .....SENSOR MENU - PH INPUT ........................................................................................................................... 61
6.6.....SENSOR MENU - ORP INPUT ........................................................................................................................ 65
6.7.....SENSOR MENU – CHLORINE, CHLORINE DIOXIDE INPUTS ............................................................................ 68
6.8 .....LEVEL (4-20 MA) INPUT MENU .................................................................................................................... 72
6.9.....FLOW METER (4-20 MA) INPUT MENU ......................................................................................................... 74
6.10...GENERIC (4-20 MA) INPUT MENU ................................................................................................................ 75
6.11...4-20 MA INPUT MENU .................................................................................................................................. 77
6.12...FLOW METER (DIGITAL) INPUT MENU ......................................................................................................... 79
6.13...INTERLOCK MENU ........................................................................................................................................ 81
Page 4

6.14...FEED VERIFICATION INPUT MENU ................................................................................................................ 81
6.15...LEVEL SWITCHES (DIGITAL) INPUT MENU ................................................................................................... 82
6.16...GENERIC (DIGITAL) INPUTS MENU ............................................................................................................... 82
6.17...COUNTER INPUTS MENU .............................................................................................................................. 83
6.18... DIGITAL INPUTS MENU ................................................................................................................................ 84
6.19... RELAY (1 – 8) OUTPUT MENUS – ON/OFF SET POINT TYPES ....................................................................... 84
6.20...RELAY (1-8) OUTPUT MENUS – TIME PROPORTIONAL TYPES ...................................................................... 87
6.21...RELAY (1 – 8) OUTPUT MENUS – CYCLES OF CONCENTRATION TYPES ........................................................ 89
6.22...RELAY (1 – 8) OUTPUT MENUS – INTERMITTENT (FIXED BLOWDOWN TIME) TYPES ................................... 92
6.23...RELAY (1 – 8) OUTPUT MENUS – INTERMITTENT (PROPORTIONAL BLOWDOWN TIME) TYPES ..................... 94
6.24...RELAY (1 - 8) OUTPUT MENUS – FLOW BASED FEED TYPE .......................................................................... 96
6.25...RELAY (1-8) OUTPUT MENUS – FEED WITH ANOTHER RELAY TYPES ......................................................... 99
6.26...RELAY (1 – 8) OUTPUT MENUS – FEED AFTER ANOTHER RELAY (%) TYPES ............................................. 101
6.27...RELAY (1-8) OUTPUT MENUS – FEED AFTER ANOTHER RELAY (FIXED TIME) .......................................... 103
6.28...RELAY (1 – 8) OUTPUT MENUS – FEED AS % OF TIME TYPES ..................................................................... 105
6.29...RELAY (1 – 8) OUTPUT MENUS – BIOCIDE TIMER BASED TYPES ............................................................... 107
6.30...RELAY (1 – 8) OUTPUT MENUS – SPIKE SET POINT TYPES ......................................................................... 110
6.31...RELAY (1 – 8) OUTPUT MENUS – DISPERSANT TYPES ................................................................................ 112
6.32...RELAY (1-8) OUTPUT MENUS - BLEED VOLUME BASED ON MAKEUP VOLUME ......................................... 115
6.33...RELAY (1- 8) OUTPUT MENU – ALARM TYPE ............................................................................................. 117
6.34...RELAY (1-8) OUTPUT MENUS – ACTIVATE ON A DI ................................................................................... 119
6.35...RELAY (1 - 8) OUTPUT MENUS – TARGET PPM FEED TYPE ....................................................................... 121
6.36...RELAY (1 - 8) OUTPUT MENUS – TARGET PPM FEED WITH FEED VERIFICATION TYPE ............................. 124
6.37...ANALOG OUTPUT (1-4) MENU – RETRANSMIT MODE ................................................................................ 127
6.38...ANALOG OUTPUT MENUS (1-4) - PROPORTIONAL FEED MODE .................................................................. 128
6.39...REMOTE ALARMING ................................................................................................................................... 131
6.40...LSI/RSI ...................................................................................................................................................... 132
6.41...VTOUCH CONFIG ....................................................................................................................................... 133
6.42...SYSTEM STATUS AUTO-REPORTING ........................................................................................................... 134
6.43...DATALOG AUTO REPORT ........................................................................................................................... 135
6.44...MANUAL DATALOG .................................................................................................................................... 137
6.45...GRAPHING/TRENDING ................................................................................................................................ 140
6.46...COMMUNICATIONS MENU .......................................................................................................................... 140
6.47...ADVANCED COMMS ................................................................................................................................... 145
6.48... CONFIGURATION FILE MENU ..................................................................................................................... 146
6.49...NOTEPAD ................................................................................................................................................... 147
6.50...ACCESS CODES ........................................................................................................................................... 147
6.51...SOFTWARE UPGRADES (ONLY APPEARS IF A NEWER REVISION OF SOFTWARE IS AVAILABLE) .................... 147
6.52...SUB-NETWORK .......................................................................................................................................... 148
7.0 MAINTENANCE ........................................................................................................................................ 149
7.1.....FLOW SWITCH CLEANING .......................................................................................................................... 149
7.2.....CONDUCTIVITY SENSOR CLEANING AND CALIBRATION ............................................................................. 151
7.3.....PH ELECTRODE CLEANING AND CALIBRATION .......................................................................................... 152
7.4.....ORP ELECTRODE CLEANING AND CALIBRATION ....................................................................................... 152
7.5.....DISINFECTION SENSOR CLEANING AND CALIBRATION ............................................................................... 153
7.6.....REPLACING THE FUSES ............................................................................................................................... 153
8.0 TROUBLESHOOTING .............................................................................................................................. 154
8.1.....ERROR MESSAGES ................................................................................................................................ 154
8.2.....PROBLEMS THAT DON’T GENERATE AN ERROR MESSAGE ........................................................ 171
8.3 .....CONNECTION PROBLEMS ................................................................................................................... 173
9.0 SERVICE POLICY ..................................................................................................................................... 174
Page 5

1.0 INTRODUCTION
The WebMasterONE series controller is multi-functional, but not all of the features mentioned are
necessarily present in the controller you have received. All features can be added in the field. The
controller may be configured to control a cooling tower, or a boiler, or both.
Standard features include a direct sensor measurement of either conductivity, pH, or ORP; six
digital inputs (for flow switch, metering pump flow feedback, counter, or other use), eight relay
outputs, and both Ethernet and USB connections to a computer.
Optional features include:
Up to three additional pH, ORP, chlorine, chlorine dioxide and/or conductivity measurements.
Up to six digital inputs (for level switch, metering pump flow feedback, counter, or other use).
Up to eight 4-20 mA inputs (for drum level, flow meters, or practically any other parameter).
Up to four 4-20 mA outputs (for retransmission of the conductivity, pH, ORP, Cl
temperature or any 4-20 mA input signals).
A modem card (for remote communications)
The controller can log data and events, automatically generate reports on a periodic basis at a
programmable frequency, and if equipped with a modem card, dial out in the event of an alarm
condition. The alarm notification may be via phone to a pager, or email.
Our revolutionary digital communications package allows you to change set points, manually
activate or deactivate pumps and valves, upgrade software, receive reports and alarms, from any
PC that has Internet access. No proprietary software needs to be installed on the PC, only a web
browser.
, ClO2,
2
2.0 SPECIFICATIONS
2.1 Measurement Performance
Contacting Conductivity pH
Range 0-10,000 µS/cm Range -2 to 16 pH units
Resolution 1 µS/cm Resolution 0.01 pH units
Calibration ± 50% of raw reading; Calibration single or dual point
scalable to read in ppm
mV Temperature
Range ± 1400 mV Range 32 to 392°F (0 to 200°C)
Resolution 1 mV Resolution 1°F (1°C)
Calibration single or dual point Calibration single point; degrees C or F
Chlorine Chlorine Dioxide
Range 0 to 8 mg/l Range 0 to 10 mg/l
Resolution 0.01 mg/l Resolution 0.01 mg/l
Calibration single or dual point Calibration single or dual point
Electrodeless Conductivity
Ranges 50 to 1000 µS/cm, 1-10 mS/cm, 10-100 mS/cm, or 100-1000 mS/cm
Resolution 1 µS/cm or 1 mS/cm (range dependent)
Calibration single or dual point; scalable to read in ppm or % concentration
1
Page 6

2.2 Electrical
Inputs
Input power 100 – 120/220-240 VAC ±10%, 12A, 50/60 Hz Fuse 1.6A, 5 x 20mm
Input signals
State-Type Digital Inputs Electrical: Non-isolated 5 VDC with 301K ohm pull-up
Low Speed Counter-Type
Digial Inputs
High Speed Counter-Type
Digial Inputs
Analog Inputs (1-8)
(Optional)
Sensor STANDARD (1)
Signal (isolated) ±1.5V Signal (isolated) ±1.5V
Temp (isolated) 1K or 10K or 100K ohm Temp (isolated) 1K or 10K or 100K ohm
Outputs
Typical response time: <10 seconds
Devices supported: Any isolated dry contact (i.e. relay, reed switch)
Types: Interlock, Level switch, Generic input
Electrical: Non-isolated 5 VDC with 301K ohm pull-up, 0-10 Hz, 50 msec minimum
width
Devices supported: Any device with isolated open drain, open collector, transistor or
reed switch
Supported on inputs: Standard inputs A-D, Optional inputs 1-6
Types: Contacting Flowmeter, Feed Verification, Generic Counter
Electrical: Non-isolated 5 VDC with 301K ohm pull-up, 0-400 Hz, 1.25 msec
minimum width
Devices supported: Any device with isolated open drain, open collector, transistor or
reed switch
Supported on inputs: Standard inputs A-D, Optional inputs 5-6
Types: Paddlewheel Flowmeter, Generic Counter
4-20 mA, 2-wire or 3 -wire, internally powered by 24 VDC, 25 ohm input resistance,
1000 ohm maximum load. Typical response time <10 seconds
Sensor OPTIONAL (3)
STANDARD
Mechanical relays:
R1, R2, R3, and R4 relays are fused together as one group, total current for this group must not exceed 5.5A
R5, R6, R7 and R8 relays are fused together as one group, total current for this group must not exceed 5.5A.
Relays 1-8 may be dry contact or may switch line (mains) voltage, depending upon model code; refer to Figure 4. Powered
relays have both NO and NC terminals available. Only powered relays are fused.
Digital: USB
Ethernet, 10 Base T
At 115 VAC, 10 amp (resistive), 1/8 HP
At 230 VAC, 6 amp (resistive), 1/8 HP
OPTIONAL
4-20 mA (1-4): Isolated, 500 ohm max. resistive load, internally powered
Agency Approvals
Safety ANSI/UL 61010-1:2012 3rd Ed.
C22.2 No. 61010-1:2012 3rd Ed.
IEC 61010-1:2010 3rd Ed.
EN 61010-1:2010 3rd Ed.
EMC IEC 61326-1:2005
EN 61326-1:2006
Note: For EN61000-4-6, and EN 61000-4-3, the controller meets performance criteria B.
*Class A equipment: Equipment suitable for use in establishments other than domestic, and those directly connected
to a low voltage (100-240 VAC) power supply network which supplies buildings used for domestic purposes.
2
Page 7

2.3 Mechanical
Enclosure
Material: Polycarbonate
NEMA Rating: NEMA 4X
Dimensions: 10” x 12” x 5-5/8” (25.4cm x 30.5cm x 14.5cm)
Display: 64 x 128 Pixel Backlit LCD Graphics Module
Operating Ambient Temp: 32-120°F (0 to 49°C)
Storage Temp: -20 to 176°F (-29 to 80°C)
Weight 11.5lb (5.2kg)
Flow switch manifold
Pressure: 150 psi up to 100° F, 50 psi @140° F
Temperature: 32 to 140°F (0 to 60°C)
Process connections: ¾” NPTF
Wetted Materials of construction: Glass-Filled Polypropylene, PVC, FKM, Isoplast
pH Electrode
Pressure: 0 to100 psi
Temperature: 50 to158°F (10 to 70°C)
Process connections: ¾” NPTF
Wetted Materials of Construction: Glass-Filled Polypropylene, CPVC, HDPE,
FKM, Glass
ORP electrode
Pressure: 0 to100 psi
Temperature: 32 to 158°F (0 to 70°C)
Process connections: ¾” NPTF
Wetted Materials of Construction: Glass-Filled Polypropylene, CPVC, HDPE,
FKM, Platinum, Glass
Contacting conductivity electrode
Pressure: 0 to150 psi
Temperature: 32 to158°F (0 to 70°C)
Process connections: ¾” NPTF
Wetted Materials of Construction: Glass-Filled Polypropylene, Graphite, FKM
Electrodeless conductivity sensor
Pressure: 0 to150 psi
Temperature: 32 to158°F (0 to 70°C)
Process connections: ¾” NPTF
Wetted Materials of Construction: Glass-Filled Polypropylene, CPVC, FKM
Stainless steel contacting conductivity electrode
Pressure: 0-150 psi
Temperature: 32-158°F (0 to 70°C)
Process connections: ¾” NPTF
Wetted Materials of Construction: Glass-Filled Polypropylene, 316 SS, FKM
3
Page 8

Chlorine, Chlorine Dioxide sensors
Pressure: 0 to 1 atm (0 to 14.7 psi)
Temperature
Chlorine Dioxide sensors: 41 to 122°F (5 to 50°C)
Chlorine: 41 to 113°F (5 to 45°C)
Flow Cell Inlet: ¼” NPTF
Flow Cell Outlet: ¾” NPTF
Wetted Materials of Construction: PVC, Silicone or PTFE, Nylon, Isoplast, FKM
High pressure tower contacting conductivity electrode
Pressure: 0-300 psi
Temperature: 32-158°F (0 to 70°C)
Process connections: ¾” NPTM
Wetted Materials of Construction: 316 SS, PEEK
High pressure boiler contacting conductivity electrode
Pressure: 0-250 psi
Temperature: 32-401°F (0 to 205°C)
Process connections: ¾” NPTM
Wetted Materials of Construction: 316 SS, PEEK
High pressure pH electrode
Pressure: 0-300 psi
Temperature: 32-275°F (0 to 135°C)
Process connections: ¾” NPTM
Wetted Materials of Construction: Glass, Polymer, PTFE, 316 SS, FKM
High Pressure ORP electrode
Pressure: 0-300 psi
Temperature: 32-275°F (0 to 135°C)
Process connections: ¾” NPTM
Wetted Materials of Construction: Platinum, Polymer, PTFE, 316 SS, FKM
High Pressure flow switch
Pressure: 0-300 psi
Temperature: 32-158°F (0 to 70°C)
Process connections: ¾” NPTF
Wetted Materials of Construction: Carbon steel, Brass, 316SS, FKM”
4
Page 9

2.4 Variables and their Limits
All menus shown may not be available. The menus that appear on your controller will vary with
options installed and programmed.
Sensor Input Menu – if pH
Calibration Reminder 0-365 days
Alarm Limits -2 to 16
Alarm Dead Band -2 to 16
Deviation from Primary Sensor 0.01 to 18
Damping 0 to 60 seconds
Temperature Alarm Limits 23 to 302°F (-5 to 150 °C)
Sensor Input Menu – if ORP
Calibration Reminder 0-365 days
Alarm Limits -1400 to 1400 mV
Alarm Dead Band -1400 to 1400 mV
Deviation from Primary Sensor 0.01 to 2800 mV
Damping 0 to 60 seconds
Temperature Alarm Limits 23 to 190°F (-5 to 88 °C)
Sensor Input Menu – if Contacting Conductivity
Calibration Reminder 0 – 365 days
ppm Conversion Factor 0.5 – 1.0
Alarm Limits 0 to 10,000 (units defined by user)
Alarm Dead Band 0 to 30,000 (units defined by user)
Deviation from Primary Sensor 0.01 to 30,000 (units defined by user)
Damping 0 to 60 seconds
Temperature Alarm Limits 23 to 190°F (-5 to 88 °C)
Sensor Input Menu – if High Temp Contacting Conductivity
Calibration Reminder 0 – 365 days
ppm Conversion Factor 0.5 – 1.0
Alarm Limits 0 to 10,000 (units defined by user)
Alarm Dead Band 0 to 30,000 (units defined by user)
Deviation from Primary Sensor 0.01 to 30,000 (units defined by user)
Damping 0 to 60 seconds
Temperature Alarm Limits 32 – 392°F (0 to 200°C)
Sensor Input Menu – if Electrodeless Conductivity
Calibration Reminder 0 – 365 days
ppm Conversion Factor 0.5 – 1.0
Alarm Limits 0 to full scale of range
Alarm Dead Band 0 to full scale of range
Deviation from Primary Sensor 0.01 to full scale of range
Temperature Alarm Limits 23 to 190°F (-5 to 88 °C)
5
Page 10

Sensor Input Menu – if Chlorine or Chlorine Dioxide
Calibration Reminder 0-365 days
Alarm Limits 0 to 10 mg/l
Alarm Dead Band 0 to 10 mg/l
Deviation from Primary Sensor 0.01 to 10 mg/l
Damping 0 to 60 seconds
Flowmeter Input Menu – Analog Input Type
Flow Rate at 4 mA 0 to 1000 (units of measure defined by user)
Flow Rate at 20 mA 0 to 1000 (units of measure defined by user)
Level Input Menu – Analog Input Type
Empty mA 0 to 20 mA
Full mA 0 to 20 mA
Full volume 0 to 10,000 (units defined by user)
Low Level Alarm Limit 0.001 to 10,000 (units defined by user)
Generic 4-20 mA Input Menu
Parameter = 4 mA -10,000 to 10,000 (units defined by user)
Parameter = 20 mA -10,000 to 10,000 (units defined by user)
Low Alarm Limit -100,000,000 to 100,000,000 (units defined by user)
High Alarm Limit -100,000,000 to 100,000,000 (units defined by user)
Flowmeter Input Menu – Digital Input Type
Volume per Contact 0 to 1000 (units of measure defined by user)
K Factor 0.001 to 20,000 (Pulses per Gallon or Liter)
Total Alarm Limit 0 = no limit, otherwise >0
Rate High Alarm >0
Rate Low Alarm >0
Feed Verification Input Menu
Alarm Time 0.1 to 10 minutes
Pump Volume per Stroke 0.000 to 100 (units of measure defined by user)
Counter Input Menu
One Count = >0
Total Alarm Limit 0 =no limit, otherwise >0
Rate High Alarm >0
Rate Low Alarm >0
Relay Output Menu – On/Off Set Point
Set Point Full scale range of the input parameter
Dead Band Full scale range of the input parameter
Output Time Limit 0 = , 1 to 1440 minutes
Hand Time Limit 1 to 1440 minutes
6
Page 11

Relay Output Menu – Time Proportional
Set Point Full scale range of the input parameter
Sample Period 1 to 1440 minutes
Proportional Band Full scale range of the input parameter
Output Time Limit 0 = , 1 to 1440 minutes
Hand Time Limit 1 to 1440 minutes
Relay Output Menu – Feed with Another Relay
Output Time Limit 0 = , 1 to 1440 minutes
Hand Time Limit 1 to 1440 minutes
Relay Output Menu – Feed after Another Relay (Fixed Time)
Fixed Time to Feed 0 to 1440 minutes
Hand Time Limit 1 to 1440 minutes
Relay Output Menu – Flow Based Feed
Volume to trigger Feed 1 to 99,999 (units defined by user)
Feed Time per unit Volume 1 second to 1440 minutes
Output Time Limit 0 = , 1 to 1440 minutes
Hand Time Limit 1 to 1440 minutes
Relay Output Menu – Biocide Timer Based
Output On-Time 0 = , 1 to 1440 min
Hand Time Limit 1 to 1440 minutes
Relay Output Menu – Feed After Another Relay (%)
% of Relay to Feed 0 to 100%
Output Time Limit 0 = , 1 to 1440 minutes
Hand Time Limit 1 to 1440 minutes
Relay Output Menu – Feed as % Time
Time Period 1 – 1440 minutes
% of Period to Feed 0.1 to 100%
Output Time Limit 0 = , 1 to 1440 minutes
Hand Time Limit 1 to 1440 minutes
Relay Output Menu – Cycles of Concentration
Cycles Set Point 1 – 50 cycles
Cycles Dead band 0.01 – 20 cycles
Cycles Low Alarm 0 – 50 cycles
Cycles High Alarm 0 – 50 cycles
Output Time Limit 0 = , 1 to 1440 minutes
Hand Time Limit 1 to 1440 minutes
7
Page 12

Relay Output Menu – Spike
Set Point Full scale range of the parameter
Dead Band Full scale range of the parameter
Relay On-Time 1 sec to 1440 minutes
Hand Time Limit 1 to 1440 minutes
Relay Output Menu – Intermittent, Fixed Blowdown Time
Set Point Full scale range of the parameter
Interval Time 5 to 1440 minutes
Duration of Sample 10 seconds to 60 minutes
Hold Time 30 seconds to 10 minutes
Blowdown Time 1 to 1440 minutes
Hand Time Limit 1 to 1440 minutes
Relay Output Menu – Intermittent, Proportional Blowdown Time
Set Point Full scale range of the parameter
Interval Time 5 to 1440 minutes
Duration of Sample 10 seconds to 60 minutes
Hold Time 30 seconds to 10 minutes
Blowdown Time 1 to 1440 minutes
Hand Time Limit 1 to 1440 minutes
Relay Output Menu - Alarm
On Delay Time 0 to 1440 minutes
Power Up On Delay Time 0 to 1440 minutes
Output Time Limit 0 = , 1 to 1440 minutes
Hand Time Limit 1 to 1440 minutes
Relay Output Menu – Activate on a DI
On Delay Time 10 seconds to 1440 minutes
Off Delay Time 10 seconds to 1440 minutes
Output Time Limit 0 = , 1 to 1440 minutes
Hand Time Limit 1 to 1440 minutes
Relay Output Menu – Target PPM Feed
Makeup Conductivity Full scale range of the parameter
Unit Volume to Trigger Output 1 to 999,999,999 (units defined by user)
Target PPM Set Point 0 to 100,000 ppm
Specific Gravity of Chemical Fed 0 to 10.000 g/ml
Pump Flow Rate 0 to 1,000 (units defined by user)
Output Time Limit 0 = , 1 to 1440 minutes
Hand Time Limit 1 to 1440 minutes
8
Page 13

Relay Output Menu – Target PPM Feed with Feed Verification
Makeup Conductivity Full scale range of the parameter
Unit Volume to Trigger Output 1 to 999,999,999 (units defined by user)
Target PPM Set Point 0 to 100,000 ppm
Specific Gravity of Chemical Fed 0 to 10.000 g/ml
Output Time Limit 0 = , 1 to 1440 minutes
Hand Time Limit 1 to 1440 minutes
4-20 mA Output Menu - Retransmit
(parameter selected) = 4 mA Full scale range of the parameter
(parameter selected) = 20 mA Full scale range of the parameter
Full Scale Ranges are:
Contacting Conductivity: 0 to 10,000 μS/cm
Electrodeless Conductivity: 50 to 10,000 μS/cm
Or 10 mS/cm to 100 mS/cm
Or 100 mS/cm to 1000 mS/cm
Temperature: 32 to 392°F (-18 to 200° C)
pH: -2 to 16 standard units
ORP: -1400 to 1400 mV
Chlorine, Chlorine Dioxide 0 to 10 mg/l
4-20 mA Output Menu – Proportional Feed
Set Point Full scale range of the parameter
Minimum Output Allowed 0 – 100%
Input Value when Output is Max Full scale range of the parameter
Damping 0 – 60 seconds
Interlock Value 0 – 100%
Input Fault Value 0 – 100%
Input Cal Set Value 0 – 100%
Output Time Limit 0 = , 1 to 1440 minutes
Hand Time Limit 1 to 1440 minutes
Hand Value 0 – 100%
Full Scale Ranges are:
Contacting Conductivity: 0 to 10,000 μS/cm
Electrodeless Conductivity: 50 to 10,000 μS/cm
Or 10 mS/cm to 100 mS/cm
Or 100 mS/cm to 1000 mS/cm
Temperature: 32 to 392°F (-18 to 200° C)
pH: -2 to 16 standard units
ORP: -1400 to 1400 mV
Chlorine, Chlorine Dioxide 0 to 10 mg/l
Data Logging Menu
Logging Interval 10 to 1440 minutes
9
Page 14

3.0 UNPACKING & INSTALLATION
3.1 Unpacking the Unit
Inspect the contents of the carton. Please notify the carrier immediately if there are any signs of
damage to the controller or its parts. Contact your distributor if any of the parts are missing. The
carton should contain a WebMasterONE and technical support package (contains instruction
manual, Quick Start Guide, CD and USB cable). Any options or accessories will be incorporated
as ordered.
3.2 Mounting the Electronic Enclosure
The WebMasterONE is supplied with mounting holes on the enclosure. It should be wall mounted
with the display at eye level on a vibration-free surface, utilizing all mounting holes for maximum
stability.
The enclosure is NEMA 4X rated, suitable for outdoor installation. The maximum ambient
operating temperature is 120° F (49° C); this should be considered if installation is in a high
temperature location.
The installation site should be in close proximity to grounded AC power, the chemistry to be
controlled, and phone line or Ethernet hub (if applicable).
Avoid locations that are in close proximity to sources of electrical noise (motor starters, power
transformers, variable speed motor drives, radio transmitters, etc.), corrosive fumes or excessive
moisture.
The enclosure requires the following clearances:
Top: 2”
Left: 10”
Right: 4”
Bottom: 8”
3.3 Installation
Plumbing
The WebMasterONE series controllers are supplied with a flow switch manifold designed to
provide a continuously flowing sample of cooling water to the sensors. Please refer to Figures 1
(a-d) below for some typical installation drawings.
Cooling Towers:
Tap off the discharge side of the recirculation pump to provide a minimum flow of 1 gallon per
minute through the flow switch manifold. The sample must flow into the bottom of the manifold in
order to close the flow switch, and return to a point of lower pressure in order to ensure flow.
Install an isolation valve on both sides of the manifold to stop flow for sensor maintenance.
IMPORTANT: To avoid damaging the female pipe threads on the supplied plumbing parts, use no
more than 3 wraps of PTFE tape and thread into the pipe FINGER tight only! DO NOT use any
pipe dope, plumber’s putty or other sealing products that contain diacetone alcohol, as these attack
the flow switch plastic! Use PTFE tape ONLY!
10
Page 15

Boilers:
The conductivity probe should be placed as close to the controller as possible, to a maximum
distance of 250 ft. The cable MUST be shielded from background electrical noise. Use 24 AWG,
3 twisted pair, shielded, low capacitance (15 pF/ft) cable such as Walchem P/N 102535 (Belden
9680) or equivalent.
Important Boiler Installation Notes: (see figure 1b and c)
1. Make sure the minimum water level in the boiler is at least 4-6 inches above the skimmer
blowdown line. If the skimmer line is closer to the surface, it is likely that steam will be drawn
into the line instead of boiler water. The skimmer line must also be installed above the highest
tube.
2. Maintain a 3/4 inch minimum pipe ID with no flow restrictions from the tap for the boiler
skimmer blowdown line to the electrode. If the ID is reduced below 3/4 inch, then flashing will
occur beyond that point and the conductivity reading will be low and erratic. Minimize the usage
of tees, valves, elbows or unions between the boiler and the electrode.
3. A manual shut off valve should be installed so that the electrode can be removed and cleaned.
This valve must be a full port valve in order to avoid a flow restriction. Keep the distance
between the tap for the boiler skimmer line to the electrode as short as possible, to a maximum
of 10 feet.
4. Mount the electrode in the side branch of a tee in a horizontal run of pipe. This will minimize
entrapment of steam around the electrode and will allow any solids to pass through.
5. There MUST be a flow restriction after the electrode and/or control valve in order to provide
back pressure. This flow restriction will be either a flow control valve or an orifice union. The
amount of the flow restriction will affect the blowdown rate as well, and should be sized
accordingly.
6. Install the motorized ball valve or solenoid valve per the manufacturer’s instructions.
7. For best results, align the hole in the conductivity electrode such that the direction of water flow
is through the hole.
Guide to Sizing Blowdown Valves and Orifice Plates
1. Determine the Rate of Steam Production in Pounds per Hour:
Either read off the boiler name plate (water-tube boilers) or Calculate from horsepower rating (fire-tube
boilers):
HP x 34.5 = lbs/hr. Example: 100 HP = 3450 lbs/hr.
2. Determine the Concentration Ratio (BASED ON FEEDWATER)
A water treatment chemical specialist should determine the desired number of cycles of concentration.
This is the ratio of TDS in the boiler water to TDS in the feedwater. Note that feedwater means the water
that is fed to the boiler from the deaerator and includes makeup water plus condensate return.
Example: 10 cycles of concentration has been recommended
11
Page 16
3. Determine the Required Blowdown Rate in Pounds Per Hour
Blowdown Rate = Steam Production / (Concentration Ratio –1)
Example: 3450/(10-1) = 383.33 lbs./hr
4. Determine if Continuous or Intermittent Sampling is Required
Use intermittent sampling when the boiler operation or loading is intermittent, or on boilers where the
required blowdown rate is less than 25% of the smallest available flow control valve or less than the flow
through the smallest orifice. See the graphs on the next page.
Use continuous sampling when the boiler is operating 24 hours per day and the required blowdown rate is
more than 25% of the smallest applicable flow control valve or orifice. See the graphs on the next page.
Use of a flow control valve will give you the best control of the process, since the flow rate can be easily
adjusted. The dial on the valve also gives you a visual indication if the flow rate has been changed. If the
valve clogs, it can be opened to clear the obstruction, and closed to the previous position.
If an orifice plate is used, you must install a valve downstream from the orifice in order to fine tune the
flow rate and provide additional back pressure in many applications.
Example: An 80 psi boiler has a Required Blowdown Rate of 383.33 lbs./hr. The maximum flow rate of
the smallest flow control valve is 3250 lbs./hr. 3250 x 0.25= 812.5 which is too high for continuous
sampling. Using an orifice, the flow rate through the smallest diameter plate is 1275 lbs./hr. This is too
high for continuous sampling.
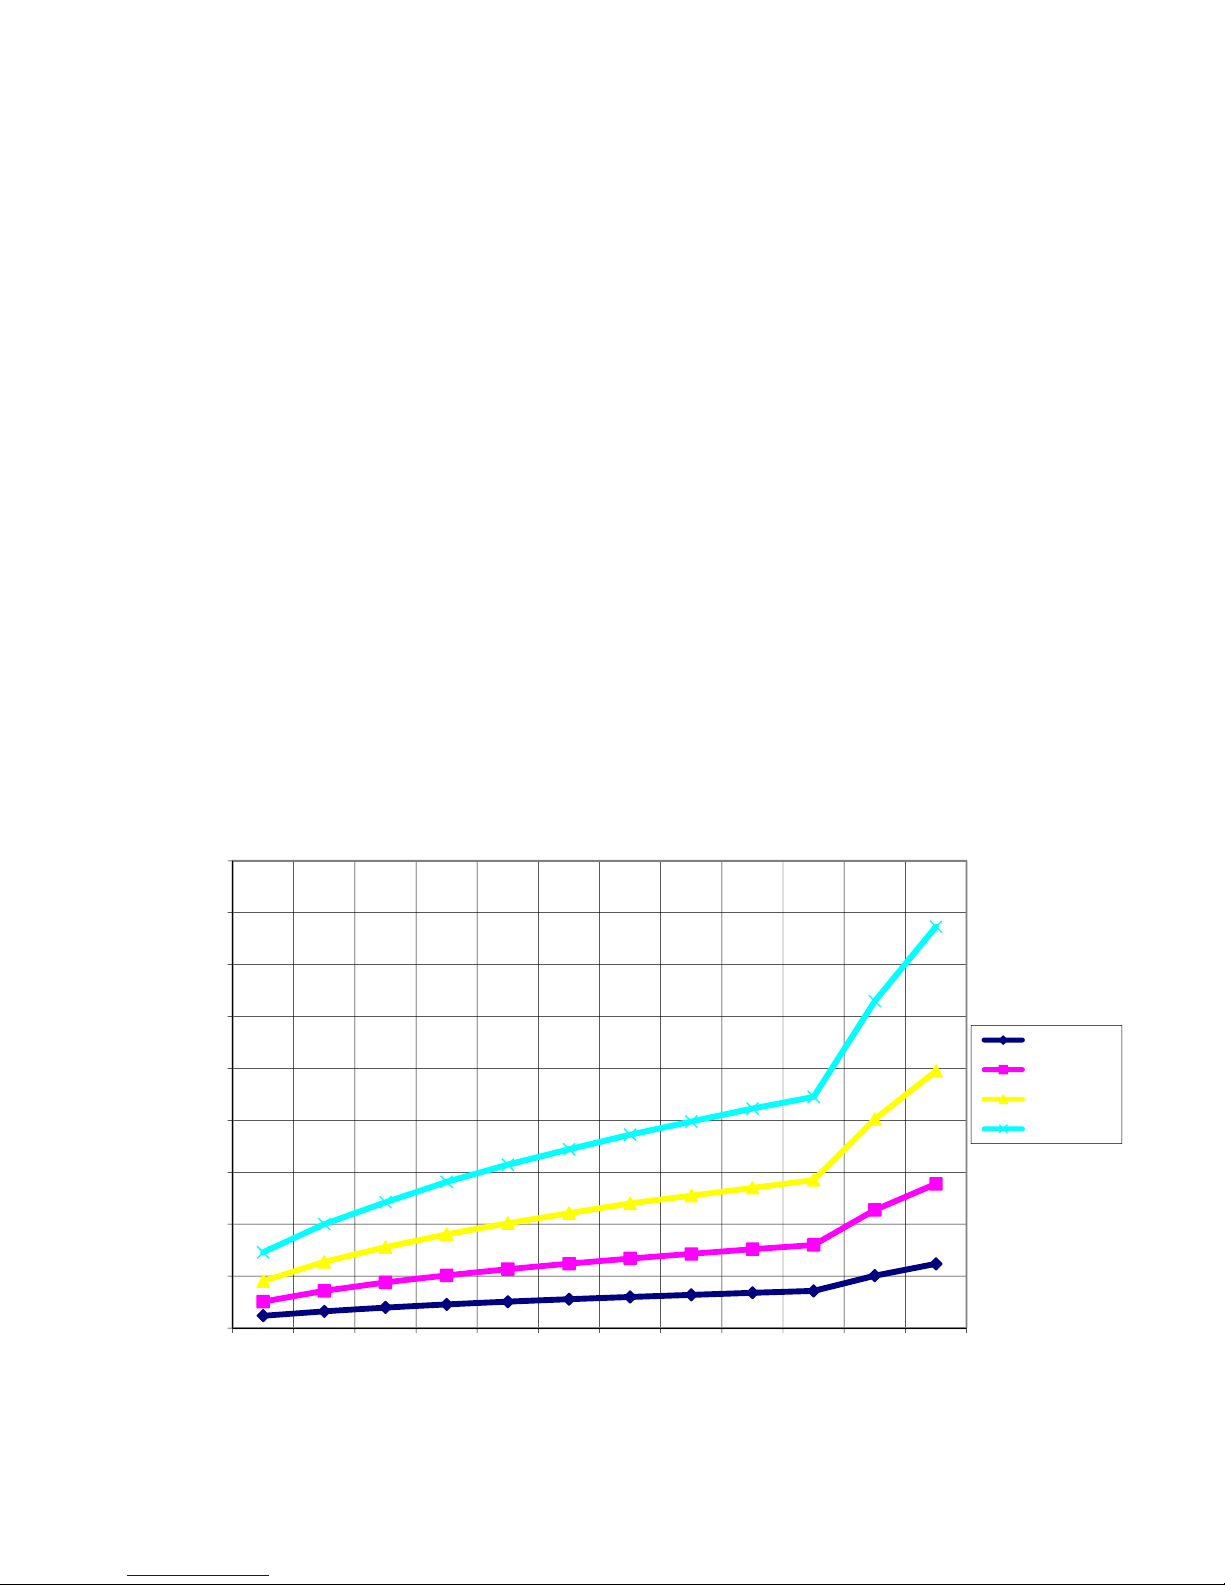
5. Determine the Orifice or Flow Control Valve Size for this Blowdown Rate
Use the following graphs to select a flow control device:
Flow Rate in Lbs/hr for Various Orifices
18000
16000
14000
12000
10000
Lbs/hr
8000
6000
4000
2000
0
10 20 30 40 50 60 70 80 90 100 200 300
Pressure PSI
1/8 inch dia
3/16 inch dia
1/4 inch dia
5/16 inch dia
12
Page 17
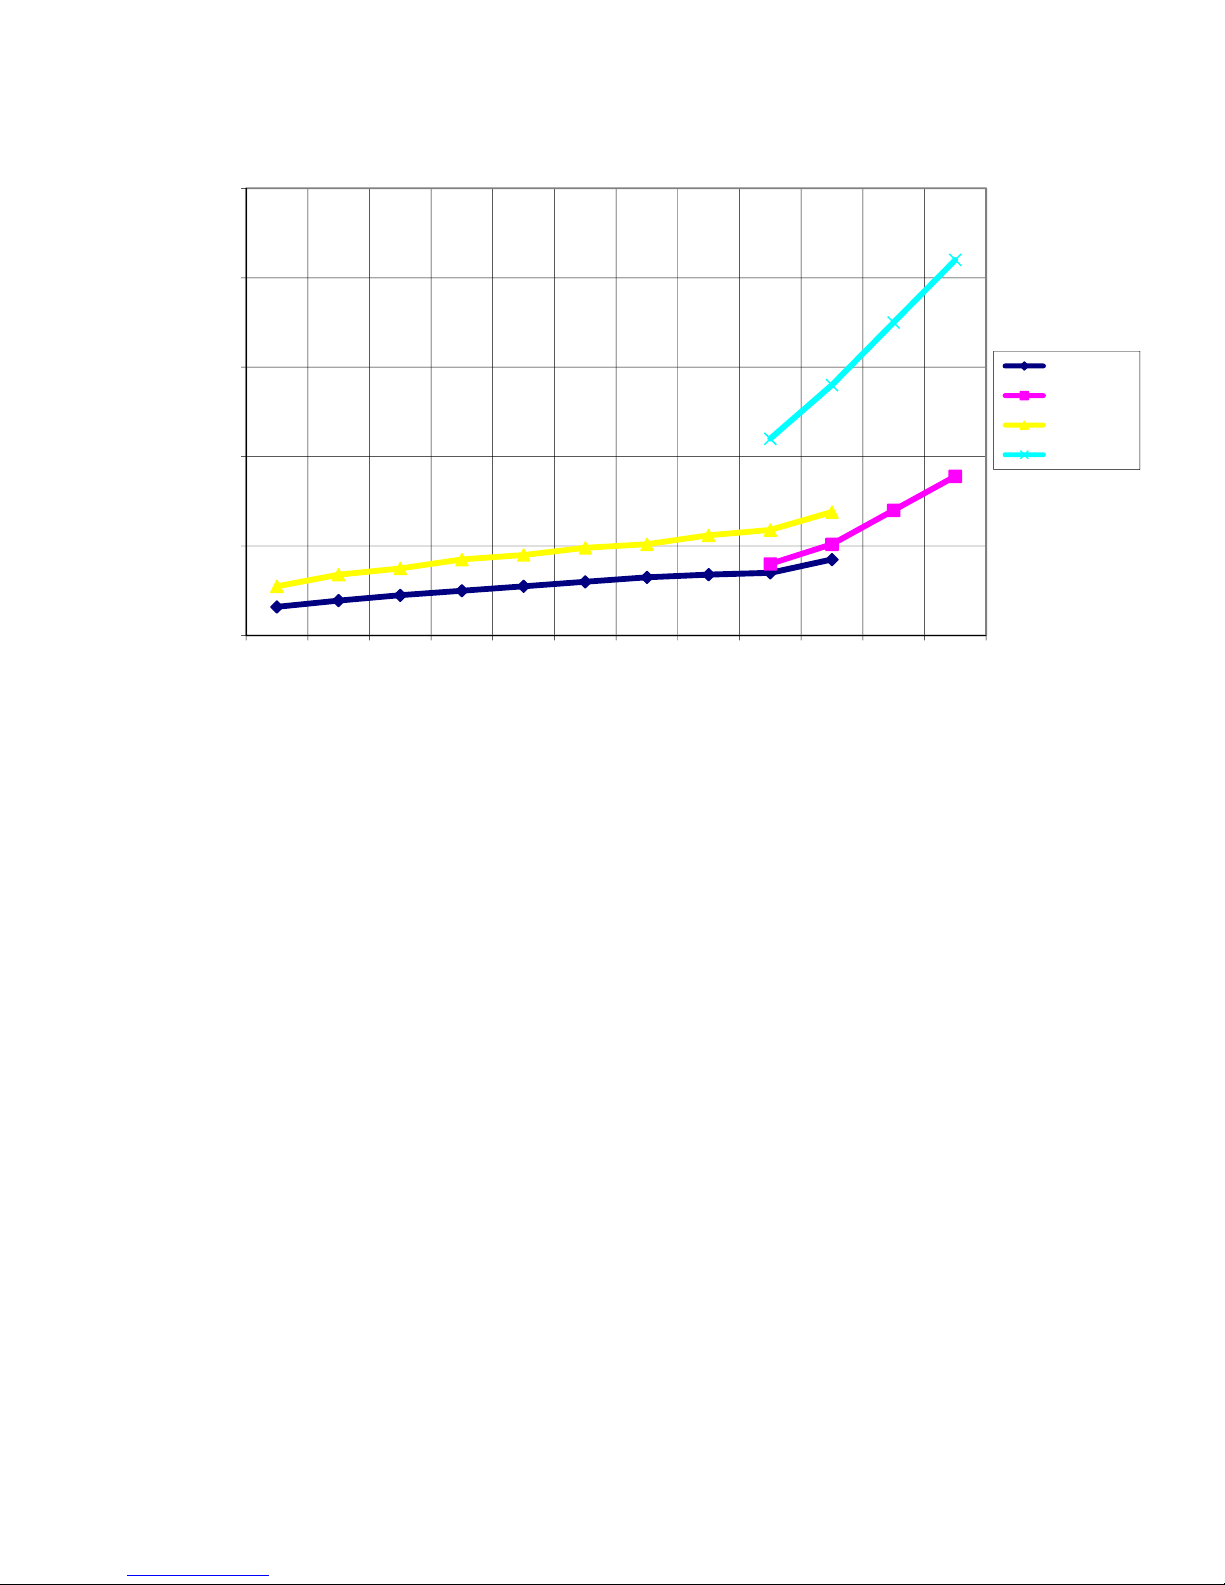
Flow Control Valve
25000
Maximum Flow Rates in Lbs/hr
20000
15000
Lbs/hr
10000
5000
0
20 30 40 50 60 70 80 90 100 150 200 300
Sensor Installation
All sensors for the WebMasterONE series are provided with signal conditioning electronics, and
conductivity sensors may be located up to 250 feet (75 meters) from the controller, and pH/ORP
sensors may be located up to 1000 feet (303 meters) from the controller. It is highly recommended
that the sensors be installed within 20 feet of the controller in order to make periodic calibration
more convenient.
Sensors should be located such that they respond rapidly to a well-mixed sample of the process
water and the treatment chemicals. If they are too close to the chemical injection point, they will
see spikes in concentration and cycle on and off too frequently. If they are too far away from the
chemical injection point, they will respond too slowly to the concentration changes, and you will
overshoot the set point.
If the sensor cables need to be extended, then 24 AWG shielded low capacitance (15 pF/ft) twisted
pair cable such as Walchem P/N 102535 (Belden 9680) or equivalent should be used. Pay attention
to the integrity of the cable shield. Always route sensor cables (or any other low voltage wiring) in
conduit that is separated from any AC voltage wiring by at least 6 inches.
pH and ORP electrodes must be installed such that the measuring surfaces will always remain wet.
A U-trap provided in the manifold design should achieve this, even if the sample flow stops. These
electrodes also must be installed with the measuring surfaces pointing down; that is 5 degrees
above the horizontal, at a minimum.
If the sensors are to be submersed in the process, mount them firmly to the tank, and protect the
cable with plastic pipe, sealed at the top with a cable gland, to prevent premature failure. Place the
sensors in an area of good solution movement.
1/2" 150 PSI
1/2" 300 PSI
3/4" 150 PSI
3/4" 300 PSI
Pressure PSI
13
Page 18
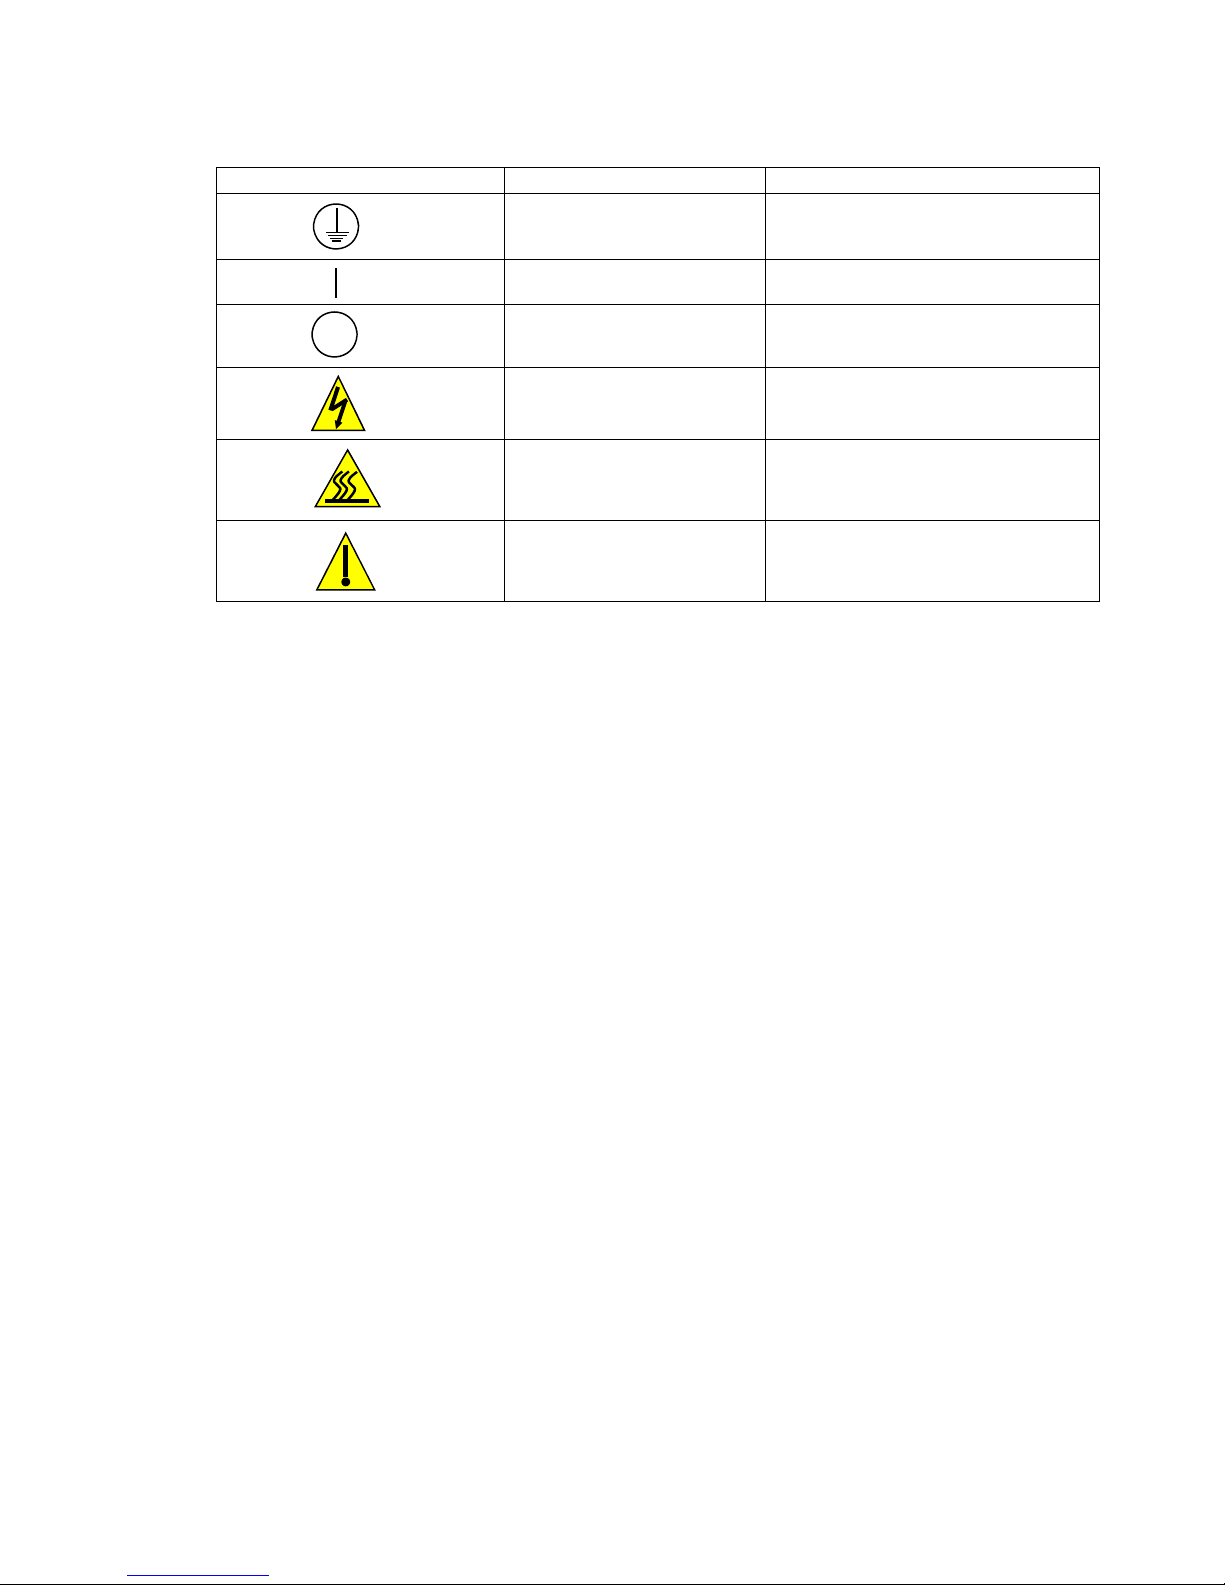
3.4 Icon Definitions
Symbol Publication Description
IEC 417, No.5019 Protective Conductor Terminal
IEC 417, No. 5007 On (Supply)
IEC 417, No. 5008 Off (Supply)
ISO 3864, No. B.3.6 Caution, risk of electric shock
Pending
Caution, High temperature, risk of
burn
ISO 3864, No. B.3.1 Caution
14
Page 19
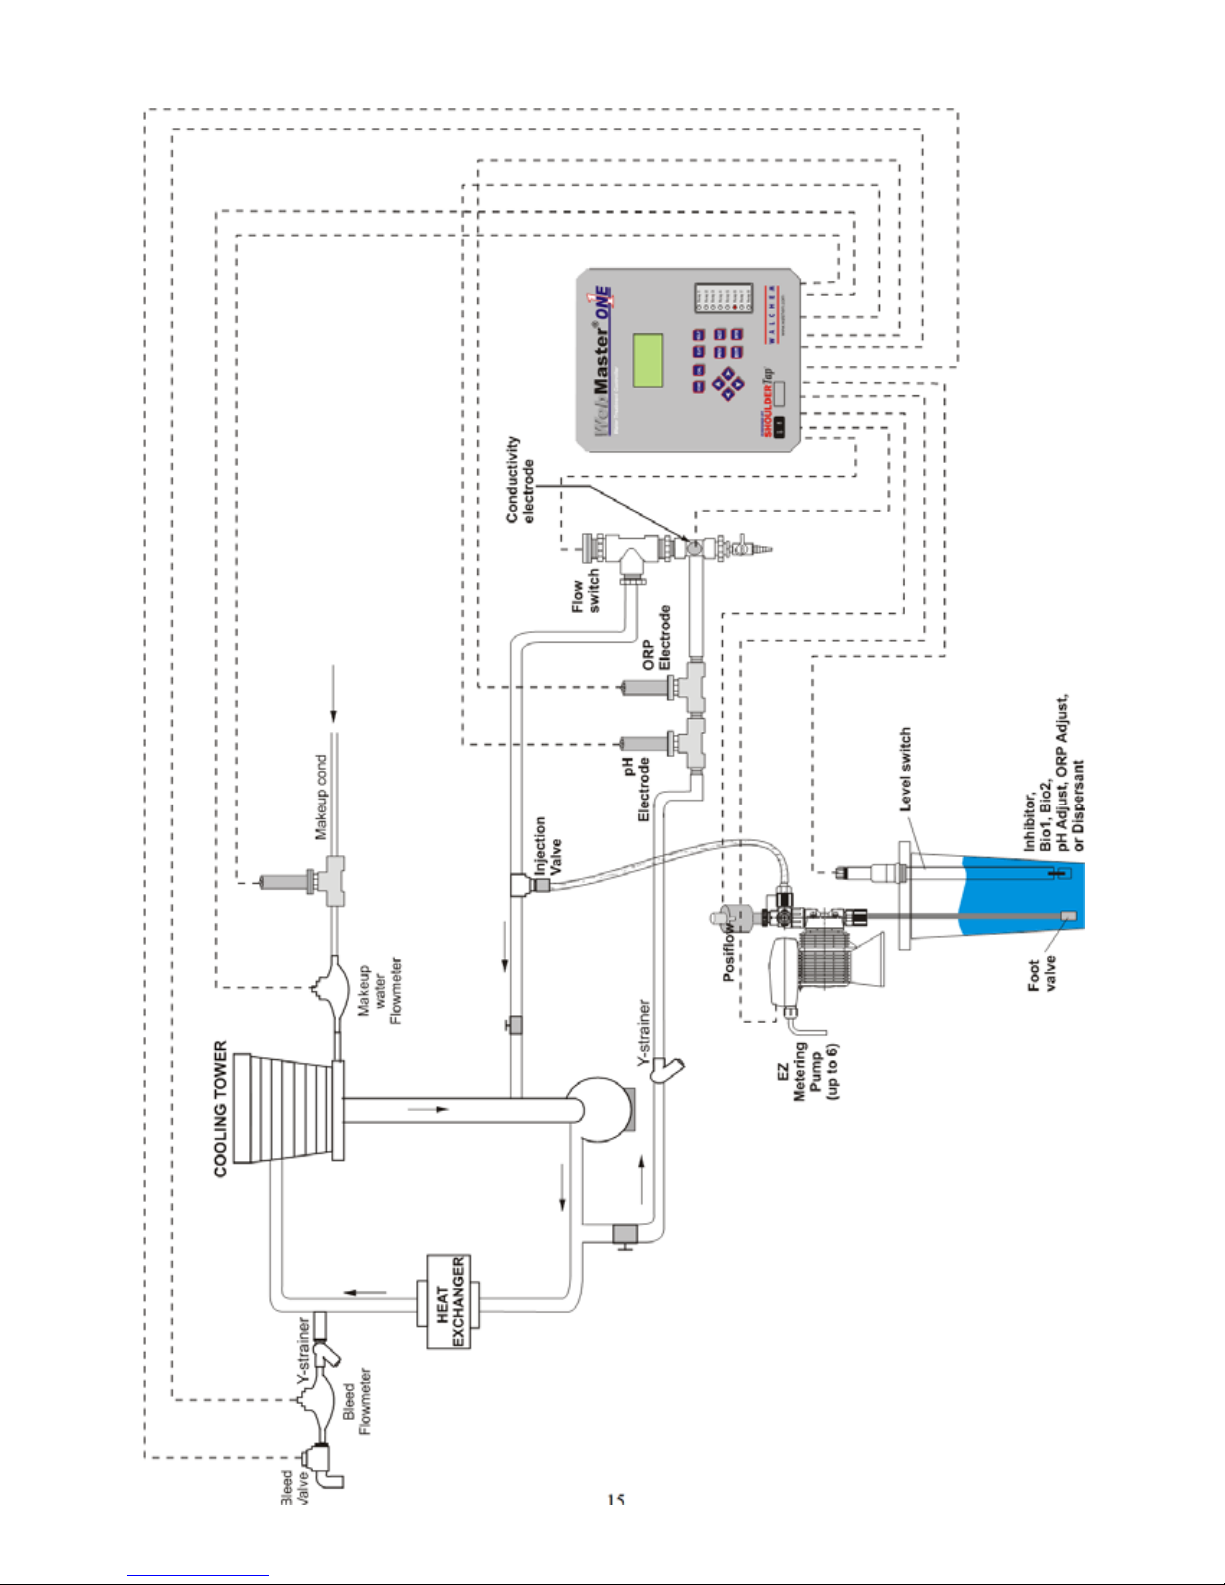
Figure 1a: Typical Installation, Cooling Tower
15
Page 20

Figure 1b Typical Installation, Boiler
p
g
Intermittent Sam
16
lin
Page 21
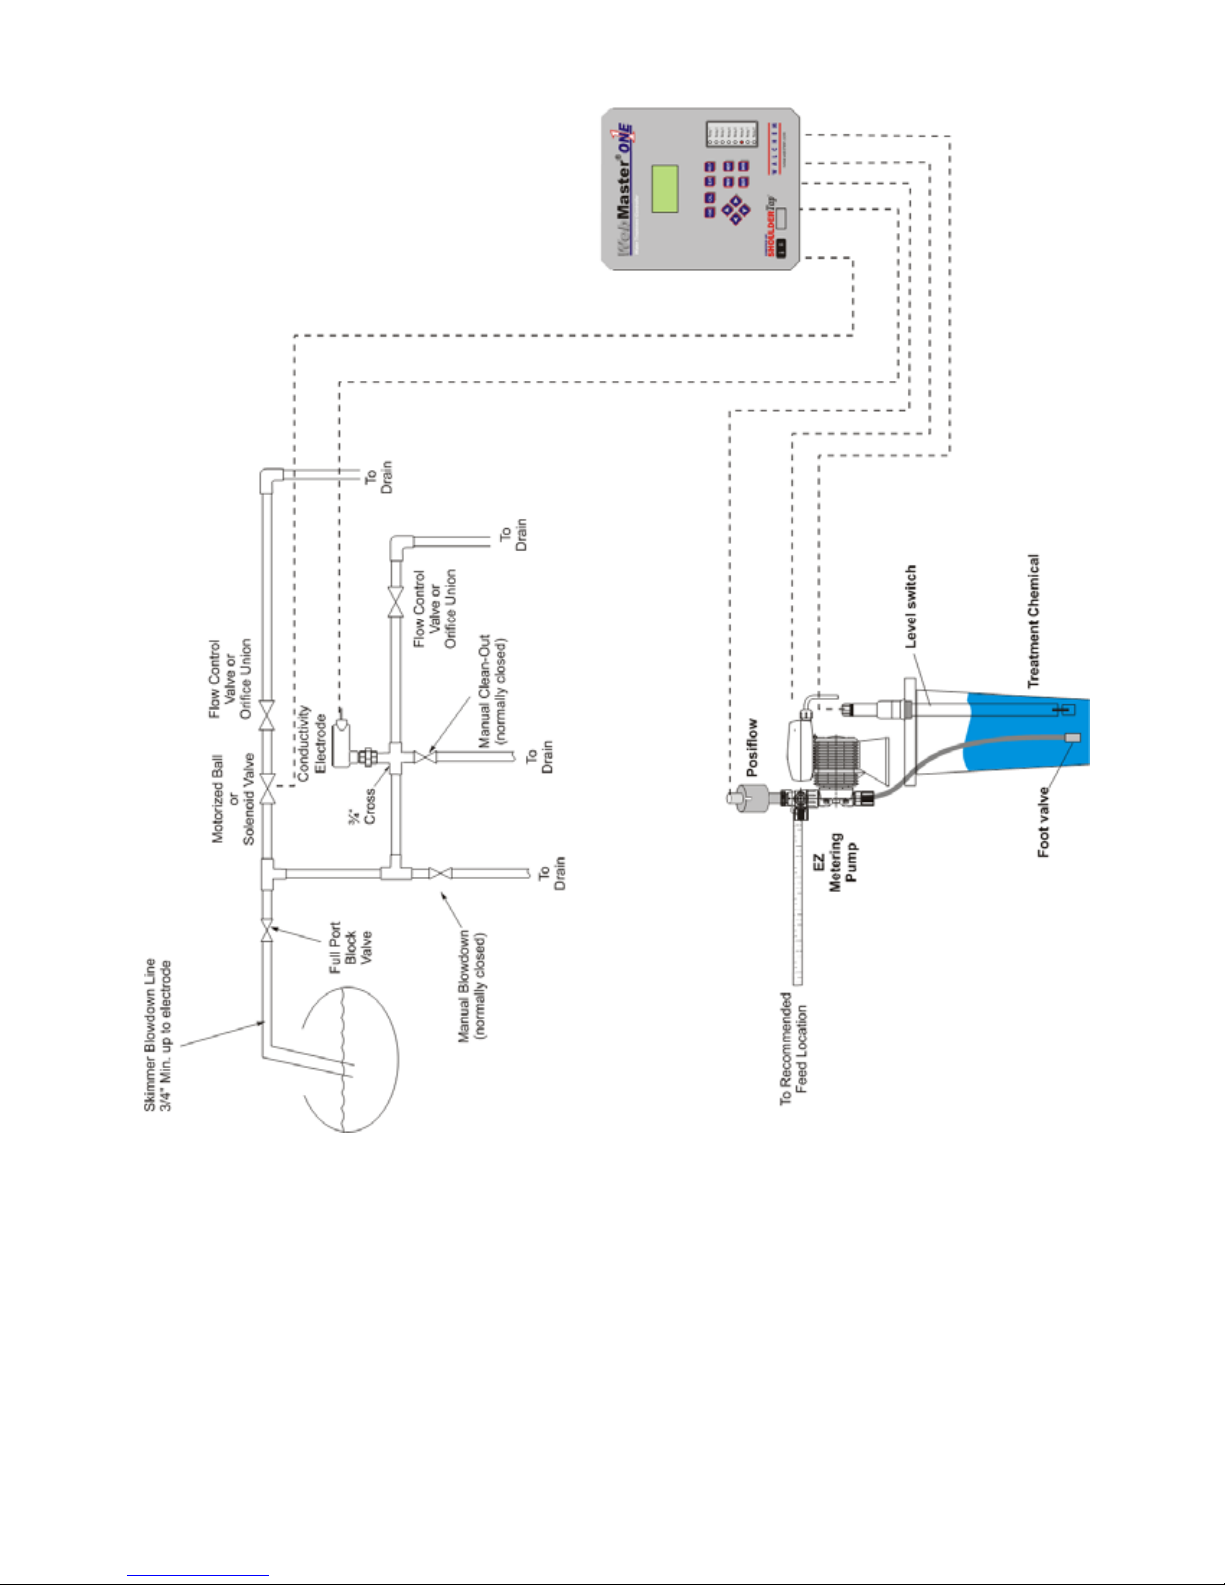
Figure 1c: Typical Installation, Boiler
p
g
Continuous Sam
lin
17
Page 22
3.5 Electrical Installation
The WebMasterONE series controllers require the following voltages:
100 –120/200-240 VAC± 10%, 50/60 Hz, 12 amperes maximum
The controller must be connected to its own 15 ampere breaker, close by, to act as an alternate
power shutdown.
Your controller is supplied either factory prewired or ready to be hardwired. Depending upon your
choice of options, you may be required to hardwire some or all of the input/output devices. Please
refer to Figures 4 through 8 for wiring diagrams.
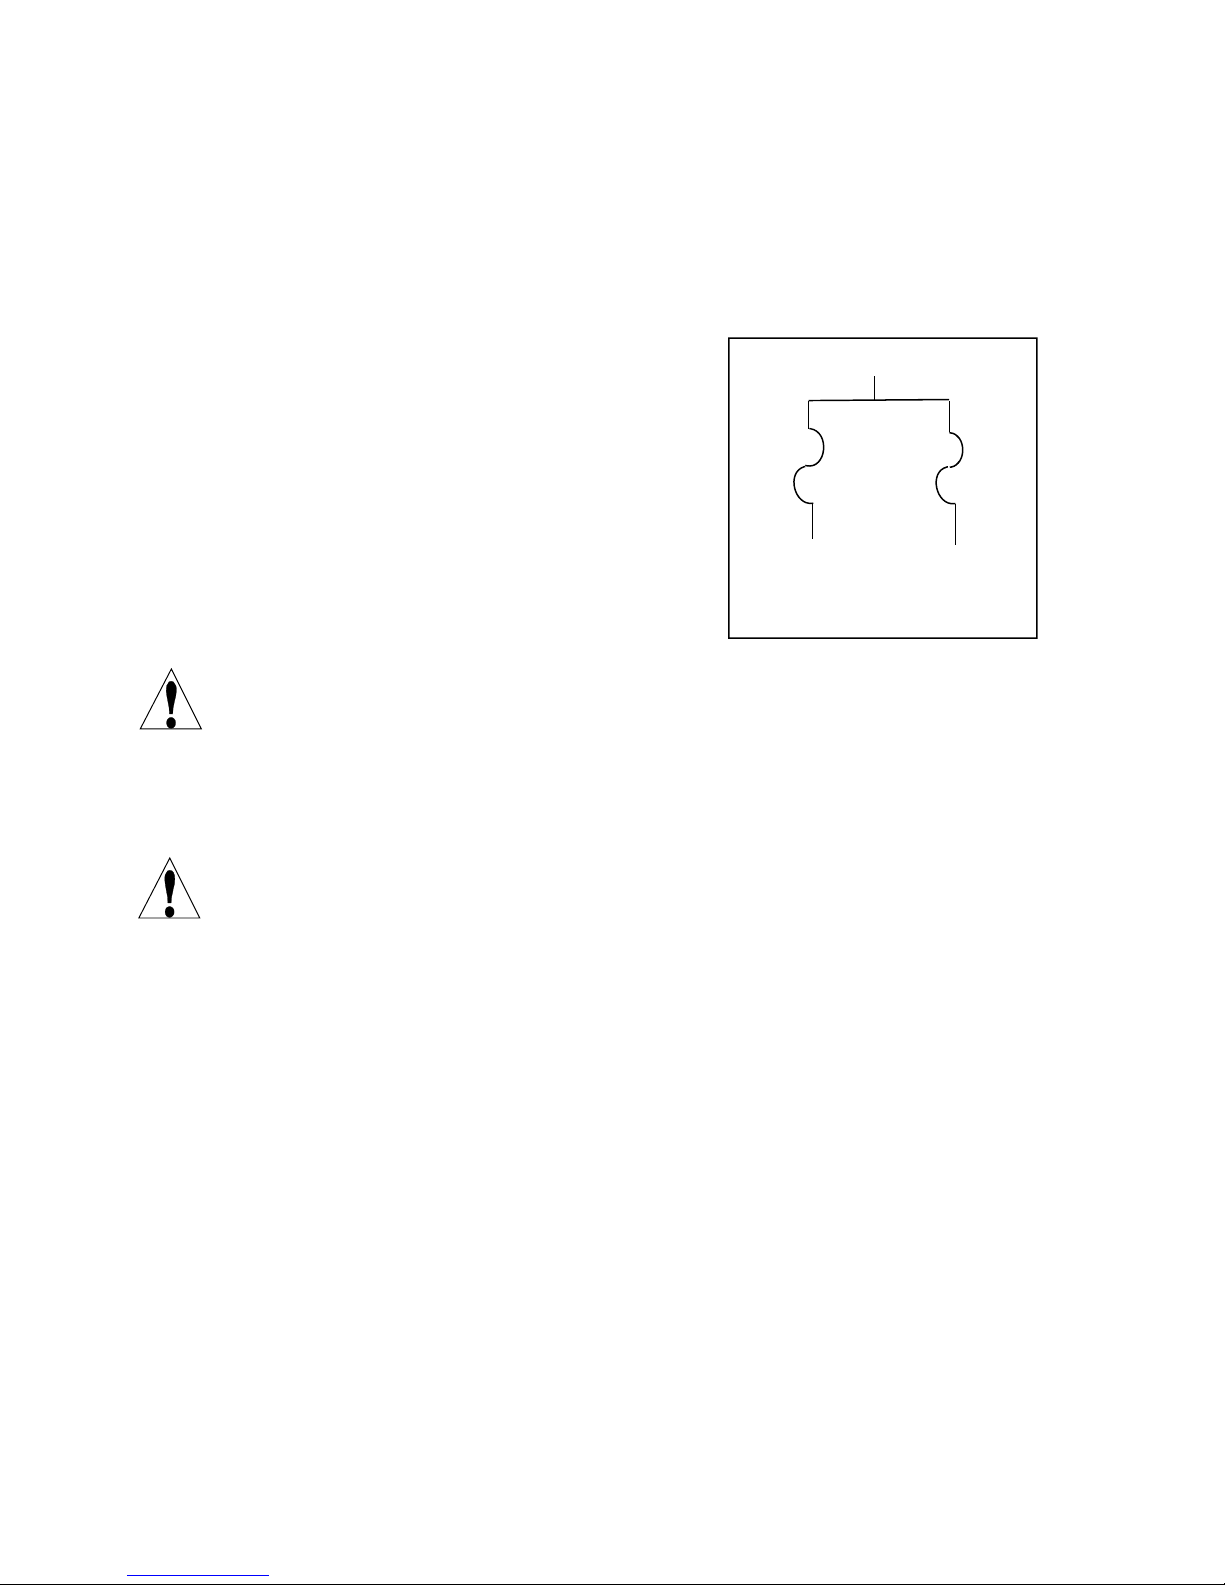
The output loads may be connected to pigtail
(125V prewired) connections or terminal block
(hardwired) connections. The total output current
must not exceed 11 amps. The output relays are
connected in two relay banks each fused at 6.3 amps.
See figure on the right. Assess the steady state amps
of all loads before connecting to controller. Depending
upon your model code, some relays may be dry contact
and not fused.
CAUTION! There are live circuits inside the controller even when the power switch on the front
panel is in the OFF position! The front panel must never be opened before power to the controller
is REMOVED!
If your controller is prewired, it is supplied with a 10 foot, 14 AWG power cord with USA style
plug and 8 inch, 18 AWG USA style receptacle cords for the powered relay outputs. A tool (#1
Phillips driver) is required to open the front panel.
CAUTION! The electrical installation of the controller must be done by trained personnel only
and conform to all applicable National, State and Local codes!
MAINS VOLTAGE
6.3A
F3
R1
R2
R3
R4
6.3A
F2
R5
R6
R7
R8
18
Page 23
A
Sensor Inputs
A
A
A
(up to 4)
(Recommended)
R4
C Power
R7
Note: Many of the inputs and outputs listed are optional
and may not be present in your controller.
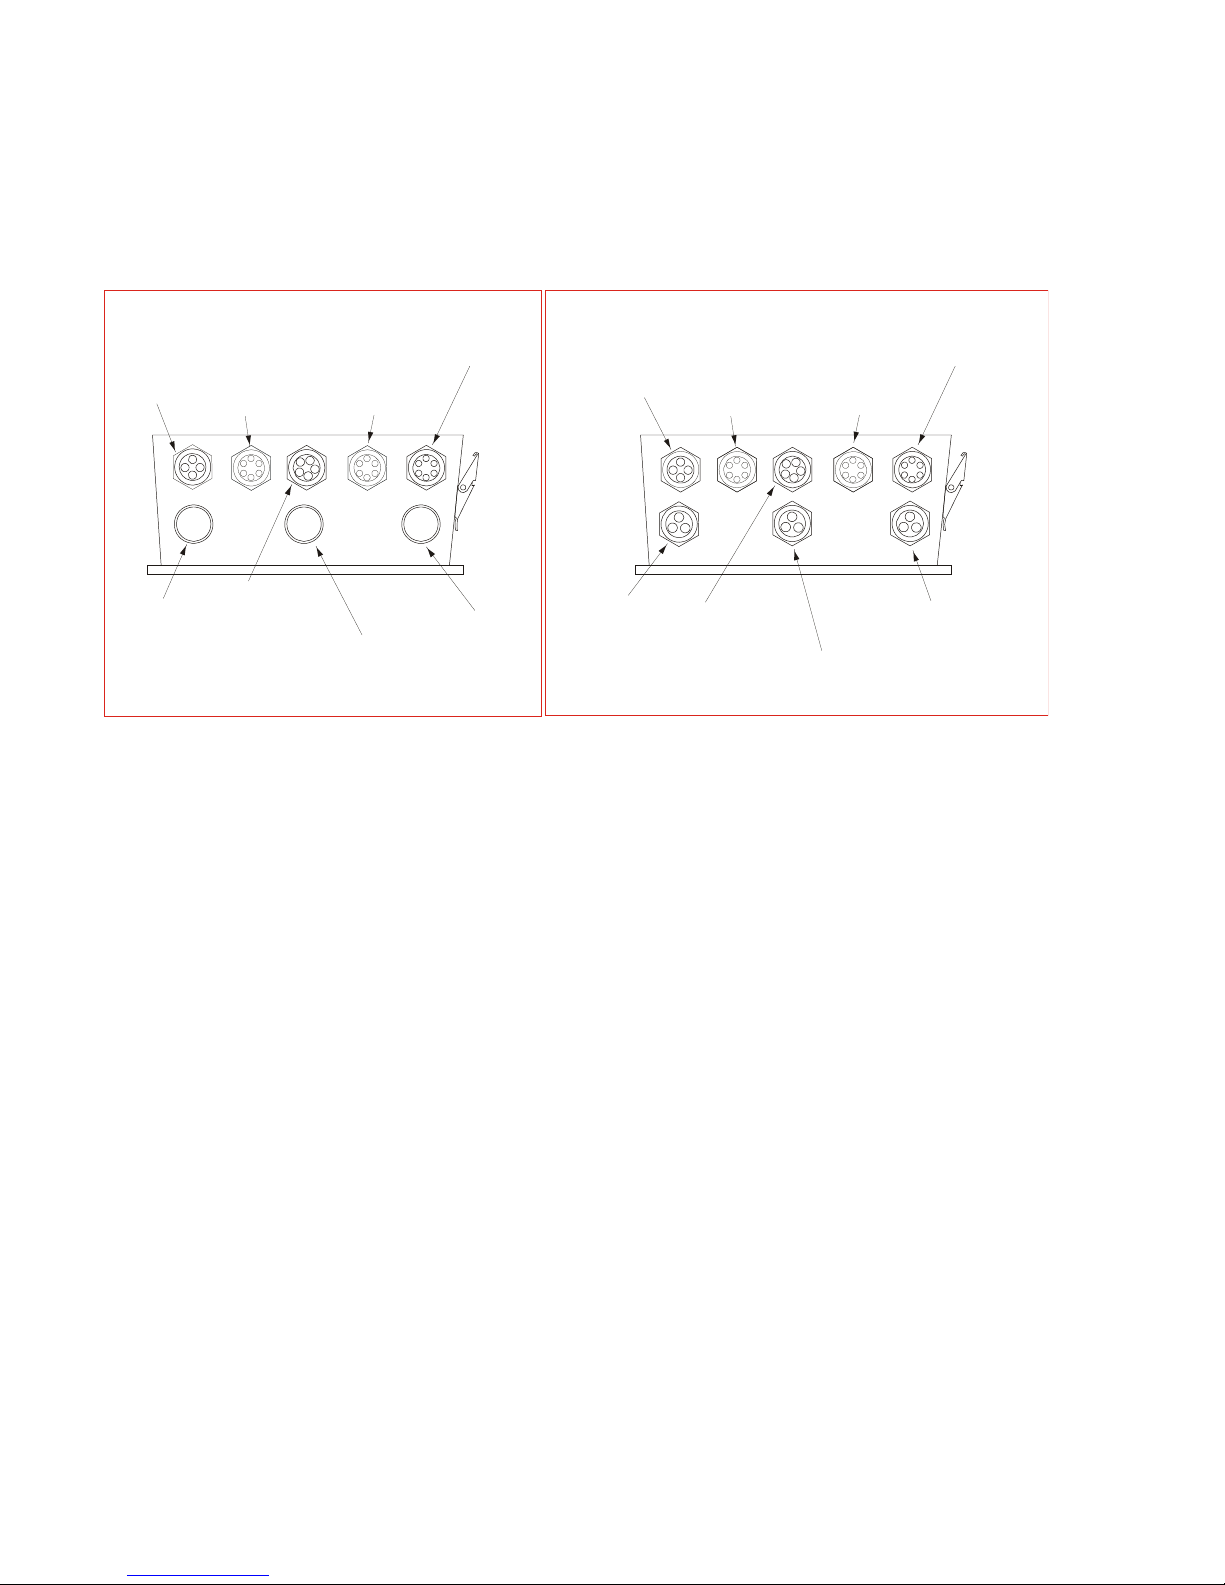
Hardwired Options
Bottom View
Strain relief
installed with
analog card option
nalog Inputs
Digital Input A
Digital Input B
Digital Input C
digital card option
Digital Inputs
(Recommended)
Strain relief
installed with
R5
R6
R8
Misc. Inputs/
Outputs
(Recommended)
R1
R2
R3
Sensor Inputs
(up to 4)
R4
C power
R7
analog card option
nalog Inputs Digital Inputs
Digital Input A
Digital Input B
Digital Input C
Figure 2: Conduit/Wiring Configuration
Prewired Option
Bottom View
Strain relief
installed with
Strain relief
installed with
digital card option
R5
R6
R8
Misc. Inputs/
Outputs
R1
R2
R3
19
Page 24
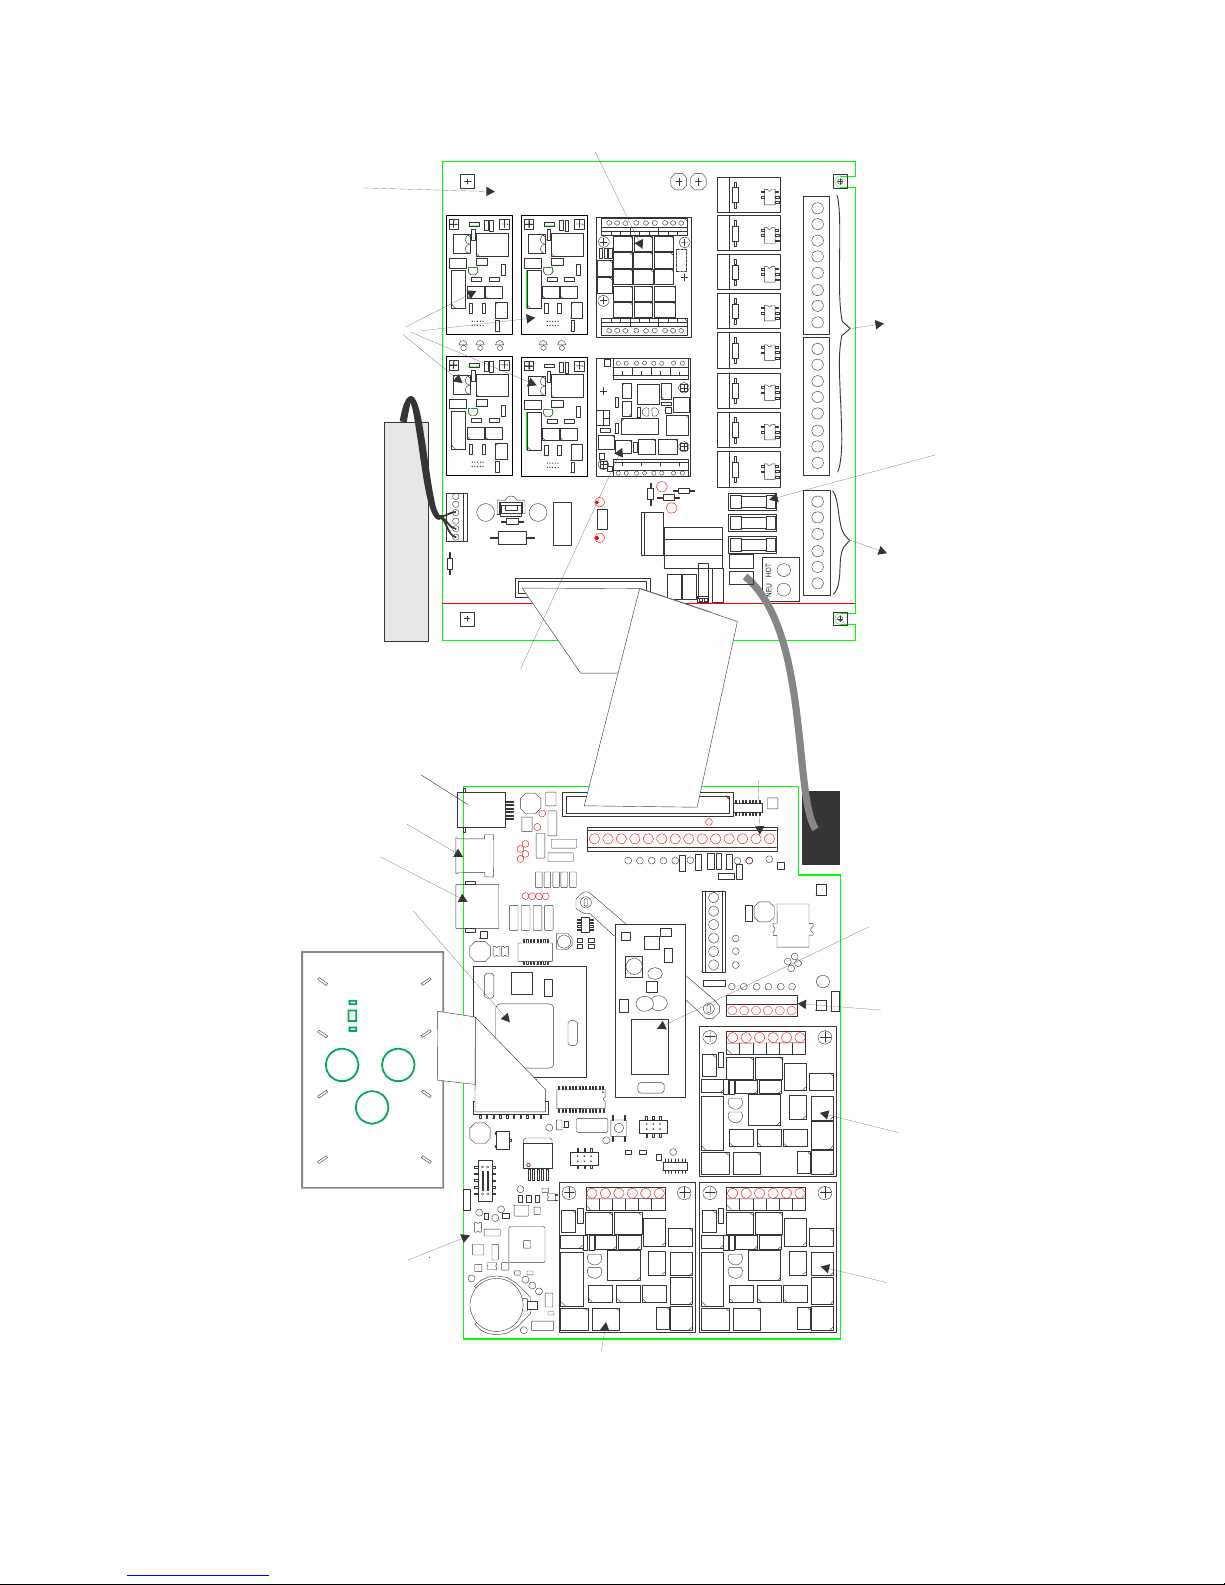
D
i
l
Power
use
s
Relay
Digital
Input
Option
Card
Board
DIG INPUT 6 DIG INPUT 5 DIG INPUT 4
IN-
IN+ +v IN- IN+ IN+IN-+v +v
REV 3
-
+-+-+
INPUT 3 INPUT 2 INPUT 1
102847
+-+-+-+
INPUT 4
+v+v +v
IN-IN-IN-
IN+IN+IN+
DIG INPUT 3DIG INPUT 2DIG INPUT 1
4-20 mA Output
Option Cards
INPUT 5
INPUT 5 INPUT 6 I NPUT 7
-
102815 RV2
+24V
TB1
GN+24
-
+
RELAY1NC NO
RELAY2NC NO
3
RELAY
NC NO
RELAY4NC NO
5
RELAY
NC NO
6
RELAY
NC NO
RELAY7NC NO
8
RELAY
NC COM
Hot
Relay Outputs
F
ay
sp
Ethernet
USB
RJ45
Power Supply
Modem
Host
Core
Neutral
Relay outputs
Card
4-20mA
Input Option
RJ11
Digital
Inputs
A, B, C, D, E & F
Modem
Option
Card
t- t+ IN- IN+ +5V -5V
Sensor 1
t- t+ IN- IN++5V -5V
Core
Interface
Board
t- t+ IN- IN++5V -5V
B1
REV 2
102839
t- t+ IN- IN++5V -5V
(Observe
markings on
circuit board)
Sensor 4 or 2
Figure 3 Identification of Parts
20
REV 2
102839
REV 2
102839
Sensor 2 or 4
(Observe markings
on circuit board)
Sensor 3
Page 25
VoltageCode
S
0 or 4 DRY DRY DRY DRY DRY DRY DRY DRY
1 or 6 POWERED POWERED POWERED POWERED POWERED POWERED POWERED DRY
2 or 5 POWERED POWERED POWERED POWERED POWERED POWERED POWERED POWERED
3 or 7 DRY POWERED DRY POWERED DRY POWERED DRY POWERED
R1 R2 R3 R4 R5 R6 R7 R8
DRY CONTACTS WILL BE LABELED COM INSTEAD OF NC.
EE
DETAIL “A”
GROUND
STUD
WHT
GND
GRN
NEU
HOT
BLK
NEU HOT
NEUTRAL
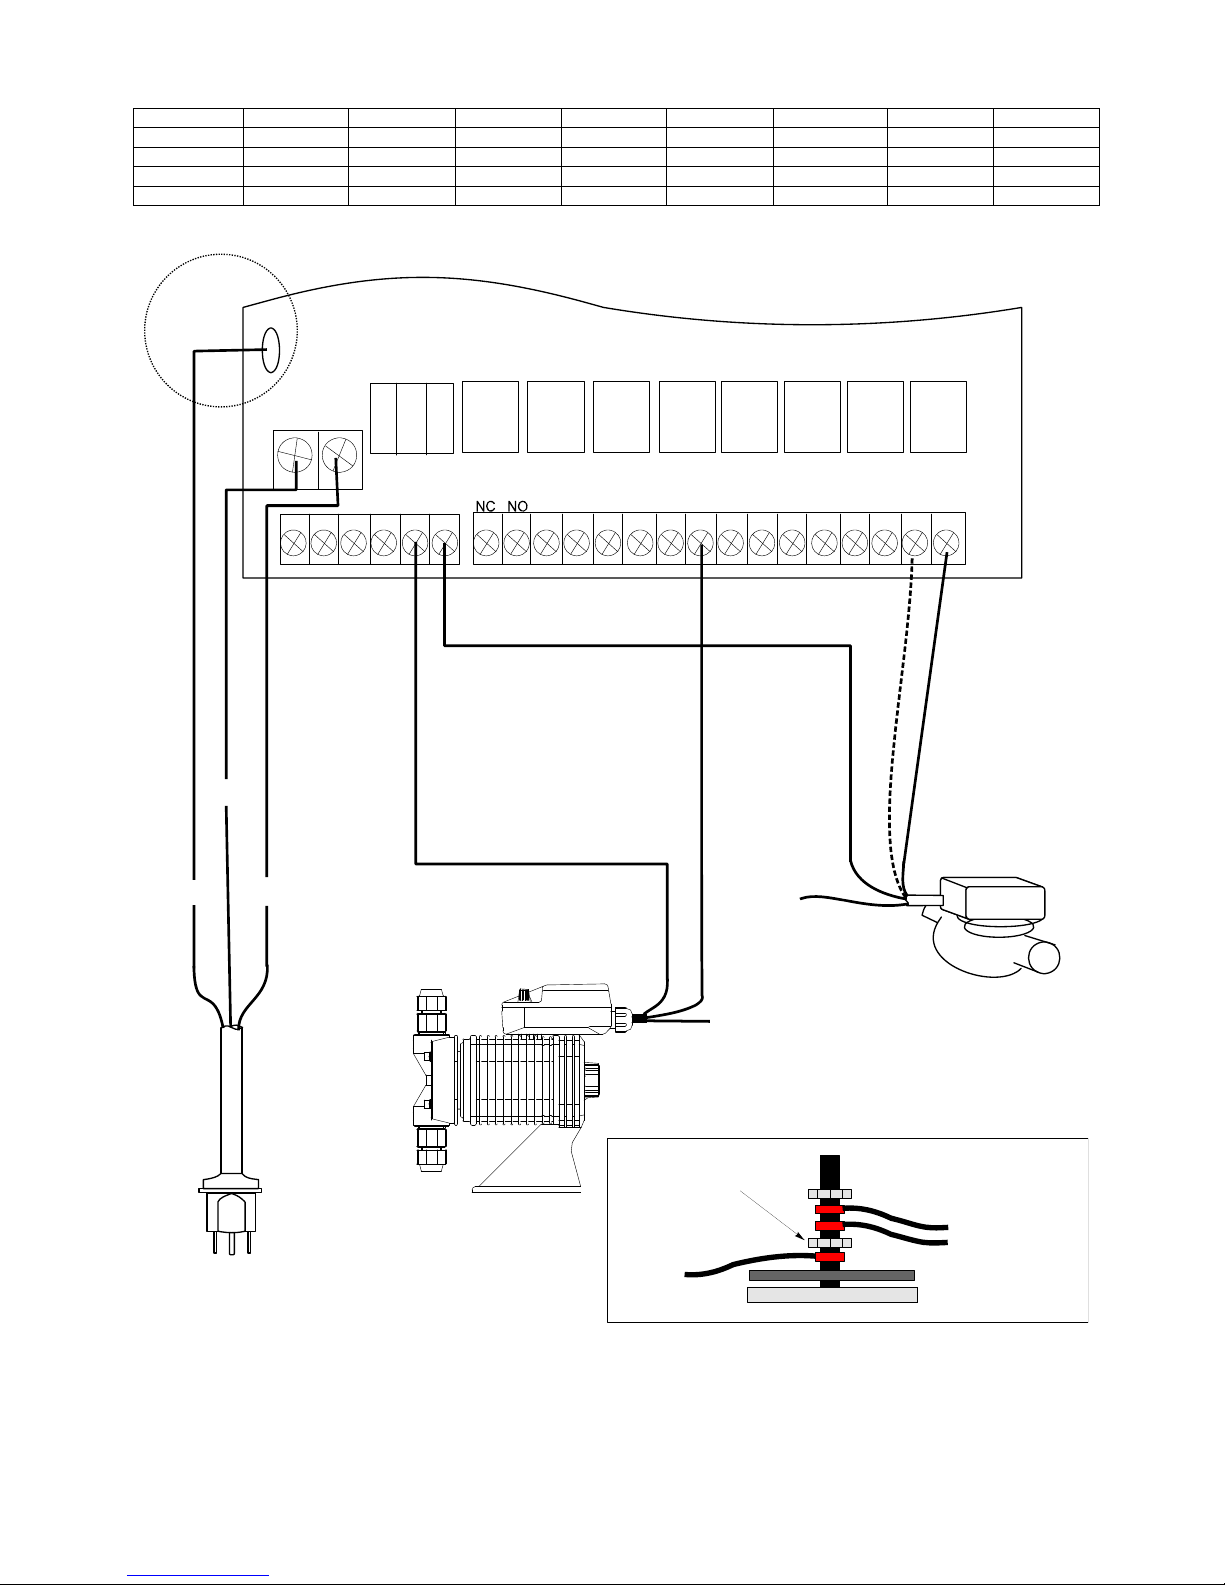
Important: The mains power supply earth ground connection
must be retained by separate nut.
RELAY8 RELAY7 RELAY6 RELAY5 RELAY4 RELAY3 RELAY2 RELAY1
IF USING
A MOTORIZED
WHT
BLK
WHT
TO GND
STUD
BALL VALVE
GRN
NC NONC NONC NONC NONC NONC NONC NO
BLK
BLK
AC POWER
INPUT
Figure 4: Wiring Diagram for AC Power Input and Relay Outputs
GRN
METERING
PUMP
SEPARATE
PRIMARY EARTH
CONNECTION
21
TO GND
STUD
NUT
BRACKET
SOLENOID OR
MOTORIZED
BALL VALVE
OTHER EARTH
CONNECTIONS
PC
BOARD
“
”
Page 26
B1
DIGITAL INPUTS
SEE DETAIL 'A'
SENSOR 4 or 2
(Observe markings
on circuit board)
SEE DETAIL 'C'
SENSOR 3
SEE DETAIL 'C'
SENSOR DETAIL "C"
Low Pressure
CONDUCTIVITY
102839
REV 2
102839
REV 2
WHT/GRN
GRN
WHT/ORN
ORN
BLU
WHT/BLU
SHIELD
TO GND STUD
pH/ORP OR
SENSOR
TT+ IN-
IN+
+5
-5
GROUND/SHIELD
t- t+ IN- IN++5V -5V
t- t+ IN- IN++5V -5V
102839
REV 2
SENSOR 2 or 4
(Observe markings
on circuit board)
SEE DETAIL 'C'
Shield
(Drain wire)
to GND
stud on
front
panel
-T -T
+T
W
H
High Pressure
Conductivity
Electrode
WHT/GRN
GRN
WHT/ORN
ORN
BLU
WHT/BLU
Sensor 1
Terminal
Block
t- t+ IN- IN++5V -5V
t- t+ IN- IN++5V -5V
SENSOR 1**
SEE DETAIL 'C'
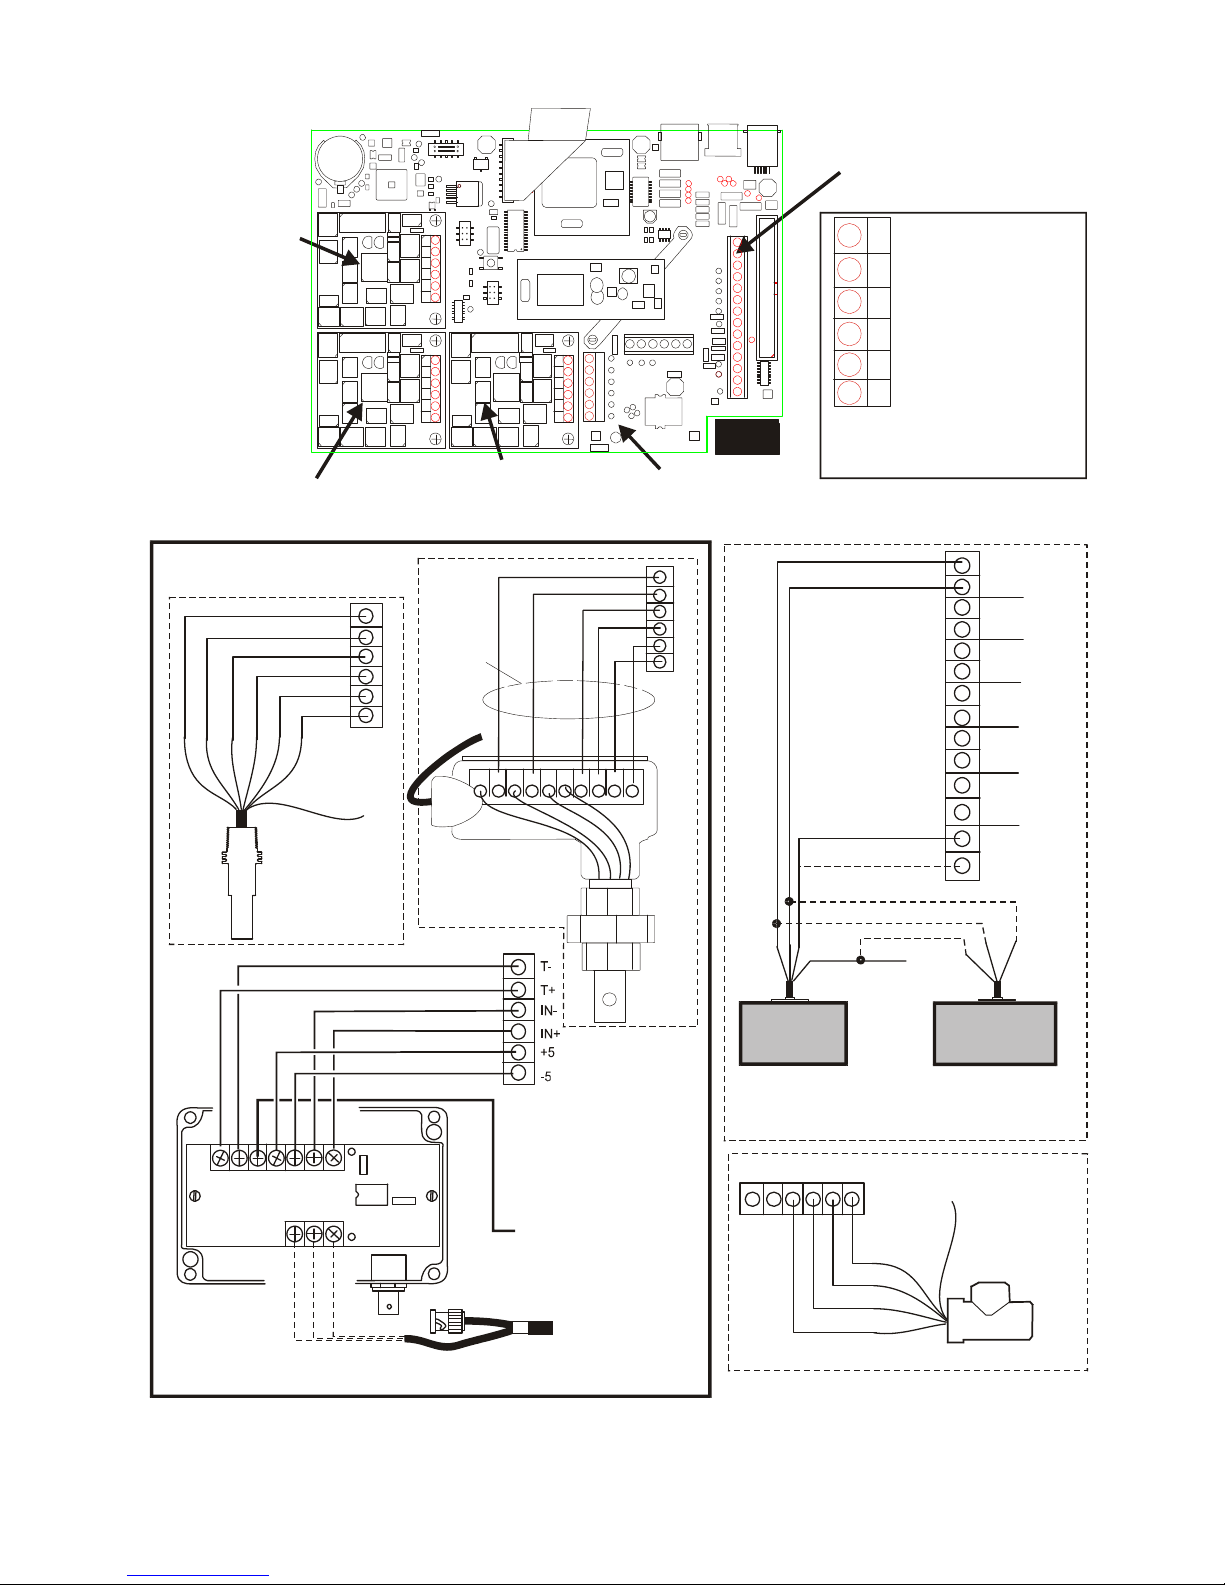
* Either an unpowered or a powered device may be
connected to each digital input, one device per input.
WHT/GRN
GRN
WHT/ORN
WHT/BLU
-S
+
+S
-
+T
T
-5
G
B
R
L
N
K
RE
ORN
BLU
+5
D
TT+
ININ+
+5
-5
SIGNAL +
SIGNAL -
POWERED
DEVICES
HALL EFFECT
WATERMETER
OR
PADDLEWHEEL
t- t+ IN- IN+ +5V -5V
** Please note: Sensor 1 terminal
block is oriented OPPOSITE of
sensors 2-4.
OR
SHIELD
(TO GROUND
STUD)
UNPOWERED
OR*
WATERMETER-CONTACTOR
DEVICES
RELAY, REED SWITCH
DIGITAL
IN+
INPUT A
ININ+
DIGITAL
INPUT B
ININ+
DIGITAL
INPUT C
ININ+
DIGITAL
INPUT D
ININ+
DIGITAL
INPUT E
ININ+
DIGITAL
INPUT F
IN-
12V
12V
DETAIL "A"
GND
-5V
+5V
TC+ TC- GND
VpH
COM
TC
GROUND
OPTIONAL TEMPERATURE
COMPENSATION (pH ONLY)
TC+ TC- TC
Figure 5: Wiring Diagram for Sensor Inputs and Digital Inputs A-F
TO GROUND STUD
INSIDE ENCLOSURE
PREAMPLIFIER
High Pressure
pH/ORP Sensor
22
T-
T+ IN-
WHT
IN+
+5
-5
RED
GRN
BLACK
TO GND STUD
SHIELD
DISINFECTION
SENSOR
SENSOR
DETAIL "C"
Page 27
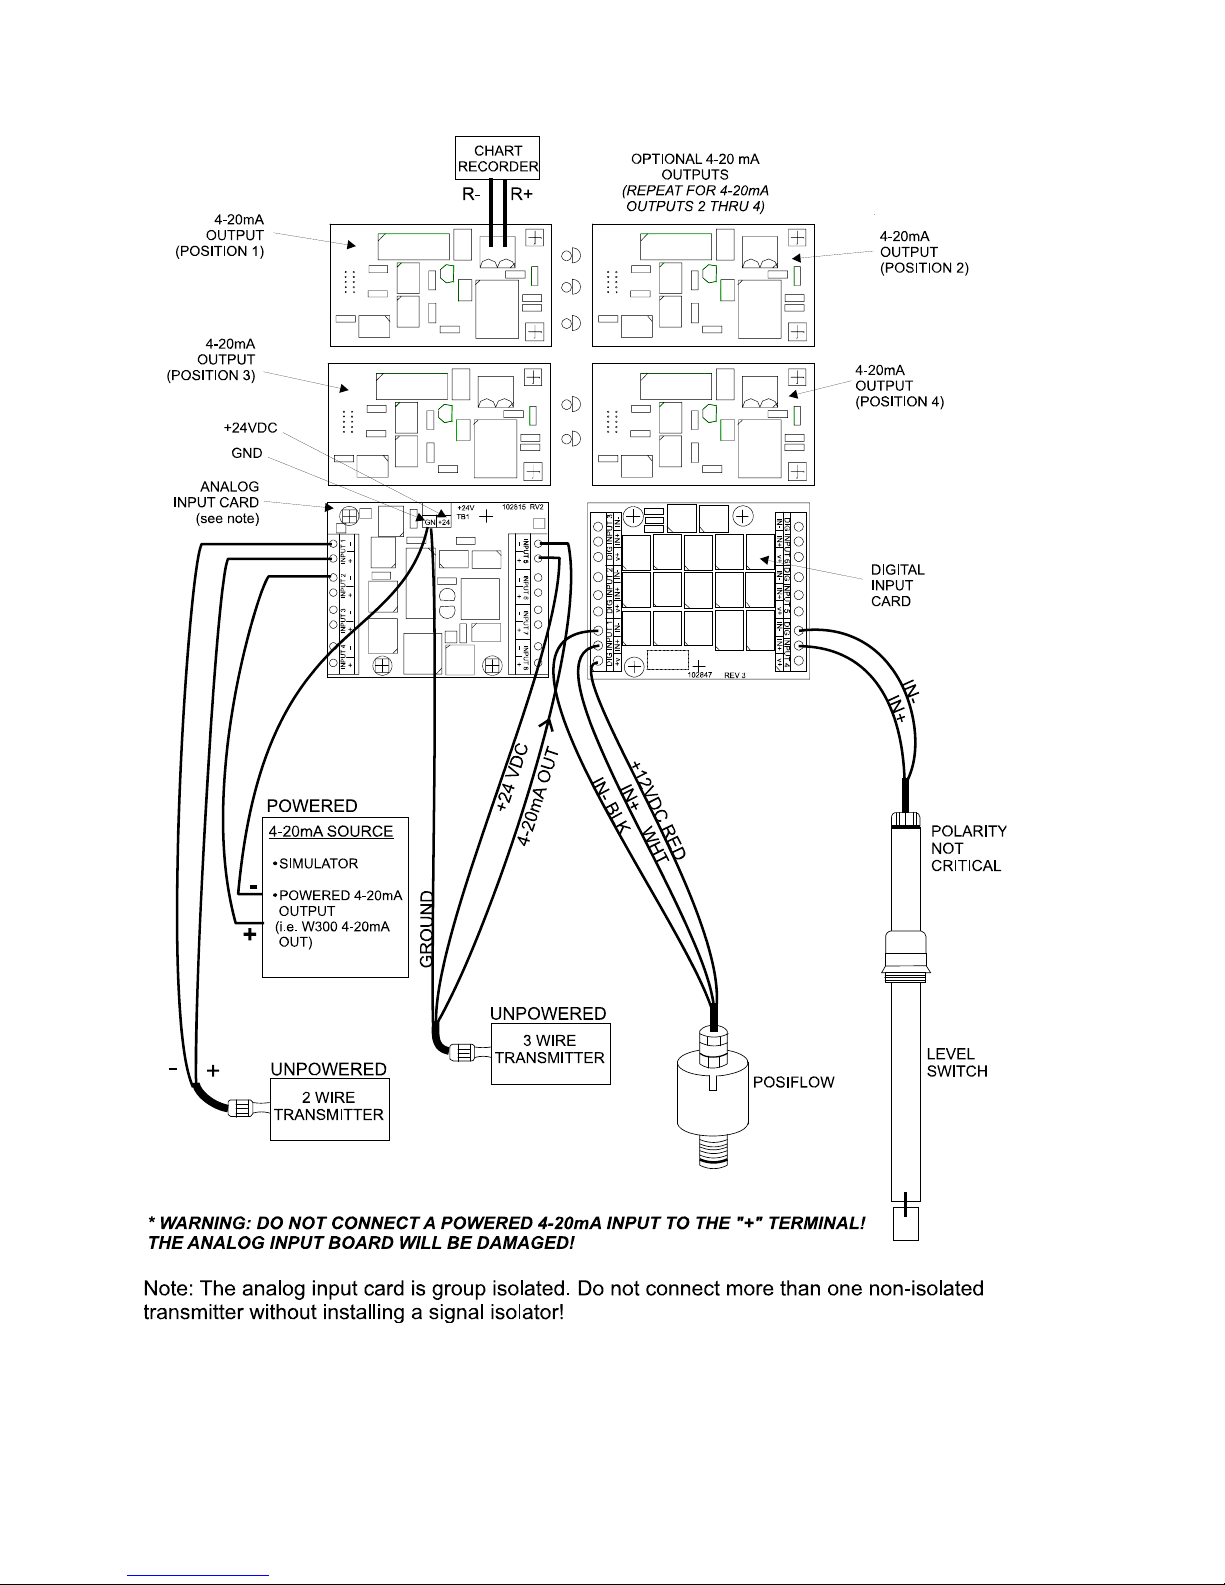
(See 4-20mA Wiring Guide on the following pages)
*Use shielded cable, grounded only at controller end, for ALL connections.
Figure 6: Wiring Diagram for Optional Digital Inputs, 4-20 mA Inputs and 4-20 mA Outputs
23
Page 28
+24V
C
y
D
TB1
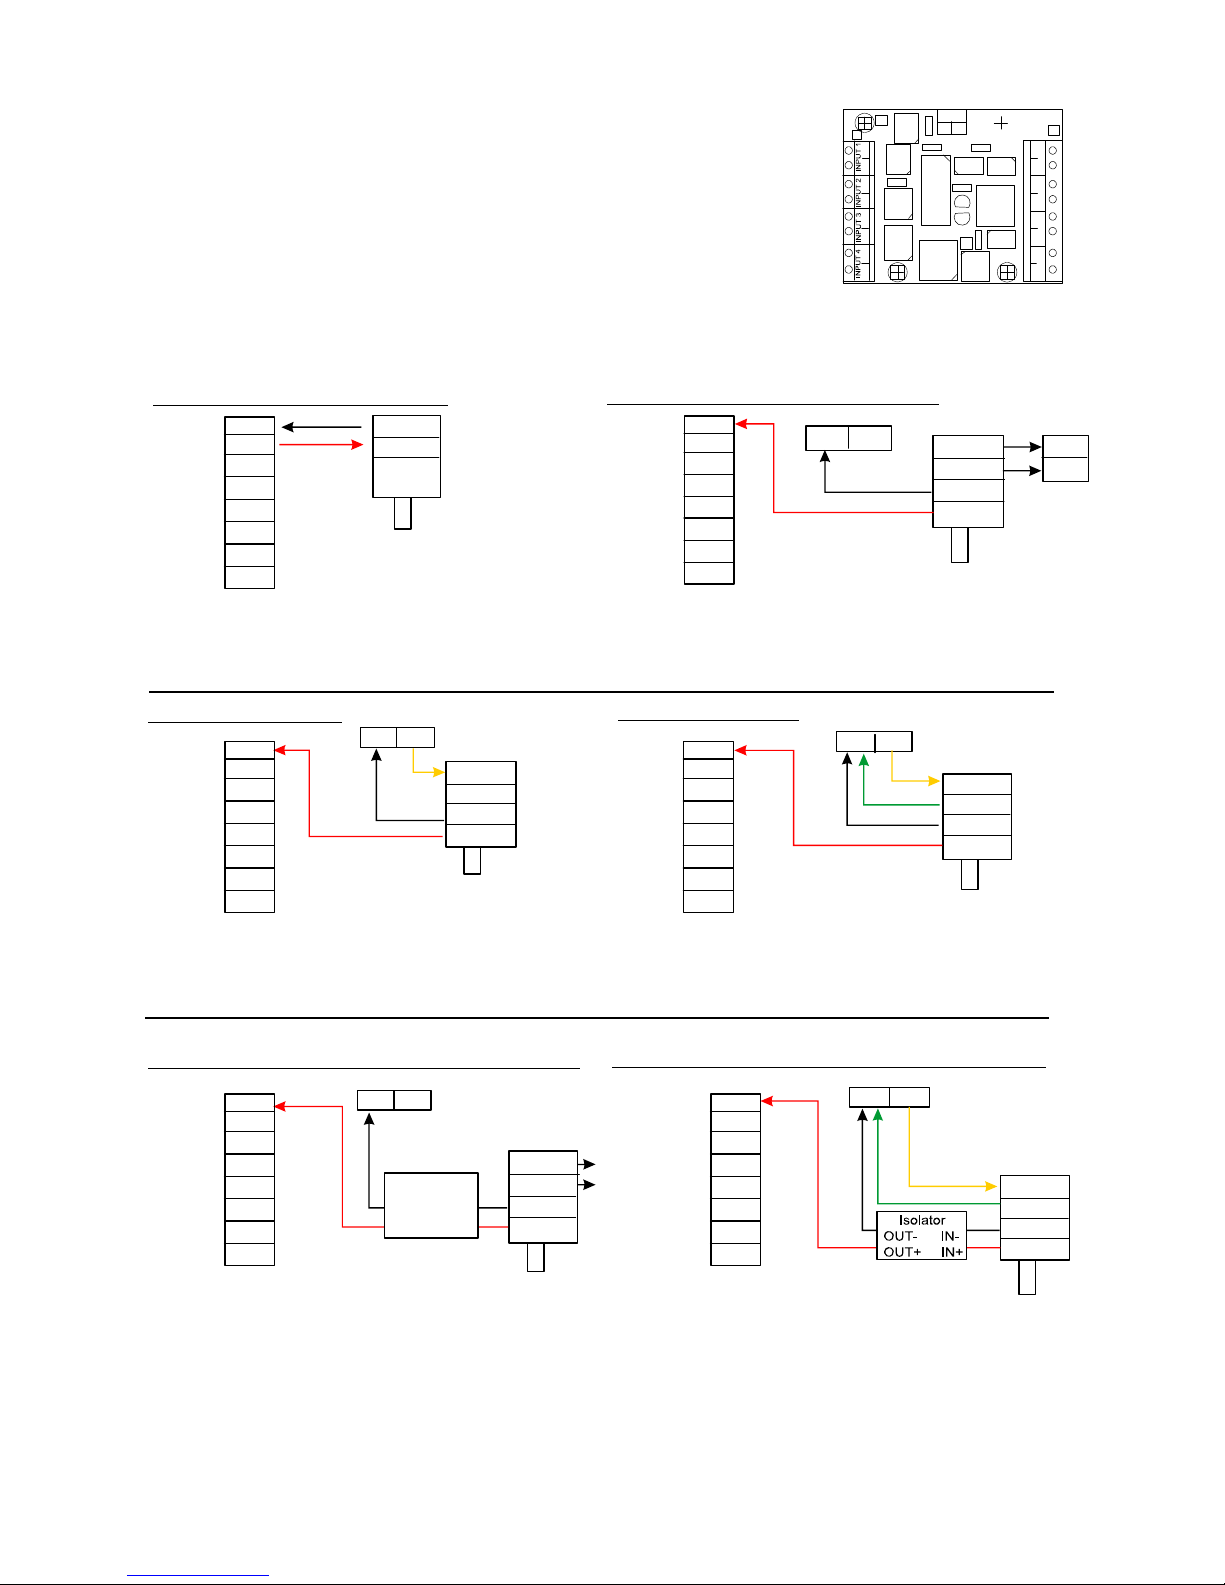
WebMaster 4-20 mA Input Wiring Guide
KEY:
(-) minus terminal is the signal input. The 4-20mA signal goes here.
A.
(+) plus terminal is a +24VDC power supply for the transmitters.
B.
GND terminal is the return for completing circuits, both signal and power.
C.
+24 terminal at the top middle of the board is the same supply as the (+) plus terminal.
D.
-
A
+
B
-
+
-
+
-
+
GN +24
Use shielded cable, grounded only at the controller end, for all connections.
INPUT 5
INPUT 5 INPUT 6 INPUT 7
-
+
-
+
-
+
-
+
A. Two-Wire Loop-Powered Transmitter
Input 1 Input 1 +
- SIGNAL
+ 24
Input 2 Input 2 +
Input 3 Input 3 +
Input 4 Input 4 +
C. Three-Wire Transmitter
Notes:
The (-) signal wire is the actual 4-20mA
signal and is also the GND return wire
to complete the circuit.
'Input -' is internally connected to GND
via 25 ohm resistor.
GND +24
Input 1 Input 1 +
Input 2 Input 2 +
Input 3 Input 3 +
Input 4 Input 4 +
+24
-SIGNAL
+SIGNAL
B. Two-Wire Externally-Powered Transmitter
Input 1 -
GND +24
Input 1 +
Input 2 Input 2 +
Input 3 Input 3 +
Input 4 Input 4 +
D. Four-WireTransmitter
Notes:
This transmitter gets its power from its own
dedicated power supply.
* Connecting a powered transmitter to the
'Input +' terminal of the WebMaster will
permanently damage the input!
GND +24
Input 1 Input 1 +
Input 2 Input 2 +
Input 3 Input 3 +
Input 4 Input 4 +
POWER+
POWER-
-SIGNAL
+SIGNAL
+24
GND
-SIGNAL
+SIGNAL
+24V
GND
E. Non-Isolated Two-Wire Externally-Powered Transmitter
GND +24
Input 1 Input 1 +
Input 2 Input 2 +
Input 3 Input 3 +
Input 4 -
Isolator
OUT- INOUT+ IN+
Input 4 +
Notes:
The analog inputs share their negative terminals.
They are all isolated from earth ground but not isolated from each other.
One non-isolated device may be connected without pr ob le ms.
If more than one non-isolated transmit ter is connected, the
F. Non-Isolated Four-Wire Externally-Powered Transmitter
GND +24
Input 1 Input 1 +
Input 2 -
POWER+
POWER-
-SIGNAL
+SIGNAL
must be installed with an isolator.
Input 2 +
Input 3 Input 3 +
Input 4 Input 4 +
+24
GND
-SIGNAL
+SIGNAL
24
Page 29
ADDING AN ISOLATED RECEIVER TO THE LOOP (PLC, CHART RECORDER, ETC)
The WebMaster GND must always be at the bottom of the loop.
Maximum total loop resistance 1000 ohms.
A. Two-Wire Loop-Powered Transmitter
Input 1 -
- PLC +
Input 1 +
Input 2 Input 2 +
Input 3 Input 3 +
Input 4 Input 4 +
B. Two-Wire Externally-Powered Transmitter
Input 1 Input 1 +
Input 2 Input 2 +
Input 3 Input 3 +
Input 4 Input 4 +
GND +24
- PLC +
C. Three-Wire Transmitter
Input 1 Input 1 +
Input 2 Input 2 +
Input 3 Input 3 +
Input 4 Input 4 +
GND +24
- PLC +
-SIGNAL
+24
POWER+
POWER-
-SIGNAL
+SIGNAL
+24
-SIGNAL
+SIGNAL
Notes:
The (-) signal is the actual 4-20mA signal
and is also the GND return wire to complete
the circuit.
'Input -' is internally connected to GND via
25 ohm resistor.
Notes:
This transmitter gets its power from its own
dedicated power supply.
+24V
* Connecting a powered transmitter to the
GND
'Input +' terminal of the WebMaster
will permanently damage the input!
D. Four-Wire T ran smitter
Input 1 Input 1 +
Input 2 Input 2 +
Input 3 Input 3 +
Input 4 Input 4 +
GND +24
- PLC +
+24
GND
-SIGNAL
+SIGNAL
25
Page 30

Figure 7: Wiring Diagram for Optional Digital Communications
26
Page 31
4.0 FUNCTION OVERVIEW
4.1 Front Panel
4.2 Display
Turn the power switch on. Be patient, the start up sequence will take about the same time as it
takes a computer to boot up, approximately 2 minutes. At first the display backlight will blink and
all output LEDS will light. Around 30 seconds later, the display backlight will come on, and the
LEDS will shut off. Then the display will come up, and show you the % complete status of the
start up process. After around 1 minute, the Summary Screen will appear. In 15 seconds, you will
hear 3 beeps, and the controller is ready to go.
The Summary Screen will display the sensor inputs, analog inputs, PPM, etc (up to 5 parameters
selected from the Startup web page) and the most significant active alarm. Any additional alarms
may be viewed by pressing the Down Arrow key.
Figure 8: Front Panel
Figure 9: Display
27
Page 32

4.3 Keypad
The keypad consists of 4 directional arrow keys (up, down, left and right), 4 menu/function keys
(previous, next, exit and enter), and 4 quick access keys (home, calibrate, relays, and help).
The arrow keys are used to change settings (up and down) and move the cursor to a different
location within that menu in order to change that setting (left and right).
The function keys are used to navigate through the different menu selections. The Next and Prev
keys move you from menu to menu. The Enter key is used to enter a submenu, and to accept a new
setting. The Exit key is used to back up one menu level. No matter where you are in the menus,
pressing Exit enough times will bring you to the Summary Screen (or press Home, see below).
To change a numeric value, move the cursor to the digit you want to change by pressing the left or
right arrow keys, then use the up or down arrow keys to change the value. Press the Enter key after
all digits have been changed to enter the new value into memory. Similarly, to change an
alphanumeric value, use the up or down arrow keys to change that character, and the left and right
arrow keys to move to the next character. Press the Enter key after all characters have been
changed.
The quick access keys bring you directly to frequently used or critical functions. The Home key
will bring you directly back to the Summary Screen. The CAL key will bring you directly to the
sensor calibration menus. The Relays key will bring you directly to menus that allow you to force
the relays off or on. The Help key is under construction. Refer to Section 5.0 for details on use of
the keypad for sensor calibration, relay control, setting communications parameters, etc.
4.4 Access Codes
The WebMasterONE series controller is shipped with the access codes at default values. In order
to prevent against unauthorized tampering, you will need to change the access codes to your own
values. See section 6.50 for details.
There are three levels of protection. If the Master password is used in the WebMasterONE
Authentication page, then any set point can be changed. The default Master password is 2001.
If the Calibration password is used in the Authentication page, then sensor calibrations will be
allowed, but other changes will not. The default Calibration password is 2002.
If the Read Only password is used the user will be able to look at any page, but will not be allowed
to make any changes. The default Read Only is 2003.
The default user name is "webmaster." This can and should be changed in the Access Code page.
See section 6.50 for details.
4.5 Initial Startup
Turn the power switch on. Be patient, the start up sequence will take about the same time as it
takes a computer to boot up, approximately 2 minutes. At first the display backlight will blink and
all output LEDS will light. Around 30 seconds later, the display backlight will come on, and the
LEDS will shut off. Then the display will come up, and show you the % complete status of the
start up process. After around 1 minute, the Summary Screen will appear. In 15 seconds, you will
hear 3 beeps, and the controller is ready to go.
The WebMasterONE Series controllers have a wide range of capabilities, so the steps required
preparing the site for installation would be different depending upon the capability you will be
using.
28
Page 33

Currently the WebMasterONE has only limited functionality for the local display and
keypad. ALL of the programming must be accomplished using a computer.
You will be able to calibrate all sensor inputs, change access codes, and enter the information
necessary to communicate with the WebMasterONE via an Ethernet connection or via the
modem over the Internet (if a modem card is installed in the controller). If neither of these
communications options are installed, you must use an USB connection to a PC for
programming. You may set most set points with the keypad, but you may not change
operating modes (for example, you may change the pump on time for a time-based add, but
not the time of day; nor can you change from a 1 week cycle to a 2 week cycle).
If you have a stand-alone controller with no communications, but you do have a computer to
connect to the USB port on the front panel of the controller for programming, go to the section
below called “Connection via the USB Port”.
If you have a controller that is equipped with a modem, then you can take full advantage of the
WebMasterONE. The controller is like a web server. Once you set up an Internet Service Provider
(ISP) account for the controller, you can “surf” to the controller from any web connected computer
to access data or reconfigure the controller. The controller can also contact you, by email or pager,
in case of trouble. In this case, a dedicated analog phone line that does not go through a company
switchboard for the controller must be provided. For details, go to the section below called
“Remote Modem Access: Shoulder Tap.” The ISP information must be entered into the controller
via the USB port, or via the local keypad before attempting a Shoulder Tap connection.
If you have not yet set up an ISP account and wish to program the WebMasterONE from a remote
location, or if you just prefer the “old fashioned method” of direct modem-to-modem
communication, go to the section below called “Direct Modem Access: Direct Tap.”
If you have the Ethernet connected, then the controller can become another PC on the network.
You can use your web browser software, enter the controller’s address (assigned by your network
administrator) and access data or reconfigure the controller. You will need to have a network node
nearby to connect your WebMasterONE. See the section below called “Ethernet Connection to
LAN”.
You may also use the Ethernet card in your laptop to communicate with the Ethernet card in the
WebMasterONE. This requires a special null (crossover) cable and the Ethernet parameters must
be programmed into the WebMasterONE using either USB or the local keypad. Refer to the
section below called “Direct Ethernet (for an WebMasterONE not connected to the LAN).”
Uploading Configuration Files
You can save all of the set points from a previously programmed controller, and then upload the
same set points into another controller. If you have already downloaded a configuration file from a
previously programmed controller, you can upload that file to this controller in order to make all
the set points the same. If you want to save the set points of this controller for use in future
controllers, or want to program this controller using a stored configuration file, refer to section
6.48 for specific instructions.
See the appropriate section above, depending upon how you plan on uploading the configuration
file; via a laptop connected to the front panel, via modem, via Ethernet connection, or via local PC
connected to the USB port.
29
Page 34

4.6 Communicating with the WebMasterONE
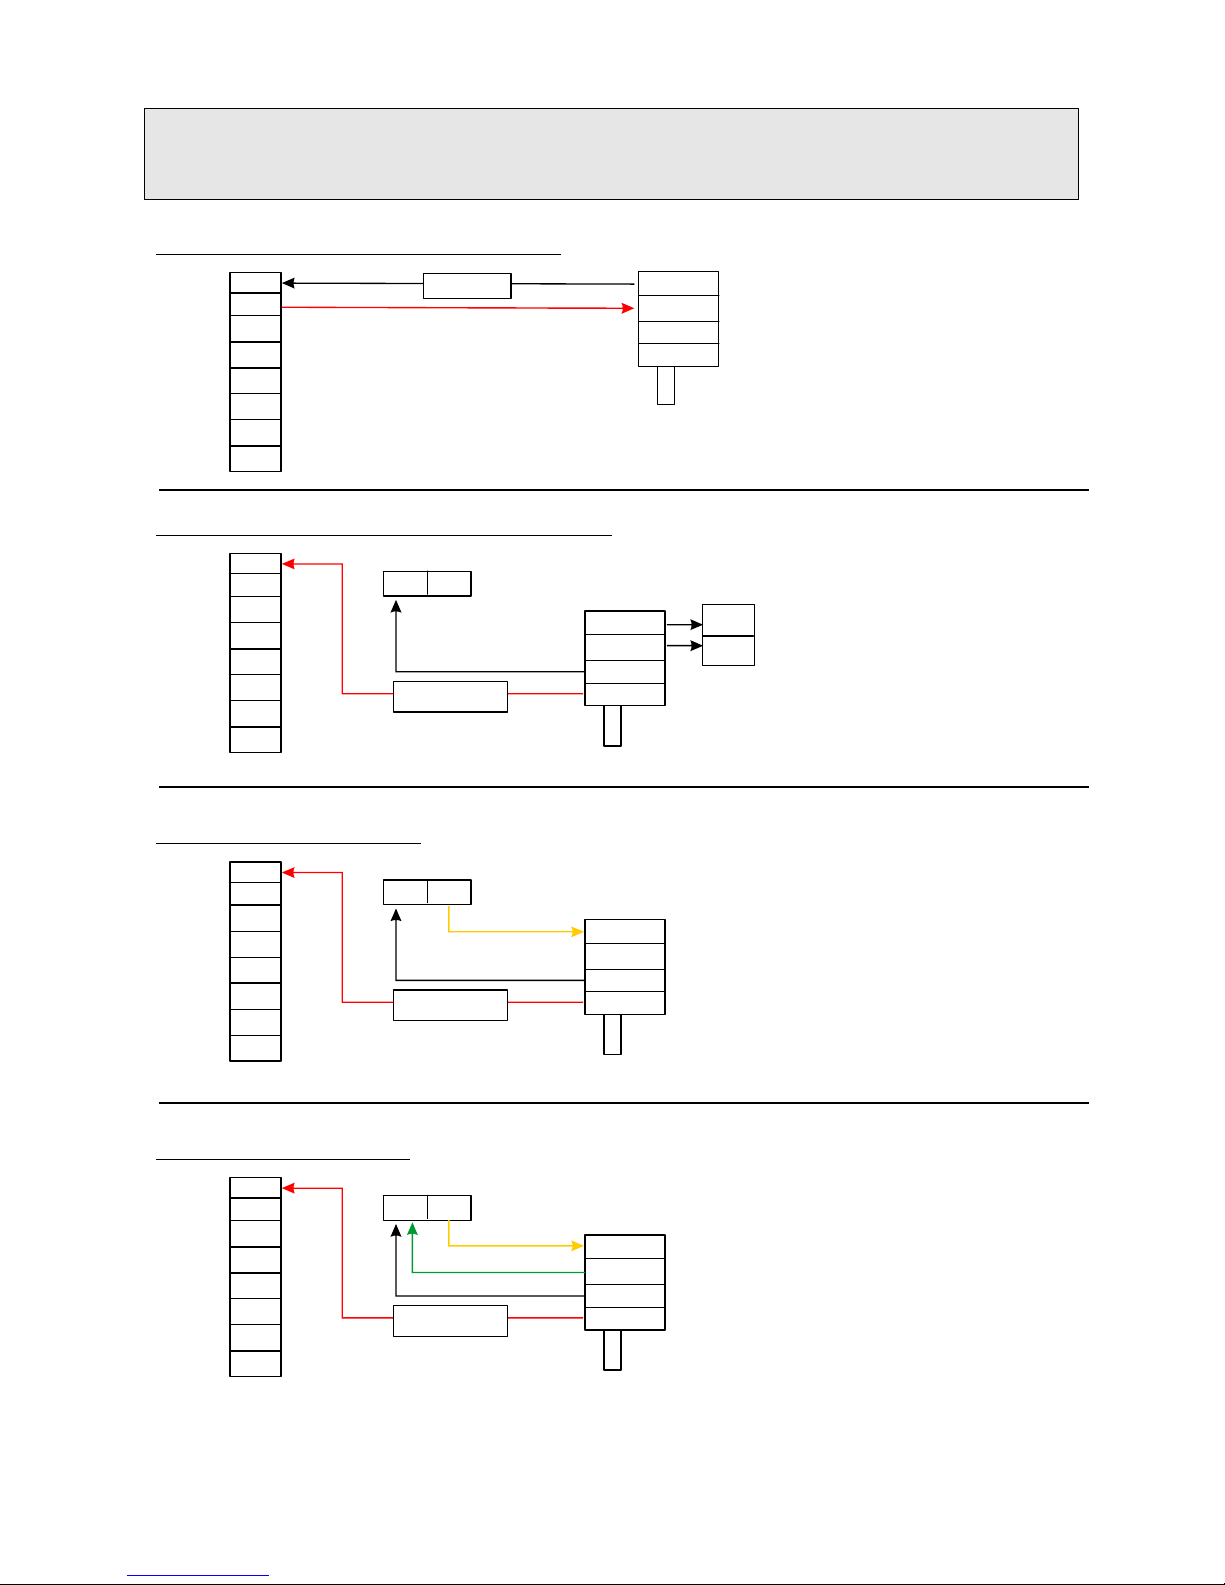
4.6.1 Connection via the USB Port
Web Browser
(Client)
USB
A USB connection to the WebMasterONE can be made via a temporary cable between a laptop
and the front panel of the controller.
Equipment Required
An USB cable with the appropriate connectors to connect your computer to the
WebMasterONE.
Features Required in the WebMasterONE
Any WebMasterONE controller is capable of an USB connection.
Utilities you need to set up on your computer
You will need the USB driver, which comes with the WebMasterONE. It’s also available on
our Web site under Tech Support > WebMaster/WIND > Downloads and Upgrades. You will
also need the Quick Start Guide which comes with the WebMasterONE, or you can download
it from our Web site under Literature > WebMaster.
Parameters that need to programmed into the WebMasterONE
The WebMasterONE is capable of this type of communication without any programming by
the user prior to attempting the communication.
Steps Required to Establish a Connection
Connect the supplied USB cable between the WebMasterONE and your computer.
Install the driver on your PC by inserting the disc supplied and following the instructions in
the Quick Start Guide. This needs to done only once for each PC that will be used to
communicate with a WebMasterONE controller.
Go to Control Panel, Network Connections, and locate the new Local Area Connection 2 that
has been created. Click on the Properties button. Highlight Internet Protocol (TCP/IP) then
click Properties. Click Use the following IP address and enter 199.199.199.1. Click OK to
exit. This needs to done only once for each PC that will be used to communicate with a
WebMasterONE controller.
Open Internet Explorer and type in the address 199.199.199.2. The sign-on screen for the
WebMasterONE will come up.
The sign-on screen of the WebMasterONE will come up. Type the User Name and Password
(Access Code) in the text boxes and click the Submit button. The default user name is
"webmaster" and the default passwords are "2001" for full access, "2002" for calibration only,
and "2003" for read only. These defaults can and should be changed in the Access Code page.
Hard coded Fixed
IP Address:
199.199.199.2
30
Page 35

4.6.2 Remote Modem Access: Shoulder Tap
Equipment Required
An Internet-ready computer.
An active analog phone line, direct to the controller (without a PBX system in between) must
be connected to the modem of the WebMasterONE.
A dialup account must be established for the WebMasterONE with an Internet Service
Provider (ISP). The connection will only be as reliable as the ISP. ISPs that require the
installation of a CD cannot be used. Contact the factory for recommendations.
Features Required in the WebMasterONE
The WebMasterONE must have the modem option installed in order to communicate via Shoulder Tap.
Utilities you need to set up on your computer
There are no special drivers, adapters or other software components required on the PC.
Parameters that need to be programmed into the WebMasterONE
Prior to attempting a Shoulder Tap connection, the following information needs to be entered
into the Communications page of the WebMasterONE, either via an USB connection, direct
modem connection (Direct Tap) or via the local keypad. Some of this information needs to be
provided to you by the Internet Service Provider (ISP) that the WebMasterONE will use to
access the Internet.
The controller’s phone number.
The local access phone number for the ISP. More than one access number may be entered.
The ISP Username that the controller will use to connect to the ISP.
The ISP Password that the controller will use to connect to the ISP.
Steps Required to Establish a Connection
Connect your PC to the Internet.
Enter the address htttp://w700.walchem.com/walchem/frontdoor.asp.
Click the link “Log onto WebMasterONE”, which will bring you to the WebMasterONE
Connection Utility Authentication Page.
Enter the Connection Utility Username (WebMaster) and Password (2001) and click the
Submit button.
Enter the phone number of the controller and click the Connect button. After a few minutes,
the sign-on screen for the WebMasterONE will come up.
The sign-on screen of the WebMasterONE will come up. Type the User Name and Password
(Access Code) in the text boxes and click the Submit button. The default user name is
"webmaster" and the default passwords are "2001" for full access, "2002" for calibration only,
and "2003" for read only. These defaults can and should be changed in the Access Code page.
31
Page 36

4.6.3 Ethernet Connection to LAN
Equipment Required
An Internet-ready computer.
A connection between the PC and the local area network (LAN).
An Ethernet connection between the WebMasterONE and the LAN.
Utilities you need to set up on your computer
There are no special drivers, adapters or other software components required on the PC.
Parameters that need to be programmed into the WebMasterONE
Prior to attempting an Ethernet connection, the following information needs to be entered into
the Communication page of the WebMasterONE, either via an USB connection or via the
local keypad. This information must be provided by the IT Administrator of the LAN.
The Ethernet IP address of the WebMasterONE. If the controller will only be accessed by
computers on the LAN then this may be a local IP address. If the controller needs to be
accessible by computers not on the LAN then this must be an Internet accessible IP address.
The Subnet Mask.
The Gateway IP address.
Steps Required to Establish a Connection
Open Internet Explorer.
Type in the Ethernet IP address that has been assigned by the IT Administrator.
The sign-on screen of the WebMasterONE will come up. Type the User Name and Password
(Access Code) in the text boxes and click the Submit button. The default user name is
"webmaster" and the default passwords are "2001" for full access, "2002" for calibration only,
and "2003" for read only. These defaults can and should be changed in the Access Code page.
32
Page 37

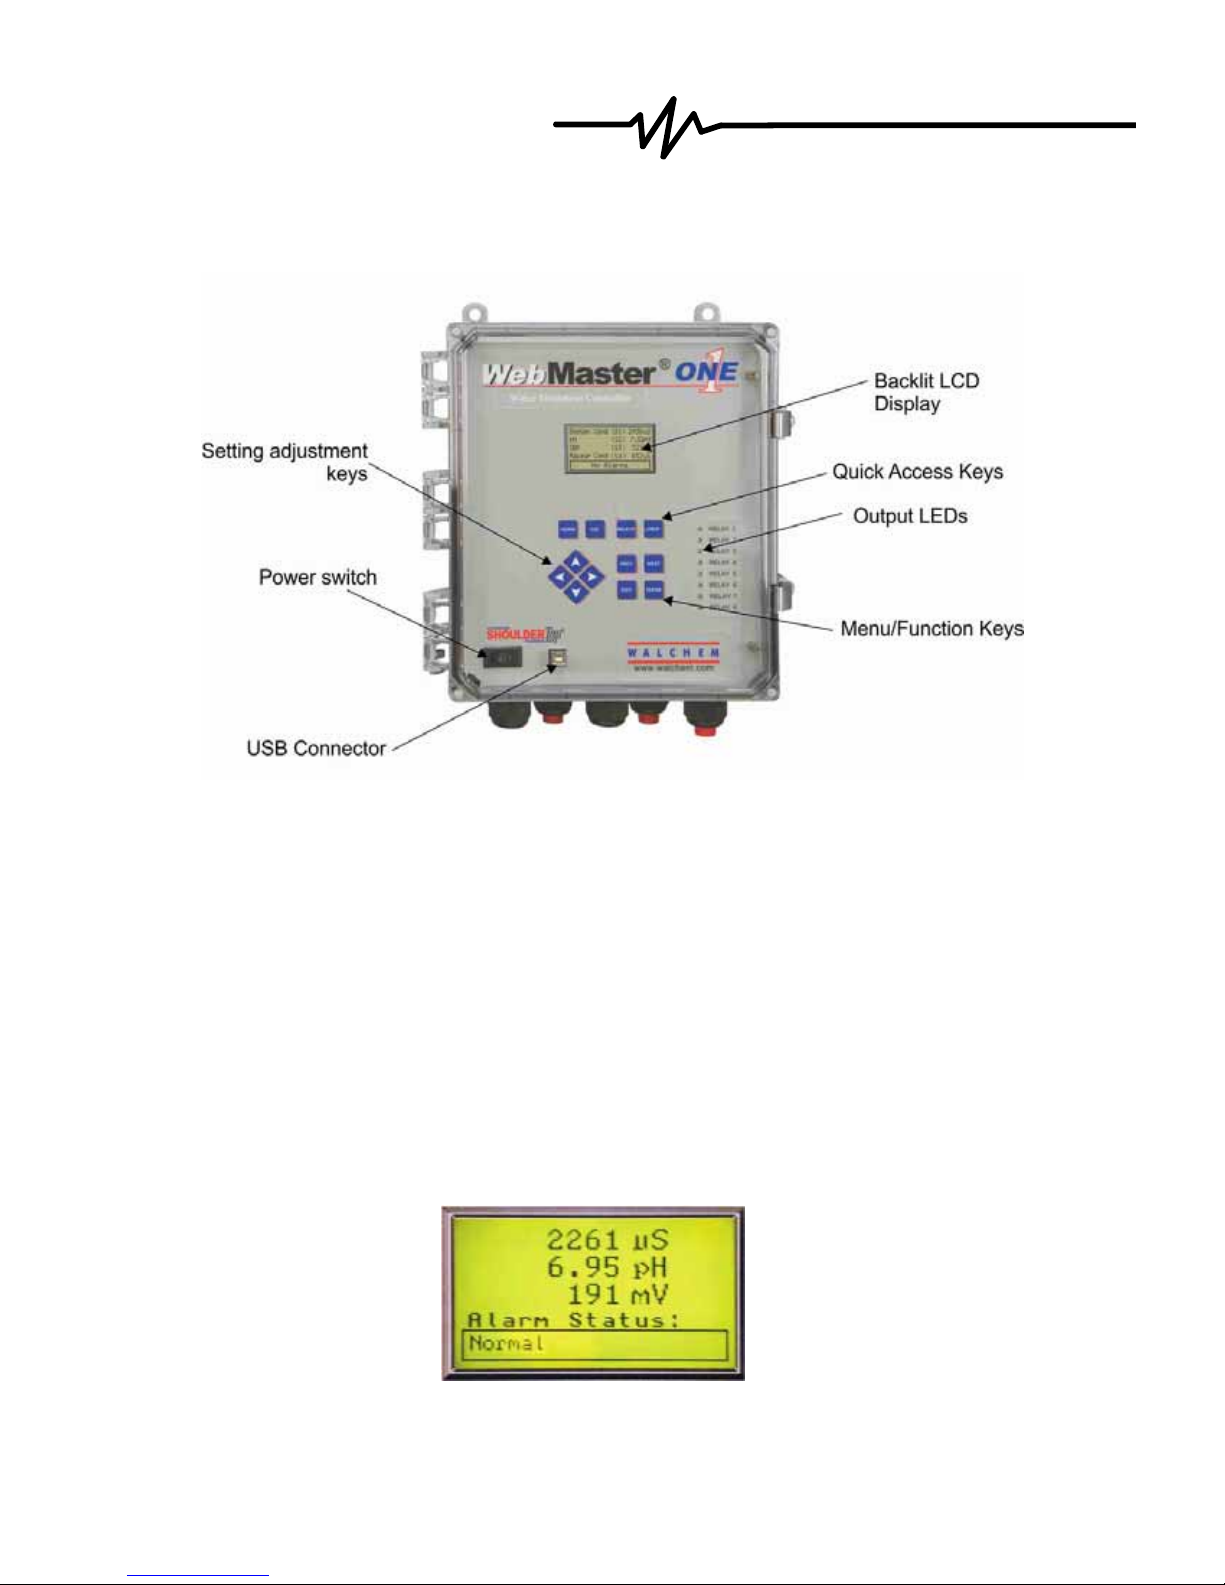
4.6.4 Direct Modem Access: Direct Tap
Web Browser
(Client)
Equipment Required
An Internet-ready computer.
An active analog phone line, direct to the controller (without a PBX system in between) must
Features Required in the WebMasterONE
The WebMasterONE must have the modem option installed in order to communicate via
Utilities you need to set up on your computer
A Windows dialup networking adapter must be created. Refer to the Quick Start Guide
Parameters that need to be programmed into the WebMasterONE
The WebMasterONE is capable of this type of communication without any programming by
Steps Required to Establish a Connection
Create the dialup networking adapter on your PC. This needs to done only once for each PC
Use the dialup networking adapter to connect the PC to the WebMasterONE.
Open Internet Explorer.
Type in the address 199.199.199.3. The sign-on screen for the WebMasterONE will come up.
The sign-on screen of the WebMasterONE will come up. Type the User Name and Password
modem
be connected to the modem of the WebMasterONE.
Direct Tap.
instructions for this procedure.
the user prior to attempting the communication.
that will be used to communicate with a WebMasterONE controller.
(Access Code) in the text boxes and click the Submit button. The default user name is
"webmaster" and the default passwords are "2001" for full access, "2002" for calibration only,
and "2003" for read only. These defaults can and should be changed in the Access Code page.
TELCO
modem
Embedded
Web Server
Hard coded
Fixed IP Address:
199.199.199.3
33
Page 38

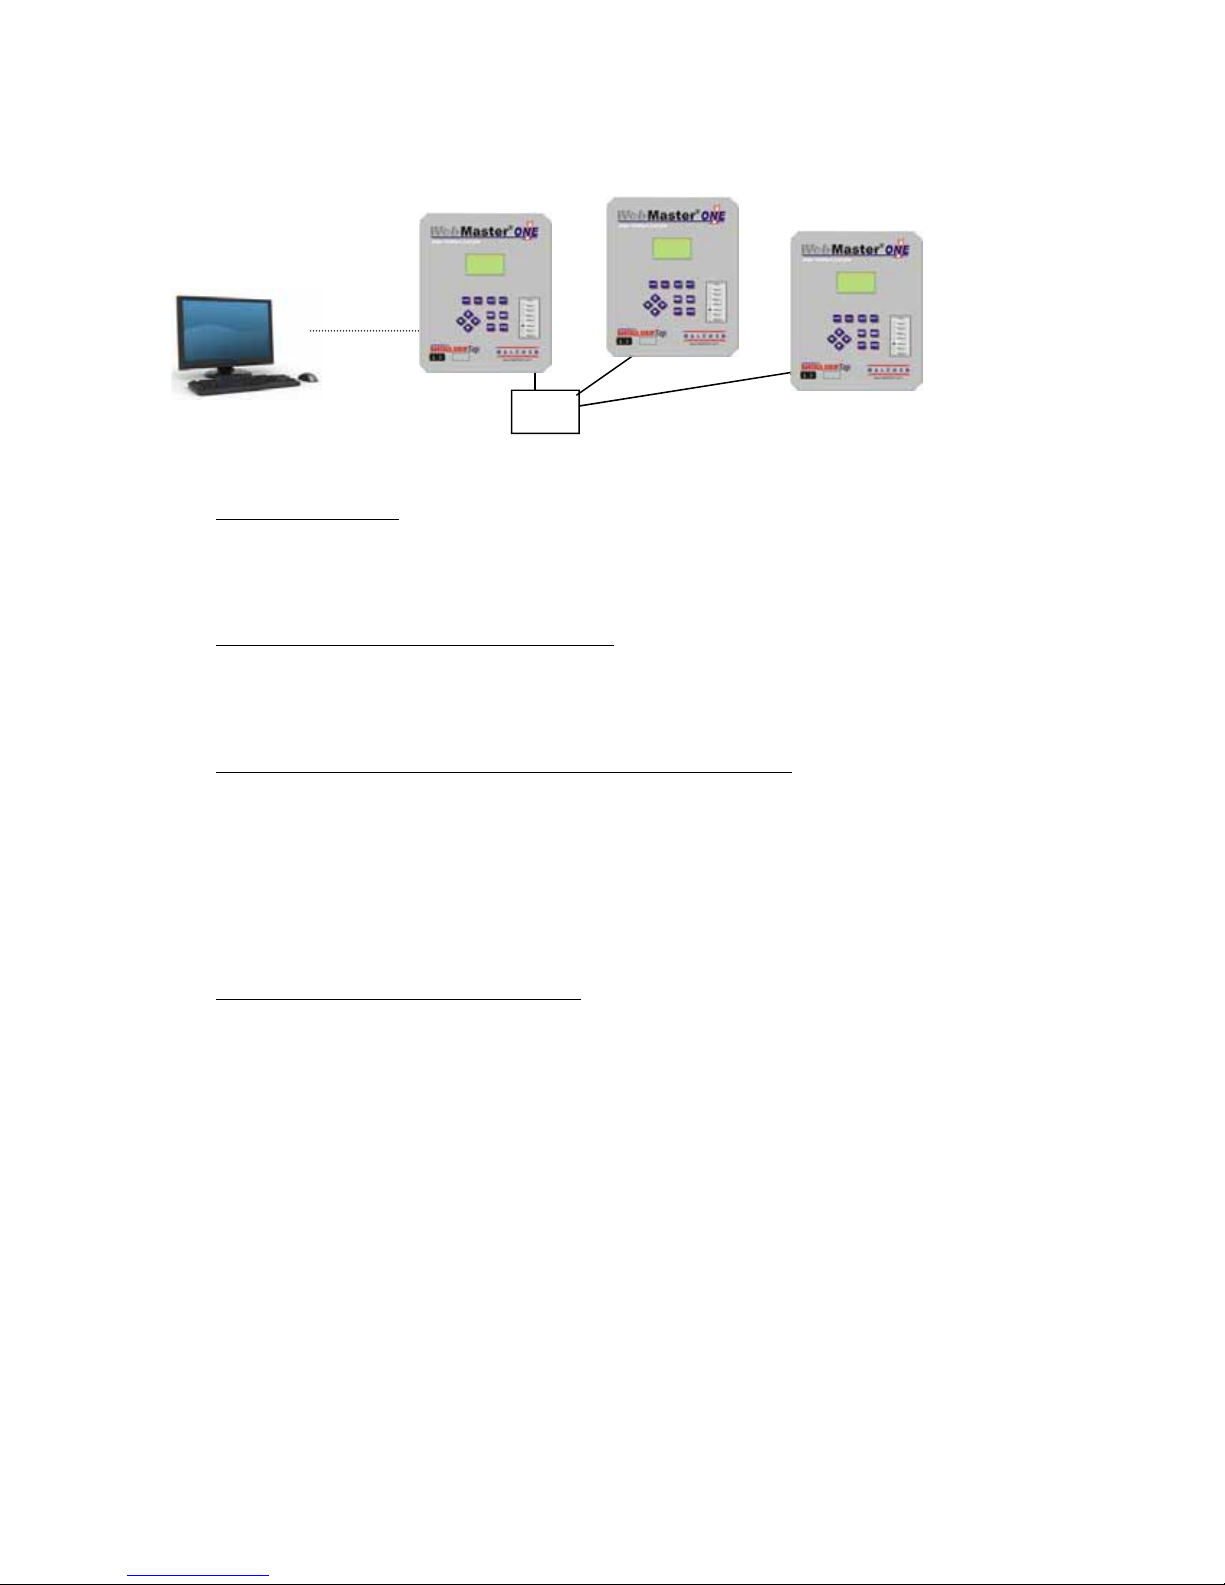
4.6.5 Direct Ethernet (for a WebMasterONE not connected to a LAN)
Web Browser
(Client)
Fixed IP
Address User
Assigned
Ethernet Cable
Equipment Required
An Internet-ready computer.
An Ethernet cable connection between the PC and WebMasterONE.
Note: Ethernet cross-over cable is required if your PC is using Windows XP. For Vista,
Windows 7 or Mac OS, a standard Ethernet cable will work.
Setting up your computer:
Go to LAN connections
For Windows XP: Control Panel > Network and Internet Connections > Network
Connections > Local Area Network
For Windows Vista: Control Panel > Network and Sharing Center > Manage Network
Connections
For Windows 7: Control Panel > View Network Status and Tasks
For Mac OSX: System Preferences > Ethernet
Right-click on the LAN connection, and choose Properties.
For Windows XP: Highlight Internet Protocol (TCP-IP)
For Vista and Windows 7: Highlight Internet Protocol Version 4 (TCP/IPv4)
For Mac OSX: Set Configure IPv4 to Manually
Select Use the following IP address
Change the IP address to 10.0.100.30. Subnet mask should be 255.255.254.0.
Parameters that need to be programmed into the WebMasterONE
The default settings will work with the LAN settings shown above. The default IP address for
the controller is 10.0.100.29. The default subnet mask is 255.255.254.0.
Steps Required to Establish a Connection
Open Internet Explorer.
Type in the Ethernet IP address that has been assigned to the WebMasterONE (10.0.100.29).
The sign-on screen of the WebMasterONE will come up. Type the User Name and Password
(Access Code) in the text boxes and click the Submit button. The default user name is
"webmaster" and the default passwords are "2001" for full access, "2002" for calibration only,
and "2003" for read only. These defaults can and should be changed in the Access Code page.
User Assigned
Fixed IP Address
Gateway + Subnet Mask
34
Page 39
4.6.6 Networking WebMasterONE Controllers via Ethernet
Web Browser connected
using any of the
previous methods
Equipment Required
An Internet-ready computer.
An Ethernet cable connection between each WebMasterONE using a hub or connection to
LAN.
Utilities you need to set up on your computer
There are no special drivers, adapters or other software components required on the PC to
support networking. Refer to the previous sections for connecting to the master controller via
USB, Ethernet, or modem.
Parameters that need to be programmed into the WebMasterONE
Prior to attempting an Ethernet connection, the following information needs to be entered into
the Communication page of each WebMasterONE on the network, either via an USB
connection or via the local keypad.
The Ethernet IP address of the WebMasterONE.
The Subnet Mask.
The Gateway IP address.
The master must be selected as the master, and the slaves selected as slaves.
Steps Required to Establish a Connection
Connect to the master controller using one of the methods described in sections 4.6.1
through 4.6.5.
The sign-on screen of the WebMasterONE will come up. Type the User Name and
Password (Access Code) in the text boxes and click the Submit button. The default user
name is "webmaster" and the default passwords are "2001" for full access, "2002" for
calibration only, and "2003" for read only. These defaults can and should be changed in
the Access Code page.
Once connected to the master, you may connect to the slaves by clicking on the link under
the heading of “Sub-Network”.
You must log onto each slave using its user name and password.
Master
Slaves
Hub
35
Page 40

4.7 Startup
Once the controller has been set up for your application, start up is a simple process. Check your
supply of chemicals, turn on the controller power, calibrate all sensors as necessary, supply the
sensors with a flow of sample water, and it will start controlling.
4.8 Shut Down
To shut down the controller, simply turn off the power. All set points will be retained in memory.
It is important that the optional pH and ORP electrodes remain wet. If it is possible for these
electrodes to dry out, remove them from the flow assembly and place them in a cup or back in
their original soaker bottles containing either pH 4 buffer solution or cooling tower water. Take
care to avoid freezing temperatures when storing the electrodes to avoid breakage of the glass.
5.0 OPERATION – Using Local Display and Keypad
On power-up, the WebMasterONE display will show the process values from the sensors, and the
most important alarm message. If there is more than one alarm, then pressing the Down Arrow key
will display the additional alarm messages.
Pressing the Enter key will display the Main Menu. The menu selections are:
Input Summary
Indices
Output Summary
Alarms
Calibration
Relay Control (HOA)
Set Points
Communication
Access Codes
Software Upgrade
Copy to USB Disk
Feature Activations
Controller Restart
Use the Next key to move the cursor down the list, or the Prev key to move the cursor up the list.
Once the cursor is on the desired menu, press the Enter key to enter that menu.
5.1 Input Summary
The Input Summary menu displays the readings from all of the sensors, as well as any optional
digital inputs, and analog inputs. Use the Next key to scroll down the list, or the Prev key to scroll
up the list. There are no programmable parameters in this menu. No access code is required to
enter this menu.
Press the Exit key to return to the Main Menu.
36
Page 41

5.2 Indices
The Indices menu displays the calculated values of the Ryznar’s Stability Index (RSI), Langliers
Saturation Index (LSI), Use the Next key to scroll down the list, or Prev key to scroll up the list.
Below the displayed values are menus to change the wet test data used to calculate the various
Indices: Calcium Hardness, and Total Alkalinity. Use the Next key to scroll down the list. When
the cursor is next to the value that needs to be changed, use the Left and Right Arrow keys to
move the cursor to the appropriate digit, then use the Up and Down Arrow keys to change the
value of the digit.
Keep in mind that the cursor can move to blank spaces to the left of the numbers and change the
blank to a number. Decimal points and minus signs may also be entered.
5.3 Output Summary
The Output Summary menu displays the state of the relays and the mA output of the optional 4-20
mA output cards. An access code will be required to enter this menu. Use the Arrow keys to enter
the access code, then press the Enter key to continue. Use the Next key to scroll down the list, or
the Prev key to scroll up the list. An Output Timeout may be reset from this menu by pressing the
Enter key while the output that is in timeout is highlighted.
Press the Exit key to return to the Main Menu.
5.4 Alarms
The Alarms menu displays all alarm messages. Use the Next key to scroll down the list, or the
Prev key to scroll up the list. There are no programmable parameters in this menu. No access code
is required to enter this menu.
Press the Exit key to return to the Main Menu.
5.5 Calibration
The Calibration menu is used to calibrate the sensor inputs, as well as any optional 4-20 mA
inputs. The list of options displayed will depend upon what options are installed in your
WebMasterONE. Not all of the menus described below will necessarily appear on your display.
An access code will be required to enter this menu. Use the Arrow keys to enter the access code,
then press the Enter key to continue.
The possible inputs to calibrate include the following. Which parameters are available depends on
which sensor type has been selected as being used:
Sensor 1 – 4 (Sensor Cal and Temperature if applicable)
4-20 mA Input #1 through #8 (only if the optional 4-20 mA input card is installed)
Each input will be listed using its Custom Name and Input Number
The possible calibration choices will be displayed. Use the Next key to move the cursor down the
list, or the Prev key to move the cursor up the list. Once the cursor is on the desired menu, press
the Enter key to start the calibration procedure.
37
Page 42

Conductivity Calibration – Standard Contacting Electrode
“1 pt Process Cal – Calibrate” will be displayed. Press the Enter key to start the calibration.
The reading from the system conductivity sensor will be displayed. Measure the conductivity of
the system water using a hand held conductivity meter, and use the Arrow keys to enter the actual
value. Press the Enter key to highlight ‘CONTINUE’, then press Enter again to put the new value
into memory.
If the calibration correction factor is within +/- 50% of the uncalibrated conductivity, the display
will say “Cal Successful”. Press the Enter key to resume control of the conductivity.
If the calibration factor is outside of +/- 50% of the uncalibrated conductivity, the display will say
“New value out of limits, Cal Fail”. The most likely cause of this is a dirty sensor. Refer to Section
7 for cleaning instructions. If cleaning fails to cure the problem, refer to Section 8 for
troubleshooting help.
Conductivity Calibration – Electrodeless Sensor
“1 pt Process Cal” and “Air Cal (Zero) will be displayed.
Use the Next key to move the cursor to the word “Calibrate” under the desired calibration routine.
Press the Enter key to start the calibration procedure.
Air Cal (Zero)
The Air Calibration is necessary on initial start up, or when installing a new sensor, in order to set
the sensor to read zero conductivity in air. This step must be done prior to the process calibration.
Place the Sensor in Air. Remove the sensor from the water and make sure that it is dry, especially
in the holes. Wait for several minutes while the conductivity reading stabilizes. Press the Enter
key to continue. If the value is within the range of calibration, it will display “Cal Successful”.
Press the Enter key after replacing the sensor in the water.
If not, it will display “New value out of limits, Cal Fail”. Refer to Section 8 for troubleshooting.
1 pt Process Cal
The reading from the system conductivity sensor will be displayed. Measure the conductivity of
the system water using a hand held conductivity meter, and use the Arrow keys to enter the actual
value. Press the Enter key to highlight ‘CONTINUE’, then press Enter again to put the new value
into memory.
If the calibration correction factor is within +/- 50% of the uncalibrated conductivity, the display
will say “Cal Successful”. Press the Enter key to resume control of the conductivity.
If the calibration factor is outside of +/- 50% of the uncalibrated conductivity, the display will say
“New value out of limits, Cal Fail”. The most likely cause of this is a dirty sensor. Refer to Section
7 for cleaning instructions. If cleaning fails to cure the problem, refer to Section 8 for
troubleshooting help.
38
Page 43

Temperature Calibration
The current temperature reading will be displayed. Measure the actual temperature of the system
water and use the Arrow keys to enter this value. Press the Enter key to highlight ‘CONTINUE’,
then press Enter again to put the new value into memory.
If the calibration factor is within +/- 15 degrees C (27 degrees F) the display will be “Cal
Successful”, otherwise it will be “Cal Fail”.
pH Calibration
There are three calibration options that will be displayed. Use the Next key to move the cursor to
the word “Calibrate” beneath the option that you want to use, then press the Enter key to start the
calibration.
Most commonly used is the “2 pt Buffer Cal” where two pH standard solutions are used to
calibrate the electrode. This is the most accurate, since the slope of the electrode (mV output per
pH unit) is measured directly.
The “1pt Buffer Cal” is not as accurate, since it assumes that the slope of the electrode is 59
mV/pH unit, which will only be true with a new electrode. This can be OK if the pH never varies
far from the value of the standard solution used in the calibration.
The third is a “1 pt Process Cal”, where the pH electrode is left in the process solution, and the pH
value is entered to match that of a hand held pH meter, or litmus paper. It also assumes a perfect
slope.
2 pt Buffer Cal
Step 1 will explain that control is suspended during the calibration procedure. Press the Enter key
when the cursor is on “Continue” to start the calibration. To cancel the calibration, press the Next
key to move the cursor to “Cancel”, then press the Enter key.
Step 2 will ask you to enter the temperature of the buffer solutions. Use the Arrow keys to change
the value of the temperature, then press the Enter key to highlight ‘CONTINUE’, then press Enter
again to put the value into memory.
Step 3 will prompt you to rinse the electrode, and place it into the first buffer solution. Press the
Enter key to continue.
Step 4 will ask you to enter the value of the first buffer solution. Use the Arrow keys to change the
value, then press the Enter key to highlight ‘CONTINUE’, then press Enter again to put the value
into memory.
Step 5 will display the mV output of the electrode in the first buffer. When this reading is stable,
press the Enter key to continue.
Step 6 will prompt you to rinse the electrode and place it in the second buffer. Press the Enter key
to continue.
Step 7 will ask you to enter the value of the second buffer. Use the Arrow keys to change the
value, then press the Enter key to highlight ‘CONTINUE’, then press Enter again to put the value
into memory.
Step 8 will display the mV output of the pH electrode in the second buffer. When the reading is
stable, press the Enter key to continue.
39
Page 44

At the end of the calibration, the display will tell you if the calibration was successful or if the
calibration failed. If successful, press the Enter key after the electrode has been replaced into the
sample stream to resume control. If failed, refer to Section 8 for troubleshooting help. The
calculated slope being more than 80% different from theoretical causes a calibration failure, or by
the pH 7 mV offset being more than 60 mV.
1 pt Buffer Cal
Step 1 will explain that control is suspended during the calibration procedure. Press the Enter key
when the cursor is on “Continue” to start the calibration. To cancel the calibration, press the Next
key to move the cursor to “Cancel”, then press the Enter key.
Step 2 will ask you to enter the temperature of the buffer solution. Use the Arrow keys to change
the value of the temperature, then press the Enter key to continue.
Step 3 will prompt you to rinse the electrode, and place it into the buffer solution. Press the Enter
key to continue.
Step 4 will ask you to enter the value of the buffer solution. Use the Arrow keys to change the
value, then press the Enter key to continue.
Step 5 will display the mV output of the electrode in the buffer. When this reading is stable, press
the Enter key to continue.
At the end of the calibration, the display will tell you if the calibration was successful or if the
calibration failed. If successful, press the Enter key after the electrode has been replaced into the
sample stream to resume control. If failed, refer to Section 8 for troubleshooting help. The
calculated slope being more than 80% different from theoretical causes a calibration failure, or by
the pH 7 mV offset being more than 60 mV.
1 pt Process Cal
Step 1 will display the current pH reading of the system water. Below that, use the Arrow keys to
fill in the new value, then press the Enter key to continue.
At the end of the calibration, the display will tell you if the calibration was successful or if the
calibration failed. If successful, press the Enter key after the electrode has been replaced into the
sample stream to resume control. If failed, refer to Section 8 for troubleshooting help. The
calculated slope being more than 80% different from theoretical causes a calibration failure, or by
the pH 7 mV offset being more than 60 mV.
ORP Calibration
2 pt Buffer Cal
Step 1 will explain that control is suspended during the calibration procedure. Press the Enter key
when the cursor is on “Continue” to start the calibration. To cancel the calibration, press the Next
key to move the cursor to “Cancel”, then press the Enter key.
Step 2 will prompt you to rinse the electrode, and place it into the first buffer solution. Press the
Enter key to continue.
Step 3 will ask you to enter the value of the first buffer solution. Use the Arrow keys to change the
value, then press the Enter key to highlight ‘CONTINUE’, then press Enter again to put the value
into memory.
40
Page 45

Step 4 will display the mV output of the electrode in the first buffer. When this reading is stable,
press the Enter key to continue.
Step 5 will prompt you to rinse the electrode and place it in the second buffer. Press the Enter key
to continue.
Step 6 will ask you to enter the value of the second buffer. Use the Arrow keys to change the
value, then press the Enter key to highlight ‘CONTINUE’, then press Enter again to put the value
into memory.
Step 7 will display the mV output of the pH electrode in the second buffer. When the reading is
stable, press the Enter key to continue.
At the end of the calibration, the display will tell you if the calibration was successful or if the
calibration failed. If successful, press the Enter key after the electrode has been replaced into the
sample stream to resume control. If failed, refer to Section 8 for troubleshooting help. A
calibration will fail if the offset calculated is more than 200 mV, or if the slope calculated is
outside of 0.5-1.5.
1 pt Buffer Cal
Step 1 will explain that control is suspended during the calibration procedure. Press the Enter key
when the cursor is on “Continue” to start the calibration. To cancel the calibration, press the Next
key to move the cursor to “Cancel”, then press the Enter key.
Step 2 will prompt you to rinse the electrode, and place it into the buffer solution. Press the Enter
key to continue.
Step 3 will ask you to enter the value of the buffer solution. Use the Arrow keys to change the
value, then press the Enter key to highlight ‘CONTINUE’, then press Enter again to put the value
into memory.
Step 4 will display the mV output of the electrode in the buffer. When this reading is stable, press
the Enter key to continue.
At the end of the calibration, the display will tell you if the calibration was successful or if the
calibration failed. If successful, press the Enter key after the electrode has been replaced into the
sample stream to resume control. If failed, refer to Section 8 for troubleshooting help. A
calibration will fail if the offset calculated is more than 200 mV, or if the slope calculated is
outside of 0.5-1.5.
1 pt Process Cal
Step 1 will display the current pH reading of the system water. Below that, use the Arrow keys to
fill in the new value, then press the Enter key to highlight ‘CONTINUE’, then press Enter again to
put the value into memory.
At the end of the calibration, the display will tell you if the calibration was successful or if the
calibration failed. If successful, press the Enter key after the electrode has been replaced into the
sample stream to resume control. If failed, refer to Section 8 for troubleshooting help. A failed
calibration is caused by an offset from the uncalibrated reading of more than 200 mV.
41
Page 46

Chlorine or Chlorine Dioxide Calibration
1 pt Process Cal
Ensure that the sensor is conditioned and equilibrated to the temperature of the sample.
Ensure that the sample flow rate is between 30 and 100 liters/hour.
Perform a test on the sample water for the oxidizer concentration.
Enter the 1 point process calibration menu.
Step 1 will display the current ppm reading of the water. When the reading is stable, use the Arrow
keys to fill in the new value, then press the Enter key to highlight ‘CONTINUE’, then press Enter
again to put the value into memory.
At the end of the calibration, the display will tell you if the calibration was successful or if the
calibration failed. If successful, press the Enter key after the sensor has been replaced into the
sample stream to resume control. If failed, refer to Section 8 for troubleshooting help.
Zero Cal
A zero calibration must be performed on initial installation, or after cleaning or replacing the
membrane or electrolyte. This step must be done prior to the process calibration.
Remove the sensor from the flow cell and place it in a beaker of clean, oxidizer-free water.
Allow the sensor 15 minutes to equilibrate to the water temperature.
Enter the Zero Cal menu.
Step 1 will display the current mV reading from the sensor.
Stir the water with the sensor until the mV reading is stable for at least 5 minutes.
When the reading is stable, press Enter to continue.
If the value is within the range of calibration, it will display “Cal Successful”. Press the Enter key
after replacing the sensor in the flow cell.
If not, it will display “Calibration Failed!” Refer to Section 8 for troubleshooting.
4-20 mA Input 1-8 Calibration
Calibrate 4 mA
Following the instructions for your 4-20 mA transmitter, supply the WebMasterONE controller
with a 4 mA signal from the transmitter. You should verify that the transmitter is accurate by
measuring the output with an ammeter. You can read the present value of the mA signal as
measured by the controller on the top line of the display. If the value is not exactly 4 mA, press the
Enter key when the cursor is on “Calibrate 4 mA”.
transmitter signal as exactly 4 mA.
The transmitter signal must be +/- 2 mA of the expected 4 mA value, or else the calibration will
fail.
Calibrate 20 mA
Repeat this process, supplying the controller with a 20 mA signal from the transmitter, and press
the Enter key when the cursor is on the “Calibrate 20 mA” to make the present value exactly 20
mA.
The transmitter signal must be +/- 2 mA of the expected 20 mA value, or else the calibration will
fail.
Once this is done, the controller will read the
42
Page 47

Calibrate 1 Pt (if not in Fluorometer Mode)
The 1-Point Calibration allows you to adjust the current reading of the process value to match
what the actual value is as measured by some independent method (such as a laboratory
measurement or handheld instrument). The software will maintain the “4 mA =” setting used to
scale the input, and adjust the “20 mA =” setting to make the reading accurate at the value entered
in the 1-Point Calibration.
Current mA
Displays a live reading of the mA output of the transmitter.
Current
Displays the live calculated process value, using the existing 4 mA = , 20 mA = and Units
settings.
New
Use the arrow keys to enter the desired new reading for the process value. Use the Arrow
keys to fill in the new value, then press the Enter key to highlight ‘CONTINUE’, then
press Enter again to put the value into memory.
At the end of the calibration, the display will tell you if the calibration was successful or if
the calibration failed. If successful, press the Enter key after the sensor has been replaced
into the sample stream to resume control. If failed, refer to Section 8 for troubleshooting
help.
Calibrate 1 Pt (Fluorometer Mode)
The 1-Point Calibration allows you to adjust the current reading of the process value to match
what the actual value is as measured by some independent method (such as a laboratory
measurement or handheld instrument). The software will maintain the “4 mA =” setting used to
scale the input, and adjust the “20 mA =” setting to make the reading accurate at the value entered
in the 1-Point Calibration.
Current mA
Displays a live reading of the mA output of the transmitter.
Prod Level
Displays the live calculated process value, using the existing 4 mA = , 20 mA = and
Dye/Prod settings.
New
Use the arrow keys to enter the desired new reading for the dye concentration in ppb. Use
the Arrow keys to fill in the new value, and then press the Enter key to tab to the next
menu.
Dye/Prod
The Dye-to-Product ratio is the ratio of the fluorescent dye in ppb to the active ingredient
in the chemical product in ppm. Use the Arrow keys to fill in the ratio (given to you by
your chemical supplier). Press the Enter key to highlight ‘CONTINUE’, and then press
Enter again to put the value into memory.
At the end of the calibration, the display will tell you if the calibration was successful or if
the calibration failed. If successful, press the Enter key to resume control. If failed, refer to
Section 8 for troubleshooting help.
43
Page 48

Reset Cal
Reset Cal is used to reset the 4 mA and 20 mA calibration coefficients to the factory
defaults. Press the Enter key and the factory calibration will be restored.
5.6 Relay Control (HOA)
This menu will present you with a list of each relay. To the right of the name of the relay will be
an indication of the current state of the relay (OFF, or ON). To the right of this, the display will
show either the time that the relay has been on, counting up (if the relay is responding to set point,
and the time for the relay to shut off is unknown) or the time that has left to be on, counting down
(if the relay has been activated by a timer, and the controller knows when it will shut off). Below
the name of the relay will be the words “HAND” “OFF” and “AUTO”, each with a radio button to
the left of the word. Use the Next key to move the cursor to the line containing the radio buttons.
Use the Left Arrow and Right Arrow keys to move the cursor to the desired relay mode. Press the
Enter key to change the mode of the relay.
If the relay is in the AUTO mode, then it will respond to the set points or other programmed
parameters. This is the normal mode for the relay to be in.
If the relay is in the OFF mode, then the relay will be open regardless of whether the programming
of the controller dictates that the relay should be ON or OFF. IF THE POWER TO THE
CONTROLLER IS CYCLED OFF AND BACK ON, THE RELAY WILL REVERT BACK TO
AUTO MODE.
If the relay is in the HAND mode, then the relay will be closed regardless of whether the
programming of the controller dictates that the relay should be ON or OFF. If a Hand Time Limit
has been programmed in the controller, the relay will shut off after this time has elapsed, and the
mode will revert back to AUTO.
5.7 Set Points
This menu is used to adjust any of the control set points for the relays that are simple entries of
numbers. Any configuration of feed control modes (for example, bleed and feed versus feed based
on makeup volume) or biocide cycles (for example, changing from daily to weekly adds), etc. may
NOT be changed using the keypad. These types of changes require a computer to accomplish.
Refer to Section 6 for detailed descriptions of each control mode and set point menu.
Pressing the Enter key with Set Points highlighted will bring you to this display:
SET POINTS
Relay 1 (R1) Set Points
Relay 2 (R2) Set Points
Relay 3 (R3) Set Points
Relay 4 (R4) Set Points
Relay 5 (R5) Set Points
Relay 6 (R6) Set Points
Relay 7 (R7) Set Points
Relay 8 (R8) Set Points
If the relay has been given a custom name, this name will precede the relay number.
Pressing Next moves the highlight down the list, while Prev moves the opposite direction. Press
Enter to go into the highlighted menu. Press Exit to return to the Main Menu.
44
Page 49

Relay 1- 8 Set Points
The set points available for each relay will vary depending upon the control mode selected. A
computer connection is required to change the control mode. The units of measure of some of the
set points will vary depending upon sensor input that may be assigned to the relay.
Set Point xxxxx (if control mode is any on/off set point, time proportional, target PPM)
Use the arrow keys to change the process value at which you want the relay to activate. The set
point value is limited to the range of the sensor input. Press Enter to accept the changes.
Dead Band xxxxx (if control mode is on/off set point)
Use the arrow keys to change the process value away from the set point at which the relay will
deactivate. For example, if you are forcing the conductivity lower, your set point is 2000 S/cm,
and your dead band is 100 S/cm, then the relay will activate at 2001 and deactivate at 1900
S/cm. The purpose of the dead band is to prevent rapid cycling of the relay open and closed,
which can shorten its life. The dead band should be set for the lowest value that still prevents the
relay from chattering. Press Enter to accept the new value.
Sample Period (minutes) xxxx (if control mode is time proportional feed)
Use the arrow keys to adjust the number of minutes used for the time proportional control sample
period. Any value between 1 and 1440 is acceptable. Press Enter to accept the new value.
Proportional Band xxxx (if control mode is time proportional feed)
Use the arrow keys to adjust the distance from the set point where the maximum output activation
time will occur. This parameter will be in the units of measure of the sensor input used to control
the relay. The acceptable range for this set point varies with the input. Press Enter to accept the
new value.
Duration (if control mode is intermittent sampling)
Use the arrow keys to set the minutes and press Enter to accept the new value. Then press Next to
move the cursor to the seconds and adjust with the arrow keys and press Enter to accept. Any
value between 10 sec and 60 minutes is acceptable. The duration is the time that the valve will be
open in order to get a fresh water sample to the electrode.
Hold Time (if control mode is intermittent sampling)
Use the arrow keys to set the minutes and press Enter to accept the new value. Then press Next to
move the cursor to the seconds and adjust with the arrow keys and press Enter to accept. Any
value between 10 sec and 10 minutes is acceptable. The hold time is the time that the valve will be
closed following a sample, but prior to the conductivity measurement. The hold time should ensure
that the sample is water and not steam.
Blowdown Time (if control mode is intermittent sampling)
Use the arrow keys to set the fixed blowdown time (in minutes) and press Enter to accept the new
value. Any value between 1 and 1440 minutes is acceptable. If the conductivity exceeds the set
point, the blowdown valve will activate for this time.
Interval Time (if control mode is intermittent sampling)
Use the arrow keys to set the time between samples (in minutes) and press Enter to accept the new
value. Any value between 5 and 1440 minutes is acceptable.
45
Page 50

Prop Band (if control mode is intermittent sampling, proportional blowdown)
Use the arrow keys to adjust the distance from the set point where the maximum output activation
time will occur. This parameter will be in the units of measure of the sensor input used to control
the relay. The acceptable range for this set point varies with the input. Press Enter to accept the
new value.
Fixed Time to Feed (if control mode is feed with another relay, feed after another relay (fixed))
Use the arrow keys to set the minutes and press Enter to accept the new value. Then press Next to
move the cursor to the seconds and adjust with the arrow keys and press Enter to accept. Any
value between 1 sec and 1440 minutes is acceptable.
% of Relay to Feed (if control mode is feed after another relay (%))
Use the arrow keys to change the % of the time that the lead relay runs that this relay should run
and press Enter to accept the change. Any value between 0 and 100% is acceptable.
Time Period (if control mode is feed as % of time)
Use the arrow keys to change the length of the time cycle to be used, then press Enter to accept the
changes. Any value between 1 and 1440 minutes is acceptable.
% of Period to Feed (if control mode is feed as % of time)
Use the arrow keys to change the percentage of the time period that will be used to activate the
relay, then press Enter to accept the changes. Any value between 0 and 100% is acceptable.
Spike Point (if control mode is any spike set point)
Use the arrow keys to change the higher set point then press Enter to accept the changes. The set
point value is limited to the range of the sensor input.
Unit Vol to Trigger xxxxx (if control mode is flow-based feed or target PPM)
Use the arrow keys to change the volume of solution that needs to flow through the flow meter in
order to trigger the chemical feed. Any value between 1 and 10,000 is acceptable. Press Enter to
accept the new value.
Output On-Time (min) xxxx (sec) xx (if control mode is flow-based or counter-based feed)
Use the arrow keys to change the amount of time for the relay to be activated, once the previously
specified volume of solution has passed through the flow meter, or counts have been detected by
the digital input. First change the minutes using the arrow keys, then Press Enter. Any value
between 1 and 1440 minutes is acceptable. Press Next to move to the seconds, and use the arrow
keys to adjust the seconds. Press Enter to accept the new value.
Counts Before Trigger xxxxx (if control mode is counter-based feed)
Use the arrow keys to change the number of counts on the digital input that will trigger the relay to
activate. Any value between 0 and 99,999 is acceptable. Press the Enter key to accept the new
value.
Output On Time (if control mode is Dispersant)
Use the arrow keys to change the pump on time (in minutes) then press Enter to accept the
changes. Any value between 1 and 1440 is acceptable.
46
Page 51

Output On Time Setup (if control mode is biocide timer or spike set point based feed)
This menu is used to change the amount of time that the output will activate for each programmed
event. Again, it is not possible to reschedule events using the keypad. Press Enter with Output On
Time highlighted to access the screens that show each event:
RLY1-8 TIMER ADDS
Event A ... T
Time Of Day xx:xx
Output On Time
(min)xxxx (sec)xx
NEXT for next event
PREV f. previous evnt
Use the arrow keys to change the relay on time in minutes. Any value between 1 and 1440 is
acceptable. Press Enter to accept the new value. Press Next to move to the seconds, use the arrow
keys to adjust the seconds, and Press Enter to accept the new value. Press Next to advance to the
next programmed event, or Prev for the previous scheduled event. Prev will also move you from
sec to min within an event.
On Delay (if control mode is Activate on a DI)
Use the arrow keys to change the time (in minutes:seconds) to delay the relay activation once the
DI changes to the active state, then press Enter to accept the changes. Any value between 1 and
1440 is acceptable.
Off Delay (if control mode is Activate on a DI)
Use the arrow keys to change the time (in minutes:seconds) to delay the relay deactivation once
the DI changes to the non-active state, then press Enter to accept the changes. Any value between
1 and 1440 is acceptable.
Specific Gravity (if control mode is target PPM)
Use the arrow keys to change the specific gravity of the chemical product being fed. Any value
between 0 and 10 g/ml is acceptable.
Pump Rating (if control mode is target PPM)
Use the arrow keys to change the flow rate of the metering pump feeding the chemical product.
Any value between 0 and 1000 gal or liters per hour is acceptable.
Output Time Limit xxxx
Use the arrow keys to change the maximum amount of time that the relay can be continuously
activated before the controller deactivates the relay and activates a Output Time Limit alarm. Press
the Enter key to accept the new value. The Output Time Limit is intended to prevent runaway
control on a faulty sensor input.
Note that the relay will not activate again until someone resets the timer!
It will take some experience to find out what the normal output on-time will be. If the relay cycles
open and closed under worst case conditions in 30 minutes, you may want to set the Output Time
Limit at 60 minutes.
Hand Time Limit xxxx
Use the arrow keys to change the maximum number of minutes that the Bleed output can be
activated in the Hand mode. Any value between 1 and 1440 is acceptable. Press Enter to accept the
new value.
47
Page 52

5.8 Communication
This menu is used to enter the information required to communicate with the WebMasterONE
using the modem option via the Internet, or using the Ethernet option. Once this information is
entered, a remote PC may be used to configuring all or the set points that are unavailable with the
keypad.
For Internet communications, it is also possible to do a manual test of the WebMasterONE’s
ability to use its modem to dial a local Internet Service Provider (ISP) and connect to the Internet.
The display will show a list of the various parameters. Use the Next key to move the cursor to the
line below the parameter. Use the Up and Down Arrow keys to change each character to the
correct number, letter, or symbol. Use the Left and Right Arrow keys to move the cursor to the
next character. Press Enter once all characters have been changed to the desired values.
Dial-up ISP Username (only if modem is installed)
When the controller needs to dial out and connect to the Internet Service Provider, it needs to
identify itself with a user name, so that the ISP knows that it has an account. Enter the user name
here.
Dial-up ISP Password (only if modem is installed)
Similarly, the controller needs to identify itself with a password in order to connect with the ISP.
Enter the password here.
Dial-up ISP Local Phone (only if modem is installed)
Enter the phone number for the controllers Internet Service Provider. This will be the phone
number that it attempts to dial when getting on the Internet.
Controller Phone # (only if modem is installed)
When you need to communicate with the controller, you go to the web site, link to the
WebMasterONE access page, and a call is made from our server to the controller to wake it up.
Enter the phone number for the controller, exactly as it needs to be dialed by our server in the
USA. If the WebMasterONE is installed within the USA or Canada, this may include the 1 prefix.
If the WebMasterONE is installed in another country, it must include the 011 prefix, country code,
and phone number.
When the cursor is on the pull down menu for the country code, use the UP or DOWN arrow keys
to scroll through the list of countries. The correct prefix (1 or 011) will be selected automatically.
Then press Next to move the cursor to the phone number and use the Arrow keys to change the
number. Press Enter to accept the changes.
48
Page 53

Dial ISP (only if modem is installed)
This menu is used to manually dial the WebMasterONE’s ISP. Press the Enter key when the
cursor is on this to start the process.
A new screen will appear. The first line will show the Dial up Status. This menu is informational
only, and tells you what is happening with the dialup connection. Possible status messages include:
Message Explanation
Off Line The controller is not connected.
Dialing xxx-xxxx The controller is dialing out to the ISP.
No Dial Tone The controller can not dial out due to phone line
or modem problems.
No phone number There is nothing entered in the ISP Phone No.
field.
Connecting to ISP The controller is successfully negotiating a
connection with the ISP.
On Line The controller is now on the Internet.
Checking for Upgrade The controller is communicating with our server
to see if a software upgrade is available.
Connection Timeout in The Internet connection process is complete. The number of
xxxxx sec seconds displayed depends upon the value entered in the Dialup
Connection Lifetime text box described below.
The second line is the Dial up Dynamic IP Address. This is informational, and tells you the last
IP assigned to the WebMasterONE by its ISP the last time it connected. When the manual ISP Dial
up process is successful, this number should change.
The third line is the date and time of the last successful connection with the ISP.
The bottom line will display “Dial ISP”, “Log Off” and “Cancel”.
Pressing the Enter key while the cursor is on “Dial ISP” will make another attempt to dial the ISP.
Pressing the Enter key while the cursor is on “Log Off” will disconnect the WebMasterONE from
the ISP. It is VERY IMPORTANT that you log off, or the controller will keep the connection on
the Internet until the connection times out. It is possible that this programmable maximum
connection time could be set for infinity, which could be expensive!
Pressing the Enter key while the cursor is on “Cancel” will stop the WebMasterONE from
attempting the Dial up process.
Ethernet IP Address
When a controller is attached to a network, your IT Administrator needs to assign it an Ethernet IP
address. When you want to communicate with the controller from your PC on the network, you go
to your Browser and type in the controller’s address.
Ethernet Subnet Mask
When a controller is attached to a network, your IT Administrator must also assign the IP
Subnet Mask. Enter this number here.
Ethernet Gateway
When a controller is attached to a network, your IT Administrator must also assign the Gateway.
Enter this number here.
49
Page 54

5.9 Access Codes
There are three levels of access code protection. If the Master password is used in the
WebMasterONE, then any set point can be changed. If the Calibration Level password is used,
then sensor calibrations will be allowed, but other changes will not. If the Read Only password is
used the user will be able to look at any menu, but will not be allowed to make any changes.
In order to change the access code for each level of access, use the Next key to move the cursor to
the space next to Present, and use the Arrow keys to make the characters match the present access
code (you have to know the present code to change it). Press the Enter key to move the cursor next
to New, then use the Arrow keys to make the characters match your new access code and press
Enter.
The default user name is "webmaster" and the default passwords are "2001" for full access, "2002"
for calibration only, and "2003" for read only. These defaults can and should be changed to assure
security.
5.10 Software Upgrade
CAUTION! There are live circuits inside the controller even when the power switch on the front
panel is in the OFF position! The front panel must never be opened before power to the controller
is REMOVED!
The software of the controller may be easily updated in the field, adding new features or fixing any
bugs. This can be accomplished in a few quick steps:
a. Save the new software upgrade to a 32 MB (or higher) USB flash memory stick.
These are available from the factory, or may be found locally.
b. Plug the memory stick into one of the USB Host connections on the core interface
board (see Figure 3). The stick will only fit in one direction.
c. Enter the Software Upgrade Menu. Press Next until the word START is
highlighted, then press Enter.
d. The Status section of the screen will indicate that the upgrade has started. Once it
finishes (in a few minutes) the controller will reboot.
e. Remove the memory stick. This may be used to upgrade as many controllers as
you would like.
5.11 Copy to USB Disk
CAUTION! There are live circuits inside the controller even when the power switch on the front
panel is in the OFF position! The front panel must never be opened before power to the controller
is REMOVED!
The data log file may be manually downloaded to a USB disk. Press Enter to initiate the process:
1. Plug a USB memory stick into one of the USB host connections. The file size may
be as large as 2 MB.
2. Press Enter when ‘Copy User Log’ is highlighted to start downloading.
3. When the Copy Status becomes ‘File Copied’, you may press Exit to return to the
Main Menu and remove the USB disk.
50
Page 55

5.12 Feature Activations
This menu is used to activate all of the various communications software features in the field. If
you have purchased the controller with the communication feature, it will already be activated and
no further action will be necessary. Press Enter to view a list of any activated features.
To activate a software feature in the field, purchase the activation key file from your distributor
and save it on the root drive of a USB flash drive. Disconnect power to the controller, and insert
the flash drive into the USB Host connector on the front panel (see figure 3). Close the front panel
and restore power. Enter the Feature Activation menu. “New Activation” will be highlighted. Press
Enter to open the New Activation menu. “Start” will be highlighted. Press Enter to start the
activation process. The Status screen will display the progress and in a few seconds will show if
the process was successful or not.
As many as three activation types are possible: Modbus TCP, Sub-Networking, and one of several
communications options. If more than one feature needs to be activated, this process must be
repeated for each one.
5.13 Controller Restart
This menu is used to safely restart the controller. This should be used instead of cycling power in
order to shut down the program in the proper manner.
6.0 OPERATION – Using PC
These units control continuously as long as power is applied. This section describes how to set up
the controller utilizing a PC. See Section 5.0 for instructions utilizing the controller keypad and
display.
When you first access the controller, the System Summary page will be displayed in the main
frame of the browser, and the Name of the controller and Alarm Status will be displayed in the top
frame. Links to each main menu page are located along the left side of the screen.
The menus are organized by inputs and outputs. Each input has menus for calibration, selecting
units of measure, etc. as required. Each output has menus for defining the set points, maximum ontime, method of control, etc.
Keep in mind when the controller is powered, it will be responding to default set points. As set
points are changed, the controller will start using the new set points immediately. If it is
undesirable for the controller to activate valves and pumps during the set up process, either
disconnect them, or go to the “Hand-Off-Auto” menu for each output and force them “Off”.
51
Page 56

6.1 Menu Selection Links
Along the left side of your PC monitor will be links to the various menu pages.
The exact configuration of your WebMasterONE Series controller will determine which menus are
available to you. Some menus only appear if an optional circuit board is installed. Others only
appear if a certain option is selected in the Start Up menu. Below is a list of all possible Menu
selections, and when they will appear.
Menus that appear all the time:
Start up Level Remote Alarming
System Summary Flow meter System Auto Report
“Custom Name” Sensor 1 Generic Datalog Auto Report
“Custom Name” Relay 1 Interlock Manual Datalog
“Custom Name” Relay 2 Level Switch Graphing/Trending
“Custom Name” Relay 3 Feed Verification Communications
“Custom Name” Relay 4 Generic Input Configuration File
“Custom Name” Relay 5 Counter Notepad
“Custom Name” Relay 6 4-20 mA Input Access Codes
“Custom Name” Relay 7 Digital Inputs Help
“Custom Name” Relay 8
Menu that appears only if one or more sensor input boards are installed:
“Custom Name” Sensor 2
“Custom Name” Sensor 3
“Custom Name” Sensor 4
Menu that appears only if a software upgrade is available:
Software upgrade
Menu that appears only if one or more 4-20mA output boards are installed:
“Custom Name” Analog Output 1
“Custom Name” Analog Output 2
“Custom Name” Analog Output 3
“Custom Name” Analog Output 4
Menu that appears only when selected from the Startup Page:
LSI/RSI
6.2 Start up Menu
Select the option that you want for each of the sections on the page. When you click on the
“Submit” button at the bottom of the page, your changes will take effect. If you move to another
page without clicking “Submit” first, your changes will be lost!
Controller Name
Type the name that you want to use to identify the controller, up to 32 characters, in the text box.
For example, “XYZ Corp, North Tower”
Controller Time and Date
Update the date and time by clicking the arrow on the pull-down list and selecting the correct
values.
52
Page 57

Controller Date Format
Click on the radio button that corresponds to the desired date format. The choices are
Month/Day/Year, Day/Month/Year or Year/Month/Day.
Sensors 1-4
Use the pull-downs to select which type of sensor is connected to that input. If the input option
cards are not installed for Sensors 2-4, then the pull-down will not be available. The sensor options
are Not Used, Contacting Conductivity, Electrodeless Conductivity, pH, ORP, Chlorine, Chlorine
Dioxide and High Temp Conductivity.
Make sure that you correctly match the programmed sensor type with the actual sensor type
connected to that input!
Digital Inputs
Use the pull-downs to select the function for each of the digital inputs. Digital Inputs A-F are
standard, while Digital Inputs 1-6 are only available if the Digital Input option card has been
installed. The functions available are explained below.
Make sure that you correctly match the programmed sensor type with the actual sensor type
connected to that input!
Not Used should be selected if nothing is connected to that input.
Contacting Flow Meter should be selected if a low frequency (10 Hz maximum) contacting-head
water meter is connected to that input. These are generally reed switch sensors that give one dry
contact closure every gallon or more of volume through the meter. A sensor of this type must be
connected to Digital Input A-F or 1-4.
Paddlewheel Flow Meter should be selected if a high frequency (10 – 300 Hz) Hall Effect style
flow meter is connected to the input. The input is not compatible with flow sensors that generate
their own sine wave. A sensor of this type must be connected to Digital Input A-D or 5-6.
Counter should be selected if the contact closure from the sensor will be used to log counts and/or
to initiate a relay to activate for a given time after a given number of counts. A sensor of this type
can be connected to any Digital Input.
Interlock should be selected if the contact closure will be used to deactivate relays that are
normally being controlled by some other means. A sensor of this type can be connected to any
Digital Input.
Level Switch should be selected if the device connected is a liquid level switch. This is normally
used to send an alarm if the liquid level gets too high or low. A sensor of this type can be
connected to any Digital Input.
Feed Verification should be selected if a metering pump feed verification device is connected to
the input. These devices can count strokes of the pump’s diaphragm, totalize the flow, and send an
alarm if the WebMasterONE relay used to activate the pump is active, but the device is not
registering any flow. A sensor of this type can be connected to any Digital Input.
Generic Input should be selected if the contact closure will be used to log the current state of the
contact (open or closed). A custom message can be assigned to each state. An alarm may be sent if
the contact changes state, if desired. A sensor of this type can be connected to any Digital Input.
53
Page 58

4-20 mA Inputs 1 - 8
This section will only appear if there is an analog input card installed in the controller.
Use the pull-downs to select the function of the analog input channel. The functions available are
described below.
Make sure that you correctly match the programmed sensor type with the actual sensor type
connected to that input!
Not Used should be selected if nothing will be connected to the input channel.
Level should be selected if a liquid level transmitter will be connected to the input channel. The
input can be logged, or alarms sent if the level is outside programmed values.
Flow Meter should be selected if a flow transmitter is connected to the input channel. The
controller can log the flow rate, total flow volume, and alarm if the flow rate or total is outside
programmed values. Relays can also be controlled to activate for a given time after a given volume
of solution has passed through the flow meter.
Generic should be selected if the transmitter connected to the input is anything else but the types
described above. You will be able to span the input, give it a custom name and units of measure,
set alarm points, and use it to control relays.
Relay (1 – 8) Control Mode
Use the pull-downs to select the control mode for each relay. The various choices are described
below. Once the control modes have been selected, click the Submit Changes button. This will
change the Relay Input Assignment section that comes next, making the possible choices for the
input assignment match the control mode.
Not Used should be selected if the relay is not being used.
On/Off Set Point should be selected if the relay needs to respond to a sensor input or analog input
signal. The relay will activate and deactivate if the input value goes outside of programmed limits.
In the relay menu, you will specify the set point value, dead band value, control direction, etc.
Time Proportional should be selected if the relay will be activated for a larger percentage of a
programmable time period as the process value gets further away from the set point value.
Cycles of Concentration should be selected to activate the relay based on a set point that is the
ratio of two conductivity sensor input readings. This option is only available if at least two sensors
are defined as conductivity sensors.
Intermittent (Fixed Blowdown Time) should be selected for boiler control where the
conductivity is checked at a fixed time interval, and if found to be above the set point, the relay is
activated for a fixed time.
Intermittent (Proportional Blowdown Time) should be selected for boiler control where the
conductivity is checked at a fixed time interval, and if found to be above the set point, the relay is
activated for a time that varies with the conductivity’s deviation from the set point.
54
Page 59

Flow based Feed should be selected if the relay will be triggered to activate for a programmable
amount of time after a given volume of water has passed by the flow meter. In the relay menu, the
volume to trigger feed, and the amount of time of the feed will be specified.
Feed With Another Relay should be selected if you want to activate this relay at the same time as
another relay (for example, inhibitor feed and bleed).
Feed After Another Relay (%) should be selected if you want to activate this relay after another
relay has finished its activation cycle (for example, inhibitor feed after bleed). This relay will
activate for a percentage of the time that the other relay was active.
Feed After Another Relay (Fixed Time) should be selected if you want to activate this relay after
another relay has finished its activation cycle (for example, inhibitor feed after bleed). This relay
will activate for a programmable amount of time.
Feed as % Time should be selected be selected to activate the relay for a given percentage of a
user-specified time period.
Spike Set Point 1 Week Cycle should be selected to activate the relay based on one set point for a
majority of the time, and then spiking the concentration for a programmable amount of time, as
often as once per day, on a weekly schedule. This is typically an oxidizer addition based on an
ORP electrode.
Spike Set Point 2 Week Cycle should be selected to activate the relay based on one set point for a
majority of the time, and then spiking the concentration for a programmable amount of time, as
often as once per day, on a bi-weekly schedule. This is typically an oxidizer addition based on an
ORP electrode.
Spike Set Point 4 Week Cycle should be selected to activate the relay based on one set point for a
majority of the time, and then spiking the concentration for a programmable amount of time, as
often as once per day, on a monthly schedule. This is typically an oxidizer addition based on an
ORP electrode.
Daily Biocide Timer should be selected if the relay will be activated up to 10 times per day, every
day, at a programmed time of day, for a programmed amount of time. In the relay menu, you will
specify the time of day for the relay to activate, as well as the amount of time it will be activated.
1 Week Biocide Timer should be selected if the relay will be activated on a schedule that is the
same every week. In the relay menu, you will specify the day of the week and the time of day for
the relay to activate, as well as the duration of the activation. The relay can activate only once per
day.
2 Week Biocide Timer is identical to the weekly timer, except the schedule will repeat in a two-
week cycle.
4 Week Biocide Timer is identical to the weekly timer, except the schedule will repeat every four
weeks.
Dispersant should be selected to activate the relay for a fixed time either before or after a biocide
addition.
Bleed Volume based on Makeup Volume should be selected if the relay will be triggered to
activate by a volume of makeup water, and will be deactivated by a volume of bleed. Note that
flow meters must be installed on both the bleed and the makeup lines to use this mode.
55
Page 60

Alarm should be selected if the relay is to be activated based on an alarm condition.
Activate on a DI should be selected if the relay is to be activated whenever a digital input is in
either an open or a closed state.
Target PPM Feed should be selected if the relay is to be activated to feed a chemical to achieve a
PPM set point. This algorithm triggers the relay activation when a user-defined volume of makeup
water (measured by up to 3 water meters) is added to the system. The relay on-time is calculated
using the PPM set point, cycles of concentration (measured or calculated), specific gravity of the
chemical product, and programmed pump flow rate.
Target PPM Feed with Feed Verification should be selected if the relay is to be activated to feed
a chemical to achieve a PPM set point. This algorithm triggers the relay activation when a userdefined volume of makeup water (measured by up to 3 water meters) is added to the system. The
relay on-time is calculated using the PPM set point, cycles of concentration (measured or
calculated), specific gravity of the chemical product, programmed pump volume per stroke, and
number of strokes counted by a feed verification device.
Click on the “Submit Changes” button to save the changes. This will change the Relay Input
Assignment section that comes next, making the possible choices for the input assignment match
the control mode.
Analog Output Control Mode (1 – 4)
This section will only appear if there are one or more 4-20 mA output cards installed.
Use the pull-downs to select the control mode for each analog output: Not Used or Retransmit.
Relay (1 – 8) Input Assignment
This section is where the input used to control the relay is assigned. The choices available in the
pull-down will depend upon the control mode of the relay. If you have changed the control mode
of any relay, click the Submit Changes button before selecting the input assignment.
If the relay control mode is Not Used:
The relay input assignment is Not Applicable.
If the relay control mode is On/Off Set Point, or Time Proportional:
The relay input assignment choices will be any of the sensor inputs, and any of the optional analog
inputs. Any number of relays may be assigned to the same input.
If the relay control mode is Cycles of Concentration:
The relay input assignment choices will be any of the conductivity inputs. Any number of relays
may be assigned to the same input.
If the relay control mode is Intermittent (Fixed Blowdown Time), Intermittent (Proportional
Blowdown Time):
The relay input assignment choices will be any of the sensor or analog inputs. Any number of
relays may be assigned to the same input.
If the relay control mode is Flow Based Feed, Bleed Vol on Makeup Vol, Target PPM Feed or
Target PPM Feed with Feed Verification:
56
Page 61

The relay input assignment choices will be any digital or optional analog inputs that are defined as
a flow meter input.
If the relay control mode is any of the Biocide Timer Based Feed options:
The relay input assignment is Not Applicable.
If the relay control mode is Feed with Another Relay, Feed After Another Relay (%) or Feed After
Another Relay (Fixed Time):
The relay input assignment choices will be all the other relays.
If the relay control mode is Feed as % Time or Dispersant:
The relay input assignment is Not Applicable.
If the relay control mode is any of the Spike modes:
The relay input assignment choices will be all sensors and analog inputs.
If the relay control mode is Alarm:
The relay input assignment is Not Applicable.
If the relay control mode is Activate on a DI:
The relay input assignment will be any Interlock or Generic Input digital inputs.
Analog Output Input Assignment (1 – 4)
This section will only appear if there are one or more 4-20 mA output cards installed.
Use the pull-downs to select the input signal that will be retransmitted as a 4-20 mA output signal.
The possible choices include any sensor input, any sensor temperature signal, or any 4-20 mA
input signal (only applicable if the analog input card is installed).
LCD Display Setup
Up to five parameters may be presented on the front panel LCD display. Click on the radio buttons
next to the parameters to show.
6.3 System Summary Menu
There are no programmable parameters in the System Summary Menu page. Several tables will be
displayed, with information on sensor readings, analog input readings, digital input states, alarms,
relay state, etc.
57
Page 62

6.4 Sensor Menu - Conductivity Input
Select the option or type in the values that you want for each of the sections on the page. When
you click on the “Submit” button at the bottom of the page, your changes will take effect. If you
move to another page without clicking “Submit” first, your changes will be lost!
Certain menu sections will only be visible if you have selected certain options in the start up menu.
Type of Sensor
Click the pull-down to select the type of sensor that you have installed. The rest of this section
assumes that you have selected contacting conductivity or electrodeless conductivity.
Warning! The power to the WebMasterONE must be cycled off and back on before the sensor
type change is completely implemented! The detection of the actual type of sensor installed
occurs at power up.
Custom Name
You can rename the input by typing a custom name in the text box provided. This name will
appear as the link to the input page, on the System Summary report, as a choice for relay input
assignments, on data logs, and in alarm messages.
Conductivity Range (only appears if the Type of Sensor is Electrodeless Conductivity)
Click on the radio button to select the conductivity range that matches your electrodeless
conductivity sensor (and also the process to be measured!). The choices are 0 –1000 µS/cm,
0-10,000 S/cm, 0-100 mS/cm, or 0-1,000 mS/cm.
You must have the correct sensor to match the conductivity range!
Conductivity Units
Click on the radio button to select the units of measure that you want to use. You will have to click
the “Submit” button at the bottom of the page to see more menus that relate to ppm or %
concentration if you change units of measure.
Backup Sensor Mode
The redundant sensor algorithm will allow the user to define a primary sensor to use for control
and a backup sensor. If the primary sensor goes invalid, the backup sensor will automatically take
over control, and the sensor error alarm will activate. If the sensors don’t match each other within
user-defined limits but both are valid readings, control will stop and a Sensor Deviated alarm will
activate. If the backup sensor goes invalid while the primary sensor is OK, control continues but
the sensor error alarm will activate. If both sensors are invalid, control stops and the sensor error
alarms activate.
To select this sensor as the backup sensor, click the Enable radio button, then click on the Submit
button at the bottom of the page. The page will reload showing the status of the sensor as Backup,
and offer additional menus:
Primary Sensor Assignment
This menu only appears if the Redundant Sensor Setting is Backup.
Use the pulldown arrow to select the sensor to use as the primary control sensor. All sensors of the
same type as the backup sensor will appear in the pulldown list.
58
Page 63

Deviation from Primary Sensor
This menu only appears if the Redundant Sensor Setting is Backup.
Type the maximum allowable difference between the two sensor readings. If this deviation is
exceeded, then control of any outputs using the sensor will stop and an alarm activated.
Current Reading/Perform Calibration
The current reading is a live reading of the calibrated conductivity of the sample.
To Calibrate the conductivity, click on the “Perform Calibration” button and a new window will
open in your browser. You will have two options, a one-point process calibration or an air (zero)
calibration.
Always set the air calibration first. This should only need to be done once for any given sensor.
Click the Calibrate button. Make sure that the sensor is in the air and dry, then click the Continue
button. The controller will either accept the calibration or will reject it if the voltage reading is too
far from the expected for a zero reading. Click the Close button to return to the Conductivity Input
page.
For the one-point process calibration, click its Calibrate button. It will display the current
conductivity reading. Determine the actual conductivity of the solution by measuring it with a
calibrated conductivity instrument, and type this value in the text box, then click the Continue
button. The controller will either accept the calibration or will reject it if the conductivity entered
is too far from the factory calibration reading. The limit is 50% of the uncalibrated reading.
Click the Close button to return to the Conductivity Input page.
Status
This section is for information only, and lets you know if any alarm conditions exist. Possible
status messages are; Normal (everything is OK), Sensor Error (the sensor signal is not valid), High
Alarm, Low Alarm or Calibration Time. For Sensors 2, 3 and 4 an error message for Circuit
Board Failure is also possible. See section 8.1 for a complete description of error messages.
Date of Last Calibration
This section is for information only, and lets you know when the last calibration occurred.
Calibration Reminder
If you want to be reminded when the sensor needs calibration, for example every 30 days then type
the desired number of days between calibration in the text box. A value of zero means you will
never be reminded. The highest value allowed is 365 days.
Self Test
The Self Test is used to check the circuitry of the conductivity input. Click on the “Self Test”
button, and the controller will display either Pass or Fail, and also readings of a simulated
conductivity and temperature. If the controller passes self test, and you are having problems
reading the correct conductivity, then the problem must be with the sensor, wiring or installation.
ppm Conversion Factor (only appears if ppm selected as the unit of measure)
Type the value that you want to use to convert S/cm to ppm into the text box. The range allowed
is 0.5 to 1.0 ppm per S/cm.
59
Page 64

Uncalibrated Conductivity
This section is for information only, and shows the conductivity reading without any calibration.
This is helpful in troubleshooting the conductivity sensor. During a one-point calibration, the new
value must be within 50% of this reading or else the calibration will be rejected.
High-High Alarm Limit
Type in the text box the sensor process value above which you a want a high-high alarm to occur.
High Alarm Limit
Type in the text box the sensor process value above which you a want a high alarm to occur.
Low Alarm Limit
Type in the text box the sensor process value below which you want a low alarm to occur.
Low-Low Alarm Limit
Type in the text box the sensor process value below which you want a low-low alarm to occur.
Alarm Dead Band
Type in the text box the dead band to be used for each alarm set point.
Damping
Damping is applied to the sensor input by taking a running average of the readings of the input
signal over the time frame specified by the damping setting (0-60 seconds)
is displayed and used for control. Type in the text box the desired time frame.
Temperature
Note: The temperature sensor detection is checked when the WebMasterONE is powered up.
Make sure that the sensor connections are made prior to turning on the power.
Current Temperature
Displays a live reading of the temperature of the system water. If no temperature sensor is
detected at power-up, this will be “Manual Temperature” and allow the temperature to be typed
into the text box.
Status
Possible status messages are; Normal (everything is OK), Sensor Error (the signal is not valid),
High Alarm, or Low Alarm. See section 8.1 for a complete description of error messages.
Calibrate
. The averaged reading
Click on the “Calibrate” button and a new window will open that read “To Modify the Current
Value”, and displays the current reading and a text box in which to type the actual value. Measure
the temperature of the sample with a thermometer, and type the actual value into the text box.
Click the Submit button. The new value will be displayed. Click the Close button to close the
calibrate window.
This menu will not appear if no temperature sensor is detected at power-up.
60
Page 65

Temperature Units
Click on the radio button to select units of measure of either Fahrenheit or Celsius.
Uncalibrated Temperature
Displays the temperature reading before correcting with calibration constants. This is helpful for
troubleshooting.
This menu will not appear if no temperature sensor is detected at power-up.
High Alarm
In the text box, type the maximum temperature that you would reasonably expect to see for the
sample. This is helpful to detect a faulty or poorly calibrated temperature sensor.
This menu will not appear if no temperature sensor is detected at power-up.
Low Alarm
In the text box, type the minimum temperature that you would reasonably expect to see for the
sample. This is helpful to detect a faulty or poorly calibrated temperature sensor.
This menu will not appear if no temperature sensor is detected at power-up.
Click on the “Submit” button to save the changes.
6.5 Sensor Menu - pH Input
Select the option or type in the values that you want for each of the sections on the page. When
you click on the “Submit” button at the bottom of the page, your changes will take effect. If you
move to another page without clicking “Submit” first, your changes will be lost!
Certain menu sections will only be visible if you have selected certain options in the start up menu.
Type of Sensor
Click the pull-down to select the type of sensor that you have installed. The rest of this section
assumes that you have selected pH.
Custom Name
You can rename the input by typing a custom name in the text box provided. This name will
appear as the link to the input page, on the System Summary report, as a choice for relay input
assignments, on data logs, and in alarm messages.
Backup Sensor Mode
The redundant sensor algorithm will allow the user to define a primary sensor to use for control
and a backup sensor. If the primary sensor goes invalid, the backup sensor will automatically take
over control, and the sensor error alarm will activate. If the sensors don’t match each other within
user-defined limits but both are valid readings, control will stop and a Sensor Deviated alarm will
activate. If the backup sensor goes invalid while the primary sensor is OK, control continues but
the sensor error alarm will activate. If both sensors are invalid, control stops and the sensor error
alarms activate.
To select this sensor as the backup sensor, click the Enable radio button, then click on the Submit
button at the bottom of the page. The page will reload showing the status of the sensor as Backup,
and offer additional menus:
61
Page 66

Primary Sensor Assignment
This menu only appears if the Redundant Sensor Setting is Backup.
Use the pulldown arrow to select the sensor to use as the primary control sensor. All sensors of the
same type as the backup sensor will appear in the pulldown list.
Deviation from Primary Sensor
This menu only appears if the Redundant Sensor Setting is Backup.
Type the maximum allowable difference between the two sensor readings. If this deviation is
exceeded, then control of any outputs using the sensor will stop and an alarm activated.
Current Reading/Perform Calibration
The current reading is a live reading of the calibrated pH of the sample.
To Calibrate the pH electrode click on the “Perform Calibration” button and a new window will
appear. Select a 2-point calibration, a 1-point calibration or a 1-point process calibration by
clicking the appropriate button.
2 Point Calibration
First you will see a warning that pH control will be suspended during the calibration. Click on
“Continue” to start the calibration, or “Cancel” to abort the calibration.
If no temperature element is detected, then the controller will allow you to enter the buffer
temperature manually. Otherwise it will display the electrode temperature.
You then be prompted to “Please Rinse the Electrode”. Do so, and then click “Continue”.
You will now be prompted to type in the value of the first buffer being used. Do so, and then click
“Continue”.
You will now see the mV output from the electrode. When this value is stable, click “Continue”.
You then be prompted to “Please Rinse the Electrode”. Do so, and then click “Continue”.
You will now be prompted to type in the value of the second buffer being used. Do so, and then
click “Continue”.
You will now see the mV output from the electrode. When this value is stable, click “Continue”.
The WebMasterONE will either pass or fail the calibration, and prompt you to return the electrode
to the process. Click “Continue” when you are ready for pH control to resume.
If the calibration fails for any reason, refer to Section 8 for troubleshooting help.
1 Point Calibration
First you will see a warning that pH control will be suspended during the calibration. Click on
“Continue” to start the calibration, or “Cancel” to abort the calibration.
If no temperature element is detected, then the controller will allow you to enter the buffer
temperature manually. Otherwise it will display the electrode temperature.
62
Page 67

Status
You then be prompted to “Please Rinse the Electrode”. Do so, and then click “Continue”.
You will now be prompted to type in the value of the buffer being used. Do so, and then click
“Continue”.
You will now see the mV output from the electrode. When this value is stable, click “Continue”.
The WebMasterONE will either pass or fail the calibration, and prompt you to return the electrode
to the process. Click “Continue” when you are ready for pH control to resume.
If the calibration fails for any reason, refer to Section 8 for troubleshooting help.
1 Point Process Calibration
The new window will display the current value of the pH, using the last calibration. Measure the
pH of a sample of the water using a handheld meter, and type the new pH value in the text box.
Click the “Continue” button.
The WebMasterONE will either pass or fail the calibration. Control of the pH will continue
throughout this process.
If the calibration fails for any reason, refer to Section 8 for troubleshooting help.
Possible status messages are; Normal (everything is OK), Sensor Error (the signal is not valid),
High Alarm, Low Alarm, Circuit Board Failure (for Sensors 2, 3 or 4) or Calibration Time. See
section 8.1 for a complete description of error messages.
Date of Last Calibration
This section is for information only, and lets you know when the last calibration occurred.
Calibration Reminder
If you want to be reminded when the sensor needs calibration, for example every 30 days then type
the desired number of days between calibration in the text box. A value of zero means you will
never be reminded. The highest value allowed is 365 days.
Self Test
The Self Test is used to check the circuitry of the pH input. Click on the “Self Test” button, and
the controller will display either Pass or Fail, and also readings of a simulated pH and temperature.
If the controller passes self test, and you are having problems reading the correct pH or calibrating,
then the problem must be with the electrode, wiring or installation.
Uncalibrated mV
Displays the mV signal from the pH electrode in the current sample. This is useful for
troubleshooting.
Calculated Slope
This displays the slope (change in the mV output of the pH electrode per pH unit) of the pH
electrode as of the last calibration. A perfect electrode will change by approximately 59 mV per
pH unit. This is helpful for troubleshooting, and also to predict when the electrode may need to be
replaced.
63
Page 68

Calculated Offset
This displays the mV output of the pH electrode in pH 7 as of the last calibration. A perfect
electrode will generate 0 mV at pH 7. The offset information is also helpful for troubleshooting.
% Difference from theoretical
This displays the % difference of the slope from the theoretical value as of the last calibration. The
higher this percentage, the weaker the pH electrode. The calibration will fail if this percentage
exceeds 80%. This number is the most useful to determine how much life is left in the electrode.
High-High Alarm Limit
Type in the text box the sensor process value above which you a want a high-high alarm to occur.
High Alarm Limit
Type in the text box the sensor process value above which you a want a high alarm to occur.
Low Alarm Limit
Type in the text box the sensor process value below which you want a low alarm to occur.
Low-Low Alarm Limit
Type in the text box the sensor process value below which you want a low-low alarm to occur.
Alarm Dead Band
Type in the text box the dead band to be used for each alarm set point.
Damping
Damping is applied to the sensor input by taking a running average of the readings of the input
signal over the time frame specified by the damping setting (0-60 seconds)
is displayed and used for control. Type in the text box the desired time frame.
Temperature
Note: The temperature sensor detection is checked when the WebMasterONE is powered up.
Make sure that the sensor connections are made prior to turning on the power.
Current Temperature
Displays a live reading of the temperature of the system water. If no temperature sensor is
detected at power-up, this will be “Manual Temperature” and allow the temperature to be typed
into the text box.
Status
Possible status messages are; Normal (everything is OK), Sensor Error (the signal is not valid),
High Alarm, or Low Alarm. See section 8.1 for a complete description of error messages.
Calibrate
. The averaged reading
Click on the “Calibrate” button and a new window will open that read “To Modify the Current
Value”, and displays the current reading and a text box in which to type the actual value. Measure
the temperature of the sample with a thermometer, and type the actual value into the text box.
64
Page 69

Click the Submit button. The new value will be displayed. Click the Close button to close the
calibrate window.
This menu will not appear if no temperature sensor is detected at power-up.
Temperature Units
Click on the radio button to select units of measure of either Fahrenheit or Celsius.
Uncalibrated Temperature
Displays the temperature reading before correcting with calibration constants. This is helpful for
troubleshooting.
This menu will not appear if no temperature sensor is detected at power-up.
High Alarm
In the text box, type the maximum temperature that you would reasonably expect to see for the
sample. This is helpful to detect a faulty or poorly calibrated temperature sensor.
This menu will not appear if no temperature sensor is detected at power-up.
Low Alarm
In the text box, type the minimum temperature that you would reasonably expect to see for the
sample. This is helpful to detect a faulty or poorly calibrated temperature sensor.
This menu will not appear if no temperature sensor is detected at power-up.
Click on the “Submit” button to save the changes.
6.6 Sensor Menu - ORP Input
Select the option or type in the values that you want for each of the sections on the page. When
you click on the “Submit” button at the bottom of the page, your changes will take effect. If you
move to another page without clicking “Submit” first, your changes will be lost!
Certain menu sections will only be visible if you have selected certain options in the start up menu.
Type of Sensor
Click the pull-down to select the type of sensor that you have installed. The rest of this section
assumes that you have selected ORP.
Custom Name
You can rename the input by typing a custom name in the text box provided. This name will
appear as the link to the input page, on the System Summary report, as a choice for relay input
assignments, on data logs, and in alarm messages.
Backup Sensor Mode
The redundant sensor algorithm will allow the user to define a primary sensor to use for control
and a backup sensor. If the primary sensor goes invalid, the backup sensor will automatically take
over control, and the sensor error alarm will activate. If the sensors don’t match each other within
user-defined limits but both are valid readings, control will stop and a Sensor Deviated alarm will
activate. If the backup sensor goes invalid while the primary sensor is OK, control continues but
65
Page 70

the sensor error alarm will activate. If both sensors are invalid, control stops and the sensor error
alarms activate.
To select this sensor as the backup sensor, click the Enable radio button, then click on the Submit
button at the bottom of the page. The page will reload showing the status of the sensor as Backup,
and offer additional menus:
Primary Sensor Assignment
This menu only appears if the Redundant Sensor Setting is Backup.
Use the pulldown arrow to select the sensor to use as the primary control sensor. All sensors of the
same type as the backup sensor will appear in the pulldown list.
Deviation from Primary Sensor
This menu only appears if the Redundant Sensor Setting is Backup.
Type the maximum allowable difference between the two sensor readings. If this deviation is
exceeded, then control of any outputs using the sensor will stop and an alarm activated.
Current Reading/Calibrate
The current reading is a live reading of the calibrated ORP of the sample.
To Calibrate the ORP electrode click on the “Perform Calibration” button and a new window will
appear. Select a 2-point calibration, a 1-point calibration or a 1-point process calibration by
clicking the appropriate button.
2 Point Calibration
First you will see a warning that ORP control will be suspended during the calibration. Click on
“Continue” to start the calibration, or “Cancel” to abort the calibration.
You then be prompted to “Please Rinse the Electrode”. Do so, and then click “Continue”.
You will now be prompted to type in the value of the first standard solution being used. Do so, and
then click “Continue”.
You will now see the mV output from the electrode. When this value is stable, click “Continue”.
You then be prompted to “Please Rinse the Electrode”. Do so, and then click “Continue”.
You will now be prompted to type in the value of the second buffer being used. Do so, then click
“Continue”.
You will now see the mV output from the electrode. When this value is stable, click “Continue”.
The WebMasterONE will either pass or fail the calibration, and prompt you to return the electrode
to the process. Click “Continue” when you are ready for ORP control to resume.
If the calibration fails for any reason, refer to Section 8 for troubleshooting help.
1 Point Calibration
First you will see a warning that ORP control will be suspended during the calibration. Click on
“Continue” to start the calibration, or “Cancel” to abort the calibration.
You then be prompted to “Please Rinse the Electrode”. Do so, and then click “Continue”.
66
Page 71

You will now be prompted to type in the value of the standard solution being used. Do so, and
then click “Continue”.
You will now see the mV output from the electrode. When this value is stable, click “Continue”.
The WebMasterONE will either pass or fail the calibration, and prompt you to return the electrode
to the process. Click “Continue” when you are ready for ORP control to resume.
If the calibration fails for any reason, refer to Section 8 for troubleshooting help.
1 Point Process Calibration
The new window will display the current value of the ORP, using the last calibration. Measure the
ORP of a sample of the water using a handheld meter, and type the new ORP value in the text box.
Click the “Continue” button.
The WebMasterONE will either pass or fail the calibration. Control of the ORP will continue
throughout this process.
If the calibration fails for any reason, refer to Section 8 for troubleshooting help.
Status
Possible status messages are; Normal (everything is OK), Sensor Error (the signal is not valid),
High Alarm, Low Alarm, Circuit Board Failure or Calibration Time. See section 8.1 for a
complete description of error messages.
Date of Last Calibration
This section is for information only, and lets you know when the last calibration occurred.
Calibration Reminder
If you want to be reminded when the electrode needs calibration, for example every 30 days then
type the desired number of days between calibration in the text box. A value of zero means you
will never be reminded. The highest value allowed is 365 days.
Self Test
The Self Test is used to check the circuitry of the ORP input. Click on the “Self Test” button, and
the controller will display either Pass or Fail, and also readings of a simulated ORP. If the
controller passes self test, and you are having problems reading the correct ORP or calibrating,
then the problem must be with the electrode, wiring or installation.
Uncalibrated Reading
Displays the mV signal from the ORP electrode in the current sample prior to calibration. This is
useful for troubleshooting.
Calculated Slope
This displays the slope (change in the mV output of the ORP electrode per expected mV change)
of the ORP electrode as of the last calibration. A perfect electrode will have a slope of 1.000. This
is helpful for troubleshooting, and also to predict when the electrode may need to be replaced.
67
Page 72

Calculated Offset
This displays the mV output of the ORP electrode at 0 mV as of the last calibration. The offset
information is helpful for troubleshooting.
High-High Alarm Limit
Type in the text box the sensor process value above which you a want a high-high alarm to occur.
High Alarm Limit
Type in the text box the sensor process value above which you a want a high alarm to occur.
Low Alarm Limit
Type in the text box the sensor process value below which you want a low alarm to occur.
Low-Low Alarm Limit
Type in the text box the sensor process value below which you want a low-low alarm to occur.
Alarm Dead Band
Type in the text box the dead band to be used for each alarm set point.
Damping
Damping is applied to the sensor input by taking a running average of the readings of the input
signal over the time frame specified by the damping setting (0-60 seconds)
is displayed and used for control. Type in the text box the desired time frame.
6.7 Sensor Menu – Chlorine, Chlorine Dioxide Inputs
Select the option or type in the values that you want for each of the sections on the page. When
you click on the “Submit” button at the bottom of the page, your changes will take effect. If you
move to another page without clicking “Submit” first, your changes will be lost!
Certain menu sections will only be visible if you have selected certain options in the start up menu.
Type of Sensor
Click the pull-down to select the type of sensor that you have installed. The rest of this section
assumes that you have selected Chlorine or Chlorine Dioxide.
Custom Name
You can rename the input by typing a custom name in the text box provided. This name will
appear as the link to the input page, on the System Summary report, as a choice for relay input
assignments, on data logs, and in alarm messages.
Backup Sensor Mode
. The averaged reading
The redundant sensor algorithm will allow the user to define a primary sensor to use for control
and a backup sensor. If the primary sensor goes invalid, the backup sensor will automatically take
over control, and the sensor error alarm will activate. If the sensors don’t match each other within
user-defined limits but both are valid readings, control will stop and a Sensor Deviated alarm will
activate. If the backup sensor goes invalid while the primary sensor is OK, control continues but
68
Page 73

the sensor error alarm will activate. If both sensors are invalid, control stops and the sensor error
alarms activate.
To select this sensor as the backup sensor, click the Enable radio button, then click on the Submit
button at the bottom of the page. The page will reload showing the status of the sensor as Backup,
and offer additional menus:
Primary Sensor Assignment
This menu only appears if the Redundant Sensor Setting is Backup.
Use the pulldown arrow to select the sensor to use as the primary control sensor. All sensors of the
same type as the backup sensor will appear in the pulldown list.
Deviation from Primary Sensor
This menu only appears if the Redundant Sensor Setting is Backup.
Type the maximum allowable difference between the two sensor readings. If this deviation is
exceeded, then control of any outputs using the sensor will stop and an alarm activated.
Current Reading/Calibrate
The current reading is a live reading of the calibrated concentration of oxidizer in the sample.
To Calibrate the sensor click on the “Perform Calibration” button and a new window will appear.
Select a zero calibration or a 1-point process calibration by clicking the appropriate button.
Zero Calibration
A zero calibration must be performed on initial installation, or after cleaning or replacing the
membrane or electrolyte. This step must be done prior to the process calibration.
Remove the sensor from the flow cell and place it in a beaker of clean, oxidizer-free water.
Allow the sensor 15 minutes to equilibrate to the water temperature.
Click on the Zero Calibration button.
Step 1 will display the current mV reading from the sensor and direct you to place the sensor in
pure water. Stir the water with the sensor until the mV reading is stable for at least 5 minutes.
Click Continue when the mV reading is stable.
If the value is within the range of calibration, it will display “Zero Calibration was Successful”.
Press the Enter key after replacing the sensor in the flow cell.
If not, it will display “Calibration Failed!” Refer to Section 8 for troubleshooting.
1 Point Process Calibration
Ensure that the sensor is conditioned and equilibrated to the temperature of the sample.
Ensure that the sample flow rate is between 30 and 100 liters/hour.
Perform a test on the sample water for the oxidizer concentration.
Enter the 1 point process calibration menu.
Step 1 will display the current ppm reading of the water using the previous calibration. When the
reading is stable, use the Arrow keys to fill in the new value, and then click on the Continue
button.
69
Page 74

At the end of the calibration, the display will tell you if the calibration was successful or if the
calibration failed. If successful, press the Enter key after the sensor has been replaced into the
sample stream to resume control. If failed, refer to Section 8 for troubleshooting help.
The WebMasterOne will either pass or fail the calibration. Control of the oxidizer will continue
throughout this process.
If the calibration fails for any reason, refer to Section 8 for troubleshooting help.
Status
Possible status messages are; Normal (everything is OK), Sensor Error (the signal is not valid),
High Alarm, Low Alarm, Circuit Board Failure or Calibration Time. See section 8.1 for a
complete description of error messages.
Date of Last Calibration
This section is for information only, and lets you know when the last calibration occurred.
Calibration Reminder
If you want to be reminded when the electrode needs calibration, for example every 30 days then
type the desired number of days between calibration in the text box. A value of zero means you
will never be reminded. The highest value allowed is 365 days.
Self Test
The Self Test is used to check the circuitry of the sensor input. Click on the “Self Test” button, and
the controller will display either Pass or Fail, and also readings of a simulated oxidizer sensor. If
the controller passes self test, and you are having problems reading the correct value or calibrating,
then the problem must be with the sensor, wiring or installation.
mV
Displays the mV signal from the sensor in the current sample prior to calibration or conversion
into ppm. This is useful for troubleshooting.
Calculated Slope
This displays the slope (mV output of the sensor per ppm of oxidizer) of the sensor as of the last
calibration. A perfect sensor will have a slope of 100 (except it’s 1.00 mv/ppm for the PAA
sensor). This is helpful for troubleshooting, and also to predict when the electrode may need to be
replaced.
Calculated Offset
This displays the mV offset of the sensor at 0 ppm (0 mV) as of the last zero calibration. The
offset information is helpful for troubleshooting.
High-High Alarm Limit
Type in the text box the sensor process value above which you a want a high-high alarm to occur.
High Alarm Limit
Type in the text box the sensor process value above which you a want a high alarm to occur.
70
Page 75

Low Alarm Limit
Type in the text box the sensor process value below which you want a low alarm to occur.
Low-Low Alarm Limit
Type in the text box the sensor process value below which you want a low-low alarm to occur.
Alarm Dead Band
Type in the text box the dead band to be used for each alarm set point.
Damping
Damping is applied to the sensor input by taking a running average of the readings of the input
signal over the time frame specified by the damping setting (0-60 seconds)
is displayed and used for control. Type in the text box the desired time frame.
Temperature
Note: The temperature sensor detection is checked when the WebMasterOne is powered up.
Make sure that the sensor connections are made prior to turning on the power. If no temperature
sensor is detected at power-up, this menu will not appear.
For conductivity and pH sensors, the temperature signal or manually entered temperature is used
for automatic temperature compensation of the sensor reading, data logging, and control. For other
sensor types, the temperature signal may be logged of used to control an output, but it is not used
to correct the sensor reading.
Current Temperature
. The averaged reading
Displays a live reading of the temperature of the system water.
Status
Possible status messages are; Normal (everything is OK), Sensor Error (the signal is not valid),
High Alarm, or Low Alarm. See section 8.1 for a complete description of error messages.
Calibrate
Click on the “Calibrate” button and a new window will open that read “To Modify the Current
Value”, and displays the current reading and a text box in which to type the actual value. Measure
the temperature of the sample with a thermometer, and type the actual value into the text box.
Click the Submit button. The new value will be displayed. Click the Close button to close the
calibrate window.
Temperature Units
Click on the radio button to select units of measure of either Fahrenheit or Celsius.
Uncalibrated Temperature
Displays the temperature reading before correcting with calibration constants. This is helpful for
troubleshooting.
High Alarm
In the text box, type the maximum temperature that you would reasonably expect to see for the
sample. This is helpful to detect a faulty or poorly calibrated temperature sensor.
71
Page 76

Low Alarm
In the text box, type the minimum temperature that you would reasonably expect to see for the
sample. This is helpful to detect a faulty or poorly calibrated temperature sensor.
Click on the “Submit” button to save the changes.
6.8 Level (4-20 mA) Input Menu
(Only appears if a 4-20 mA input option card is installed, and a Level pull-down is selected in the
4-20 mA Input section of the Start Up page)
Input
Displays which 4-20 mA inputs are defined as level inputs.
Drum
Type in the text box the name of the container the level sensor to the left is measuring.
Volume
This displays the current volume of chemical remaining in that drum.
Raw mA
This displays the mA output of the level transmitter, before it is converted into a volume. This is
helpful for troubleshooting.
Status
This displays whether the current drum level is “Normal” or in “Low Alarm”. Possible status
messages for level transmitters are; Normal (everything is OK), Sensor Error (the sensor signal is
not valid), Over Range (between 20 and 21 mA), Under Range (between 3.9 and 4.0 mA), Low
Alarm or Circuit Board Failure.
Full Volume
Type into the text box the volume contained by a full drum.
mA when tank “empty”
Type into the text box the mA output that the level transmitter will send when the drum is empty.
mA when tank “full”
Type into the text box the mA output that the level transmitter will send when the drum is full.
High-High Alarm Limit
Type in the text box the process value above which you a want a high-high alarm to occur.
High Alarm Limit
Type in the text box the process value above which you a want a high alarm to occur.
72
Page 77

Low Alarm Limit
Type in the text box the process value below which you want a low alarm to occur.
Low-Low Alarm Limit
Type in the text box the process value below which you want a low-low alarm to occur.
Alarm Dead Band
Type in the text box the dead band to be used for each alarm set point.
Damping
Damping is applied to the input by taking a running average of the readings of the input signal
over the time frame specified by the damping setting (0-60 seconds)
displayed and used for control. Type in the text box the desired time frame.
Backup Sensor Mode
The redundant sensor algorithm will allow the user to define a primary sensor to use for control
and a backup sensor. If the primary sensor goes invalid, the backup sensor will automatically take
over control, and the sensor error alarm will activate. If the sensors don’t match each other within
user-defined limits but both are valid readings, control will stop and a Sensor Deviated alarm will
activate. If the backup sensor goes invalid while the primary sensor is OK, control continues but
the sensor error alarm will activate. If both sensors are invalid, control stops and the sensor error
alarms activate.
To select this sensor as the backup sensor, click the Backup radio button, then click on the Submit
button at the bottom of the page. The page will reload showing the status of the sensor as Backup,
and offer additional menus:
Primary Sensor Assignment
. The averaged reading is
This menu only appears if the Redundant Sensor Setting is Backup.
Use the pulldown arrow to select the sensor to use as the primary control sensor. All sensors of the
same type as the backup sensor will appear in the pulldown list.
Deviation from Primary Sensor
This menu only appears if the Redundant Sensor Setting is Backup.
Type the maximum allowable difference between the two sensor readings. If this deviation is
exceeded, then control of any outputs using the sensor will stop and an alarm activated.
73
Page 78

6.9 Flow Meter (4-20 mA) Input Menu
(Only appears if a 4-20 mA input option card is installed, and a Flow Meter pull-down is selected
in the 4-20 mA Input section of the Start Up page)
Backup Sensor Mode
The redundant sensor algorithm will allow the user to define a primary sensor to use for control
and a backup sensor. If the primary sensor goes invalid, the backup sensor will automatically take
over control, and the sensor error alarm will activate. If the sensors don’t match each other within
user-defined limits but both are valid readings, control will stop and a Sensor Deviated alarm will
activate. If the backup sensor goes invalid while the primary sensor is OK, control continues but
the sensor error alarm will activate. If both sensors are invalid, control stops and the sensor error
alarms activate.
To select this sensor as the backup sensor, click the Backup radio button, then click on the Submit
button at the bottom of the page. The page will reload showing the status of the sensor as Backup,
and offer additional menus:
Primary Sensor Assignment
This menu only appears if the Redundant Sensor Setting is Backup.
Use the pulldown arrow to select the sensor to use as the primary control sensor. All sensors of the
same type as the backup sensor will appear in the pulldown list.
Deviation from Primary Sensor
This menu only appears if the Redundant Sensor Setting is Backup.
Type the maximum allowable difference between the two sensor readings. If this deviation is
exceeded, then control of any outputs using the sensor will stop and an alarm activated.
Input
This column displays all of the 4-20 mA inputs that are defined as Flow Meter type.
Custom Name
Type in the text box the customer name that you may want to give to this flow meter.
Rate
This column will display the flow rate through (or past) the flow meter.
Present mA
This column will display the mA output of the flow meter.
4 mA=
Type the flow rate at which the flow meter will send a 4 mA signal into the text box. This will
generally be at 0 gallons or liters/minute.
74
Page 79

Dead Band
The dead band prevents the flow total from accumulating when the flowmeter transmitter output is
just slightly above 4 mA. For example, entering a dead band of 0.1 mA means that any transmitter
signal below 4.1 mA will be recorded as a flow rate of 0.
20 mA =
Type the flow rate at which the water meter will send a 20 mA signal into the text box. This will
generally be at the maximum rated flow rate of the meter.
Units
Type the units of measure for the flow rate into the text box.
Rate High-High Alarm Limit
Type in the text box the process value above which you a want a high-high alarm to occur.
Rate High Alarm Limit
Type in the text box the process value above which you a want a high alarm to occur.
Rate Low Alarm Limit
Type in the text box the process value below which you want a low alarm to occur.
Low-Low Alarm Limit
Type in the text box the process value below which you want a low-low alarm to occur.
Rate Alarm Dead Band
Type in the text box the dead band to be used for each alarm set point.
Damping
Damping is applied to the input by taking a running average of the readings of the input signal
over the time frame specified by the damping setting (0-60 seconds)
displayed and used for control. Type in the text box the desired time frame.
6.10 Generic (4-20 mA) Input Menu
(only appears if a 4-20 mA option card is installed, and a Generic pull-down is selected in the 4-20
mA input section of the Start Up page)
Input
Displays which 4-20 mA inputs have been selected as “Generic” in the 4-20 mA input section of
the Start Up page.
Name
. The averaged reading is
Type in the text box a name to describe the device connected to that 4-20 mA input (for example
“Pressure”).
75
Page 80

Present Value
This displays the current reading of the device, using the mA signal from the device, the span of
the 4-20 mA signal defined in “4 mA =” and “20 mA =” below, and the units of measure defined
below.
Present mA
This displays the present raw mA signal from the device. This is helpful in troubleshooting.
Status
This displays whether the present value is “Normal”, or in a “Low Alarm” or “High Alarm”
condition. Possible status messages are; Normal (everything is OK), Sensor Error (the sensor
signal is not valid), Over Range (between 20 and 21 mA), Under Range (between 3.9 and 4.0 mA),
High Alarm, Low alarm or Circuit Board Failure. See section 8.1 for a complete description of
error messages.
4 mA =
Type into the text box the value that corresponds to a 4 mA output signal from the device. For
example, if the pressure transmitter sends out 4 mA at 0.00 psi, type in 0.00. Any value between –
10,000 and 10,000 is acceptable.
20 mA =
Type into the text box the value that corresponds to a 20 mA output signal from the device. For
example, if the pressure transmitter sends out 20 mA at 100 psi, type in 100. Any value between –
10,000 and 10,000 is acceptable.
Units
Type into the text box the units of measure that you want to use for the device connected to that
input. For example, you could use “psi”, “Bars”, etc.
High-High Alarm Limit
Type in the text box the process value above which you a want a high-high alarm to occur.
High Alarm Limit
Type in the text box the process value above which you a want a high alarm to occur.
Low Alarm Limit
Type in the text box the process value below which you want a low alarm to occur.
Low-Low Alarm Limit
Type in the text box the process value below which you want a low-low alarm to occur.
Alarm Dead Band
Type in the text box the dead band to be used for each alarm set point.
Damping
Damping is applied to the input by taking a running average of the readings of the input signal
over the time frame specified by the damping setting (0-60 seconds)
displayed and used for control. Type in the text box the desired time frame.
. The averaged reading is
76
Page 81

Fluorometer Mode
The Fluorometer Mode should be selected if a Turner Fluorometer is being used. This will change
the 1-Point Calibration to make it easy to adjust the ppm reading of the chemical product based on
measurement of the fluorescent dye.
To select this transmitter as fluorometer, click the Enable radio button, then click on the Submit
button at the bottom of the page.
Backup Sensor Mode
The redundant sensor algorithm will allow the user to define a primary sensor to use for control
and a backup sensor. If the primary sensor goes invalid, the backup sensor will automatically take
over control, and the sensor error alarm will activate. If the sensors don’t match each other within
user-defined limits but both are valid readings, control will stop and a Sensor Deviated alarm will
activate. If the backup sensor goes invalid while the primary sensor is OK, control continues but
the sensor error alarm will activate. If both sensors are invalid, control stops and the sensor error
alarms activate.
To select this sensor as the backup sensor, click the Backup radio button, then click on the Submit
button at the bottom of the page. The page will reload showing the status of the sensor as Backup,
and offer additional menus:
Primary Sensor Assignment
This menu only appears if the Redundant Sensor Setting is Backup.
Use the pulldown arrow to select the sensor to use as the primary control sensor. All sensors of the
same type as the backup sensor will appear in the pulldown list.
Deviation from Primary Sensor
This menu only appears if the Redundant Sensor Setting is Backup.
Type the maximum allowable difference between the two sensor readings. If this deviation is
exceeded, then control of any outputs using the sensor will stop and an alarm activated.
6.11 4-20 mA Input Menu
This page is used to assign the purpose of each 4-20 mA input and to calibrate each input.
Status
Possible status messages are Normal (everything is OK), Sensor Error (the sensor signal is not
valid), Over Range (between 20 and 21 mA), Under Range (between 3.9 and 4.0 mA), High
Alarm, Low Alarm or Circuit Board Failure. See section 8.1 for a complete description of error
messages.
4-20 mA Input Assignment Menu
This table is used to reassign the function of the device connected to the input. Click on the pulldown that best describes what is connected to the input. If you assign the inputs on this page, you
need to click on the Submit button to see the appropriate menu selections on the page. These are
normally already defined in the Start up page.
Not Used should be selected if nothing is connected to that input.
77
Page 82

Level should be selected if a continuous level transmitter is attached to that output. For point level
devices, which do not use a 4-20 mA signal, wire into and program with the Digital Inputs section.
Flow Meter should be selected if an analog flow transmitter is connected to that input.
Generic should be selected if the 4-20 mA transmitter connected to that input is anything other
than the previously mentioned ones. Later when you re-submit the 4-20 mA Input Page, you will
be able to name the input (for example, Phosphate or System Pressure) and also define the Units of
Measure (like mg/l or psi).
4-20 mA Input Calibration Menu
Set 4 mA
Following the instructions for your 4-20 mA transmitter, supply the WebMasterONE with a 4 mA
signal from each transmitter. You should verify that the transmitter is accurate by measuring the
output with an ammeter. You can read the present value of the mA signal as measured by the
WebMasterONE in the second column of the table. If the present value is not exactly 4 mA, click
on the “Set 4 mA” button. You will be asked to verify that you want to change the calibration.
Once this is done, the controller will read the transmitter signal as exactly 4 mA.
Set 20 mA
Repeat this process, supplying the WebMasterONE with a 20 mA signal from each transmitter,
and click on the “Set 20 mA” button in order to calibrate the controller.
1 Pt Cal (if not in Fluorometer Mode)
The 1-Point Calibration allows you to adjust the current reading of the process value to match
what the actual value is as measured by some independent method (such as a laboratory
measurement or handheld instrument). The software will maintain the “4 mA =” setting used to
scale the input, and adjust the “20 mA =” setting to make the reading accurate at the value entered
in the 1-Point Calibration. A new window will open when you click the 1 Pt Cal button.
Current mA
Displays a live reading of the mA output of the transmitter.
Current Value
Displays the live calculated process value, using the existing 4 mA = , 20 mA = and Units
settings.
New Value
Enter the desired new reading for the process value, and then click Continue.
At the end of the calibration, the display will tell you if the calibration was successful or if
the calibration failed. If successful, click Close to resume control. If failed, refer to Section
8 for troubleshooting help.
1 Pt Cal (Fluorometer Mode)
The 1-Point Calibration allows you to adjust the current reading of the process value to match
what the actual value is as measured by some independent method (such as a laboratory
measurement or handheld instrument). The software will maintain the “4 mA =” setting used to
scale the input, and adjust the “20 mA =” setting to make the reading accurate at the value entered
in the 1-Point Calibration. A new window will open when you click the 1 Pt Cal button.
Current mA
Displays a live reading of the mA output of the transmitter.
78
Page 83

Product Level
Displays the live calculated process value, using the existing 4 mA = , 20 mA = and
Dye/Product Ratio settings.
New Value
Enter the desired new reading for the ppb of fluorescent dye.
Dye/Product Ratio
The Dye-to-Product ratio is the ratio of the fluorescent dye in ppb to the active ingredient
in the chemical product in ppm. Type the ratio (given to you by your chemical supplier).
Click Continue.
At the end of the calibration, the display will tell you if the calibration was successful or if
the calibration failed. If successful, click Close to resume control. If failed, refer to Section
8 for troubleshooting help.
Reset Defaults
If for any reason you want to go back to factory default settings for the calibration coefficients,
click on the Reset Defaults button. You will be asked to verify that you want to change the
calibration. Click Yes to continue. Another window will popup to tell you that the calibration was
successful.
6.12 Flow Meter (Digital) Input Menu
All flow meters connected to digital inputs will be configured in this menu. Each meter will have a
separate section. The sections available for a contact meter will differ than those for a paddlewheel
meter.
Volume Units
Click on the radio button to select volume in units of Gallons, Liters or Cubic Meters. If you
change the units in this screen, changes will not occur on the page until the “Submit” button is
pressed.
Custom Name
Type in the text box a name to describe the flow meter.
Total/Reset Total
The Total displays the volume of solution to pass the flow meter since the last time the totalizer
was reset.
If you want to reset the total, click on the “Reset Total” button.
Last Total Reset
Displays the date and time that the totalizer was last reset.
Rate (only appears if the water meter type is selected as ‘Paddlewheel’)
Displays the current water flow rate through the water meter.
Status
Possible status messages are; Normal (everything is OK) or Circuit Board Failure (Digital Inputs
1-6 only). See section 8.1 for a complete description of error messages.
79
Page 84

Volume per Contact (appears only if the Contact type is selected)
Type the volume of solution that needs to flow through the flow meter before the meter sends a
contact into the text box. The controller uses this information to update the totalizer.
K Factor (appears only if the Paddlewheel type is selected)
Type the K factor (number of pulses per unit volume) of your flow meter into the text box. Consult
the documentation for the flow meter for information on what the K factor will be for your
particular pipe size and installation. The K factor allows the controller to translate pulses from the
meter into gallons or liters. Any value between 0.001 and 20,000 is acceptable.
Total Alarm Limit
Type in the text box the total volume of solution to pass the flow meter before setting off an alarm.
If you do not need an alarm to occur at any given volume, entering 0 will disable the alarm.
Rate High-High Alarm Limit (appears only if the Paddlewheel type is selected)
Type in the text box the process value above which you a want a high-high alarm to occur.
Rate High Alarm Limit (appears only if the Paddlewheel type is selected)
Type in the text box the process value above which you a want a high alarm to occur.
Rate Low Alarm Limit (appears only if the Paddlewheel type is selected)
Type in the text box the process value below which you want a low alarm to occur.
Rate Low-Low Alarm Limit (appears only if the Paddlewheel type is selected)
Type in the text box the process value below which you want a low-low alarm to occur.
Alarm Dead Band (appears only if the Paddlewheel type is selected)
Type in the text box the dead band to be used for each alarm set point.
Damping (appears only if the Paddlewheel type is selected)
Damping is applied to the input by taking a running average of the readings of the input signal
over the time frame specified by the damping setting (0-60 seconds)
displayed and used for control. Type in the text box the desired time frame.
. The averaged reading is
Backup Sensor Mode (appears only if the Paddlewheel type is selected)
The redundant sensor algorithm will allow the user to define a primary sensor to use for control
and a backup sensor. If the primary sensor goes invalid, the backup sensor will automatically take
over control, and the sensor error alarm will activate. If the sensors don’t match each other within
user-defined limits but both are valid readings, control will stop and a Sensor Deviated alarm will
activate. If the backup sensor goes invalid while the primary sensor is OK, control continues but
the sensor error alarm will activate. If both sensors are invalid, control stops and the sensor error
alarms activate.
To select this sensor as the backup sensor, click the Backup radio button, then click on the Submit
button at the bottom of the page. The page will reload showing the status of the sensor as Backup,
and offer additional menus:
80
Page 85

Primary Sensor Assignment (appears only if the Paddlewheel type is selected)
This menu only appears if the Redundant Sensor Setting is Backup.
Use the pulldown arrow to select the sensor to use as the primary control sensor. All sensors of the
same type as the backup sensor will appear in the pulldown list.
Deviation from Primary Sensor (appears only if the Paddlewheel type is selected)
This menu only appears if the Redundant Sensor Setting is Backup.
Type the maximum allowable difference between the two sensor readings. If this deviation is
exceeded, then control of any outputs using the sensor will stop and an alarm activated.
6.13 Interlock Menu
The Interlock feature allows you to use a contact closure to shut down certain control outputs. For
example, a dry contact from a DCS could be sent when the process is shutdown for maintenance,
or a flow switch could stop control based upon a stagnant sample.
Digital Inputs
Displays which digital input has been selected as an Interlock input in the digital input section of
the Start Up page.
Outputs Interlocked
Click on the check box to the left of the relays that you want to be deactivated when the dry
contact signal is received by the controller. Clicking once places a check in the box, clicking again
removes the check from the box.
Interlock when contact is
Click on the radio button that describes how your Interlock switch operates. If the contact is open
when you want the outputs to deactivate, click on “open”. Otherwise, click on “closed”.
Click on the “Submit” button to save the changes.
6.14 Feed Verification Input Menu
Digital Inputs
Displays which digital inputs have been defined as Feed Verification inputs in the start up page.
Output
Click on the arrow for the pull-down list to tell the controller that the Feed Verification device for
the digital input shown to left is attached to the relay that you selected.
Control-Output Status
This column lets you know if the control output for the pump to which the Feed Verification
device is attached is currently on or off.
Feed Verification Status
This column lets you know if the Feed Verification device is sensing flow from the pump or not.
81
Page 86

Vol. per Stroke
Type in the text box the volume of chemical that the metering pump delivers each time it strokes
the diaphragm. This information is used to totalize the volume of chemical delivered, by
multiplying the volume per stroke by the number of strokes counted by the Feed Verification
device.
Alarm Time
Type in the text box the amount of time that can pass between the output relay being activated and
the Feed Verification device sensing a stroke of the pump. If the pump is set to deliver 10 strokes
per minute, then the controller must wait a minimum of 6 seconds before activating the alarm.
Total
This column tells you the volume of chemical that has been delivered by the metering pump. This
value is calculated by multiplying the volume per stroke by the number of strokes counted by the
Feed Verification device.
Last Reset Time
This column gives you the date and time that the total was last reset.
Reset Total
Click on the “Reset Total” button to reset the value in the “Total” column back to 0.0.
Click on the “Submit” button to save the changes.
6.15 Level Switches (Digital) Input Menu
Digital Inputs
Displays which digital inputs are defined as level inputs.
Drum
Type in the text box the name of the container the level sensor to the left is measuring.
Status
Displays whether the drum is currently “Low” or “Normal.” Possible status messages for point
level switches are; Normal, Low Alarm or Circuit Board Failure (Digital Inputs 1-6 only). See
section 8.1 for a complete description of error messages.
Drum Low when Contact is
Click on the radio button that describes how your level switch operates. If the switch is closed
when the drum is empty, select “closed”. If the switch is open when the drum is empty, select
“open”.
Click on the “Submit” button to save the changes.
6.16 Generic (Digital) Inputs Menu
Digital Inputs
This column shows all digital inputs that have been defined as generic input types.
82
Page 87

Custom Name
You may give the input a custom name by typing it in the text box.
Custom Message for Open Contact
You may specify a custom message to be displayed in the System Summary when the digital input
contact is open. Type it in the text box.
Custom Message for Closed Contact
You may specify a custom message to be displayed in the System Summary when the digital input
contact is closed. Type it in the text box.
Status
This column displays the current status of the digital input using the custom message.
Alarm Active when Contact is
Select the state of the digital input that corresponds to an alarm condition. If Open or Closed is
selected, then when the switch is in that state the critical alarm action specified in the Alarm page
will occur. If Neither is selected, then neither contact state will initiate the critical alarm action.
6.17 Counter Inputs Menu
Custom Name
You may give the input a custom name by typing it in the text box.
Total
The total number of counts since the last time the total was reset will be displayed here. The Reset
Total button allows you to set the total back to 0.
Last Total Reset
The date and time of the last time the total was reset will be displayed here.
Rate
The current rate of contact closures will be displayed here. The unit of measure used is defined
below.
Status
This menu reports the status of the input. Possible messages are Normal, High Alarm, Low Alarm,
or Total Limit.
Rate Units
Select the units of measure that you want to use using the pull-down. The choices are pulses per
second, minute, hour, day, week, month, or year.
One Count =
This menu allows you to specify that each count (contact closure) signifies a certain number of the
custom units of measure. For example, one count could equal 100 liters of fluid.
83
Page 88

Total Alarm Limit
You may specify a total number of counts accumulated above which an alarm message will occur.
Type this in the text box. You must go to the Alarm page to specify that this alarm condition is a
critical alarm in order to close the alarm relay or send an email or call a pager.
Rate High Alarm
You may specify a contact rate above which an alarm message will occur. Type this in the text
box. You must go to the Alarm page to specify that this alarm condition is a critical alarm in order
to close the alarm relay or send an email or call a pager.
Rate Low Alarm
You may specify a contact rate below which an alarm message will occur. Type this in the text
box. You must go to the Alarm page to specify that this alarm condition is a critical alarm in order
to close the alarm relay or send an email or call a pager.
6.18 Digital Inputs Menu
This page is used to assign the function of the devices attached to each digital input. These are
normally already defined in the Start up page.
Use the pull-downs to define each input as Not Used, Contacting Flow Meter, Paddlewheel Flow
Meter, Counter, Interlock, Level Switch, Feed Verification or Generic Input. Click on the
“Submit” button to save the changes.
6.19 Relay (1 – 8) Output Menus – On/Off Set Point types
This page is used to select the set point, dead band, etc. Which units of measure appear depends
upon how the input assigned to the relay is configured. If you make changes to the Input
Assignment, you will need to click on the “Submit” button in order to see all the correct units.
You may also change the Relay Control Mode here. If you do, you will have to reselect the Input
Assignment as well.
This section assumes that the Relay Control Mode is set to On/Off Set Point. Other control mode
types are described in sections to follow.
Relay Control Mode
Click on the arrow of the pull down menu and select the way that you want to control the relay.
See Section 6.2 for details on each control mode.
Relay Input Assignment
Click on the arrow of the pull down menu and select the input that will be used to control the
relay. See Section 6.2 for details.
Current Reading
This field is for information only, and will display the calibrated reading from the sensor that is
assigned to control the relay.
84
Page 89

Status
This menu is for information only, and displays whether the output is “Off” or “On” and if on, for
how much time, as well as any alarm conditions. Possible status messages are; Off, Off/Manual,
On/Time counting up (if activated based on sensor input), Off/Time counting down or On/Time
counting down/Hand (for manual relay activation). Possible error messages are Timeout and
Interlock. See section 8.1 for a complete description of error messages.
Reset Timeout
There is a button called “Reset Timeout” which is used to reset the output if it has been activated
for longer than the time limit imposed in the “Output Time Limit” menu described below.
Custom Name
This menu allows you to rename the output if desired. Type the new name into the text box.
Set Point
Type in the text box the process value at which you want the relay to activate. The set point value
is limited to the range of the assigned input.
Control Direction
Click on the radio button to select between “Force Lower” or “Force Higher”.
Dead Band
Type in the text box the process value away from the set point at which the relay will deactivate.
For example, if you are forcing the conductivity lower, your set point is 2000 S/cm, and your
dead band is 100 S/cm, then the relay will activate at 2001 S/cm and deactivate at 1900 S/cm.
The purpose of the dead band is to prevent rapid cycling of the relay open and closed, which can
shorten its life. The dead band should be set for the lowest value that still prevents the relay from
chattering.
Mutual Interlocks
Click the check boxes to select or de-select the relays and analog output control outputs that you
want to be prevented from turning ON if this output relay is already ON. If you do not need any
other output to shut off when this relay turns on, UNCHECK all boxes. The selection is mutually
exclusive, meaning that if Relay 2 has Relay 4 interlocked, then R2 won’t turn on if R4 is already
on, and R4 won’t turn on if R2 is already on. This feature should be used with caution since it can
potentially delay a chemical addition for a long time.
Output Time Limit
Type in the text box the maximum amount of time that the relay can be continuously activated
before the controller deactivates the relay and activates an Output Time Limit alarm. This is
intended to prevent the output from running out of control if the input fails in such a way that it
will never deactivate the relay.
Note that the relay will not activate again until someone resets the timer!
It will take some experience to find out what the normal output on-time will be. If the relay cycles
open and closed under worst case conditions in 30 minutes, you may want to set the Output Time
Limit at 60 minutes.
85
Page 90

Hand Time Limit
Type in the text box the maximum number of minutes that the relay can be activated in the Hand
mode. Any value between 1 and 1440 is acceptable.
Click on the “Submit” button to save the changes.
Output Mode
Click on the radio buttons to manually control the relay. The normal selection will be Auto, where
the controller uses the various set points to open and close the relay. You can force the relay closed
regardless of the set points by selecting Hand, or force the relay open regardless of the set points
by selecting Off.
If you select Off, the relay will not activate again until either Hand or Auto is selected (or if power
is cycled)! If you select Hand, the relay will activate until either Auto or Off is selected, or until
the Hand Time Limit (programmed in the next menu) expires or until the controller power is
cycled.
The Off mode is handy to prevent the relay from activating while you are changing set points. The
Hand mode is handy to be able to test the pump or valve, wiring, etc without needing to change set
points.
Event Log
Click on the link to view the event log. The event log contains the date and time of each relay
activation and deactivation, as well as the state of each Interlock, Level Switch, or Generic digital
input.
Type of Event Status to generate a ‘1’ in the log Status to generate a ‘0’ in the log
Relay output Relay activated Relay not activated
Interlock DI In the Interlock state as defined in
the Interlock page
Level Switch DI In the Low Alarm state as defined
in the Level Switches page
Generic DI –
Alarm selected
Generic DI – No
In the Alarm state as defined in the
Generic Inputs page
Switch closed Switch open
In the non-Interlock state as defined in
the Interlock page
In the Normal state as defined in the
Level Switches page
In the Normal state as defined in the
Generic Inputs page
Alarm selected
A window will open to ask if you would like to open the file or save it to disk. Select the method
you would like to use. The file is .csv (comma separated variable) file that will open in a
spreadsheet such as Excel.
86
Page 91

6.20 Relay (1-8) Output Menus – Time Proportional Types
This page is used to select the set point, proportional band, etc. In time proportional control, the
WebMasterONE will look at the process value and compare it to the set point value. If the set
point is not satisfied, the controller will calculate an output on-time that will vary in proportion to
the deviation from that set point. The user defines the time period, and the proportional band away
from the set point where the relay will stay active for the entire time period.
Which units of measure appear depends upon how the input assigned to the relay is configured. If
you make changes to the Input Assignment, you will need to click on the “Submit” button in order
to see all the correct units.
You may also change the Relay Control Mode here. If you do, you will have to reselect the Input
Assignment as well.
This section assumes that the Relay Control Mode is set to Time Proportional. Other control mode
types are described in sections to follow.
Relay Control Mode
Click on the arrow of the pull down menu and select the way that you want to control the relay.
See Section 6.2 for details on each control mode.
Relay Input Assignment
Click on the arrow of the pull down menu and select the input that will be used to control the
relay. See Section 6.2 for details.
Current Reading
This field is for information only, and will display the calibrated reading from the sensor that is
assigned to control the relay.
Status
This menu is for information only, and displays whether the output is “Off” or “On” and if on, for
how much time, as well as any alarm conditions. Possible status messages are; Off, Off/Manual,
On/Time counting up (if activated based on sensor input), or On/Time counting down/Hand (for
manual relay activation). Possible error messages are Timeout and Interlock. See Section 8.1 for a
complete description of error messages.
Reset Timeout
There is a button called “Reset Timeout” which is used to reset the output if it has been activated
for longer than the time limit imposed in the “Output Time Limit” menu described below.
Custom Name
This menu allows you to rename the output if desired. Type the new name into the text box.
Set Point
Type in the text box the process value at which you want the relay to activate. The set point value
is limited to the range of the assigned input.
87
Page 92

Sample Period
Type in the text box the time span for the sample period. Refer to the example below under
Proportional Band.
Proportional Band
Type in the text box the process value away from the set point at which the relay will be active for
the entire sample period.
For example, if you are forcing the conductivity higher, your set point is 200 mS/cm, your sample
period is one hour and your proportional band is 10 mS/cm. At the beginning of the sample
period, the conductivity is 195 mS/cm. The relay will activate for 30 minutes, then deactivate for
30 minutes. If the conductivity is now 197.5 mS/cm, the relay will activate for 15 minutes and then
deactivate for 45 minutes.
Control Direction
Click on the radio button to select between “Force Lower” or “Force Higher.”
Mutual Interlocks
Click the check boxes to select or de-select the relays and analog output control outputs that you
want to be prevented from turning ON if this output relay is already ON. If you do not need any
other output to shut off when this relay turns on, UNCHECK all boxes. The selection is mutually
exclusive, meaning that if Relay 2 has Relay 4 interlocked, then R2 won’t turn on if R4 is already
on, and R4 won’t turn on if R2 is already on. This feature should be used with caution since it can
potentially delay a chemical addition for a long time.
Output Time Limit
Type in the text box the maximum amount of time that the relay can be continuously activated
before the controller deactivates the relay and activates an Output Time Limit alarm. This is
intended to prevent the output from running out of control if the input fails in such a way that it
will never deactivate the relay.
Note that the relay will not activate again until someone resets the timer!
It will take some experience to find out what the normal output on-time will be. If the relay cycles
open and close under worst case conditions in 30 minutes, you may want to set the Output Time
Limit at 60 minutes.
Hand Time Limit
Type in the text box the maximum number of minutes that the relay can be activated in the Hand
Mode. Any value between 1 and 1440 is acceptable.
Click on the “Submit” button to save the changes.
Output Mode
Click on the radio buttons to manually control the relay. The normal selection will be Auto, where
the controller uses the various set points to open and close the relay. You can force the relay closed
regardless of the set points by selecting Hand, or force the relay open regardless of the set points
by selecting Off.
If you select Off, the relay will not activate again until either Hand or Auto is selected (or if power
is cycled)! If you select Hand, the relay will activate until either Auto or Off is selected, or until
88
Page 93

the Hand Time Limit (programmed in the next menu) expires or until the controller power is
cycled.
The Off mode is handy to prevent the relay from activating while you are changing set points. The
Hand mode is handy to be able to test the pump or valve, wiring, etc. without needing to change
set point.
Event Log
Click on the link to view the event log. The event log contains the date and time of each relay
activation and deactivation, as well as the state of each Interlock, Level Switch, or Generic digital
input.
Type of Event Status to generate a ‘1’ in the log Status to generate a ‘0’ in the log
Relay output Relay activated Relay not activated
Interlock DI In the Interlock state as defined in
the Interlock page
Level Switch DI In the Low Alarm state as defined
in the Level Switches page
Generic DI –
Alarm selected
Generic DI – No
Alarm selected
A window will open to ask if you would like to open the file or save it to disk. Select the method
you would like to use. The file is .csv (comma separated variable) file that will open in a
spreadsheet such as Excel.
In the Alarm state as defined in the
Generic Inputs page
Switch closed Switch open
In the non-Interlock state as defined in
the Interlock page
In the Normal state as defined in the
Level Switches page
In the Normal state as defined in the
Generic Inputs page
6.21 Relay (1 – 8) Output Menus – Cycles of Concentration Types
This page is used to activate the relay based on a set point that is the ratio of two conductivity
sensor input readings. This option is only available if at least two sensors are defined as
conductivity sensors.
You may also change the Relay Control Mode here. If you do, you will have to reselect the Input
Assignment as well.
This section assumes that the Relay Control Mode is set to Cycles of Concentration. Other control
mode types are described in other sections of the manual.
Relay Control Mode
Click on the arrow of the pull down menu and select the way that you want to control the relay.
See Section 6.2 for details on each control mode.
Sys. Cond. Input Assignment
Click on the arrow of the pull down menu to select the conductivity sensor that is installed in the
cooling tower water.
Makeup Cond. Input Assignment
Click on the arrow of the pull down menu to select the conductivity sensor that is installed in the
makeup water.
89
Page 94

System Conductivity
This is a display of the current cooling tower system water conductivity as measured by the
assigned sensor.
Makeup Conductivity
This is a display of the current makeup water conductivity as measured by the assigned sensor
Measured Cycles
This is a display of the current ratio of system conductivity to makeup conductivity.
Status
This displays the current status of the relay output, either “Off” or “On”, and if on, the amount of
time it has been on. Possible status messages are Off, Off/Manual, On/Time counting down and
On/Time counting down/Hand (for manual activation). The only possible error messages are
Interlock, Timeout and Sensor Error. See section 8.1 for a complete description of error messages.
Custom Name
This menu allows you to call the output another name if desired. Type the new name in the text
box.
Cycles Dead Band
Type in the desired dead band. See Cycles Set Point below.
Cycles Set Point
Type in the desired set point value. The control direction is always a High set point, so if the
measured cycles exceeds the set point, the relay will activate until the measured cycles is less than
the set point minus dead band.
Cycles Low/High Alarm
Type in the desired alarm points.
Mutual Interlocks
Click the check boxes to select or de-select the relays and analog output control outputs that you
want to be prevented from turning ON if this output relay is already ON. If you do not need any
other output to shut off when this relay turns on, UNCHECK all boxes. The selection is mutually
exclusive, meaning that if Relay 2 has Relay 4 interlocked, then R2 won’t turn on if R4 is already
on, and R4 won’t turn on if R2 is already on. This feature should be used with caution since it can
potentially delay a chemical addition for a long time.
Output Time Limit
Type in the text box the maximum amount of time that the relay can be continuously activated
before the controller deactivates the relay and activates an Output Time Limit alarm. This is
intended to prevent the output from running out of control if the input fails in such a way that it
will never deactivate the relay.
Note that the relay will not activate again until someone resets the timer!
90
Page 95

It will take some experience to find out what the normal output on-time will be. If the relay cycles
open and closed under worst case conditions in 30 minutes, you may want to set the Output Time
Limit at 60 minutes.
Output Mode
Click on the radio buttons to manually control the relay. The normal selection will be Auto, where
the controller uses the various set points to open and close the relay. You can force the relay closed
regardless of the set points by selecting Hand, or force the relay open regardless of the set points
by selecting Off.
If you select Off, the relay will not activate again until either Hand or Auto is selected (or if power
is cycled)! If you select Hand, the relay will activate until either Auto or Off is selected, or until
the Hand Time Limit (programmed in the next menu) expires or until the controller power is
cycled.
The Off mode is handy to prevent the relay from activating while you are changing set points. The
Hand mode is handy to be able to test the pump or valve, wiring, etc without needing to change set
points.
Hand Time Limit
Type in the text box the maximum number of minutes that the relay can be activated in the Hand
mode. Any value between 1 and 1440 is acceptable.
Click on the “Submit” button to save the changes.
Event Log
Click on the link to view the event log. The event log contains the date and time of each relay
activation and deactivation, as well as the state of each Interlock, Level Switch, or Generic digital
input.
Type of Event Status to generate a ‘1’ in the log Status to generate a ‘0’ in the log
Relay output Relay activated Relay not activated
Interlock DI In the Interlock state as defined in
the Interlock page
Level Switch DI In the Low Alarm state as defined
in the Level Switches page
Generic DI –
Alarm selected
Generic DI – No
Alarm selected
A window will open to ask if you would like to open the file or save it to disk. Select the method
you would like to use. The file is .csv (comma separated variable) file that will open in a
spreadsheet such as Excel.
In the Alarm state as defined in the
Generic Inputs page
Switch closed Switch open
In the non-Interlock state as defined in
the Interlock page
In the Normal state as defined in the
Level Switches page
In the Normal state as defined in the
Generic Inputs page
91
Page 96

6.22 Relay (1 – 8) Output Menus – Intermittent (Fixed Blowdown Time) Types
This page is used for boiler control where the conductivity is checked at intervals, and if found to
be above the set point, the relay is activated for a fixed time. The following sequence occurs while
sampling:
The relay activates to open the control valve, allowing a sample of the boiler water to flow past the
electrode. The valve remains open for the time programmed in Duration of Sample.
The relay deactivates, and closes the control valve. The sample is held in the pipe for the time
programmed in Hold Time.
At the end of the hold time, the controller reads the conductivity, and compares it to the set point
value.
If it is above the set point, the relay activates and opens the valve for the time programmed in
Blowdown Time.
The valve closes again and the sample is held again.
If the conductivity is still too high, the blowdown time repeats.
This continues until the conductivity is below the set point.
The valve closes and will not reactivate until the Interval Time has expired.
You may also change the Relay Control Mode here. If you do, you will have to reselect the Input
Assignment as well.
This section assumes that the Relay Control Mode is set to Intermittent (Fixed Blowdown Time).
Other control mode types are described in other sections of the manual.
Relay Control Mode
Click on the arrow of the pull down menu and select the way that you want to control the relay.
See Section 6.2 for details on each control mode.
Relay Input Assignment
Click on the arrow of the pull down menu to select the sensor to be used to activate this relay.
Current Reading
This is a display of the current process value as measured by the assigned sensor.
Status
This displays the current status of the relay output, either “Off” or “On”, and if on, the amount of
time it has been on. Possible status messages are Off, Off/Manual, On/Time counting
down/Sampling, Off/Time counting down/Holding, On/Time counting down/Blowdown, Off/Time
counting down/Waiting and On/Time counting down/Hand (for manual activation). The only
possible error messages are Interlock and Sensor Error. See section 8.1 for a complete description
of error messages.
Custom Name
This menu allows you to call the output another name if desired. Type the new name in the text
box.
Set Point
Type in the desired set point value. The control direction is always Force Lower.
92
Page 97

Interval Time
Type in the desired time between samples. Too short a time will waste water and drop the
conductivity well below the set point. Too long a time will cause the conductivity to rise too high,
potentially resulting in scale or carryover.
Duration of Sample
Type in the desired sample time. This should be as short as possible while still guarantying a fresh
sample of boiler water at the electrode.
Hold Time
Type in the desired time to hold the water sample while it returns to boiler pressure.
Blowdown Time
Type in the desired time to blowdown if the conductivity is above the set point. Too long a time
will waste water and drop the conductivity well below the set point. Too short a time could cause
the conductivity to rise too high, potentially resulting in scale or carryover.
Mutual Interlocks
Click the check boxes to select or de-select the relays and analog output control outputs that you
want to be prevented from turning ON if this output relay is already ON. If you do not need any
other output to shut off when this relay turns on, UNCHECK all boxes. The selection is mutually
exclusive, meaning that if Relay 2 has Relay 4 interlocked, then R2 won’t turn on if R4 is already
on, and R4 won’t turn on if R2 is already on. This feature should be used with caution since it can
potentially delay a chemical addition for a long time.
Output Mode
Click on the radio buttons to manually control the relay. The normal selection will be Auto, where
the controller uses the various set points to open and close the relay. You can force the relay closed
regardless of the set points by selecting Hand, or force the relay open regardless of the set points
by selecting Off.
If you select Off, the relay will not activate again until either Hand or Auto is selected (or if power
is cycled)! If you select Hand, the relay will activate until either Auto or Off is selected, or until
the Hand Time Limit (programmed in the next menu) expires or until the controller power is
cycled.
The Off mode is handy to prevent the relay from activating while you are changing set points. The
Hand mode is handy to be able to test the pump or valve, wiring, etc without needing to change set
points.
Hand Time Limit
Type in the text box the maximum number of minutes that the relay can be activated in the Hand
mode. Any value between 1 and 1440 is acceptable.
Click on the “Submit” button to save the changes.
Event Log
Click on the link to view the event log. The event log contains the date and time of each relay
activation and deactivation, as well as the state of each Interlock, Level Switch, or Generic digital
input.
93
Page 98

Type of Event Status to generate a ‘1’ in the log Status to generate a ‘0’ in the log
Relay output Relay activated Relay not activated
Interlock DI In the Interlock state as defined in
the Interlock page
Level Switch DI In the Low Alarm state as defined
in the Level Switches page
Generic DI –
Alarm selected
Generic DI – No
Alarm selected
A window will open to ask if you would like to open the file or save it to disk. Select the method
you would like to use. The file is .csv (comma separated variable) file that will open in a
spreadsheet such as Excel.
In the Alarm state as defined in the
Generic Inputs page
Switch closed Switch open
In the non-Interlock state as defined in
the Interlock page
In the Normal state as defined in the
Level Switches page
In the Normal state as defined in the
Generic Inputs page
6.23 Relay (1 – 8) Output Menus – Intermittent (Proportional Blowdown Time)
Types
This page is used for boiler control where the conductivity is checked at intervals, and if found to
be above the set point, the relay is activated for a time that varies with the conductivity’s deviation
from the set point.
The following sequence occurs while sampling:
The relay activates to open the control valve, allowing a sample of the boiler water to flow past the
electrode. The valve remains open for the time programmed in Duration of Sample.
The relay deactivates, and closes the control valve. The sample is held in the pipe for the time
programmed in Hold Time.
At the end of the hold time, the controller reads the conductivity, and compares it to the set point
value.
If it is above the set point, the relay activates and opens the valve for the time calculated using the
Maximum Blowdown Time and Proportional Band.
The valve closes again and the sample is held again.
If the conductivity is still too high, the blowdown time is recalculated and the valve is opened for
that time.
This continues until the conductivity is below the set point.
The valve closes and will not reactivate until the Interval Time has expired.
You may also change the Relay Control Mode here. If you do, you will have to reselect the Input
Assignment as well.
This section assumes that the Relay Control Mode is set to Intermittent (Proportional Blowdown
Time). Other control mode types are described in other sections of the manual.
Relay Control Mode
Click on the arrow of the pull down menu and select the way that you want to control the relay.
See Section 6.2 for details on each control mode.
Relay Input Assignment
Click on the arrow of the pull down menu to select the sensor to be used to activate this relay.
94
Page 99

Current Reading
This is a display of the current process value as measured by the assigned sensor.
Status
This displays the current status of the relay output, either “Off” or “On”, and if on, the amount of
time it has been on. Possible status messages are Off, Off/Manual, On/Time counting
down/Sampling, Off/Time counting down/Holding, On/Time counting down/Blowdown, Off/Time
counting down/Waiting and On/Time counting down/Hand (for manual activation). The only
possible error messages are Interlock and Sensor Error. See section 8.1 for a complete description
of error messages.
Custom Name
This menu allows you to call the output another name if desired. Type the new name in the text
box.
Set Point
Type in the desired set point value. The control direction is always Force Lower.
Interval Time
Type in the desired time between samples. Too short a time will waste water and drop the
conductivity well below the set point. Too long a time will cause the conductivity to rise too high,
potentially resulting in scale or carryover.
Duration of Sample
Type in the desired sample time. This should be as short as possible while still guarantying a fresh
sample of boiler water at the electrode.
Hold Time
Type in the desired time to hold the water sample while it returns to boiler pressure.
Blowdown Time
Type in the desired maximum time to blowdown if the conductivity is above the set point. Too
long a time will waste water and drop the conductivity well below the set point. Too short a time
could cause the conductivity to rise too high, potentially resulting in scale or carryover.
Proportional Band
Type in the conductivity above the set point that will correlate to the maximum blowdown time.
For example, the set point is 2000 S/cm, the proportional band is 100 S/cm, and the maximum
blowdown time is 30 minutes. If the conductivity measured is 2100 S/cm or above, the valve
opens for 30 minutes. If the conductivity measured is 2050 S/cm, the valve opens for 15 minutes.
If the conductivity measured is 2000 S/cm or below, the valve remains closed and the Interval
time counts down.
Mutual Interlocks
Click the check boxes to select or de-select the relays and analog output control outputs that you
want to be prevented from turning ON if this output relay is already ON. If you do not need any
other output to shut off when this relay turns on, UNCHECK all boxes. The selection is mutually
95
Page 100

exclusive, meaning that if Relay 2 has Relay 4 interlocked, then R2 won’t turn on if R4 is already
on, and R4 won’t turn on if R2 is already on. This feature should be used with caution since it can
potentially delay a chemical addition for a long time.
Output Mode
Click on the radio buttons to manually control the relay. The normal selection will be Auto, where
the controller uses the various set points to open and close the relay. You can force the relay closed
regardless of the set points by selecting Hand, or force the relay open regardless of the set points
by selecting Off.
If you select Off, the relay will not activate again until either Hand or Auto is selected (or if power
is cycled)! If you select Hand, the relay will activate until either Auto or Off is selected, or until
the Hand Time Limit (programmed in the next menu) expires or until the controller power is
cycled.
The Off mode is handy to prevent the relay from activating while you are changing set points. The
Hand mode is handy to be able to test the pump or valve, wiring, etc without needing to change set
points.
Hand Time Limit
Type in the text box the maximum number of minutes that the relay can be activated in the Hand
mode. Any value between 1 and 1440 is acceptable.
Click on the “Submit” button to save the changes.
Event Log
Click on the link to view the event log. The event log contains the date and time of each relay
activation and deactivation, as well as the state of each Interlock, Level Switch, or Generic digital
input.
Type of Event Status to generate a ‘1’ in the log Status to generate a ‘0’ in the log
Relay output Relay activated Relay not activated
Interlock DI In the Interlock state as defined in
the Interlock page
Level Switch DI In the Low Alarm state as defined
in the Level Switches page
Generic DI –
Alarm selected
Generic DI – No
Alarm selected
A window will open to ask if you would like to open the file or save it to disk. Select the method
you would like to use. The file is .csv (comma separated variable) file that will open in a
spreadsheet such as Excel.
In the Alarm state as defined in the
Generic Inputs page
Switch closed Switch open
In the non-Interlock state as defined in
the Interlock page
In the Normal state as defined in the
Level Switches page
In the Normal state as defined in the
Generic Inputs page
6.24 Relay (1 - 8) Output Menus – Flow Based Feed Type
This page is used to set the flow volume to trigger feed, feed time, etc. Which units of measure
appear depends upon how the flow meter input assigned to the relay is configured. If you make
changes to the Input Assignment, you will need to click on the “Submit” button in order to see all
the correct units.
96
 Loading...