

Page 1
SMART
™
SideKick
Multi-Room Powered Roller for
Continuous Painting
Owner’s Manual
Read this manual for complete instructions
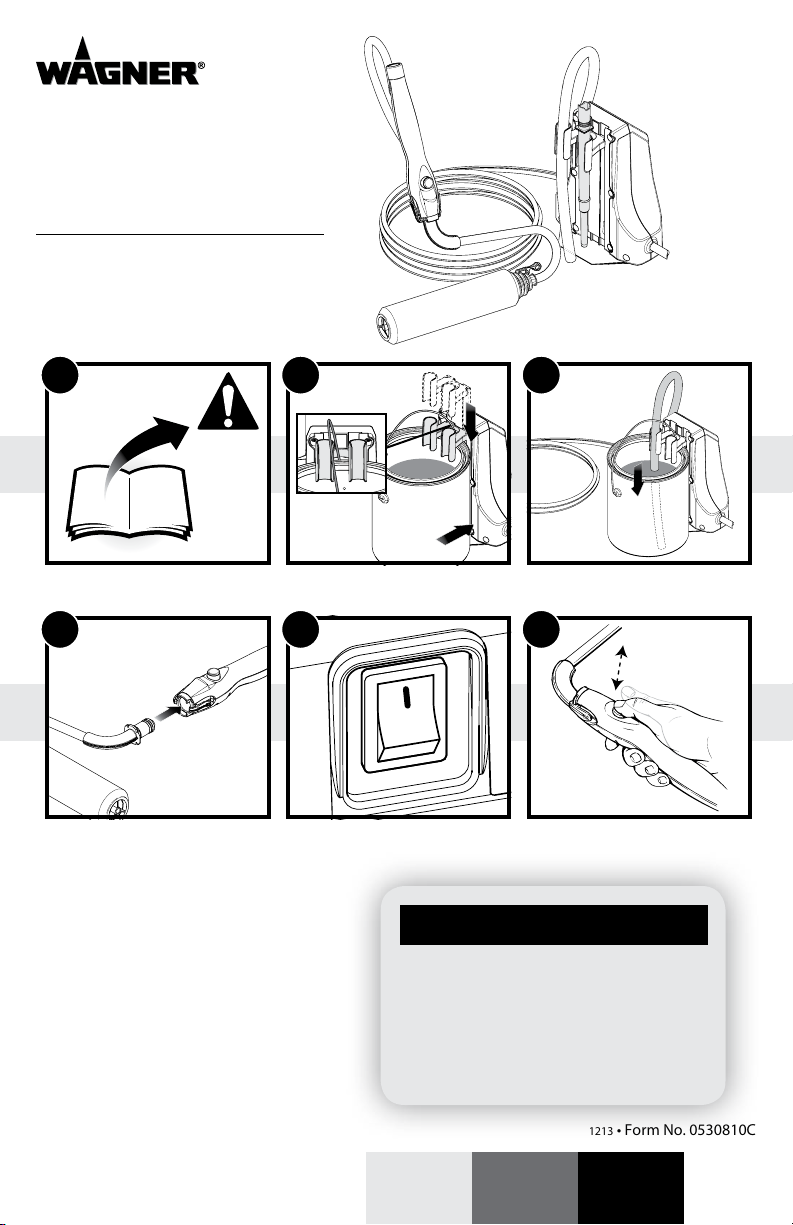
Quick-Start Guide
1
Read all warnings!
2
Secure container to pump
4 5
Attach the roller arm
Contents
2 / 3 Important Safety Information
4 / 5 Parts and Components
6 / 7 Setup
8 / 9 Practice / Usage
10 / 11 Cleanup
12 Storage / Maintenance
13 Troubleshooting
14 Warranty
43 Parts List
44 Optional Accessories
Français (page 15) / Español (página 29)
Plug in, turn switch on (l)
3
Insert suction tube
6
Press and release to start
Questions?
Call Wagner Technical Service at:
1-800-760-3844
Register your product online at:
www.wagnerspraytech.com
1213 • Form No. 0530810C
EnglishFrançaisEspañol
Page 2
Important Safety Information
Read all safety information before
operating the equipment. Save these
instructions.
Indicates a hazardous situation which,
if not avoided, could result in death or
serious injury.
To reduce the risks of re or explosion,
electrical shock and the injury to
persons, read and understand all
instructions included in this manual. Be
familiar with the controls and proper
usage of the equipment.
HAZARD: EXPLOSION OR FIRE
Solvent and paint fumes can
explode or ignite, causing
property damage and/or
severe injury.
PREVENTION:
• Exhaust and fresh air introduction must be
provided to keep the air within the work area
free from accumulation of ammable vapors.
• Avoid all ignition sources such as static
electricity sparks, open ames, pilot lights, hot
objects, cigarettes, and sparks from connecting
and disconnecting power cords or working light
switches.
• Fire extinguishing equipment must be present
and in working order.
• Do not use materials with a ashpoint below
100° F (38° C). A uid’s ashpoint is the
temperature at which vapors from the uid
could ignite if exposed to a ame or spark.
Consult your paint supplier for information
about a uid’s ashpoint.
• Keep the unit in a well ventilated location away
from the work area. The pump contains arcing
parts which emit sparks.
HAZARD: HAZARDOUS VAPORS
Paints, solvents, insecticides, and other
materials may be harmful if inhaled,
causing severe nausea, fainting, or
poisoning.
PREVENTION:
• Use a respirator or mask whenever there is a
chance that vapors may be inhaled. Read all
instructions with the mask to insure that it will
provide the necessary protection against the
inhalation of harmful vapors.
HAZARD: GENERAL
May cause property damage or severe
injury.
PREVENTION:
• Read all instructions and safety precautions
before operating any equipment. Never leave
the unit running while unattended. Unplug
whenever not in use.
• Never immerse the unit into any liquid.
• Comply with all appropriate local, state and
national codes governing ventilation, re
prevention, and operation.
• This paint roller system is designed to be used
with authorized parts only. When using this
system with parts that do not comply with the
minimum specications and safety devices of
the system manufacturer, the user assumes all
risks and liabilities.
• Before each use, check all hoses for cuts,
leaks, abrasion or bulging of cover or damage
or movement of couplings. If any of these
conditions exist, call Customer Service.
Note: Additional warnings are contained on the
tag molded to the electrical cord of the unit. Be
sure to read this tag before operating the unit.
2 © Wagner Spray Tech. - All Rights Reserved
English
Page 3
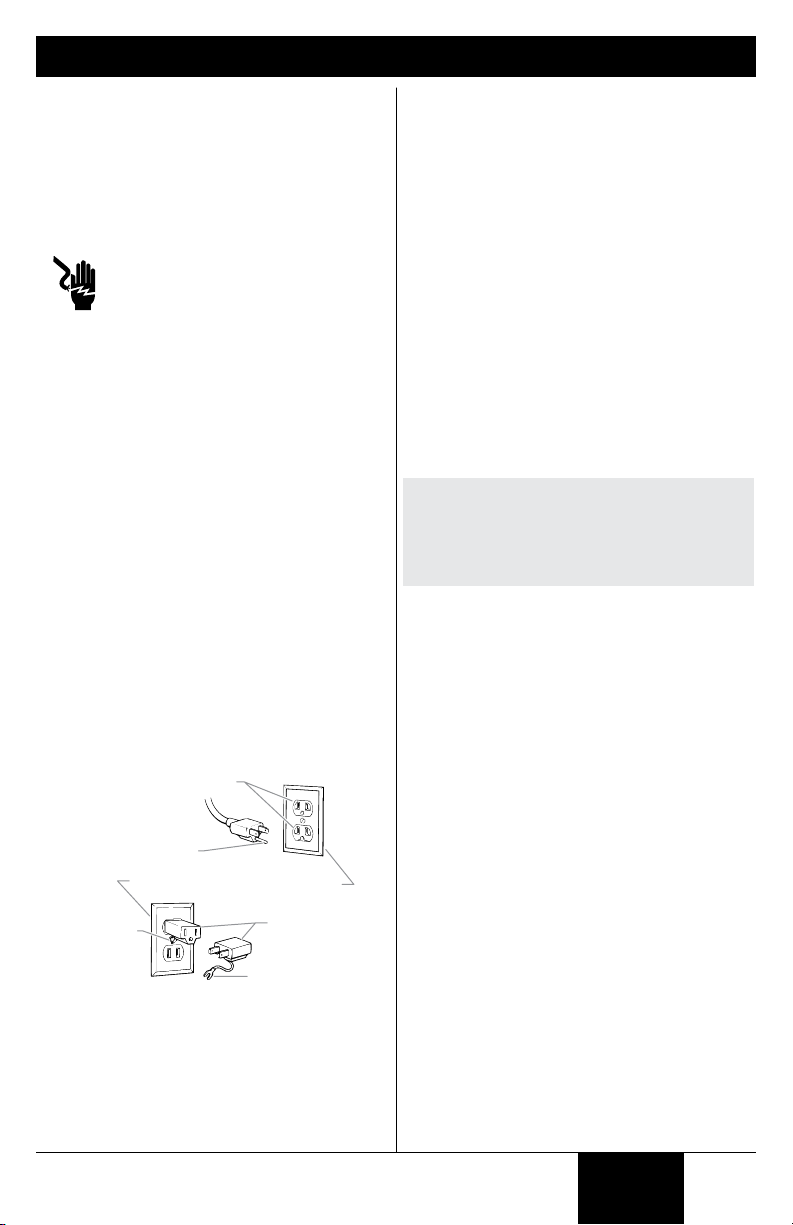
Important Safety Information
Grounded Outlet
Tab for Grounding
Screw
Metal Screw
Grounding Instructions
This product must be grounded. In the event of an
electrical short circuit, grounding reduces the risk
of electric shock by providing an escape wire for
the electric current. This product is equipped with a
cord having a grounding wire with an appropriate
grounding plug. The plug must be plugged into an
outlet that is properly installed and grounded in
accordance with all local codes and ordinances.
WARNING - Improper installation of
the grounding plug can result in a risk
of electric shock.
If repair or replacement of the cord or plug is
necessary, do not connect the green grounding wire
to either at blade terminal. The wire with insulation
having a green outer surface with or without yellow
stripes is the grounding wire and must be connected
to the grounding pin.
Check with a qualied electrician or serviceman
if the grounding instructions are not completely
understood, or if you are in doubt as to whether the
product is properly grounded. Do not modify the
plug provided. If the plug will not t the outlet, have
the proper outlet installed by a qualied electrician.
This product is for use on a nominal 120 volt circuit
and has a grounding plug that looks like the plug
illustrated below. A temporary adapter which looks
like the adapter illustrated in the gure below may
be used to connect this plug to a 2 pole receptacle as
shown if a properly grounded outlet is not available.
The temporary adapter should be used only until a
properly grounded outlet as shown below can be
installed by a qualied electrician. The green colored
rigid ear lug or the grounding wire extending from
the adapter must be connected to a permanent
ground such as a properly grounded outlet box
cover. Whenever the adapter is used, it must be held
in place by a metal screw.
Extension Cord Selection
If an extension cord is used, make sure that it is of
the 3-conductor type with NEMA connectors so a
continuous grounding circuit is provided from the
tool to the power circuit receptacle. Make sure your
extension cord is in good condition. Also, be sure
that the conductor size is large enough to prevent
excessive voltage drop which will cause loss of power
and possible motor damage to the unit. A 14 or 12
gauge cord is recommended.
If an extension cord is to be used outdoors, it must be
marked with the sux W-A following the cord type
designation. For example, SJTW-A to indicate that it
is acceptable for outdoor use.
General Description
This high performance power roller is a precision
power tool used for both interior and exterior
painting and may be used with both water (latex)
and oil based paints.
IMPORTANT: Use of oil-based paints must
be limited to only those paints which can be
cleaned with mineral spirits. Latex paints can
be cleaned with soapy, lukewarm water. DO
NOT use hot water when cleaning or flushing
the unit.
Specications
Flow rate: up to 8 - 20 uid oz. per minute (ow rate
will depend on thickness of paint)
Power source: 120 VAC
Power requirement: 60 Hz current.
Capability: Most oil and water based paints and
stains. Do not use with lacquers, lacquer thinners
or any other solvent with a ash point below 100° F
(38°C).
Grounding Pin
Cover for grounded outlet box
Adapter
© Wagner Spray Tech. - All Rights Reserved 3
English
Page 4
Parts and Components
a
c
b
f
g
h
i
j
k
d
e
**
l
e
k2
k3
4 © Wagner Spray Tech - All Rights Reserved
English
k1
Page 5
Parts and Components
Note: Some of the parts listed on this page can
be replaced by calling technical service. See page
43 for part numbers.
Note: Some parts are not assembled out of the
box. See “Setup” section, page 6-7.
Item Description
a Suction tube
b Tube guide
c Pump assembly
d Extension holder
e ON/OFF switch
f Paint hose
g Roller handle
h Handle button
**
Paint can shown for reference only. Not included.
Item Description
i Quick-release tabs
j Extension
k 9” Roller assembly
h1 - 3/8” nap roller cover
h2 - Roller cap
h3 - Roller core
l Roller arm
© Wagner Spray Tech. - All Rights Reserved 5
English
Page 6

Setup
Material Preparation:
Make sure the material you plan on using is
thoroughly stirred and free from debris. Strain if
necessary. Any impurities in the material can cause
clogs in the pump system or roller assembly.
Note: The SideKick™ Roller can be used with any
type of one-gallon or five-gallon paint container.
Scan this QR code with your
mobile device and you will be
directed to a video on how to set
up your Power Roller.
Setup:
1. Pull the suction tube (a) and extension (b) from
their place holders. This will allow the tube guide
to move more easily.
Lift the suction tube guide (c) to provide
clearance for the material container.
2. Position the material container next to the pump
assembly (d) as shown. The container handle
(e) should be vertical and placed in between the
suction tube guide and the extension holder.
Slide the suction tube guide (f) down until it
touches the top of the material container.
Note: The container is now secured to the pump
and the entire unit can be carried by the container
handle.
IMPORTANT: The container handle must be
placed between the suction tube guide and the
extension holder, or the container will tip when
carried due to the added weight of the pump
assembly.
Continued on next page.
2
One-gallon Five-gallon
(f)
(e)
(e)
1
(a)
(c)
(b)
(f)
(d)
(d)
6 © Wagner Spray Tech. - All Rights Reserved
English
Page 7

Setup (continued)
3. If using a ve-gallon container, insert the
small end of the extension into the suction
tube.
4. Place the suction tube back into position in
the suction tube guide. Make sure the tube
(or the extension) reaches the bottom of the
material container.
5. Press the quick-release tabs on the handle
and attach the roller arm assembly to the
handle.
6. If you want to use an extension, a standard,
household broom handle or other threaded
extension can be threaded into the roller
handle as shown.
4
One-gallon Five-gallon
3
65
© Wagner Spray Tech - All Rights Reserved 7
English
Page 8

Practice / Usage
Scan this QR code with your
mobile device and you will be
directed to a video on Practice
and Usage tips.
IMPORTANT: Make sure your oors and
furnishings are covered with drop cloths during
usage.
Break Periods
During break periods, the handle assembly should
be placed at with the roller sitting on a clean piece
of cardboard or on top of the container.
• During break periods, make sure that the roller
is not saturated with paint, or it will drip and
accumulate.
• Avoid leaving the roller exposed to the sun or
excessive heat during break periods.
• During extended break periods (more than 1/2
hour) wrap the roller in a plastic bag to keep it
from drying out. Place it away from any heat
sources and out of the sun.
Handle Button
When the handle button is pressed and released,
the pump motor will turn on and material will begin
owing into the paint hose.
To shut the motor o and stop the ow of material,
press and release the handle button again.
Note: Make sure to fully press and release the
handle button. If the handle button is only partially
pressed, the motor will start, but will shut down
again after the button is released.
IMPORTANT: Do not submerge handle into any
liquids, and avoid getting any spillage around
the handle button.
Practice / Usage
1. Turn the ON/OFF switch to ON.
2. To start the motor, fully press and release the
handle button.
When paint starts to show through the roller,
press and release the handle button to shut o
the motor.
Tips:
• Practice rolling on a scrap piece of wood or
cardboard.
• Press the handle button to start and stop the
pump as needed.
8 © Wagner Spray Tech - All Rights Reserved
English
Page 9

Practice / Usage
Prepping the Room
Remove all pictures, mirrors, and decorations from
the walls and draperies from the windows. Remove
all nails, hardware and switch and receptacle covers.
Cover furniture and oor with drop cloths.
Surface Preparation
• Always remove wallpaper before painting.
Wash o old adhesive and rinse with water.
Allow the walls to dry before painting.
• Wash and rinse dirt, grease and oil build-up o
the walls with soap and water.
• Fill all nail holes, joints and cracks with patching
paste. Let dry and sand the surface until
smooth. Clean sanded area with a damp cloth.
• Spot prime all patched areas and any marker
and/or pen marks before applying rst coat.
Tip: Write the important information from your
paint can - color, formula, brand and paint type - on
the back of a switch plate for future reference.
Painting the Room
Tip: If you need more than one gallon of paint to do
the room’s walls, mix them together to ensure color
uniformity.
• Always make sure to open a window or door to
ensure proper ventilation.
• If you are painting both the ceiling and walls in
your room, start with the ceiling rst and then
move to the walls.
Ceilings:
• Paint across the short width of the ceiling.
Walls:
• Paint one wall at a time.
• Pick an area to start where you can saturate
the roller cover and evenly distribute the
paint. Working in three-foot sections, begin by
cutting-in around windows, doors, cabinets,
base and other breaks in the wall surface.
• Press and release the handle button until paint
appears through the roller cover.
• Start painting at one end of a wall and roll out
the letter “W”. Fill it in with crosswise strokes,
working your way across the wall in 3’ x 3’
sections. Finish the sections by painting one
solid swipe from ceiling to oor. This will give
you a nice even paint nish.
• Press and release the handle button as needed
for more paint. Be careful not to over-saturate
the roller cover as it may drip, slide on the wall
or spatter.
• Make sure to run the roller cover over the areas
you cut-in around the trim and baseboards to
even out the texture.
• If you need to stop and take a break; nish
painting the entire wall, or stop at a break in the
wall such as a doorway or corner to prevent lap
marks.
© Wagner Spray Tech. - All Rights Reserved 9
English
Page 10

Cleanup
Scan this QR code with your
mobile device and you will be
directed to a video on Cleanup
tips.
IMPORTANT: Make sure your floors and
furnishings are covered with drop cloths
during cleanup.
You will need:
• A waste container
• A minimum of one gallon of warm, soapy
water if you used latex paints
• A minimum of one quart of mineral spirits if
you used oil-based paints
IMPORTANT: DO NOT SUBMERGE THE
ROLLER HANDLE INTO ANY LIQUIDS!
Notes:
• Thoroughly cleaning your unit and its
components is the best way to ensure the
prolonged life of your unit.
• A light paint lm residue may remain in the
paint hose after cleaning. This is normal and
will not aect the future performance of your
unit.
• Switch the unit OFF (0) prior to removing any
accessories or components.
• A Roller Cleanup Kit™ is available for separate
purchase. See Accessories, page 44 for
ordering information.
1
2
PRESS
3
To Clean:
1. Submerge suction tube into a bucket of the
appropriate cleaning solution.
2. Press locking tab and drop roller cover
assembly into a bucket of the appropriate
cleaning solution.
3. Place the roller arm in the material container
in order to catch paint.
4. Turn the switch ON. Fully press and release
the handle button to switch the motor on.
Let the motor run for 15 seconds to push
paint from the hoses back into the paint can.
Fully press and release the handle button to
switch the motor o.
4
15 SECONDS
10 © Wagner Spray Tech. - All Rights Reserved
English
Page 11

Cleanup (continued)
5. Remove container from pump. Leave suction tube
submerged into the bucket of the appropriate cleaning
solution.
6. Hang the roller arm from the bucket.
7. Fully press and release the handle button to run the
appropriate cleaning solution through the hoses and
roller arm.
Note: Allow the pump to circulate the cleaning solution
for about 10 minutes. If desired, refill the bucket with new
cleaning solution and repeat for another 5 minutes.
8. While unit is self-cleaning, disassemble the roller
assembly*, and thoroughly clean the roller cover, core,
and cap by hand.
* Insert thumb to rst knuckle, pry and pull the cap from
the roller cover. Once the cap is removed, push the core
out the other end. DO NOT throw away the core and
cap.
9. Fully press and release the handle button to switch the
motor o.
Remove suction tube from solution and run motor until
all cleaning solution is purged from the unit. Turn the
switch OFF. Unplug power cord.
10. Press quick-release tabs and remove the roller arm from
the roller handle. Remove any remaining paint with the
appropriate cleaning solution and a damp cloth.
IMPORTANT: If you used mineral spirits to clean your
unit, you must repeat all the steps on this page using
warm, soapy water.
7
5
CLEANING
SOLUTION
6
8
ON
9
© Wagner Spray Tech - All Rights Reserved 11
10
English
Page 12

Storage / Maintenance
Quick-release tabs
O-ring
ting
Connecting area
You will need:
• Petroleum jelly
• An old toothbrush or other similar cleaning brush
Cleaning and Storage Tips:
• Wrap the paint hose around the extension
holder and rest the roller arm assembly on the
pump underneath the suction tube for easy
storage.
In addition to thoroughly cleaning your unit after
every use, you must clean and lubricate the areas on
the roller arm indicated below. Use a thin layer of
petroleum jelly to lubricate the indicated areas.
Proper lubrication will prolong O-ring and seal life,
and keep your unit functioning smoothly.
Seal
Connec
area
• Keep water, paint, and other residues away from
the handle button. A clogged handle button
will aect the performance of your unit.
• Be sure that your unit is free from all uids
before storage. After storing your unit in
extreme cold temperatures, allow unit to reach
room temperature before using.
• When storing your unit, be sure the paint hose
is stored in a large loop without any kinks. If it is
bent, it could be damaged.
IMPORTANT: Store the unit indoors with the
power cord wrapped safely around the pump.
This unit contains no serviceable
electrical parts. Do not attempt to
service the unit yourself.
Maintenance
The areas on the roller handle indicated below must
be cleaned thoroughly and lubricated after each use.
ALL paint should be removed from the areas
highlighted in gray below, especially the quickrelease tabs and all other areas that connect
with other parts. This can be done by using the
appropriate cleaning solution and an old toothbrush.
Reassembly
When all of the components have been throughly
cleaned, dried, and lubricated, you can now
reassemble the roller assembly and roller arm for
storage.
1. Reassemble the cap and core into the roller
cover.
2. Reattach the roller assembly (cap, core and
cover) to the roller arm.
3. Press the quick-release tabs on the roller handle
and attach the the roller assembly to the roller
handle.
Connecting area
IMPORTANT: Do not submerge roller handle.
12 © Wagner Spray Tech. - All Rights Reserved
English
Page 13

Troubleshooting
PROBLEM CAUSE SOLUTION
Problem A: The pump
will not run.
Problem B: Paint fails
to load the roller.
Problem C: The motor
does not turn o.
Problem D: There is
paint leakage.
1. The power cord is unplugged, or no
power in outlet.
2. The power switch is turned to 0
(OFF) and handle button has not
been pressed.
3. There is a kink in the air hose.
4. Fluids have entered the handle
assembly.
1. The suction tube is not immersed in
the paint.
2. There is an obstruction in the
suction tube.
3. The paint can is empty.
1. The handle button is activated.
2. There is a kink in the air hose.
3. There is an air switch malfunction.
1. The seal on the roller arm is
backwards.
2. The seal and cap were not properly
cleaned.
3. The O-ring and the connecting area
were not cleaned properly.
4. Paint residue on connecting areas.
5. The O-rings are damaged or
missing.
6. The roller cover is worn or
damaged.
7. The roller core or cap is worn or
damaged.
8. The bearing areas on the roller arm
are worn.
9. The pump tube is punctured.
10. The paint hose is damaged.
1. Plug the power cord into 120V
outlet
2. Turn power switch ON and press
handle button.
3. Unkink the air hose. If unit
still fails to run, call Customer
Service.
4. Call Customer Service.
1. Fully immerse the tube into the
paint.
2. Remove the obstruction.
3. Fill the paint can.
1. Press and release handle button.
2. Unkink the air hose.
3. Unplug unit, then call Customer
Service.
1. Turn the seal around.
2. Clean and properly lubricate.
3. Clean and properly lubricate (pg
9-10).
4. Clean connecting areas.
5. Replace the O-rings*
6. Replace the roller cover*.
7. Replace the roller core or cap*.
8. Call Customer Service
9. Call Customer Service
10. Call Customer Service
* Replacement parts available by calling customer service
© Wagner Spray Tech. - All Rights Reserved 13
English
Page 14

Warranty
Wagner one year limited warranty - Keep on le
This product, manufactured by Wagner Spray Tech Corporation (Wagner) is warranted against defects in
material and workmanship for one year following date of purchase if operated in accordance with Wagner’s
printed recommendations and instructions. This warranty does not cover damage resulting from improper
use, accidents, user’s negligence or normal wear. This warranty does not cover any defects or damages
caused by service or repair performed by anyone other than a Wagner Authorized Service Center.
ANY IMPLIED WARRANTY OF MERCHANTABlLITY OR FITNESS FOR A PARTICULAR PURPOSE IS LIMITED
TO ONE YEAR FOLLOWING DATE OF PURCHASE. THIS PRODUCT IS DESIGNED FOR HOME USAGE ONLY. IF
USED FOR COMMERCIAL OR RENTAL PURPOSES, THIS WARRANTY APPLIES ONLY FOR 30 DAYS FROM DATE
OF PURCHASE. WAGNER SHALL NOT IN ANY EVENT BE LIABLE FOR ANY INCIDENTAL OR CONSEQUENTIAL
DAMAGES OF ANY KIND, WHETHER FOR BREACH OF THIS WARRANTY OR ANY OTHER REASON. THIS
WARRANTY DOES NOT APPLY TO ACCESSORIES.
If any product is defective in material and/or workmanship during the applicable warranty period, return it
with proof of purchase, transportation prepaid, to any Wagner Authorized Service Center. Call the Wagner
Technical Service at 1-800-760-3844 Monday through Friday between 8:00 AM and 4:30 PM Central time.
Thank you for your purchase!
Questions? Product Registration
Call Wagner Technical Service at:
1-800-760-3844
Monday - Friday
8:00 am to 4:30 pm CST
14 © Wagner Spray Tech - All Rights Reserved
English
In order to register your product today, visit:
www.wagnerspraytech.com/registration
We value your opinion. To complete your review,
please visit:
www.wagnerspraytech.com/reviews
Page 15

Parts List • Liste de pièces • Lista de piezas
1
2
3
7
4
5
6
(**)
# Part No.
Nº de piéce
Pieza No.
1 0514118 Roller core and cap Corps du rouleau et
2 0155206A 3/8” nap roller
3 0284432 Fill tube Tube de remplissage Tubo de llenar 1
4 0530216A Roller arm
5 0514112 Seal and O-rings Joint d’étanchéité et joints
6 0530251A Handle assembly
7 --------- Pump Pompe Bomba 1
8 0530554 Strap (not shown) Courroie (non représentés) Correa (no ilustrado) 1
(**) --------- For reference only À titre de référence
© Wagner Spray Tech - All Rights Reserved 43
English
Description
cover
assembly (includes
item 5)
(does not include
hoses)
Français
Description
capuchon
Manchon de rouleau à
grain de 3/8 po
Ensemble de bras de
rouleau (inclut l’article 5)
toriques
Ensemble de la poignée
(ne comprend pas les
tuyaux)
seulement
Español
Descripción
Centro y tapa del rodillo 1
Cubierta del rodillo con
lanilla de 3/8”
Conjunto del brazo
del rodillo (incluye el
artículo 5)
Sello y juntas tóricas 1
Conjunto de la manilla
(no incluye mangueras)
Sólo para referencia
EnglishFrançaisEspañol
Qty.
Qte.
Cant.
1
1
1
Page 16

Optional Accessories • Accessoires Optional • Accesorios Opciónal
Part No.
Nº de piéce
Pieza No.
0155206A 3/8” nap roller cover (9”) Manchon de rouleau à grain
0155208A 3/4” nap roller cover (9”) Manchon de rouleau à grain
0284112B Roller Cleanup Kit™ Roller Cleanup Kit™ Roller Cleanup Kit™
0514026 Trim pad Rouleau pour garnitures Almohadilla para bordes
0514028 Corner pad Rouleau pour coins Almohadilla para esquinas
0530251A Handle assembly Ensemble de la poignée Conjunto de la manilla
0530201A SMART Edge Roller arm
0530206A SMART Mini Roller arm
0530217A Roller arm adapter Adaptateur de bras de
0514230 Spatter guard Garde-éclaboussures Protección contra
English
Description
assembly*
assembly*
* Must be used along
with 0530217A
Français
Description
de 3/8 po (22 cm)
de 3/4 po (22 cm)
Bras de rouleau SMART
Edge*
Bras de rouleau SMART Mini
Roller*
rouleau
* Doit être utilisé avec la
pièce 0530217A
Español
Descripción
Cubierta del rodillo con
lanilla de 3/8” (9”)
Cubierta del rodillo con
lanilla de 3/4” (9”)
Brazo del rodillo SMART
Edge*
Brazo del rodillo SMART
Mini Roller*
Adaptador de brazo del
rodillo
salpicaduras
* Se debe usar junto con
0530217A
44 © Wagner Spray Tech - All Rights Reserved
EspañolFrançaisEnglish
 Loading...