

Waeco PerfectCharge IU404A, PerfectCharge IU254A, PerfectCharge IU452A, PerfectCharge IU154A, PerfectCharge IU802A Installation And Operating Manual
...Page 1

PerfectCharge
IU152A, IU154A, IU252A, IU254A,
IU452A, IU404A, IU802A
DE 11 IU0U-Automatiklader
Montage- und Bedienungsanleitung
EN 36 IU0U Automatic Charger
Installation and Operating Manual
FR 58 Chargeur automatique de batteries
IU0U
Instructions de montage et de service
ES 83 Cargador automático IU0U
Instrucciones de montaje y de uso
IT 132 Caricabatterie automatico IU0U
Istruzioni di montaggio e d’uso
NL 156 IUOU automatische lader
Montagehandleiding en gebruiksaanwijzing
DA 178 IU0U automatisk oplader
Monterings- og betjeningsvejledning
SV 199 IU0U automatisk lader
Monterings- och bruksanvisning
NO 199 IU0U-Automatisk batteriladdare
Monterings- og bruksanvisning
FI 221 IU0U-automaattilaturi
Asennus- ja käyttöohje
RU 268 Автоматическое зарядное
устройство IU0U
Инструкция по монтажу и
эксплуатации
PL 242 Ładowarka akumulatorów IU0U
Instrukcja montażu i obsługi
CS 293 Automatická nabíječka IU0U
Návod k montáži a obsluze
SK 315 Automatická nabíjačka IU0U
Návod na montáž a uvedenie do
prevádzky
I PHASE
IU PHASE
U PHASE
O
N
O
F
F
S
L
E
E
P
M
O
D
E
I
II
0
Page 2

Fordern Sie weitere Informationen zur umfangreichen Produktpalette aus dem
Hause Dometic WAECO an. Bestellen Sie einfach unsere Kataloge kostenlos und
unverbindlich unter der Internetadresse: www.dometic-waeco.de
We will be happy to provide you with further information about Dometic WAECO
products. Please order our free catalogue with no obligation to buy on our
homepage: www.dometic-waeco.com
Demandez d’autres informations relatives à la large gamme de produits de la
maison Dometic WAECO. Commandez tout simplement notre catalogue
gratuitement et sans engagement à l’adresse internet suivante :
www.dometic-waeco.com
Solicite más información sobre la amplia gama de productos de la empresa
Dometic WAECO. Solicite simplemente nuestros catálogos de forma gratuita y sin
compromiso en la dirección de Internet: www.dometic-waeco.com
Per ottenere maggiori informazioni sull’ampia gamma di prodotti Dometic WAECO
è possibile ordinare una copia gratuita e non vincolante del nostro Catalogo
all’indirizzo Internet: www.dometic-waeco.com
Maak kennis met het omvangrijke productscala van de firma Dometic WAECO.
Bestel onze catalogus gratis en vrijblijvend onder het internetadres:
www.dometic-waeco.com
Bestil yderligere information om det omfattende produktudvalg fra Dometic
WAECO. Bestil vores katalog gratis og uforpligtende på internetadressen:
www.dometic-waeco.com
Inhämta mer information om den omfattande produktpaletten från Dometic
WAECO: Beställ våra kataloger gratis och utan förpliktelser under vår
Internetadress: www.dometic-waeco.com
Be om mer informasjon om det rikholdige produktutvalget fra Dometic WAECO.
Bestill vår katalog gratis uforbindtlig på Internettadressen:
www.dometic-waeco.com
Pyytäkää lisää tietoja Dometic WAECOn kattavista tuotevalikoimista. Tilatkaa
tuotekuvastomme maksutta ja sitoumuksetta internet-osoitteesta:
www.dometic-waeco.com
Запросите дальнейшую информацию об обширном ассортименте продукции
компании Dometic WAECO. Просто закажите наши каталоги на сайте
www.dometic-waeco.com; эта услуга предоставляется бесплатно и ни к чему
не обязывает.
Proszę się zapoznać z informacjami na temat szerokiej gamy produktów Dometic
WAECO. Proszę zamówić nasz bezpłatny katalog i zapoznać się zniewiążącą
ofertą pod adresem: www.dometic-waeco.com
Žádejte další informace o rozsáhlé nabídce výrobků firmy Dometic WAECO. Stačí
zdarma a nezávazně
objednat naše katalogy na internetové adrese:
www.dometic-waeco.com
Vyžiadajte si ďalšie informácie o rozsiahlej palete výrobkov Dometic WAECO.
Objednajte si bezplatne a nezáväzne náš katalóg na internetovej adrese:
www.dometic-waeco.com
DE
EN
FR
ESITNL
DA
SV
NO
FI
RU
PL
CS
SK
Page 3

PerfectCharge
3
I P
H
A
S
E
IU
P
H
A
S
E
U
P
H
A
S
E
OFF
ON
I
II
0
SLEEP
MODE
1
3
2
5
4
6
1
I PHASE
IU PHASE
U PHASE
ONOFF
SLEEP
MODE
I
II
0
2 31
2
Page 4

PerfectCharge
4
TS
START BATT +
230 V AC
INPUT
BATT + BATT -
RC
RC
TS
BATT 1+ BATT 2+ BATT 3+ BATT -
230 V AC
INPUT
BATT 3+BATT 2+BATT 1+
BATT -
RC
TS
230 V AC
INPUT
3 421
IU254A, IU452A, IU404A, IU802A
3 42
1
1
32 4
IU154A, IU252A
IU152A
3
Page 5

PerfectCharge
5
1.
2.
I P
H
A
S
E
IU
P
H
A
S
E
U
P
H
A
S
E
ON
OFF
I
II
0
SLEEP
MODE
4
230 V
AC
IN
P
UT
2
1
5
Page 6

PerfectCharge
6
I P
H
ASE
IU P
H
ASE
U
P
H
AS
E
O
N
O
FF
S
LE
EP
M
OD
E
I
II
0
2
1
6
I P
H
A
S
E
IU
P
H
A
S
E
U
P
H
A
S
E
O
N
O
F
F
S
L
E
E
P
M
O
D
E
I
II
0
2
3
4
1
7
Page 7

PerfectCharge
7
230 V AC
INP
UT
1
2
5
4
3
8
IU152A
TS
START BATT +
230 V AC
INPUT
BATT + BATT -
RC
+
_
+
_
12 V
12 V
9
Page 8

PerfectCharge
8
IU154A
RC
TS
BATT 1+ BATT 2+ BATT 3+ BATT -
230 V AC
INPUT
+
_
+
_
24 V
+
_
+
_
24 V
+
_
+
_
24 V
0
IU252A
RC
TS
BATT 1+ BATT 2+ BATT 3+ BATT -
230 V AC
INPUT
+
_
+
_
+
_
12 V 12 V
12 V
a
Page 9

PerfectCharge
9
IU254A, IU404A
RC
TS
BATT 2+BATT 1+ BATT 3+ BATT -
230 V AC
INPUT
+
_
+
_
24 V
+
_
+
_
24 V
+
_
+
_
24 V
b
IU452A, IU802A
BATT 2+ BATT 3+BATT 1+ BATT -
RC
TS
230 V AC
INPUT
+
_
+
_
+
_
12 V 12 V 12 V
c
Page 10

PerfectCharge
10
230 V A
C
IN
P
U
T
1
2
3
d
Page 11

DE
PerfectCharge
11
Bitte lesen Sie diese Anleitung vor Einbau und Inbetriebnahme sorgfältig durch und bewahren Sie sie auf. Geben Sie sie im Falle einer
Weitergabe des Produktes an den Nutzer weiter.
Inhaltsverzeichnis
1 Erklärung der Symbole . . . . . . . . . . . . . . . . . . . . . . . . . . . . . . . . . . 12
2 Allgemeine Sicherheitshinweise . . . . . . . . . . . . . . . . . . . . . . . . . . . 12
3 Lieferumfang . . . . . . . . . . . . . . . . . . . . . . . . . . . . . . . . . . . . . . . . . . 15
4 Zubehör . . . . . . . . . . . . . . . . . . . . . . . . . . . . . . . . . . . . . . . . . . . . . . 15
5 Bestimmungsgemäßer Gebrauch . . . . . . . . . . . . . . . . . . . . . . . . . . 16
6 Technische Beschreibung . . . . . . . . . . . . . . . . . . . . . . . . . . . . . . . . 17
7 IU0U-Automatiklader befestigen . . . . . . . . . . . . . . . . . . . . . . . . . . . 19
8 IU0U-Automatiklader an Abluftsystem anschließen. . . . . . . . . . . . . 20
9 IU0U-Automatiklader anschließen . . . . . . . . . . . . . . . . . . . . . . . . . . 21
10 IU0U-Automatiklader verwenden. . . . . . . . . . . . . . . . . . . . . . . . . . . 25
11 IU0U-Automatiklader pflegen und reinigen . . . . . . . . . . . . . . . . . . . 30
12 Fehlerbeseitigung . . . . . . . . . . . . . . . . . . . . . . . . . . . . . . . . . . . . . . 30
13 Gewährleistung . . . . . . . . . . . . . . . . . . . . . . . . . . . . . . . . . . . . . . . . 32
14 Entsorgung. . . . . . . . . . . . . . . . . . . . . . . . . . . . . . . . . . . . . . . . . . . . 32
15 Technische Daten . . . . . . . . . . . . . . . . . . . . . . . . . . . . . . . . . . . . . . 33
Page 12

DE
Erklärung der Symbole PerfectCharge
12
1 Erklärung der Symbole
!
WARNUNG!
Sicherheitshinweis: Nichtbeachtung kann zu Tod oder schwerer
Verletzung führen.
A
ACHTUNG!
Nichtbeachtung kann zu Materialschäden führen und die Funktion
des Produktes beeinträchtigen.
I
HINWEIS
Ergänzende Informationen zur Bedienung des Produktes.
➤ Handlung: Dieses Symbol zeigt Ihnen, dass Sie etwas tun müssen. Die
erforderlichen Handlungen werden Schritt für Schritt beschrieben.
✓ Dieses Symbol beschreibt das Ergebnis einer Handlung.
Abb. 1 5, Seite 3: Diese Angabe weist Sie auf ein Element in einer Abbil-
dung hin, in diesem Beispiel auf „Position 5 in Abbildung 1 auf Seite 3“.
2 Allgemeine Sicherheitshinweise
Der Hersteller übernimmt in folgenden Fällen keine Haftung für Schäden:
Montage- oder Anschlussfehler
Beschädigungen am Produkt durch mechanische Einflüsse und Über-
spannungen
Veränderungen am Produkt ohne ausdrückliche Genehmigung vom
Hersteller
Verwendung für andere als die in der Anleitung beschriebenen Zwecke
Beachten Sie folgende grundsätzliche Sicherheitsmaßnahmen beim
Gebrauch von elektrischen Geräten zum Schutz vor:
elektrischem Schlag
Brandgefahr
Verletzungen
Page 13

DE
PerfectCharge Allgemeine Sicherheitshinweise
13
2.1 Allgemeine Sicherheit
!
WARNUNG!
Batterien enthalten aggressive Säuren.
Vermeiden Sie den Kontakt mit der Batterieflüssigkeit.
Wenn es zu einem Kontakt mit der Batterieflüssigkeit kommt,
spülen Sie die betroffenen Körperstellen oder die Kleidung
gründlich mit viel klarem Wasser ab.
Suchen Sie bei Verletzungen durch Säure unbedingt einen Arzt
auf.
Versuchen Sie nie, eine gefrorene Batterie zu laden.
Es besteht Explosionsgefahr!
Stellen Sie die Batterie in diesem Fall an einen frostfreien Ort
und warten Sie, bis sich die Batterie der Umgebungstemperatur angepasst hat. Beginnen Sie erst dann mit dem Ladevorgang.
Personen (einschließlich Kinder), die aufgrund ihrer physi-
schen, sensorischen oder geistigen Fähigkeiten oder ihrer
Unerfahrenheit oder Unkenntnis nicht in der Lage sind, das
Produkt sicher zu benutzen, sollten dieses Produkt nicht ohne
Aufsicht oder Anweisung durch eine verantwortliche Person
nutzen.
Elektrogeräte sind kein Kinderspielzeug!
Kinder können Gefahren, die von elektrischen Geräten ausgehen, nicht richtig einschätzen. Lassen Sie Kinder nicht ohne
Aufsicht elektrische Geräte benutzen.
A
ACHTUNG!
Benutzen Sie den IU0U-Automatiklader nur zu seinem
bestimmungsgemäßen Gebrauch.
Laden Sie Batterien nur in gut belüfteten Räumen.
Unterbrechen Sie bei Arbeiten am Gerät immer die Strom-
versorgung
Lagern Sie den IU0U-Automatiklader an einem trockenen und
kühlen Ort.
Die Wartung und Reparatur darf nur durch eine Fachkraft erfol-
gen, die mit den damit verbundenen Gefahren bzw. den einschlägigen Vorschriften vertraut ist.
Page 14

DE
Allgemeine Sicherheitshinweise PerfectCharge
14
2.2 Sicherheit beim Betrieb des Gerätes
A
ACHTUNG!
Bei falscher Installation elektrischer Geräte auf Booten kann es
zu Korrosionsschäden am Boot kommen. Die Installation des
IU0U-Automatikladers sollte von einem fachkundigen
(Boots-)Elektriker durchgeführt werden.
Betreiben Sie den IU0U-Automatiklader nur, wenn das Gehäu-
se und die Leitungen unbeschädigt sind.
Betreiben Sie den IU0U-Automatiklader nicht in feuchter oder
nasser Umgebung.
Achten Sie auf einen sicheren Stand!
Der IU0U-Automatiklader sowie die zu ladende Batterie müssen so sicher aufgestellt werden, dass sie nicht umstürzen oder
herabfallen können.
Sichern Sie den IU0U-Automatiklader so, dass Kinder keinen
Zugriff darauf haben.
Es können Gefahren entstehen, die von Kindern nicht erkannt
werden können!
Betreiben Sie das Gerät nur über eine geerdete und mit einem
Schutzschalter (FI-Schalter) gesicherte Steckdose.
Page 15
DE
PerfectCharge Lieferumfang
15
3Lieferumfang
4 Zubehör
Pos. in
Abb. 1,
Seite 3
Bezeichnung
1 Automatiklader
2 Halterungen (4 Stück)
3 Anschlusskabel
(für 230-VAC-Versorgung)
4 Abluftadapter
5 Befestigungswinkel
6 Innensechskant-Schlüssel
– Befestigungsschrauben (12 Stück)
– Bedienungsanleitung
Bezeichnung Art.-Nr.
Fernbedienung 901-RC
Temperaturfühler TF-500
Page 16

DE
Bestimmungsgemäßer Gebrauch PerfectCharge
16
5 Bestimmungsgemäßer Gebrauch
Die PerfectCharge IU0U-Automatiklader können Batterien, die an Bord von
Fahrzeugen oder Booten zur Stromerzeugung genutzt werden, laden bzw.
mit einer Erhaltungsspannung versorgen.
Die IU0U-Automatiklader dienen zum kontinuierlichen Aufladen von
Versorgungs- oder Starterbatterien. So können die Batterien aufgeladen
oder auf hohem Kapazitätsniveau gehalten werden:
12-V-Batterien: IU152A, IU252A, IU452A, IU802A
24-V-Batterien: IU154A, IU254A, IU404A
Die IU0U-Automatiklader dienen zum Aufladen folgender Batterietypen:
Blei-Starterbatterien
Gel-Batterien
Vlies-Batterien (AGM)
wartungsfreie Blei-Batterien
mit den Kapazitäten und Spannungen, die im Kapitel „Technische Daten“ auf
Seite 33 genannt sind.
Für Blei-Gel-Batterien erfragen Sie bitte die maximalen Kapazitäten bei
Ihrem Batteriehändler.
!
WARNUNG!
Batterien mit Zellenschluss dürfen nicht geladen werden, da
durch Überhitzung der Batterie explosive Gase entstehen können.
Die IU0U-Automatiklader dürfen keinesfalls zum Laden ande-
rer Batterietypen (z. B. NiCd, NiMH usw.) verwendet werden!
Page 17

DE
PerfectCharge Technische Beschreibung
17
6 Technische Beschreibung
6.1 Funktion
Eine Sicherung schützt bei Verpolung vor Geräteschäden. Zur Art und
Wertigkeit der Sicherung in Ihrem Gerät siehe Kapitel „Technische Daten“
auf Seite 33.
!
WARNUNG!
Der Austausch der Gerätesicherung darf nur durch eine Fachwerkstatt erfolgen, die mit den damit verbundenen Gefahren bzw.
den einschlägigen Vorschriften vertraut ist.
I
HINWEIS
Durch einen Temperaturfühler (Zubehör) können Sie die Batterie
vor Schäden bei hoher oder tiefer Außentemperatur schützen. Der
Temperaturfühler wird an der Batterie befestigt und am IU0U-Automatiklader angeschlossener. Er schützt die Batterie, indem er die
Ladespannung der Temperatur an der Batterie anpasst (siehe Kapitel „Ladecharakteristik“ auf Seite 28).
Drei Kontrolleuchten am Gerät ermöglichen eine ständige Überwachung des
IU0U-Automatikladers (siehe Kapitel „Funktionskontrolle“ auf Seite 30).
6.2 Spezifikationen der Gerätevarianten
Die PerfectCharge IU0U-Automatiklader werden in unterschiedlichen
Gerätevarianten geliefert.
Ihr IU0U-Automatiklader kann Batterien bis zu einer festgelegten Batteriekapazität laden (siehe Kapitel „Technische Daten“ auf Seite 33):
IU152A: zum Laden von einer Versorgungsbatterie und einer Starter-
batterie geeignet
IU154A, IU252A: zum Laden von bis zu zwei Versorgungsbatterien und
einer Starterbatterie geeignet
IU254A, IU452A, IU404A, IU802A: zum Laden von bis zu drei Versor-
gungsbatterien geeignet.
Zur Identifikation Ihres Gerätes sehen Sie die Artikelnummer auf dem Typenschild.
Page 18

DE
Technische Beschreibung PerfectCharge
18
6.3 Bedienelemente
Frontansicht (Abb. 2, Seite 3)
Rückansicht (Abb. 3, Seite 4)
Nr. Beschreibung
1 Hauptschalter
0/Off: Gerät ausgeschaltet
I/On: Gerät eingeschaltet
Durch eine Fernbedienung (Zubehör) kann das Gerät im Sleepmodus
(geräuscharm) betrieben werden
(Sleepmodus: Leistung wird halbiert)
II/Sleep Mode: Gerät wird geräuscharm betrieben
Eine entgegengesetzte Einstellung durch eine Fernbedienung (Zube-
hör) wird überschrieben.
2 Status-LEDs: zeigen den aktuellen Ladezustand an
(siehe Kapitel „Ladecharakteristik“ auf Seite 28)
U Phase: der IU0U-Automatiklader befindet sich in der U-Phase
IU Phase: der IU0U-Automatiklader befindet sich in der U0-Phase
I Phase: der IU0U-Automatiklader befindet sich in der I-Phase
3 Lüfter
Nr.
Beschreibung
1 Anschluss für 230-V-Spannungsversorgung
2 RC: Anschluss für Fernbedienung (Zubehör)
3 TS: Anschluss für Temperatursensor (Zubehör)
4 Anschlussklemmen Batterien
BATT 1+, BATT 2+, BATT 3+: Plus-Pol für Versorgungsbatterien
BATT –: Minus-Pol
START BATT + (nur IU152A), BATT 1+ (nur IU154A, IU252A): Plus-
Pol der Starterbatterie
Page 19

DE
PerfectCharge IU0U-Automatiklader befestigen
19
7 IU0U-Automatiklader befestigen
Sie können den IU0U-Automatiklader mit den beiliegenden vier Halterungen
befestigen.
Beachten Sie bei der Wahl des Montageortes folgende Hinweise:
Sie können den IU0U-Automatiklader horizontal oder vertikal montieren.
Betreiben Sie das Gerät nicht in
– feuchter oder nasser Umgebung
– staubiger Umgebung
– Umgebungen mit entflammbaren Materialien
– explosionsgefährdeten Räumen
Wählen Sie einen gut belüfteten Montageort.
Bei Installationen in geschlossenen kleinen Räumen sollte eine Be- und
Entlüftung vorhanden sein. Der freie Abstand um den IU0U-Automatiklader muss mindestens 5 cm betragen.
Achten Sie darauf, dass der die Lüftungsöffnungen auf der Front- und
Unterseite sowie auf der Rückseite des IU0U-Automatiklader freibleibt.
Wählen Sie eine Montagefläche, die eben ist und eine ausreichende
Festigkeit aufweist.
Beachten Sie bei der Wahl des Montageortes den Platzbedarf hinter dem
Gerät für den Befestigungswinkel.
A
ACHTUNG!
Bevor Sie irgendwelche Bohrungen vornehmen, stellen Sie sicher,
dass keine elektrischen Kabel oder andere Teile des Fahrzeugs
durch Bohren, Sägen und Feilen beschädigt werden.
IU0U-Automatiklader am Boden befestigen
➤ Klipsen Sie je zwei Halterungen auf den linken und rechten unteren Steg
(Abb. 4, Seite 5).
Sie können die Halterungen anschließend beliebig verschieben.
➤ Schrauben Sie den IU0U-Automatiklader fest, indem Sie jeweils eine
Schraube durch die Bohrungen in den Halterungen schrauben.
➤ Legen Sie den Befestigungswinkel (Abb. 5 1, Seite 5) mit der Lasche
über die Kante an der Rückseite des IU0U-Automatiklader (Abb. 5 2,
Seite 5).
➤ Schrauben Sie den Befestigungswinkel mit je einer Schraube durch die
vier Bohrungen fest.
Page 20

DE
IU0U-Automatiklader an Abluftsystem anschließen PerfectCharge
20
IU0U-Automatiklader an der Wand befestigen
➤ Klipsen Sie je zwei Halterungen auf den linken und rechten unteren Steg
(Abb. 4, Seite 5).
Sie können die Halterungen anschließend beliebig verschieben.
➤ Schrauben Sie den Befestigungswinkel (Abb. 6 1, Seite 6) mit je einer
Schraube durch die vier Bohrungen an der Wand fest.
➤ Schieben Sie den IU0U-Automatiklader (Abb. 6 2, Seite 6) so auf den
Befestigungswinkel, dass die Kante an der Rückseite des IU0U-Automatiklader zwischen Wand und der Lasche des Befestigungswinkels
geklemmt wird.
➤ Schrauben Sie den IU0U-Automatiklader fest, indem Sie jeweils eine
Schraube durch die Bohrungen in den Halterungen schrauben.
8 IU0U-Automatiklader an Abluftsystem
anschließen
Sie können den IU0U-Automatiklader an ein Abluftsystem anschließen.
Dadurch wird die warme Abluft aus dem Innenraum nach draußen geleitet.
Gehen Sie wie folgt vor (Abb. 7, Seite 6):
➤ Platzieren Sie den Abluftadapter (2) so auf die Frontseite des Automatik-
laders (1) über dem Lüfter, dass die Schrauben in die Bohrungen passen.
➤ Befestigen Sie den Abluftadapter mit den beiliegenden vier Schrauben.
➤ Stecken Sie den Schlauchstutzen (3, nicht im Lieferumfang enthalten)
auf den Abluftadapter.
➤ Stecken Sie den Schlauch (4) des Abluftsystems auf den Schlauch-
stutzen.
Page 21

DE
PerfectCharge IU0U-Automatiklader anschließen
21
9 IU0U-Automatiklader anschließen
!
WARNUNG!
Der Anschluss des IU0U-Automatikladers darf ausschließlich von
entsprechend ausgebildeten Fachbetrieben durchgeführt werden.
Die nachfolgenden Informationen richten sich an Fachkräfte, die
mit den anzuwendenen Richtlinien und Sicherheitsvorkehrungen
vertraut sind (z. B. in Deutschland VDE 0100, Teil 721).
Beachten Sie folgende Sicherheitshinweise beim elektrischen Anschluss:
A
ACHTUNG! Kurzschlussgefahr!
Verwenden Sie stets geerdete und durch FI-Schutzschalter ge-
sicherte Steckdosen.
Wenn Sie Leitungen durch Blechwände oder andere scharf-
kantige Wände führen müssen, benutzen Sie Leerrohre oder
Leitungsdurchführungen.
Verlegen Sie Leitungen nicht lose oder scharf abgeknickt an
elektrisch leitenden Materialien (Metall).
Befestigen Sie die Leitungen gut.
Ziehen Sie nicht an Leitungen.
Verlegen Sie 230-V-Netzleitung und 12/24-V-Gleichstrom-
leitung nicht zusammen im gleichen Leitungskanal (Leerrohr).
Verlegen Sie die Leitungen so, dass keine Stolpergefahr ent-
steht und eine Beschädigung des Kabels ausgeschlossen ist.
9.1 IU0U-Automatiklader an Batterie anschließen
(Abb. 8, Seite 7)
!
WARNUNG!
Vermeiden Sie unbedingt den Kontakt mit der Batterie-
flüssigkeit!
Batterien mit Zellenschluss dürfen nicht geladen werden, da
durch Überhitzung der Batterie explosive Gase entstehen können.
Page 22

DE
IU0U-Automatiklader anschließen PerfectCharge
22
A
ACHTUNG!
Lose Verbindungen können zu Überhitzungen führen.
Ziehen Sie die Schrauben an den Anschlussklemmen mit einem
Drehmoment von 12 – 13 Nm fest.
I
HINWEIS
IU152A: Nutzen Sie zum Anschluss von Starterbatterien die
speziell dafür vorgesehene Anschlussklemme „START
BATT +“.
IU154A, IU252A: Nutzen Sie zum Anschluss von Starterbatte-
rien die speziell dafür vorgesehene Anschlussklemme
„BATT 1+“.
Die Schaltpläne mit der maximal möglichen Verschaltung zu den unterschiedlichen IU0U-Automatikladern finden Sie in den Abbildungen Abb. 9,
Seite 7 bis Abb. c, Seite 9.
Batteriekabel verlegen
➤ Plus-Kabel von den Batterien zum IU0U-Automatiklader verlegen.
I
HINWEIS
Wenn Sie mehr als eine Batterie anschließen, verbinden Sie die
Minuspole der Batterien mit einem Massekabel und schließen Sie
das Massekabel am IU0U-Automatiklader an.
➤ Minus-Kabel der Batterie oder Massekabel zum IU0U-Automatiklader
verlegen.
IU0U-Automatiklader vorbereiten
➤ Hauptschalter auf „0“ stellen.
➤ Die vier Befestigungsschrauben (2) der Rückwand mit dem beiliegenden
Innensechskant-Schlüssel herausschrauben.
➤ Rückwand (1) abnehmen.
Page 23

DE
PerfectCharge IU0U-Automatiklader anschließen
23
Batteriekabel am IU0U-Automatiklader anschließen
I
HINWEIS
Die Anschlüsse des IU0U-Automatikladers sind geeignet für Kabel
mit einem Querschnitt von 10 mm² bis 25 mm².
➤ Versehen Sie die Kabelenden mit Aderendhülsen, damit der dauerhafte
Kontakt gesichert ist.
➤ Plus-Kabel der Batterien durch die dafür vorgesehene Öffnung schieben:
– Versorgerbatterie: „BATT 1+“, „BATT 2+“, „BATT 3+“
– Starterbatterie: „START BATT +“ (IU152A), „BATT 1+“ (IU154A,
IU252A)
➤ Minus-Kabel der Batterie oder Massekabel durch die dafür vorgesehene
Öffnung schieben:
– Versorgerbatterie: „BATT –“
Die folgenden Anweisungen gelten für alle Kabel entsprechend:
➤ Kabelenden mit Kabelendhülsen (4) versehen.
➤ Sicherungsschraube (3) etwas herausdrehen.
➤ Kabelendhülsen (4) des Kabels in die dafür vorgesehenen Öffnungen
schieben.
➤ Sicherungsschraube (3) wieder anziehen.
Batterien verbinden
➤ Batterien entsprechend Schaltplan Ihres IU0U-Automatikladers ver-
binden.
IU0U-Automatiklader schließen
➤ Rückwand (1) wieder aufsetzen und mit den Schrauben (2) befestigen.
9.2 230-V-Versorgungsleitung anschließen
➤ 230-V-Anschlusskabel (Abb. 1 3, Seite 3) in den 230-V-Anschluss
(Abb. 3 1, Seite 4) des IU0U-Automatikladers stecken.
➤ Stecker des 230-V-Anschlusskabels (Abb. 1 3, Seite 3) in eine geerdete
und durch einen FI-Schutzschalter gesicherte Steckdose stecken.
Page 24

DE
IU0U-Automatiklader anschließen PerfectCharge
24
9.3 Temperatursensor anschließen (Zubehör)
Der Temperatursensor misst die Temperatur an der Batterie oder in der
Umgebung der Batterie und überträgt sie zum IU0U-Automatiklader. Die im
Kapitel „Technische Daten“ auf Seite 33 angegebenen Ladespannungen
beziehen sich auf eine Umgebungstemperatur von 15 °C bis 25 °C. Bei
abweichenden Temperaturen wird die Ladespannung entsprechend des
Diagramms auf Seite 29 erhöht oder gesenkt.
➤ Hauptschalter auf „0“ stellen.
➤ Kabel von der Batterie zum IU0U-Automatiklader verlegen.
➤ Temperatursensor über die Buchse TS an der Rückseite des IU0U-Auto-
matikladers anschließen (Abb. d 1, Seite 10).
➤ Sensorkopf direkt an der Batterie befestigen (Abb. d 2, Seite 10), z. B.
mit doppelseitigem Klebeband.
9.4 Fernbedienung anschließen (Zubehör)
Die Fernbedienung dient zum Ein- und Ausschalten des Sleepmodus und
zur Funktionskontrolle (siehe Kapitel „Funktionskontrolle“ auf Seite 30) des
IU0U-Automatikladers.
➤ Kabel von der Fernbedienung zum IU0U-Automatiklader verlegen.
➤ Stecker der Fernbedienung in die Buchse „RC“ (Abb. d 3, Seite 10) des
IU0U-Automatikladers stecken.
Page 25

DE
PerfectCharge IU0U-Automatiklader verwenden
25
10 IU0U-Automatiklader verwenden
Mit dem IU0U-Automatiklader können Sie entweder leere Batterien aufladen
oder Batterien mit einer Erhaltungsladung versorgen.
I
HINWEIS
Die Ladegeräte IU152A, IU252A und IU154A besitzen einen
Ladeausgang für die Starterbatterie mit einer Ausgangsspannung
zwischen 13,2 V (26,4 V) und 13,8 V (27,6 V). Der Ladeausgang
für die Starterbatterie lädt die Starterbatterie mit einem Strom von
bis zu 1 A nach oder hält sie auf hohem Kapazitätsniveau.
➤ Schalten Sie das Gerät mit dem Hauptschalter (Abb. 2 1, Seite 3) ein.
10.1 IU0U-Automatiklader einstellen (Abb. 8, Seite 7)
Ladespannung und Zeitbegrenzung
I
HINWEIS
Erfragen Sie bitte die Ladespannung und die benötigte Zeitbegrenzung für Ihre Batterien bei Ihrem Batteriehändler.
A
ACHTUNG!
Achten Sie darauf, dass das Gerät nie betrieben wird, wenn sich
die DIP-Schalter 1 und 2 bzw. 3 und 4 gleichzeitig in der Position
„ON“ befinden. Nur die in den nachfolgenden Tabellen beschriebenen Schalterpositionen gewährleisten eine korrekte Funktion der
IU0U-Automatiklader.
➤ Hauptschalter auf „0“ stellen.
➤ Die vier Befestigungsschrauben (2) der Rückwand mit dem beiliegenden
Innensechskant-Schlüssel herausschrauben.
➤ Rückwand (1) abnehmen.
Page 26

DE
IU0U-Automatiklader verwenden PerfectCharge
26
➤ Stellen Sie mit den DIP-Schaltern (5) die benötigte Ladespannung und
die Dauer für die Hauptladephase (U0-Phase, siehe auch Kapitel „Ladecharakteristik“ auf Seite 28) ein:
Ladespannung für IU152A, IU252A, IU452A und IU802A einstellen:
Ladespannung für IU154A, IU254A und IU404A einstellen:
Dauer der Hauptladephase einstellen:
Einstellungen des Ladeverhaltens:
10.2 Sleepmodus mit der Fernbedienung (Zubehör) einund ausschalten
I
HINWEIS
Wenn der Hauptschalter (Abb. 2 1, Seite 3) auf „II“ steht, ist die
Fernbedienung ohne Funktion.
➤ Stellen Sie den Hauptschalter am IU0U-Automatiklader (Abb. 2 1,
Seite 3) auf „I“, damit der Sleepmodus per Fernbedienung ein- und ausgeschaltet werden kann.
Ladespannung Schalter 1 Schalter 2 Anwendungsgebiet
13,8 V OFF OFF alte Starterbatterien,
Netzteilbetrieb
14,4 V ON OFF Nass- und Gel-Batterien
14,8 V OFF ON Vlies-Batterien
Ladespannung Schalter 1 Schalter 2 Anwendungsgebiet
27,6 V OFF OFF alte Starterbatterien,
Netzteilbetrieb
28,8 V ON OFF Nass- und Gel-Batterien
29,6 V OFF ON Vlies-Batterien
Dauer der Hauptladephase Schalter 3 Anwendungsgebiet
8 Std. ON Nass-Batterien
16 Std. OFF Gel- und Vlies-Batterien
Ladeverhalten Schalter 4
Die Erhaltungsladung wird abhängig vom Ladestrom eingeschaltet. OFF
Die Ladespannung wird für die eingestellte Dauer der Hauptladephase
unabhängig vom Ladestrom gehalten. Nach Ablauf dieser Zeit wird auf
die Erhaltungsladung umgeschaltet.
ON
Page 27

DE
PerfectCharge IU0U-Automatiklader verwenden
27
➤ Drücken Sie zum Ein- bzw. Ausschalten des Sleepmodus die Taste
„ON/OFF“ auf der Fernbedienung.
10.3 Batterie konditionieren
Um eine Sulphatierung der Batterie bei längerem Nichtgebrauch (Überwintern) zu vermeiden, muss sie voher geladen werden.
➤ Trennen Sie ggf. die angeschlossene Starterbatterie vom Ladegerät.
➤ Schließen Sie die zu ladende Batterie an.
➤ Stellen Sie den DIP-Schalter (Abb. 8 5, Seite 7) ein:
– Schalter 4: ON
– Nass-Batterien: Schalter 3: ON
Gel-/Vlies-Batterien: Schalter 3: OFF
➤ Stellen Sie den Hauptschalter am IU0U-Automatiklader (Abb. 2 1,
Seite 3) auf „I“.
✓ Die Batterie wird 8 Stunden (Schalter 3: ON) oder 16 Stunden
(Schalter 3: OFF) mit der eingestellten Ladespannung geladen.
Nach dieser Zeit schaltet der IU0U-Automatiklader automatisch in die
Erhaltungsphase.
I
HINWEIS
Es kann hierbei zu einer leichten Überladung kommen, die sich bei
Nassbatterien durch entweichende Gase und bei Gel-/Vlies-Batterien durch leichte Erwärmung zeigt.
➤ Schalten Sie den Schalter 4 am DIP-Schalter (Abb. 8 5, Seite 7) nach
der Konditionierung auf „OFF“.
Dadurch verhindern Sie, dass die Konditionierung durch Aus- und
Wieder-Einschalten des Laders wiederholt wird, wodurch die Batterie
beschädigt werden kann.
Page 28

DE
IU0U-Automatiklader verwenden PerfectCharge
28
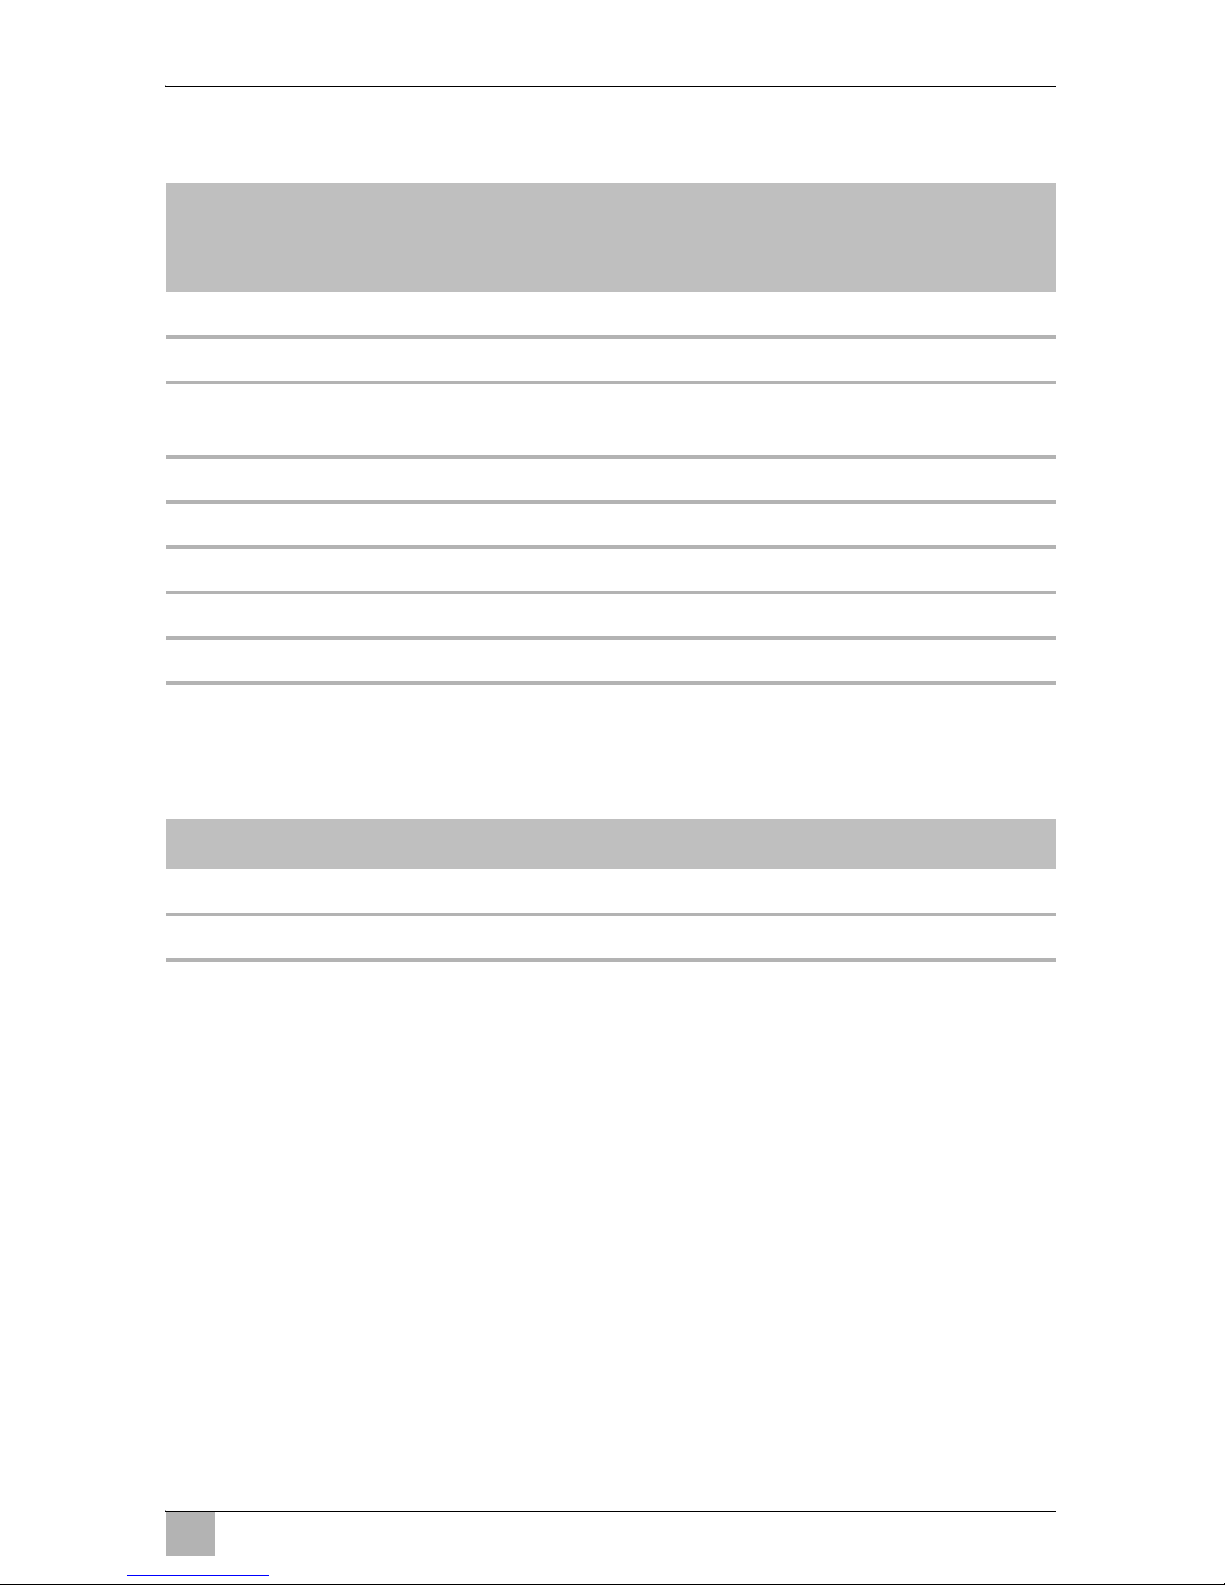
10.4 Ladecharakteristik
Die Ladecharakteristik wird als modifizierte IU0U-Kennlinie bezeichnet.
I-Phase
Zu Beginn des Ladevorgangs wird die leere Batterie mit konstantem Strom
geladen, bis die Batteriespannung 13,8 V bzw. 27,6 V erreicht. Erreicht die
Batterie dieses Spannungsniveau, nimmt der Ladestrom langsam ab. Bei
Abnahme des Stroms auf die 80-%-Marke schaltet das Ladegerät auf die
höhere Ladespannung 14,4 V/14,8 V bzw. 28,8 V/29,6 V um.
I
HINWEIS
Die Ladespannung und der Zeitraum für die Hauptladephase
(U0-Phase) kann über ein Schalterfeld gewählt werden (siehe Kapitel „IU0U-Automatiklader einstellen (Abb. 8, Seite 7)“ auf
Seite 25).
U0-Phase
Nun beginnt die Zeiterfassung, die die Hauptladephase (U0-Phase) auf
maximal 8/16 Stunden begrenzt. Mit dem Umschalten der Ladespannung
steigt der Strom wieder auf seinen Maximalwert. Er bleibt nun konstant, solange die Batteriespannung unterhalb 14,4 V/14,8 V bzw. 28,8 V bzw. 29,6 V
liegt.
Nach Erreichen der maximalen Spannung nimmt der Strom wieder ab. Dabei
bleibt die Spannung konstant (U0). In dieser Hauptladephase, die auf
8/16 Stunden begrenzt ist, wird die Batterie voll geladen.
U/V
I/A
I
I 80%
I 10%
t
IU0U
U
8/16 h
Page 29

DE
PerfectCharge IU0U-Automatiklader verwenden
29
U-Phase
Sinkt der Strom auf 10 % des Nennstromes oder wird die zeitliche Begrenzung von 8/16 Stunden überschritten, schaltet der Lader auf Erhaltungsladung (13,8 V bzw. 27,6 V) um (U-Phase).
I
HINWEIS
Bei den Ladegeräten mit Doppellade- oder Dreifachladeanschluss
besteht die Möglichkeit, Batterien getrennt voneinander zu laden.
Die Ausgänge sind intern über Dioden getrennt. Es wird immer zuerst die schwächere Batterie auf das Ladeniveau der Stärkeren gebracht. Die Ladecharakteristik ist dieselbe wie oben beschrieben.
A
ACHTUNG!
Die maximale Batteriekapazität (siehe Kapitel „Technische Daten“
auf Seite 33) darf nicht überschritten werden, um die Funktion der
einzelnen Ladephasen nicht zu beeinflussen.
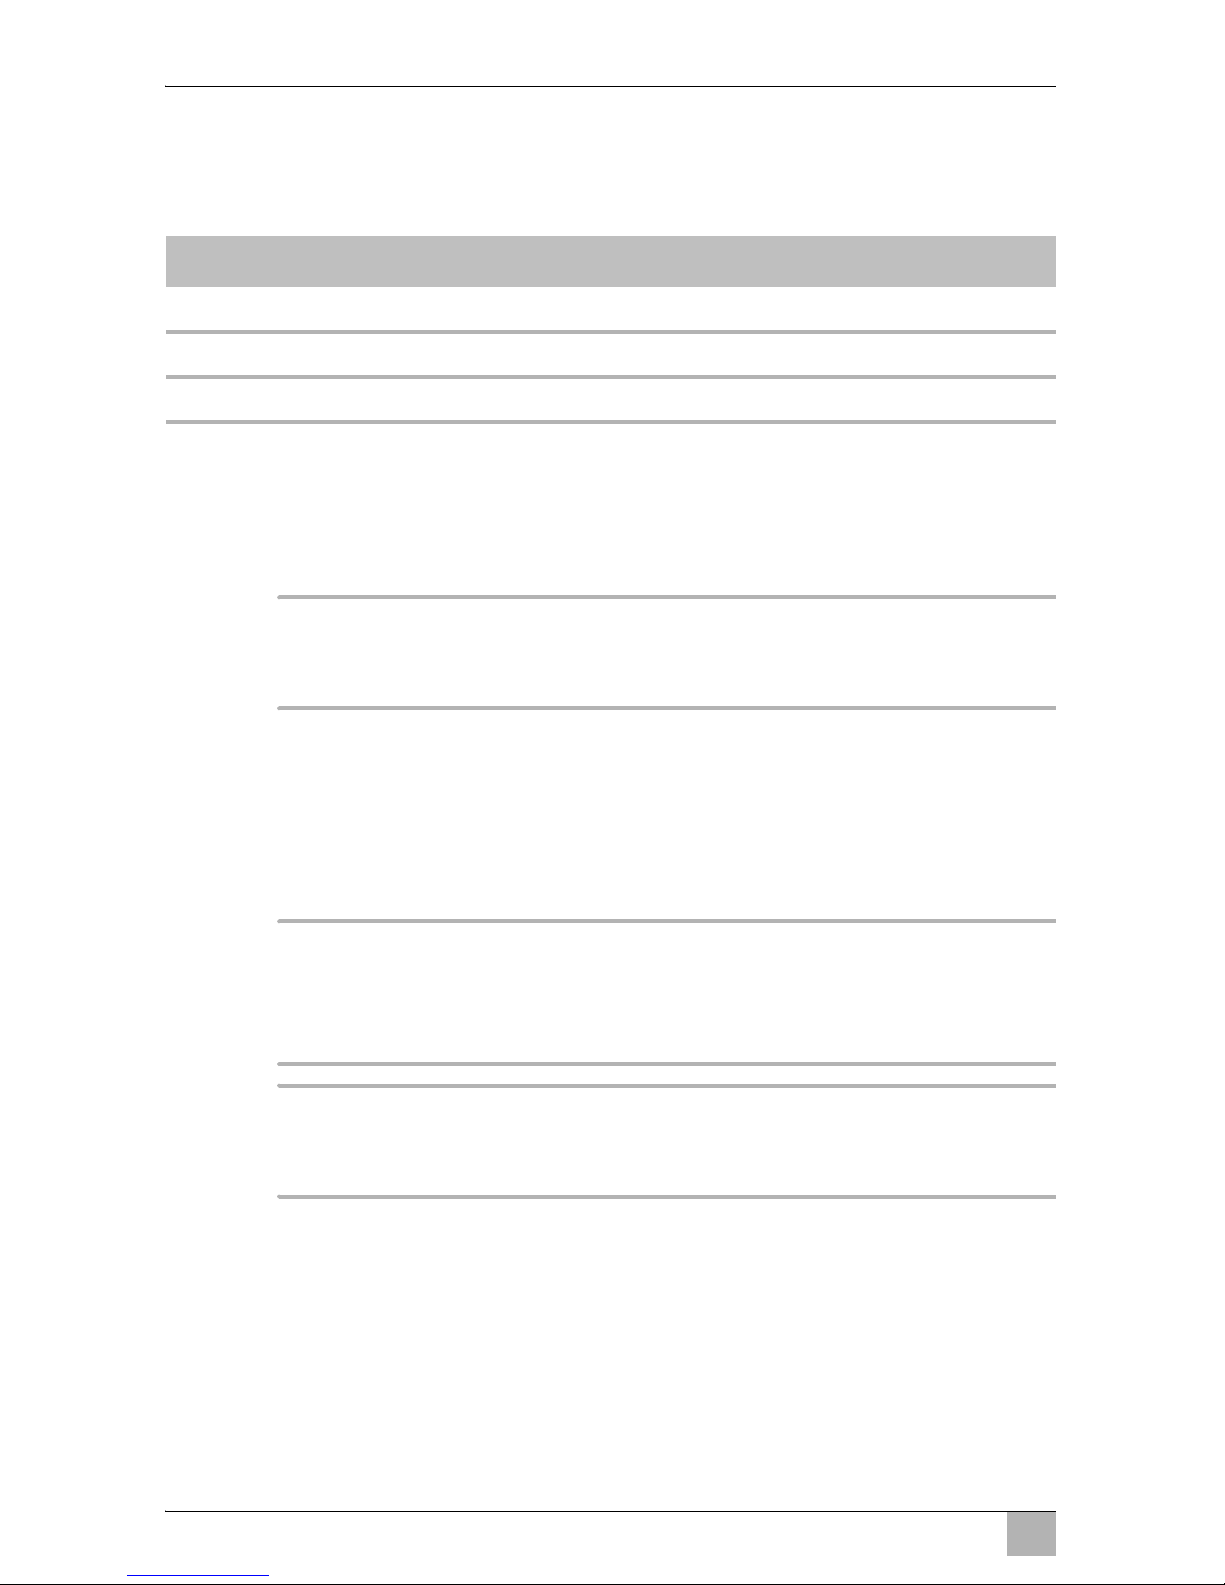
Geräte mit Temperatursensoren (Zubehör)
Die Ladespannung wird in Abhängigkeit der Batterietemperatur angepasst.
Zur optimalen Ladefunktion ist ein Temperaturfühler anschließbar. In
Abhängigkeit der Batterietemperatur werden die Ladespannungen erhöht
oder gesenkt (siehe folgendes Diagramm):
16/32 V
-10 0 +10 +20 +30 +40
°C
U1
U2
15/30 V
14/28 V
13/26 V
12/24 V
Page 30
DE
IU0U-Automatiklader pflegen und reinigen PerfectCharge
30
10.5 Funktionskontrolle
Der Ladevorgang der Batterien kann über eine LED an der Frontseite des
Geräts kontrolliert werden:
11 IU0U-Automatiklader pflegen und
reinigen
A
ACHTUNG!
Keine scharfen oder harten Mittel zur Reinigung verwenden, da
dies zu einer Beschädigung des Gerätes führen kann.
➤ Reinigen Sie den IU0U-Automatiklader gelegentlich mit einem feuchten
Tuch.
12 Fehlerbeseitigung
!
WARNUNG!
Dieses Kapitel richtet sich an Fachkräfte, die mit den anzuwendenen Richtlinien und Sicherheitsvorkehrungen vertraut sind (z. B. in
Deutschland VDE 0100, Teil 721).
I
HINWEIS
Bei detaillierten Fragen zu den Batteriedaten wenden Sie sich
bitte an den Batteriehersteller.
LED Ladestatus der Batterie
I Phase zwischen 10 % und 50 %
U0 Phase zwischen 50 % und 90 %
U Phase über 90 %
Page 31

DE
PerfectCharge Fehlerbeseitigung
31
Nach Anschluss und Inbetriebnahme des IU0U-Automatikladers steigt
die Spannung in der Batterie nicht
➤ Messen Sie ggf. während des Aufladens mit einem geeigneten Multi-
meter, ob die Spannung an den Batterieklemmen steigt.
➤ Prüfen Sie, ob die Anschlussklemmen einwandfrei mit den Batteriepolen
verbunden sind.
➤ Reinigen Sie ggf. die Batteriepole.
Die Batterie ist nach einer Ladezeit von etwa 20 Stunden nicht voll
geladen
➤ Trennen Sie den IU0U-Automatiklader vom Stromnetz.
➤ Entfernen Sie die Ladeklemmen von der Batterie und warten Sie einige
Minuten.
➤ Messen Sie mit einem geeigneten Multimeter die Spannung an den
Batterieklemmen.
12-V-Batterie: Wenn das Multimeter eine Spannung von 10 V oder dar-
unter anzeigt, bedeutet das, dass die Batterie defekt ist und keine
Ladung mehr annimmt.
24-V-Batterie: Wenn das Multimeter eine Spannung von 20 V oder darunter anzeigt, bedeutet das, dass die Batterie defekt ist und keine
Ladung mehr annimmt.
➤ Lassen Sie die Batterie ggf. von einem Fachmann prüfen oder entsorgen
Sie die Batterie.
Die Batterie entlädt sich ohne Belastung bereits nach kurzer Zeit
➤ Messen Sie mit einem geeigneten Multimeter die Spannung an den
Batterieklemmen.
Wenn das Multimeter eine Spannung unter 12 V bei einer 12-V-Batterie oder
eine Spannung unter 24 V bei einer 24-V-Batterie anzeigt, ist die Batterie zu
schwach, um die Ladung halten zu können.
➤ Lassen Sie die Batterie ggf. von einem Fachmann prüfen oder entsorgen
Sie die Batterie.
Page 32

DE
Gewährleistung PerfectCharge
32
13 Gewährleistung
Es gilt die gesetzliche Gewährleistungsfrist. Sollte das Produkt defekt sein,
wenden Sie sich bitte an die Niederlassung des Herstellers in Ihrem Land
(Adressen siehe Rückseite der Anleitung) oder an Ihren Fachhändler.
Zur Reparatur- bzw. Gewährleistungsbearbeitung müssen Sie folgende
Unterlagen mitschicken:
eine Kopie der Rechnung mit Kaufdatum,
einen Reklamationsgrund oder eine Fehlerbeschreibung.
14 Entsorgung
➤ Geben Sie das Verpackungsmaterial möglichst in den entsprechenden
Recycling-Müll.
M
Wenn Sie das Produkt endgültig außer Betrieb nehmen, informieren Sie sich bitte beim nächsten Recyclingcenter oder bei
Ihrem Fachhändler über die zutreffenden Entsorgungsvorschriften.
B
Schützen Sie Ihre Umwelt!
Akkus und Batterien gehören nicht in den Hausmüll.
Geben Sie bitte Ihre defekten Akkus oder verbrauchten Batterien
beim Händler oder bei einer Sammelstelle ab.
Page 33

DE
PerfectCharge Technische Daten
33
15 Technische Daten
WAECO PerfectCharge
IU152A IU252A IU154A
Art.-Nr.: 2222500001 2222500002 2222500003
Batterieanschluss 1: Starterbatterie
13,8 V/1 A
Starterbatterie
13,8 V/1 A
Starterbatterie
27,6 V/1 A
Batterieanschluss 2: 13,8 – 14,8 V/15 A 13,8 – 14,8 V
insgesamt max.
25 A für beide
Anschlüsse
27,6 – 29,6 V
insgesamt max.
15 A für beide
Anschlüsse
Batterieanschluss 3: –
Eingangsspannungsbereich: 207 – 253 V~ / 50 – 60 Hz
Ladeschlussspannung: 14,4 V/14,8 V 28,8 V/29,6 V
Erhaltungsladespannung: 13,8 V 27,6 V
max. Batteriekapazität: 150 Ah 300 Ah 200 Ah
U0-Phase Begrenzung: 8 h oder 16 h
max. Ladestrom 15 A 25 A 15 A
Betriebstemperatur-
bereich: 0 °C – 50 C°
Sicherung: T2 A / 250 V T4 A / 250 V
Abmessungen: 175 x 91 x 310 mm 208 x 96 x 332 mm
Gewicht: 3,1 kg 3,8 kg
Page 34

DE
Technische Daten PerfectCharge
34
WAECO PerfectCharge
IU452A IU254A
Art.-Nr.: 2222500004 2222500005
Batterieanschluss 1: 13,8 – 14,8 V
insgesamt max.
45 A für alle drei
Anschlüsse
27,6 – 29,6 V
insgesamt max.
25 A für alle drei
Anschlüsse
Batterieanschluss 2:
Batterieanschluss 3:
Eingangsspannungsbereich: 207 – 253 V~ / 50 – 60 Hz
Ladeschlussspannung: 14,4 V/14,8 V 28,8 V/29,6 V
Erhaltungsladespannung: 13,8 V 27,6 V
max. Batteriekapazität: 500 Ah 300 Ah
U0-Phase Begrenzung: 8 h oder 16 h
max. Ladestrom 45 A 25 A
Betriebstemperatur-
bereich: 0 °C – 50 C°
Sicherung: T6,3 A / 250 V T6,3 A / 250 V
Abmessungen (mm): 208 x 96 x 418 mm
Gewicht: 5,5 kg
WAECO PerfectCharge
IU802A IU404A
Art.-Nr.: 2222500006 2222500007
Batterieanschluss 1: 13,8 – 14,8 V
insgesamt max.
80 A für alle drei
Anschlüsse
27,6 – 29,6 V
insgesamt max.
40 A für alle drei
Anschlüsse
Batterieanschluss 2:
Batterieanschluss 3:
Eingangsspannungsbereich: 207 – 253 V~ / 50 – 60 Hz
Ladeschlussspannung: 14,4 V/14,8 V 28,8 V/29,6 V
Erhaltungsladespannung: 13,8 V 27,6 V
max. Batteriekapazität: 800 Ah 400 Ah
U0-Phase Begrenzung: 8 h oder 16 h
max. Ladestrom 80 A 40 A
Betriebstemperatur-
bereich: 0 °C – 50 C°
Sicherung: T8 A / 250 V T8 A / 250 V
Abmessungen (mm): 208 x 96 x 453 mm
Gewicht: 6,5 kg
Page 35

DE
PerfectCharge Technische Daten
35
Auf die IU0U-Automatiklader angewandte Prüfungen/Zertifikate:
Produkt Serien Standard:
IEC 60950-1:2001 (1
st
Edition), EN 60950-1: 2001 + A11: 2004
Basis Standard:
EN 55022:2006 Class B
EN 55024: 1998 + A1: 2001 + A2:2003
EN 61000-3-2: 2000 + 2005 Class A
EN 61000-3-3: 1995 + A1: 2001 + A2: 2005
Page 36

EN
PerfectCharge
36
Please read this instruction manual carefully before installation and
first use, and store it in a safe place. If you pass on the product to another person, hand over this instruction manual along with it.
Table of contents
1 Explanation of symbols . . . . . . . . . . . . . . . . . . . . . . . . . . . . . . . . . . 37
2 General safety instructions . . . . . . . . . . . . . . . . . . . . . . . . . . . . . . . 37
3 Scope of delivery . . . . . . . . . . . . . . . . . . . . . . . . . . . . . . . . . . . . . . . 39
4 Accessories . . . . . . . . . . . . . . . . . . . . . . . . . . . . . . . . . . . . . . . . . . . 40
5 Intended use . . . . . . . . . . . . . . . . . . . . . . . . . . . . . . . . . . . . . . . . . . 40
6 Technical description . . . . . . . . . . . . . . . . . . . . . . . . . . . . . . . . . . . . 41
7 Fastening the IU0U automatic charger . . . . . . . . . . . . . . . . . . . . . . 43
8 Connecting the IU0U automatic charger to the exhaust system . . . 44
9 Connecting the IU0U automatic charger . . . . . . . . . . . . . . . . . . . . . 44
10 Using the IU0U automatic charger. . . . . . . . . . . . . . . . . . . . . . . . . . 48
11 Cleaning and servicing the IU0U automatic charger . . . . . . . . . . . . 53
12 Rectifying faults . . . . . . . . . . . . . . . . . . . . . . . . . . . . . . . . . . . . . . . . 53
13 Guarantee . . . . . . . . . . . . . . . . . . . . . . . . . . . . . . . . . . . . . . . . . . . . 54
14 Disposal . . . . . . . . . . . . . . . . . . . . . . . . . . . . . . . . . . . . . . . . . . . . . . 55
15 Technical data . . . . . . . . . . . . . . . . . . . . . . . . . . . . . . . . . . . . . . . . . 55
Page 37

EN
PerfectCharge Explanation of symbols
37
1 Explanation of symbols
!
WARNING!
Safety instruction: Failure to observe this instruction can cause
fatal or serious injury.
A
NOTICE!
Failure to observe this instruction can cause material damage and
impair the function of the product.
I
NOTE
Supplementary information for operating the product.
➤ Action: This symbol indicates that action is required on your part. The
required action is described step-by-step.
✓ This symbol describes the result of an action.
fig. 1 5, page 3: This refers to an element in an illustration. In this case,
item 5 in figure 1 on page 3.
2 General safety instructions
The manufacturer accepts no liability for damage in the following cases:
Faulty assembly or connection
Damage to the product resulting from mechanical influences and excess
voltage
Alterations to the product without express permission from the manu-
facturer
Use for purposes other than those described in the operating manual
Please observe the following basic safety information when using electrical
devices to protect against:
Electric shock
Fire hazards
Injury
Page 38

EN
General safety instructions PerfectCharge
38
2.1 General safety
!
WARNING!
Batteries contain aggressive acids.
Avoid coming into contact with battery fluid.
If your skin does come into contact with battery fluid, wash the
part of your body in question and your clothes thoroughly with
plenty of fresh water.
If you sustain any injuries from acids, contact a doctor immediately.
Never attempt to charge a frozen or defective battery.
There is a danger of explosions!
Place the battery in a frost-free area and wait until the battery
has acclimatised to the ambient temperature. Only then can
you start the charging process.
Persons whose physical, sensory or mental capacities prevent
them from using this device safely should not operate it without
the supervision of a responsible adult.
Electronic devices are not toys
Keep electrical appliances out of reach of children or infirm persons. Do not let them use the appliances without supervision.
A
NOTICE!
Use the IU0U automatic charger only as intended.
Charge the battery only in well ventilated rooms.
Always disconnect the power supply when working on the de-
vice.
Store the IU0U automatic charger in a dry and cool place.
Maintenance and repair work may only be carried out by quali-
fied personnel who are familiar with the risks involved and the
relevant regulations.
2.2 Operating the device safely
A
NOTICE!
If electrical devices are incorrectly installed on boats, corrosion
damage might occur. The IU0U automatic charger should be installed by a specialist (marine) electrician.
Page 39

EN
PerfectCharge Scope of delivery
39
Only operate the IU0U automatic charger if you are certain that
the housing and the cables are not damaged.
Do not operate the IU0U automatic charger in a damp or wet
environment.
Make sure the device is standing firmly.
The IU0U automatic charger and the batteries to be charged
must be set up in such a way that they cannot tip over or fall
down.
Take precautions necessary to ensure that the IU0U automatic
charger is out of reach of children.
Dangerous situations may occur which cannot be recognised by
children!
Always use sockets which are grounded and secured by resid-
ual current circuit breakers to operate the device.
3 Scope of delivery
No. in
fig. 1,
page 3
Designation
1 Charger
2 Holders (4 pcs)
3 Connection cable
(for 230 V
AC
-supply)
4 Exhaust adapter
5 Mounting bracket
6 Hexagon socket wrench
– Fastening screws (12 pcs)
– Operating manual
Page 40

EN
Accessories PerfectCharge
40
4 Accessories
5 Intended use
PerfectCharge IU0U automatic chargers can charge or trickle charge batteries or supply batteries, which are used to generate power in vehicles or on
boats.
The IU0U automatic charger can be used to continuously charge supply or
starter batteries. It can charge these batteries or maintain a high charge level:
12 V batteries: IU152A, IU252A, IU452A, IU802A
24 V batteries: IU154A, IU254A, IU404A
The IU0U automatic charger can be used to charge the following types of batteries:
Lead starter batteries
Gel batteries
Fleece batteries (AGM)
Maintenance-free lead batteries
with the capacities and voltages specified in the “Technical data” on page 55.
Ask your battery retailer for details relating to the maximum capacity of lead
gel batteries.
!
WARNING!
Batteries with a cell short circuit may not be charged, as explo-
sive gases may form due to overheating of the battery.
The IU0U automatic charger may never be used to charge oth-
er battery types (e.g. NiCd, NiMH, etc.)!
Designation Item no.
Remote control 901-RC
Temperature sensor TF-500
Page 41

EN
PerfectCharge Technical description
41
6 Technical description
6.1 Function
A fuse protects the device from damage if the polarity is reversed. For the
type and rating of the fuse in your device, see “Technical data” on page 55.
!
WARNING!
The device's fuse may only be replaced by qualified personnel who
are familiar with the risks involved and the relevant regulations.
I
NOTE
You can use a temperature sensor (accessory) to protect the bat-
tery from damage from extreme outdoor temperatures. The temperature sensor is attached to the battery and connected to the
IU0U automatic charger. It protects the battery by adjusting the
charging voltage to the temperature of the battery (see “Charging
characteristics” on page 51).
Three control lamps on the device are for constant monitoring of the IU0U automatic charger (see “Functional check” on page 53).
6.2 Specifications for the device variants
Various PerfectCharge IU0U automatic charger versions are available.
Your IU0U automatic charger can be used to charge batteries up to a specified battery capacity (see “Technical data” on page 55):
IU152A: suitable for charging one supply battery and one starter battery
IU154A, IU252A: suitable for charging up to two supply batteries and one
starter battery
IU254A, IU452A, IU404A, IU802A: suitable for charging up to three
supply batteries.
For the identification of your device, see the item number on the type plate.
Page 42

EN
Technical description PerfectCharge
42
6.3 Control elements
Front view (fig. 2, page 3)
Rear view (fig. 3, page 4)
No. Description
1 Main switch
0/Off: device is switched off
I/On: device is switched on
Using a remote control (accessory) the unit can be operated in sleep
mode (low noise).
(sleep mode: half power)
II/Sleep Mode: device runs quietly
Contrary settings by the remote control (accessory) will be overwritten.
2 Status LEDs: show the current charging status
(see “Charging characteristics” on page 51)
U Phase: the IU0U automatic charger is in the U phase
IU Phase: the IU0U automatic charger is in the U0 phase
I Phase: the IU0U automatic charger is in the I phase
3Fan
No.
Description
1 230 V power supply connection
2 RC: connection for remote control (accessory)
3 TS: connection for temperature sensor (accessory)
4 Battery connection terminals
BATT 1+, BATT 2+, BATT 3+: positive terminal for supply batteries
BATT –: negative terminal
START BATT + (only IU152A), BATT 1+ (only IU154A, IU252A): posi-
tive terminal of the starter battery
Page 43

EN
PerfectCharge Fastening the IU0U automatic charger
43
7 Fastening the IU0U automatic charger
You can fasten the IU0U automatic charger using the four holders supplied.
When selecting the installation location, observe the following instructions:
You can mount the IU0U automatic charger either horizontally or vertical-
ly.
Do not operate the device
– In wet or damp environments
– In dusty environments
– In the vicinity of flammable materials
– In spaces where there is a danger of explosion
Select a well-ventilated location for the device.
A ventilation system must exist for installations in small, enclosed
spaces. The free space around the IU0U automatic charger must be at
least 5 cm.
Make sure that the ventilation slots on the front and back as well as under
the IU0U automatic charger are not covered.
Select a mounting surface which is flat and sufficiently firm.
Make sure you have adequate space for the mounting bracket behind the
device when choosing a mounting location.
A
NOTICE!
Before drilling any holes, make sure that no electrical cables or other parts of the vehicle can be damaged by drilling, sawing and filing.
Fastening the IU0U automatic charger to the floor
➤ Clip two holders on the left bar and two on the lower right bar (fig. 4,
page 5).
You can move the holders as required.
➤ Fasten the IU0U automatic charger by screwing one screw through each
hole in the holders.
➤ Lay the mounting bracket (fig. 5 1, page 5) with the clip over the edge
on the back of the IU0U automatic charger (fig. 5 2, page 5).
➤ Fasten the mounting bracket by screwing one screw into each of the four
holes.
Page 44

EN
Connecting the IU0U automatic charger to the exhaust system
44
Mounting the IU0U automatic charger on the wall
➤ Clip two holders on the left bar and two on the lower right bar (fig. 4,
page 5).
You can move the holders as required.
➤ Screw the mounting bracket (fig. 6 1, page 6) on to the wall by screwing
one screw into each of the four holes.
➤ Press the IU0U automatic charger (fig. 6 2, page 6) on to the mounting
bracket so that the edge on the back of the IU0U automatic charger is
pinched between the wall and the clip on the mounting bracket.
➤ Fasten the IU0U automatic charger by screwing one screw through each
hole in the holders.
8 Connecting the IU0U automatic
charger to the exhaust system
You can connect the IU0U automatic charger to an exhaust system. The
warm exhaust is thereby driven out of the internal chamber.
Proceed as follows (fig. 7, page 6):
➤ Set the exhaust adapter (2) on the front of the charger (1) over the fan, so
that the screws fit into the holes.
➤ Attach the exhaust adapter using the four screws provided.
➤ Connect the hose support (3, not included) to the exhaust adapter.
➤ Connect the exhaust system hose (4) to the hose support.
9 Connecting the IU0U automatic
charger
!
WARNING!
The IU0U automatic charger may only be connected by a qualified
specialist.
The following information is intended for technicians who are familiar with the guidelines and safety precautions to be applied.
Page 45

EN
PerfectCharge Connecting the IU0U automatic charger
45
Observe the following safety instruction for the electrical connections:
A
NOTICE! Risk of short circuit
Always use sockets which are grounded and secured by resid-
ual current circuit breakers.
If you have to feed cables through metal walls or other walls with
sharp edges, use ducts or tubes to prevent damage.
Do not lay cables which are loose or bent next to electrically
conductive material (metal).
Fasten the cables securely.
Do not pull on the cables.
Do not lay the 230 V mains cable and the 12/24 V DC cable in
the same duct.
Lay the cables so that they cannot be tripped over or damaged.
9.1 Connecting the IU0U automatic charger to a battery
(fig. 8, page 7)
!
WARNING!
Avoid coming into contact with the battery fluid.
Batteries with a cell short circuit may not be charged, as explo-
sive gases may form due to overheating of the battery.
A
NOTICE!
Loose connections may cause overheating.
Tighten the screws on the terminals to a torque of 12 – 13 Nm.
I
NOTE
IU152A: To connect starter batteries, use the special “START
BATT +” terminal intended for this purpose.
IU154A, IU252A: To connect starter batteries, use the special
“BATT 1+” terminal intended for this purpose.
You will find the circuit diagrams with all possible wiring options for the various IU0U automatic chargers in fig. 9, page 7 to fig. c, page 9.
Page 46

EN
Connecting the IU0U automatic charger PerfectCharge
46
Laying the battery cables
➤ Lay the positive cable of the batteries to the IU0U automatic charger.
I
NOTE
To connect more than one battery, connect the negative terminals
of the batteries to an earth cable and connect the earth cable to the
IU0U automatic charger.
➤ Lay the negative cable of the battery or earth cable to the IU0U automatic
charger.
Preparing the IU0U automatic charger
➤ Turn the main switch to “0”.
➤ Unscrew the four fastening screws (2) from the rear panel using the hex-
agon socket wrench provided.
➤ Remove the rear panel (1).
Connecting the battery cables to the IU0U automatic charger
I
NOTE
The IU0U automatic charger's connections are suitable for cables
with cross-sections of 10 mm² to 25 mm².
➤ Fit wire sleeves to the ends of the cables to ensure permanent contact.
➤ Connect the positive battery cable to the respective slot:
– Supply battery: “BATT 1+”, “BATT 2+”, “BATT 3+”
– Starter battery: “START BATT +” (IU152A), “BATT 1+” (IU154A,
IU252A)
➤ Connect the negative battery cable or earth cable to the respective slot:
– Supply battery: “BATT –”
The following instructions apply to all cables accordingly:
➤ Fit cable sleeves on the ends of the cables (4).
➤ Undo the safety bolt (3) slightly.
➤ Insert the cable sleeves (4) in the slots provided.
➤ Retighten the safety bolt (3).
Page 47

EN
PerfectCharge Connecting the IU0U automatic charger
47
Connecting batteries
➤ Connect batteries according to the circuit diagram of your IU0U automatic
charger.
Closing the IU0U automatic charger
➤ Refit the rear panel (1) and fasten it with the screws (2).
9.2 Connecting the 230 V power cable
➤ Connect the 230 V connection cable (fig. 1 3, page 3) to the 230 V con-
nection (fig. 3 1, page 4) of the IU0U automatic charger.
➤ Insert the plug of the 230 V connection cable (fig. 1 3, page 3) to an
earthed socket which is protected by a residual current circuit breaker.
9.3 Connecting the temperature sensor (accessory)
The temperature sensor measures the temperature at the battery or around
the battery and transfers the data to the IU0U automatic charger. The charging voltages specified in the “Technical data” on page 55 refer to an ambient
temperature of 15 °C to 25 °C. If temperatures deviate, the charging voltage
is increased or reduced according to the diagram on page 52.
➤ Turn the main switch to “0”.
➤ Lay the cable between the battery and the IU0U automatic charger.
➤ Connect the temperature sensor to the TS socket on the back of the IU0U
automatic charger (fig. d 1, page 10).
➤ Attach the sensor head directly to the battery (fig. d 2, page 10), e.g. us-
ing double-sided adhesive tape.
9.4 Connecting the remote control (accessory)
The remote control is for activating and deactivating sleep mode and for monitoring the functions (see “Functional check” on page 53) of the IU0U automatic charger.
➤ Lay the cable between the remote control and the IU0U automatic charg-
er.
➤ Insert the plug of the remote control in the “RC” socket (fig. d 3, page 10)
of IU0U automatic charger.
Page 48

EN
Using the IU0U automatic charger PerfectCharge
48
10 Using the IU0U automatic charger
You can use the IU0U automatic charger to trickle charge empty batteries or
supply batteries.
I
NOTE
The chargers IU152A, IU252A and IU154A have a charger output
for the starter battery with an output voltage in the range between
13.2 V (26.4 V) and 13.8 V (27.6 V). The charger output for the
starter battery recharges the starter battery with a current of up to
1 A or maintains a high charge level.
➤ Switch on the device with the main switch (fig. 2 1, page 3).
10.1 Setting the IU0U automatic charger (fig. 8, page 7)
Charging voltage and time limit
I
NOTE
Ask your battery retailer for details on the charging voltage and time
limit required for your batteries.
A
NOTICE!
Make sure that the device is never used if DIP switches 1 and 2 or
DIP switches 3 and 4 are both at the “ON” position. Only the switch
positions described in the following tables ensure the correct operation of the IU0U automatic charger.
➤ Turn the main switch to “0”.
➤ Unscrew the four fastening screws (2) from the rear panel using the hex-
agon socket wrench provided.
➤ Remove the rear panel (1).
➤ Use the DIP switches (5) to set the required charging voltage and the du-
ration of the main charging phase (U0 phase, also see “Charging characteristics” on page 51):
Page 49

EN
PerfectCharge Using the IU0U automatic charger
49
Setting the charging voltage for IU152A, IU252A, IU452A and IU802A:
Setting the charging voltage for IU154A, IU254A and IU404A:
Setting the duration of the main charging phase:
Setting the charging mode:
10.2 Switching sleep mode on/off with the remote
control (accessory)
I
NOTE
When main switch (fig. 2 1, page 3) is in position “II”, the remote
control is inactive.
➤ Move the main switch IU0U-automatic loader (fig. 2 1, page 3) to posi-
tion “I”, so that sleep mode can be switched on/off via remote control.
➤ To switch sleep mode on/off, press the “ON/OFF” button on the remote
control.
Charging voltage Switch 1 Switch 2 Area of application
13.8 V OFF OFF Old starter batteries,
mains adapter operation
14.4 V ON OFF Wet and gel batteries
14.8 V OFF ON Fleece batteries
Charging voltage Switch 1 Switch 2 Area of application
27.6 V OFF OFF Old starter batteries,
mains adapter operation
28.8 V ON OFF Wet and gel batteries
29.6 V OFF ON Fleece batteries
Duration of the main charging phase Switch 3 Area of application
8 hours ON Wet batteries
16 hours OFF Gel and fleece batteries
Charging mode Switch 4
The trickle charge is activated according to the charging current. OFF
The charging voltage is maintained for the duration of the set main charg-
ing phase irrespective of the charging current. When this time has
passed, the device switches back to trickle charge.
ON
Page 50

EN
Using the IU0U automatic charger PerfectCharge
50
10.3 Conditioning the battery
To prevent any sulphation of the battery during prolonged non-use (during
the winter), it must be charged beforehand.
➤ If applicable, disconnect the starter battery from the charger.
➤ Connect the battery to be charged.
➤ Set the DIP switch (fig. 8 5, page 7):
– Switch 4: ON
– Wet batteries: Switch 3: ON
Gel/fleece batteries: Switch 3: OFF
➤ Set the main switch on the IU0U-automatic charger (fig. 2 1, page 3) to
“I”.
✓ The battery will be charged for 8 hours (switch 3: ON) or for 16 hours
(switch 3: OFF) at the charging voltage which has been set.
When this time has passed, the IU0U-automatic charger automatically
switches to the retentionphase.
I
NOTE
A slight overcharging could occur, in wet batteries indicated by escaping gases and in gel/fleece batteries by slight warmth.
➤ After conditioning, turn switch 4 on the DIP switch (fig. 8 5, page 7)
to “OFF”.
You will thereby prevent any repetition of the conditioning caused by
switching the charger off and on again, which can damage the battery.
Page 51

EN
PerfectCharge Using the IU0U automatic charger
51
10.4 Charging characteristics
The charging characteristics are referred to as modified IU0U characteristics.
I Phase
The empty battery is charged with a constant current at the beginning of the
charging process, until the battery voltage reaches 13.8 V or 27.6 V. The
charging current falls slowly when the battery has reached this charging level. If the current falls below the 80% mark, the charger switches to the higher
charging voltage of 14.4 V/14.8 V or 28.8 V/29.6 V.
I
NOTE
The charging voltage and the time for the main charging phase
(U0 phase) can be selected by means of a switch panel (see “Setting the IU0U automatic charger (fig. 8, page 7)” on page 48).
U0 Phase
Now the time that limits the main charging phase (U0 phase) to a maximum
of 8/16 hours is recorded. When the charging voltage is switched over, the
current is increased until the maximum is reached. It remains constant as
long as the battery voltage is below 14.4 V/14.8 V or 28.8 V or 29.6 V.
When the maximum voltage is established, the current drops again. The voltage remains constant (U0). During this main charging phase, which is limited
to 8/16 hours, the battery is charge completely.
U/V
I/A
I
I 80%
I 10%
t
IU0U
U
8/16 h
Page 52

EN
Using the IU0U automatic charger PerfectCharge
52
U Phase
If the current falls to 10% of the rated current or if the time limit of 8/16 hours
is exceeded, the charger switches to trickle charge (13.8 V or 27.6 V)
(U phase).
I
NOTE
The chargers with two or three charging connections enable batteries to be charged separately. The outputs are separated internally
via diodes. The charge level of the weaker battery is always
brought to the level of the stronger battery first. The charging characteristics are as described above.
A
NOTICE!
The maximum battery capacity (see “Technical data” on page 55)
must not be exceeded since that would affect the individual charging phases.
Devices with temperature sensors (accessory)
The charging voltage is adjusted according to the battery temperature. A
temperature sensor can be connected for an optimum charging function. The
charging voltage is increased or reduced according to the battery temperature (see diagram):
16/32 V
-10 0 +10 +20 +30 +40
°C
U1
U2
15/30 V
14/28 V
13/26 V
12/24 V
Page 53

EN
PerfectCharge Cleaning and servicing the IU0U automatic charger
53
10.5 Functional check
The charging of the batteries can be monitored by means of an LED on the
front of the device:
11 Cleaning and servicing the IU0U auto-
matic charger
A
NOTICE!
Do not use any sharp or hard objects for cleaning since they may
damage the device.
➤ Clean the IU0U automatic charger with a damp cloth from time to time.
12 Rectifying faults
!
WARNING!
This chapter is intended for technicians who are familiar with the
guidelines and safety precautions to be applied.
I
NOTE
If you have questions concerning details of the battery specifications please contact the battery manufacturer.
The voltage of the battery does not rise after the IU0U automatic
charger has been connected and put into operation.
➤ Use a suitable multimeter to check whether the voltage of the battery ter-
minals rises during charging.
➤ Check whether the terminals are connected properly to the battery termi-
nals.
➤ Clean the battery terminals as necessary.
LED Battery charge status
I Phase Between 10% and 50%
U0 Phase Between 50% and 90%
U Phase Above 90%
Page 54

EN
Guarantee PerfectCharge
54
The battery is not completely charged after charging for approximately
20 hours.
➤ Disconnect the IU0U automatic charger from the mains power.
➤ Remove the charger terminals from the battery and wait for a few minutes.
➤ Use a suitable multimeter to check the voltage of the battery terminals.
12 V battery: if the multimeter indicates a voltage of 10 V or below, this
means that the battery is defective and cannot be charged.
24 V battery: if the multimeter indicates a voltage of 20 V or below, this
means that the battery is defective and cannot be charged.
➤ Have the battery checked by a specialist, if necessary, or dispose of the
battery.
The battery discharges itself after a short time if it is not used
➤ Use a suitable multimeter to check the voltage of the battery terminals.
If the multimeter indicates a voltage below 12 V (12 V battery) or 24 V (24 V
battery), the battery is too weak to be able to remain charged.
➤ Have the battery checked by a specialist, if necessary, or dispose of the
battery.
13 Guarantee
The statutory warranty period applies. If the product is defective, please
contact the manufacturer's branch in your country (see the back of the
instruction manual for the addresses) or your retailer.
For repair and guarantee processing, please include the following documents when you send in the device:
A copy of the receipt with purchasing date
A reason for the claim or description of the fault
Page 55

EN
PerfectCharge Disposal
55
14 Disposal
➤ Place the packaging material in the appropriate recycling waste bins
wherever possible.
M
If you wish to finally dispose of the product, ask your local recycling
centre or specialist dealer for details about how to do this in
accordance with the applicable disposal regulations.
B
Protect the environment!
Do not dispose of any batteries with general household waste.
Return defective or used batteries to your retailer or dispose of
them at collection points.
15 Technical data
WAECO PerfectCharge
IU152A IU252A IU154A
Item no.: 2222500001 2222500002 2222500003
Battery connection 1: starter battery
13,8 V/1 A
starter battery
13,8 V/1 A
starter battery
27,6 V/1 A
Battery connection 2: 13,8 – 14,8 V/15 A 13,8 – 14,8 V
Total max. 25 A for
both connections
27,6 – 29,6 V
Total max . 1 5 A f or
both connections
Battery connection 3: –
Input voltage range: 207 – 253 V~ / 50 – 60 Hz
Final charging voltage: 14.4 V/14.8 V 28.8 V/29.6 V
Trickle charge voltage: 13.8 V 27.6 V
Max. battery capacity: 150 Ah 300 Ah 200 Ah
U0 phase limitation: 8 h or 16 h
Max. charging current: 15 A 25 A 15 A
Operating temperature
range: 0 °C – 50 C°
Fuse: T2 A / 250 V T4 A / 250 V
Dimensions: 175 x 91 x 310 mm 208 x 96 x 332 mm
Weight: 3.1 kg 3.8 kg
Page 56

EN
Technical data PerfectCharge
56
WAECO PerfectCharge
IU452A IU254A
Item no.: 2222500004 2222500005
Battery connection 1: 13,8 – 14,8 V
total max. 45 A for
all three
connections
27,6 – 29,6 V
total max. 25 A for
all three
connections
Battery connection 2:
Battery connection 3:
Input voltage range: 207 – 253 V~ / 50 – 60 Hz
Final charging voltage: 14.4 V/14.8 V 28.8 V/29.6 V
Trickle charge voltage: 13.8 V 27.6 V
Max. battery capacity: 500 Ah 300 Ah
U0 phase limitation: 8 h or 16 h
Max. charging current: 45 A 25 A
Operating temperature
range: 0 °C – 50 C°
Fuse: T6.3 A / 250 V T6.3 A / 250 V
Dimensions (mm): 208 x 96 x 418 mm
Weight: 5.5 kg
WAECO PerfectCharge
IU802A IU404A
Item no.: 2222500006 2222500007
Battery connection 1: 13,8 – 14,8 V
total max. 80 A for
all three
connections
27,6 – 29,6 V
total max. 40 A for
all three
connections
Battery connection 2:
Battery connection 3:
Input voltage range: 207 – 253 V~ / 50 – 60 Hz
Final charging voltage: 14.4 V/14.8 V 28.8 V/29.6 V
Trickle charge voltage: 13.8 V 27.6 V
Max. battery capacity: 800 Ah 400 Ah
U0 phase limitation: 8 h or 16 h
Max. charging current: 80 A 40 A
Operating temperature
range: 0 °C – 50 C°
Fuse: T8 A / 250 V T8 A / 250 V
Dimensions (mm): 208 x 96 x 453 mm
Weight: 6.5 kg
Page 57

EN
PerfectCharge Technical data
57
Tests/certificates applied to the IU0U automatic charger:
Product series standard:
IEC 60950-1:2001 (1
st
Edition), EN 60950-1: 2001 + A11: 2004
Basic standard:
EN 55022:2006 Class B
EN 55024: 1998 + A1: 2001 + A2:2003
EN 61000-3-2: 2000 + 2005 Class A
EN 61000-3-3: 1995 + A1: 2001 + A2: 2005
Page 58

FR
PerfectCharge
58
Veuillez lire attentivement cette notice avant le montage et la mise en
service. Veuillez ensuite la conserver. En cas de passer le produit,
veuillez le transmettre au nouvel acquéreur.
Table des matières
1 Explications des symboles. . . . . . . . . . . . . . . . . . . . . . . . . . . . . . . . 59
2 Consignes de sécurité générales. . . . . . . . . . . . . . . . . . . . . . . . . . . 59
3 Contenu de la livraison . . . . . . . . . . . . . . . . . . . . . . . . . . . . . . . . . . 62
4 Accessoires . . . . . . . . . . . . . . . . . . . . . . . . . . . . . . . . . . . . . . . . . . . 62
5 Usage conforme. . . . . . . . . . . . . . . . . . . . . . . . . . . . . . . . . . . . . . . . 62
6 Description technique . . . . . . . . . . . . . . . . . . . . . . . . . . . . . . . . . . . 64
7 Fixation du chargeur automatique IU0U . . . . . . . . . . . . . . . . . . . . . 66
8 Raccordement au système d'évacuation d'air . . . . . . . . . . . . . . . . . 67
9 Raccordement du chargeur automatique IU0U . . . . . . . . . . . . . . . . 68
10 Utilisation du chargeur automatique IU0U . . . . . . . . . . . . . . . . . . . . 72
11 Entretien et nettoyage du chargeur automatique IU0U . . . . . . . . . . 78
12 Réparation des pannes . . . . . . . . . . . . . . . . . . . . . . . . . . . . . . . . . . 78
13 Garantie . . . . . . . . . . . . . . . . . . . . . . . . . . . . . . . . . . . . . . . . . . . . . . 79
14 Recyclage . . . . . . . . . . . . . . . . . . . . . . . . . . . . . . . . . . . . . . . . . . . . 80
15 Caractéristiques techniques. . . . . . . . . . . . . . . . . . . . . . . . . . . . . . . 80
Page 59

FR
PerfectCharge Explications des symboles
59
1 Explications des symboles
!
AVERTISSEMENT !
Consigne de sécurité : le non-respect de ces consignes peut
entraîner la mort ou de graves blessures.
A
AVIS !
Le non-respect de ces consignes peut entraîner des dommages
matériels et des dysfonctionnements du produit.
I
REMARQUE
Informations complémentaires sur l'utilisation du produit.
➤ Manipulation : ce symbole vous indique une action à effectuer. Les
manipulations à effectuer sont décrites étape par étape.
✓ Ce symbole décrit le résultat d’une manipulation.
fig. 1 5, page 3 : cette information renvoie à un élément figurant sur une
illustration, dans cet exemple à la « position 5 de l'illustration 1 à la page 3 ».
2 Consignes de sécurité générales
Le fabricant décline toute responsabilité pour des dommages dans les cas
suivants :
des défauts de montage ou de raccordement
des influences mécaniques et des surtensions ayant endommagé le
matériel
des modifications apportées au produit sans autorisation explicite de la
part du fabricant
une utilisation différente de celle décrite dans la notice
Lors de l'utilisation d'appareils électriques, les consignes générales de sécurité suivantes doivent être respectées afin d'éviter
une électrocution
un incendie
des blessures.
Page 60

FR
Consignes de sécurité générales PerfectCharge
60
2.1 Sécurité générale
!
AVERTISSEMENT !
Les batteries contiennent des acides dangereux.
Evitez tout contact avec le liquide contenu dans la batterie.
Si vous entrez en contact avec le liquide de la batterie, net-
toyez soigneusement à l'eau claire les parties du corps
atteintes ou bien les vêtements.
Faites impérativement examiner par un médecin toute blessure
causée par l'acide.
N'essayez jamais de charger une batterie gelée.
Elle risque d'exploser !
Stockez la batterie dans un endroit à l'abri du gel et attendez
qu'elle ait atteint la température ambiante. Le processus de
chargement peut alors commencer.
Ne laissez pas des personnes (enfants compris) incapables
d’utiliser le produit de manière sûre, en raison de déficiences
physiques, sensorielles ou mentales ou de leur manque
d’expérience ou de connaissances, utiliser ce produit sans
surveillance.
Les appareils électriques ne sont pas des jouets !
Les enfants ne sont pas en mesure d'évaluer les dangers potentiels émanant des appareils électriques. Ne laissez pas les enfants utiliser des appareils électriques sans surveillance.
A
AVIS !
Utilisez le chargeur automatique IU0U conformément à l'usage
pour lequel il a été conçu.
Chargez les batteries uniquement dans des endroits bien aérés.
Coupez l'alimentation électrique avant tous travaux sur
l'appareil.
Stockez le chargeur automatique IU0U dans un endroit frais et
sec.
Seul un personnel qualifié et parfaitement informé des dangers
et règlements spécifiques à ces manipulations est habilité à effectuer les réparations et l'entretien.
Page 61

FR
PerfectCharge Consignes de sécurité générales
61
2.2 Consignes de sécurité concernant l’utilisation de
l’appareil
A
AVIS !
Une mauvaise installation des appareils électriques sur des ba-
teaux peut entraîner des dommages dus à la corrosion au niveau du bateau. L'installation du chargeur automatique IU0U
doit être effectuée par un électricien spécialisé.
Faites fonctionner le chargeur automatique IU0U seulement si
le boîtier et les conduites électriques sont intacts.
Ne faites pas fonctionner le chargeur automatique IU0U dans
un environnement humide.
Veillez à un positionnement stable de l'appareil !
Veillez à installer le chargeur automatique IU0U et la batterie à
charger de façon qu'ils ne puissent pas se renverser ou tomber.
Installez le chargeur automatique IU0U de façon que les en-
fants ne puissent pas l'atteindre.
Ces derniers pourraient s'exposer à des dangers dont ils ne
sont pas conscients !
Utilisez l'appareil uniquement sur une prise mise à la terre et
protégée par un disjoncteur différentiel.
Page 62

FR
Contenu de la livraison PerfectCharge
62
3 Contenu de la livraison
4 Accessoires
5 Usage conforme
Le chargeur automatique IU0U PerfectCharge peut charger ou alimenter en
tension de compensation les batteries utilisées comme source de courant à
bord de véhicules ou de bateaux.
Les chargeurs automatiques IU0U servent au chargement continu de
batteries d'alimentation ou de démarrage. Les batteries peuvent ainsi être
chargées ou maintenues à un haut niveau de capacité :
Batteries 12 V : IU152A, IU252A, IU452A, IU802A
Batteries 24 V : IU154A, IU254A, IU404A
Pos. dans
fig. 1,
page 3
Désignation
1 Chargeur
2 Fixations (4 pièces)
3 Câble de raccordement
(pour alimentation 230 VCA)
4 Adaptateur d'évacuation d'air
5 Cornière de fixation
6 Clé à six pans creux
– Vis de fixation (12 pièces)
– Notice d'utilisation
Désignation N° de réf.
Télécommande 901-RC
Capteur de température TF-500
Page 63

FR
PerfectCharge Usage conforme
63
Les chargeurs automatiques IU0U permettent de charger les types de batteries suivants :
Batteries de démarrage au plomb
Batteries au gel
Batteries à recombinaison de gaz (AGM)
Batteries au plomb sans entretien
ayant les capacités et les tensions indiquées au « Caractéristiques
techniques », page 80.
Pour connaître les capacités maximales des batteries plomb-gel, consultez
votre commerçant spécialisé.
!
AVERTISSEMENT !
Les batteries dont les éléments sont fermés ne peuvent pas être
chargées, car la surchauffe de la batterie pourrait entraîner la libération de gaz explosifs.
Un chargeur automatique IU0U ne doit servir en aucun cas à
charger des batteries d'autre types (p. ex. : NiCd, NiMH, etc.) !
Page 64

FR
Description technique PerfectCharge
64
6 Description technique
6.1 Fonctionnement
Un fusible empêche que l'appareil soit endommagé en cas d'inversion de polarité. Pour connaître le type et la valeur du fusible de votre appareil, voir
« Caractéristiques techniques », page 80.
!
AVERTISSEMENT !
Seul un personnel qualifié et parfaitement informé des dangers et
règlements spécifiques à ces manipulations est habilité à effectuer
le remplacement du fusible de l'appareil.
I
REMARQUE
Une sonde de température (en accessoire) vous permet de proté-
ger la batterie des dommages causés par une température extérieure trop basse ou trop élevée. La sonde de température est fixée
sur la batterie et raccordée au chargeur automatique IU0U. Elle
protège la batterie en adaptant la tension de charge à la température de la batterie (voir « Caractéristique de charge », page 75).
Trois voyants de contrôle situés sur l'appareil permettent de surveiller en permanence le chargeur automatique IU0U (voir « Contrôle du
fonctionnement », page 77).
6.2 Spécifications des variantes de l'appareil
Les chargeurs automatiques IU0U PerfectCharge existent en différentes
variantes d'appareils.
Votre chargeur automatique IU0U peut charger des batteries jusqu'à une
capacité de batterie fixée (voir « Caractéristiques techniques », page 80) :
IU152A : permet de charger une batterie d'alimentation et une batterie de
démarrage
IU154A, IU252A : permet de charger jusqu'à deux batteries d'alimenta-
tion et une batterie de démarrage
IU254A, IU452A, IU404A, IU802A : permet de charger jusqu'à trois
batteries d'alimentation.
Pour identifier votre appareil, regardez la référence de la plaque signalétique.
Page 65

FR
PerfectCharge Description technique
65
6.3 Eléments de commande
Vue de face (fig. 2, page 3)
Vue de dos (fig. 3, page 4)
nº Description
1 Interrupteur principal
0 / Off : appareil désactivé
I / On : appareil activé
Vous pouvez mettre l'appareil en SleepMode (mode silencieux) à l'aide
d'une télécommande (Accessoires).
(mode sleep : la puissance est diminuée de moitié)
II / Sleep Mode : l'appareil est en mode silencieux
Un réglage effectué à l'aide de la télécommande (Accessoires) annulle
tout réglage contraire.
2 LED d'état : indique l'état actuel de la charge
(voir « Caractéristique de charge », page 75)
Phase U : le chargeur automatique IU0U se trouve en phase U
Phase IU : le chargeur automatique IU0U se trouve en phase U0
Phase I : le chargeur automatique IU0U se trouve en phase I
3 Ventilateur
nº
Description
1 Branchement de l'alimentation 230 V
2 RC : raccordement pour la télécommande (en accessoire)
3 TS : raccordement pour la sonde de température (en accessoire)
4 Bornes de branchement de la batterie
BATT 1+, BATT 2+, BATT 3+ : pôle positif pour batteries d'alimentation
BATT – : pôle négatif
START BATT + (uniquement IU152A), BATT 1+ (uniquement
IU154A, IU252A) : pôle positif de la batterie de démarrage
Page 66

FR
Fixation du chargeur automatique IU0U PerfectCharge
66
7 Fixation du chargeur automatique
IU0U
Vous pouvez fixer le chargeur automatique IU0U à l'aide des quatre supports
fournis dans la livraison.
Lisez attentivement les remarques suivantes lors du choix du lieu d'installation :
Vous pouvez monter le chargeur automatique IU0U horizontalement ou
verticalement.
N'utilisez pas l'appareil
– en milieu humide,
– dans un environnement poussiéreux
– à proximité de matériaux inflammables
– dans des espaces où risquent de se produire des explosions
Choisissez un lieu de montage bien aéré.
En cas d'installations dans de petits locaux fermés, ceux-ci doivent disposer d'un système d'aération et de ventilation. L'espace vide autour du
chargeur automatique IU0U doit être d'au moins 5 cm.
Veillez à ce que les ouvertures d'aération à l'avant, à l'arrière et en des-
sous du chargeur automatique IU0U soient dégagées.
Veillez à ce que la surface de montage soit plane et suffisamment stable.
Lors du choix du lieu d'installation, tenez compte de la distance néces-
saire derrière l'appareil pour l'équerre de fixation.
A
AVIS !
Avant de commencer à percer, assurez-vous qu’aucun câble électrique ou autre élément du véhicule ne risque d’être endommagé
par le perçage, le sciage ou le limage.
Fixation du chargeur automatique IU0U au sol
➤ Enclenchez deux supports sur les barres inférieures de gauche et de
droite (fig. 4, page 5).
Vous pouvez ensuite décaler les supports comme vous le souhaitez.
➤ Fixez le chargeur automatique IU0U en vissant une vis dans chacun des
trous des supports.
➤ Placez l'équerre de fixation (fig. 5 1, page 5) avec le tenon sur le bord à
l'arrière du chargeur automatique IU0U (fig. 5 2, page 5).
Page 67

FR
PerfectCharge Raccordement au système d'évacuation d'air
67
➤ Fixez l'équerre de fixation en vissant chacune des vis dans les quatre
trous.
Fixation du chargeur automatique IU0U au mur
➤ Enclenchez deux supports sur les barres inférieures de gauche et de
droite (fig. 4, page 5).
Vous pouvez ensuite décaler les supports comme vous le souhaitez.
➤ Fixez l'équerre de fixation (fig. 6 1, page 6) en vissant chacune des vis
dans les quatre trous du mur.
➤ Faites glisser le chargeur automatique IU0U (fig. 6 2, page 6) sur
l'équerre de fixation de telle sorte que le bord au dos du chargeur automatique IU0U soit coincé entre le mur et le tenon de l'équerre de fixation.
➤ Fixez le chargeur automatique IU0U en vissant une vis dans chacun des
trous des supports.
8 Raccordement au système
d'évacuation d'air
Vous pouvez raccorder le chargeur automatique IU0U à un système d'évacuation d'air. L'air chaud est ainsi évacué de l'habitacle et acheminé vers l'extérieur.
Procédez comme suit (fig. 7, page 6) :
➤ Placez l'adaptateur d'évacuation d'air (2) sur la face avant du chargeur (1)
au-dessus du ventilateur, de telle sorte que les vis rentrent dans les trous.
➤ Fixez l'adaptateur d'évacuation d'air à l'aide des quatre vis fournies.
➤ Enfichez l'embout du flexible (3, non compris dans la livraison, ) sur
l'adaptateur d'évacuation d'air.
➤ Enfichez le flexible (4) du système d'évacuation d'air sur l'embout du
flexible.
Page 68

FR
Raccordement du chargeur automatique IU0U PerfectCharge
68
9 Raccordement du chargeur
automatique IU0U
!
AVERTISSEMENT !
Seule une entreprise spécialisée possédant le savoir-faire nécessaire est habilitée à effectuer le raccordement du chargeur automatique IU0U.
Les informations suivantes sont destinées à un personnel qualifié,
informé des directives et des consignes de sécurité à appliquer.
Veuillez respecter les consignes de sécurité suivantes pour le raccordement
électrique :
A
AVIS ! Risque de court-circuit !
Utilisez uniquement des prises de courant mises à la terre pro-
tégées par un disjoncteur différentiel.
Si des lignes électriques doivent traverser des cloisons en tôle
ou autres murs à arêtes vives, utilisez des tubes vides ou des
conduits pour câbles.
Ne posez pas de lignes électriques sans fixation ou en les pliant
sur des matériaux conducteurs (métal).
Fixez bien les lignes.
Ne tirez pas sur les lignes électriques.
Ne placez pas les câbles 230 V et la ligne de courant continu
12/24 V dans le même conduit (tube vide).
Posez les lignes de manière à exclure tout risque de trébuche-
ment ou d'endommagement du câble.
9.1 Raccordement du chargeur automatique IU0U à la
batterie (fig. 8, page 7)
!
AVERTISSEMENT !
Evitez absolument tout contact avec le liquide de batterie !
Les batteries dont les éléments sont fermés ne peuvent pas être
chargées, car la surchauffe de la batterie pourrait entraîner la libération de gaz explosifs.
Page 69

FR
PerfectCharge Raccordement du chargeur automatique IU0U
69
A
AVIS !
Si les vis sont mal serrées, cela peut provoquer des surchauffes.
Vissez les vis sur les bornes de raccordement avec un couple de
serrage de 12 – 13 Nm.
I
REMARQUE
IU152A : pour raccorder les batteries de démarrage, utilisez la
borne de raccordement « START BATT + » spécialement
conçue à cet effet.
IU154A, IU252A : pour raccorder les batteries de démarrage,
utilisez la borne de raccordement « BATT 1+ » spécialement
conçue à cet effet.
Vous trouverez les schémas électriques comportant le câblage maximal pour
les différents chargeurs automatiques IU0U aux fig. 9, page 7 à fig. c,
page 9.
Pose des câbles de batterie
➤ Raccordez le câble positif des batteries au chargeur automatique IU0U.
I
REMARQUE
Si vous raccordez plus d'une batterie, raccordez le pôle négatif des
batteries à un câble de masse et raccordez le câble de masse au
chargeur automatique IU0U.
➤ Raccordez le câble négatif de la batterie ou le câble de masse au char-
geur automatique IU0U.
Préparation du chargeur automatique IU0U
➤ Placez le commutateur principal sur « 0 ».
➤ Dévissez les quatre vis de fixation (2) de la paroi arrière avec la clé à six
pans creux fournie à la livraison.
➤ Retirez la paroi arrière (1).
Page 70

FR
Raccordement du chargeur automatique IU0U PerfectCharge
70
Raccordement des câbles de la batterie au chargeur automatique IU0U
I
REMARQUE
Les raccordements du chargeur automatique IU0U conviennent
pour des câbles d'une section de 10 mm² à 25 mm².
➤ Mettez des embouts sur les extrémités de câbles, afin qu'un contact du-
rable soit assuré.
➤ Insérez les câbles positifs des batteries dans l'ouverture prévue à cet
effet :
– Batterie d'alimentation : « BATT 1+ », « BATT 2+ », « BATT 3+ »
– Batterie de démarrage : « START BATT + » (IU152A), « BATT 1+ »
(IU154A, IU252A)
➤ Insérez les câbles négatifs de la batterie ou le câble de masse dans
l'ouverture prévue à cet effet :
– Batterie d'alimentation : « BATT – »
Les instructions suivantes sont valables pour tous les câbles :
➤ Mettez des embouts sur les extrémités (4) de câbles.
➤ Desserrez un peu la vis de sécurité (3).
➤ Insérez les embouts (4) du câble dans les ouvertures prévues à cet effet.
➤ Reserrez la vis de sécurité (3).
Raccordement des batteries
➤ Raccordez les batteries conformément au schéma électrique de votre
chargeurautomatique IU0U.
Fermeture du chargeur automatique IU0U
➤ Replacez la paroi arrière (1) et fixez-la à l'aide des vis (2).
9.2 Raccordement d'une ligne d'alimentation 230 V
➤ Enfichez le câble de raccordement 230 V (fig. 1 3, page 3) dans le rac-
cordement 230 V (fig. 3 1, page 4) du chargeur automatique IU0U.
➤ Enfichez la prise du câble de raccordement 230 V (fig. 1 3, page 3) dans
une prise mise à la terre et protégée par disjoncteur.
Page 71

FR
PerfectCharge Raccordement du chargeur automatique IU0U
71
9.3 Raccordement de la sonde de température
(accessoire)
La sonde de température mesure la température au niveau de la batterie ou
aux alentours de la batterie et la transmet au chargeur automatique IU0U.
Les tensions de charge indiquées au « Caractéristiques techniques »,
page 80 se rapportent à une température ambiante de 15 °C à 25 °C. Si les
températures ne correspondent pas à cette plage, la tension de charge est
augmentée ou réduite suivant le diagramme de la page 77.
➤ Placez le commutateur principal sur « 0 ».
➤ Raccordez le câble de la batterie au chargeur automatique IU0U.
➤ Raccordez la sonde de température au dos du chargeur automatique
IU0U via la douille TS (fig. d 1, page 10).
➤ Fixez la tête de la sonde directement au niveau de la batterie (fig. d 2,
page 10), p. ex. avec du ruban adhésif double face.
9.4 Raccordement de la télécommande (accessoire)
La télécommande permet d'activer et de désactiver le mode Sleep et de
contrôler le fonctionnement du chargeur automatique IU0U (voir « Contrôle
du fonctionnement », page 77).
➤ Raccordez le câble de la télécommande au chargeur automatique IU0U.
➤ Enfichez le connecteur de la télécommande dans la douille « RC »
(fig. d 3, page 10) du chargeur automatique IU0U.
Page 72

FR
Utilisation du chargeur automatique IU0U PerfectCharge
72
10 Utilisation du chargeur automatique
IU0U
Le chargeur automatique IU0U vous permet de charger des batteries vides
ou des batteries avec une charge de compensation.
I
REMARQUE
Les chargeurs IU152A, IU252A et IU154A possèdent une sortie de
charge pour la batterie de démarrage avec une tension de sortie
entre 13,2 V (26,4 V) et 13,8 V (27,6 V). La sortie de charge pour
la batterie de démarrage recharge cette dernière avec un courant
allant jusqu'à 1 A ou la maintient à un haut niveau de capacité.
➤ Allumez l'appareil à l'aide du commutateur principal (fig. 2 1, page 3).
10.1 Réglage du chargeur automatique IU0U (fig. 8,
page 7)
Tension de charge et limite de temps
I
REMARQUE
Consultez votre revendeur spécialisé pour connaître la tension de
charge et la limite de temps nécessaire pour vos batteries.
A
AVIS !
Veillez à ce que l'appareil ne soit jamais utilisé lorsque les commutateurs DIP 1 et 2 ou 3 et 4 se trouvent simultanément en position
« ON ». Seules les positions décrites dans les tableaux suivants
garantissent un fonctionnement correct du chargeur automatique
IU0U.
➤ Placez le commutateur principal sur « 0 ».
➤ Dévissez les quatre vis de fixation (2) de la paroi arrière avec la clé à six
pans creux fournie à la livraison.
➤ Retirez la paroi arrière (1).
➤ A l'aide des commutateurs DIP (5), réglez la tension de charge et la durée
nécessaire pour la phase principale de chargement (phase U0, voir également « Caractéristique de charge », page 75) :
Page 73

FR
PerfectCharge Utilisation du chargeur automatique IU0U
73
Réglage de la tension de charge pour IU152A, IU252A, IU452A et
IU802A :
Réglage de la tension de charge pour IU154A, IU254A et IU404A :
Réglage de la durée de la phase principale de chargement :
Réglages du comportement de charge :
Tension de charge Commutateur 1 Commutateur 2 Domaine d'application
13,8 V OFF OFF Anciennes batteries de
démarrage,
fonctionnement sur bloc
d'alimentation
14,4 V ON OFF Batteries au gel et à
électrolyte liquide
14,8 V OFF ON Batteries à recombinaison
de gaz
Tension de charge Commutateur 1 Commutateur 2 Domaine d'application
27,6 V OFF OFF Anciennes batteries de
démarrage,
fonctionnement sur bloc
d'alimentation
28,8 V ON OFF Batteries au gel et à élec-
trolyte liquide
29,6 V OFF ON Batteries à recombinaison
de gaz
Durée de la phase principale de char-
gement
Commuta-
teur 3
Domaine d'application
8 h ON Batteries à électrolyte liquide
16 h OFF Batteries au gel ou à
recombinaison de gaz
Comportement de charge Commutateur 4
La charge de compensation est activée en fonction du courant de
charge.
OFF
La tension de charge est maintenue pour la durée réglée de la phase
principale de chargement indépendamment du courant de charge.
Une fois ce temps expiré, l'appareil commute sur la charge de compensation.
ON
Page 74

FR
Utilisation du chargeur automatique IU0U PerfectCharge
74
10.2 Allumer et éteindre le SleepMode à l'aide de la télécommande (Accesoires)
I
REMARQUE
Lorsque l'interrupteur principal (fig. 2 1, page 3) est sur « II », la
télécommande est sans fonction.
➤ Placez le commutateur principal du chargeur automatique-IU0U
(fig. 2 1, page 3) sur « I » afin que le SleepMode puisse être allumé et
éteint par télécommande.
➤ Appuyez sur la touche « ON/OFF » de la télécommande pour allumer ou
éteindre le Sleepmode.
10.3 Conditionnement de la batterie
Lorsque la batterie n’est pas utilisée pendant une longue période (hivernation), elle doit être chargée auparavant pour éviter un sulfatage.
➤ Si nécessaire, débranchez la batterie de démarrage du chargeur.
➤ Raccordez la batterie à charger.
➤ Réglez le commutateur DIP (fig. 8 5, page 7) :
– Commutateur 4 : ON
– Batteries à électrolyte liquide : Commutateur 3 : ON
Batteries au gel ou à recombinaison de gaz : Commutateur 3 : OFF
➤ Placez le commutateur principal du chargeur automatique IU0U
(fig. 2 1, page 3) sur la position « I ».
✓ La batterie se charge pendant 8 heures (commutateur 3 : ON) ou
16 heures (commutateur 3 : OFF) avec la tension de charge reglée.
Ensuite, le chargeur automatique IU0U commute automatiquement en
phase de compensation.
I
REMARQUE
Il se peut que les batteries soient légèrement surchargées, repérable par un échappement de gaz des batteries à électrolyte liquide
et un échauffement des batteries au gel ou à recombinaison de
gaz.
➤ Après le conditionnement, placez le commutateur 4 du commutateur DIP
(fig. 8 5, page 7) sur « OFF ».
Page 75

FR
PerfectCharge Utilisation du chargeur automatique IU0U
75
Ainsi, vous évitez une répétition du conditionnement lorsque vous éteignez et rallumez le chargeur, qui peut endommager la batterie.
10.4 Caractéristique de charge
La caractéristique de charge est désignée comme courbe IU0U modifiée.
Phase I
Au début du processus de charge, la batterie vide est chargée avec un courant constant, jusqu'à ce que la tension de la batterie atteigne 13,8 V ou
27,6 V. Lorsque la batterie atteint ce niveau de tension, le courant de charge
se réduit lentement. Lorsque le courant atteint la barre des 80 %, le chargeur
commute sur la tension de charge plus élevée 14,4 V/14,8 V ou
28,8 V/29,6 V.
I
REMARQUE
Un champ de commutation permet de sélectionner la tension de
charge et la durée de la phase principale de chargement (phase
U0) (voir « Réglage du chargeur automatique IU0U (fig. 8,
page 7) », page 72).
U/V
I/A
I
I 80%
I 10%
t
IU0U
U
8/16 h
Page 76

FR
Utilisation du chargeur automatique IU0U PerfectCharge
76
Phase U0
Commence alors le décompte temporel qui limite la phase principale de
chargement (phase U0) à 8/16 heures maximum. Avec la commutation de la
tension de charge, le courant remonte à sa valeur maximale. Il reste alors
constant tant que la tension de la batterie se trouve en dessous de
14,4 V/14,8 V ou 28,8 V ou 29,6 V.
Une fois que la tension maximale est atteinte, le courant est de nouveau réduit. La tension reste quant à elle constante (U0). Lors de cette phase principale de chargement, limitée à 8/16 heures, la batterie est entièrement
chargée.
Phase U
Si le courant baisse à 10 % du courant nominal ou si la limite temporelle de
8/16 heures est dépassée, le chargeur commute en charge de compensation
(13,8 V ou 27,6 V) (phase U).
I
REMARQUE
Pour les chargeurs disposant d'un raccord de charge double ou
triple, il est possible de charger les batteries séparément les unes
des autres. Les sorties sont séparées en interne par des diodes.
Dans un premier temps, c'est toujours la batterie la plus faible qui
est portée au niveau de charge de la plus forte. La caractéristique
de charge est la même que celle décrite ci-dessus.
A
AVIS !
La capacité maximale de la batterie (voir « Caractéristiques
techniques », page 80) ne doit pas être dépassée, afin de ne pas
influencer le fonctionnement des différentes phases de charge.
Page 77

FR
PerfectCharge Utilisation du chargeur automatique IU0U
77
Appareils équipés d'une sonde de température (en accessoire)
La tension de charge est adaptée à la température de la batterie. Pour un
fonctionnement optimal du chargement, il est possible de raccorder une
sonde de température. En fonction de la température de la batterie, les tensions de charge sont augmentées ou abaissées (voir le diagramme suivant) :
10.5 Contrôle du fonctionnement
Il est possible de contrôler la procédure de charge des batteries via une LED
située à l'avant de l'appareil :
LED Etat de charge de la batterie
Phase I entre 10 % et 50 %
Phase U0 entre 50 % et 90 %
Phase U plus de 90 %
16/32 V
-10 0 +10 +20 +30 +40
°C
U1
U2
15/30 V
14/28 V
13/26 V
12/24 V
Page 78

FR
Entretien et nettoyage du chargeur automatique IU0U PerfectCharge
78
11 Entretien et nettoyage du chargeur
automatique IU0U
A
AVIS !
N’utilisez aucun objet coupant ou dur pour le nettoyage de l'appareil. Cela risquerait de l'endommager.
➤ Nettoyez de temps à autre le chargeur automatique IU0U avec un tissu
humide.
12 Réparation des pannes
!
AVERTISSEMENT !
Ce chapitre s'adresse à un personnel qualifié, informé des directives et des consignes de sécurité à appliquer.
I
REMARQUE
Concernant les questions de détail sur les données de la batterie,
veuillez vous adresser au fabricant.
La tension dans la batterie n'augmente pas après branchement et mise
en service du chargeur automatique IU0U.
➤ Mesurez éventuellement pendant le chargement avec un multimètre adé-
quat pour vérifier que la tension au niveau des bornes n'augmente pas.
➤ Vérifiez que les bornes de raccordement sont correctement reliées aux
pôles de la batterie.
➤ Nettoyez les cosses, le cas échéant.
La batterie n'est toujours pas complètement chargée au bout de 20
heures de charge environ.
➤ Débranchez le chargeur automatique IU0U du secteur.
➤ Débranchez les pinces de chargement de la batterie puis attendez
quelques minutes.
Page 79

FR
PerfectCharge Garantie
79
➤ Mesurez la tension au niveau des bornes de la batterie à l'aide d'un mul-
timètre adéquat.
Batterie 12 V : la batterie est défectueuse et ne peut plus être rechargée
si le multimètre affiche une tension égale ou inférieure à 10 V.
Batterie 24 V : la batterie est défectueuse et ne peut plus être rechargée
si le multimètre affiche une tension égale ou inférieure à 20 V.
➤ Envoyez éventuellement la batterie à un organisme de contrôle ou de re-
traitement.
La batterie se décharge très rapidement, bien que n'étant pas sollicitée.
➤ Mesurez la tension au niveau des bornes de la batterie à l'aide d'un mul-
timètre adéquat.
La batterie est trop faible pour supporter un chargement si le multimètre affiche une tension inférieure à 12 V pour batterie 12 V ou bien une tension inférieure à 24 V pour batterie 24 V.
➤ Envoyez éventuellement la batterie à un organisme de contrôle ou de re-
traitement.
13 Garantie
Le délai légal de garantie s'applique. Si le produit s'avérait défectueux, veuillez vous adresser à la filiale du fabricant située dans votre pays (voir
adresses au verso du présent manuel) ou à votre revendeur spécialisé.
Veuillez y joindre les documents suivants pour la gestion des réparations et
de la garantie :
une copie de la facture avec la date d'achat,
le motif de la réclamation ou une description du dysfonctionnement.
Page 80

FR
Recyclage PerfectCharge
80
14 Recyclage
➤ Jetez les emballages dans les conteneurs de déchets recyclables prévus
à cet effet.
M
Lorsque vous mettrez votre produit définitivement hors service,
informez-vous auprès du centre de recyclage le plus proche ou
auprès de votre revendeur spécialisé sur les prescriptions relatives
au retraitement des déchets.
B
Protégez l'environnement !
Les piles et les batteries usagées ne sont pas des déchets ménagers.
Rapportez les piles défectueuses ou les batteries usagées à votre
revendeur ou à un centre de collecte.
15 Caractéristiques techniques
WAECO PerfectCharge
IU152A IU252A IU154A
Nº de réf. : 2222500001 2222500002 2222500003
Raccord de la batterie 1: batterie de
démarrage
13,8 V/1 A
batterie de
démarrage
13,8 V/1 A
batterie de
démarrage
27,6 V/1 A
Raccord de la batterie 2: 13,8 – 14,8 V/15 A 13,8 – 14,8 V
25 A max. sur deux
raccords
27,6 – 29,6 V
15 A max. sur deux
raccords
Raccord de la batterie 3: –
Plage de tension d'entrée : 207 – 253 V~ / 50 – 60 Hz
Tension finale de charge : 14,4 V/14,8 V 28,8 V/29,6 V
Tension de charge de com-
pensation :
13,8 V 27,6 V
Capacité max. de batterie : 150 Ah 300 Ah 200 Ah
Limite phase U0 : 8 h ou 16 h
Courant de charge max. : 15 A 25 A 15 A
Plage de température de
service : 0 °C – 50 C°
Fusible : T2 A / 250 V T4 A / 250 V
Dimensions : 175 x 91 x 310 mm 208 x 96 x 332 mm
Poids : 3,1 kg 3,8 kg
Page 81

FR
PerfectCharge Caractéristiques techniques
81
WAECO PerfectCharge
IU452A IU254A
Nº de réf. : 2222500004 2222500005
Raccord de la batterie 1: 13,8 – 14,8 V
45 A max. sur tous
les trois
27,6 – 29,6 V
25 A max. sur tous
les trois
Raccord de la batterie 2:
Raccord de la batterie 3:
Plage de tension d'entrée : 207 – 253 V~ / 50 – 60 Hz
Tension finale de charge : 14,4 V/14,8 V 28,8 V/29,6 V
Tension de charge de
compensation : 13,8 V 27,6 V
Capacité max. de batterie : 500 Ah 300 Ah
Limite phase U0 : 8 h ou 16 h
Courant de charge max. : 45 A 25 A
Plage de température de
service : 0 °C – 50 C°
Fusible : T6,3 A / 250 V T6,3 A / 250 V
Dimensions (mm) : 208 x 96 x 418 mm
Poids : 5,5 kg
WAECO PerfectCharge
IU802A IU404A
Nº de réf. : 2222500006 2222500007
Raccord de la batterie 1: 13,8 – 14,8 V
80 A max. sur tous
les trois
27,6 – 29,6 V
40 A max. sur tous
les trois
Raccord de la batterie 2:
Raccord de la batterie 3:
Plage de tension d'entrée : 207 – 253 V~ / 50 – 60 Hz
Tension finale de charge : 14,4 V/14,8 V 28,8 V/29,6 V
Tension de charge de
compensation : 13,8 V 27,6 V
Capacité max. de batterie : 800 Ah 400 Ah
Limite phase U0 : 8 h ou 16 h
Courant de charge max. : 80 A 40 A
Plage de température de
service : 0 °C – 50 C°
Fusible : T8 A / 250 V T8 A / 250 V
Dimensions (mm) : 208 x 96 x 453 mm
Poids : 6,5 kg
Page 82

FR
Caractéristiques techniques PerfectCharge
82
Contrôles/certificats appliqués au chargeur automatique IU0U :
Standard produits en série :
IEC 60950-1:2001 (1
st
Edition), EN 60950-1 : 2001 + A11: 2004
Standard de base :
EN 55022:2006 Class B
EN 55024:1998 + A1:2001 + A2:2003
EN 61000-3-2:2000 + 2005 Class A
EN 61000-3-3:1995 + A1:2001 + A2:2005
Page 83

ES
PerfectCharge
83
Lea detenidamente estas instrucciones antes de llevar a cabo la instalación y puesta en funcionamiento, y consérvelas en un lugar seguro.
En caso de vender o entregar el producto a otra persona, entregue
también estas instrucciones.
Índice
1 Aclaración de los símbolos . . . . . . . . . . . . . . . . . . . . . . . . . . . . . . . 84
2 Indicaciones generales de seguridad . . . . . . . . . . . . . . . . . . . . . . . 84
3 Volumen de entrega. . . . . . . . . . . . . . . . . . . . . . . . . . . . . . . . . . . . . 87
4 Accesorios . . . . . . . . . . . . . . . . . . . . . . . . . . . . . . . . . . . . . . . . . . . . 87
5 Uso adecuado . . . . . . . . . . . . . . . . . . . . . . . . . . . . . . . . . . . . . . . . . 87
6 Descripción técnica . . . . . . . . . . . . . . . . . . . . . . . . . . . . . . . . . . . . . 89
7 Fijar el cargador automático IU0U . . . . . . . . . . . . . . . . . . . . . . . . . . 91
8 Conectar a un sistema de aire de escape . . . . . . . . . . . . . . . . . . . . 92
9 Conectar el cargador automático IU0U . . . . . . . . . . . . . . . . . . . . . . 93
10 Utilizar el cargador automático IU0U . . . . . . . . . . . . . . . . . . . . . . . . 96
11 Mantenimiento y limpieza del cargador automático IU0U . . . . . . . 103
12 Solución de fallos. . . . . . . . . . . . . . . . . . . . . . . . . . . . . . . . . . . . . . 103
13 Garantía legal . . . . . . . . . . . . . . . . . . . . . . . . . . . . . . . . . . . . . . . . 104
14 Gestión de residuos. . . . . . . . . . . . . . . . . . . . . . . . . . . . . . . . . . . . 105
15 Datos técnicos . . . . . . . . . . . . . . . . . . . . . . . . . . . . . . . . . . . . . . . . 105
Page 84

ES
Aclaración de los símbolos PerfectCharge
84
1 Aclaración de los símbolos
!
¡ADVERTENCIA!
Indicación de seguridad: su incumplimiento puede acarrear la
muerte o graves lesiones.
A
¡AVISO!
Su incumplimiento puede acarrear daños materiales y perjudicar el
correcto funcionamiento del producto.
I
NOTA
Información adicional para el manejo del producto.
➤ Paso a seguir: este símbolo le indica que debe realizar un paso. Todos
los procedimientos necesarios se describen paso a paso.
✓ Este símbolo describe el resultado de un paso realizado.
fig. 1 5, página 3: esta indicación hace referencia a un elemento de una
figura, en este ejemplo a la “Posición 5 en la figura 1 de la página 3”.
2 Indicaciones generales de seguridad
El fabricante declina toda responsabilidad ante daños ocurridos en los
siguientes casos:
errores de montaje o de conexión,
daños en el producto debido a influencias mecánicas y sobretensiones
modificaciones realizadas en el producto sin el expreso consentimiento
del fabricante
utilización del aparato para fines distintos a los descritos en las instruc-
ciones.
Tenga en cuenta las siguientes medidas básicas de seguridad en el manejo
de aparatos eléctricos para la protección ante:
descargas eléctricas
peligro de incendio
lesiones
Page 85

ES
PerfectCharge Indicaciones generales de seguridad
85
2.1 Seguridad general
!
¡ADVERTENCIA!
Las baterías contienen ácidos agresivos.
Evite el contacto con el líquido de la batería.
En caso de contacto con el líquido de la batería, enjuague las
zonas afectadas o la ropa con abundante agua.
Si se han producido lesiones debidas a ácidos, acuda al
médico.
Nunca intente cargar una batería congelada.
Existe peligro de eplosión.
Coloque la batería en un lugar protegido contra las heladas y
espere a que ésta se encuentre a temperatura ambiente.
Empiece entonces a cargarla.
Las personas (incluidos los niños) que, debido a sus capacida-
des físicas, sensoriales o mentales, a su falta de experiencia o
a desconocimiento, no pueden utilizar el producto de forma
segura, no tienen permitido utilizar este producto sin la vigilancia y las instrucciones de una persona sobre la que recae tal
responsabilidad.
Los aparatos eléctricos no son juguetes.
Los niños no son conscientes de los peligros que conllevan los
aparatos eléctricos. No deje que los niños usen aparatos eléctricos sin estar bajo su vigilancia.
A
¡AVISO!
Realice únicamente un uso adecuado del cargador automático
IU0U.
Cargue las baterías sólo en espacios bien ventilados.
Siempre que realice trabajos en el aparato, desconecte la ali-
mentación de corriente.
Almacene el cargador automático IU0U en un lugar fresco y se-
co.
Sólo personal técnico especializado que conozca los posibles
peligros y las normativas pertinentes puede realizar trabajos de
mantenimiento y reparación.
Page 86

ES
Indicaciones generales de seguridad PerfectCharge
86
2.2 Seguridad durante el funcionamiento del aparato
A
¡AVISO!
Una instalación incorrecta de aparatos eléctricos en embarca-
ciones puede producir daños de corrosión en la embarcación.
La instalación del cargador automático IU0U debe ser realizada
por un electricista especializado (en embarcaciones).
Use el cargador automático IU0U sólo cuando la carcasa y los
cables no presenten daños.
No ponga en funcionamiento el cargador automático IU0U en
ambientes húmedos o en contacto con líquidos.
¡Procure mantenerlo en una posición segura!
El cargador automático IU0U así como la batería que vaya a
cargar, deberán colocarse de un modo seguro para evitar que
se caigan.
Asegure el cargador automático IU0U de modo que los niños no
puedan acceder a él.
De no hacerlo, los niños podrían estar expuestos a peligros de
los que no son conscientes.
Ponga en funcionamiento el aparato sólo con una caja de en-
chufe con puesta a tierra y protegida mediante un interruptor de
protección (interruptor FI).
Page 87

ES
PerfectCharge Volumen de entrega
87
3 Volumen de entrega
4 Accesorios
5 Uso adecuado
Los cargadores automáticos IU0U PerfectCharge pueden cargar o suministrar tensión de compensación a baterías que se utilizan a bordo de vehículos
o embarcaciones para producir corriente.
Los cargadores automáticos IU0U sirven para cargar de forma continua
baterías de abastecimiento o baterías de arranque. Así podrán cargarse o
mantenerse a un alto nivel de capacidad las siguientes baterías:
Baterías de 12 V: IU152A, IU252A, IU452A, IU802A
Baterías de 24 V: IU154A, IU254A, IU404A
Pos. en
fig. 1,
página 3
Denominación
1 Cargador
2 Soportes (4 unidades)
3 Cable de conexión
(para alimentación de 230 VCA)
4 Adaptador de aire de escape
5 Escuadra de sujeción
6 Llave Allen
– Tornillos de fijación (12 unidades)
– Instrucciones de uso
Denominación N.° de art.
Control remoto 901-RC
Sensor de temperatura TF-500
Page 88

ES
Uso adecuado PerfectCharge
88
Los cargadores automáticos IU0U sirven para cargar los siguientes tipos de
baterías:
Baterías de arranque de plomo
Baterías de gel
Baterías AGM
Baterías de plomo sin mantenimiento
con las capacidades y tensiones, que se indican en el “Datos técnicos” en la
página 105.
Para baterías de gel de plomo, consulte las capacidades máximas a su
distribuidor de baterías.
!
¡ADVERTENCIA!
No se puede cargar baterías con cortocircuito interno ya que
debido al recalentamiento de la batería se podrían desprender
gases explosivos.
¡Los cargadores automáticos IU0U no pueden utilizarse bajo
ningún concepto para cargar otros tipos de baterías (p. ej.
NiCd, NiMH, etc.)!
Page 89

ES
PerfectCharge Descripción técnica
89
6 Descripción técnica
6.1 Funcionamiento
Un fusible protege de daños en aparato debido a la polaridad invertida. Para
más información sobre la clase y la valencia del fusible de su aparato, véase
el “Datos técnicos” en la página 105.
!
¡ADVERTENCIA!
Sólo personal técnico especializado que conozca los posibles
peligros y las normativas pertinentes puede realizar el cambio del
fusible del aparato.
I
NOTA
Podrá proteger la batería de daños causados por una temnperatura exterior demasiado alta o demasiado baja con un sensor de temperatura (accesorio). El sensor de temperatura está sujeto a la
batería y conectado al cargador automático IU0U. Protege la batería adecuando la tensión de carga de la temperatura a la batería
(véase el “Característica de carga” en la página 100).
Tres luces de aviso en el aparato permiten controlar constantemente el cargador automático IU0U (véase el “Control del funcionamiento” en la
página 102).
6.2 Especificaciones de las variantes del aparato
Los cargadores automáticos IU0U PerfectCharge se suministran en distintas
variantes.
Su cargador automático IU0U puede cargar baterías que tengan una capacidad máxima fijada (véase el “Datos técnicos” en la página 105):
IU152A: adecuado para cargar una batería de abastecimiento y una ba-
tería de arranque
IU154A, IU252A: adecuado para cargar hasta dos baterías de abasteci-
miento y una batería de arranque
IU254A, IU452A, IU404A, IU802A: adecuado para cargar hasta tres
baterías de abastecimiento.
Para identificar su aparato, compruebe el número de artículo en la placa de
características.
Page 90

ES
Descripción técnica PerfectCharge
90
6.3 Elementos de mando
Vista delantera (fig. 2, página 3)
Vista trasera (fig. 3, página 4)
N.º Descripción
1 Interruptor principal
0 / Off: aparato apagado
I/On: aparato encendido
El modo Sleep (modo silencioso) del aparato puede activarse mediante
un mando a distancia (accesorio).
(modo Sleep: potencia reducida)
II/Sleep Mode: el aparato funciona en modo silencioso
Cualquier ajuste contrario al indicado se sobrescribirá mediante el
mando a distancia (accesorio).
2 LEDs de estado: indican el estado actual de carga
(véase “Característica de carga” en la página 100)
Fase U: el cargador automático IU0U se encuentra en la fase U
Fase IU: el cargador automático IU0U se encuentra en la fase U0
Fase I: el cargador automático IU0U se encuentra en la fase I
3 Ventilador
N.º
Descripción
1 Conexión para una alimentación de tensión de 230 V
2 RC: conexión para el control remoto (accesorio)
3 TS: conexión para el sensor de temperatura (accesorio)
4 Bornes de conexión de las baterías
BATT 1+, BATT 2+, BATT 3+: polo positivo para baterías de abastecimiento
BATT –: polo negativo
START BATT + (sólo IU152A), BATT 1+ (sólo IU154A, IU252A): polo
positivo de la batería de arranque
Page 91

ES
PerfectCharge Fijar el cargador automático IU0U
91
7 Fijar el cargador automático IU0U
Puede fijar el cargador automático IU0U con los cuatro soportes adjuntos.
Al elegir el lugar de montaje, tenga en cuenta las siguientes indicaciones:
Puede montar el cargador automático IU0U en horizontal o en vertical.
No utilice este aparato en:
– entornos húmedos ni mojados
– entornos polvorientos
– entornos con materiales inflamables
– recintos con peligro de explosión
Elija un lugar de montaje bien ventilado.
En caso de instalaciones en recintos cerrados pequeños, debe haber
una ventilación suficiente. El espacio libre en torno al cargador automático IU0U debe ser como mínimo de 5 cm.
Preste atención a que las aberturas de ventilación en la parte delantera
einferior así como en la parte posterior del cargador automático IU0U no
estén obstaculizadas.
Elija una superficie de montaje llana y lo suficientemente resistente.
Al elegir el lugar de montaje, tenga en cuenta el espacio requerido detrás
del aparato para la escuadra de sujeción.
A
¡AVISO!
Antes de realizar cualquier perforación, asegúrese de que ningún
cable eléctrico ni ninguna pieza del vehículo puedan resultar dañados al taladrar, serrar o limar.
Fijar el cargador automático IU0U al suelo
➤ Enganche dos soportes en la trabilla inferior izquierda y dos en la derecha
(fig. 4, página 5).
A continuación puede desplazar los soportes a voluntad.
➤ Fije el cargador automático IU0U apretando un tornillo en los orificios de
cada soporte.
➤ Coloque la escuadra de sujeción (fig. 5 1, página 5) con la pestaña so-
bre el lado de la parte trasera del cargador automático IU0U (fig. 5 2,
página 5).
➤ Fije la escuadra de sujeción apretando un tornillo en cada uno de los cua-
tro orificios.
Page 92

ES
Conectar a un sistema de aire de escape PerfectCharge
92
Fijar el cargador automático IU0U a la pared
➤ Enganche dos soportes en la trabilla inferior izquierda y dos en la derecha
(fig. 4, página 5).
A continuación puede desplazar los soportes a voluntad.
➤ Fije la escuadra de sujeción a la pared (fig. 6 1, página 6) apretando un
tornillo en cada uno de los cuatro orificios.
➤ Deslice el cargador automático IU0U (fig. 6 ) en la escuadra de sujeción
de modo que el lado de la parte trasera del cargador automático IU0U
quede enclavado entre la pared y la pestaña de -la escuadra de sujeción.
➤ Fije el cargador automático IU0U apretando un tornillo en los orificios de
cada soporte.
8 Conectar a un sistema de aire de
escape
Puede conectar el cargador automático IU0U a un sistema de aire de escape. De esta forma se conducirá el aire de escape caliente desde el interior
hacia el exterior.
Proceda de la siguiente manera (fig. 7, página 6):
➤ Coloque el adaptador de aire de escape (2) sobre el ventilador situado en
la parte delantera del cargador (1), de modo que los tornillos puedan entrar en los orificios correspondientes.
➤ Fije el adaptador de aire de escape con los cuatro tornillos adjuntos.
➤ Conecte el empalme de la manguera (3, no se incluye en el volumen de
entrega) al adaptador de aire de escape.
➤ Conecte la manguera (4) del sistema de aire de escape al empalme de la
manguera.
Page 93

ES
PerfectCharge Conectar el cargador automático IU0U
93
9 Conectar el cargador automático IU0U
!
¡ADVERTENCIA!
La conexión del cargador automático IU0U sólo la puede llevar a
cabo personal técnico debidamente cualificado.
La siguiente información va dirigida a personal técnico familiarizado con las directivas y normativas de seguridad que se han de aplicar (p. ej. en Alemania VDE 0100, parte 721).
Tenga en cuenta las siguientes indicaciones de seguridad durante la conexión eléctrica:
A
¡AVISO! ¡Peligro de cortocircuito!
Utilice siempre cajas de enchufe con puesta a tierra y protegi-
das mediante interruptor de protección FI.
Si los cables deben pasar a través de paredes de chapa o de
otro tipo de paredes con aristas afiladas, utilice tubos corrugados o guías de cable.
Los cables no deben quedar sueltos ni muy doblados al colo-
carlos en materiales conductores de electricidad (metales).
Fije bien los cables.
No tire de los cables.
No tienda el cable de red de 230 V y el cable de corriente con-
tinua de 12/24 V en el mismo canal de cableado (tubo corrugado).
Tienda los cables de forma que no generen ningún peligro de
tropiezo y que se excluyan daños en el cable.
9.1 Conectar el cargador automático IU0U a una
batería (fig. 8, página 7)
!
¡ADVERTENCIA!
¡Evite totalmente el contacto con el líquido de la batería!
No se puede cargar baterías con cortocircuito interno ya que
debido al recalentamiento de la batería se podrían desprender
gases explosivos.
Page 94

ES
Conectar el cargador automático IU0U PerfectCharge
94
A
¡AVISO!
Las conexiones sueltas pueden producir sobrecalentamientos.
Apriete los tornillos en los bornes de conexión con un par de
apriete de 12 – 13 Nm.
I
NOTA
IU152A: para conectar baterías de arranque, utilice el borne de
conexión especial “START BATT +” previsto para ello.
IU154A, IU252A: para conectar baterías de arranque, utilice el
borne de conexión especial “BATT 1+” previsto para ello.
Encontrará los esquemas de conexiones con las máximas conexiones posibles para los diferentes cargadores automáticos IU0U en las figuras fig. 9,
página 7 a fig. c, página 9.
Tender el cable de la batería
➤ Tienda el cable positivo desde la batería al cargador automático IU0U.
I
NOTA
Cuando conecte más de una batería, una los polos negativos de
las baterías con un cable de masa y conecte éste al cargador automático IU0U.
➤ Tienda el cable negativo de la batería o del cable de masa hacia el car-
gador automático IU0U.
Preparar el cargador automático IU0U
➤ Coloque el interruptor principal en “0”.
➤ Desatornille los cuatro tornillos de fijación (2) de la pared posterior con la
llave Allen suministrada.
➤ Extraiga la pared posterior (1).
Page 95

ES
PerfectCharge Conectar el cargador automático IU0U
95
Conectar el cable de la batería al cargador automático IU0U
I
NOTA
Las conexiones del cargador automático IU0U son apropiadas
para cables con una sección de 10 mm² a 25 mm².
➤ Ponga casquillos para los extremos de los hilos en los extremos de los
cables para que quede asegurado un contacto duradero.
➤ Desplace el cable positivo de la batería por la abertura prevista para ello:
– Batería de alimentación: “BATT 1+”, “BATT 2+”, “BATT 3+”
– Batería de arranque: “START BATT +” (IU152A), “BATT 1+” (IU154A,
IU252A)
➤ Desplace el cable negativo de la batería o el cable de masa por la
abertura prevista para ello:
– Batería de alimentación: “BATT –”
Las siguientes instrucciones rigen para todos los cables:
➤ Ponga casquillos para los extremos de los hilos (4) en los estremos de
los cables.
➤ Desatornille ligeramente el tornillo del fusible (3).
➤ Desplace los casquillos para los extremos de los hilos (4) del cable por
las aberturas previstas para ello.
➤ Vuelva a apretar el tornillo del fusible (3).
Conectar las baterías
➤ Conecte las baterías según el esquema de conexiones de su cargador
automático IU0U.
Conectar el cargador automático IU0U
➤ Vuelva a colocar la pared posterior (1) y fíjela con los tornillos (2).
9.2 Conectar un cable de alimentación de 230 V
➤ Inserte el cable de conexión de 230 V (fig. 1 3, página 3) en la conexión
de 230 V (fig. 3 1, página 4) del cargador automático IU0U.
➤ Inserte la clavija del cable de conexión de 230 V (fig. 1 3, página 3) en
una caja de enchufe con puesta a tierra y protegidas mediante un interruptor de protección FI.
Page 96

ES
Utilizar el cargador automático IU0U PerfectCharge
96
9.3 Conectar el sensor de temperatura (accesorio)
El sensor de temperatura mide la temperatura en la batería o en el entorno
de la batería y lo transmite al cargador automático. Las tensiones de carga
indicadas en el “Datos técnicos” en la página 105 se refieren a una temperatura ambiente de 15 °C a 25 °C. Con estas temperaturas tan variables se aumentará o reducirá la tensión de carga según el diagrama en la página 102.
➤ Coloque el interruptor principal en “0”.
➤ Tienda el cable desde la batería al cargador automático IU0U.
➤ Conecte el sensor de temperatura mediante la clavija TS a la parte pos-
terior del cargador automático IU0U (fig. d 1, página 10).
➤ Fije el cabezal del sensor directamente en la batería (fig. d 2,
página 10), p. ej. con cinta adhesiva por los dos lados.
9.4 Conectar el control remoto (accesorio)
El control remoto sirve para activar y desactivar el modo Sleep y para el control del funcionamiento (véase el “Control del funcionamiento” en la
página 102) del cargador automático IU0U.
➤ Tienda el cable desde el control remoto al cargador automático IU0U.
➤ Inserte la clavija del control remoto en la clavija “RC” (fig. d 3,
página 10) del cargador automático IU0U.
10 Utilizar el cargador automático IU0U
Con el cargador automático IU0U podrá cargar baterías descargadas o
alimentar baterías con una carga de compensación.
I
NOTA
Los cargadores IU152A, IU252A e IU154A disponen de una salida
de carga para la batería de arranque con una tensión de salida entre 13,2 V (26,4 V) y 13,8 V (27,6 V). La salida de carga para la batería de arranque carga esta batería con una corriente de hasta 1 A
o la mantiene a un alto nivel de capacidad.
➤ Encienda el aparato con el interruptor principal (fig. 2 1, página 3).
Page 97

ES
PerfectCharge Utilizar el cargador automático IU0U
97
10.1 Ajustar el cargador automático IU0U (fig. 8,
página 7)
Tensión de carga y delimitación del tiempo
I
NOTA
Consulte a su distribuidor de baterías la tensión de carga y la delimitación del tiempo necesaria para sus baterías.
A
¡AVISO!
Preste atención a no poner nunca en funcionamiento el aparato
cuando los interruptores dip 1 y 2 ó 3 y 4 se encuentren simultáneamente en la posición “ON”. Sólo las posiciones de conmutación
descritas en las tablas abajo indicadas garantizan un funcionamiento correcto del cargador automático IU0U.
➤ Coloque el interruptor principal en “0”.
➤ Desatornille los cuatro tornillos de fijación (2) de la pared posterior con la
llave Allen suministrada.
➤ Extraiga la pared posterior (1).
➤ Ajuste la tensión de carga necesaria y la duración de la fase de carga
principal (fase U0, véase también el “Característica de carga” en la
página 100) con los interruptores dip (5):
Ajustar la tensión de carga para IU152A, IU252A, IU452A e IU802A:
Ajustar la tensión de carga para IU154A, IU254A e IU404A:
Tensión de carga Interruptor 1 Interruptor 2 Campo de aplicación
13,8 V OFF OFF Todas las baterías de
arranque,
funcionamiento como fuente
de alimentación
14,4 V ON OFF Baterías convencionales y
de gel
14,8 V OFF ON Baterías AGM
Tensión de carga Interruptor 1 Interruptor 2 Campo de aplicación
27,6 V OFF OFF Todas las baterías de
arranque,
funcionamiento como fuente
de alimentación
Page 98

ES
Utilizar el cargador automático IU0U PerfectCharge
98
Ajustar la duración de la fase de carga principal:
Ajustes del procedimiento de carga:
10.2 Activar y desactivar el modo Sleep con el mando a
distancia (accesorio)
I
NOTA
Si el interruptor principal (fig. 2 1, página 3) está situado en “II”, el
mando a distancia estará sin funcionamiento.
➤ Coloque el interruptor principal del cargador automático IU0U (fig. 2 1,
página 3) en “I” para que el modo Sleep pueda activarse con el mando a
distancia.
➤ Pulse la tecla “ON/OFF” del mando a distancia para activar o desactivar
el modo Sleep.
10.3 Acondicionar la batería
Para evitar que se produzca una sulfatación de la batería cuando no se utilice durante un tiempo prolongado (acondicionamiento para el invierno), se
deberá cargar antes de guardarla.
➤ Si la batería de arranque está conectada al cargador, desconéctela.
➤ Conecte la batería que se vaya a cargar.
28,8 V ON OFF Baterías convencionales y
de gel
29,6 V OFF ON Baterías AGM
Duración de la fase de
carga principal
Interruptor 3 Campo de aplicación
8 h ON Baterías convencionales
16 h OFF Baterías de gel y AGM
Procedimiento de carga Interruptor 4
La carga de compensación se conecta en función de la corriente de
carga.
OFF
La carga de compensación se mantiene durante la duración de la fase
de carga principal independientemente de la corriente de carga. Una
vez transcurridp este tiempo, conmuta la carga de compensación.
ON
Tensión de carga Interruptor 1 Interruptor 2 Campo de aplicación
Page 99

ES
PerfectCharge Utilizar el cargador automático IU0U
99
➤ Ajuste el interruptor DIP (fig. 8 5, página 7):
– interruptor 4: ON
– baterías convencionales: interruptor 3: ON
baterías de gel y AGM: interruptor 3: OFF
➤ Coloque el interruptor principal del cargador automático IU0U (fig. 2 1,
página 3) en la posición “I”.
✓ La batería se carga durante 8 horas (interruptor 3: ON) ó 16 horas
(interruptor 3: OFF) con la tensión de carga ajustada.
Una vez transcurrido este tiempo, el cargador automático IU0U pasa
automáticamente a la fase de compensación.
I
NOTA
Aquí se puede producir una ligera sobrecarga que en el caso de
baterías convencionales se manifiesta por un desprendimiento de
gases y en el caso de las baterías de gel/AGM, por un ligero calentamiento.
➤ Tras el acondicionamiento, coloque el interruptor 4 del interruptor DIP
(fig. 8 5, página 7) en la posición “OFF”.
Con ello se evita que se repita el acondicionamiento al apagar y volver a
encender el cargador, lo cual podría dañar la batería.
Page 100

ES
Utilizar el cargador automático IU0U PerfectCharge
100
10.4 Característica de carga
La característica de carga se denomina curva característica IU0U modificada.
Fase I
Al comenzar la carga, la batería descargada se carga con corriente constante hasta que la tensión de la batería llegue a 13,8 V o 27,6 V. Cuando la batería llega a este nivel de tensión, la corriente de carga disminuye
lentamente. Cuando la corriente disminuye hasta llegar a la marca del 80 %,
el cargador cambia a la tensión de carga más elevada 14,4 V/14,8 V o
28,8 V/29,6 V.
I
NOTA
La tensión de carga y el período de tiempo de la fase de carga principal (fase U0) puede seleccionarse mediante un campo de conmutación (véase el “Ajustar el cargador automático IU0U (fig. 8,
página 7)” en la página 97).
U/V
I/A
I
I 80%
I 10%
t
IU0U
U
8/16 h
 Loading...