

Page 1
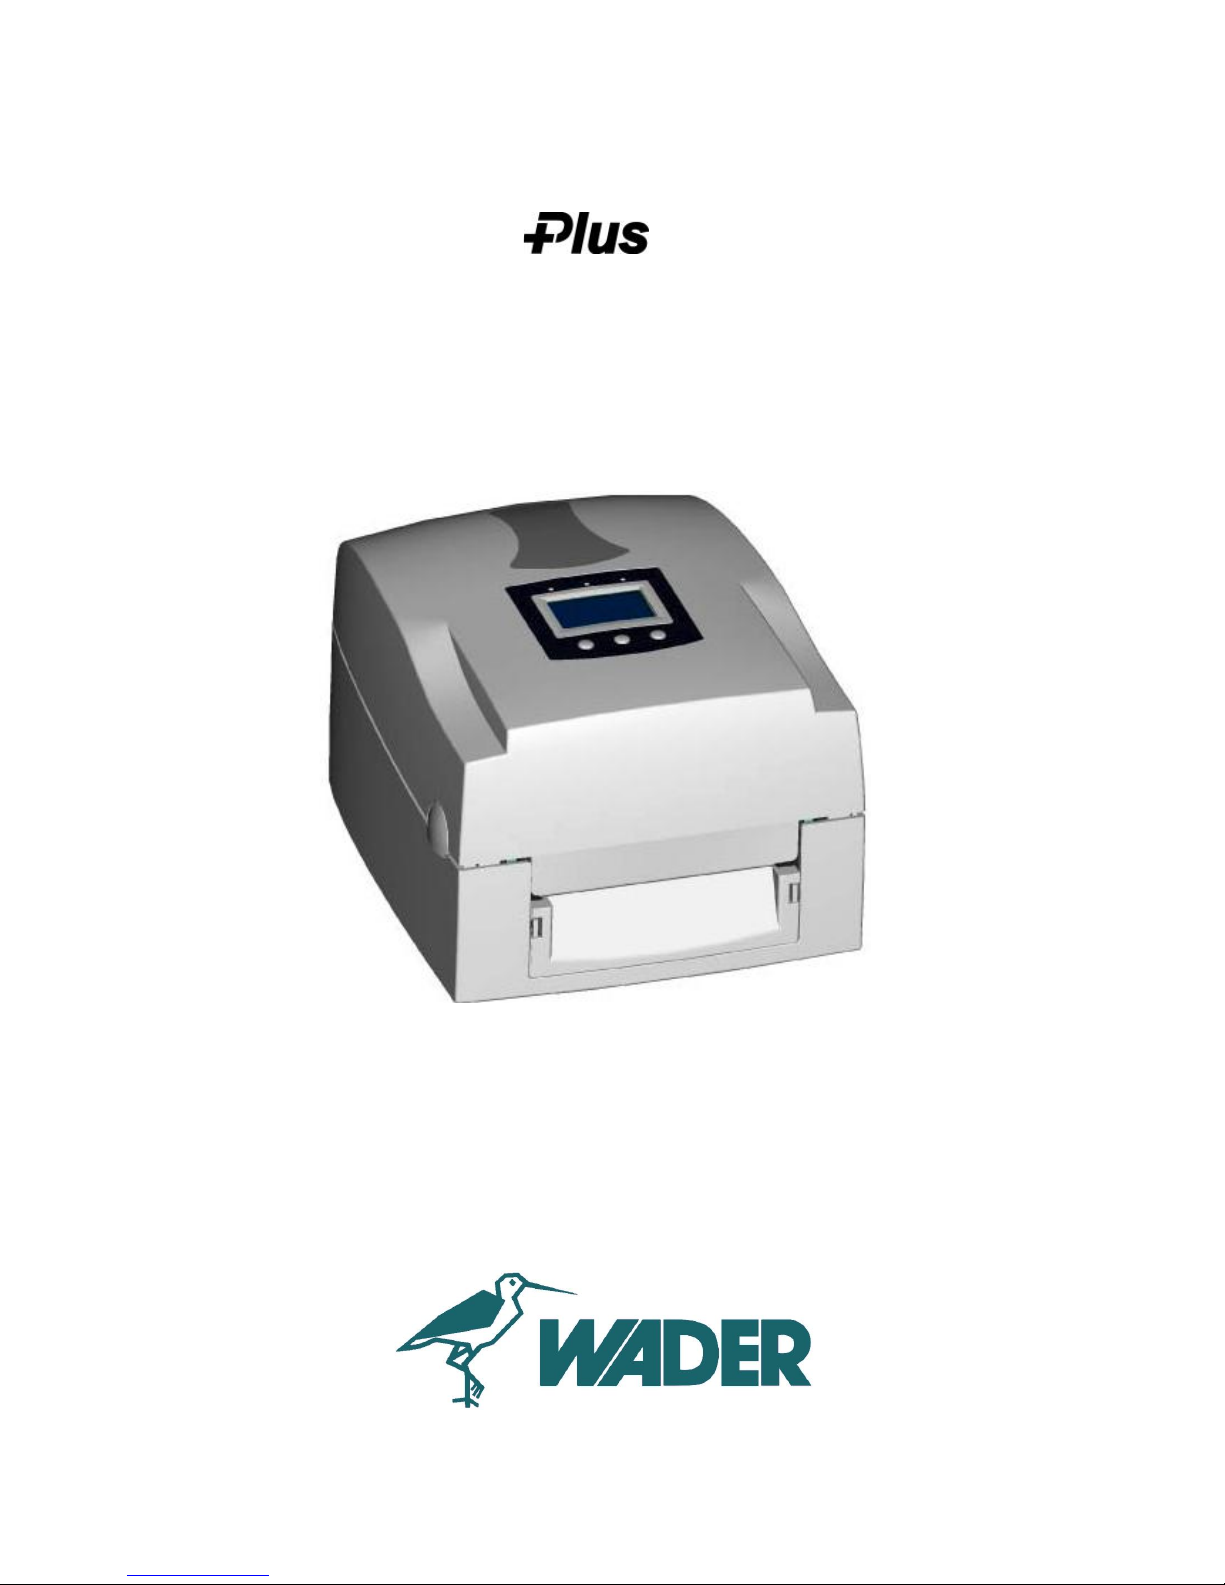
Laundryprint
Thermal Label Printing System
Operating Instructions 1.7
1
Wader Labelling Systems Limited
26 Carham Road, Hoylake, Wirral, England
0151 632 3464
www.wader.co.uk
Page 2
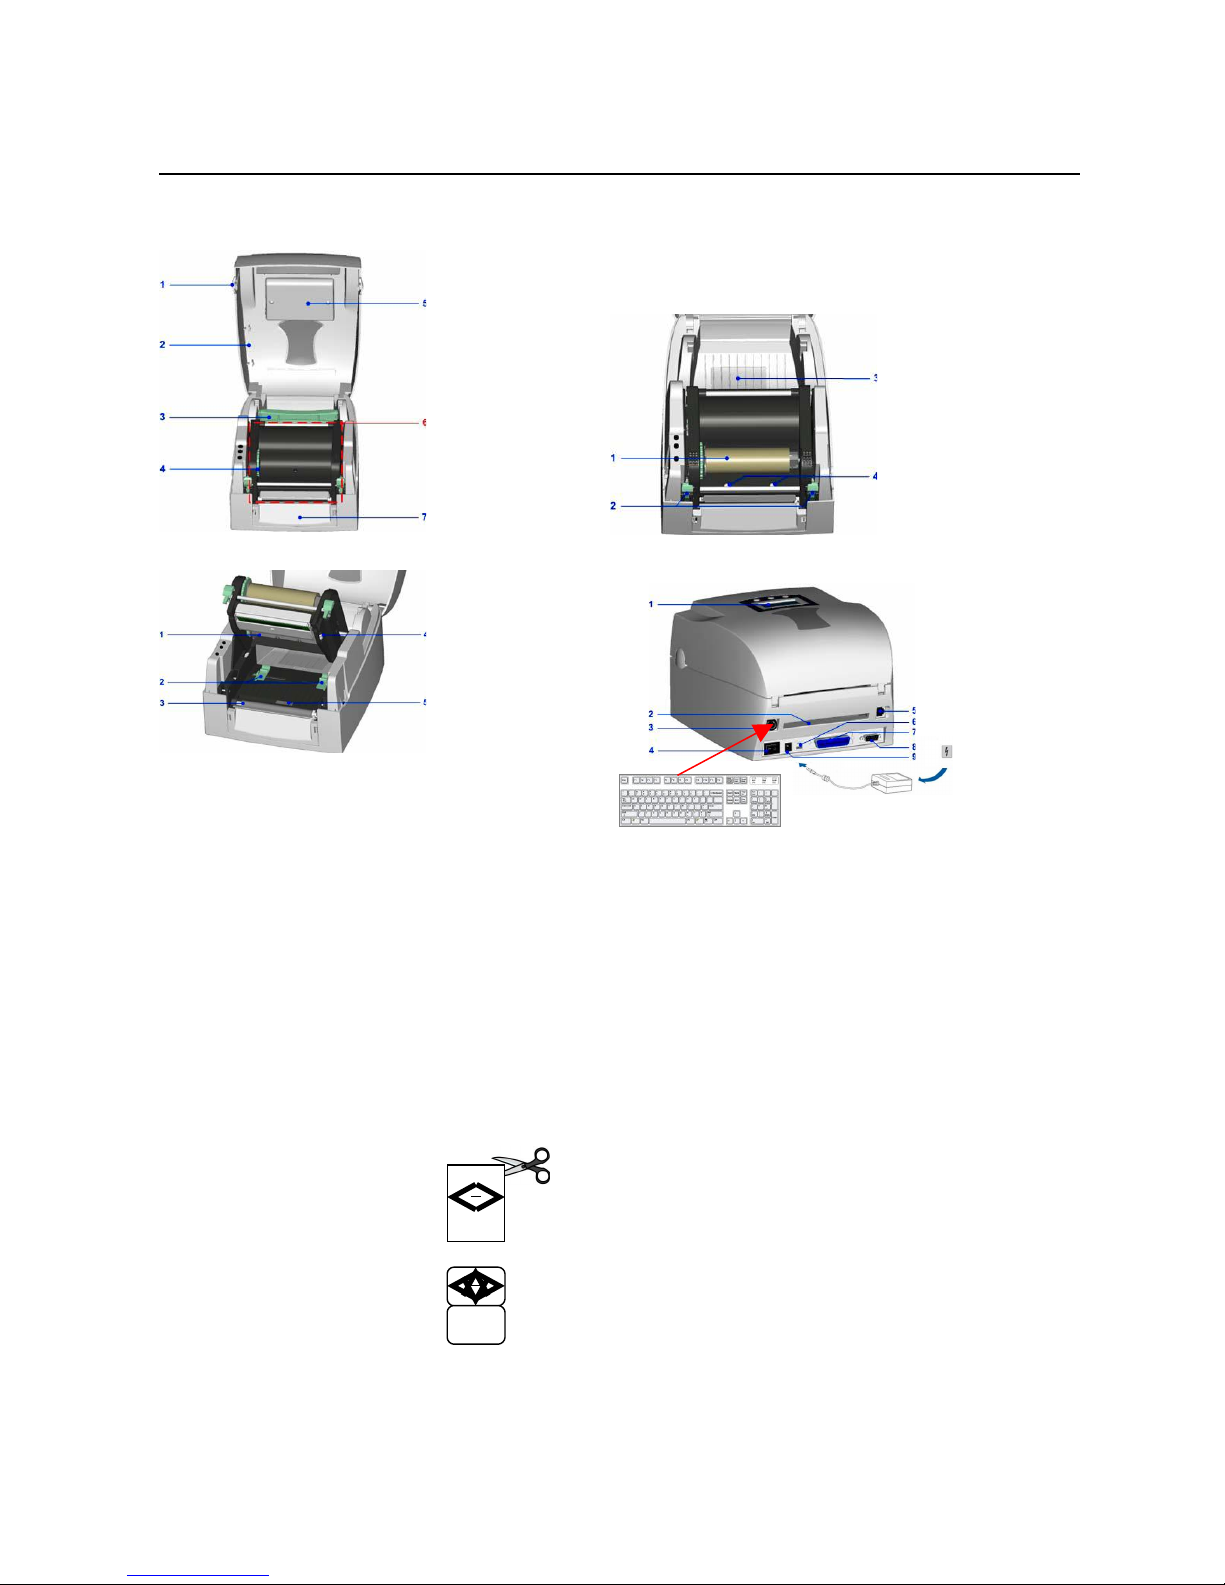
Identifying Printer Parts
• Unpack the printer and keyboard units and locate on a suitable surface near a mains outlet.
• Connect the keyboard & mains adaptor to the printer (see Fig.4).
• Ensure that the thermal tape & ribbon are installed (see pages 7 to 10).
• If you are using die cut tape ensure that the sensor is aligned correctly (see page 10).
• Switch on the printer (see Fig.4 #4) & the LED power will illuminate (Fig – 8/9).
Thermal Media Sizes & Re-order Codes
Plain continuous thermal tape
TH - 40
TH - 60
TH - 80
Butterfly die cut thermal tape
TH - 48x19
TH - 48x20
TH - 70x38
TH - 82x25
TH - 82x34
TH - 92x50
Laundry thermal ribbon
TH - RIBBON+
2
Fig-1
1. Cover open Button
2. Top Cover
3. Label Roll Core
4, Ribbon Rewind Wheel
5. LCD Module
6. Printing Mechanism
7. Front Cover Piece
1. Ribbon Rewind Shaft & Empty Ribbon Roll
2. Locking Tenon
3. Card Slot
4. Print Head Adjustment Screw
1. Ribbon Supply Shaft
2. Label Guide
3. Platen Roller
4. Adjustment Gear
5. Label Sensor
(will be pre adjusted to customer
Fig.4
1. LCD Control
2. External Label Feed
3. Keyboard Connector
4. Power Switch
5. (N/A with Laundryprint)
6. (N/A with Laundryprint)
7. (N/A with Laundryprint)
8. (N/A with Laundryprint)
9. Power Connector
PS2 keyboard
Page 3
Getting Started
Stored within the printer are numerous standard label layouts that you can access, enter text & then print.
If you have specified a custom designed layout these will be stored in the printer along with the standard
layouts (samples and the form name will be enclosed).
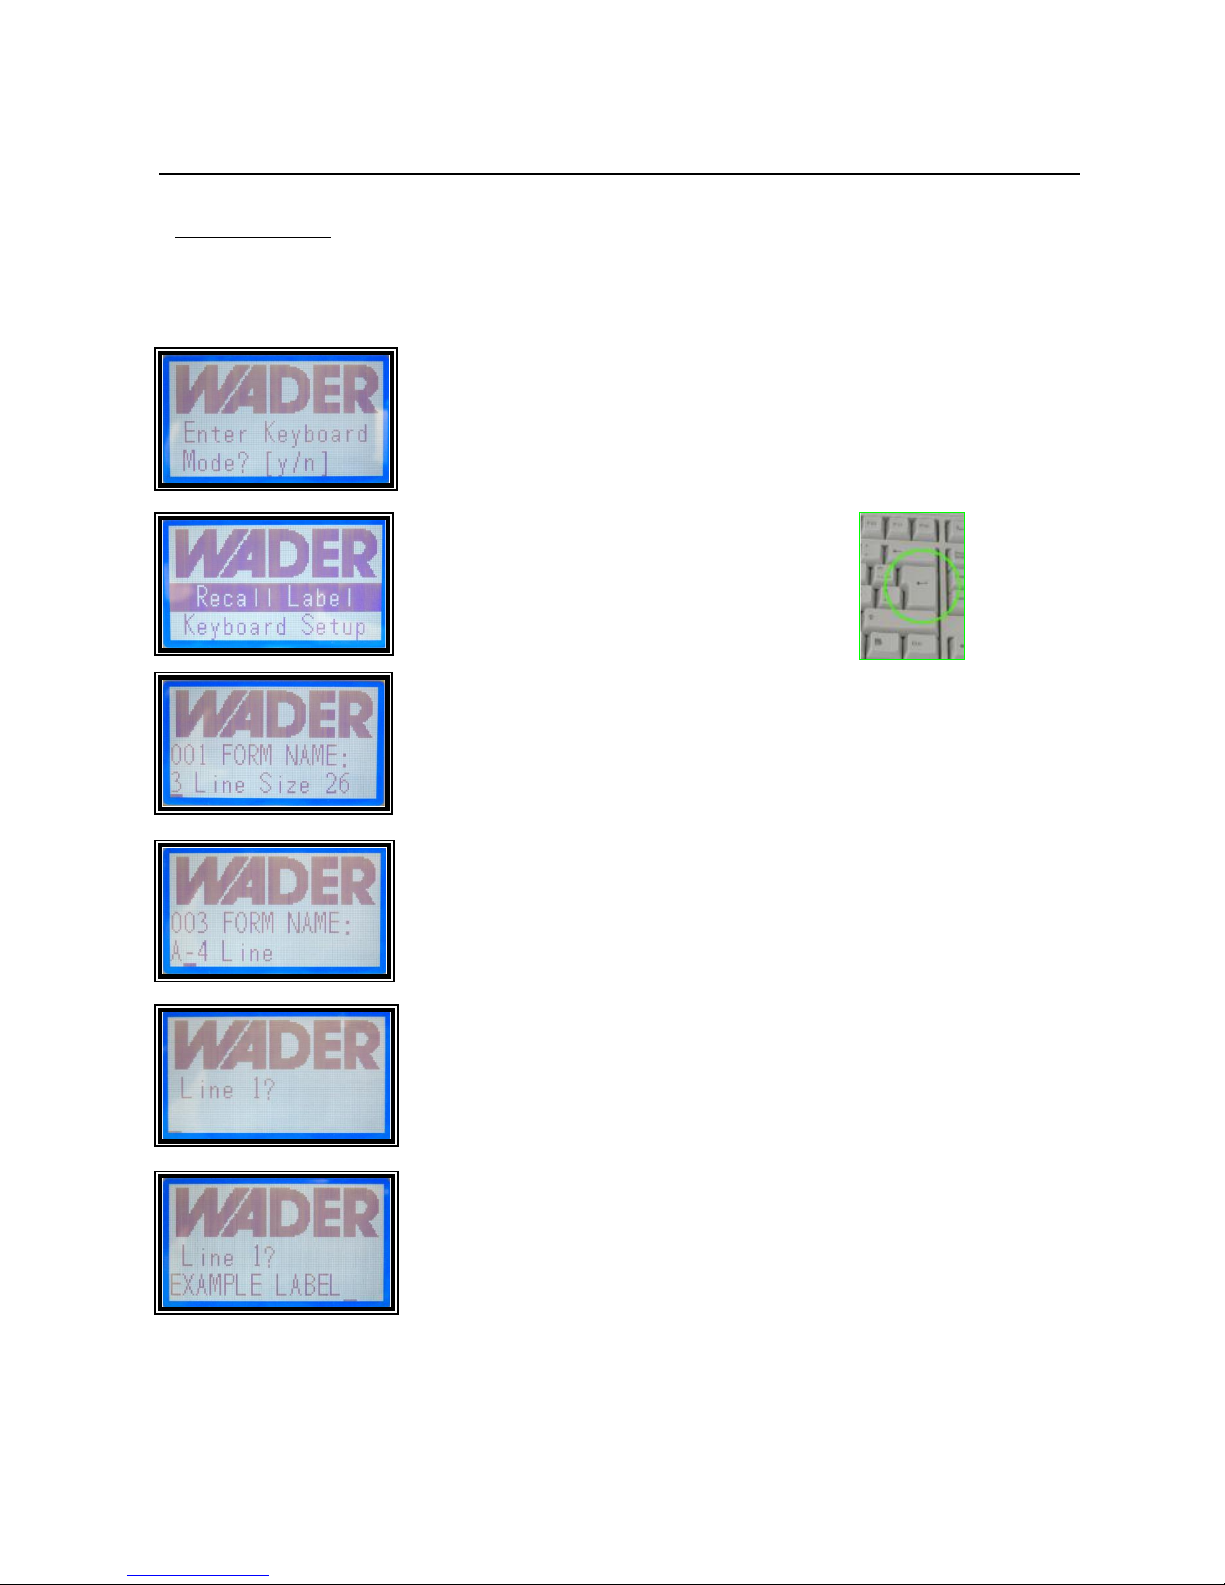
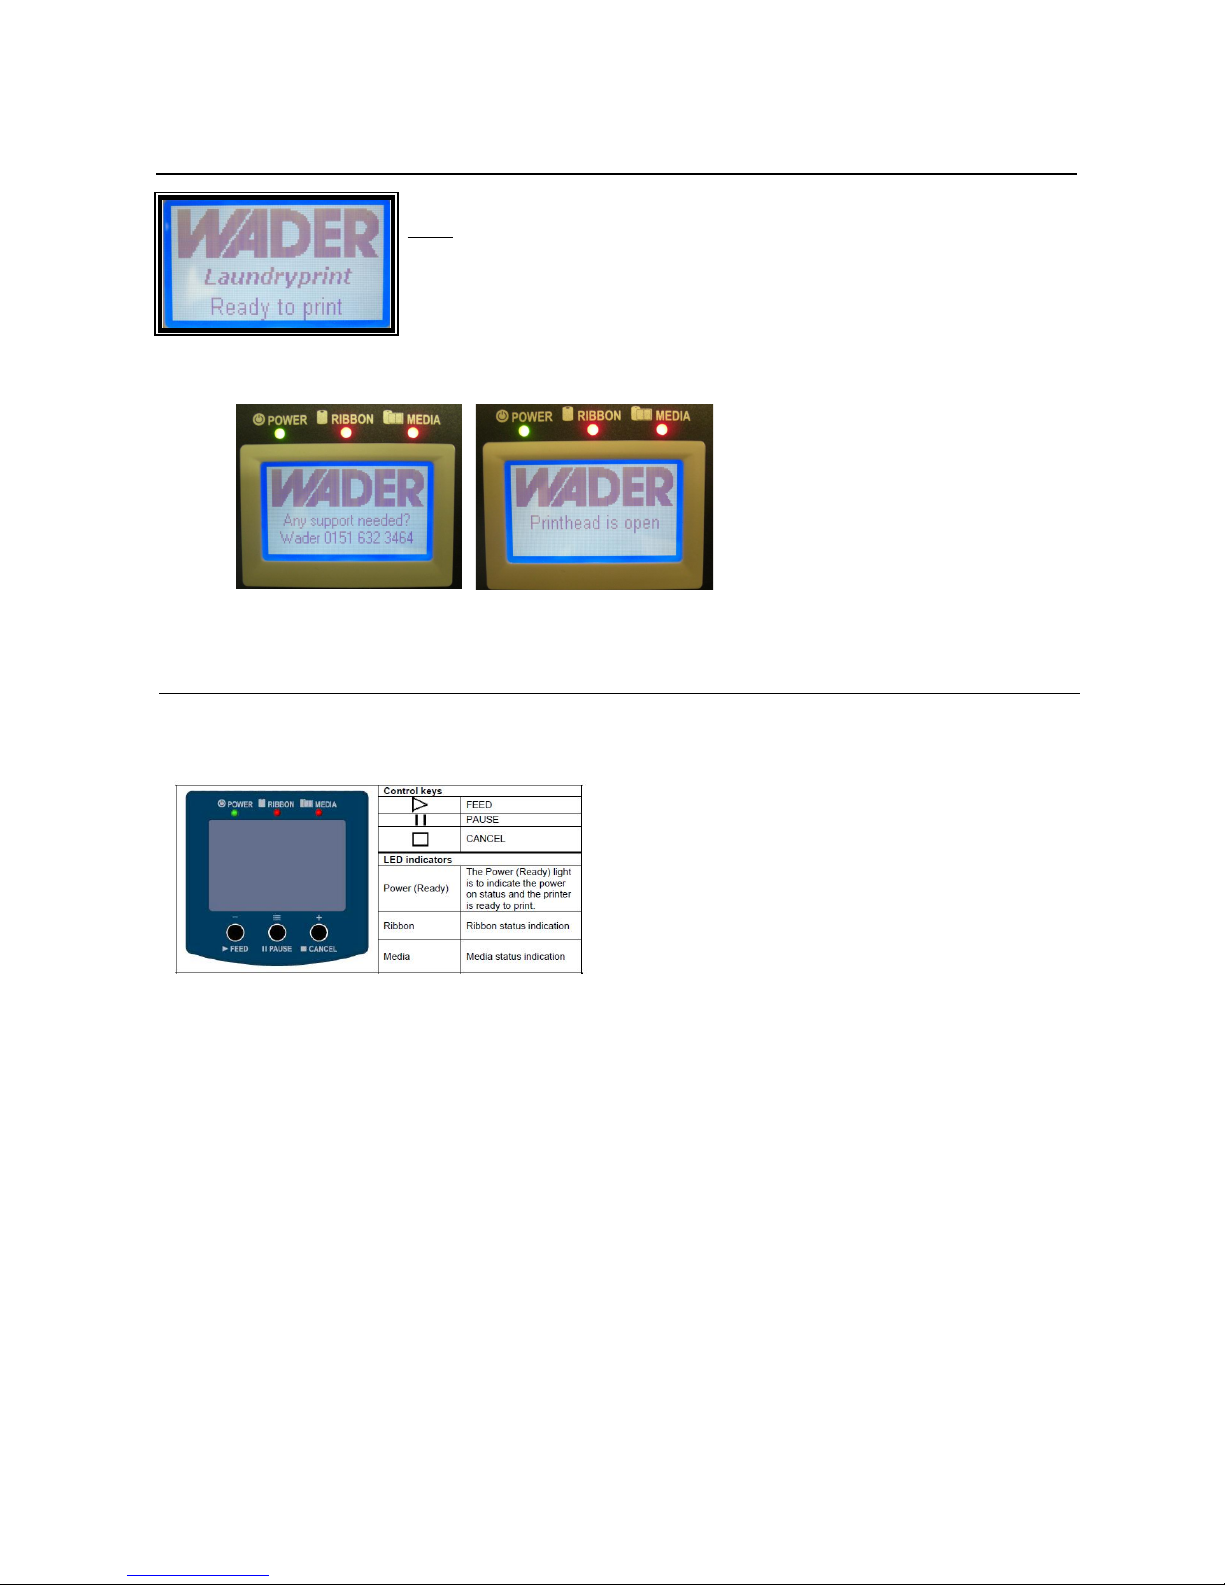
When the Laundryprint powers up the LCD display will show….
Press Y (yes) to recall a stored label layout (form)
(If the display is different from the one on the right refer to page 4 Other Control Displays)
Press the Return/Enter key to retrieve a stored label
Stored label layouts are listed in alphabetical order, labels that have a
numerical digit are listed first.
Either press the arrow keys to scroll through the labels or press the first letter of
the label layout name required to jump to that label.
For this example we are going to use the label layout called A-4 Line, so this
could be found within the stored labels by either pressing A (being the first
letter of the label name) or by scrolling through the layouts using the arrow
keys. Once the name is displayed on the screen simply press the Return/ Enter
key to select it for editing.
The screen will now display the first line of the label. The screen prompt for this
particular label is “Line 1?” but this can vary in different label layouts.
For the first line of the label we are going to enter the text EXAMPLE LABEL
and press the Return key.
3
Page 4
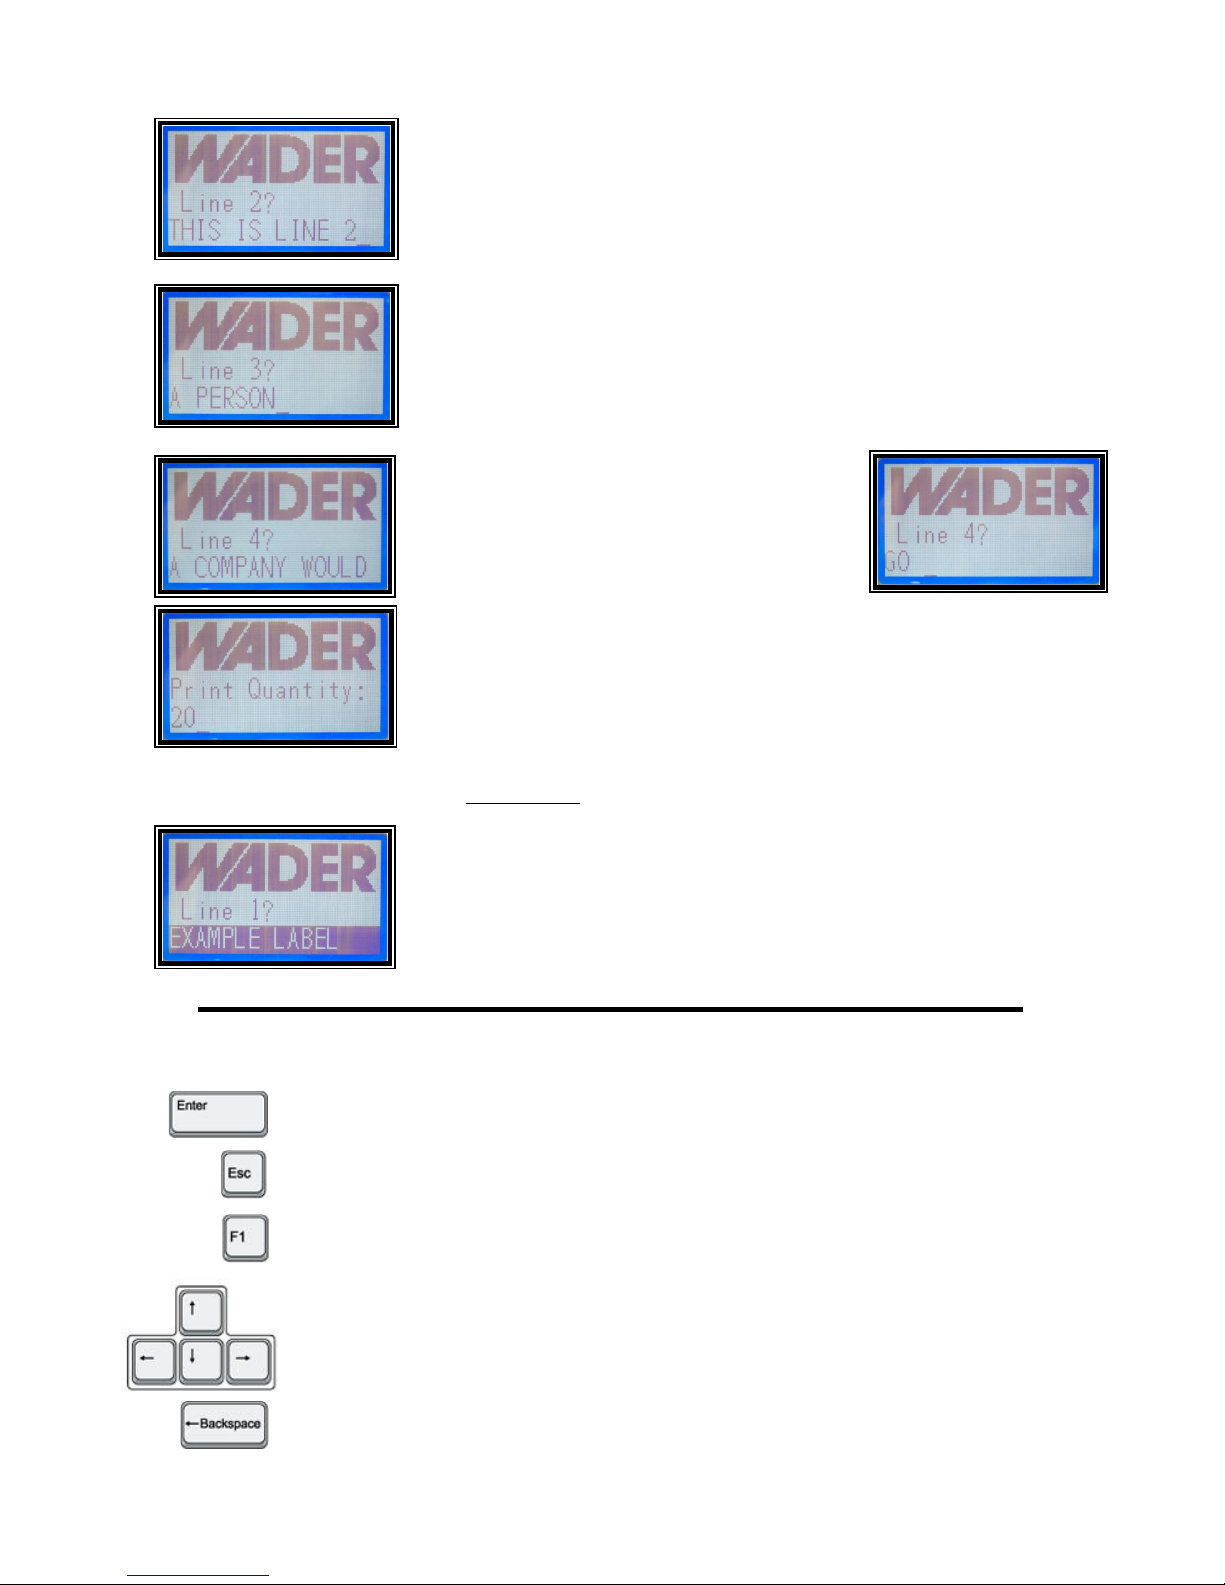
We are now prompted to enter text for line 2 of the label.
For this line we have entered THIS IS LINE 2 again after entering the required
text press the Return key to precede to line 3 of the label.
Text for this line will be A PERSON followed by the Return key.
Text for line four will be A COMPANY WOULD GO as
you can see, if the text is too long for the screen it
simply scrolls along as you type. The keyboard arrow
keys may be used to move L/R along the text.
As before press the Return key to enter the line of text.
This particular label is made up of four lines only so now the screen prompts
the user for a quantity of labels to print.
For this example we have entered a quantity of 20.
Press the Return key and the printer will print the entered label 20 times.
Once printing has finished the screen displays the print quantity in-case the
user requires more of the same label (different quantities may be entered).
If you do not wish to print any more of that particular label, press the Esc key and the screen returns to the
first line of the label (by pressing the Esc key twice the screen returns to the Labels stored selection).
The Laundryprint will remember the label text entered. To leave the line as it is
simply press the Return Key or type new text to replace it followed by the
Return key.
Repeat the processes for the remainder of the label as described previously.
Commonly Used Keys (fig-11)
Enter or Return (key) / confirm typed text into the system.
Exit or go back / exit out of process.
Go to Keyboard mode.
Line navigation whilst editing label text.
&
Scrolling through label layouts (form selection).
While working with text, use this key to delete characters to the left of the cursor.
4
Page 5
Other Control Displays
This is the Laundryprint main screen and is normally displayed if the system is
not in keyboard mode.
Exiting out of keyboard mode may be the result of pressing the Esc key too
many times (whilst exiting label edit mode) or non detection of a keyboard
connected. Check that the keyboard is connected correctly and press the F1
key to go back to Keyboard mode or reset the printer by switching it off / on.
If a fault is detected the screen will toggle between the two displays below, note the LED’s at the top of the
panel are also illuminated (see fig 10).
Check that the thermal tape or ribbon
has not run out and that the print head
has been closed correctly.
Control Panel
It should not be necessary under normal printing to access the control panel buttons as most of the standard
label printing functions can be accessed via the keyboard.
Feed Key
When printing with continuous media, pressing the FEED key will feed media out to a certain length. When
printing with gap labels, pressing the FEED key will feed one label at a time
Pause Key
When pressing the Pause key in standby mode (ready to print), the printer will go into the Pause Mode, and
LCD Display will indicate “Pause”. At this status, printer is not able to receive any command. Then pressing
the Pause key once again, the printer will get out of the Pause mode and go back to standby mode.
Pressing the Pause key while printing, printer will suspend the print job. When the Pause key is pressed one
more time, the printer will continue with the rest of the print job. For example, when printing with a print job
that contains 10 labels and then press the Pause key to suspend the print job after 2 labels are printed out. If
the Pause key is pressed again, the printer will print out remaining 8 labels to complete the print job.
Cancel Key
The Cancel key is used to cancel current print job. The LCD Display will show “Print job is cancelled” when
pressing the Cancel key during printing. For example, when printing with a print job that contains 10 labels
and then press the Cancel key after 2 labels are printed out. The remaining 8 labels will not be printed, and
the printer goes back to standby mode.
5
Fig – 8/9
Page 6
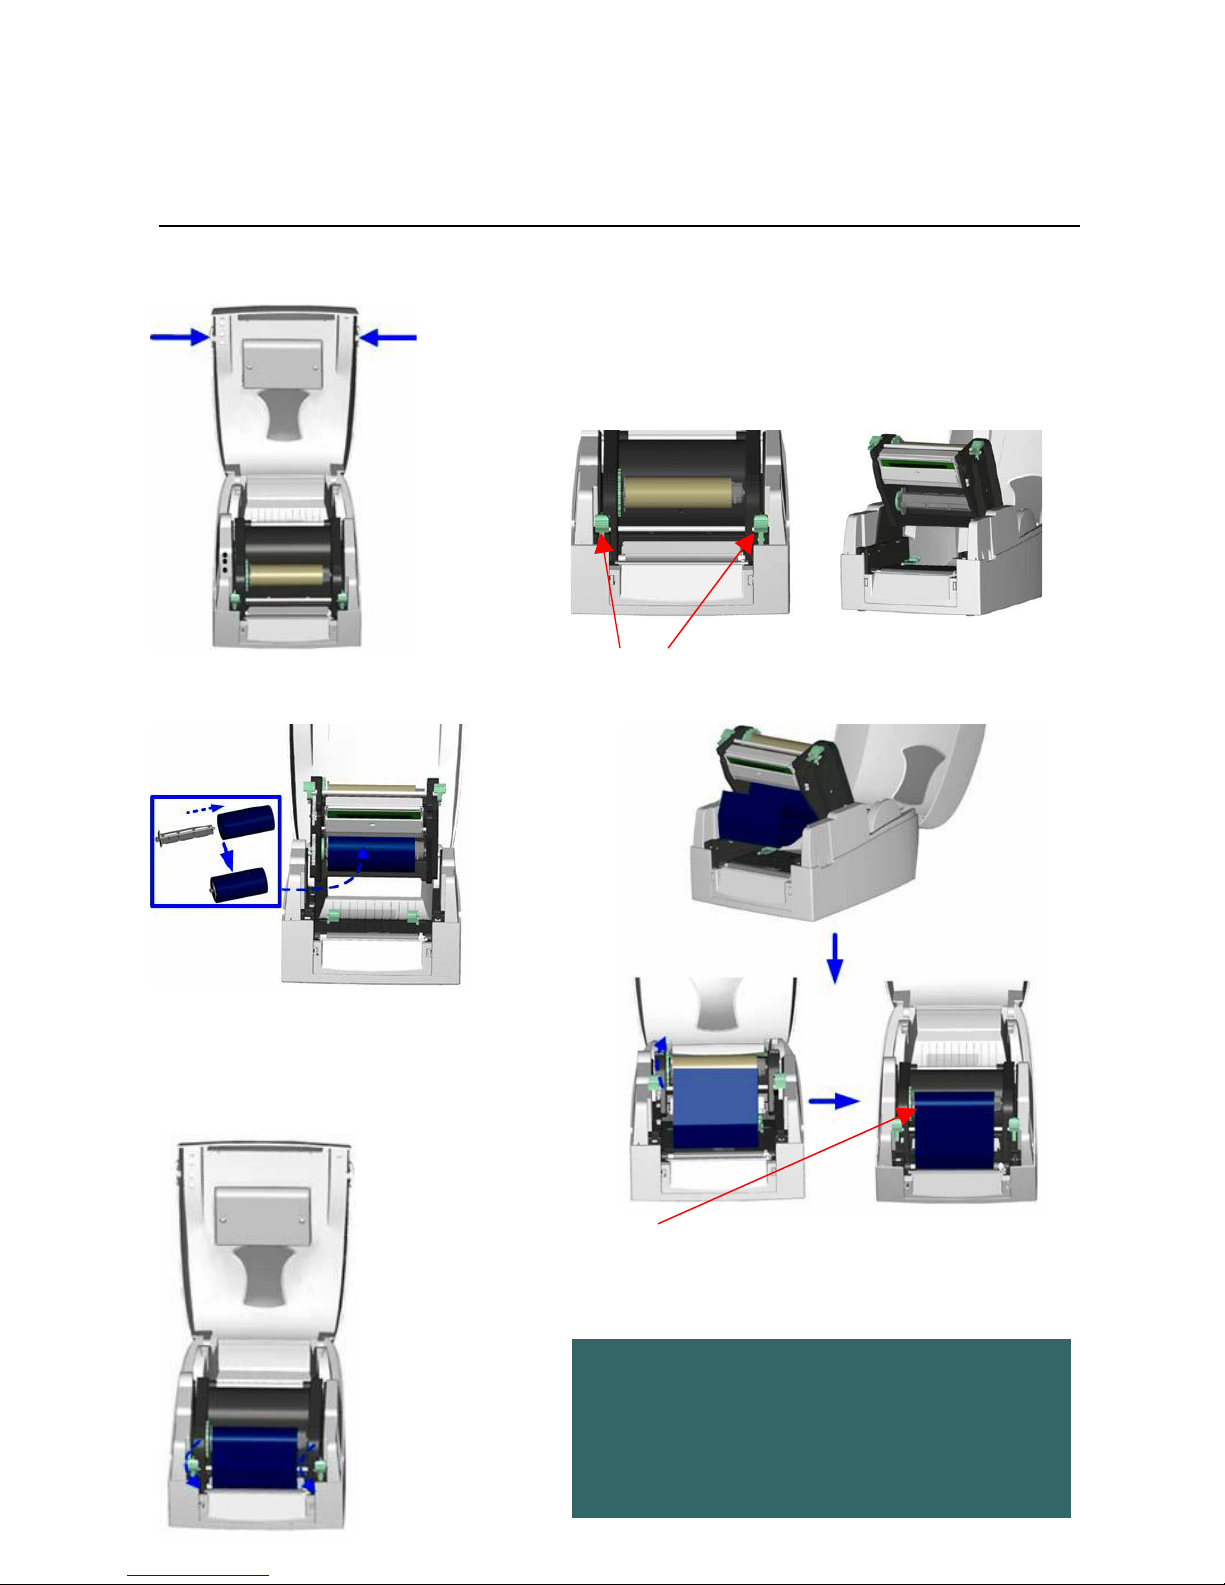
Ribbon Installation
It is recommended to use only approved Wader laundry thermal ribbons with this system.
.
6
Place the printer
on a horizontal
surface, and open
the top cover by
pressing the
Cover Open
Buttons on both
sides.
Loosen and then lift the upper print mechanism by pressing the
locking tenons
Place a new ribbon roll onto the ribbon
supply shaft
Feed the ribbon
from the Ribbon
Supply Shaft under
the Print Head.
Wrap the ribbon around the Ribbon Shaft and stick the ribbon
onto the Empty Ribbon Roll Core, take out any slack by
advancing the ribbon rewind wheel
Firmly close the upper
print mechanism.
Ensure that the
Printhead is closed
firmly and an audible
click is heard when
locking the mechanism
down.
Your new Laundryprint system will come with a Ribbon
already installed.
Ensure that you only use the special Wader Thermal fast
ribbon, this product has been laundry wash tested.
Replacement laundry ribbons and printing media are
available from direct Wader Labelling Systems Ltd.
1.
2.
3. 4.
5.
Page 7
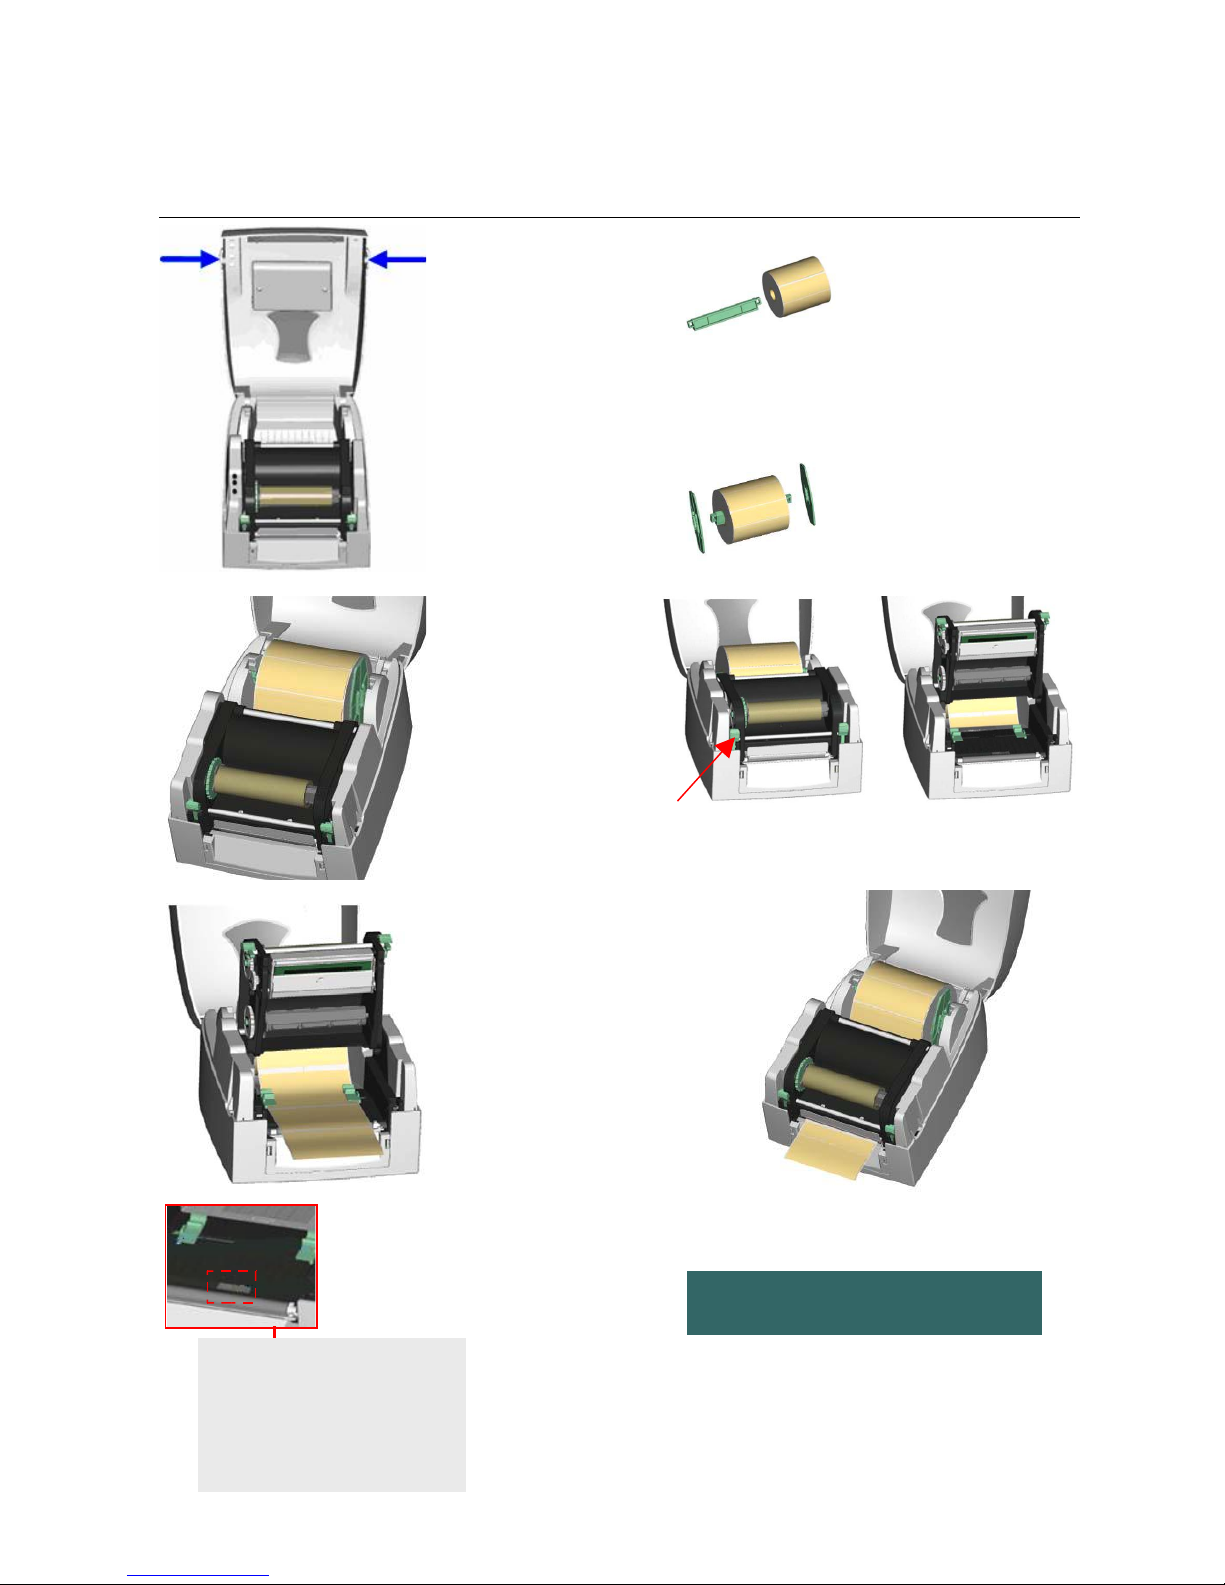
Tape Installation
(For additional information on die-cut tape see page 8)
.
7
Note:
It should not be necessary to disturb the
tape alignment sensor if you are
replacing tape of the same size.
Moving the sensor out of position could
cause the auto sensing feature of the
Laundryprint to fail.
Note the core holder is stepped
for altering label roll heights.
See Sensor adjustment details
Open the top cover
by pressing the
cover open buttons
on both sides.
Insert the label roll core into
the label roll.
Assemble the label
stop plates on both
sides of the roll.
Feed the label
through the two
Label Guides to the
Tear-off Bar.
Align the label guides
to the edge of label
Loosen and lift the upper print mechanism by pressing the locking
tenons
Place the roll of labels
into the printer
Close the upper print mechanism from the top to finish
label installation.
1.
2. 3.
4.
5.
Ensure that the Printhead is closed firmly
and an audible click is heard when locking
the mechanism down
Page 8
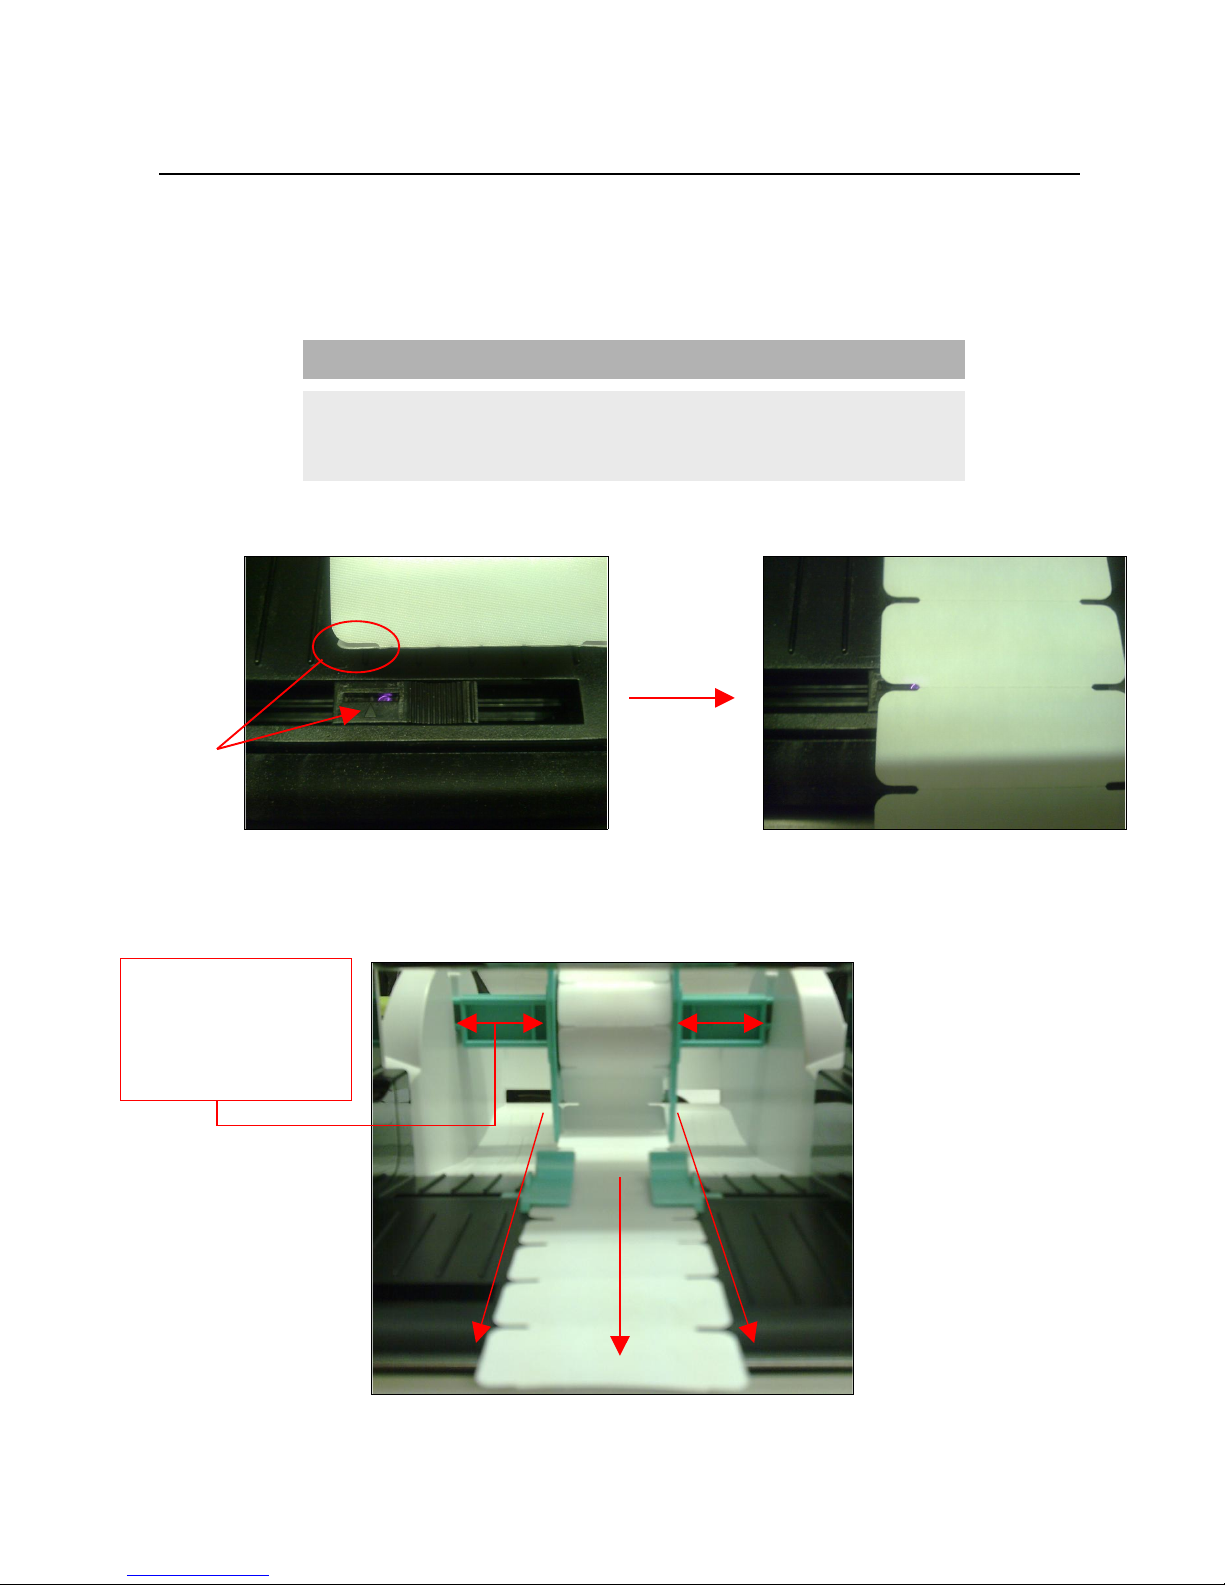
Die Cut Tape.
If you are using die-cut (gap labels) feed the tape forward or print two test labels to allow the printers internal
auto sensor function to align the tape correctly.
This procedure is required only when the Printhead is unclamped and lifted clear of the tape.
If you are experiencing problems with the tape gap alignment first check the sensor positioning (see below)
then try an auto sensing calibration.
Sensor Adjustment for use with die cut tape only.
Tape Centring
Getting the tape centred correctly will ensure that the label sensing function operates correctly.
8
Align the arrow
on the sensor
centrally to the
cut-out.
Turn off the printer
Press and hold the printers PAUSE key (located on the top control panel of the printer) and turn on
the printer until the buzzer beeps 3 times.
The printer will now go in to auto sensing mode and detect the label gap length.
Auto sensing Calibration
Ensure that the label roll
holder side plates are located
centrally on the spool & that
the side plates are not too
tightly pressed into the side of
the tape to cause any
restriction of movement.
Page 9
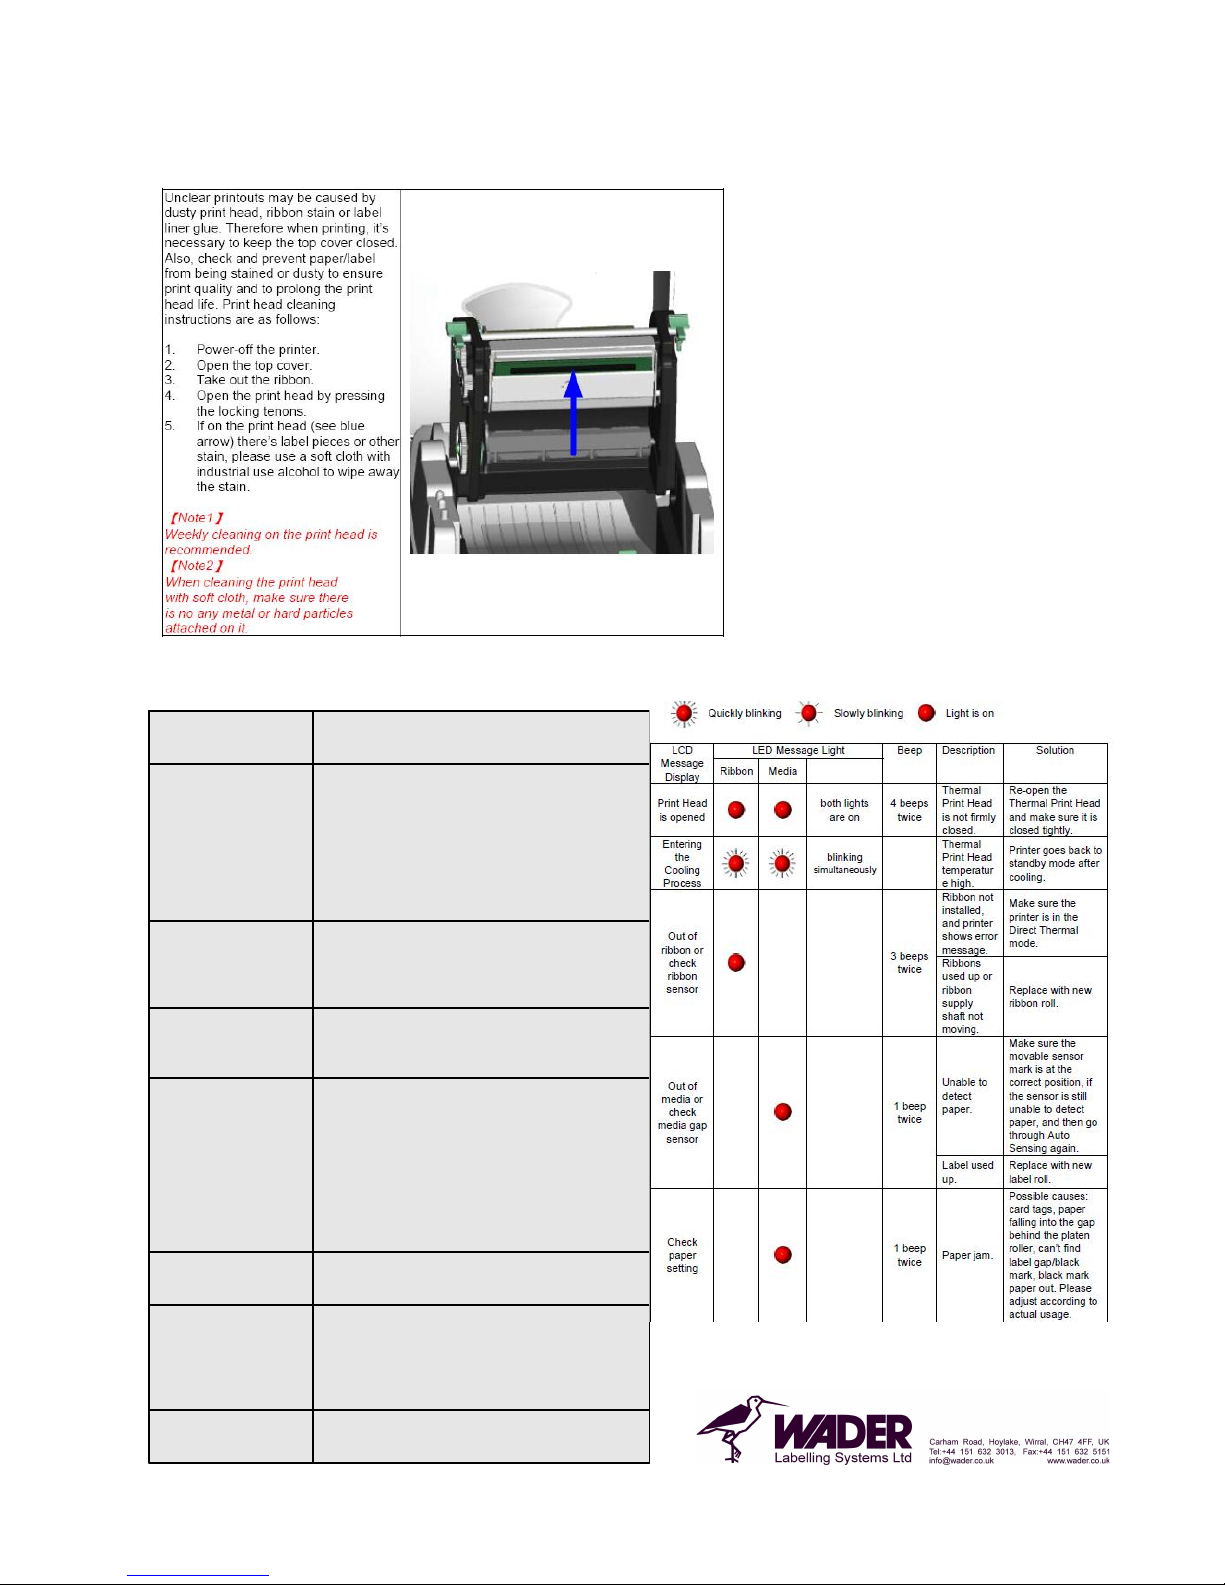
Maintenance – Thermal Printhead Cleaning
Troubleshooting & LED Indicators Fig-10
Power on the printer,
but the LED does not
light up
♦ Check the power connector is plugged
correctly
LED light turns red
(power/status) after
printing stops
♦ Check for software setting or program
command errors
♦ Replace with suitable label or ribbon
♦ Check if label or ribbon is all out
♦ Check if label is jammed/tangled up
♦ Check if mechanism is not closed(Thermal
Print Head not positioned correctly)
♦ Check if sensor is blocked by paper/label
Printing started, but
nothing was printed
on the label
♦ Check if label is placed upside down or if
label is not suitable for the application
♦ Select the correct printer driver
♦ Select the correct label and print type
When printing, label
is jammed/tangled up
♦ Clean the label jam, and if label is stuck on
Thermal Print Head, please remove it by using
soft cloth with alcohol
When printing, only
part of the contents
were printed
♦ Check if label or ribbon is stuck on the
Thermal Print Head
♦ Check if start position setting has errors
♦ Check if ribbon has wrinkles
♦ Check if ribbon supply shaft is creating
friction with the platen roller. If the platen roller
needs to be replaced, please contact your
reseller for more information
♦ Check if power supply is correct
When printing, part
of the label wasn’t
printed completely
♦ Check if Thermal Print Head is stained or
dusted
Printout not in
desired position
♦ Check if sensor is covered by paper or dust
♦ Check if liner is suitable for use, please
contact reseller for more information
♦ Check if label roll edge is aligned with Label
Width Guide
Unclear printout ♦ Check print darkness setting
♦ Check if Thermal Print Head is covered with
glue or stain
9
 Loading...