

Page 1
ING
U
S
P
N
E
USE
O
M
A
T
BLET
C
STOMIZING
U
N
P
E
USE
M
O
BLET
T
A
P
P
P
-
O
U
PLICATION
A
P
T
R
OUBLESHOOTING
O
C
NTENTS
M
NU
E
S
ECIFIC
S
-
P
TTINGS
E
DEX
N
I
1
User’s Manual for Windows & Macintosh
®®
O
NTENTS
C
N
I
DEX
1
Page 2

2
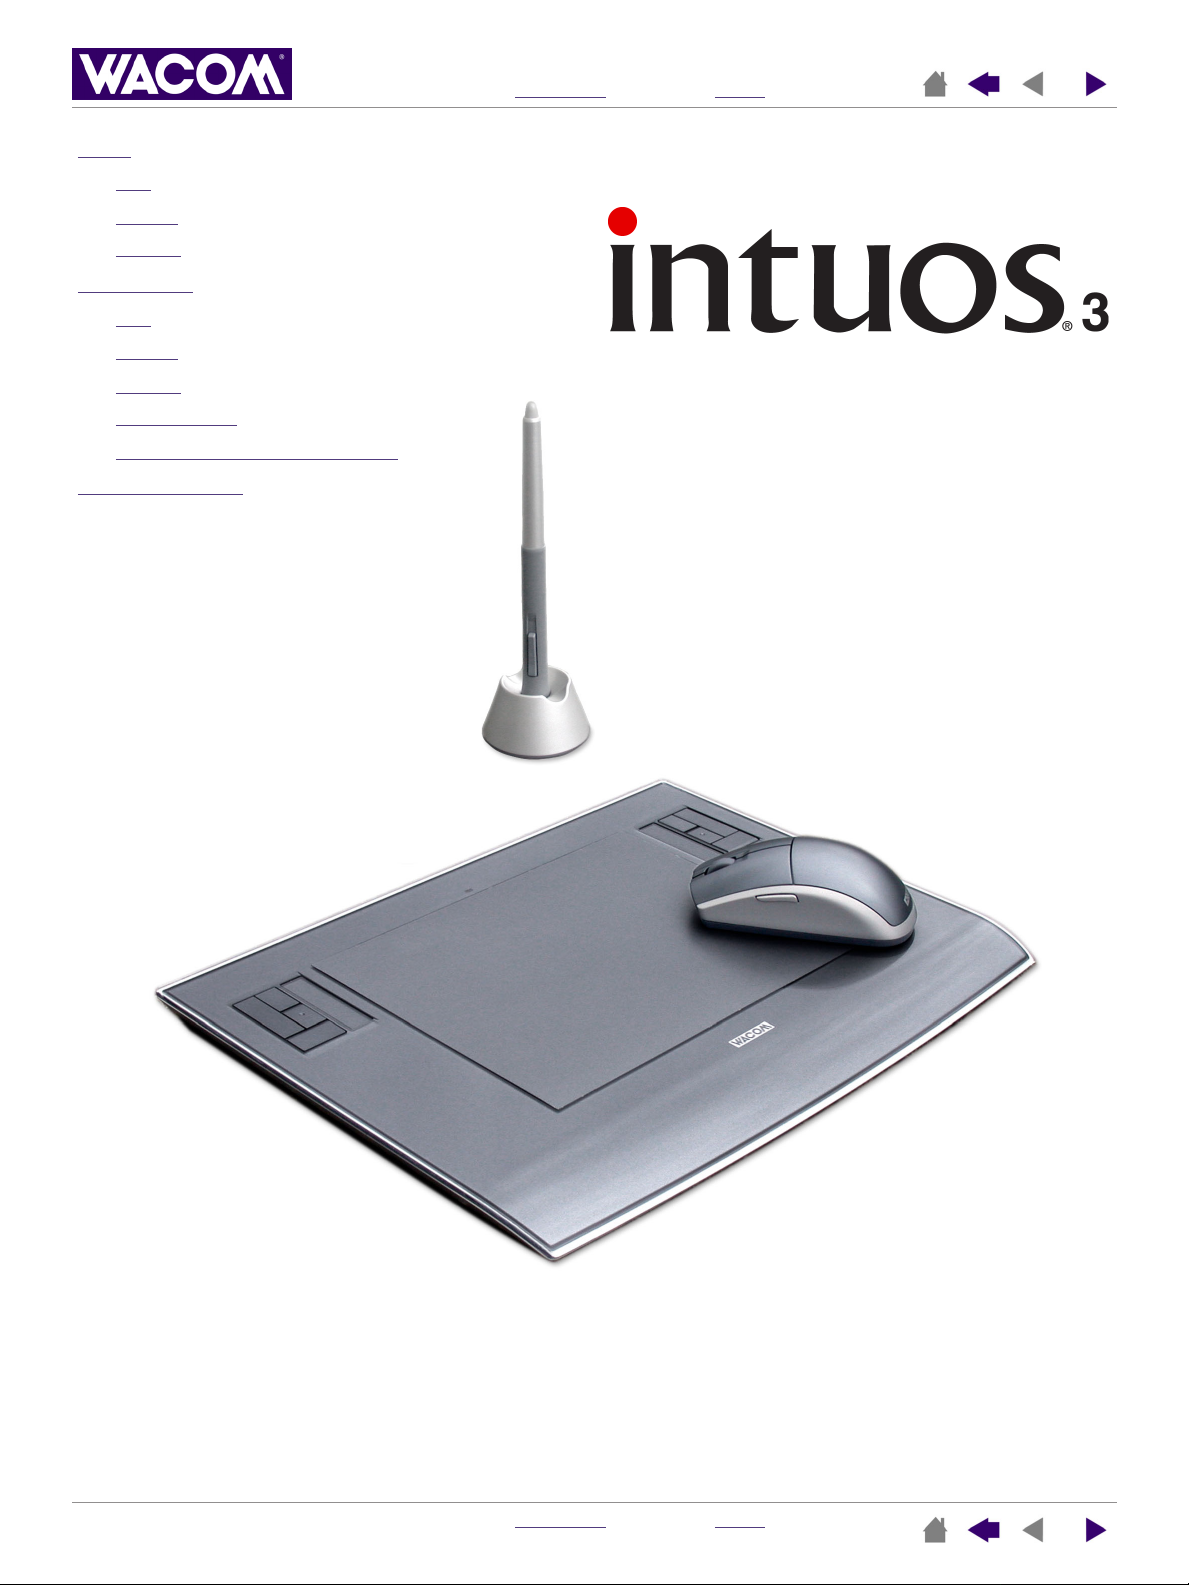
Wacom Intuos
®
3 User’s Manual for Windows
C
O
NTENTS
®
& Macintosh
DEX
I
N
®
English version 1.0, April 03, 2004
Copyright
WACOM Company, Limited, 2004
All rights reserved. No part of this manual may be reproduced e xcept for your express personal use. W acom reserves
the right to revise this publication without obligation to provide notification of such changes. Wacom does its best to
provide current and accurate information in this manual. However, Wacom reserves the right to change any
specifications and product configurations at its discretion, without prior notice and without obligation to include such
changes in this manual.
Penabled, Tool ID, QuickPoint, and DuoSwitch are trademarks, and Intuos and Wacom are registered trademarks of
WACOM Company, Limited.
Adobe, Acrobat, Reader, and Photoshop are either registered trademarks or trademarks of Adobe Systems
Incorporated in the United States and/or other countries. Microsoft and Windows are either registered trademarks or
trademarks of Microsoft Corporation in the United States and/or other countries. Apple, the Apple logo, and Macintosh
are registered trademarks of Apple Computer, Inc., registered in the U.S. and other countries. Any additional company
and product names mentioned in this documentation may be trademarked and/or registered as trademarks. Mention of
third-party products is for information purposes only and constitutes neither an endorsement nor a recommendation.
Wacom assumes no responsibility with regard to the performance or use of these products.
Watch for the Penabled logo to ensure you
are getting the natural feel and superior
performance of Wacom’s patented cordless
and battery-free pen technology.
O
NTENTS
C
N
I
DEX
2
Page 3

O
C
NTENTS
CONTENTS
About the manual 5
Navigating the manual 6
ORKING WITH INTUOS3 7
W
Intuos3 tablet features 8
Intuos3 input tools 9
Intuos3 optional tools 10
Setting up your work area 11
Using the Grip Pen 12
Holding the Pen 12
ointing 13
P
Clicking 14
Dr
agging 14
Using the side switch 15
Drawing with pressure-sensitivity 16
Drawing with tilt 16
Erasing 17
Eye-hand coordination exercise 18
Using the Mouse 19
Using the Airbrush 20
Working with the tablet 21
Using the Tablet Keys 22
Using the Touch Strips 23
CUSTOMIZING
Opening the control panel 24
Control panel overview 25
Control panel settings 26
Customizing the Pen 27
Adjusting tip feel and double-click 28
Adjusting eraser feel 29
Advanced tip and eraser pressure settings 30
Customizing tool buttons 31
Button functions 32
Customizing tilt sensitivity 35
24
DEX
N
I
Customizing the Mouse
3
36
Customizing Mouse buttons 36
Customizing the Mouse fingerwheel 37
Tablet to screen mapping 38
Pen mode 38
Mouse mode 39
Orientation 39
Screen area 40
Force proportions 41
ablet area 42
T
Mapping to multiple monitors 43
Customizing the tab
let functions 44
Customizing Tablet Keys 45
Customizing tablet Touch Strips 46
Advanced Touch Strip settings 49
Customizing the Pop-up Menu 50
Working with multiple tools 51
Working with application-specific settings 52
Creating an application-specific setting 53
Changing settings for a specific tool
and application 54
Removing application-specific settings 54
ROUBLESHOOTING 55
T
Testing your tablet 56
Testing your tools 57
Testing the Tablet Keys 58
Testing the tablet Touch Strips 58
Testing a Pen 59
Testing a Mouse 60
Troubleshooting tables 61
General problems 61
Windows-specific problems 64
Macintosh-specific problems 65
O
C
NTENTS
N
I
DEX
3
Page 4

ONTENTS
C
O
C
NTENTS
echnical support options 67
T
Obtaining driver downloads 68
APPENDICES
69
Caring for your tablet and tools 69
Replacing the Pen tip 70
Uninstalling the softw
Changing the tab
are 70
let mode 71
Installing multiple tablets 71
Product specifications 72
General specifications for all Intuos3 tablets 72
Intuos3 4x5/A6 tablet (model PTZ-430) 72
Intuos3 6x8/A5 tab
let (model PTZ-630) 72
Intuos3 9x12/A4-regular tablet (model PTZ-930) 72
Intuos3 Grip Pen (model ZP-501E) 73
Intuos3 Mouse (model ZC-100) 73
Intuos3 Airbrush (model ZP-400E) 73
Intuos3 Ink P
en (model ZP-130) 73
Product information 74
Ordering parts and accessories 74
Tablets 75
Tools 75
Other parts and accessories 76
DEX
N
I
4
Radio and television interference 77
FCC notice 77
CE declaration 77
License and Warranties
(Worldwide, Except for Europe,
Africa and Middle East) 78
Software License 78
Limited Warranty (Worldwide, Except Europe,
Africa and Middle East) 78
Warranty Service in the U.S. and Canada 80
Warranty on Sales Outside of U.S. and Canada
(Except Europe, Africa and Middle East) 80
License and Warranty
(Europe, Africa and Middle East) 81
Software License Agreement 81
Entitlement to Use the Software 81
Limited Warranty 81
GLOSSAR
INDE
Y 83
X 85
O
C
NTENTS
N
I
DEX
4
Page 5

C
O
NTENTS
DEX
I
N
5
About the manual
This combined interactive User’s Manual for Windows and Macintosh provides quick access to information
about Intuos3. Just click on a navigation button or highlighted word to move through the document.
The information is common to both platforms and Windows screen captures are shown, unless otherwise
noted.
• In the contents
• Working with Intuos3 is the learning chapter , and introduces you to the man y capabilities of y our Intuos3
tablet. It describes the various tablet models, the features and functions of each Intuos3 tool, and
includes exercises for new users.
• Customizing
and tools for the way you like to work.
•Want to test your tablet and tools? Need troubleshooting guidelines? T
find the answers to most common questions.
• The appendices
uninstalling the software, your license and w arr anty, and more. If you are using more than one tablet on
your computer, you will find instructions on adding and working with multiple tablets.
Note: This man ual does not contain information on installing your tablet. Please refer to your product Quick
Start Guide and to the automated software installer (located on the Wacom Tablet CD) for details on
installing your Wacom tablet.
If you are new to electronic documentation, be sure to read na
Here are some other points to keep in mind:
• The tablet size descriptions shown within this manual reflect usage for both the USA and European
markets, and are separated by a “/ “. For example, in the descriptor “4x5/A6”, “4x5” is the tablet sizing
descriptor for markets in the USA. “A6” is the descriptor for European markets . Within this manual, USA
tablet size descriptors are always shown before the “/ “.
MALL
CAPITAL
•S
options.
• Remember that you can always use the Adobe Reader zoom-in tool to increase the size of the manual
on your display screen.
• The following kinds of information are not included with this product: information about your specific
computer hardware or operating system, or information about your application software. Your best
source for this information is the set of manuals and disks that came with your hardware, operating
system, or application.
• Many graphics applications have built-in support for Intuos3 features (such as pressure-sensitivity, tilt,
airbrush simulation, and fingerwheel input for the Intuos3 Mouse). You can find a listing of applications
that support these features at W acom’s web site (see product inf
to use Intuos3 features within a specific application, refer to the instructions in that application’s
manuals.
you can go directly to a topic by clicking on it.
describes how you can change the control panel settings to optimize your Intuos3 tablet
roubleshooting is where you will
include a variety of information: tips on caring for your tablet and tools, a how-to on
vigating the manual.
LETTERS
are used to identify the names of ke yboard ke ys , dialog bo x es , and control panel
ormation). F or information on how best
O
C
NTENTS
N
I
DEX
5
Page 6
C
O
NTENTS
Navigating the manual
Use the navigation controls to move through the manual:
Go to front page.
CONTENTS
INDEX
HEADING TEXT
topic
Go to table of contents.
Go to index.
Go back to previous view.
Page back, or page forward.
Go to beginning of section.
Go to topic.
Topic continued.
DEX
I
N
6
Adobe Reader provides you with additional tools for using and printing the manual. Refer to the Adobe
Reader help for more information.
O
C
NTENTS
N
I
DEX
6
Page 7

7
WORKING WITH
O
C
NTENTS
INTUOS3
DEX
N
I
This section introduces you to the Intuos3 professional pen tab let. Intuos3 consists of a tablet that serves as
your work area and the Intuos3 input tools
you use on the tablet. The quic kest way to learn about Intuos3 is
to become familiar with its appearance and f eatures . If you are new to using a pen tablet, read the following
sections to learn about your Intuos3 tools and how to use them with the tablet.
Note: Intuos3 tools will only work on an Intuos3 tablet. They will not work on an Intuos or Intuos2 series
tablet. Likewise, older Intuos or Intuos2 input tools will not work on your Intuos3 tablet.
Intuos3 tab
let features
Intuos3 input tools
Setting up your work area
Using the Grip Pen
Using the Mouse
Using the Airbrush
Working with the tablet
O
C
NTENTS
N
I
DEX
7
Page 8
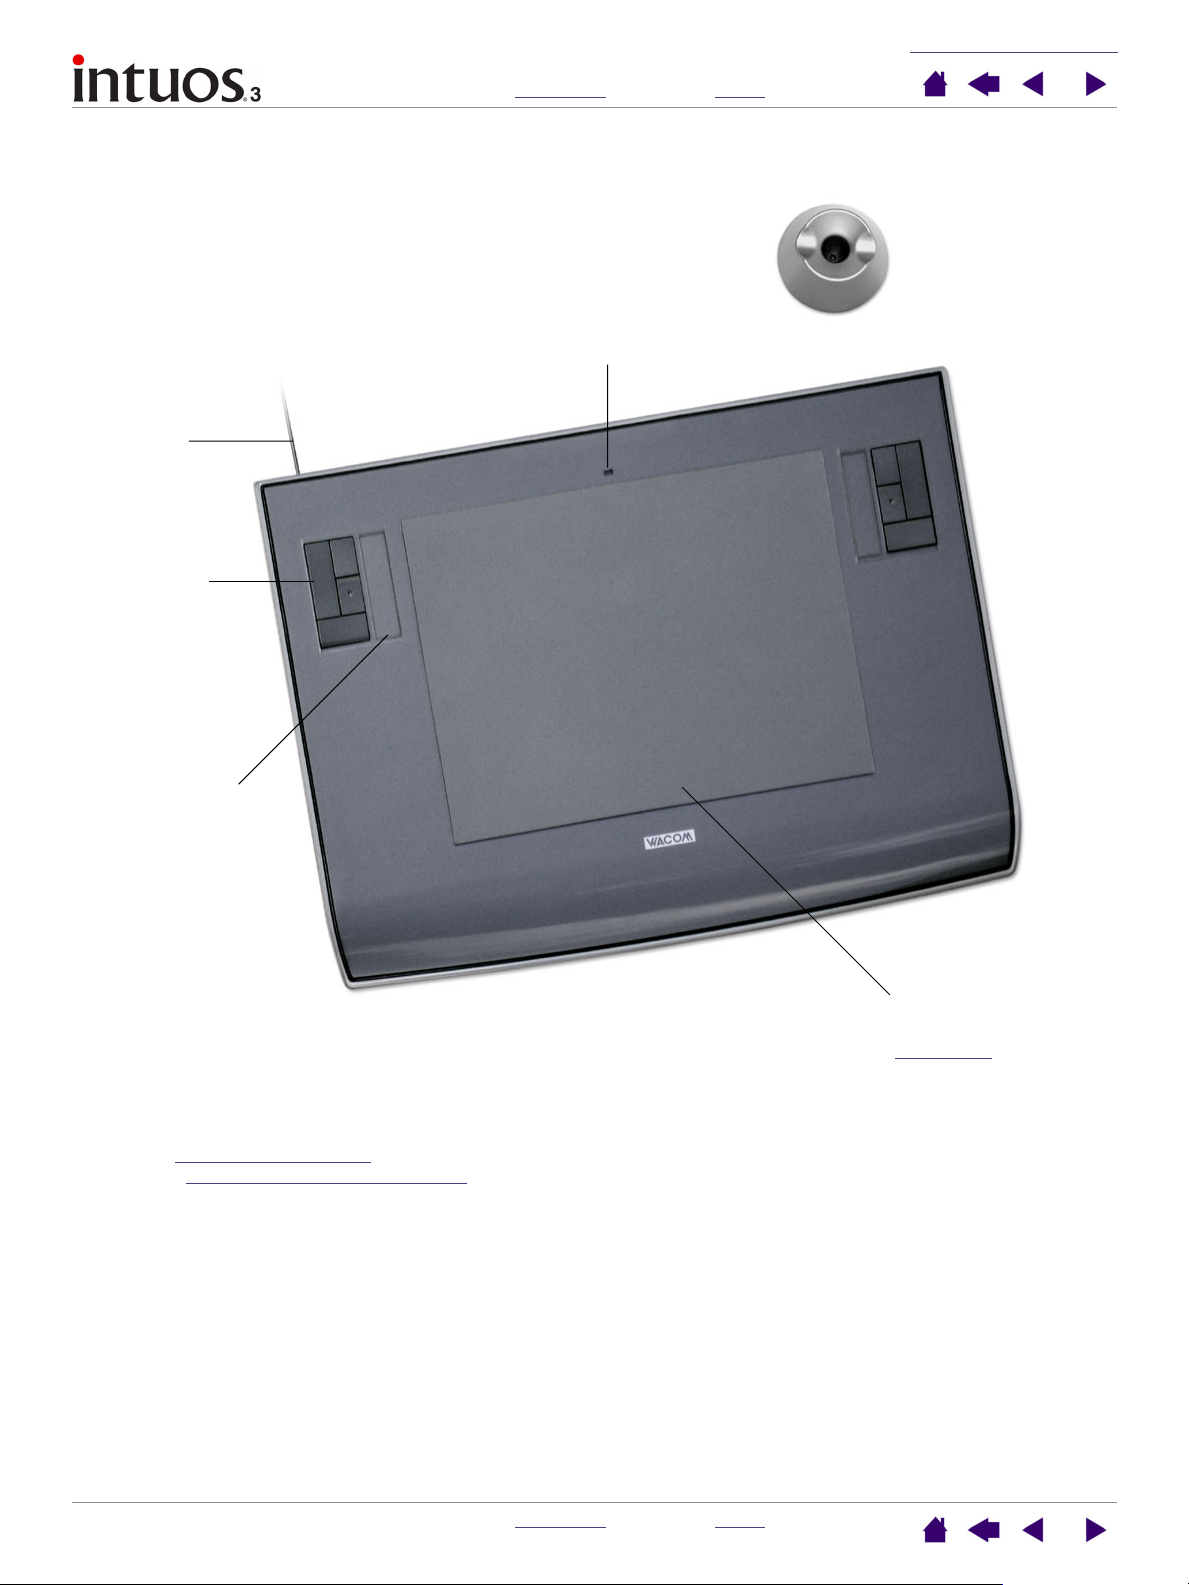
Intuos3 tablet features
Cable
Recessed cable
tracks on the back
of the tablet allow
the cable to exit
the top or left of
the tablet.
Customizable
Tablet Keys
O
C
NTENTS
Status LED
ORKING
W
I
DEX
N
WITH
NTUOS
I
8
3
Pen stand
Touch Strip controls
Note: 4x5/A6 tablet
models come equipped
with Tablet Keys and a
single Touch Strip
located to the left of the
tablet’s active area.
Note: Intuos3 6x8/A5 tablet shown. To learn more about your
tablet, see working with the tablet. For a complete listing of Intuos3
tablets, see ordering parts and accessories.
Tablet work surface
Identifies the tablet
activ
e area.
O
C
NTENTS
N
I
DEX
8
Page 9
O
C
NTENTS
ORKING
W
I
DEX
N
WITH
NTUOS
I
9
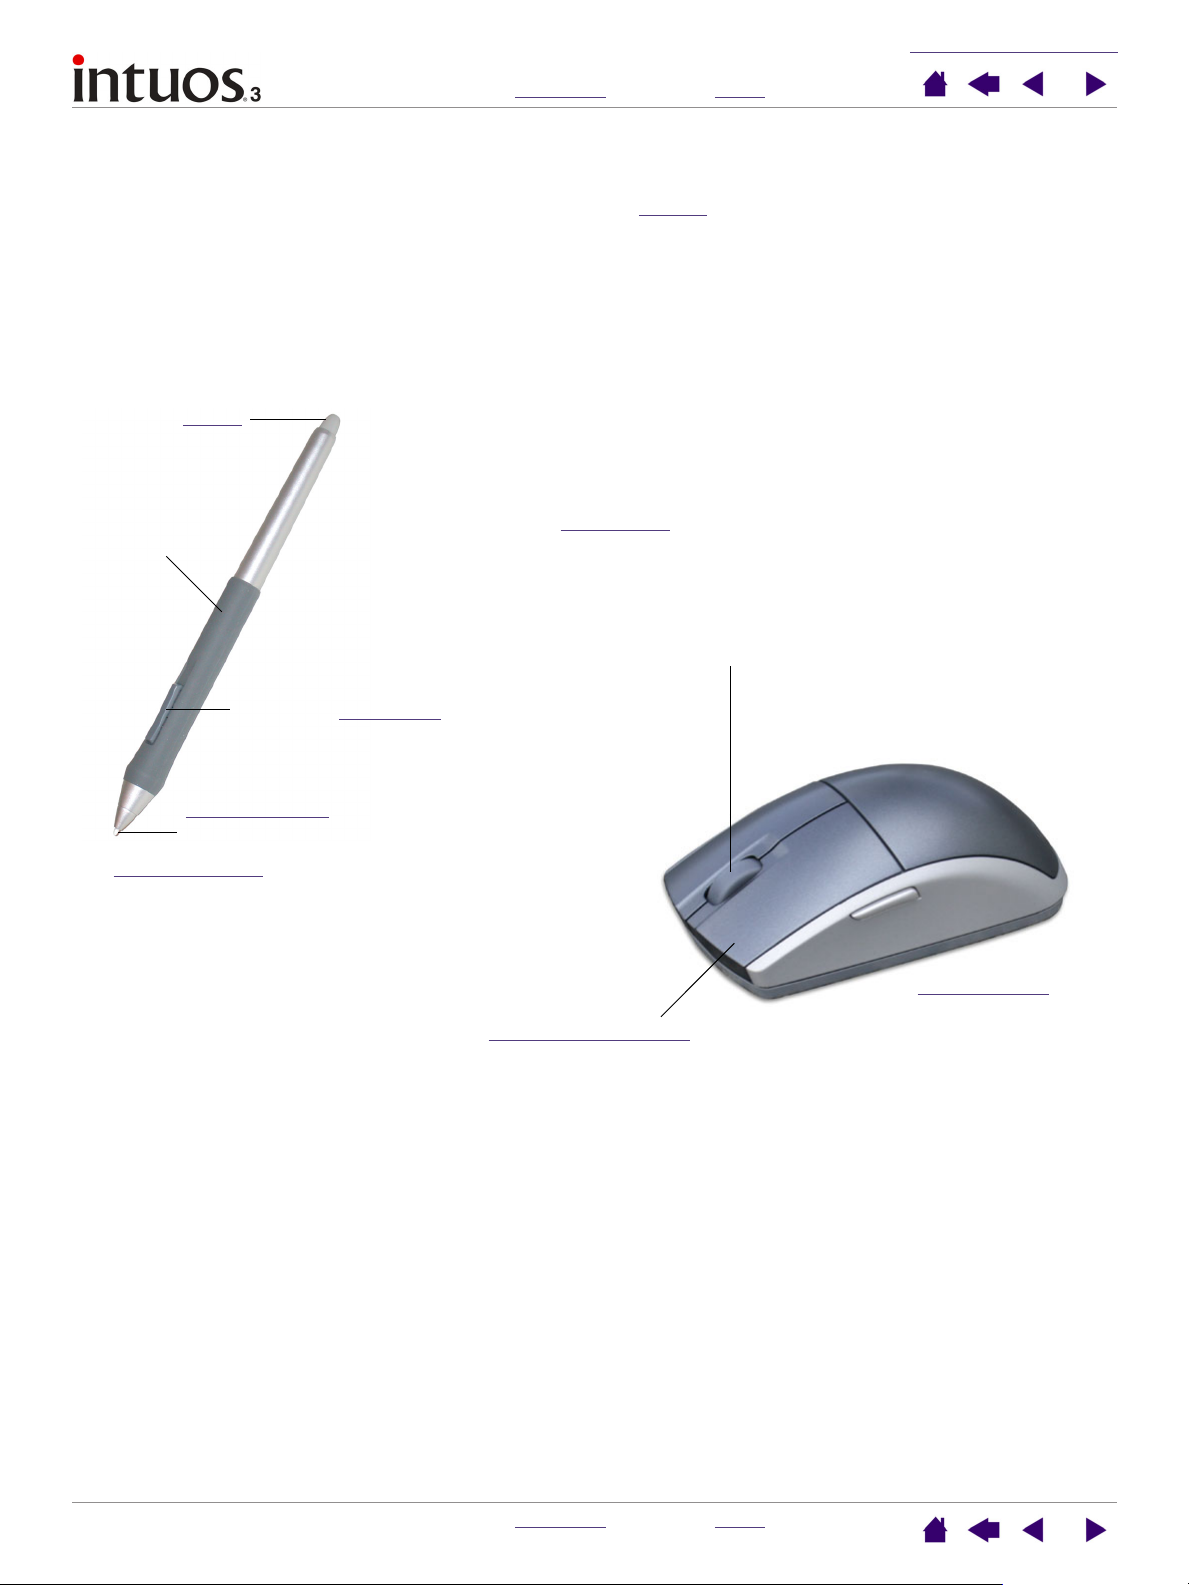
Intuos3 input tools
Various input tools are available for your tablet. All Intuos3 tools are cordless, batteryless, and
ergonomically designed. Each tool also features a unique T
tools and to customize each tool differently.
The Intuos3 Grip Pen is a pressure-sensitive freehand tool for image editing and creating natural-looking
pen and brush strokes.
If you prefer to use a mouse for general navigation, pointing, and clicking, just set aside your Intuos3 Pen
and place the Intuos3 Mouse on the tablet – the mouse is cordless and symmetrically designed so you can
use it just as easily in your left or right hand.
Eraser
Rubberized
grip area
Fingerwheel. An integrated
middle button and rolling
wheel that can be used for
up and down scrolling in the
active window. It can also
be customized to perform a
variety of button functions.
ool ID, which enables you to work with multiple
3
Removable DuoSwitch
(rocker style)
Replaceable nib
(standard or stroke tip)
Intuos3 Grip Pen
Programmable buttons can be
customized for the way you like to work.
Note: Some product configurations may not include the Intuos3 Mouse.
Intuos3 Mouse
O
C
NTENTS
N
I
DEX
9
Page 10

O
C
NTENTS
ORKING
W
I
DEX
N
WITH
NTUOS
I
10
Intuos3 optional tools
Like the Intuos3 Grip Pen, the optional Airbrush is a pressure-sensitive freehand tool for image editing and
creating natural-looking pen and brush strokes.
Er
aser
Side switch
Fingerwheel
3
Replaceable nib
Intuos3 Airbrush (optional accessory)
Replaceable nib
(standard or inking tip)
Intuos3 Ink Pen (optional accessory)
The Ink Pen is pressure-sensitive and comes with
replaceable inking cartridges. With the Ink Pen you
can write or draw as you do with a regular pen – just
place a sheet of paper on your tablet and everything
you write will be captured on paper and on your
computer.
For information on these and other available Intuos3 tablets, tools, or parts and accessories, see order
ing
parts and accessories. Visit Wacom’s web site f or a list of applications supporting the Ink Pen and Airbrush
features. See product inf
ormation.
O
C
NTENTS
N
I
DEX
10
Page 11

O
C
NTENTS
ORKING
W
I
DEX
N
WITH
NTUOS
I
11
Setting up your work area
To minimize fatigue, organize your work area so you can work comfortably. Position your tablet, input tools,
and keyboard so they are easily accessible without unnecessary reaching. Your monitor should be
positioned so you can view it comfortably with a minimum of eyestrain. For best results, orient the tablet so
the screen cursor follows the same direction as your hand movements on the tablet.
Here are some other points to keep
in mind:
•Take short breaks between
tasks to stretch and relax your
muscles.
• Use a gentle grip when working
with your tools.
• Alternate tasks and tools
throughout the day.
• Maintain a good posture at all
times. Minimize awkward
postures and repetitive
movements that cause
discomfort.
• Change your position if you feel
any discomfort due to your work
position.
3
Note: Wacom makes no representation, promise or guarantee that Wacom products will cure or prevent, in
whole or in part, mouse-induced repetitive stress symptoms, injuries or conditions. Individual results may
vary. Alw a ys obtain competent medical advice to determine the most appropriate treatment for your specific
situation.
See w
orking with the tablet for additional information.
O
C
NTENTS
N
I
DEX
11
Page 12

O
C
NTENTS
ORKING
W
I
DEX
N
WITH
NTUOS
I
12
Using the Grip Pen
The Intuos3 Grip Pen is cordless, batteryless, and pressure sensitive. There are four basic techniques for
using the pen: pointing, clicking, double-clicking, and dragging. With a bit of practice, using the pen will
become second nature to you. If you are unfamiliar with using the pen, try the exercises on the following
pages.
Holding the Pen
ointing
P
Clicking
Dragging
Using the side switch
Drawing with pressure-sensitivity
Drawing with tilt
Erasing
Eye-hand coordination exercise
3
Holding the Pen
Hold the Intuos3 Pen like you would a normal pen or pencil. Make sure the DuoSwitch is in a convenient
location where you can toggle it with your thumb or forefinger, but not accidently press the switch while
drawing. You can tilt the pen in any way that feels most comfortable for drawing.
Position for drawing
Your tablet comes with a free-standing pen stand that is used to
hold your pen when it is not in use. Position the pen stand within
easy reach of your tablet. When you are between tasks, store
the pen either horizontally or vertically in the pen stand; this
makes the pen available for quick, easy access when you are
working.
Important: When the Intuos3 Pen is not in use, place it
in the pen stand or lay it flat on your desk. To maintain
the sensitivity of your pen tip, do not store the pen in a
container where it will rest on its tip. Leaving an Intuos3
tool on the tablet may interfere with screen cursor
positioning when using other pointing devices.
Position for erasing
O
C
NTENTS
N
I
DEX
12
Page 13

O
C
NTENTS
ORKING
W
I
DEX
N
WITH
NTUOS
I
13
Pointing
The Intuos3 Pen positions the pointer (or cursor) on your screen. You can position the screen cursor two
EN
different ways, like a pen (P
• In P
EN
mode, the tablet’s active area is a mapped representation of your computer screen where every
mode) or like a mouse (M
point on the active area corresponds to exactly one point on the display screen; wherever you place the
pen on the tablet, the screen cursor will jump to the corresponding point on the screen. This is the
default setting for the pen.
OUSE
• In M
mode, the def ault setting f or the Intuos3 Mouse , you mo v e the cursor with a “pic k up and slide”
action similar to using a traditional mouse.
OUSE
mode).
Try moving the screen cursor by lifting the pen and
placing the pen tip in a new location on the tablet.
The cursor instantly jumps to the new location.
3
When positioning the screen cursor and operating the side
switch, the pen tip needs to be within 6 mm (0.25 inch) of
the tablet surface . You do not need to touch the tablet with
the pen tip in order to move the screen cursor or use the
side switch.
All Intuos3 tools, including the mouse, work only over the
active area of the tablet.
Hints:
• If you are used to working with a mouse and find that using a pen is somewhat difficult,
try the ey
•Pointing is easier when you orient the tablet so the screen cursor follows the same
direction as your hand movements on the tablet.
e-hand coordination exercise.
6 mm (0.25 inch)
O
C
NTENTS
N
I
DEX
13
Page 14

ORKING WITH INTUOS
W
3
O
C
NTENTS
I
DEX
N
14
Clicking
You typically click to highlight or select something on the screen, and double-click to open it.
Clicking.
register a click. (There is no audib le pen tip “click” sound.) Try clicking on a folder icon by moving the screen
cursor over the icon and pressing down on the pen tip. The folder should highlight when you press.
Double Clicking.
clicking twice with a mouse button. Try double-clicking on a folder icon to open it.
Hints:
• Press the upper side switch to double-click in Windows, or the
• Windows: You can make navigating with the pen easier by
To click, tap the pen tip once on the tablet, or press the pen tip on the tablet with enough force to
To double-clic k, quic kly tap the tab let twice in the same place with the pen tip. This is like
lower switch to doub le-click on Macintosh systems . This is easier
than tapping twice with the pen tip, and is the preferred method of
double-clicking with a pen.
configuring Windows to select when the pen is over an icon and
to launch the icon with a single click. To turn on this feature:
Windows Me, 2000, or XP: Open a folder, select the TOOLS pull-
down menu, and FOLDER OPTIONS.... From the GENERAL tab
select the option SINGLE-CLICK TO OPEN AN ITEM (POINT TO
SELECT).
Windows 98: Open a folder, select the
and F
OLDER OPTIONS.... From the GENERAL tab select the WEB
STYLE option.
VIEW pull-down menu,
Dragging
Dragging is used to select and move objects on the screen. To drag, first point to an object. Then press the
pen tip to the tablet and slide it across the tablet surface. The selected object will move across the screen.
To select text, mov e the screen cursor to the beginning of a te xt line , then drag the pen across the tablet until
the text is highlighted.
First, try moving an icon on the screen. Then, within a
document, select some text by pressing and dragging
the pen tip across the text.
O
C
NTENTS
N
I
DEX
14
Page 15

WORKING WITH INTUOS3
CONTENTS
INDEX
15
Using the side switch
The Intuos3 Grip Pen is equipped with a DuoSwitch. This switch has two programmable functions that can
be selected by rocking the switch in either direction. You can use the DuoSwitch whenever the pen tip is
within 6 mm (0.25 inch) of the tablet’s active area. You do not have to touch the pen tip to the tablet in order
to use the switch.
Windows: The upper switch position is set to DOUBLE-CLICK,
and the lower switch is set to RIGHT-CLICK by default.
Macintosh OS X: The upper switch is set to I
and the lower switch is set to DOUBLE-CLICK by default.
NK TOGGLE,
Hint: Press the upper side switch to double-click in Windows, or the lower side switch to
double-click on Macintosh systems. This is easier than tapping twice with the pen tip.
Note: The DuoSwitch on the Grip Pen can be removed if you do not need the switch
functionality. See other par
grip for use with the side switch removed.
To assign new switch functions, see customizing tool b
ts and accessories for inf ormation on ordering an alternate pen
uttons.
CONTENTS
INDEX
15
Page 16

WORKING WITH INTUOS3
CONTENTS
INDEX
16
Drawing with pressure-sensitivity
The Intuos3 Pen responds to the nuance and inflection of your hand movements, enabling you to create
natural-looking pen and brush strokes. Many graphics applications have drawing tools that respond to the
pressure you place on the pen. For example, in some drawing programs sliders are used to vary brush
characteristics (width, color, and opacity). These characteristics can be controlled much better by the pen’s
pressure-sensitivity – you can vary line width, blend colors, and change opacity with the pressure you exert
upon the pen.
To draw with pressure-sensitivity, first select a pressuresensitive tool from your application’s tool palette. Then draw
along the surface of the tablet while applying v arious amounts
of pressure downward on the tip of the pen. Press hard for
thick lines or dense color. Press gently for thin lines or softer
color. To adjust the tip feel, see adjusting tip feel and double-
click.
Visit our web site for a list of graphics applications that support
pressure. See product information.
Drawing with tilt
As with pressure-sensitivity, the tablet recognizes when you tilt the pen from vertical to inclined positions.
In some drawing applications, tilt can be used to control line shape and thickness. This is like working with
an airbrush where tilt can be used to make a line thin when the tool is vertical, or wide when the tool is tilted.
In other applications, you can adjust tilt to define brush characteristics such as width, color and opacity.
To test tilt, draw a curve in a graphics application (such as
Painter) that supports tilt. Be sure that the tilt function in
your application is active, then change the tilt of the pen as
you draw to vary the shape and thickness of the brush
stroke.
As an example, when the brush shape dynamics in
Photoshop have been configured for tilt operation, tilting
the pen results in an elongated pattern. This simulates
the effects of an airbrush spray that is angled away from
the paint surface.
To adjust the amount of pen tilt required to produce a desired tilt effect in your application, see customizing
tilt sensitivity. Visit our web site for a list of applications that support tilt. See product information.
CONTENTS
INDEX
16
Page 17

WORKING WITH INTUOS3
CONTENTS
INDEX
17
Erasing
The eraser on the Intuos3 Pen works like the eraser on a pencil. In graphics applications that support the
pen’s eraser, you can erase intuitively and naturally. When you use the pen’s eraser, the application will
automatically switch to the eraser tool. In applications that support pressure-sensitivity, you can select
pressure-sensitive tools in an application’s tool palette to vary the width and depth of your erasures as you
change the amount of pressure you exert upon the pen.
You can also use the eraser in many standard office applications. The eraser will not be pressure sensitive
in these applications, but you can use it to select and delete text or spreadsheet cells.
Try your eraser by opening Notepad (Windows) or TextEdit (Macintosh) and typing a few words. Use the
eraser to select the text. When you lift the eraser, the text will be deleted. For further information on using
your eraser, see adjusting er
aser feel.
Visit our web site for a list of graphics applications that support the eraser (see product information). If the
eraser is not supported in an application, you can still use the eraser for navigating and drawing.
CONTENTS
INDEX
17
Page 18

WORKING WITH INTUOS3
CONTENTS
INDEX
18
Eye-hand coordination exercise
If you use a mouse, you may remember how long it took to get used to positioning the screen cursor.
Your Intuos3 Grip Pen, likewise, will take a bit of practice to master the technique of positioning the screen
cursor in P
This exercise is designed to retrain your eye-hand coordination for using the pen:
1. Open any graphics application. Use the line tool to draw a rectangular grid with line spacings of about
20-25 mm (3/4 to 1 inch). You can use your traditional mouse to do this.
2. Choose a free-hand tool in your application and use the pen to draw a dot at each grid intersection.
3. Draw an X at each grid intersection.
4. Now draw a circle around each intersection. Your screen should look like this:
EN mode. This may seem difficult at first, but it is more natural and faster than in MOUSE mode.
5. Clear your screen and make a simple drawing of your own. The more you use your Intuos3 Pen, the
easier drawing and navigation will become.
CONTENTS
INDEX
18
Page 19

WORKING WITH INTUOS3
CONTENTS
INDEX
19
Using the Mouse
The Intuos3 Mouse is a cordless, batteryless, maintenance-free mouse that works on any Intuos3 tablet.
The left and right side buttons are set for Back and
Forward functionality within your Internet browser.
The right button is set to
RIGHT-CLICK by default, and
displays a context menu when
pressed.
The left button is set to CLICK by default, and
is the primary button used for selecting.
The fingerwheel can be rolled, or pressed down for an
additional button function.
• Rolling. By default, rolling the fingerwheel will scroll in
most windows and applications. Move the fingerwheel
forward to scroll up , and back to scroll do wn. You can also
set the fingerwheel to issue a custom keystroke for each
notch of wheel movement. This is useful when working
with repetitive functions, such as zooming in Photoshop or
moving forward and backward within your Internet
browser.
• Wheel button. Press down on the wheel to perform a
button click. The wheel button is set to middle-click by
default.
Hint: For MS Office applications that support
a wheel mouse, press the C
the fingerwheel to zoom in and out.
TRL key and move
Note: Some product configurations may not include the Intuos3 Mouse.
Important: When the Intuos3 Mouse is not in use, place it on your desk. Leaving an Intuos3 tool on
the tablet may interfere with screen cursor positioning when using other pointing devices, or may
prevent your computer from going to sleep.
To learn how to adjust the mouse behavior for your preferences, see customizing the
CONTENTS
INDEX
mouse.
19
Page 20

WORKING WITH INTUOS3
CONTENTS
INDEX
20
Using the Airbrush
The optional Intuos3 Airbrush works like the pen, but also includes a fingerwheel for an additional degree of
control. With proper software support, you can simulate realistic airbrushing. For example, tilting the
Airbrush can cause the spray pattern to elongate and feather out. Rolling the fingerwheel can adjust the
spray intensity, and pressure on the tip can control the brush size.
All other functions work similarly to the pen. For additional information, see using the
Important: When the Airbrush is not in use, lay it flat on your desk. To maintain the sensitivity of
your Airbrush tip, do not store the Airbrush in a container where it will rest on its tip. Leaving an
Intuos3 tool on the tablet may interfere with screen cursor positioning when using other pointing
devices.
Hold the Airbrush with your thumb and middle finger. The fingerwheel should be in a conv enient location f or
you to roll it with your inde x finger . Tilt the Airbrush to find a comfortable position that allows y ou to paint and
draw with pressure-sensitivity.
For Windows, the side switch is set for a RIGHT-CLICK by
default. For Macintosh, the switch is set for DOUBLE-CLICK.
Grip Pen.
Roll the fingerwheel backwards to increase ink flow
or brush size, and forward to reduce it.
Your index finger should operate the wheel
independently of the pressure you apply to the tip.
Visit Wacom’s web site to learn where to purchase an Intuos3 Airbrush, and which applications currently
support the Airbrush fingerwheel. See product inf
ormation.
CONTENTS
INDEX
20
Page 21
WORKING WITH INTUOS3
CONTENTS
INDEX
21
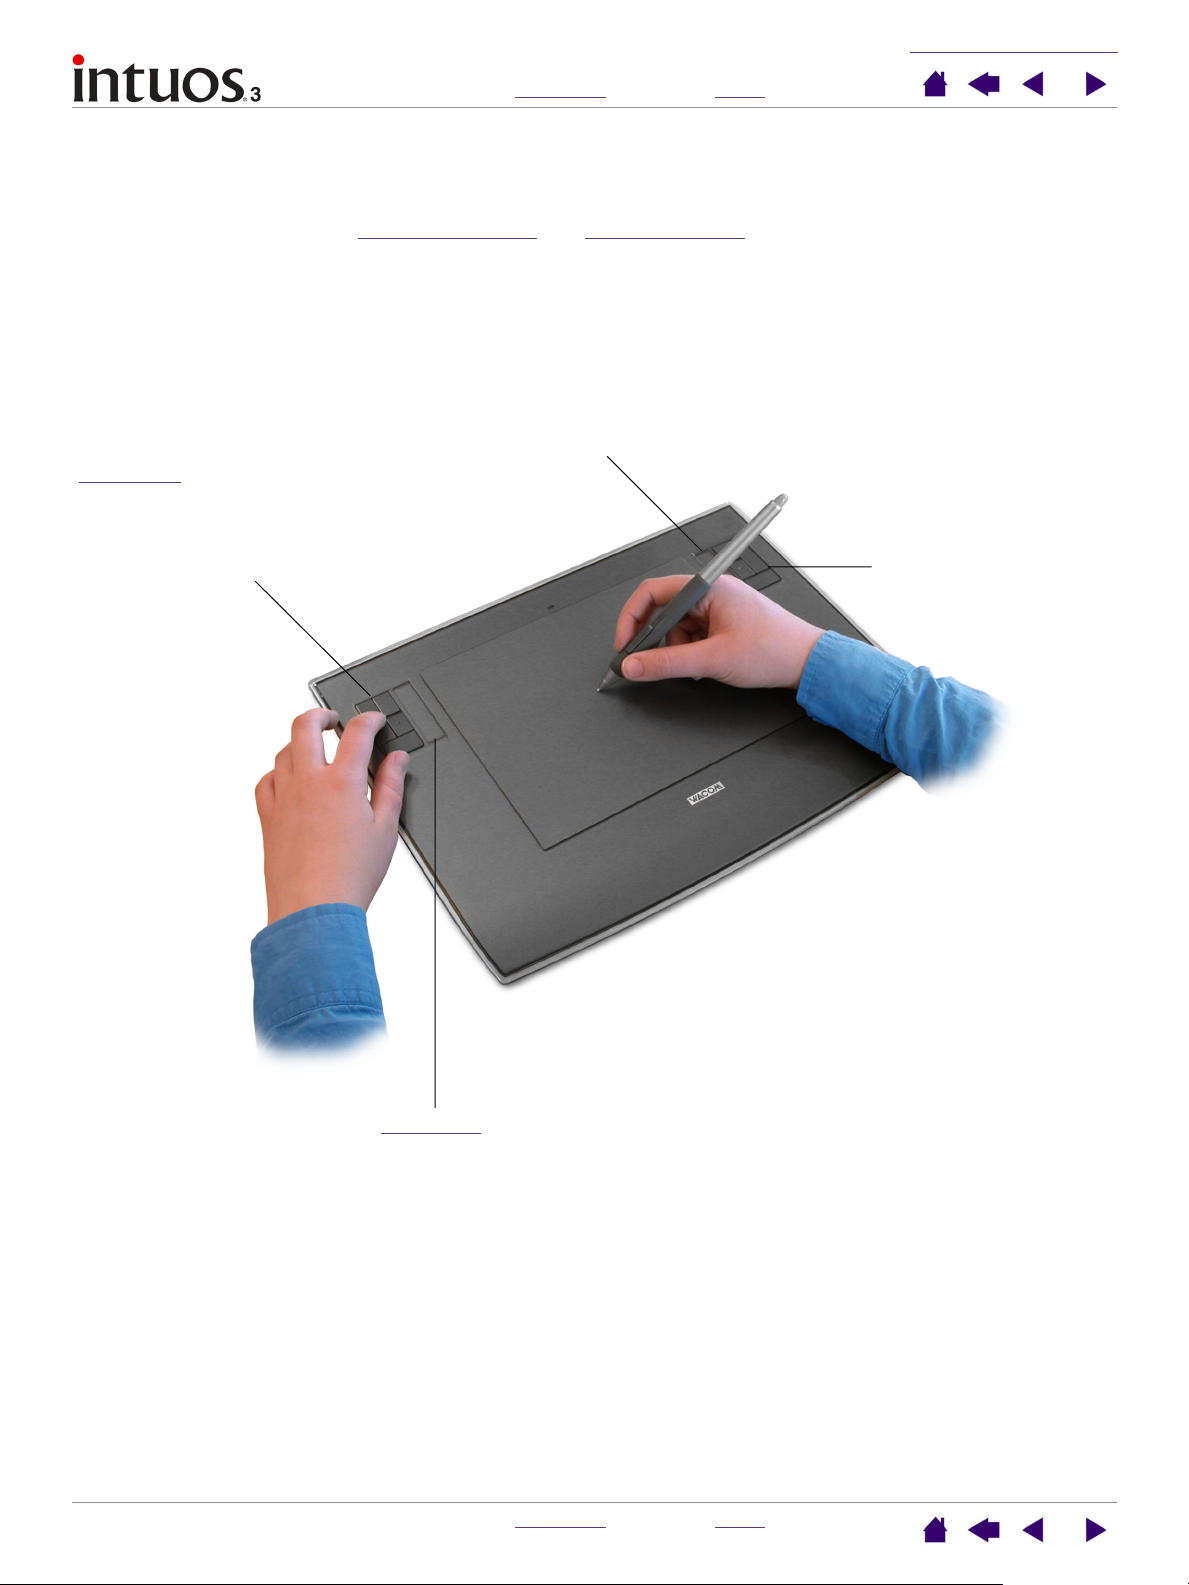
Working with the tablet
The middle area of the Intuos3 tablet is the working, or active, area for the pen and mouse. Rest your hand
on the tablet and then work with the pen on the active area of the tablet just as if you were using a ball point
pen on a piece of paper. See using the
input devices on the tablet.
To speed up your workflow in graphics and other applications, all Intuos3 tablets feature Tablet Keys and
Touch Strip(s) located next to the tablet’s active area. While using the pen with your dominant hand on the
active area, you can simultaneously use your other hand to operate the Tablet Keys or Touch Strip.
For example, you can change the properties of your tool without removing your hands from the Intuos3
tablet. (Note that 4x5/A6 tablet models come with Tablet Keys and a single Touch Strip.)
Tablet Keys. Press the customizable Tablet
Keys to perform frequently used functions or
keystrokes. By default, the keys emulate
keyboard modifier keys. In Photoshop, this
provides quick access to the grabber hand and
alternate tools.
Grip Pen and using the mouse for more information about using your
Touch Strip.
Tablet Keys.
6x8/A5 tablet shown.
T
ouch Strip. Slide your finger over the Touch Strips to zoom,
scroll, or perform custom keystroke actions. By default, the
Touch Strips enable you to zoom in most graphics applications
and to scroll in other applications. You can also set them to
issue custom keystrokes. For example, you might set a Touch
Strip function to change brush sizes when working in
Photoshop.
CONTENTS
INDEX
21
Page 22

WORKING WITH INTUOS3
CONTENTS
INDEX
22
Using the Tablet Keys
Press the Tablet Ke ys with y our secondary hand to toggle between tools or change tool properties while you
are using your primary hand to work with your pen on the Intuos3 tablet. The default settings were chosen
to optimize your workflow in Photoshop and other graphics applications, using the following modifier keys:
Button 1: C
Button 2: SHIFT modifier key.
Button 3: ALT modifier key for Windows. OPTION modifier key for Macintosh.
Button 4: SPACE key (spacebar).
TRL modifier key for Windows. COMMAND (Apple key) for Macintosh.
2
1
3
4
2
3
4
6x8/A5 tablet shown.
1
The Tablet Keys are chordab le. For example , pressing ke ys 3 and 1 together simulates
ALT+CTRL in Windows, or OPTION+COMMAND on Macintosh systems.
Tips:
• In Photoshop, pressing the spacebar (key 4 on your Intuos3 tablet) switches the
currently selected tool to the hand tool and lets you pan (move) the image within
the application window.
• In Photoshop and many other graphics applications, the ALT, CTRL, and SHIFT
modifier keys modify a tool or switch to a complementary tool while the modifier
key is pressed.
The Tablet Keys are fully customizable, enabling you to make the best possible use of them. You may want
to consider the following ways of working with the Tablet Keys:
• Set a pair of keys to commonly used keystrokes, such as [ and ] to decrease and increase your brush
size in Photoshop.
• Set a key to a commonly used keyboard shortcut in order to open files or start an application.
• If you prefer not to (or cannot) use the side switches on your Intuos3 Pen, then set a Tablet Key to rightor double-click.
• Choose from any of the other available functions.
See customizing
Tablet Keys for more details on the available Tablet Key settings.
If you require different key functions in different applications, you can easily set up application-specific
settings for the tablet controls. See creating an application-specifi
c setting for more information.
CONTENTS
INDEX
22
Page 23
WORKING WITH INTUOS3
CONTENTS
INDEX
23
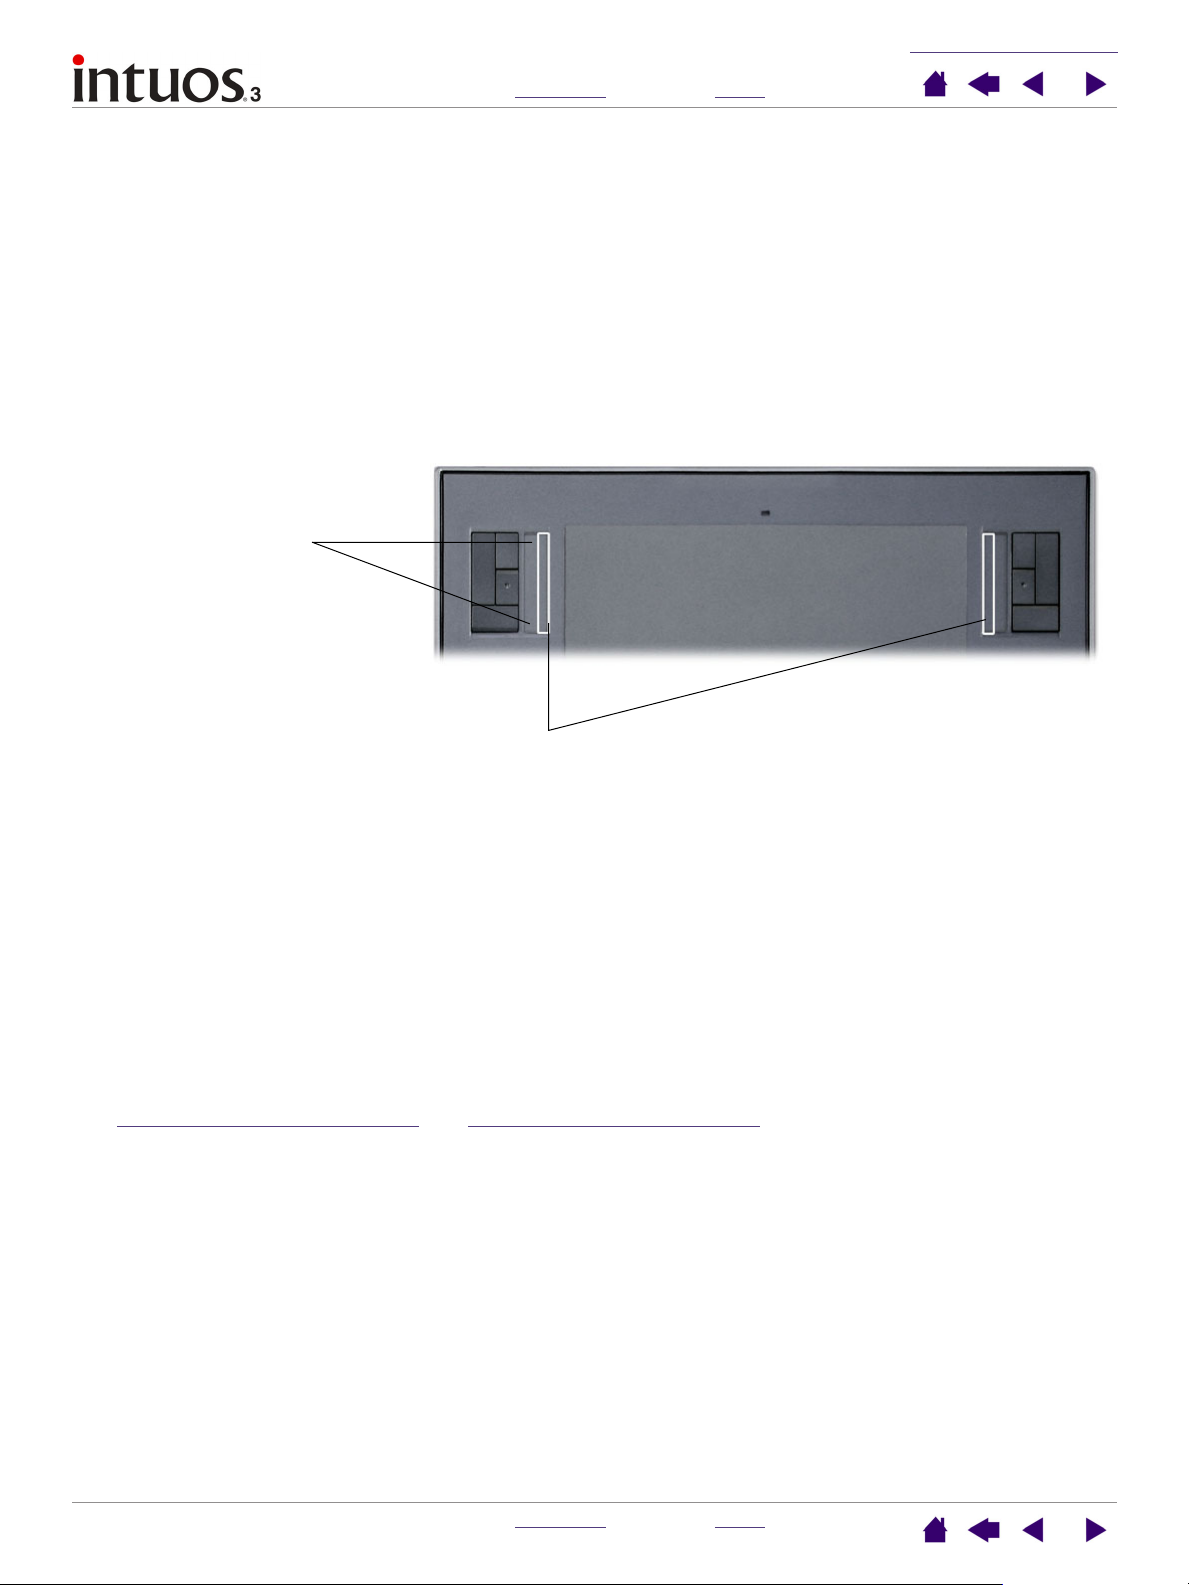
Using the Touch Strips
Slide your finger over the Touch Strip to quic kly z oom in or out, scroll up or down, or perform other functions
with your secondary hand while using your dominant hand to work with your pen or mouse. You can also set
each Touch Strip to issue custom keystrokes. For example, you might set a Touch Strip action to cycle
through layers when working in Photoshop. You can use the Touch Strips in three different ways:
• Standard operation: Slide your finger up or down to zoom, scroll, or issue the assigned keystroke
function.
• Continuous operation: Press and hold your finger at either end of the Touch Strip to continuously
scroll. This is useful for scrolling through long documents or web pages.
• Single step operation: Press and release your finger at either end of the Touch Strip to zoom, scroll, or
issue the assigned keystroke function one step at a time.
Press and hold here for
continuous operation, or
press and release for
single step operation.
6x8/A5 tablet shown.
To use the tip of your Intuos3 Pen to operate the Touch Strip, rest the pen tip against
the edge of the Touch Strip adjacent to the tablet’s active area. Then press hard
enough to issue a click and move the pen tip up or do wn along the Touch Strip edge.
(Only the inside edge of the Touch Strip responds to pen input.)
By default, the Touch Strips enable you to zoom in most graphics applications and to scroll in other
applications. Each Touch Strip can be independently customized to meet your needs.
Many applications support two methods of zooming. In Photoshop, Painter, and some other applications,
you can specify the center point for z ooming by pointing with y our Intuos tool while oper ating the Touch Strip
(make sure you are pointing inside the document window with an Intuos tool). Otherwise, the image will
zoom centering on the document window.
Tip: Photoshop users who frequently change brush sizes may want to assign the [ and ] keys to a Touch
Strip. Sliding your finger up or down the Touch Strip will then change the brush size without the need to
reach for the keyboard or access the Photoshop B
RUSHES palette.
See customizing tablet Touch Strips and advanced Touch Strip settings if you would like to customize the
way your tablet Touch Strip(s) work.
CONTENTS
INDEX
23
Page 24

CONTENTS
INDEX
24
CUSTOMIZING
After you master the basics of using your Intuos3 professional pen tablet, you may want to customize the
way Intuos3 works. This chapter describes how to use the Wacom Tablet control panel to adjust your
Intuos3 tablet and tool settings.
Advanced users can learn how to further optimize Intuos3 by creating application-specifi
Opening the control panel
Control panel o
verview
Control panel settings
Opening the control panel
To open the control panel, use the Intuos3 tool you wish to customize on the tablet:
• Windows. Click on the Windows START button and choose ALL PROGRAMS. (For versions other than
Windows XP, choose the P
ABLET option.
T
• Macintosh. Open SYSTEM PREFERENCES from either the Dock, the Apple menu, or from the
PPLICATIONS folder. Then double-click on the WACOM TABLET icon.
A
ROGRAMS group.) Then select WACOM TABLET and choose the WACOM
c settings.
After you have opened the Wacom Tablet control panel, you can begin customizing Intuos3.
CONTENTS
INDEX
24
Page 25

CUSTOMIZING
CONTENTS
Control panel overview
Use the Wacom Tablet control panel to customize Intuos3.
The upper portion of the control panel displays icons representing your
ABLET, TOOLs, and the APPLICATIONs with customized tool settings.
T
Tabs display
customizable settings
for the selected tool.
INDEX
25
Choose F
customize your tablet
control and Pop-up
Menu settings.
Choose PEN to
customize your
Intuos3 Pen settings.
Choose MOUSE to
customize your
Intuos3 Mouse
settings.
UNCTIONS to
Displays a dialog
box containing
information about
the tablet and tablet
software, including
an option to access
IAGNOSTICS
the D
dialog box.
Displays advanced options.
Displays this User’s Manual.
The D
EFAULT button
resets the selected
tab to its default
settings.
As you explore the control panel, experiment with different settings to find what works best for you.
Any changes you make will take effect immediately, but you can always click D
factory settings. See control panel settings
for more information on the features and functions of each tab.
EFAULT to return a tab to the
Tool Tips are available for most control panel items. Simply position the screen cursor ov er an item and let it
rest there; in a few moments the Tool Tip will pop up.
Additionally, your keyboard tab and arrow keys can be used to navigate the control panel.
CONTENTS
INDEX
25
Page 26

CUSTOMIZING
CONTENTS
INDEX
26
Control panel lists and tabs: The control panel TABLET, TOOL, and APPLICATION lists allow you to select the
tablet, tool, or application for which you want to change settings. To change tool settings, open the control
panel using the tool you wish to customize. The tool will be automatically selected in the T
appropriate tabs will be displayed. To customize settings for a different tool, select it from the T
clicking on its icon (the appropriate tabs will be displayed). See customizing the
pen, customizing the
OOL list, and the
OOL list by
mouse, and customizing the tablet functions for more information.
The TABLET list displays an icon for any
supported tablet that has been installed on
your system. All settings shown below this
list apply to the selected tablet.
The TOOL list displays an icon for the tablet
FUNCTIONS, and for each Intuos3 tool that has
been used on the tablet. When a new tool is
first used on the tablet it is automatically
added to the tool list, and functions with the
default settings. See also working with
multiple tools.
The APPLICATION list lets you define tool
settings that only apply to a specific
application. See working with application-
specific settings.
Your current selections are highlighted.
Note: The control panel A
PPLICATION list is for advanced users; it is not necessary to select or add
applications in order to customize your Intuos3 tool(s).
Control panel settings
Use these sections as a reference when working with the Wacom Tablet control panel; they provide detailed
information about each tab and some of the more complex topics. Many of the sections also contain useful
customizing tips.
Customizing the P
Customizing the Mouse
Tablet to screen mapping
Customizing the tablet functions
Customizing the Pop-up Menu
Working with multiple tools
Working with application-specific settings
en
CONTENTS
INDEX
26
Page 27

CUSTOMIZING
CONTENTS
INDEX
27
Customizing the Pen
Customizing your Intuos3 Pen is easy. First open the Wacom Tablet control panel using the pen. The pen
will be selected in the T
available options.
Customizing tool buttons
OOL list and the appropriate tabs will be displayed. Select a tab and choose from the
Adjusting eraser feel
Customizing tilt sensitivity
Tablet to screen mapping
Adjusting tip feel and double-click
Working with application-specific settings
CONTENTS
INDEX
27
Page 28

CUSTOMIZING
CONTENTS
INDEX
28
Adjusting tip feel and double-click
To adjust the tip sensitivity of your Intuos3 Pen, select the PEN tab. To create broad brush strokes or to click
with a light touch, use a soft tip setting. For maximum control while drawing thin lines, use a firm tip setting.
Customizes the amount of pressure
needed to click or draw. Drag the
slider to a softer or firmer setting.
Displays the tip F
box where you can further
customize the tip sensitivity.
Press down on the tablet with your
pen tip to test the current tip feel
setting. You can use the C
PRESSURE bar to determine how
hard you must press on the pen to
reach maximum pressure.
EEL DETAILS dialog
URRENT
Adjusts the size of the double-click area.
A larger setting makes double-clicking
easier.
Drag the slider to the O
FF position if you
do not want double-click assist.
Hints:
• Use a soft T
IP FEEL for a wider range of pressure values with most pressure-sensitive
applications.
• In some applications a soft pressure setting can make the pen overreact – any small
press on the pen is magnified on the screen. If you experience this, try a firmer TIP
FEEL setting.
• Double-clicking: To make double-clicking easier, expand the tap area that accepts a
double-click (the double-click distance).
Note: A large double-click distance may cause a delay at the beginning of your
brushstrokes in some drawing applications. If you notice such effects, try setting a
smaller double-click distance and using the side switch to double-click (see using the
side switch). You can also set one of the Tablet Keys to double-click.
Returns the tab settings
to their factory default
conditions.
CONTENTS
INDEX
28
Page 29

CUSTOMIZING
CONTENTS
INDEX
29
Adjusting eraser feel
To adjust the eraser sensitivity of your Intuos3 P en, select the ERASER tab. To erase with a broad stroke or to
click with a light touch, use a soft eraser setting. For maximum control while erasing, use a firm eraser
setting.
Select the button functions to
perform when using the eraser.
Customizes the amount of pressure
needed to erase. Drag the slider to a
softer or firmer setting.
Displays the eraser F
dialog box where you can further
customize the eraser sensitivity.
EEL DETAILS
With your screen cursor positioned
over an empty area of your desktop,
press down on the tablet with your
tool’s eraser to test the current
eraser feel setting. You can use the
C
URRENT PRESSURE bar to
determine how hard you must press
on the eraser to reach maximum
pressure.
Returns the tab
settings to their factory
default conditions.
CONTENTS
INDEX
29
Page 30

CUSTOMIZING
CONTENTS
INDEX
30
Advanced tip and eraser pressure settings
To further customize tip or eraser pressure settings, from the PEN or ERASER tab click on the DETAILS...
button to display the F
tip or eraser pressure sensitivity and click threshold settings independently. (In the P
these settings are adjusted simultaneously with the T
Important: The TIP FEEL or ERASER FEEL slider overrides the detail pressure settings. If you
customize the detail settings, then drag the slider, your detail settings will be removed.
Drag the slider to select a
pressure sensitivity setting.
If you have a soft touch and
want to achiev e full pressure
without having to apply full
force to your pen, choose a
softer setting.
Drag the slider to adjust
the click threshold level.
This setting determines
the amount of force
required to generate a tip
click.
EEL DETAILS dialog box. The options within this dialog box enable you to change the
EN and ERASER tabs,
IP FEEL or ERASER FEEL slider.)
The PROFILE graphically
displays the selected
pressure SENSITIVITY curve
and CLICK THRESHOLD
settings.
A curve that increases
quickly makes the pen f eel
more sensitive.
Using your pen tip or
eraser, make several
strokes within the box to
test the results of your
changes.
CONTENTS
INDEX
30
 Loading...