

Page 1

Radio and Television Interference (U.S.A.)
The equipment described in this manual generates, uses, and can radiate radio-frequency energy. If it is
not installed and used properly that is, in strict accordance with Wacom instructions it may cause inter-
ference with radio and television reception.
Federal Communications Commission (FCC) Notice
This equipment has been tested and found to comply with the limits for Class B digital devices, pursuant to
Part 15 of FCC Rules. These limits are designed to provide reasonable protection against harmful interfer-
ence in a residential installation.
This equipment generates, uses and can radiate radio frequency energy and, if not installed and used in
accordance with the instructions, may cause harmful interference to radio communications. However,
there is no guarantee that interference will not occur in a particular installation.
You can determine whether the tablet equipment is causing interference by powering it off. If the interfer-
ence stops, it was probably caused by the tablet.
If your tablet equipment does cause interference to radio or television reception, you may be able to correct
the interference by using one or more of the following measures:
- Rotate the television or radio antenna until the interference stops.
- Move the tablet equipment farther away from the television or radio.
- Plug the tablet equipment and computer into an outlet that is on a different circuit from the television or
radio.
If necessary, consult your Wacom dealer or an experienced radio/television technician for help.
Changes or modifications to this product not authorized by Wacom could void the FCC Certification and
negate your authority to operate the product.
Page 2

Table of Centents
Checking Packed Components
Installation
LCD Monitor Installation
Wacom Tablet Software Installation
Calibrating the Tablet
PL-700 Component Functions
Front View
Rear View
Mounting the PL-700 onto a Mount Arm or Other Stand
Caring For Your PL-700
Using the UltraPen
UltraPen
Pen Type Settings in the Wacom Tablet Control Panel
Replacing the Pen Tip
Specifications
General Specifications
LCD Display
Tablet
UltraPen
3
4
8
13
2
Page 3

Checking Packed Components
In your package you will find the following items:
PL-700
UltraPen with Pen Stand
User s Manual
Wacom Software CD
Contains the Interactive
Pen Display software
and a Readme file
(Windows/Macintosh)
AC Adaptor and Power Cable
USB Cble or RS-232C Cable
DVI-DVI Cable or DVI-RGB Cable
3
Page 4
Installation
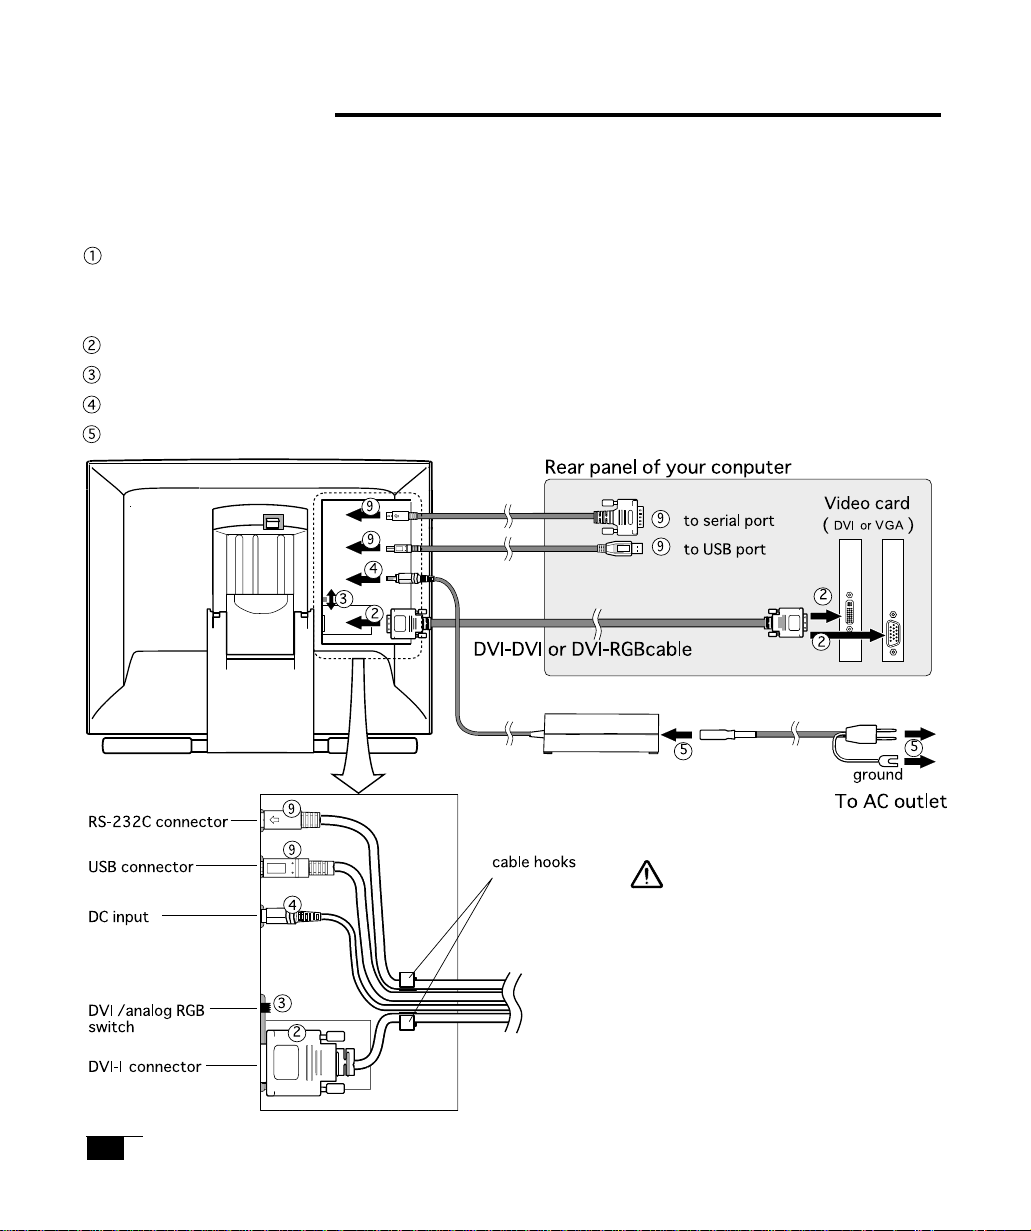
LCD Monitor Installation
First install the PL-700 as a monitor. Do not connect the USB cable or serial data cable until instructed in the
tablet software installation.
Turn off your computer.
Caution: Never connect or disconnect the DVI video cable or power cable while your computer
or the PL-700 is powered on. This can damage the LCD display or video card.
Connect the DVI-DVI cable or DVI-RGB between the PL-700 and your computer.
Set the DVI / Analog RGB switch. Turning up is for Analog RGB, and turning down is for DVI.
Connect the AC adaptor to the PL-700.
Connect the AC adaptor power cable and plug the adaptor into an AC outlet.
CAUTION
● Donot use anycable that did not
come withthePL-700.Itmay
damagethePL-700.
● Makesureyourgraphicscardhasa
VGAorDVIconnector,andthatyou
correctly set theAnalog(VGA)/
Digital(DVI) switch fo thethe PL700for the graphicscard you are
using. Theuseofanimproper
video card maydamagethePL-
700.
4
Page 5

Turn on the power switch of the PL-700. The power lamp will lite green, and then turns orange.
Turn on your computer to start your operating system.
As necessary configure the monitor settings for proper size and color resolution. (The recommended
resolution is 1280 x 1024. Other settings may give unsatisfactory results.)
the color palett and number of locors are as follows:
-
High Color (16 bit), 65,536 color
-
True Color (24 bit), 16,770,000 color approximate
The number of colotrs is constrained by the performance of your computer or graphics card. Refere to
the documentation of the manufacturer for datails.
Wacom Tablet Software Installation
After setting the monitor for proper size and color resolution, turn off your computer and connect the USB
cable or serial data cable. (
Then, install the Wacom tablet software. Refere to the Tablet Software Installation Guide for the
instructions.
)
Calibrating the Tablet
As necessary, you can calibrate the tablet in order to line up the screen cursor position with the position of
the UltraPen on the Interactive Pen Display. This is required to adjust for parallax caused by the glass
overlay. To calibrate the tablet, from the Wacom Tablet Control Panel, select the Monitor tab. Refere to the
Wacom Tablet Help for details.
5
Page 6

PL-700 Component Functions
Front View
EN
STATUS
MENU
POWER
-
ENTER
PowerSwitch
PowerLamp
StatusLamp
PenHolder
ENTERButton
+(plus)Button
-(minus)Button
MENUButton
IntegratedTablet and
LCDScreen
*1
Power Switch
Turns the power to the PL-700 on or off.
Power Lamp
Lights green when power has properly been supplied to the PL-700. Turns orange or flashes when your
computer goes into power management mode and stops sending the video signal to the PL-700.
Status Lamp
Lights green when a pen switch is pressed.
ENTER Button
Press this button when you select or exit an item in the OSD menu.
+ (plus) Button, - (minus)Button
Press this button when you change the option or settings in the OSD menu.
MENU Button
Opens or closes the OSD menu.
*1
- On a TFT liquid crystal display, a very small number of pixels may be permanently illuminated or not illuminated
at all. This does not mean that the display is defective.
-
When pressing the LCD panel hard it may temporaryly cause moire to appear. This does not mean the display is
defective.
-
When a still image is displayed for a long period of time, a n after image may temporaryly remain.
6
Page 7

Integrated Tablet and LCD Screen
The LCD monitor and tablet sensor function as an integrated input and output device.
The LCD resolution is 1280 x 1024 pixels at 16,777,216 colors. The tablet sensor reports en coordinates, pressure, switch, and eraser information.
Rear View
StandLever
Pulling this lever allows the stand to
move freely. Releasing the lever locks
the stand in place.
ConnectorLid
CAUTION
Be careful to avoid catching your
finger in the gap of the movable
portion of the stand.
Stand
The stand can be used to adjust
the tilt angle of the unit from low
(18° from horizontal) to high (72°
from horizontal).
IMPOTANT
Be sure to close the stand when packing the Cintiq Interactive Pen Display.
If you do not close the stand, the notched mechanism may be damaged during transportation
and storage. Do not lift the PL-700 by the stand; this may damage the stand mechanism. When
lifting the PL-700, always do so by grasping the main unit casing.
7
Page 8

PL-700 Component Functions
Mounting the PL-700 onto a Mount Arm or Other Stand
The PL-700 conforms to VESA FPMPM standard.
You can remove the adjustalbe stand and mount the PL-700 onto a VESA conforming mount arm or stand.
(Screw gap: 75 mm, Thred pitch: 0.7 mm )
Turn off your computer and the PL-700. Then disconnect all cables from the PL-700.
Protect the display screen surface by
spreading a soft cloth onto a flat table and
placing Cintiq face down on the cloth.
Remove the four screws and lift the ad-
justable stand assembly away from the
body of the unit.
Using the appropriate screws for your
mounting platform, firmly attach Cintiq to
the alternate mounting platform.
unscrew
Rettach the cabling and retain the four
screws just removed.
CAUTION
When attaching Cintiq onto an alternate
mounting platform, be sure to follow all
instructions in the documentation
supplied by the platform manufacturer.
If improperly installed, the unit could fall
and be damaged.
8
Page 9

Caring For Your PL-700
To clean the PL-700 casing, use a soft cloth with mild detergent (such as dish washing liquid) diluted with
water. Do not use paint thinner, benzine, alcohol, or other organic solvents to clean the PL-700 casing or
pen.
To clean the cover glass of the PL-700, use a soft, dry cloth. If necessary, slightly moisten the cloth with
water and try again. When cleaning, apply only a light amount of pressure to the cover glass and do not
make the surface wet. Do not use detergent to clean the cover glass; this may damage the coating on the
screen.
9
Page 10

Using the UltraPen
UltraPen
Hold the UltraPen as you would a pencil. Make sure the side switch is in a convenient location where you
can press it with your thumb or forefinger, but won’t accidentally press it while drawing.
Eraser
SecondSideSwitch
SideSwitch
TipSwitch
Pen Tip
When the pen tip is within proximity (5 mm or 0.2 in) of the active area, the tablet reports:
- The x, y coordinates of the pen tip.
- The pressure applied to the pen tip.
- Whether a side switch is on or off.
When pressure is applied to the pen tip, the tip switch is turned on and the pen simulates a mouse button
click.
Eraser
To use the eraser, hold the UltraPen upside down. When the eraser is within proximity of the active area,
the tablet reports the x, y coordinates and the pressure applied to the eraser.
The eraser can be used as an eraser or assigned to another function, depending on the appli-cation. The
tablet distinguishes the tip switch from the eraser switch.
Side Switch and Second Side Switch
These switches are programmable, and can be used to perform the same click and double-click functions
as the tip switch. The switches are turned on when pressed, and are otherwise turned off. Please refer to
the online Help for more information on side switch settings.
10
Page 11

Using a Pen
Pointing and Selecting
Move the UltraPen above the Cintiq Interactive Pen Display screen to position the screen cursor.
The cursor instantly jumps to the new location (absolute positioning). Press the pen tip on the Interactive
Pen Display screen to make a selection.
Note: If the screen cursor is not aligned with the pen tip, you will need to calibrate the Interactive
Pen Display.
Clicking
Tap the Interactive Pen Display screen once with the pen tip, or touch the pen to the display screen with
enough pressure to generate a mouse click.
Double-Clicking
Press the upper side switch (Windows systems) or quickly tap the Interactive Pen Display screen twice in
the same place with the pen tip. Double-clicking is easier when the pen is perpendicular to the tablet
screen.
Dragging
Select an object, then slide the pen tip across the Interactive Pen Display screen to move the object.
Erasing
In supporting applications, the pen s eraser works like the eraser on a pencil. In text applications,
use the eraser to select text, then lift the eraser from the tablet to delete the text.
11
Page 12

PL-700 Component Functions
Replacing the Pen Tip
The pen tip will wear with normal use. When the nib gets too short, you can replace it with one of the extra
nibs that came with your UltraPen. If the pen tip wears and becomes angular, it may damage the coating
on the cover glass of the Cintiq Interactive Pen Display. To avoid this, periodic nib replacement is recom-
mended.
To insert a new nib:
Slide it straight into the barrel of the pen.
Firmly push the nib until it stops. The new
nib will slide into the correct position.
To remove the old nib:
Clasp it with the o-ring tool that came with
your UltraPen and pull the old nib straight
out of the pen.
CAUTION
Prevent your children from swallowing the UltraPen nib or side switch. The pen nib
or side switch may accidentally be pulled out if children are biting on them.
12
Page 13

Specifications
General Specifications
Physical dimensions(WxDxH): 418x362x57mm (excluding the stand)
Weight: 5.4kg (including the stand)
Main Unit input Voltage: DC18V
Power consumption: 45W or less (DC18V)
Operating temp. & humidity: 5 to 35deg. C, 80%RH (non condensing)
Storage temp. & humidity: -10 to 60deg. C, 90%RH (non condensing) (maximum storage humidity is 38% at
60 deg.C, and maximum storage temperature is 42 deg. C at 90% humidity)
LCD Display
Display: a-Si TFT active matrix LCD
Screen size: 17 in
Resolution(75Hz Max.) 1280x1024 pixels (SXGA), 1024x768 pixels (XGA), 800x600 pixels (SGA),
640x480 pixels (VGA)
Pixel pitch: 0.264(W) x 0.264(H)mm
Color depth: 256 levels: 16,777,216 colors (24 bit)
Signal Inputs: Analog RGB: 0.7Vp-p, 75ohms, positive
Synchronous signals: TTL level, 2.2kohms, free polarity (H/V separate or complex
sync.)
Digital sygnals: DVI 1.0
Synchronous frequency: H--30 to 80kHz, V--50 to 75Hz
Plug and Play DDC2B
= TBD
<
On a TFT liquid crystal display, a very small number of pixels may be permanently illuminated or not illuminated at all.
This does not mean that the display is defective.
Tablet
Reading technology: Electromagnetic reasonance mothod
Active area: 337.9 x 270.3mm
Resolution: 20 lpmm (0.05mm) max.
Accuracy: +/-0.5mm, four corners ( 7 mm wide, 25 mm long from each corner of four "L"
shaped areas) to be +/-1.0mm
Maximum reading height: 5mm
Maximum report rate: 205 points/sec. max.
Pressue levels 512 levels
Communicatin I/F USB, RS-232C
13
Page 14

UltraPen
UP-813E
Side switch: Double (rocker switch)
Pressure: Tip and Eraser
Tip trave: 0.1mm max.
Eraser tip travel: 2 mm approzimate
Tip switch ON load: 30g max.
Physical dimensions, weight: 11.4 dia x 140.5 mm, 12grams
14
 Loading...