

Page 1
English
한국어
中文 ( 繁體 )
User's Guide
사용자가이드
使用手冊
CTF-220
Page 2

Contents
Contents ............................................................................1
Introduction .......................................................................2
Precaution ........................................................................................... 2
Important information ............................................................................ 4
Checking Packed Components ............................................5
Component names and functions ............................................................ 6
Tablet Driver Setup ................................................................................ 7
Uninstalling the Tablet Driver .................................................................. 7
Basic Operation ................................................................. 8
The Parts of the Pen and Their Functions .................................................. 8
How to hold and place the Pen .............................................................. 9
Tablet Active Area ................................................................................ 9
Moving the Pointer ............................................................................... 10
Clicking .............................................................................................. 10
Double-clicking ..................................................................................... 10
Dragging ............................................................................................. 11
Function Keys ....................................................................................... 11
Using theControl Panel .......................................................12
Displaying the Control Panel .................................................................. 12
Control Panel Overview ........................................................................ 13
Troubleshooting ................................................................. 17
Supplementary Information
Specifications ..................................................................... 20
Tablet .................................................................................................. 20
Pen ..................................................................................................... 20
Make Notes and other Marks Quickly and Easily with
JustWrite Office ..................................................................21
Installing JustWrite Office ...................................................................... 21
Ideal for Use with PowerPoint Presentations〜JustShow
Adding Notes and other Marks to Excel, Word and PowerPoint Files
Up JustWrite〜 ....................................................................................
Sticking Post-it Notes on Excel and Word Files
Adding a Signature to Excel and Word Files〜JustSign
JustWrite Office Functions
〜
Obtaining Technical Support ............................................... 27
...............................................20
........................
〜
Starting
〜
JustTag
〜
A Compatibility Table〜 ...............................
...................... 25
〜
........................
〜
22
24
26
26
English
1
Page 3
Introduction
We would like to take this opportunity to thank you for purchasing BizTablet.
In order to make the most of the functionality of BizTablet ((hereafter referred
to as “BizTablet,” “the product” or “this product”) for a variety of business
applications, it is important to carefully read this user guide. Please keep it,
along with the guarantee, in an easy-to-remember place so that it may be
easily located and referred to
Precaution
The following symbols appear throughout this user guide in order to ensure
safe use of the BizTablet (hereafter referred to as “BizTablet,” “the product”
or “this product”). Please read these items carefully and always heed the
Warning and Caution items when using your BizTablet.
Warning
Caution
Indicates that the action or actions noted are to be avoided.
Indicates it is important to take the action or actions noted.
This symbol indicates an item that, if ignored when handling the
product, could lead to the loss of life or serious injury.
This symbol indicates an item that, if ignored when handling the
product, could lead to injury or damage to personal property.
2
Page 4
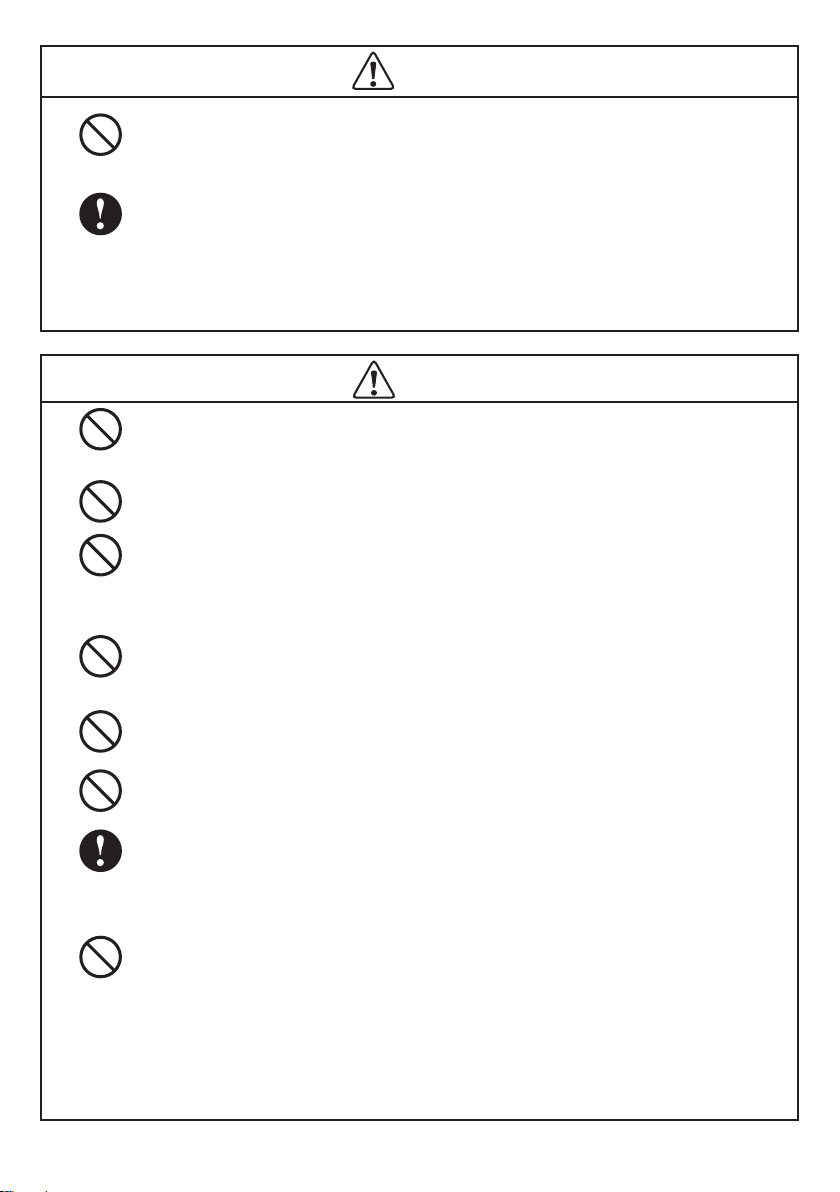
Warning
Do not use the product in a facility control system that requires an
■
extremely high level of reliability.
This product may cause other electronic devices to malfunction, or other
devices may cause this product to malfunction.
Turn this product off in places where the use of electronic equipment
■
is prohibited.
In airports, hospital intensive care units and other such places where the
use of electronic equipment is prohibited, this product may adversely affect
the operation of other electrical devices. In order to prevent this, when in
such locations, always disconnect the productʼs USB connector from your
computer and turn off the switch.
Caution
Do not place the product on unstable surfaces.
■
Do not place the product where it is likely to totter, lean or be exposed to strong
vibrations. Doing so may lead to the product falling, resulting in injury and/or
product failure.
Do not place heavy objects on the product.
■
Do not put excessive weight, or place heavy objects on the product. These
actions may cause product failure.
Do not place the product in either very hot or very cold places.
■
Do not place the product in very hot (35 degrees centigrade or more) or very
cold (5 degrees centigrade or less) locations. Also, avoid placing it in locations
with severe temperature fluctuations as this may adversely affect the product
and cause product failure.
Do not disassemble the product.
■
Do not disassemble or modify the product, as these actions may lead to fire,
excessive generation of heat, electrical shock or injury. The guarantee on the
product will become null and void if the product is ever disassembled.
Do not use organic solvents to clean this product.
■
When cleaning the product, never use such organic solvents as alcohol. Such
solvents may cause discoloration and deterioration in quality.
Do not let the product get wet.
■
Please do not place containers such as cups and vases containing water near
the product. Coming in contact with water or other liquids may cause product
failure.
When cleaning this product, always disconnect the USB connector.
■
When cleaning the product, always disconnect the USB connector from the
USB port of the computer. Failure to do so may result in electric shock.
While this product is in use, avoid placing any metal objects on it.
■
Do not place any metal objects on the product while you are using it. This may
result in malfunction or product failure.
Regarding the Pen
■
-Do not strike hard objects with the Pen. Doing so may cause damage to the
product.
-Be careful to not allow small children to put either the pen or the spare nib into
their mouths. There is the danger that the nib or side switch may be accidentally
swallowed or that the grip pen may be damaged.
3
Page 5

Important information
Regarding Usage of the Product
Please take the following precautions to protect the health of your eyes.
When using the product, make sure that the room is sufficiently illuminated and be careful
●
not to get your face too close to the screen.
Take regular breaks when using the product over an extended period of time.
●
Warranty Exclusions
Wacom will not bear any responsibility for damage caused by fire, earthquake, accidents
●
caused by third persons, intentional or accidental abuse by the customer or any other
damage caused by abnormal use of the product.
Wacom will not bear any responsibility for contingent damages (such as loss of business
●
profits, suspension of operations, alterations to and disappearance of data, etc.) caused by
use of, or inability to use, this product.
Wacom will not bear any responsibility for damage resulting from the use of this product in a
●
fashion other than as explained in this user guide.
● Wacomwillnotbearanyresponsibilityfordamageresultingfrommalfunctions
causedbyusingthisproductinconjunctionwithadaptationequipmentorother
company'ssoftware.
Regarding warranty of the product
Wacom warrants the product, to the original consumer purchaser, except software, to be
free from defects in materials and workmanship under normal use and service as long as the
product remains in production, but not less than one (1) year, from the date of original retail
purchase, as evidenced by a copy of the receipt or a registration card that has been returned to
Wacom within 30 days of purchase.
Regarding Trademarks
Windows is a trademark of Microsoft Corporation, registered in the United States and other
●
countries.
● Otherproductnamesandrelateditemsarethetrademarksorregistered
trademarksofeachconcernedcompany.
Precautions
1WacomCompany,Ltd.holdsthecopyrighttotheauxiliarytablet.
2Theunauthorizedduplicationorreproductioninwholeorinpartofthetablet
driverorthisuserguideisexpresslyprohibited.
3Wacomreservestherighttochangetheconfigurationsorspecificationsofthe
tabletdriverortheproduct,aswellasthecontentsofthisuserguide,without
priornotice.
4 DependingoncomputerconfigurationandtheOSversion,actualoperationsand
screendisplaysmaydiffersomewhatfromthosedescribedinthisuserguide.
4
Page 6
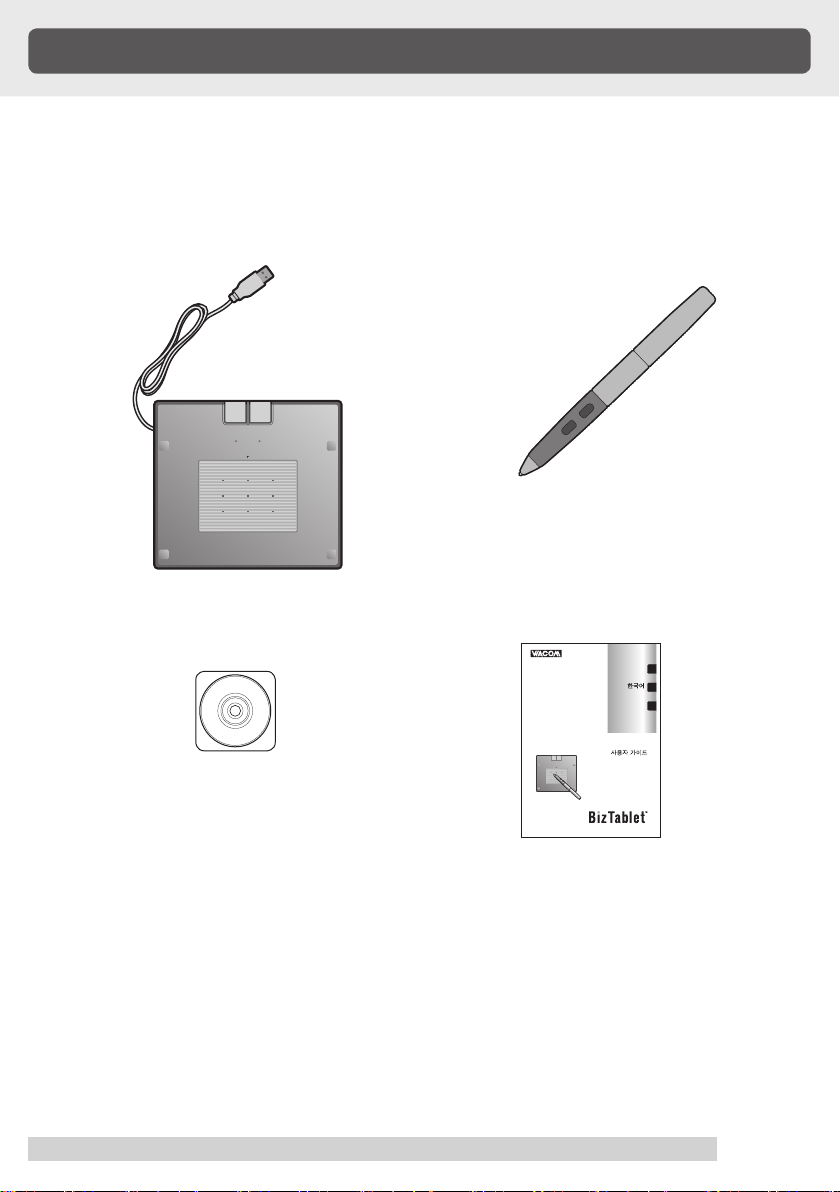
Checking Packed Components
English
한국어
中文 (繁體 )
使用手冊
User's Guide
사용자가이드
In your package you will find the following items.
Tablet (main body)
●
●
Pen
Tablet driver
●
CD-ROM
User's Guide (this manual)
●
5
Page 7

Component names and functions
USB Connector
Connect to a USB port of
your computer.
FunctionKey
By default, the customizable
FunctionKeys are set to
perform the FORWARD and
BACK functions within most
Internet browsers.
Active area
You can use pen inside of
it.
6
Status LED
Lights up depending on the
condition of the tablet, as
indicated below:
Orange: the unit is properly
connected and is
operating normally.
Green: the pen switch becomes
active while the pen is on
the work screen.
Page 8

Tablet Driver Setup
Before installation, connect the BizTablet USB cable to your computer .
Insert the Tablet Driver CD-ROM into the CD-ROM drive of your
1
computer and the install menu should appear. If the menu does not
appear, double-click on the Install.exe icon located on the CD-ROM.
The Install Pen Tablet menu will display. Click OK and the license
2
agreement will appear.
Click Accept.
3
After installation is complete, click OK and finish the installation. If you
4
must renew your driver, click immediately Restart System and your
computer will automatically restart.
Refer to “Using the Control Panel” on page 12, open the control panel
5
and adjust the pen settings and positions.
Windows 98SE: The ADD NEW HARDWARE WIZARD will display. Follow
the prompts, selecting the default options. If prompted to install drivers
for the USB Human Interface Device, insert the Windows 98SE CD, click
OK, and enter the location of the Windows CAB
files (e.g., D:\WIN98). Note that the files may be located on your hard disk
in the C:\WINDOWS\OPTIONS\CABS folder.
Uninstalling the Tablet Driver
Click on the Windows Start button and open the control panel. Double
1
click the Add and Remove Program (Application) icon.
Select Pen Tablet from the list and click the Modify (Add) and Delete
2
button. Follow the instructions in the dialog box to initiate uninstall.
When Windows is restarted, the driver will be deleted.
7
Page 9
Basic Operation
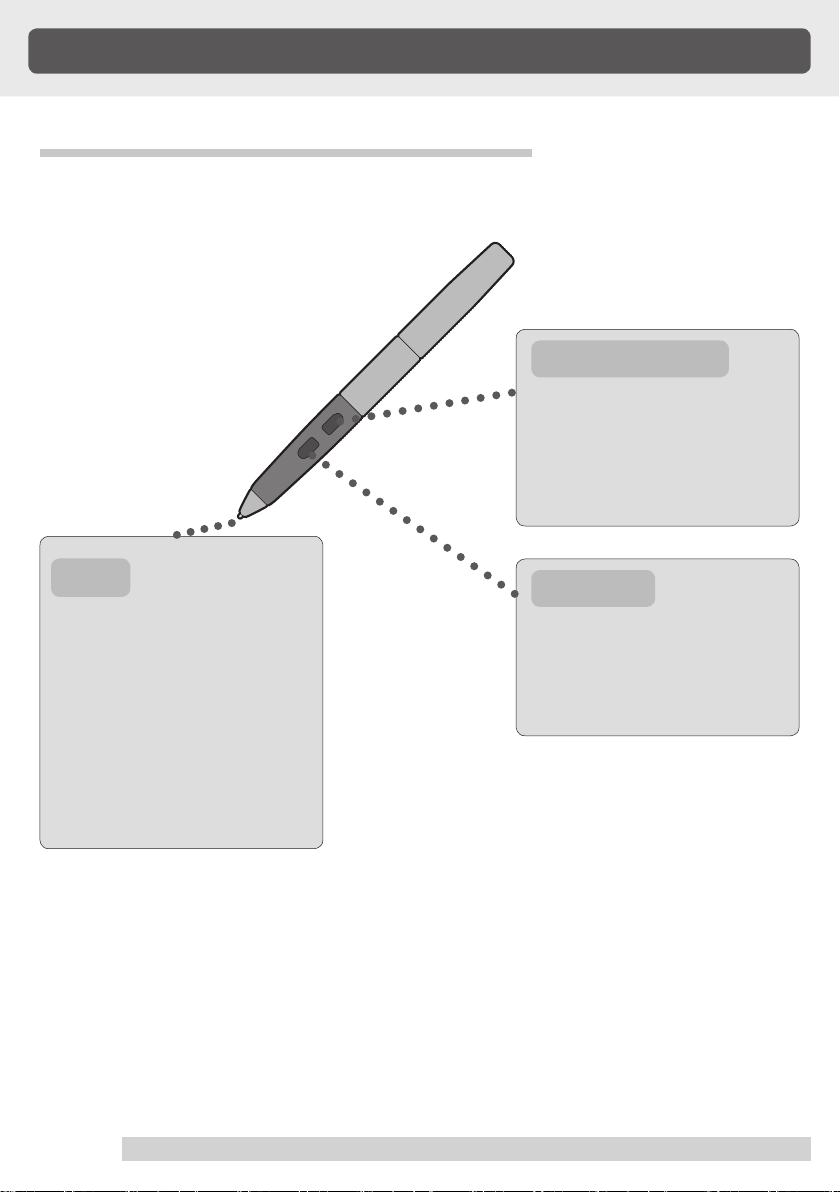
The Parts of the Pen and Their Functions
Second Side Switch
With one touch of the
second side switch,
functions that have been
previously established
become functional(double
click by default).
Pen Tip
• You can change the
position of the screen
pointer by moving the tip
of the pen.
• By varying the amount
of pressure applied, the
boldness of lines and
the size of points can be
adjusted.
8
Side Switch
With one touch of the side
switch, functions that have
been previously established
become functional(right click
by default).
Page 10
How to hold and place the Pen
Hold the pen as you would a pencil.
Make sure the side switch is in a convenient location where you can press it
with your thumb or forefinger, but won't accidentally press it while drawing.
When the pen is not in use and it is left on the tabletʼs active area, nonBizTablet input devices such as mice cannot be used. Therefore, when
not in use, the pen should be placed somewhere other than on the tabletʼs
active area.
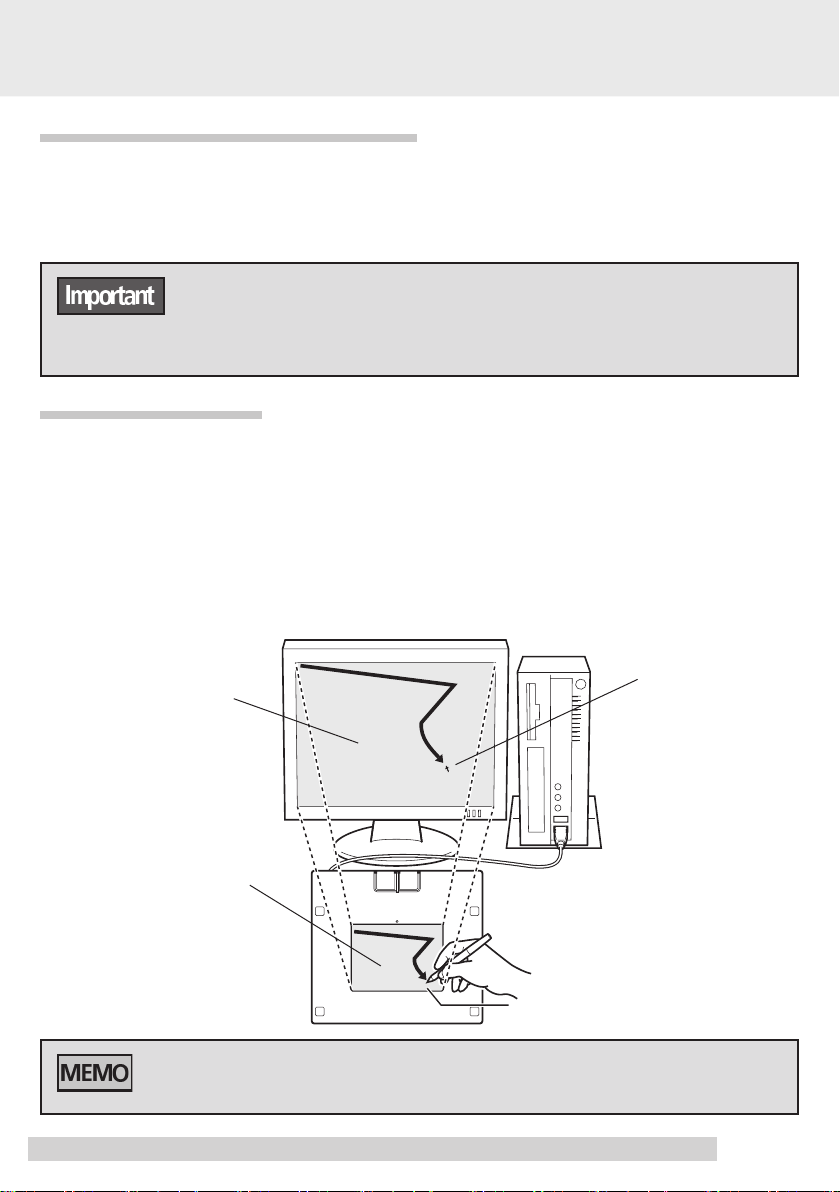
Tablet Active Area
The area where the pen is used is called the active area, and the screen
where the manipulations of the pen are displayed is called the display area.
Default Settings
*The active area and the display area are set up on a 1:1 scale.
*The entire work screen is set up as a work area.
Screen(Displayarea)
Workarea(Activearea)
The functional settings of the work screen may be changed. For details, please
refer to “Using the Control Panel”
(▶
Page12
Pointer
).
9
Page 11

Moving the Pointer
By raising the pen a little above the
tablet and moving it, you can move
the position of the screen pointer.
To select an icon or folder on the
screen, move the pen tip while
watching the screen and position the
pointer over the desired item.
Clicking
Tap on the tablet lightly once with the
tip of the pen to click.
Double-clicking
Tap in the same place twice quickly
with the tip of the pen to double-click.
The settings of the side switch and second side switch may be changed. For
details, please refer to “Using the Control Panel”
10
(▶
Page12
).
Page 12
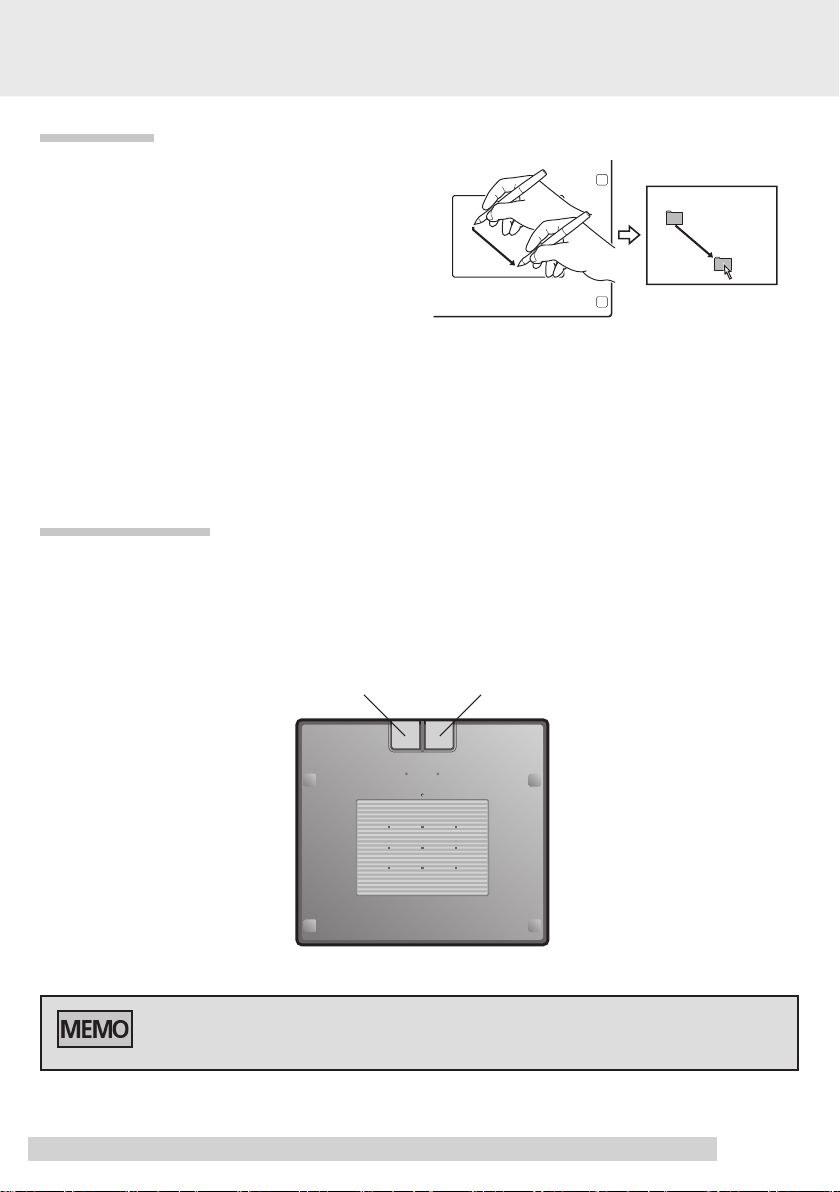
Dragging
Select an icon or folder and then,
while keeping the pen tip pushed
down, move the pen to move the
object.
Function Keys
By default, the customizable FunctionKeys are set to perform the FORWARD
and BACK functions within most Internet browsers.When you use JustWrite
Office, it is possible to switch PowerPoint slides.
BACK
The settings of the function keys may be changed. For details, please refer to
“Using the Control Panel”
(▶
Page12
FORWARD
).
11
Page 13

Using theControl Panel
Displaying the Control Panel
Use the following procedure to display the tablet driver control panel.
Click on the Windows Start button, go to All Programs(P) or Programs(P),
1
open Wacom tablet and select Wacom Tablet Properties.
The property of Pen Tablet Control Panel is displayed.
The control panels displayed in the property of Pen tablet are Pen tab and
Tablet tab.
Pen tab
Tablet tab
12
Page 14
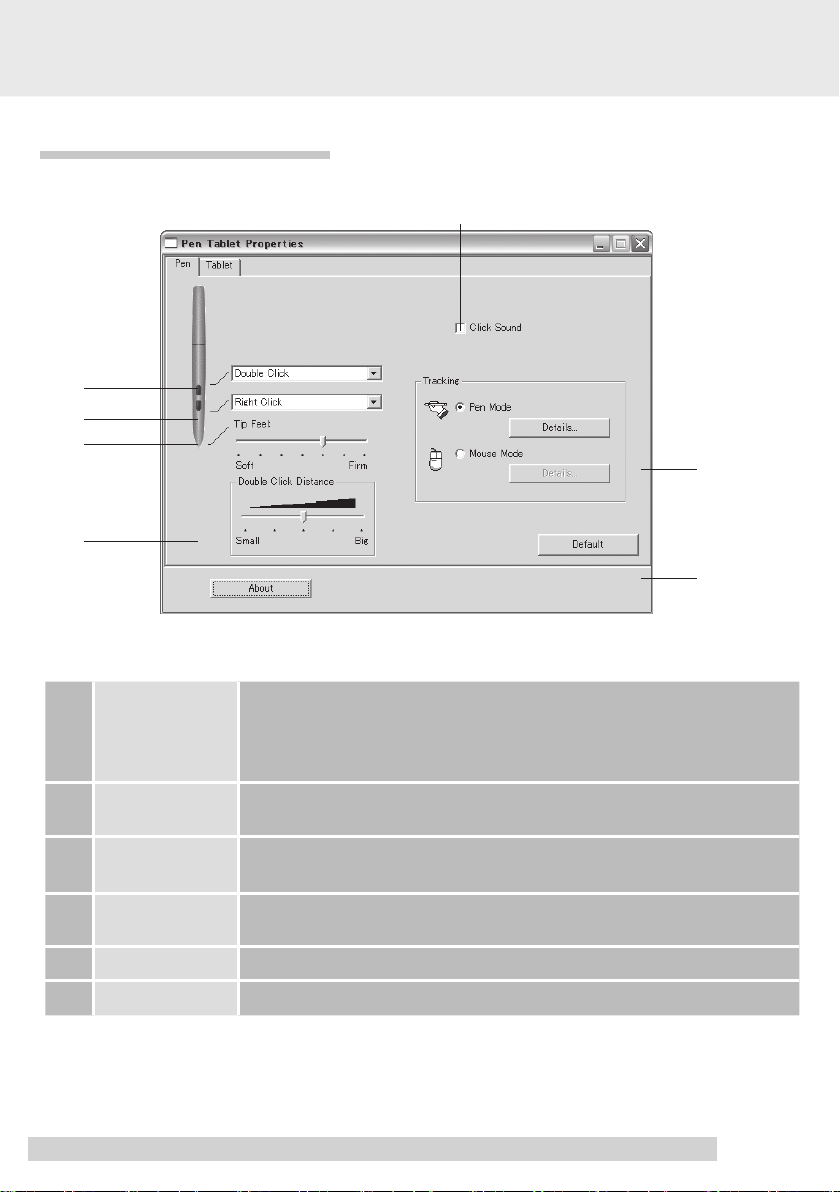
Control Panel Overview
Pen tab
1
2
3
4
T h e s e c o n d
s i d e s w i t c h
1
and the side
switch
2
Tip Feel
Selects the side switch button functions for pens equipped with a
side switch.
Customizes the amount of pressure needed to click or draw with the
pen.
5
6
7
Doub l e Clic k
4
Distace
5
Click Sound
Mode You can change the detail of Pen mode.
6
7
Default
Adjusts the size of the double-click area.
When checked, an audible “click” sound will be heard whenever a
pen click occurs and your computer speakers are turned on.
Returns the PEN tab settings to their factory defaults.
13
Page 15
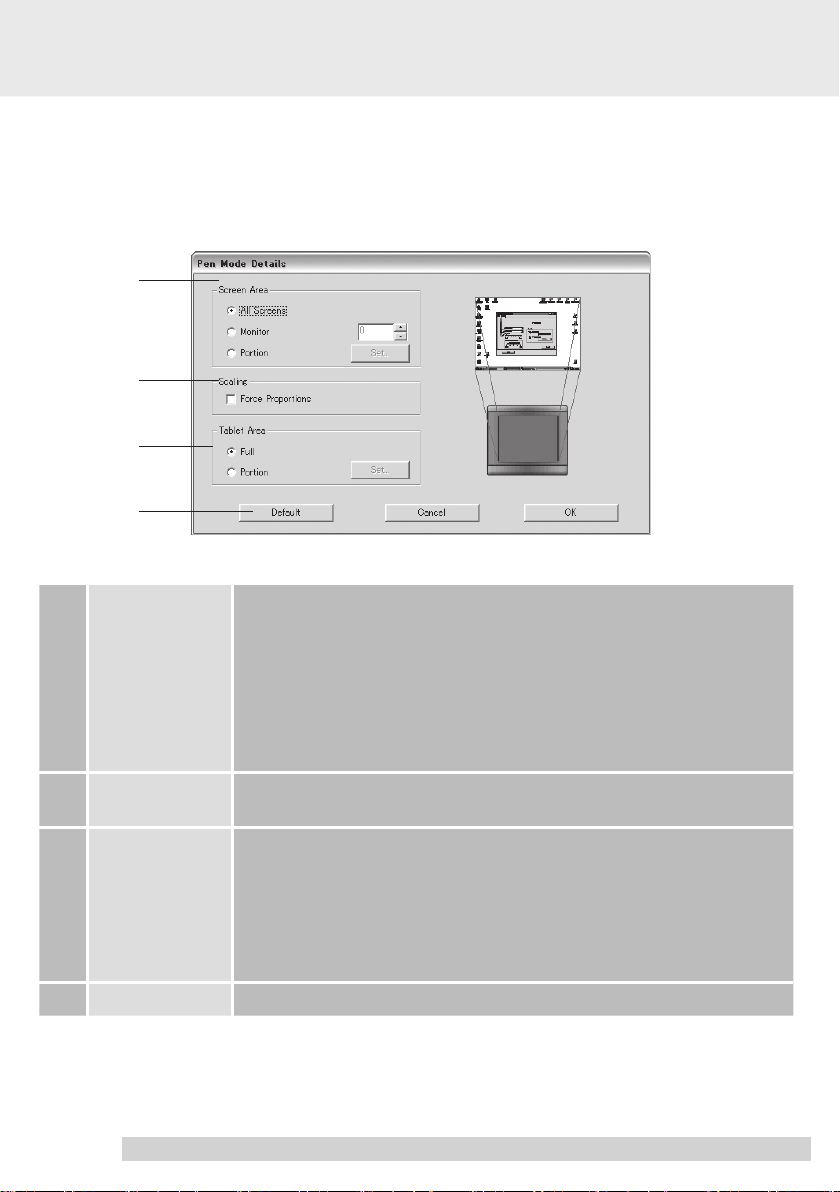
Pen mode details...
When you click on the Pen mode details..., the Pen mode details dialog
box is displayed.
1
2
3
4
You can cange a setting of screen area on your display.
All Screens:The entir e mointor(s) area is mapped; this is default
・
setting.
Monitor:
1 Screen Area
2 Scaling
3 Tablet area
4 Default Returns settings to their factory defaults.
・
Portion: A portion of the desktop area is mapped.Click Set...
・
Check or uncheck the box to determine the tablet to screen mapping
relationship.
You can cange a setting of tablet area on a active area.
Full: The entire active area of the tablet is mapped. This is
・
Portion: A portion of the tablet area is mapped.Click Set... to
・
The entire area of a single monitor that you choose is
mapped.
to open a dialog box where you can set the portion of
screen area.
the default setting.
open a dialog box where you can set the portion of
tablet area.
14
Page 16

Portion of screen area
The tracking options in the Pen mode details dialog box allow you to define
which portion of the display screen your tablet will map.
Portion of tablet area
The tracking options in the Pen mode details dialog box allow you to define
the tablet area that will be mapped to the screen area.
15
Page 17

Tablet tab
To change the settings of the Function Keys, you can click tablet tab of the
properties of pen tablet.
16
Page 18

Troubleshooting
If you encounter problems with Biz Tablet, refer to the following tablets.Your
problem may be described here, and you can try the solution offered.
Problem Hint
The pen nib produces a click
even when only very lightly
coming in contact with the
tablet.
The pen does not produce
a click unless excessive
pressure is used.
The pen nib and side switch
do not work.
The pen cannot be doubleclicked using the pen nib.
If you connect a tablet, you
can not move a pointer on a
display using your mouse.
When drawing a line, the initial
display of the line is delayed.
Use the control panel to set the pen nib sensitivity to Firm
・
setting.
When the status lamp turns green in response to the pen
・
nib being moved to close proximity to the tablet, either the
pen or the tablet is probably defective.
Use the control panel to set the pen nib sensitivity to Soft
・
setting.
Verify that the side switch setting in the control panel isnʼt
・
set to Not Available.
Please verify that the status lamp turns green when the
・
pen nib and side switch are pushed. If the lamp doesnʼt
change colours, this probably indicates that either the pen
or the tablet is probably defective.
If possible, quickly click in the same area.
・
You can also set the side and second side switches so
that one click is the equivalent of a double-click.
In the control panel, set the double-clicking interval to a
・
longer setting and set the pen nib sensitivity to a lighter
setting.
Verify that the double-click speed setting is not too fast in
・
the regular mouse control panel.
When the pen is left on the tabletʼs work area, other input
・
devices cannot be used to move the pointer. When not in
use, the pen should be placed somewhere other than on
the tabletʼs work area.
Set Double Click Distance to Small in the penʼs control
・
panel.
Check the double-click interval setting for normal mouse. If
・
it is too slow, adjust it to a faster setting.
17
Page 19

Problem Hint
The pointer cannot be moved
to the desired location.
There is a discrepancy between
the position of the pointer and
where the drawing appears.
The drawing does not appear
at all.
The movements of the pointer
lag the movements of the pen
tip.
When a replacement computer
is purchased or new software
is used, the tablet cannot be
used.
The tablet, which is connected
to a USB hub, doesnʼt respond.
When Windows is in DOS
full screen mode, moving the
pointer with the pen becomes
impossible.
If the mouse is set for lefthanded use in the regular
mouse control panel, the ability
to click with the pen nib is lost.
Click Default on the Pen Tablet Control Panel and return
・
the settings to the factory default settings.
If the method explained above doesnʼt work, delete the
・
files indicated below and restart your computer.
For Windows XP: delete “Windows \system32 \tablet.dat”
For Windows 2000: delete “WinNT \system32 \tablet.dat”
For other versions of Windows: delete “Windows \system \tablet.
dat”
Try changing the settings using the following procedure:
・
1. From the Windows Control Panel, first open Mouse
and then Pointer Options. Remove the check from
Display pointer trails. Next click on the Pointers tab and
set Scheme to Windows Default (system scheme).
2. If this fails to solve the problem, decrease the number
of display colors. Also, from the Control Panel, open
System and then Advanced. In the Performance field
click the Settings button and select the Adjust for Best
Performance radio button in the Visual Effects tab.
Installing the newest version of tablet driver may resolve
this problem. The newest tablet driver can be downloaded
from the Wacom homepage.
Some USB hubs cannot recognize tablets. Connect the
・
tablet directly to the computerʼs USB port.
When using a DOS mouse, the pen is inoperable. You
・
must use another mouse.
Restart Windows.
・
18
Page 20

Problem Hint
The status lamp does not light
up even when the product is
connected to the USB port.
The status lamp is lit up but the
tablet does not function.
Clicking with the pen results in
the disappearance of the pointer.
Check whether your computerʼs USB port is operational
・
via the computerʼs BIOS setting or not (for detailed
information on this procedure, please refer to your
computerʼs instruction manual or Help function).
If the method explained above doesnʼt work, try the
・
following procedure.
From the Windows Control Panel, open System and then
click on Hardware tab and then Device Manager.
1. Check whether Universal Serial Bus controllers is
present in the list or not. If it is not present, please
consult with your computerʼs manufacturer.
2. If there is an Unknown Device item, confirm whether
BizTablet is present or not.
If present, delete it from the list as well as all other
settings. Next, uninstall the tablet driver. After
restarting the computer, reinstall the tablet driver.
There is the possibility that the tablet driver has not been
・
installed properly. Try reinstalling it.
If using a keyboard button, a TouchPad device for a
・
laptop computer or a non-standard mouse, the installed
drivers of these devices may create a conflict with the
tablet driver.
From the Windows Control Panel, open System and then
click on the Hardware tab and then Device Manager.
Next, disable any non-standard devices and enable all
standard devices.
Also, if possible, uninstall all non-standard device drivers,
leaving only the standard drivers, and then check the
operations of the tablet.
19
Page 21

Supplementary Information
Removing Stains
If the product casing or pen becomes soiled, wipe off with a clean, soft cloth.
If this fails to remove the stains, soak a clean, soft cloth with a water-diluted
detergent mixture, wring thoroughly and wipe off.
If the protective covering for the tablet becomes soiled, wipe with a dry, soft
cloth. If the stain is difficult to remove, try moistening the cloth slightly.
Specifications
Tablet
Reading range
Reading resolution: 0.025 mm
Accuracy: ± 0.5 mm
Reading hight: 3 mm
Report rate: Maximum 100 point per second
Interface: USB
Certification and compliance:
Physical size(WxDxH): 155.8 x 138.9 x 13.5 mm
Weight: 200g, approximately
Power consumption: Maximum 40 mA
Pressure level: 512 levels
Usage environment
Temprature: 5
Storage temprature: -10
Humidity: 20
(conditions where condensation does not form)
Storage humidity: 20
(conditions where condensation does not form)
81.2×58 mm
:
VCCI, CE, C-Tick, BSMI, MIC
〜40℃
60
〜
80 %
〜
90 %
〜
℃
Pen
Physical size: 148x12.5 mm
Pressure level: 512 level
Weight: 12g, approximately
Tip refill type: POM
20
Page 22

Make Notes and other Marks Quickly and Easily with JustWrite Office
Installing JustWrite Office
JustWrite Office, a tool that is compatible with Microsoft PowerPoint, Microsoft
Word and Microsoft Excel, is contained within the accompanying tablet driver
CD-ROM.
Insert the tablet driver CD-ROM in the CD-ROM drive. The install screen
1
will appear.
Click on Install JustWrite Office. Follow the prompts in the dialog box
2
and install the product.
21
Page 23

Ideal for Use with PowerPoint Presentations〜JustShow
〜
During presentations, use a pen to make notes and other marks directly in the
slide, creating altogether persuasive presentations. It can also be used during
conferences as a white board.
When you start up PowerPoint, the JustOffice tool bar appears.
Emphasize Key Points and Add Supplemental Notes in Slide Shows
Click on the JustShow button and the slide show begins. Move the pointer into
the upper portion of the slide and the JustShow tool bar appears. Emphasize
key points and add supplemental notes through the features outlined below.
Pointers, either laser-like or hand-shaped, can be used to point out items.
・
The pen can be used to make notes and other marks, as well as to erase.
・
The tablet button can be used to advance to new pages and return to prior ones.
・
Notes and other marks may be saved.
・
JustShow
toolbar
22
Free Write button
In order to stop the slideshow, click on the right-most button on the JustShow
toolbar. For more detailed information on how to use JustShow, please refer to
.
Help
Stop JustShow
Handwritten note
Page 24

Using the Whiteboard Function
With the following procedure, you can use the whiteboard function.
Move the hand cursor into upper-most portion of the screen of the
1
slideshow and the JustShow toolbar appears.
Switch to Blank Slide button
Click on the Switch to Blank Slide button and the whiteboard appears.
2
You can use the pen to make notes and other marks.
3
Click on the Blank Slide button to create a new whiteboard. Whiteboards
4
may be up to 10 pages in length.
Click on the Stop JustShow button to go back to the slide.
5
For more detailed information on how to use JustShow, please refer to Help.
Blank Slide button
Switch to Main Slide button
23
Page 25
Adding Notes and other Marks to Excel, Word and PowerPoint Files
When engaged in business discussions involving observation of Excel file
data, the ability to jot down notes directly in the Excel graphs and tables
allows clearer communication. Furthermore, JustWrite makes adding postit notes, proofreading Word files and adding information to documents easy,
thus effectively improving the business efficiency of internal document
creation. Moreover, notes added to documents may be read and deleted even
on computers that do not have JustWrite Office installed.
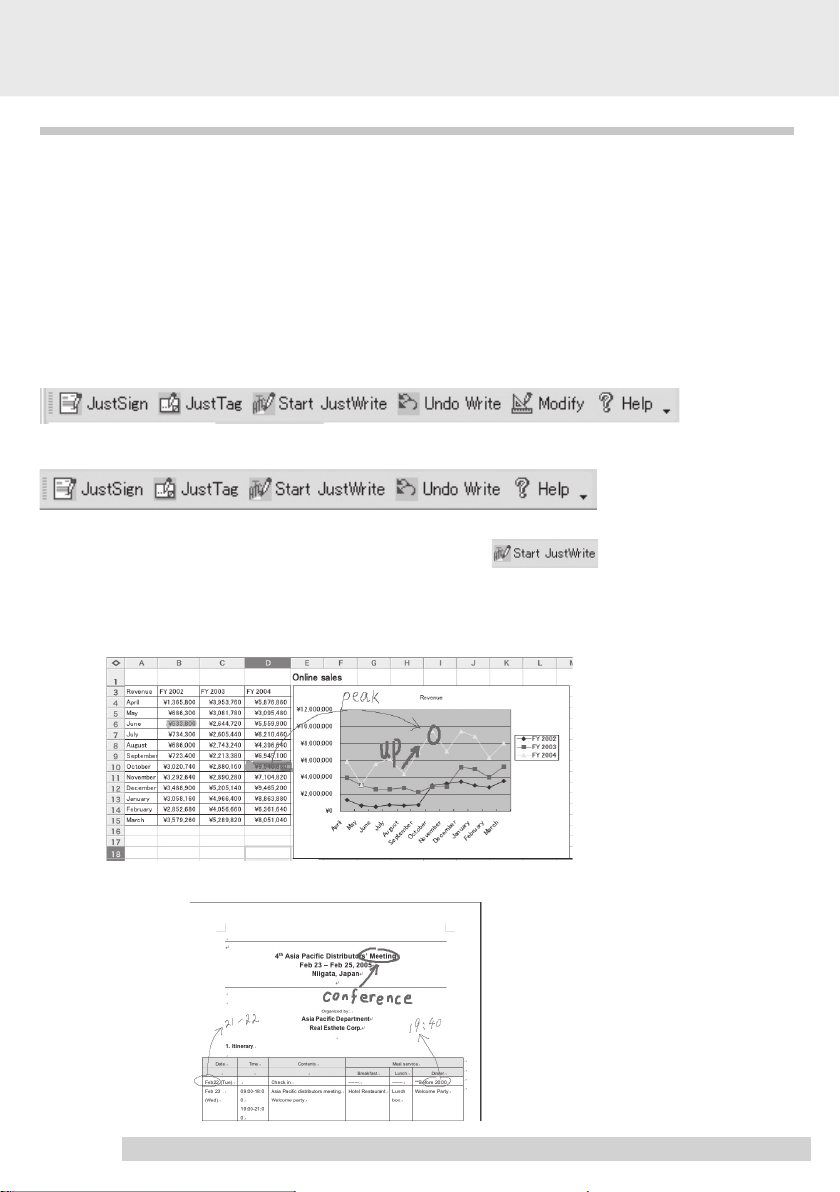
Start up Excel, Word or PowerPoint and the JustWrite Office toolbar appears.
The JustWrite Office toolbar as it appears on Excel.
The JustWrite Office toolbar as it appears on Word
Make Notes and Other Marks with the Pen
JustWrite is handy for emphasizing key points and adding supplementary
notes in Excel files. With graphs use the regular pen function and for columns
use the marker.
Starting Up JustWrite
〜
〜
For Word documents, it is useful for proofreading and making corrections.
24
Page 26

With PowerPoint, JustWrite is convenient for proofreading and making
corrections, as well as emphasizing key points.
When the JustWrite toolbar is being used, the
to an
End JustWrite
button. To close JustWrite, click this button.
Start JustWrite
Sticking Post-it Notes on Excel and Word Files
Write Post-it Notes and Paste them to Files
Post-it note
Post-it notes appear and may be deleted even on computers that do not have
JustWrite Office installed.
button changes
JustTag
〜
〜
25
Page 27
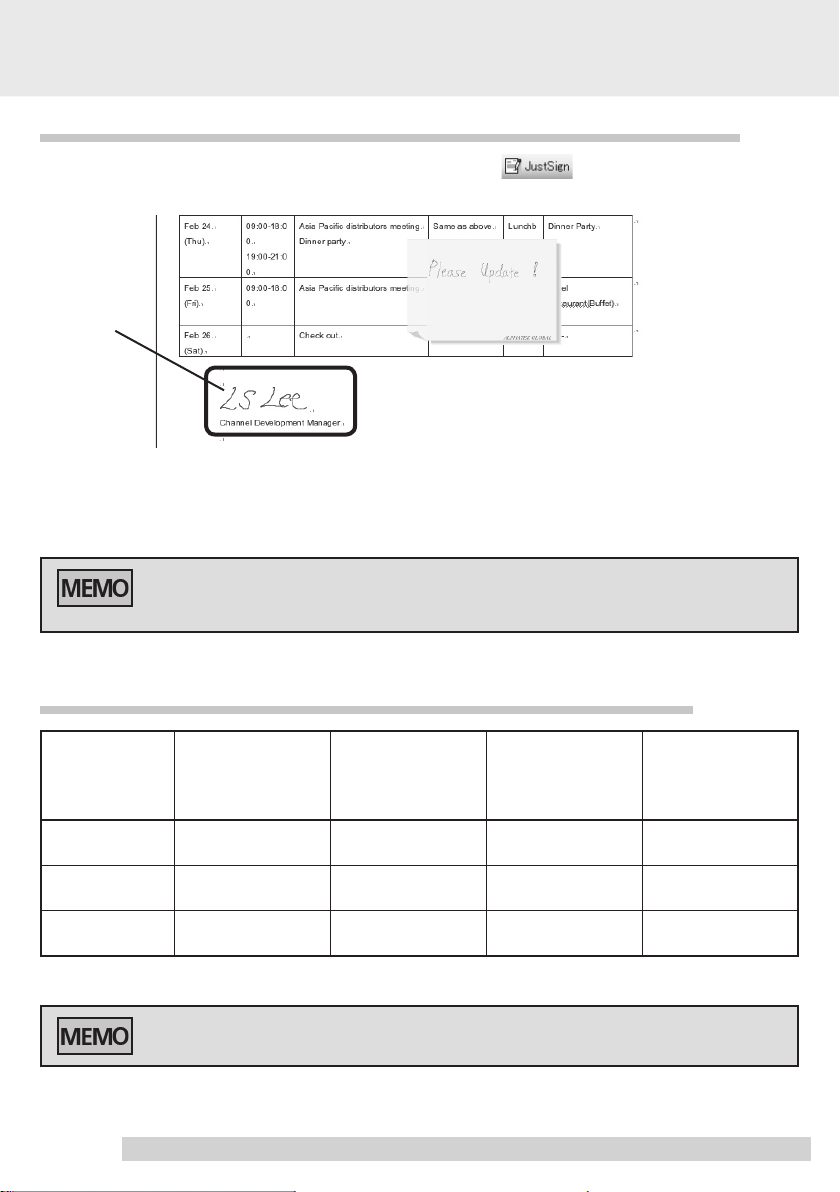
Adding a Signature to Excel and Word Files〜JustSign
Sign and Paste the Signature to a Document
Signature
Signatures appear and may be deleted even on computers that do not have
JustWrite Office installed.
〜
JustWrite Office Functions
JustShow
(Function for adding
notes and other marks
to slideshows)
PowerPoint
Excel
Word
For more detailed information on each JustOffice function, please refer to Help.
×
×
26
A Compatibility Table
〜
JustWrite
(Function for adding
notes and other marks
to files)
JustTag
(Function for adding
post-it notes)
× ×
〜
JustSign
(Function for adding
signatures)
Page 28

Obtaining Technical Support
If you have any problem with BizTablet, first check the appropriate setup
chapter in this guide to make sure the unit is installed correctly. Then review
the Troubleshooting section within this manual, your problem may be
described there and you can try the solution offered. You can also check the
product Frequently Asked Questions on the Wacom web site.
FAQ: http://club.wacom.co.jp/wacom-en/servlet/support.user.Swusr101Sv00
Support Staff
If you think your BizTablet is not working properly, contact the Wacom
authorized distributors in your area (Check your area distributor on the Wacom
web site: http://www.wacom.com.sg/distributor/dist_index.html), or contact us
by the following means:
Asia/Pacific & Oceania
By Inquiry Form: http://club.wacom.co.jp/support-en/servlet/support.user.
Swusr200Sv00
Tel: ++81-3-5309-1588
Fax: ++81-3-5309-1514
About technical support for JustWrite Office, please contact the below:
Email Support (English) : sales@ateglobal.com
27
Page 29

UM-0315
BizTabletUser'sGuide
©2005WACOMCo.,Ltd.Allrightsreserved.
WACOMCo.,Ltd.
PrintedinChina
 Loading...