

Page 1
Operating instructions
Perfect 60i | Perfect 60i eco | Optima 2
Refrigerator
Page 2

Thank you for choosing to buy one of our products. Your appliance is made to high
standards and is easy to use. Nevertheless, please take the time to read these operating
instructions in order to familiarise yourself with the appliance and get the best use out of
it.
Please follow the safety precautions.
Modifications
Text, diagrams and data correspond to the technical standard of the appliance at the
time these operating instructions went to press. The right to make technical modifications
for the purpose of the further development of the appliance is reserved.
Validity
The product family (model number) corresponds to the first alphanumerics on the identification plate. These operating instructions apply to:
Model Product family Size system
Perfect 60i 51083 Euro 60
Perfect 60i eco 51084 Euro 60
Optima 2 51085 SMS 55 / Euro 60
Variations depending on the model are noted in the text.
© V-ZUG Ltd, CH-6302 Zug, 2018
2
Page 3

Contents
1 Safety precautions 4
1.1 Symbols used......................................................... 4
1.2 General safety precautions.................................. 4
1.3 Instructions for use................................................ 4
2 Appliance description 7
2.1 Structure ..................................................................7
2.2 Operating and display elements......................... 8
3 Using for the first time 8
4 Operation 9
5 Special functions 10
5.1 Fast cooling .......................................................... 10
5.2 Sabbath mode......................................................10
6 Glass shelves and door trays 11
6.1 Positioning door trays.........................................11
6.2 Positioning glass shelves................................... 11
7 Tips and tricks 12
7.1 General information on using the appliance ..12
7.2 Notes on storing food.........................................12
7.3 Notes on freezing ................................................13
7.4 Notes on saving energy ..................................... 13
8 Care and maintenance 14
8.1 Cleaning ................................................................14
8.2 Defrosting.............................................................. 14
8.3 Changing the LED lighting.................................16
9 Noises and alarms 16
9.1 Operating noise ...................................................16
9.2 Warning and alarm signals................................ 17
10 Trouble-shooting 18
11 Technical data 19
11.1 Temperature measurement ...............................19
11.2 Note for testing institutes ...................................19
11.3 Product fiche ........................................................20
12 Disposal 21
13 Index 22
14 Service & Support 23
3
Page 4
1 Safety precautions
1.1 Symbols used
Denotes important safety precautions.
Failure to observe said precautions
can result in injury or in damage to
the appliance or fittings!
Information and precautions that
should be observed.
Information on disposal
Information about the operating instructions
▸ Indicates step-by-step instructions.
– Describes how the appliance reacts
to the steps taken.
▪ Indicates a list.
1.2 General safety precautions
▪ Read the operating instruc-
tions before using the appliance for the first time!
Cleaning and user maintenance shall not be undertaken
by children without supervision.
▪ If an appliance is not
equipped with a mains cable
and a plug or other means for
disconnecting from the mains
with a contact opening on
each pole complying with the
conditions of overvoltage category III for full isolation, an
isolating device must be incorporated into the permanently installed electrical installation in accordance with the
installation regulations.
▪ If the mains cable of this ap-
pliance is damaged, it must
be replaced by the manufacturer or its Customer Services
or a similarly qualified person
in order to avoid hazard.
▪ This appliance can be used
by children aged 8 and above
and by persons with reduced
physical, sensory or mental
capabilities, or lack of experience and/or knowledge,
provided they are supervised
or have been instructed on
the safe use of the appliance
and have understood the hazards involved. Children shall
not play with the appliance.
4
1.3 Instructions for use
Before using for the first time
▪ The appliance must be installed and
connected to the electricity supply in
accordance with the separate installation instructions. Have a qualified fitter/
electrician carry out the necessary
work.
▪ Do not use the appliance if the cold cir-
cuit is damaged.
▪ Electrical safety (protection against con-
tact) must be ensured by the installation.
Page 5

▪ When installed, it is important to ensure
that the air inlets and vent openings are
not covered or blocked.
▪ Do not use extension cables, if pos-
sible.
Correct use
▪ The appliance is designed for cooling
and storing food in the home.
The appliance must only be used as described in the operating instructions.
▪ This appliance is intended for use in the
home and similar settings such as: in
staff kitchens in shops, offices and
other commercial establishments; in agricultural establishments; by guests in
hotels, motels and other accommodation establishments; in bed and breakfast establishments. This appliance is
not intended for use in the professional
sector.
▪ No liability is assumed for any damage
caused by improper or incorrect use or
by repairs carried out by unqualified
people. In this case, any warranty or
other liability claims are deemed null
and void.
▪ Any repairs, modifications or manipula-
tions to the appliance, especially any
electrically live parts, may only be carried out by the manufacturer, its Customer Services or a similarly qualified
person. Repairs if carried out incorrectly
may cause serious injury, damage to
the appliance and fittings, as well as affect the functioning of the appliance. If
the appliance is not working properly or
in case a repair is needed, follow the instructions given in the «Service & Support» section. Please contact our Customer Services if necessary.
▪ Use original spare parts only.
▪ Retain these operating instructions for
future reference.
1 Safety precautions
▪ The appliance corresponds to recog-
nized technology standards and the relevant safety regulations. Proper use of
the appliance is essential to avoid damage and accidents. Please therefore follow the precautions given in these operating instructions.
Note on use
▪ Do not use any electrical appliances in-
side the cooling and/or freezer compartment.
▪ Strong alcohol should only be stored
tightly sealed and standing upright. Do
not store explosive materials in the appliance. Danger of explosion!
▪ This appliance is CFC and FC-free and
contains small quantities of the environmentally friendly refrigerant isobutane
(R600a).
When handling the appliance, ensure
that the cold circuit is not damaged. If
the cold circuit is damaged, however,
all types of open flame and sources of
ignition must be avoided, as isobutane
is flammable. The room in which the appliance is located must be ventilated for
a few minutes. Inform Customer Services.
▪ If you have received a damaged appli-
ance, contact your supplier immediately.
Caution: Risk of injury!
▪ Be careful not to put fingers in the door
hinges, as there is otherwise a risk of
injury if the appliance door is moved.
Particular care should be taken when
children are around.
▪ Cut the power going to the appliance
before cleaning. Pull out the mains plug
or switch off the fuse. Never pull the
mains plug out of the mains socket by
the cable or with wet hands. Hold the
mains plug and pull it straight out of the
socket.
▪ Do not remove the evaporation tray on
the compressor. Fire hazard!
5
Page 6

1 Safety precautions
Caution: Risk to life!
Packaging materials, e.g. plastic film and
polystyrene, can be dangerous for children. Danger of suffocation! Keep packaging material away from children.
How to avoid damaging the appliance
▪ Only use water or a mild alkaline solu-
tion when cleaning the appliance.
▪ Do not use pointed or sharp-edged ob-
jects when removing layers of ice or
frozen-on food.
▪ No mechanical or artificial means other
than those recommended may be used
to accelerate defrosting.
6
Page 7
2 Appliance description
3
2
1
4
5
5
12
13
9
11
8
7
10
2
3
2
1
4
5
8
12
13
9
7
6
6
6
10
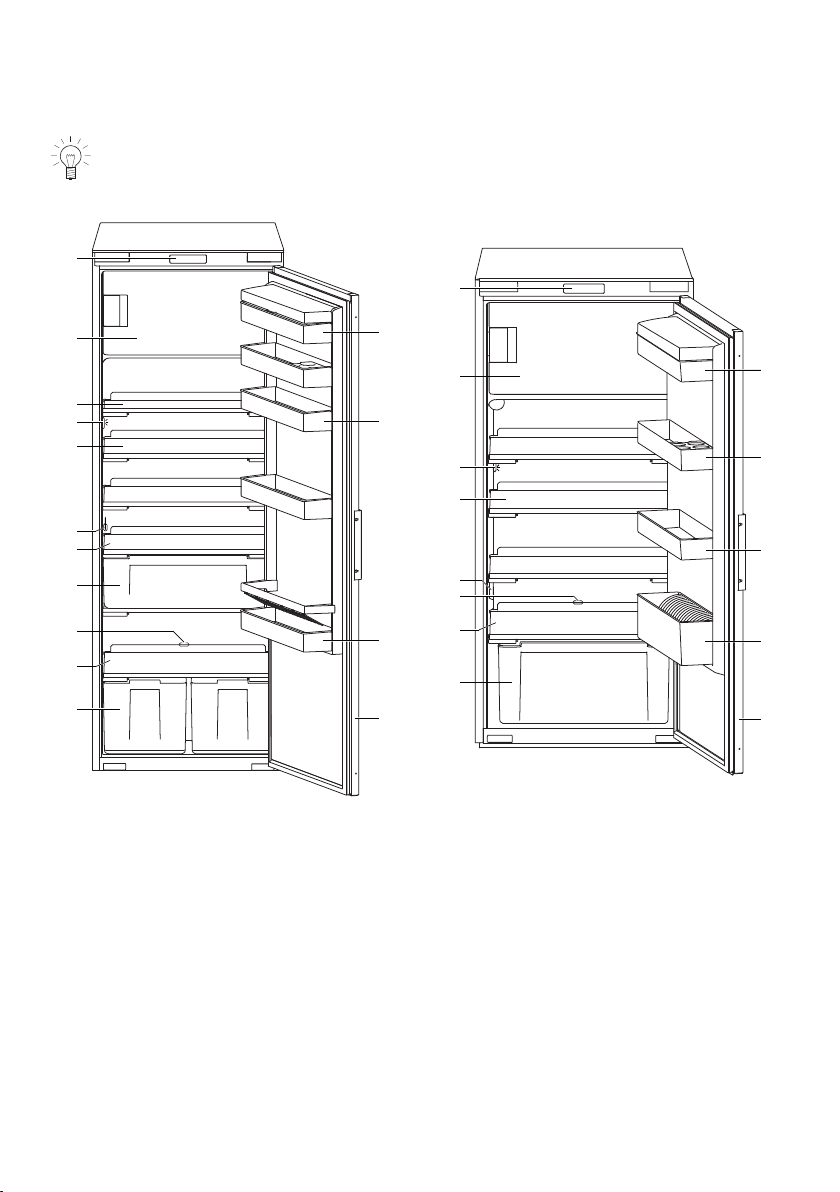
2.1 Structure
If necessary, the direction in which the door opens can be changed. Our Customer
Services can make the necessary adjustments to the appliance.
Product family 51085 Product family 51083/51084
Door tray with cover
1
Door trays
2
Door tray with bottle holder
3
(bottles up to max. 1.5 litres)
Vegetable drawer
5
Shelf over vegetable drawer (do not
6
Appliance door
4
use any other shelf in this position)
Defrost drainage channel
7
Temperature sensor
8
Shelves
9
LED lighting
10
Half-shelf
11
Freezer compartment
12
Operating and display elements
13
7
Page 8
3 Using for the first time
05
o
1
2 4
B
A
3
DC
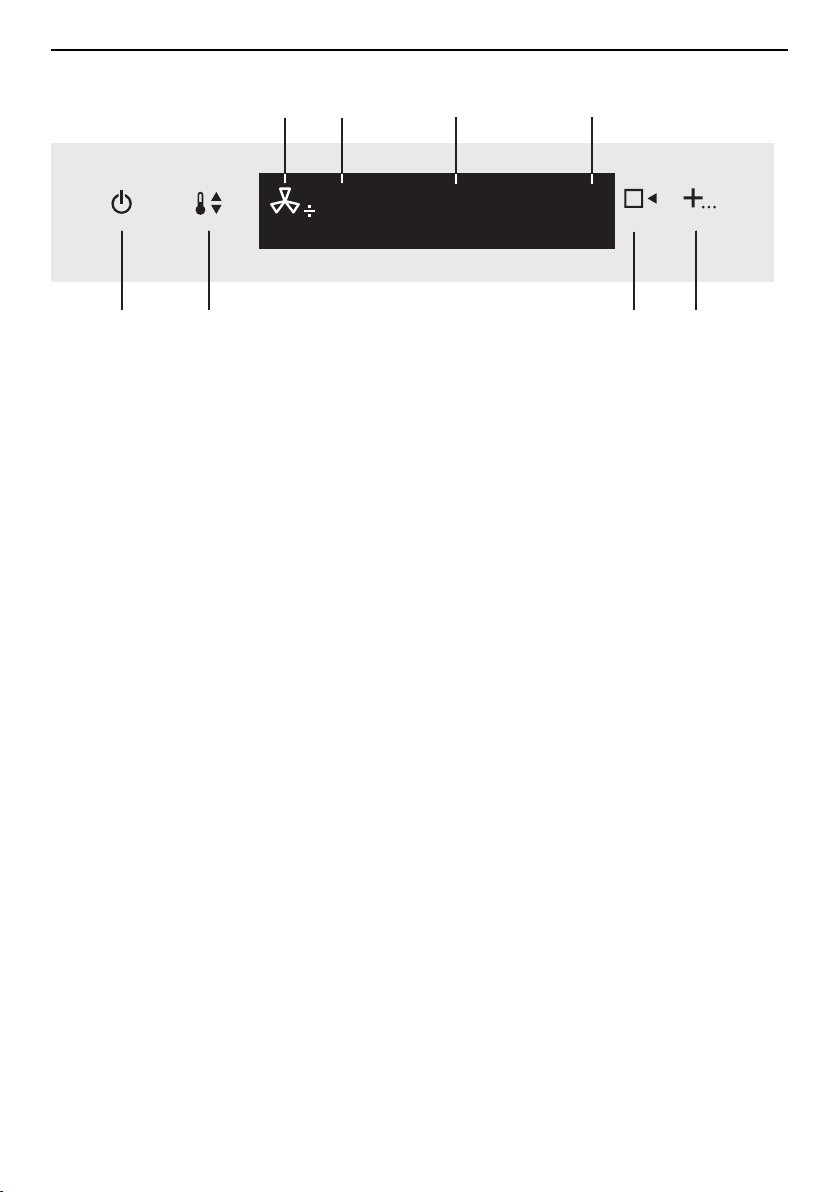
2.2 Operating and display elements
Displays
Fast cooling
A
Cooling compartment temperature display
B
Display
C
Appliance switched off
D
Buttons
ON/OFF
1
Temperature setting
2
Preselection
3
Special functions
4
3 Using for the first time
Before operating the newly installed appliance for the first time, the following steps
should be taken:
▸ Remove packaging and transport material, as well as protective film, if any, from the
interior.
▸ Clean the interior and accessories with lukewarm water or a mild alkaline solution,
and dry completely.
▸ Check that all appliance door seals are completely dry, and dry them if necessary.
▸ If the appliance was transported in a horizontal position, wait an hour before switching
it on.
8
Page 9

4 Operation
4 Operation
Switching the appliance on
▸ Plug in the appliance at the mains.
– «off» is shown on the right-hand side of the display for 30 seconds.
– «off» is shown in the digital display for 30 seconds when the appliance door is
opened or a button is pressed.
▸ Hold the button depressed for 3 seconds.
– The appliance is switched on.
An appliance that has been started up for the first time takes around 15 hours
(with food inside) to reach its normal operating temperatures.
Setting the temperature in the cooling compartment
The temperature can be set between 2°C and 9°C. When the cooling compartment
temperature is between 4–6°C, the temperature of the freezer compartment is at least.
-18°C.
▸ Depress the button for 3 seconds.
– The cooling compartment temperature display flashes in the display.
▸ Press the button repeatedly until the required temperature flashes.
– If no further settings are made after 5 seconds, the current value is accepted and
the temperature display stops flashing.
– The average temperature for the last 2hours is shown in the temperature display;
the set temperature will be reached after a few hours.
The value displayed may be different from the target value if the door is open for
an extended period of time or if warm foods have been placed inside.
If the button is pressed without having pressed the button beforehand, a
double acoustic signal is emitted.
Button lock
The button lock prevents the temperature from being adjusted unintentionally. To override the button lock:
▸ Depress the desired button for 3 seconds until the corresponding display/symbol
flashes.
▸ Touch another button or make settings within 5 seconds.
– The button lock is reactivated 10 seconds after the last press of a button.
Switching the appliance off
▸ Hold the button depressed for 3 seconds.
– The appliance switches off.
– «off» is shown in the digital display for 30 seconds.
– «off» is shown in the digital display for 30 seconds when the appliance door is
opened or a button is pressed.
9
Page 10

5 Special functions
If the appliance is being taken out of operation, e.g. for repair work or disposal:
▸ Remove the mains plug from the mains socket.
▸ When not in use for an extended period of time: Clear out, defrost and clean the appli-
ance, and leave the cooling compartment door and freezer compartment door open.
5 Special functions
Switching the special function on
Special function Symbol Remarks
▸ Depress the
button for
3seconds.
▸ Press the but-
ton again
– The corresponding symbol flashes in the display.
▸ Press the button.
– The special function is activated.
– The corresponding symbol is illuminated in the display.
Fast cooling
Sabbath mode
Switching the special function off (early)
▸ Depress the button for 3 seconds.
▸ Press the button repeatedly until the desired special function is reached.
▸ Press the button.
– The special function is deactivated.
next to the cooling compartment
temperature display
on the cooling
compartment temperature display
is illuminated for
30 seconds after activation.
5.1 Fast cooling
The fast cooling function allows large quantities of food, e.g. after a shopping trip, to
be cooled more quickly. The temperature of the cooling compartment is controlled at
2 °C for 24 hours.
During the fast cooling process, the compressor operates at a higher cooling output,
which increases the noise level to a level that is above the normal operating noise. The
compressor output is increased until the temperature in the cooling compartment
reaches the set temperature or the maximum time period has elapsed. The set temperature for the refrigerator compartment is reset to the previously set temperature after
24hours.
Immediately before putting food in the cooling compartment, switch on to prevent food that is already in the refrigerator from warming up.
5.2 Sabbath mode
In Sabbath mode, the lighting and displays are switched off for 28hours.
10
Page 11

6 Glass shelves and door trays
6 Glass shelves and door trays
The height of the glass shelves in the cooling compartment and the door trays on the inside of the cooling compartment door can be adjusted.
The glass half-shelf enables you to store taller vessels. Position the glass half-shelf
at the top to ensure that the air circulates well. Included in the scope of delivery
with product family 51085, 51060, 51063, 51064.
6.1 Positioning door trays
▸ Push the door tray up and remove it.
▸ Select the desired height.
▸ Hang the door tray in the openings in the
door frame.
▸ Push the door tray down as far as it will
go.
The top door tray with the cover is not adjustable.
When the appliance is new, it may require a little more effort to take out the door
trays.
6.2 Positioning glass shelves
▸ On both sides, push the slide bar in-
wards and downwards.
– The slide bar engages and stays in
this position.
▸ Pull the glass shelf out of the rear guide
and insert into desired position.
▸ To fix the glass shelf in place, turn the
slide bar upwards and release it.
– The slide bar engages.
11
Page 12

7 Tips and tricks
7 Tips and tricks
7.1 General information on using the appliance
▪ When closing the door make sure that it forms a seal all the way round. This is sup-
ported by the self-closing hinges (dependent on model), as the appliance doors shut
themselves if the opening angle is between 20–30°.
▪ It can take up to 6 hours for food and beverages to cool down from room temperature
to the cooling compartment temperature. The greater the quantity of warm food, the
longer it takes to cool down.
▪ Changing the temperature setting has no effect on the time it takes for food and
beverages to cool down, only the temperature itself.
▪ Storing food that releases moisture can lead to condensation on the glass shelves.
For this reason, food must be covered or wrapped; this also prevents it from drying
out.
▪ The electronic controller defrosts the cooling compartment once a day. A visible layer
of snow or ice on the rear wall of the cooling compartment is therefore normal.
▪ At high ambient temperatures, a significant amount of ice may form on the rear wall.
This is normal: due to the high humidity, more water condenses in the appliance and
ices up. Defrost the appliance manually if necessary.
▪ The food must not come into contact with the rear wall of the cooling compartment or
it may freeze. Additionally, when defrosting the appliance, water may enter the cooling
compartment.
▪ Placing very warm or very cold items (e.g. warm, bottled sauces or frozen food for de-
frosting) directly in front of the temperature sensor can affect the appliance's temperature regulation: it may cool too little or too much.
▪ Snow and ice forming on the rear wall of the cooling compartment can be caused by
the appliance door not being closed properly. Make sure no food items are protruding, the appliance door does not catch and the hinges move freely.
7.2 Notes on storing food
▪ Store oils and fats in closed containers. They must not come into contact with the
plastic parts or the door seal.
▪ The coldest areas of the cooling compartment are the rear wall and the space above
the bottom shelf, regardless of the temperature setting. Perishables like meat should
therefore be stored on the lowest shelf.
12
Page 13

Example arrangement (from top to bottom)
In the freezer section:
For freezing and storing food and
making ice
On the glass shelves:
▪ Bakery products
▪ Ready meals
▪ Dairy products
▪ Meat, sausages and fish
In the vegetable drawer:
Vegetables, fruit and salad
In the door trays:
▪ Butter and cheese
▪ Tubes and eggs
▪ Small tins
▪ Smaller bottles and Tetra Pak
containers
▪ Large bottles (up to max. 1.5
litres)
7 Tips and tricks
7.3 Notes on freezing
▪ Check packaging for damage. Damp patches or swollen packaging may indicate that
the contents have defrosted.
▪ Food to be frozen should not come into contact with goods that are already frozen or
it may cause them to defrost.
▪ Only freeze small quantities at any one time so that the temperature of the frozen food
already in the freezer does not increase too sharply (for max. freezing capacity, see
identification plate or product data sheet). The special function can be activated; it
switches off automatically after 24 hours.
▪ Defrosted frozen food must not be refrozen as the food may perish.
7.4 Notes on saving energy
▪ Leave the drawers, glass shelves and door trays in the positions they were in upon
delivery, if possible. This ensures the best possible temperature distribution.
▪ Only open the appliance doors when necessary and keep them open for as short a
time as possible. The sooner the appliance door is closed, the less cold air escapes.
▪ Allow hot or warm food to cool down before putting it in the appliance.
13
Page 14

8 Care and maintenance
▪ Store food that releases moisture in closed containers or covered in the cooling com-
partment, if possible. Moisture can cause the rear wall of the refrigerator to ice up
more quickly and reduce its cooling output.
▪ Make sure the appliance doors close correctly. The door seal must align properly with
the appliance frame.
▪ Do not install the appliance near radiators, heating pipes or flues, and protect it
against direct sunlight.
8 Care and maintenance
8.1 Cleaning
For hygienic food storage, the interior should be kept clean.
Do not use any abrasive cleaning agents or scouring cloths.
This may damage the appliance.
▸ Every so often, use a mild soapy solution to wipe the interior and dry thoroughly. Oc-
casionally wipe with lemon water; this eliminates smells.
▸ Regularly inspect the door seals and if dirty clean using a soft brush. This prevents
them from sticking and getting damaged.
▸ Clean the operating and display elements just with a slightly damp cloth.
▸ When not in use for an extended period of time, switch the appliance
«off» via the button. Clear out, defrost and clean the appliance, and leave the cool-
ing compartment door and freezer compartment door open.
Ensure that no cleaning water runs through the defrost drainage channel into the
evaporation tray.
8.2 Defrosting
Defrosting the cooling compartment
The cooling compartment defrosts once a day automatically.
During defrosting, the temperature inside
the cooling compartment increases so that
the ice on the rear wall melts. The water
created when the ice melts collects in the
defrost channel, flows through the drain
hole and evaporates outside the appliance
in the evaporation tray.
When defrosting is complete, the temperature is lowered back down to the set target
temperature.
14
Page 15

8 Care and maintenance
Keep the collection channel and the drain pipe clean so that the water can flow
freely.
▸ Clean the defrost drainage channel with
the green cleaner that is in it with an upand-down and circular motion.
If milk has been spilt accidentally and has ended up in the defrost drainage channel:
► Push some kitchen towel into the drain hole and try to absorb as much liquid
as possible.
► If more than 1dl has flowed into the defrost drainage channel and/or a strong
odour develops after a while: call Customer Services.
If any foreign objects get into the defrost drainage channel:
► Carefully insert a flexible plastic object (such as a cable tie) into the drain hole
and try to remove any foreign objects.
► Do not use hard or sharp objects, or the defrost drainage channel and sur-
rounding components could get damaged.
Defrosting the freezer compartment
A thick layer of ice will prevent the cold from being transferred to the frozen food. Therefore, the freezer compartment should be defrosted if a lot of ice has formed. When defrosting, keep frozen food as cold and insulated as possible, e.g. by wrapping it in newspaper.
Do not use pointed objects to remove ice or food that has frozen on solid. Do not
use electrical heaters or naked flames for defrosting.
▸ Switch the appliance «off» using the button.
▸ Absorb the water created when the ice melts with a sponge.
▸ After defrosting, clean the interior and dry thoroughly.
▸ Start the appliance again using the button.
15
Page 16

9 Noises and alarms
1
8.3 Changing the LED lighting
Only use original LED lighting from the manufacturer.
▸ Disconnect the power supply: by pulling out the mains plug or switching off the fuse.
▸ Remove the LED lighting.
▸ Disconnect the plug and socket connec-
tion 1 for the LED lighting.
▸ Insert the new LED lighting by following
the instructions above in reverse order.
9 Noises and alarms
9.1 Operating noise
The compressor and the cooling circuit make various noises while the appliance is running.
Although the appliance is fitted with a quiet compressor and a noise-optimized cooling
circuit, some noises cannot be completely avoided. The volume of these noises depends
on the size of the appliance, how it is installed and the cooling requirement (e.g. for Fast
cooling). Operating noises are particularly audible immediately after switching on the
compressor; however, these noises become quieter as the appliance runs.
16
Page 17

9 Noises and alarms
Keyword Cause Remarks
Buzzing Cooling unit Normal operating noise made by the cooling
unit, volume depends on the size of the appliance and the load-dependent speed of the compressor motor.
Gurgling, bubbling, hissing
Fizzling Cooling circuit Normal operating noise caused by the injection
Rattling Glass shelves, bas-
Creaking Housing Normal, temperature-dependent stress-strain of
Cooling circuit Normal operating noise caused by the flow of
refrigerant through the cold circuit.
of refrigerant into the evaporator.
Arrange the parts in the interior so that they are
kets, door trays, contents, etc.
fixed in place and are not touching.
the materials, e.g. plastics, insulation.
Unusual noises caused by improper installation
Unusual noises are often caused by improper installation. The appliance must be installed on a level and stable surface. The pipework on the back of the appliance must
never be routed across the wall or other furniture. The pipes must not touch each other.
In open kitchens or in the case of appliances installed in partitioned areas, normal operating noises may appear louder. This is not a fault but rather an effect of the architecture.
9.2 Warning and alarm signals
Warnings when the appliance doors are open
After 2 minutes LEDs flash every 15 seconds.
After 3 minutes LEDs flash every 5 seconds.
After 4 minutes LEDs flash rhythmically every second.
After 10 minutes An acoustic alarm sounds for 3 minutes. The acoustic alarm
repeats every 30minutes.
Temperature alarm
An acoustic signal sounds if the cooling compartment temperature rises 10°C above
the selected temperature value.
Cancelling alarm
▸ Touch any button.
▸ To resolve the problem, see Trouble-shooting.
17
Page 18

10 Trouble-shooting
10 Trouble-shooting
This section lists faults that can be solved simply by following the instructions given. If
the fault cannot be remedied, please call Customer Services.
Before calling Customer Services: Please note down the serial number (for FN, see identification plate under «Technical data») and what led to the fault.
Malfunction Possible cause Solution
The appliance is not
working.
Illumination is not
working.
Illumination is flashing
Malfunction Possible cause Solution
Error display
Error display
▪ An interruption in the
power supply.
▪ The fuse or circuit breaker
keeps blowing.
▪ The appliance is faulty. ▸ Contact Customer Services.
▪ LED light bulb is defective. ▸ Replace the LED light bulb.
▪ Appliance door has been
standing open for more
than 2minutes.
▪ Appliance door was not
closed properly.
▪ Temperature sensor in the
cooling compartment is
defective.
▪ Various situations can lead
to an «F» message.
▸ Check the power supply.
▸ Change fuse.
▸ Reset automatic circuit breaker.
▸ Contact Customer Services.
▸ Close the appliance door.
▸ Contact Customer Services.
– The appliance enters emer-
gency mode. The cooling compartment is cooled at the same
output level as before the temperature sensor malfunction.
▸ Contact Customer Services.
18
Page 19

Malfunction Possible cause Solution
Temperature display
flashes.
Malfunction Possible cause Solution
Error display
Error display
▪ The cooling compartment
temperature is 10°C
higher than the set temperature or the freezer compartment temperature is
above -9°C.
▪ There has been a power
failure. The flashing temperature display show the
temperature when the appliance is put back into
service.
▪ The temperature in the
cooling compartment is
above 20°C.
▪ The temperature in the
cooling compartment is
below -5°C.
▸ Do not place warm foods right
next to the temperature sensor.
▸ If there is no warm food in the
appliance: call Customer Services.
▸ Touch any button.
– The set temperature is shown
in the temperature display.
▸ Check any refrigerated or frozen
food and discard if spoiled.
▸ Touch any button.
– The set temperature is shown
in the temperature display.
▸ Touch any button.
– The set temperature is shown
in the temperature display.
11 Technical data
11 Technical data
External dimensions
▸ See installation instructions
Electrical connection
▸ See identification plate
The identification plate is located to the left of the vegetable drawer.
11.1 Temperature measurement
The refrigerator and freezer compartment temperature are measured in accordance with
an internationally recognized standard. Own measurements can be imprecise and are
not suitable for checking the accuracy of the temperature.
11.2 Note for testing institutes
In order to freeze the maximum quantity (see identification plate), compartment above
the grille must be used. In this case the special function must be activated immediately
before putting the food into the appliance.
19
Page 20

11 Technical data
11.3 Product fiche
In accordance with EU Regulation No. 1060/2010
Brand – V-ZUG Ltd
Model name – Optima 2 Perfect 60i Perfect 60i
eco
Category – 7 (refrigerator/freezer)
Energy Efficiency Class – A++ A++ A+++
Annual Energy Consumption
1)
(AEC)
Storage volume, refrigerator compartment overall
of which chill compartment l – – –
Storage volume, freezer compartment
Star rating – ****
Frost-free refrigerator/freezer
compartment
3)
Power cut safe time h 13 13 13
Freezing capacity kg/24 h 2.0 2.0 2.0
Climate class SN-ST
Airborne acoustical noise emissions
Built-in appliance – Yes
1) Annual energy consumption based on standard test results for 24 hours. The actual consumption value will depend on how the appliance is used
and where it is located.
2) Food freezer compartment and frozen-food storage compartment -18°C or colder with a minimum freezing capacity
3) Automatic defrost system for the refrigerator or freezer compartment is present
4) This appliance is intended to be used at an ambient temperature between 10°C and 38°C.
5) This appliance is intended to be used at an ambient temperature between 10°C and 43°C.
kWh per
199 176 122
year
l 244 175 175
l 24 24 24
2)
****
2)
****
– yes/no yes/no yes/no
4)
SN-ST
4)
SN-T
dB (A) 36 36 34
2)
5)
20
Page 21

12 Disposal
12 Disposal
12.1 Packaging
Never allow children to play with packaging material due to the danger of injury or
suffocation. Store the packaging material in a safe location or dispose of it in an
environmentally-friendly way.
12.2 Safety
Render the appliance unusable to prevent accidents caused by improper use (e.g.
through children playing):
▸ Disconnect the appliance from the mains. With a fixed appliance, this is to be carried
out by a qualified electrician. Then cut the mains cable off flush with the appliance.
12.3 Disposal
▪ The «crossed‐out wheeled bin» symbol requires the separate collection of waste
electrical and electronic equipment (WEEE). Such equipment can contain hazardous,
environmentally harmful materials.
▪ These appliances are to be handed over to a designated collection point for the recyc-
ling of electrical and electronic equipment and must not be disposed of with unsorted
household waste. And in this way, you will be helping to protect resources and the environment.
▪ For more information, please contact the local authorities.
21
Page 22

13 Index
A
Alarm.................................................................. 17
Appliance disposal .......................................... 21
B
Button lock ........................................................... 9
C
Care and maintenance ................................... 14
Cleaning............................................................. 14
Construction......................................................... 7
Cooling compartment temperature display
........................................................................ 8
D
Defrost drainage channel............................... 14
Defrosting .......................................................... 14
Disposal............................................................. 21
Door trays.......................................................... 11
E
Electrical connection ....................................... 19
Error display
Appliance not working................................ 18
F ...................................................................... 18
F1.................................................................... 18
HI .................................................................... 19
Illumination flashing..................................... 18
Illumination not working.............................. 18
LO ................................................................... 19
Temperature display flashes ..................... 19
F
Fast cooling ...................................................... 10
G
Glass shelves ................................................... 11
I
Identification plate..................................... 19, 23
Initial set-up ..................................................... 4, 8
Instructions for use ............................................. 4
M
Model number ..................................................... 2
N
Noises ................................................................ 16
O
ON/OFF ................................................................ 8
Operating and display elements...................... 8
Operating the appliance.................................... 9
P
Preselection ......................................................... 8
Product family...................................................... 2
Q
Queries .............................................................. 23
S
Sabbath mode.................................................. 10
Safety precautions
Correct use ...................................................... 5
General ............................................................. 4
Service & Support................................... 23
Service agreement........................................... 23
Setting temperature
Cooling compartment .................................... 9
Special functions................................................. 8
Switching on ................................................. 10
Switching appliance on...................................... 9
Switching on ........................................................ 9
Symbols ................................................................ 4
T
Technical data .................................................. 19
Temperature measurement............................ 19
Temperature setting ........................................... 8
Testing institutes .............................................. 19
Tips ..................................................................... 12
Trouble-shooting .............................................. 18
Type....................................................................... 2
U
Using for the first time................................... 4, 8
V
Validity................................................................... 2
W
Warning signal.................................................. 17
22
Page 23

14 Service & Support
14 Service & Support
The «Trouble-shooting» section gives you valuable tips on how to deal with minor
malfunctions yourself, saving you the time and trouble of calling out a service technician and any cost that goes along with it.
Information on the V-ZUG warranty can be found at www.vzug.com →Service
→Warranty information. Please read this information carefully.
Please register your V-ZUG appliance immediately:
▪ online at www.vzug.com →Service →Online warranty registration or
▪ using the enclosed registration card.
This will allow you to take advantage of the best possible support in the event of a fault
in the appliance during the guarantee period. You will require the serial number (FN) and
appliance designation to register your appliance. You will find them on the identification
plate of your appliance.
My appliance information:
FN: ___________________ Appliance: _____________________
Please have this appliance information to hand when contacting V-ZUG. Thank you.
The identification plate is located to
the left of the vegetable drawer.
Your repair order
Call the free service number 0800 850 850 to contact your nearest
V-ZUG service centre. You can arrange an on-site visit by us by phone if you wish.
General queries, accessories and service agreement
V-ZUG will be happy to help you with any general administrative or technical queries, to
accept your orders for accessories and spare parts and to inform you about our progressive service agreements. You can contact us by calling tel. +41 58 767 67 67 or by
going to our website at www.vzug.com.
23
Page 24

V-ZUG Ltd, Industriestrasse 66, CH-6302 Zug
1051080-R03
Tel. +41 58 767 67 67, Fax +41 58 767 61 61
info@vzug.com, www.vzug.com
Service Centre: Tel. 0800 850 850
 Loading...