

V-ZUG Perfect V, Magnum/Magnum 60i, Perfect/Perfect 60i, Perfect eco, Optima 2/Optima 3 Instructions For Use Manual
...Page 1

V-ZUG AG
Variofresh 60i
Perfect/Perfect 60i
Perfect V
Perfect eco
Perfect 60i eco
Optima 2/Optima 3
Magnum/Magnum 60i
Magnum eco
Magnum 60i eco
Built-in refrigerator
Réfrigérateur à encastrer
Inbouwkoelkast
Inbyggnadskylskåp
Kjøleskap for innbygging
Встраиваемый холодильник
Instructions for use
Mode dʼemploi
Gebruiksaanwijzing
Bruksanvisning
Bruksanvisning
Инcтpyкции по экcплyaтaции
Page 2

Dear V-ZUG Customer,
Thank you for choosing one of our products.
Your appliance meets high standards, and is very easy to use.
Please take the time to read these instructions, which will ensure better understanding of the appliance and optimum and trouble-free use.
The text, images and data correspond to the technical level of the appliance at the time of printing of these instructions, subject to change
understood as further development.
Please follow the safety precautions.
Validity range
These instructions apply to the following models
The number of the model corresponds to the first 5 digits on the data plate.
Chère cliente, cher client V-ZUG
Nous vous remercions d’avoir porté votre choix sur l’un de nos produits.
Votre nouvel appareil répond aux exigences les plus élevées et son utilisation est des plus simples. Accordez-vous le temps néc essaire
pour lire attentivement ce mode d’emploi. Vous vous familiariserez ainsi avec votre appareil, ce qui vous permettra de l’utiliser de
manière optimale et sans dérangement.
Le texte, les illustrations et les données correspondent au niveau technique de l’appareil au moment de la mise sous presse de ce mode
d’emploi. Sous réserve de modifications dans le cadre du progrès technique.
Veuillez tenir compte des conseils de sécurité.
Domaine de validité
Le présent mode d’emploi est valable pour les modèles suivants
Le numéro de modèle correspond aux 5 premiers chiffers figurant sur la plaque signalétique.
Beste V-ZUG-klant,
Wij danken u dat u voor één van onze producten hebt gekozen.
Uw apparaat voldoet aan hoge eisen en is zeer gebruiksvriendelijk.
Neem evengoed de tijd om deze gebruiksaanwijzing te lezen. Zo raakt u vertrouwd met het apparaat en kunt u het optimaal en zonder
problemen gebruiken.
Tekst, beeld en gegevens komen overeen met de technische toestand van het apparaat bij het ter perse gaan van deze gebruiksaanwijzing.
Veranderingen in de zin van verdere ontwikkeling blijven voorbehouden.
Houd u aan de veiligheidsvoorschriften.
Geldigheidsbereik
Deze gebruiksaanwijzingen betreffen de volgende modellen
Het nummer van het model stemt overeen met de eerste 5 cijfers op het typeplaatje.
Ty p e Model nr. Meetsysteem
KV60i 51006 EURO 60
KP60i/KP60i eco 51007/51008 EURO 60
KPV 51009 SMS 55
KP/KP eco/KPi/KPi eco 51010/51050/51011/51012 SMS 55
KO2i/KO3i 51014/51015 EURO 60 / SMS 55
KMi/KMi eco 51024/51030 SMS 55
KM60i/KM60i eco 51025/51031 EURO 60
Ty p e No de modèle Système de mesure
KV60i 51006 EURO 60
KP60i/KP60i eco 51007/51008 EURO 60
KPV 51009 SMS 55
KP/KP eco/KPi/KPi eco 51010/51050/51011/51012 SMS 55
KO2i/KO3i 51014/51015 EURO 60 / SMS 55
KMi/KMi eco 51024/51030 SMS 55
KM60i/KM60i eco 51025/51031 EURO 60
Ty p e Model No. Measuring system
KV60i 51006 EURO 60
KP60i/KP60i eco 51007/51008 EURO 60
KPV 51009 SMS 55
KP/KP eco/KPi/KPi eco 51010/51050/51011/51012 SMS 55
KO2i/KO3i 51014/51015 EURO 60 / SMS 55
KMi/KMi eco 51024/51030 SMS 55
KM60i/KM60i eco 51025/51031 EURO 60
Page 3

Bästa V-ZUG-kund!
Tack för att du har valt en av våra produkter.
Denna apparat uppfyller högt ställda krav och den är mycket enkel att använda.
Det är dock viktigt att du tar dig tid att läsa denna bruksanvisning så att du lär känna apparaten bättre och kan använda den på optimalt
sätt och utan problem.
Text, bild och data svarar mot apparaten ur teknisk synvinkel i det ögonblick denna bruksanvisning går i tryck, med förbehåll för ändringar
som syftar till att utveckla apparaten ytterligare.
Var god följ säkerhetsanvisningarna.
Giltighetsområde
Denna bruksanvisning gäller följande modeller
Modellnumret motsvaras av de första 5 siffrorna på dataskylten.
Kjære V-ZUG kunde
Takk for at du valgte et av våre produkter.
Apparatet oppfyller høye brukerkrav og er svært enkelt å bruke.
Det er likevel nødvendig at du tar deg tid til å lese disse bruksinstruksjonene som lar deg bli mer kjent med apparatet slik at kan bruke det
på en optimal måte uten problemer.
Tekst, bilder og opplysninger tilsvarer apparatets tekniske nivå på utgivelsestidspunktet for disse bruksinstruksjonene, med forbehold om
eventuelle endringer som er ment å forbedre apparatet.
Vi ber deg om å følge sikkerhetsopplysningene.
Gyldighetsområde
Disse bruksinstruksjonene gjelder for følgende modeller
Modellnummeret er de første 5 sifrene på typeskiltet.
Уважаемый потребитель,
мы благодарим вас за выбор продукции производства компании V-ZUG.
Приобретенное вами изделие соответствует высочайшим требованиям, при этом его использование отличается большой
простотой.
Тем не менее, необходимо, чтобы вы выделили время для ознакомления с настоящим руководством, содержание которого
поможет вам лучше понять, как устроен прибор, и использовать его оптимальным образом и без каких-либо проблем.
Текст, иллюстрации и данные соответствуют техническому уровню прибора на момент отправки в печать настоящего
руководства; при этом изготовитель сохраняет за собой право внесения дальнейших усовершенствований в его конструкцию.
Просим вас придерживаться указаний по технике безопасности.
Область применения
Настоящее руководство по эксплуатации действительно для следующих моделей
Номер модели соответствует первым 5 цифрам на табличке технических данных прибора.
Ty p e Modell nr. Målesystem
KV60i 51006 EURO 60
KP60i/KP60i eco 51007/51008 EURO 60
KPV 51009 SMS 55
KP/KP eco/KPi/KPi eco 51010/51050/51011/51012 SMS 55
KO2i/KO3i 51014/51015 EURO 60 / SMS 55
KMi/KMi eco 51024/51030 SMS 55
KM60i/KM60i eco 51025/51031 EURO 60
Тип № модели Система измерения
KV60i 51006 EURO 60
KP60i/KP60i eco 51007/51008 EURO 60
KPV 51009 SMS 55
KP/KP eco/KPi/KPi eco 51010/51050/51011/51012 SMS 55
KO2i/KO3i 51014/51015 EURO 60 / SMS 55
KMi/KMi eco 51024/51030 SMS 55
KM60i/KM60i eco 51025/51031 EURO 60
Ty p Modellnummer Måttsystem
KV60i 51006 EURO 60
KP60i/KP60i eco 51007/51008 EURO 60
KPV 51009 SMS 55
KP/KP eco/KPi/KPi eco 51010/51050/51011/51012 SMS 55
KO2i/KO3i 51014/51015 EURO 60 / SMS 55
KMi/KMi eco 51024/51030 SMS 55
KM60i/KM60i eco 51025/51031 EURO 60
Page 4

Liebe V-ZUG-Kundin, lieber V-ZUG-Kunde
Wir danken Ihnen, dass Sie sich für den Kauf eines unserer Produkte entschieden haben.
Ihr Gerät genügt hohen Ansprüchen und seine Bedienung ist einfach. Nehmen Sie sich trotzdem Zeit, diese Bedienungsanleitung zu lesen. So
werden Sie mit Ihrem Gerät vertraut und können es optimal und störungsfrei benutzen.
Text, Bild und Daten entsprechen dem technischen Stand des Gerätes zur Zeit der Drucklegung dieser Bedienungsanleitung. Änderungen im
Sinne der Weiterentwicklung bleiben vorbehalten.
Beachten Sie bitte die Sicherheitshinweise.
Gültigkeitsbereich
Die vorliegende Bedienungsanleitung gilt für folgendes Modell
Chère cliente, cher client V-ZUG
Die Modellnummer entspricht den ersten 3 Ziffern auf dem Typenschild
Nous vous remercions d’avoir porté votre choix sur l’un de nos produits.
Votre nouvel appareil répond aux exigences les plus élevées et son utilisation est des plus simples. Accordez-vous le temps néc essaire pour
lire attentivement ce mode d’emploi. Vous vous familiariserez ainsi avec votre appareil, ce qui vous permettra de l’utiliser de manière optimale
et sans dérangement.
Le texte, les illustrations et les données correspondent au niveau technique de l’appareil au moment de la mise sous presse de ce mode
d’emploi. Sous réserve de modifications dans le cadre du progrès technique.
Veuillez tenir compte des conseils de sécurité.
Domaine de validité
Le présent mode d’emploi est valable pour les modèles suivants
Le numéro de modèle correspond aux 3 premiers chiffres figurant sur la plaque signalétique
Cara cliente V-ZUG, caro cliente V-ZUG
Vi ringraziamo per aver scelto uno dei nostri prodotti.
Il vostro apparecchio soddisfa elevate esigenze, e il suo uso è molto semplice.
E’ tuttavia necessario che vi prendiate il tempo per leggere queste istruzioni per l’uso che vi permetteranno di comprendere meglio
l’apparecchio e di utilizzarlo in modo ottimale e senza problemi.
Testo, immagine e dati corrispondono al livello tecnico dell’apparecchio al momento della stampa di queste istruzioni per l’uso , con riserva di
modifiche intese come ulteriore sviluppo.
Vi preghiamo di attenervi alle osservazioni sulla sicurezza
.
Campo di validità
Queste istruzioni per l’uso riguardano i seguenti modelli
Il numero del modello corrisponde alle prime 3 cifre sulla targhetta dei dati
© V-ZUG AG, CH-6301 Zug, 20
Typ Modell-Nr. Masssystem
KPA60i EURO 60
Type No de modèle
Système de mesure
Tipo
Modello n°.
Sistema di misura
,1"J&630
,1"J&630
Page 5

ENGLISH Instructions for use Page 6
FRANÇAIS Mode d’emploi Page 13
NEDERLANDS Gebruiksaanwijzing Pagina 20
SVENSKA Bruksanvisning Sidan 27
NORSK Bruksanvisning Side 34
РУCCКИЙ
Инcтpyкции по экcплyaтaции Cтpaницa
41
Page 6
6
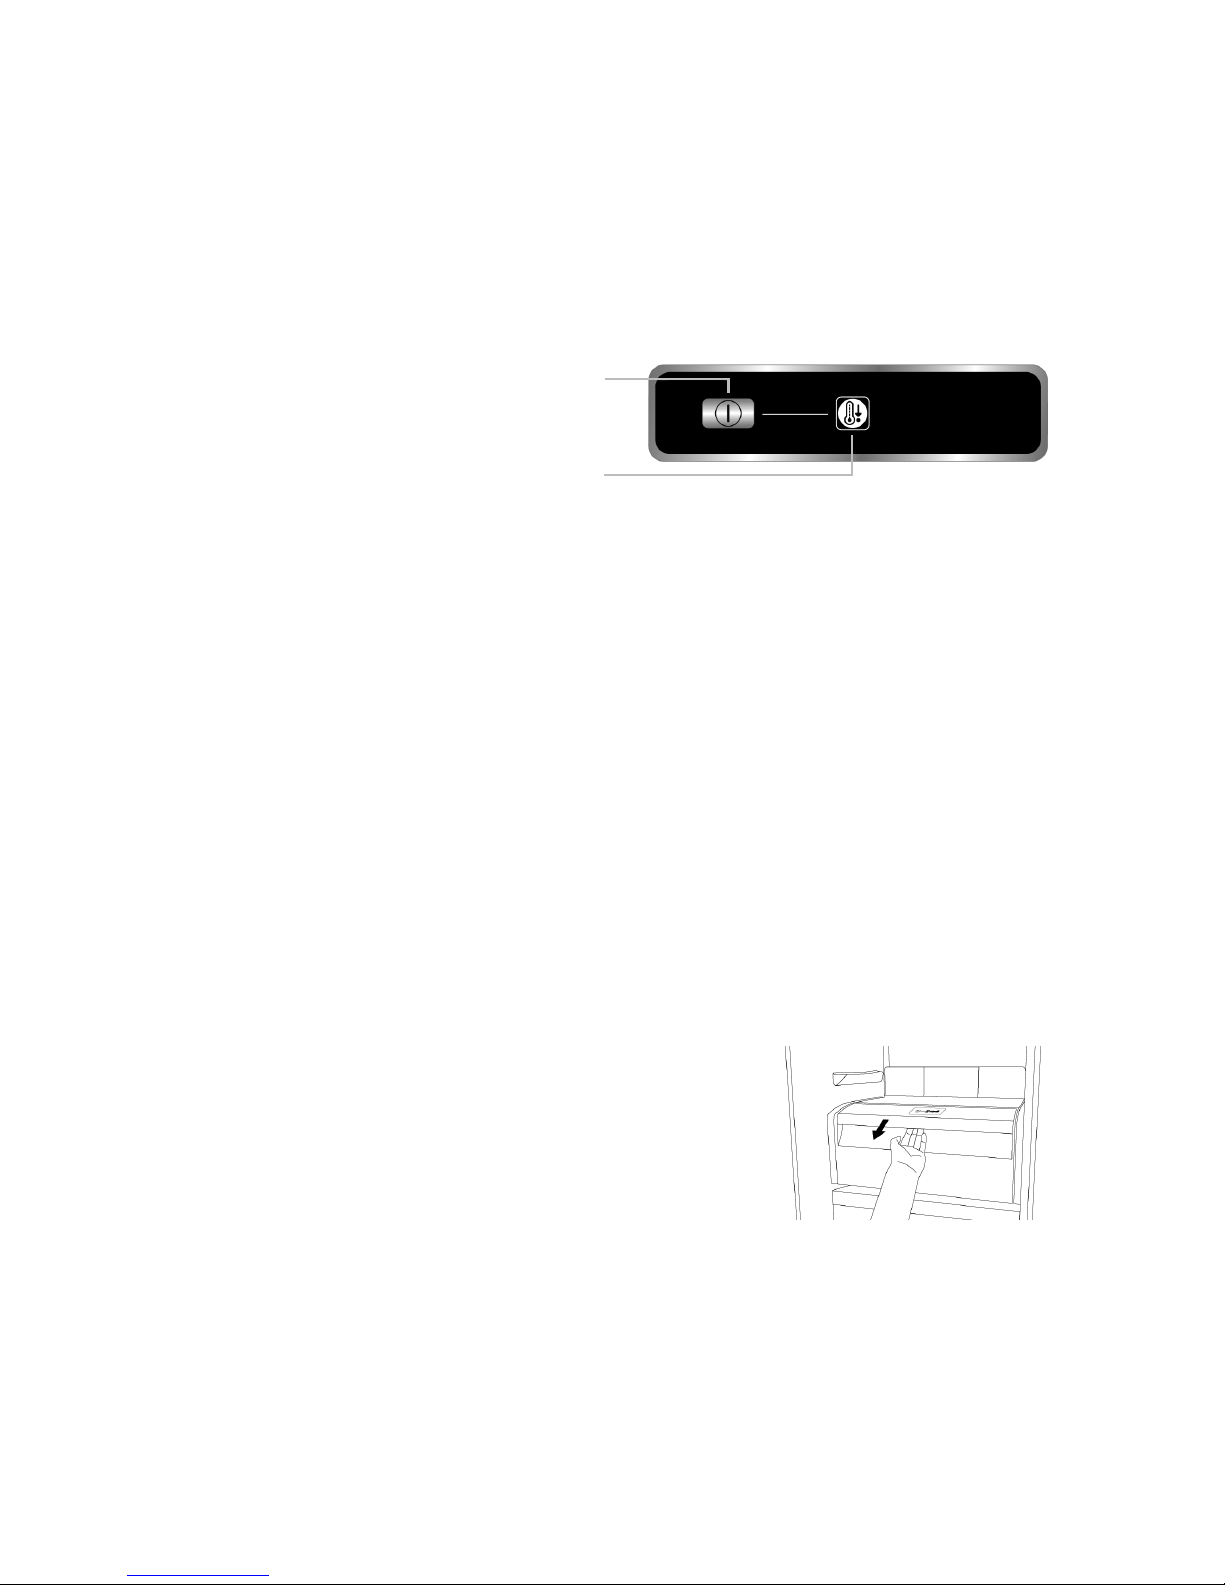
Starting the appliance
1. Insert the plug
2. When the plug is inserted, the appliance is
normally factory-set to a temperature of 5°C.
If the indicator A (standby) is lit up, press the
icon A.
Temperature adjustment
For temperature adjustment, see the enclosed
product sheet.
Note:
The room temperature, frequency of door
opening, the introduction of hot food and incorrect
positioning of the appliance can affect the
temperatures inside the refrigerator, which may
differ from that indicated on the panel.
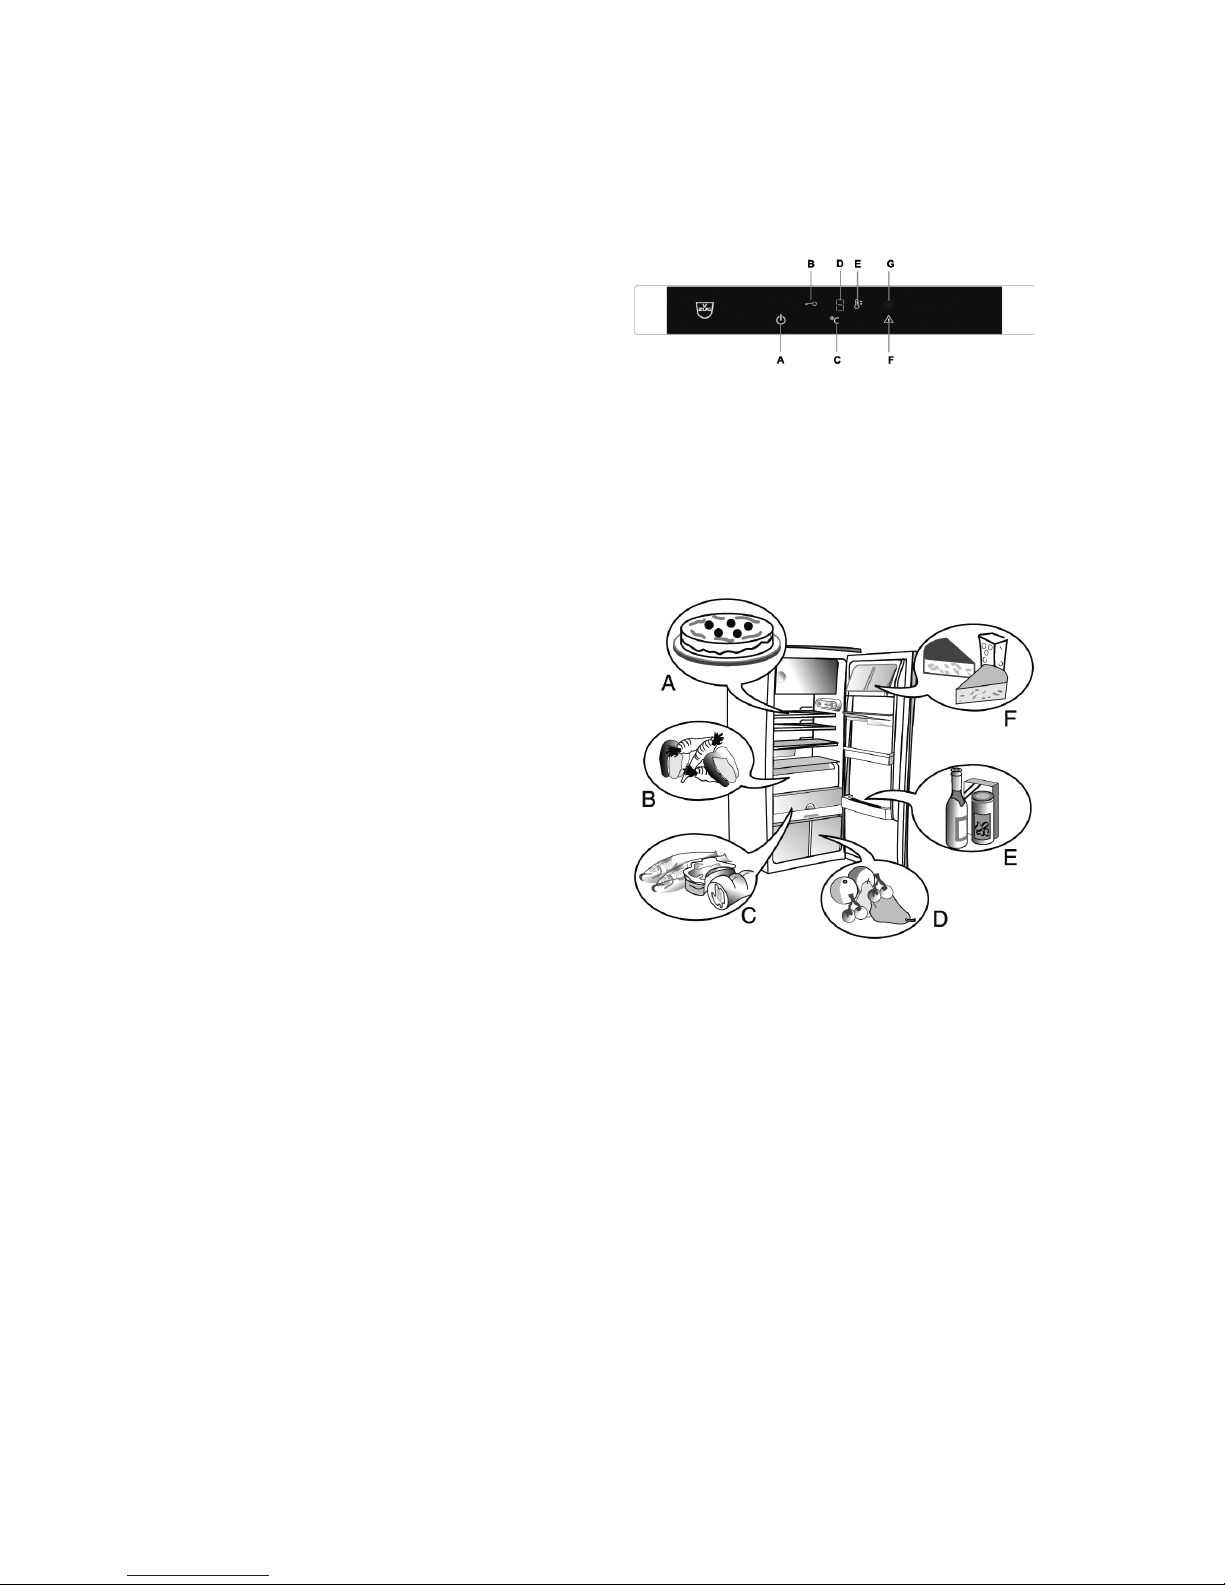
Storing food in the refrigerator
compartment:
Arrange food as shown in the figure:
A Cooked food
B Vegetables
C Fish, meat
D Fruit and vegetables
E Bottles
F Cheese
Note:
• Cover food to prevent it from becoming dry
• The space between the shelves and the rear
wall inside the refrigerator must ensure the free
circulation of air
• Do not place food in direct contact with the
rear wall of the refrigerator compartment
• Do not put food in the refrigerator when still
hot
• Store liquids in closed containers
Attention:
Storing vegetables with a high water content
can cause condensation on the glass shelves;
this does not affect proper appliance
operation.
USING THE REFRIGERATOR
COMPARTMENT
Page 7

The appliance has a special compartment designed
for optimum storage of Meat and Fish.
Therefore the temperature inside the
compartment is kept lower than in the rest of the
refrigerator compartment.
This means that fresh food (meat and fish) can be
stored for much longer without having to freeze it
and without altering its original freshness and
nutritional properties.
The optimum temperature in the meat-fish
compartment is ensured with the middle setting.
Do not store fruit or vegetables in this
compartment, since the temperature may drop
below 0°C, causing the water contained in the
food to freeze.
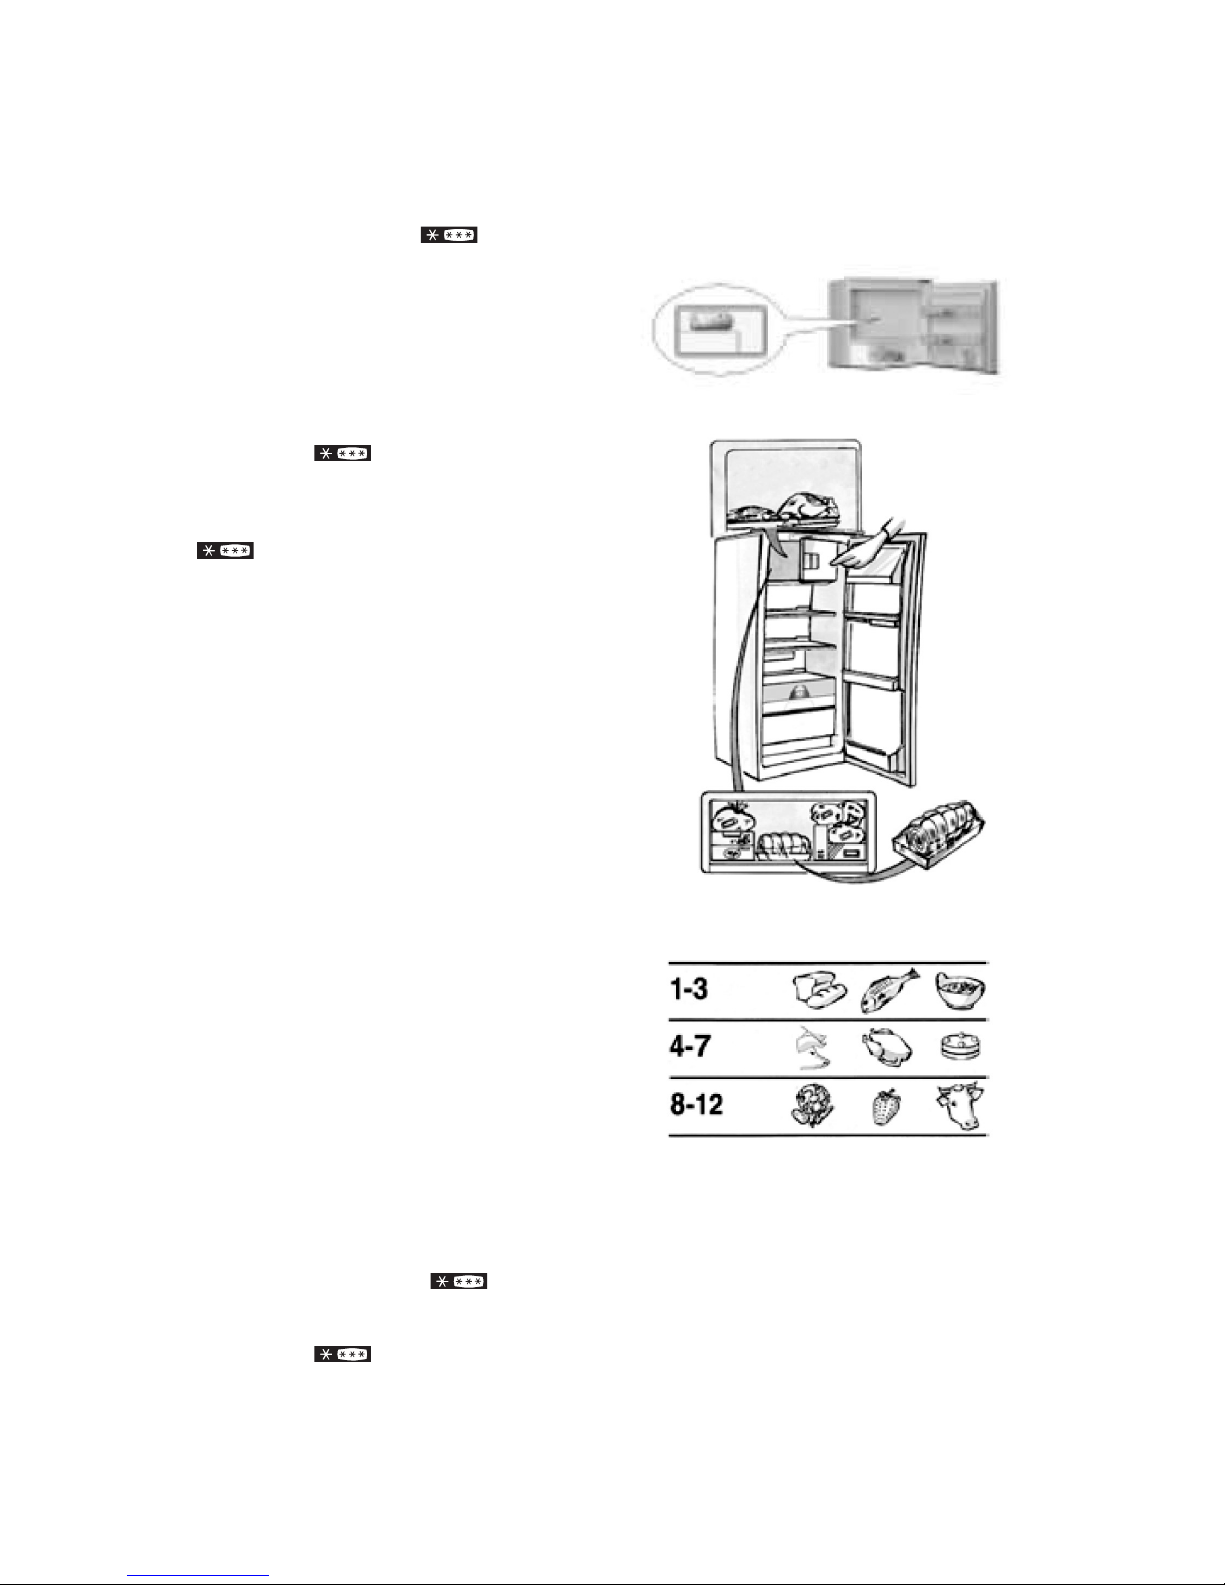
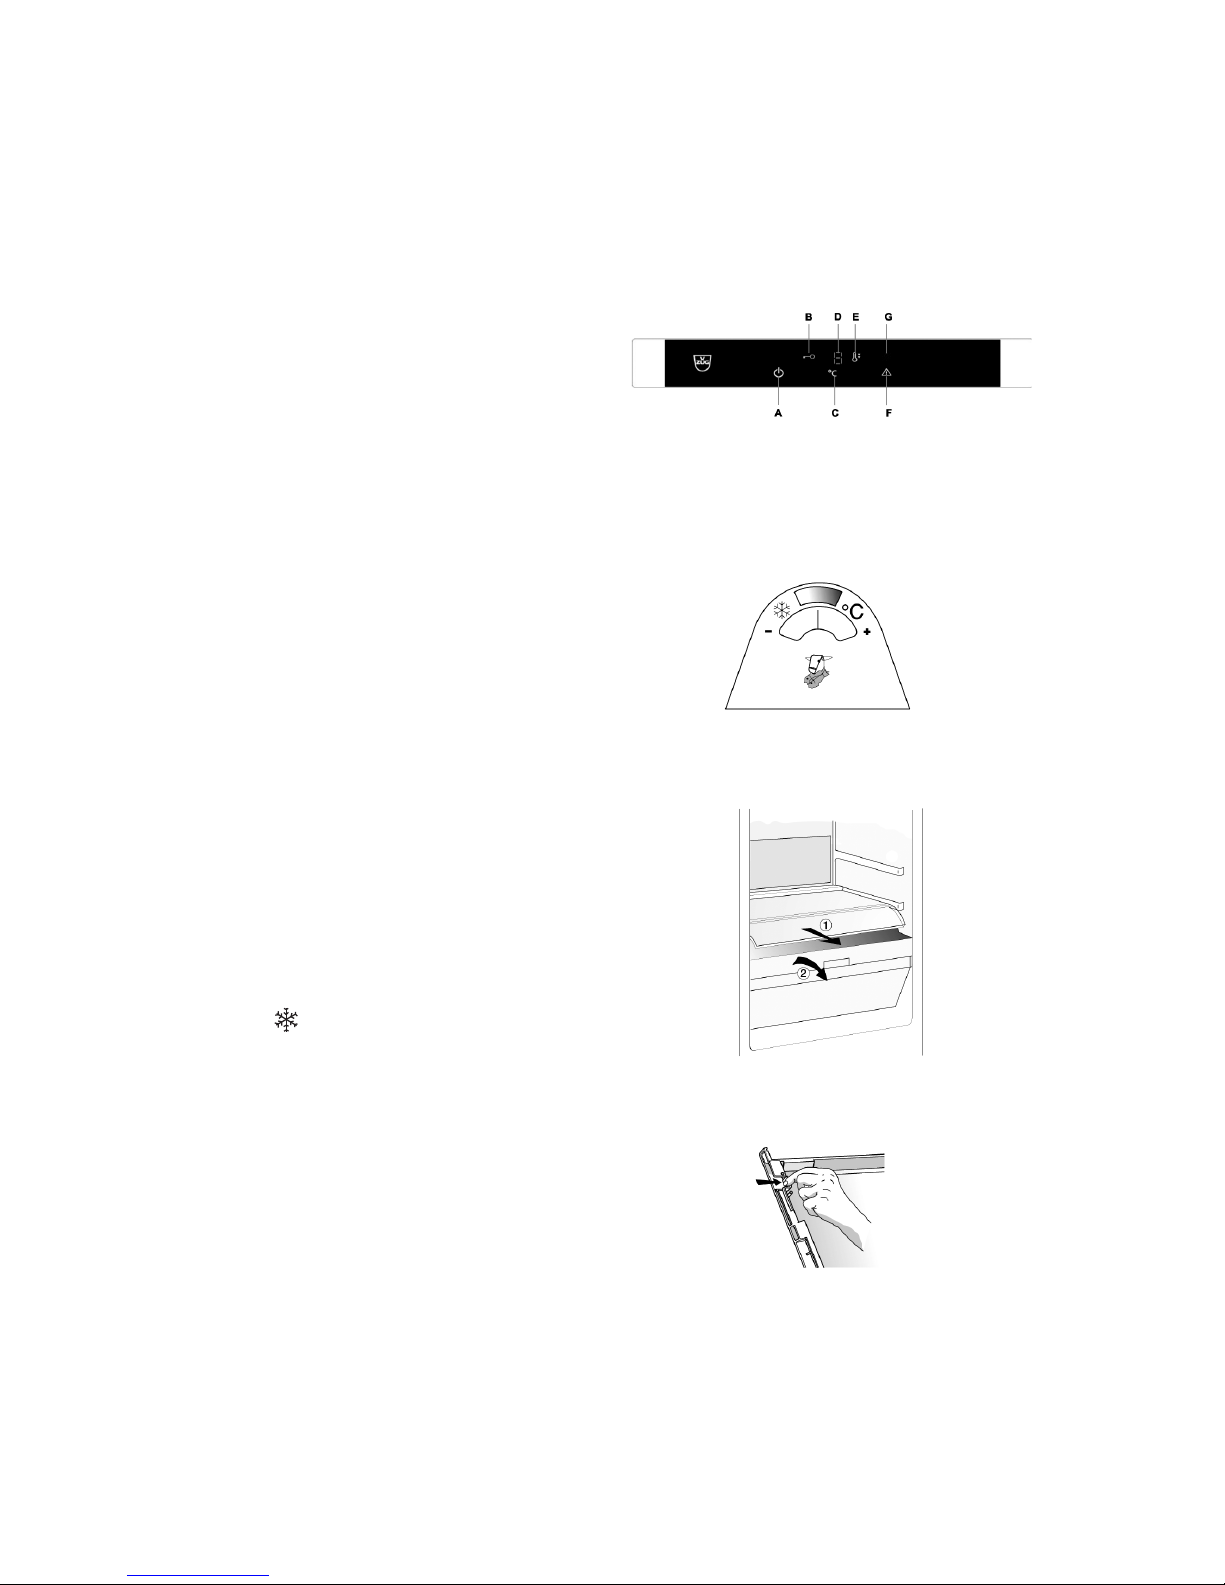
Temperature indicator
• The temperature inside the compartment is
displayed by an indicator on the compartment
door (Fig. 1)
• The coloured section indicates the ideal
temperature range for storing meat and fish
• The temperature inside the compartment takes
about one hour to stabilise.
Attention:
The meat & fish compartment temperature is
linked to the refrigerator compartment
temperature.
Therefore, if the compartment temperature
indicated is in the sector , press the button (C)
to change the refrigerator temperature.
The meat & fish compartment temperature will
correct itself.
Removing the compartment
To use the refrigerator without the meat & fish
compartment, proceed as follows:
1. Remove the compartment lid by releasing the
two side clips on the bottom front (See Fig. 3)
2. Remove the compartment (See Fig. 2)
To reinstate the meat & fish compartment,
proceed as follows:
1. Insert the compartment
2. Fit the meat & fish compartment lid
7
Fig. 1
Fig. 2
Fig. 3
USING THE MEAT-FISH COMPARTMENT
(If provided)
Page 8
The FRESHBOX compartment is specially designed to maintain a low temperature and the right humidity, in
order to preserve fresh foods (e.g. meat, fish, winter vegetables and fruit) longer.
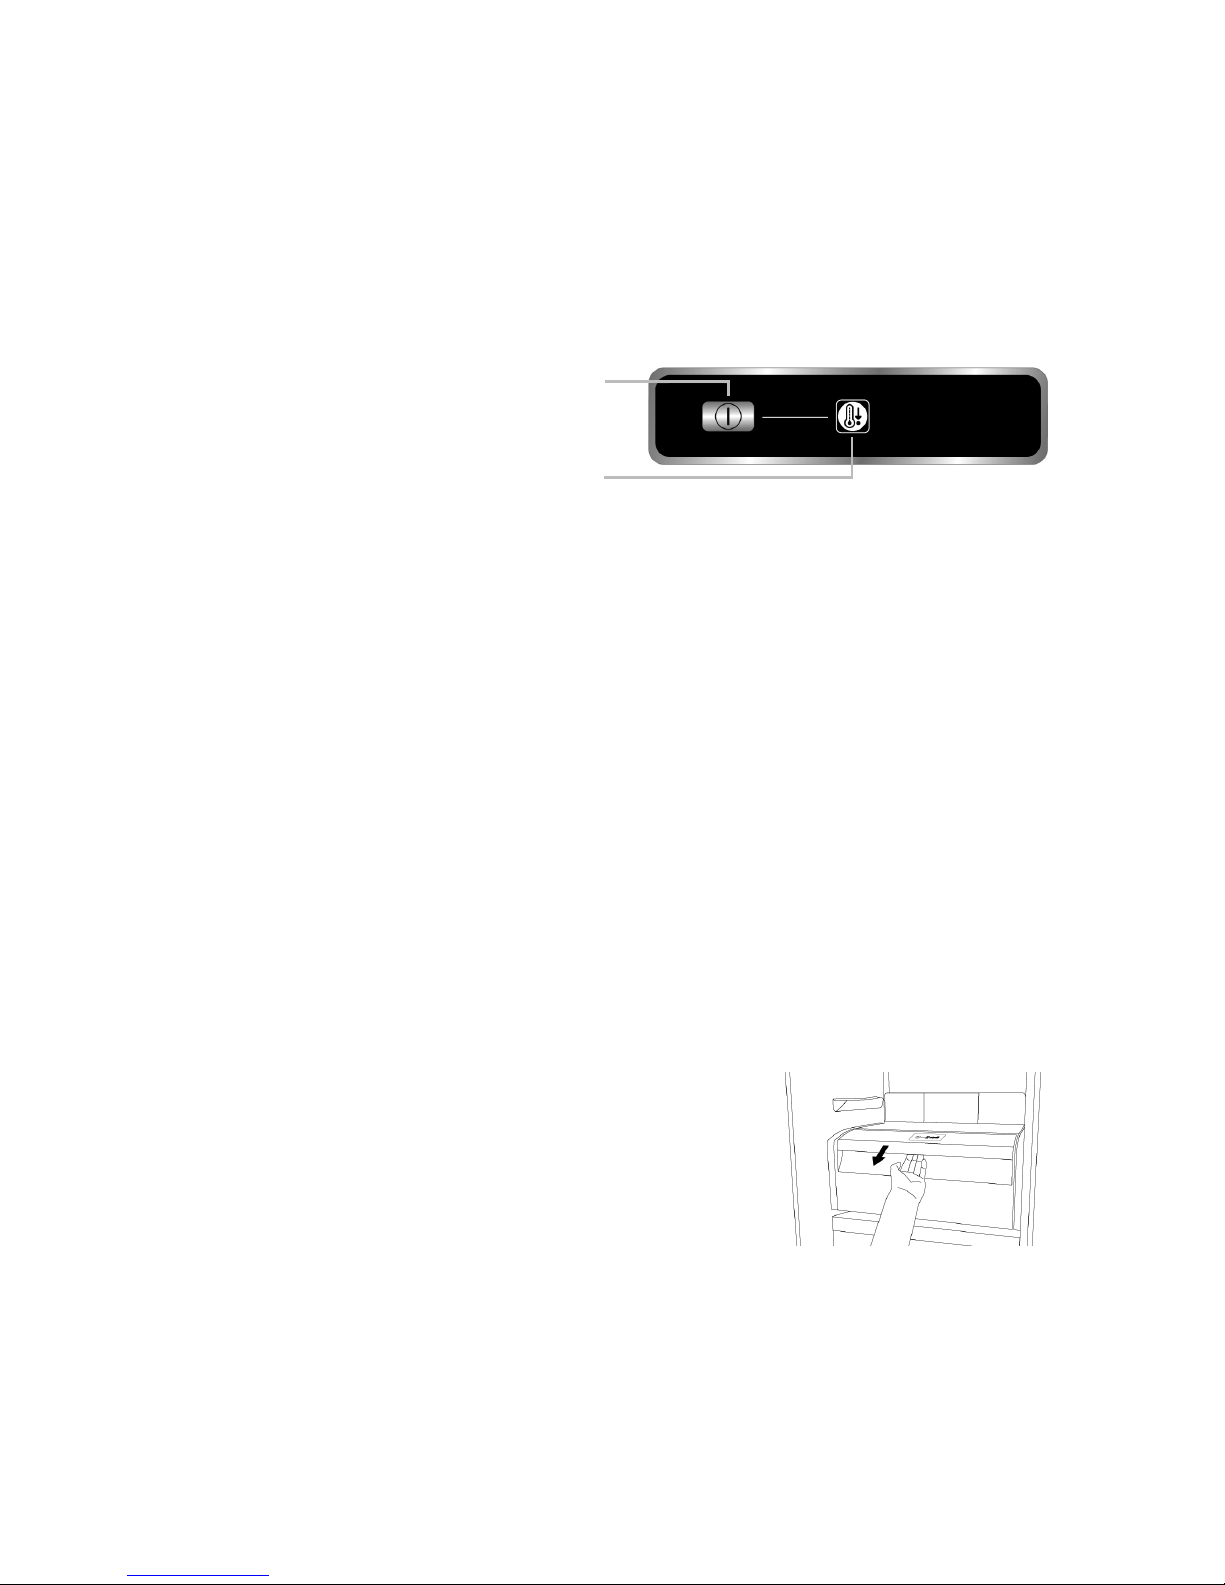
Compartment activation and deactivation
The temperature inside the compartment is approx. 0°C when the compartment is on.
To activate the compartment, press the button shown
in the figure for more than 1 second, until the symbol
lights up.
The symbol lit up indicates that the compartment is
on. Press the button again for more than 1 second to
deactivate the compartment.
For proper operation of the FRESHBOX compartment:
- the refrigerator compartment must be on;
- the refrigerator compartment temperature must be between +2°C and +6°C;
- the drawer must be inserted to allow activation;
- special functions (Standby, Cooling-Off, Vacation - if available) must not have not been selected.
If one of these special functions has been selected, the FRESHBOX compartment must be manually disabled,
taking care to remove the fresh food from it. In case of no manual deactivation, the compartment will be
automatically deactivated after about 8 hours.
Note:
- If the symbol does not light up when the compartment is activated, make sure the drawer is properly
inserted; if the problem persists, contact the authorised After-Sales Service;
- if the compartment is on and the drawer is open, the control panel symbol may go off automatically. The
symbol will be active again on inserting the drawer;
- regardless of the compartment status, a slight noise may be heard, which is normal;
- when the compartment is not on, the temperature inside it depends on the general temperature of the
refrigerator compartment. In this case, fruit and vegetables not sensitive to cold (berries, apples, apricots,
carrots, spinach, lettuce, etc.) are best stored.
Important: If the function is activated and food with high water content is present, condensation may occur on
the shelves. In this case, temporarily deactivate the function.
When arranging food and small containers on the top shelf of the FRESHBOX compartment, make sure they
cannot accidentally fall between the drawer and the rear wall of the refrigerator compartment.
Removing the FRESHBOX compartment:
The FRESHBOX compartment can be removed to obtain more storage
space in the refrigerator. In this case, proceed as follows:
- to facilitate removal, it is advisable to empty (and possibly remove) the
two bottom door trays;
- switch the compartment off;
- remove the drawer and the white plastic shelf under the compartment.
Note: The top shelf and side supports cannot be removed.
To reinstate the FRESHBOX compartment, make sure to refit the white plastic shelf under the compartment
before inserting the drawer and reactivating operation. To optimise energy consumption, it is advisable to
deactivate the FRESHBOX compartment and remove the compartment.
Periodically clean the compartment and its components using a cloth and a solution of lukewarm water (taking
care not to immerse the white plastic shelf under the drawer in water) and neutral detergent specific for
cleaning inside the refrigerator.
Before cleaning the compartment (externally), remove the drawer in order to disconnect the
compartment power supply.
Never use abrasive detergents.
FRESHBOX
(If provided)
8
Page 9
The freezer compartment can also be
used to freeze fresh food.
The quantity of fresh food that can be frozen
in 24 hours is shown on the rating plate.
Freezing fresh food
• The recommended position for food to be
frozen is as shown in Fig. 1, if the rack is
provided, or Fig. 2 if the rack is not provided.
• Arrange the food in the middle of the
compartment without it coming into
contact with already frozen food, maintaining a
space of about 20 mm (Fig. 1 and 2).
• For products that have the compartment
, press the button (E) to activate the Fast
Freezing function; the white indicator (E) lights
up and remains so throughout the period of
freezing.
• After about 26h the function switches off
automatically and the white indicator (E) goes
off.
The function can be stopped by pressing the
button (E) again.
The table opposite gives the storage times (in
months) for frozen fresh foods.
When purchasing frozen food products:
• Make sure the packaging is intact (frozen food in
damaged packaging may have deteriorated). If
the package is swollen or has damp patches, it
has not been stored in optimum conditions and
thawing may have already begun.
• When shopping, leave frozen food purchases
until last and carry in thermally insulated bags.
• Place frozen food in the compartment
immediately upon returning home.
• Do not re-freeze partially thawed food.
Consume within 24 hours.
• Avoid or minimise temperature variations.
Observe the expiry date on the package.
• Always follow the directions on the package, for
storing frozen food.
Making ice cubes
• Fill the ice cube tray with water up to 2/3 and
place it in the compartment .
• Do not use sharp or pointed objects to remove
the tray if it is stuck to the bottom of the
compartment .
• Bend the tray slightly to facilitate removing the
ice cubes.
9
Fig. 1
Fig. 2
USING THE FREEZER COMPARTMENT
(If provided)
Page 10
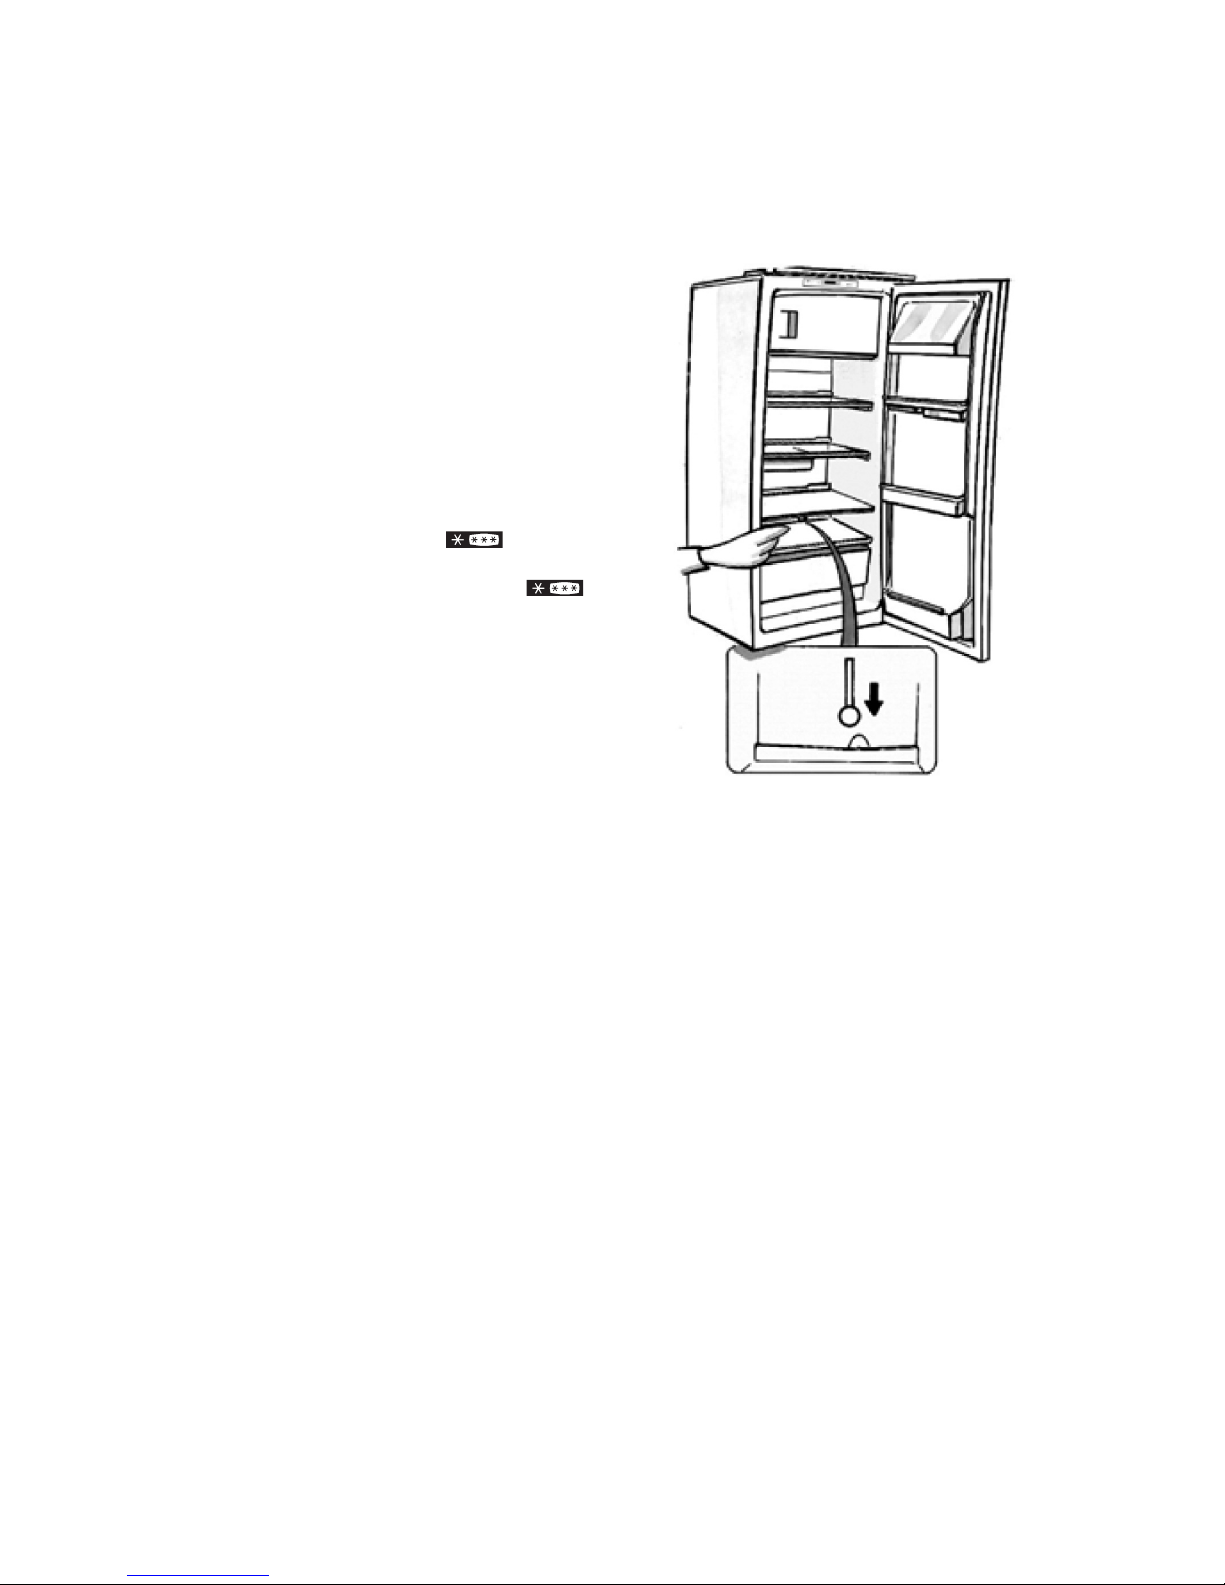
Before defrosting, unplug the appliance or
disconnect the power supply.
Defrosting of the refrigerator compartment is
completely automatic. Droplets of water on
the rear wall inside the refrigerator
compartment indicate that the automatic
defrost cycle is in progress. The defrost water
is automatically run to a drain hole and into a
container where it evaporates.
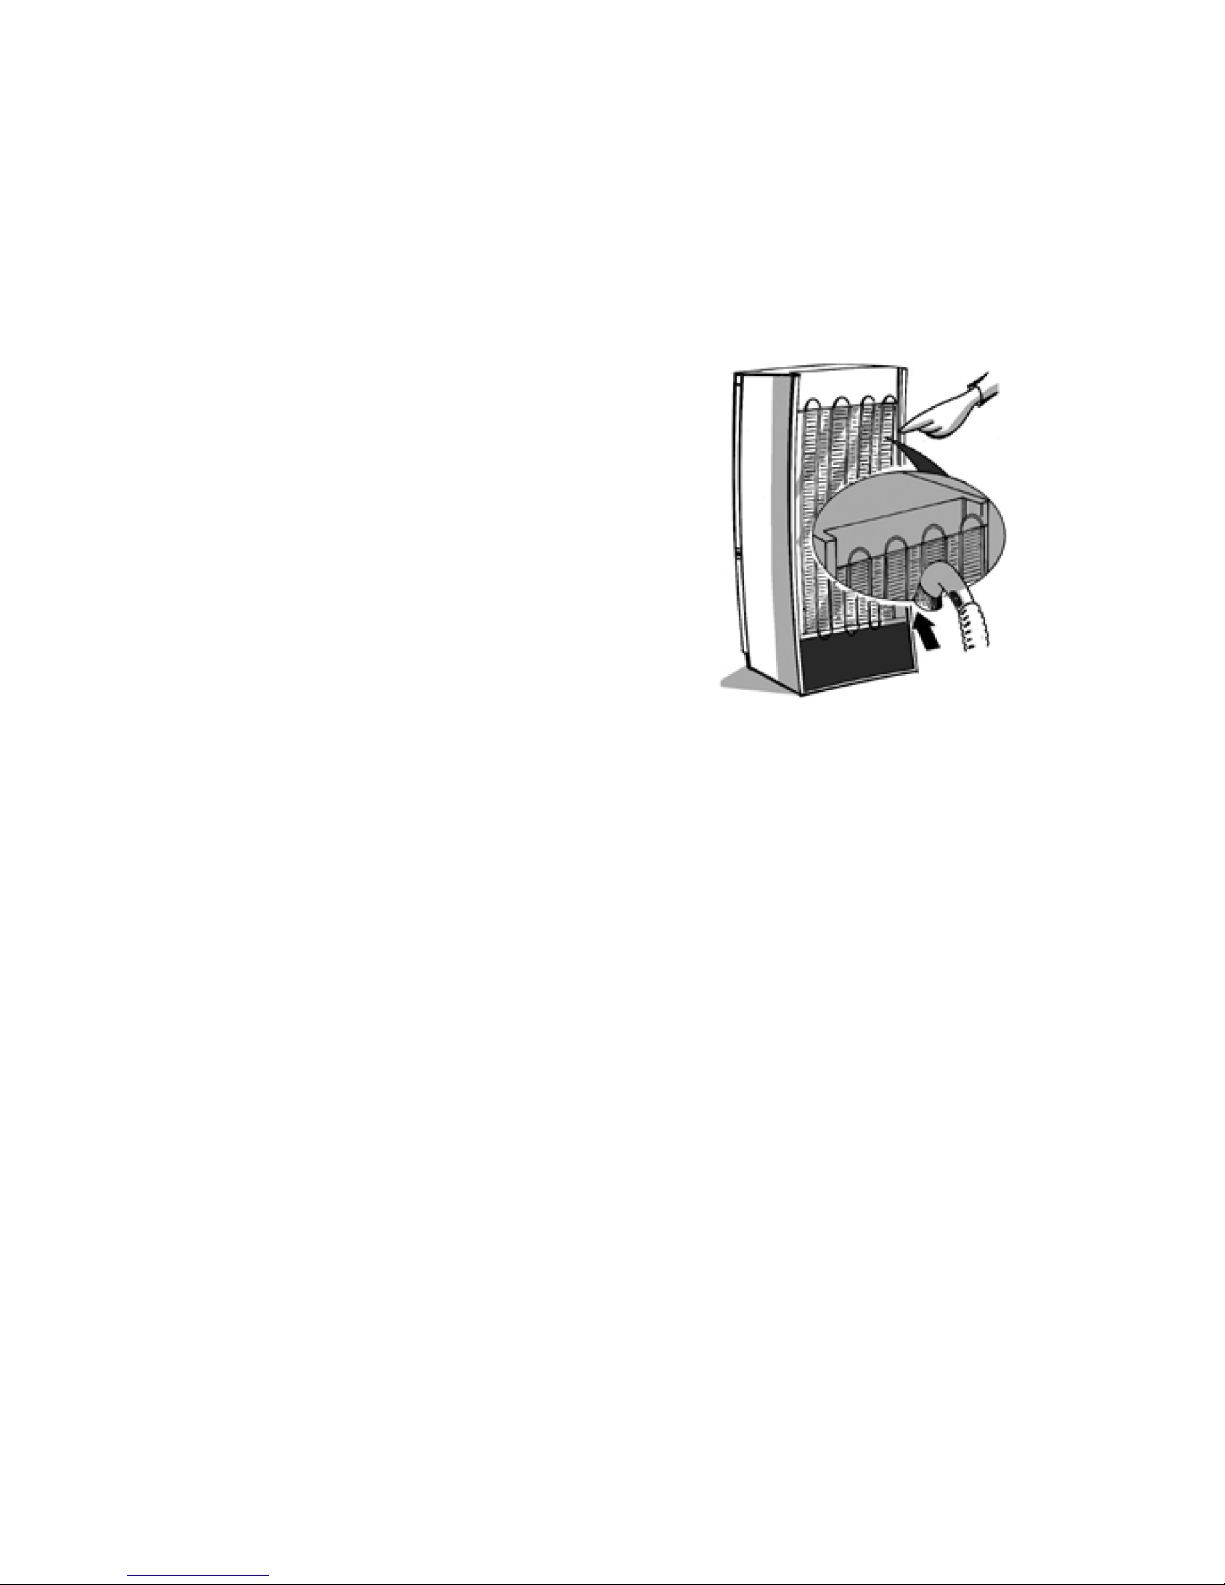
Regularly clean the inside of the defrost water
drain hole using the tool provided, to ensure the
constant and proper flow of defrost water. (Fig. 1)
Defrosting the compartment
(if provided)
It is advisable to defrost the compartment
once or twice a year or when there is excessive
ice.
It is perfectly normal for ice to form.
The amount and speed at which the ice forms
depends on ambient conditions and how often the
freezer door is opened. The formation of ice,
especially at the top of the compartment, is quite
normal and does not affect proper appliance
operation.
It is advisable to defrost when there is little food
inside.
• Open the door, remove all the food and put it in
a very cool place or in a cool bag.
• Leave the door open to allow the ice to melt.
• Clean the inside with a sponge soaked in a
lukewarm solution of water and/or neutral
detergent. Do not use abrasive substances.
• Rinse and dry thoroughly.
• Arrange food.
• Close the door.
Insert the plug again and start the product,
following the instructions in the section “Using the
refrigerator compartment”. Adjustments and
selections existing before switching the appliance
off will automatically be restored.
10
Fig. 1
DEFROSTING THE APPLIANCE
Page 11
11
Before carrying out any maintenance or
cleaning, unplug the appliance or in any case
disconnect it from the mains power supply.
• Periodically clean the refrigerator compartment
with a sponge moistened with lukewarm water
and/or neutral detergent. Rinse and dry with a
soft cloth. Do not use abrasive products.
• The separators must not be immersed in water
but cleaned with a damp sponge.
• Clean the inside of the freezer compartment
during defrosting.
• Periodically clean the air vents and condenser at
the back of the appliance with a vacuum cleaner
or brush.
• Clean the outside with a soft cloth moistened
with water. Do not use abrasive pastes,
scourers or stain-removers (e.g. acetone,
trichloroethylene) or vinegar.
Prolonged disuse
1. Empty the refrigerator.
2. Disconnect the appliance from the mains
power supply.
3. Defrost and clean the inside.
4. If the appliance is not being used for a long
time, leave the door open to prevent mould,
unpleasant odours and oxidation from forming.
5. Clean the appliance.
• Clean the inside of the low temperature
compartment (in models where available)
during defrosting.
• Periodically clean the inside of the
refrigerator compartment with a sponge
moistened with lukewarm water and/or
neutral detergent. Rinse and dry with a soft
cloth. Do not use abrasive products.
CLEANING AND MAINTENANCE
Page 12

12
If you have to contact us for a malfunction or for
an order, always give the serial number (SN) and
the name of your appliance. Write down the
following indications, also on the service sticker
supplied with the appliance (apply the sticker in a
visible place or in your telephone book).
SN Appliance
- These details are given on the warranty
certificate or on the original invoice, or on the
data plate of your appliance, located on the left
of the vegetable container.
In case of malfunction, you can contact the
nearest V-ZUG SA Service Centre by calling
the toll-free number 0800 850 850.
To avoid unnecessary interventions, before
requesting the assistance of a technician check the
power supply (is the plug inserted in the socket? Is
the fuse blown?).
Queries, orders, service contract
For queries and problems of an administrative or
technical nature, and for ordering spare parts and
accessories, please contact the headquarters in
ZUG directly,
Tel. +41 58 767 67 67
At the end of the one-year warranty, the customer
can sign a service contract for all our products. We
will be pleased to send you the relevant
documentation.
AFTER-SALES SERVICE
Page 13

13
Mise en service de l’appareil
1. Insérez la fiche dans la prise secteur
2. Lorsqu’on branche l’appareil, il fonctionne
normalement sur le réglage d’usine à 5 °C.
Si le voyant est allumé A (veille), appuyer sur
l’icône A.
Réglage de la température
Pour le réglage de la température, consultez la
fiche produit jointe
Remarque :
La température ambiante, la fréquence
d’ouverture de la porte, l’introduction
d’aliments chauds et la position défavorable
de l’appareil peuvent influer sur la température
intérieure des deux compartiments, qui peut
être différente de celle qui est indiquée sur le
bandeau de commande.
Conservation des aliments dans le
compartiment réfrigérateur :
Rangez les aliments comme indiqué sur la figure :
A Aliments cuits
B Légumes
C Poisson, viande
D Fruits et légumes
E Bouteilles
F Fromages
Remarque :
• Les aliments doivent être recouverts afin
d’empêcher leur déshydratation
• l’espace entre les clayettes et la paroi intérieure
arrière du réfrigérateur permet à l’air de circuler
librement
• Disposez les aliments de façon à ce qu’ils
n’entrent pas en contact direct avec la paroi
arrière du compartiment réfrigérateur
• Ne placez pas d’aliments encore chauds dans le
compartiment réfrigérateur
• Conservez les liquides dans des récipients
fermés
Remarque importante :
La conservation de légumes à forte teneur en
eau peut provoquer la formation de
condensation sur les clayettes en verre ; ceci
ne porte pas préjudice au fonctionnement
correct de l’appareil.
COMMENT FAIRE FONCTIONNER
LE COMPARTIMENT REFRIGERATEUR
Page 14
14
Fig.1
Fig.2
Fig.3
L’appareil est doté d’un compartiment
spécialement étudié pour garantir la conservation
des viandes et des poissons.
Pour cette raison, la température à l’intérieur du
compartiment est maintenue plus basse que le
reste du réfrigérateur.
Cela permet d’augmenter considérablement la
durée de conservation des aliments frais (viandes
et poissons) sans devoir les congeler et sans altérer
leurs valeurs nutritives et leur fraîcheur d’origine.
La température optimale du compartiment viandes
et poissons est garantie par le réglage
intermédiaire.
Il n’est pas conseillé de placer des fruits ou des
légumes dans ce compartiment, car la température
peut descendre au-dessous de 0 °C et l’eau
contenue dans les aliments pourrait geler.
Indicateur de température
• La température à l’intérieur du compartiment
est affichée par un indicateur placé sur la porte
du compartiment (Fig. 1).
• La zone colorée indique la plage de température
idéale pour la conservation des viandes et des
poissons.
• La température à l’intérieur du compartiment
met environ une heure pour se stabiliser.
Attention :
La température du compartiment viandes et
poissons est liée à la température du
compartiment réfrigérateur. Par conséquent, si
l’indicateur de température du compartiment est
sur la plage , appuyez sur la touche (C) pour
modifier la température du réfrigérateur.
La température du compartiment viandes et
poissons sera corrigée en conséquence.
Extraction du compartiment
Si vous souhaitez utiliser le réfrigérateur sans le
compartiment viandes et poissons, procédez
comme suit :
1. Retirez la couverture du compartiment par le
biais des deux butées latérales présentes sur la
face inférieure (voir Fig. 3).
2. Retirez le compartiment (voir Fig. 2).
Si vous souhaitez remettre le compartiment viandes
et poissons en place, procédez comme suit :
1. Introduisez le compartiment.
2. Introduisez la couverture du compartiment
viandes et poissons.
COMMENT UTILISER LE COMPARTIMENT
VIANDES ET POISSONS (Si présent)
Page 15
Le compartiment FRESHBOX est spécialement conçu pour maintenir une température basse et un niveau
d’humidité adéquat, afin de conserver plus longtemps les aliments frais (par exemple : viande, poisson, fruits et
légumes d’hiver).
Activation et désactivation du compartiment
Lorsque le compartiment est activé, la température à l’intérieur de celui-ci est d’environ 0 °C.
Pour activer le compartiment, appuyez sur le bouton
indiqué sur la figure pendant au moins
une seconde, jusqu’à ce que le symbole s’allume.
Lorsque le symbole est allumé, le compartiment
fonctionne. Appuyez à nouveau sur le bouton pendant
au moins une seconde pour désactiver le
compartiment.
Pour que le compartiment FRESHBOX fonctionne correctement, il faut que :
- le compartiment réfrigérateur soit activé ;
- la température du compartiment réfrigérateur soit comprise entre +2 °C et +6 °C ;
- le bac soit inséré pour permettre l’activation ;
- aucune fonction spéciale ne soit activée (Stand-by (Veille), Cooling-Off (Refroidissement-Off), Vacation
(Vacances) - si disponibles).
Si l’une de ces fonctions spéciales est activée, il est nécessaire de désactiver le compartiment FRESHBOX
manuellement, en veillant à retirer les aliments frais qui y sont stockés. Si vous omettez de désactiver le
compartiment manuellement, la désactivation s’opérera automatiquement au bout de 8 heures.
Remarque :
- Si le symbole ne s’allume pas à l’activation du compartiment, vérifiez que le bac est correctement inséré. Si le
problème persiste, contactez un Service Après-vente agréé.
- Si le compartiment est activé et que le bac est ouvert, il se peut que le symbole du bandeau de commande se
désactive automatiquement. Refermez le bac ; le symbole est de nouveau activé.
- Indépendamment de l’état du compartiment, il se peut que vous entendiez un léger bruit, ce qui est tout à fait
normal.
- Lorsque le compartiment n’est pas en service, la température du compartiment dépend de la température
générale du compartiment réfrigérateur. Dans ce cas, il est conseillé d’y conserver des fruits et des légumes
non sensibles au froid (fruits des bois, pommes, abricots, carottes, épinards, laitues, etc.).
Important : si la fonction est active avec des aliments contenant beaucoup d’eau, il est possible que de la
condensation se forme sur les clayettes. Dans ce cas, désactivez temporairement la fonction. Il est recommandé
de positionner correctement sur la clayette supérieure du compartiment FRESHBOX les aliments et les
récipients de petite dimension afin d’éviter qu’ils ne tombent entre le bac et la paroi arrière du réfrigérateur.
Retrait du compartiment FRESHBOX :
Pour avoir plus de volume disponible dans le réfrigérateur, il est possible
d’enlever le compartiment FRESHBOX. Pour ce faire, procédez de la façon
suivante :
- Pour en faciliter l’extraction, nous vous conseillons de vider (et
éventuellement de retirer) les deux balconnets inférieurs.
- Eteignez le compartiment.
- Extrayez le bac et la tablette en plastique située sous le compartiment.
Remarque : a tablette supérieure et les supports latéraux ne sont pas
amovibles.
Pour réutiliser le compartiment FRESHBOX, veillez à remettre la tablette blanche en plastique sous le
compartiment avant d’introduire le bac et d’activer de nouveau cette fonction. Afin d’optimiser la
consommation énergétique, il est conseillé de désactiver le compartiment FRESHBOX et de retirer le
compartiment.
Nettoyez périodiquement le compartiment et ses éléments à l’aide d’un chiffon imbibé d’une solution d’eau
tiède (en veillant à ne pas plonger la tablette blanche en plastique située sous le bac) et d’un peu de détergent
neutre spécial pour réfrigérateur.
Avant de procéder au nettoyage du compartiment (également à l’extérieur), il est nécessaire de
dégager le bac, de façon à le déconnecter de l’alimentation électrique du compartiment.
N’utilisez jamais de produits abrasifs.
FRESHBOX
(Si présent)
15
Page 16

16
Le compartiment congélateur permet
également de congeler des aliments frais. La
quantité d’aliments frais qu’il est possible de
congeler en 24 heures est indiquée sur la
plaque signalétique.
• Il est conseillé de placer les aliments à congeler
dans la position indiquée dans la Fig. 1 si la grille
est présente, ou dans la position indiquée par la
Fig. 2 si la grille n’est pas fournie.
• Placez les aliments à congeler au centre du
compartiment en veillant à ce que
ceuxci n’entrent pas en contact avec les aliments
déjà congelés ; respectez une distance de 20
mm environ (Fig. 1 et 2).
• Sur les appareils qui disposent de ce
compartiment , Fast Freezing, le voyant
blanc (E) s’allume et reste allumé pendant le
temps de congélation.
• Au bout de 26 heures environ, la fonction se
désactive automatiquement et le voyant blanc
(E) s’éteint. Il est possible d’interrompre la
fonction en appuyant à nouveau sur la touche
(E).
Pour les périodes de conservation des
aliments frais congelés, respectez les
indications du tableau ci-contre.
Au moment d’acheter des aliments surgelés,
veillez à observer ce qui suit :
• L’emballage ou le paquet doit être intact, car, si
tel n’est pas le cas, l’aliment pourrait se
détériorer. Si un paquet est gonflé ou s’il
présente des taches d’humidité, cela signifie qu’il
n’a pas été conservé dans des conditions
optimales et peut avoir subi un début de
décongélation.
• Achetez les produits surgelés en dernier lieu et
utilisez des sacs isothermes pour leur transport.
• Dès que vous arrivez à la maison, rangez-les
immédiatement dans le compartiment
congélateur.
• Ne recongelez pas les aliments partiellement
décongelés, mais consommez-les dans un délai
de 24 heures.
• Evitez ou réduisez au maximum les variations de
température. Respectez la date de péremption
indiquée sur l’emballage.
• Respectez toujours les instructions figurant sur
l’emballage pour la conservation des aliments
congelés.
Production de glaçons
• Remplissez le bac à glaçons aux 2/3 et placez-le
dans le compartiment .
• Si le bac est collé au fond du compartiment
,
n’utilisez pas d’objets pointus ou
tranchants pour le décoller.
• Pour sortir plus facilement les glaçons du bac,
pliez légèrement ce dernier.
COMMENT FAIRE FONCTIONNER LE
COMPARTIMENT CONGELATEUR (Si présent)
Fig.1
Fig.2
Page 17

17
Fig.1
Avant de procéder au dégivrage, retirez la
fiche de la prise de courant ou couper
l’alimentation électrique.
Le dégivrage du compartiment réfrigérateur
est entièrement automatique.
La présence périodique de petites gouttes
d’eau sur la paroi arrière, à l’intérieur du
compartiment réfrigérateur, indique qu’un
dégivrage automatique est en cours. L’eau de
dégivrage est amenée automatiquement à
travers un orifice d’évacuation puis recueillie
dans un récipient où elle s’évapore.
Nettoyez régulièrement l’orifice d’évacuation de
l’eau de dégivrage en utilisant l’outil fourni avec
l’appareil, pour garantir une évacuation constante
et correcte de l’eau de dégivrage.
(Fig. 1)
Dégivrage du compartiment
(si présent)
Nous vous suggérons de dégivrer le
compartiment 1 ou 2 fois par an ou
lorsque la formation de glace sur les parois est
excessive.
La formation de glace est un phénomène normal.
La quantité et la rapidité de formation de la glace
varient en fonction des conditions ambiantes et de
la fréquence d’ouverture de la porte du
congélateur. L’accumulation de glace dans le haut
du compartiment est normale et n’a aucune
influence sur le bon fonctionnement de l’appareil.
Il est conseillé de dégivrer quand les réserves sont
peu abondantes.
• Ouvrez la porte et retirez tous les aliments.
Placez-les dans un endroit très frais ou dans un
sac isotherme.
• Laissez la porte du congélateur ouverte pour
faire fondre la glace.
• Nettoyez l’intérieur avec une éponge imbibée
d’eau tiède et/ou de détergent neutre. N’utilisez
pas de substances abrasives.
• Rincez et séchez soigneusement.
• Rangez les aliments.
• Fermez la porte.
Rebranchez l’appareil et mettez-le en service en
suivant les instructions figurant au chapitre «
Comment faire fonctionner le compartiment
réfrigérateur ». Les réglages et les sélections
présents avant la mise à l’arrêt de l’appareil seront
restaurés.
COMMENT DEGIVRER L’APPAREIL
Page 18

18
Avant d’effectuer toute opération d’entretien
ou de nettoyage, retirez la fiche de la prise de
courant ou coupez l’alimentation de
l’appareil.
• Nettoyez régulièrement l’intérieur du
réfrigérateur à l’aide d’une éponge imbibée
d’une solution d’eau tiède et/ou de détergent
neutre. Rincez et essuyez avec un chiffon doux.
N’utilisez pas de substances abrasives.
• Pour laver les cloisons internes, ne les immergez
pas dans l’eau ; nettoyez-les avec une éponge
légèrement humide.
• Nettoyez l’intérieur du compartiment
congélateur pendant le dégivrage.
• Nettoyez régulièrement les grilles de ventilation
ainsi que le condenseur situé à l’arrière de
l’appareil avec un aspirateur ou une brosse.
• Nettoyez l’extérieur avec un chiffon doux
imbibé d’eau. N’utilisez ni produits abrasifs,
ni éponges métalliques, ni produits
détachants (ex. acétone trichloréthylène) ni
vinaigre.
Vacances de longue durée
1. Videz complètement le réfrigérateur.
2. Débranchez l’appareil.
3. Dégivrez et nettoyez l’intérieur de l’appareil.
4. Pour éviter la formation de moisissures, de
mauvaises odeurs ou d’oxydation, la porte de
l’appareil doit rester ouverte lorsque celui-ci
n’est pas en service pendant une longue
période.
5. Nettoyez l’appareil.
• Nettoyez l’intérieur du compartiment basse
température (s’il est présent) durant le
dégivrage.
• Nettoyez régulièrement l’intérieur du
réfrigérateur à l’aide d’une éponge imbibée
d’une solution d’eau tiède et/ou de détergent
neutre. Rincez et essuyez avec un chiffon
doux. N’utilisez pas de substances
abrasives.
NETTOYAGE ET ENTRETIEN
Page 19

19
Si vous souhaitez nous contacter en raison d'un
dysfonctionnement ou par rapport à une
commande, veuillez toujours indiquer le numéro
de série (SN) et le nom de votre appareil. Veuillez
entrer ces données ici et sur l'autocollant de
service fourni avec l'appareil (collez-le à un endroit
hautement visible ou dans votre répertoire
téléphonique).
SN Appareil
- Vous trouverez ces données sur le certificat de
garantie ou sur la facture, ou encore sur
l'étiquette d'identification de votre appareil.
L'étiquette d'identification se trouve à gauche du
bac à légumes de gauche.
En cas de dysfonctionnement, veuillez appeler
le Service Après-Vente local de V-ZUG AG au
numéro sans frais 0800 850 850
Afin d'éviter tout signalement de défauts inutile,
veuillez vérifier que l'alimentation électrique
fonctionne correctement (le cordon d'alimentation
a-t-il été branché ? Le fusible est-il intact ?) avant
de faire appel à un technicien.
Questions, commandes, contrat d'entretien
Pour toute question ou problème d'ordre
administratif ou technique, ainsi que pour
commander des pièces de rechange et des
accessoires, veuillez contacter le siège social à
Zug directement,
tél. +41 (0)41 767 67 67.
A la fin de l'année de garantie, vous pouvez
conclure un contrat d'entretien pour l'entretien de
tous nos produits. Nous serons heureux de vous
faire parvenir les documents correspondants.
SERVICE DES REPARATIONS
Page 20

20
Ingebruikneming van het apparaat
1. Steek de stekker in het stopcontact
2. Wanneer de stekker in het stopcontact wordt
gestoken, is het apparaat normaal in de fabriek
ingesteld op een temperatuur van 5°C. Als het
lampje A brandt (standby), druk dan op het
symbool A.
Temperatuurregeling
Raadpleeg het bijgeleverde productinformatieblad
voor de regeling van de temperatuur.
Opmerking:
De luchttemperatuur van de omgeving, de
frequentie waarmee de deur wordt geopend en de
plaats van het apparaat kunnen van invloed zijn op
de binnentemperatuur van de koelkast, die kan
afwijken van de temperatuur op het paneel.
Bewaren van levensmiddelen in het koelvak:
Plaats de levensmiddelen zoals in de afbeelding te
zien is:
A Gekookt voedsel
B Groenten
C Vis, vlees
D Groente en fruit
E Flessen
F Kaas
Opmerking:
• De voedingsmiddelen moeten worden afgedekt
om te voorkomen dat ze uitdrogen
• De afstand tussen de schappen en de achterste
binnenwand van de koelkast zorgt voor een vrije
luchtcirculatie
• Zet de levensmiddelen niet tegen de
achterwand van de koelkast
• Zet geen levensmiddelen in de koelkast die nog
warm zijn
• Bewaar vloeistoffen in gesloten houders
Let op:
Het bewaren van groente met een hoog
watergehalte kan condensvorming veroorzaken op
de glazen schappen: dit brengt de goede werking
van het apparaat niet in gevaar.
GEBRUIK VAN DE KOELKAST
Page 21

21
Het apparaat heeft een speciaal ontwikkeld vak
voor het bewaren van Vlees en Vis.
Om deze reden wordt de temperatuur in het vak
lager gehouden dan in de rest van het koelvak.
Zodoende kan de conservering van vers voedsel
(vlees en vis) aanzienlijk worden verlengd, zonder
dat het hoeft te worden ingevroren en zonder de
voedingswaarden en de oorspronkelijke versheid
aan te tasten.
De optimale temperatuur in het vlees- en visvak
wordt gegarandeerd met de gemiddelde instelling.
Het wordt afgeraden fruit of groenten in dit vak te
bewaren, want de temperatuur kan ook onder 0°C
dalen en het water in het voedsel zou dan kunnen
bevriezen.
Temperatuurindicator
• De temperatuur in het vak wordt weergegeven
door een indicator die op de deur van het vak is
geplaatst (Afb. 1)
• Het gekleurde segment geeft het ideale
temperatuurbereik aan voor het bewaren van
vlees en vis
• De temperatuur in het vak heeft ongeveer een
uur nodig om zich te stabiliseren.
Let op:
De temperatuur van het vlees- en visvak is
gerelateerd aan de temperatuur in het koelvak.
Als de temperatuurwijzer van het vak dus in de
sector staat met dient de knop (C) te worden
gebruikt om de temperatuur in de koelkast te
wijzigen.
Vervolgens wordt de temperatuur van het vleesen visvak gecorrigeerd.
Het vak verwijderen
Als u de koelkast wilt gebruiken zonder het vleesen visvak gaat u als volgt te werk:
1. Verwijder de afdekking van het vak via de twee
vergrendelingen aan de zijkanten onderop
(zie Afb. 3)
2. Verwijder het vak (zie Afb. 2)
Ga als volgt te werk om het vlees- en visvak weer
te herstellen:
1. Plaats het vak
2. Plaats de afdekking van het vlees- en visvak
GEBRUIK VAN HET VLEES- EN VISVAK
(Indien aanwezig)
Afb. 1
Afb. 2
Afb. 3
Page 22

De FRESHBOX is speciaal ontworpen om een lage temperatuur en de juiste vochtigheidsgraad te handhaven
om verse levensmiddelen langer te kunnen bewaren (bijvoorbeeld vlees, vis, winterfruit en -groenten).
In- en uitschakelen van het vak
De temperatuur van het vak is ongeveer 0°C wanneer het vak actief is.
Druk voor de inschakeling van het vak langer dan één
seconde op de knop die in de afbeelding is
weergegeven totdat het symbool gaat branden.
Het brandende symbool geeft aan dat het vak
ingeschakeld is. Druk opnieuw langer dan een
seconde op de knop om het vak uit te schakelen.
Voor een correcte werking van de FRESHBOX is het volgende noodzakelijk:
- het koelvak moet ingeschakeld zijn;
- de temperatuur van het koelvak moet tussen de +2°C en +6°C zijn;
- de lade moet geplaatst zijn om de inschakeling mogelijk te maken;
- er mogen geen speciale functies geselecteerd zijn (Stand-by, Cooling-Off, Vacation - indien aanwezig).
Indien één van deze speciale functies is geselecteerd, moet de FRESHBOX handmatig worden uitgeschakeld.
Zorg ervoor om de verse levensmiddelen uit het vak te halen. Het vak wordt na ongeveer 8 uur automatisch
uitgeschakeld, ingeval het niet handmatig is uitgeschakeld.
Opmerking:
- als het symbool bij inschakeling van het vak niet gaat branden, moet gecontroleerd worden of de lade correct
geplaatst is; neem contact op met een erkende klantenservice, als het probleem aanhoudt;
- als het vak actief is en de lade open is, kan het symbool van het bedieningspaneel automatisch uitgaan. Als de
lade correct wordt geplaatst, gaat het symbool weer branden;
- onafhankelijk van de status van het vak, is het mogelijk dat u een zacht geluid hoort, dit is normaal;
- wanneer het vak niet werkt, is de temperatuur in het vak afhankelijk van de algemene temperatuur van het
koelvak. In dit geval is het aanbevolen fruit en groenten die niet gevoelig zijn voor kou te bewaren
(bosvruchten, appels, abrikozen, wortels, spinazie, sla, enz.).
Belangrijk: als de functie geactiveerd is en er levensmiddelen met een hoog watergehalte aanwezig zijn, kan
zich condens op de schappen vormen. Schakel in dat geval de functie tijdelijk uit.
Let op bij het plaatsen van levensmiddelen en kleine houders op het bovenste schap van de FRESHBOX om te
voorkomen dat ze onbedoeld tussen de lade en de achterwand van het koelvak vallen.
Verwijderen van de FRESHBOX:
Voor meer ruimte in de koelkast kan de FRESHBOX worden verwijderd.
Ga in dat geval als volgt te werk:
- het is raadzaam om de twee onderste deurvakken leeg te maken (en
eventueel te verwijderen) om het vak gemakkelijker weg te kunnen
nemen;
- schakel het vak uit;
- neem de lade en het witte plastic schap onder het vak weg.
Opmerking: het bovenste schap en de zijsteunen kunnen niet worden
verwijderd.
Om de FRESHBOX weer in gebruik te nemen, dient u ervoor te zorgen dat het witte plastic schap weer onder
het vak geplaatst wordt, voordat u de lade zelf terugzet en de functie weer in werking stelt. Voor een optimaal
energieverbruik is het raadzaam om de FRESHBOX uit te schakelen en het vak te verwijderen.
Maak het vak en de bijbehorende onderdelen regelmatig schoon met een doek met lauw water en specifieke
neutrale schoonmaakmiddelen voor de interne reiniging van de koelkast (let erop het witte plastic schap onder
de lade niet onder water te dompelen).
Voordat u het vak (ook van de buitenkant) reinigt, moet de lade worden verwijderd om de
elektrische voeding van het vak los te koppelen.
Gebruik nooit schuurmiddelen.
22
FRESHBOX
(Indien aanwezig)
Page 23

In het vriesvak kunnen ook verse
levensmiddelen worden ingevroren.
De hoeveelheid verse levensmiddelen die in
24 uur kan worden ingevroren staat
aangegeven op het typeplaatje.
Invriezen van verse levensmiddelen
• De aanbevolen plaats voor de in te vriezen
levensmiddelen is aangegeven in Afb. 1, als het
rooster aanwezig is of Afb. 2 als het rooster
niet is bijgeleverd.
• Zet het voedsel midden in het vak ,
zonder dat het in aanraking komt met de al
bevroren producten door een afstand van
ongeveer 20 mm aan te houden (Afb. 1 en 2).
• Druk bij de apparaten met het vak op
de toets (E) om de functie Fast Freezing te
activeren, het witte lampje (E) gaat branden en
blijft branden gedurende de invriesperiode.
• Na ongeveer 26h wordt de functie automatisch
uitgeschakeld en gaat het witte lampje (E) uit.
De functie kan worden gestopt door opnieuw
op de toets (E) te drukken.
In de tabel hiernaast kunt u zien hoeveel
maanden verse ingevroren levensmiddelen
bewaard kunnen worden.
Bij de aankoop van diepvriesproducten moet
u op de volgende punten letten:
• De verpakking of het pak moet onbeschadigd
zijn, omdat het product anders kan bederven.
Als een pakje bol staat of als er vochtplekken op
zitten, is het niet onder optimale
omstandigheden bewaard en kan het al
gedeeltelijk zijn ontdooid.
• De diepvriesproducten moeten als laatste
worden gekocht en in isolerende tassen worden
vervoerd.
• Leg de diepvriesproducten bij thuiskomst
meteen in het vriesvak.
• De gedeeltelijk ontdooide diepvriesproducten
mogen niet opnieuw worden ingevroren, maar
moeten binnen 24 uur worden geconsumeerd.
• Variaties in temperatuur moeten vermeden
worden of tot een minimum worden beperkt.
De uiterste houdbaarheidsdatum op de
verpakking moet worden gerespecteerd.
• De aanwijzingen op de verpakking voor het
conserveren van diepvriesproducten moeten
altijd worden opgevolgd.
IJsblokjes maken
• Vul het ijsbakje voor 2/3 met water en zet het in
het vriesvak .
• Gebruik, indien het ijsbakje aan de bodem van
het vak is vastgevroren, geen puntige of
scherpe voorwerpen om het los te maken.
• Om de ijsblokjes makkelijk te kunnen
verwijderen, buigt u het bakje om.
23
Afb. 1
Afb. 2
GEBRUIK VAN HET VRIESVAK
(Indien aanwezig)
Page 24

Verwijder altijd de stekker uit het
stopcontact of koppel hoe dan ook het
apparaat af van de stroomtoevoer, voordat u
het apparaat gaat ontdooien.
De koelkast wordt geheel automatisch
ontdooid. De aanwezigheid van
waterdruppels op de achterwand aan de
binnenkant van de koelkast duidt erop dat
het apparaat bezig is automatisch te
ontdooien. Het dooiwater wordt via een
afvoeropening in een opvangbak geleid, waar
het verdampt.
Maak regelmatig het afvoergat van het dooiwater
schoon met behulp van het bijgeleverde
hulpmiddel om te garanderen dat het dooiwater
constant en direct wordt afgevoerd. (Afb. 1)
Ontdooien van het vak
(indien aanwezig)
Wij raden u aan om het vak één- of
tweemaal per jaar te ontdooien, of wanneer de
ijslaag te dik is geworden.
IJsvorming is een normaal verschijnsel.
De hoeveelheid en de snelheid waarmee zich het
ijs vormt, hangt af van de omgeving waarin het
apparaat zich bevindt en van de frequentie
waarmee de deur van het vriesvak wordt geopend.
De ijsvorming is het grootst op het bovenste
gedeelte van het vak. Dit is normaal en heeft geen
invloed op het correct functioneren van het
apparaat.
Het is raadzaam het vak te ontdooien wanneer u
weinig voorraad heeft.
• Open de deur en haal alle levensmiddelen uit
het vriesvak en zet ze op een heel koele plaats
of in een koeltas.
• Laat de deur open zodat het ijs kan smelten.
• Reinig de binnenkant van de vriezer met een
vochtige spons met lauw water en/of een
neutraal schoonmaakmiddel. Gebruik geen
schuurmiddelen.
• Spoel goed en droog zorgvuldig af.
• Plaats de levensmiddelen weer in het vak.
• Sluit de deur.
Steek de stekker weer in het stopcontact en start
het apparaat weer volgens de aanwijzingen in het
hoofdstuk ‘Gebruik van het koelvak’. De
instellingen en de selecties die aanwezig waren
voordat het apparaat werd uitgezet, worden
hervat.
ONTDOOIEN VAN HET APPARAAT
24
Afb. 1
Page 25

Trek altijd de stekker uit het stopcontact of
sluit de stroomtoevoer af voordat u
onderhouds- en reinigingswerkzaamheden
gaat uitvoeren.
• Reinig de binnenkant van de koelkast met een
vochtige spons met lauw water en/of een
neutraal schoonmaakmiddel. Spoel en droog het
apparaat met een zachte doek. Gebruik geen
schuurmiddelen.
• De scheidingselementen mogen niet in water
worden ondergedompeld, maar moeten worden
afgewassen met een niet al te vochtige spons.
• Reinig de binnenkant van het vriesvak tijdens het
ontdooien.
• Maak de ventilatieroosters en de condensor op
de achterkant van het apparaat regelmatig
schoon met een stofzuiger of een borstel.
• Reinig de buitenkant met een met water
bevochtigde zachte doek. Gebruik geen
schuurmiddelen of schuursponsjes,
vlekkenmiddelen (bv. aceton,
trichloorethyleen), of azijn.
Als u het apparaat langere tijd niet gebruikt
1. Maak de koelkast helemaal leeg.
2. Haal de stekker uit het stopcontact.
3. Ontdooi het apparaat en reinig de
binnenwanden.
4. Om te voorkomen dat er schimmel,
onaangename geuren en oxidaties ontstaan,
dient de deur open te worden gelaten wanneer
het apparaat gedurende lange tijd niet wordt
gebruikt.
5. Reinig het apparaat.
• Reinig de binnenkant van het vriesvak (op de
modellen waar dit aanwezig is) tijdens het
ontdooien.
• Reinig de binnenkant van de koelkast met een
vochtige spons met lauw water en/of een
neutraal schoonmaakmiddel. Spoel en droog
het apparaat met een zachte doek. Gebruik
geen schuurmiddelen.
REINIGING EN ONDERHOUD
25
Page 26

26
Als u contact met ons opneemt voor een storing of
om een bestelling te plaatsen, geef dan steeds het
serienummer (SN) en de naam van uw apparaat
door. Noteer de volgende aanduidingen, die ook te
vinden zijn op het label dat bij het apparaat werd
geleverd (kleef het label op een zichtbare plaats of
in uw telefoonboek).
SN Apparaat
- Deze informatie staat ook op het
garantiecertificaat of op de originele factuur, of
op het typeplaatje van uw apparaat, links van de
groentebak.
In geval van een storing kunt u contact
opnemen met het dichtstbijzijnde V-ZUG SA
Servicecentrum door het gratis nummer 0800
850 850 te bellen.
Om onnodige interventies te voorkomen, moet u
voordat u de hulp van een technicus inroept steeds
de voeding controleren (Zit de stekker in het
stopcontact? Is de zekering kapot?).
Vragen, bestellingen, onderhoudscontract
Voor vragen en problemen van administratieve of
technische aard, en om reserveonderdelen en
accessoires te bestellen, kunt u rechtstreeks
contact opnemen met het hoofdkantoor in ZUG,
Tel. +41 58 767 67 67
Aan het einde van de garantie van één jaar kan de
klant een onderhoudscontract afsluiten voor al
onze producten. We sturen u graag de
desbetreffende documentatie op.
KLANTENSERVICE
Page 27

Att starta apparaten
1. Sätt in stickkontakten i eluttaget
2. När stickkontakten sätts in i eluttaget är
apparaten normalt fabriksinställd för en
temperatur på 5 °C. Om kontrollampan A
tänds (viloläge), tryck på ikonen A.
Reglering av temperaturen
Se det medföljande produktbladet för upplysningar
om reglering av temperaturen.
Anmärkning:
Olika faktorer, till exempel rumstemperaturen,
apparatens placering, hur ofta dörren öppnas och
temperaturen på maten som ställs in i skåpet,
inverkar på den invändiga temperaturen i
kylskåpet. Denna temperatur kan därför skilja sig
från den som anges på panelen.
Placering av livsmedel i kyldelen:
Placera livsmedlen som på bilden:
A Tillagade livsmedel
B Grönsaker
C Fisk och kött
D Frukt och grönsaker
E Flaskor
F Ost
Anmärkning:
• Alla livsmedel ska täckas över för att förhindra
att de blir torra
• I det tomma utrymmet mellan hyllorna och
kylskåpets bakre innervägg ska luften kunna
cirkulera obehindrat
• Placera inte matvaror direkt mot den bakre
väggen i kyldelen
• Placera inte varma livsmedel i kylskåpet
• Förvara vätskor i behållare med lock
Observera:
Om grönsaker med hög vätskehalt förvaras i
kyldelen kan det leda till att det bildas kondens på
glashyllorna. Det betyder inte att apparaten inte
fungerar korrekt.
ANVÄNDNING AV KYLDELEN OCH DESS
FUNKTIONER
27
Page 28

Apparaten har ett fack som är speciellt avsett för
förvaring av kött och fisk.
Därför är temperaturen i detta fack lägre än i
resten av kyldelen.
Tack vare den låga temperaturen kan färska
livsmedel (kött och fisk) lagras betydligt längre
utan att behöva frysas och utan att deras
fräschör och näringsämnen går förlorade.
Optimal temperatur i kött- och fiskfacket
garanteras när en medeltemperatur är inställd.
Det är inte lämpligt att lägga frukt och grönsaker i
detta fack. Temperaturen kan nämligen sjunka
under 0°C och vattnet som finns i livsmedlen
kan frysa till is.
Temperaturindikator
• Temperaturen inuti kött- och fiskfacket utvisas
av en indikator som är placerad på fackets dörr
(Fig. 1)
• Den färgade sektorn på indikatorn svarar mot
temperaturområdet som är idealiskt för lagring
av kött och fisk
• Det krävs cirka en timme för att temperaturen
inuti facket ska stabiliseras.
Observera:
Temperaturen i kött- och fiskfacket är knuten till
temperaturen i kyldelen.
Om fackets temperaturindikator är i sektorn
används knappen (C) för att ändra kylskåpets
temperatur.
På detta sätt korrigeras även temperaturen i köttoch fiskfacket.
Att avlägsna kött- och fiskfacket
Gör du så här om du vill använda kylskåpet utan
kött- och fiskfacket:
1. Ta av fackets lock genom att lossa de två
spärrarna på undersidan (se Fig. 3)
2. Ta ut facket (se Fig. 2)
Gör så här när du vill sätta tillbaka kött- och
fiskfacket:
1. Sätt kött- och fiskfacket på plats
2. Sätt tillbaka locket på kött- och fiskfacket
ANVÄNDNING AV KÖTT- OCH FISKFACKET
OCH DESS FUNKTIONER
(på vissa modeller)
28
Fig. 1
Fig. 2
Fig. 3
Page 29

FRESHBOX-facket är speciellt utformat för att hålla låg temperatur och rätt fukthalt så att färsk mat (t.ex. kött,
fisk, vinterfrukt och -grönsaker) ska kunna lagras längre.
Aktivering och avaktivering av facket
Temperaturen i detta fack är cirka 0 °C när facket är aktivt.
För att aktivera facket, håll knappen som visas på
bilden intryckt i mer än en sekund, tills symbolen
tänds.
Symbolen lyser och visar att facket är i funktion. Håll
knappen intryckt i mer än en sekund igen för att
stänga av funktionen.
För att FRESHBOX-facket ska fungera korrekt krävs att:
- kyldelen är påslagen
- temperaturen i kyldelen är mellan +2 °C och +6 °C
- lådan är insatt
- man inte har valt några specialfunktioner (Stand-by, Cooling-Off, Vacation - på vissa modeller).
Om någon av dessa specialfunktioner har valts måste FRESHBOX-facket avaktiveras manuellt och alla livsmedel
måste tas ut ur facket. Om facket inte avaktiveras manuellt avaktiveras det automatiskt efter cirka 8 timmar.
Anmärkning:
- Om symbolen inte tänds när facket aktiveras, kontrollera att lådan är insatt på rätt sätt. Om problemet
kvarstår, kontakta en auktoriserad teknisk kundtjänst.
- Om facket har aktiverats och lådan är öppen kan symbolen på kontrollpanelen avaktiveras automatiskt. När
lådan sätts in igen aktiveras symbolen igen.
- Oberoende av fackets funktionsstatus kan det höras ett lätt buller, vilket är normalt.
- När facket inte är i funktion är temperaturen inuti facket beroende av temperaturen i kyldelen. Vi
rekommenderar i detta fall att frukt och grönsaker som inte är köldkänsliga (bär, äpplen, aprikoser, morötter,
spenat, sallad, osv.) förvaras i facket.
Viktigt: När funktionen är aktiverad och det finns mat med hög fukthalt i facket kan det bildas kondens på
hyllorna. Stäng i så fall tillfälligt av funktionen.
Se upp när små förpackningar läggs på den översta hyllan i FRESHBOX-facket, så att förpackningarna inte ramlar
ner mellan lådan och kylskåpets bakre innervägg.
Att ta ur FRESHBOX-facket:
Det går att ta ur FRESHBOX-facket när man vill ha mer förvaringsutrymme
i kylskåpet. Gör så här:
- Töm (och ta eventuellt ur) de två nedre dörrfacken för att underlätta
urtagningen av facket.
- Stäng av facket.
- Ta ur lådan och den vita plasthyllan under facket.
Anmärkning: Det går inte att ta ur den översta hyllan och sidostöden.
När FRESHBOX-facket ska användas igen måste den vita plasthyllan sättas tillbaka under facket innan själva lådan
sätts tillbaka och funktionen aktiveras. För att optimera energiförbrukningen är det lämpligt att avaktivera
FRESHBOX-facket och ta ur facket.
Rengör regelbundet facket och dess komponenter med en trasa och en ljummen lösning av vatten och milt
rengöringsmedel avsett för rengöring av kylskåpets insida (se till att det inte kommer vatten på den vita
plasthyllan under lådan).
Innan facket rengörs (även fackets utsida) måste lådan tas ur så att strömmen kopplas bort från
facket.
Använd aldrig slipande rengöringsmedel.
29
FRESHBOX
(på vissa modeller)
Page 30

Frysdelen kan även användas för
infrysning av färska livsmedel.
På typskylten anges vilken mängd färska
livsmedel det går att frysa in under ett dygn
(24 timmar).
Infrysning av färska livsmedel
• Det rekommenderade läget för matvaror som
ska frysas visas i Fig. 1 på apparater som har
galler Fig. 2 på apparater utan galler.
• Lägg livsmedlen mitt i frysdelen . Se till
att det är cirka 20 mm avstånd mellan färska
livsmedel och livsmedel som ska frysas in (fig. 1
och 2).
• På apparater med frysdel , tryck på
knappen (E) för att aktivera
snabbinfrysningsfunktionen Fast Freezing. Den
vita kontrollampan (E) tänds och lyser under
hela infrysningen.
• Efter cirka 26 timmar avaktiveras funktionen
automatiskt och den vita kontrollampan (E)
slocknar.
Det går att stoppa funktionen genom att trycka
på knappen (E) igen.
I vidstående tabell anges hur många månader
frysta livsmedel av olika slag kan förvaras i
frysen. Följ dessa anvisningar.
Att tänka på när du köper frysta livsmedel:
• Försäkra dig om att förpackningen eller omslaget
är intakt, eftersom kvaliteten på livsmedlet
annars kan ha försämrats. Om förpackningen är
skrovlig eller har fuktfläckar har livsmedlet inte
förvarats på optimalt sätt och det finns risk att
det har börjat tina.
• Planera din runda i livsmedelsaffären så att du
går till frysdisken det sista du gör och använd
fryspåsar för hemtransporten.
• Lägg in de frysta livsmedlen i frysen så fort du
kommer hem.
• Tinade livsmedel får inte frysas om, utan måste
förtäras inom 24 timmar.
• Se till att temperaturvariationerna i matvarorna
blir så små som möjligt. Respektera det “bäst
före datum” som anges på förpackningen.
• Följ alltid anvisningarna om frysförvaring som
finns på matförpackningen.
Tillverkning av isbitar
• Fyll isbitslådan till 2/3 med vatten och ställ in den
i frysdelen .
• Använd inte spetsiga eller vassa föremål för att få
loss isbitslådan om den har frusit fast på botten
av frysdelen .
• Bänd en aning på isbitslådan så går det lättare att
få loss isbitarna.
30
Fig. 1
Fig. 2
ANVÄNDNING AV FRYSDELEN OCH DESS
FUNKTIONER (på vissa modeller)
Page 31

Dra alltid ut stickkontakten ur eluttaget eller
koppla bort apparaten från elnätet på annat
sätt innan apparaten frostas av.
Avfrostningen av kyldelen sker helt
automatiskt. Det är helt normalt att det
bildas vattendroppar på kyldelens bakre
innervägg och det visar att det automatiska
avfrostningsprogrammet pågår.
Avfrostningsvattnet leds till ett dräneringshål
och samlas sedan upp i en behållare där det
förångas
Rengör regelbundet insidan av dräneringshålet med
det medföljande verktyget, så att
avfrostningsvattnet kan rinna bort. (Fig. 1)
Avfrostning av frysdelen
(på vissa modeller)
Vi rekommenderar att frysdelen frostas av
1 eller 2 gånger per år eller när frostlagret på
väggarna har blivit alltför tjockt.
Det är normalt att det bildas frost.
Hur mycket frost det bildas och hur snabbt detta
går beror på omgivningsvillkoren och på hur ofta
frysdelens dörr öppnas. Framför allt bildas det frost
i den övre delen av frysdelen, men detta är helt
normalt och försämrar inte apparatens funktion.
Det är en god regel att passa på att göra
avfrostningen när livsmedelsförråden inte är så
stora.
• Öppna dörren, ta ut alla livsmedel och lägg dem
på en mycket sval plats eller i en frysväska.
• Låt dörren stå öppen så att frosten smälter.
• Rengör frysens insida med en svamp som fuktats
i en lösning av ljummet vatten och milt
rengöringsmedel. Använd inte slipmedel.
• Skölj och torka noggrant.
• Lägg tillbaka livsmedlen i frysen.
• Stäng dörren.
Sätt in stickkontakten i eluttaget och starta
apparaten enligt anvisningarna i avsnittet
“Användning av kyldelen och dess funktioner”. Då
återställs inställningarna som fanns när apparaten
stängdes av.
31
Fig. 1
AVFROSTNING AV APPARATEN
Page 32

Dra alltid ut stickkontakten ur eluttaget eller
skilj apparaten från elnätet på annat sätt
innan någon typ av rengöring och underhåll
utförs.
• Rengör regelbundet kyldelen med en svamp som
fuktats i ljummet vatten och ett milt
rengöringsmedel. Skölj och torka torrt med en
mjuk trasa. Använd inte slipmedel.
• Avskiljarna får inte läggas i vatten, utan ska
rengöras med en lätt fuktad svamp.
• Rengör insidan av frysdelen under avfrostningen.
• Rengör regelbundet ventilationsgallren och
kondensorn, som är placerad på baksidan av
kylskåpet. Använd en dammsugare eller en
borste.
• Rengör skåpets utsida med en mjuk trasa som
fuktats i vatten. Använd inte slipmedel,
slipande svampar, fläckborttagningsmedel
(t.ex. aceton, trikloretylen) eller vinäger.
När du åker bort (längre bortavaro)
1. Ta ut alla livsmedel ur kylskåpet.
2. Skilj skåpet från elnätet.
3. Frosta av skåpet och rengör det invändigt.
4. För att undvika att det bildas mögel, dålig lukt
eller rost ska dörren alltid lämnas öppen när
apparaten inte är i funktion under en längre tid.
5. Rengör apparaten.
• Rengör frysdelens insida (på vissa modeller)
under avfrostningen.
• Rengör regelbundet kyldelens insida med en
svamp som fuktats i ljummet vatten och ett
milt rengöringsmedel. Skölj och torka torrt
med en mjuk trasa. Använd inte slipmedel.
RENGÖRING OCH UNDERHÅLL
32
Page 33

33
Om du måste kontakta oss för en felfunktion eller
för en beställning, uppge alltid serienumret (SN)
och namnet på din produkt. Skriv ned följande
indikationer, även på servicedekalen som medföljde
produkten (sätt dekalen på en synlig plats eller i din
telefonbok).
SN Produkt
- Dessa detaljer anges på garantisedeln eller på
originalfakturan, eller på produktens typskylt som
sitter till vänster om grönsakslådan.
I händelse av en felfunktion kan du kontakta
närmaste V-ZUG SA Serviceverkstad genom
att ringa det kostnadsfria telefonnumret 0800
850 850.
Innan du begär hjälp av en tekniker och för att
undvika onödiga interventioner, kontrollera
nätspänningen (sitter kontakten i eluttaget? Har
säkringen bränt?).
Förfrågningar, beställningar, servicekontrakt
För förfrågningar och problem av en administrativ
eller teknisk natur, och för att beställa reservdelar
och tillbehör, var god kontakta huvudkontoret i
ZUG direkt,
Tel: +41 58 767 67 67
I slutet av den ettåriga garantin kan kunden teckna
ett servicekontrakt för alla våra produkter. Vi
skickar gärna relevant dokumentation till dig.
KUNDTJÄNST
Page 34

34
Igangsetting av apparatet
1. Sett støpslet i stikkontakten
2. Når støpselet settes i stikkontakten, er
apparatet vanligvis fabrikkinnstilt til en
temperatur på 5 °C. Hvis lampen A lyser
(standby-tilstand), trykker du på ikonet A.
Justere temperaturen
Se produktbeskrivelsen angående regulering av
temperaturen.
Merk:
Omgivelsestemperaturen, hvor ofte dørene åpnes,
innsetting av varme matvarer samt apparatets
plassering, kan påvirke temperaturen i de to
seksjonene og kan gi avvikende
temperaturindikasjon på displayet.
Oppbevaring av matvarer i kjøleseksjonen:
Plasser matvarene som vist i illustrasjonen:
A Kokte matvarer
B Grønnsaker
C Fisk, kjøtt
D Frukt og grønnsaker
E Flasker
F Ost
Merk:
• Matvarene må tildekkes, slik at de ikke blir tørre
• Avstanden mellom hyllene og bakveggen i
kjøleseksjonen må ikke blokkeres, ellers kan
ikke luften sirkulere fritt
• Ikke plasser matvarene helt inntil bakveggen i
kjøleseksjonen
• Sett ikke matvarer som fortsatt er varme i
kjøleskapet
• Oppbevar flytende varer i lukkede beholdere
Merk:
Oppbevaring av grønnsaker med høyt
vanninnhold kan føre at det dannes kondens
på glasshyllene. Dette har ingen innvirkning
på apparatets funksjon.
BRUK AV KJØLESEKSJONEN
Page 35

Apparatet er utstyrt med en spesiell seksjon for
oppbevaring av Kjøtt og Fisk.
Derfor er temperaturen i denne seksjonen lavere
enn i resten av kjøleseksjonen.
Dette gjør at ferske matvarer (kjøtt og fisk) kan
oppbevares lengre uten å fryses ned, samtidig som
de bevarer sin næringsverdi og ferskhet.
Den optimale temperaturen i kjøtt/fisk-seksjonen
er garantert med en middels innstilling.
Det anbefales å ikke oppbevare frukt eller
grønnsaker i denne seksjonen, fordi temperaturen
kan synke under 0 °C og føre til at vannet i
matvarene fryser.
Temperaturindikator
• Innvendig temperatur vises på en
temperaturindikator på seksjonsdøren (Fig. 1)
• Det fargede feltet indikerer det ideelle
temperaturområdet for oppbevaring av kjøtt og
fisk
• Temperaturen inne i seksjonen stabiliseres etter
cirka en time.
Merk:
Temperaturen inne i kjøtt/fisk-seksjonen vil følge
temperaturen i resten av kjøleseksjonen.
Dersom temperaturindikatoren for seksjonen er i
feltet , bruker du knappen (C) til å endre
temperaturen i kjøleskapet.
Temperaturen i kjøtt/fisk-seksjonen vil reguleres på
samme tid.
Fjerning av seksjonen
Hvis man ønsker å bruke kjøleskapet uten
kjøtt/fisk-seksjonen, gjøres følgende:
1. Fjern dekselet over seksjonen ved å løsne på de
to sidestopperne under (se Fig. 3)
2. Ta ut seksjonen (se Fig. 2)
Dersom man ønsker å ta i bruk igjen kjøtt/fiskseksjonen, går man frem på følgende måte:
1. Sett seksjonen inn igjen
2. Sett inn dekselet over kjøtt/fisk-seksjonen
BRUK AV KJØTT/FISK-SEKSJONEN
(Noen versjoner)
35
Fig. 1
Fig. 2
Fig. 3
Page 36

FRESHBOX-seksjonen er spesielt utviklet for å en holde lav temperatur og en riktig fuktighetsgrad, for å kunne
oppbevare ferske matvarer lenger (for eksempel kjøtt, fisk, vinterfrukt og -grønnsaker).
Aktivering og deaktivering av seksjonen
Temperaturen inne i seksjonen er på cirka 0 °C når seksjonen er aktivert.
For å slå på seksjonen, trykker du på knappen som
vist i figuren i mer enn ett sekund, til symbolet lyser.
Et lysende symbol viser at seksjonen er i funksjon.
Trykk én gang til på knappen i mer enn ett sekund for
å slå av seksjonen.
For at FRESHBOX-seksjonen skal kunne fungere korrekt, må:
- kjøleseksjonen være slått på
- temperaturen i kjøleseksjonen være på mellom +2 °C og +6 °C
- skuffen være satt inn for å tillate aktivering
- det ikke være valgt spesialfunksjoner (standby, avkjøling, ferie - noen versjoner)
Dersom en av disse spesialfunksjonene er valgt, må FRESHBOX-seksjonen deaktiveres manuelt og de ferske
matvarene i seksjonen tas ut. Dersom seksjonen ikke deaktiveres manuelt, blir den deaktivert automatisk etter
cirka 8 timer.
Merk:
- Dersom symbolet ikke tennes ved aktivering av seksjonen, må du kontrollere at skuffen er satt riktig inn. Hvis
problemet vedvarer, kontakt kundeservice.
- Dersom seksjonen er aktivert og skuffen er åpen, kan det hende at symbolet på betjeningspanelet deaktiveres
automatisk. Når skuffen settes inn, aktiveres symbolet igjen.
- Uavhengig av seksjonens status kan du høre en svak lyd som er helt normalt.
- Når den ikke er i bruk, er temperaturen i seksjonen den samme som i resten av kjøleseksjonen. I dette tilfellet
anbefales det å oppbevare frukt og grønnsaker som ikke er følsomme for kulde (skogsbær, epler, aprikoser,
gulrøtter, spinat, salat osv.).
Viktig: Når funksjonen er slått på og det er matvarer med høyt vanninnhold i seksjonen, kan det dannes
kondens på hyllene. I dette tilfellet må funksjonen slås av midlertidig.
Vær forsiktig ved plassering av små matvarer og beholdere på den øverste hyllen i FRESHBOX-seksjonen, for å
unngå at disse faller ned mellom skuffen og bakveggen i kjøleseksjonen.
Fjerning av FRESHBOX-seksjonen:
For å oppnå bedre plass i kjøleskapet, kan man fjerne FRESHBOXseksjonen. Gå frem på følgende måte:
- For å gjøre det enklere å ta den ut anbefaler vi å tømme (og eventuelt
fjerne) de to nedre dørbalkongene.
- Slå av seksjonen.
- Ta ut skuffen og den hvite plasthyllen under seksjonen.
Merk: Det er ikke mulig å fjerne den øverste hyllen og sidestøttene.
FRESHBOX-seksjonen kan gjenmonteres ved først å sette den hvite plasthyllen på plass under seksjonen og
deretter skuffen. Aktiver så funksjonen igjen. For å spare energi anbefales det å deaktivere FRESHBOXseksjonen og fjerne den.
Rengjør jevnlig seksjonen og komponentene med en klut og en blanding av lunkent vann (ikke dypp den hvite
plasthyllen under skuffen i vann) og et nøytralt rengjøringsmiddel for kjøleskap.
Før rengjøring av seksjonen (også utvendig) må du fjerne skuffen og koble seksjonen fra
strømnettet.
Bruk aldri skurende produkter.
36
FRESHBOX
(Noen versjoner)
Page 37

I fryseseksjonen kan man også fryse
inn ferske matvarer.
Den mengde ferske matvarer som kan fryses
inn på 24 timer er oppgitt på typeplaten.
Innfrysing av ferske matvarer
• Anbefalt plassering av matvarer som skal fryses
inn, er som vist i Fig. 1, dersom det er en rist,
eller Fig. 2 dersom det ikke er en rist.
• Legg matvarene midt i seksjonen og pass
på at de ikke kommer i kontakt med frosne
matvarer. Sørg for en avstand på ca. 20 mm
(Fig. 1 og 2).
• På apparatet med seksjonen , trykker du
på tasten (E) for å aktivere funksjonen Fast
Freezing. Den hvite lampen (E) tennes og lyser
under hele innfrysingsprosessen.
• Etter cirka 26 timer kobler funksjonen seg ut
automatisk og den hvite lampen (E) slukker.
Funksjonen kan avbrytes ved å trykke på tasten
(E) på nytt.
I tabellen ved siden av ser du hvor mange
måneder du kan oppbevare frosne matvarer.
Når du kjøper frysevarer, må du forsikre deg
om at:
• Emballasjen eller pakken er i god stand, slik at
matvarene ikke har blitt forringet. Dersom
pakken buler ut eller det er våte flekker på den,
er den ikke blitt oppbevart riktig og kan ha vært
utsatt for en delvis opptining.
• Kjøp alltid frysevarene til sist og frakt dem hjem i
kjølebag.
• Legg dem i fryseseksjonen med en gang du
kommer hjem.
• Frys ikke inn igjen delvis opptinte matvarer, men
spis dem i løpet av et døgn.
• Unngå variasjoner i temperaturen eller reduser
dem til et minimum. Ta hensyn til
holdbarhetsdatoen på emballasjen.
• Følg alltid instruksjonene på emballasjen for
oppbevaring av frysevarene.
Produksjon av isterninger
• Fyll isterningbrettet 2/3 fullt med vann og plasser
det i fryseseksjonen .
• Hvis brettet skulle fryse fast , må man
ikke bruke skarpe gjenstander for å få det løs.
• Isterningene løsner lettere hvis isterningbrettet
bøyes forsiktig.
BRUK AV FRYSESEKSJONEN
(Noen versjoner)
37
Fig. 1
Fig. 2
Page 38

Før avriming må støpselet tas ut av
stikkontakten eller apparatet kobles fra
strømnettet.
Avriming av kjøleseksjonen skjer automatisk.
Tidvis dannelse av vanndråper på bakveggen i
kjøleseksjonen viser at apparatet er i ferd
med å avrime seg. Smeltevannet renner ned
gjennom et dreneringshull, og samles
deretter opp i en skål, der det fordamper
Rengjør hullet for drenering av avrimingsvann
regelmessig ved hjelp av det vedlagte redskapet,
for å garantere at avrimingsvannet renner konstant
og på rett måte. (Fig. 1)
Avriming av seksjonen
(noen versjoner)
Det anbefales å avrime seksjonen 1 til 2
ganger i året, eller når det har dannet seg større
mengder med rim.
Rimdannelse er normalt.
Hvor raskt det danner seg rim og hvor mye som
dannes, avhenger av omgivelsestemperaturen og
hvor ofte døren åpnes. Rimdannelse i den øverste
delen av seksjonen er normalt og har ingen
innvirkning på apparatets funksjon.
Avrimingen bør foretas når det er minimalt med
matvarer i seksjonen.
• Åpne døren og ta ut alle matvarene. Plasser dem
på et meget kjølig sted eller i en kjølebag.
• La døren stå åpen for å fremskynde
nedsmeltingen.
• Rengjør innsiden av seksjonen med en svamp
fuktet i lunkent vann, eventuelt tilsatt et nøytralt
vaskemiddel. Benytt ikke slipende
rengjøringsmidler.
• Skyll og tørk omhyggelig.
• Legg matvarene inn igjen.
• Lukk døren.
Sett støpselet tilbake i stikkontakten og sett
apparatet igang igjen ved å følge instruksene i
kapittelet “Bruk av kjøleseksjonen”. De innstillinger
og valg som fantes på apparatet før det ble slått av,
vil gjenopprettes.
AVRIMING AV APPARATET
38
Fig. 1
Page 39

39
Før enhver form for rengjøring eller
vedlikehold, må støpselet tas ut av
stikkontakten eller apparatet kobles fra
strømnettet.
• Kjøleseksjonen må rengjøres jevnlig med en
svamp fuktet i lunkent vann og/eller et nøytralt
rengjøringsmiddel. Skyll og tørk med en myk
klut. Ikke bruk skurende midler.
• Skilleveggene må ikke dyppes i vann, man tørkes
av med en såvidt fuktig svamp.
• I forbindelse med avriming bør fryseseksjonen
rengjøres.
• Rengjør jevnlig ventilasjonsåpningene og
kondensatoren som sitter bak på apparatet med
en støvsuger eller med en børste.
• Rengjør utsiden av apparatet med en myk, fuktig
klut. Ikke bruk etsende midler eller stålull,
og heller ikke løsemidler (f.eks. aceton,
terpentin) eller eddik.
Ved lengre fravær
1. Tøm kjøleskapet.
2. Ta ut støpslet.
3. Avrim og rengjør seksjonene innvendig.
4. La døren stå åpen når apparatet ikke er i
funksjon, slik at det ikke dannes mugg,
innestengt lukt eller korrosjon.
5. Rengjør apparatet.
• Rengjør lavtemperaturseksjonen (noen
versjoner) i forbindelse med avriming.
• Kjøleseksjonen må rengjøres jevnlig med en
svamp fuktet i lunkent vann og/eller et
nøytralt rengjøringsmiddel. Skyll og tørk med
en myk klut. Ikke bruk skurende midler.
RENGJØRING OG VEDLIKEHOLD
Page 40

40
Hvis du må kontakte oss på grunn av en feil eller
for en bestilling, oppgi alltid serienummeret (SN)
og navnet på apparatet. Skriv ned følgende
informasjon, også på serviceetiketten som følger
med apparatet (fest etiketten på et synlig sted eller
i telefonboken din).
SN Apparat
- Disse detaljene finner du på garantisertifikatet,
originalfakturaen eller dataplaten til apparatet
som er plassert på venstre side av
grønnsaksskuffen.
Ved feil kan du kontakte nærmeste V-ZUG
SA-kundeservice ved å ringe gratisnummeret
0800 850 850.
For å unngå unødvendig konsultasjon, kontroller
strømforsyningen før du bestiller hjelp av en
tekniker (er pluggen satt inn i stikkontakten? Har
sikringen gått?).
Ved forespørsel, bestilling og service,
vennligst kontakt
For forespørsler og problemer av administrativ
eller teknisk natur, og for bestilling av reservedeler
og tilbehør, vennligst kontakt hovedavdelingen i
ZUG direkte,
Tlf. +41 58 767 67 67
Ved slutten av ettårs garantien kan kunden signere
en servicekontrakt for alle våre produkter. Vi
sender deg gjerne relevante dokumenter.
KUNDESERVICE
Page 41

41
Первое включение прибора
1. Вставьте вилку сетевого шнура в розетку
2. Обычно на заводе-изготовителе прибор
отрегулирован таким образом, что
включении в сеть он начинает работать с
заданным значением температуры 5°C. Если
горит индикатор A (ситуация режима
ожидания), нажмите на символ A.
Регулировка температуры
Для регулировки температуры обратитесь к
прилагаемому техническому описанию
прибора.
Примечание:
Температура окружающего воздуха, частота
открываний дверцы, помещение в
холодильник горячих продуктов и
неправильная установка прибора могут влиять
на внутреннюю температуру холодильника, в
результате чего она может отличаться от тех
значений, которые указаны на панели.
Хранение продуктов питания в
холодильной камере:
Разложите продукты, как показано на рисунке:
A Продукты, прошедшие термальную
обработку
B Зелень
C Рыба, мясо
D Фрукты и овощи
E Бутылки
F Сыр
Примечание:
• Во избежание пересыхания продуктов они
должны быть завернуты
• Пространство, имеющееся между полками и
задней стенкой холодильника, обеспечивает
свободную циркуляцию воздуха
• Располагайте продукты таким образом,
чтобы они не соприкасались с задней
стенкой холодильной камеры
• Не кладите в холодильник еще горячие
продукты
• Храните жидкости в закрытых емкостях
Внимание:
Хранение овощей с высоким содержанием
воды может привести к образованию
конденсата на стеклянных полках; это не
препятствует правильной работе прибора.
РАБОТА ХОЛОДИЛЬНОЙ КАМЕРЫ
Page 42

В приборе имеется отделение, специально
предназначенное для хранения мяса и рыбы.
Внутри этого отделения поддерживается
более низкая температура, чем в остальной
части холодильной камеры.
Это позволяет значительно увеличить период
хранения свежих продуктов (мяса и рыбы), не
замораживая их и не изменяя их пищевую
ценность и первоначальную свежесть.
Оптимальная температура в отделении для
мяса и рыбы обеспечивается при задании
среднего положения.
Не рекомендуется помещать в это отделение
фрукты или овощи, поскольку температура в
нем может опускаться даже ниже 0 °C, и вода,
содержащаяся в продуктах, может
превратиться в лед.
Указатель температуры
• Температура внутри отделения
визуализируется с помощью указателя,
расположенного на дверце отделения
(Рис.1)
• Цветной участок обозначает диапазон
температур, наилучшим образом
подходящих для хранения мяса и рыбы
• Для стабилизации температуры внутри
отделения требуется примерно один час.
Внимание:
Температура в отделении для мяса и рыбы
связана с температурой внутри холодильной
камеры.
Поэтому, если указатель температуры
находится в секторе [IMG], измените
температуру холодильной камеры с помощью
кнопки (C).
При этом соответствующим образом
изменится температура отделения для мяса и
рыбы.
Демонтаж ящика отделения для рыбы и
мяса
Если вы намереваетесь использовать
холодильник без отделения для мяса и рыбы,
необходимо выполнить следующие действия:
1. Снимите крышку отделения, нажав на два
боковых фиксатора, находящихся на
внутренней стороне (см. Рис. 3)
2. Выньте ящик (См. Рис. 2)
Для повторной установки ящика отделения
для мяса и рыбы в холодильник действуйте
следующим образом:
1. Вставьте ящик
2. Вставьте крышку отделения для мяса и рыб
42
Рис. 1
Рис. 2
Рис. 3
КАК ИСПОЛЬЗОВАТЬ OТДЕЛЕНИЕ
ДЛЯ МЯСА И РЫБЫ (если таковое имеется)
Page 43

Отделение FRESHBOX специально предназначен для поддержания низкой температуры и оптимальной
влажности с тем, чтобы увеличить срок хранения свежих продуктов (например, мяса, рыбы, фруктов и зимних
овощей).
Включение и выключение отделения
Когда отделение включено, температура внутри него составляет примерно 0°C.
Чтобы включить это отделение, нажмите показанную
на рисунке кнопку и держите ее нажатой не менее
одной секунды - до тех пор, пока не загорится
указанный символ.
Загоревшийся символ указывает на то, что отделение
включено. Чтобы выключить отделение, снова
нажмите эту же кнопку не менее, чем на одну секунду.
Для правильной работы отделения FRESHBOX, необходимо, чтобы:
- холодильная камера была включена;
- температура внутри холодильной камеры лежала в пределах от +2°C до +6°C;
- для того чтобы можно было включить отделение, соответствующий ящик должен быть установлен на свое
место;
- не были заданы специальные функции (режим ожидания, режим Cooling-Off, режим “Отпуск” - если таковые
имеются).
В случае задания одной из этих специальных функций необходимо выключить отделение FRESHBOX вручную, на
забыв при этом вынуть из него содержащиеся там свежие продукты. Если отделение не будет выключено
вручную, примерно через 8 часов произойдет его автоматическое выключение.
Примечание:
- если символ не загорается при включении отделения, убедитесь, что ящик установлен правильно; если
неисправность остается, обратитесь в авторизованный сервисный центр;
- если при включенном отделении выдвинуть ящик, символ на панели управлении может автоматически
погаснуть. При установке ящика на место символ снова загорится;
- вне зависимости от состояния отделения может быть слышен небольшом шум - это нормальное явление;
- когда отделение выключено, температура внутри него определяется общей температурой холодильной
камеры. В этом случае рекомендуется хранить в нем овощи и фрукты, не чувствительные к холоду (лесные
ягоды, мед, абрикосы, морковь, шпинат, салат и т.д.).
Внимание! При включенном отделении и наличии продуктов с высоким содержанием влаги на стеклянных
полках может образовываться конденсат. В таких случаях следует временно выключить отделение.
Рекомендуется уделять внимание правильному размещению продуктов и емкостей небольших размеров на
верхней полке отделения FRESHBOX, чтобы они не могли упасть в пространство между ящиком и задней стенкой
холодильной камеры.
Демонтаж ящика FRESHBOX:
Для получения большего свободного объема в холодильной камере можно
демонтировать ящик FRESHBOX. В этом случае следует выполнить
следующие действия:
- для облегчения вынимания ящика мы рекомендуем освободить (и при
необходимости вынуть) обе нижние полки;
- выключите отделение;
- выньте ящик и расположенную внизу белую пластиковую полку.
Примечание: верхняя полка и боковые опоры не вынимаются.
Чтобы восстановить работу отделения FRESHBOX, установите внизу белую пластиковую полку, а затем - вставьте
ящик и включите отделение. Для оптимизации энергопотребления рекомендуется выключить отделение
FRESHBOX и вынуть ящик.
Периодически выполняйте чистку отделения и его компонентов с помощью тряпки, смоченной в теплой воде
(при этом не погружайте в воду белую пластиковую полку, расположенную под ящиком) с добавлением моющих
средств, специально предназначенных для чистку внутренних поверхностей холодильника.
Перед чисткой отделения (в том числе его наружных поверхностей) необходимо вынуть ящик для
отсоединения электропитания отделения.
Никогда не используйте абразивные моющие средства.
ОТДЕЛЕНИЕ FRESHBOX
(Ели таковое имеется)
43
Page 44

В морозильной камере можно также
замораживать свежие продукты.
Количество свежих продуктов, которое
можно заморозить в течение 24 часов,
указано на табличке технических данных.
Замораживание свежих продуктов
• Рекомендуемое положение для
замораживаемых продуктов показано на
Рис. 1 в случае наличия решетки или на Рис.
2 при отсутствии решетки в комплекте
поставки.
• Поместите продукты в середину камеры
класса таким образом, чтобы они не
касались уже замороженных продуктов - на
расстоянии примерно 20 мм от них (Рис. 1 и
2).
• Для изделий, оснащенных отделением
, нажмите кнопку (E), для включения
функции Fast Freezing - “Быстрое
замораживание”, при этом загорится белый
индикатор (E), который будет гореть на всем
протяжении замораживания.
• Примерно через 26 часов эта функция
автоматически выключается, и белый
индикатор (E) гаснет.
Функцию можно также прервать, снова
нажав кнопку (E).
Для определения допустимых сроков
хранения свежезамороженных продуктов
используйте приведенную сбоку таблицу.
При приобретении замороженных
продуктов следует придерживаться
следующих правил:
• Проверяйте целостность упаковки или
пакета, в противном случае продукт может
оказаться испорченным. Если пакет вздут
или на нем видны влажные пятна, то это
означает, что он хранился не в оптимальных
условиях, и что уже мог начаться процесс
размораживания.
• Покупайте замороженные продукты в
последнюю очередь и для их переноски
используйте сумки с термоизоляцией.
• Сразу же по возвращении домой помещайте
замороженные продукты в морозильную
камеру.
• Не подвергайте частично размороженные
продукты повторному замораживанию;
такие продукты должны быть использованы
в течение 24 часов.
• Избегайте перепадов температуры или
сводите их к минимуму. Соблюдайте срок
хранения, указанный на упаковке.
• Всегда придерживайтесь указаний по
хранению замороженных продуктов,
приведенных на их упаковке.
Получение кубиков льда
• Наполните водой ванночку для льда на 2/3
ее емкости и поставьте ее в морозильную
камеру .
• В случае если ванночка примерзает ко дну
морозильной камеры , не
используйте для ее отделения заостренные
или режущие предметы.
• Чтобы облегчить отделение кубиков льда от
ванночки, слегка согните ее.
44
Рис. 1
Рис. 2
ИСПОЛЬЗОВАНИЕ МОРОЗИЛЬНОЙ КАМЕРЫ
(Ели таковая имеется)
Page 45

Прежде чем размораживать прибор,
выньте вилку из розетки или отключите
электропитание.
Размораживание холодильной камеры
происходит полностью автоматически.
Периодическое образование капель воды
на внутренней задней стенке холодильной
камеры указывает на этап автоматического
размораживания. Талая вода
автоматически стекает в сливное отверстие
и накапливается в емкости, где испаряется.
Регулярно прочищайте отверстие для слива
талой воды, используя специальный
инструмент, входящий в комплект поставки,
для обеспечения непрерывного и правильного
стока. (Рис. 1)
Размораживание морозильной камеры
(если таковая имеется)
Рекомендуем размораживать морозильную
камеру 1 или 2 раза в год или же, если
на стенках образовался чрезмерный слой льда.
Образование льда является нормальным
явлением.
Количество и скорость его накопления зависят
от условий окружающей среды и от количества
открываний дверцы морозильной камеры.
Накопление льда, особенно на верхней части
камеры, является нормальным явлением и не
препятствует правильной работе прибора.
Рекомендуется выполнять размораживание
при минимальном запасе продуктов.
• Откройте дверцу, выньте все продукты и
поместите их в прохладное место или в
термосумку.
• Оставьте дверцу открытой для обеспечения
таяния льда.
• Чистите внутренние поверхности камеры
губкой, смоченной в теплой воде и/или в
растворе нейтрального моющего средства.
Не пользуйтесь абразивными веществами.
• После этого сполосните водой и тщательно
протрите.
• Разместите продукты.
• Закройте дверцу.
Снова вставьте вилку в розетку и включите
прибор в соответствии с указаниями,
приведенными в разделе “Работа холодильной
камеры”. Все настройки, сделанные до
выключения прибора, будут восстановлены.
45
Рис. 1
РАЗМОРАЖИВАНИЕ ПРИБОРА
Page 46

46
Перед выполнением каких-либо операций
по чистке прибора или уходу за ним выньте
вилку из розетки или, в любом случае,
отключите прибор от электросети.
• Периодически выполняйте чистку
холодильной камеры, пользуясь губкой,
смоченной в теплой воде и/или в растворе
нейтрального моющего средства.
Ополосните стенки камеры и вытрите ее
насухо мягкой тряпкой. Не пользуйтесь
абразивными составами.
• Не погружайте разделители в воду; вместо
этого их следует протирать чуть
увлажненной губкой.
• Выполняйте чистку внутренних
поверхностей морозильной камеры во
время ее размораживания.
• Периодически выполняйте чистку
вентиляционных решеток и конденсатора,
расположенных с задней стороны прибора,
с помощью пылесоса или щетки.
• Протирайте холодильник снаружи мягкой
влажной тряпкой. Нельзя пользоваться
абразивными пастами или мочалками,
пятновыводителями (например,
ацетоном, трихлорэтиленом) или
уксусом.
Меры предосторожности в случае вашего
продолжительного отсутствия
1. Выньте все продукты из холодильника.
2. Отключите прибор от электросети.
3. Разморозьте прибор и прочистите его
внутренние поверхности.
4. Во избежание образования плесени,
неприятных запахов и окислений дверцу в
отключенном на длительное время
приборе следует оставлять открытой.
5. Выполните чистку прибора.
• Выполняйте чистку внутренних
поверхностей камеры низкой
температуры (на тех моделях, на которых
она предусмотрена) во время
размораживания.
• Периодически холодильную камеру
изнутри, пользуясь губкой, смоченной в
теплой воде и/или в растворе
нейтрального моющего средства.
Ополосните стенки камеры и вытрите ее
насухо мягкой тряпкой. Не пользуйтесь
абразивными составами.
ЧИСТКА И УХОД
Page 47

47
При обращении к нам в случае неисправности
или для размещения заказа всегда указывайте
серийный номер (SN) и название прибора.
Запишите следующие данные, в том числе на
наклейке для технического обслуживания,
поставляемой вместе с прибором (прикрепите
наклейку на видном месте или в своей
телефонной книге).
SN Прибор
- Эти сведения приведены в гарантийном
сертификате или в оригинале счета-фактуры,
или в паспортной табличке вашего прибора,
расположенной на левой стороне ящика для
овощей.
В случае неисправности можно обратится в
ближайший сервисный центр V-ZUG SA по
бесплатному номеру телефона 0800 850
850.
Во избежание ненужных вмешательств и
прежде чем обращаться за помощью к
техническому специалисту, проверьте
электропитание (Вилка вставлена в розетку?
Перегорел предохранитель?).
Запросы, заказы, договор на техническое
обслуживание
С запросами и по поводу проблем
административного или технического
характера, а также для заказа запасных частей
и принадлежностей обращайтесь
непосредственно в центральный офис ZUG,
тел. +41 58 767 67 67
По истечении одногодичной гарантии
покупатель может подписать договор на
техническое обслуживание всех наших
изделий. Мы будем рады прислать вам
необходимые документы.
СЕРВИСНАЯ СЛУЖБА
Page 48

N RUS
Printed in Italy 03/15
V-ZUG AG
Industriestrasse 66, 6301 Zug
Tel. +41 58 767 67 67, Fax +41 58 767 61 61
info@vzug.com, www.vzug.com
Service-Center: Tel. 0800 850 850
GB F NL S
1007468-R01
400010787541
 Loading...