

Page 1
Operating instructions
Miwell HSL
Microwave
Page 2

Thank you for choosing to buy one of our products. Your appliance is made to
high standards and is easy to use. Nevertheless, please take the time to read
these operating instructions in order to familiarise yourself with the appliance
and get the best use out of it.
Please follow the safety precautions.
Modifications
Text, diagrams and data correspond to the technical standard of the appliance
at the time these operating instructions went to press. The right to make technical modifications for the purpose of the further development of the appliance
is reserved.
Validity
The product family (model number) corresponds to the first alphanumerics on
the identification plate. These operating instructions apply to:
Type Product family Size system
MWHSL60 24006 60-374
Variations depending on the model are noted in the text.
Colour operating instructions can be downloaded from the internet from
www.vzug.com.
© V-ZUG Ltd, CH-6301 Zug, 2015
2
Page 3

Inhaltsverzeichnis
1 Safety precautions 5
1.1 Symbols used ........................................................................................................ 5
1.2 General safety precautions ................................................................................. 6
1.3 Appliance-specific safety precautions ............................................................. 7
1.4 Instructions for use ............................................................................................... 8
1.5 Accessories..........................................................................................................11
2 Disposal 13
3 Using for the first time 14
4 Appliance description 15
4.1 Construction.........................................................................................................15
4.2 Operating and display elements ......................................................................15
4.3 Cooking space ....................................................................................................16
4.4 Accessories..........................................................................................................17
4.5 Ventilation fan ......................................................................................................18
4.6 Installation.............................................................................................................18
5 Operating modes 19
5.1 Overview of operating modes ..........................................................................19
5.2 Favourite ...............................................................................................................19
5.3 Microwave ............................................................................................................20
5.4 CombiCrunch.......................................................................................................22
5.5 Grill.........................................................................................................................23
5.6 Grill combi mode ................................................................................................24
6 Operating the appliance 25
6.1 Selecting and starting the operating mode ...................................................25
6.2 Changing the microwave power level.............................................................26
6.3 Changing the operating mode .........................................................................27
6.4 Changing the duration .......................................................................................27
6.5 Timer......................................................................................................................28
6.6 Interrupting ...........................................................................................................29
6.7 Continuing ............................................................................................................29
6.8 Aborting the operation .......................................................................................29
6.9 End of operation..................................................................................................29
6.10 Switching the appliance off...............................................................................30
3
Page 4

7 AutomaticPlus 31
7.1 Overview ...............................................................................................................31
7.2 Selecting and starting automatic programme ...............................................33
8 Tips and tricks 34
8.1 Tips on settings ...................................................................................................34
8.2 Uneven browning ................................................................................................40
9 User settings 41
9.1 Selecting user settings.......................................................................................41
9.2 Adjusting user settings ......................................................................................41
9.3 Language..............................................................................................................41
9.4 Childproof lock ....................................................................................................42
9.5 Clock functions....................................................................................................42
9.6 Illumination ...........................................................................................................43
9.7 Acoustic signal ....................................................................................................43
9.8 Temperature unit .................................................................................................43
9.9 Time format ..........................................................................................................44
9.10 Contrast ................................................................................................................44
9.11 Factory settings ...................................................................................................44
10 Care and maintenance 45
10.1 Cleaning the exterior ..........................................................................................45
10.2 Cleaning the appliance door ............................................................................45
10.3 Cleaning the door seal.......................................................................................46
10.4 Cleaning the cooking space.............................................................................46
10.5 Cleaning the accessories..................................................................................47
10.6 Replacing the light bulb.....................................................................................47
11 Trouble-shooting 48
11.1 What to do if ... ....................................................................................................48
11.2 After a power failure ...........................................................................................49
12 Accessories and spare parts 50
13 Technical data 51
13.1 Temperature measurement...............................................................................51
13.2 Automatic energy-saving stand-by...................................................................51
14 Index 52
15 Service & Support 55
4
Page 5

1 Safety precautions
1.1 Symbols used
Denotes important safety precautions.
Failure to observe said precautions can result in injury or in damage
to the appliance or fittings!
Information and precautions that should be observed.
Information on disposal
Information about the operating instructions
▸ Indicates step-by-step instructions.
– Describes how the appliance reacts to the steps taken.
▪ Indicates a list.
5
Page 6

1 Safety precautions
1.2 General safety precautions
▪ Read the operating instructions before using the appliance for
the first time!
▪ This appliance can be used by children aged 8 and above
and by persons with reduced physical, sensory or mental capabilities, or lack of experience and/or knowledge, provided
they are supervised or have been instructed on the safe use
of the appliance and have understood the hazards involved.
Children shall not play with the appliance. Cleaning and user
maintenance shall not be undertaken by children without supervision.
▪ If an appliance is not equipped with a mains cable and a plug
or other means for disconnecting from the mains with a contact opening on each pole complying with the conditions of
overvoltage category III for full isolation, an isolating device
must be incorporated into the permanently installed electrical
installation in accordance with the installation regulations.
▪ If the mains cable of this appliance is damaged, it must be re-
placed by the manufacturer or its Customer Services or a similarly qualified person in order to avoid hazard.
6
Page 7

1 Safety precautions
1.3 Appliance-specific safety precautions
▪ READ THE IMPORTANT SAFETY INSTRUCTIONS CARE-
FULLY AND RETAIN FOR FUTURE USE.
▪ WARNING: In the event that the door, door seals or interior
are damaged, the appliance must not be used until it has
been repaired by a qualified competent person.
▪ WARNING: Maintenance or repair work which involves remov-
ing a cover that gives protection against exposure to microwave energy must only be carried out by a qualified competent person.
▪ WARNING: Never heat food or liquids in sealed containers
such as cans or bottles, as they are liable to explode due to
overpressure. Always open food containers before placing
them in the cooking space.
▪ WARNING: Children should only use the appliance in the
combined operating mode under adult supervision due to the
temperatures generated.
▪ This appliance is intended for use in the home or in similar
environments such as staff kitchens in shops, offices and
other commercial spaces; on agricultural premises; for customers in hotels, motels and other residential facilities; or in
bed and breakfasts.
▪ The appliance is intended for heating up food and beverages.
Desiccating food, drying clothing or heating warming pads,
slippers, sponges, damp cloths and the like can result in injury, ignition or fire.
▪ If you notice smoke, switch off the appliance or disconnect it
from the mains. Keep the door closed to stifle any flames.
▪ The appliance is intended to be used built-in. Do not use it
freestanding. Do not place nor use in a cabinet.
7
Page 8

1 Safety precautions
▪ Only use containers that are suitable for use with microwave
appliances.
▪ Heating beverages in a microwave can result in delayed
eruptive boiling (super boiling). Scalding hazard! Be careful
when you handle the container!
▪ The contents of feeding bottles and baby food jars must be
stirred or shaken and the temperature must to be checked
before consumption in order to avoid burns and scalds.
▪ Eggs in their shell or whole hard-boiled eggs should not be
heated in microwave appliances since they may explode,
even after microwave heating has ended.
▪ Keep the appliance and the door seals clean. Remove any
soiling as soon as possible. Otherwise the appliance or the
door seal could become damaged, adversely affecting the life
of the appliance and possibly resulting in a hazardous situation. For more information on cleaning the door seals, the
cooking space and the adjoining parts, see the «Care and
maintenance» section.
▪ Do not use aggressive or abrasive cleaning agents or sharp
metal scrapers to clean the glass in the appliance door, as
they could scratch the surface. This could destroy the glass.
▪ Never use a steam cleaner for cleaning the appliance.
1.4 Instructions for use
Before using for the first time
▪ The appliance must be installed and connected to the electricity supply in
accordance with the separate installation instructions. Have a qualified fitter/
electrician carry out the necessary work.
Correct use
▪ The appliance is designed for use in the home for preparing food. Under no
circumstances flambé or cook food using a lot of fat in the cooking space!
No liability is assumed for any damage caused by improper use or incorrect
handling.
▪ Never use the appliance to dry animals, textiles or paper, etc.
▪ Do not use the appliance as a room heater.
8
Page 9

1 Safety precautions
▪ The appliance should only be installed and operated at an ambient temper-
ature of 5 °C to 35 °C.
▪ Any repairs, modifications or manipulations to the appliance, especially any
electrically live parts, may only be carried out by the manufacturer, its Customer Services or a similarly qualified person. Repairs if carried out incorrectly may cause serious injury, damage to the appliance and fittings, as
well as affect the functioning of the appliance. If the appliance is not working properly or in case of a repair order, follow the instructions given in the
«Service & Support» section. Please contact our Customer Services if necessary.
▪ Use original spare parts only.
▪ Retain these operating instructions for future reference.
▪ The appliance corresponds to recognized technology standards and the rel-
evant safety regulations. Proper use of the appliance is essential to avoid
damage and accidents. Please therefore follow the precautions given in
these operating instructions.
Note on use
▪ Use the childproof locking facility.
▪ If the appliance is visibly damaged, do not use it. Contact our Customer
Services.
▪ If the appliance is not operating properly, disconnect it from the power sup-
ply immediately.
▪ Ensure there are no foreign bodies or pets in the cooking space before
closing the appliance door.
▪ Objects that could pose a danger if the appliance were accidentally
switched on should not be stored in the cooking space or the heatable appliance drawer. Do not store food or any temperature-sensitive or inflammable materials, e.g. cleaning agents, oven sprays, etc., in the cooking
space or the heatable appliance drawer.
▪ For appliances with grill: Leave the appliance door closed when grilling. The
heat could otherwise damage the operating and display elements or the fitted units above.
▪ Do not switch the microwave on until you have put the food in the cooking
space.
▪ Remove any non-microwaveable plastic and paper packaging from the food
before cooking or defrosting it. Ignition hazard!
▪ Do not leave the appliance unattended when heating food in plastic or pa-
per containers. Ignition hazard!
9
Page 10

1 Safety precautions
▪ Always open sealed food containers before placing them in the cooking
space. Danger of explosion due to excess pressure!
Caution: Risk of burns!
▪ The appliance gets very hot when in use. The appliance door also gets hot.
▪ Steam and/or hot air may escape from the cooking space when the appli-
ance door is opened.
▪ The appliance will remain hot for some time after it is switched off and will
only cool down slowly to room temperature. Allow sufficient time for the appliance to cool down before, for instance, cleaning it.
▪ Overheated fat and oil can easily catch fire. Heating oil in the cooking
space to sear meat is dangerous and should not be done. Never attempt to
extinguish burning oil or fat with water. Danger of explosion! Smother the
flames with a fire blanket. Keep doors and windows closed.
▪ Do not pour spirits (brandy, whisky, schnapps, etc.) over hot food. Danger
of explosion!
▪ Do not leave the appliance unattended when drying herbs, bread, mush-
rooms, etc. If the foodstuff dries out too much, it can pose a fire hazard.
▪ If you notice smoke possibly coming from the appliance itself or from inside
the cooking space, keep the appliance door closed. Disconnect the appliance from the power supply.
▪ Accessories get hot in the cooking space. Use protective gloves or oven
cloths.
▪ Do not heat up alcoholic beverages!
▪ When heating liquids in a microwave, place a teaspoon in the vessel to pre-
vent delayed boiling. When delayed boiling occurs, the boiling temperature
is reached without the usual steam bubbles rising. Disturbing a vessel, even
slightly, can cause the liquid to erupt if the container is open. Do not use
vessels with a narrow lip.
Caution: Risk of injury!
▪ Be careful not to put fingers in the door hinges, there is otherwise a risk of
injury if the appliance door is moved. Particular care should be taken when
children are around.
▪ Only leave the appliance door open in the at-rest position. An open appli-
ance door poses a danger of tripping or injury! Do not sit or rest on the appliance door or use it as a storage surface.
▪ For hobs: A hob guard can be fitted to protect small children. Hob guards
are available from specialist retailers.
10
Page 11

1 Safety precautions
Caution: Risk to life!
▪ Danger of suffocation! Keep packaging material, e.g. plastic film and poly-
styrene, away from children. Packaging material can be dangerous for children.
How to avoid damaging the appliance
▪ Close the appliance door carefully.
▪ For appliances with visible bottom heating element: Do not place any ob-
jects directly on the bottom heating element.
▪ Do not use protective aluminium inserts with appliances with no visible bot-
tom heating element.
▪ Do not use objects that can rust in the cooking space.
▪ Using knives or cutting wheels on the baking tray will visibly damage the
surface.
▪ To prevent corrosion, leave the appliance door open in the at-rest position
until the cooking space has cooled down.
▪ When cleaning the appliance, make sure no water gets inside it. Use a
moderately damp cloth. Do not spray the outside or the inside of the appliance with water. If water gets inside the appliance, it will cause damage.
▪ The construction of the appliance may not be changed in any way. Do not
apply force to or interfere with the appliance door or the control and safety
devices. The illumination may only be replaced by our Customer Services.
▪ Take care not to damage the appliance door, the door frame and the door
hinges.
▪ Ensure that nothing is trapped between the appliance door and the frame.
▪ Do not switch the microwave on until you have put the food in the cooking
space.
1.5 Accessories
Risk of burns! The accessories get very hot during use. Use protective
gloves or oven cloths.
Turntable roller and glass turntable
▪ Use the appliance at all times and exclusively with the turntable roller and
the glass turntable supplied.
▪ Never place any other vessel than the glass turntable directly on the
turntable roller.
▪ Allow the glass turntable to cool down first before cleaning it or rinsing it
with water.
11
Page 12

1 Safety precautions
▪ Do not cook food directly on the glass turntable.
▪ Do not place hot food or containers on the glass turntable when it is cold.
▪ Do not place frozen food or containers on the glass turntable when it is hot.
CombiCrunch plate
▪ Only use the CombiCrunch plate in the CombiCrunch mode.
▪ Never use the CombiCrunch plate in the CombiCrunch mode together with
the wire rack.
▪ Never use the CombiCrunch plate as a stand for dishes or containers.
Wire rack
▪ Always place the wire rack in the centre of the glass turntable.
▪ Never lay metal dishes on the wire rack in combi mode. This could cause
sparks which could damage the appliance.
▪ Never use the wire rack for favourite, microwave or CombiCrunch operation.
This could cause sparks which could damage the appliance.
Food cover
▪ Only use the food cover in microwave mode. Otherwise, the food cover
could melt.
Cookware
▪ Ensure the cookware does not touch the sides of the cooking space as it
rotates.
▪ Use only heat-resistant, microwave-safe cookware, such as glass, ceramic,
porcelain, or heat-resistant plastics. Microwaves can penetrate these materials. Microwaves cannot or can only partially penetrate metal cookware; food
in this instance will remain cold. If you use metal cookware, arcing may occur which could damage the appliance.
▪ Only use cookware with a metal decor, e.g. a gold rim, or food in aluminium
containers if the manufacturer guarantees their microwave compatibility.
This also applies to products made from recycled paper.
▪ Do not use a meat thermometer. The features of meat thermometers can
cause arcing in the microwave mode, which will damage your appliance.
▪ Porcelain, ceramic and earthenware cookware may have cavities. These
can fill with water, causing the dishware to crack. Follow the manufacturers'
instructions.
12
Page 13

2 Disposal
Packaging
▪ All packaging materials (cardboard, plastic film (PE) and polystyrene (EPS))
are marked and should, if possible, be collected for recycling and disposed
of in an environmentally friendly way.
Disconnection
▪ Disconnect the appliance from the mains. With a fixed appliance, this is to
be carried out by a qualified electrician!
Safety
▪ Disable the appliance to prevent accidents caused by improper use, espe-
cially through children playing.
▪ Pull the plug out of the mains socket or have the appliance disconnected
from the mains by an electrician. Then cut the mains cable off flush with the
appliance.
Disposal
▪ The old appliance should not be discarded as worthless rubbish. If dis-
posed of correctly, the raw materials can be recovered for recycling.
▪ The symbol on the identification plate warns that the appliance may not
be disposed of in normal household waste.
▪ The appliance must be disposed of in accordance with local regulations on
waste disposal. For more information on the handling, disposal and recycling of the product, please contact the local authorities, the local recycling
facilities for household waste or the retailer from whom you purchased the
appliance.
13
Page 14

3 Using for the first time
Before operating the newly installed appliance for the first time, the following
steps should be taken:
▸ Remove the packaging and transportation material as well as any blue pro-
tective film from the cooking space.
▸ Set the time (see page 42).
▸ Switch on the childproof lock if necessary.
▸ Clean the cooking space and accessories with a mild cleaning agent and
water, and wipe dry with a soft cloth.
14
Page 15
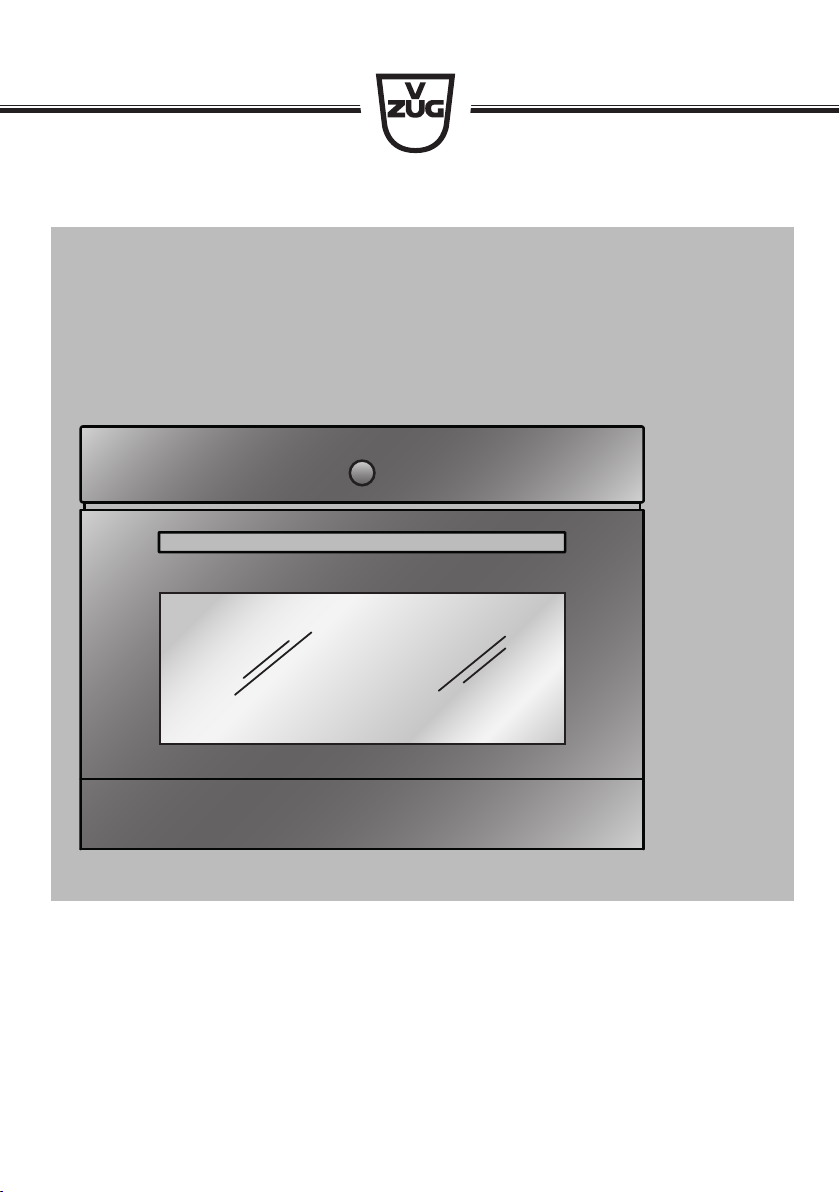
4 Appliance description
1
3
4
2
00:00
1
2 3
4
4.1 Construction
Operating and display elements
1
Ventilation opening
2
Door handle
3
Appliance door
4
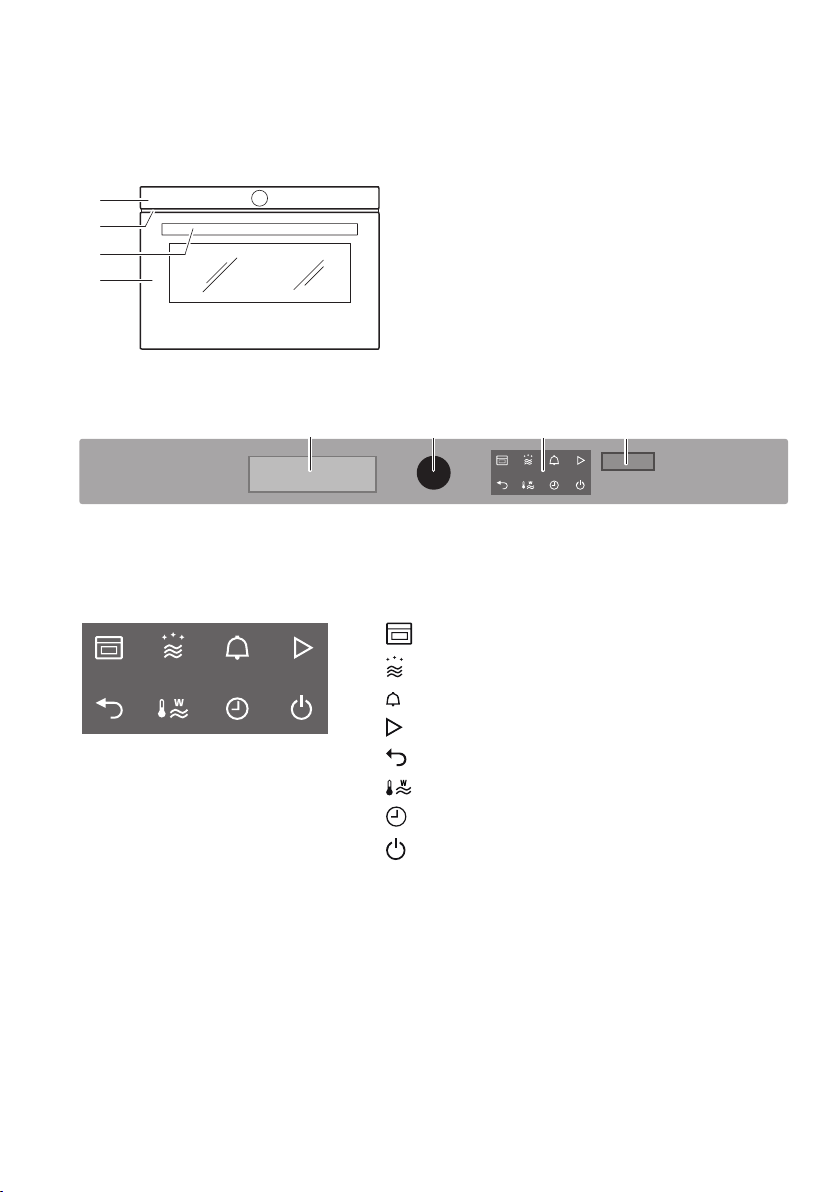
4.2 Operating and display elements
Display
1
Adjusting knob
2
Touch buttons
Touch buttons
3
Digital display (time/timer)
4
Operating modes
AutomaticPlus
Timer
Start
Back
Microwave power level setting
Time
Switch off
15
Page 16
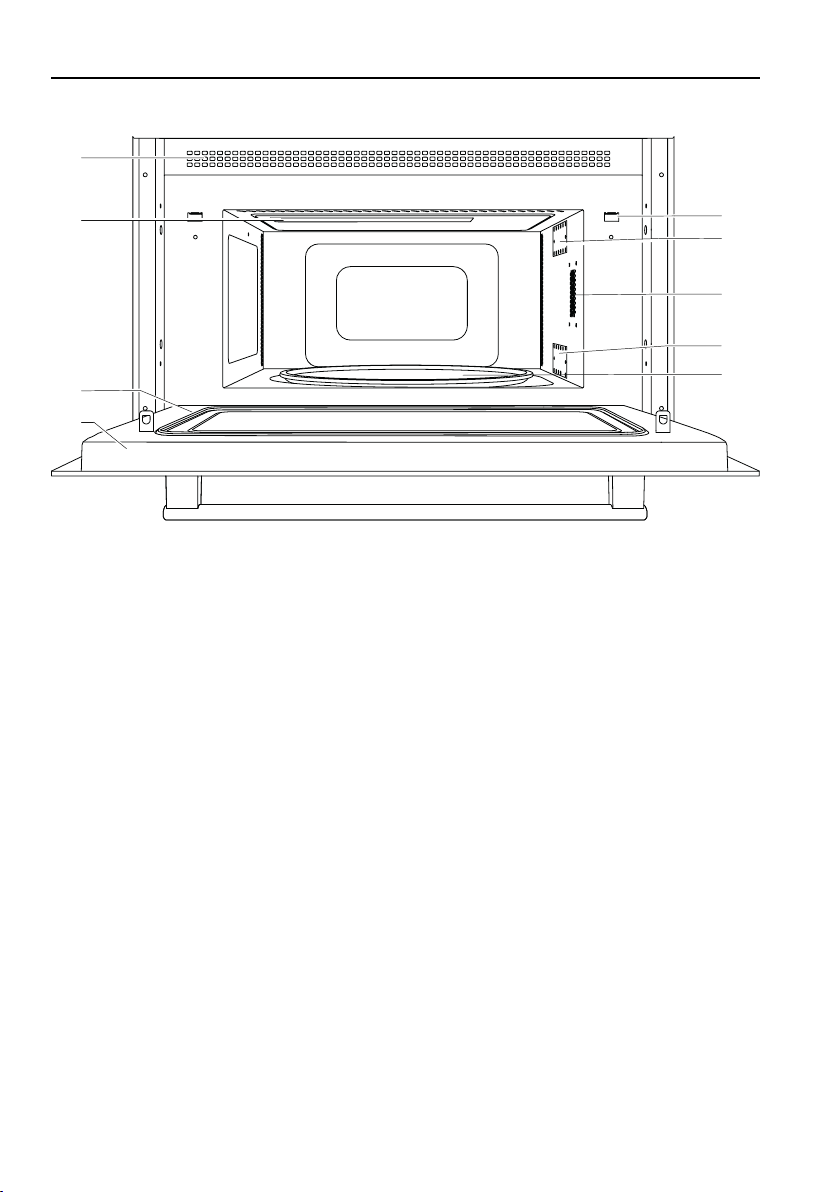
4 Appliance description
7
5
6
1
2
3
4
6
8
4.3 Cooking space
1
2
3
4
Appliance door
Door seal
Grill
Ventilation openings
5
6
7
8
Safety door catch
Microwave inlet
Illumination
Glass turntable
16
Page 17
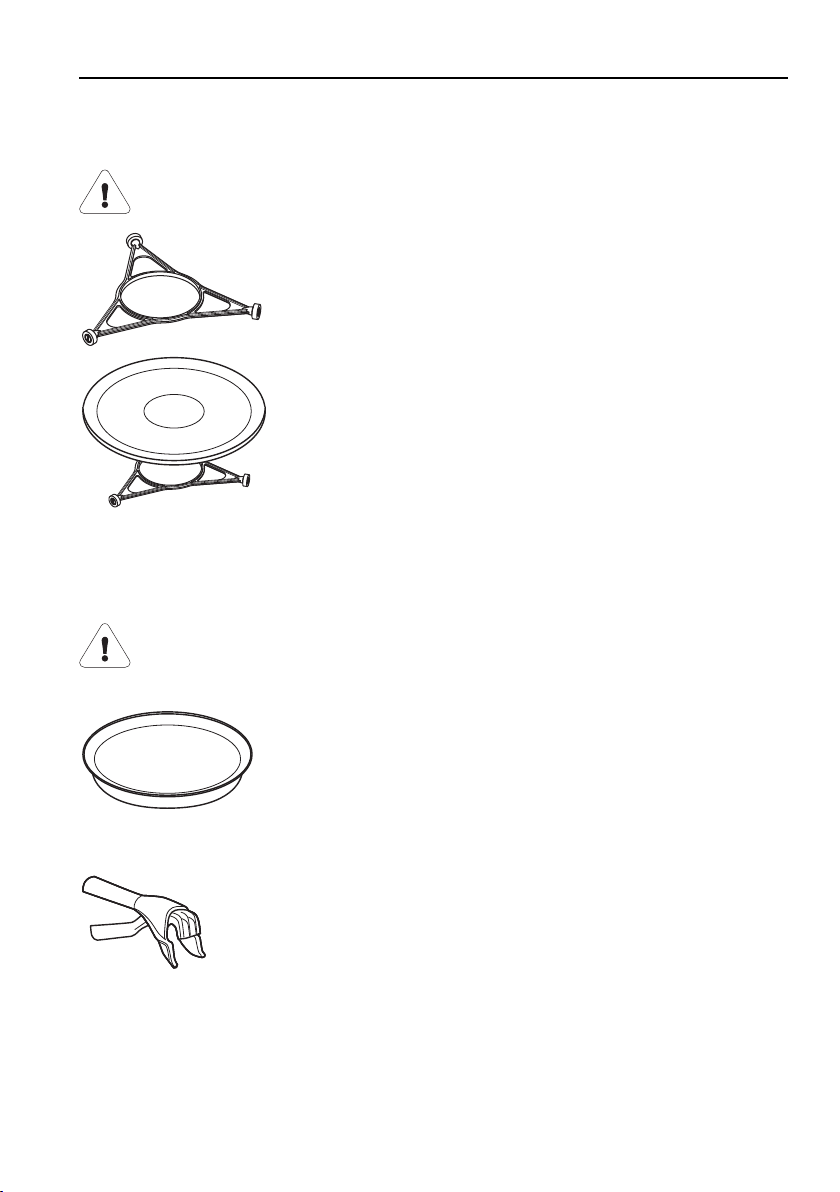
4.4 Accessories
Turntable roller and glass turntable
Always use the turntable roller and the glass turntable, also in combination with the other accessories.
▸ Place the turntable roller in the fitting in the floor of the
cooking space.
▸ Position the glass turntable on the turntable roller so
that the pegs on the base of the glass turntable engage in the corresponding recesses of the turntable
drive in the floor of the cooking space. The glass
turntable can turn clockwise and anti-clockwise.
▸ The glass turntable must be used with all operating
modes, including when using accessories. It collects
meat juices and food particles, preventing soiling of
the cooking space floor.
CombiCrunch plate
4 Appliance description
Do not use the CombiCrunch plate in microwave or grill mode.
Do not use knives or cutting wheels on the CombiCrunch plate. This
will cause visible damage.
CombiCrunch grip
▪ Browns and crisps up the food.
▸ Arrange the food directly on the CombiCrunch plate.
▸ Use the CombiCrunch grip for taking the CombiCrunch-
plate out of the cooking space.
17
Page 18

4 Appliance description
Wire rack
Never place metal dishes on the wire shelf in the combi mode. This
could cause sparks which could damage the appliance.
▸ In the grill mode, place the food directly on the wire
Food cover
Use the food cover in the microwave mode only. The food cover could
otherwise melt.
▪ Prevents the food from drying out.
▪ Prevents the cooking space from becoming soiled.
▪ Shortens the cooking time.
▪ For reheating food on more than one level:
▸ Place a plate on the glass turntable and cover with the
▸ Place a second plate on the food cover and cover it
rack and do not cover.
food cover.
with a second food cover.
4.5 Ventilation fan
The fan switches on automatically during operation. The fan can continue to
run at the end of operation to cool down the electronic components.
During this time, the appliance door can be opened and the food removed.
The fan switches off automatically.
4.6 Installation
Do not obstruct the ventilation slots at any time.
Adequate air circulation is essential for the appliance to run smoothly.
Observe, therefore, the installation instructions and follow the detailed
installation specifications.
The appliance may only be operated with the appropriate approved installation
kit. Alternative ways of setting up or installing the appliance are not permitted.
A special mounting rail is provided for installing the appliance.
The appliance can be operated at an ambient temperature of +10°C to
+35°C.
18
Page 19

5 Operating modes
Always use the turntable roller and the glass turntable, also in combination with the other accessories.
5.1 Overview of operating modes
All the operating modes are described below.
Follow the advice under «Tips and tricks» (see page 34).
5.2 Favourite
If you use a specific operating mode, microwave power level and duration frequently, e.g. to heat up milk, you can save these settings as a favourite.
Setting favourites
▸ Press the sensor button.
▸ Select the desired operating mode.
▸ Make the settings and confirm.
– The operating mode summary appears in the display.
▸ Press and hold the adjusting knob down for 2 seconds.
– The settings are saved.
▸ Press the sensor button.
– The operation starts.
Starting favourites
▸ Press the sensor button.
▸ Select .
– The operating mode summary appears in the display.
▸ Press the sensor button.
– The operation starts.
19
Page 20

5 Operating modes
5.3 Microwave
Power range
Recommended value
Accessories
Foods and liquids are heated using microwaves.
Uses
▪ Precooked foods
▪ Frozen and convenience foods
▪ Liquids
Preparing eggs:
▸ Crack open the eggs and beat them before cooking.
▸ For fried eggs: Prick the yolk before cooking
50–1000 W
650 W/5 min
▸ Turn or stir foods, if possible, halfway through the cooking time.
Use a fork to prick the skin or peel of foods such as potatoes, tomatoes, sausages, shellfish or similar.
Otherwise, the steam that is produced will be unable to escape and
may cause the food to explode.
Note on use
Please follow the
Porcelain, ceramic and earthenware dishes with cavities – which can
fill with water – can crack. Follow the manufacturer’s instructions.
Suitable for microwave and combi mode
Not suitable for microwave and combi mode
20
safety precautions
.
Page 21

5 Operating modes
Particularly suitable for microwave and combi mode
▪ Glass
▪ Porcelain
▪ Microwaveable plastic
▪ Silicon baking mould
Permitted for microwave mode
▪ Aluminium packaging for convenience foods
▸ Follow the manufacturer’s instructions
Forbidden for microwave mode
▪ Cast iron pots
▪ Metal cookware
▪ Aluminium foil
▪ Baking trays
▪ Cookware with gold rim or metal decor
▪ Meat thermometer
Tips for microwave mode
Do not switch the microwave on until you have put the food in the
cooking space.
▸ Cover food when using the microwave mode to prevent it from drying out.
Suitable covers include microwave food covers, glass or porcelain covers
and microwaveable films.
The cooking space can become damp when using the microwave mode. To
avoid unpleasant odours and corrosion in the cooking space, please observe
the following:
▸ Cover liquid and steaming foods.
▸ Wipe the cooking space with a damp cloth at the end of cooking.
▸ Leave the appliance door open in the at-rest position at the end of cooking
until the cooking space has cooled down.
21
Page 22

5 Operating modes
5.4 CombiCrunch
Recommended duration 2 min
Accessories
Use the CombiCrunch plate exclusively.
Risk of burns! The cooking space and the CombiCrunch plate get very
hot.
Always use the supplied CombiCrunch grip or an oven cloth to remove the CombiCrunch plate.
Do not place the hot CombiCrunch plate on heat-sensitive surfaces.
In CombiCrunch mode, the cooking space heats up using a combination of
the grill and microwaves with a fixed microwave power level. The
CombiCrunch plate browns and crisps up the food.
▸ Arrange the food directly on the CombiCrunch plate.
Uses
▪ Frozen convenience food, e.g. pizza, chips, fish fingers, chicken nuggets
22
▸ Preheat the CombiCrunch plate for 3minutes. This makes the food
even crispier.
Use a fork to prick the skin or peel of foods such as potatoes, tomatoes, sausages, shellfish or similar.
Otherwise, the steam that is produced will be unable to escape and
may cause the food to explode.
Page 23

5.5 Grill
Risk of damage to the appliance!
Do not use silicone dishes.
Recommended duration 15 min
Accessories
The cooking space is heated by the grill element.
The food quickly gets a crispy, brown crust on top.
Uses
▪ Gratinating
▪ Toasting
▸ Place the food to be grilled directly on the wire rack.
▸ Place a plate under the wire rack to catch food
particles and condensate.
5 Operating modes
Use a fork to prick the skin or peel of foods such as potatoes, tomatoes, sausages, shellfish or similar.
Otherwise, the steam that is produced will be unable to escape and
may cause the food to explode.
23
Page 24

5 Operating modes
5.6 Grill combi mode
Risk of damage to the appliance!
Only use a glass or porcelain dish, never a metal or silicone dish.
Power range 50–650 W
Recommended value 350 W/15 min
Accessories
In the combi mode, food is also cooked with microwaves which shortens the
cooking time. Unlike CombiCrunch, the microwave power level can be set individually.
Uses
▪ Fast browning and gratinating, e.g. for baked potatoes or vegetables
Use a fork to prick the skin or peel of foods such as potatoes, tomatoes, sausages, shellfish or similar.
Otherwise, the steam that is produced will be unable to escape and
may cause the food to explode.
24
Page 25

6 Operating the appliance
The different menus are selected by pressing the corresponding sensor buttons. Selected sensor buttons and functions are illuminated in white; all other
sensor buttons are illuminated in orange.
The following sensor buttons are available with the following menus:
Operating modes
AutomaticPlus
Timer
Start
Back
Microwave power level setting
Time
Switch off
Adjusting knob functions
Press ▪ Switching on the appliance
▪ Selecting/opening a submenu, setting, etc.
▪ Confirming/closing a message
▪ Activating/deactivating a user setting
Turn ▪ Navigating within the submenus
▪ Changing/setting a value or user setting
Return to the previous operating level at any time by pressing the
sensor button.
6.1 Selecting and starting the operating mode
Risk of burns when heating liquids in the microwave!
When liquids such as milk are heated in a microwave, delayed boiling
can occur, and disturbing the vessel, even slightly, can cause the liquid to erupt.
► To prevent this delayed boiling, always place a teaspoon in the
vessel with the liquid before heating. Stir the liquid halfway
through.
▸ If the appliance is switched off, first press the adjusting knob.
– All the sensor buttons are illuminated.
25
Page 26

6 Operating the appliance
3UHVVVWDUW궇
곗:
굙K굚
▸ Press the sensor button.
– The selection of operating modes appears in the display.
▸ Select the desired operating mode.
– The microwave power level setting (in watts) appears in the display.
▸ Set the desired microwave power level by turning the adjusting knob and
pressing to confirm.
– The duration appears in the display.
▸ Set the desired duration and confirm.
– If the duration is 20minutes or less, the setting for the end time ap-
pears in the display. This allows a delayed start to be set.
If a delayed start has been set, the appliance starts later on.
▸ If you wish, set the desired end time and con-
firm.
– The settings summary is displayed, e.g.:
▸ To start the selected operating mode, press
the sensor button.
– The operating mode starts.
– If a delayed start has been set, the appli-
ance remains switched off until the automatic start.
With a delayed start, the settings summary remains visible for
3minutes, then the display goes out. The and sensor buttons
are illuminated in white; the sensor button is illuminated in orange.
6.2 Changing the microwave power level
The microwave power level cannot be changed during an automatic
programme.
To change the microwave power level during operation:
▸ Press the sensor button.
– The current microwave power level is displayed.
▸ Use the adjusting knob to set the required value and confirm.
– The operating mode summary appears in the display.
26
Page 27

6 Operating the appliance
6.3 Changing the operating mode
The operating mode selected cannot be changed during operation.
If no operating mode is running:
▸ Press the or sensor button.
– The operating modes menu is displayed.
If an operating mode is already running:
▸ Press the sensor button.
– The selected operating mode is aborted and the appliance is switched
off.
▸ Press the adjusting knob and select another operating mode.
6.4 Changing the duration
The duration cannot be changed for automatic programmes.
To change the duration during a running operating mode:
▸ Press the sensor button.
– The duration remaining is displayed.
▸ Change the duration by turning the adjusting knob and pressing to confirm.
– The summary of the running operating mode appears in the display.
Or:
▸ Press the sensor button.
– Each press extends the duration by 30 seconds.
Or:
▸ Turn the adjusting knob.
– The duration is extended in the display.
If no further settings are made after 5 seconds, the displayed value is
confirmed and the summary of the running operating mode is displayed again.
27
Page 28

6 Operating the appliance
6.5 Timer
The timer functions like an egg timer. It can be used at any time and independently of all other functions when the appliance is switched on.
Setting and starting the timer
▸ Press the sensor button.
▸ Turn the adjusting knob and set the required duration.
The timer can be set for:
▪ Up to 10 minutes in 10-second intervals, e.g. 9minutes and 50seconds.
▪ Over 10 minutes in 1-minute intervals, e.g. 1hour and 12minutes.
The maximum timer duration that can be set is 9 hours and 59 minutes.
▸ Press the adjusting knob to confirm.
– The timer starts.
– The countdown to the time remaining is visible in the digital display.
– The sensor button is illuminated in white.
When the timer finishes
When the set duration is up:
– An acoustic signal is emitted for 1 minute.
– The display says «Timer finished».
▸ Confirm the message and switch off the acoustic signal by pressing the ad-
justing knob or a sensor button.
Checking and changing
▸ Press the sensor button.
– The time remaining flashes in the digital display.
▸ Turn the adjusting knob to change the duration of the timer.
▸ Press the adjusting knob to confirm.
Switching off before time
▸ Press the sensor button.
– The time remaining flashes in the digital display.
▸ Press the sensor button again or turn the adjusting knob to set the count-
down to the time remaining to 0.
▸ Press the adjusting knob to confirm.
28
Page 29

6 Operating the appliance
(QGRIRSHUDWLRQ
곗 :
굙
6.6 Interrupting
All operating modes can be interrupted by opening the appliance door. The
settings are maintained for 3minutes. This means the food can be checked,
turned or stirred.
6.7 Continuing
▸ Close the appliance door.
▸ Press the sensor button 1×.
Operation is continued.
If the sensor button is pressed repeatedly, each touch of the button
lengthens the cooking time by 30seconds (does not apply to automatic programmes).
6.8 Aborting the operation
▸ Press the sensor button.
– The operating mode is aborted and all settings are cleared.
– An acoustic signal is emitted.
– The appliance switches off.
▸ Open the appliance door and remove the food.
6.9 End of operation
▪ When the set duration is up:
– The operating mode ends automatically.
– An acoustic signal is emitted.
– The following appears in the display, e.g.:
▸ Confirm the message and switch off the acoustic signal by pressing the ad-
justing knob or a sensor button.
▸ Open the appliance door and remove the cooked food.
The accessories get hot. Use protective gloves or the CombiCrunch
grip.
Risk of burns when heating liquids in the microwave!
► Leave liquids to stand briefly after heating and stir them before
consuming.
29
Page 30

6 Operating the appliance
The cooling fan can continue to run for a short period.
Extending operation
▸ Press the sensor button once or several times up to 3minutes after the
end of operation.
– The operating mode is extended by 30 seconds each time.
Or:
▸ Press the sensor button.
– The duration appears in the display.
▸ Set the desired duration and confirm.
▸ Press the sensor button.
Or:
▸ Press the sensor button.
– The current microwave power level is displayed.
▸ Set the required value and confirm.
▸ Set the duration and confirm.
▸ Press the sensor button.
6.10 Switching the appliance off
▸ Press the sensor button.
– An acoustic signal is emitted.
– The display and all sensor buttons go out.
The appliance is switched off if none of the sensor buttons are illuminated any more and the display is dark.
The cooling fan can continue to run.
30
Page 31

7 AutomaticPlus
With «AutomaticPlus» , food can be prepared quickly and easily. The duration, preparation method and possible accessories are recommended automatically depending on the desired technique.
Neither a duration nor a delayed start can be set.
No settings can be changed during operation.
Follow the advice in the tips on settings.
7.1 Overview
Automatic programmes
PerfectDefrost Cooking
Reheating Melting
Crispy baking Softening
Accessories
The possible accessories required are displayed before the start of an automatic programme in the settings summary:
Food cover
CombiCrunch plate
PerfectDefrost
«PerfectDefrost» is used for defrosting food. The following food groups can
be selected:
Symbol Food group Weight Accessories
Meat 100–2000 g
Chicken 100–2500 g
Fish 100–2000 g
Vegetables 100–2000 g
Bread 100–1000 g
–
31
Page 32

7 AutomaticPlus
Reheating
Foods are heated up using microwaves in the «Reheating» setting. The following types of food can be selected:
Symbol Type of food Weight Accessories
Plated meal 250–500 g
Frozen plated meal 250–500 g
Soup 200–800 g
Crispy baking
The following foods can be prepared using the «Crispy baking» automatic
programme:
Symbol Type of food Weight Accessories
Chips 200–500 g
Country fries 200–500 g
Pizza 300–800 g
Chicken wings/
200–600 g
chickennuggets
Quiche 200–800 g
Cooking
The «Cooking» automatic programme can be used to cook food automatically and to prepare popcorn. The following types of food can be selected:
Symbol Type of food Weight Accessories
Baked potatoes 200–1000 g
Fresh vegetables 200–800 g
Frozen vegetables 200–800 g
Tinned vegetables 200–600 g
Popcorn 90–100 g -
Risk of damage to the appliance from sparks! Do not place tin cans
in the cooking space!
Always empty vegetables from a tin can onto a plate or into a bowl
before placing them in the cooking space.
32
Page 33

7 AutomaticPlus
Melting
The «Melting» programme can be used to melt 50–250g of butter/margarine or chocolate .
▸ Cut the butter into small pieces and place on a plate. Turn or stir halfway
through.
▸ Break the chocolate into small pieces and place on a plate. Turn or stir
halfway through.
Softening
The «Softening» programme can be used to soften 50–250g of butter/margarine or 250–1000g of ice cream , e.g. for further processing in cakes
or desserts.
▸ Turn or stir halfway through.
7.2 Selecting and starting automatic programme
The cooking space must be cool, otherwise the required cooking time
cannot be calculated correctly.
▸ If the appliance is switched off, first press the adjusting knob.
▸ Press the sensor button.
▸ Select the required automatic programme.
▸ Select the food group if necessary.
▸ Specify the weight or quantity if necessary.
– The summary of the operating mode and any accessories that should
be used is displayed.
▸ Press the sensor button.
In some automatic programmes, an acoustic signal is emitted during operation
and a prompt to stir or turn the food is displayed. The duration does not continue to run.
▸ Open the appliance door, take out the food and stir or turn it.
▸ Close the appliance door.
▸ Press the sensor button.
If the appliance door is not opened within 2 minutes of the message,
operation is aborted and the appliance switches itself off.
33
Page 34

8 Tips and tricks
8.1 Tips on settings
Symbols used
Operating mode
Microwave power level
min
Operating modes
Optimal usage
The microwave power level readings (in watts), the required accessories and
the levels listed in recipe books are not always the most ideal choices for this
appliance. In the following tables, you can find the specifications for both optimal usage and suitable dishes.
▸ Always place the food in the centre of the glass turntable.
▸ Cover liquid or steaming food – unless it should remain crispy.
▸ Add a little liquid when heating food so that it doesn't dry out.
▸ Stir the food or turn it over halfway through time.
Duration in minutes
.
Accessories
Microwave Grill
CombiCrunch Grill combi mode
Lots of small portions will heat up quicker and more evenly than one
large portion.
34
Page 35

8 Tips and tricks
Suitable accessories
Follow the «Safety precautions» section in the operating instructions.
Porcelain, ceramic and earthenware cookware with cavities – which
can fill with water – can crack. Follow the manufacturers' instructions.
Always use the turntable roller and the glass turntable in combination
with the other accessories.
Accessories Note
CombiCrunch plate - ✓ - -
Wire shelf - - ✓ ✓
Food cover ✓ - - -
Porcelain without metal
✓ - ✓ ✓
Included in the scope
of delivery
parts or metallic decoration
Heat-resistant glass ✓ - ✓ ✓
Microwaveable plastic ✓ - - -
Microwaveable cling film ✓ - - -
Silicon baking mould ✓ - - -
Follow the manufactur-
ers' instructions
Metal bakeware - - ✓ -
Ready meal packaging ✓ - - -
Meat thermometer - - - -
35
Page 36

8 Tips and tricks
Heating up
Quantity W
min
Milk * 2 dl 650 1 ½–2 ‑
Beverage * 2 dl 800 1 ½–2 ‑
Plated meal ** 300g 800 2 ½–3
550g 800 4–5
Soup * 3–5 dl 800 2–6 ‑
Lasagne, baked
400–500g 800 5–6
dish, gratin **
Pasta **' *** 200–300g 800 2–3
Rice **' *** 150–300g 800 1 ½–3
Vegetables 250–400g 800 1 ½–3
▸ After heating, leave to stand for about 2 minutes.
* ▸ When heating liquids, place a teaspoon in the vessel to prevent
delayed boiling.
** ▸ Turn halfway through time.
*** ▸ Add liquid.
36
Page 37

Defrosting
8 Tips and tricks
Quantity W
min
Sausages * - 150 5–8
Minced meat * 500g 150 10–15
Joint of meat * 800g 150 18–25
Chicken parts * 600g 150 12–20
Fish * 400g 150 7–10
Spinach * 300g 150 6–8
Berries 200 g 150 4–5
Bread loaf 500g 150 6–7
Bread bun 4 pieces of 50g 150 2–3
▸ When freezing, use as shallow a container as possible.
▸ To defrost completely, leave to stand for about 4 minutes after the end
of defrosting.
* ▸ Turn halfway through time.
Defrosting and cooking simultaneously
Quantity W
min
Pizza 300–350g ‑ 6–8
‑
Hamburgers 2–4 pieces ‑ 5–8
Fish fingers 200–300g ‑ 5–7
Chicken nuggets* 200–600g ‑ 6–12
Chips 400 g ‑ 15–16
Mixed vegetables ** 200–500g 800 4–8
Fruit compote 200–400g 650 4–7
Lasagne 400 g 650 13–17
▸ For frozen convenience food, follow the manufacturers' recommenda-
tions.
* ▸ Preheat the empty CombiCrunch plate for 3 minutes.
** ▸ Turn halfway through time.
‑
37
Page 38

8 Tips and tricks
Cooking of meat, poultry, fish
Meat
Quantity W
min
Roast pork 1 kg ‑ 20
Roast veal 1 kg ‑ 15–18
Pork chop 1 kg
(thick)
1 kg
‑
22–24
18–20
(thin)
Haunch of
1 kg ‑ 20–25
lamb
Roast beef 1 kg
10–12
(rare)
1 kg
‑
12–14
(medium)
1 kg
14–16
(well-done)
Sausages 200–400 g ‑ 4–8
Brochette (ke-
600 g ‑ 12–15
bab)
Chicken, whole
portions
1,2 kg
600 g
‑ 20–25
16–18
Chicken breast 125–300 g ‑ 7–10
▸ Depending on the piece of meat, turn halfway through the cooking time.
▸ Allow to stand for 10–15 minutes after cooking.
▸ After cooking chicken, allow the food to stand for about 3 minutes.
38
Page 39

Fish
Quantity W
min
Whole fish 500–800 g ‑ 10–15
Fillet of fish 400–500 g ‑ 3–6
8 Tips and tricks
.
Salmon 2 slices
‑ 22–24
(à 200 g)
Fillet of
400 g ‑ 20–25
Dover sole
Trout 2 slices
(à 200 g)
2 slices
650
5–7
8–11
(à 400 g)
Squid 650 g ‑ 7–9
Crab 500 g 500 7–8
▸ Liquid, e.g. stock or wine, may be added.
▸ Allow to stand for about 3 minutes after cooking.
39
Page 40

8 Tips and tricks
Cooking of fresh vegetables
Quantity W
Broccoli * 300–
500g
Cauliflower * 300–
500g
Carrots * 300–
400g
Tomatoes ** 400 g 800 2–3
Aubergines 400 g ‑ 6–8
Sweet peppers 2–4 pieces ‑ 10–15
Courgettes 250 g ‑ 3–5
Chopped potatoes *
Baked potatoes**1 piece of
* ▸ Turn halfway through time.
** ▸ Before cooking, prick with a fork. Turn halfway through time.
250–
500g
250g
800 5–8
800 3–8
800 3–8
‑ 8–18
‑ 7–8
min
Popcorn
Quantity W
Popcorn 100g 900 2½ ‑
min
▸ Follow the manufacturers' instructions.
8.2 Uneven browning
Result Solution
▪ The food has browned un-
evenly.
Some uneven browning is normal.
40
▸ For check whether the selected accessory
complies with the tips on settings further on
in the document.
▸ Do not push baking tins or bulky food right
to the back of the cooking space.
Page 41

9 User settings
9.1 Selecting user settings
The following user settings can be changed:
Language Temperature unit
Childproof lock Time format
Time display Contrast
Illumination Factory settings
Acoustic signal
9.2 Adjusting user settings
You can adjust the user settings:
▸ When the appliance is switched off, hold the adjusting knob depressed for
5 seconds.
Or:
▸ When the appliance is switched on, press the sensor button until the dis-
play goes black. Press and hold the adjusting knob down for 5 seconds.
– The user settings menu appears in the display.
▸ Select the required user setting, make the setting and
confirm.
– The user settings menu appears in the display.
▸ To exit the user settings, press the sensor button.
– The appliance switches off.
The user settings are retained in the event of a power failure.
9.3 Language
The language in the display can be changed. Different languages are available
for selection.
41
Page 42

9 User settings
9.4 Childproof lock
The childproof lock prevents an operating mode from being started accidentally. When you try to start an operating mode, an acoustic signal is emitted
and the message «Childproof lock» appears in the display.
The childproof lock is activated:
▪ When the appliance is switched on
▪ 1minute after the appliance door has been closed if no operating mode
starts and neither a sensor button nor the adjusting knob is pressed
▪ 4minutes after the end of operation
All of the sensor buttons except for can be pressed at any time.
Deactivating the childproof lock
▸ Open the appliance door and close it again.
Acknowledging the message «Childproof lock»
▸ Press any sensor button or the adjusting knob.
9.5 Clock functions
The time cannot be changed if an operating mode is running or if a
delayed start has been set.
The time is not displayed if a timer has been set or if the user setting
«Time display» «Invisible» has been activated.
Setting the time
▸ If the appliance is switched off, first press the adjusting knob.
▸ Press the sensor button.
– The current time is displayed. The hours flash.
▸ Set and/or confirm the hours.
– The minutes flash in the display.
▸ Set and/or confirm the minutes.
– The time is shown in the digital display.
– The operating modes menu appears in the display.
The settings are not saved if the or sensor buttons are pressed
while making the settings.
42
Page 43

9 User settings
After a power failure
After a power failure, the time must be set before the appliance can
be operated normally again.
– The sensor button is illuminated in white.
– flashes in the digital display.
▸ Set the time and confirm.
Time display
With the «Visible» setting (factory setting), the time is dimmed between 00:00
and 06:00 (24-hour format) and 12:00a.m. and 06:00a.m. (12-hour format).
With the «Invisible» setting, the time is never displayed.
To reduce power consumption to a minimum, select «Invisible» in the
user settings. Despite automatic energy-saving stand-by, all safety features are active.
9.6 Illumination
There are 3 possible settings:
«With appliance
A
door»
«With appliance
B
door and during
operation»
«No illumination» The illumination is always switched off.
C
The illumination is switched on when the appliance
door is opened and switched off when the appliance door is closed.
The illumination is switched on during operation
and when the appliance door is opened.
The illumination switches off automatically 3
minutes after the end of an operating mode or the
last time the door is opened.
9.7 Acoustic signal
The acoustic signal can either be switched on or off.
An acoustic signal is emitted when there is a fault or when the appliance is switched off – even if the setting is set to «Off» (safety function).
9.8 Temperature unit
The temperature can be displayed in «°C» or «°F».
▪ °C: Degrees Celsius
▪ °F: Degrees Fahrenheit
43
Page 44

9 User settings
9.9 Time format
The time can be displayed in the European 24-hour time format or the US
12‑hour format (a.m./p.m.).
9.10 Contrast
With this function, the readability of the display can be adjusted based on how
the appliance is installed.
9.11 Factory settings
If one or more user settings have been changed, these can be reset to the
factory settings.
44
Page 45

10 Care and maintenance
Risk of burns from hot surfaces!
Allow the appliance and the accessories to cool down before cleaning
them.
Risk of leaking microwaves!
Regularly check the appliance door, the door seal and the door lock.
If these parts are damaged, do not use the appliance any more.
Improper use can result in damage to the appliance!
Do not use scouring or acidic cleaning agents, sharp or scouring
metal scrapers, steel wool, scouring pads, etc. These products will
scratch the surfaces. Glass surfaces that are scratched can crack.
Never use a steam cleaner to clean the appliance.
10.1 Cleaning the exterior
▸ Remove any soiling or excess cleaning solution immediately.
▸ Clean the surfaces with a soft cloth dampened with water and a little wash-
ing-up liquid – for metallic surfaces rub in the direction of the original polish
lines. Dry with a soft cloth.
10.2 Cleaning the appliance door
Under no circumstances may the appliance door be removed, otherwise the protection against leaking microwaves is no longer guaranteed.
Do not use abrasive cleaning agents or cleaning aids such as steel
wool, knives, glass scrapers, razor blades, etc. to clean the door
glass. Scratches on the door glass could cause a breakage.
▸ Clean the appliance door with a soft cloth dampened with water and a little
washing-up liquid.
▸ Wipe dry with a soft cloth.
Remove cleaning products from the door seal and trim kit immediately.
Risk of damage to plastic. Protection from leaking microwaves is not
guaranteed if the seals are damaged.
45
Page 46

10 Care and maintenance
10.3 Cleaning the door seal
▸ Clean the door seal with a soft cloth dampened with water, but do not use
any cleaning agent.
▸ Wipe dry with a soft cloth.
10.4 Cleaning the cooking space
Always replace the turntable roller and glass turntable after cleaning.
Do not use oven cleaner or any other abrasive cleaning agents. Do
not use scouring pads, wire wool, etc., as such products will damage
the surface.
▸ Take all accessories out of the cooking space before cleaning.
▸ Clean the cooking space regularly, especially when food has been spilt. Im-
mediately clean away grease splashes or food residue.
▸ Remove any soiling from the cooking space while still warm to the touch us-
ing a soft cloth dampened with water and a little washing-up liquid. Wipe dry
with a soft cloth.
▸ For stubborn dirt deposits heat up a glass of water at maximum microwave
power level for 2–3minutes. The steam that is produced will soften the soiling.
▸ To eliminate unpleasant odours, heat up a glass of water with lemon juice
for 2–3minutes at maximum microwave power level.
46
Page 47

10 Care and maintenance
10.5 Cleaning the accessories
Allow the glass turntable and the CombiCrunch plate to cool down before cleaning. Never immerse the CombiCrunch plate when still hot in
detergent water or hold it under running water to it cool down. Cooling
down the plate quickly can damage it. Do not use abrasive scouring
pads, wire wool, etc. since they damage the surface.
The following accessories can be cleaned in the dishwasher:
▪ Turntable roller
▪ Glass turntable
▪ Food cover
▪ CombiCrunch grip
▪ Wire shelf
The CombiCrunch plate must not be cleaned in the dishwasher. This
could damage the coating.
▸ Clean the CombiCrunch plate with a mild cleaning agent, water and a
sponge.
10.6 Replacing the light bulb
For safety reasons, our Customer Services must be contacted in the case of a
defective light bulb.
47
Page 48

11 Trouble-shooting
11.1 What to do if ...
This section lists faults that can be solved simply by following the instructions
given. If another fault is displayed or the fault cannot be remedied, please call
Customer Services.
Before calling Customer Services, please note down the error message in full as well as the serial number (FN) of your appliance.
The serial number can be found on the identification plate.
… the appliance is not working
Possible cause Solution
▪ A household fuse or circuit
breaker has tripped.
▪ The fuse or circuit breaker
keeps blowing.
▪ An interruption in the
mains power supply.
▪ The appliance is faulty. ▸ Call Customer Services.
… the appliance was switched on without any food in it
Possible cause Solution
▸ Change the fuse.
▸ Reset the circuit breaker.
▸ Call Customer Services.
▸ Check the power supply.
The appliance will be undamaged if only
switched on for a short time.
▸ Do not switch appliance on without any food
in it.
… a scratching noise can be heard when the appliance is switched on
Possible cause Solution
▪ Cooking space floor and
turntable roller are soiled.
48
▸ Clean the floor of the cooking space and the
turntable roller regularly.
Page 49

11 Trouble-shooting
... the appliance is causing interference with television or radio reception
Possible cause Solution
▪ Appliance is not defective. When in use, it
can cause interference with television or
radio reception. This is a similar kind of
interference to that caused by small electrical appliances (mixers, vacuum cleaners, etc.).
… hot air flows out of the appliance during microwave operation
Possible cause Solution
▪ Normal functional state. The heat emitted
by the food warms the air in the cooking
space. This is then discharged to the outside. The heated air contains no microwaves.
... the appliance switches off prematurely
Possible cause Solution
▪ Appliance is overheated. ▸ Check ventilation slots. These must be freely
accessible.
▪ Ventilation slots are ob-
structed.
▸ Remove any obstructions from the ventilation
slots.
▸ Wait for the appliance to cool down.
▸ Restart the appliance.
▸ If the appliance still switches off prematurely,
contact Customer Services.
▸ Ventilation slots must be kept
unobstructed.
11.2 After a power failure
After a power failure, the sensor button illuminates and flashes in the
digital display.
▸ Setting the time (see page 42).
The user settings remain unchanged.
49
Page 50

12 Accessories and spare parts
Please give model number of the appliance and exact description of the accessory or spare part when ordering parts.
Turntable roller
Glass turntable
Food cover
CombiCrunch plate
CombiCrunch grip
Wire shelf
50
Page 51

13 Technical data
1
Dimensions
▸ See installation instructions
Electrical connection
▸ See identification plate
13.1 Temperature measurement
The temperature of the cooking space is measured when the cooking space is
empty according to an internationally accepted standard. Own measurements
can be imprecise and are not suitable for checking the accuracy of the temperature.
13.2 Automatic energy-saving stand-by
The appliance is equipped with automatic energy-saving stand-by to avoid
consuming energy unnecessarily.
To reduce power consumption to a minimum, select «Time display» «
invisible» in the user settings. Despite automatic energy-saving standby, all safety functions remain active.
1
51
Page 52

14 Index
A
Aborting the operation ................................. 29
Accessories ..................................... 11, 17, 50
Acoustic signal .............................................. 43
Ambient temperature ................................... 18
Appliance door
Cleaning.............................................. 45
Automatic programme
Starting ................................................ 33
Automatic programmes ............................... 31
AutomaticPlus................................................ 31
B
Before using for the first time....................... 8
C
Care................................................................. 45
Changing
Duration............................................... 27
Microwave power level..................... 26
Operating mode ................................ 27
Changing the duration ................................. 27
Childproof lock .............................................. 42
Cleaning.......................................................... 45
Accessories........................................ 47
Appliance door .................................. 45
Cooking space ..................................46
Door seal ............................................ 46
Combi mode
With grill .............................................. 24
CombiCrunch
Grip ............................................... 17, 50
Plate .......................................12, 17, 50
Continuing ...................................................... 29
Contrast .......................................................... 44
Cooking .......................................................... 32
Cooking space
Temperature measurement ............. 51
Cookware ....................................................... 12
Crispy baking................................................. 32
D
Defrosting ....................................................... 31
Delayed start.................................................. 26
Dimensions .................................................... 51
Disconnection................................................ 13
Disposal.......................................................... 13
Door seal
Cleaning.............................................. 46
Duration .......................................................... 26
E
Electrical connection .................................... 51
End of operation ........................................... 29
Extending operation ..................................... 30
Exterior
Cleaning.............................................. 45
F
Factory settings............................................. 44
Faults............................................................... 48
Favourite ......................................................... 19
Saving.................................................. 19
Setting ................................................. 19
Starting ................................................ 19
Food cover....................................... 12, 18, 50
G
Glass turntable ................................ 11, 17, 50
Grill .................................................................. 23
Combi mode ...................................... 24
I
Identification plate......................................... 51
Illumination ..................................................... 43
Initial set-up ...................................................... 8
Installation ...................................................... 18
Instructions for use ......................................... 8
Interrupting ..................................................... 29
L
Language........................................................ 41
Light bulb........................................................ 47
52
Page 53

14 Index
M
Maintenance .................................................. 45
Melting ............................................................ 33
Microwave ...................................................... 20
Note on use........................................ 20
Tableware ........................................... 20
Tips ...................................................... 21
Model number ................................................. 2
N
Notes............................................................... 54
O
Operating and display elements................ 15
Operating modes
Changing ............................................ 27
CombiCrunch..................................... 22
Grill....................................................... 23
Operation........................................................ 25
P
Packaging ...................................................... 13
PerfectDefrost................................................ 31
Power failure .................................................. 49
Product family.................................................. 2
R
Radio interference ........................................ 49
Reheating ....................................................... 32
T
Technical data ............................................... 51
Technical questions...................................... 55
Television interference ................................. 49
Temperature unit........................................... 43
Time
Setting ................................................. 42
Time display................................................... 43
Time format .................................................... 44
Timer ............................................................... 28
Touch buttons................................................ 15
Turntable roller ................................ 11, 17, 50
Type................................................................... 2
U
Uneven browning.......................................... 40
User settings.................................................. 41
Adjusting ............................................. 41
Selection ............................................. 41
Using for the first time.................................. 14
V
Validity............................................................... 2
Ventilation fan ................................................ 18
W
Warranty extensions ..................................... 55
Wire rack ........................................................ 12
Wire shelf................................................. 18, 50
S
Safety .............................................................. 13
Safety precautions
Appliance-specific ................................7
Before using for the first time ............8
Correct use............................................8
General...................................................6
Scratching noise ........................................... 48
Selecting the operating mode .................... 25
Service & Support......................................... 55
Softening......................................................... 33
Spare parts .................................................... 50
Stand-by.......................................................... 51
Symbols ............................................................ 5
53
Page 54

Notes
54
Page 55

15 Service & Support
The «Troubleshooting» chapter provides valuable information for dealing with
minor operating faults. This saves you the time, effort and potential cost of having
to call out a service technician.
Information on the V-ZUG warranty can be found at www.vzug.com →Service →Warranty information. Please read this information carefully.
Please register your V-ZUG appliance online immediately at www.vzug.com →Service
→Warranty registration. This will allow you to take advantage of the best possible support
in the event of an fault in the appliance during the warranty period. You will require the
serial number (FN) and appliance designation to complete the registration process. This
information can be found on the identification plate for your appliance.
My appliance information:
FN:
___________________
Always have this appliance information to hand when you contact V-ZUG. Thank you.
▸ Open the appliance door.
– The identification plate is located to the left above the cooking space.
Appliance
: _____________________
Your repair order
At www.vzug.com →Service→Service number you will find the telephone number of your
nearest V‑ZUG service centre.
Technical questions, accessories, warranty extensions
V-ZUG is happy to help you with any general administrative or technical queries, to take
your orders for accessories and spare parts and to inform you about our progressive ser-
vice agreements.
55
Page 56

Quick instructions
Please first read the safety precautions in the operating instructions.
▸ If the appliance is switched off, first press the adjusting knob.
Setting the time
▸ Press the touch button.
▸ Turn the adjusting knob to set the hours and press to confirm.
▸ Use the adjusting knob to set the minutes and confirm.
Selecting and starting the operating mode
▸ Press the touch button.
▸ Select the operating mode and adjust the settings.
▸ Press the touch button.
Switching the appliance off
▸ Press the touch button.
Setting the timer
▸ Press the touch button.
▸ Set the hours and minutes and confirm.
V-ZUG Ltd, Industriestrasse 66, CH-6301 Zug
info@vzug.com, www.vzug.com
J24005352-R05
400011043587
 Loading...