

Page 1
Operating instructions
GKD46TIMASZO | Fusion
Induction hob with integrated range hood
Page 2

Thank you for choosing to buy one of our products. Your appliance is made to high
standards and is easy to use. Nevertheless, please take the time to read these operating
instructions in order to familiarize yourself with the appliance and get the best use out of
it.
Please follow the safety precautions.
Modifications
Text, diagrams and data correspond to the technical standard of the appliance at the
time these operating instructions went to press. The right to make technical modifications
for the purpose of the further development of the appliances is reserved.
Validity
The model number corresponds to the first alphanumerics on the identification plate.
These operating instructions apply to:
Model designation Model number Type
Fusion 31094 GKD46TIMASZO
Variations depending on the model are noted in the text.
Colour operating instructions can be downloaded from the internet from www.vzug.com.
© V-ZUG Ltd, CH-6302 Zug, 2018
2
Page 3

Contents
1 Safety warnings 4
1.1 Symbols used......................................................... 4
1.2 General safety precautions.................................. 4
1.3 Appliance-specific safety precautions ............... 5
1.4 Instructions for use................................................ 5
2 Using for the first time 9
3 Appliance description 9
3.1 Appliance overview ............................................... 9
3.2 Operating and display elements......................... 9
3.3 How induction hobs function............................. 10
3.4 Flexible cooking...................................................10
3.5 Pan detection .......................................................10
3.6 Cookware ..............................................................10
3.7 Range hood..........................................................12
4 General operation 13
5 Operating the hob 13
5.1 Switching the appliance on ...............................13
5.2 Setting the power level for a cooking zone....13
5.3 Overview of power levels ................................... 14
5.4 Switching a cooking zone off ............................ 14
5.5 Residual heat indicator....................................... 14
5.6 Power management ............................................ 15
5.7 PowerPlus .............................................................15
5.8 Operating time .....................................................15
5.9 Cooking functions................................................17
5.10 Easy cooking........................................................18
5.11 Timer ...................................................................... 20
5.12 Pause cooking .....................................................21
5.13 Wipe protection....................................................22
5.14 Recall function......................................................22
6 Operating the range hood 23
6.1 Switching the range hood on manually........... 23
6.2 Power level "P" ..................................................... 23
6.3 Switching the range hood off ............................ 23
6.4 OptiLink..................................................................23
6.5 CleanAir.................................................................24
6.6 After-running time .................................................25
6.7 Filter.........................................................................25
7 User settings 26
7.1 Childproof lock......................................................26
7.2 Languages .............................................................27
7.3 Brightness ..............................................................27
7.4 Loudness................................................................27
7.5 Button signal..........................................................28
7.6 Ventilation...............................................................28
7.7 Factory setting.......................................................28
8 Care and maintenance 29
8.1 Glass ceramic surfaces.......................................29
8.2 Range hood ...........................................................30
9 Trouble-shooting 32
10 Accessories and spare parts 35
11 Technical data 35
11.1 Hob..........................................................................35
11.2 Range hood ...........................................................35
12 Disposal 36
13 Index 37
14 Service & Support 39
3
Page 4
1 Safety warnings
1.1 Symbols used
Denotes important safety precautions.
Failure to observe said precautions
can result in injury or in damage to
the appliance or fittings!
Information and precautions that
should be observed.
Information on disposal
Information about the Operating Instructions
▸ Indicates step-by-step instructions.
– Describes how the appliance reacts
to the steps taken.
▪ Indicates a list.
1.2 General safety precautions
▪ Read the operating instruc-
tions before using the appliance for the first time!
Cleaning and user maintenance shall not be undertaken
by children without supervision.
▪ If an appliance is not
equipped with a mains cable
and a plug or other means for
disconnecting from the mains
with a contact opening on
each pole complying with the
conditions of overvoltage category III for full isolation, an
isolating device must be incorporated into the permanently installed electrical installation in accordance with the
installation regulations.
▪ If the mains cable of this ap-
pliance is damaged, it must
be replaced by the manufacturer or its Customer Services
or a similarly qualified person
in order to avoid hazard.
▪ This appliance can be used
by children aged 8 and above
and by persons with reduced
physical, sensory or mental
capabilities, or lack of experience and/or knowledge,
provided they are supervised
or have been instructed on
the safe use of the appliance
and have understood the hazards involved. Children shall
not play with the appliance.
4
Page 5

1.3 Appliance-specific safety precautions
▪ WARNING: Under no circum-
stances may hot pots or pans
be placed on the display.
▪ WARNING: If the surface is
cracked, switch the appliance
off and disconnect it from the
mains to avoid possible electric shock.
▪ Children under 8 years of age
must not operate the appliance, unless they are constantly supervised.
▪ WARNING: The appliance
and its accessible parts get
hot during use.
▪ Under no circumstances use
a steam cleaner to clean the
appliance.
▪ Do not place metal objects
such as knives, forks,
spoons, lids or aluminium foil
on the hob as they can get
hot.
▪ After use, switch the hob off
using the controls and do not
rely on the pan detector.
▪ WARNING: It can be danger-
ous to leave the hob unattended when cooking with fat or
oil, as this can lead to fires.
NEVER attempt to extinguish
a fire with water. Switch the
1 Safety warnings
appliance off. Try to smother
the flames with a pan lid or
fire blanket.
▪ WARNING: NEVER store ob-
jects on the hob due to the
risk of fire.
▪ WARNING: The cooking pro-
cess must be constantly supervised. A short cooking
process must be supervised
the whole time.
▪ Do not operate the appliance
using an external time switch
or a separate remote control
system.
1.4 Instructions for use
Before using for the first time
▪ The appliance must be installed and
connected to the electricity supply in
accordance with the separate installation instructions. Have a qualified fitter/
electrician carry out the necessary
work.
▪ Observe the official regulations for the
exhaust-air layout.
Correct use
▪ The appliance is designed for use in
the home for preparing food. No liability
is assumed for any damage caused by
improper use or incorrect handling.
▪ The appliance is designed for use in
the home for extracting cooking fumes
and smells from above the cooking surface.
▪ Any repairs, modifications or manipula-
tions to the appliance, especially any
electrically live parts, may only be carried out by the manufacturer, its customer service department or similarly
qualified persons. Repairs if carried out
incorrectly may cause serious injury,
5
Page 6

1 Safety warnings
damage to the appliance and fittings,
as well as affect the functioning of the
appliance. If the appliance is not working properly or in case of a repair order,
follow the instructions given in the Repair service section. Contact our Customer Services if necessary.
▪ Use original spare parts only.
▪ Retain these operating instructions for
future reference. If you sell the appliance or pass it on to a third party,
please ensure these operating instructions accompany the appliance, together with the installation instructions.
▪ The appliance corresponds to recog-
nized technology standards and the relevant safety regulations. However,
proper use of the appliance is essential
to avoid damage and accidents. Please
therefore follow the precautions given in
these operating instructions.
▪ The heated surface will remain hot for
some time after it is switched off and
will cool down only slowly to room temperature. Please allow sufficient time for
the appliance to cool down before, for
instance, cleaning it.
Children in the home
▪ Packaging materials, e.g. plastic film
and polystyrene, can be dangerous for
children. Danger of suffocation! Keep
packaging material away from children.
▪ The appliance is designed for use by
adults who are familiar with these operating instructions. Children may not always be aware of the danger involved
in using electrical appliances. Ensure
proper supervision and do not allow
children to play with the appliance –
there is a danger that children could
hurt themselves.
Caution: Burns hazard
▪ Overheated fat and oil can easily catch
fire. NEVER attempt to extinguish burning oil or fat with water. Danger of explosion! Smother the flames with a fire
blanket. Keep doors and windows
closed.
▪ The accessible surfaces of the hob can
get very hot when operated with pans in
place.
Caution: Risk of injury
▪ Use of unsuitable protective guards can
cause accidents.
▪ Keep pets away from the appliance.
Caution: Risk to life
▪ Packaging materials, e.g. plastic film
and polystyrene, can be dangerous for
children. Danger of suffocation! Keep
packaging material away from children.
How to avoid damaging the appliance
▪ Under no circumstances place hot pots
and pans on the display!
▪ In case of overheating, switch the hot-
plate off and allow it to cool down completely. Do not put any dishes on it. Under no circumstances use cold water to
cool it down quickly.
▪ Do not climb on to the appliance.
▪ Do not put hot cookware on the silicone
joints to prevent damaging them.
▪ Do not cut or prepare food on the sur-
face and avoid impact with hard objects. Do not drag cookware across the
surface.
▪ Take particular care that sugary foods
or juices do not get onto the hot cooking zones as this can damage the surface. If sugary foods or juices do get on
to the hot cooking zones clean away
immediately (while still hot) with a
scraper.
6
Page 7

▪ Pots with pure copper or aluminium
bases should not be used for cooking
as they can leave behind traces that
can be difficult to clean. If the traces
are not removed immediately after
cooking with a suitable cleaning agent,
they can be permanently burned on and
therefore permanently ruin the visual
appearance of the appliance.
▪ Sliding pans and cookware across the
glass ceramic causes scratches. This
can be largely prevented by lifting pans
and cookware up and then placing
them down in position.
▪ The hob is designed to be used – signs
of use, such as scratches or the wear
and tear from pans and cookware, are
normal. The more intensively it is used,
the greater the signs of use; however,
the appliance remains in perfect working order and therefore does not give a
right of complaint. Safety is guaranteed
at all times.
▪ There is no such thing as completely
scratch-proof glass; scratches can even
develop on sapphire glass, which is
used in watches. The glass ceramic
used is of the best quality available on
the market.
Note on use
▪ Tests have shown that under normal cir-
cumstances there is no risk to cardiac
pacemaker users. If, as the user of a
cardiac pacemaker (or a hearing aid or
another type of implant), you would like
to be reassured that using the appliance does not pose a risk, you are advised to consult a competent medical
authority.
▪ If the appliance is visibly damaged, do
not use it. Contact our Customer Services.
▪ If the appliance is not functioning prop-
erly, disconnect it from the power supply immediately.
▪ If the mains cable of the appliance is
damaged, it must be replaced by Customer Services in order to avoid hazard.
1 Safety warnings
▪ Caution: Accessible parts may become
hot when used with cooking appliances.
▪ The room must be adequately ventil-
ated when operating the range hood at
the same time as other appliances that
burn gas or other fuels.
▪ Do not flambé food next to the range
hood.
▪ Do not leave the appliance unattended
when deep-frying on the cooking surface. The cooking oil in the deep-frying
appliance could overheat and catch
fire. Constantly monitor the temperature
of the cooking oil, keeping it below the
temperature at which it can catch fire.
Change the cooking oil regularly – dirty
oil catches fire more easily than clean
oil.
▪ Do not operate the individual cooking
zones of the cooking surface without a
pan or with an empty pan on them so
as to avoid damaging the appliance or
the kitchen fittings through a build-up of
heat.
▪ Ensure there is adequate ventilation
when the extractor fan is on so as to
avoid creating a disturbing underpressure in the kitchen and to achieve optimal air extraction.
▪ Avoid a cross-current of air, which
could blow the cooking vapours over
the cooking surface.
▪ If other appliances – fired by gas or
other fuels – are being used at the
same time, ensure that there is a sufficient supply of fresh air. This does not
apply to air recirculation appliances.
▪ If other firing systems are being used at
the same time (e.g. wood, gas, oil or
coal fired heating appliances), safe operation is only possible providing a
room negative pressure of 4Pa
(0.04mbar) is not exceeded at the location of the appliance. Risk of toxic
7
Page 8

1 Safety warnings
fumes! An adequate flow of fresh air
must be guaranteed e.g. via non-closable openings in doors or windows and
in combination with an air-intake/exhaust-air wall box or by other technical
means.
▪ When carrying out maintenance work
on the appliance, including replacing
light bulbs, cut off the electricity supply
to the appliance: remove the screw fuse
from the holder or switch the circuit
breaker off, or disconnect from the
mains supply.
▪ When cleaning the appliance make
sure no water gets inside it. Use a moderately damp cloth only. NEVER spray
the inside or the outside of the appliance with water. If water gets inside the
appliance, it can cause damage.
▪ Observe the cleaning intervals (see
page 30). Failure to do so increases
the fire hazard due to the build-up of
grease in the metal grease filters.
▪ Failure to follow the cleaning instruc-
tions may cause a fire hazard.
8
Page 9
2 Using for the first time
431 2
4 5 6 7
132
The appliance must be installed and connected to the electricity supply in accordance with the separate installation instructions. Have a qualified fitter/electrician
carry out the necessary work.
During the first few hours of use, a cooking zone can give off an unpleasant smell.
This is normal for brand new appliances. Ensure that the room is well ventilated.
3 Appliance description
3.1 Appliance overview
▪ 1 cooking zone ø210mm (back left)
– PowerPlus output: 3500W
▪ 1 cooking zone ø210mm (back right)
– PowerPlus output: 3700W
▪ 2 cooking zones ø180mm (front)
– PowerPlus output: 3000W
▪ Centrally positioned range hood with filter
cassette
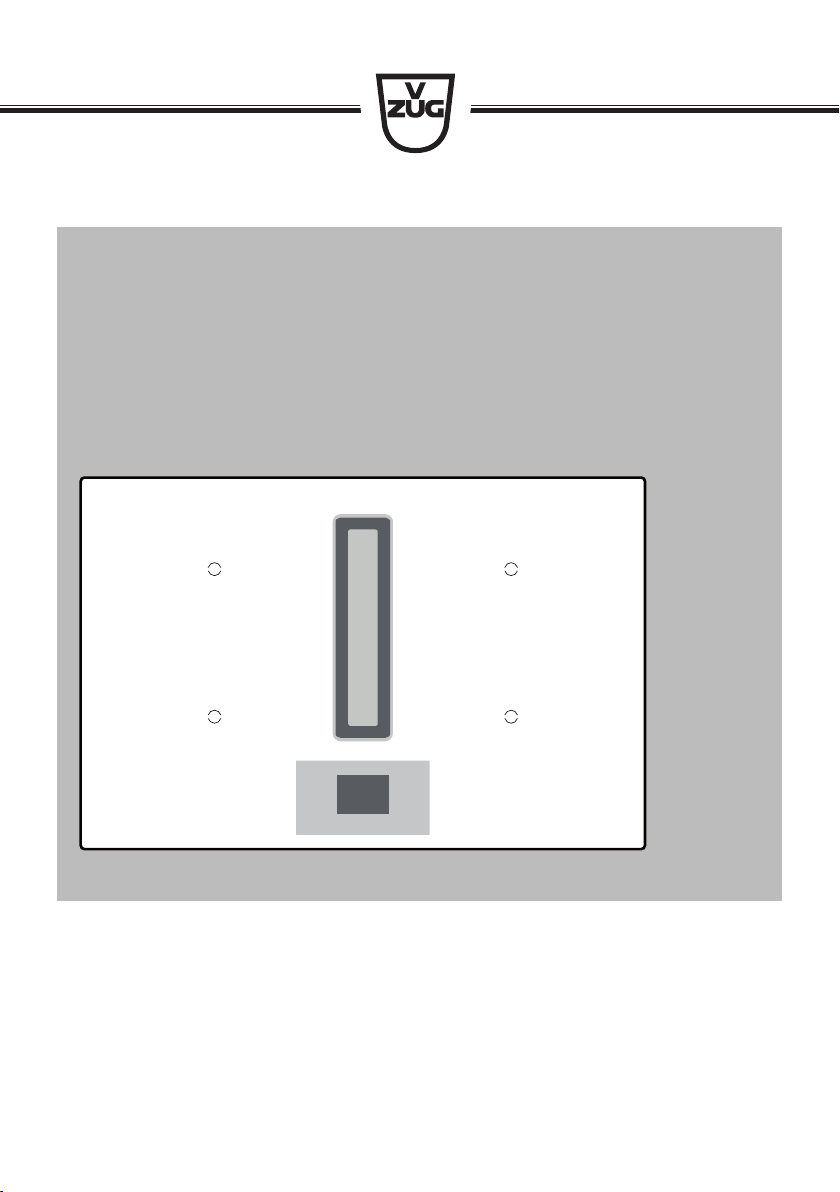
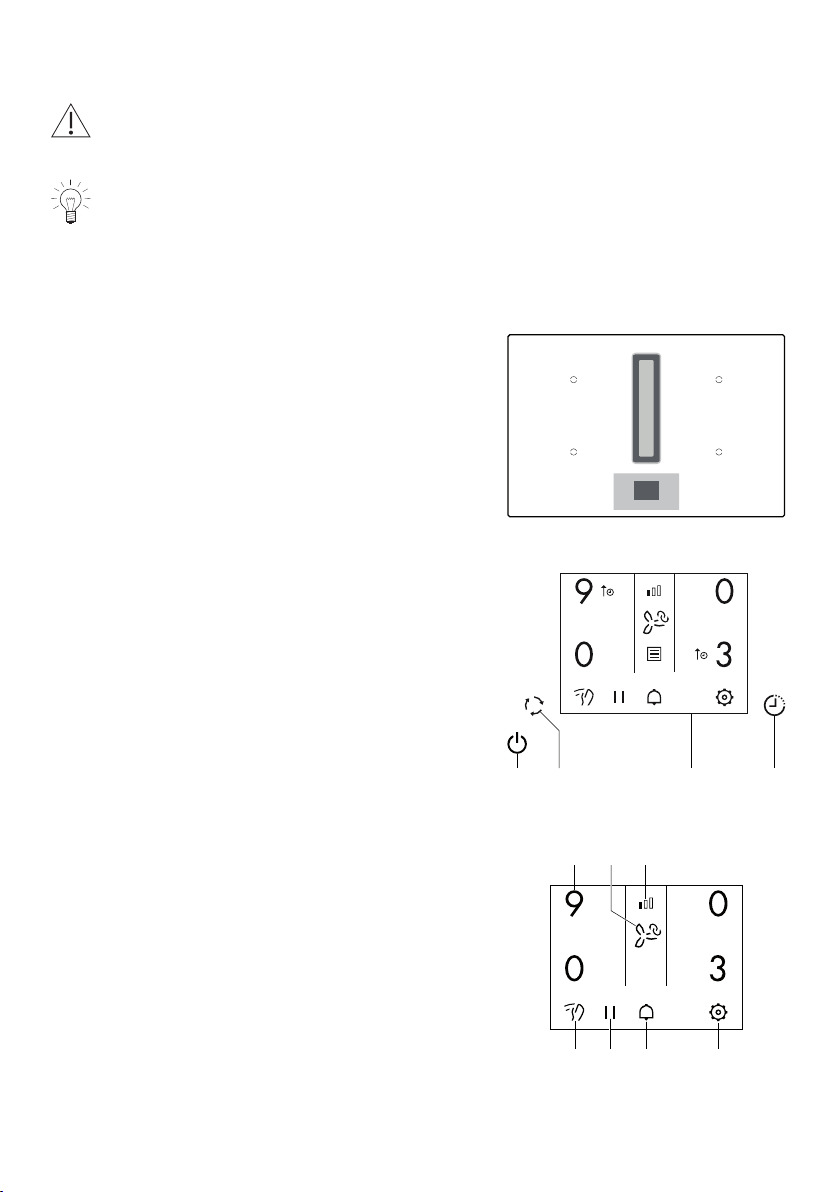
3.2 Operating and display elements
ON/OFF button
1
CleanAir activated
2
Display
3
After-running time for range hood activated
4
Display
Cooking zone power level
1
Range hood mode
2
OptiLink mode
3
Wipe protection
4
Pause cooking
5
Timer
6
Settings
7
9
Page 10
3 Appliance description
3.3 How induction hobs function
Induction hobs work very differently from conventional hobs or hot plates. The induction
coils under the glass ceramic plate produce a rapidly changing magnetic field which directly heats up the magnetic base of the cookware.
The glass ceramic plate is only warmed by the hot cookware. Removing the cookware
from the cooking zone immediately interrupts the supply of energy.
Induction hobs are:
▪ quick reacting ▪ energy-efficient
▪ finely adjustable ▪ safe
▪ powerful
Cookware with a full-surface or full magnetic base is required for cooking with an
induction hob.
3.4 Flexible cooking
In flexible cooking, there are no marked cooking zones.
Pans of any diameter can be used on any cooking zone. must, however, be completely covered for pan detection.
For even frying, the pan must be centred on . The diameter of the base of the
pan should not be greater than the diameter of the cooking zone.
3.5 Pan detection
Each cooking zone is equipped with pan detection. This detects suitable induction compatible cookware with a magnetic base.
▪ If the cookware is removed during operation or if unsuitable cookware is used,
– the power level selected flashes alternately with .
▪ If no suitable cookware is placed on the cooking zone before the pan detection time
(10minutes) elapses,
– the cooking zone switches off.
– the display changes from to «0».
– the appliance switches off after 10seconds if no other cooking zone is in use.
3.6 Cookware
Suitable cookware
Only cookware with a magnetic base (ø 10 cm to 22 cm) is suitable for use with the induction hob.
This can be checked in the following ways:
▪ A magnet sticks anywhere on the base of the cookware.
▪ Only the power level set illuminates on the hob.
Do not heat any unsuitable cookware using aids such as metal rings and the like.
This can damage the hob.
10
Page 11
Sandwich base
Multi-layer material
Pressed base
Cast iron
Enamelled cast
iron (silit)
Key:
Noise level Steel
Heat distribution Aluminium
Reaction speed Enamel
Care Good
Weight Satisfactory
3 Appliance description
Unfavourable
General notes on cookware
▸ As far as possible ensure that the dia-
meter of the base of the cookware is
the same size as the upper diameter
of the cookware.
▸ We advise against the use of cook-
ware with a pressed base as this type
of cookware does not work with all induction hobs.
▸ Some induction hobs have the melt,
keep warm and simmer functions. We
recommend using cookware without a
concave base for these functions.
▸ Handles that are loose or hollow can produce a loud whistling noise.
▸ The adherence of the cookware to the hob surface is reduced during operation, and
the cookware can therefore be moved more easily.
▸ Thick pan walls absorb the vibrations and reduce the noise level.
11
Page 12
3 Appliance description
Pan position
Position pots and pans on the hob so
that the steam is not drawn into the
range hood over the handles.
Energy-efficient cooking
For maximum energy efficiency and even heat distribution note the following:
▪ The base of the cookware must be clean, dry and smooth.
▪ Centre the cookware in the middle of the cooking zone.
▪ Use a well-fitting lid.
▪ Match the diameter of the cookware to the quantity of food to be cooked.
Coated cookware
▪ For frying, do not use a higher power level than «7».
▪ Coated cookware may be operated above level «7» provided that the bottom of the
pan is completely covered with liquid.
– The coating may otherwise become overheated and damaged.
Never use coated frying pans with automatic boost or PowerPlus.
Noise during cooking
Cookware can make noise during cooking. This does not indicate any malfunction, nor
does it affect the functioning of the appliance in any way.
Noise depends on the cookware used. If the noise causes considerable disturbance, it can help to change the cookware.
3.7 Range hood
The range hood is designed for extracting cooking vapours and odours. It can be used
in the extraction or recirculation mode.
Extraction mode
Vapours and odours produced during cooking are extracted by a fan. The metal grease
filters clean the extracted air, which is then passed through a connecting pipe fitted with
an integrated non-return valve and through the air duct to the outside.
When in use, ensure there is a sufficient supply of fresh air to replace the air that is
being extracted.
Recirculation mode with activated charcoal filter
Vapours and odours produced during cooking are extracted by a fan. The air is passed
through the metal grease filters and activated charcoal filter, grease particles and odours
are largely removed from the air and it is then circulated back into the room.
12
Page 13

4 General operation
Do not place hot
cookware on the display
If activated charcoal filters are not supplied with the appliance, these should be
ordered and installed before using the appliance for the first time.
4 General operation
Overview of the various menus, functions and options of the hob:
Menu Content Selection Menu activation
Menu for a specific
cooking zone
Menu for the range
hood
User menu Functions and op-
Functions and options that can be
used with one individual cooking zone.
Functions and options of the range
hood.
tions affecting the
whole appliance.
▪ Operating time
▪ Temperature func-
tions
▪ Automatic func-
tions
▪ OptiLink
▪ After-running time
▪ CleanAir
▪ Filter options
▪ Childproof lock
▪ Language
▪ Brightness
▪ Loudness
▪ Button signal
▪ Ventilation setting
▪ Factory setting
▸ Hold the relevant
cooking zone depressed for
1second or touch
2×.
▸ Hold or de-
pressed for
1second or touch
2×.
▸ Touch .
5 Operating the hob
5.1 Switching the appliance on
▸ Hold the button depressed for 1second.
– An acoustic signal is emitted and a message appears
in the display.
▸ Confirm with .
The message disappears automatically after 2 seconds.
5.2 Setting the power level for a cooking zone
▸ Touch the required cooking zone.
– The cooking zone selected is highlighted and the slider
appears.
13
Page 14

5 Operating the hob
▸ Touch or swipe the slider «0–P» to set the power level.
– The desired setting can be selected when the cooking
zone and the slider are displayed.
– The power level selected is accepted when the slider is
released.
– Shortly after the last entry is made, the slider disap-
pears.
5.3 Overview of power levels
Power level Cooking method Use
Melting Butter, chocolate
1
2
3
4
5
6
7
8
9
P «PowerPlus»
Gentle warming Gelatine, sauces
Simmering Poaching eggs
Swelling Rice
Continue cooking, reducing,
stewing, steaming
Continue cooking, braising Pasta, soup, braised meat
Gentle frying Rösti, omelettes, breaded fried foods,
Frying, deep frying Meat, chips
Flash frying Steak
Fast heating Boiling water
Vegetables, potatoes, sauces, fruit, fish
sausages
5.4 Switching a cooking zone off
▸ Touch the required cooking zone.
– The cooking zone selected is displayed and the slider
appears.
▸ Touch «0» on the slider.
– If no other entry is made and the other cooking zones
are switched off, the appliance switches off after
10seconds.
5.5 Residual heat indicator
remains illuminated in the position of the relevant cooking
zone as long as there is a risk of burns.
14
Page 15

5.6 Power management
A
B
A2
B1
A1
B2
Operating time
High power levels cannot be set with
both cooking zones of a group (A or B)
at the same time.
For instance, if PowerPlus is activated
with both cooking zones of a group, then
the power output is reduced for the
cooking zone that was first selected according to the following table.
5 Operating the hob
Newly selected
cooking zone
PowerPlus
9
8
7
6
5
Cooking Control
Residual power of the remaining cooking zone in the same group
A1 A2 B1 B2
7 5 7 5
8 8 9 9
9 9 9 9
9 P 9 P
9 P 9 P
P P P P
6 4 6 6
If the power level is increased above these levels, PowerPlus switches off.
5.7 PowerPlus
All the cooking zones are equipped with the PowerPlus booster.
When PowerPlus is switched on, the cooking zone selected works at extra high power
for 10 minutes. PowerPlus can be used, for instance, to heat a large quantity of water
quickly.
5.8 Operating time
Do not leave the hob unattended during use. Risk of food boiling over, burning on
and igniting!
With the operating time function, the cooking zone switches off automatically after a set
time (from 1minute to 1hour and 59minutes).
Setting the operating time
▸ Hold the active cooking zone depressed for 1second or
touch 2×.
▸ Select the «Operating time» menu item with or .
15
Page 16

5 Operating the hob
Operating time
1h 30
30min
▸ Increase or decrease the selected value with or re-
spectively.
▸ Use and in the setting range at the bottom to switch
between hours and minutes.
▸ Touch .
– The operating time is set to «0h00».
▸ Confirm the entry with or scroll with .
Touch the button to exit the menu and cancel the setting.
– The operating time is displayed below the cooking
zone.
Changing the operating time
▸ Hold the cooking zone with the operating time depressed
for 1second or touch 2×.
▸ Increase or decrease the selected value with or re-
spectively.
▸ Use and in the setting range at the bottom to move
from one digit to the next.
▸ Confirm the entry with .
– The changed operating time is displayed below the
cooking zone.
Ending the operating duration before time
▸ Hold the cooking zone with an active operating time de-
pressed for 1second or touch 2×.
▸ Touch .
– The operating time is reset to «0h00».
▸ Confirm the entry with .
16
Page 17

End of the operating time
00s
Cooking functions
Simmer
When the operating time is up
– the relevant cooking zone switches off
– an acoustic signal is emitted
– «00s» flashes below the cooking zone.
▸ Touch the cooking zone to switch off the acoustic signal
and display.
5.9 Cooking functions
Melting With the melting function, butter, chocolate or honey, for in-
stance, can be gently melted at approx.42°C.
Keep warm The keep warm setting keeps cooked food warm at approx.
65°C.
Simmering With the simmer function, sausages, dumplings and stuffed
pasta, for instance, can be cooked just below boiling point.
Switching the cooking function on
▸ Hold the cooking zone depressed for 1second or touch
2×.
▸ Select the «Cooking functions» menu item with or .
▸ Make selection and confirm with .
5 Operating the hob
Ending the cooking function before time
▸ Touch the cooking zone.
▸ Touch «0» on the slider.
– If no other entry is made and the other cooking zones
are switched off, the appliance switches off after
10seconds.
17
Page 18

5 Operating the hob
Easy cooking
Cooking control
5.10 Easy cooking
Do not leave food cooking unattended while using the easy cooking function. Risk
of food boiling over, burning on and igniting!
The following functions are available for selection:
Cooking Control The hob detects boiling point and switches automatic-
ally to the continued cooking level.
Temperature Control The hob monitors the temperature of the base of the
cookware and keeps it constant.
Automatic boost A cooking zone works at power level 9 for a set dura-
tion. When this duration is up, it automatically
switches back to the previously set power level.
Cooking Control
In order to correctly detect the boiling point, use cool, unsalted, unseasoned water
only. The use of a pan lid is recommended. Cooking Control can only be started
on a cooking zone that is switched off. The pan should not be moved during the
heating-up phase.
Minimum and maximum quantity of water per cooking zone:
Diameter of cooking zone Minimum quantity of water Maximum quantity of water
180mm 0.2l 3l
210mm 0.4l 4l
Selecting and starting Cooking Control
▸ Place the cookware with water on the required cooking
zone.
▸ Hold the cooking zone depressed for 1second.
▸ Select the «Easy cooking» menu item with or .
▸ Touch .
– Cooking Control starts.
– An acoustic signal is emitted when boiling point is
reached.
– The slider can be used to adjust the power level.
▸ Touch «0» to end the function.
18
Page 19

5 Operating the hob
Easy cooking
Temperature control
Easy cooking
Automatic boost
Temperature Control
For this function, the cooking zone must be in operation with cookware on it.
▸ Hold the cooking zone depressed for 1second.
▸ Select the «Easy cooking» menu item with or .
▸ Touch .
– Temperature Control starts.
– A triple acoustic signal is emitted when temperature
detection is completed.
– The slider can be used to adjust the power level.
▸ Touch «0» to end the function.
Switching the easy cooking function off
▸ Touch the cooking zone.
▸ Touch «0» on the slider.
– Alternatively, the easy cooking function can be
switched off in the «Easy cooking» menu with .
Automatic boost
With the automatic boost, a cooking zone works at the highest continued cooking level
for a certain duration (see table). When this duration is up, it automatically switches back
to the previously set power level.
Power level / function 1 2 3 4 5 6 7 8
Automatic boost in mins.:secs.
0:40 1:15 2:00 3:00 4:15 7:15 2:00 2:15
If, during the automatic boost, a higher power level is selected, the duration will
change automatically. If a lower power level is selected, the automatic boost
switches off.
Selecting and starting automatic boost
To activate the automatic boost function, a continued cooking level of 1–8 must be selected.
▸ Hold the cooking zone depressed for 1second or touch
2×.
▸ Select the «Easy cooking» menu item with or .
▸ Touch .
19
Page 20

5 Operating the hob
Automatic boost
Continued cooking level 7
Timer
2h 15
Timer
▸ The desired continued cooking level is selected by touch-
ing the corresponding number.
▸ Confirm the entry with .
Switching the automatic boost off before time
▸ Switch the cooking zone off.
▸ To resume operation without the automatic boost, select the cooking zone and set a
power level.
5.11 Timer
The timer functions like an egg timer (1minute to 99hours and 59minutes).
It can be used at any time and independently of all other functions.
Setting the timer
▸ Touch .
▸ Increase or decrease the selected value with or re-
spectively.
▸ Switch between hours and minutes with and .
▸ Touch to set the timer to «00h00».
▸ Confirm the entry with .
Touch the button to exit the menu and cancel the setting.
▸ The timer countdown is displayed next to .
Changing the duration remaining of the timer
▸ Touch or the digits of the timer.
▸ Increase or decrease the selected value with or re-
spectively.
▸ Switch between hours and minutes with and .
▸ Confirm the entry with .
20
Page 21

5 Operating the hob
Timer
00s
Pause act ivated
9‘40
Pause act ivated
9‘40
Switching the timer off before time
▸ Touch or the digits of the timer.
▸ Touch .
– The timer is set to «00h00».
▸ Confirm the entry with .
Timer finished
When the timer finishes
– an acoustic signal is emitted.
– flashes.
– «00s» flashes.
▸ Touch «00s» or to switch off the acoustic signal and
display.
5.12 Pause cooking
With this function, the power level of all the cooking zones that are switched on can be
switched to «0» for up to 10minutes. After pause cooking, operation can be resumed
using the previous settings.
Temperature Control and Cooking Control are switched off through use of pause
cooking.
Switching pause cooking on
▸ Touch .
– All cooking zones that are switched on switch to power
level «0».
– Operating times are stopped.
– The timer continues to run.
– If switched on, Temperature Control and Cooking Con-
trol are switched off.
The maximum pause time is 10minutes. By which time, if it has not already
ended, the appliance switches off completely.
Switching pause cooking off
▸ Touch .
– All cooking zones switch back to the previous setting.
– Operating times continue to run again.
– Automatic functions cannot be restored.
21
Page 22

5 Operating the hob
Wipe protection activated
19s
Wipe protection activated
19s
Restore last set tings?
5.13 Wipe protection
This function prevents the power level from being changed accidentally, for instance
when wiping the control panel with a cloth.
Switching wipe protection on
▸ Touch .
– Wipe protection is activated for 20 seconds or until
cancelled.
Switching wipe protection off before time
Wipe protection can be cancelled during the first 3 seconds. Then disappears.
▸ Touch .
– Wipe protection has been cancelled and the appliance
may be operated again.
Touch the button to switch the appliance off at any time.
5.14 Recall function
If the hob is inadvertently switched off, the recall function can restore the previous settings within 5seconds.
▸ Hold the button depressed for 1second.
▸ Touch to restore the most recent settings.
▸ Touch to cancel the function.
Temperature Control and Cooking Control cannot be restored.
22
Page 23

6 Operating the range hood
6 Operating the range hood
6.1 Switching the range hood on manually
▸ Press .
– The slider is displayed.
▸ Touch the slider "0-P" or swipe it to set the power level.
– The desired setting can be set as long as the display is
flashing.
– The setting is applied when you let go of the slider.
– The slider is hidden shortly after the last entry.
6.2 Power level "P"
Power level "P" is the range hood's most powerful level. The range hood automatically
changes the power level to a lower level after 6 minutes. After 30 seconds without an
entry, the range hood resets to power level "P".
6.3 Switching the range hood off
▸ Touch the range hood.
– The power level is displayed and the slider appears.
▸ Touch «0» on the slider.
– The range hood switches itself off.
6.4 OptiLink
With this function, the user no longer needs to control the range hood manually. OptiLink
monitors the power levels set for the cooking zones and automatically sets the optimum
power level for the range hood.
23
Page 24

6 Operating the range hood
OptiLink
Standard
CleanA ir
Stand ard
The following settings are available for selection:
OFF OptiLink is switched off
Silent mode Low noise level operation
▸ Use a wooden spoon to-
gether with the pan lid to
vent the steam into the
suction inlet of the range
hood.
Standard mode Normal mode
Power mode High power for extracting cooking fumes and smells
Setting the OptiLink
▸ Hold depressed for 2 seconds.
▸ Select the «OptiLink» menu item with or .
▸ Make selection and confirm with .
– When OptiLink is activated, the , or symbols
above are displayed.
6.5 CleanAir
With this function, the range hood is regularly switched on after operation in order to remove unpleasant odours from the air.
The following settings are available for selection:
OFF CleanAir is switched off
Standard Normal mode. The range hood is switched on at level1
every 60minutes for 10minutes. The function is not timelimited.
Intensive The range hood runs at level1 for 8hours to remove stub-
born odours such as fish and fondue.
Setting CleanAir
▸ Hold depressed for 2seconds or touch 2×.
▸ Select the «CleanAir» menu item with or .
▸ Make selection and confirm with .
– When the function is active, the CleanAir display is il-
luminated.
24
Page 25

6 Operating the range hood
After-running time
10 minutes
Filter
Reset ac tivate d
charc oal filter
6.6 After-running time
When the appliance is switched off, the range hood can continue to run for a certain
period of time at level1. Residual cooking fumes and smells are extracted and the range
hood is dried. The after-running time is activated if the appliance has been in operation
and at least one cooking zone has been used, the range hood was used or residual heat
is displayed.
The following settings are available for selection:
OFF After-running time is switched off
10 minutes The range hood continues to run at level1 for 10 minutes.
20 minutes The range hood continues to run at level1 for 20 minutes.
30 minutes The range hood continues to run at level1 for 30 minutes.
Setting the after-running time
▸ Hold depressed for 2seconds or touch 2×.
▸ Select the «After-running time» menu item with or .
▸ Make selection and confirm with .
– When the function is active, the after-running time dis-
play is illuminated.
6.7 Filter
With this function, the status of the grease and activated charcoal filters is shown and
set.
The following settings are available for selection:
Status Shows the status of the filter.
Activated charcoal
Reset the meter of the activated charcoal filter.
filters
Metal grease filter Reset the meter of the metal grease filter.
Resetting the filter
▸ Hold the power level or depressed for 2seconds.
▸ Select the «Filter» menu item with or .
▸ Select or and confirm with .
25
Page 26

7 User settings
activated
Childproof lock
Childproof lock activated
Code 226
7 User settings
Overview of user settings
▪ Childproof lock ▪ Button signal
▪ Language ▪ Ventilation
▪ Brightness ▪ Factory setting
▪ Loudness
Changing user settings
To change the user settings, the appliance must be switched on.
▸ Touch .
▸ The desired user setting page can be selected using or .
▸ Make the desired setting.
▸ Confirm the setting with .
– The setting is saved.
▸ To confirm several changes made to the user settings at once, after every single
change scroll with or or confirm directly with .
▸ To exit the user settings without accepting a change, touch .
7.1 Childproof lock
The childproof lock makes it difficult for children to switch the appliance on.
Switching the childproof lock on
▸ Select the «Childproof lock» user setting.
▸ Touch to activate the childproof lock.
▸ Confirm the setting with .
Overriding the childproof lock for cooking
▸ Switch the appliance on.
– A newly generated code appears in the middle of the
display.
▸ Enter the code specified using the numbers below.
– An acoustic signal is emitted each time a digit is
entered.
– After the code has been entered, the childproof lock is
overridden and it is possible to cook without any restrictions.
As soon as the appliance is switched off again, the childproof lock is immediately
reactivated.
26
Page 27

7 User settings
off
Childproof lock
Languages
English
Brightness
Loudne ss
Switching the childproof lock off
▸ With the childproof lock activated, select the «Childproof
lock» user setting.
▸ Touch to deactivate the childproof lock.
▸ Confirm the setting with .
7.2 Languages
The language of the display can be changed. Different languages are available for selection.
▸ Select the «Languages» user setting.
▸ The language selection can be changed using or be-
low.
▸ Confirm the setting with .
7.3 Brightness
The brightness of the display can be changed. Nine different levels are available for selection.
▸ Select the «Brightness» user setting.
▸ Select level of brightness from «1–9» on the slider.
▸ Confirm the setting with .
7.4 Loudness
The loudness of the button signal can be changed. Nine different levels of loudness are
available for selection.
▸ Select the «Loudness» user setting.
▸ Select level of loudness from «1–9» on the slider.
▸ Confirm the setting with .
27
Page 28

7 User settings
activated
Button signal
Ventilatio n
Extr acted a ir
Factory settings
Restore factor y settings?
7.5 Button signal
The button signal can be switched on or off.
▸ Select the «Button signal» user setting.
▸ Touch to activate the button signal.
▸ Confirm the setting with .
7.6 Ventilation
The ventilation mode of the range hood can be changed. It is possible to switch between
recirculation mode and extraction mode.
▸ Select the «Ventilation» user setting.
▸ Touch to set the mode to extraction.
▸ Confirm the setting with .
7.7 Factory setting
User settings that have been changed can be restored to the factory setting.
▸ Select the «Factory setting» user setting.
▸ Touch to restore the appliance to the factory setting.
▸ Confirm with .
The following functions are defined in the appliance as the default factory setting:
Function Factory setting
Childproof lock OFF
Languages German
Brightness Level 9 (loud)
Loudness Level 5 (medium)
Button signal OFF
Ventilation Recirculation air
OptiLink Standard mode
After-running time 20 minutes
CleanAir OFF
28
Page 29

8 Care and maintenance
8 Care and maintenance
8.1 Glass ceramic surfaces
Ideally, clean the appliance when it has completely cooled down.
Burns hazard!
Always clean the hob after use. This prevents food residue from burning on. Dried-on or
burned-on food residue is harder to clean off.
Use of improper cleaning techniques can result in damage to the markings or surface.
Avoid cleaning the surface of the glass ceramic hob with abrasive cleaning agents,
scouring pads, wire wool, etc. as they can damage the surface.
▸ Use only a soft cloth or sponge with water and a suitable detergent for cleaning every-
day soiling. Always follow the detergent manufacturer’s instructions for use. Using a
detergent with a protective additive is recommended.
▸ Remove stubborn soiling, e.g. boiled-over milk, while still warm using a glass ceramic
hob scraper. Always follow the scraper manufacturer's instructions for use.
▸ Foods with a high sugar content, e.g. marmalade, that boil over should be removed
while still hot using a glass ceramic hob scraper. The surface of the glass ceramic
hob could otherwise become damaged.
▸ Remove melted plastic while still warm using a glass ceramic hob scraper. The sur-
face of the glass ceramic hob could otherwise become damaged.
▸ Remove limescale stains when cool with a small amount of limescale remover, e.g.
vinegar or lemon juice. Then wipe clean with a damp cloth.
Cleaning
For good results, follow these cleaning instructions.
▸ To clean thoroughly, remove most of the soiling using a hob scraper or a special
cleaning sponge for glass ceramic hobs.
▸ Add a few drops of a suitable cleaning fluid to the cold hob surface and rub over the
surface using kitchen towel or a clean cloth.
29
Page 30

8 Care and maintenance
▸ Wipe off with a wet cloth and then polish with a dry cloth or the soft side of a suitable
cleaning sponge.
Only use the cleaning agents and methods recommended on our «Homepage».
8.2 Range hood
Take care that no water gets into the housing of the appliance! If water gets into
the housing, it can cause damage.
Do not use abrasive cleaners, scouring pads, steel wool, etc. for cleaning, as they
can damage the surface.
Cleaning the inside
▸ Clean the inside of the appliance with a warm, damp cloth and a little detergent and
then wipe dry.
– Grease and condensate water can build up on the inside.
▸ Wash with a brush if necessary and then wipe dry with a kitchen towel.
Cleaning the grease filters
The grease filters must be cleaned at least once a month with normal use or whenever
the saturation indicator illuminates. If properly cared for, the grease filters should
provide years of service.
Do not to damage the filter cassette or grease filters when removing/inserting
them.
Removing the filter cassette
▸ Switch the appliance off.
▸ Using the handle, lift the filter cassette up and out of the cut-out in the work surface.
– The grease filters are visible.
Removing the grease filters
▸ Push the lug on the grease filter outwards.
– This releases the grease filter.
▸ Carefully tilt the grease filter and remove from the filter
cassette.
30
Page 31

8 Care and maintenance
Grease filter
Reset grease filter
Cleaning the grease filters
▸ Clean the grease filters in the dishwasher.
▸ Select an «intensive» or «heavy» wash programme.
Cleaning may cause the grease filters to become slightly discoloured. However,
this will not affect the functioning of the filters in any way.
If no dishwasher is available:
▸ Clean the grease filters in the sink with hot water and detergent.
▸ Then soak the grease filters in hot water in the sink for about 2hours and finally clean
with a washing-up brush. Rinse well with clean, cold water.
– Grease filters can be used again after being cleaned.
▸ If necessary, clean around the outside of the filter cassette with a warm, damp cloth
and a little detergent and then wipe dry with a kitchen towel.
The filter cassette can be cleaned in the dishwasher together with the grease filters. Place the filter cassette in the dishwasher with the handle facing down or to
the side.
Inserting the filter cassette
▸ Reassemble in the reverse order.
▸ Ensure that the lug on the grease filter is at the top.
Resetting the saturation indicator for the grease filters
▸ In the display, touch the grease filter .
– The «Filter» menu is displayed.
▸ Reset the filter as described (see page 25).
Alternatively, the saturation indicator can also be accessed via the «Filter» menu of
the range hood.
Recirculation box with activated charcoal filters
With normal use, the activated charcoal filters have to be changed every 3 years or
whenever the saturation indicator illuminates. Replace all the activated charcoal filters
at the same time. The spent activated charcoal filters can be disposed of in the household waste or at a suitable recycling point.
31
Page 32

9 Trouble-shooting
Filter
Reset ac tivate d
charc oal filter
Contin uous act ivatio n
Releas e or clean b utto n
Repeate d activation
Release or clean buttons
Resetting the saturation indicator for the activated charcoal filters
▸ In the display, touch the activated charcoal filter .
– The «Filter» menu is displayed.
▸ Reset the filter as described (see page 25).
Alternatively, the saturation indicator can also be accessed via the «Filter» menu of
the range hood.
9 Trouble-shooting
You may be able to trouble-shoot the following errors yourself. If not, note down the error
message in full and the serial number (SN), which can be found on the identification
plate, and call Customer Services.
Malfunction Possible cause Solution
▪ A button was touched for
longer than 10seconds.
▪ There is boiled-over food
on the control panel.
▸ Remove the object or liquid
from the display.
▸ The appliance can be used
again as normal.
▪ Object (e.g. pan, dish) on
the control panel.
▪ There is boiled-over food
on the control panel.
flashes. ▪ The excess temperature
protection of a cooking
zone was triggered.
and «0» flash altern-
ately
▪ The automatic safety shut-
off was triggered.
If a cooking zone has been running for longer without any settings being changed,
the appliance switches the cooking zone off automatically, after how much time depends on the power level set.
Power level /
function
Safety shut-off
after hrs.:mins.
32
1 2 3 4 5 6 7 8 9
2:00 8:30 6:30 5:30 4:30 3:30 3:00 2:30 2:00 1:30
▸ Remove the object or liquid
from the display.
▸ The appliance can be used
again as normal.
▸ Allow the cooking zone to
cool down.
▸ Continue cooking on a dif-
ferent cooking zone.
▸ Check cookware.
▸ Switch the cooking zone
back on again if required.
Page 33

Malfunction Possible cause Solution
Childproof lock activated
Code 226
«A0» or «EC» illuminates in the display
▪ Automatic programme
was cancelled
▸ Pan was moved or removed
from the cooking zone
▸ Centre the pan.
▸ Pan selected was too small.
▸ Cookware not really suitable
for use with induction hobs.
The appliance is not
working and the display
is dark.
▪ The fuse or circuit
breaker for electrical installations in the home
▸ Change the fuse.
▸ Reset the circuit breaker.
is defective.
▪ An interruption in the
▸ Check the power supply.
power supply.
▪ The fuse or circuit
▸ Call Customer Services.
breaker keeps blowing.
Power level selected
and flash alternately
in the display
▪ Cookware is not suit-
able for use with induction hobs.
▪ Cookware is too small
for the cooking zone
selected.
▪ The childproof lock is
activated.
▸ Use suitable magnetic cook-
ware. See «Cookware». sec-
tion.
▸ The diameter of the base of
the cookware must be at least
10 cm.
▸ For operating the appliance
with the childproof lock activ-
ated, see the «User settings»
section (see page 26).
▸ Switch off or override the child-
proof lock.
9 Trouble-shooting
«E» and «8» flash alternately in the display
▪ An object (e.g. paper)
underneath the hob is
obstructing the air intake for cooling the
hob.
▸ Remove object in the drawer
underneath the hob.
▸ Touch any button to cancel the
error.
▸ After 10 minutes the appliance
can be used again as normal.
▪ Ventilation is defective. ▸ Note down the error number.
▸ Note down the serial number
(SN) of the appliance. See the
identification plate (see page
39) for this.
▸ Call Customer Services.
33
Page 34

9 Trouble-shooting
Er 22
Malfunction Possible cause Solution
▪ Internal error occurred. ▸ Note down the error number.
▸ Note down the serial number
(SN) of the appliance. See the
identification plate (see page
39) for this.
▸ Call Customer Services.
«E6» or «E9» flash or illuminate in the display
▪ Internal error occurred. ▸ Note down the error number.
▸ Note down the serial number
(SN) of the appliance. See the
identification plate (see page
39) for this.
▸ Call Customer Services.
«Er57» illuminates in the
display and an acoustic
signal is emitted
▪ Display has overheated
due to, for instance, hot
cookware or food being
on the display.
▸ Immediately remove the hot
cookware or food that has
boiled over from the display.
▸ Touch the button to cancel
the error.
▪ An object (e.g. paper)
underneath the hob is
obstructing the air intake for cooling the
hob.
▸ Remove object in the drawer
underneath the hob.
▸ Touch any button to cancel the
error.
▸ After 10 minutes the appliance
can be used again as normal.
▪ Ventilation is defective. ▸ Note down the error number.
▸ Note down the serial number
(SN) of the appliance. See the
identification plate for this.
▸ Call Customer Services.
Range hood is not extracting cooking fumes
and odours satisfactorily.
▪ Grease filters are dirty. ▸ Clean the grease filters (see
page 30).
▪ Recirculation mode
only: The activated
charcoal filters in the re-
▸ Replace all the activated char-
coal filters in the recirculation
box (see page 30).
circulation box are saturated.
▪ Extraction mode only:
The fresh air intake is
▸ Ensure fresh air intake is suffi-
cient.
insufficient.
If the error is only displayed in one or two cooking zones, the remaining cooking
zones can still be used until repaired.
34
Page 35

10 Accessories and spare parts
10 Accessories and spare parts
Grease filters Recirculation box Activated charcoal filters
11 Technical data
11.1 Hob
In accordance with EU Regulation No. 66/2014
Description Unit Value
Model number GK 31094
Type designation GK GKD46TIMASZO
Number of cooking zones 4
Heating technology Induction cooking zone
Cooking zone dimensions cm ø18 ø21 ø21 ø18
Energy consumption per cooking zone Wh/kg 175.7 168.9 174.3 176.8
Energy consumption of entire hob EC Wh/kg 173.9
11.2 Range hood
In accordance with EU Regulation No. 65/2014 and No. 66/2014
Description Abbreviation Unit Value
Brand - - V-ZUG Ltd
Model number - - 31094
Yearly energy consumption AEC
Energy efficiency index EEI
hood
hood
Energy efficient class EEC - B
Fluid dynamic efficiency FDE
hood
Class for the fluid dynamic efficiency FDEC - B
Luminous efficacy LE
hood
Luminous efficacy class LEC - -
Grease filter level GFE
hood
Class for the grease filter level GFEC - C
Air flow at minimal speed Q
Air flow at maximum speed (except intensive or fast-
min
Q
max
running level)
kWh/a 50.2
% 58.3
% 25.9
Lux/W -
% 84.3
m3/h 58.2
m3/h 324.3
35
Page 36

12 Disposal
Description Abbreviation Unit Value
Air flow in operation at intensive or fast-running level Q
A-rated airborne acoustical noise at minimum speed SPE
A-rated airborne acoustical noise at maximum speed SPE
A-rated airborne acoustical noise when operating at
SPE
boost
min
max
boost
m3/h 582.8
dBA -
dBA -
dBA -
intensive or fast-running level
Measured power consumption in off mode P
Measured power consumption in standby mode P
0
s
W -
W 0.27
Time extension factor f - 1.1
Measured air volume flow at maximum power Q
Measured air pressure at maximum power P
Measured electrical input power at maximum power W
Nominal power of the lighting system W
Average illumination of the lighting system on the
E
BEP
BEP
BEP
L
middle
m3/h 264.9
PA 454
W 128.9
W -
lux -
hob
Sound power level L
wa
dBA 63
12 Disposal
12.1 Packaging
Never allow children to play with packaging material due to the danger of injury or
suffocation. Store the packaging material in a safe location or dispose of it in an
environmentally-friendly way.
12.2 Safety
Render the appliance unusable to prevent accidents caused by improper use (e.g.
through children playing):
▸ Disconnect the appliance from the mains. With a fixed appliance, this is to be carried
out by a qualified electrician. Then cut the mains cable off flush with the appliance.
12.3 Disposal
▪ The «crossed‐out wheeled bin» symbol requires the separate collection of waste
electrical and electronic equipment (WEEE). Such equipment can contain hazardous,
environmentally harmful materials.
▪ These appliances are to be handed over to a designated collection point for the recyc-
ling of electrical and electronic equipment and must not be disposed of with unsorted
household waste. And in this way, you will be helping to protect resources and the environment.
▪ For more information, please contact the local authorities.
36
Page 37

13 Index
A
Accessories ...................................................... 35
After-running time............................................. 25
Setting............................................................ 25
Appliance description ........................................ 9
Appliance disposal .......................................... 36
Appliance overview ............................................ 9
Appliance-specific safety precautions
........................................................................ 5
Automatic boost ............................................... 19
Selecting and starting ................................. 19
Switching off before time ........................... 20
B
Brightness ......................................................... 27
Button signal..................................................... 28
C
Care and maintenance ................................... 29
Childproof lock ................................................. 26
Overriding...................................................... 26
Switching off ................................................. 27
Switching on ................................................. 26
CleanAir ............................................................. 24
Setting............................................................ 24
Coated cookware............................................. 12
Connection plate.............................................. 39
Cooking Control ............................................... 18
Selecting and starting ................................. 18
Cooking function
Ending before time...................................... 17
Switching on ................................................. 17
Cooking functions............................................ 17
Cookware .......................................................... 10
D
Disposal............................................................. 36
E
Easy cooking .................................................... 18
Easy cooking function
Switching off ................................................. 19
Energy-efficient cooking ................................. 12
Extraction mode ............................................... 12
F
Factory setting.................................................. 28
Filter.................................................................... 25
Resetting ....................................................... 25
Flexible cooking ............................................... 10
G
General operation ............................................ 13
H
How induction hobs function ......................... 10
L
Languages ........................................................ 27
Loudness ........................................................... 27
M
Model designation .............................................. 2
Model number ..................................................... 2
N
Noise during cooking...................................... 12
O
Operating and display elements...................... 9
Display .............................................................. 9
Operating the hob............................................ 13
Operating the range hood.............................. 23
Operating time.................................................. 15
Changing....................................................... 16
Ending before time...................................... 16
Finished ......................................................... 17
Setting............................................................ 15
OptiLink.............................................................. 23
Setting............................................................ 24
Overview of power levels ............................... 14
P
Pan detection.................................................... 10
Pan position ...................................................... 12
Pause cooking.................................................. 21
Switching off ................................................. 21
Switching on ................................................. 21
Power level P .................................................... 23
Power management ........................................ 15
PowerPlus.......................................................... 15
Product fiche
Hob................................................................. 35
Range hood.................................................. 35
Q
Queries .............................................................. 39
Quick instructions ............................................ 40
R
Range hood ...................................................... 12
Cleaning the grease filters.................. 30, 31
Cleaning the inside...................................... 30
37
Page 38

Inserting the filter cassette......................... 31
Recirculation box with activated charcoal fil-
ters.................................................................. 31
Removing the filter cassette ...................... 30
Removing the grease filters....................... 30
Resetting saturation indicator for activated
charcoal filters.............................................. 32
Resetting saturation indicator for grease fil-
ters.................................................................. 31
Switching off ................................................. 23
Switching on manually................................ 23
Recall function.................................................. 22
Recirculation mode with activated charcoal fil-
ters............................................................... 12
Residual heat indicator................................... 14
S
Safety precautions
General ............................................................. 4
Safety shut-off ................................................... 32
Serial number (SN).......................................... 39
Service & Support............................................ 39
Service agreement........................................... 39
Setting the power level ................................... 13
Spare parts ....................................................... 35
Switching a cooking zone off ........................ 14
Switching the appliance on............................ 13
Symbols ................................................................ 4
T
Technical data .................................................. 35
Temperature Control ....................................... 19
Timer .................................................................. 20
Finished ......................................................... 21
Setting............................................................ 20
Switching off before time ........................... 21
Trouble-shooting .............................................. 32
Type....................................................................... 2
U
User settings..................................................... 26
Changing....................................................... 26
Overview........................................................ 26
Using for the first time........................................ 9
V
Validity................................................................... 2
Ventilation.......................................................... 28
W
Wipe protection ................................................ 22
Switching off before time ........................... 22
Switching on ................................................. 22
38
Page 39

14 Service & Support
2
1
14 Service & Support
The «Trouble-shooting» section gives you valuable tips on how to deal with minor
malfunctions yourself, saving you the time and trouble of calling out a service technician and any cost that goes along with it.
Information on the V-ZUG warranty can be found at www.vzug.com →Service
→Warranty information. Please read this information carefully.
Please register your V-ZUG appliance straightaway:
▪ online at www.vzug.com →Service →Online warranty registration or
▪ using the enclosed registration card.
This will allow you to take advantage of the best possible support in the event of a fault
in the appliance during the guarantee period. You will require the serial number (SN) and
appliance designation to register your appliance. You will find them on the identification
plate of your appliance.
My appliance information:
SN: __________________________ Appliance:
__________________________________
Please have this appliance information to hand when contacting V-ZUG. Thank you.
The identification plate and the connection plate are located on the underside of the hob.
Identification plate with serial number (SN)
1
Connection plate
2
A second identification plate is supplied and should
be affixed in the fitted unit underneath the hob.
Your repair order
Call the free service number 0800 850 850 to contact your nearest
V-ZUG service centre. You can arrange an on-site visit by us by phone if you wish.
General queries, accessories and service agreement
V-ZUG will be happy to help you with any general administrative or technical queries, to
accept your orders for accessories and spare parts and to inform you about our progressive service agreements. You can contact us by calling tel. +41 58 767 67 67 or by
going to our website at www.vzug.com.
39
Page 40

Quick instructions
1039661-R0A
Please first read the safety precautions in the operating instructions!
To switch appliance on
▸ Hold the button depressed for 1second.
To set cooking zone or range hood
▸ Touch the required cooking zone or range hood.
▸ Touch or swipe the slider «0–P» to set the power level.
To switch cooking zone or range hood off
▸ Touch the required cooking zone or range hood.
▸ Touch «0» on the slider.
To switch appliance off
▸ Hold the button depressed for 1second.
V-ZUG Ltd, Industriestrasse 66, CH-6302 Zug
Tel. +41 58 767 67 67, Fax +41 58 767 61 61
info@vzug.com, www.vzug.com
Service Centre: Tel. 0800 850 850
 Loading...