

Page 1
V-ZUG Ltd
Range hood
DW-SE/DI-SE
Operating instructions
Page 2
Thank you for choosing to buy one of our products. Your appliance is made
to high standards and is easy to use. Nevertheless, please take the time to
read these operating instructions in order to familiarize yourself with the
appliance and get the best use out of it.
Please follow the safety precautions.
Modifications
Text, diagrams and data correspond to the technical standard of the appliance at the time these operating instructio ns went to p ress. The right to make
technical modifications for the purpose of the further development of the
appliance is reserved.
Symbols used
Denotes important safety precautions. Failure to observe said
precautions can result in injury or damage to the appliance or
fittings!
➤ Indicates step-by-step instructions.
– Describes how the appliance reacts to the steps taken.
• Indicates a list.
Denotes useful tips for the user.
Validity
The model number corresponds to the first 3 digits on the identification plate.
These operating instructions apply to the models:
Type Model no. Size system Type Model no. Size system
DW-SE6 048 60 DI-SE10 076 100
DW-SE7 054 70 DI-SE12 077 120
DW-SE9 059 90
DW-SE12 068 120
Variations depending on the model are noted in the text.
© V-ZUG Ltd, CH-6301 Zug, 2011
2
Page 3

Contents
1 Safety precautions 4
1.1 Before using for the first time . . . . . . . . . . . . . . . . . . . . . . . . . . . . . . . . . . 4
1.2 Correct use . . . . . . . . . . . . . . . . . . . . . . . . . . . . . . . . . . . . . . . . . . . . . . . . 5
1.3 Children in the home . . . . . . . . . . . . . . . . . . . . . . . . . . . . . . . . . . . . . . . . 5
1.4 Note on use . . . . . . . . . . . . . . . . . . . . . . . . . . . . . . . . . . . . . . . . . . . . . . . 6
2 Appliance description 8
2.1 Extraction model . . . . . . . . . . . . . . . . . . . . . . . . . . . . . . . . . . . . . . . . . . . . 8
2.2 Recirculation model . . . . . . . . . . . . . . . . . . . . . . . . . . . . . . . . . . . . . . . . . 8
2.3 Equipment . . . . . . . . . . . . . . . . . . . . . . . . . . . . . . . . . . . . . . . . . . . . . . . . 9
2.4 Construction . . . . . . . . . . . . . . . . . . . . . . . . . . . . . . . . . . . . . . . . . . . . . . . 9
2.5 Operating and display elements . . . . . . . . . . . . . . . . . . . . . . . . . . . . . . . 10
3Use 11
3.1 Operation . . . . . . . . . . . . . . . . . . . . . . . . . . . . . . . . . . . . . . . . . . . . . . . . 11
3.2 After-running time . . . . . . . . . . . . . . . . . . . . . . . . . . . . . . . . . . . . . . . . . . 12
3.3 Intensive level . . . . . . . . . . . . . . . . . . . . . . . . . . . . . . . . . . . . . . . . . . . . . 12
3.4 Illumination . . . . . . . . . . . . . . . . . . . . . . . . . . . . . . . . . . . . . . . . . . . . . . . 13
4 Care and maintenance 14
4.1 Cleaning the housing . . . . . . . . . . . . . . . . . . . . . . . . . . . . . . . . . . . . . . . 14
4.2 Cleaning the grease filters . . . . . . . . . . . . . . . . . . . . . . . . . . . . . . . . . . . 15
4.3 Replacing the standard activated charcoal filter . . . . . . . . . . . . . . . . . . . 16
4.4 Cleaning and replacing the long-life activated charcoal filter . . . . . . . . . 17
4.5 Changing the halogen light . . . . . . . . . . . . . . . . . . . . . . . . . . . . . . . . . . 19
5 Trouble-shooting 20
5.1 What to do if ... . . . . . . . . . . . . . . . . . . . . . . . . . . . . . . . . . . . . . . . . . . . . 20
6 Accessories and spare parts 21
7 Technical data 22
8Disposal 23
9Notes 24
10 Index 25
11 Repair service 27
3
Page 4

1 Safety precautions
The appliance corresponds to recognised technology standards
and the relevant safety regulations. Proper use of the appliance is
however essential to avoid damage and accidents. Please
therefore follow the precautions given in these operating instructions.
In accordance with the requirements of IEC 60335-1:
• This appliance is not intended for use by persons (including children) with
reduced physical, sensory or mental capabilities, or lack of experience and
knowledge, unless supervised or unless they have been given instruction
concerning the use of the appliance by a person responsible for their
safety.
1.1 Before using for the first time
• The appliance must be installed and connected up to the electricity supply
according to the separate installation instructions. The necessary work
should be carried out by a qualified fitter or electrician.
• Dispose of the packaging material in accordance with local regulations.
4
Page 5

1 Safety precautions
1.2 Correct use
• The appliance is designed for use in the home for extracting cooking fumes
and smells from above the cooking surface.
• Any repairs, modifications or manipulations to the appliance, especially
any electrically live parts, should only be carried out by the manufacturer,
its Customer Services or similarly qualified persons. Repairs if carried out
incorrectly may cause serious injury, damage to the appliance and fittings,
as well as affect the functioning of the appliance. If the appliance is not
working properly or in case of a repair order, follow the instructions given
in the 'Repair service' section. Please contact our Customer Services if
necessary.
• Use original spare parts only.
• Retain these operating instructions for future reference. If you sell or pass
the appliance on to a third party, please ensure these operating instructions, together with the installation instructions, accompany the appliance.
In this way, the new owner can inform themselves about how to use the
appliance correctly and read the pertinent safety precautions.
1.3 Children in the home
• Packaging material e.g. plastic and polystyrene can be dangerous for
children. Danger of suffocation! Please keep packaging material away from
children.
• The appliance is designed for use by adults who are familiar with these
operating instructions. Children are often unable to recognise the danger
of electrical appliances. Ensure proper supervision and do not allow
children to play with the appliance – there is a danger that children could
hurt themselves.
5
Page 6

1 Safety precautions
1.4 Note on use
• If the appliance is visibly damaged, do not use it. Contact our Customer
Services.
• If the appliance is not operating properly, disconnect it from the electricity
supply immediately.
• If the mains cable of the appliance is damaged, it must be replaced by
Customer Services in order to avoid hazard.
• Caution: Accessible parts may become hot when used with cooking
appliances.
• Do not flambé food underneath the hood as the grease filters if laden with
grease could catch fire.
• If frying on the cooking surface, do not leave the frying appliance
unattended. The cooking oil in the frying appliance could overheat and
catch fire. Constantly monitor the temperature of the cooking oil, keeping
it below the temperature at which it can catch fire. Change the cooking oil
regularly – dirty oil catches fire more easily than clean oil.
• Clean the filters regularly. Failure to do so can increase the fire hazard due
to the build-up of grease in the grease filter.
• Do not operate the individual cooking zones of the cooking surface without
a pan on them or with an empty pan on them so as to avoid damaging the
appliance or the kitchen fittings through a build-up of heat. Avoid open fires
with oil, gas, wood and coal fired cookers.
• Ensure there is adequate ventilation when the extraction fan is on so as to
avoid creating a disturbing underpressure in the kitchen and to achieve
optimal air extraction.
• Avoid a cross-current of air, which could blow the cooking vapours over
the cooking area.
6
Page 7

1 Safety precautions
• If other appliances – fuelled by gas or other fuels – are being used at the
same time, ensure that there is a sufficient supply of fresh air. This does
not apply to air recirculation appliances.
• If other firing systems are being used at the same time (e.g. wood, gas, oil
or coal-fired heating appliances), safe operation is only possible providing
a room negative pressure of 4 Pa (0.04 mbar) is not exceeded at the
location of the appliance. Risk of toxic fumes! An adequate flow of fresh air
must be guaranteed e.g. via non-closable openings in doors or windows
and in combination with an air-intake/exhaust-air wall box or by other
technical means.
• When carrying out maintenance work on the appliance, including replacing
the light bulb, cut off the electricity supply to the appliance (remove the
screw fuse from the holder or switch the circuit breaker off, or disconnect
from the mains supply).
• When cleaning the appliance make sure no water gets inside the
appliance. Use a moderately damp cloth. Do not spray the inside or
outside of the appliance with water. Do not use a steam cleaner. If water
gets inside the appliance, it can cause damage.
7
Page 8

2 Appliance description
The appliance is designed to extract cooking fumes and smells from the
cooking area.
This particular model can be used to extract or recirculate air.
2.1 Extraction model
The integrated fan extracts cooking fumes and smells from above the
cooking surface. The air is cleaned through the grease filters and then fed
through the exhaust air conduit to the outside.
When the appliance is in use, ensure there is a sufficient supply of
fresh air to replace the air that is being extracted.
2.2 Recirculation model
The fumes over the hob are largely removed by the metal grease filter through
activated charcoal and then recirculated back into the room through the side
air slits in the hood.
If the appliance is not equipped with an activated charcoal filter, one
should be ordered and installed prior to initial use. In addition, the
saturation indicator for the activated charcoal filter must be activated.
8
Page 9
2 Appliance description
2.3 Equipment
• 1 Extractor fan
• Illumination
• 2, 3 or 4 metal grease filters
• 1 activated charcoal filter (only for recirculation mode, not included in
scope of delivery)
The extractor fan has four power levels
• 1 = low, 2 = medium, 3 = high power and the intensive level.
• Levels 1–3 are suitable for continuous operation.
• The intensive level is used for brief, intensive extraction of fumes, e.g. when
searing. The intensive level can be run for five minutes.
2.4 Construction
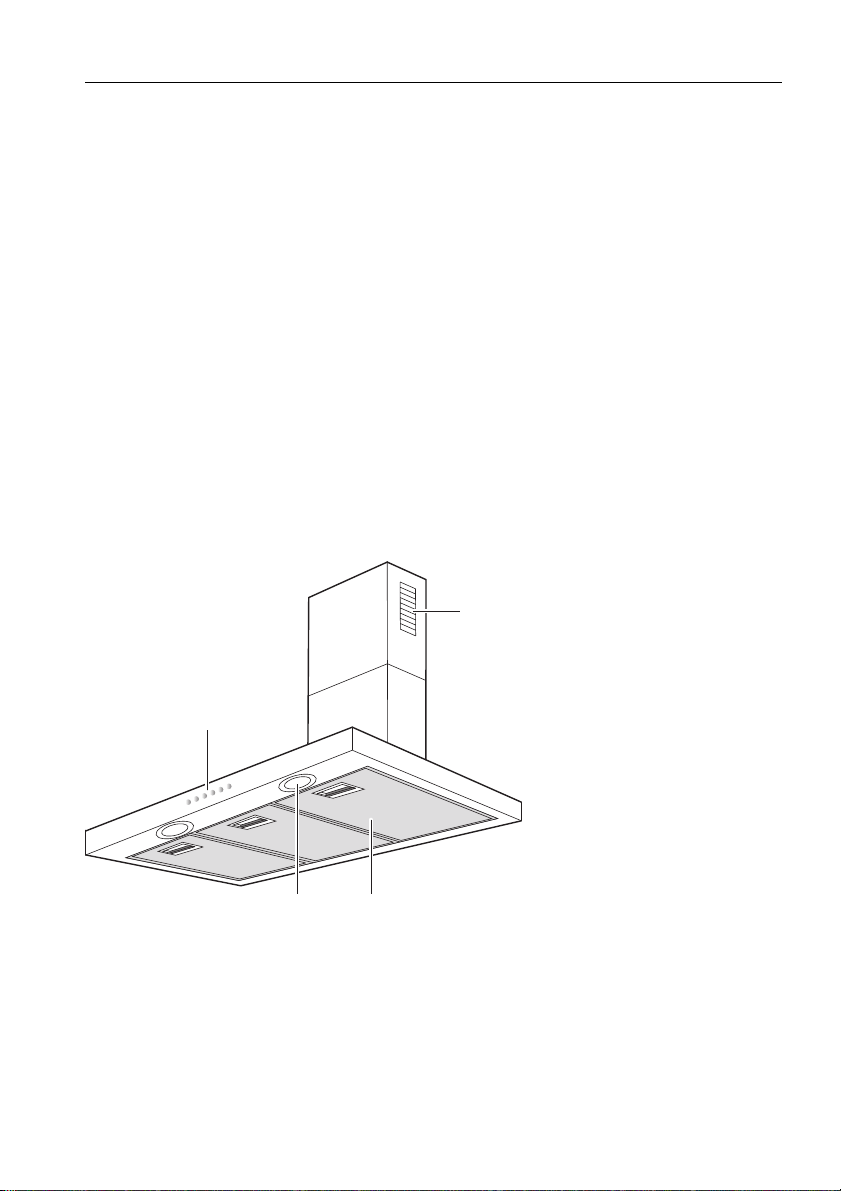
4
1
32
1 Operating elements
2 Metal grease filter
3 Illumination
4 Air recirculation with recirculation model
9
Page 10
2 Appliance description
2.5 Operating and display elements
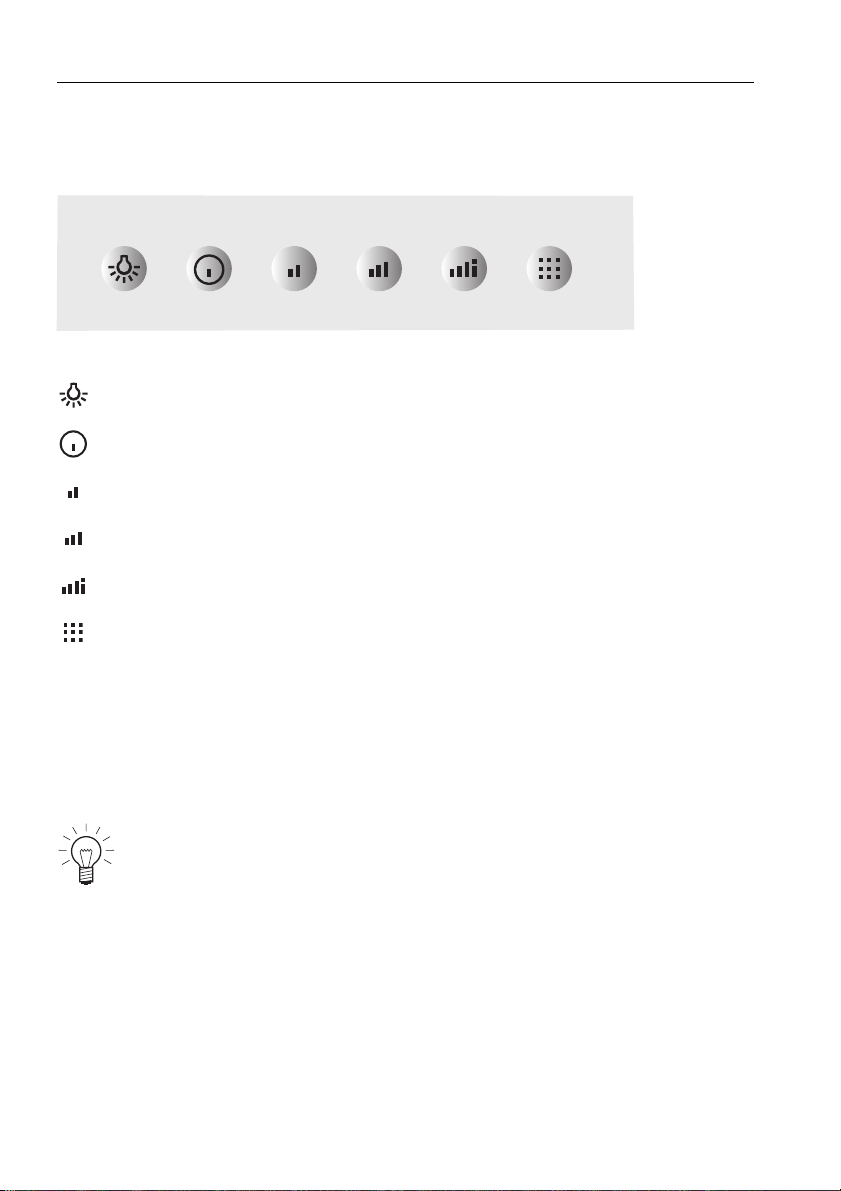
Illumination ON/OFF
Power level 1/Switch OFF
Power level 2
Power level 3
Intensive level
Filter saturation indicator
– Flashing: Cleaning the grease filters
Cleaning the long-life activated charcoal filters
(when present)
– Luminous: Replacing the standard activated charcoal filters
(when present)
Depending on the model and features, the specification of the
appliance may differ from the standard specification described herein.
10
Page 11
3Use
3.1 Operation
Switching the appliance on
➤ Pressing the / / or button switches the appliance on at
power level 1, 2, 3 or Intensive.
– The corresponding button illuminates to indicate which power level is
being used.
We recommend switching the appliance on at power level 1 some
5 minutes before cooking. Use a low power level for normal cooking
smells and a higher power level for very strong cooking fumes and
smells.
Switching the appliance off
➤ Select power level 1.
➤ Press the button repeatedly to switch the appliance off.
After you have finished cooking, allow the appliance to run for another
15 minutes so that the cooking fumes and smells can be extracted.
11
Page 12
3 Use
3.2 After-running time
➤ Press the / / or button to select the desired power level.
➤ Hold the / / or button depressed for at least 3 seconds to
activate the after-running time.
– An acoustic signal is emitted.
– The button flashes and the after-running time is activated.
With the after-running time function, the appliance keeps running according
to the following table and then switches off.
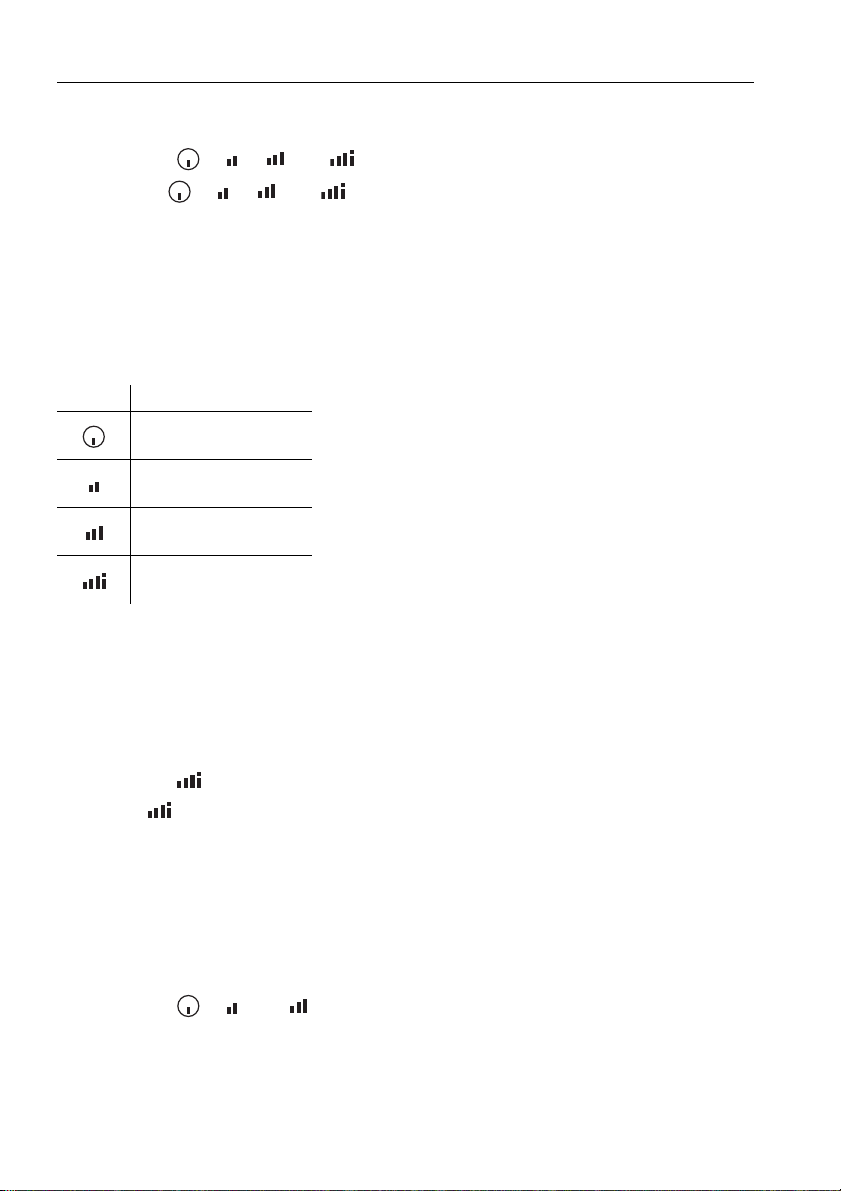
Button After-running time
20 minutes
15 minutes
10 minutes
5 minutes
3.3 Intensive level
The intensive level can be selected irrespective of whether the appliance is
switched on or off.
➤ Press the button to switch the intensive level on for 5 minutes.
– The button lights up.
• If another power level had been running beforehand, then the
appliance will automatically revert to this power level after the
5 minutes has elapsed.
• If the appliance had not been switched on beforehand, then the
appliance will automatically switch off after the 5 minutes has elapsed.
➤ Press the / or button to stop the intensive level before the
5 minutes has elapsed.
12
Page 13
3 Use
3.4 Illumination
➤ Press the button to switch the illumination on.
➤ Repeatedly press the button to switch the illumination off.
The illumination can be used independently of the extractor fan.
Saturation indicator for grease filter
The button flashes after 40 operating hours. The saturation level is
reached and the grease filters must be cleaned.
Saturation indicator for the standard activated charcoal filter
The button illuminates after 160 operating hours. The saturation level is
reached and the standard activated charcoal filter must be replaced.
The saturation indicator is deactivated at the factory. If the appliance
is being used as a recirculation model, the saturation indicator must
first be activated.
Activate:
➤ Switch off the appliance.
➤ Hold the button (doesn’t light up) depressed for at least 3 seconds.
– An acoustic signal is emitted.
– The button lights up, as long as it is pressed.
– The recirculation mode is activated.
Deactivate:
➤ Switch off the appliance.
➤ Hold the button (lights up) depressed for at least 3 seconds.
– An acoustic signal is emitted.
– The button light goes out.
– The recirculation mode is deactivated.
13
Page 14

4 Care and maintenance
4.1 Cleaning the housing
Take care that no water gets into the housing of the appliance! If
water gets into the housing, it can cause damage.
Do not use abrasive cleaners, scouring pads, steel wool, etc. as
they can damage the surface.
Remove the screw fuse or switch off the circuit breaker.
Cleaning the outside/inside
➤ Clean the outside using a slightly damp cloth – and detergent if necessary
– and wipe dry.
Grease and condensate water can build up on the inside next to the grease
filters.
➤ Clean using a slightly damp cloth – and detergent if necessary – and wipe
dry.
14
Page 15
4 Care and maintenance
4.2 Cleaning the grease filters
The grease filters should be cleaned at least once a month with normal use
or whenever the button flashes. If properly cared for, the grease filters
should provide unlimited years of service.
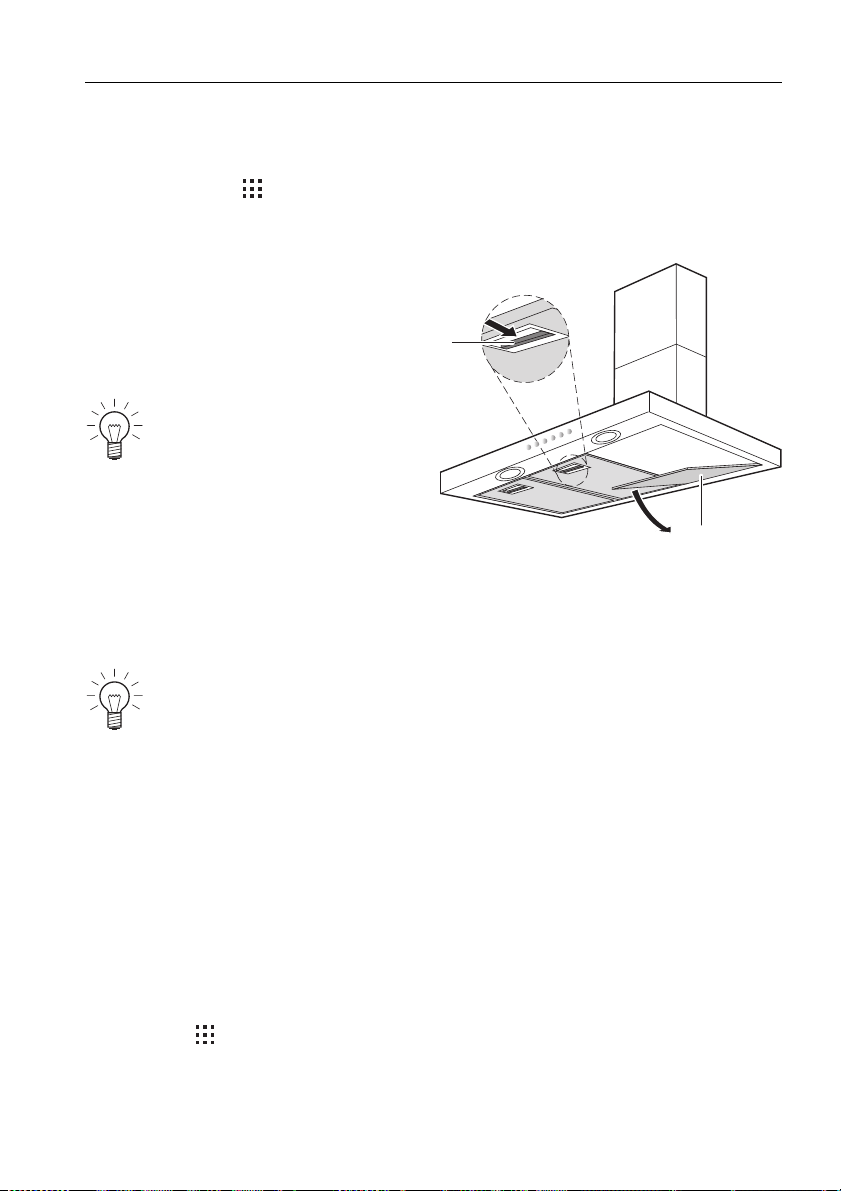
Removing
➤ Press back the grip 2 on the
grease filter 1.
➤ Carefully pull the grease filter
down and out of the fixture.
Take care not to damage the
grease filters.
Cleaning
➤ The grease filters can be cleaned in a dishwasher.
➤ Select an «intensive» – or «heavy soil» – wash programme with a warm
pre-wash.
Cleaning may cause the grease filters to become discoloured.
However, this will not affect the functioning of the filter in any way.
2
1
If you do not have a dishwasher:
➤ Clean the grease filters in the sink with hot water and detergent.
➤ Then soak the filters in hot water in the sink for about 2 hours and finally
clean with a washing-up brush.
Replacing
➤ Insert the grease filter into the slots at the back.
➤ Push the grip back.
➤ Swing the grease filter up and engage in position.
➤ Hold the button depressed for at least 3 seconds.
➤ The flashing button light goes out.
15
Page 16
4 Care and maintenance
4.3 Replacing the standard activated charcoal filter
Standard activated charcoal filters are only used in the recirculation model.
A standard activated charcoal filter becomes less effective with use. With
normal use, it has to be changed at least every 4 months or whenever the
button lights up. It cannot be washed or regenerated.
A dirty standard activated charcoal filter can be disposed of with the
household waste.
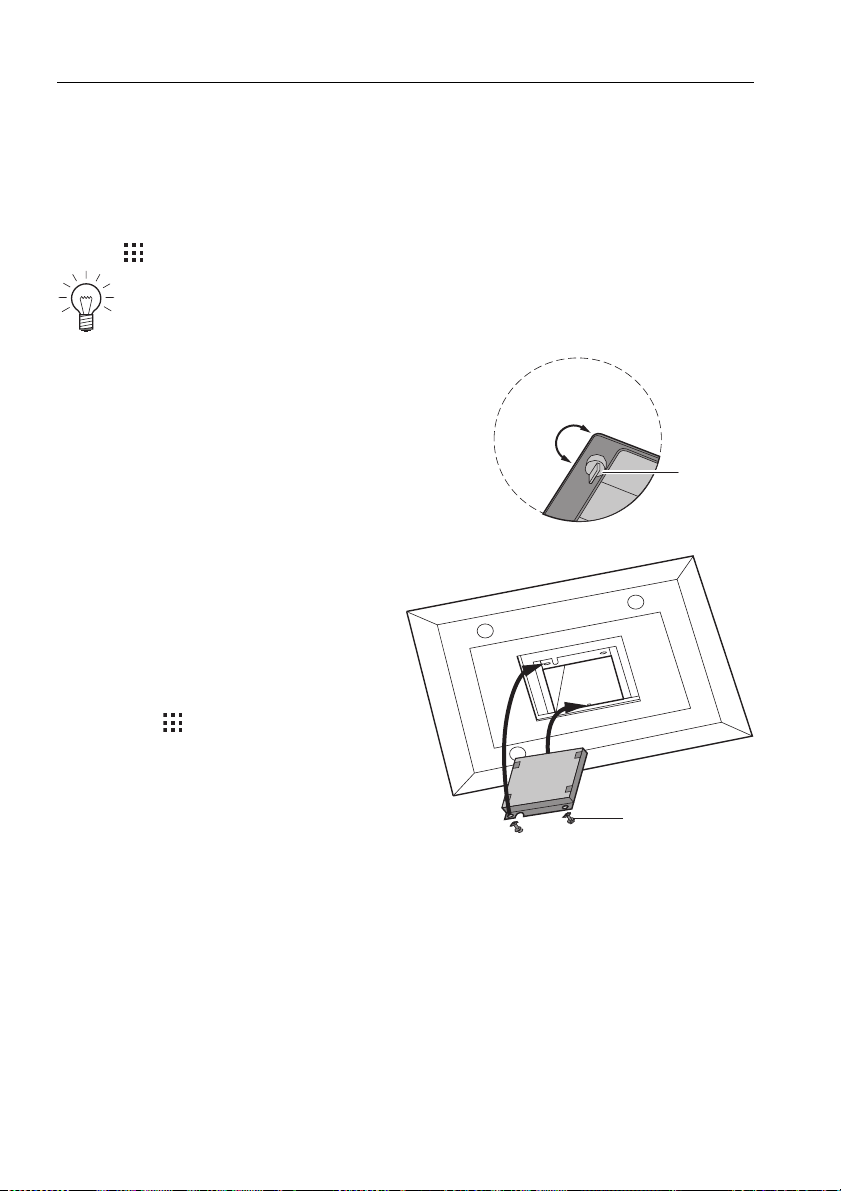
➤ Remove the grease filter and
clean it.
➤ Turn the two locking knobs A by
90° and remove the standard
activated charcoal filter by pulling
it down.
➤ Insert the new standard activated
charcoal filter until it latches at the
back and secure it in the front
with the locking knobs.
➤ Reinsert the grease filter.
➤ Replace the fuse resp. switch the
circuit breaker back on again.
➤ Hold the button depressed for
at least 3 seconds.
– The luminous button light goes
out.
90˚
A
A
16
Page 17

4 Care and maintenance
4.4 Cleaning and replacing the long-life activated charcoal filter
Long-life activated charcoal filters are only used in the recirculation mode.
Unlike the standard activated charcoal filter, the long-life activated charcoal
filter can be cleaned and reactivated. The long-life activated charcoal filter
should be changed ever month with normal use or whenever the button
flashes.
The filter can be cleaned in a dishwasher at 65 °C (select an «intensive» resp.
«heavy soil» wash programme). Wash the filter separately so that it does not
become clogged with food particles.
If it is not possible to wash the filter in a dishwasher, soak the filter in 60 °C
water and detergent for one hour. Then rinse well.
To reactivate the activated charcoal, dry the filter without the frame in the
oven.
➤ Select top and bottom heat or hot air and set the temperature to 100 °C.
Place the filter on a wire shelf and allow to dry for 60 minutes.
The long-life activated charcoal filter needs to be replaced after about
3 years as its ability to absorb odours declines. The spent long-life
activated charcoal filter can be disposed of in the household waste.
17
Page 18
4 Care and maintenance
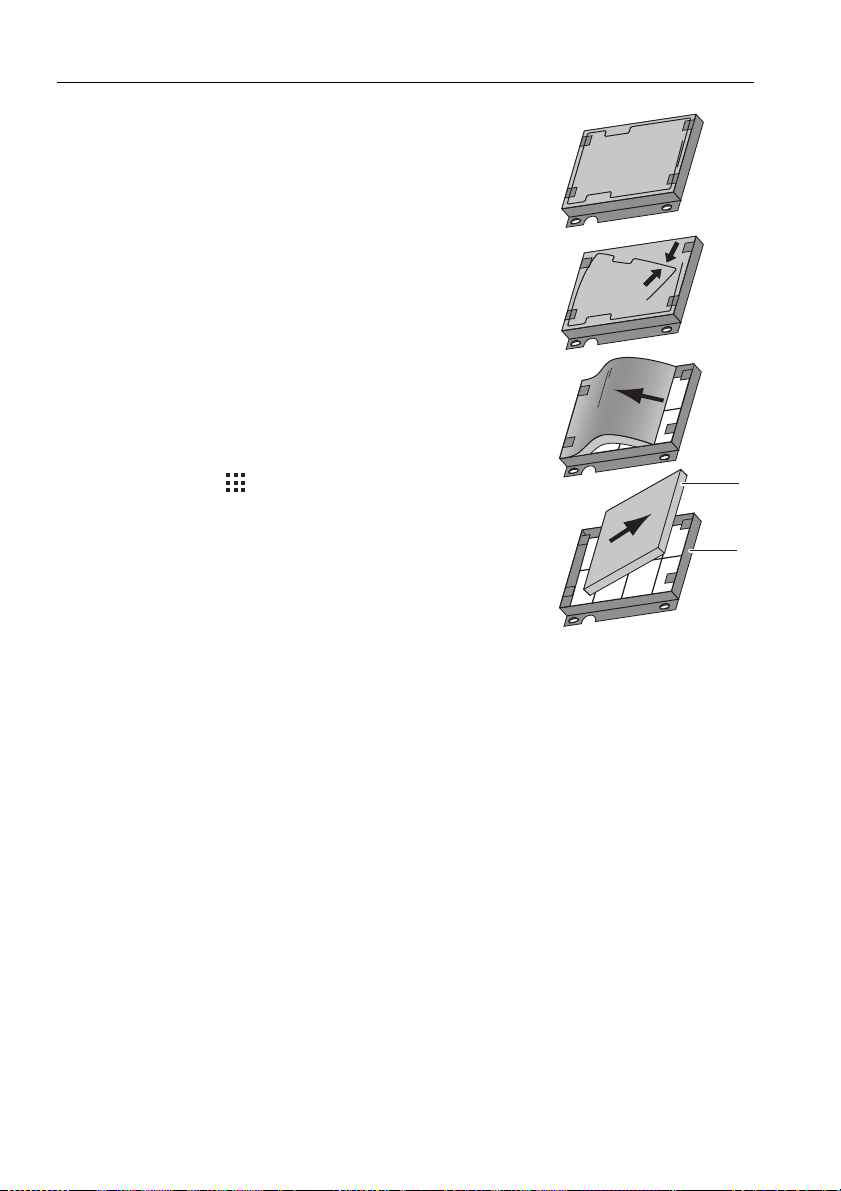
➤ Remove and clean the grease filter.
➤ Turn both knobs 90° and remove the long-life
activated charcoal filter from the bottom.
➤ Remove, clean, reactivate and replace the filter 1
into the frame 2. Take care not to damage the filter.
If necessary, replace the used long-life activated
charcoal filter by a new one.
➤ Replace the long-life activated charcoal filter and
engage it at the back and secure at the front with the
knobs.
➤ Replace the grease filter.
➤ Replace the fuse resp. switch the circuit breaker
back on again.
➤ Hold the button depressed for at least 3 seconds.
– The flashing button light goes out.
1
2
18
Page 19
4.5 Changing the halogen light
Remove the screw fuse or switch off the circuit breaker.
Halogen lights get hot during operation! Allow to cool down first.
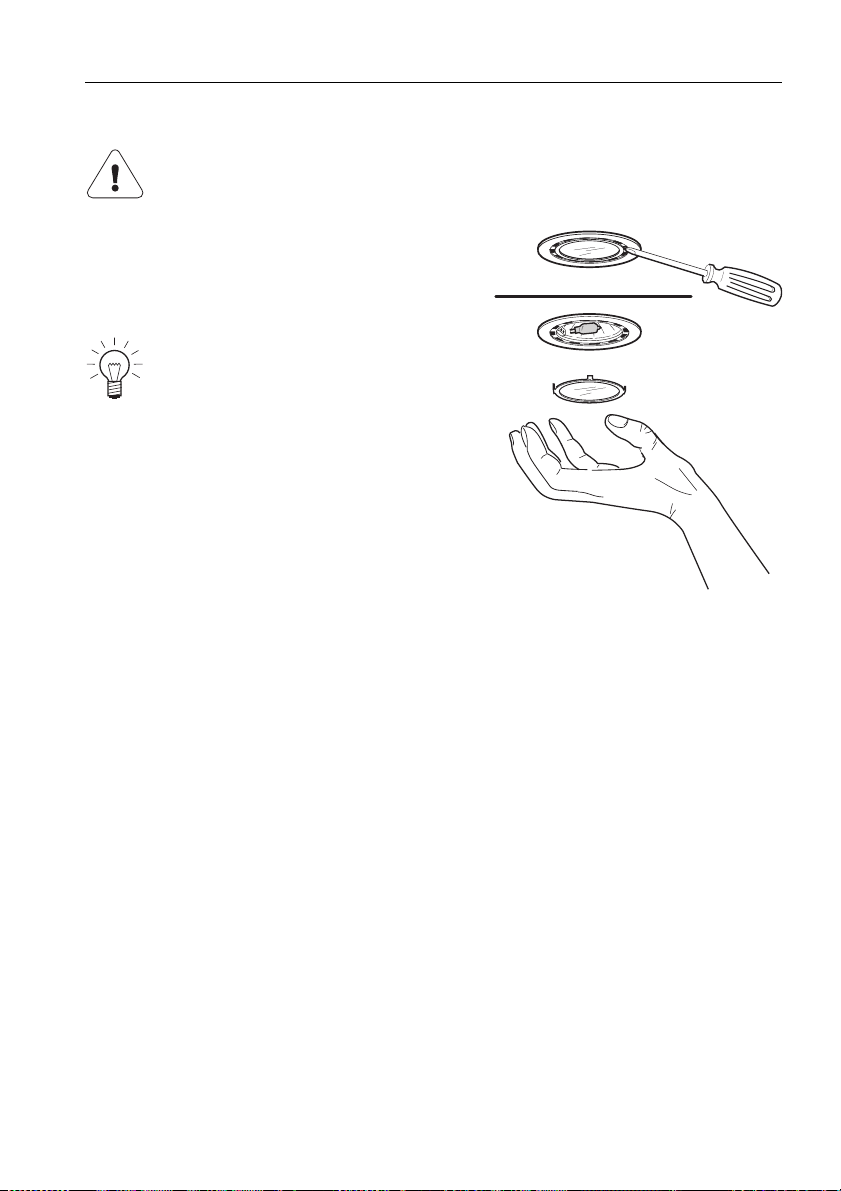
➤ Using a small screw driver, carefully lever
the ring out.
➤ Replace the defective halogen light with a
bulb of the same type (max. 20 watts).
Avoid touching the new halogen
light with bare hands. Use a soft,
dry, grease-free cloth.
➤ Clean the ring and the glass.
➤ Fit the ring and the glass back into the
openings.
➤ Replace the fuse resp. switch the circuit
breaker back on again.
4 Care and maintenance
19
Page 20

5 Trouble-shooting
5.1 What to do if ...
… the illumination is not working
Possible cause Solution
• Fuse or circuit breaker for
electrical installations in
the home is faulty.
• Interruption in the power
supply.
• The halogen light is faulty.
… the appliance is not extracting the cooking fumes and smells
satisfactorily
Possible cause Solutions
• The grease filters are
dirty.
• The activated charcoal
filter (in recirculation
models) is spent.
➤ Replace the fuse.
➤ Reset the circuit breaker.
➤ Check the power supply.
➤ Replace the halogen light.
➤ Clean the grease filters.
➤ Change the standard activated charcoal
filter.
➤ Clean or change the long-life activated
charcoal filter.
20
Page 21
6 Accessories and spare parts
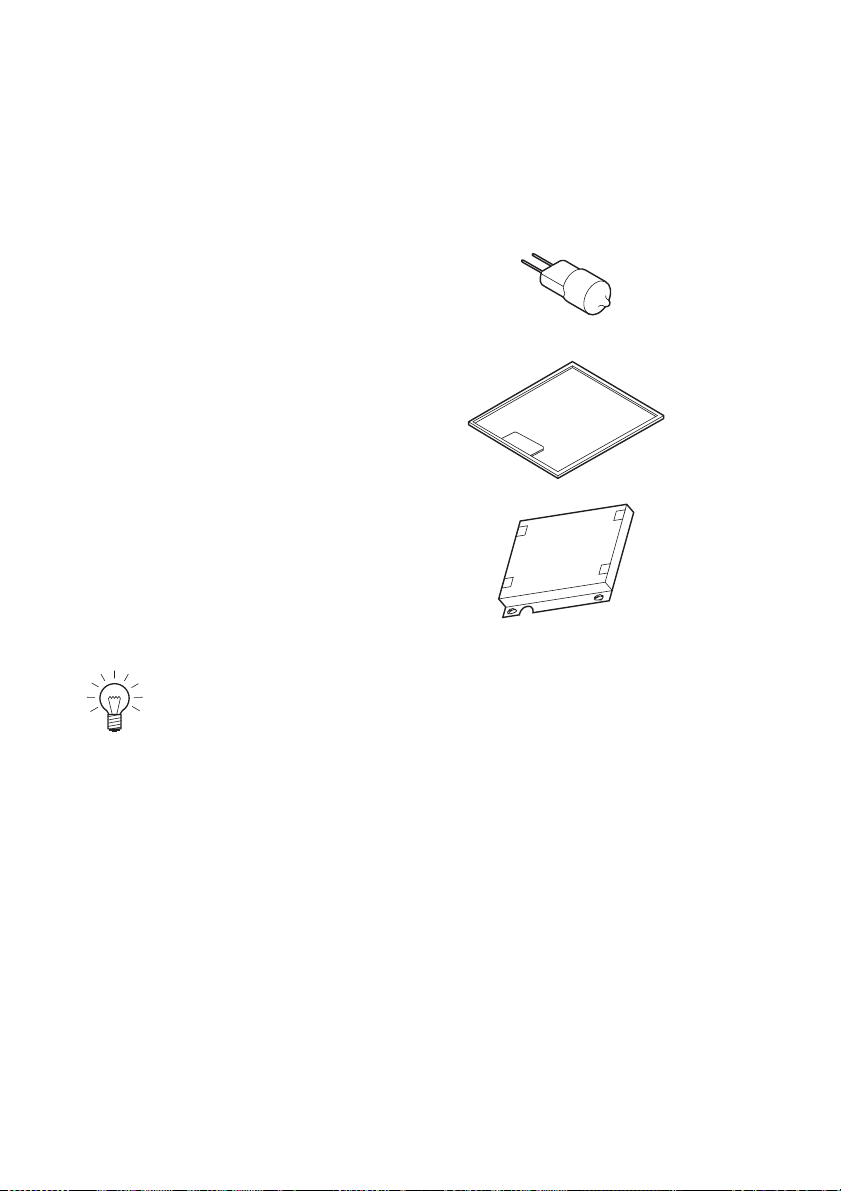
Please give model number and exact description when ordering parts.
Halogen light
Metal grease filter
Standard activated charcoal filter
Long-life activated charcoal filter
The halogen light is also available from specialist retailers.
21
Page 22

7 Technical data
Electrical connection
➤ See identification plate.
➤ Remove the grease filter.
– The identification plate is located on the inside of the appliance.
22
Page 23
8 Disposal
Packaging
• All packaging materials (cardboard, plastic film (PE) and polystyrene
(EPS)) are marked and should, if possible, be collected for recycling and
disposed of in an environmentally friendly way.
Disconnection
• Disconnect the appliance from the mains. With a fixed appliance, this is to
be carried out by a qualified electrician!
Safety
• Disable the appliance to prevent accidents caused by improper use,
especially through children playing.
• Pull the plug out of the mains socket or have the appliance disconnected
from the mains by a qualified electrician. Then cut off the mains cable.
Disposal
• The old appliance should not be discarded as worthless rubbish. If
disposed of correctly, the raw materials can be recovered for recycling.
• The symbol on the identification plate warns that the appliance may
not be disposed of in normal household waste.
• The appliance must be disposed of in accordance with local regulations
on waste disposal. For more information on the handling, disposal and
recycling of the product, please contact the local authorities, the local
recycling facilities for household waste or the retailer from whom you
purchased the appliance.
23
Page 24

9Notes
24
Page 25

10 Index
A
Accessories . . . . . . . . . . . . . . . . . . 21
Activated charcoal filter . . . . . . . . . . 8
After-running time . . . . . . . . . . . . . 12
Appliance
Switch on. . . . . . . . . . . . . . . . . . . 11
C
Care. . . . . . . . . . . . . . . . . . . . . . . . 14
Children in the home . . . . . . . . . . . . 5
Cleaning . . . . . . . . . . . . . . . . . . . . 14
Long-life activated charcoal
filter . . . . . . . . . . . . . . . . . . . . . . . 17
Construction . . . . . . . . . . . . . . . . . . 9
D
Disconnection . . . . . . . . . . . . . . . . 23
Display elements . . . . . . . . . . . . . . 10
Disposal. . . . . . . . . . . . . . . . . . . . . 23
E
Electrical connection . . . . . . . . . . . 22
Equipment . . . . . . . . . . . . . . . . . . . . 9
Extraction model . . . . . . . . . . . . . . . 8
F
Faults. . . . . . . . . . . . . . . . . . . . . . . 20
Filter
Combi filter . . . . . . . . . . . . . . . . . 15
Metal grease filter . . . . . . . . . . . . 15
G
Grease filters
Cleaning . . . . . . . . . . . . . . . . . . . 15
Removing . . . . . . . . . . . . . . . . . . 15
Replacing . . . . . . . . . . . . . . . . . . 15
Saturation indicator . . . . . . . . . . . 13
H
Halogen light . . . . . . . . . . . . . . . . . 19
I
Identification plate . . . . . . . . . . . . . 22
Illumination . . . . . . . . . . . . . . . . 9, 13
Intensive level . . . . . . . . . . . . . . . . 12
L
Long-life activated charcoal filter
Cleaning and replacing . . . . . . . . 17
M
Maintenance . . . . . . . . . . . . . . . . . 14
Metal grease filter . . . . . . . . . . . . . . 9
Model no. . . . . . . . . . . . . . . . . . . . . 2
O
Operating elements . . . . . . . . . . 9, 10
P
Packaging . . . . . . . . . . . . . . . . . . . 23
Q
Quick instructions . . . . . . . . . . . . . 28
25
Page 26

10 Index
R
Recirculation model . . . . . . . . . . . . . 8
Repair service . . . . . . . . . . . . . . . . 27
S
Safety . . . . . . . . . . . . . . . . . . . . . . 23
Safety precautions
Before using for the first time . . . . . 4
Children in the home . . . . . . . . . . . 5
Correct use . . . . . . . . . . . . . . . . . . . 5
Note on use . . . . . . . . . . . . . . . . . . 6
Saturation indicator
Grease filters. . . . . . . . . . . . . . . . 13
Standard activated charcoal
filter. . . . . . . . . . . . . . . . . . . . . . . 13
Spare parts . . . . . . . . . . . . . . . . . . 21
Standard activated charcoal filter
Replacing . . . . . . . . . . . . . . . . . . . 16
Saturation indicator. . . . . . . . . . . . 13
Switching off . . . . . . . . . . . . . . . . . . 11
Symbols . . . . . . . . . . . . . . . . . . . . . . 2
T
Technical data . . . . . . . . . . . . . . . . 22
Type . . . . . . . . . . . . . . . . . . . . . . . . . 2
U
Using for the first time. . . . . . . . . . . . 4
V
Validity . . . . . . . . . . . . . . . . . . . . . . . 2
26
Page 27

11 Repair service
TROUBLE-SHOOTING section will help you to carry out small
The
repairs yourself, saving you the time and trouble of calling out a
service technician and the cost that goes along with it.
Whether you contact us about a malfunction or an order, please always state
the serial number (FN) and the model type of your appliance. Enter these
details below and also on the service sticker which comes with the appliance.
Stick it in a conspicuous place or in your telephone or address book.
FN
You will also find the same details on the certificate of guarantee, the original
sales invoice and the identification plate of the appliance.
➤ Remove metal grease filter.
– The identification plate is located on the inside of the appliance.
Appliance
27
Page 28
Quick instructions
Please first read the safety precautions in the operating instructions!
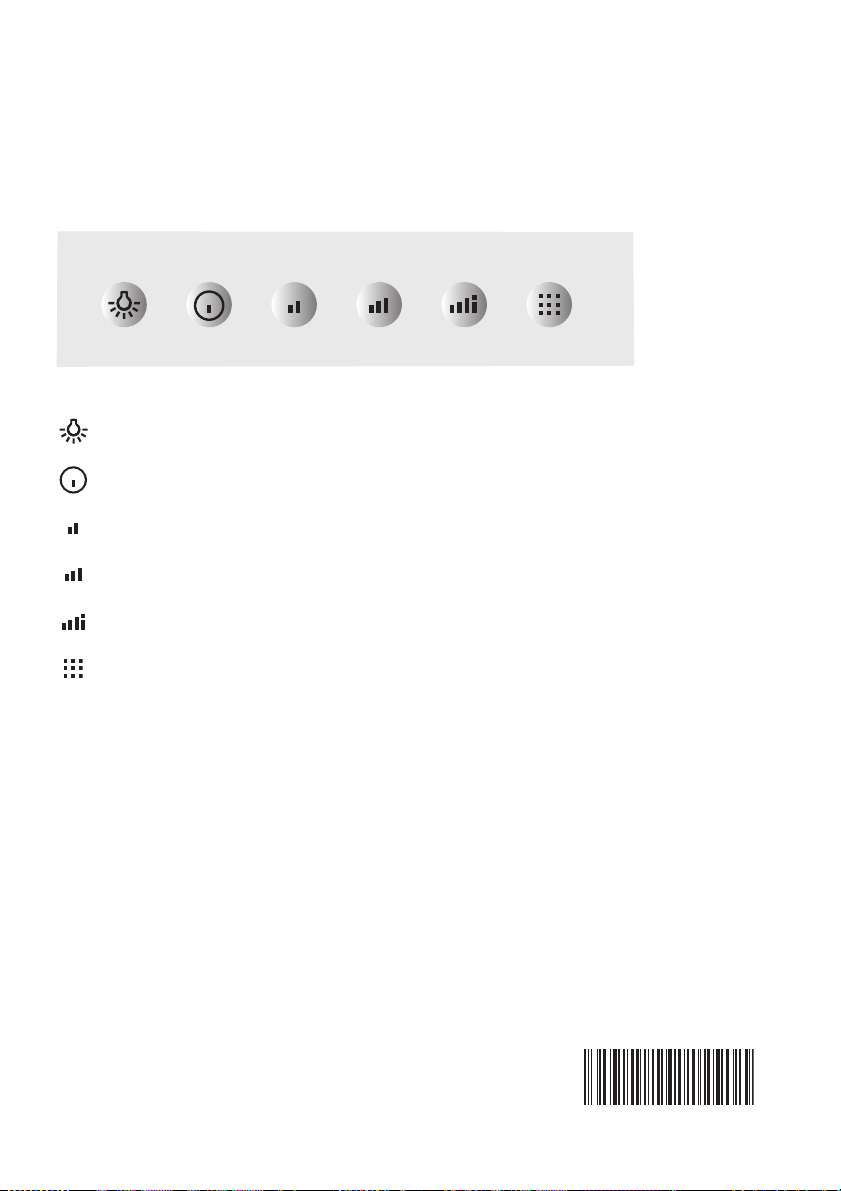
Illumination ON/OFF
Power level 1/Switch OFF
Power level 2
Power level 3
Intensive level
Filter saturation indicator
– Flashing: Cleaning the grease filters
Cleaning the long-life activated charcoal filters
(when present)
– Luminous: Replacing the standard activated charcoal filters
(when present)
V-ZUG Ltd
Industriestrasse 66, CH-6301 Zug
[email protected], www.vzug.com
J048.352-0
 Loading...