

Page 1
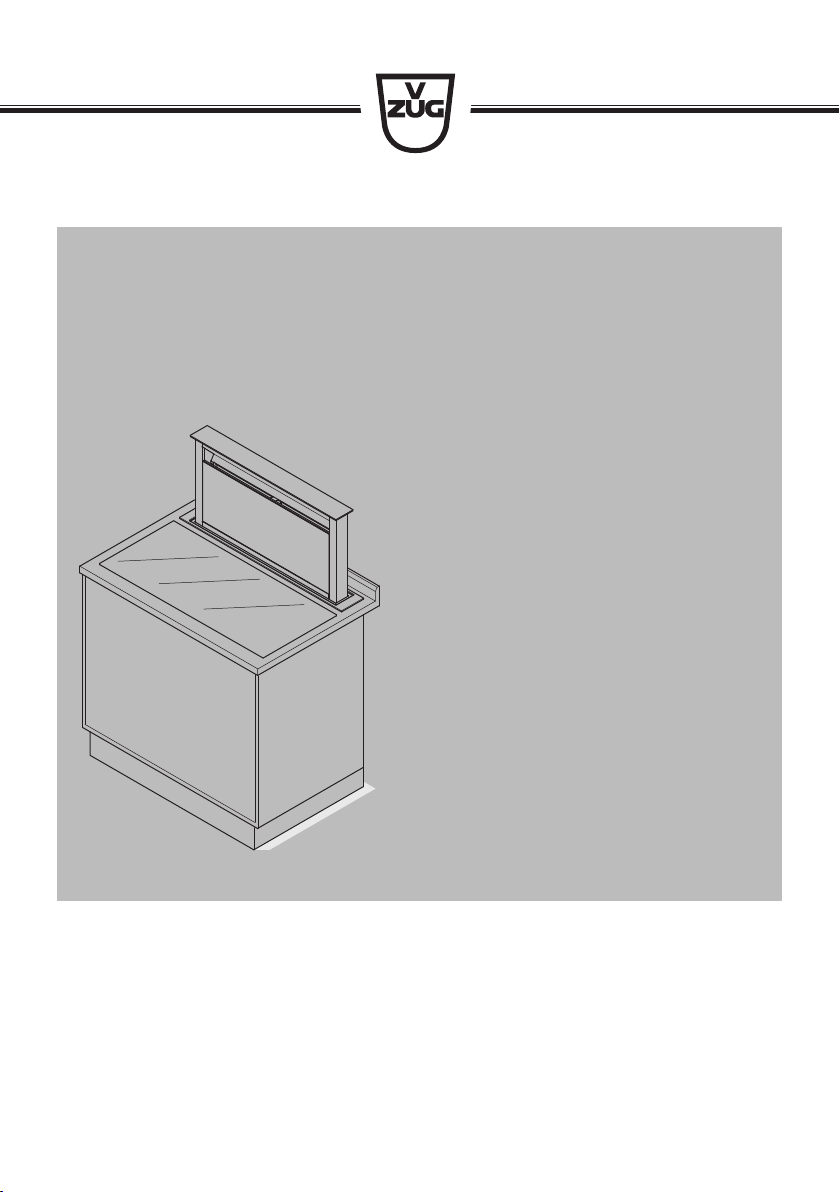
Operating instructions
DSTS9
Range hood
Page 2
Thank you for choosing to buy one of our products. Your appliance is made to high
standards and is easy to use. Nevertheless, please take the time to read these operating
instructions in order to familiarise yourself with the appliance and get the best use out of
it.
Please follow the safety precautions.
Modifications
Text, diagrams and data correspond to the technical standard of the appliance at the
time these operating instructions went to press. The right to make technical modifications
for the purpose of the further development of the appliance is reserved.
Validity
The product family (model number) corresponds to the first alphanumerics on the identification plate. These operating instructions apply to:
Type Product family Size system
DSTS9 64004 90
Variations depending on the model are noted in the text.
© V-ZUG Ltd, CH-6302 Zug, 2018
2
Page 3

Contents
1 Safety precautions 4
1.1 Symbols used......................................................... 4
1.2 General safety precautions.................................. 4
1.3 Appliance-specific safety precautions ............... 4
1.4 Instructions for use................................................ 5
2 Appliance description 7
2.1 Appliance description ...........................................7
2.2 Extraction model .................................................... 7
2.3 Recirculation model with long-life activated
charcoal filter.......................................................... 7
2.4 Operating and display elements......................... 7
2.5 Recirculation model with recirculation box....... 8
2.6 Features................................................................... 8
2.7 Construction ...........................................................8
3 Operating the appliance 9
3.1 Operation ................................................................9
3.2 Illumination.............................................................. 9
3.3 Changing the light intensity ................................. 9
3.4 Intensive level ......................................................... 9
3.5 After-running time ................................................10
3.6 Wipe protection....................................................10
3.7 CleanAir.................................................................10
3.8 Saturation indicators ........................................... 11
4 Care and maintenance 11
4.1 Cleaning the housing.......................................... 11
4.2 Metal grease filters..............................................12
4.3 Long-life activated charcoal filter......................14
4.4 Long-life activated charcoal filter display ........14
4.5 Cleaning the long-life activated charcoal filter .....
14
4.6 Recirculation box with activated charcoal filters
(option) ..................................................................15
5 Trouble-shooting 16
5.1 What to do if …..................................................... 16
6 Accessories and spare parts 17
7 Technical data 17
7.1 Product fiche ........................................................17
8 Disposal 19
9 Index 20
10 Notes 22
11 Service & Support 23
3
Page 4
1 Safety precautions
1.1 Symbols used
Denotes important safety precautions.
Failure to observe said precautions
can result in injury or in damage to
the appliance or fittings!
Information and precautions that
should be observed.
Information on disposal
Information about the operating instructions
▸ Indicates step-by-step instructions.
– Describes how the appliance reacts
to the steps taken.
▪ Indicates a list.
1.2 General safety precautions
▪ Read the operating instruc-
tions before using the appliance for the first time!
Cleaning and user maintenance shall not be undertaken
by children without supervision.
▪ If an appliance is not
equipped with a mains cable
and a plug or other means for
disconnecting from the mains
with a contact opening on
each pole complying with the
conditions of overvoltage category III for full isolation, an
isolating device must be incorporated into the permanently installed electrical installation in accordance with the
installation regulations.
▪ If the mains cable of this ap-
pliance is damaged, it must
be replaced by the manufacturer or its Customer Services
or a similarly qualified person
in order to avoid hazard.
▪ This appliance can be used
by children aged 8 and above
and by persons with reduced
physical, sensory or mental
capabilities, or lack of experience and/or knowledge,
provided they are supervised
or have been instructed on
the safe use of the appliance
and have understood the hazards involved. Children shall
not play with the appliance.
4
1.3 Appliance-specific safety precautions
▪ The room must be adequately
ventilated when operating the
range hood at the same time
as other appliances that burn
gas or other fuels.
▪ Observe the official regula-
tions for the exhaust-air layout.
Page 5

1 Safety precautions
▪ The extracted air must not be
fed into a chimney which is
used for exhausting fumes
from appliances burning gas
or other fuels.
▪ The minimum distance
between the supporting surface for the cooking equipment on the hob and the lowest part of the range hood
must be observed. If the
range hood is installed above
a gas appliance, this distance
must not be less than 65 cm.
If the installation instructions
for the gas hob stipulate a larger distance, this must be observed.
▪ WARNING: Before replacing
the light bulb, ensure the appliance is switched off and
disconnected from the mains
power supply to avoid possible electric shock.
▪ When replacing a light bulb,
the maximum wattage rating
of replaceable light bulbs
must be visible.
▪ This appliance is intended for
use in the home and similar
settings such as: in staff kitchens in shops, offices and
other commercial establishments; in agricultural establishments; by guests in hotels,
motels and other accommodation establishments; in bed
and breakfast establishments.
▪ Do not operate the appliance
using an external time switch
or a separate remote control
system.
▪ Failure to follow the cleaning
instructions may cause a fire
hazard.
▪ Do not flambé food under-
neath the range hood.
1.4 Instructions for use
Before using for the first time
▪ The appliance must be installed and
connected to the electricity supply in
accordance with the separate installation instructions. Have a qualified fitter/
electrician carry out the necessary
work.
▪ Observe the official regulations for the
exhaust-air layout.
▪ Dispose of the packaging material in
accordance with local regulations.
Correct use
▪ The appliance is designed for use in
the home for extracting cooking fumes
and smells from above the cooking surface.
▪ Any repairs, modifications or manipula-
tions to the appliance, especially any
electrically live parts, may only be carried out by the manufacturer, its customer service department or similarly
qualified persons. Repairs if carried out
incorrectly may cause serious injury,
damage to the appliance and fittings,
as well as affect the functioning of the
appliance. If the appliance is not working properly or in case a repair is
needed, follow the instructions given in
the 'Service & Support' section. Contact
our Customer Services if necessary.
5
Page 6

1 Safety precautions
▪ Use original spare parts only.
▪ Retain these operating instructions for
future reference.
Note on use
▪ If the appliance is visibly damaged, do
not use it. Contact our Customer Services.
▪ If the appliance is not functioning prop-
erly, disconnect it from the power supply immediately.
▪ Ensure there is adequate ventilation
when the extractor fan is on so as to
avoid creating underpressure in the kitchen and to achieve optimal air extraction.
▪ Avoid a cross-current of air, which
could blow the cooking vapours over
the cooking area.
▪ If other appliances – fired by gas or
other fuels – are being used at the
same time, ensure that there is a sufficient supply of fresh air. This does not
apply to air recirculation appliances.
▪ If other firing systems are being used at
the same time (e.g. wood, gas, oil or
coal fired heating appliances), safe operation is only possible providing a
room negative pressure of 4Pa
(0.04mbar) is not exceeded at the location of the appliance. Risk of toxic
fumes! An adequate flow of fresh air
must be guaranteed e.g. via non-closable openings in doors or windows and
in combination with an air-intake/exhaust-air wall box or by other technical
means.
▪ When cleaning the appliance make
sure no water gets inside it. Use a moderately damp cloth only. Do not spray
the inside or outside of the appliance
with water. Do not use a steam cleaner.
If water gets inside the appliance, it can
cause damage.
▪ Accessible parts may become hot when
used with cooking appliances.
Caution: Burns hazard!
▪ Do not leave the appliance unattended
when deep-frying on the cooking surface. The cooking oil in the deep-frying
appliance could overheat and catch
fire. Constantly monitor the temperature
of the cooking oil, keeping it below the
temperature at which it can catch fire.
Change the cooking oil regularly – dirty
oil catches fire more easily than clean
oil.
Caution: Risk to life!
▪ Packaging material, e.g. plastic film and
polystyrene, can be dangerous for children and animals. Danger of suffocation! Keep packaging material away
from children and animals.
▪ When carrying out maintenance work
on the appliance, including replacing
light bulbs, cut off the electricity supply
to the appliance: remove the screw fuse
from the holder or switch the circuit
breaker off, or disconnect from the
mains supply.
How to avoid damaging the appliance
▪ Observe the cleaning intervals. Failure
to do so can increase the fire hazard
due to the build-up of grease in the
metal grease filters.
6
Page 7
2 Appliance description
2.1 Appliance description
The appliance is designed for use in the home for extracting cooking fumes and smells
from above the cooking surface.
The model can be used to extract or recirculate air.
2.2 Extraction model
A fan draws cooking fumes and smells from above the cooking area. The metal grease
filters clean the extracted air, which is passed through a connecting pipe fitted with an integrated non-return valve and through the air duct to the outside.
When in use, ensure there is a sufficient supply of fresh air to replace the air that is
being extracted.
2.3 Recirculation model with long-life activated charcoal filter
The cooking fumes and smells above the cooking area are passed through the metal
grease filters and long-life activated charcoal filters, the odours are largely removed from
the air and it is then circulated back into the room.
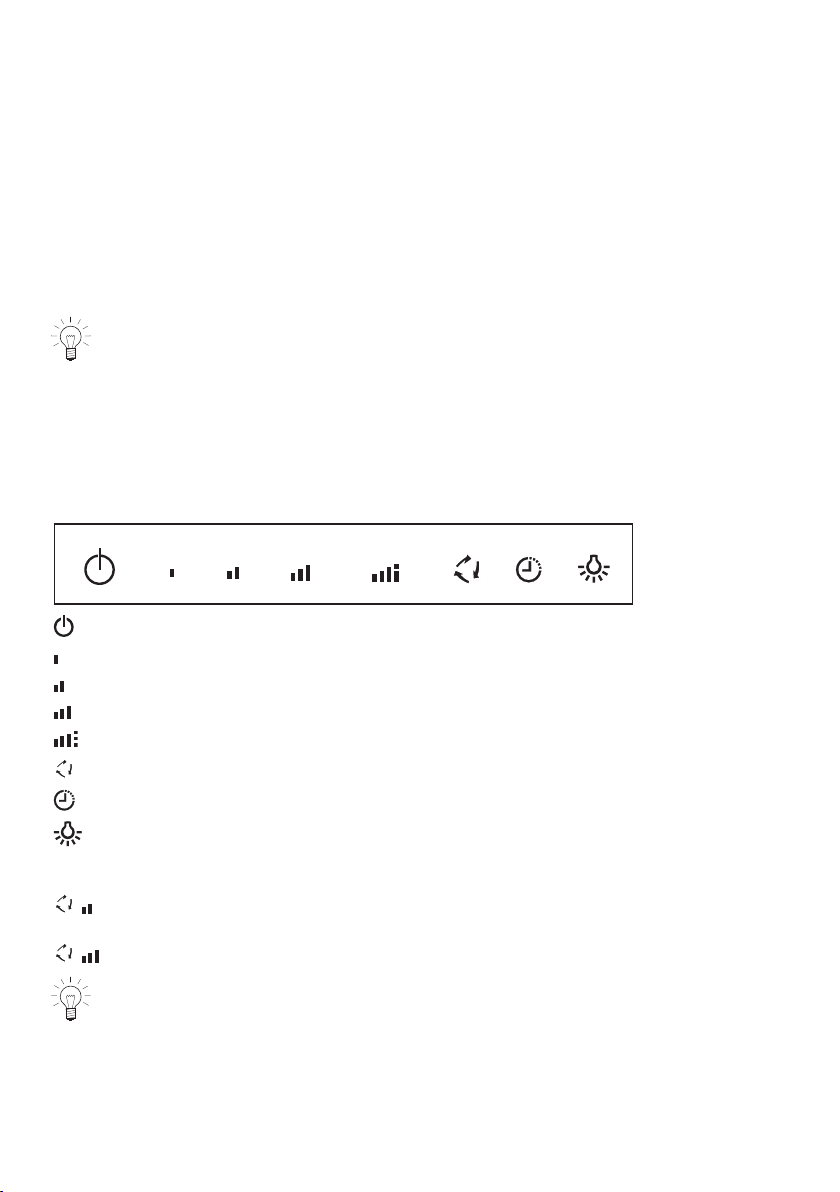
2.4 Operating and display elements
Switch on/off, extend/retract hood body
Power level 1
Power level 2, activate/deactivate wipe protection
Power level 3
Intensive level
CleanAir function (air extraction every hour for 10 minutes)
After-running time (delays switching-off of appliance by 15 minutes)
Touch button, switch illumination on at maximum intensity and off.
Depress the button for two seconds to switch the illumination on at
medium intensity.
Flashing Clean the metal grease filters, reactivate or replace the long-life ac-
/
Flashing Replacing the activated charcoal filter
/
Depending on the model and features, the specification of the appliance may differ
from the standard specification described herein.
tivated charcoal filters
7
Page 8
2 Appliance description
7
6
5
1
2
3
4
8
9
10
2.5 Recirculation model with recirculation box
After being filtered through the metal grease filters, the cooking fumes and smells above
the cooking area are passed through a recirculation box with integrated activated charcoal filters, the odours are largely removed from the air and it is then circulated back into
the room.
2.6 Features
▪ 1 extractor fan with 4 power levels
– Level 1 = low, 2 = medium, 3 = high extraction rate
– Power level 4 (intensive) is used for short bursts of intensive extraction of cooking
smells and fumes, and is available for 6 minutes.
▪ 2 metal grease filters (extraction/recirculation model)
▪ 2 long-life activated charcoal filters (recirculation model)
▪ Optional, separate recirculation box with activated charcoal filters (recirculation model)
▪ Illumination
▪ 1 panel, 1 mains cable, 2 holders (bottom), 2 holders (top), 2 angle brackets
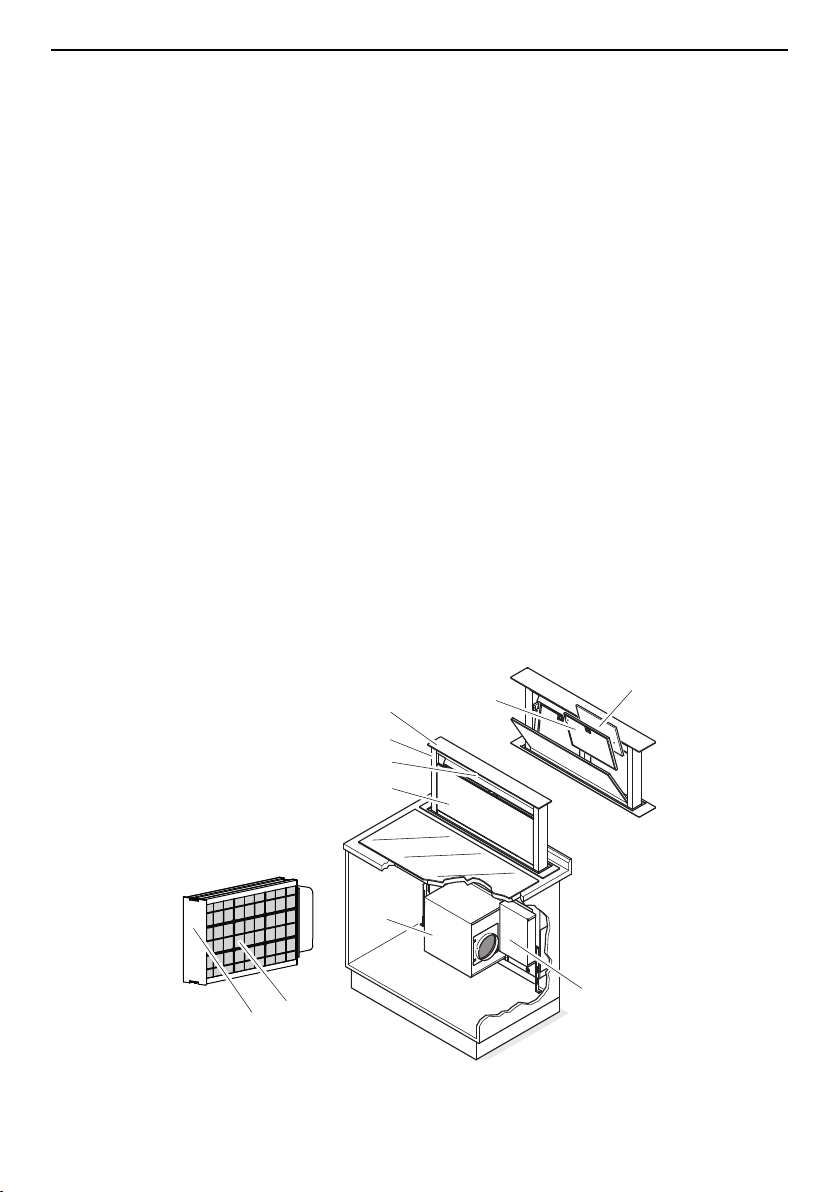
2.7 Construction
1. Operating and display elements
2.3.Extendable/retractable hood body
Illumination
4.5.Panel
Metal grease filters
6.7.Motor housing
Control unit
Options
8. Long-life activated charcoal filter (for recirculation air)
9. Activated charcoal filter for recirculation
box
10. Recirculation box (optional)
8
Page 9

3 Operating the appliance
3 Operating the appliance
3.1 Operation
Extending and switching on the appliance
▸ Hold the button depressed for 3 seconds.
– The hood body is extended and the appliance switches on at power level .
▸ Touching the / / or button switches the appliance on at power level 1, 2, 3 or
intensive.
– The corresponding button illuminates to indicate which power level is being used.
We recommend switching the appliance on at power level 2 some five minutes before starting to cook. Use a low power level for normal cooking smells and a
higher power level for very strong cooking fumes and smells.
Switching off the appliance and retracting the hood
▸ Touching the button switches the appliance off.
▸ Hold the button depressed for 3 seconds.
– The hood body is retracted.
After you have finished cooking, allow the appliance to run for another 15minutes
(see page 10) so that the cooking fumes and smells can be extracted.
Do not put your hands into the hood when the hood body is moving.
3.2 Illumination
▸ Touch the button.
– The illumination switches on at maximum intensity.
▸ Touch the button again.
– The illumination switches off.
3.3 Changing the light intensity
▸ When the illumination is switched on, hold the button depressed for two seconds.
– The light intensity lowers.
▸ When the light intensity is low, press the button.
– The light intensity increases.
▪ The illumination switches off if, prior to this, the button has been held depressed
for two seconds when the light intensity is low or if it is pressed when the light intensity is normal.
3.4 Intensive level
▸ Touch the button.
– The button flashes.
– The intensive level switches on.
▪ If another power level had been running beforehand, then the appliance will automat-
ically revert to this power level after six minutes has elapsed.
9
Page 10

3 Operating the appliance
▪ If the appliance had not been switched on beforehand, then the appliance will auto-
matically switch off after the six minutes has elapsed.
▸ Touch the or button.
– The button stops flashing.
– The intensive level switches off before time.
3.5 After-running time
In the after-running time, the motor, fan blades and illumination run for another 15
minutes and then switch off automatically.
▸ Touch the / or button and select the desired power level.
▸ Touch the button.
– The after-running time switches on.
– The button illuminates for 15minutes.
▸ Touch the button again.
– The button no longer illuminates.
– The after-running time switches off before time.
3.6 Wipe protection
Activating wipe protection
▸ With the appliance is switched off, hold the button depressed for five seconds.
– Wipe protection is activated, all the buttons flash in sequence from left to right.
Wipe protection is useful when cleaning the appliance.
Deactivating wipe protection
▸ Hold the button depressed for five seconds.
– Wipe protection is deactivated.
3.7 CleanAir
Switching the CleanAir function on/off
▸ Touch the button.
– The level illuminates.
– The button flashes.
– The appliance switches on every hour for 10 minutes.
▸ Touch the or button.
– The button and the level no longer illuminate.
– The CleanAir function switches off.
10
Page 11

4 Care and maintenance
3.8 Saturation indicators
Saturation indicator for metal grease filters and long-life activated charcoal
filters
The and buttons flashes after 100 operating hours.
The saturation level has been reached and the metal grease filters and long-life activated charcoal filters must be cleaned.
Activating/deactivating the saturation indicator (recirculation models)
▸ Hold the button depressed for five seconds.
– The recirculation mode is activated.
▸ Hold the button depressed for five seconds to deactivate the recirculation mode.
– The recirculation mode is deactivated.
Saturation indicator for activated charcoal filters in recirculation box
The and buttons flash after 550 operating hours.
The saturation level has been reached and the activated charcoal filters must be
replaced.
Resetting the saturation indicator
ü The metal grease filters have been cleaned.
ü The activated charcoal filters have been replaced.
ü The long-life activated charcoal filters have been cleaned or replaced.
▸ With the appliance switched off, hold the button depressed until all the LEDs flash
three times.
4 Care and maintenance
4.1 Cleaning the housing
Take care that no water gets into the housing of the appliance! If water gets into
the housing, it can cause damage.
Do not use abrasive cleaners, scouring pads, steel wool, etc. for cleaning, as the
surface could otherwise be damaged.
Remove the screw fuse or switch off the circuit breaker.
Cleaning the outside/inside
▸ With the appliance switched off, hold the button depressed for five seconds.
– Wipe protection is activated, all the buttons flash in sequence from left to right.
▸ Clean the outside with a slightly damp cloth and neutral cleaning agent, then wipe dry.
Grease and condensate water can build up on the inside around the metal grease filters.
▸ Clean the inside with a slightly damp cloth and neutral cleaning agent, then wipe dry.
▸ After cleaning, hold the button depressed for five seconds.
– Wipe protection is deactivated.
11
Page 12

4 Care and maintenance
4
3
2
1
4.2 Metal grease filters
The metal grease filters can be cleaned.
Removing the metal grease filters
▸ Hold the panel 1 at the top 2 and pull
forwards.
▸ Pull the handle 3 down and take out the
metal grease filters 4.
Do not drop or damage the metal grease filters.
Cleaning the metal grease filters
The metal grease filters 4 must be cleaned
at least once a month with normal use or
whenever the indicator light flashes.
▸ Clean the metal grease filters 4 in the dishwasher.
▸ Select an «intensive» – or «heavy» – wash programme with a warm pre-wash.
Cleaning may cause the metal grease filters to become discoloured. This will not
affect the functioning of the filters in any way.
If no dishwasher is available:
▸ Clean the metal grease filters in hot water and detergent.
▸ Soak the metal grease filters in hot water and detergent for about two hours, then
clean with a washing-up brush and rinse well with cold water.
12
Page 13

Installing the metal grease filters
4
3
5
2
1
2
1
2
1
▸ Insert each of the metal grease filters 4
into the holder 5.
▸ Pull handle 3 down and allow the metal
grease filter 4 to engage.
▸ Hold the panel 1 at the top 2 and push
to.
▸ With the appliance switched off, hold the
button depressed until all the LEDs
flash three times.
– The flashing button goes out.
Removing the panel
The panel is kept in place by magnets.
▸ Hold the panel 1 at the top 2 and pull
forwards.
▸ Release the panel at the bottom and pull
it out.
Cleaning the panel
The panel is not suitable for washing in a dishwasher.
4 Care and maintenance
▸ Clean the panel with a slightly damp cloth and neutral cleaning agent, then
wipe dry.
Installing the panel
▸ Hold the panel 1 at the top 2, hook in at
the bottom and insert into position.
13
Page 14

4 Care and maintenance
3
3
4
5
5
4.3 Long-life activated charcoal filter
The long-life activated charcoal filters should be reactivated every other month or
whenever the cooking fumes and smells are no longer being filtered effectively.
After about three years the long-life activated charcoal filter must be replaced because
its ability to absorb odours will be reduced.
Installing/removing the long-life activated charcoal filters
▸ Release the holder 4 on the back of the
metal grease filter 3 and remove the
long-life activated charcoal filter 5.
▸ Clean/reactivate.
▸ Insert the new long-life activated char-
coal filter 5 and fasten with the holder 4
on the back of the metal grease filter 3.
Dispose of long-life activated charcoal filters that are spent and can no longer be
reactivated in the household waste.
4.4 Long-life activated charcoal filter display
Activating the long-life activated charcoal filter display
This function must only be activated with the recirculation model.
▸ With the appliance switched off, hold the button depressed for five seconds.
– All LEDs flash twice.
– The long-life activated charcoal filter display is activated.
Deactivating the long-life activated charcoal filter display
▸ With the appliance switched off, hold the button depressed for five seconds.
– All LEDs flash once.
– The long-life activated charcoal filter display is deactivated.
4.5 Cleaning the long-life activated charcoal filter
14
Long-life activated charcoal filters are only used in the recirculation model.
Page 15

4 Care and maintenance
The long-life activated charcoal filter can be cleaned and reactivated. With normal use
the long-life activated charcoal filter should be cleaned every other month or whenever
the indicator light flashes. It can be cleaned in a dishwasher at 65°C (select an «intensive» or «heavy soiling» wash programme). Wash the filter separately so that it does
not become clogged with food particles. If it is not possible to wash the filter in a dishwasher, soak it in 60°C water with a little washing-up liquid for one hour. Then rinse well.
To reactivate the activated charcoal, dry the filter without the frame in the oven.
▸ Select top/bottom heat or hot air and set the temperature to 100 °C. Place the filter
on a wire shelf and allow to dry for 60 minutes.
After about three years the long-life activated charcoal filter must be replaced because its ability to absorb odours will be reduced. The spent long-life activated
charcoal filter can be disposed of in the household waste.
4.6 Recirculation box with activated charcoal filters (option)
Recirculation mode with recirculation box
Activated charcoal filters are only used in the recirculation model.
An activated charcoal filter becomes less effective with use. With normal use, the activated charcoal filters have to be changed every 3 years. They cannot be washed or regenerated.
Take care that no water gets into the housing of the appliance! If water gets into
the housing, it can cause damage.
Do not use abrasive cleaners, scouring pads, steel wool, etc. for cleaning, as they
can damage the surface.
Remove the screw fuse or switch off the circuit breaker.
Recirculation box with integrated activated
charcoal filters.
▸ Clean the outside with a slightly damp
cloth and neutral cleaning agent, then
wipe dry.
Grease and condensate water can build up
on the inside around the metal grease filters.
▸ Clean the inside with a slightly damp
cloth and neutral cleaning agent, then
wipe dry.
15
Page 16

5 Trouble-shooting
5 Trouble-shooting
5.1 What to do if …
… the illumination is not working
Possible cause Solution
▪ Fuse or automatic circuit breaker
for electrical installations in the
home is defective.
▪ An interruption in the power sup-
ply.
▪ LED is defective. ▸ Inform Customer Services.
… the appliance is not extracting enough air
Possible cause Solution
▪ Metal grease filters are dirty. ▸ Clean metal grease filters.
▪ Only for recirculation model with
long-life activated charcoal filter
or: The long-life activated char-
coal filters are saturated.
▪ Only for recirculation model with
recirculation box: The activated
charcoal filters are saturated.
… Saturation indicator illuminates
Possible cause Solution
▪ Metal grease filters are dirty. ▸ Clean metal grease filters.
▪ Only for recirculation model with
long-life activated charcoal filter
or: The long-life activated char-
coal filters are saturated.
▪ Only for recirculation model with
recirculation box: The activated
charcoal filters are saturated.
▸ Replace the fuse.
▸ Reset the automatic circuit breaker.
▸ Check the power supply.
▸ Reactivate the long-life activated charcoal
filters or replace them after three years.
▸ Replace the activated charcoal filters.
▪ Reactivate the long-life activated charcoal
filters or replace them after three years.
▪ Replace the activated charcoal filters.
Valid for all three filter models.
▸ After cleaning, hold the button de-
pressed for at least five seconds.
▸ The display goes out.
16
Page 17

6 Accessories and spare parts
6 Accessories and spare parts
Please give model number of the appliance and exact designation of the accessory or
spare part when ordering parts.
Metal grease filter
Long-life activated charcoal filter
Activated charcoal filter for the recirculation
box
7 Technical data
Electrical connection
▸ See identification plate.
▸ Remove the metal grease filters.
– The identification plate is located on the inside of the appliance.
7.1 Product fiche
In accordance with EU Regulation No. 65/2014 and No. 66/2014.
Description Abbreviations Unit Value
Brand S - V-ZUG Ltd
Model identifier M - 64004
Annual Energy Consumption AEC
Energy Efficiency Index EEI
hood
hood
Energy Efficiency Class EEC - B
Fluid Dynamic Efficiency FDE
hood
Fluid Dynamic Efficiency Class FDEC - B
Lighting Efficiency LE
hood
Lighting Efficiency Class LEC - A
Grease Filtering Efficiency GFE
hood
kWh/a 62.1
% 60.1
% 27.05
lux/W 28.1
% 70.0
17
Page 18

7 Technical data
Grease Filtering
GFEC - D
Efficiency Class
Air flow at minimum
Q
min
m3/h 280
speed
Air flow at maximum
Q
max
m3/h 420
speed (intensive or boost excluded)
Air flow at intensive
Q
boost
m3/h 670
or boost setting
Airborne acoustical A-weighted
SPE
min
dBA 49
Sound Power Emissions at minimum
speed
Airborne acoustical A-weighted
SPE
max
dBA 57
Sound Power Emissions at maximum
speed
Airborne acoustical A-weighted
SPE
boost
dBA 69
Sound Power Emissions at intensive
or boost setting
Measured power consumption of off
P
0
W 0.49
mode
Measured power consumption of
P
s
W -
standby mode
Time increase factor f - 1.0
Measured air flow rate at the best ef-
Q
BEP
m3/h 348.0
ficiency point
Measured air pressure at the best ef-
P
BEP
PA 431.0
ficiency point
Measured value of the electric power
W
BEP
W 154.0
input at the best efficiency point
Nominal power of the lighting system W
Average illumination of the lighting
E
L
middle
W 6.0
lux 170
system on the cooking surface
Sound power level L
wa
dBA 57
18
Page 19

8 Disposal
8 Disposal
8.1 Packaging
Never allow children to play with packaging material due to the danger of injury or
suffocation. Store the packaging material in a safe location or dispose of it in an
environmentally-friendly way.
8.2 Safety
Render the appliance unusable to prevent accidents caused by improper use (e.g.
through children playing):
▸ Disconnect the appliance from the mains. With a fixed appliance, this is to be carried
out by a qualified electrician. Then cut the mains cable off flush with the appliance.
8.3 Disposal
▪ The «crossed‐out wheeled bin» symbol requires the separate collection of waste
electrical and electronic equipment (WEEE). Such equipment can contain hazardous,
environmentally harmful materials.
▪ These appliances are to be handed over to a designated collection point for the recyc-
ling of electrical and electronic equipment and must not be disposed of with unsorted
household waste. And in this way, you will be helping to protect resources and the environment.
▪ For more information, please contact the local authorities.
19
Page 20

9 Index
A
Accessories and spare parts ........................ 17
After-running time............................................. 10
Appliance
Operating ......................................................... 9
Appliance description ........................................ 7
Appliance disposal .......................................... 19
C
Care and maintenance ................................... 11
CleanAir ............................................................. 10
Cleaning the inside.......................................... 11
Cleaning the outside ....................................... 11
Construction......................................................... 8
D
Display elements................................................. 7
Disposal............................................................. 19
E
Electrical connection ....................................... 17
Equipment ............................................................ 8
Extending the appliance.................................... 9
Extraction model ................................................. 7
H
Housing
Cleaning ........................................................ 11
I
Identification plate............................................ 17
Illumination ........................................................... 9
Initial set-up .......................................................... 5
Intensive level ...................................................... 9
L
Light intensity
Changing..........................................................9
Long-life activated charcoal filter
Cleaning ........................................................ 15
Installing ........................................................ 14
Removing ...................................................... 14
Replacing ...................................................... 15
Long-life activated charcoal filter display
Activating....................................................... 14
Deactivating .................................................. 14
M
Malfunction
Illumination not working.............................. 16
Metal grease filter saturation indicator
Resetting ....................................................... 11
Metal grease filters
Cleaning ........................................................ 12
Installing ........................................................ 13
Removing ...................................................... 12
Model number ..................................................... 2
N
Notes.................................................................. 22
O
Operating elements ............................................ 7
P
Panel
Cleaning ........................................................ 13
Installing ........................................................ 13
Removing ...................................................... 13
Product family...................................................... 2
Product fiche..................................................... 18
Q
Queries .............................................................. 23
R
Recirculation box ............................................. 15
Recirculation model
Recirculation box ....................................... 7, 8
S
Safety precautions
Appliance-specific .......................................... 4
Before using for the first time....................... 5
Correct use ...................................................... 5
General ............................................................. 4
Instructions for use......................................... 5
Note on use ..................................................... 6
Saturation indicator
Activating....................................................... 11
Deactivating .................................................. 11
Metal grease filter........................................ 11
Service & Support............................................ 23
Service agreement........................................... 23
Switching appliance on/off ............................... 9
Symbols ................................................................ 4
T
Technical data .................................................. 17
Type....................................................................... 2
V
Validity................................................................... 2
20
Page 21

W
What to do if
The illumination is not working ................. 16
The saturation indicator illuminates
........................................................................ 16
Wipe protection
Activating....................................................... 10
Deactivating .................................................. 10
9 Index
21
Page 22

10 Notes
22
Page 23

11 Service & Support
The «Trouble-shooting» section gives you valuable tips on how to deal with minor
malfunctions yourself, saving you the time and trouble of calling out a service technician and any cost that goes along with it.
Information on the V-ZUG warranty can be found at www.vzug.com →Service
→Warranty information. Please read this information carefully.
Please register your V-ZUG appliance straightaway:
▪ online at www.vzug.com →Service →Online warranty registration or
▪ using the enclosed registration card.
This will allow you to take advantage of the best possible support in the event of a fault
in the appliance during the guarantee period. You will require the serial number (SN) and
appliance designation to register your appliance. You will find them on the identification
plate of your appliance.
My appliance information:
SN:
__________________________
Please have this appliance information to hand when contacting V-ZUG. Thank you.
▸ Remove the metal grease filters.
– The identification plate is located on the inside of the appliance.
– A second identification plate is included in the scope of delivery and should be re-
tained for the purpose of appliance identification.
Appliance: __________________________________
Your repair order
Call the free service number 0800 850 850 to contact your nearest
V-ZUG service centre. You can arrange an on-site visit by us by phone if you wish.
General queries, accessories and service agreement
V-ZUG will be happy to help you with any general administrative or technical queries, to
accept your orders for accessories and spare parts and to inform you about our progressive service agreements. You can contact us by calling tel. +41 58 767 67 67 or by
going to our website at www.vzug.com.
23
Page 24

Quick instructions
1011455-R03
Switch on/off, extend/retract hood body
Power level 1
Power level 2, activate/deactivate wipe protection
Power level 3
Intensive level
CleanAir function (air extraction every hour for 10 minutes)
After-running time (delays switching-off of appliance by 15 minutes)
Touch button, switch illumination on at maximum intensity and off.
Depress the button for two seconds to switch the illumination on at
medium intensity.
Flashing Clean the metal grease filters, reactivate or replace the long-life ac-
/
Flashing Replacing the activated charcoal filter
/
tivated charcoal filters
V-ZUG Ltd, Industriestrasse 66, CH-6302 Zug
Tel. +41 58 767 67 67, Fax +41 58 767 61 61
info@vzug.com, www.vzug.com
Service Centre: Tel. 0800 850 850
 Loading...