

Page 1
The Choice of Experience
INSTRUCTION MANUAL
A Product of Berkel
VSPH VEGETABLE SLICER
ML-136212
Troy, OH
Form 35007 Rev. A (December 2009)
Page 2

TABLE OF CONTENTS
GENERAL ............................................................................................................................................. 3
INSTALLATION ..................................................................................................................................... 3
Unpacking ........................................................................................................................................ 3
Back Case ....................................................................................................................................... 3
Feed Hopper .................................................................................................................................... 3
Adjustable Slicer Plate Unit ............................................................................................................. 4
Shredder Plate and Plate Holder ..................................................................................................... 4
Grater Plate and Plate Holder ......................................................................................................... 5
OPERATION .......................................................................................................................................... 5
Using the Vegetable Slicer .............................................................................................................. 5
CLEANING ............................................................................................................................................ 6
Immediately After Use ..................................................................................................................... 6
MAINTENANCE .................................................................................................................................... 7
Service ............................................................................................................................................. 7
TROUBLESHOOTING .......................................................................................................................... 7
– 2 –
Page 3
Installation, Operation and Care of
Vegetable Slicer Attachment
SAVE THESE INSTRUCTIONS
GENERAL
The Vegetable Slicer uses are many and varied: cutting cabbage for salads and cole slaw, slicing potatoes
ranging in thickness from that of a potato chip to
vegetables and fruits, and shredding or grating cheese, raw carrots, beets, etc.
The food is sliced by stainless steel scimitar knives for fast, clean, uniform cutting. The front of the Vegetable
Slicer is hinged at one side, and can be swung aside or removed, permitting quick and easy changing of
plates and cleaning.
The Vegetable Slicer Attachment includes back case, feed hopper, plate holder and
Optional accessories are the adjustable slicer plate and other size shredder plates and a grater plate.
The Vegetable Slicer may also be used with Power Drive units.
5
⁄8", slicing nuts, bananas, cucumbers, celery and other
3
/16" shredder plate.
INSTALLATION
UNPACKING
Immediately after unpacking the vegetable slicer, check for possible shipping damage. If the vegetable slicer
is found to be damaged, save the packaging material and contact the carrier within 15 days of delivery.
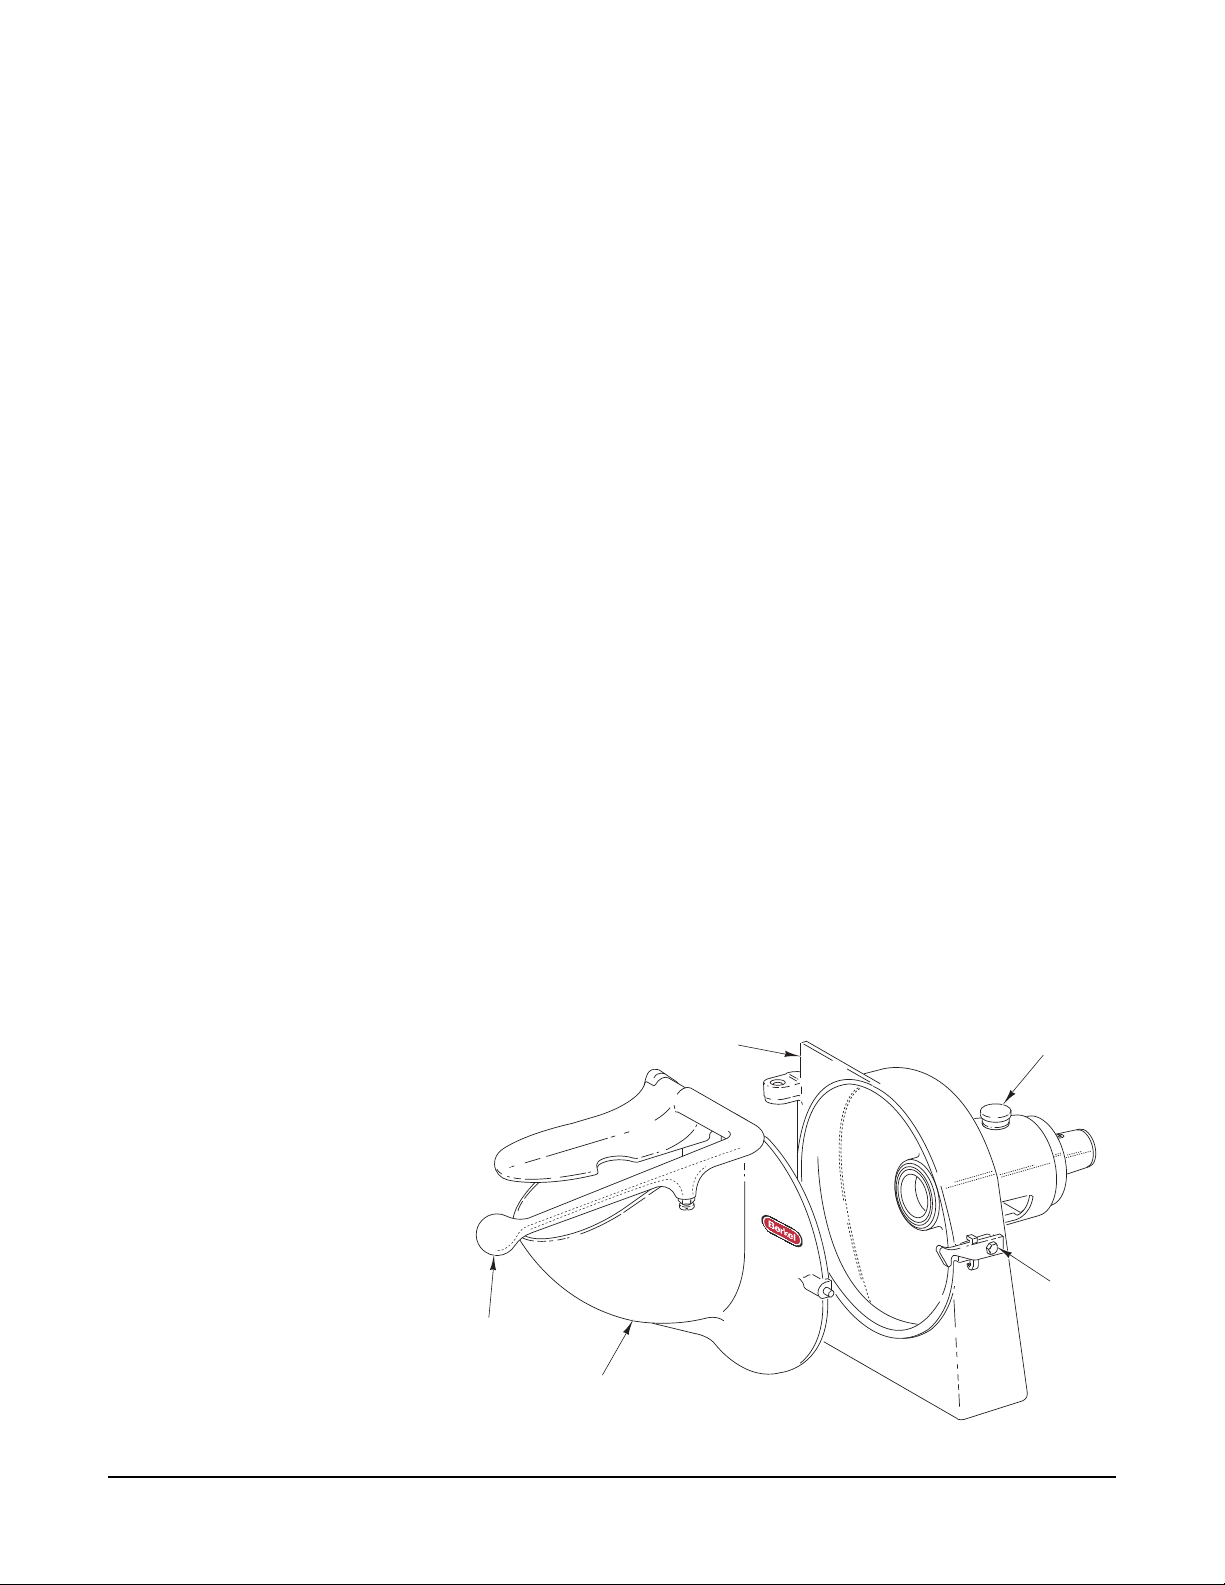
BACK CASE
The back case (Fig. 1) mounts into the
attachment hub of a mixer, chopper,
food cutter, or power drive and is
retained by a thumb screw of that
machine. It is available with a #12
size hub.
FEED HOPPER
The standard front is the feed hopper
and pusher lever (Fig. 1) feed design. It
hinges onto the back case and is held
with a latch (Fig. 1). To remove front,
lift latch, swing front open, and raise
from hinge holes. The pusher lever is
held in the feed hopper by a large pin.
To remove pull the pin ring.
PUSHER
LEVER
BACK CASE
FEED HOPPER
– 3 –
PLUNGER
LATCH
Fig. 1
Page 4

ADJUSTABLE SLICER PLATE UNIT
Open front, lift plunger (Fig. 1) and slide the
adjustable slicer plate (Fig. 2) into operating
position. Slicing thickness may be adjusted
from approximately
1
/16" to 5/8" by turning
the adjusting nut (Fig. 2), without removing
unit from its assembled position. The easy
accessibility of this adjustment makes it
possible to vary the slice thickness to suit
the user's preference.
KNIFE AND
SHAFT ASSEMBLY
ADJUSTING NUT
SPRING
THRUST
COLLAR
SHREDDER PLATE AND PLATE
Fig. 2
HOLDER
Shredder plates are available with
3
/32", 3/16", 5/16" and 1/2" hole sizes. These plates have keyhole slots for
attaching to shoulder studs on the plate holder. The shredder
plate also has two locking tabs (Fig. 3), which prevent spin-off
during high-speed operation. The two tabs allow the shredder
plate to engage the plate holder shoulder pins in all positions;
one tab (and only one) will always engage a plate holder
spoke. A simple method of attaching is to loosely assemble
plate to plate holder, then place it plate side down on a work
surface (not a fi nished surface as teeth will mar the fi nish).
Press down and turn the plate holder until the plate locks
into place. To detach the plate from the plate holder, place
PLATE
HOLDER
SHREDDER
PLATE
the assembled plate and plate holder face down on a work
surface (as when attaching the plate), then, using a fi nger
of one hand, depress the tab (Fig. 3) while rotating the plate
holder with the other hand.
TABS
Fig. 3
The detachable plate design makes it possible to use one plate holder for several shredder plates;
however, a separate plate holder may be ordered and used for each size plate, if desired, for a complete
unit change. The coarse plate is normally used for making chopped slaw, cutting vegetables for soup
stock, salad blends or hash brown potatoes. The medium and fi ner plates are for fi ne shredding of carrots,
beets, turnips, etc., and for salads or quick cooking use.
GRATER PLATE AND PLATE HOLDER
The grater plate (Fig. 4) also has keyhole slots and
attaches to the same plate holder as the shredder
plates. Loosely assemble plate to plate holder, then
place the plate side down on a work surface (not
a fi nished surface as the teeth will mar the fi nish).
Press down and turn the plate holder until the plate
locks into place. Reverse assembly procedure to
detach plate from the plate holder.
The grater plate may be used for crumbling hard
cheese or grating hard vegetables.
PLATE HOLDER
GRATER PLATE
Fig. 4
– 4 –
Page 5

OPERATION
Rotating knives inside. Always use the pusher lever. Keep hands out.
Do not put meat, dough or frozen foods in the vegetable slicer. Remove all hard parts that can
damage the cutting plate blades, such as apple and pineapple stems, mango pits and fi brous cores.
USING THE VEGETABLE SLICER
1. Stop power unit (mixer, chopper, food cutter or power drive).
2. Attach back case (Fig. 1) of the slicer to attachment hub of companion machine and secure with the
thumb screw.
3. Drop hinge pins of feed hopper into holes in bosses of back case.
4. Select accessory (such as adjustable slicer plate) to be used. Lift plunger (Fig. 1) and insert rotating
unit into drive position. Release plunger.
5. Set slice thickness adjustment (if used) to proper thickness.
6. Close feed hopper and fasten latch.
7. Start companion machine. Set at a speed to produce the best product.
8. Raise pusher lever. Keep hands out of feed hopper.
9. Place commodity to be sliced in feed hopper and gently press down on the pusher lever. Too much
pressure crushes the food and causes irregularity in the slices.
– 5 –
Page 6

CLEANING
The cutting plates are sharp. Use care when handling to avoid injury.
Unplug the electrical cord.
Do not clean stainless steel with cleansers containing bleach like automatic dishwashing detergent.
Bleach can corrode stainless steel. Do not clean the aluminum parts with high-alkaline detergents like
automatic dishwashing detergent or with hot water: Black aluminum oxide can form.
IMMEDIATELY AFTER USE
1. Stop the power unit (mixer, chopper, food cutter or power drive).
2. Release the latch and open the feed hopper.
3. Lift the plunger (Fig. 1) and withdraw the rotating unit.
4. The shredder and grater plates are easily removed from the plate holder by rotating plate counter-
clockwise to release the keyslot from the shouldered studs.
5. All parts (case, hopper and rotating unit) may be immersed in warm soapy water for cleaning. Rinse
in hot clear water and dry immediately. It is important that juices be cleaned from slicer before they
can dry. When using the adjustable slicer unit, make sure it is cleaned frequently to assure easy
thickness adjustment. Use a drop of tasteless oil on the adjustment threads after cleaning. Occasionally
disassemble the slicer unit for a thorough cleaning. To do this it is necessary to unscrew the knurled
thrust collar (Fig. 2), which has left-hand threads. The spring (Fig. 2) is then free for removal. Withdraw
the knife and shaft assembly (Fig. 2). Unscrew the adjusting nut (Fig. 2) from the plate.
After cleaning to prevent damage thrust bearing (Fig. 2) must be tightened until seated against
shoulder on shaft (Fig. 2). Failure to properly reassemble can result in damage to knives, shaft and slicer
plate.
– 6 –
Page 7

MAINTENANCE
Unplug the electrical cord.
SERVICE
Contact your local Berkel authorized service offi ce for any repairs or adjustments needed on this
equipment.
TROUBLESHOOTING
Fault Possible Cause Remedy
Food is cut poorly or slowly. Wrong cutting plates used. Use correct cutting plate.
Cutting plates are dull or
knicked.
Pressing pusher too hard. Press down on the product lightly.
Sharpen or replace.
– 7 –
Page 8

FORM 35007 Rev. A (December 2009) PRINTED IN U.S.A.
– 8 –
 Loading...