

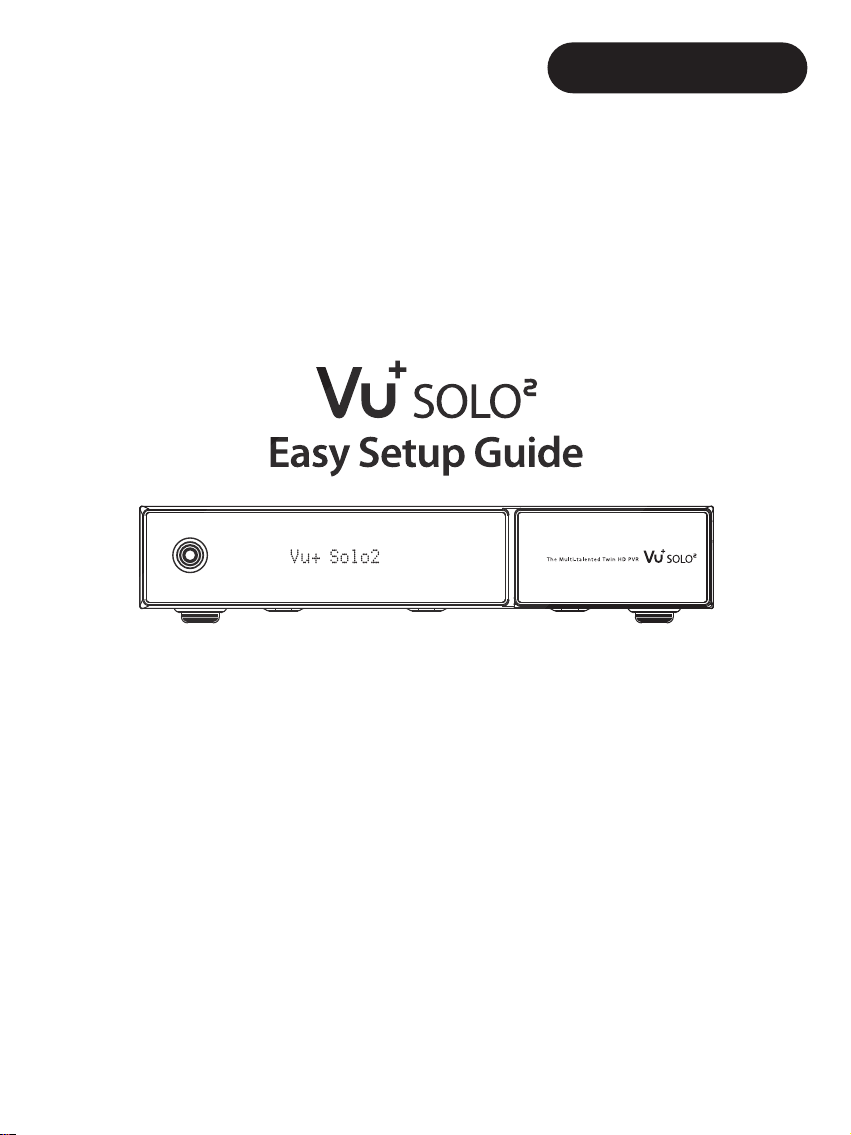
Page 1
Deutsch/English
Page 2
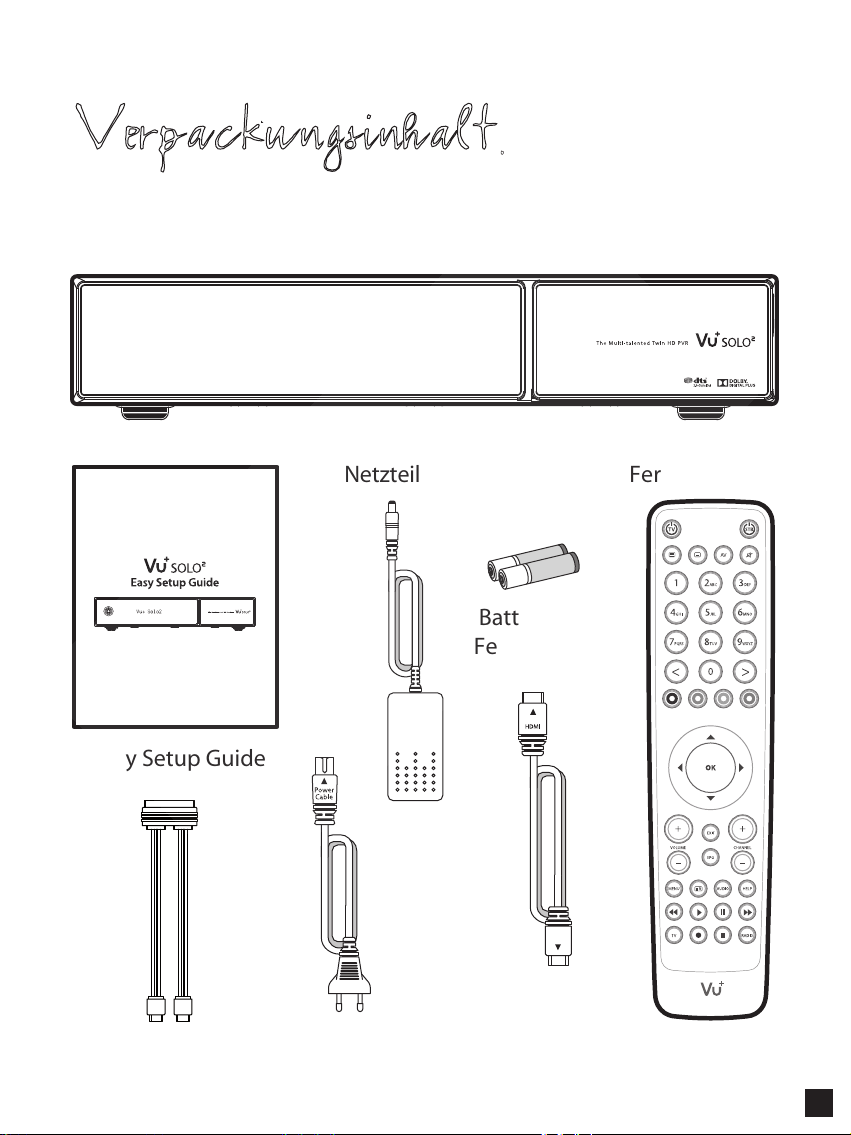
Verpackungsinhalt
Netzteil Fernbedienung
Batterie für
Fernbedienung
Easy Setup Guide
SATA kabel
HDMI Kabel
Netzkabel
1
Page 3

Vorderseite
Standby
Vu+ So lo2
Display
Zeigt Informationen des
aktuellen Menüs bzw.
Program Informationen an.
Klappe
oen
CI Modul Slot
USB Host
Anschluß für USB Sstick
oder externe Festplatte.
Smartkartenleser
2 Smartkartenleser werden unterstützt.
2
Page 4
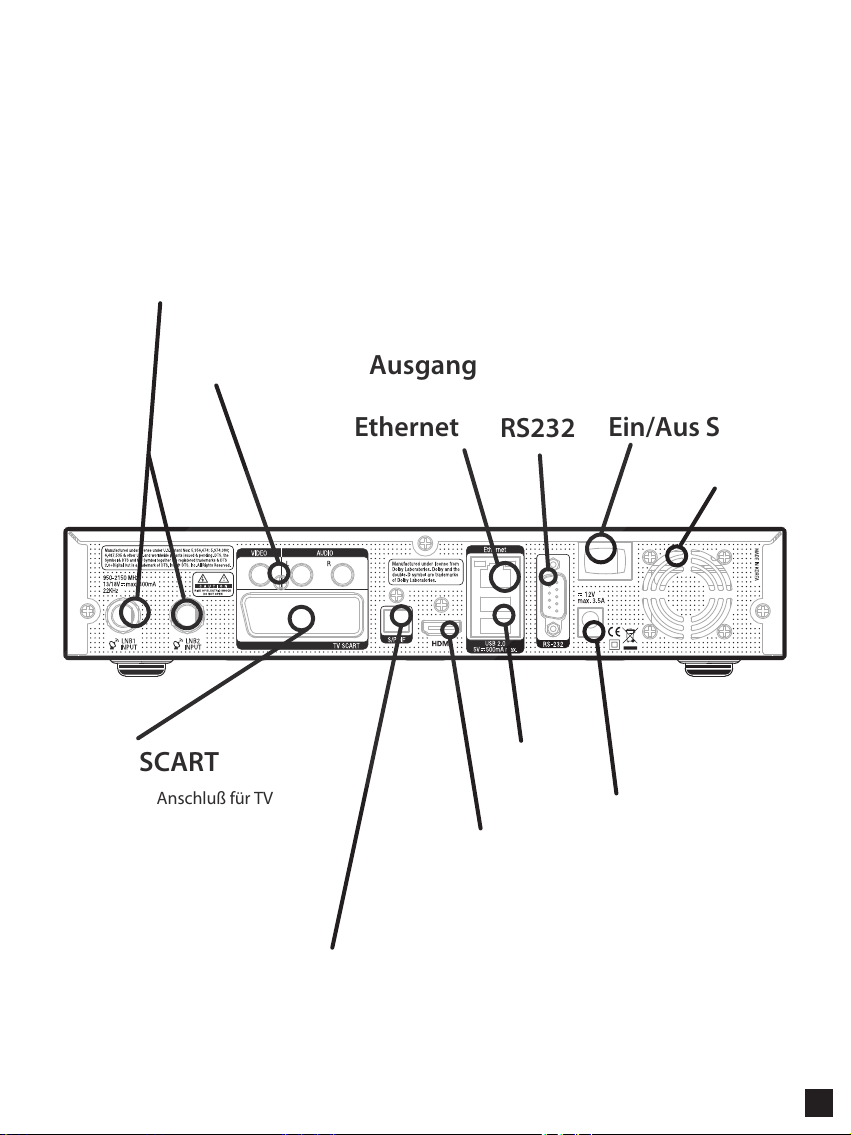
Rückseite
LNB EINGANG 1/2
Video /Audio Ausgang
TV SCART
SCART Anschluß für TV
Ethernet
RS232
Ein/Aus Schalter
2 x USB
Netzteil Anschluß
HDMI
Stellt die Verbindung zum Fernsehgerät über
ein HDMI-Kabel für Audio- und Videosignal her.
S/PDIF
Stellt die Verbindung mit einem digitalen Audiosystem
über das S/PDIF-Kabel her.
Lüfter
3
Page 5
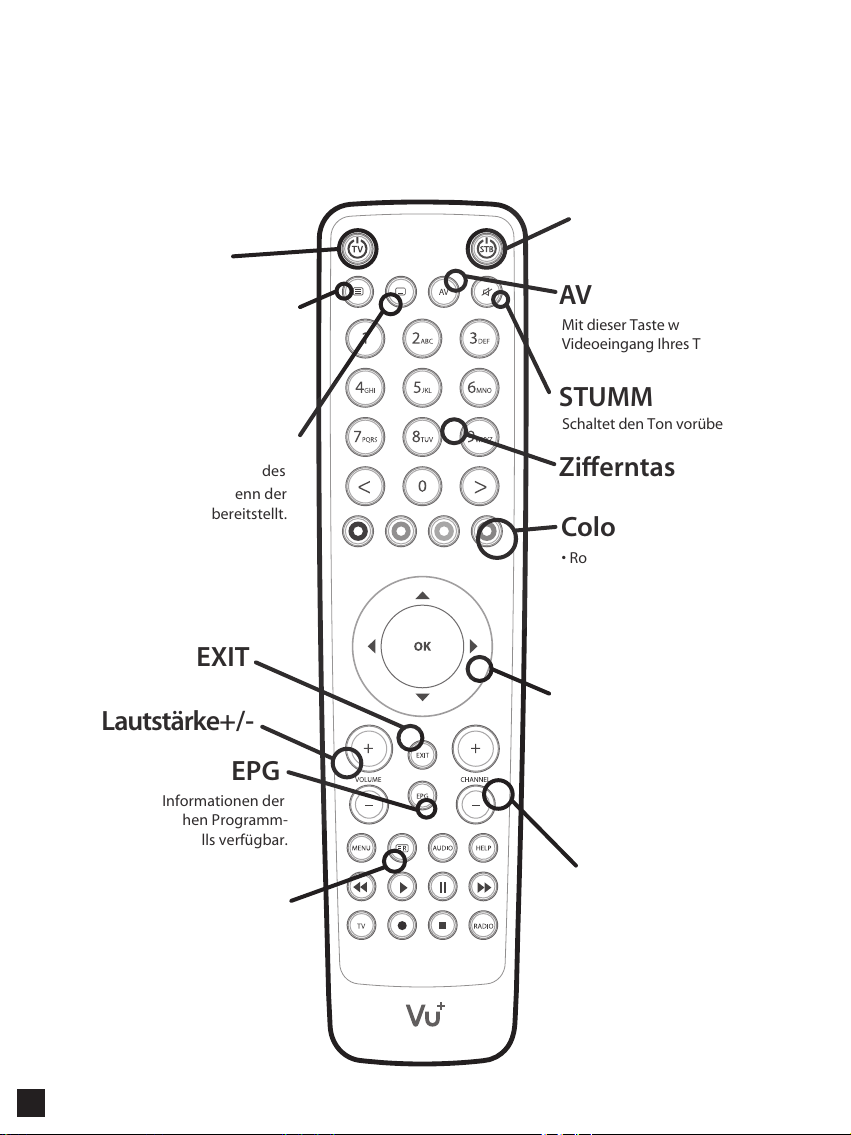
Fernbedienung
TV EIN/AUS
Receiver EIN/AUS
Untertitel
Zeigt die Untertitel des aktuellen
Senders an, wenn der Sender
Untertitel bereitstellt.
Teletext
Zeigt Teletextinformationen des
aktuellen Senders an, wenn der
Sender Teletextdaten bereitstellt.
EXIT
Lautstärke+/-
EPG
Zeigt die Informationen der
elektronischen Programm-
zeitschrift (EPG) an, falls verfügbar.
Aufnahmeliste
Zeigt die auf der internen Festplatte
gespeicherten Aufnahmen an,
falls vorhanden.
AV
Mit dieser Taste wählen Sie den
Videoeingang Ihres TV Gerätes aus.
STUMM
Schaltet den Ton vorübergehend aus.
Zierntasten
Color Keys
• Rot: hauptsächlich für Aufnahme,
Abbrechen usw
• Grün: hauptsächlich für OK
• Gelb
• Blau
Navigationstasten
Zum Navigieren nach oben/unten
und links/rechts in den Menüoptionen.
Mit den Tasten Nach oben/unten
wird die Senderliste aufgerufen.
Kanal+/-
Navigiert durch die Liste der Bouquets.
4
Page 6
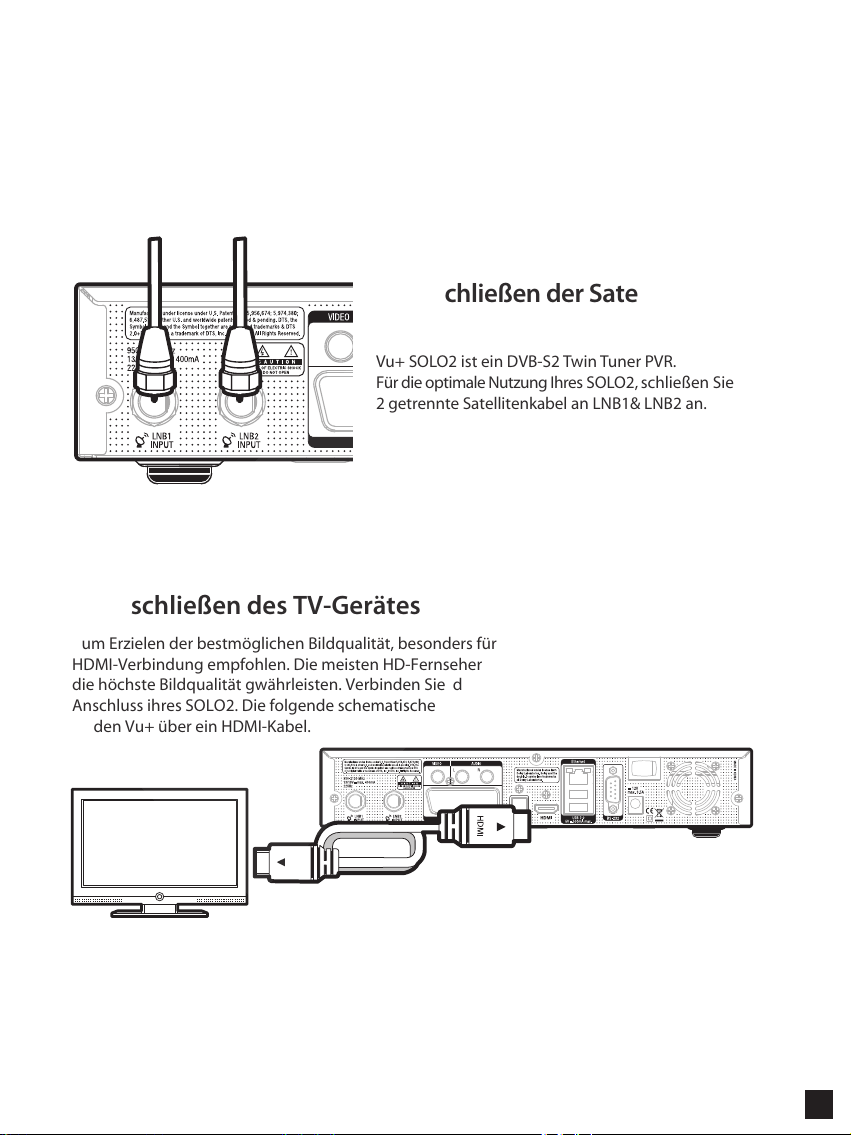
Anschließen der Kabel
1. Anschließen der Satellitenkabel
Vu+ SOLO2 ist ein DVB-S2 Twin Tuner PVR.
Für die optimale Nutzung Ihres SOLO2, schließen Sie
2 getrennte Satellitenkabel an LNB1& LNB2 an.
2. Anschließen des TV-Gerätes
Zum Erzielen der bestmöglichen Bildqualität, besonders für digitales Fernsehen, wird eine
HDMI-Verbindung empfohlen. Die meisten HD-Fernseher verfügen über HDMI-Anschlüsse, welche
die höchste Bildqualität gwährleisten. Verbinden Sie das beiliegende HDMI Kabel mit dem HDMIAnschluss ihres SOLO2. Die folgende schematische Abbildung zeigt den Anschluss des Fernsehers
an den Vu+ über ein HDMI-Kabel.
HDMI
5
Page 7
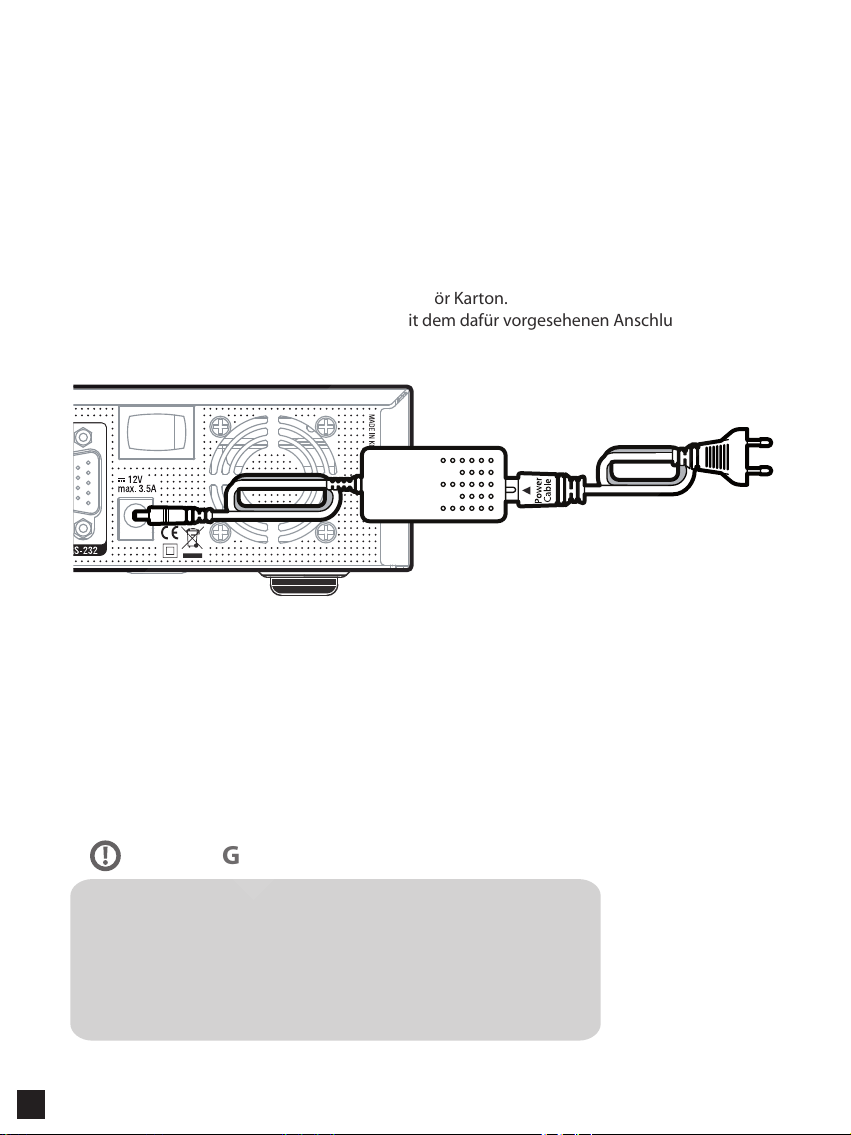
Anschließen der Kabel
3. Spannungsversorgung
Netzteil und Netzekabel befinden sich im Zubehör Karton.
Verbinden Sie das Netzteil (runder Stecker) mit dem dafür vorgesehenen Anschluss Ihres SOLO2.
ACHTUNG
Spannungsomversorgung
• Nennspannungsbereich: 100 – 250 V Wechselspannung
• Max. Spannungsbereich: 90 – 264 V Wechselspannung
• Nennfrequenz: 50 / 60 Hz
• Max. Frequenzbereich: 47 – 63 Hz
6
Page 8
Erstmalige Inbetriebnahme
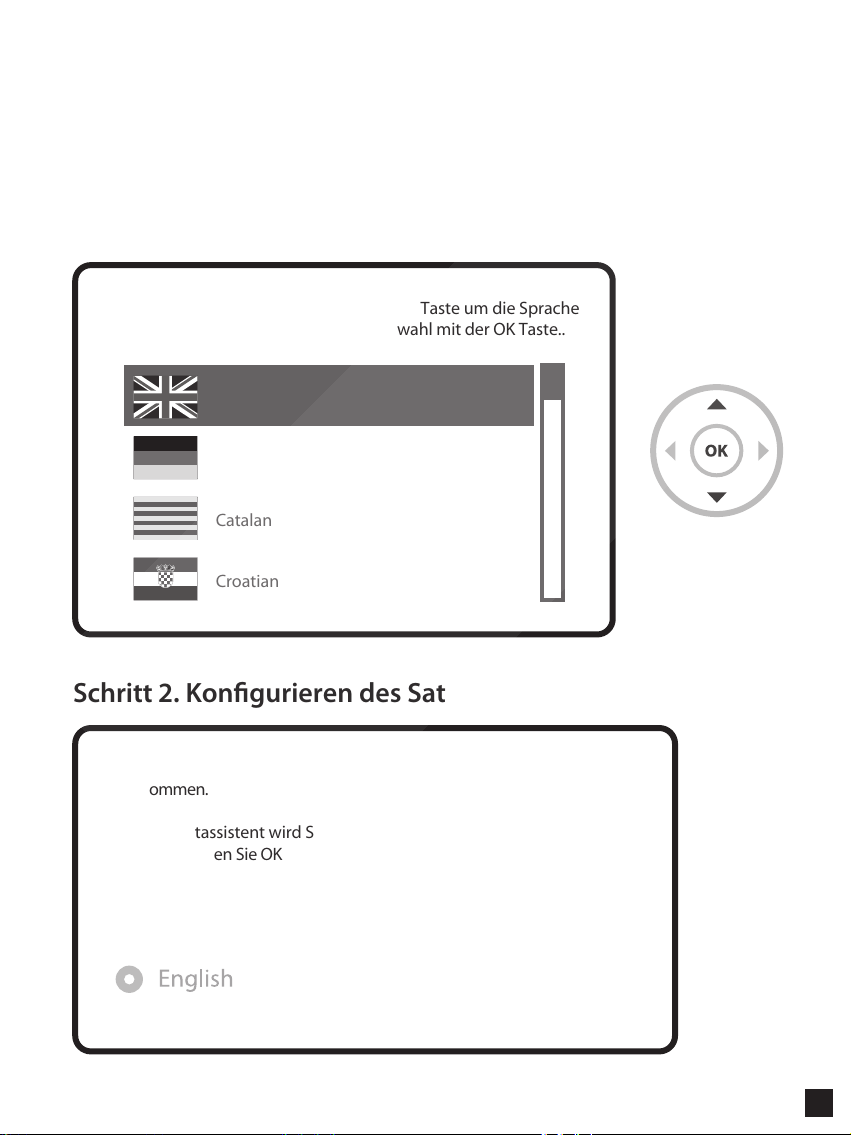
Schritt 1. Auswählen der Sprache
Bitte benutzen Sie die Hoch und Runter Taste um die Sprache
auszuwählen. Bestätigen Sie die Auswahl mit der OK Taste..
English
German
Catalan
Croatian
Schritt 2. Kongurieren des Satellitenanschlusses
Willkommen.
Dieser Startassistent wird Sie durch die Grundeinstellunen Ihres STB
führen. Drücken Sie OK um zum nächsten Schritt zu gelangen.
7
Page 9
Erstmalige Inbetriebnahme
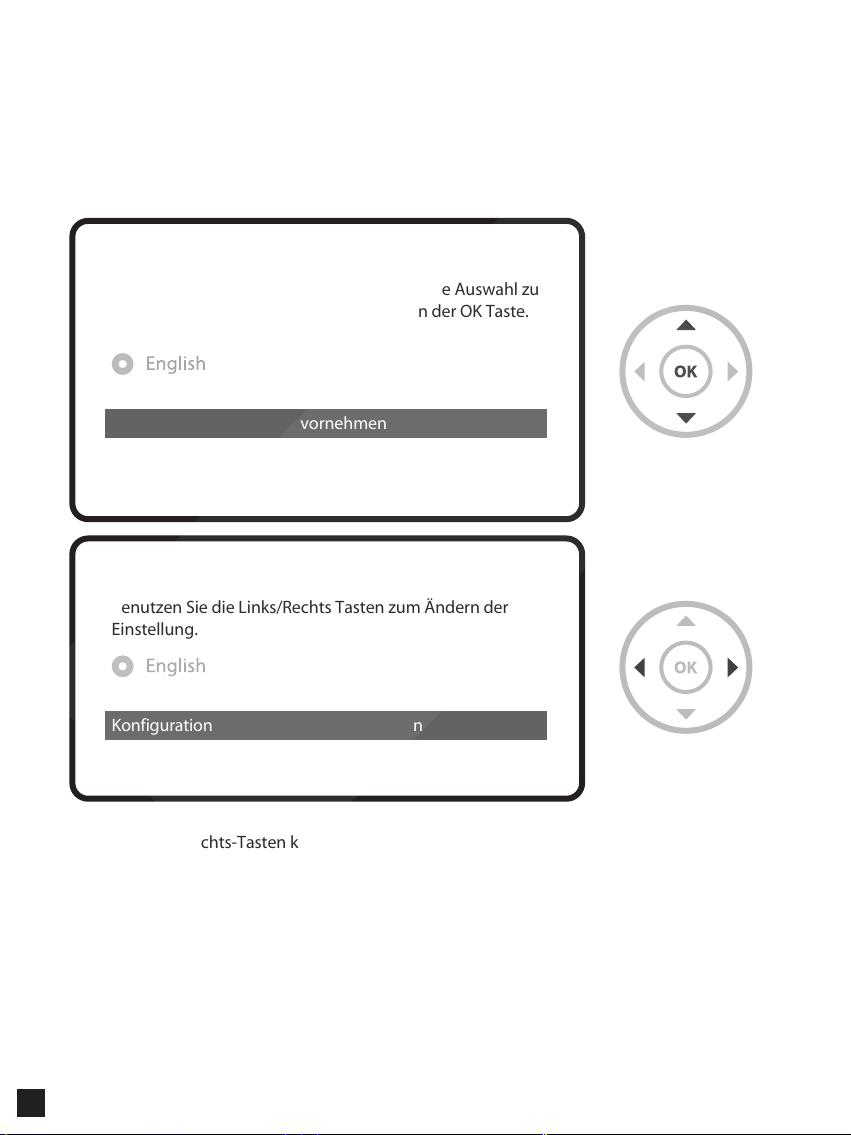
Benutzen Sie die Hoch/Runter Tasten um eine Auswahl zu
treffen. Bestätigen Sie diese durch drücken der OK Taste.
Grundeinstellungen jetzt vornehmen
Assistenten beenden
Benutzen Sie die Links/Rechts Tasten zum Ändern der
Einstellung.
Konfiguration nicht Konfiguriert
Mit den Links-/Rechts-Tasten können Sie einen der folgenden Konfigurationsmodi auswählen:
• Nicht Konfiguriert
• Einfach
• Durchschleifen : LNB 2 wird intern mit dem LNB 1 verbunden.
• Gleich: Verwendet die gleichen Einstellungen wie für Tuner A.
• Erweitert: erweiterte Benutzerkonfiguration.
8
Page 10

Erstmalige Inbetriebnahme
Bei Auswahl des Modus “Einfach” wird folgender Bildschirm angezeigt.
Benutzten Sie die Links/Rechts Tasten zum Ändern der
Einstellung.
Konfiguration
Modus
Satellit
DiSEqC senden
Die nachfolgend beschriebenen fünf Modi stehen für die Satellitenkabelverbindung zwischen dem
LNB und Ihrem Vu+ zur Auswahl:
• Einzeln
Diese Option wird gewählt, wenn ein Satellit empfangen und ein einzelnes LNB verwendet wird.
Das Kabel des LNB wird direkt an den Vu+ angeschlossen.
Für die anderen Modi sehen Sie bitte in der Bedienungsanleitng Ihres SOLO2 nach.
Einfach
Einzeln
Astra(19.2E)
nein
9
Page 11

Erstmalige Inbetriebnahme
Schritt 3. Kanal-Suchlauf
• Suchlauf Modus auswählen - Automatische Suche / Manuelle Suche
Sie können einen manuellen oder automatischen Sendersuchlauf ausführen.
Wollen Sie einen Kanal-Suchlauf ausführen?
Ja, automatischen Suchlauf jetzt starten
Ja, manuellen Suchlauf jetzt starten
Nein, manuellen Suchlauf später durchführen
• Automatischer Sendersuche
Wenn Sie den automatischen Suchlauf auswählen, erfolgt die Abfrage ob die vorhandenen Kanäle
vor dem Suchlauf gelöscht werden sollen oder nicht
10
Wollen Sie einen Kanal Suchlauf ausführen?
Ja, manuellen Suchlauf jetzt starten
Yes, do a manual scan now
Nein, manuellen Suchlauf später durchführen
Page 12

Erstmalige Inbetriebnahme
Drücken Sie die OK Taste um den Suchlauf zu starten.
Suche läuft
Suche beendet ! 2 Kanäle gefunden!
ANIXE HD
ASTRA HD+
• Kanal Suchlauf
Die gefundene Kanäle werden angezeigt wenn die vorangegangenen Einstellungen korrekt
durchgeführt wurden.
11
Page 13

Erstmalige Inbetriebnahme
Schritt 4. Installieren der Standard-Kanallisten
In diesem Schritt werden Sie gefragt, ob Sie Standard-Satellitenlisten (“Standardkanallisten”)
installieren möchten. Beim Drücken auf OK wird der folgende Bildschirm angezeigt:
Kanal Suchlauf
Tuner Konguration
Standard Kanallisten
Automatische Suche
Manuelle Suche
12
Bitte wählen Sie Standard Kanalliste die Sie installieren wollen aus.
Astra(19.2E)
Hotbird(13.0E)
Astra(19.2E) nein
no
nein
Page 14

Erstmalige Inbetriebnahme
Schritt 5. Jugendschutzoption
Sie können nun wählen, ob Sie den Jugendschutz aktivieren möchten.
Beim Drücken auf OK werden Sie zur Eingabe Ihres Pincodes aufgefordert.
Jugendschutz Setup
Jugendschutz Optionen aktivieren
Setup sperren
Kanäle sperren
Pincode ändern
Neuer PIN
neuen Pin nochmal eingeben
ja
nein
nein
****
****
13
Page 15

Mehr Informationen finden Sie unter
1. Wählen Sie im Hauptmenü den Punkt “Erweiterungen“ aus
3. Wählen Sie den Menüpunkt ”Tools” und danach “Bookmark” aus
14
Page 16

English
Page 17

What's included ?
Power Adapter RCU
RCU Battery
16
Easy Setup Guide
SATA cable
HDMI cable
Power cord
Page 18

Front Panel
Standby
Vu+ So lo2
Display
Displays the current menu
and program information.
Door
open
CI Module slot
USB Host
Connects to the USB memory stick
or external HDD.
Smartcard reader slot
Two Smartcard slots are provided.
17
Page 19

Rear Panel
LNB INPUT 1/2
Video /Audio Output
Ethernet
On/O Switch
TV SCART
SCART connector for TV
RS232
Power Adaptor Input
HDMI
Connects to TV using a HDMI cable
for both audio and video signals.
S/PDIF
Connects to a digital audio system
using S/PDIF cable.
Fan
USB
18
Page 20

Remote Control
TV Power
STB Power
Subtitle
Displays the subtitle of
the current channel
if the channel provides subtitle.
Teletext
Displays the teletext information of
the current channel if the channel
provides subtitles.
Volume+/-
EXIT
EPG
Displays the Electronic Program
Guide (EPG) information
if provided.
Recording List
Displays the list
of recordings stored
on the internal HDD if any.
AV
This button is used
when selecting video source of TV.
Mute
Numeric Keys
Color Keys
• Red – mainly used for REC,
Cancel, etc.
• Green – mainly used for OK
• Yellow
• Blue
Navigation Keys
Navigates up/down and left/right
on the menu options.
Up/down keys are used to call up
the channel list.
CHANNEL+/-
19
Page 21

Connecting Cable
1. Connect Satellite Signal Cable
to SOLO2
Vu+ SOLO2 is DVB-S2 Twin Tuner PVR.
For the best use of SOLO2, connect two separate satellite
cables to LNB 1 & 2.
2. Connect SOLO2 to the TV
One HDMI cable is included in the accessory box. Connect one end of the cable to the HDMI input
of TV. Connect the other end to the HDMI output of SOLO2.
20
Page 22

Connecting Cable
3. Power Up
A power cord and an adapter are provided in the accessory box.
Plug the round end of the adapter power cord into the power input of SOLO2.
NOTE
AC input condition
• Nominal Voltage Range: 100 – 250 VAC
• Maximum Voltage Range: 90 – 264 VAC
• Nominal Frequency: 50 / 60 Hz
• Maximum Frequency Range: 47 – 63 Hz
21
Page 23

Run First Time Installation
Step 1. Language Selection
Please use the UP and DOWN keys to select your language.
Afterwards press the OK button.
English
German
Catalan
Croatian
Step 2. Conguring Satellite Connection
22
Welcome.
This start wizard will guide you through the basic setup of your STB.
Press the OK button on your remote control to move to the next step.
Page 24

Run First Time Installation
Use the up/down keys on your remote control to select an
option. After that, press OK.
Use wizard to set up basic features
Exit wizard
Use the left and right buttons to change an option.
Configuration Mode not configured
Using LEFT/RIGHT key, you can choose one of the following Configuration Modes:
• Nothing connected
• Simple
• Loop through to: mode to make the LNB1 be internally connected to the LNB2 in.
• Equal to: mode to use the same configuration as that of Tuner B.
• Advanced: for an advanced user configuration.
23
Page 25

Run First Time Installation
If you choose Simple configuration mode, the following picture will appear.
Use the left and right buttons to change an option.
Configuration Mode
Mode
Satellite
Send DiSEqC
The five modes are available for the satellite cable connection between LNB and your Vu+ as below :
• Single
This option is used to receive a single satellite with a single LNB. The cable from LNB is directly
connected to Vu+.
For the other modes, please refer to the user manual of SOLO2.
Simple
Single
Astra(19.2E)
no
24
Page 26

Run First Time Installation
Step 3. Channel Scan
• Selecting Scan Mode - Automatic Scan / Manual Scan
Channel scanning is possible either in Automatic Scan mode or Manual Scan mode.
Do you want to do a service scan?
Yes, do an automatic scan now
Yes, do a manual scan now
No, scan later manually
• Automatic Scan
If you choose Automatic Scan, you will be asked whether to erase all the existing channels
before scaninig.
Do you want to do a service scan?
Yes, do an automatic scan now
Yes, do a manual scan now
No, scan later manually
25
Page 27

Run First Time Installation
Press OK to initiate the channel scan.
Service Scan
scan done! 2 services found!
ANIXE HD
ASTRA HD+
• Channel Scanning
The scanned channels will be displayed if the previous configurations have been done correctly.
26
Page 28

Run First Time Installation
Step 4. Install Default Service List
Here you will be asked whether you want to install the default satellite lists. Press OK and
the following image appears:
Service Searching
Tuner conguration
Default services lists
Automatic Scan
Manual Scan
Please choose the default services lists you want to install.
Astra(19.2E)
Hotbird(13.0E)
no
no
27
Page 29

Step 5. Parental Control Option
Here you can choose whether to enable the parental control option. If you press OK,
you will be asked to enter PIN number
Parental control setup
Enable parental control
Protect setup
Protect services
Change pin code
New PIN
Reenter new PIN
yes
no
no
****
****
28
Page 30

For more information about SOLO2
1. Go to "Plugins" from Main Menu
2. Click "Opera Web Browser"
3. Go to "Tools" - "Bookmark"
4. Click "User Manual"
29
Page 31

 Loading...