

Page 1

User’s manual
Model:VT9042
www.vtech.com/hk/tel
Page 2

TABLE OF CONTENTS
1. IMPORTANT SAFETY INSTRUCTIONS ..................................................1
2. SET UP THE TELEPHONE....................................................................... 2
2.1 Package Contents ..........................................................................................2
2.2 Location ..........................................................................................................2
2.3 Connect the Base Station ...............................................................................3
2.4 Install and Charge the Handset Batteries .......................................................4
3. GET TO KNOW YOUR PHONE ................................................................5
3.1 Overview of the Handset ................................................................................5
3.2 Overview of the Base Station .........................................................................7
3.3 Handset LCD Display Icons and Symbols ......................................................7
3.4 Menu Structure ...............................................................................................9
3.5 Text and Digit Entry Table ............................................................................10
3.5.1 English Character Set.....................................................................10
4. USE YOUR PHONE ................................................................................11
4.1 Make a Call...................................................................................................11
4.1.1 Preparatory Dialing .........................................................................11
4.1.2 Direct Dialing ..................................................................................11
4.1.3 Call from the Contacts ....................................................................11
4.1.4 Call from the Call Log .....................................................................11
4.1.5 Call from the Redial List..................................................................11
4.1.6 Call Timer .......................................................................................11
4.2 Make a Call from Direct Access Memory......................................................11
4.3 Answer a Call................................................................................................12
4.4 Audio Boost Feature .....................................................................................12
4.5 End a Call .....................................................................................................12
4.6 Adjust Earpiece and Handsfree Volume.......................................................12
4.7 Mute a Call....................................................................................................13
4.8 Set the Silent Mode ......................................................................................13
4.9 Turn on/off the Keypad Lock.........................................................................13
4.10 Redial the Last Number ................................................................................13
4.10.1 Redial a Number from the Redial List.............................................13
4.10.2 Store a Redial Number into the Contacts .......................................14
4.10.3 Delete a Redial Number .................................................................14
4.10.4 Delete the Entire Redial List ...........................................................14
4.11 Find the Handset ..........................................................................................14
4.12 Make an Internal Call....................................................................................15
4.12.1 Intercom another Handset ..............................................................15
4.12.2 Call all Handsets.............................................................................15
4.12.3 Transfer an External Call to another Handset ................................15
4.12.4 Make a 3-way Conference Call.......................................................16
Page 3

5. PRIVATE CONTACTS ............................................................................ 17
5.1 Add a New Contacts Entry............................................................................17
5.2 Search for a Contacts Entry..........................................................................17
5.3 View a Contacts Entry ..................................................................................17
5.4 Edit a Contacts Entry ....................................................................................18
5.5 Delete a Contacts Entry................................................................................18
5.6 Delete the Entire Private Contacts................................................................18
5.7 Check the Contacts Usage ...........................................................................18
5.8 Set the Fast Dial Numbers............................................................................19
5.8.1 Add or Edit the Fast Dial Number ...................................................19
5.8.2 Delete the Fast Dial Number ..........................................................19
6. CALLER DISPLAY (NETWORK DEPENDENT).....................................20
6.1 View the Call Log..........................................................................................20
6.2 Store a Call Log Number into the Contacts ..................................................20
6.3 Delete an Entry in the Call Log .....................................................................20
6.4 Delete the Entire List of the Call Log ............................................................21
6.5 View the Details of the Call Log Entry ..........................................................21
7. PHONE SETTINGS ................................................................................. 22
7.1 Clock Settings...............................................................................................22
7.1.1 Change the Date Format ................................................................22
7.1.2 Change the Time Format................................................................22
7.1.3 Set the Time ...................................................................................22
7.1.4 Set the Date....................................................................................23
7.2 Alarm Settings ..............................................................................................23
7.2.1 Turn on/off the Alarm ......................................................................23
7.2.2 Set the Alarm Time (if the Alarm is set to be ON)...........................24
7.3 Handset Settings ..........................................................................................24
7.3.1 Set the Ringer Melody for Internal Calls .........................................24
7.3.2 Set the Ringer Melody for External Calls........................................24
7.3.3 Set the Ringer Volume....................................................................25
7.3.4 Set Alert Tones ...............................................................................25
7.3.5 Set the Equalizer ............................................................................25
7.3.6 Select Base.....................................................................................26
7.3.7 Rename the Handset......................................................................26
7.3.8 Choose the Information to be Displayed in idle ..............................26
7.3.9 Set the Auto Answer .......................................................................26
7.3.10 Set the Direct Memory Keys ...........................................................27
7.4 Base Settings................................................................................................27
7.4.1 De-register a Handset.....................................................................27
7.4.2 Change the Dial Mode ....................................................................27
7.4.3 Change the Flash Time ..................................................................28
7.4.4 Change the System PIN Code........................................................28
7.4.5 Set the ECO Mode..........................................................................28
7.5 Registration...................................................................................................29
7.6 Reset Your Phone ........................................................................................29
Page 4

8. DEFAULT SETTINGS .............................................................................30
9. TROUBLESHOOTING ............................................................................ 31
10. TECHNICAL SPECIFICATIONS .............................................................34
11. CARE AND MAINTENANCE INSTRUCTIONS.......................................35
Page 5

1. IMPORTANT SAFETY INSTRUCTIONS
When using your telephone equipment, basic safety precautions should always be
followed to reduce the risk of fire, electric shock and injury, including the following:
1. Read and understand all the instructions.
2. Follow all warnings and instructions marked on the product.
3. Unplug this product from the wall outlet before cleaning. Do not use liquid cleaners
or aerosol cleaners. Use a damp cloth for cleaning.
4. Do not use this product near water (for example, near a bath tub, kitchen sink,
swimming pool).
5. Do not expose the telephone to direct sunlight or extreme cold environment. Do not
put the telephone close to heating sources such as radiators, cookers, etc.
6. Do not overload wall outlets and extension cords as this can result in the risk of fire
or electric shock.
7. Unplug this product from the wall outlet and refer servicing to VTech under the
following conditions:
• When the power supply cord or plug is damaged or frayed.
• If the product does not operate normally by following the operating instructions.
• If the product has been dropped and the cabinet has been damaged.
• If the product exhibits a distinct change in performance.
8. Avoid using a telephone (other than a cordless type) during an electrical storm.
There may be a remote risk of electric shock from lightning.
9. Do not use the telephone to report a gas leak in the vicinity of the leak.
10. Use only the supplied NiMH (Nickel Metal Hydride) batteries! The operation periods
for the handsets are only applicable with the default battery capacities.
11. The use of other battery types or non-rechargeable batteries/primary cells can be
dangerous. These may cause interference and/or unit damages. The manufacturer will
not be held liable for damage arising from such non-compliance.
12. Do not use third party charging bays. The batteries may be damaged.
13. Please note the correct polarity while inserting the batteries.
14. Do not immerse batteries in water, do not place in fire.
If you have questions about this product, or having difficulty with setup or operation,
call our Customer Service Centre.
Customer Service Hotline: (852) 2666 5558
Technical Inquiry Hotline: (852) 2667 7433
1
Page 6

2. SET UP THE TELEPHONE
2.1 Package Contents
The package contains the following items:
• 1 Handset
• 1 Base station
• 1 AC power adapter
• 2 Telephone line cords
• 2 NiMH rechargeable batteries
• 1 Chinese user's manual
• 1 English user's manual
2.2 Location
For maximum coverage and reduce the interference, here are some guidelines you
should consider when you place the base unit:
- place it at a convenient, high, and central location with no obstructions between the
handset and base unit in an indoor environment.
- place it away from electronic appliances such as televisions, microwave ovens,
SET UP THE TELEPHONE
radios, personal computers, wireless devices or other cordless phones.
- avoid facing radio frequency transmitters, such as external antennas of mobile phone
cell stations.
- avoid plugging it into the same circuit as other major household electrical appliances
because of the potential interference. Try moving the appliance or the base unit to
another power outlet.
If the reception for a base unit location is not satisfactory, move it to another location for
better reception.
Depending on the surrounding conditions as well as spatial and structural factors,
the range may be reduced. The range indoors is normally less than outdoors.
2
Page 7

2.3 Connect the Base Station
Power supply
Telephone
line cord
1. Insert the DC plug of the power adapter and the telephone line cord into the base
station, as shown above.
2. Insert the other end of the power adapter into the wall outlet not controlled by a wall
switch and the telephone line cord into a telephone wall jack. If you have DSL high
speed internet service, a DSL filter (not included) is required.
NOTES
1. Always use the cables supplied with the product.
2. Use only the power adapter supplied with the base station.
3
Page 8

2.4 Install and Charge the Handset Batteries
1. Slide open the battery compartment cover.
2. Place the two batteries as indicated. Respect the polarity.
SET UP THE TELEPHONE
3. Slide the battery compartment cover back.
4. Put the handset on the base to charge for 16 hours first time. A beep indicates that
the handset is properly placed on the base.
NOTES
1. Use only the supplied NiMH rechargeable batteries.
2. If you do not use the handset for a long time, disconnect and remove the batteries to
prevent possible leakage.
4
Page 9

3. GET TO KNOW YOUR PHONE
3.1 Overview of the Handset
1. SLIDE UP/DOWN
During a call: Press to increase or decrease the earpiece volume.
2. M1/M2/M3 - DIRECT MEMORY KEYS
In idle mode: Press and hold to dial the stored number.
3. RIGHT SOFT KEY (CLEAR/BACK/MUTE/INTERCOM)
In main menu mode: Press to go back to idle screen.
In sub-menu mode: Press to go back to previous level.
In sub-menu mode: Press and hold to go back to idle screen.
In editing / pre-dial mode: Press to delete a character / digit.
In editing / pre-dial mode: Press and hold to delete all the characters / digits.
During a call: Press to mute / resume the microphone.
In idle mode: Press to intercom another handset.
5
Page 10

4. UP/CALL LOG
In idle mode: Press to access the call log.
In menu mode: Press to scroll up the menu items.
In contacts list/ redial list/ call log: Press to scroll up the list.
5. DOWN/REDIAL LIST
In idle mode: Press to access the redial list.
In menu mode: Press to scroll down the menu items.
In contacts list/ redial list/ call log: Press to scroll down the list.
6. TALK OFF
During a call: Press to end a call and go back to idle screen.
In menu / editing mode: Press to go back to previous menu.
In menu / editing mode: Press and hold to go back to idle screen.
In idle mode: Press and hold to power off the handset.
Press and hold to power on when it is off.
7. ALPHANUMERIC KEYPAD, * (STAR), # (HASH)
Press to insert a digit / character / * / #
1 key in idle mode: Press and hold to access the voice mail.
* key in idle mode: Press and hold to enable or disable the keypad lock.
* key during a call (in Pulse mode): Press to switch to tone mode.
# key in idle mode: Press and hold to turn on / off the ringer.
# key during a call: Press and hold to insert a flash.
0 key in idle / pre-dial / number editing mode: Press and hold to insert a pause.
# key in call log mode: Press to review caller's number if applicable.
GET TO KNOW YOUR PHONE
8. MICROPHONE
9. TALK ON/SPEAKERPHONE
In idle / pre-dial mode: Press to make a call. Press again to turn on the
speakerphone.
In contacts list/ redial list/ call log: Press to make a call to the selected entry in the
list. Press again to turn on the speakerphone.
During ringing: Press to answer a call. Press again to answer with speakerphone.
10. LEFT SOFT KEY (MENU/OK)
In idle mode: Press to access the main menu.
In sub-menu mode: Press to confirm the selection.
During a call: Press to access intercom / contacts list / redial list / call log.
11. AMPLIFY
During a call: Press to turn on or off the audio boost.
12. LED
Steadily on when audio boost is turned on.
Flashes when there is an incoming call.
13. EARPIECE
6
Page 11

3.2 Overview of the Base Station
1. CHARGING CRADLE
2. PAGE
Press the Page on the base station to page your handset. It will ring for
approximately 60 seconds.
Press and hold to initiate registration mode.
3.3 Handset LCD Display Icons and Symbols
The screen display gives you information on the current status of the telephone.
Steadily on when the handset is within range of the base.
Flashes when the handset is in marginal range of the base.
Off when the handset is out of range of the base or cannot communicate
with the base.
Steadily on when a call is in progress.
Flashes when there is an incoming call.
Steadily on when the speakerphone is turned on.
Steadily on when an intercom call is connected successfully.
Flashes when there is an incoming internal call or an internal call is put on
hold.
Steadily when there is(are) new call(s) in call log.
7
Page 12

Steadily on when the ringer is switched off.
Steadily on when an alarm is set.
Flashes when the alarm time set before reaches.
Steadily on when the keypad is locked.
Steadily on when more digits are existed before the text currently displayed.
Steadily on when more digits are existed after the text currently displayed.
Steadily on when the battery is fully charged.
Steadily on when the battery is 2/3 charged.
Steadily on when the battery is 1/3 charged.
Flashes when low battery power level is detected to indicate that it needs
charging.
Animates in cycle when the batteries are charging.
GET TO KNOW YOUR PHONE
8
Page 13
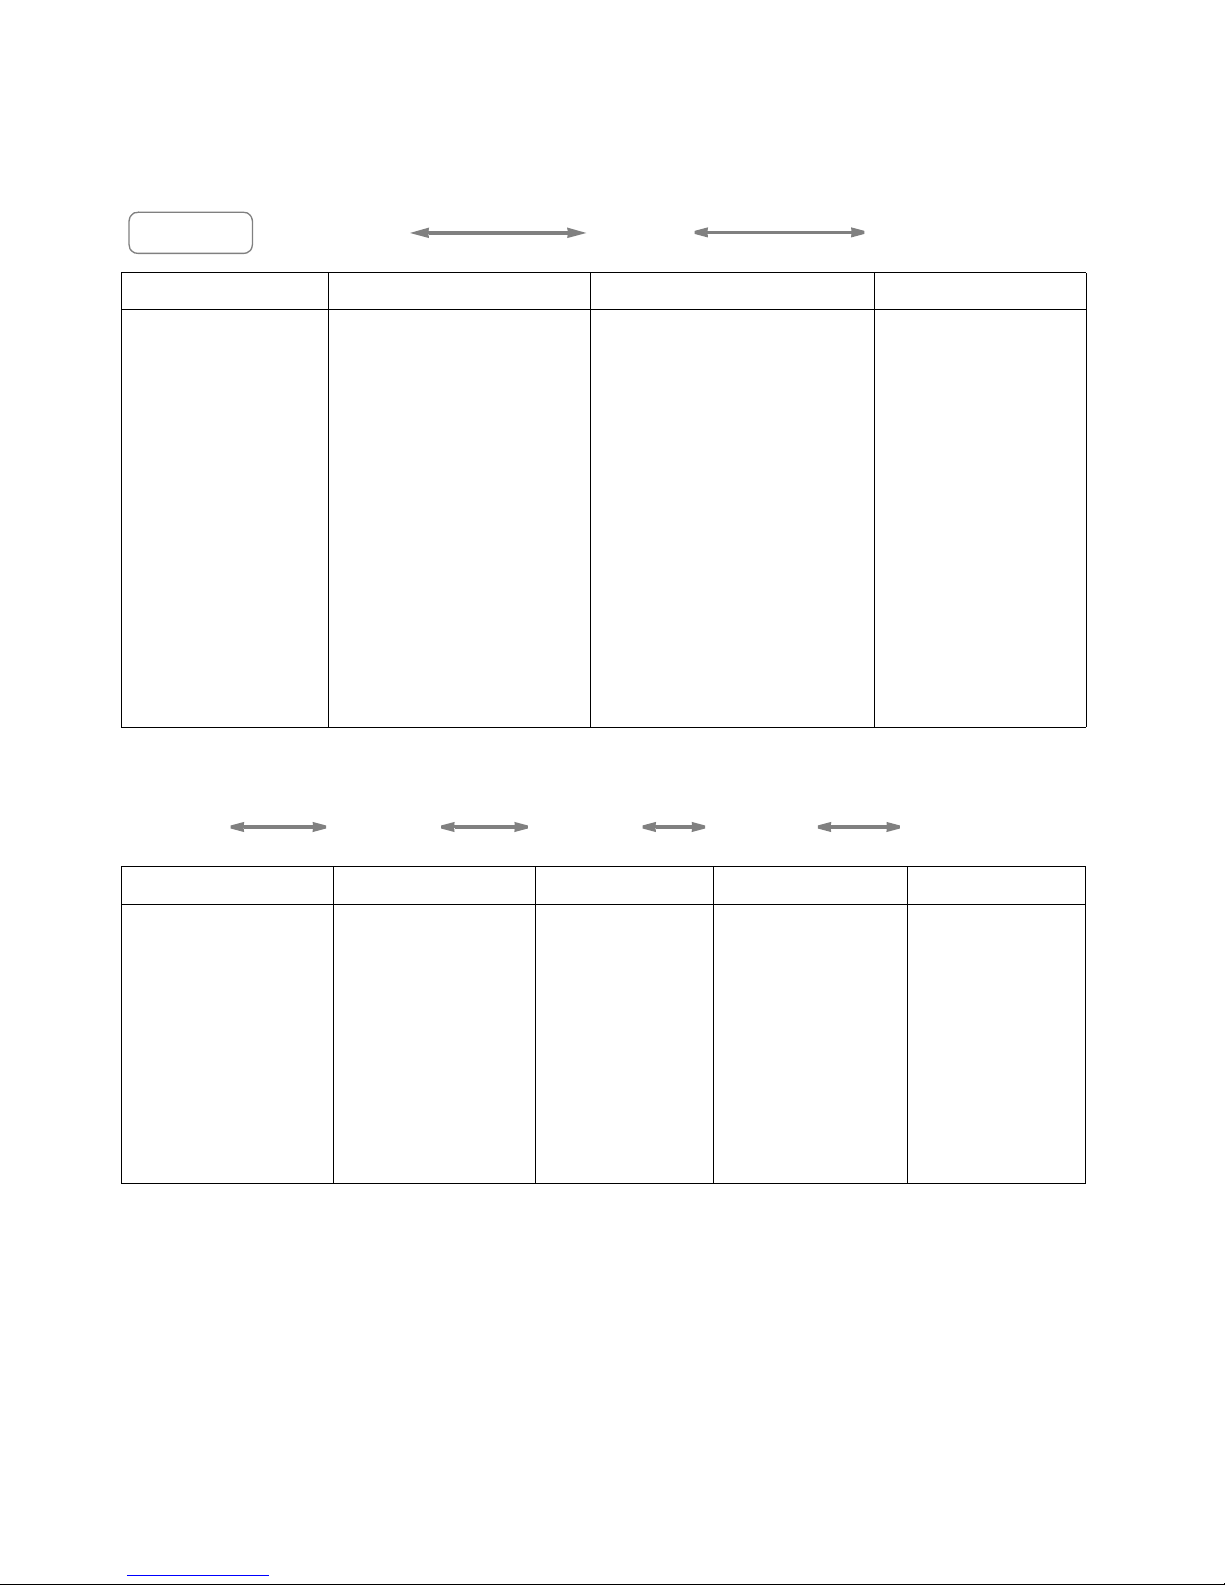
3.4 Menu Structure
In idle mode, pressing r will firstly access the CONTACTS menu. Refer to the
following for the menu structure.
Key Press
Main Menu CONTACTS CALL LOG BS SET
Sub menu Review contacts list
r
Under a Contacts
entry:
ADD
VIEW
EDIT
DELETE
DEL ALL
CAPACITY
FASTDIAL
(/) (/)
Review Call Log
Under a selected Call
Log entry:
STORE
DELETE
DEL ALL
DETAILS
CATEGORY
DEL HS
DIALMODE
FLASH
CHG PIN
ECO MODE
(/)(/)(/)(/)(/)
HS SET CLOCK ALARM REGISTER DEFAULT
RINGER
TONE
EQLIZER
SEL BASE
HS NAME
DISPLAY
AUTO ANS
MEM KEY
DATE FMT
TIME FMT
SET TIME
SET DATE
ON
OFF
9
Page 14

3.5 Text and Digit Entry Table
The following table shows you where each letter and punctuation character can be found.
Respective character table will be used when corresponding menu language is selected.
This will be helpful when storing a name in the contacts or renaming your handset.
In editing mode, a cursor is displayed to indicate the current text entry position. It is
positioned at the right of the last character entered.
NOTES
1. Once a character is selected, the cursor will move to the next position after a short
pause.
2. You can move the cursor within the text by
3. Press
4. Press and hold
m to delete the last character.
m to delete the entire text string.
(/) to amend the text entry.
3.5.1 English Character Set
Key
Key Press 1st 2nd 3rd 4th 5th 6th 7th 8th 9th 10th
1space-1
2ABC2
3DEF3
4GHI4
5JKL5
6MNO6
7PQRS7
8TUV8
9 WXYZ9
00
**?/\()
##‘,-.&
(For contacts name editing and renaming handset)
Alphanumeric Editing
GET TO KNOW YOUR PHONE
Number Editing
(For phone
number editing,
date / time
editing)
1
2
3
4
5
6
7
8
9
0, P (Pause)
*
#
10
Page 15

4. USE YOUR PHONE
4.1 Make a Call
4.1.1 Preparatory Dialing
Enter the phone number and press O to dial the number, press it again to turn on the
speakerphone. Press
4.1.2 Direct Dialing
Press O to take the line and enter the phone number. Press it again to turn on the
speakerphone.
4.1.3 Call from the Contacts
Press r to access the contacts list and press (/) to select the desired contacts
entry. Press
4.1.4 Call from the Call Log
Press ( to access the call log and press (/) to select the desired call log entry.
Press
Alternatively, press
O to dial the selected call log entry, press it again to turn on the speakerphone.
O to dial the selected entry, press it again to turn on the speakerphone.
m to clear the entry.
r to access the call log from the main menu.
4.1.5 Call from the Redial List
Press ) to access the redial list and press (/) to select the desired redial number.
Press
4.1.6 Call Timer
Your handset automatically times the duration of every call. The call timer will display a
few seconds after the call has made. It is shown in hours, minutes and seconds format
(HH--MM--SS).
O to dial the selected redial number, press it again to turn on the speakerphone.
4.2 Make a Call from Direct Access Memory
In idle, press and hold i/B/M to dial the number pre-stored into the keys respectively.
OR
Press
keys respectively.
NOTES
1. You need to set the direct access number first. See section 7.3.10 for details.
O, and then press and hold i/B/M to dial the number pre-stored into the
2. If no number is stored, you will hear double beeps tone.
11
Page 16

4.3 Answer a Call
If the handset is not on the base station:
When the phone rings, press
If the handset is on the base station and if AUTO ANS is set to be ON: When the phone
rings, pick up the handset to answer a call.
O to answer a call, press it again to turn on the speakerphone.
4.4 Audio Boost Feature
The audio boost feature allows you to amplify the handset earpiece volume to compensate
for the ear's limited sensitivity.
1. To turn on the audio boost feature, press
top indicator turns on.
2. When the audio boost feature is activated, press </> to increase or decrease the
earpiece volume within the specific frequency range set in Equalizer. See section
7.3.5 for more details.
3. To turn off the audio boost feature and return the earpiece volume back to normal,
press
D again and the handset top indicator light turns off.
D at any time during a call. The handset
USE YOUR PHONE
NOTE
The audio boost feature will be turned off automatically when the call is ended.
4.5 End a Call
During a call connection, press F to end the call.
OR
Put the handset on the base station to end the call.
4.6 Adjust Earpiece and Handsfree Volume
There are 5 levels (VOLUME 1 to VOLUME 5) to choose from for each of earpiece and
handsfree volume.
During a call:
Press
When you end the call, the setting will remain at the last selected level.
</> to select volume 1-5. The current setting is shown.
12
Page 17

4.7 Mute a Call
With the call muted, you can talk to someone nearby without letting the caller hear you
during a call.
During a call:
Press
Your caller cannot hear you.
Press
4.8 Set the Silent Mode
In idle, press and hold # to turn off the handset ringer. The icon will be displayed
on the screen.
In silent mode, press and hold
4.9 Turn on/off the Keypad Lock
You can turn on/off the keypad lock of a handset to avoid misoperation.
In idle, press and hold
the screen.
In keypad lock mode, press and hold
m to mute the microphone and "MUTED" will be displayed on the screen.
m again to resume the microphone.
# to turn on the handset ringer. The will disappear.
* to turn on the keypad lock. The icon will be displayed on
* to turn off the keypad lock. The will disappear.
4.10 Redial the Last Number
You can redial up to 5 of the last numbers called. If you have stored a name in the
contacts to match with the number, the name will be displayed instead. The most recent
last number will display at the top of the redial list.
4.10.1 Redial a Number from the Redial List
1. In idle mode, press ) to access the redial list.
REMARK
If redial entry displays with name, press
2. Press
3. Press
NOTE
If there are no numbers in the redial list, the display will show "EMPTY".
(/) to browse the redial list.
O to dial the selected redial number.
# to view the number.
13
Page 18

4.10.2 Store a Redial Number into the Contacts
1. Follow Steps 1 and 2 in section 4.10.1.
2. Press
3. Press
4. Press
5. Press
6. Press
you are browsing the melody list.
7. Press
4.10.3 Delete a Redial Number
1. Follow Steps 1 and 2 in section 4.10.1.
2. Press
3. Press
4.10.4 Delete the Entire Redial List
1. Follow Steps 1 and 2 in section 4.10.1.
2. Press
r and (/) to select STORE.
r to enter the name.
r to store the redial number into the contacts.
r to select contacts melody.
(/) to browse the melody list. The respective melody will be played while
r to confirm.
r and (/) to select DELETE.
r to confirm.
r and (/) to select DEL ALL.
USE YOUR PHONE
3. Press
4. Press
4.11 Find the Handset
This feature helps you find the misplaced handset(s).
You can locate the handset by pressing
registered to the base will produce the paging tone and "PAGING" is displayed on the
screen. You can stop the paging by pressing
the base again.
NOTE
If there is an incoming call during paging, the phone will ring with the incoming call
instead of paging.
r to confirm.
r to confirm again.
P on the base station. All the handsets
O / F / m on any handset or P on
14
Page 19

4.12 Make an Internal Call
This feature is only applicable when there are at least two registered handsets. It allows
you to make internal calls, transfer external calls from one handset to another handset
and make conference calls. If the called handset is not answered within 60 seconds, the
called handset will stop ringing and the calling handset will return to standby mode.
NOTE
If only one handset is registered to the base station, press
4.12.1 Intercom another Handset
1. In idle mode, press m and the registered handsets will display except the calling
handset.
2. Enter the desired handset number you want to intercom with.
m will display "FAILED".
3. The called handset rings. Press
NOTE
If two handsets are registered to the base station, press
immediately.
4.12.2 Call all Handsets
1. In idle mode, press m and the registered handsets will display.
2. Press
4.12.3 Transfer an External Call to another Handset
During an external call:
1. Press
2. Press
3. The external call is put on hold automatically and the called handset rings.
4. Press
9 to call all registered handsets.
r and (/) to select INTERCOM.
r to select the desired handset you want to intercom with.
O on the called handset to establish an internal call.
O on the called handset to establish the internal call.
m will call another handset
5. Press
the current call with the external party.
6. The external call is transferred to the called handset.
F on the calling handset or put the calling handset on the base station to end
15
Page 20

4.12.4 Make a 3-way Conference Call
The conference call feature allows one external call to be shared with two handsets
(in intercom). The three parties can share the conversation and no network subscription
is required.
During an external call:
1. Follow Steps 1 to 4 in section 4.12.3.
2. Press and hold
NOTE
Any handset hangs up during a conference call will leave the other handset still in
connection with the external call.
* on the calling handset to establish the conference call.
USE YOUR PHONE
16
Page 21

5. PRIVATE CONTACTS
Your phone can store up to 20 private contacts entries with names and numbers. Each
contacts entry can have a maximum of 20 digits for the phone number and eight
characters for the name. You can also select different ringtones for your contacts entries.
Contacts entries are stored alphabetically by name.
5.1 Add a New Contacts Entry
In idle:
1. Press
the contacts list.
2. Press
3. Press
4. Press
5. Press
6. Press
5.2 Search for a Contacts Entry
In idle:
1. Enter the contacts list.
2. Enter the first character of the name by multi-tap.
5.3 View a Contacts Entry
In idle:
1. Press
r to select CONTACTS main menu item and then press r to access
r to select ADD.
r to enter the name.
r to enter the number.
r and (/) to select the desired ringtone for your contacts entry.
r to store the contacts entry.
r to select CONTACTS main menu item and then press r to access
the contacts list.
2. Press
3. Press
4. Press
contacts entry.
NOTE
If the number has more than eight digits, press
(/) to select the desired contacts entry.
r and (/) to select VIEW.
r and (/) to review the name, number and melody of the selected
* or # to view the remaining digits.
17
Page 22

5.4 Edit a Contacts Entry
In idle:
1. Press
the contacts list.
2. Press
3. Press
4. Press
5. Edit the name and press
6. Edit the number and press
7. Press
8. Press
5.5 Delete a Contacts Entry
In idle:
1. Press
the contacts list.
2. Press (/) to select the desired contacts entry.
3. Press
r to select CONTACTS main menu item and then press r to access
(/) to select the desired contacts entry.
r and (/) to select EDIT.
r and the current contents of the selected contacts entry displays.
r.
r.
(/) to select the ring tone.
r to confirm.
r to select CONTACTS main menu item and then press r to access
r and (/) to select DELETE.
PRIVATE CONTACTS
4. Press
5.6 Delete the Entire Private Contacts
1. Press r to select CONTACTS main menu item and then press r to access
the contacts list.
2. Press
3. Press
4. Press
5.7 Check the Contacts Usage
You can check how many contacts entries have been occupied in your phone and how
many contacts entries are available for you to store in the contacts.
1. Press
the contacts list.
2. Press r and (/) to select CAPACITY.
r to confirm.
r and (/) to select DEL ALL.
r to confirm.
r to re-confirm.
r to select CONTACTS main menu item and then press r to access
3. Press
r to confirm.
18
Page 23

5.8 Set the Fast Dial Numbers
After setting the fast dial numbers, you can dial to the pre-set numbers by pressing and
holding the respective digit keys from idle mode.
5.8.1 Add or Edit the Fast Dial Number
1. Press r to select CONTACTS main menu item and then press r to access
the contacts list.
2. Press
3. Press
If there is no number stored in the selected key:
4. Press
5. Press
Or if there is already a number stored in the selected key:
4. Press
5. Press
6. Press
5.8.2 Delete the Fast Dial Number
1. Repeat the steps 1 to 3 in section 5.8.1.
2. Press
3. Press
r and (/) to select FASTDIAL.
(/) and r to select one digit key from 2 to 9.
(/) to select an entry from the contacts list.
r to confirm.
r to select EDIT.
r to select an entry from the contacts list.
r to confirm.
(/) to select an entry from the contacts list.
r and (/) to select DELETE.
4. Press
r to confirm.
19
Page 24

6. CALLER DISPLAY
(NETWORK DEPENDENT)
This feature is available if you have subscribed to the Caller Line Identification service
from your network service provider. Your phone can store up to 10 received calls with
date/time information in the call log. The number will be shown on the screen when the
phone is ringing. If the number matches with one of the entries in your Private Contacts,
the caller's name stored in the Private Contacts will be displayed alternatively with the
number. The handset will ring with the melody associated with that contacts entry.
If the caller number is disabled to send caller information, "WITHHELD" will be displayed.
In standby, if three unanswered calls are received, "3 CALLS" will be displayed.
6.1 View the Call Log
All received calls are saved in call log with the latest call putting at the top of the list.
When the call log is full, the oldest call will be replaced by a new call. The unanswered
call which has not been read is marked with a at the centre of the bottom line of the
display.
1. Press
OR
1. Press
2. Press
( to access the call log.
r and (/) to select CALL LOG.
(/) to select the desired entry.
CALLER DISPLAY (NETWORK DEPENDENT)
3. Press
6.2 Store a Call Log Number into the Contacts
1. Follow Steps 1 and 2 in Section 6.1.
2. Press
3. Press
4. Press
5. Edit the number if necessary.
6. Press
7. Press
6.3 Delete an Entry in the Call Log
1. Follow Steps 1 and 2 in Section 6.1.
2. Press
3. Press
# to view the caller's number if applicable.
r and (/) to select STORE.
r to enter the name.
r and the selected call log number will be displayed.
r and (/) to select the melody.
r to confirm.
r and (/) to select DELETE.
r to confirm.
20
Page 25

6.4 Delete the Entire List of the Call Log
1. Follow Steps 1 and 2 in Section 6.1.
2. Press
3. Press
4. Press
6.5 View the Details of the Call Log Entry
1. Follow Steps 1 and 2 in Section 6.1.
2. Press
3. Press
4. Press
r and (/) to select DEL ALL.
r to confirm.
r to re-confirm.
r and (/) to select DETAILS.
r to display the date and time of the selected call log entry.
r to go back to previous screen.
21
Page 26

7. PHONE SETTINGS
Your phone comes with a selection of settings that you can change to personalize your
phone the way you like it to work.
7.1 Clock Settings
You will need to set the correct date and time so that you know when you received call
log entries.
7.1.1 Change the Date Format
1. Press r and (/) to select CLOCK.
2. Press
3. Press
4. Press
7.1.2 Change the Time Format
1. Press r and (/) to select CLOCK.
2. Press
3. Press
4. Press
7.1.3 Set the Time
1. Press r and (/) to select CLOCK.
2. Press
3. Press
set in section 7.1.2.
4. Press
r and (/) to select DATE FMT.
(/) to select your desired date format (DDMMYY or MMDDYY).
r to confirm.
r and (/) to select TIME FMT.
(/) to select your desired time format (12 HR or 24 HR).
r to confirm.
r and (/) to select SET TIME.
r to enter the time information. The time entered will be in the format you
r to confirm.
PHONE SETTINGS
NOTE
If time has been set before, the current time will be displayed, otherwise, "HH--MM" will
be displayed.
22
Page 27

7.1.4 Set the Date
1. Press r and (/) to select CLOCK.
2. Press
3. Press
set in section 7.1.1.
4. Press
NOTE
If date has been set before, the current date will be displayed, otherwise, "DD--MM--YY"
will be displayed.
r and (/) to select SET DATE.
r to enter the date information. The date entered will be in the format you
r to confirm.
7.2 Alarm Settings
You can use this phone to set an alarm clock. When an alarm is set, the displays on
the screen. When the alarm time is reached, the and "ALARM ON" flash on the
screen ringing with the alarm melody for a duration of 45 seconds. You can press any
key to disable the alarm. If snooze function is activated, the alarm will sound again at the
end of the snooze period of seven minutes.
NOTES
a. Key press is still applicable if handset keypad is locked and when the alarm time is
reached.
b. The alarm volume level is the same as the settings of the handset ringer volume.
If the handset ringer is set to OFF, the alarm still sounds at VOLUME 1 level.
c. During an external call or an internal call, if an alarm is set and when the alarm time is
reached, the and "ALARM ON" will still flash. An alarm tone will be emitted from
the earpiece to notify user the alarm time is reached. Once user press any key or
press and hold
d. During paging or ringing, the alarm will not sound when the alarm time is reached.
However, if snooze function is enabled, the alarm will sound again at the end of the
snooze period provided that it's not ringing or in paging mode at the end of the
snooze period.
7.2.1 Turn on/off the Alarm
1. Press r and (/) to select ALARM.
2. Press
3. Press
r and (/) to select ON/OFF.
r to confirm.
F to disable the alarm, it will revert to the call duration screen.
NOTE
If ON is selected, you are prompted to set the alarm time.
23
Page 28

7.2.2 Set the Alarm Time (if the Alarm is set to be ON)
1. Follow Steps 1 to 3 in Section 7.2.1.
2. Enter the alarm time.
3. Press
4. Press
5. Press
7.3 Handset Settings
7.3.1 Set the Ringer Melody for Internal Calls
You can set special melody to personalize your internal ringer. A total of 10 melodies are
provided for your selection.
1. Press
2. Press
3. Press
4. Press
melody for internal calls.
NOTE
The respective ringer melody will be played while you are browsing the melody list.
r to set the snooze function.
r and (/) to select ON or OFF.
r to confirm.
r and (/) to select HS SET.
r and (/) to select RINGER.
r and (/) to select INT RING.
r and (/) to select the desired ringer melody for setting ringer
PHONE SETTINGS
5. Press
7.3.2 Set the Ringer Melody for External Calls
You can set special melody to personalize your external ringer. A total of 10 melodies are
provided for your selection.
1. Press
2. Press
3. Press
4. Press
melody for external calls.
NOTE
The respective ringer melody will be played while you are browsing the melody list.
5. Press
r to confirm.
r and (/) to select HS SETT.
r and (/) to select RINGER.
r and (/) to select EXT RING.
r and (/) to select the desired ringer melody for setting ringer
r to confirm.
24
Page 29

7.3.3 Set the Ringer Volume
You can set the ringer volume level. A total of 6 ringer volume levels including OFF are
provided for your selection.
1. Press
2. Press
3. Press
4. Press
NOTE
The respective ringer volume will be played during your selection. If OFF is selected,
icon will be displayed.
5. Press
7.3.4 Set Alert Tones
A single beep is emitted when you press a key. You can turn on or off the key tone.
You can also turn on the alert tones when low battery and out of range are detected.
Low battery tone will be emitted while you are talking with the phone to alert you that
you need to charge up your battery.
r and (/) to select HS SET.
r and (/) to select RINGER.
r and (/) to select RING VOL.
r and (/) to select the desired ringer volume.
r to confirm.
1. Press
2. Press
3. Press
4. Press
5. Press
7.3.5 Set the Equalizer
The phone has three different frequency range filters to compensate for the ear's limited
sensitivity in these ranges.
1. Press
2. Press
3. Press
4. Press
r and (/) to select HS SET.
r and (/) to select TONE.
r and (/) to select KEY TONE / LOW BATT / OUTRANGE.
r and (/) to turn on or off these tones.
r to confirm.
r and (/) to select HS SET.
r and (/) to select EQLIZER.
r and (/) to select the desired frequency range filter.
r to confirm.
25
Page 30

7.3.6 Select Base
If you have registered the handset to more than one base, you can select any one of
them to use with your handset.
1. Press
2. Press
3. Press
4. Press
7.3.7 Rename the Handset
1. Press r and (/) to select HS SET.
2. Press
3. Press
4. Press
7.3.8 Choose the Information to be Displayed in idle
You can choose to display time or handset name in your idle screen.
1. Press
2. Press
r and (/) to select HS SET.
r and (/) to select SEL BASE.
r and (/) to select the desired base.
r to confirm.
r and (/) to select HS NAME.
r and enter the name of your handset.
r to confirm.
r and (/) to select HS SET.
r and (/) to select DISPLAY.
PHONE SETTINGS
3. Press
4. Press
7.3.9 Set the Auto Answer
If you turn on the Auto Answer, you can answer a call by lifting the handset from the base
station without pressing any key.
1. Press
2. Press
3. Press
4. Press
r and (/) to select HS NAME or TIME.
r to confirm.
r and (/) to select HS SET.
r and (/) to select AUTO ANS.
r and (/) to turn on or off the auto answer feature.
r to confirm.
26
Page 31

7.3.10 Set the Direct Memory Keys
There are three direct memory keys i/B/M. You can store three numbers into
these keys and dial them directly from idle mode.
1. Press
2. Press
3. Press
4. Press
5. Press
7.4 Base Settings
The current settings are marked with an asterisk which is displayed at the rightmost of
the menu item.
7.4.1 De-register a Handset
You are requested to enter the 4-digit PIN in order to de-register a handset from the base
station. The on the de-registered handset will be off.
NOTE
You cannot de-register the handset that you are currently using.
r and (/) to select HS SET.
r and (/) to select MEM KEY.
r and (/) to select the desired memory key from M1, M2 and M3.
r to enter a new number or edit the number stored already.
r to confirm.
1. Press
2. Press
3. Press
4. Enter the 4-digit system PIN.
5. Press
6. Press
7. Press
7.4.2 Change the Dial Mode
The default dial mode is best suitable for your country and network operator. It is unlikely
that you should need to change this setting unless advised to do so.
1. Press
2. Press
3. Press
4. Press
r and (/) to select BS SET.
r and (/) to select DEL HS.
r and you are requested to enter the 4-digit system PIN.
r and a list of registered handsets is displayed.
(/) to select one of the handsets that you want to de-register.
r to confirm.
r and (/) to select BS SET.
r and (/) to select DIALMODE.
r and (/) to select TONE or PULSE.
r to confirm.
27
Page 32

7.4.3 Change the Flash Time
The default flash time is best suitable for your country and network operator. It is unlikely
that you should need to change this setting unless advised to do so.
1. Press
2. Press
3. Press
4. Press
7.4.4 Change the System PIN Code
A 4-digit system PIN code is used for changing the system settings of the base station. It
is used to protect your phone against unauthorized use. The default system PIN code is
0000.
1. Press
2. Press
3. Press
4. Enter the old system PIN.
5. Press
6. Press
r and (/) to select BS SET.
r and (/) to select FLASH.
r and (/) to select your desired flash time (SHORT, MID, LONG).
r to confirm.
r and (/) to select BS SET.
r and (/) to select CHG PIN.
r and you are requested to enter the 4-digit system PIN.
r and enter the new system PIN.
r and enter the new system PIN again.
PHONE SETTINGS
NOTE
If the new PIN entered in Step 6 is not matched with the new system PIN entered in
Step 5, user is requested to enter the valid system PIN again in Step 5.
7. Press
7.4.5 Set the ECO Mode
1. Press r and (/) to select BS SET.
2. Press
3. Press
4. Press
r to confirm.
r and (/) to select ECO MODE.
r and (/) to select ON or OFF.
r to confirm.
28
Page 33

7.5 Registration
Your handset and base station is pre-registered. Up to five handsets can be registered to
a single base station.
If for some reason, the handset is not registered to the base station ( flashes even
when the handset is near the base station), register your handset according to the
following procedure.
1. Press and hold
entered into registration mode.
2. Press
3. Press
4. Enter the 4-digit system PIN.
5. Press
NOTE
If the handset registration is successful, you will hear a confirmation tone and the will
stop flashing. The handset will automatically be allocated the next available handset
number. This handset number is shown in the handset display in standby mode. If the
handset registration is unsuccessful, the will still flash.
7.6 Reset Your Phone
You can reset your phone to the default settings. After reset, all your personal settings
and call log entries will be deleted, but your contacts list remains unchanged.
1. Press
2. Press
3. Enter the 4-digit system PIN.
4. Press
5. Press
r and (/) to select REGISTER.
r and you are requested to enter the 4-digit system PIN.
r to confirm.
r and (/) to select DEFAULT.
r and you are requested to enter the 4-digit system PIN.
r to confirm.
r to re-confirm.
P on the base station for about five seconds, the base station is
29
Page 34

8. DEFAULT SETTINGS
Items Default Values
Default Settings of Handset
LANGUAGE ENGLISH
EXT RING MELODY 1
INT RING MELODY 2
INT RING VOLUME VOLUME 3
EXT RING VOLUME VOLUME 3
EARPIECE VOLUME VOLUME 3
SPEAKER VOLUME VOLUME 3
HANDSET NAME HS
KEY TONE ON
LOW BATTERY BEEP ON
OUT OF RANGE BEEP ON
AUTO ANSWER ON
DATE FORMAT DD--MM--YYYY
DEFAULT SETTINGS
TIME FORMAT 24 HR
SET DATE 01--01--2012
SET TIME 00--00
ALARM OFF
Default Settings of Base
FLASH TIME LONG
DIAL MODE TONE
ECO MODE ON
30
Page 35

9. TROUBLESHOOTING
If you have difficulty with your phone, please try the suggestions listed below.
Problem Solutions
My telephone does
not work at all.
• Make sure the batteries are installed and charged correctly.
For optimum daily performance, return the handset to the
telephone base after use.
• Make sure the power adapter is securely plugged into an outlet
not controlled by a wall switch.
• Make sure the telephone line cord is plugged firmly into the
telephone base and the telephone wall jack.
• Unplug the electrical power to the telephone base. Wait for
approximately 15 seconds, then plug it back in. Allow up to
one minute for the handset and telephone base to
synchronize.
• Remove and re-insert the batteries. If that still does not work,
it might be necessary to purchase new batteries.
• Disconnect the telephone base from the telephone wall jack
and plug in a working telephone. If the other telephone does
not work, the problem is probably in the wiring or the
telephone service. Call your telephone service provider.
Low battery shows
on screen.
The batteries do
not charge in the
handset or the
handset batteries
do not accept
charge.
• Place the handset in the telephone base for recharging.
• Remove and re-install the batteries and use it until fully
depleted, then recharge the handset in the telephone base.
• If the above measures do not solve the problem, replace the
batteries.
• Make sure the handset is placed in the telephone base
correctly.
• Remove and reinstall the batteries, then charge for up to 16
hours.
• Purchase new batteries.
31
Page 36

There is
• The handset may be out of range. Move it closer to the
interference during
a telephone
conversation. My
calls fade out when
I am using the
handset.
telephone base.
• If you subscribe to high-speed Internet service (digital
subscriber line - DSL) through your telephone line, you must
install a DSL filter between the telephone base and the
telephone wall jack. The filter prevents noise and caller ID
problems caused by DSL interference. Please contact your
DSL service provider for more information about DSL filters.
• Appliances or other cordless telephones plugged into the
same circuit as the telephone base can cause interference. Try
moving the appliance or telephone base to another outlet.
• Other electronic products may cause interference to your
cordless telephone. Install your telephone as far away as
possible from the following electronic devices: wireless
routers, radios, radio towers, pager towers, cellular
telephones, digital telephones, intercoms, room monitors,
televisions, VCRs, personal computers, kitchen appliances,
and other cordless telephones.
TROUBLESHOOTING
• If your telephone is plugged in with a modem or a surge
protector, plug the telephone (or modem/surge protector) into
a different location. If this doesn't solve the problem, re-locate
your telephone or modem farther apart from each other, or
use a different surge protector.
• The location of your telephone base can impact the
performance of your cordless phone. For better reception,
install the telephone base in a centralized location within your
home or office, away from walls or other obstructions. In
many environments, elevating the telephone base improves
overall performance.
• Disconnect the telephone base from the telephone wall jack
and plug in a corded telephone. If calls are still not clear, the
problem is probably in the wiring or telephone service.
Contact your telephone service provider (charges might
apply).
• If the other telephones in your home are having the same
problem, the problem is in the wiring or telephone service.
Contact your telephone service provider (charges may apply).
32
Page 37

Common cure for
If the telephone is not responding normally, put the handset in
electronic
equipment.
the telephone base. If it does not respond, try the following (in
the order listed):
• Disconnect the power to the telephone base.
• Disconnect the batteries on the handset.
• Wait a few minutes before connecting power to the telephone
base.
• Re-install the batteries and place the handset in the
telephone base.
• Wait for the handset to synchronize with the telephone base.
Allow up to one minute for this to take place.
Please contact the technical support of the network provider for further information.
This telephone is not equipped with a grounding function! Therefore some of the
functions may be limited when used in PBX systems.
Technical Support
For technical support, please call VTech Technical Inquiry Hotline 852-2667 7433.
Please read out the serial number of this telephone to Technical Center.
The serial number can be found in the battery compartment after having the batteries
removed.
33
Page 38
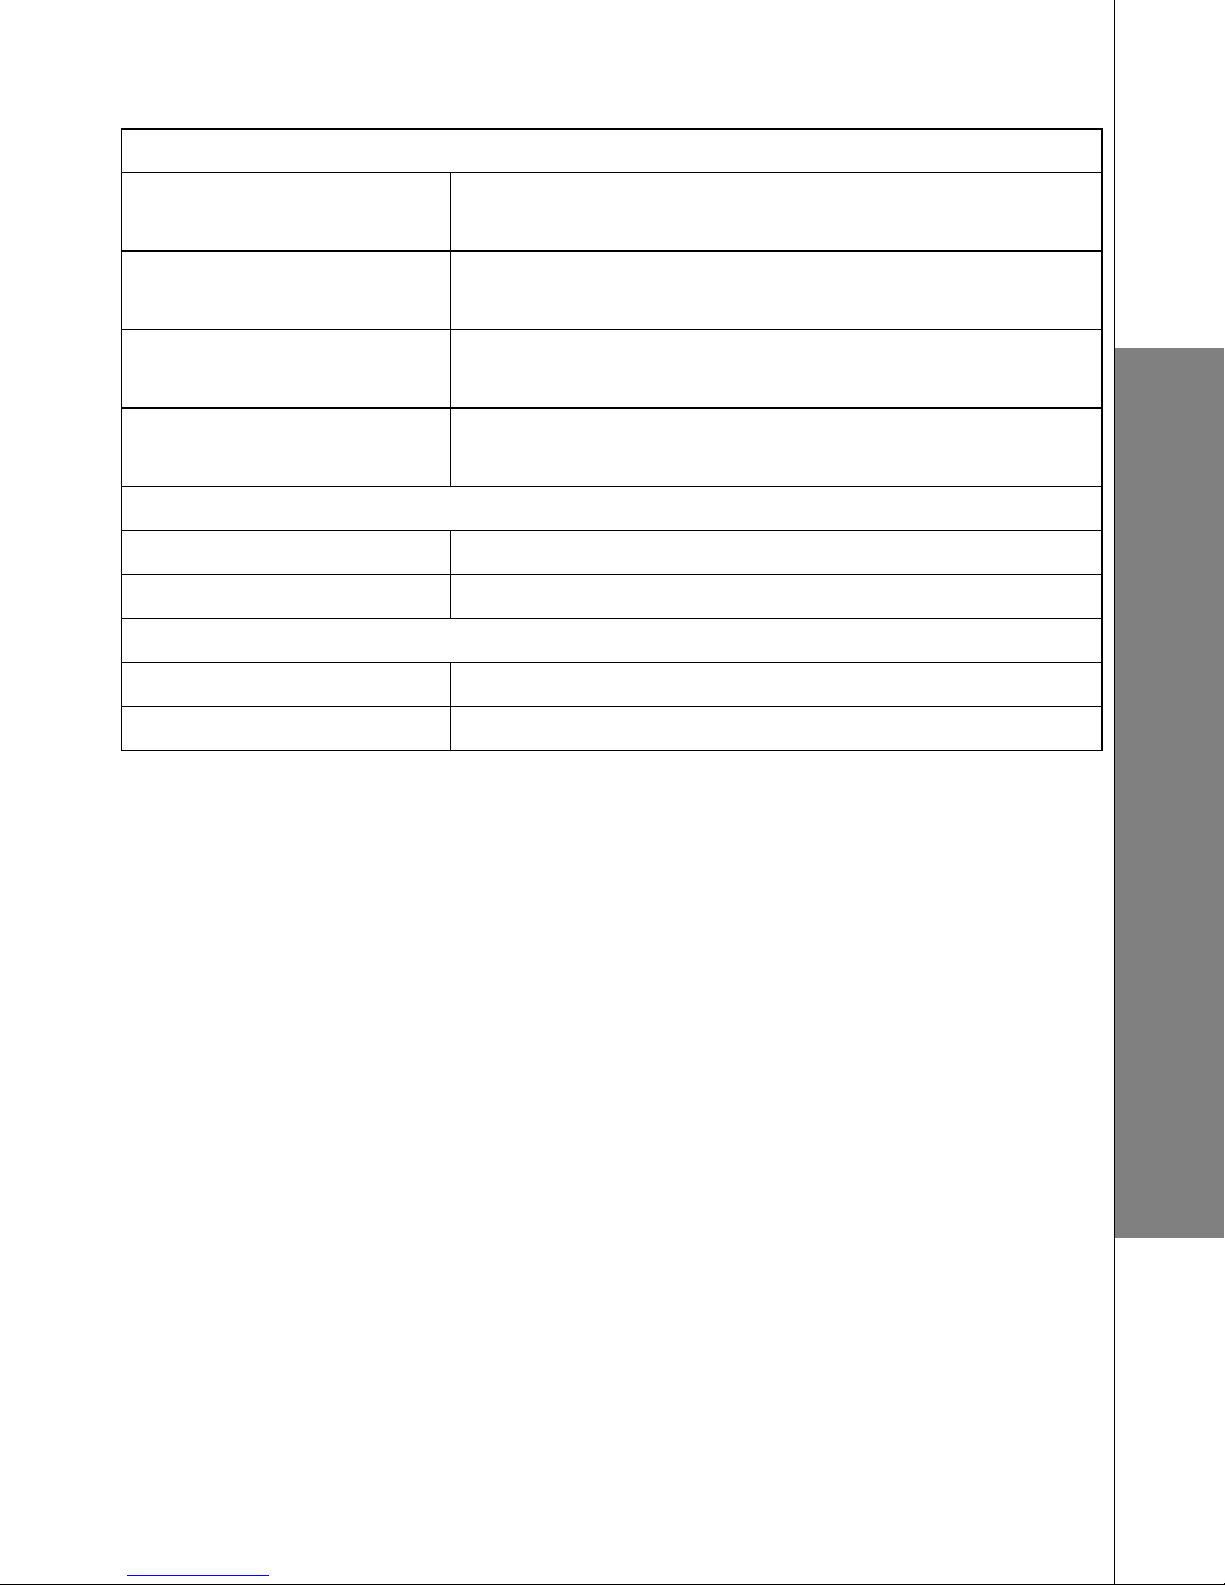
10. TECHNICAL SPECIFICATIONS
Basic Information
Dimensions
Handset: width / depth / height = 57.7 X 36.4 X 180.5 mm
Base: width / depth / height = 115.7 X 114.3X 57.2 mm
Handset: 161.7g
Weight
Base: 122.2g
Indoor: 50m
Valid range
Outdoor: 300m
Standby time: 100Hours approx.
Handset Operating Time
Talk time: 10Hours approx.
RF Parameter
Frequency 1.88GHz to 1.9GHz
Number of Channels 10
Power Supply
Base Input 100-240V 50/60Hz; output 6V 300mA adapter
Handset 2 x NIMH; 1.2V; 500mAH rechargeable batteries
TECHNICAL SPECIFICATIONS
34
Page 39

11. CARE AND MAINTENANCE
INSTRUCTIONS
Take care of your telephone
• Your cordless telephone contains sophisticated electronic parts, so you must treat it
with care.
• Avoid rough treatment.
• Place the handset down gently.
• Save the original packing materials to protect your telephone if you ever need to ship it.
Avoid water
• You can damage your telephone if it gets wet. Do not use the handset in the rain,
or handle it with wet hands. Do not install the telephone base near a sink, bathtub or
shower.
Electrical storms
• Electrical storms can sometimes cause power surges harmful to electronic equipment.
For your own safety, take caution when using electric appliances during storms.
Cleaning your telephone
• Your telephone has a durable plastic casing that should retain its luster for many
years. Clean it only with a soft cloth slightly dampened with water or a mild soap.
• Do not use excess water or cleaning solvents of any kind.
NOTE
Remember that electrical appliances can cause serious injury if used when you are wet
or standing in water. If the telephone base should fall into water, DO NOT RETRIEVE IT
UNTIL YOU UNPLUG THE POWER CORD AND TELEPHONE LINE CORDS FROM
THE WALL. Then pull the unit out by the unplugged cords.
35
Page 40

Customer Service Centre
Suite 1601, Lever Tech Centre, 69-71 King Yip Street,
Kwun Tong, Kowloon, Hong Kong.
Customer Service Hotline: (852) 2666 5558
Technical Inquiry Hotline: (852) 2667 7433
Distributed in Hong Kong by: VTech Telecommunications Ltd.
© 2012 VTech Telecommunication Ltd. All Rights Reserved.
010612
91-006134-010-100
 Loading...